Control panel.....................................................................................................................................................................2
Home Center Software ..................................................................................................................................................3
Home Center Software for WINDOWS OS-based computers.....................................................................3
Home Center Software for MACINTOSH Computers....................................................................................3
Setting your printer as the default printer...........................................................................................................5
Configuring a wireless network connection.......................................................................................................5
Setting up an IP address...........................................................................................................................................9
Verifying the network configuration.....................................................................................................................9
Printing the network configuration.....................................................................................................................10
Installing your printer on additional computers on the network.................................................................10
Connecting to another KODAK All-in-One Printer........................................................................................10
Adding a network connection to a USB-connected computer...........................................................................11
For WINDOWS OS-based computers................................................................................................................11
For MACINTOSH Computers...............................................................................................................................11
3 Handling Paper
Paper types......................................................................................................................................................................12
Paper sizes.......................................................................................................................................................................12
Loading photo paper ..............................................................................................................................................14
Printing pictures from a memory card.....................................................................................................................17
Types of memory cards.........................................................................................................................................17
Printing a picture using the default settings.....................................................................................................17
Printing pictures using non-default photo options.........................................................................................18
Zooming and cropping pictures..........................................................................................................................20
Transferring pictures to a computer.........................................................................................................................21
Transferring pictures to a WINDOWS OS-based computer.......................................................................21
Transferring pictures to a MACINTOSH Computer......................................................................................21
Table of contents
ivwww.kodak.com/go/aiosupport
5 Copying
Making a copy................................................................................................................................................................22
Enlarging or reducing a document......................................................................................................................25
Enlarging or reducing a photo..............................................................................................................................25
Darkening or lightening copies............................................................................................................................26
6 Scanning
Before you begin scanning..........................................................................................................................................27
Scanning multiple pictures with a WINDOWS OS-based computer........................................................28
Scanning multiple pictures with a MACINTOSH Computer.......................................................................28
7 Maintaining Your Printer
General care and cleaning...........................................................................................................................................29
Cleaning the scanner glass..................................................................................................................................30
Cleaning inside the scanner lid.............................................................................................................................31
Replacing the printhead...............................................................................................................................................35
Upgrading the printer software and firmware.......................................................................................................39
Upgrading software and firmware on a WINDOWS OS-based computer..............................................39
Upgrading software and firmware on a MACINTOSH Computer.............................................................39
Monitoring and adjusting printer performance....................................................................................................40
Status lights....................................................................................................................................................................43
Power status light...................................................................................................................................................43
Wi-Fi status light....................................................................................................................................................43
9 Product and Safety Specifications
Specifications and features........................................................................................................................................44
Paper tray features.................................................................................................................................................46
System requirements.............................................................................................................................................47
Canadian statements..........................................................................................................................................51
German compliance statement..........................................................................................................................52
Waste electrical and electronic equipment labeling.....................................................................................52
ENERGY STAR® Qualified..........................................................................................................................................52
Declaration of Conformity..........................................................................................................................................54
1www.kodak.com/go/aiosupport
1
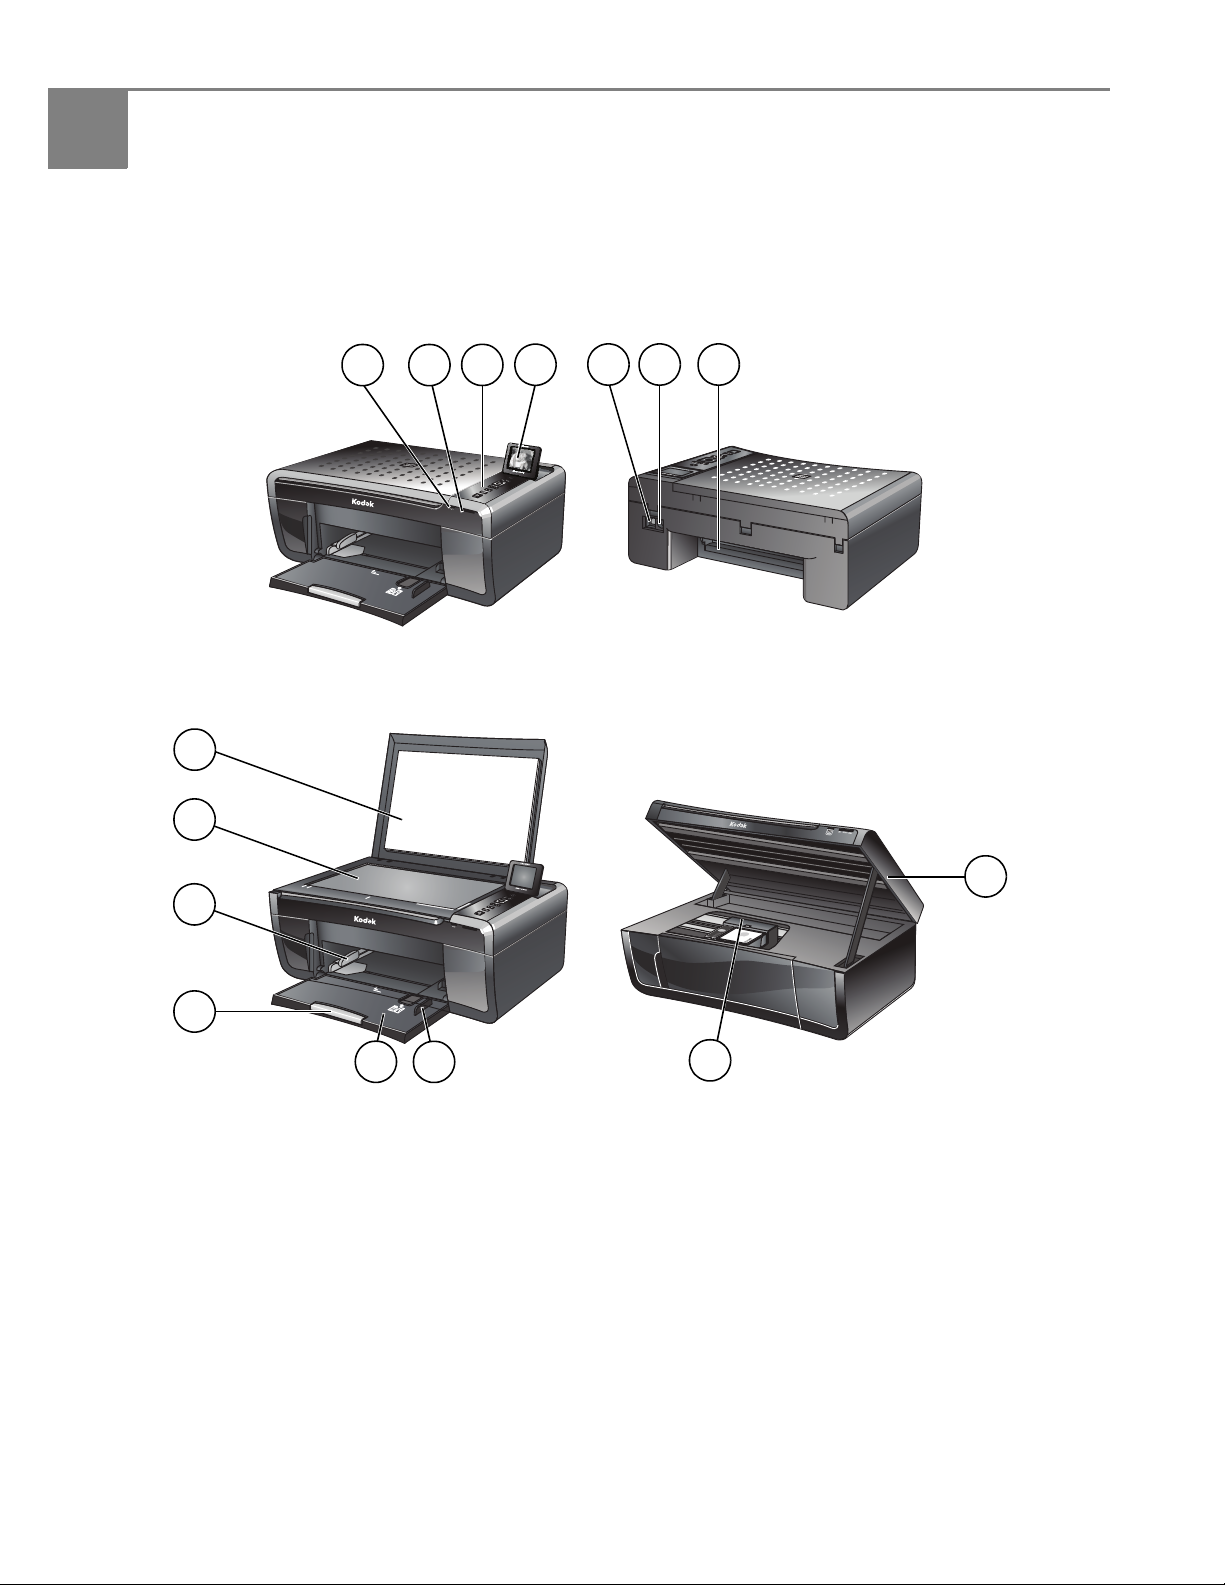
Printer Overview
This printer lets you print, copy, and scan pictures and documents. In addition, this
printer supports networking, letting you access the printer over a wireless (Wi-Fi)
network.
Components
1Wi-Fi connectivity LED9Printhead with ink cartridges installed
2Memory card slot10Right paper-edge guide
3Control panel11Paper tray
4LCD12Paper tray extender / paper stop
5USB port13Left paper-edge guide
6Power cord connection port14Scanner glass
7Rear-access cleanout area15Scanner lid
8Printer access door
MS SD/HC MMC
Rotate
BackHome
MS SD/HC MMC
Rotate
BackHome
567
8
14
4
13
2
13
12
1110
15
9
www.kodak.com/go/aiosupport2
KODAK ESP 5200 Series All-in-One Printer
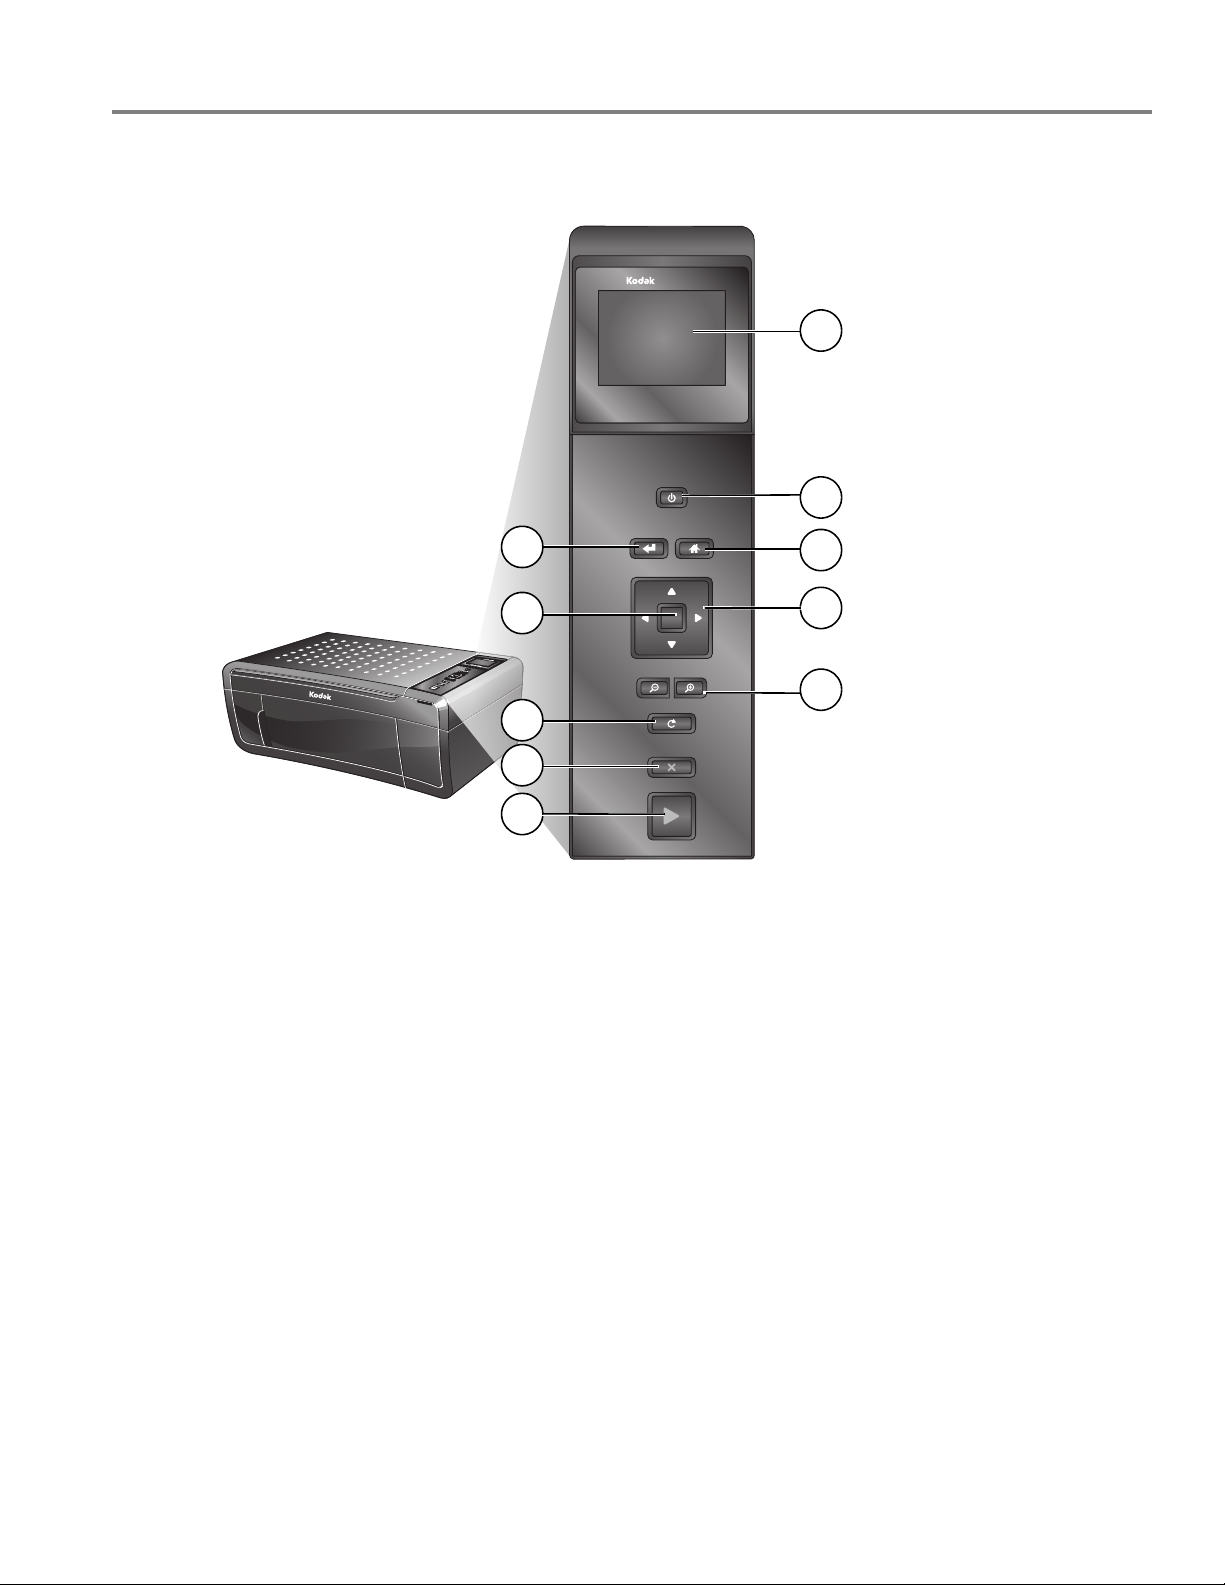
Control panel
FeatureDescription
1LCDDisplays pictures, messages, and menus; lifts for easy viewing
2On/Off buttonTurns the printer on or off
3Home buttonDisplays the main menu, and toggles between screens
4Navigation buttonsUsed to navigate menus, scroll through pictures
5Zoom buttonsEnlarge or reduce the size of the displayed picture
6Start buttonBegins copying, scanning, printing, maintenance task, and file transfer
7Cancel buttonStops the current operation and returns to the menu; returns to previous item when
navigating menus
8Rotate buttonChanges the orientation of the displayed picture; with the zoom function, changes the
orientation of the red box that shows the area of the picture to be printed
9OK buttonSelects a menu item, accepts a zoom setting, and lets you continue with the current
operation
10Back buttonDisplays the previous screen
MS SD/HC MMC
Start
Cancel
Rotate
Zoom
Back
All-in-One-Printer
Home
ESP 5250ESP 5250
OK
Rotate
BackHome
1
2
3
4
5
6
7
9
10
8
Printer Overview
3www.kodak.com/go/aiosupport
Home Center Software
KODAK Home Center Software is installed as part of the software installation on
your computer. The Home Center icon will appear on your desktop. Use this icon to
start Home Center Software.
Home Center
Software for
WINDOWS
OS-based
computers
On a WINDOWS OS-based computer, you can use Home Center Software to
browse and edit pictures, print, copy, scan, order supplies, access the Extended User
Guide, and configure your all-in-one printer from your computer. You can also
access the KODAK Tips and Projects Center Web site or upgrade your printer with a
newer version of software and/or firmware.
Clicking one of the three icons located in the upper-right corner of Home Center
Software does the following:
Home Center
Software for
MACINTOSH
Computers
On a MACINTOSH Computer, Home Center Software has three panes: Select, Tools,
and Maintenance. These panes let you do the following:
Select pane — select your printer from a list of connected printers and check the
printer ink levels.
Tools pane — start a scan, select scanning settings, change Home Center Software
settings, and restore all factory default settings.
Maintenance pane — print a test page, align and clean the printhead, and initiate an
upload of diagnostic data for service personnel.
From any pane, you can order supplies from the KODAK Web site and view the
status of your printer.
From the File menu of Home Center Software, you can check for software updates.
Home - takes you to the main Home Center Software window from other functions
within Home Center Software
Tools - displays menu options, including links to Kodak sites, troubleshooting, and
maintenance functions
Help - displays a Help panel for Home Center Software
www.kodak.com/go/aiosupport 4
2
Configuring Your Printer
This chapter presumes that you have set up your printer and that you may or may
not have installed the printer software.
This chapter tells you how to configure or change your printer settings and your
network settings.
Configuring printer settings
Configuring basic
printer settings
NOTE: When you first power on the printer, the printer automatically steps you
through the process of selecting the Language and Country/Region.
To set or change basic printer settings:
1.Press Home.
2.Press to select Printer Settings, then press OK.
3.Press to select one of the following settings:
•Date and Time*
–Press
OK, then press to select Year, Month, Day, Hour, or Minute.
Press or to change the values; press OK when you are done.
•Time to Low Power
–Press to change the time to energy-saving low power (select from 1 to 4
hours in 0.5 hour increments). After the Time to Low Power, the printer
goes into a low-power mode.
•Tagged Images Printing (see Printing tagged pictures, page19)
–Press to select On or Off.
If you select On, when you are printing pictures, the printer LCD prompts
you to verify that you want to print pictures that were tagged (or marked)
using your camera. Different cameras use different terminology; KODAK
Digital Cameras use “marked” images; others use either tagged images or
DPOF.
•Language
–Press OK, press to select a language, then press OK.
•Country/Region
–Press OK, press to select a country or region, then press OK.
•Reset All Settings (see Resetting factory defaults, page40)
NOTE: Resetting factory defaults does not change the date and time, language, or
country/region.
4.Press Back.
* You can also synchronize the printer's date and time to your computer from Home
Center Settings under Tools in Home Center Software.
Configuring Your Printer
5www.kodak.com/go/aiosupport
Setting your
printer as the
default printer
If you have more than one printer, and after installation your all-in-one printer was
not the default printer, you can make your all-in-one printer your default printer.
IMPORTANT: For all operating systems, if you connect your printer with a USB cable and
with a wireless connection, your printer may be listed twice. Be sure to select
the correct printer. (The name of the printer plus a number indicates a
wireless connection; for example, KodakESP5200+1133.)
For all computers and operating systems: If you haven’t yet installed the printer
software, insert the software CD that came with your printer and follow the
on-screen instructions to install the software.
For WINDOWS XP OS-based computers
1.Select Start> Control Panel > Printers and Faxes.
2.Right-click your printer, and select Set as Default Printer.
For WINDOWS VISTA OS-based computers
1.Select Start > Control Panel > Hardware and Sound > Printers.
2.Right-click your printer, and select Set as Default Printer.
For WINDOWS 7 OS-based computers
1.Select Start > Control Panel > Hardware and Sound > Devices and Printers.
2.Right-click your printer, and select Set as Default Printer.
For MACINTOSH Computers
When a new printer is installed, it becomes the default printer. If your all-in-one
printer is not the default printer:
1.From the dock, open System Preferences.
2.In the Hardware section, click Print & Fax.
3.Select your printer from the drop-down list next to Default Printer.
Configuring network settings
To connect your printer to an 802.11 wireless (Wi-Fi) network, see the information
that came with your printer, or refer to the following information, as needed.
Additional resources for related topics, information, and network troubleshooting
are available at www.kodak.com/go/inkjetnetworking.
If you are unsure of how your network is configured, contact your Internet service
provider or your network administrator for assistance.
Configuring a
wireless network
connection
If you did not do so during printer setup, you can connect your printer to a wireless
network from the printer control panel.
www.kodak.com/go/aiosupport6
KODAK ESP 5200 Series All-in-One Printer
Before you connectYou need:
•A laptop or desktop computer equipped with a network interface card or
wireless networking support.
•A working 802.11 wireless network. Kodak recommends that you use a wireless
access point/router that uses Dynamic Host Configuration Protocol (DHCP).
•Your network name (SSID - Service Set Identifier). You can obtain your SSID
from the wireless access point, most commonly a router, using the router’s
embedded Web server. See the manufacturer’s documentation provided with
your wireless system for more information.
•Your Wired Equivalent Privacy (WEP) key or Wi-Fi Protected Access
(WPA/WPA2) passphrase.
•To
be sure to temporarily disable your firewall until the printer is successfully
installed and communicating.
For assistance with any of the items listed above, contact your Internet service
provider or your network administrator.
Connecting to a
wireless network
using the WiFi
Setup Wizard
You can use the WiFi Setup Wizard on the printer to connect to your wireless
network. Read the following procedures and use the one that is appropriate for your
network setup.
Connecting to a
listednetwork
See Before you connect to determine what is needed to connect your printer to the
network. For assistance, contact your Internet service provider or your network
administrator.
To connect to a listed network using the WiFi Setup Wizard:
1.Press Home.
2.Press to select Network Settings, then press OK.
3.With WiFi Setup Wizard selected, press OK.
NOTE: The Wi-Fi radio is turned on automatically when you select WiFi Setup
Wizard.
The printer searches for available wireless networks within range, then displays
the list in order of signal strength. For example:
Configuring Your Printer
7www.kodak.com/go/aiosupport
NOTE: If there are more networks than can be shown on the LCD, a (page down)
symbol appears in the bottom right of the display. If you don’t see your
network in the list or want to change your network, select Rescan for
Wireless Networks, then press OK.
4.Press to select your network, then press OK.
5.If your network requires a password, “Enter Security String” and a keyboard
appear on the LCD. Press , , or to select the letters and numbers of
your password, using the correct uppercase and lowercase letters. Press OK
after each character. When your security string is entered, select DONE, then
press OK.
•To erase a character, select BKSP (backspace), then press OK.
•To change from uppercase to lowercase, select abc/123, then press OK.
•To change from lowercase to uppercase, select ABC/123, then press OK.
•To enter punctuation or symbols, select !@#, then press OK.
6.When the confirmation message appears, press OK.
7.If you haven’t yet installed the printer software, insert the software CD that
came with your printer and follow the on-screen instructions to install the
software.
Connecting to an
unlisted network
To connect to an unlisted network using the Wi-Fi Setup Wizard:
1.Press Home.
2.Press to select Network Settings, then press OK.
3.With WiFi Setup Wizard selected, press OK.
NOTE: The Wi-Fi radio is turned on automatically when you select WiFi Setup
Wizard.
4.If your network is configured to not broadcast its SSID (network name) and does
not appear in the list, select Unlisted Network, then press OK.
5.Use the keyboard on the LCD to enter the network name.
Press , , or to select the letters and numbers of your network name,
using the correct uppercase and lowercase letters. Press OK after each
character. When you have finished entering the network name, select DONE,
then press OK.
•To erase a character, select BKSP (backspace), then press OK.
•To change from uppercase to lowercase, select abc/123, then press OK.
•To change from lowercase to uppercase, select ABC/123, then press OK.
•To enter punctuation or symbols, select !@#, then press OK.
6.Select WEP or WPA/WPA2 as required for your network's security setup, then
press OK.
7.Use the keyboard on the LCD to enter the required security information
(password or passphrase), pressing OK after each character. When your
security information is entered, select DONE, then press OK.
www.kodak.com/go/aiosupport8
KODAK ESP 5200 Series All-in-One Printer
8.When the confirmation message appears, press OK.
9.If you haven’t yet installed the printer software, insert the CD that came with
your printer, and install the software.
Using WPS to
connect to a Wi-Fi
network
If your router supports Wi-Fi Protected Setup (WPS), you can use WPS Connect.
WPS lets you configure your printer for a wireless network by pressing buttons or
entering a PIN.
To connect to a network using WPS:
1.Press Home.
2.Press to select Network Settings, then press OK.
3.With WiFi Setup Wizard selected, press OK.
NOTE: The Wi-Fi radio is turned on automatically when you select Wi-Fi Setup
Wizard.
4.Press to select WPS Connect, then press OK.
5.Select one of two methods of connecting:
IMPORTANT: Before you press OK on the printer, make sure you know where the router's
push button is, or where to enter the generated PIN.
If necessary, consult your Internet service provider or router device
manufacturer’s documentation for more information.
•To use push buttons:
a.With Push Button Configuration selected, press OK.
b.You will have two minutes to push the WPS button on your router (this may
either be a physical button on the router or a virtual button in the router’s
software).
•To enter a PIN:
a.Press to select Generate WPS PIN, then press OK.
b.Go to your router’s software and locate the PIN button.
c.Enter the PIN you received on the LCD into the PIN screen for your router.
6.When the confirmation message appears, press OK.
7.If you haven’t yet installed the printer software, insert the CD that came with
your printer in your computer and install the software.
The printer with a wireless connection is listed as the name of the printer plus a
number (for example, KodakESP5200+1133).
www.kodak.com/go/aiosupport 16
4
Printing Pictures
The quickest way to print pictures is from a memory card inserted into the printer.
Another way to print pictures is to use Home Center Software on your computer
running the WINDOWS Operating System. Home Center Software lets you edit and
enhance your pictures on your computer before printing. Open Home Center
Software, select Print Pictures, then follow the on-screen instructions.
If you have a MACINTOSH Computer, print your pictures using KODAK
EASYSHARE Software, iPhoto, or another picture-editing program.
Changing Print Photos Options / Defaults
You can change the print photos options for an individual picture or group of
pictures, or you can change the settings and save them as the default.
To change print photos options:
1.Press Home.
2.If necessary, press to select View and Print Photos, then press OK.
3.Press or as needed to change the settings below.
Print Photos OptionSettingsDescription
View Photos --Scroll through the pictures on the
memory card.
Transfer All to PC--To transfer all the pictures on the
memory card to your computer, press
OK then Start. (Your printer and
computer must be connected with a USB
cable.)
Quantity1 (default) to 99The number of copies that print.
Print Size2 x 3
3.5 x 5
4 x 6 (default)
4 x 7
5 x 7
4 x 12
8 x 10
8.5 x 11 or A4
If the selected copy size is smaller than
the paper in the paper tray, the printer
automatically arranges the pictures to
best fit the paper size.
Plain Paper QualityNormal (default)Good quality output; prints faster than
Best.
BestThe highest quality.
DraftThe fastest print speed.
Photo Paper QualityAutomatic
(default)
The printer detects when you load photo
paper and sets Best quality
automatically.
Printing Pictures
17www.kodak.com/go/aiosupport
Printing pictures from a memory card
Types of memory
cards
Your printer accepts the following memory cards:
•SD Card
•SDHC Card
•MMC Card
•Memory Stick
•Variations of the memory cards listed above that require an adapter (for
example, MEMORY STICK Duo, miniSD, and microSD)
IMPORTANT: If you use a memory card with an adapter, make sure you insert and remove
the adapter and the memory card as a unit; do not remove the memory card
while leaving the adapter in the printer.
Printing a picture
using the default
settings
If you use the default settings, one 4 x 6 in. /101 x 152 mm picture is printed.
To print a picture:
1.Load photo paper with the logo side facing up (see Loading photo paper,
page14), and move the left paper-edge guide until it touches the paper.
ColorColor (default)Prints full color.
Black & WhitePrints black and white (gray scale).
Scene Balance On (default)
Off
Adjusts the image brightness to correct
for underexposure and reduces the
variation in contrast in different areas of
the picture.
Add Date to PrintsNo (default)
Yes
Prints the date of the picture(s) (the date
the picture was taken or last edited) in a
corner of the print.
Save as DefaultsNo (default)
Yes
To save settings as the new default, press
OK, select Yes, then press OK.
Print Photos OptionSettingsDescription
Printing Pictures
21www.kodak.com/go/aiosupport
NOTE: You can press Zoom + repeatedly to enlarge the picture in increments of
0.25 up to a magnification of 5X. Press Zoom– to decrease the
magnification in increments of 0.25 back down to 1X.
5.Use the navigation buttons to move the picture on the LCD up, down, left, or
right. Only the part of the picture in the red box will print.
6.After you have pressed the zoom button(s), press Rotate if you want to rotate
the red box in 90 degree increments. This will determine the content that is
printed.
NOTE: Zooming and cropping does not change the saved picture on the memory
card.
7.When you are satisfied with the picture, press OK. The picture appears in the
original view with a red box around the portion of the picture that will print.
8.Press Start to begin printing.
Transferring pictures to a computer
You can transfer .jpg, .mov, and .wav files from a memory card in the printer to your
computer. To transfer these files, the printer must be connected to your computer
with a USB cable.
NOTE: If you have large video files or a large number of pictures (400 or more), we
recommend that you use a memory card reader attached directly to your
computer to transfer them.
Transferring
pictures to a
WINDOWS
OS-based
computer
1.Insert the memory card into the memory card slot on the printer.
2.Press Back.
3.If necessary, use the navigation buttons to select View and Print Photos.
4.Press OK.
5.Press to select
Transfer All to PC, then press OK.
6.Press Start.
7.If your computer is connected to a wireless network and with a USB cable, select
the USB-connected printer (no number after the printer name).
8.Follow the on-screen instructions on your computer.
Transferring
pictures to a
MACINTOSH
Computer
1.Insert the memory card into the memory card slot on the printer.
2.Press Back.
3.If necessary, use the navigation buttons to select View and Print Photos.
4.Press OK.
5.Press to select
Transfer All to PC, then press OK.
6.Press Start.
7.If your computer is connected to a wireless network and with a USB cable, select
the USB-connected printer (no number after the printer name).
8.Use iPhoto or Image Capture on your computer to complete the transfer.
www.kodak.com/go/aiosupport 22
5
Copying
You can copy documents and pictures with your all-in-one printer. The printer
produces high–quality color or black-and-white copies on a variety of paper types
(see Paper types, page12).
Making a copy
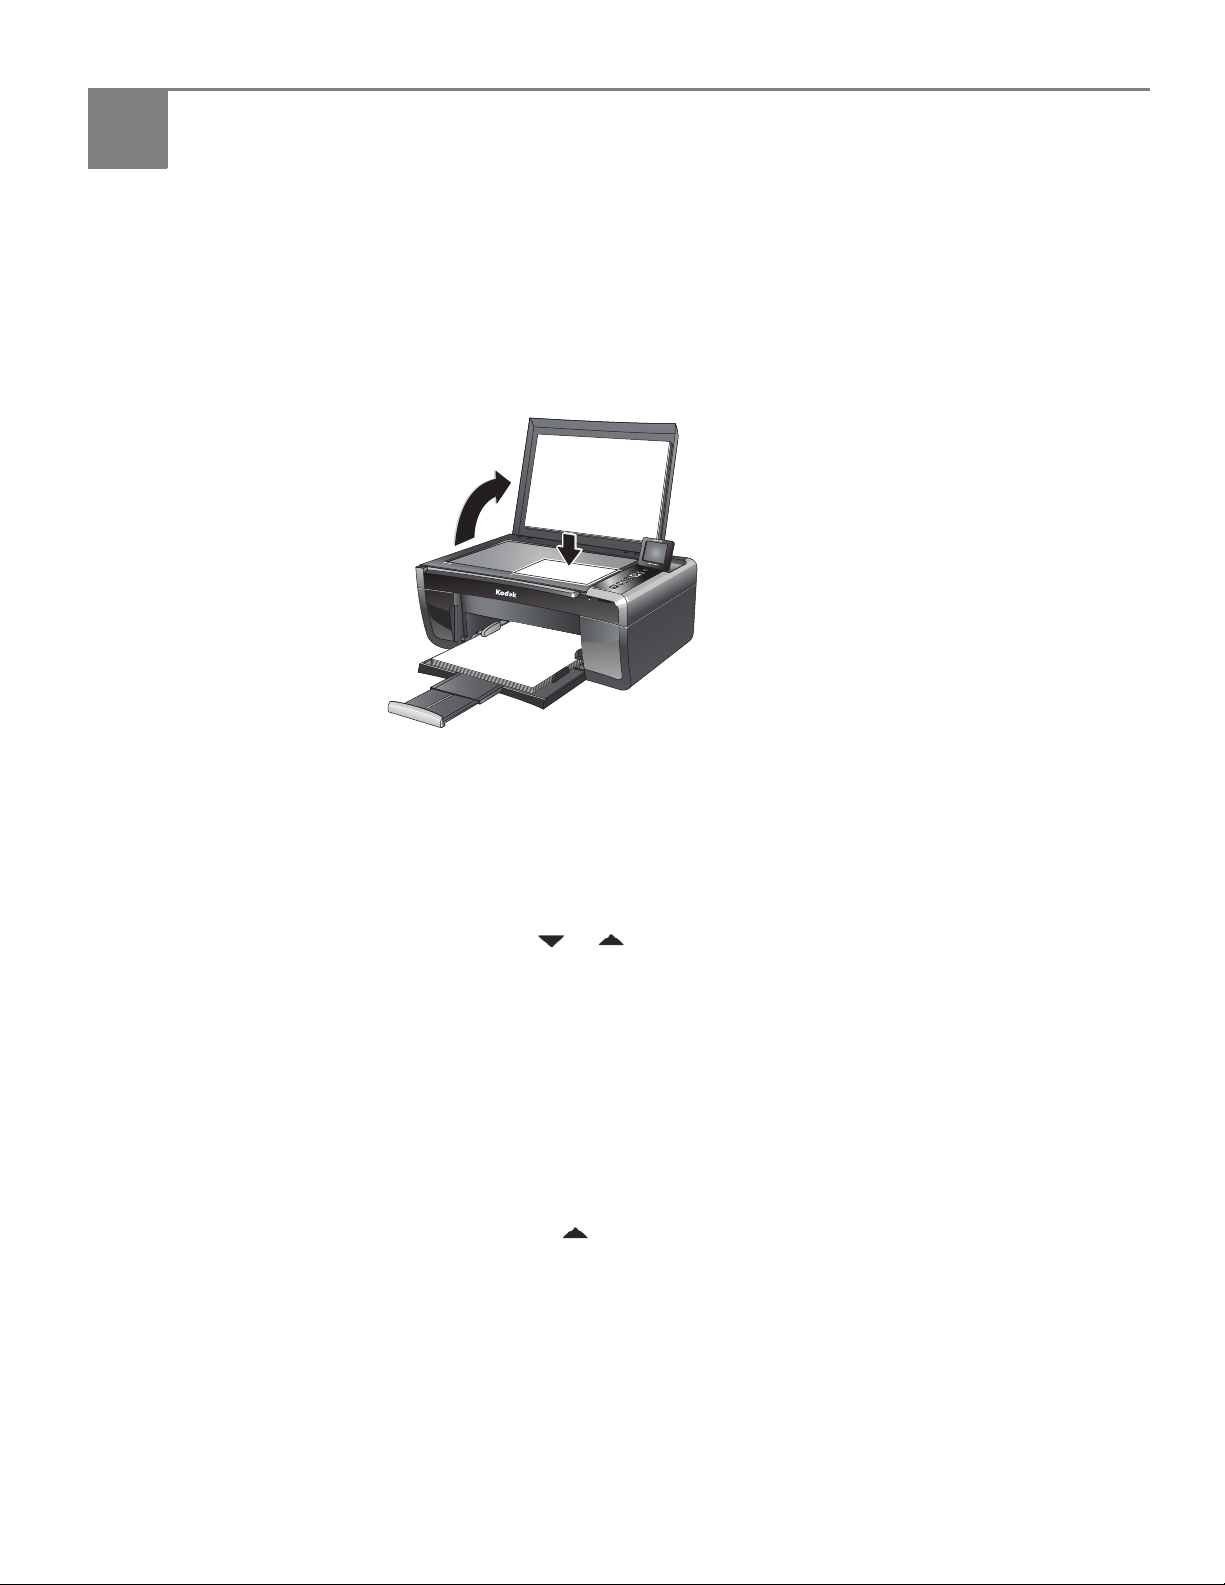
To copy a document or a picture using the default settings:
1.Lift the scanner lid, and place the document or picture face down on the glass.
2.Close the lid.
NOTE: Single-button document copy is a feature that lets you put paper on the
scanner and immediately press Start, without following the remaining steps
below. You can use this feature when the printer has been idle or when it is
turned on; the printer automatically goes to Copy Document mode.
3.Press Home.
4.If needed, press or to select Copy Document or Copy Photo.
5.Press Start to begin copying.
Changing copy options
You can change the copy options for an individual copy, or you can change the
settings for copying documents or copying photos, and save them as the defaults.
Changing copy
document options
To change the copy document options:
1.Press Home.
2.If necessary, press to select Copy Document.
3.Press OK.
MS SD/HC MMC
Rotate
BackHome
Copying
23www.kodak.com/go/aiosupport
4.Press to go through the options, and press or as needed to change the
settings below:
Copy Document OptionSettingsDescription
Quantity1 (default) to 99The number of copies that print.
Copy SizeSame Size
(default)
The copy is the same size as the
original.
Fit to PageThe printer detects the size of the
original on the scanner glass and the
size of the paper in the paper tray, and
automatically reduces or enlarges the
original so that the copy fits on the
paper.
20% to 500%Reduces up to 20% or enlarges up to
500% of the original size.
Plain Paper QualityNormal
(default)
Good quality output; prints faster than
Best.
BestThe highest quality, but the slowest
print speed; eliminates the banding
effect that sometimes occurs when
printing Draft or Normal.
DraftThe fastest print speed, but the lowest
quality.
Photo Paper QualityAutomatic
(default)
The printer detects when you load
photo paper and sets Best quality
automatically.
ColorColor
(default)
Prints full color.
Black & WhitePrints black and white (gray scale).
Brightness-3 to +3
(0 is default)
Lightens or darkens the copy.
0 (Normal) is no change from the
original; -3 is the darkest; +3 is the
lightest.
Save as DefaultsNo / YesTo save settings as the new default:
press OK, select Yes, then press OK.
www.kodak.com/go/aiosupport24
KODAK ESP 5200 Series All-in-One Printer
Changing copy
photo options
To change the copy photo options:
1.Press Home.
2.If necessary, press to select Copy Photo.
3.Press OK.
4.Press to view the options, and press or as needed to change the settings
below:
Copy Photo OptionSettingsDescription
Quantity1 (default) to 99The number of copies that print.
Copy Size2 x 3
3.5 x 5
4 x 6 (default)
4 x 7
5 x 7
4 x 12
8 x 10
8.5 x 11 or A4
If the selected copy size is smaller
than the paper in the paper tray, the
printer automatically arranges the
pictures to best fit the paper size.
Plain Paper Quality Normal
(default)
Good quality output; prints faster
than Best.
BestThe highest quality.
DraftThe fastest print speed.
Photo Paper QualityAutomatic
(default)
The printer detects when you load
photo paper and sets Best quality
automatically.
ColorColor
(default)
Prints full color.
Black & WhitePrints black and white (gray scale).
Brightness-3 to +3
(0 is default)
Lightens or darkens the copy.
0 (Normal) is no change from the
original; -3 is the darkest; +3 is the
lightest.
Save as DefaultsNo / YesTo save settings as the new default:
press OK, select Yes, then press
OK.
Copying
25www.kodak.com/go/aiosupport
Adjusting copy settings
You can change the copy settings for individual copy tasks. A few of the common
tasks are described below.
Enlarging or
reducing a
document
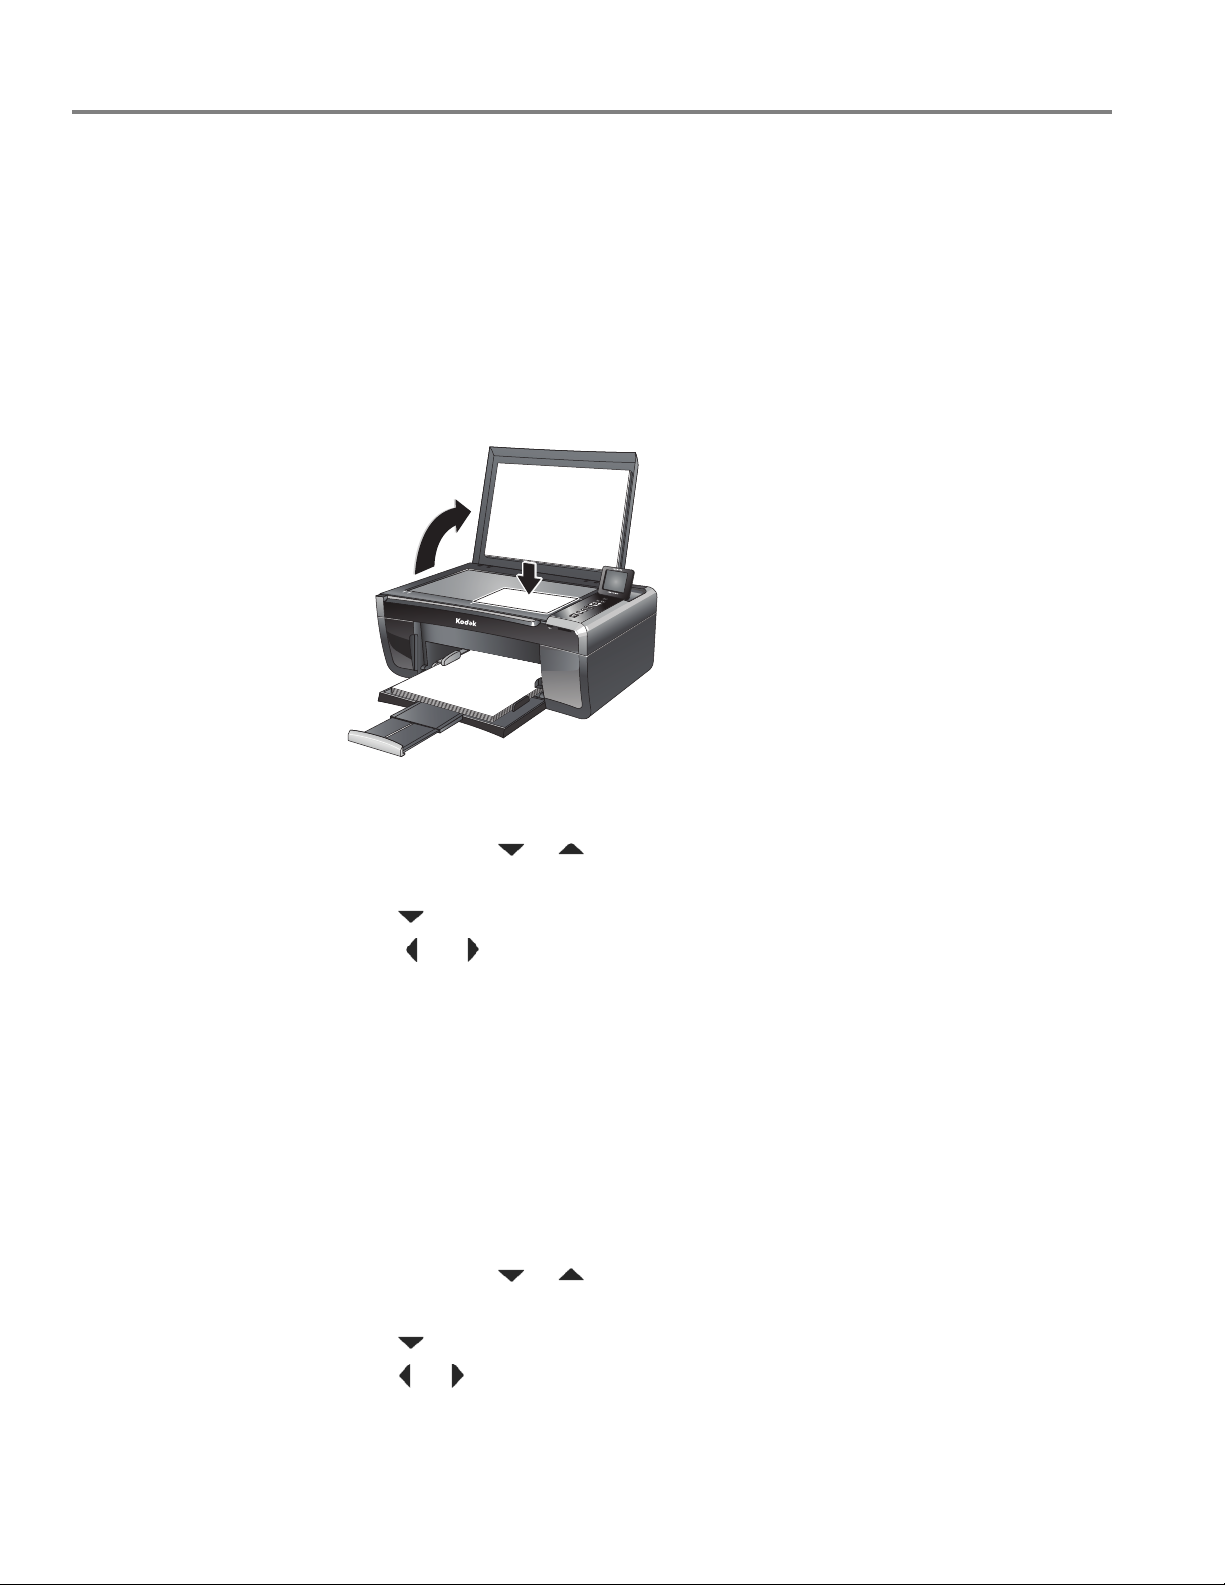
To enlarge or reduce the size of your copy:
1.Lift the scanner lid, and place the document face down on the glass.
Note the orientation of the paper on the glass and make sure the paper is flush
to the edges.
2.Close the lid.
3.Press Home.
4.If needed, press or to select Copy Document.
5.Press OK.
6.Press to select
Copy Size.
7.Press or to select the enlargement or reduction you want.
NOTE: If you select
Fit to Page, the printer detects the size of the original on the
scanner glass and the size of the paper in the paper tray, and automatically
reduces or enlarges the original so that the copy fits on the paper
8.Press Start to begin copying.
Enlarging or
reducing a photo
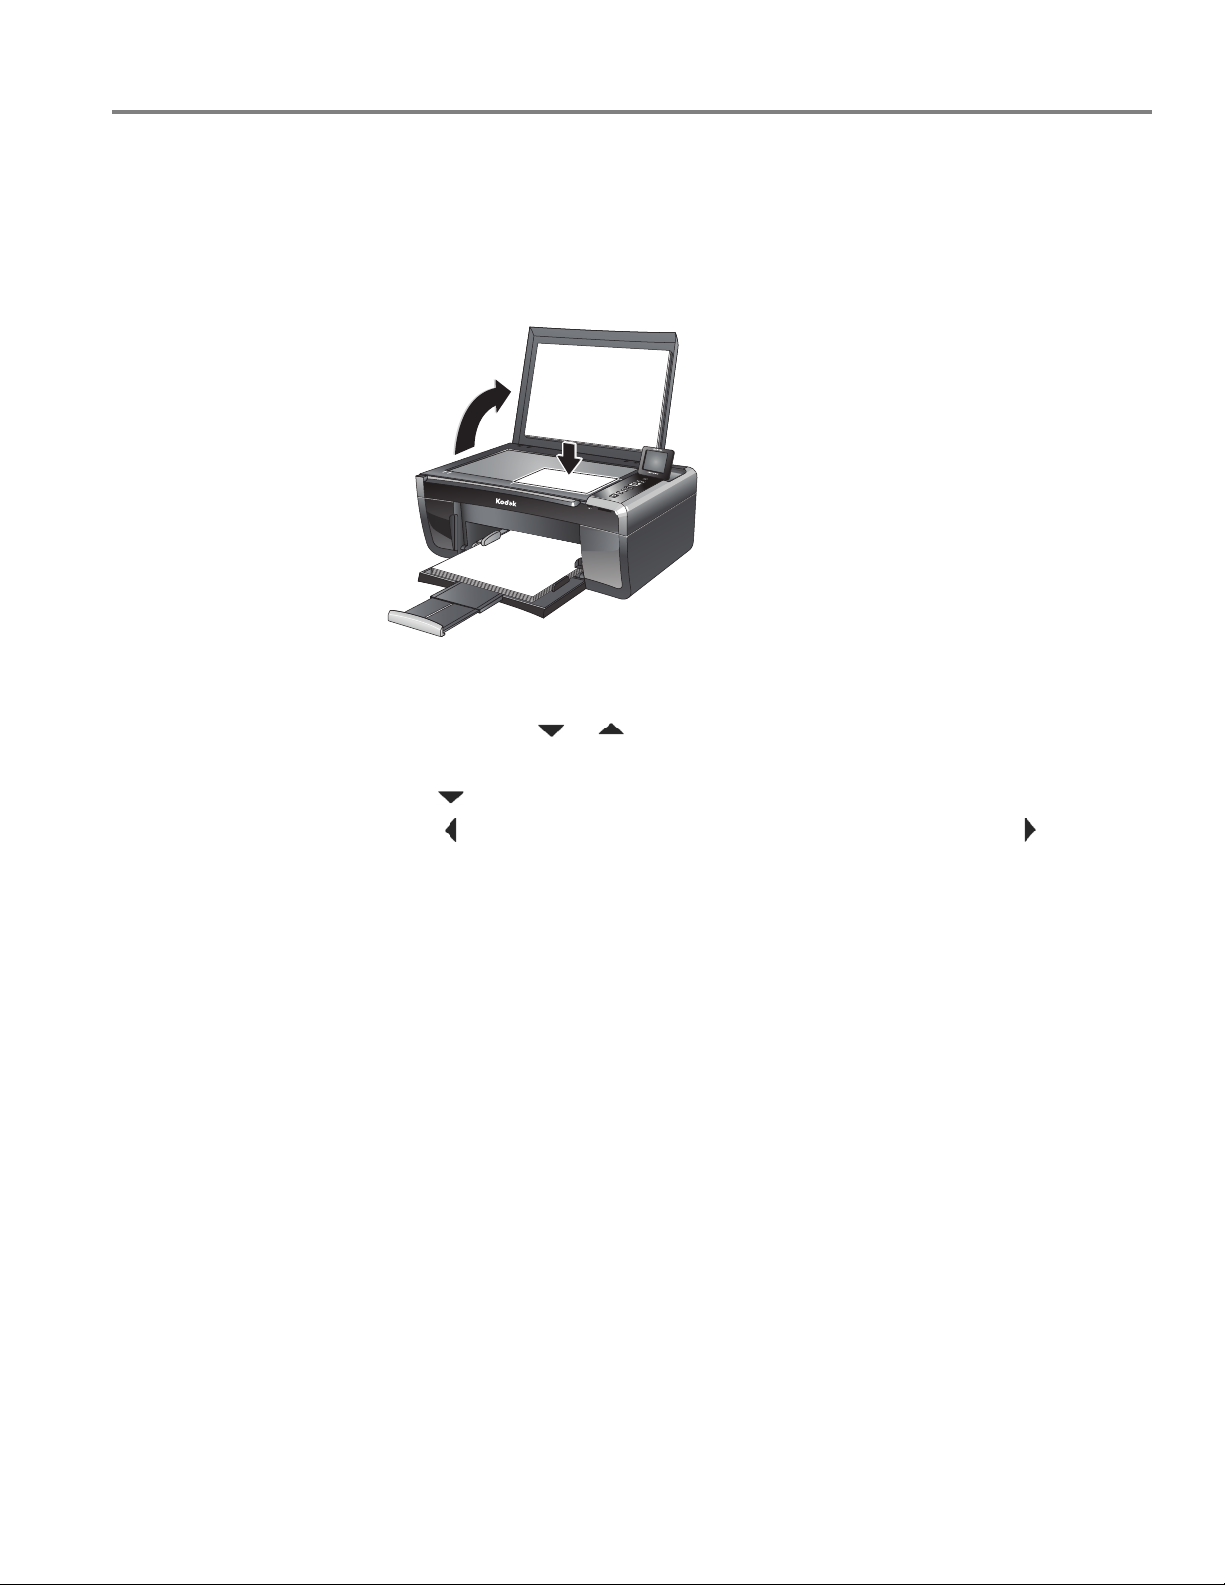
To enlarge or reduce the size of your copy:
1.Lift the scanner lid, and place the photo face down on the glass.
2.Close the lid.
3.Press Home.
4.If needed, press or to select Copy Photo.
5.Press OK.
6.Press to select
Copy Size.
7.Press or to select the photo size you want.
8.Press Start to begin copying.
MS SD/HC MMC
Rotate
BackHome
www.kodak.com/go/aiosupport26
KODAK ESP 5200 Series All-in-One Printer
Darkening or
lightening copies
If the original document or picture is too light or too dark, you can make the copy
darker or lighter.
To darken or lighten the copy:
1.Lift the scanner lid, and place the document face down on the glass.
2.Close the lid.
3.Press Home.
4.If needed, press or to select Copy Document or Copy Photo.
5.Press OK.
6.Press to select
Brightness.
7.Press to select a number below zero for a darker copy, or press to select a
number above zero for a lighter copy.
8.Press Start to begin copying.
MSSD/HC MMC
Rotate
BackHome
www.kodak.com/go/aiosupport28
KODAK ESP 5200 Series All-in-One Printer
Scanning multiple pictures simultaneously
Using Home Center Software, you can scan multiple pictures simultaneously and
save them as separate files.
NOTE: For Home Center Software to interpret two or more pictures, the scan option
must be set to Picture.
When scanning multiple pictures, leave space between the pictures so that the
printer can detect the separate pictures. Any pictures that overlap are interpreted as
a single picture.
Scanning multiple
pictures with a
WINDOWS
OS-based
computer
To scan multiple pictures simultaneously and save them as separate files:
1.Lift the scanner lid, and place the pictures face down on the glass leaving space
between the pictures.
2.Close the lid.
3.Open Home Center Software, then select Scan Pictures and Documents.
4.Open the Tools panel, if it is not open, by clicking the Tools icon.
5.Click Printer Scan Settings.
6.Select the Picture tab.
7.Select Automatically Detect Pictures, if it is not selected, then click OK.
8.Make sure Picture is selected, then follow the on-screen instructions.
NOTE: Click the Help icon for additional instructions.
Scanning multiple
pictures with a
MACINTOSH
Computer
To scan multiple pictures simultaneously and save them as separate files:
1.Lift the scanner lid, and place the pictures face down on the glass leaving space
between the pictures.
2.Close the lid.
3.Open Home Center Software, then select the Tools tab.
4.Select Color Picture or Black and White Picture.
5.Click the Scan Application button.
6.Select Automatically detect multiple pictures, if it is not selected.
7.Click Preview or Scan All, and follow the on-screen instructions.
NOTE: Click the Help icon for additional instructions.
Maintaining Your Printer
35www.kodak.com/go/aiosupport
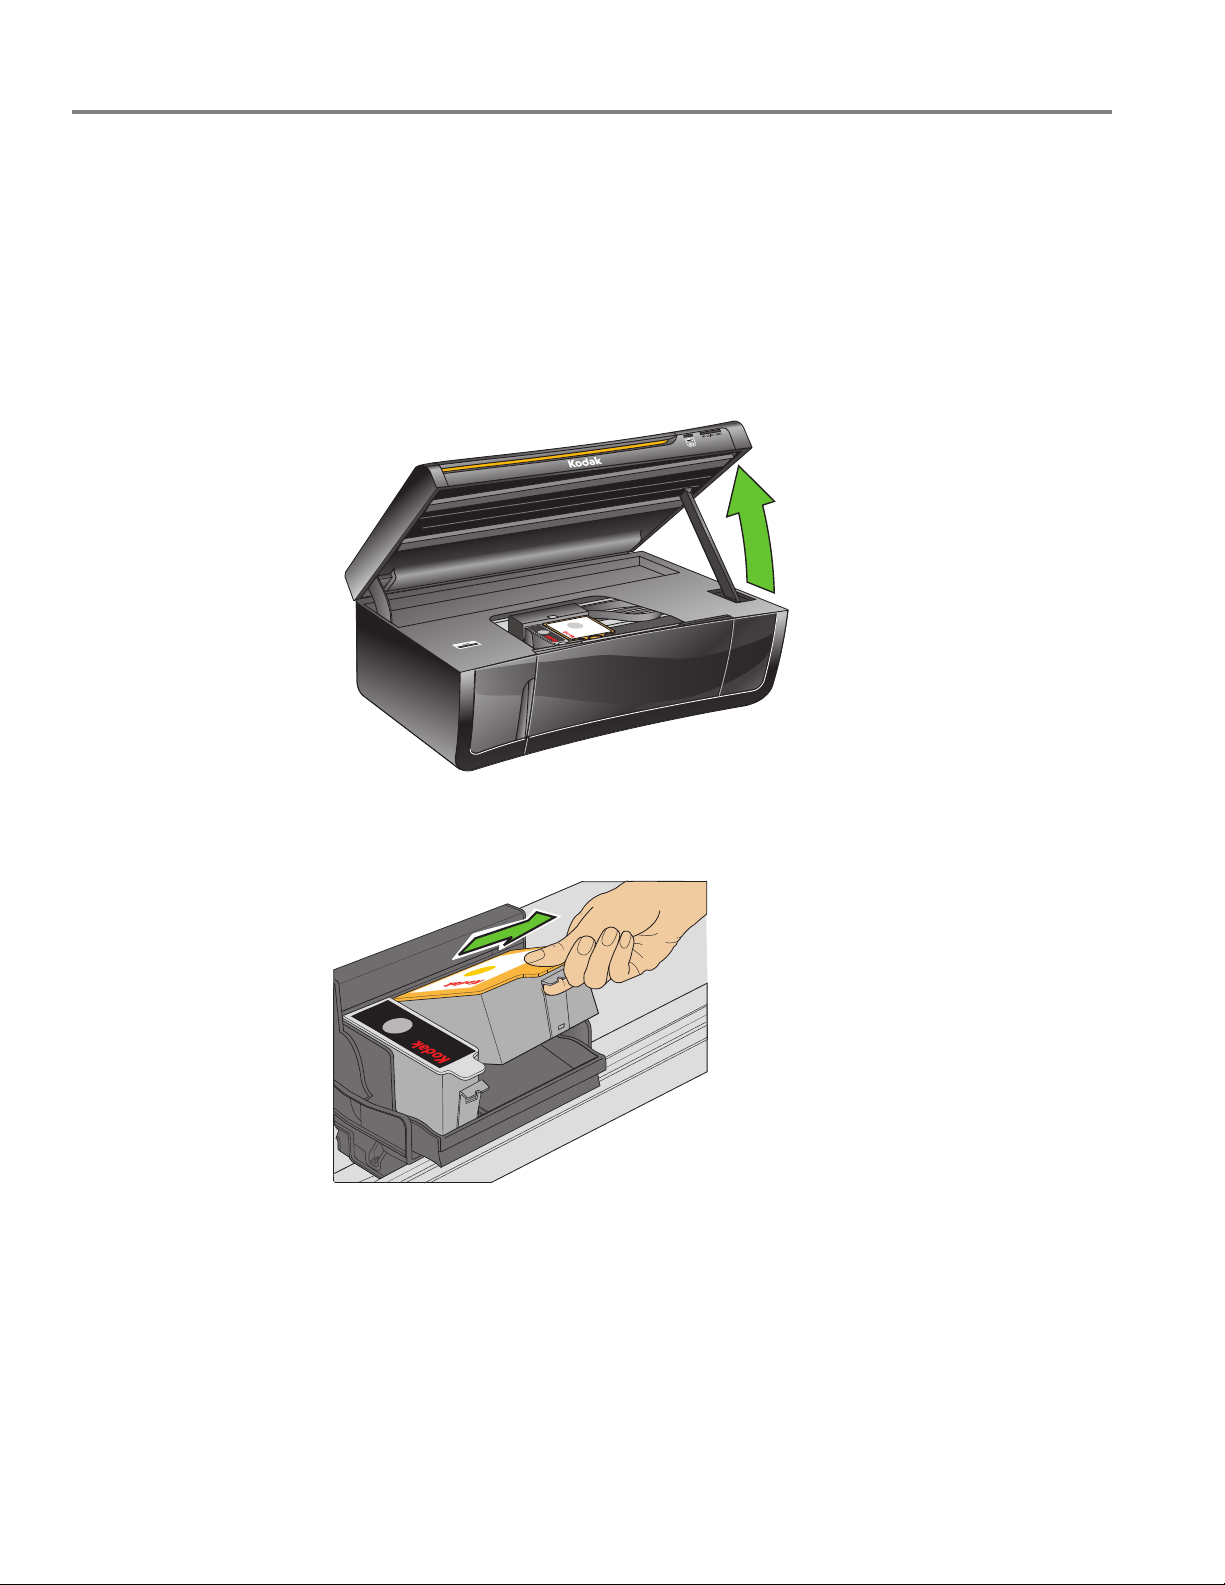
Replacing the printhead
IMPORTANT: Replacing the printhead is not a regular maintenance procedure. Replace
the printhead only if you receive a new printhead from Kodak.
To replace the printhead:
1.Make sure your printer is on.
2.Lift the printer access door, and wait for the carriage to move to the access
position.
3.Remove any paper that may be loaded in the printer.
4.Remove both ink cartridges and set them aside.
www.kodak.com/go/aiosupport52
KODAK ESP 5200 Series All-in-One Printer
Industry Canada (IC) Radiation Exposure Statement
This equipment complies with IC radiation exposure limits set forth for an
uncontrolled environment. This equipment should be installed and operated with a
minimum distance of 20 cm between the radiator and your person.
German compliance statement
Noise emissions for this equipment do not exceed 70 dBa.
This equipment is not intended for use in the work place in accordance with
BildscharbV regulations.
“Das Gerät ist nicht für die Benutzung am Bildschirmarbeitsplatz gemäß
BildscharbV vorgesehen.”
REACH Article 33 declarations
Go to www.kodak.com/go/REACH for information about the presence of
substances included on the candidate list according to article 59(1) of Regulation
(EC) No. 1907/2006 (REACH).
Waste electrical and electronic equipment labeling
In the European Union, do not discard this product as unsorted municipal waste.
Contact your local authorities or go to www.kodak.com/go/recycle for recycling
program information.
ENERGY STAR® Qualified
ENERGY STAR and the ENERGY STAR mark are registered U.S. service marks. As an
ENERGY STAR partner, KODAK has determined that this product meets ENERGY
STAR Guidelines for energy efficiency. For more information on the ENERGY STAR
Libble takes abuse of its services very seriously. We're committed to dealing with such abuse according to the laws in your country of residence. When you submit a report, we'll investigate it and take the appropriate action. We'll get back to you only if we require additional details or have more information to share.
Product:
Forumrules
To achieve meaningful questions, we apply the following rules:
First, read the manual;
Check if your question has been asked previously;
Try to ask your question as clearly as possible;
Did you already try to solve the problem? Please mention this;
Is your problem solved by a visitor then let him/her know in this forum;
To give a response to a question or answer, do not use this form but click on the button 'reply to this question';
Your question will be posted here and emailed to our subscribers. Therefore, avoid filling in personal details.
Register
Register getting emails for Kodak ESP 5200 series at:
new questions and answers
new manuals
You will receive an email to register for one or both of the options.
Get your user manual by e-mail
Enter your email address to receive the manual of Kodak ESP 5200 series in the language / languages: English as an attachment in your email.
The manual is 3.66 mb in size.
You will receive the manual in your email within minutes. If you have not received an email, then probably have entered the wrong email address or your mailbox is too full. In addition, it may be that your ISP may have a maximum size for emails to receive.
If you have not received an email with the manual within fifteen minutes, it may be that you have a entered a wrong email address or that your ISP has set a maximum size to receive email that is smaller than the size of the manual.
The email address you have provided is not correct.
Please check the email address and correct it.
Your question is posted on this page
Would you like to receive an email when new answers and questions are posted? Please enter your email address.