16
Bedienungsanleitung für den Backofen
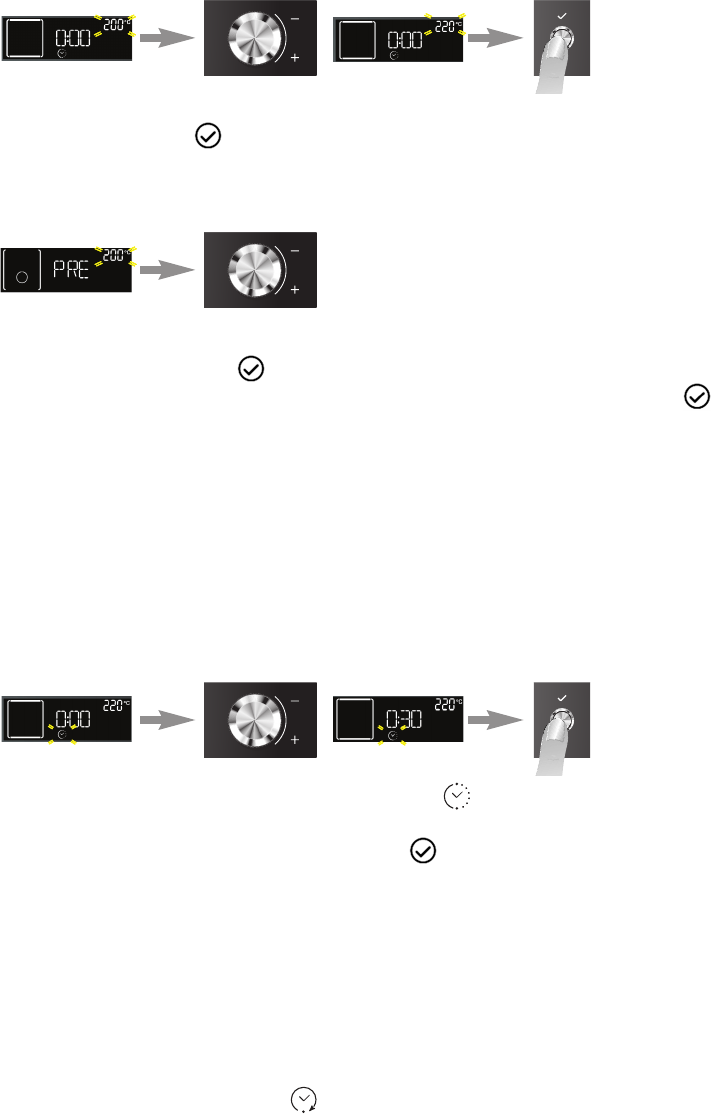
EINSTELLUNG DER TEMPERATUR/LEISTUNG DES GRILLS
Zur Änderung der Temperatur oder der Leistung des Grills gehen Sie folgendermaßen vor:
1. Drehen Sie den “Navigationsknopf”, bis der gewünschte Wert angezeigt wird.
2. Drücken Sie die Taste zur Bestätigung.
SCHNELLES VORHEIZEN
1. Wählen Sie die Funktion Schnelles Vorheizen durch Drehen des “Funktionswahlknopfs”.
2. Bestätigen Sie mit der Taste : Die Einstellungen erscheinen auf dem Display.
3. Wenn die vorgeschlagene der gewünschten Temperatur entspricht, drücken Sie die Taste . Zum
Ändern der Temperatur gehen Sie vor wie in den vorhergehenden Abschnitten beschrieben vor. Die
Meldung PRE erscheint auf dem Display. Wenn die eingestellte Temperatur erreicht ist, erscheint der
entsprechende Wert (z.°B. 200 °C) auf dem Display, und der Signalton ertönt. Am Ende der
Aufheizphase wählt der Ofen automatisch die Funktion Ober-/Unterhitze.
Stellen Sie jetzt das Gargut in den Ofen und starten Sie den Garvorgang.
4. Falls Sie eine andere Garfunktion wählen möchten, drehen Sie den “Funktionswahlknopf” und wählen
Sie die gewünschte Funktion.
EINSTELLEN DER GARZEIT
Diese Funktion erlaubt das Garen für eine unbestimmte Zeitdauer, von mindestens 1 Minute bis zur für die
gewählte Garfunktion maximal zulässigen Garzeit. Nach Ablauf der Garzeit schaltet sich der Ofen
automatisch ab.
1. Nach dem Bestätigen der Temperatur blinkt das Symbol .
2. Drehen Sie den “Navigationsknopf”, bis die gewünschte Garzeit angezeigt wird.
3. Bestätigen Sie die Garzeit durch Drücken der Taste .
EINSTELLEN VON GARZEITENDE/ STARTVERZÖGERUNG
WICHTIG: Die Einstellung Startverzögerung ist für folgende Funktionen nicht verfügbar:
SCHNELLES VORHEIZEN, BROT/PIZZA.
Hinweis: Bei dieser Einstellung wird die gewählte Temperatur etwas langsamer erreicht. Die
Garzeiten sind daher etwas länger als in der Gartabelle angegeben.
Die gewünschte Abschaltzeit lässt sich einstellen, indem das Einschalten des Ofens ab der aktuellen
Uhrzeit um bis maximal 23 Stunden und 59 Minuten verzögert wird. Die ist erst nach dem Einstellen der
Garzeit möglich. Nach Einstellen der Garzeit wird auf dem Display die Abschaltzeit angezeigt
(beispielsweise 15:45), und das Symbol blinkt.