332847
14
Zoom out
Zoom in
Previous page
1/20
Next page
14
(Zie het productbeschrijvingsblad voor het model)
Verwijder de onderkant van het kookelement en til de
montagesteunen op om het spuitstuk voor de dubbelkapsgaspit
voor de wok te vervangen. Neem contact op met de
Klantenservice.
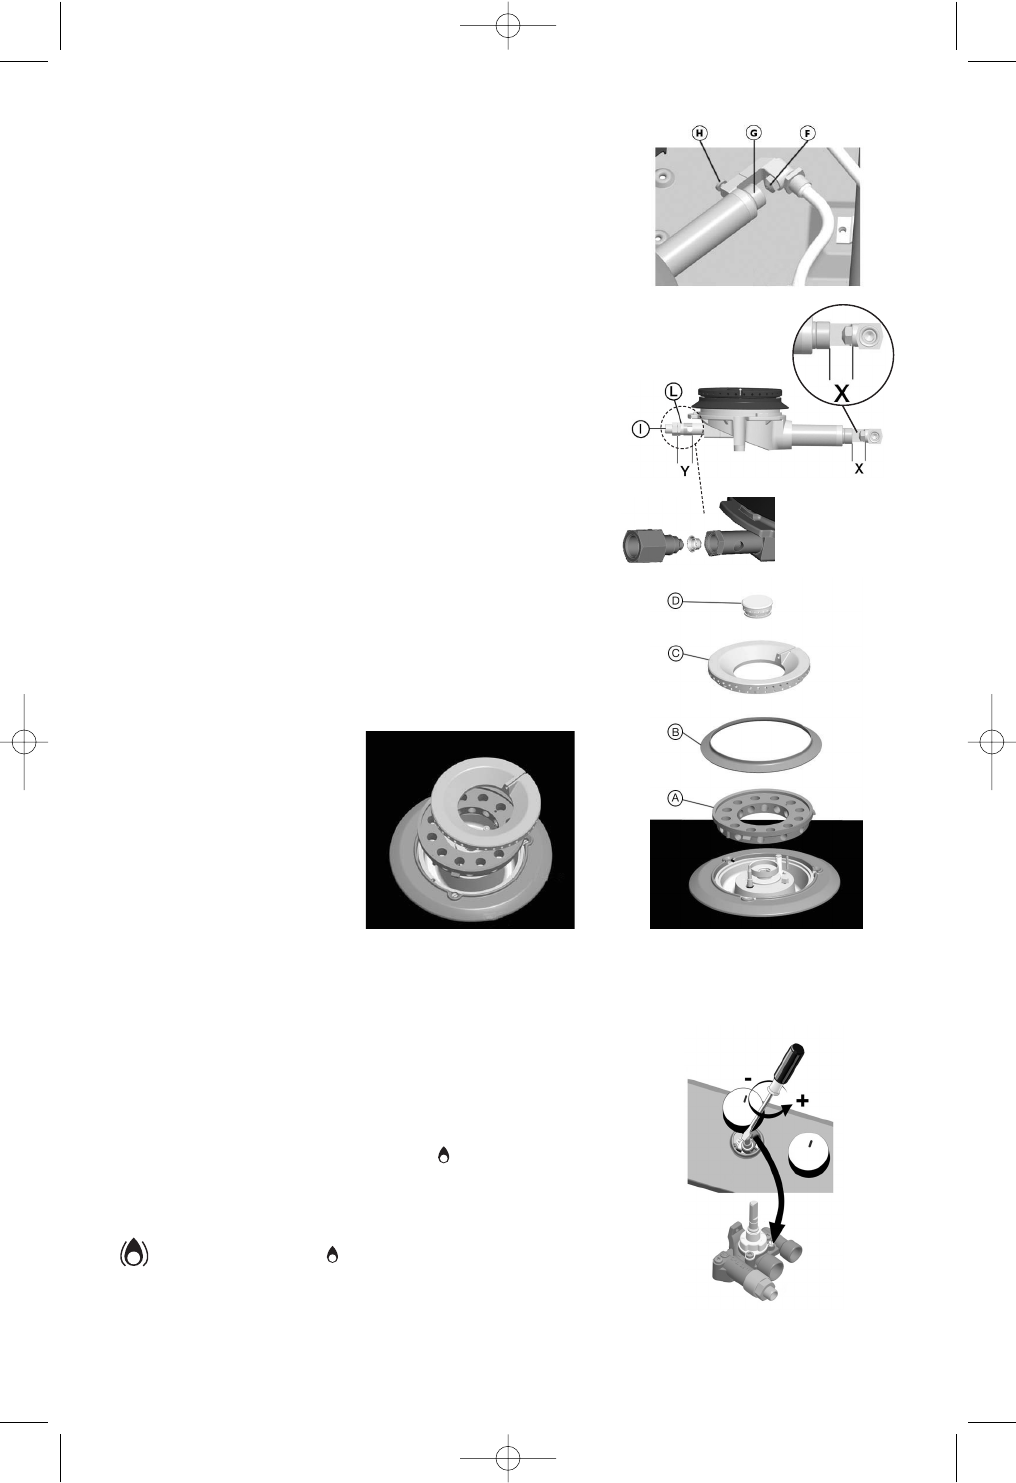
HET HOOFDSPUITSTUK VERVANGEN
Verwijder het hoofdspuitstuk (F) met behulp van een 10 mm
moersleutel. Draai de bevestigingsschroef (H) los om de positie
(X) van het gasinlaatopeningkoppel (G) in verhouding tot het
spuitstuk te regelen.
HET SECUNDAIRE SPUITSTUK VERVANGEN
Verwijder het spuitstuk (I) met behulp van een 12 mm
moersleutel. Het is niet nodig om de positie (Y) van het
gasinlaatopeningkoppel (L) in verhouding tot het spuitstuk te
regelen. Houd deze aan het einde op dezelfde afmetingen als in
de injectietabel staan aangegeven.
HET GASPIT VOOR DE WOK INSTALLEREN
Voor het installeren van het dubbelkapsgaspit voor de wok, plaats
de onderdelen als volgt: de brander-ring (A), de decoratieve
afdekring (B), de buitenste gaspitkap (C) en de binnenste
gaspitkap (D).
De spuitstukken terugplaatsen
On na te gaan dat het laagste niveau op correcte wijze geregeld
is, verwijder de bedieningsknop en stel de op de kraan aanwezige
schroeven als volgt bij:
draai aan om de hoogte van de vlam 1 (-) te verminderen;
draai los om de hoogte van de vlam (+) toe te laten nemen;
Het regelen van het minimale stroomniveau dient met de kraan
gedraaid op de laagste positie (kleine vlam) uit te worden
gevoerd.
- Het is niet nodig om de primaire lucht in de gaspitten te regelen.
- Met de branders aan, draai de knoppen van de hoogte positie
naar de laagste positie om de stabiliteit van de vlam te
controleren.
Als u eenmaal het regelen beëindigd heeft, sluit de pakkingen
opnieuw af met behulp van afdichtwas.
Het minimale stroomniveau van de gaskranen regelen
5019_719_01140_NL_FILO 9-11-2007 13:28 Pagina 14
14


Need help? Post your question in this forum.

Forumrules


Report abuse

Libble takes abuse of its services very seriously. We're committed to dealing with such abuse according to the laws in your country of residence. When you submit a report, we'll investigate it and take the appropriate action. We'll get back to you only if we require additional details or have more information to share.

Product:

For example, Anti-Semitic content, racist content, or material that could result in a violent physical act.

For example, a credit card number, a personal identification number, or an unlisted home address. Note that email addresses and full names are not considered private information.

Forumrules

To achieve meaningful questions, we apply the following rules:

Register

Register getting emails for KitchenAid khmf 9010 at:


You will receive an email to register for one or both of the options.


Get your user manual by e-mail

Enter your email address to receive the manual of KitchenAid khmf 9010 in the language / languages: Dutch as an attachment in your email.

The manual is 1,01 mb in size.


You will receive the manual in your email within minutes. If you have not received an email, then probably have entered the wrong email address or your mailbox is too full. In addition, it may be that your ISP may have a maximum size for emails to receive.

Others manual(s) of KitchenAid khmf 9010

KitchenAid khmf 9010 User Manual - English - 20 pages

KitchenAid khmf 9010 User Manual - German - 20 pages


The manual is sent by email. Check your email

If you have not received an email with the manual within fifteen minutes, it may be that you have a entered a wrong email address or that your ISP has set a maximum size to receive email that is smaller than the size of the manual.

The email address you have provided is not correct.

Please check the email address and correct it.

Your question is posted on this page

Would you like to receive an email when new answers and questions are posted? Please enter your email address.


Info