Montage des Laufrades / Assembly of the wheel / Montage de la roue / Monteren van het wiel / Montaje de la
rueda / Montaggio della ruota / Montaż koła jezdnego /Montagem da roda / Montering af hjulet /
Montering av hjulet / Montering av løpehjulet / Pyörän asentaminen / A futókerék összeszerelése /
Montáž kola / Montáž kolesa / Montaža kolesa / Συναρµολόγηση του τροχού /
Монтаж на колелото / Montarea roţii / Монтаж ходового колеса / Tekerin montajı /
Munta tar-Rota / Ratta monteerimine / Vienračio montavimas / Riteņa montāža
GB
D
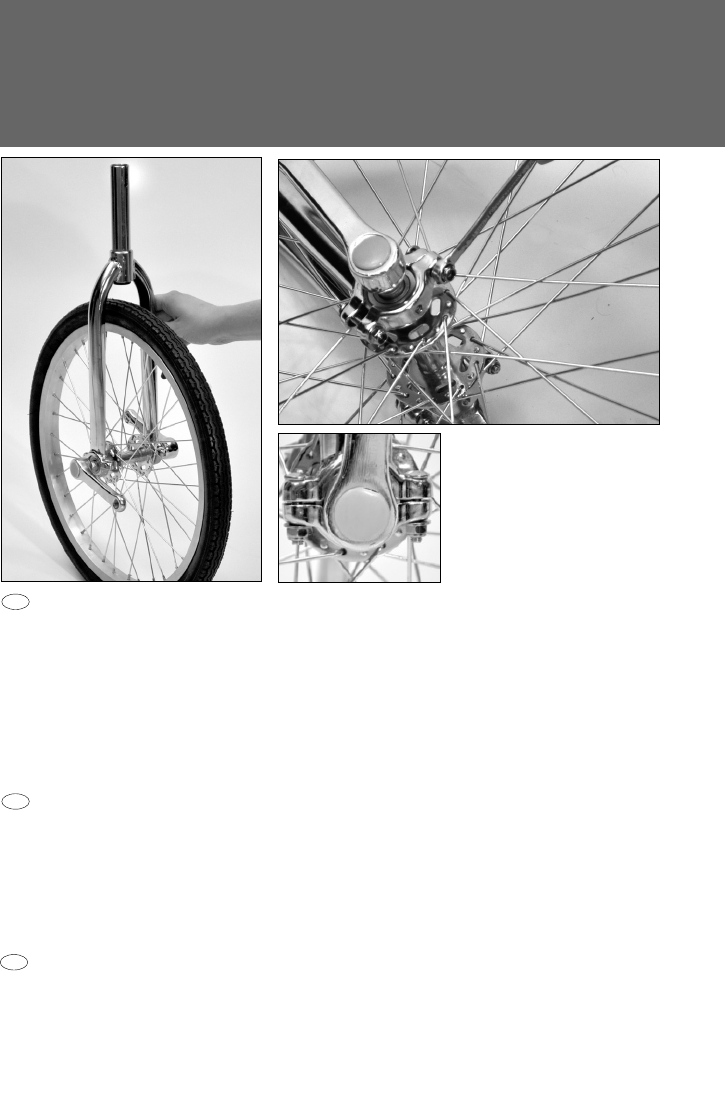
Stellen Sie das Laufrad so vor sich auf den Boden, dass die rechte Kurbel auf der rechten Seite ist (die
Tretkurbeln des Laufrades sind innen mit »L« für links und »R« für rechts gekennzeichnet). Setzen Sie die
Gabel mit ihren Schalen auf die Kugellager des Laufrades. Dabei muss der Schlitz im Sitzrohr zu Ihnen hin
zeigen.
Drücken Sie die Gegenschalen von unten auf die Kugellager und verschrauben Sie sie mit den
Gabelschalen. Vergessen Sie dabei nicht, zwischen Mutter und Gegenscha le eine Unterlegscheibe einzu-
setzen.
Ziehen Sie die Schrauben mit dem 10 mm Gabelschlüsseln fest (Anzugsdrehmo ment 9,5 Nm). Der Schlitz
zwischen Gabelschale und Gegenschale muss nach dem Festziehen der Schrauben auf beiden Seiten
gleich breit sein.
Place the wheel on the floor in front of you in such a way that the right crank is on the right side (the pedal
cranks of the wheel have a designation on the inside, “L” for left and “R” for right). Place the fork with its
holders on the roller bearings of the wheel. The slot in the seat tube must point into your direction.
Push the counter shells to the roller bearings from below and screw them together with the fork holders. Do
not forget to place a washer between the nut and the counter shell.
Tighten the screws with a 10 mm flat wrench (torque 9.5 Nm). The slot between the fork holder and the
counter shell must have the same width on both sides after the screws have been tightened.
Placez la roue devant vous sur le sol de telle façon que la manivelle de droite se trouve du côté droit (les
manivelles de pédalier de la roue sont signalées avec l’inscription à l’intérieur d’un « L » pour gauche et
d’un « R » pour droite). Placez la fourche avec sa coque sur le roulement à billes de la roue. Pour ce faire,
la fente dans le tube de selle doit être dirigée vers vous.
Pressez les contre-coques par dessous sur le roulement à billes et vissez-les avec la coque de la fourche.
N’oubliez pas en le faisant de placer la rondelle entre l’écrou et la contre coque.
Serrez les vis avec la clé à fourche de 10 mm (couple de serrage de 9,5 Nm). La fente entre la coque de
la fourche et la contre coque doit être de la même largeur des deux côtés après le serrage des vis
.
F
83