Functions and operation of the training computer
GB
9
17
20
10
6
7/8/9
16
15
3
19
14
18
11
12
13
4/5
1
2/3
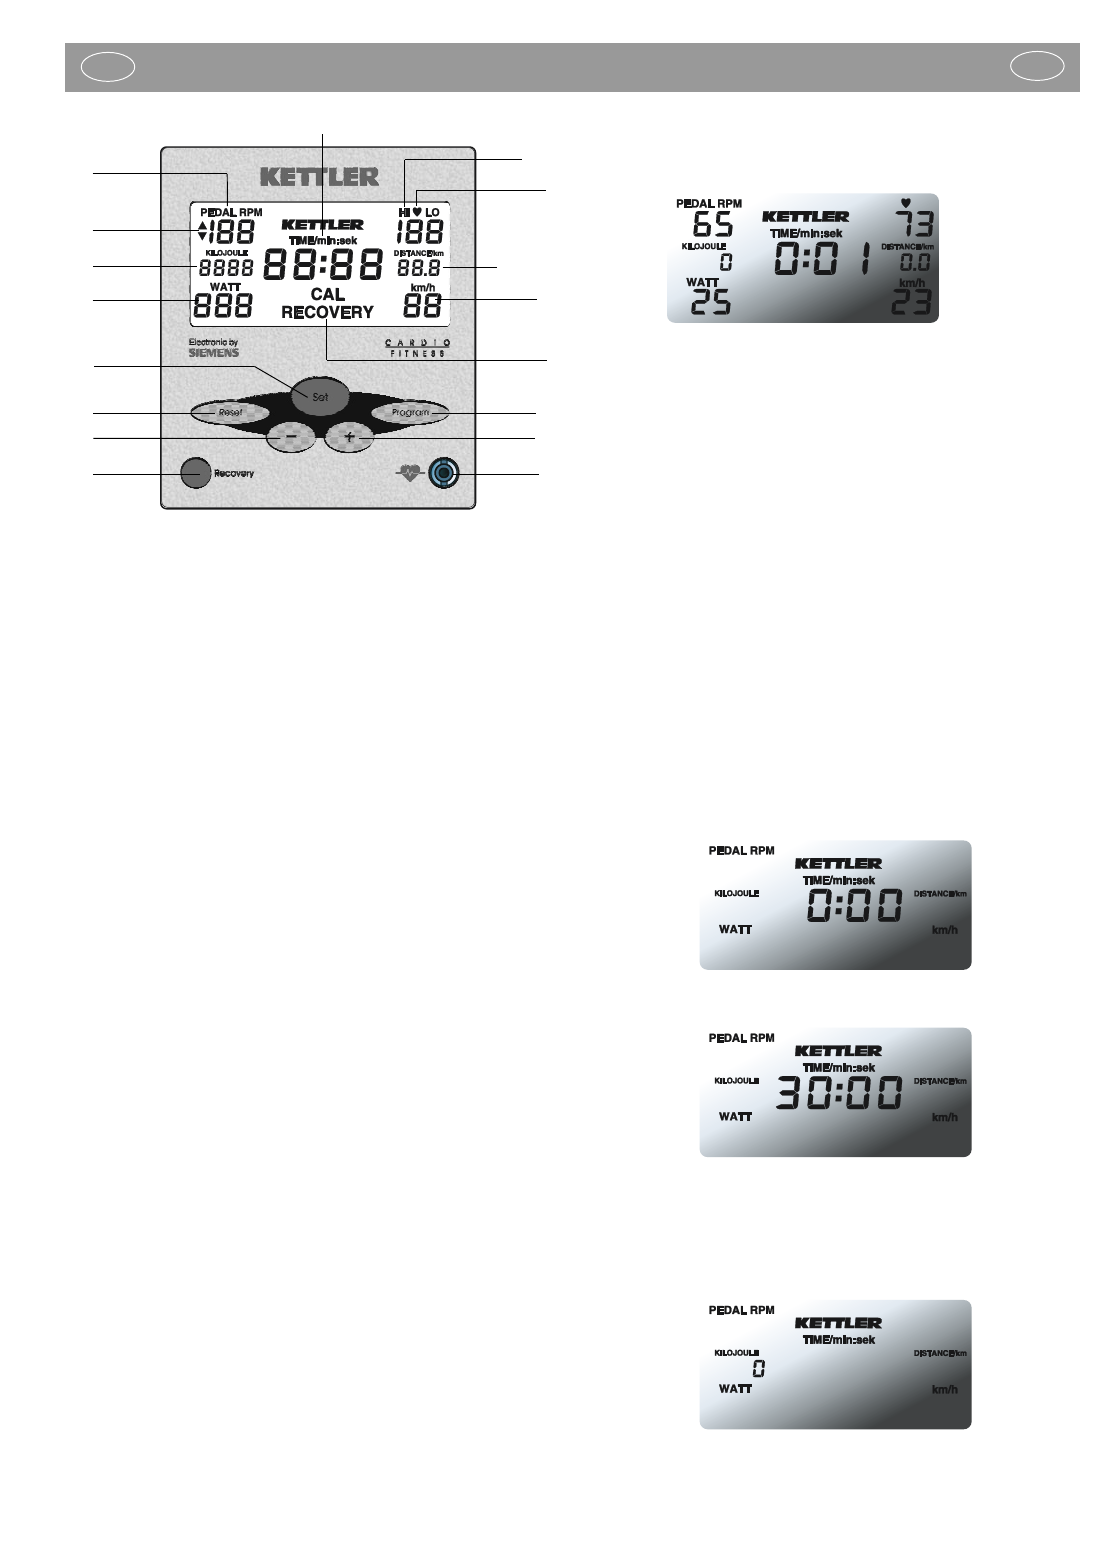
2 Features
1 Step frequency [PEDAL RPM]
2Time measurement [TIME/min. : sec.]
3Time count-down recovery pulse rate measurement
[0.60 – 0.00] [RECOVERY]
4 Pulse rate measurement
5 Pulse rate difference between loading and recovery pulse rates
6 Pulse rate-controlled program (©)
7Total kilometres (odo)
8Training distance (DISTANCE/km)
9 Fitness mark (F 1.0 – 6.0)
10 Speed (km/h)
11 Power (WATT),
12 Energy consumption (KILOJOULE)
13 Arrows (pointer to faster/slow stepping)
14 Key for input of training data (SET)
15 Key for adjusting training data (+) (increase number)
16 Key for adjusting training data (-) (reduce number)
17 Key for program selection
18 Key for recovery pulse rate measurement
19 Key for deleting training data
20 Pulse rate socket –connection for pulse rate receiver
21 Interface (RS 232) on the back) for ERGOKONZEPT PC soft
ware (Part no. 7926–000; training software is available as ac
cessory. Please consult your specialist dealer)
3 Input facilities
- Training time (in minutes)
- Energy consumption (in kilojoules)
- Training distance (in 0.5 km steps)
- Training pulse rate (90 – 189) with visual warning signal when rate is
above or below
- Initial power (stored – only in pulse rate-controlled program) See 5.3.3
4 Description of functions
4.1 Switching on
The display appears when the power supply is switched on, when any
key is pressed at the start of training (speed detection), or by activation
of the interface. An automatic segment test is carried out immediately af-
ter switching on (all segments displayed for two seconds). The segment
test can be repeated by pressing the ‚Delete‘ key. Total kilometres are then
shown with the legend ‚odo‘ for ten seconds. Pressing any key will remo-
ve the display.
If there is a malfunction, ‚CAL‘ also appears in the display. The el-
ectronic unit must then be returned to KETTLER for examination.
4.2 Switching off
Four minutes after the end of training (no speed, no key depressed), the
display is switched off automatically (standby mode).
4.3 Programs
The display computer includes three different programs (count-up mode,
input mode and pulse rate-controlled program).
4.3.1 Count-up mode
If training is started without any input, all data is displayed in ‚count-up
mode‘ (all values increase from 0).
Display directly after training starts. The heart symbol flashes in syn-
chronism with the pulse rate when there is a pulse signal (also applies to
all following illustrations in which the heart symbol is shown)
4.3.2 Input mode
When the ‚Program‘ key is pressed once, the display computer goes into
input mode. This is indicated by numbers appearing in the one area.
Inputs start with TIME and are carried out in the following sequence. TIME
> KILOJOULE > DISTANCE > PULSE > Training start.
The standard value in each case is zero or ‚- -‚ when values have not been
input previously. The display can be altered with the ‚+‘ and ‚-‚ keys. If
one of the two keys is pressed for longer than two seconds, numbers in
the corresponding area change more rapidly. If both keys are pressed at
the same time, the particular value reverts to zero. When the ‚Set‘ key is
pressed, the respective value is accepted and input moves to the next
area. Training can start when the training pulse rate is input and the ‚Set‘
key is pressed.
If there is no input to an area, this counts upwards during training. If no
value is input in any area, that computer starts in count-up mode when
training begins.
If one of the input parameters reaches the value zero, the corresponding
display flashes for five seconds and then continues to count up, taking into
account the counted-back input values.
4.3.2.1 Training time
The first input is the training time. Values are adjusted in minute steps
(when the key is kept pressed, in five minute steps) in the range from 0 -
99 minutes.
Display before input of training time
Display after input of a training time of 30 minutes
4.3.2.2 Energy consumption
The second input is the energy consumption in kilojoules. Inputs are made
in steps of 10, or 50 when the key is kept pressed, in the range from 0 -
9990 K.
Display before input of kilojoules
GB