510784
14
Zoom out
Zoom in
Previous page
1/132
Next page
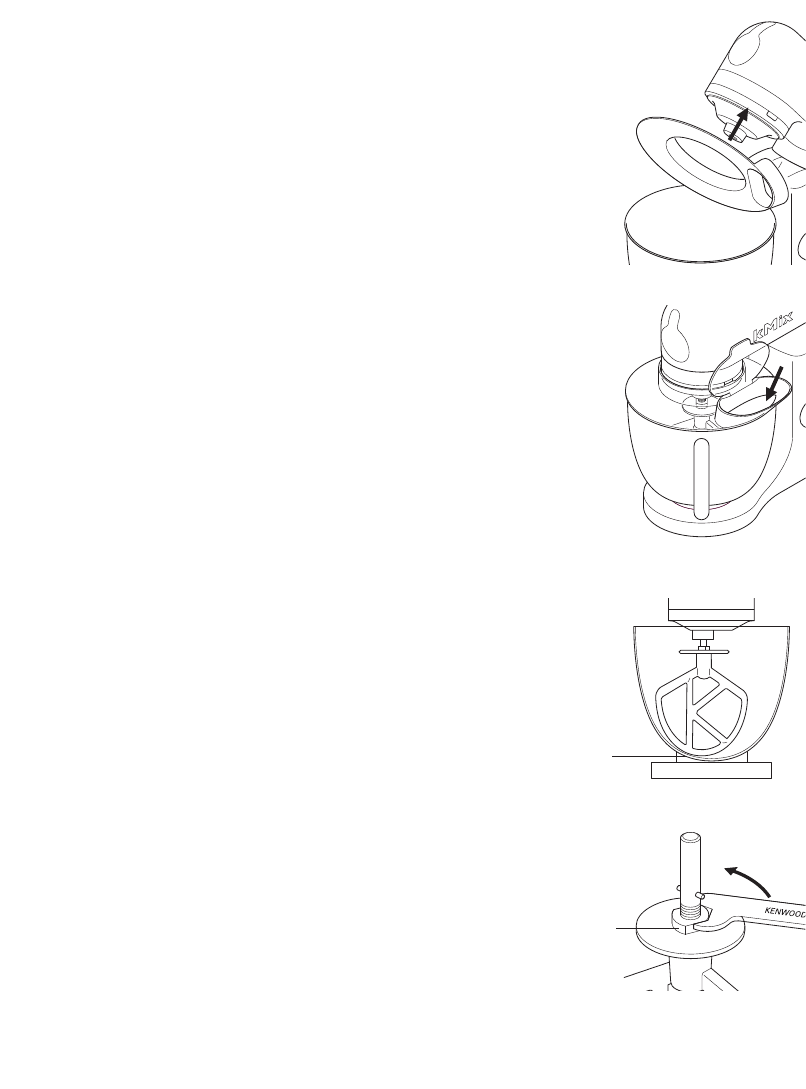
1 Breng de mixerkop omhoog totdat deze wordt vergrendeld.
2 Plaats de kom op het onderstel.
3 Monteer het spatdeksel onderaan de mixerkop , tot hij goed
vast zit. Het scharnier bevindt zich zoals op de afbeelding staat
aangegeven.
4 Monteer het gewenste hulpstuk.
5 Laat de mixerkop zakken.
Tijdens het mixen kunt u ingrediënten rechtstreeks aan de kom
toevoegen via het scharnierende deel van de spatbescherming .
U hoeft het spatdeksel niet te verwijderen om van hulpstuk te
wisselen.
6 Verwijder het spatdeksel door de mixerkop omhoog te halen en
het deksel ervanaf te trekken.
oplossen van problemen
probleem:
De garde of de K klopper slaat tegen de bodem van de kom of
reikt niet tot aan de ingrediënten op de bodem van de kom.
oplossing
Stel de hoogte met de meegeleverde moersleutel bij. Ga als volgt
te werk:
1 Haal de stekker uit het stopcontact.
2 Breng de mixerkop omhoog en breng de garde of klopper aan.
3 Laat de kop weer zakken. Als de tussenruimte moet worden
aangepast, tilt u de mixerkop op en verwijdert het hulpstuk.
Voor de beste prestaties moet de klopper of de K klopper de
bodem van de kom bijna aanraken .
4 Gebruik de meegeleverde sleutel om de moer voldoende
los te draaien en de steel bij te stellen . Om het hulpstuk
dichter bij de bodem van de kom te krijgen, draait u de steel
naar links. Om het hulpstuk verder van de bodem van de kom
te verwijderen, draait u de steel naar rechts.
5 Draai de moer weer vast.
6 Zet het hulpstuk in de mixer en laat de mixerkop zakken.
(Controleer de positie, zie bovenstaande punten).
7 Herhaal zo nodig de bovengenoemde stappen tot het hulpstuk
zich in de juiste positie bevindt. Vervolgens draait u de moer
goed vast.
deeghaak dit hulpstuk is in de fabriek ingesteld en hoeft
verder niet te worden aangepast.
aanbrengen en gebruik van het
spatdeksel
13
14


Need help? Post your question in this forum.

Forumrules


Report abuse

Libble takes abuse of its services very seriously. We're committed to dealing with such abuse according to the laws in your country of residence. When you submit a report, we'll investigate it and take the appropriate action. We'll get back to you only if we require additional details or have more information to share.

Product:

For example, Anti-Semitic content, racist content, or material that could result in a violent physical act.

For example, a credit card number, a personal identification number, or an unlisted home address. Note that email addresses and full names are not considered private information.

Forumrules

To achieve meaningful questions, we apply the following rules:

Register

Register getting emails for Kenwood Kmix54 at:


You will receive an email to register for one or both of the options.


Get your user manual by e-mail

Enter your email address to receive the manual of Kenwood Kmix54 in the language / languages: English, German, Dutch, Danish, French, Italian, Polish, Portuguese, Swedish, Turkish, Spanish, Norwegian, Finnish as an attachment in your email.

The manual is 1,74 mb in size.


You will receive the manual in your email within minutes. If you have not received an email, then probably have entered the wrong email address or your mailbox is too full. In addition, it may be that your ISP may have a maximum size for emails to receive.

The manual is sent by email. Check your email

If you have not received an email with the manual within fifteen minutes, it may be that you have a entered a wrong email address or that your ISP has set a maximum size to receive email that is smaller than the size of the manual.

The email address you have provided is not correct.

Please check the email address and correct it.

Your question is posted on this page

Would you like to receive an email when new answers and questions are posted? Please enter your email address.


Info