771474
15
Zoom out
Zoom in
Previous page
1/48
Next page
5.3.1 Verplaatsen en installeren
Wees voorzichtig wanneer u het toestel optilt met de band.
Het zwaartepunt bevindt zich niet altijd in het midden.
Pak de inlaat van het buitentoestel niet beet om vervorming te
vermijden.
Raak de ventilator niet aan met de handen of met andere
voorwerpen.
Houd het toestel niet onder een hoek van meer dan 45° en leg
het niet plat op de vloer.
Zorg voor een betonnen fundering om het buitentoestel op
vast te zetten.
Zet de poten van het toestel met bouten stevig vast om te
voorkomen dat het bij harde wind of aardbevingen kan
omvallen
0
0
6
>
Zet met bouten vast
OPMERKING:
De afbeeldingen in deze handleiding zijn uitsluitend bedoeld ter
verduidelijking. De airconditioner die u hebt aangeschaft kan er
enigszins anders uit zien (afhankelijk van het model). Ga altijd uit
van het door u gekochte model.
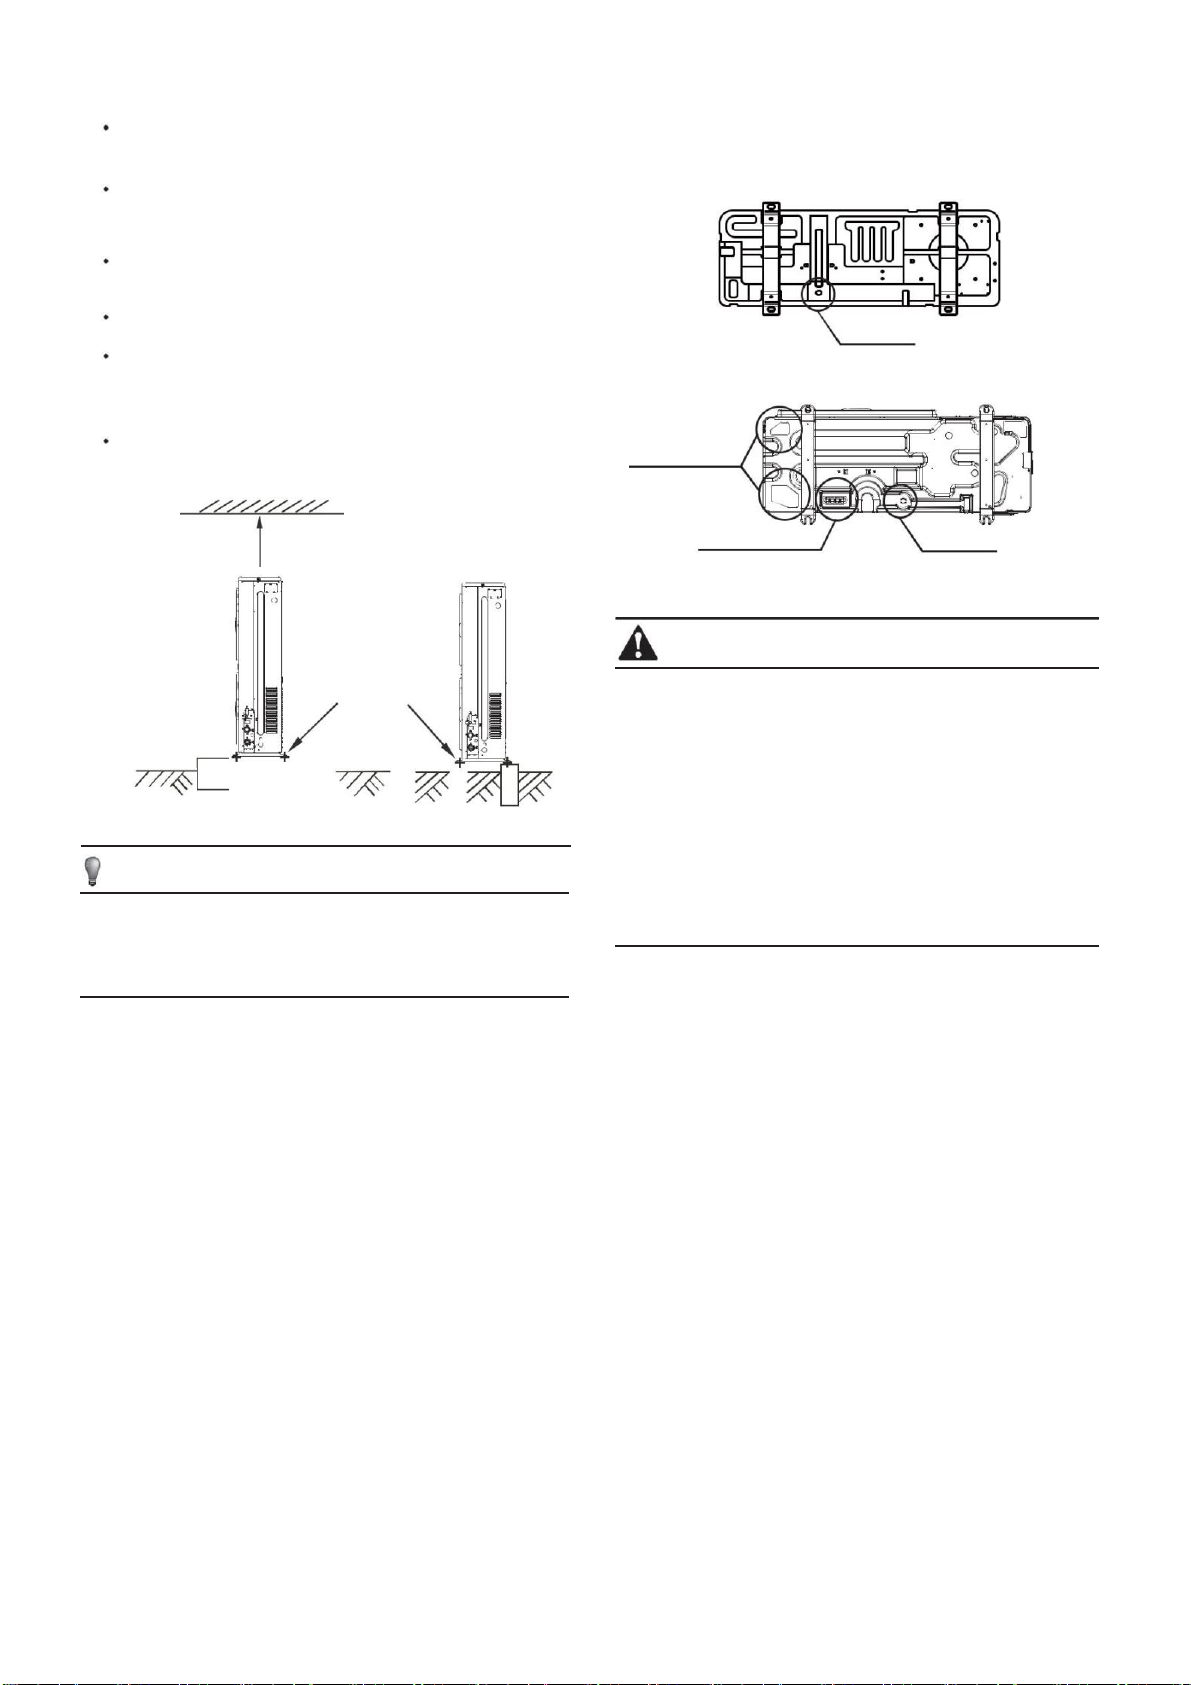
5.3.2 Wateruitlaat
De condensatiewateruitlaten op de chassis voor de selectie
zoals getoond in onderstaande afbeelding:
5/7kW
Wateruitlaat
10~16kW
Uitlaat reservewater.
(Moet worden opengetikt)
Uitlaat reservewater.
Wateruitlaat
(Met rubberen stop)
LET OP
Let bij het installeren van het buitentoestel op de plaats van
installatie en het afvoerpatroon.
Als het toestel geïnstalleerd is in een gebied met extreem lage
temperaturen, kan het bevroren condenswater de wateruitlaat
blokkeren. Trek dan de rubberen stop uit de reserve wateruitlaat
(10~16kW). Als dat niet helpt om het water af te voeren, tik dan de
andere wateruitlaten (10~16kW) open en zorg ervoor dat het water
tijdig kan worden afgevoerd.
Let er op dat de reservewateruitlaat van buiten naar binnen moet
worden opengetikt, zodat het later hersteld kan worden. Kies de
installatieplaats waar water geen overlast kan geven.
Zorg ervoor dat er geen motten of andere insecten in het gat
komen, deze kunnen de interne componenten beschadigen.
13
15


Need help? Post your question in this forum.

Forumrules


Report abuse

Libble takes abuse of its services very seriously. We're committed to dealing with such abuse according to the laws in your country of residence. When you submit a report, we'll investigate it and take the appropriate action. We'll get back to you only if we require additional details or have more information to share.

Product:

For example, Anti-Semitic content, racist content, or material that could result in a violent physical act.

For example, a credit card number, a personal identification number, or an unlisted home address. Note that email addresses and full names are not considered private information.

Forumrules

To achieve meaningful questions, we apply the following rules:

Register

Register getting emails for Kaysun KEM-12 DTN at:


You will receive an email to register for one or both of the options.


Get your user manual by e-mail

Enter your email address to receive the manual of Kaysun KEM-12 DTN in the language / languages: Dutch as an attachment in your email.

The manual is 5.18 mb in size.


You will receive the manual in your email within minutes. If you have not received an email, then probably have entered the wrong email address or your mailbox is too full. In addition, it may be that your ISP may have a maximum size for emails to receive.

Others manual(s) of Kaysun KEM-12 DTN

Kaysun KEM-12 DTN User Manual - English - 48 pages


The manual is sent by email. Check your email

If you have not received an email with the manual within fifteen minutes, it may be that you have a entered a wrong email address or that your ISP has set a maximum size to receive email that is smaller than the size of the manual.

The email address you have provided is not correct.

Please check the email address and correct it.

Your question is posted on this page

Would you like to receive an email when new answers and questions are posted? Please enter your email address.


Info