INSTRUCTIONS
CD PORT
RC-EX26B
Thank you f
Please read these instructions carefully before starting operation to be
sure to obtain optimum performance and a longer service life from the
unit.
LVT1382-010A [E/EN]
0205NSMBICORI
EN ©2005
SAFETY PRECA
Caution –– ST
Disconnect the mains plug to shut the power off completely
ST
position does not disconnect the mains line.
CA
To reduce the risk of electr
1. Do not remove scre
2. Do not expose this appliance to r
IMPORT
1. CLASS 1 LASER PRODUCT
2.
CA Do not open the top co
unit;
3. CA Visib
defeated.
4. REPRODUCTION OF LABEL:
CAUTION - INVISIBLE LASER RADIA
DEFEA
VORSICHT ! UNSICHTBARE LASERSTRAHLUNG TRITT AUS, WENN DECKEL
GEÖFFNET UND WENN SICHERHEITSVERRIEGELUNG
ÜBERBRÜCKT IST
VARNING - OSYNLIG LASERSTRÅLNING NÄR DENNA DEL ÄR ÖPPNAD OCH
SPÄRR ÄR URKOPPLAD STRÅLEN ÄR FARLIG.
ADVARSEL - USYNLIG LASERSTRÅLING VED ÅBNING NÅR
SIKKERHEDSAFBRYDERE ER UDE AF FUNKTION. UNDGÅ
UDSÆTTELSE FOR STRÅLING.
Caution:
To avoid risk of electric shock and fire
1Front:
No obstructions and open spacing.
2 Sides/ T
No obstructions should be placed in the areas shown b
3 Bottom:
Place on the lev
with a height of 10 cm or more.
15 cm 15 cm
15 cm
10 cm
15 cm
15 cm
15 cm
10 cm
Front view
Side view
FIRST THINGS
This por
FM telecscopic antenna
BEA
Battery compartment
PHONES jack
AC outlet
Supplied power cord
INSERTING BA
1 Open the battery compar
Pull the battery compar
2 Insert six R20 (SUM-1)/D (13D)-size batteries. (not supplied)
Be sure to inser
3 Replace the battery compar
Inserting Batteries into the Remote Control Unit:
Match the polarity (+ and –) of the batteries. R03 (UM4)/AAA (24F) × 2 (supplied)
Note: The battery power will be switched off when you plug the power cord into the
Ó
Ó
Ó AC
IN jack on the unit.
CAUTION:
Toavoid battery leakage or e
• If you are not going to use y
compartment.
• Dispose of batteries in the proper manner
• Do not mix with different battery types or with new and old ones
battery not intended to be recharged.
• Discard leaky batteries immediately
SUPPRLYING AWER
Plug the power cord into the Ó AC IN jac
Note:
CAUTIONS:
1. ONL
D
2. BE SURE
THE UNIT IS NO
USING HEADPHONES
Connect commercially available headphones to the PHONES jack on the rear of the main unit. While the
headphones are connected, the speakers do not produce any sound. Before connecting the headphones,
make sure to turn down the sound volume.
ANTENNAS
The AM antenna is built in, so adjusting the position of the unit ma
antenna on the back of the unit can be extended and rotated for better FM reception.
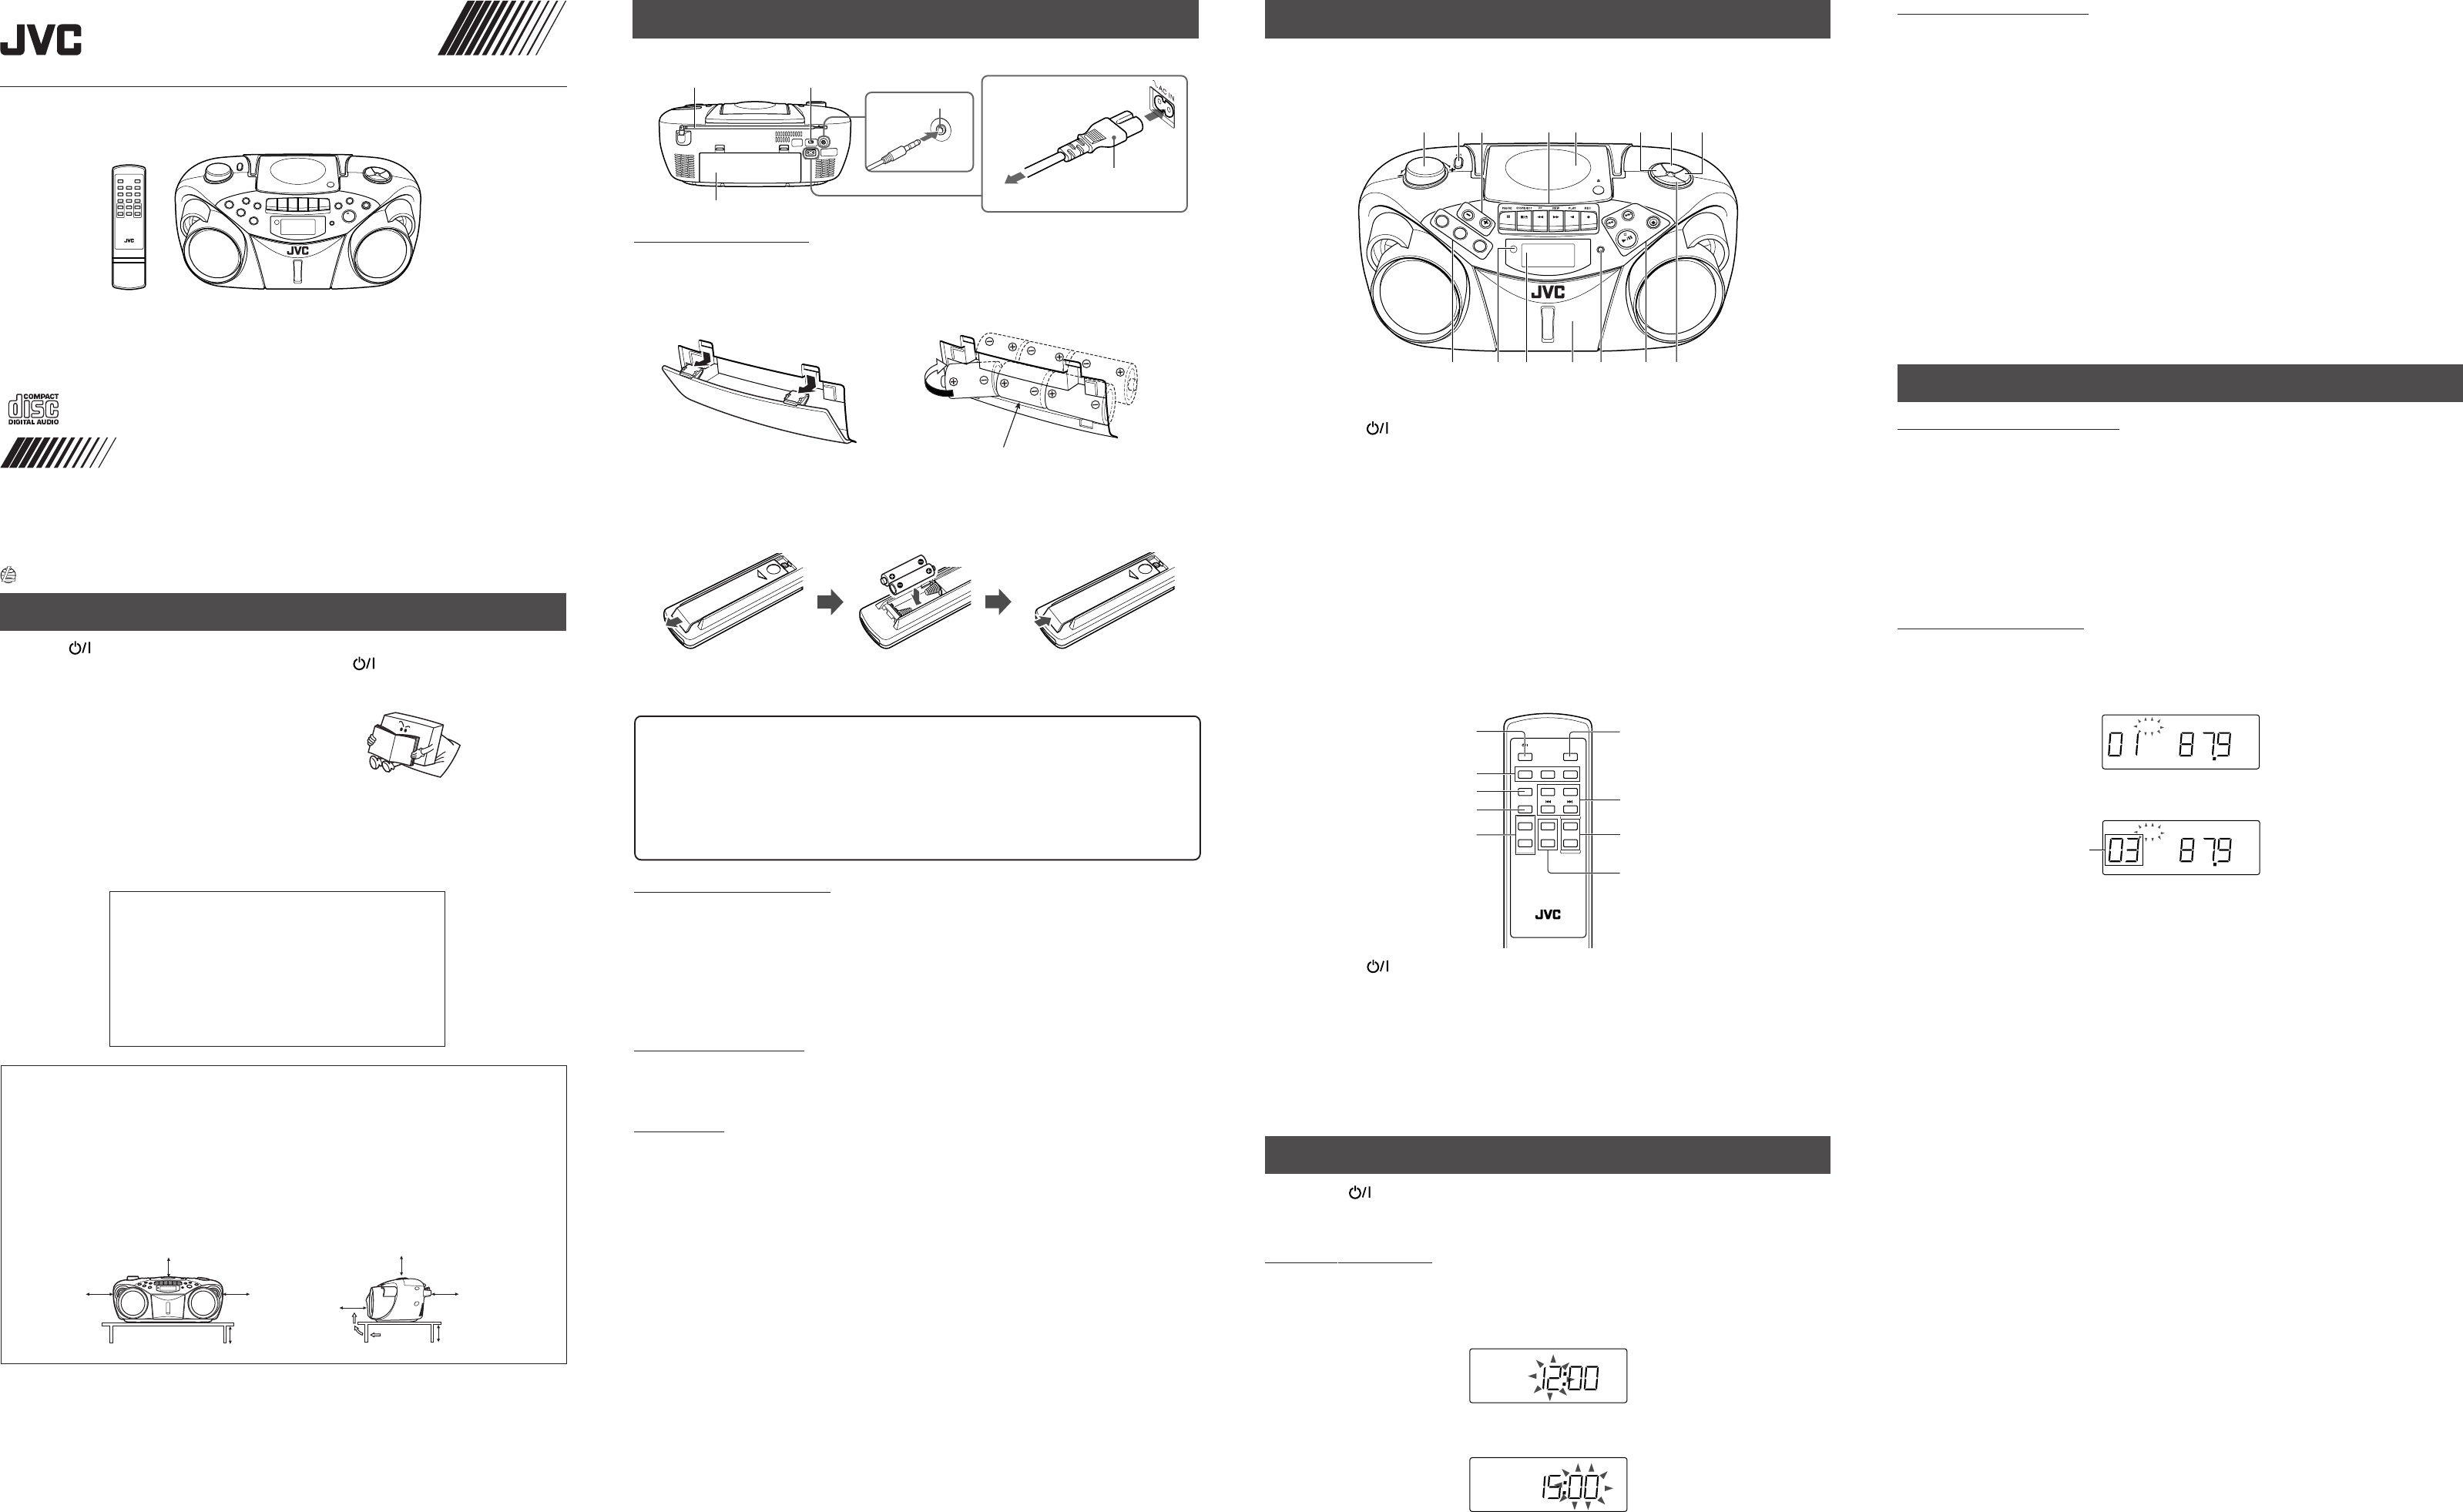
NAMES OF P
Top and fr
Main unit
PUSH
STAN
DBY/ON
PLAY/P
STO
P
DISPLAY
TAPE
RANDOM
PRESET
CD R
EPEAT
CD
BAND
REMOTE
SENSOR
MUTING
FM
M
OD
E
PR
OG
RAM
/
CLOCK
SET
HB
S/
P
RESE
T E
Q
1 2
9 11 13
4 6 7 8
14 15
1 VOLUME knob
2SANDBY/ON
button
3 PRESET – button
PRESET + / CD REPEA
4Tape operation b
PAUSE 8 b
ST§ button
FF 1 button
REW ¡ button
PLA2 button
REC ÷ b
5 CD door
6 FM MODE button
7 MUTING button
8POGRAM/CLOCK SET button
Names of buttons:
Remote control unit
CD/
RANDOM
TAP E
FM MODE
INTRO STOP
HBS/
PRESET EQ
MUTING
STANDBY/ON DISPLAY
+
VOLUME
–
TUNER/
BAND
CD PLAY
/PA
+
–
CD REPEAT/
1SANDBY/ON button
2 CD/RANDOM button
TUNER/BAND button
TAPE button
3 INTRO button
4 FM MODE button
5 PRESET + /CD REPEA
PRESET – button
GENERAL CONTROLS
ST - Press to turn on/off the unit.
The displa
light ev
SETTING
1 Press DISPLA
The clock flashes on the displa
2 Press and hold PROGRAM/CLOCK SET f
The hour digits start flashing.
3 Press 4 or ¢ to adjust the hour
The minute digits start flashing.
4 Press 4 or ¢ adjust the minutes, then press PR
Notes:
• If there is a po
flashing until y
•You can also set the cloc
step 2.
To show the c
Press DISPLA
Each time you press the b
(Operating the unit while clock indication is displa
ADJUSTING
Tu rnthe
the volume to desired le
•Turning off the sound temporarily
During playbac
window
• Reinforcing the bass sound
Press and hold HBS/PRESET EQ so that the HBS indicator appears in the displa
enjoy po
• Selecting the sound mode
You can select one of the 5 preset sound modes.
Press HBS/PRESET EQ repeatedly until the indicator for the sound mode you want appears in the
displa
CLASSIC: Enriched sound with fine treble and ample bass.
ROCK : Pow erful sound emphasizing treble and bass.
POP : More presence in the vocals and midrange.
JAZZ : Accented lo
FLA Equalizer eff
USING THE
TUNING IN RADIO ST
1 Press
2 Press
3 Press and hold 4 or ¢ for more than 1 second.
The unit star
If you press 4 or ¢ briefly and repeatedly
Changing the FM reception mode
When an FM stereo broadcast is hard to receiv
appears in the displa
To restore the stereo eff
The MONO will be cancelled also when changing the station.
PRESETTING STA
You can preset 10 FM and 10 AM stations.
1 Press
2 Press 4 or ¢ to tune in the station you want to preset.
3 Press PROGRAM/CLOCK SET
The PROG indicator starts blinking in the displa
4 Press PRESET + /CD REPEA
is blinking.
5 Press PROGRAM/CLOCK SET while the PR
The tuned station in step 2 is stored in the preset number selected in step 4.
used number erases the pre
6 Repeat steps 2 to 5 to preset other stations
T
1 Press
2 Press PRESET + /CD REPEA
Notes:
• In some cases
the tuner preset function before shipment.
want into memory by follo
• If y
days. If this happens, preset the stations again.
9TAPE button
CD/RANDOM button
TUNER/BAND button
10 REMOTE SENSOR
11 Display window
12 Cassette deck
13 DISPLA
14 4 button
¢ button
PLA6
ST7
15 HBS/PRESET EQ button
6 DISPLA
7SOP button
CD PLA
4 button
¢ button
8 VOLUME + button
VOLUME – button
9 HBS/PRESET EQ button
MUTING button
Preset number
R20 (SUM-1)/D (13D)-size batteries
ENGLISH
RC_EX26B[EEN].p65 05.5.17, 8:09 PM