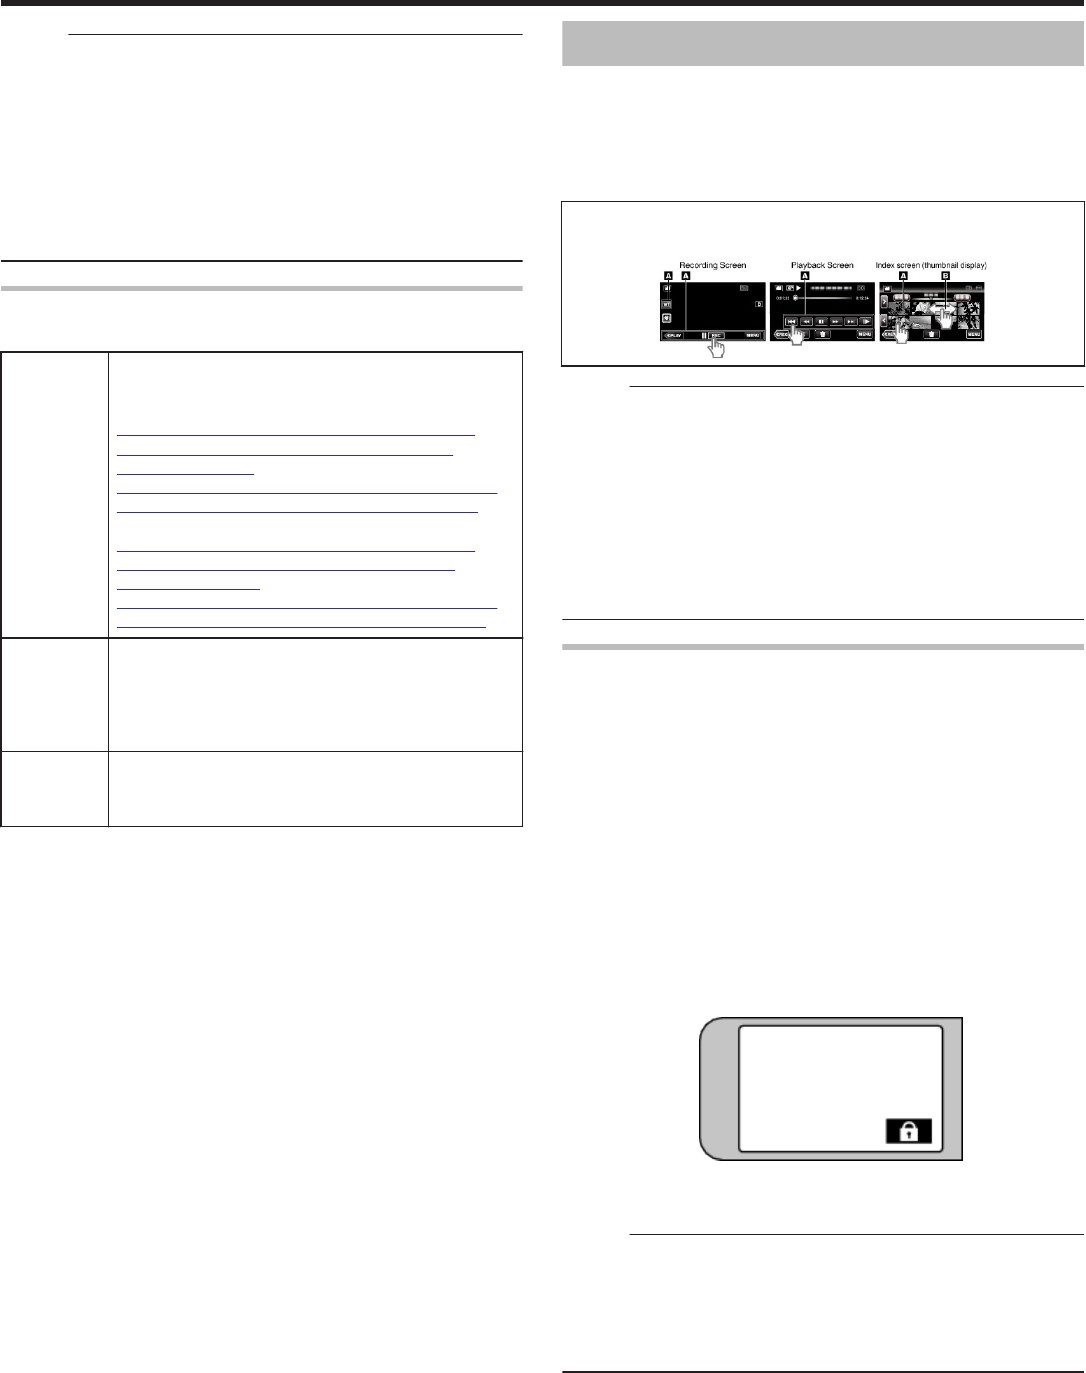
The LCD monitor of this unit is a touch panel which enables operations by
touching the screen with your finger.
The operation buttons, thumbnails, and menu items are displayed on the
screen according to each mode (recording/playback/setting).
0
There
are two ways to operate the touch screen, namely “tap” and “drag”.
The following are some examples.
A
Tap the button (icon) or thumbnail (file) on the screen to make a selection.
B Drag the thumbnails on the screen to search for the desired file.
.
Memo :
0
The
touch screen of this unit is pressure-sensitive. When the touch screen
does not respond smoothly, apply slightly more force to your fingertip.
0
Do not press or rub with excessive force.
0
Do not operate the touch screen using an object with a sharp tip.
0
Perform “TOUCH SCREEN ADJUST” if the reactive area of the screen is
misaligned with the touched area.
“Adjusting the Touch Screen” (A p. 11)
0
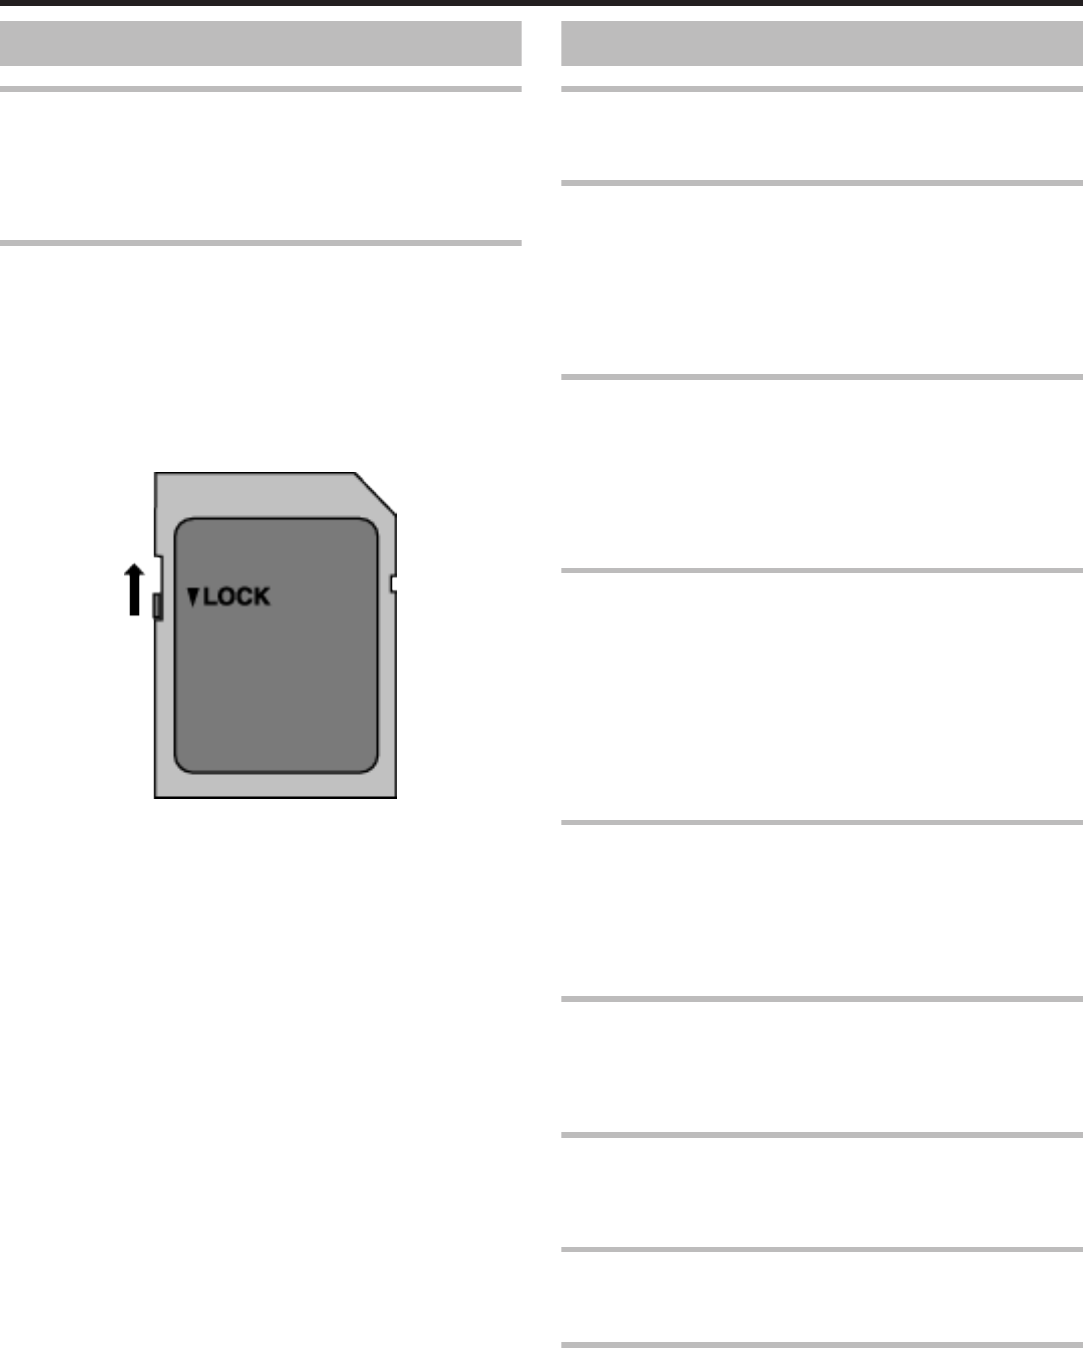
You cannot operate the touch screen under water. Lock the screen to
prevent operation errors.
“Shooting under Water” (A p. 33)
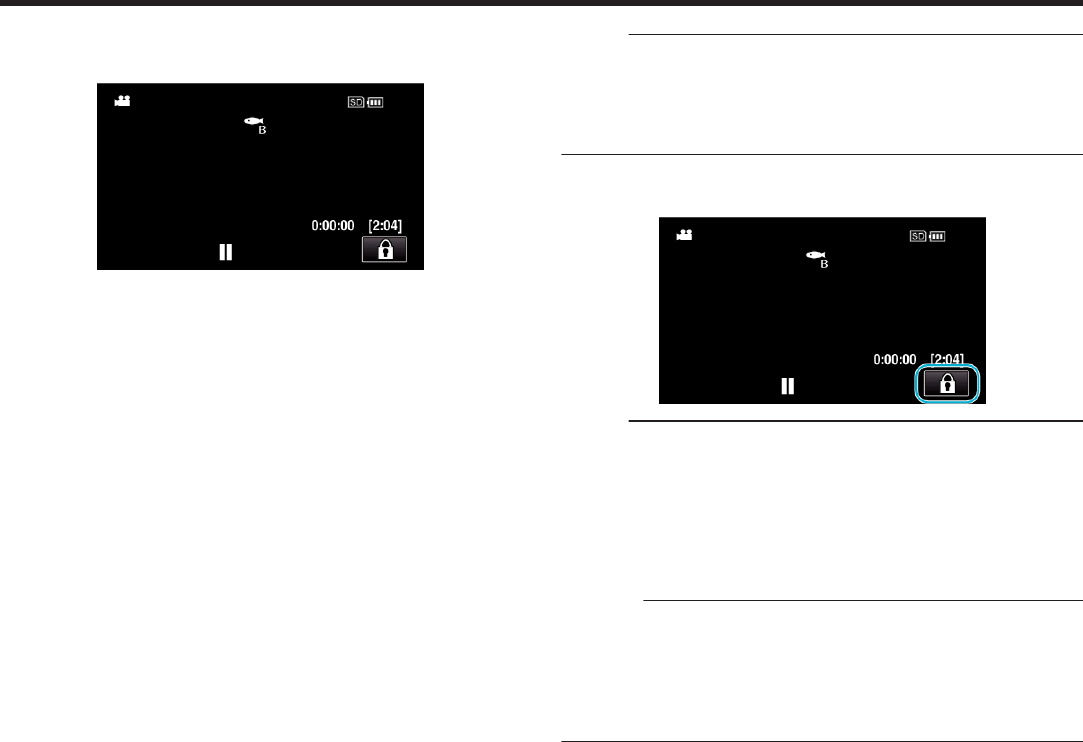
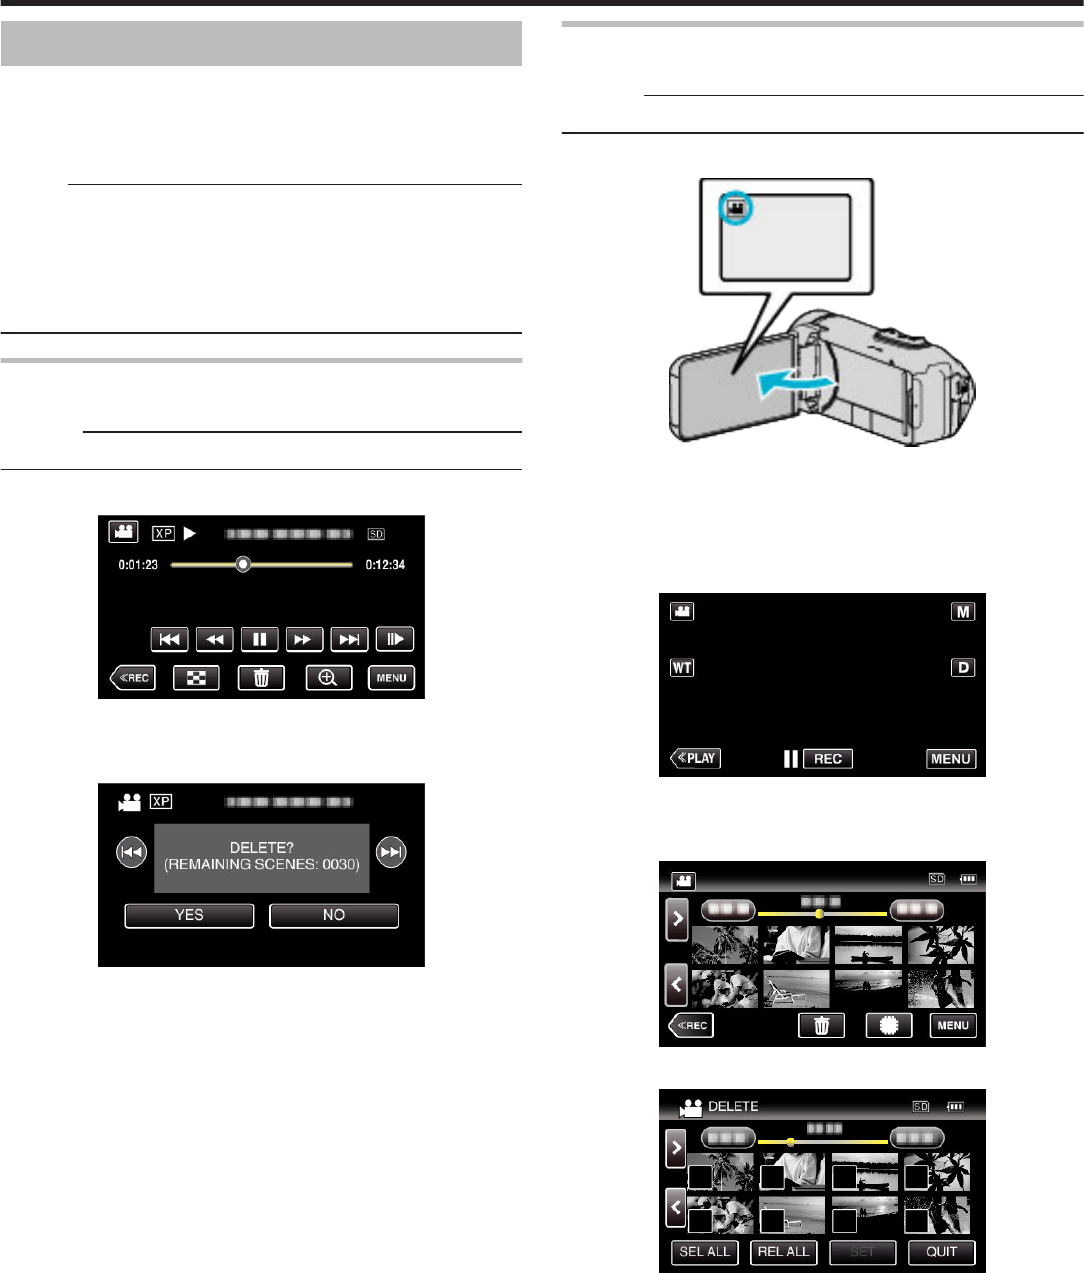
Locking the Screen (when Shooting Underwater)
Lock the screen before using this unit underwater to prevent operation errors
on the touch screen due to water pressure.
0
Once the screen is locked, operations on the touch screen except L are
disabled.
0
The START/STOP (recording) button and the zoom lever can be used
while the screen is locked.
0
You can set for both video and still image modes.
0
If “SCREEN LOCK” has been set, it will take a longer time for the unit to
power off after closing the LCD monitor.
o
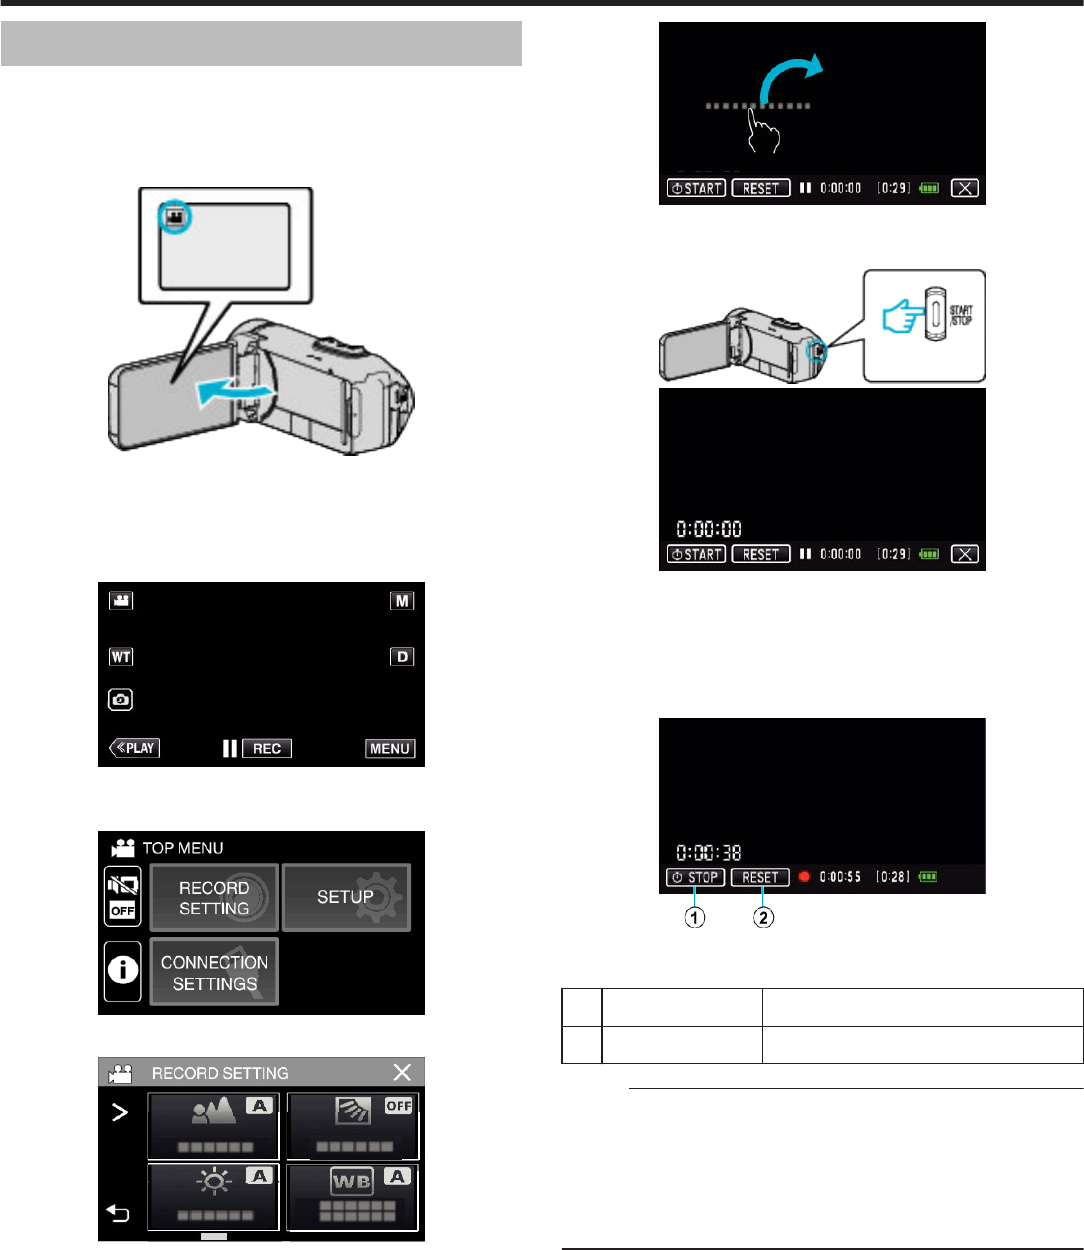
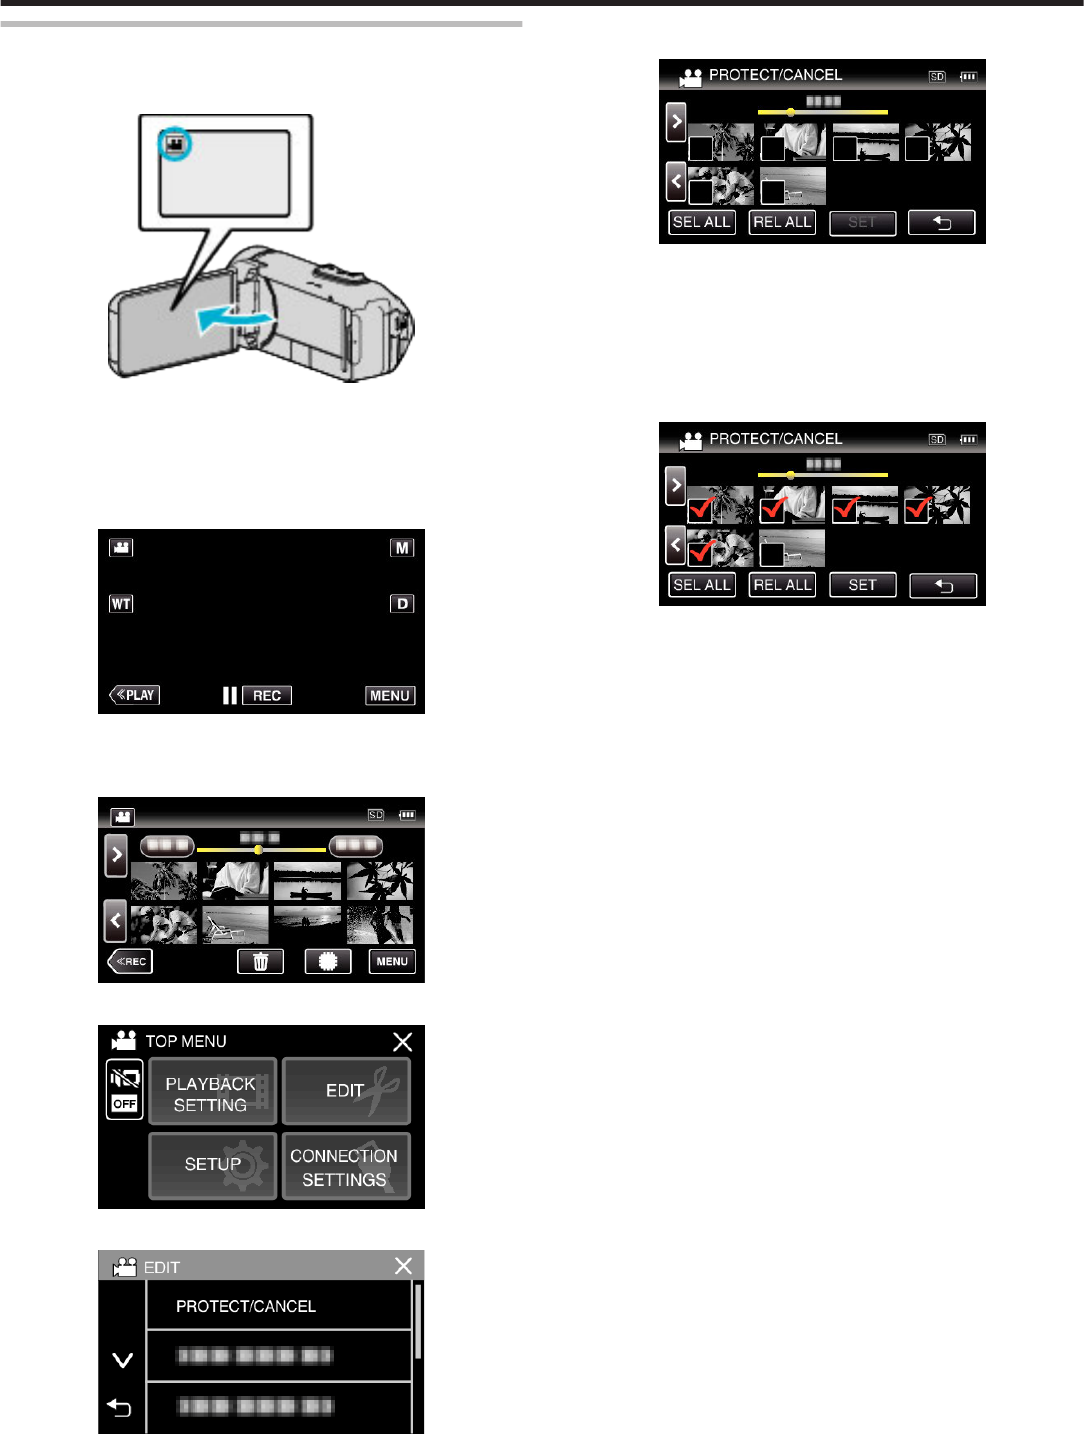
Setting the “SCREEN LOCK”
A
Check that the unit is in the recording mode.
B
Tap “MENU”.
C
Tap “RECORD SETTING”.
D
Tap “SCREEN LOCK”.
0
The L button appears on the screen.
.
o
To cancel “SCREEN LOCK”
Tap the L
button.
Memo :
0
Once
“SCREEN LOCK” is set, only the L button on the touch screen can
be operated.
0
“SCREEN LOCK” cannot be set for the following cases:
- during recording
- when “TIME-LAPSE RECORDING” or “DATE/TIME RECORDING” has
been set
Getting Started
10
Adjusting the Touch Screen
Adjust the response position when the touch screen is touched.
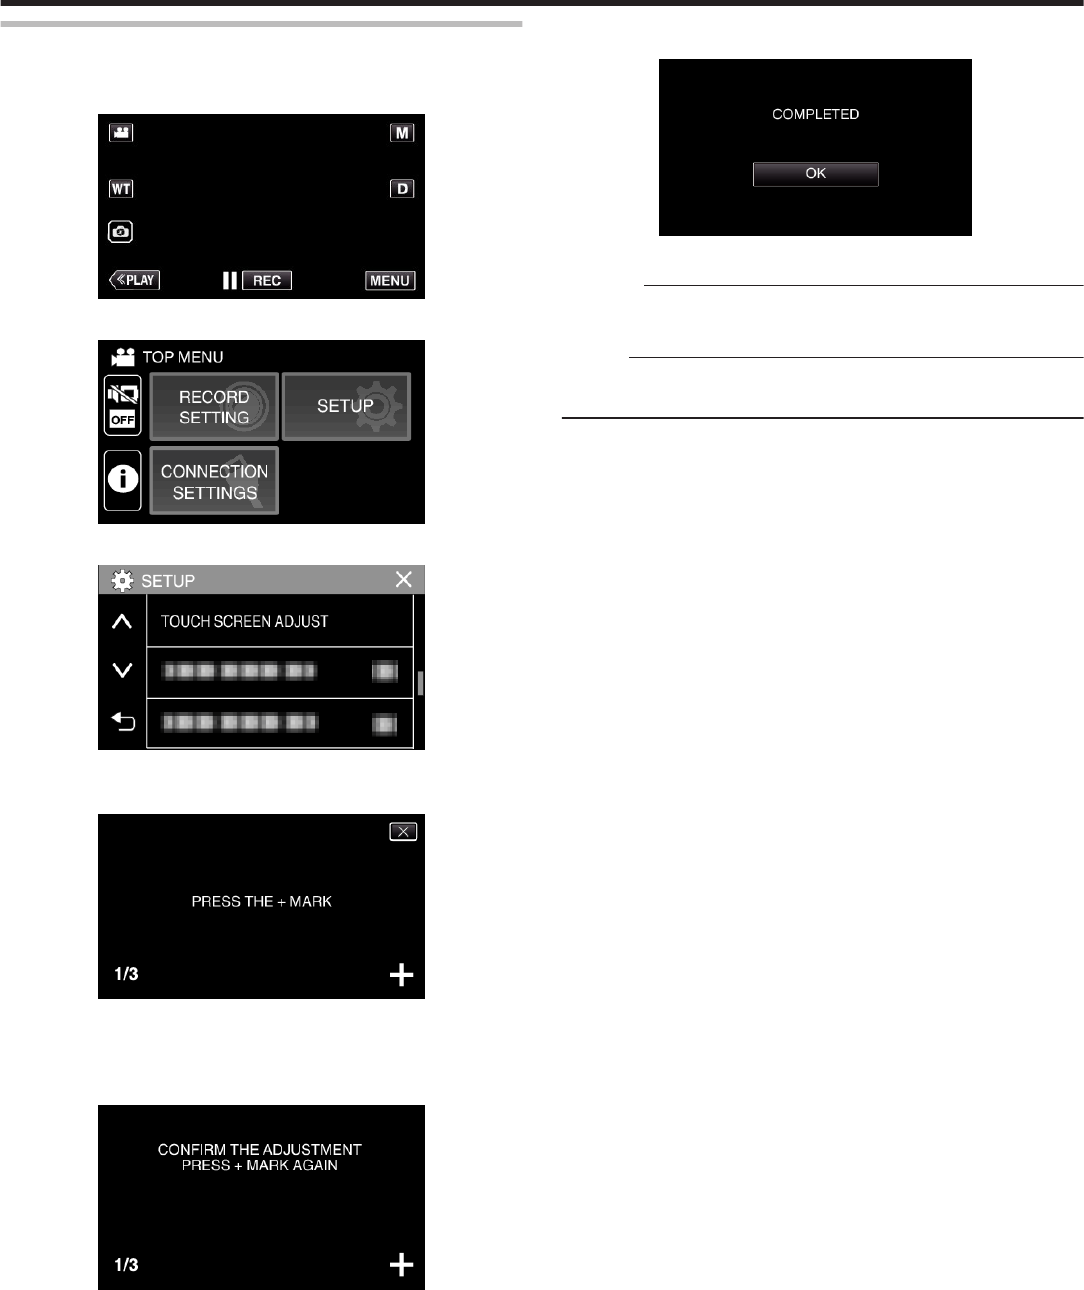
1
Tap “MENU”.
.
2
Tap “SETUP”.
.
3
Tap “TOUCH SCREEN ADJUST”.
.
0
The touch screen adjustment screen appears.
4
Tap “+”. (3 times in total)
.
0
Keep tapping “+” as its position changes with every tap.
0
If areas other than the “+” mark are tapped, errors will occur. Make
sure to tap the “+” mark.
5
Tap “+” again to confirm the adjusted positions. (3 times in total)
.
0
Keep tapping “+” as its position changes with every tap.
6
Tap “OK”.
.
0
Setting ends and returns to the menu screen.
Caution :
0
Do not tap areas other than the “+” mark during touch screen adjustment
(steps 4 - 5). Doing so may cause the touch screen to malfunction.
Memo :
0
Adjust by lightly tapping with a corner of an SD card, etc.
0
Do not press with an object with a sharp tip or do not press hard.
Getting Started
11
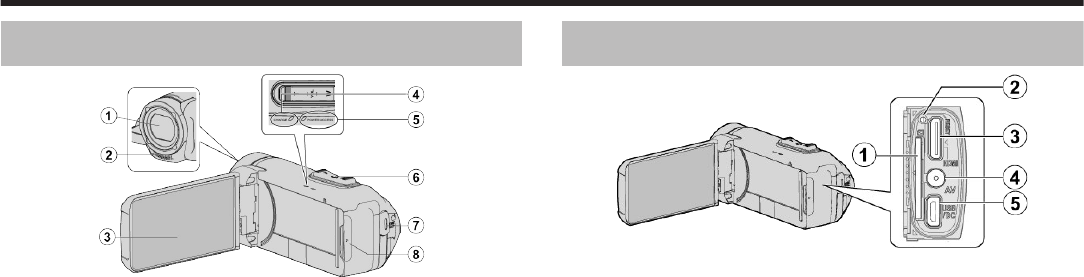
Names of Buttons and Functions on the LCD Monitor
The following screens are displayed during A
video and B still image
modes.
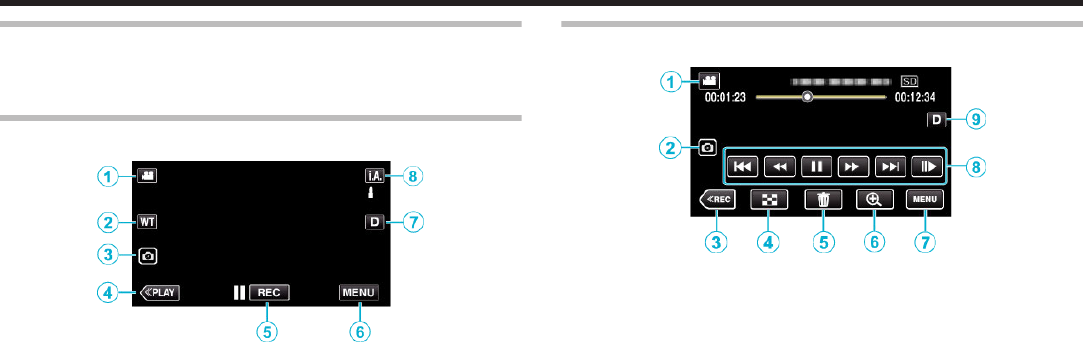
Recording Screen (Video/Still Image)
.
1
A/B (Video/Still Image) Mode Button
0
Switches between A video and B still image modes.
2
Zoom Button
“Zooming” (A p. 26)
3
Still Image Recording Button
0
Records still images during video recording.
“Capturing Still Images During Video Recording” (A p. 23
)
4
Playback Mode Button
0
Switches to the playback mode.
5
Recording Start/Stop Button
0
6: Video Recording Start Button
0
7: Video Recording Stop Button
6
Menu Button
“Operating the Menu” (A p. 85)
7
Display Button
Switches the display between full (m) and simple (n) with every tap of
the button.
0
Simple display: Some displays disappear automatically when the
screen is not operated.
0
Full display: Displays everything. The display button changes from n
to m.
0
When the power is turned off, the display setting will revert to simple
display (n).
8
Recording Mode Button
Switches the recording mode (P Intelligent Auto/H Manual).
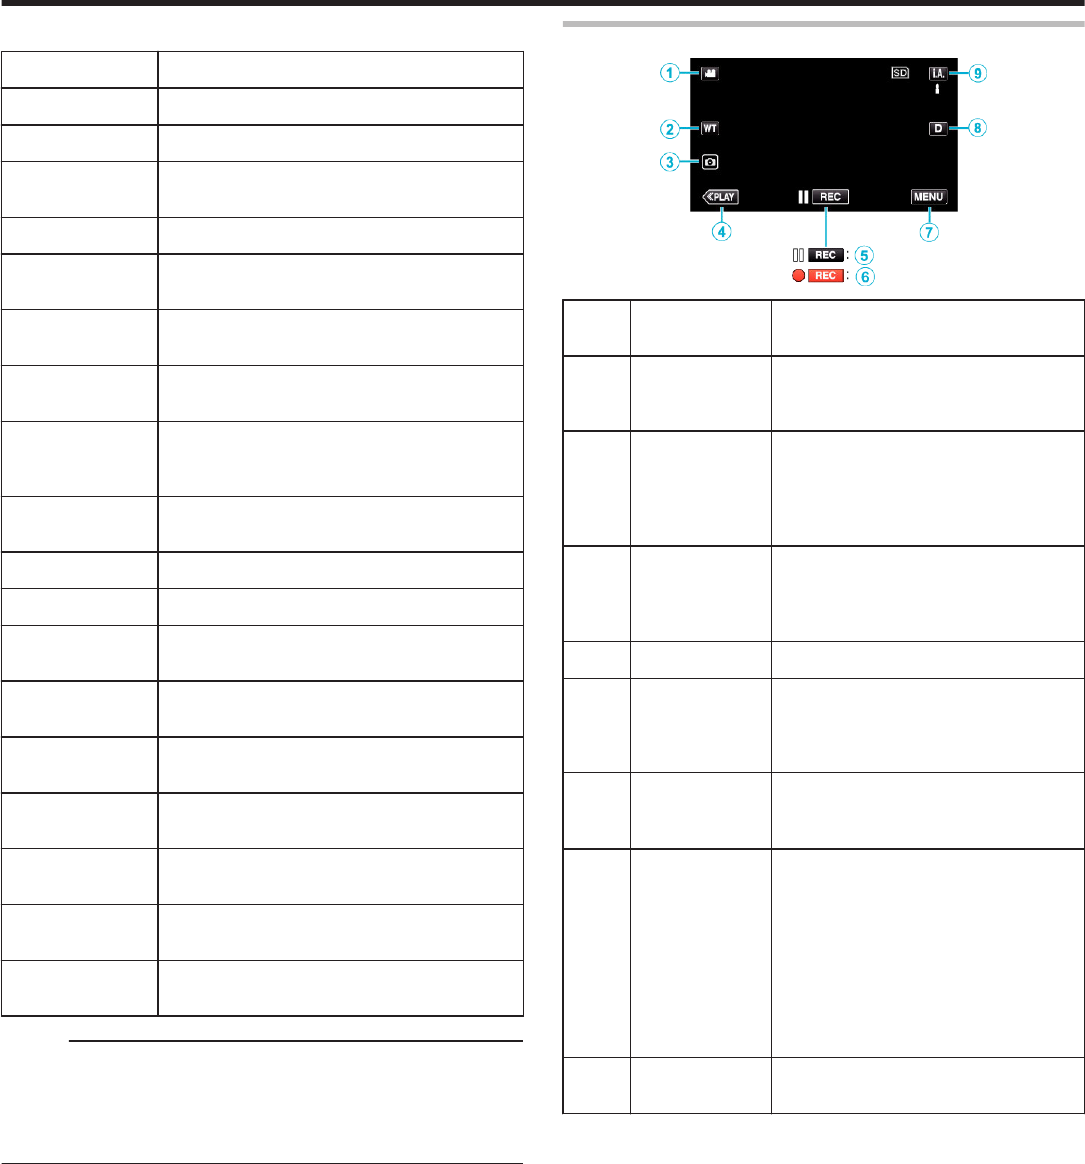
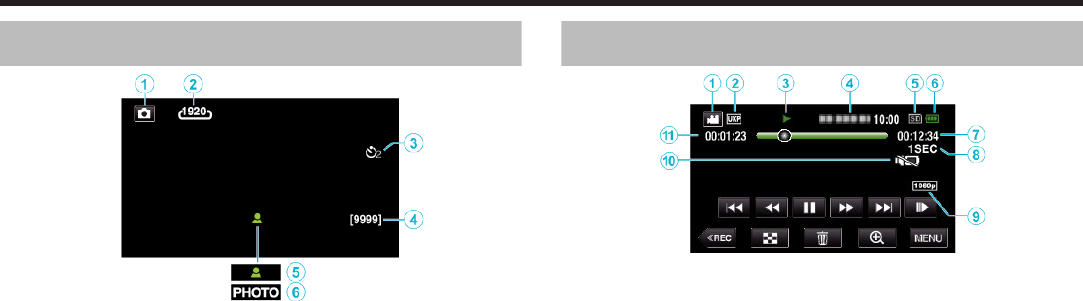
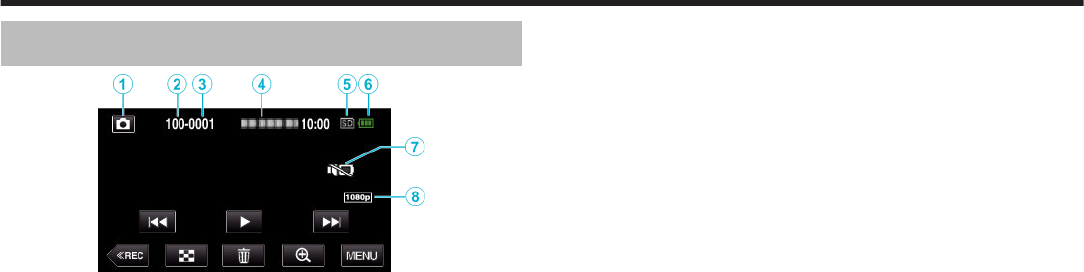
Playback Screen (Video)
.
0
When this unit is not operated for a certain period of time, the operation
buttons on the LCD monitor disappear automatically. Tap on the screen
to display the operation buttons again.
1
A/B (Video/Still Image) Mode Button
0
Switches between A video and B still image modes.
2
Video Scene Capture Button
0
Displayed when playback is paused.
0
Saves one scene of the video being played back as a still image.
3
Recording Mode Button
0
Switches to the recording mode.
4
Index Screen (Thumbnail Display) Button
0
Returns to the index screen (thumbnail display).
“Operation Buttons for Video Playback” (A p. 51
)
5
Delete Button
“Deleting the Currently Displayed File” (A p. 63)
6
Playback Zoom Button
0
Enlarges the video image that is played back.
“During Video Playback” (A p. 51)
7
Menu Button
“Operating the Menu” (A p. 85)
8
Operation Buttons
“Operation Buttons for Video Playback” (A p. 51)
9
Display Button
Switches the display between full (m) and simple (n) with every tap of
the button.
0
Simple display: Some displays disappear automatically when the
screen is not operated.
0
Full display: Displays everything. The display button changes from n
to m.
0
When the power is turned off, the display setting will revert to simple
display (n).
Getting Started
12
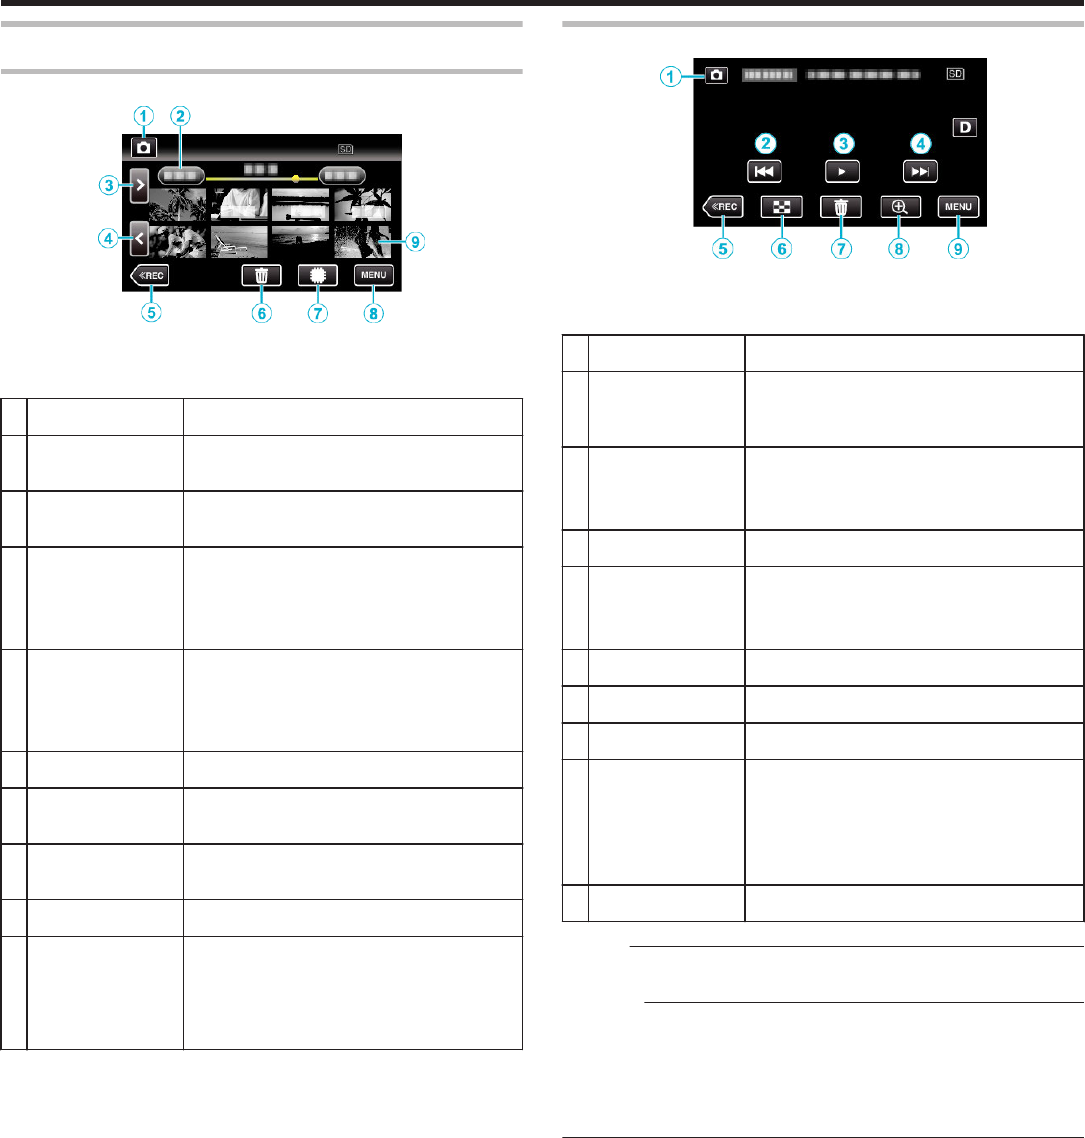
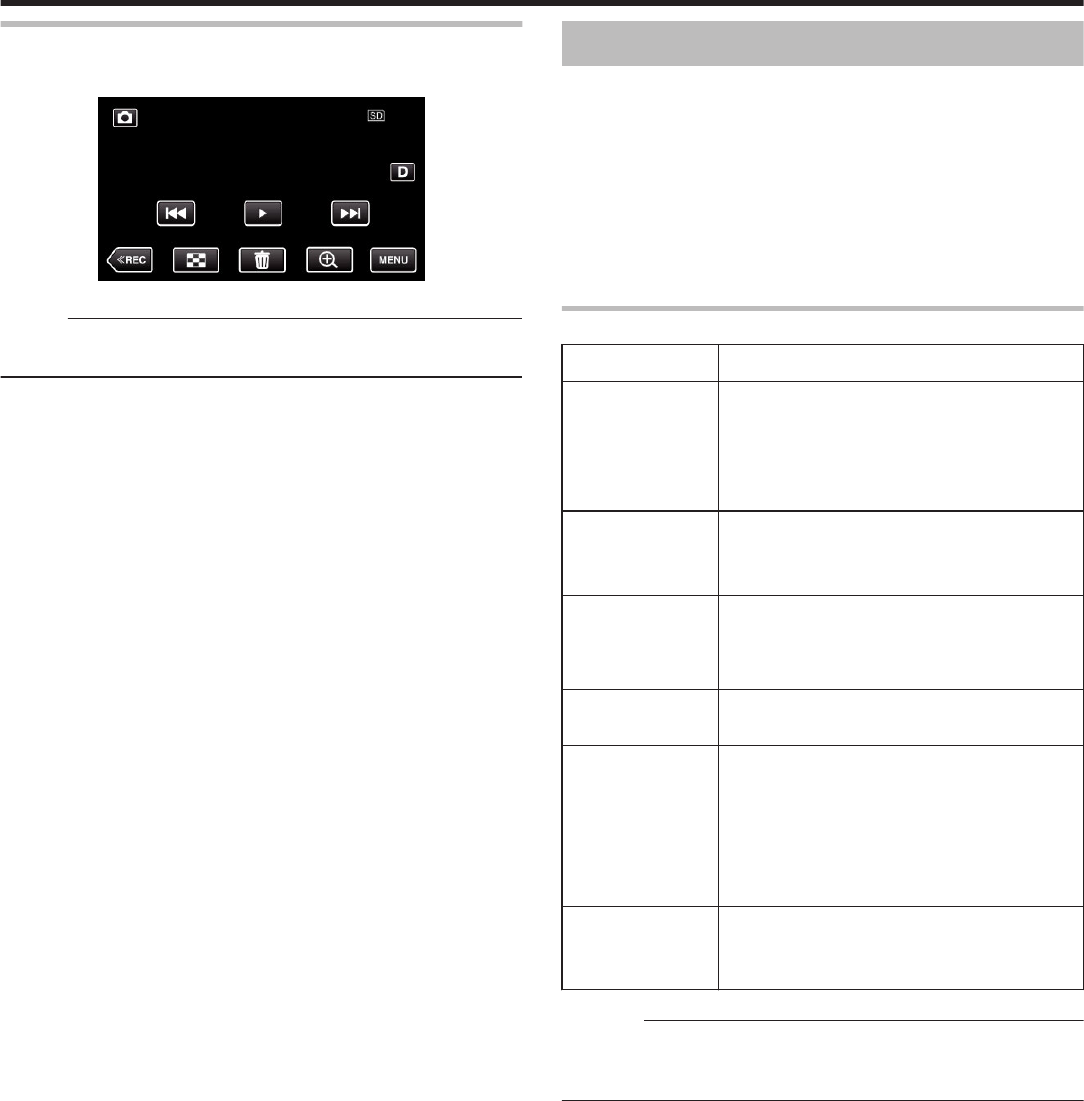
Playback Screen (Still Image)
.
0
When this unit is not operated for a certain period of time, the operation
buttons on the LCD monitor disappear automatically. Tap on the screen
to display the operation buttons again.
1
A/B (Video/Still Image) Mode Button
0
Switches between A video and B still image modes.
2
Recording Mode Button
0
Switches to the recording mode.
3
Index Screen (Thumbnail Display) Button
0
Returns to the index screen (thumbnail display).
“Operation Buttons for Still Image Playback” (A p. 58
)
4
Delete Button
“Deleting the Currently Displayed File” (A p. 63)
5
Playback Zoom Button
0
Enlarges the still image that is being played back.
“Playing Back Still Images” (A p. 58)
6
Menu Button
“Operating the Menu” (A p. 85)
7
Operation Buttons
“Operation Buttons for Still Image Playback” (A p. 58)
8
Display Button
Switches the display between full (m) and simple (n) with every tap of
the button.
0
Simple display: Some displays disappear automatically when the
screen is not operated.
0
Full display: Displays everything. The display button changes from n
to m.
0
When the power is turned off, the display setting will revert to simple
display (n).
Index Screen (Thumbnail Display) Display
.
1
A/B (Video/Still Image) Mode Button
0
Switches between A video and B still image modes.
2
Page Forward/Back Button
“Operation Buttons for Video Playback” (A p. 51
)
“Operation Buttons for Still Image Playback” (A p. 58)
3
Recording Mode Button
0
Switches to the recording mode.
4
Delete Button
“Deleting Selected Files” (A p. 63)
“Deleting the Currently Displayed File” (A p. 63)
5
Playback Media Button
0
Switches between SD card and built-in memory.
6
Menu Button
“Operating the Menu” (A p. 85)
7
Date Button
“Operation Buttons for Video Playback” (A p. 51)
“Operation Buttons for Still Image Playback” (A p. 58)
Getting Started
13
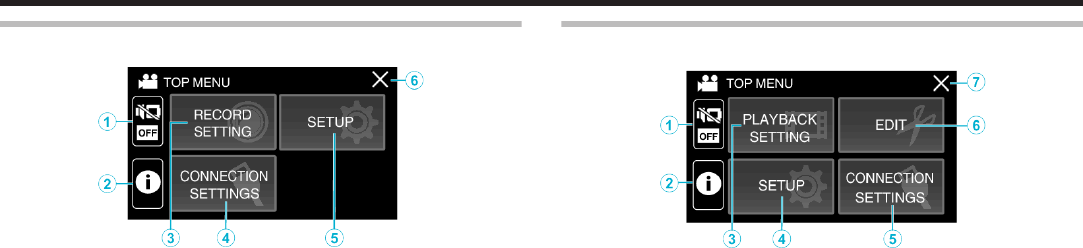
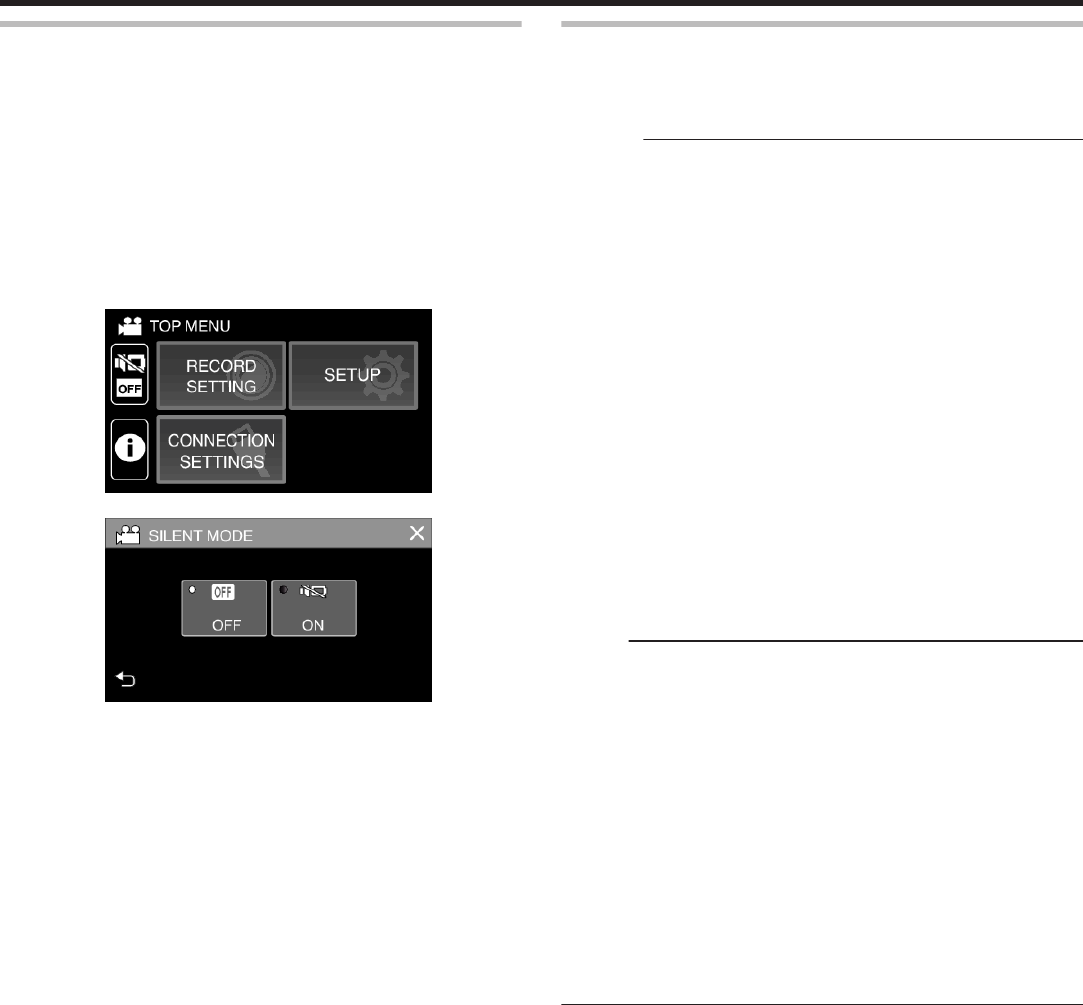
Menu screen (recording mode)
.
1
SILENT Button
“Using the Silent Mode” (A p. 22)
2
INFO. Button
“Checking the Remaining Recording Time” (A p. 48
)
3
RECORD SETTING Menu
“RECORD SETTING Menu (video)” (A p. 86)
“RECORD SETTING Menu (still image)” (A p. 91)
4
CONNECTION SETTINGS Menu
“CONNECTION SETTINGS (video/still image)” (A p. 100)
5
SETUP Menu
“SETUP (video/still image)” (A p. 97)
6
Close Button
Exit the menu.
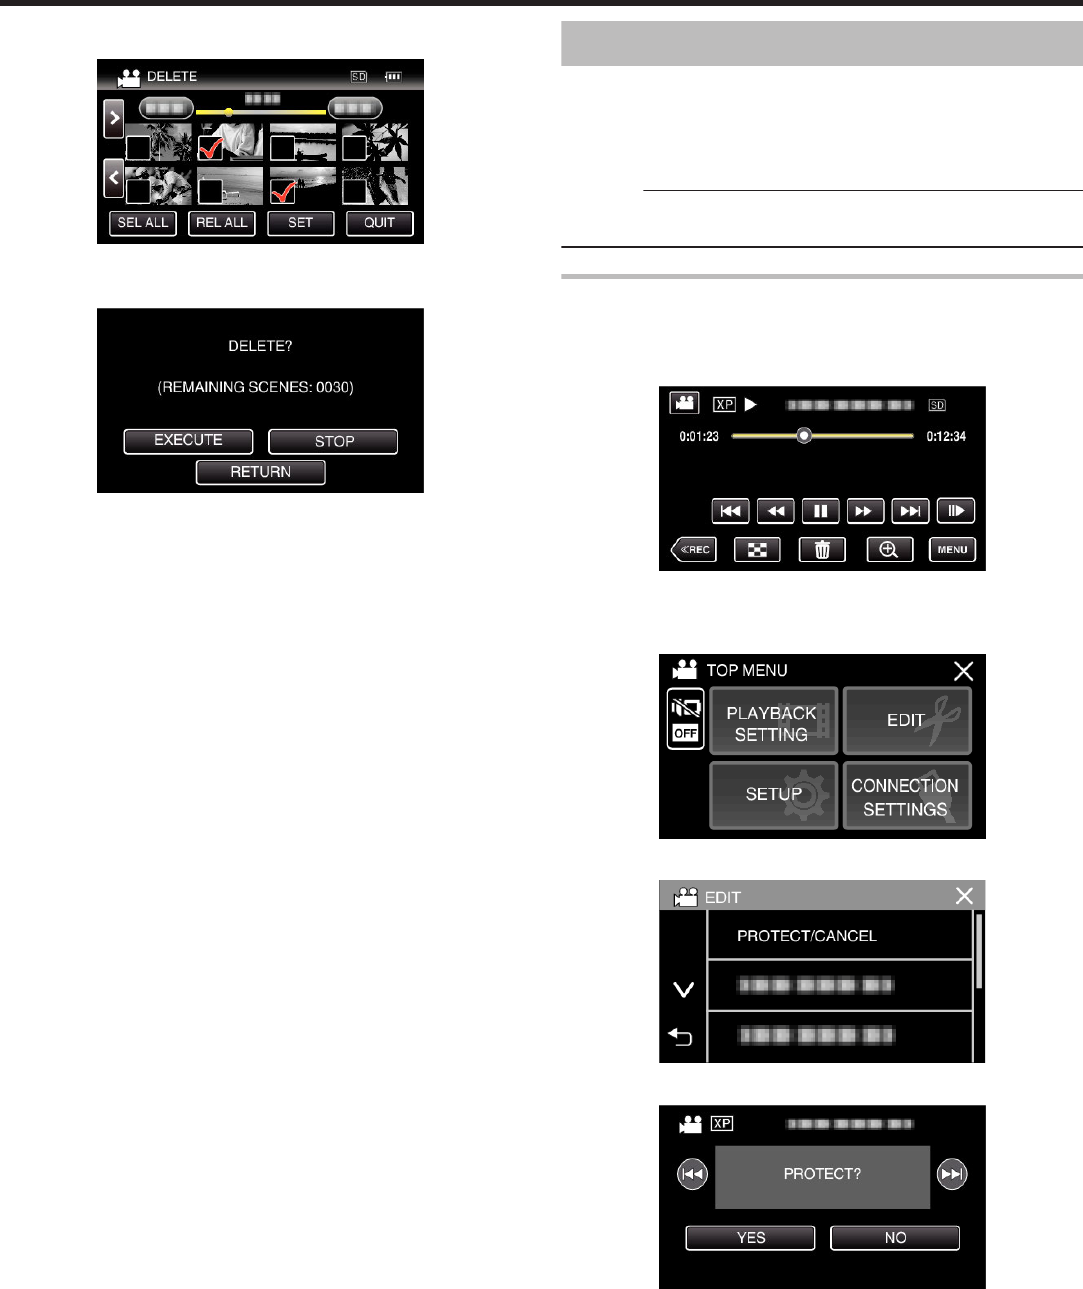
Menu screen (playback mode)
.
1
SILENT Button
“Using the Silent Mode” (A p. 22)
2
INFO. Button (Displayed only after playback)
“Checking the Recording Date and Other Information” (A p. 53
)
3
PLAYBACK SETTING Menu
“PLAYBACK SETTING Menu (video)” (A p. 93)
“PLAYBACK SETTING Menu (still image)” (A p. 95)
4
SETUP Menu
“SETUP (video/still image)” (A p. 97)
5
CONNECTION SETTINGS Menu
“CONNECTION SETTINGS (video/still image)” (A p. 100)
6
EDIT Menu
“EDIT Menu (video)” (A p. 94)
“EDIT Menu (still image)” (A p. 96)
7
Close Button
Exit the menu.
Getting Started
14
Clock Setting
“SET DATE/TIME!” is displayed when you turn on the unit for the first time
or when the unit has not been used for a prolonged period.
Set the clock before recording.
1
Open the LCD monitor.
.
0
The unit turns on.
0
When the LCD monitor is closed, the unit turns off.
2
Tap “OK” when “SET DATE/TIME!” is displayed.
.
3
Set the date and time.
.
0
When the day, month, year, hour, or minute item is tapped, “3” and
“2” will be displayed.
0
Tap 3 or 2 to adjust the year, month, day, hour, and minute.
4
After setting the date and time, tap “SAVE”.
5
Select the region where you live and tap “SAVE”.
.
0
Time difference between the selected city and the GMT (Greenwich
Mean Time) is displayed.
0
Tap 0 or 1 to select the city name.
Memo :
0
The clock can be reset again later.
“Resetting the Clock” (A p. 15)
0
When using this unit overseas, you can set it to the local time for recording.
“Setting the Clock to Local Time when Traveling” (A p. 18)
0
The clock is reset about one month after the battery is depleted. “SET
DATE/TIME!” is displayed the next time you turn on this unit. Set the clock
again after charging the battery.
Resetting the Clock
Set the clock with “DATE & TIME” from the menu.
1
Tap “MENU”.
.
2
Tap “SETUP”.
.
3
Tap “DATE & TIME”.
.
0
Tap 3 or 2 to scroll the screen.
4
Tap “CLOCK SETTING”.
.
5
Set the date and time.
.
0
When the day, month, year, hour, or minute item is tapped, “3” and
“2” will be displayed.
0
Tap 3 or 2 to adjust the year, month, day, hour, and minute.
6
After setting the date and time, tap “SET”.
Getting Started
15
7
Select the region where you live and tap “SAVE”.
.
0
Time difference between the selected city and the GMT (Greenwich
Mean Time) is displayed.
0
Tap 0 or 1 to select the city name.
Changing the Display Language
The language on the display can be changed.
1
Tap “MENU”.
.
2
Tap “SETUP”.
.
3
Tap “LANGUAGE”.
.
0
Tap 3 or 2 to scroll the screen.
4
Tap to the desired language.
.
0
Tap 3 or 2 to scroll the screen.
Getting Started
16
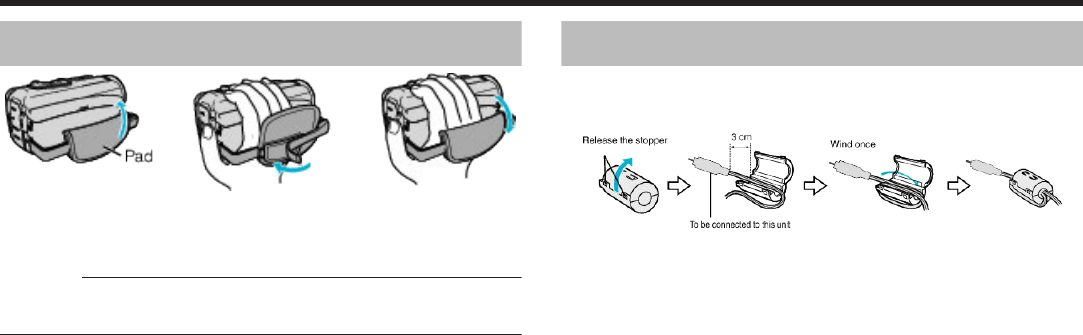
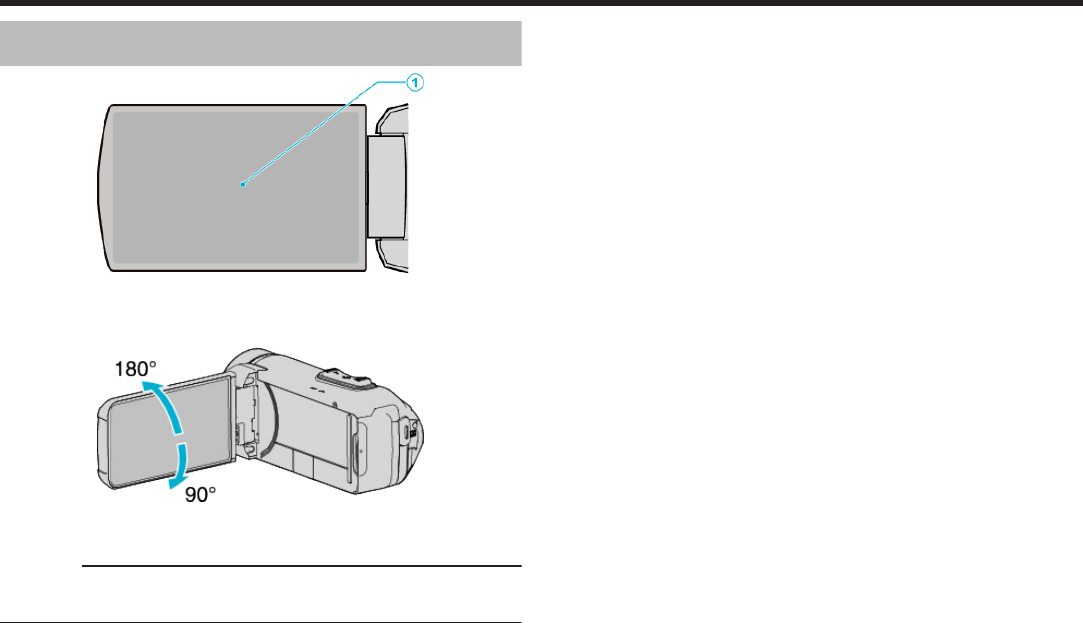
Holding this Unit
When holding this unit, keep your elbows close to your sides to prevent
camera shake.
.
0
Hold
the LCD monitor with your left hand and adjust the angle accordingly.
Holding the LCD monitor with your left hand helps to stabilize the camera
for recording.
Caution :
0
The photographer should pay attention to the surroundings during
shooting,
making sure that he/she is in no danger of falling or collision with
another person or vehicle.
0
Be careful not to drop this unit during transportation.
0
Guardians should pay close attention when this unit is used by children.
Tripod Mounting
This unit can be mounted on a tripod (or monopod). This is useful for
preventing camera shake and recording from the fixed position.
.
0
To
prevent this unit from falling off, check the tripod mounting screw holes
and positioning holes on the unit carefully before mounting, and turn the
screws until they are fastened firmly.
Caution :
0
To prevent injuries or damages which may result if this unit falls off, read
the instruction manual of the tripod (or monopod) to be used and make
sure that it is securely attached.
0
In strong wind conditions and when placed at an unstable location, there
is a risk of the tripod toppling and falling.
0
Please check beforehand if the use of a tripod is allowed as it may be
prohibited depending on the shooting location.
Memo :
0
It is recommended to use a tripod or monopod when recording in
conditions
prone to camera shake (such as in dark places or when zoomed
to the telephoto end).
0
Set the image stabilizer to b (OFF) when using a tripod for recording.
“Reducing Camera Shake” (A p. 40)
Getting Started
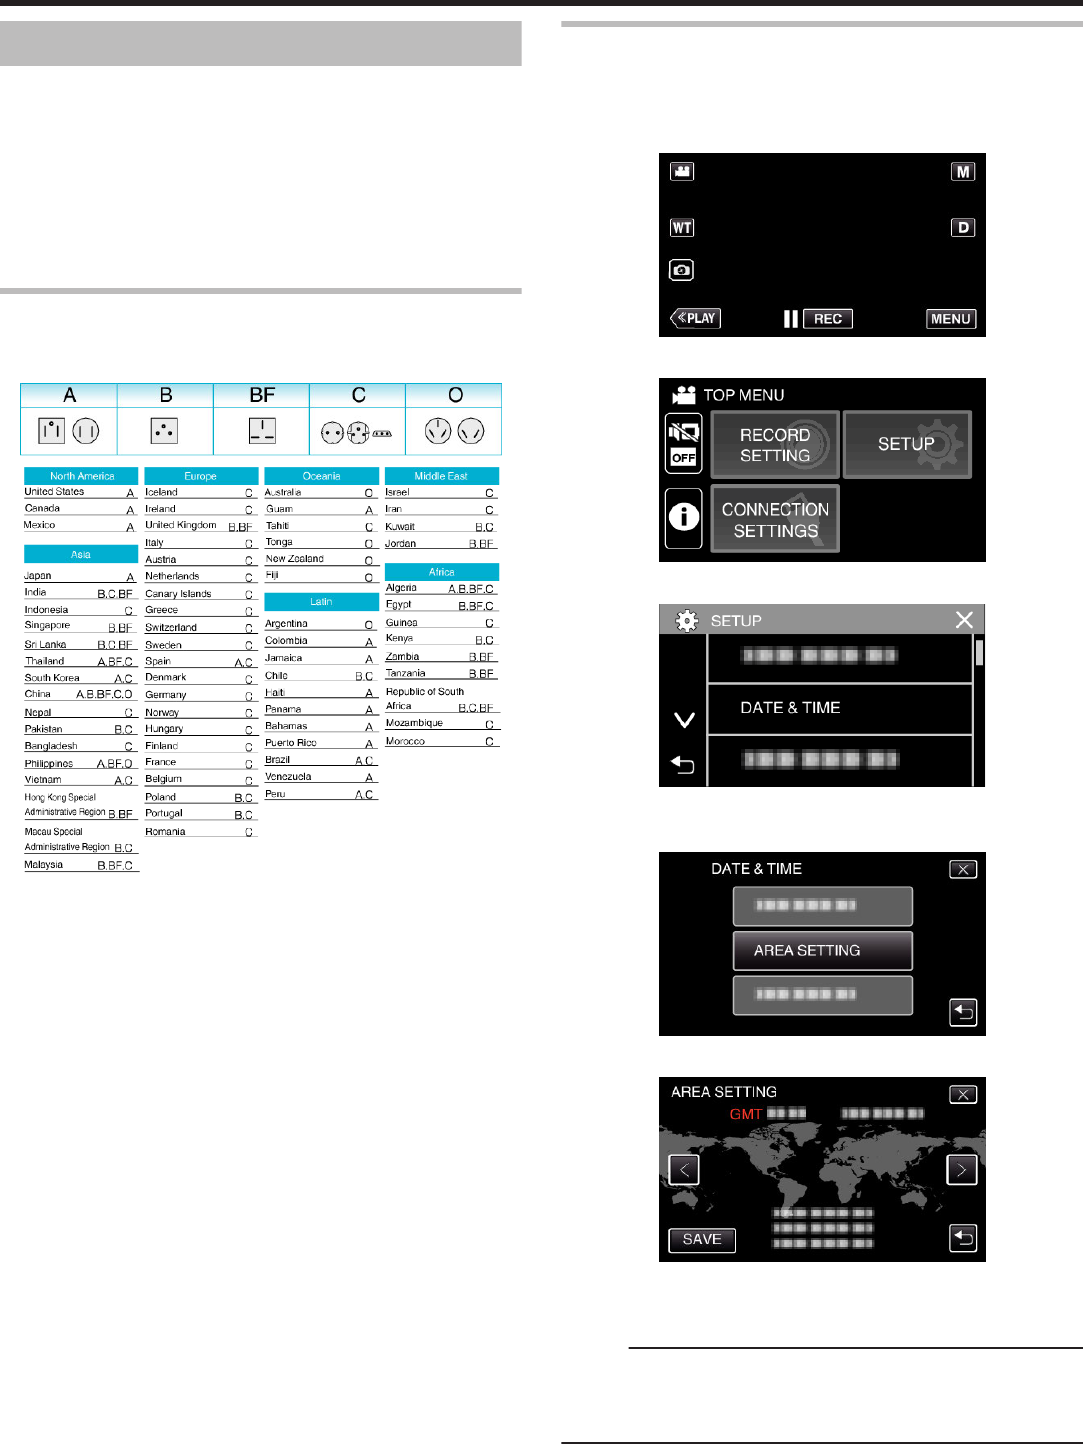
17
Using this Unit Overseas
The shape of the power outlet varies according to countries and regions.
To charge the battery pack, you need a converter plug that matches the
shape of the outlet.
“Charging the Battery Pack Overseas” (A p. 18)
Change the date and time display to the local time by selecting your travel
destination in “AREA SETTING” of “DATE & TIME”.
“Setting the Clock to Local Time when Traveling” (A p. 18)
When
“ON” is selected in “DST SETTING” of “DATE & TIME”, the time is set
1 hour ahead.
“Setting Daylight Saving Time” (A p. 19)
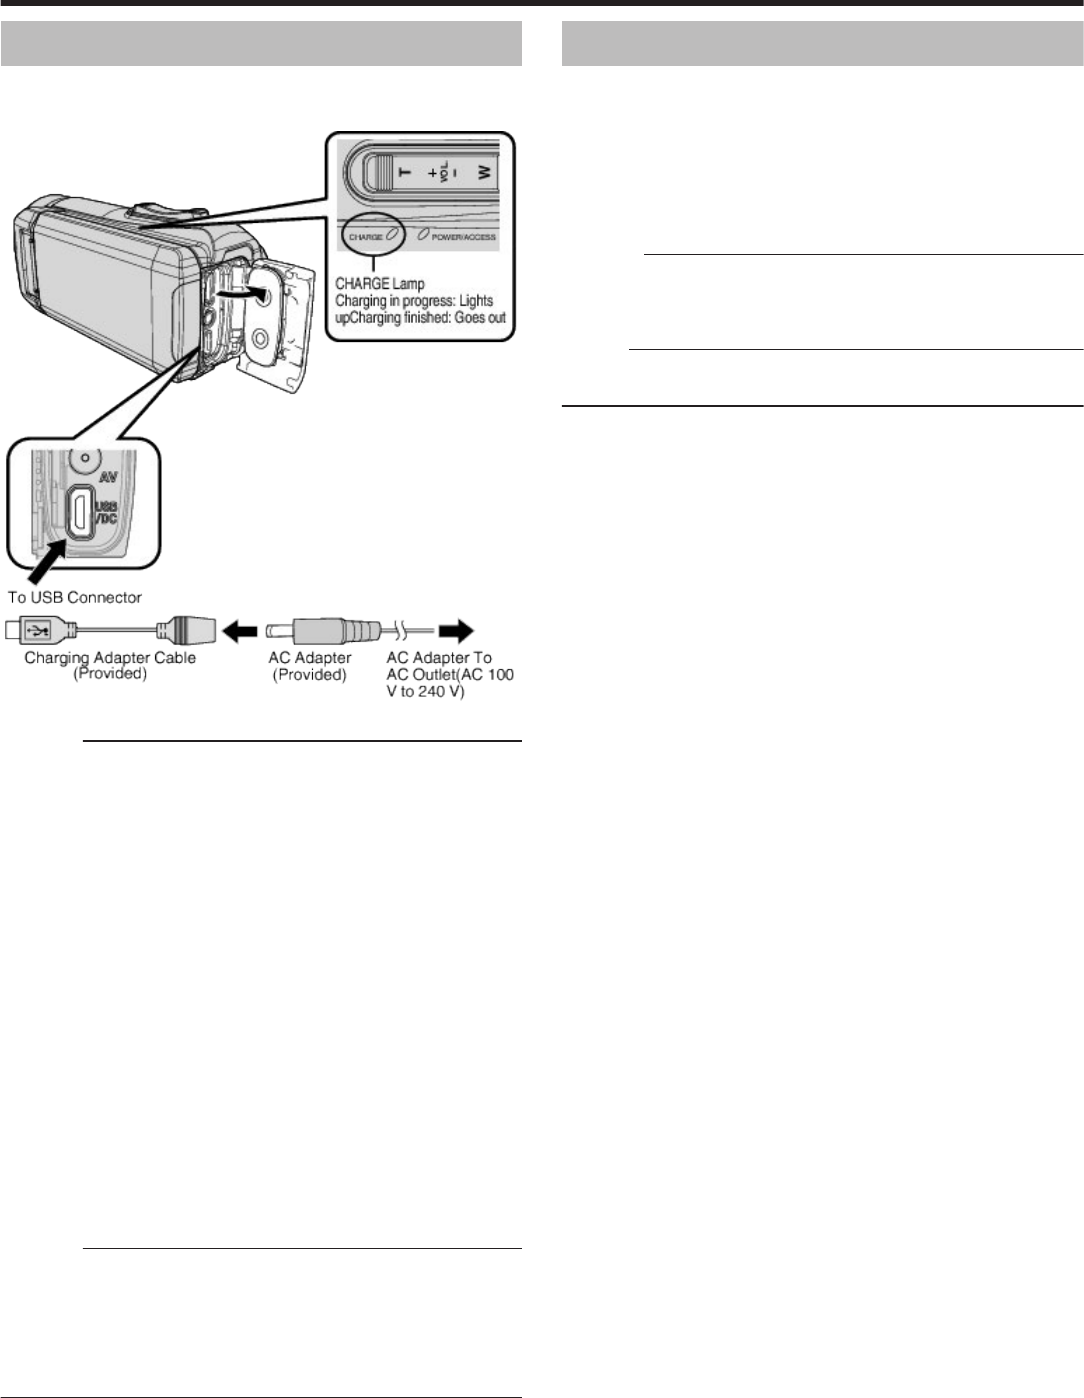
Charging the Battery Pack Overseas
The shape of the power outlet varies according to countries and regions.
To charge the battery pack, you need a converter plug that matches the
shape of the outlet.
.
Setting the Clock to Local Time when Traveling
Change the date and time display to the local time by selecting your travel
destination in “AREA SETTING” of “DATE & TIME”.
Restore the region settings after you returned from the trip.
1
Tap “MENU”.
.
2
Tap “SETUP”.
.
3
Tap “DATE & TIME”.
.
0
Tap 3 or 2 to scroll the screen.
4
Tap “AREA SETTING”.
.
5
Select the area you are traveling to and tap “SAVE”.
.
0
Time difference between the selected city and the GMT (Greenwich
Mean Time) is displayed.
0
Tap 0 or 1 to select the city name.
Memo :
0
Setting
“AREA SETTING” changes the clock time such that time difference
is accounted for.
After returning to your country, re-select the region that was set initially to
restore the original clock settings.
Getting Started
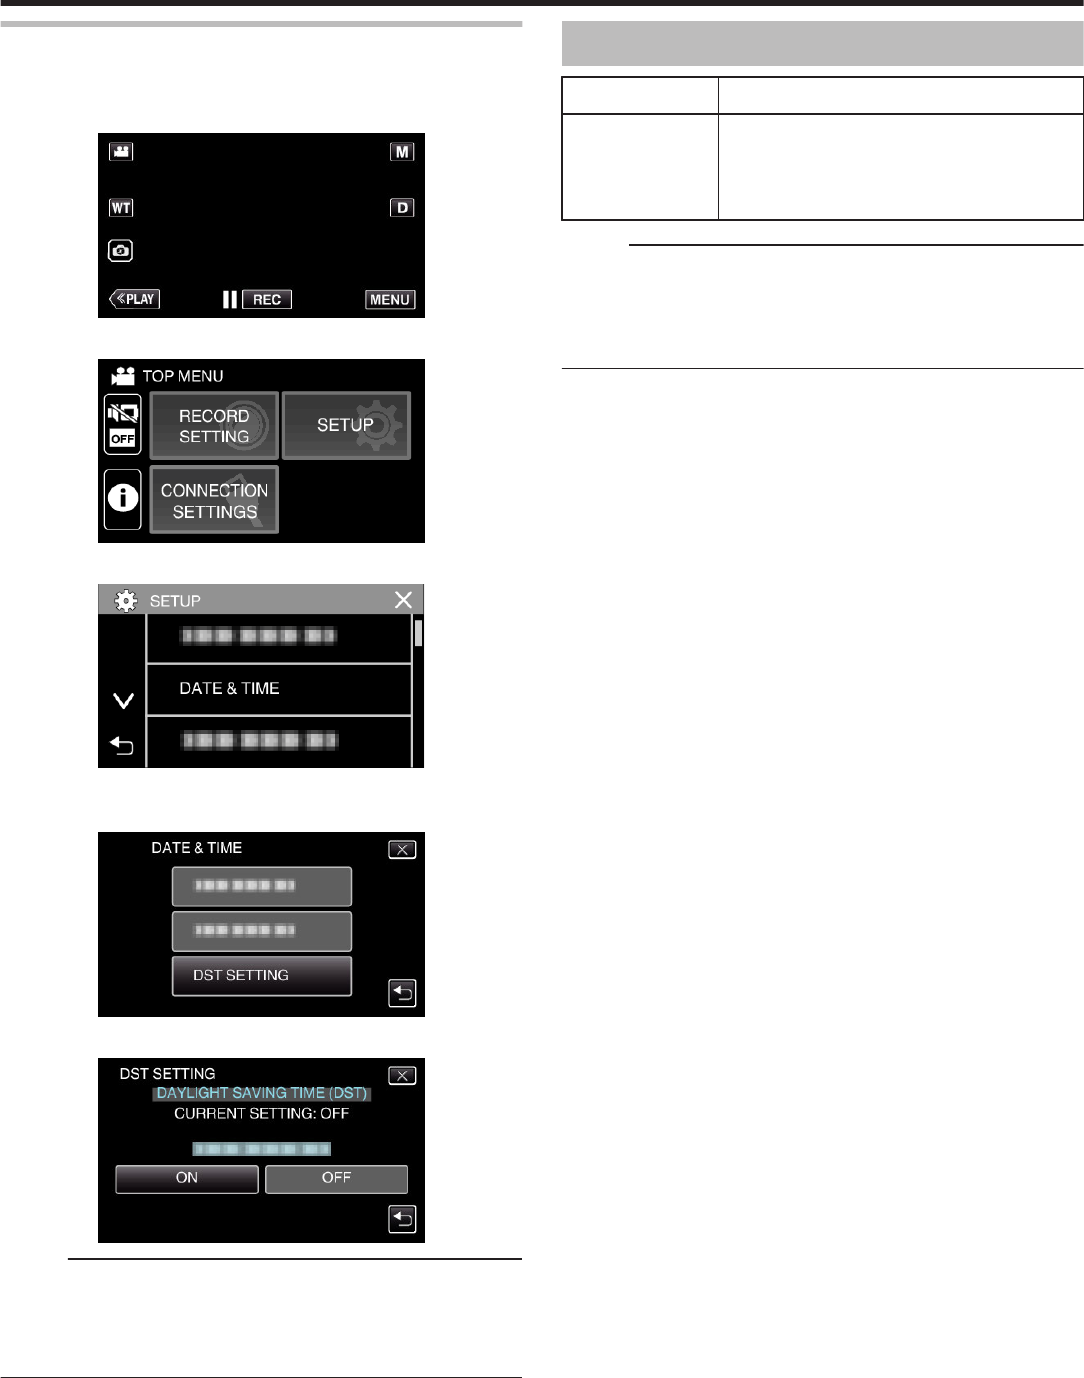
18
Setting Daylight Saving Time
When “ON” is selected in “DST SETTING” of “DATE & TIME”, the time is set
1 hour ahead.
1
Tap “MENU”.
.
2
Tap “SETUP”.
.
3
Tap “DATE & TIME”.
.
0
Tap 3 or 2 to scroll the screen.
4
Tap “DST SETTING”.
.
5
Tap “ON”.
.
Memo :
0
What is daylight saving time?
Daylight saving time is the system of setting the clock 1 hour ahead for a
fixed period in summer.
It is used mainly in the Western countries.
0
Restore the daylight saving time settings after you returned from the trip.
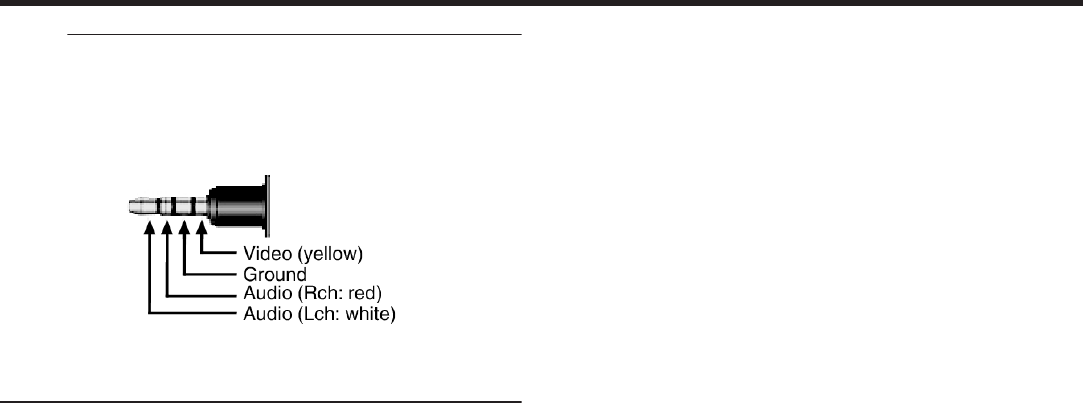
Optional Accessories
Product NameDescription
HDMI Mini Cable
0
VX-HD310
0
VX-HD315
0
Allows viewing in high picture quality when
connected to a TV.
0
Transmits video, audio, and control signals
between devices.
Memo :
0
The optional accessories above may not be supported in some regions.
0
For more information, refer to the catalog.
0
For details on the provided accessories, refer to “Verifying the
Accessories”.
“Verifying the Accessories” (A p. 3
)
Getting Started
19
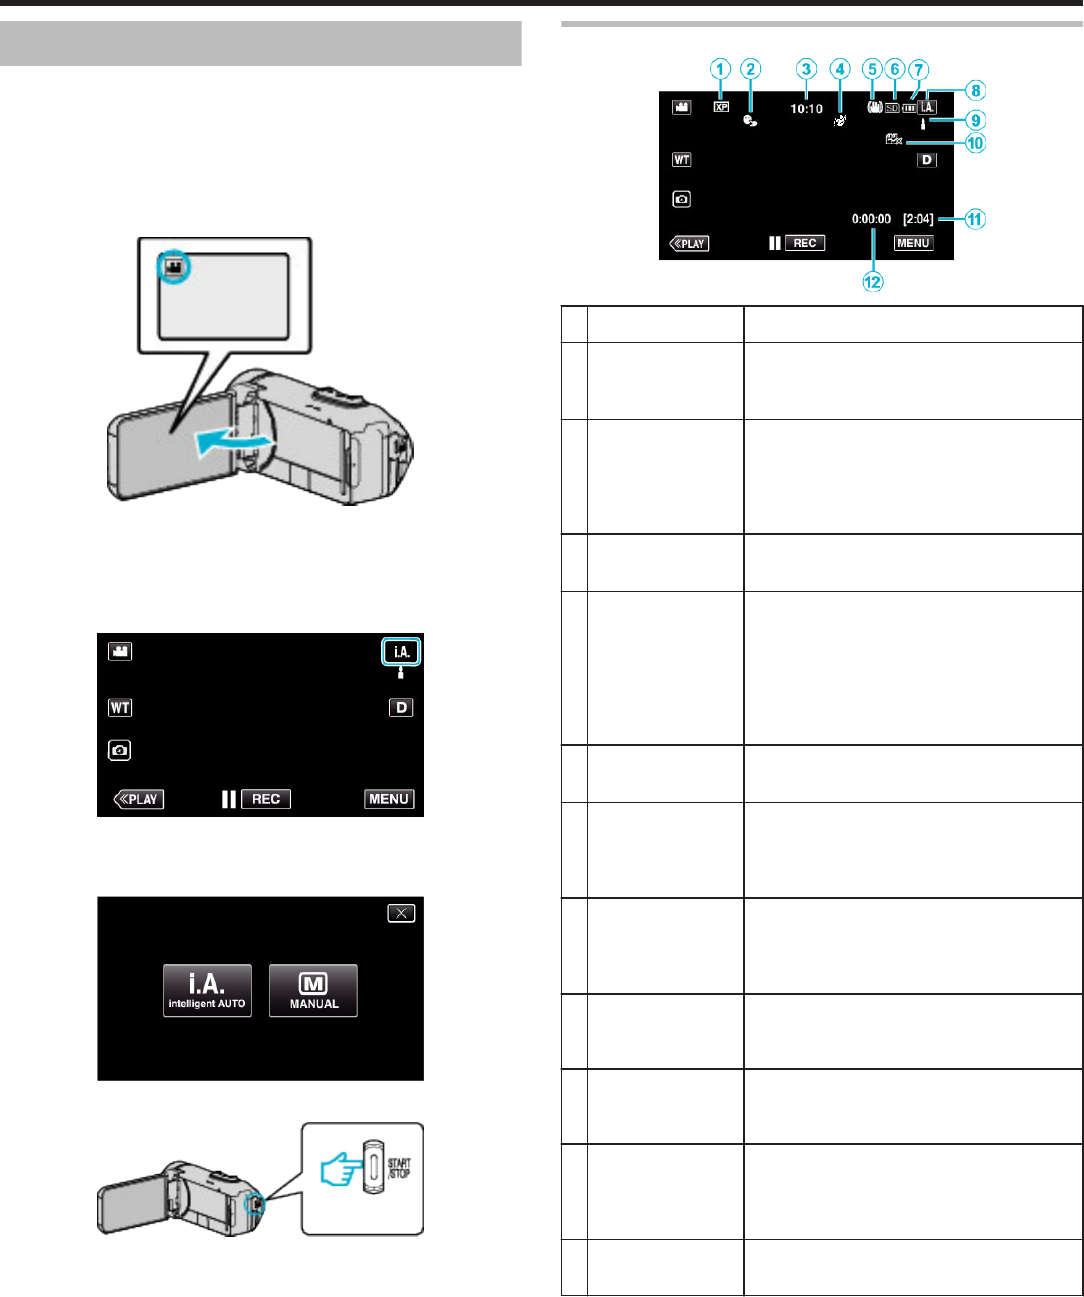
Taking Videos in Auto Mode
With
Intelligent Auto recording, the camera automatically adjusts the settings
such as brightness and focus to suit the shooting conditions.
0
In case of specific shooting scenes such as person etc., its icon is
displayed on the screen.
0
Before recording an important scene, it is recommended to conduct a trial
recording.
1
Open the LCD monitor.
.
0
Check if the recording mode is A.
0
If
the mode is B still image, tap B on the recording screen to display
the mode switching screen.
Tap A to switch the mode to video.
2
Check if the recording mode is P Intelligent Auto.
.
0
If the mode is H Manual, tap H on the recording screen to display
the mode switching screen.
Tap P to switch the recording mode to Intelligent Auto.
.
3
Press the START/STOP button to start recording.
.
0
Press again to stop.
0
Some displays disappear after approximately 3 seconds.
Use the n button to change the displays.
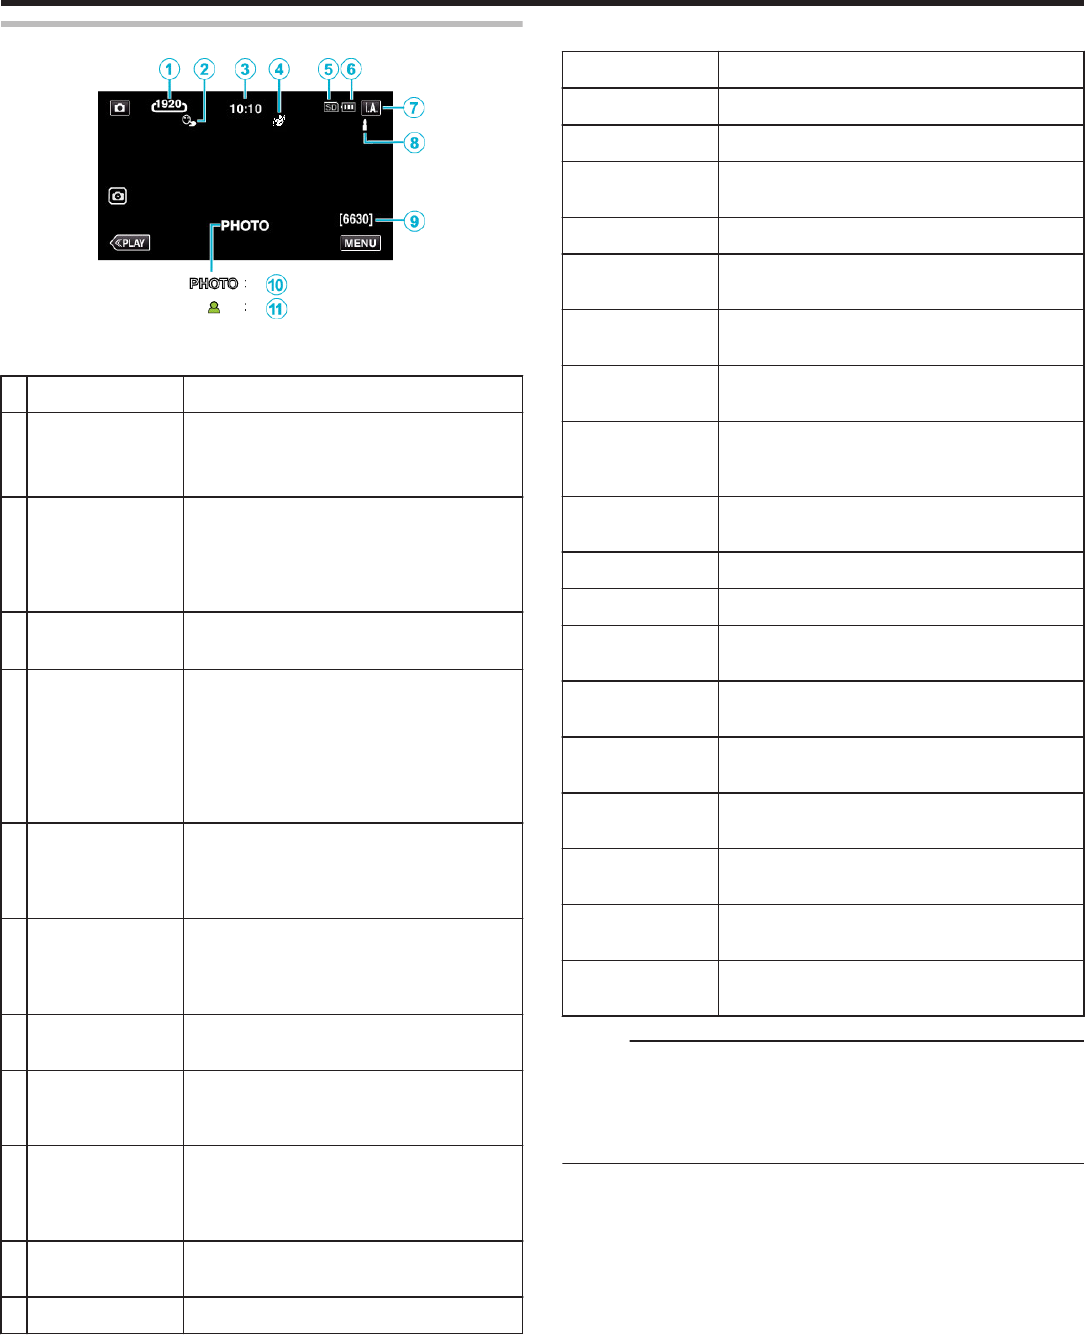
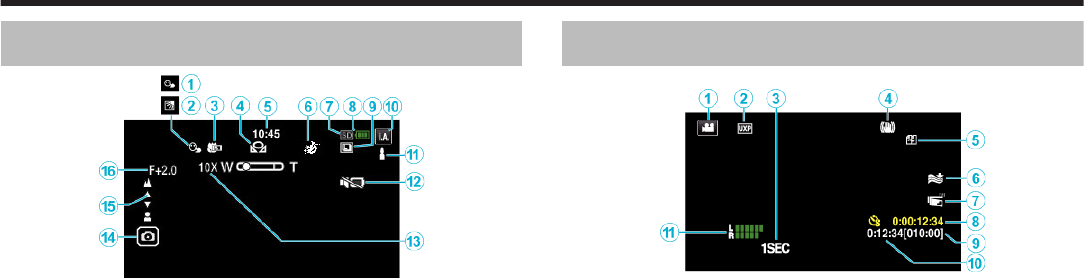
Indications for Video Recording
.
Display IconDescription
A
Video QualityDisplays the icon of the “VIDEO QUALITY”
setting selected in the recording menu.
“ VIDEO QUALITY ” (A p. 88)
B
TOUCH PRIORITY
AE/AF
Displays the setting of “TOUCH PRIORITY AE/
AF”.
By default, it is set to “FACE TRACKING”.
“Capturing Subjects Clearly (TOUCH
PRIORITY AE/AF)” (A p. 39)
C
TimeDisplays the current time.
“Clock Setting” (A p. 15)
D
RECORDING
EFFECT
Displays the corresponding icon when a
recording effect is specified.
C: GRAINY MONOCHROME
D: FOOD
B: BABY
“Recording with Effects (RECORDING
EFFECT)” (A p. 35)
E
Image StabilizerDisplays the image stabilizer setting.
“Reducing Camera Shake” (A p. 40
)
F
Recording MediaDisplays the icon of the media where videos
are recorded to.
The recording media can be changed.
“ REC MEDIA FOR VIDEO ” (A p. 98)
G
Battery IndicatorDisplays the approximate remaining battery
power during use.
“Checking the Remaining Recording Time”
(A p. 48
)
H
Recording ModeDisplays the current recording mode of P
(Intelligent Auto) or H (Manual).
Current shooting mode is displayed.
I
Setting Scenes of
Intelligent Auto
Displays scenes detected automatically in the
Intelligent Auto function. Multiple scenes may
be detected.
J
Remaining
Recording Time
Displays the remaining time for video
recording.
“Checking the Remaining Recording Time”
(A p. 48
)
K
Scene Counter
(Recorded Time)
Displays the elapsed time of the video that is
currently being recorded.
Recording
20
o
Scenes of Intelligent Auto
Display IconDescription
g
Captures one’s skin beautifully.
V
Allows people to be captured naturally.
f
Record a group of people with the most suitable
settings.
S
Records while focusing on a near object.
a
Focuses at a far distance and captures a sharp
image with vivid colors.
Z
Records in dark places with minimal noise in the
overall image.
T
Allows night scenes to be captured accurately with
minimal noise in the overall image.
d
Prevents colors from fading even when recording
in a bright environment, such as snowfield and
beaches.
X
Prevents colors from fading when recording a
subject in a spotlight.
i
Reproduces the green color of trees vividly.
Y
Reproduces the colors of sunset naturally.
h
Adjusts settings so that the subject does not
appear too dark due to backlight.
k
Records while emphasizing the brightness of the
colors.
U
Reproduces the natural colors of the outdoors
during the day.
c
Reproduces the natural colors of the indoors in a
cold-color illumination.
b
Reproduces the natural colors of the indoors in a
warm-color illumination.
e
Selects the most suitable settings for handheld
shooting.
j
Selects the most suitable settings when a tripod is
used for shooting.
Memo :
0
Scenes can be detected according to the shooting conditions and
automatically adjusted in Intelligent Auto mode.
0
Multiple
scenes may be detected depending on the recording conditions.
0
Some functions may not work properly depending on the shooting
conditions.
Operation Buttons for Video Recording
.
Operation
Buttons
Description
A
Video/Still Image
Mode
A/B
Switches between video and still image
modes.
B
WT ZoomAllows the same functions as the zoom
lever to be performed.
Camera shake that often occurs when
using the zoom lever can be minimized.
“Zooming” (A p. 26)
C
Still Image
Recording A
Tap this button to record a still image during
video recording.
“Capturing Still Images During Video
Recording” (A p. 23
)
D
Playback ModeSwitches to the playback mode.
E/ FRecording Start
6
Record-Standby
7
Functions as the START/STOP button.
G
MENUDisplays the various menus of video
recording.
“Operating the Menu” (A p. 85)
H
Display Button nSwitches the display between full (m)
and
simple (n) with every tap of the button.
0
Simple display: Some displays
disappear automatically when the
screen is not operated.
0
Full display: Displays everything. The
display button changes from n to m.
0
When the power is turned off, the display
setting will revert to simple display (n).
I
Recording Mode
P/H
Switches between the P
Intelligent Auto
and H Manual recording mode.
Recording
21
Using the Silent Mode
When the Silent mode is used, the LCD monitor darkens and operation
sounds
will not be output. Use this mode to record quietly in dark places such
as during a performance.
0
T appears when “SILENT MODE” is set to “ON”.
0
To mute only the operating sound, set “OPERATION SOUND” in the menu
to “OFF” instead of using the silent mode.
“ OPERATION SOUND ” (A p. 98)
o
Operating procedure
A
Tap “MENU”.
0
The top menu appears.
B
Tap T.
.
C
Tap “ON”.
.
Useful Settings for Recording
0
When “DATE/TIME RECORDING” is used, the date and time can be
recorded together with the video.
“Recording Videos with Date and Time” (A p. 46)
Caution :
0
Do not expose the lens to direct sunlight.
0
While this unit can be used with the LCD monitor reversed or the LCD
monitor closed with “LCD CLOSED RECORDING” activated, the
temperature of this unit rises more easily. Leave the LCD monitor open
when
using this unit for long periods of time, or in places exposed to direct
sunlight or high temperatures.
0
The power may turn off to protect the circuit if the temperature of this unit
rises too much.
0
If the temperature of this unit rises during recording, 7 changes color
to yellow as a notification.
0
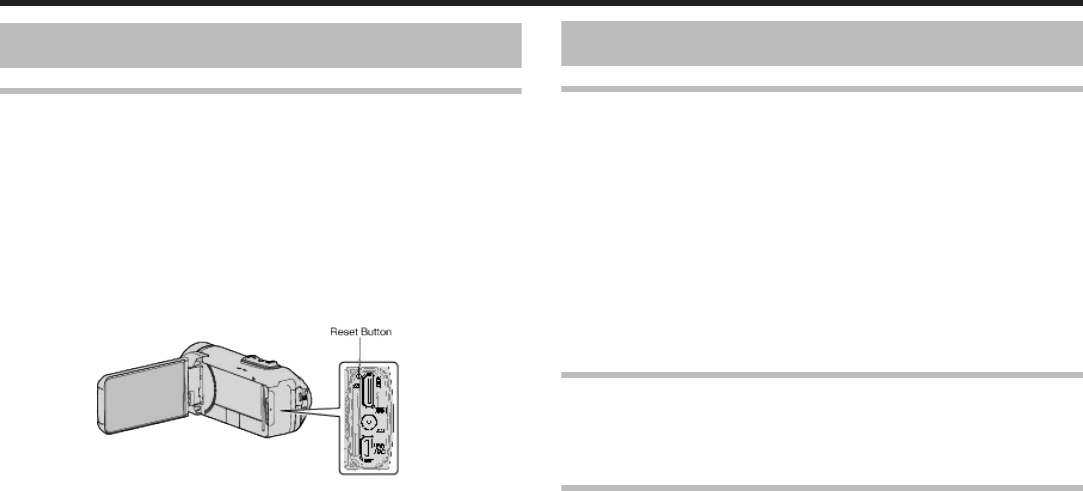
This unit is a microcomputer-controlled device. Electrostatic discharge,
external noise and interference (from a TV, a radio, etc.) might prevent it
from functioning properly. In such a case, close the monitor screen to turn
off the power and remove the AC adapter, then press the Reset button to
reset this unit.
“Resetting this Unit” (A p. 5)
0
Disclaimer
- We shall not be held responsible for loss of recorded contents when
recording videos/audio or playback cannot be operated due to
malfunctions in this unit, provided parts, or SD card.
- Once deleted, recorded contents (data), including data loss due to
malfunctions in this unit, cannot be restored. Please be forewarned.
- JVC will not be responsible for any lost data.
Memo :
0
Check that the remaining recording time in the media is sufficient before
you start recording. “Checking the Remaining Recording Time”
(A p. 48)
If the remaining recording time is not sufficient, save the files on a PC or
disc before deleting the files from the unit. “Deleting Unwanted Files”
(A p. 63)
0
When there are many files in the media, it may take time for them to be
displayed on the playback screen. Wait for a while as the POWER/
ACCESS lamp blinks, indicating normal operation.
0
Recording stops automatically as it cannot be performed for 12 or more
consecutive hours according to specifications.
(It may take some time to resume recording.)
0
Up to 4GB per video file can be recorded. File recorded using long
recordings that exceeds 4GB is split and recorded into several video files.
0
Depending on the shooting conditions, the four corners of the screen may
appear dark, but this is not a malfunction. In this case, change the shooting
conditions by moving the zoom lever, etc.
Recording
22
Capturing Still Images During Video Recording
Still images can be captured by tapping the A
button while in the video mode
(standby or recording).
.
0
“PHOTO” lights up on the screen when a still image is being captured.
.
0
The still images captured during video recording are saved to the
destination set in “REC MEDIA FOR IMAGE”.
Memo :
0
The size of the still image that is captured in the video mode is 1,920 x
1,080.
0
Operation is invalid under the following conditions:
- when menu is being displayed
- when remaining recording time or battery power is being displayed
- when the “TIME-LAPSE RECORDING”, “RECORDING EFFECT” or
“DATE/TIME RECORDING” function is set
- when the special AV cable is connected to the AV connector
- when the HDMI cable is connected and a resolution other than 1080i is
output
Taking Still Images in Auto Mode
You can record without worrying about the setting details by using the P
Intelligent Auto mode.
1
Open the LCD monitor.
.
0
Check if the recording mode is B.
0
If the mode is A
video, tap A on the recording screen to display the
mode switching screen.
Tap B to switch the mode to still image.
2
Check if the recording mode is P Intelligent Auto.
.
0
If the mode is H Manual, tap H on the recording screen to display
the mode switching screen.
Tap P to switch the recording mode to Intelligent Auto.
.
3
Press the START/STOP button.
.
0
PHOTO lights up when a still image is being captured.
Memo :
0
Depending
on the subject and shooting conditions, recording may not be
performed properly even in the Intelligent Auto mode.
o
Start recording after adjusting the focus
A
Press and hold the A button on the touch screen until the focus is
adjusted.
.
B
Remove your finger from the button to release the shutter.
Available only when “SHUTTER MODE” is set to “RECORD ONE SHOT”.
Recording
23
Indications During Still Image Recording
.
0
Some displays disappear after approximately 3 seconds.
Use the n
button to change the displays.
Display IconDescription
A
Image SizeDisplays the icon of the image size.
0
The size of still images can be changed.
“ IMAGE SIZE ” (A p. 92)
B
TOUCH PRIORITY
AE/AF
Displays the setting of “TOUCH PRIORITY AE/
AF”.
By default, it is set to “FACE TRACKING”.
“Capturing Subjects Clearly (TOUCH
PRIORITY AE/AF)” (A p. 39)
C
TimeDisplays the current time.
“Clock Setting” (A p. 15
)
D
RECORDING
EFFECT
Displays the corresponding icon when a
recording effect is specified.
C: GRAINY MONOCHROME
D: FOOD
B: BABY
“Recording with Effects (RECORDING
EFFECT)” (A p. 35)
E
Recording mediaDisplays the icon of the media where still
images are recorded to.
The recording media can be changed.
“ REC MEDIA FOR IMAGE ” (A p. 99)
F
Battery IndicatorDisplays the approximate remaining battery
power during use.
“Checking the Remaining Recording Time”
(A p. 48)
G
Recording ModeDisplays the current recording mode of P
(Intelligent Auto) or H (Manual).
H
Setting Scenes of
Intelligent Auto
Displays scenes detected automatically in the
Intelligent Auto function. Multiple scenes may
be detected.
I
Remaining Number
of Shots
Displays the remaining number of shots for still
image recording.
“Approximate Number of Still Images (Unit:
Number of Shots)” (A p. 49)
J
Recording in
Progress
“PHOTO” appears when a still image is being
captured.
K
FocusLights up in green when focused.
o
Scenes of Intelligent Auto
Display IconDescription
g
Captures one’s skin beautifully.
V
Allows people to be captured naturally.
f
Record a group of people with the most suitable
settings.
S
Records while focusing on a near object.
a
Focuses at a far distance and captures a sharp
image with vivid colors.
Z
Records in dark places with minimal noise in the
overall image.
T
Allows night scenes to be captured accurately with
minimal noise in the overall image.
d
Prevents colors from fading even when recording
in a bright environment, such as snowfield and
beaches.
X
Prevents colors from fading when recording a
subject in a spotlight.
i
Reproduces the green color of trees vividly.
Y
Reproduces the colors of sunset naturally.
h
Adjusts settings so that the subject does not
appear too dark due to backlight.
k
Records while emphasizing the brightness of the
colors.
U
Reproduces the natural colors of the outdoors
during the day.
c
Reproduces the natural colors of the indoors in a
cold-color illumination.
b
Reproduces the natural colors of the indoors in a
warm-color illumination.
e
Selects the most suitable settings for handheld
shooting.
j
Selects the most suitable settings when a tripod is
used for shooting.
Memo :
0
Scenes can be detected according to the shooting conditions and
automatically adjusted in Intelligent Auto mode.
0
Multiple
scenes may be detected depending on the recording conditions.
0
Some functions may not work properly depending on the shooting
conditions.
Recording
24
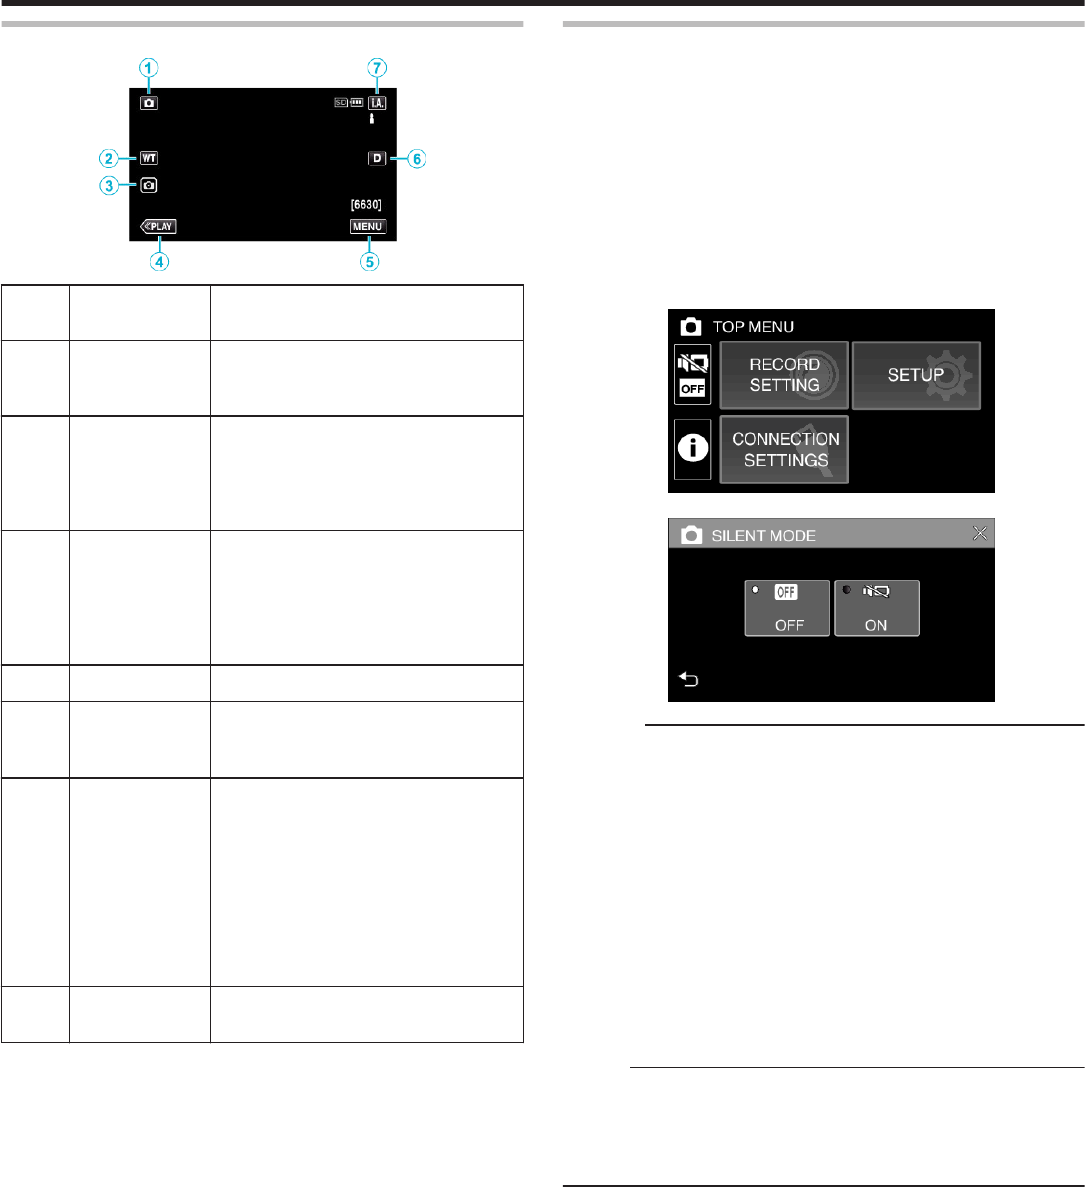
Operation Buttons for Still Image Recording
.
Operation
Buttons
Description
A
Video/Still Image
Mode
A/B
Switches between video and still image
modes.
B
WT ZoomAllows the same functions as the zoom
lever to be performed.
Camera shake that often occurs when
using the zoom lever can be minimized.
“Zooming” (A p. 26)
C
Still Image
Recording A
Allows you to take still images using the
touch panel. Pressing and holding the
button
allows you to adjust the focus before
shooting.
“Start recording after adjusting the focus”
(A p. 23)
D
Playback ModeSwitches to the playback mode.
E
MENUDisplays the various menus of still image
recording.
“Operating the Menu” (A p. 85)
F
Display Button nSwitches the display between full (m)
and
simple (n) with every tap of the button.
0
Simple display: Some displays
disappear automatically when the
screen is not operated.
0
Full display: Displays everything. The
display button changes from n to m.
0
When the power is turned off, simple
display (n) will be set.
G
Recording Mode
P/H
Switches between the P
Intelligent Auto
and H Manual recording mode.
Using the Silent Mode
When the Silent mode is used, the LCD monitor darkens and operation
sounds
will not be output. Use this mode to record quietly in dark places such
as during a performance.
0
T appears when “SILENT MODE” is set to “ON”.
0
To mute only the operating sound, set “OPERATION SOUND” in the menu
to “OFF” instead of using the silent mode.
“ OPERATION SOUND ” (A p. 98)
o
Operating procedure
A
Tap “MENU”.
0
The top menu appears.
B
Tap T.
.
C
Tap “ON”.
.
Caution :
0
Do not expose the lens to direct sunlight.
0
While this unit may be used with the LCD monitor reversed and closed,
the temperature rises more easily. Leave the LCD monitor open when
using this unit for long periods of time, or in places exposed to direct
sunlight or high temperatures.
0
The
power may turn off to protect the circuit if the temperature of this unit
rises too much.
0
Do not remove the AC adapter or SD card when the POWER/ACCESS
lamp is lighted. The recorded data may become unreadable.
0
This unit is a microcomputer-controlled device. Electrostatic discharge,
external noise and interference (from a TV, a radio, etc.) might prevent it
from functioning properly. In such a case, close the monitor screen to turn
off the power and remove the AC adapter, then press the Reset button to
reset this unit.
“Resetting this Unit” (A p. 5)
Memo :
0
Before
recording an important scene, it is recommended to conduct a trial
recording.
0
Depending on the shooting conditions, the four corners of the screen may
appear dark, but this is not a malfunction. In this case, change the shooting
conditions by moving the zoom lever, etc.
Recording
25
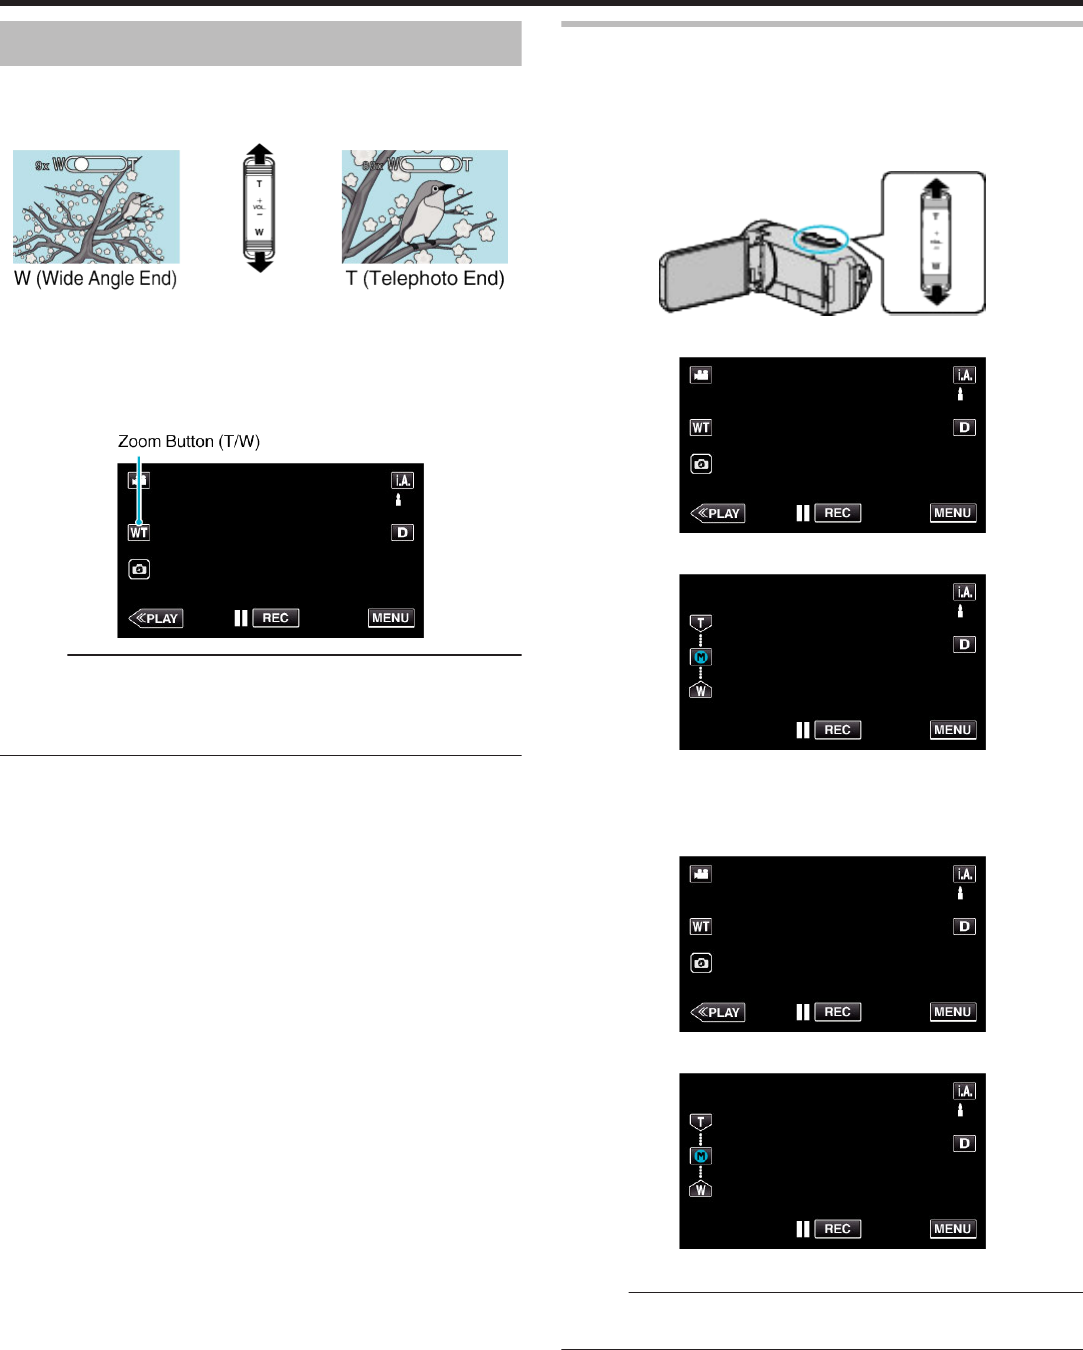
Zooming
The angle of view can be adjusted using zoom.
0
Use the W end (wide angle end) to shoot a wider field of view.
0
Use the T end (telephoto end) to magnify the subject for shooting.
.
0
The following zoom options are available:
- Optical Zoom (1 - 40x)
- Digital Zoom (41 - 200x)
0
You can also use the zoom (WT) button on the touch screen to zoom.
0
Tap
the WT button, then press and hold the T (telephoto end) or W (wide
angle end) button.
.
Memo :
0
When digital zoom is used, the image becomes grainy as it is digitally
enlarged.
0
The zoom ratio range can be changed.
“ ZOOM ” (A p. 88)
Zoom Memory
The zoom position can be stored by the Zoom Memory icon (WT) on the
touch screen.
o
Storing Method
1
Zoom to the position to reach to the desired position for storing.
.
2
Tap “WT”.
.
3
Press and hold “M” (approx. 1 second).
.
0
Store the zoom position.
o
Operating Detail
1
Tap “WT”.
.
2
Tap “M”.
.
0
Zoom to the point that is stored in advance.
Memo :
0
If the setting of DIS, VIDEO QUALITY or ZOOM is changed, the zoom
position stored will be erased.
Recording
26
Manual Recording
In situations where you are unable to recording properly using Intelligent
Auto recording, you can change the settings and record using manual
recording.
1
Open the LCD monitor.
.
0
Set the recording mode to either A video or B still image.
0
To
switch the mode between video and still image, tap A or B on the
recording screen to display the mode switching screen.
Tap A or B to switch the mode to video or still image respectively.
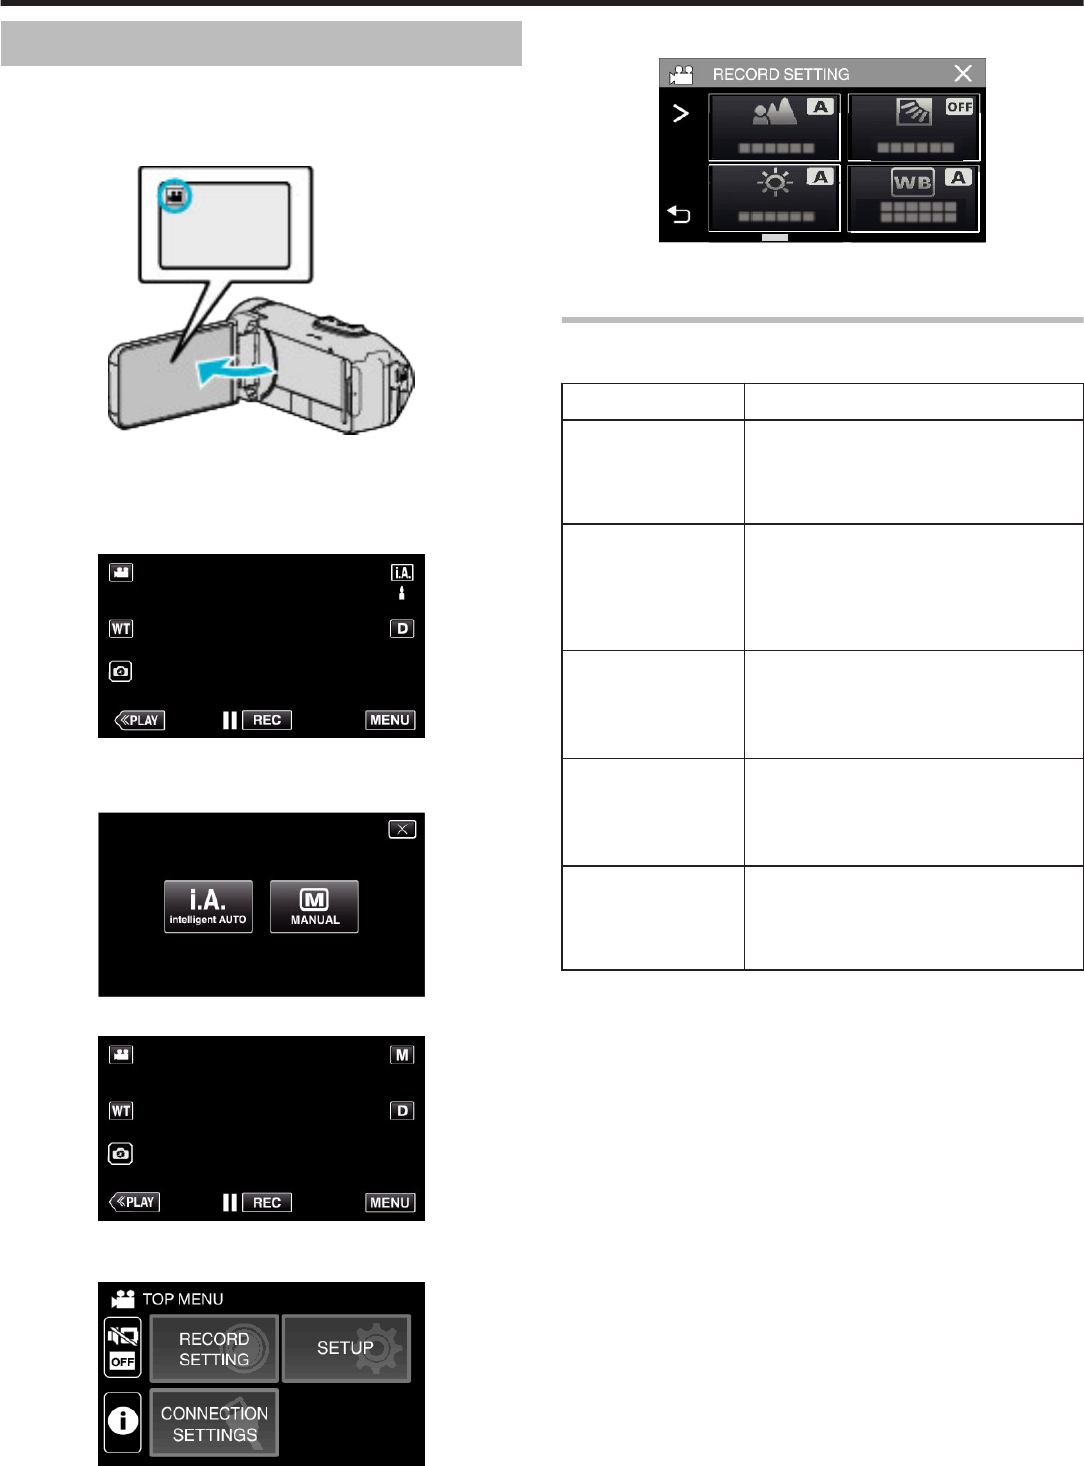
2
Select the Manual recording mode.
.
0
If the mode is P Intelligent Auto, tap P on the recording screen
to display the mode switching screen.
Tap H to switch the recording mode to Manual.
.
3
Tap “MENU”.
.
0
The top menu appears.
4
Tap “RECORD SETTING”.
.
5
Tap the item to set manually.
.
0
For
details on the various manual settings, refer to “Manual Recording
Menu”.
Manual Recording Menu
The following items can be set.
NameDescription
FOCUS
0
Use manual focus if the subject is not
focused automatically.
“Adjusting Focus Manually (FOCUS)”
(A p. 28)
BRIGHTNESS
ADJUST
0
Overall brightness on the screen can be
adjusted.
0
Use this when recording in a dark or bright
location.
“Adjusting Brightness” (A p. 29)
BACKLIGHT COMP.
0
Corrects the image when the subject
appears dark due to backlight.
0
Use this when shooting against the light.
“Setting Backlight Compensation” (A p. 30)
WHITE BALANCE
0
Overall
color on the screen can be adjusted.
0
Use this when the color on the screen
appears differently from the actual color.
“Setting White Balance” (A p. 31)
TELE MACRO
0
Use
this to take close-up (macro) shots of the
subject.
“Taking Close-up Shots (TELE MACRO)”
(A p. 32)
Recording
27
Adjusting Focus Manually (FOCUS)
Adjust the focus manually when you are unable to focus clearly using
Intelligent Auto or when you want to lock the focus.
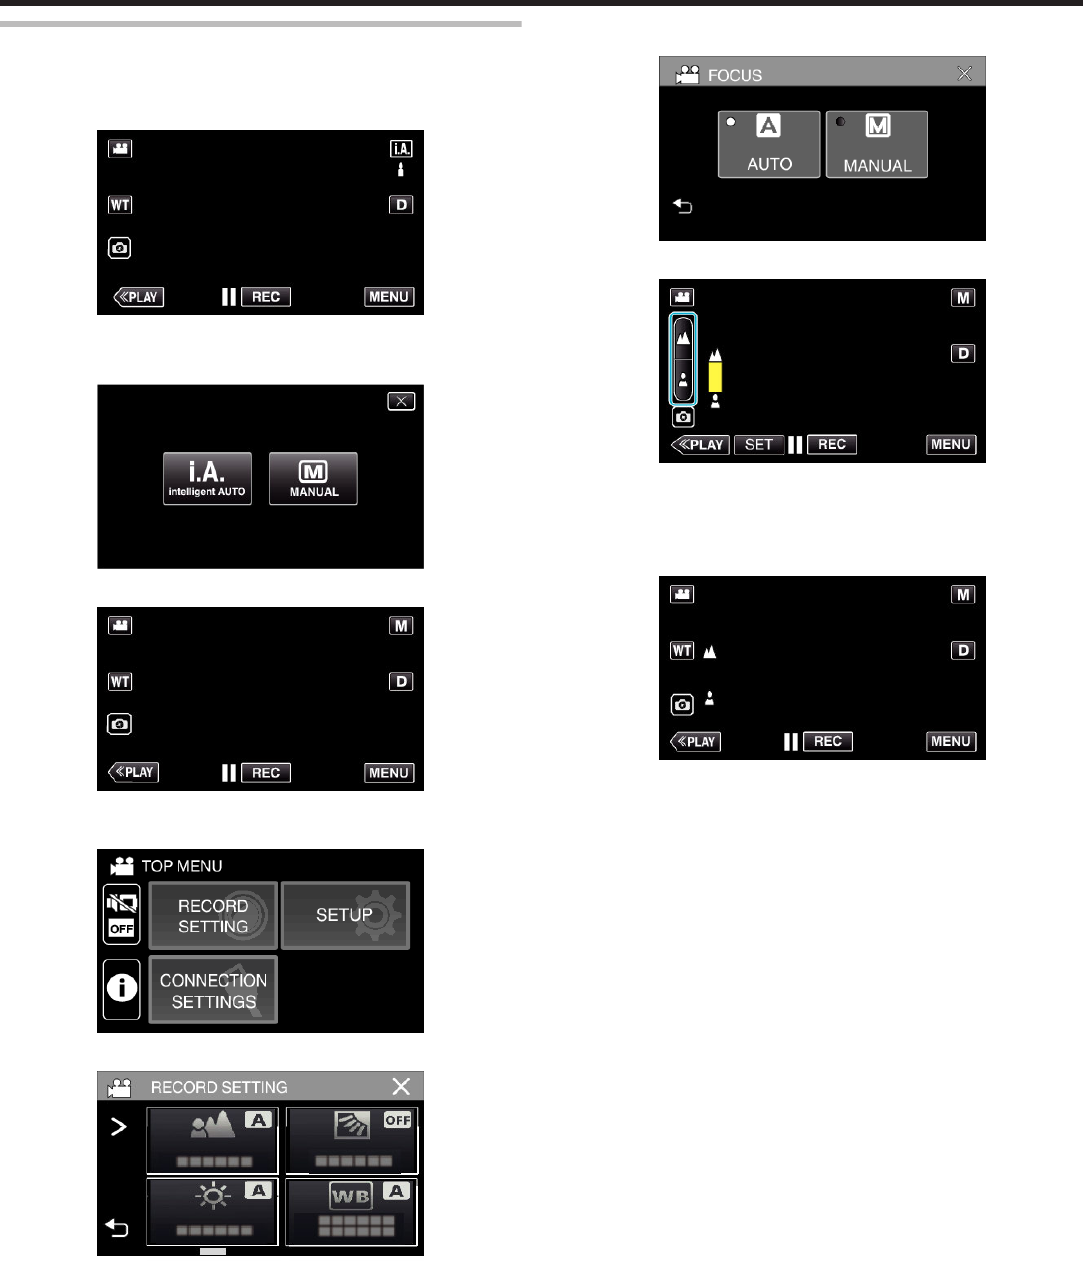
1
Select the Manual recording mode.
.
0
If the mode is P Intelligent Auto, tap P on the recording screen
to display the mode switching screen.
Tap H to switch the recording mode to Manual.
.
2
Tap “MENU”.
.
0
The top menu appears.
3
Tap “RECORD SETTING”.
.
4
Tap “FOCUS”.
.
0
Tap L to exit the menu.
0
Tap J to return to the previous screen.
5
Tap “MANUAL”.
.
6
Adjust the focus.
.
0
Tap E to focus on a distant subject.
If E appears blinking, focus cannot be set any further.
0
Tap p to focus on a near subject.
If p appears blinking, focus cannot be set any nearer.
7
Tap “SET” to confirm.
.
0
When
focus is confirmed, the focusing frame disappears and E and
p are displayed.
Recording
28
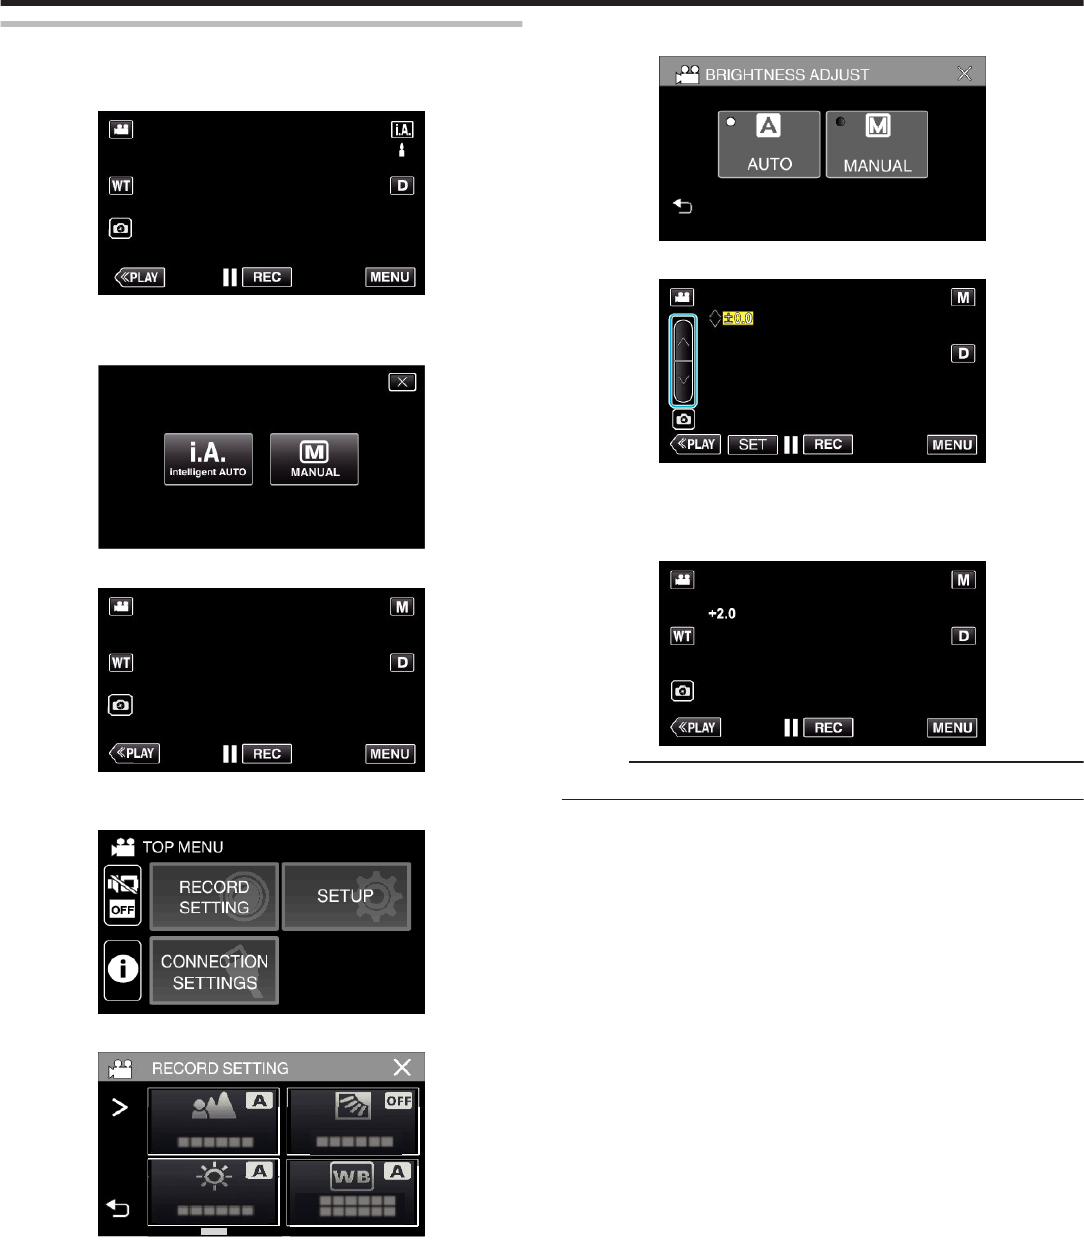
Adjusting Brightness
You can adjust the brightness to your preferred level.
1
Select the Manual recording mode.
.
0
If the mode is P Intelligent Auto, tap P on the recording screen
to display the mode switching screen.
Tap H to switch the recording mode to Manual.
.
2
Tap “MENU”.
.
0
The top menu appears.
3
Tap “RECORD SETTING”.
.
4
Tap “BRIGHTNESS ADJUST”.
.
0
Tap L to exit the menu.
0
Tap J to return to the previous screen.
5
Tap “MANUAL”.
.
6
Adjust the brightness value.
.
0
Compensation range: -2.0 to +2.0
0
Tap 3 to increase the brightness.
0
Tap 2 to decrease the brightness.
7
Tap “SET” to confirm.
.
Memo :
0
Settings can be adjusted separately for videos and still images.
Recording
29
Setting Backlight Compensation
You can correct the image when the subject appears too dark due to
backlight.
1
Select the Manual recording mode.
.
0
If the mode is P Intelligent Auto, tap P on the recording screen
to display the mode switching screen.
Tap H to switch the recording mode to Manual.
.
2
Tap “MENU”.
.
0
The top menu appears.
3
Tap “RECORD SETTING”.
.
4
Tap “BACKLIGHT COMP.”.
.
0
Tap L to exit the menu.
0
Tap J to return to the previous screen.
5
Tap “ON” or “ADVANCE”.
.
0
“ADVANCE” is designed to perform more effective backlight
compensation. Choose this when the backlight compensation is not
adjusted appropriately by “ON”.
0
After setting, the l icon (Advance: Q) appears.
SettingDetails
OFFBacklight compensation is disabled.
ONBacklight compensation is enabled.
ADVANCEShould be selected for a better backlight
compensation effect.
Recording
30
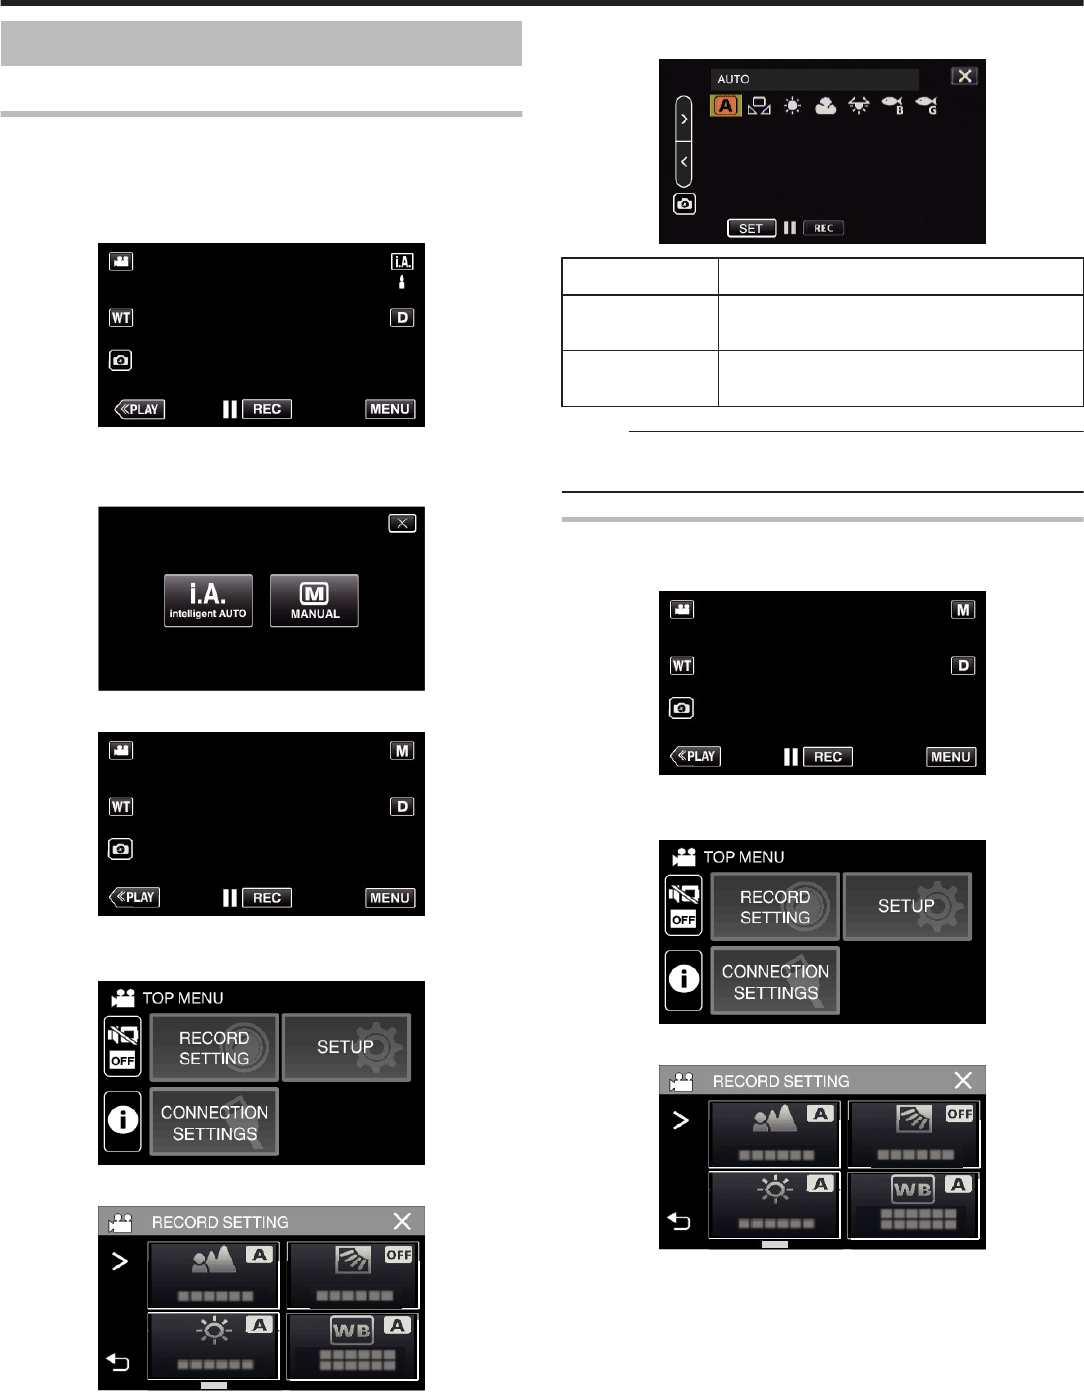
Setting White Balance
You can set the color tone to suit the light source.
1
Select the Manual recording mode.
.
0
If the mode is P Intelligent Auto, tap P on the recording screen
to display the mode switching screen.
Tap H to switch the recording mode to Manual.
.
2
Tap “MENU”.
.
0
The top menu appears.
3
Tap “RECORD SETTING”.
.
4
Tap “WHITE BALANCE”.
.
0
Tap L to exit the menu.
0
Tap J to return to the previous screen.
5
Select the white balance setting.
.
0
You can either tap the icon, or select the item using the “0”“1” button
and tap “SET”.
0
The White Balance icon appears on the screen upon completing the
setting.
SettingDetails
n
AUTOAdjusts automatically to the natural colors.
l
MWBUse this when the problem of unnatural colors is
not resolved.
m
FINESet this when shooting outdoors on a sunny day.
p
CLOUDSet this when shooting on a cloudy day or inside a
shade.
o HALOGENSet this when shooting under illumination such as
a video light.
q MARINE:BLUESet this when shooting in deep waters (water
appears blue).
r
MARINE:GREEN
Set this when shooting in shallow waters (water
appears green).
Using MWB
1
Point the cursor to “MWB” using the “0”“1” button.
2
Hold a sheet of plain white paper in front of the lens so that the white
paper fills the screen, tap and hold the “SET” button.
3
o blinks, release your finger after the setting screen disappears.
0
You can also tap and hold the “MWB” icon to perform the setting.
Memo :
0
The setting will not change if “MWB” is being tapped too fast (less than 1
second).
Recording
31
Taking Close-up Shots (TELE MACRO)
You can take close-up shots of an object using the tele macro function even
when the unit is at the telephoto zoom setting.
.
*The image is only an impression.
1
Select the Manual recording mode.
.
0
If the mode is P Intelligent Auto, tap P on the recording screen
to display the mode switching screen.
Tap H to switch the recording mode to Manual.
.
2
Tap “MENU”.
.
0
The top menu appears.
3
Tap “RECORD SETTING”.
.
4
Tap “TELE MACRO”.
.
0
Tap L to exit the menu.
0
Tap J to return to the previous screen.
5
Tap “ON”.
.
0
After setting, the tele macro icon o
appears.
SettingDetails
OFFEnables close-up shots up to 1 m at the telephoto (T) end.
Enables close-up shots up to 5 cm at the wide angle (W) end.
ONEnables close-up shots up to 60 cm at the telephoto (T) end.
Enables close-up shots up to 5 cm at the wide angle (W) end.
Caution :
0
When you are not taking close-up shots, set “TELE MACRO” to “OFF”.
Otherwise, the image may be blur.
Recording
32
Shooting under Water
Perform the following settings to shoot underwater.
Setting the White Balance to Underwater Mode
Corrects the color when shooting underwater to record more natural images.
Select
from the following two settings depending on the color of the water at
the shooting location.
1
Select the Manual recording mode.
.
0
If the mode is P Intelligent Auto, tap P on the recording screen
to display the mode switching screen.
Tap H to switch the recording mode to Manual.
.
2
Tap “MENU”.
.
0
The top menu appears.
3
Tap “RECORD SETTING”.
.
4
Tap “WHITE BALANCE”.
.
5
Tap q or r.
.
SettingDetails
q MARINE:BLUESet this when shooting in deep waters (water
appears blue).
r
MARINE:GREEN
Set this when shooting in shallow waters (water
appears green).
Memo :
0
You may not necessarily achieve the correction effect as expected.
0
It is recommended to conduct a trial recording in advance.
Locking the Screen
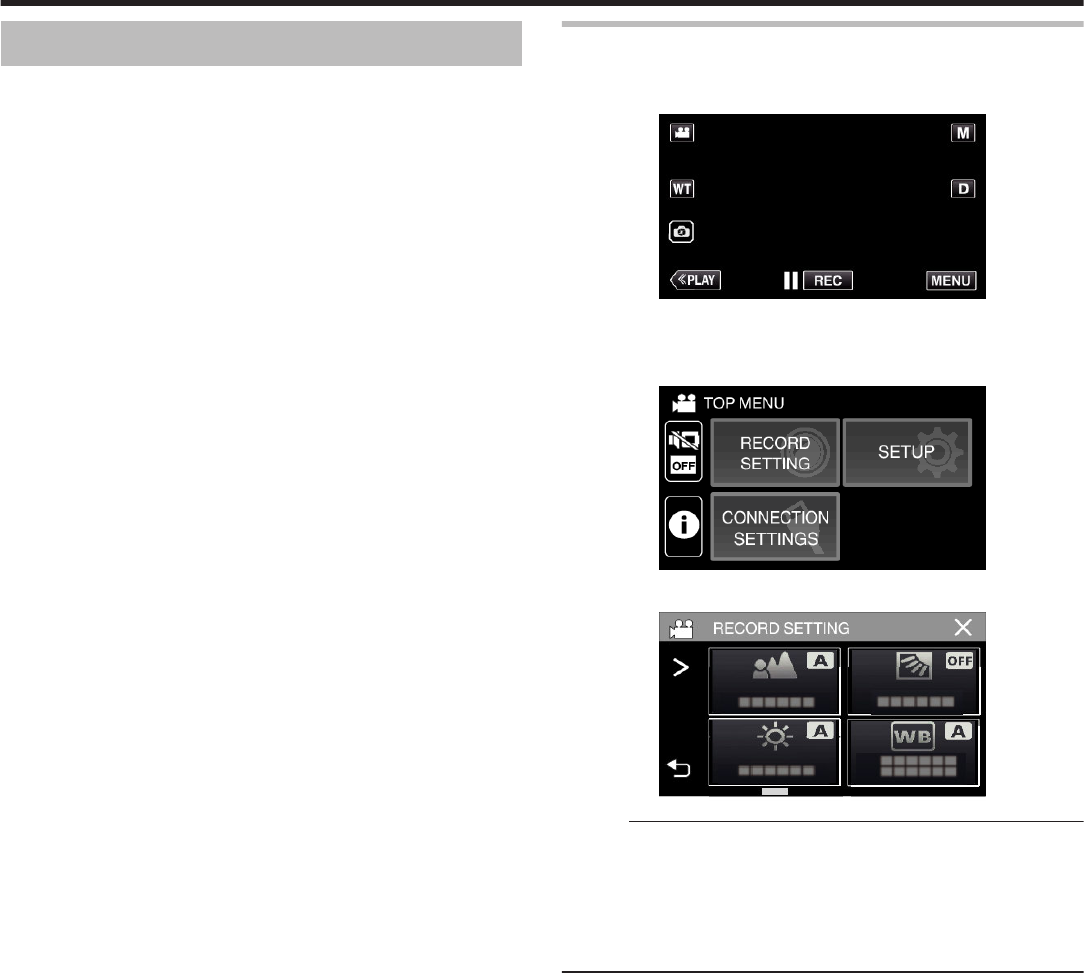
1
Tap “MENU”.
.
0
The top menu appears.
2
Tap “RECORD SETTING”.
.
3
Tap 1 to change the items displayed.
.
Recording
33
4
Tap “SCREEN LOCK”.
0
The L button appears.
.
Memo :
0
If “SCREEN LOCK” has been set, it will take a longer time for the unit to
power
off after closing the LCD monitor. If you open the LCD monitor after
closing it, and the power is still turned on, you can continue to record.
0
If “LCD CLOSED RECORDING” (A p. 90) is set to “ON”, this unit does
not turn off even when the LCD monitor is closed.
o
To cancel “SCREEN LOCK”
Tap the L button.
.
Memo :
0
Once
“SCREEN LOCK” is set, only the L button on the touch screen can
be operated.
0
The START/STOP (recording) button and the zoom lever can be used
while the screen is locked.
0
“SCREEN LOCK” cannot be set for the following cases:
- during recording
- when “TIME-LAPSE RECORDING” or “DATE/TIME RECORDING” is set
Caution :
0
Before using the camera underwater, read “Before Using Underwater or
under Low Temperature” (A p. 6) carefully. Improper usage resulting in
water submersion will damage the device and cause injury.
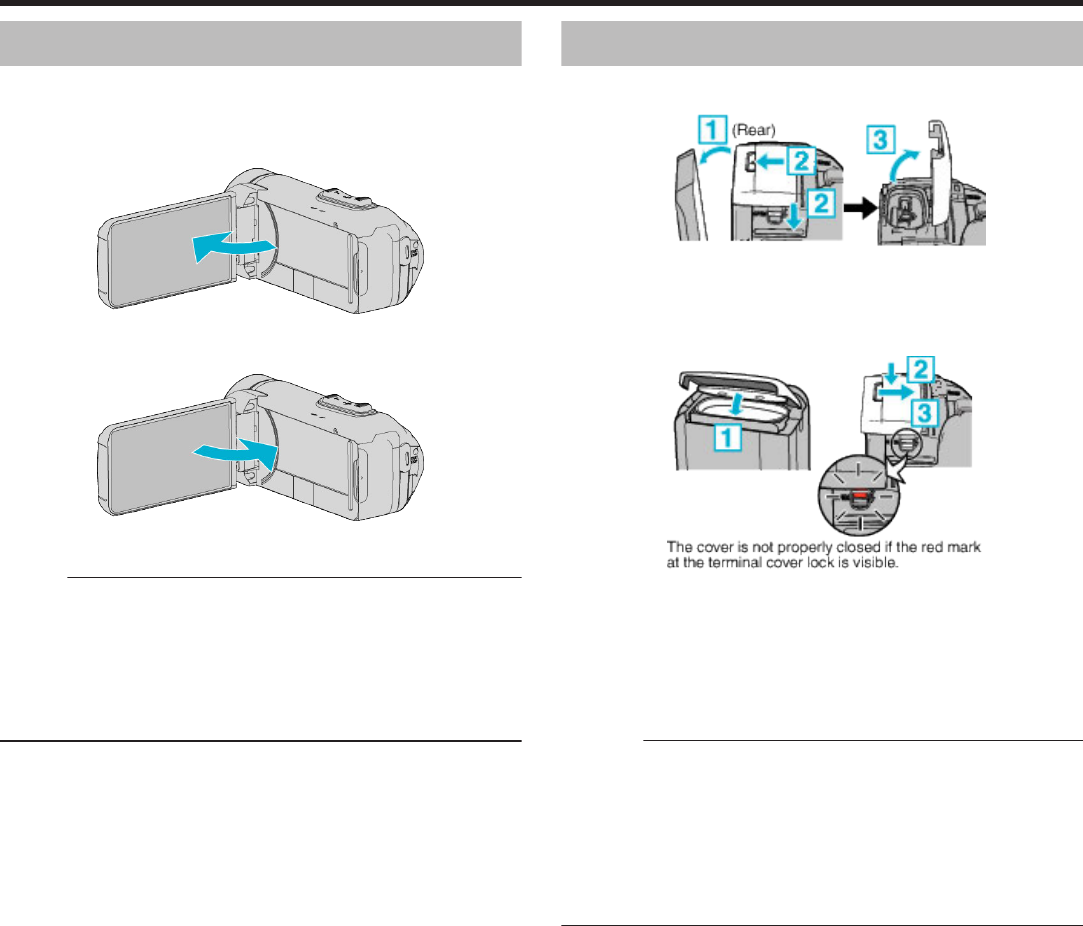
0
Ensure
that the terminal cover is closed tightly before using underwater or
on the beach.
“Opening the Terminal Cover (SD Card Cover)” (A p. 4)
Recording
34
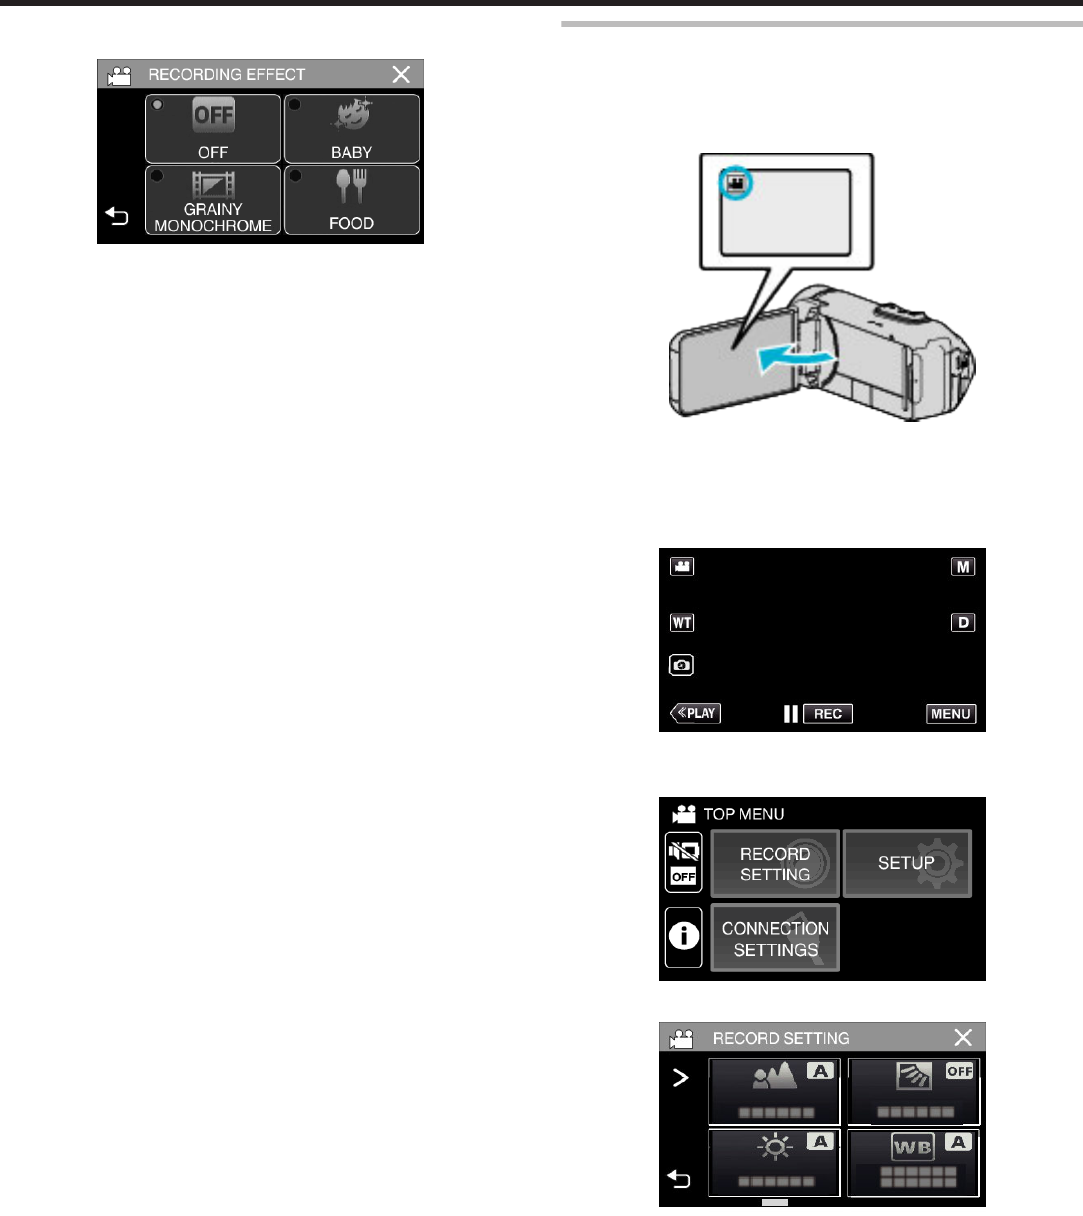
Recording with Effects (RECORDING
EFFECT)
You can add and record various effects to videos or still images.
Once
setting is done, you can easily record images that are suitable for each
image.
Type of EffectDescription of Effect
C
GRAINY
MONOCHROME
Captures film-like monochrome images by
increasing
the contrast of mid-level brightness and
emphasizing the rough grainy feel on the image.
“Recording Images Like an Old Black and White
Photo (GRAINY MONOCHROME)” (A p. 35)
D
FOOD
Captures food images such that the food looks
appetizing even under fluorescent lighting in
homes
by changing the colors to warm-colors and
deepening the colors.
“Recording Food Images (FOOD)” (A p. 36)
B
BABY
Captures a soft and gentle image by lightening the
skin tone while retaining the reddish hue,
enhancing the skin beautifying effect as well as
smoothing the appearance of the skin.
“Recording Images of a Baby (BABY)”
(A p. 37)
Caution :
0
Depending
on the shooting environment and subject, you may not achieve
the shooting effect as intended.
Recording Images Like an Old Black and White Photo
(GRAINY MONOCHROME)
Captures film-like monochrome images by increasing the contrast of mid-
level brightness and emphasizing the rough grainy feel on the image.
1
Open the LCD monitor.
.
0
Set the recording mode to either A video or B still image.
0
To
switch the mode between video and still image, tap A or B on the
recording screen to display the mode switching screen.
Tap A or B to switch the mode to video or still image respectively.
2
Tap “MENU”.
.
0
The top menu appears.
3
Tap “RECORD SETTING”.
.
4
Tap “RECORDING EFFECT”.
.
0
If the icon is not displayed on the screen, tap 1 to scroll the screen.
0
Tap L to exit the menu.
0
Tap J to return to the previous screen.
Recording
35
5
Tap “GRAINY MONOCHROME”.
.
0
Tap L to exit the menu.
0
Tap J to return to the previous screen.
6
Start recording.
0
To cancel the setting, repeat the procedure from the beginning and
tap “OFF” in Step 5.
Recording Food Images (FOOD)
Captures food images such that the food looks appetizing even under
fluorescent lighting in homes by changing the colors to warm-colors and
deepening the colors.
1
Open the LCD monitor.
.
0
Set the recording mode to either A video or B still image.
0
To
switch the mode between video and still image, tap A or B on the
recording screen to display the mode switching screen.
Tap A or B to switch the mode to video or still image respectively.
2
Tap “MENU”.
.
0
The top menu appears.
3
Tap “RECORD SETTING”.
.
4
Tap “RECORDING EFFECT”.
.
0
If the icon is not displayed on the screen, tap 1 to scroll the screen.
0
Tap L to exit the menu.
0
Tap J to return to the previous screen.
Recording
36
5
Tap “FOOD”.
.
0
Tap L to exit the menu.
0
Tap J to return to the previous screen.
6
Start recording.
0
To cancel the setting, repeat the procedure from the beginning and
tap “OFF” in Step 5.
Recording Images of a Baby (BABY)
Captures a soft and gentle image by lightening the skin tone while retaining
the
reddish hue, enhancing the skin beautifying effect as well as smoothing
the appearance of the skin.
1
Open the LCD monitor.
.
0
Set the recording mode to either A video or B still image.
0
To
switch the mode between video and still image, tap A or B on the
recording screen to display the mode switching screen.
Tap A or B to switch the mode to video or still image respectively.
2
Tap “MENU”.
.
0
The top menu appears.
3
Tap “RECORD SETTING”.
.
4
Tap “RECORDING EFFECT”.
.
0
If the icon is not displayed on the screen, tap 1 to scroll the screen.
0
Tap L to exit the menu.
0
Tap J to return to the previous screen.
Recording
37
5
Tap “BABY”.
.
0
Tap L to exit the menu.
0
Tap J to return to the previous screen.
6
Start recording.
0
To cancel the setting, repeat the procedure from the beginning and
tap “OFF” in Step 5.
Recording
38
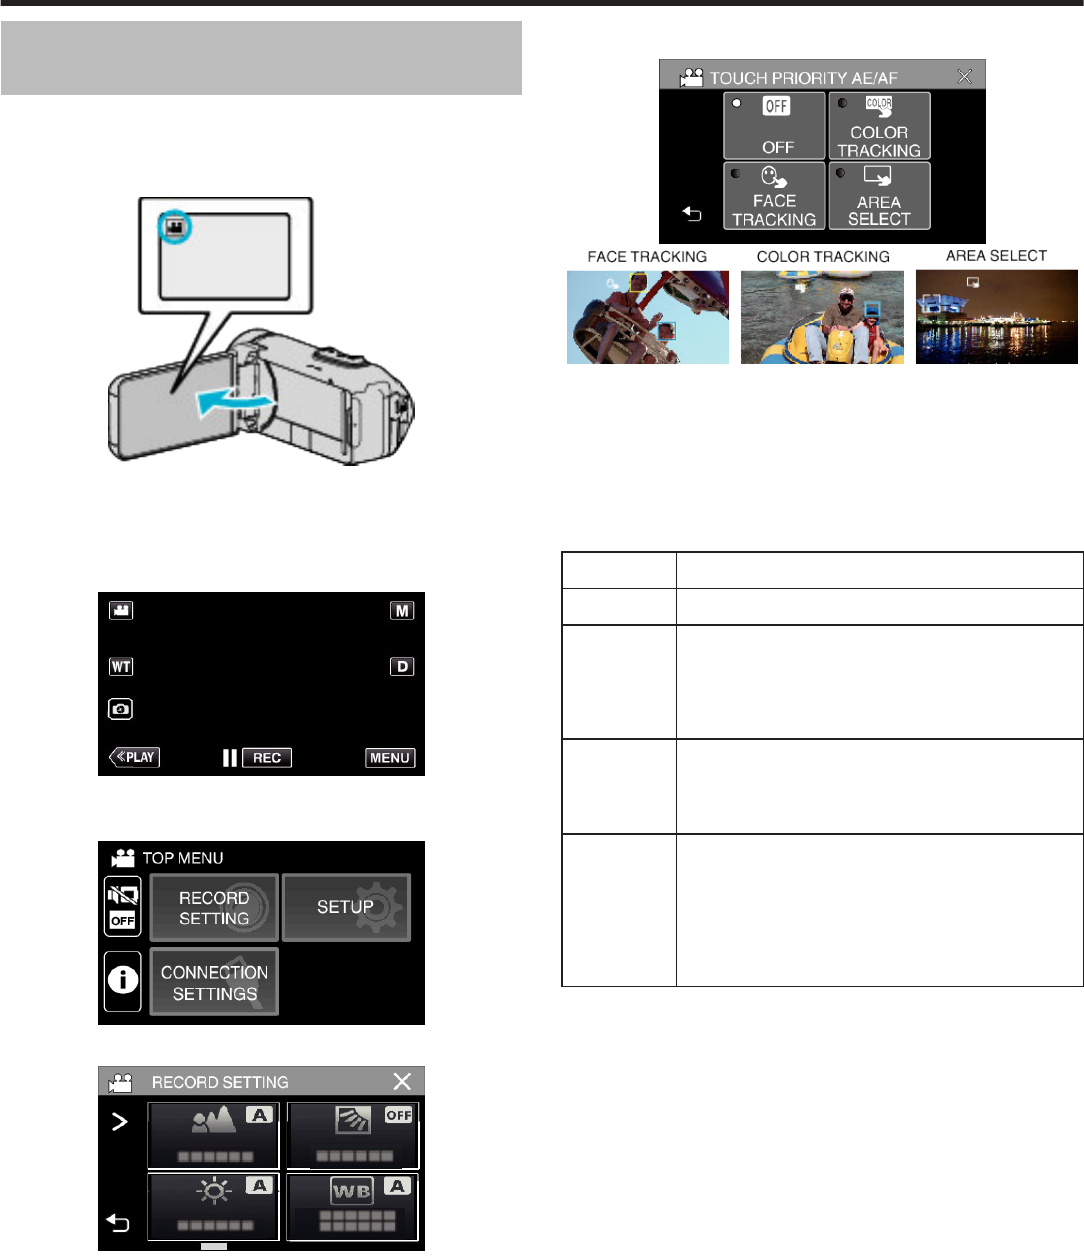
Capturing Subjects Clearly (TOUCH PRIORITY
AE/AF)
“TOUCH PRIORITY AE/AF” is a function that adjusts focus and brightness
based on a tapped position.
This function is available for both videos and still images.
1
Open the LCD monitor.
.
0
Set the recording mode to either A video or B still image.
0
To
switch the mode between video and still image, tap A or B on the
recording screen to display the mode switching screen.
Tap A or B to switch the mode to video or still image respectively.
2
Tap “MENU”.
.
0
The top menu appears.
3
Tap “RECORD SETTING”.
.
4
Tap “TOUCH PRIORITY AE/AF”.
.
0
If the icon is not displayed on the screen, tap 1 to scroll the screen.
0
Tap L to exit the menu.
0
Tap J to return to the previous screen.
5
Tap the desired setting.
.
.
0
Focus and brightness will be adjusted automatically based on the
tapped position (face/color/area). A blue frame appears around the
selected
subject (face/color), while a white frame appears around the
selected area.
0
To reset, tap the desired position (face/color/area) again.
0
To cancel “FACE TRACKING” or “COLOR TRACKING”, tap the blue
frame.
0
To cancel “AREA SELECT”, tap the white frame.
SettingDetails
OFFDeactivates the function.
FACE
TRACKING
e
appears on the screen. Recording is performed while
tracking and automatically adjusting the tapped face
(subject) with appropriate focus and brightness. In
addition, a blue frame appears around the tapped face
(subject).
COLOR
TRACKING
f
appears on the screen. Recording is performed while
tracking and automatically adjusting the tapped color
(subject) with appropriate focus. In addition, a blue frame
appears around the tapped color (subject).
AREA
SELECT
g
appears on the screen. Recording is performed while
automatically adjusting the tapped area (fixed position)
with appropriate focus and brightness. In addition, a
white frame appears around the tapped area.
AREA SELECT in TOUCH PRIORITY AE/AF is only
available within the optical zoom range. (unavailable
when digital zoom is being used)
Recording
39
Memo :
0
When “TOUCH PRIORITY AE/AF” is set, “FOCUS” will be set to “AUTO”
automatically.
0
Tap the selected position (face/color/area) again to cancel the setting.
0
Tap on an unselected position (face/color/area) to reset.
0
If the camera loses track of a subject, tap the subject again.
0
Settings are canceled when zoom operation is performed. (“AREA
SELECT” only)
0
When “COLOR TRACKING” is set, the targeted subject (color) may
change if similar colors are detected. In this case, tap the subject again.
The targeted subject (color) may also be tracked back again if it appears
in the center of the screen within a specific time.
Caution :
0
Subjects near the sides of the LCD monitor may not respond or be
recognized when tapped. In this case, move the subject to the center and
tap again.
0
“FACE TRACKING” may not work properly depending on the shooting
conditions (distance, angle, brightness, etc.) and the subject (direction of
face, etc.). It is also particularly difficult to detect faces in backlight.
0
“COLOR TRACKING” may not function properly in the following cases:
- when recording subjects with no contrast
- when recording subjects that are moving at high speed
- when recording in a dark place
- when the surrounding brightness changes
0
“AREA SELECT” is not available while the digital zoom is in use.
0
When “FACE TRACKING” is set, the subject may be lost if the camera is
moved vertically or horizontally very fast.
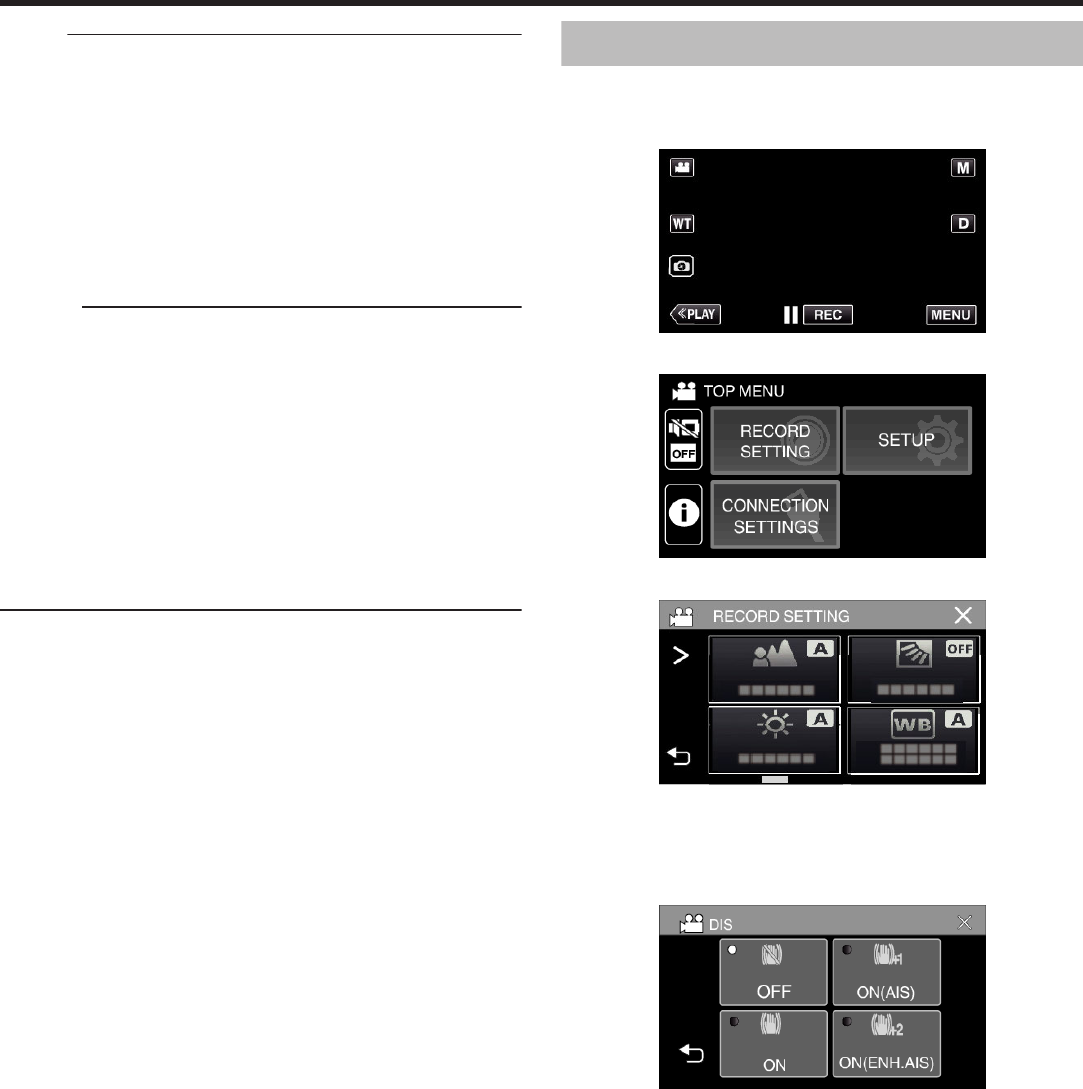
Reducing Camera Shake
When the image stabilizer is set, camera shake during video recording can
be effectively reduced.
1
Tap “MENU”.
.
2
Tap “RECORD SETTING”.
.
3
Tap “OIS”.
.
0
If the icon is not displayed on the screen, tap 1 to scroll the screen.
0
Tap L to exit the menu.
0
Tap J to return to the previous screen.
4
Tap the desired setting.
.
Recording
40
SettingDetails
b
OFF
Deactivates image stabilizer.
a
ON
Reduces camera shake under normal
shooting conditions.
r
ON (AIS)
Reduces camera shake more effectively
when shooting bright scenes on the wide
angle end.
Only on the wide angle end (approx. 5x).
s (Enhanced AIS)
The area of correction in the enhanced AIS
mode is greater than that in the AIS mode.
Camera shake can be reduced more
effectively
even when recording is performed
by zooming from wide angle to telephoto.
Memo :
0
It is recommended to set the image stabilizer to “OFF” when shooting a
subject of little movement with the unit on a tripod.
0
Complete
stabilization may not be possible if camera shake is excessive.
0
This setting is effective for video recording only.
0
Using the image stabilizer will narrow the angle of view.
0
Dynamic zoom is not available in the enhanced AIS mode.
0
The resolution for the enhanced AIS mode is lower compared to the other
modes.
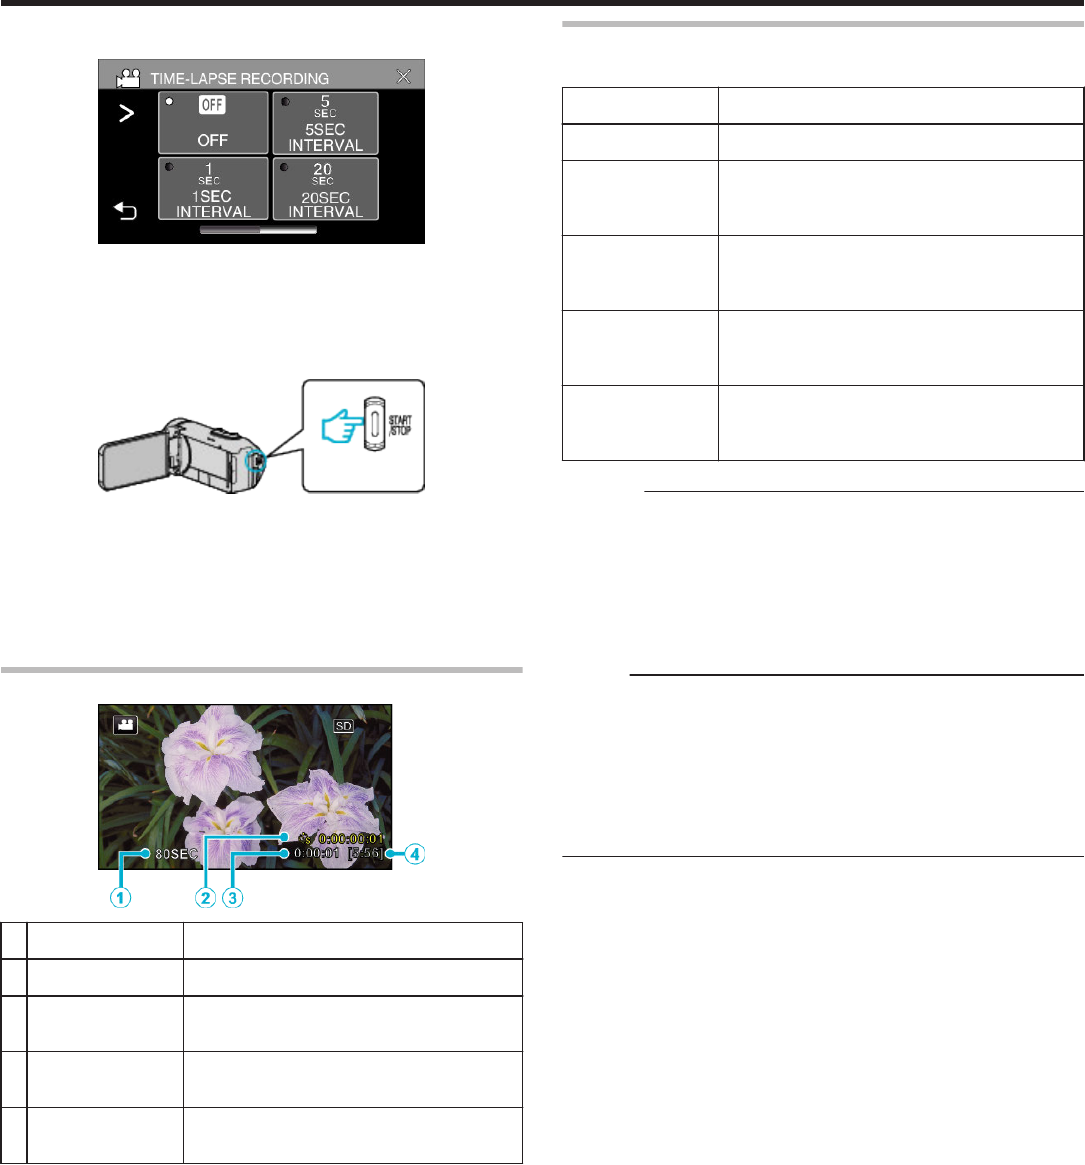
Recording at Intervals (TIME-LAPSE
RECORDING)
This function enables the changes of a scene that occur slowly over a long
period to be shown within a short time by taking frames of it at a certain
interval.
This is useful for making observations such as the opening of a flower bud.
1
Open the LCD monitor.
.
0
Check if the recording mode is A.
0
If
the mode is B still image, tap B on the recording screen to display
the mode switching screen.
Tap A to switch the mode to video.
2
Tap “MENU”.
.
0
The top menu appears.
3
Tap “RECORD SETTING”.
.
4
Tap “TIME-LAPSE RECORDING”.
.
0
If the icon is not displayed on the screen, tap 1 to scroll the screen.
0
Tap L to exit the menu.
0
Tap J to return to the previous screen.
Recording
41
5
Tap to select a recording interval (1 to 80 seconds).
.
0
If the icon is not displayed on the screen, tap 1 to scroll the screen.
0
The greater the number of seconds, the longer the recording interval.
0
Tap L to exit the menu.
0
Tap J to return to the previous screen.
6
Start recording.
.
0
A frame is taken at intervals of the selected period.
0
When the recording interval is set to “20SEC INTERVAL” or higher,
this unit switches to the power-saving mode between recordings.
At the next point to record, the power-saving mode will be turned off
and recording will start automatically.
0
Settings of Time-Lapse recording are not saved when the power is
turned off.
Indications During Time-Lapse Recording
.
DisplayDescription
A
Recording intervalDisplays the recording interval that is set.
B
Recorded TimeDisplays the actual recorded time of the video.
Recorded time increases in units of frames.
C
Actual Elapsed
Time
Displays the actual elapsed time after
recording starts.
D
Remaining
Recording Time
Remaining time left to record with the currently
selected video quality.
Time-Lapse Setting
The greater the number of seconds, the longer the recording interval.
SettingDetails
OFFDeactivates the function.
1SEC INTERVALTakes a frame at 1-second intervals.
Recorded videos will be played back at 30 times
speed.
5SEC INTERVALTakes a frame at 5-second intervals.
Recorded videos will be played back at 150 times
speed.
20SEC INTERVALTakes a frame at 20-second intervals.
Recorded videos will be played back at 600 times
speed.
80SEC INTERVALTakes a frame at 80-second intervals.
Recorded
videos will be played back at 2 400 times
speed.
Caution :
0
During the time-lapse recording, video quality is set to XP mode.
0
Audio cannot be recorded during time-lapse recording.
0
When
recording is stopped with the recorded time less than “0:00:00:14”,
the video will not be saved.
0
Zooming, simultaneous still image recording, and image stabilizer are not
available in time-lapse recording.
0
When Time-Lapse recording is set, you cannot record still images.
Memo :
0
Settings of time-lapse recording are reset when the power is turned off.
To
start time-lapse recording again, it is necessary to make the selection
once more.
0
Recording stops automatically 99 hours after it is started.
0
Make use of a tripod and AC adapter for time-lapse recordings with long
intervals.
It is also recommended to fix the focus and white balance manually.
“Tripod Mounting” (A p. 17)
Recording
42
Using the Self-timer
You can record video or still image using the self-timer.
This is useful when taking a video or still image that includes the
photographer.
The 2-second self-timer is useful for preventing camera shake caused by
pressing the shutter button when taking a still image.
Memo :
0
When shooting a photo using the self-timer function, use of a tripod is
recommended.
“Tripod Mounting” (A p. 17
)
o
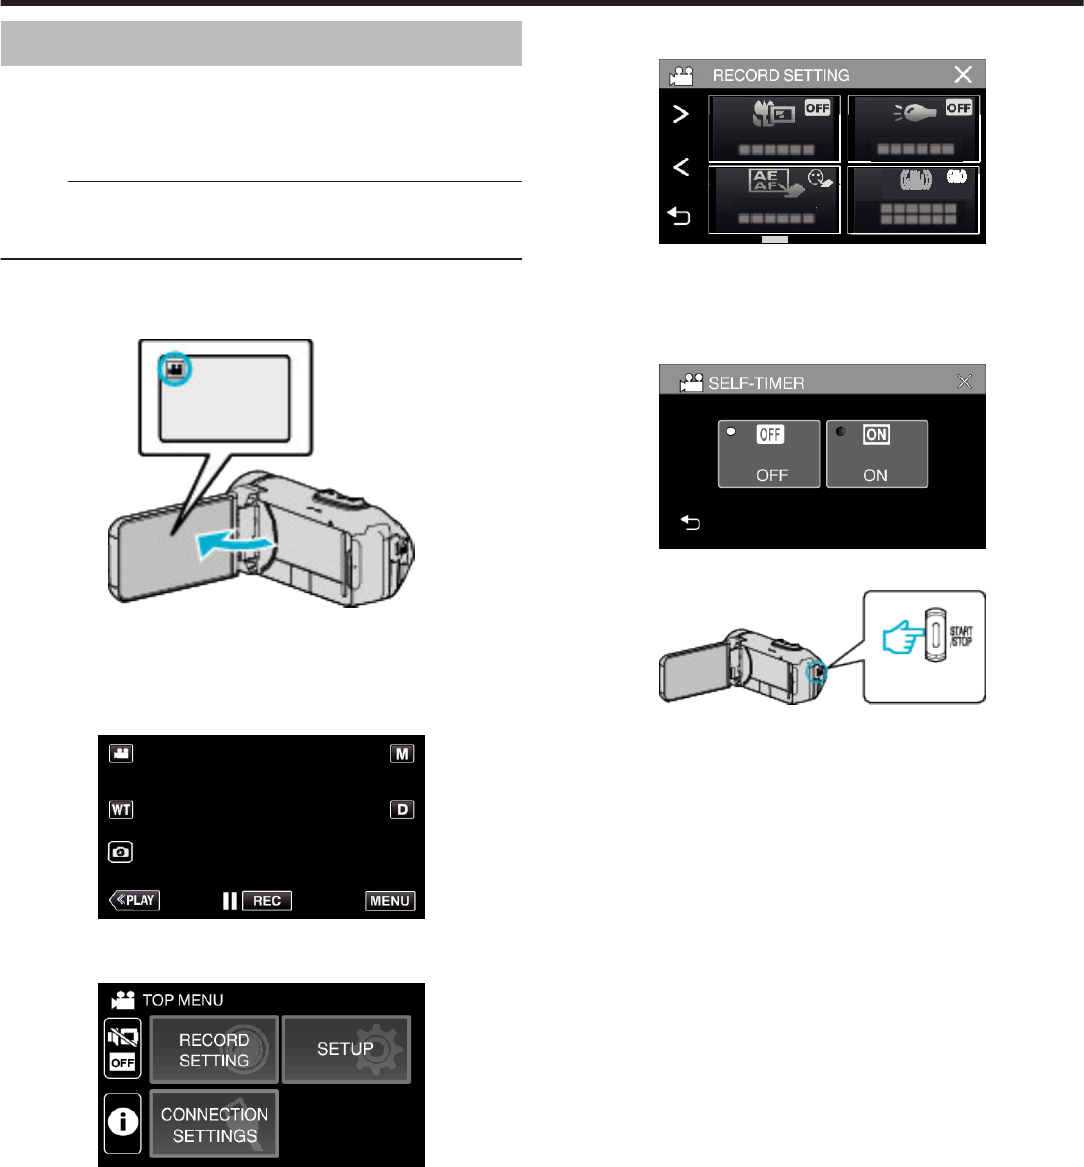
Using the Self-timer in Video Mode
1
Open the LCD monitor.
.
0
Check if the recording mode is A.
0
If
this unit is in the still image mode B, tap the D (video/still image)
button on the touch screen to display the mode switching screen.
Tap A to switch the mode to video.
2
Tap “MENU”.
.
0
The top menu appears.
3
Tap “RECORD SETTING”.
.
4
Tap “SELF-TIMER”.
.
0
If the icon is not displayed on the screen, tap 1 to scroll the screen.
0
Tap L to exit the menu.
0
Tap J to return to the previous screen.
5
Tap “ON”.
.
6
Press the START/STOP button.
.
0
The countdown to recording appears and recording will start after 5
seconds.
0
To stop the self-timer, press the recording button again.
Recording
43
o
Using the Self-timer in Still Image Mode
1
Open the LCD monitor.
.
0
Check if the recording mode is B.
0
If the mode is A
video, tap A on the recording screen to display the
mode switching screen.
Tap B to switch the mode to still image.
2
Tap “MENU”.
.
0
The top menu appears.
3
Tap “RECORD SETTING”.
.
4
Tap “SELF-TIMER”.
.
0
If the icon is not displayed on the screen, tap 1 to scroll the screen.
0
Tap L to exit the menu.
0
Tap J to return to the previous screen.
5
Tap “2SEC” or “10SEC”.
.
6
Take a still image.
0
A timer appears and countdown to shooting starts.
0
To stop the self-timer, press the START/STOP button again.
Memo :
0
The START/STOP button on this unit cannot be used to adjust the focus
in advance. To adjust the focus in advance, press and hold the A button
on the touch screen until the focus is adjusted.
“Start recording after adjusting the focus” (A p. 23)
0
While the countdown timer is displayed, the buttons cannot be used as
they are not displayed on the screen.
Recording
44
Recording at a Fixed Interval and Playing
Back Repeatedly
After
recording for a specified duration, this unit automatically plays back the
scene and then repeats the recording process and the playback process
over and over again. This can be used to check a sports form or dance form.
The recorded scene can also be deleted automatically depending on the
setting.
1
Open the LCD monitor.
.
0
Check if the recording mode is A.
0
If
the mode is B still image, tap B on the recording screen to display
the mode switching screen.
Tap A to switch the mode to video.
2
Tap “MENU”.
.
0
The top menu appears.
3
Tap “RECORD SETTING”.
.
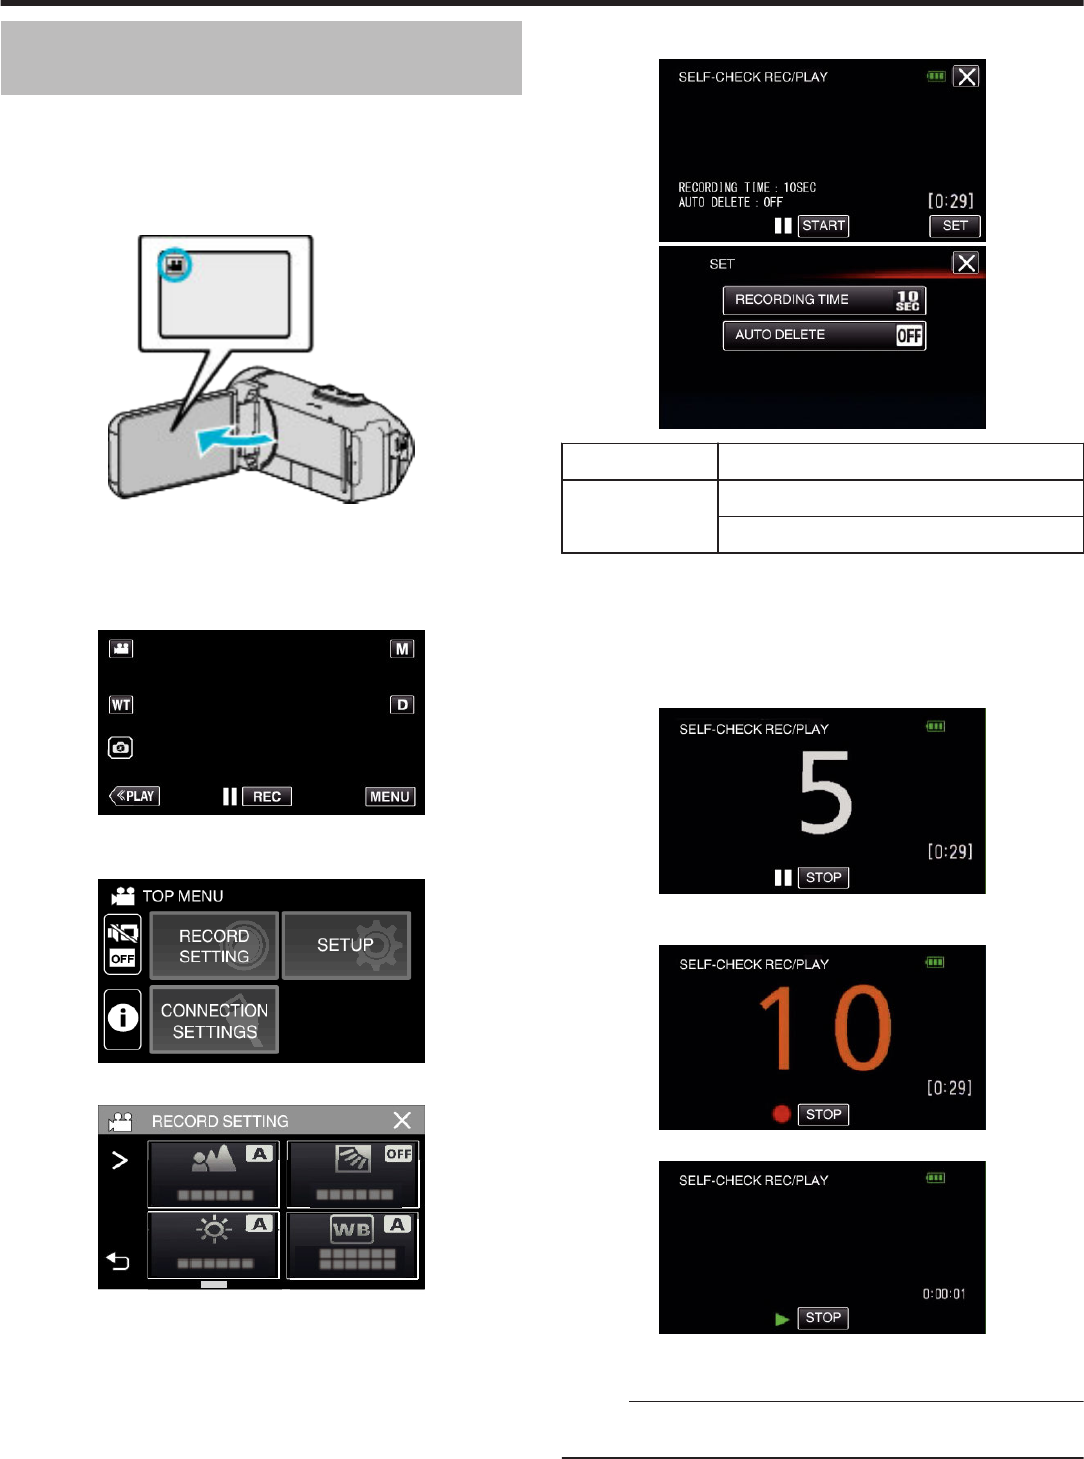
4
Tap “SELF-CHECK REC/PLAY”.
.
0
If the icon is not displayed on the screen, tap 1 to scroll the screen.
0
Tap L to exit the menu.
0
Tap J to return to the previous screen.
5
Tap “SET”.
.
.
RECORDING TIME10 to 40 seconds (Can be set in 5-second interval.)
AUTO DELETEOff: The recorded video is retained.
On: The recorded video is deleted.
0
Tap L to return to the previous screen.
0
This operation is not necessary if you do not intend to change the
current setting displayed.
6
Tap “START”.
0
There is a 5 second countdown before recording starts at the
beginning of the operation only.
.
0
When the recording starts, the color of the number changes and the
remaining number of seconds for recording is displayed.
.
0
When recording is complete, playback starts automatically.
.
0
When playback ends, the next recording starts automatically.
0
Tap “STOP” to exit “SELF-CHECK REC/PLAY”.
Memo :
0
The
START/STOP button cannot be used during the “SELF-CHECK REC/
PLAY” operation.
Recording
45
Recording Videos with Date and Time
You can record videos together with the date and time.
Set this when you want to save the file with date and time display.
(The date and time cannot be deleted after recording.)
1
Open the LCD monitor.
.
0
Check if the recording mode is A.
0
If
the mode is B still image, tap B on the recording screen to display
the mode switching screen.
Tap A to switch the mode to video.
2
Tap “MENU”.
.
0
The top menu appears.
3
Tap “RECORD SETTING”.
.
4
Tap “DATE/TIME RECORDING”.
.
0
If the icon is not displayed on the screen, tap 1 to scroll the screen.
0
Tap L to exit the menu.
0
Tap J to return to the previous screen.
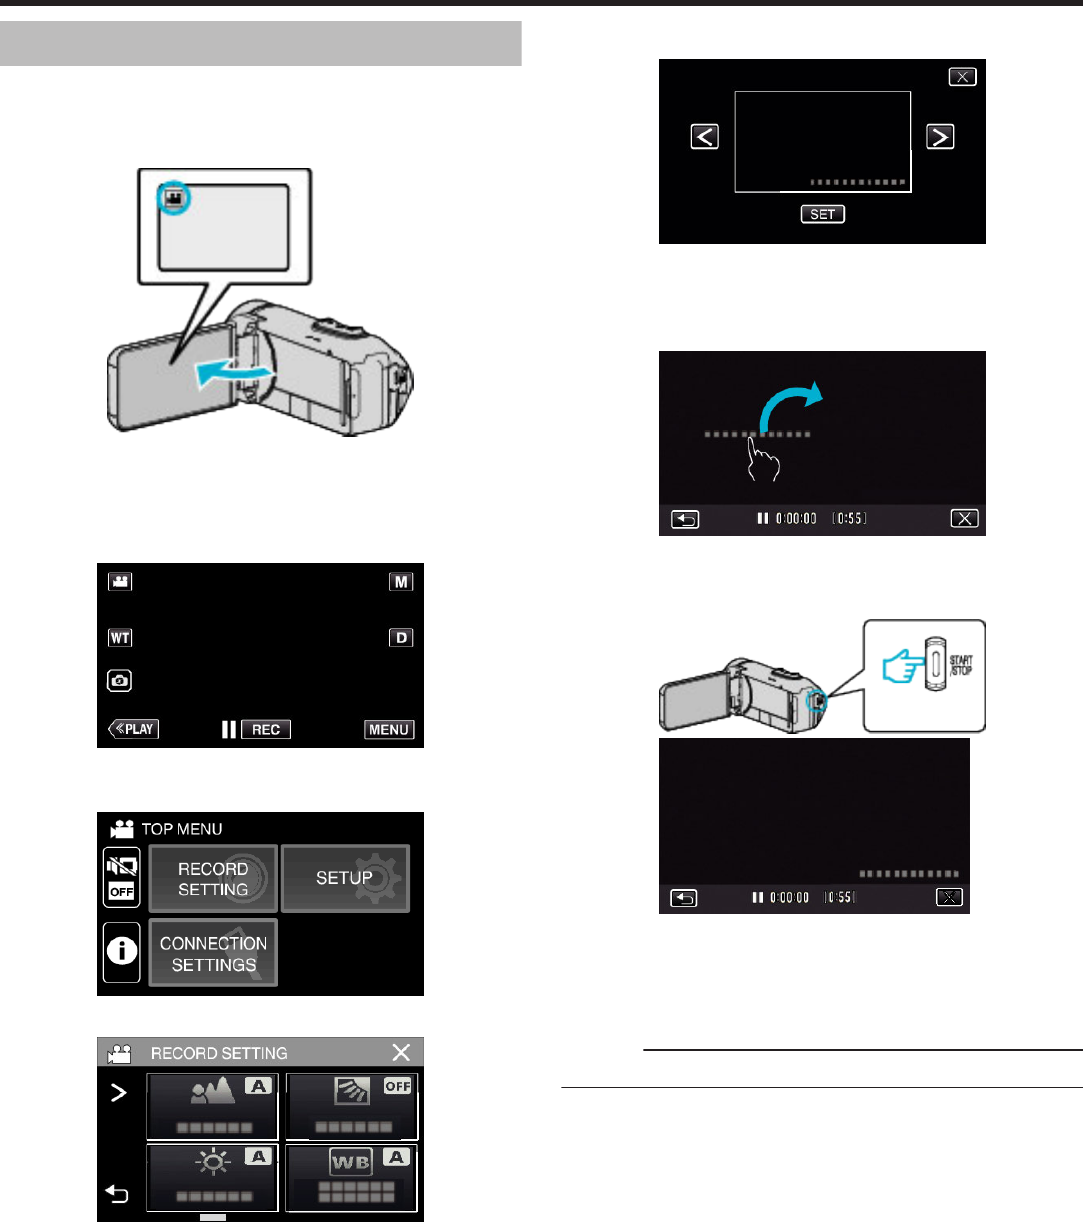
5
Select the type of clock with 0 or 1, and tap “SET”.
.
0
When “SET” is tapped, the precaution for date/time recording
appears.
0
Tap L to exit the menu.
6
Tap the display position with your finger and drag your finger to adjust.
.
0
Move
the date and time display while touching it with your finger and
tracing it on a screen.
7
Press the START/STOP button to start recording.
.
.
0
Press the START/STOP button again to stop recording.
0
Tap J to return to the screen for selecting the types of clock.
0
Tap L to exit “DATE/TIME RECORDING”.
(To perform operations other than recording, tap L to cancel the
“DATE/TIME RECORDING” first.)
Caution :
0
The date and time cannot be deleted after recording.
Recording
46
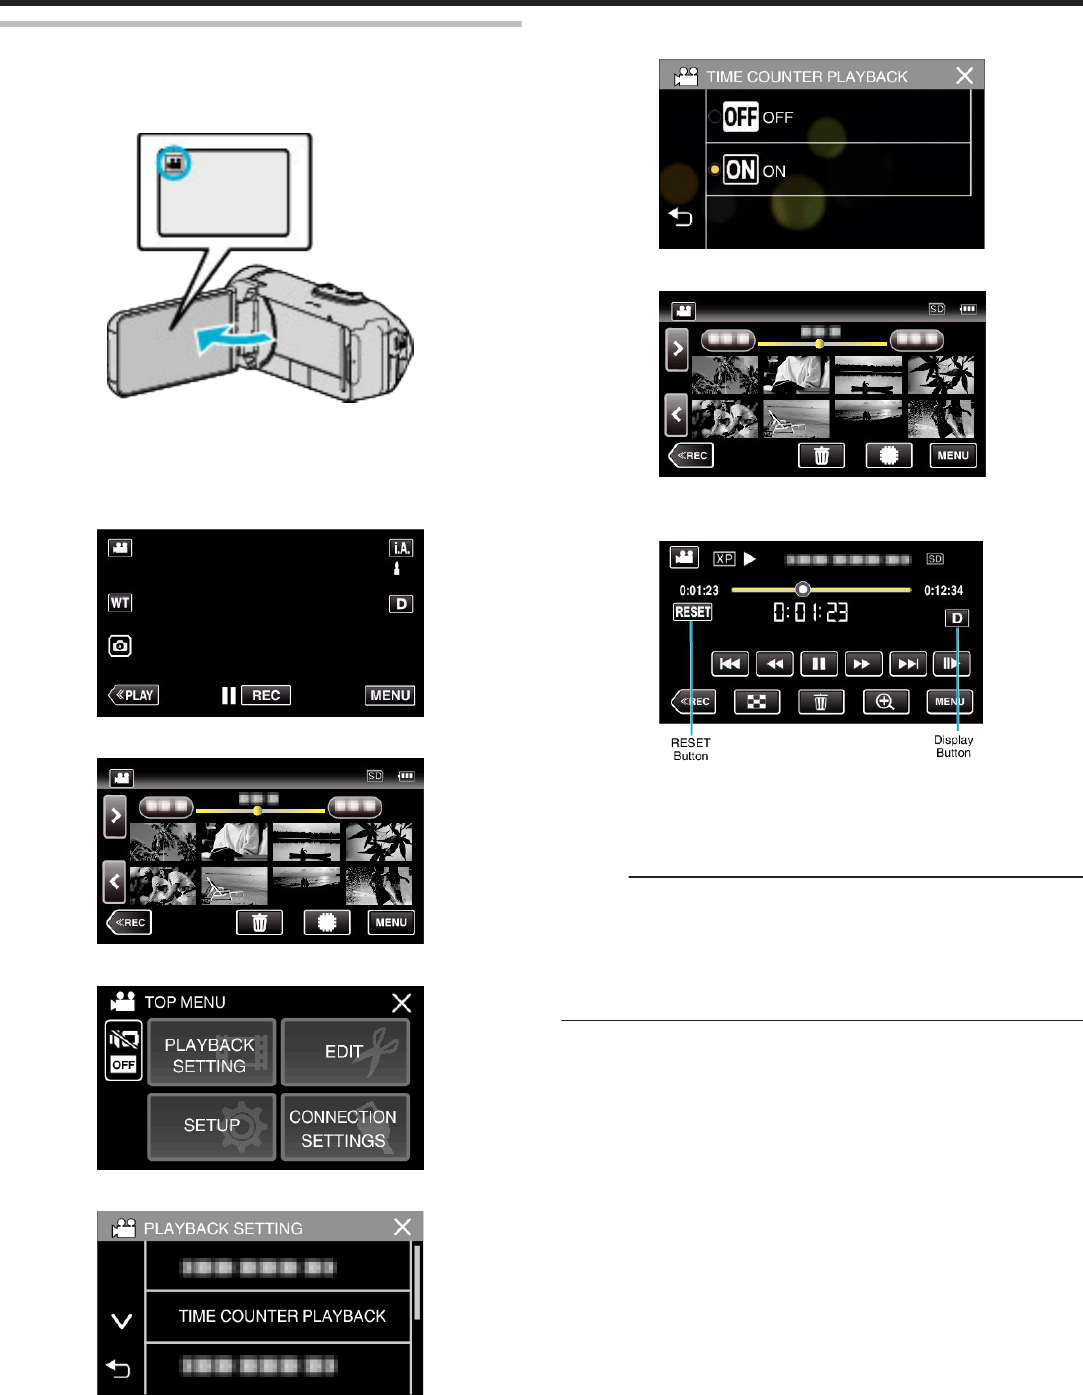
Recording Videos with Time Counter
You can take a video with a stopwatch recorded. You can start, stop and
reset the stopwatch as with any stopwatch.
This can be used to record sports video.
(The recorded time counter cannot be deleted afterward.)
1
Open the LCD monitor.
.
0
Check if the recording mode is A.
0
If
the mode is B still image, tap B on the recording screen to display
the mode switching screen.
Tap A to switch the mode to video.
2
Tap “MENU”.
.
0
The top menu appears.
3
Tap “RECORD SETTING”.
.
4
Tap “TIME COUNTER RECORDING”.
.
0
If the icon is not displayed on the screen, tap 1 to scroll the screen.
0
Tap L to exit the menu.
0
Tap J to return to the previous screen.
5
Tap the display position with your finger and drag your finger to adjust.
.
0
The position can be adjusted when the recording stops.
6
Press the START/STOP button to start recording.
.
.
0
Press the START/STOP button again to stop recording.
0
Tap L to exit “TIME COUNTER RECORDING” when the recording
stops.
(To
perform operations other than recording, tap L to exit the “TIME
COUNTER RECORDING” first.)
7
Tap “E START” on the screen to start the counter.
.
0
You can start the recording after the counter has been started.
0
You can freely stop, reset or resume the counter during recording.
A
ESTART/STOPStarts and stops the counter.
B
RESETSets the counter reading to 0:00:00.
Memo :
0
If “TIME COUNTER RECORDING” is exited while the counter is still
running,
the counter continues to count from where it left off the next time
“TIME COUNTER RECORDING” is operated.
0
If 24 hours have elapsed since the counter started running or if the clock
has been set, the counter reading automatically returns to “0:00:00” and
the counter stops running.
0
The recorded time counter cannot be deleted afterward.
Recording
47
Checking the Remaining Recording Time
Display the remaining battery power and the remaining recording time.
Memo :
0
The remaining battery power and the remaining recording time are
estimates.
0
The remaining recording time is displayed only during video mode.
0
The remaining recording time is displayed for the recording media that is
currently selected.
1
Open the LCD monitor.
.
0
Check that the camera is set to the recording mode. If the camera is
in the playback mode, click 3 to switch to recording mode.
2
Tap “MENU”.
.
0
The top menu appears.
3
Tap C.
.
4
Display the remaining recording time.
.
0
The
remaining recording time is displayed only in the video recording
mode.
0
The remaining recording time is displayed for the recording media
that is currently selected.
0
O is displayed instead of the remaining battery power when the AC
adapter is connected.
0
To exit the display, tap L.
Recording
48
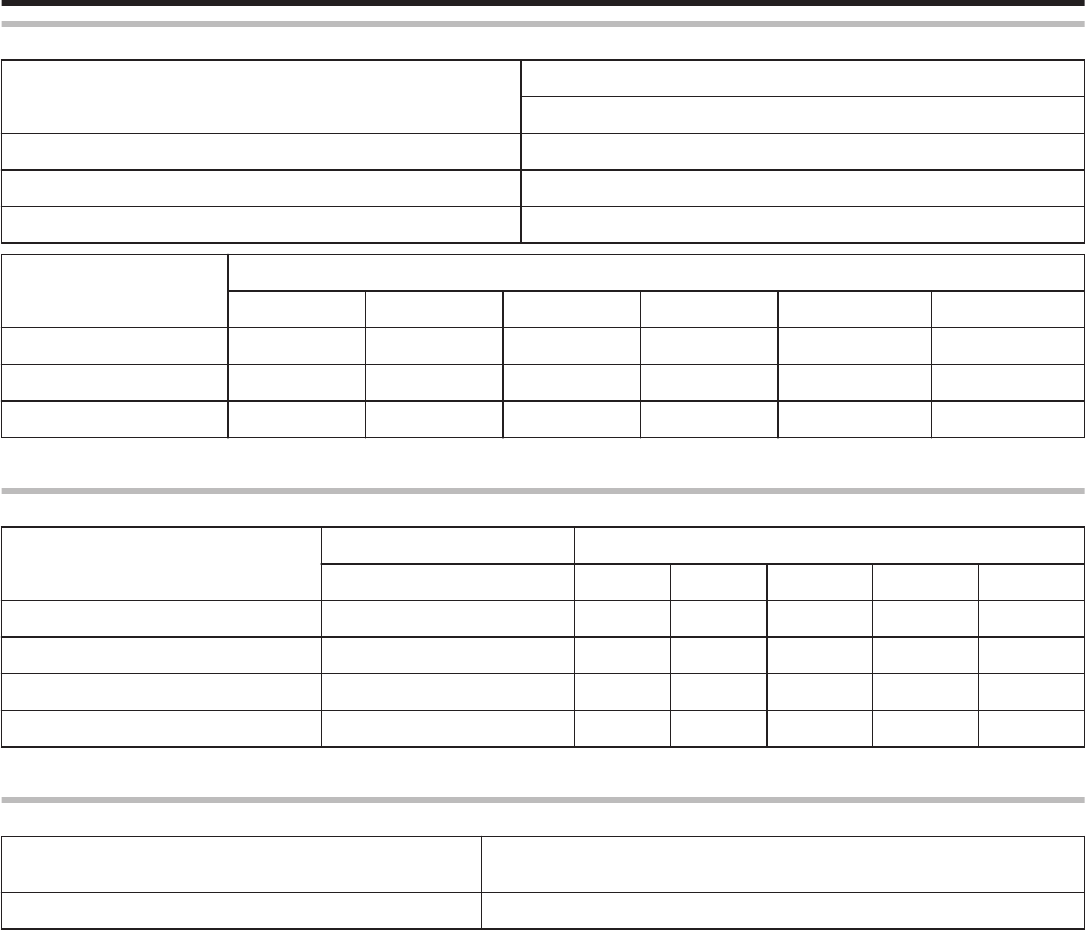
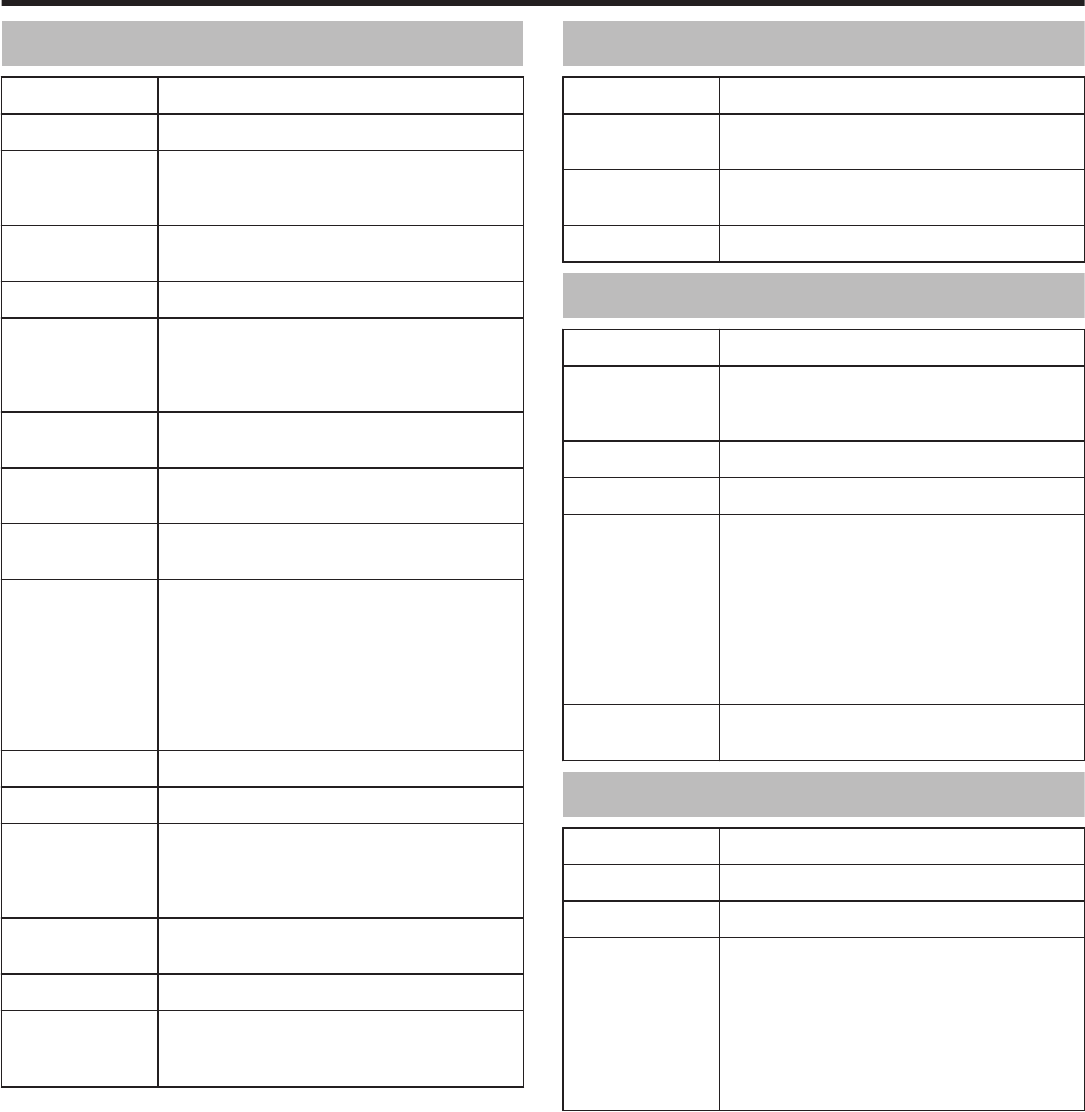
Approximate Video Recording Time
Picture qualityBuilt-in memory
4GB
UXP15 m
XP20 m
EP1 h 20 m
Picture qualitySDHC/SDXC card
4GB8GB16GB32GB64GB128GB
UXP20 m40 m1 h 20 m2 h 40 m5 h 40 m11 h 30 m
XP30 m1 h1 h 50 m3 h 50 m8 h 10 m16 h 20 m
EP1 h 40 m3 h 30 m7 h14 h28 h 50 m57 h 50 m
0
The recording time indicated above will change depending on the recording conditions.
Approximate Number of Still Images (Unit: Number of Shots)
Image sizeBuilt-in memorySDHC/SDXC card
4GB4GB8GB16GB32GB64GB
3680x2760(10M)(4:3)5006001300250051009999
1920x1080(2M)(16:9)250031006400999999999999
1440x1080(1.5M)(4:3)330042008400999999999999
640x480(0.3M)(4:3)999999999999999999999999
0
Still images that are captured during video recording or video playback are saved at a size of 1920 x 1080.
Approximate Duration of Built-in Battery
Actual recording timeContinuous recording time
(Maximum Recording Time)
2 h 50 m5 h 10 m
0
The above are values when “MONITOR BRIGHTNESS” is set to “3” (standard).
0
The actual recording time is the recording time when operations such as starting/stopping recording, turning on/off the unit or zooming is performed
repeatedly.
0
Recording time may differ depending on the shooting environment and usage.
0
When the recording time becomes extremely short even when the battery is fully charged, the battery needs to be replaced. For details on replacing the
built-in battery (subject to a fee), consult the nearest JVC service center.
Recording
49
Playing Back Videos
The
followings are the types of playback that can be performed by this unit.
ItemDescription
Normal
Playback
Plays back the recorded videos.
DIGEST
PLAYBACK
From the recorded video, scenes are extracted
automatically, pieced together for a digest playback
within the specified length.
Start playback from “DIGEST PLAYBACK” in the
“PLAYBACK SETTING” menu.
PLAYBACK
OTHER FILE
Videos with defective management information can be
played back.
Start playback from “PLAYBACK OTHER FILE” in the
“PLAYBACK SETTING” menu.
Caution :
0
Make a backup of important recorded data.
It
is recommended to copy your important recorded data to a BD or other
recording media for storage.
0
This unit is a microcomputer-controlled device. Electrostatic discharge,
external noise and interference (from a TV, a radio, etc.) might prevent it
from functioning properly. In such a case, close the monitor screen to turn
off the power and remove the AC adapter, then press the Reset button to
reset this unit.
“Resetting this Unit” (A p. 5)
0
Disclaimer
- We shall not be held responsible for loss of recorded contents when
recording videos/audio or playback cannot be operated due to
malfunctions in this unit, provided parts, or SD card.
- Once deleted, recorded contents (data), including data loss due to
malfunctions in this unit, cannot be restored. Please be forewarned.
- JVC will not be responsible for any lost data.
- In order for quality improvement, defective recording medium is subject
to be analyzed. Therefore, it may not be returned.
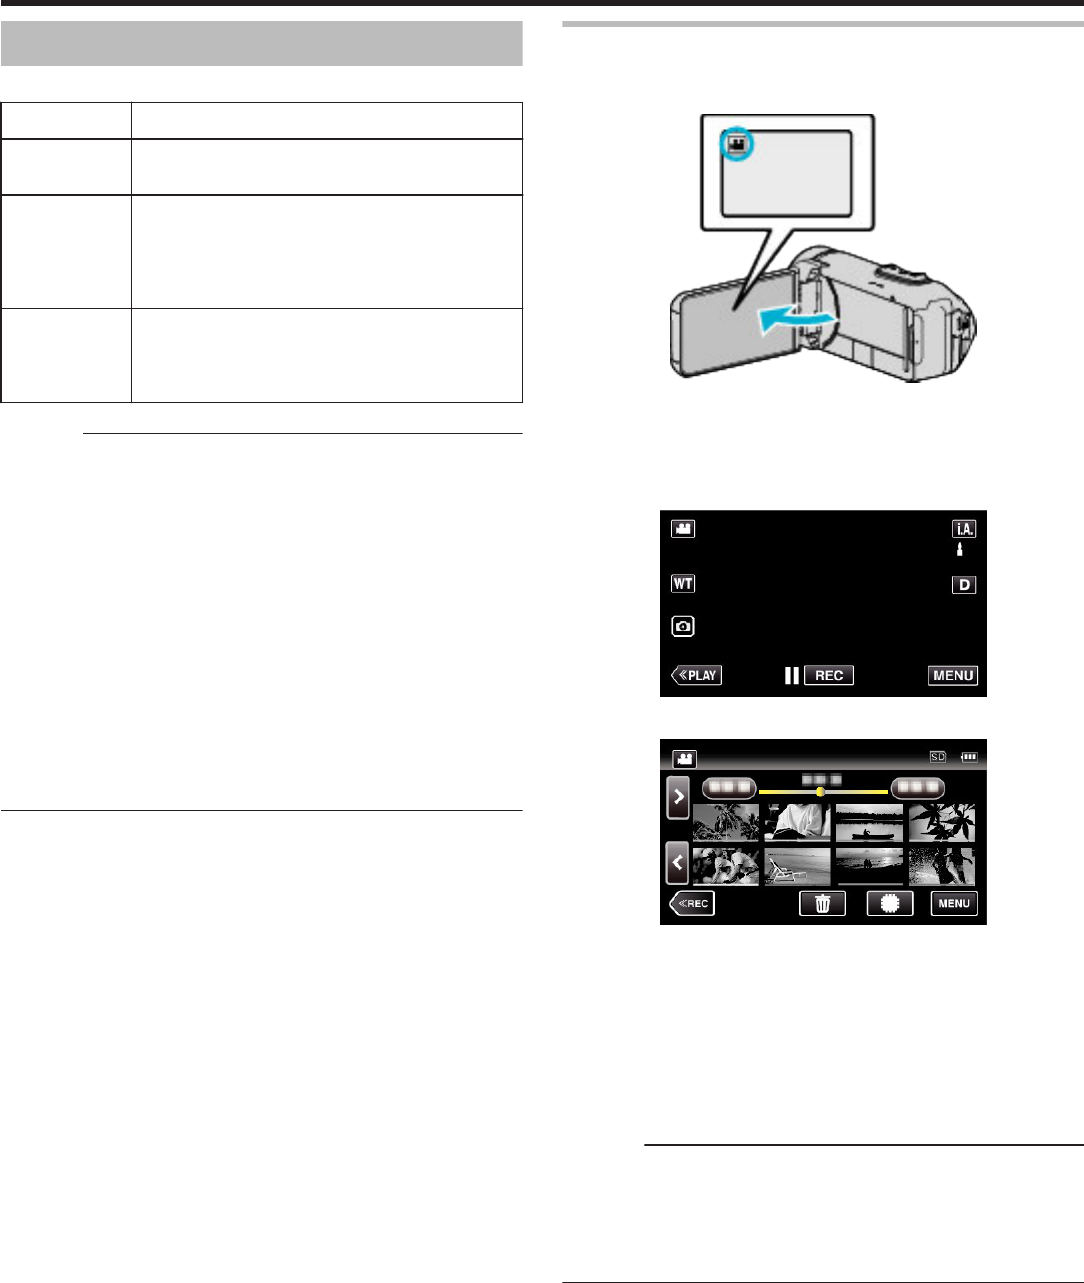
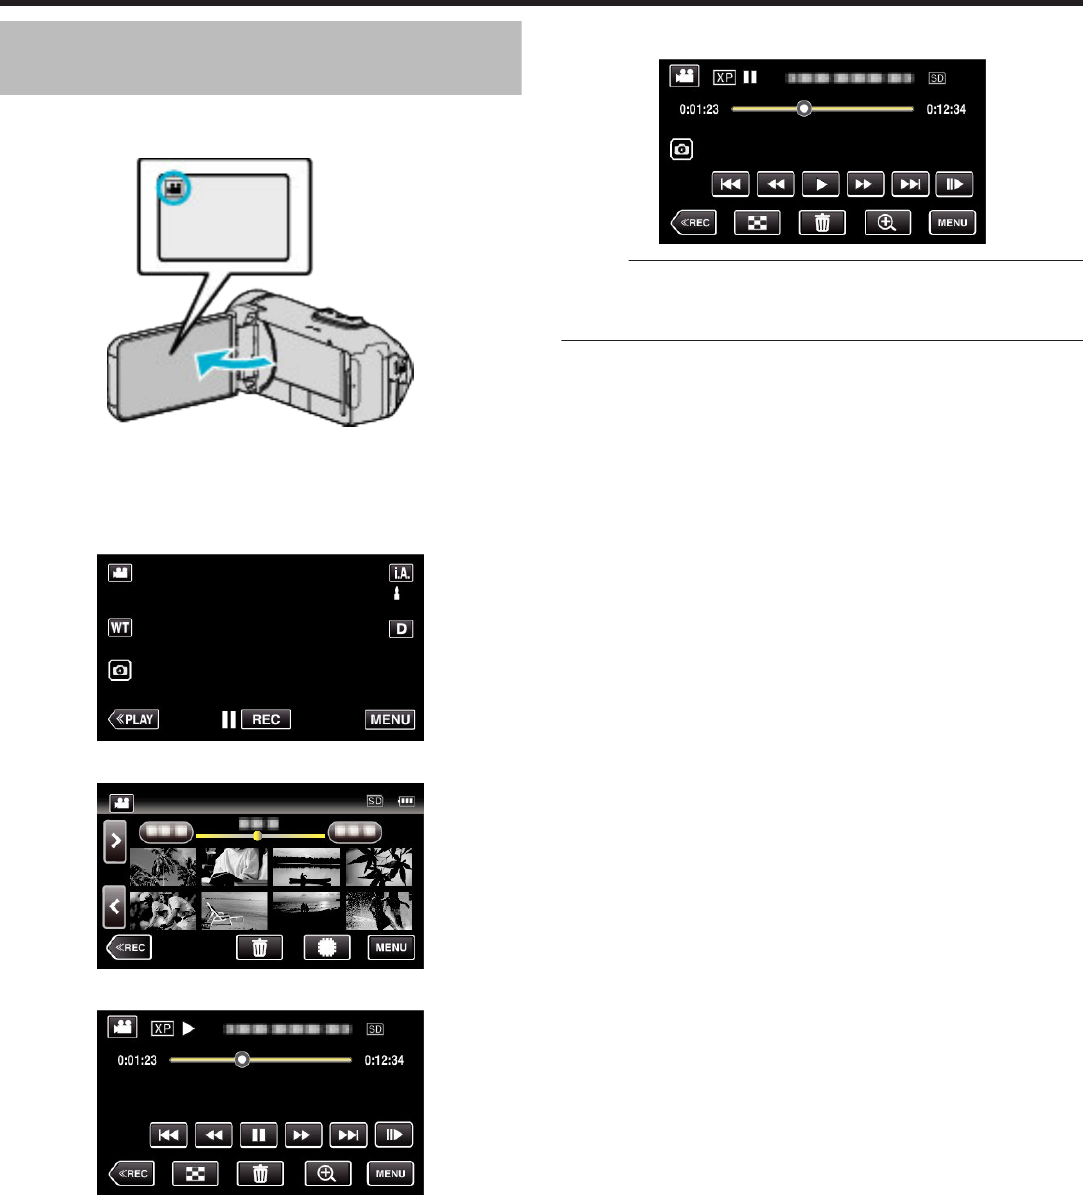
Normal Playback
Plays back the recorded videos.
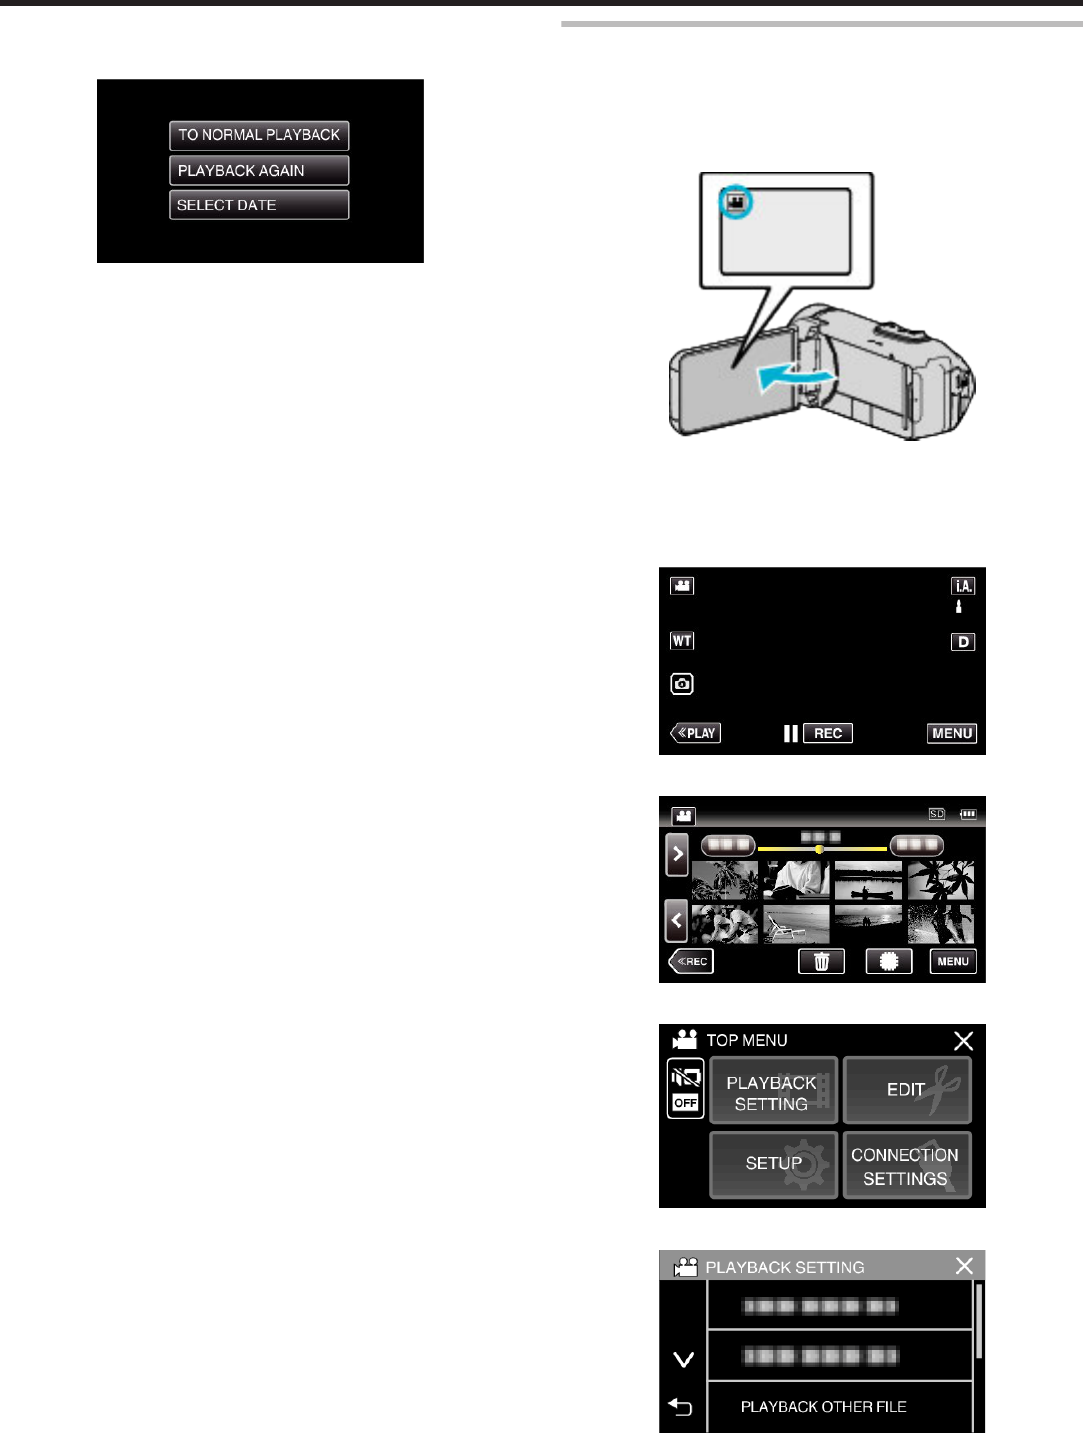
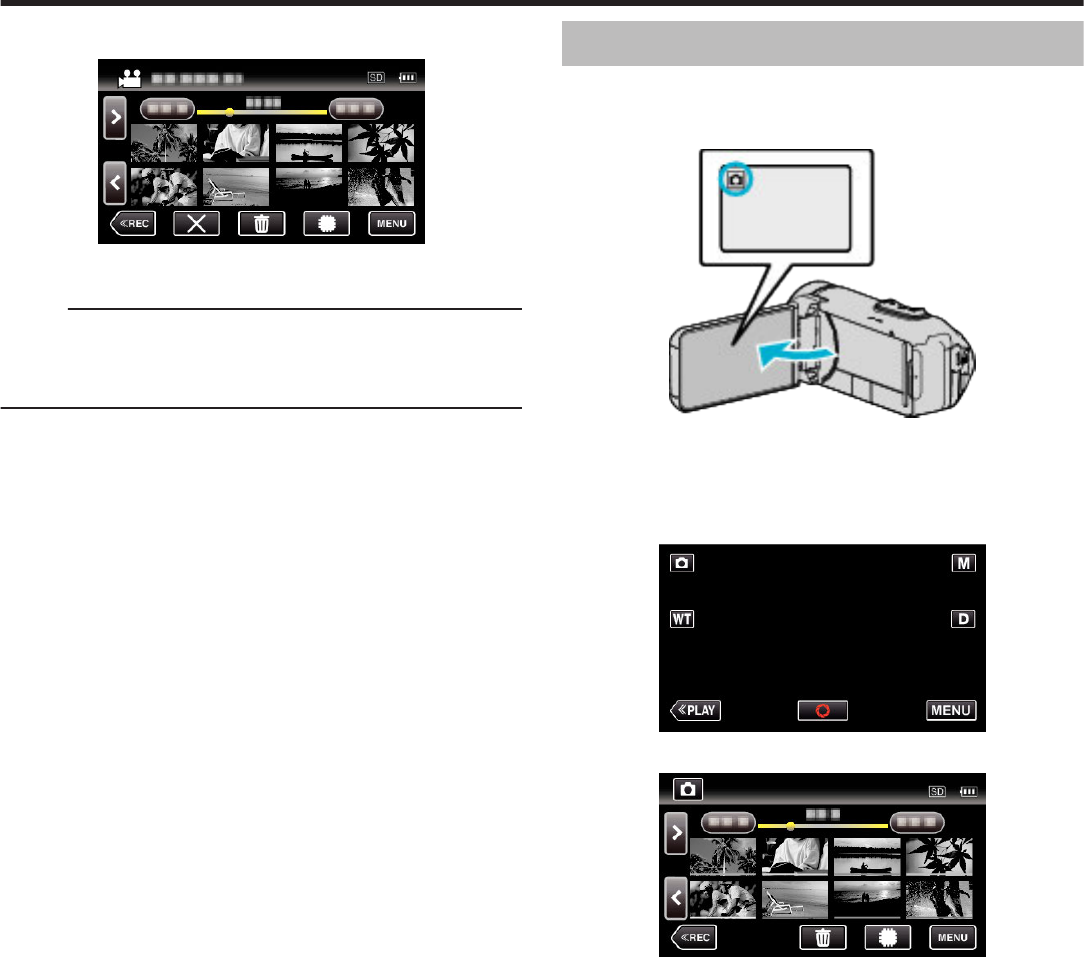
1
Open the LCD monitor.
.
0
Check if the recording mode is A.
0
If
the mode is B still image, tap B on the recording screen to display
the mode switching screen.
Tap A to switch the mode to video.
2
Tap M to select the playback mode.
.
3
Tap the file (image).
.
0
Tap I/J to select the media for playback and change the index
screen (thumbnail display).
0
L appears on the last image played back.
0
Lines
in different colors are displayed under the thumbnail display to
distinguish the recording date.
4
Playback starts.
0
Tap e to pause.
0
Tap u to return to the index screen.
Caution :
0
While this unit may be used with the LCD monitor reversed and closed,
the temperature rises more easily. Do not use this unit with the LCD
monitor
reversed and closed for long periods of time, or in places exposed
to direct sunlight or high temperatures.
0
The power may turn off to protect the circuit if the temperature of this unit
rises too much.
Playback
50
Operation Buttons for Video Playback
During Index Screen Display
.
DisplayDescription
A
A/BSwitches between video and still image
modes.
B
(Date and Time
Display)
Moves to the previous/next date
C
>Displays the next index screen (thumbnail
display)
0
You
can perform the same operation with the
zoom lever.
D
<Displays the previous index screen (thumbnail
display)
0
You
can perform the same operation with the
zoom lever.
E
3
Switches to the recording mode.
F
R
Displays the index screen (thumbnail display)
to perform deletion
G
I/JSwitches between the memories in which
images are recorded (I built-in memory/J
SD card)
H
MENUDisplays the menu screen
I
Thumbnail (File)Tap: Starts playback
Drag
to right: Displays the file taken before the
recording date
Drag to left: Displays the file taken after the
recording date
Thumbnails with the same underlined color
indicate files with the same recording date.
During Video Playback
.
0
When
this unit is not operated, the operation buttons on the touch screen
disappear automatically. Tap on the screen to display the operation
buttons again.
DisplayDescription
A
A/BSwitches between video and still image
modes.
B
(Timeline Bar)Tap on a random position - Moves to the
tapped position
Drag playback point to the left or right - Starts
playback from the new position
Tap on a random position - Moves to the
tapped position
C
(Pointer)Displays the current estimated playback
position within the scene
D
A
Saves one scene of the video being played
back as a still image.
0
Displayed while playback is paused.
E
h
Returns to the beginning of the scene Returns
to
the previous scene if tapped at the beginning
of a scene.
0
Allows the same functions as the zoom lever
to be performs while pausing playback.
F
j (during
playback)
Reverse search (speed increases with each
tap)
l (during pause
mode)
Reverse slow-motion / Press and hold to start
reverse slow playback
G
d
Starts playback
e
Pause
H
i (during
playback)
Forward search (speed increases with each
tap)
k (during pause
mode)
Forward slow-motion / Press and hold to start
slow playback
I
g
Advances to the next scene
J
ed
0
The speed can be set using
“SLOW-
MOTION SPEED” (A p. 93) .
K
n
Switches the display between full (m) and
simple (n) with every tap of the button.
0
Simple display: Some displays disappear
automatically when the screen is not
operated.
0
Full display: Displays everything. The
display button changes from n to m.
0
When the power is turned off, the display
setting will revert to simple display (n).
L
3
Switches to the recording mode.
c
u
Stop (returns to index screen)
Playback
51
d
R
Deletes the currently displayed video.
e
2
Enlarges the displayed video.
0
Tap the position of the image you want to
enlarge.
0
Zoom ratio changes by using the (+) and (-)
buttons.
f
MENUDisplays the menu screen
Memo :
0
Tap or drag on the operation area of the touch screen.
0
The recording date and time can be displayed on the screen during
playback.
(A p. 93)
Adjusting the Volume of Videos
You can use the zoom/volume lever to control the volume.
.
Playback
52
Checking the Recording Date and Other Information
You can see the recording information of the recorded videos.
1
Open the LCD monitor.
.
0
Tap A or B to select the video or still image mode.
2
Tap M to select the playback mode.
.
3
Tap on the file to start playback.
.
4
Tap “MENU”.
.
5
Tap C.
.
0
Tap L to exit the menu.
You can display the recording date and duration of the selected file.
.
Playback
53
TIME COUNTER PLAYBACK
A time counter that can be reset can be displayed during playback.
This can be used to play sports video.
1
Open the LCD monitor.
.
0
Check if the recording mode is A.
0
If
the mode is B still image, tap B on the recording screen to display
the mode switching screen.
Tap A to switch the mode to video.
2
Tap M to select the playback mode.
.
3
Tap “MENU”.
.
4
Tap “PLAYBACK SETTING”.
.
5
Tap “TIME COUNTER PLAYBACK”.
.
6
Set “TIME COUNTER PLAYBACK” to ON.
.
7
Tap on the file to start playback.
.
0
An hours:minutes:seconds counter appears.
8
Pause the playback and reset the counter.
.
0
Tapping “RESET” sets the counter reading to “0:00:00”.
0
The 1/10 second digit is displayed while playback is paused.
0
The counter can also be reset during normal playback and slow
playback.
Memo :
0
To reset the counter during playback, switch to full display using the
“Display Buttonn” (A p. 21) button.
0
To reset the counter at the precise position, it is recommended to pause
the playback then tap “RESET”.
0
When the unit switches to the next scene, the counter is automatically
reset.
Playback
54
DIGEST PLAYBACK
You can play back a digest of recorded videos (Digest Playback).
This is useful for checking the content of videos quickly.
1
Open the LCD monitor.
.
0
Check if the recording mode is A.
0
If
the mode is B still image, tap B on the recording screen to display
the mode switching screen.
Tap A to switch the mode to video.
2
Tap M to select the playback mode.
.
3
Tap “MENU”.
.
4
Tap “PLAYBACK SETTING”.
.
5
Tap “DIGEST PLAYBACK”.
.
6
Tap to select a date for Digest Playback.
.
0
After selecting a date, tap “NEXT”.
0
When “ALL” is tapped, Digest Playback will be performed for all the
dates.
0
Tap L to exit the menu.
0
Tap J to return to the previous screen.
7
Select the Digest Playback time
(Only when “AUTO” is selected in Step 7)
.
0
Select the Digest Playback time in minutes (min).
0
The
time display of Digest Playback varies according to the recording
time.
0
When it takes time (more than 2 seconds) for “DIGEST PLAYBACK”
to start after selecting Digest Playback time, a progress status will be
displayed.
0
The Digest Playback time is only a guide.
8
Digest Playback starts.
.
0
Tap e to pause.
0
Tap u to return to the index screen.
0
Tap “DIGESTL“ to return to the normal playback screen.
0
Operations During Video Playback
“Operation Buttons for Video Playback” (A p. 51)
Playback
55
9
Digest playback stops automatically, or display the next screen by
tapping “MENU”.
.
0
TO NORMAL PLAYBACK: start normal playback.
0
PLAYBACK AGAIN: start the digest playback again.
0
SELECT DATE: return to step 6.
PLAYBACK OTHER FILE
The management information of a video may be damaged if recording is not
performed
correctly, such as turning off the power in the middle of recording.
You can perform the following operations to play back the videos with
defective management information.
1
Open the LCD monitor.
.
0
Check if the recording mode is A.
0
If
the mode is B still image, tap B on the recording screen to display
the mode switching screen.
Tap A to switch the mode to video.
2
Tap M to select the playback mode.
.
3
Tap “MENU”.
.
4
Tap “PLAYBACK SETTING”.
.
5
Tap “PLAYBACK OTHER FILE”.
.
Playback
56
6
Tap on the file to start playback.
.
“Operation Buttons for Video Playback” (A p. 51)
0
Tap “L” to return to the usual index screen.
Memo :
0
An MTS file is created in the EXTMOV folder when management
information is corrupted.
0
Depending on the condition of the damaged file, playback might fail or
may not run smoothly.
Playing Back Still Images
You
can select and play back the recorded still images from an index screen
(thumbnail display).
1
Open the LCD monitor.
.
0
Check if the recording mode is B.
0
If the mode is A
video, tap A on the recording screen to display the
mode switching screen.
Tap B to switch the mode to still image.
2
Tap M to select the playback mode.
.
3
Tap on the file to start playback.
.
0
Tap I/J to select the media for playback and change the index
screen (thumbnail display).
0
Tap u to return to the index screen.
0
L appears on the last image played back.
0
Lines
in different colors are displayed under the thumbnail display to
distinguish the recording date.
Playback
57
Operation Buttons for Still Image Playback
During Index Screen Display
.
0
Still images that are recorded continuously in high-speed or medium-
speed will be grouped together. Only the first recorded file (still image) is
shown and the group is displayed with a green frame.
DisplayDescription
A
A/BSwitches between video and still image
modes.
B
(Date and Time
Display)
Moves to the previous/next date
C
>Displays the next index screen (thumbnail
display)
0
You
can perform the same operation with the
zoom lever.
D
<Displays the previous index screen (thumbnail
display)
0
You
can perform the same operation with the
zoom lever.
E
3
Switches to the recording mode.
F
R
Displays the index screen (thumbnail display)
to perform deletion
G
I/JSwitches between the index screen of the built-
in memory and SD card
H
MENUDisplays the menu screen
I
File (Still Image)Tap on thumbnail - Starts playback
Drag to right - Scrolls to the right to show the
previous index screen (thumbnail display)
Drag
to left - Scrolls to the left to show the next
index screen (thumbnail display)
During Still Image Playback
.
0
When
this unit is not operated, the operation buttons on the touch screen
disappear automatically. Tap on the screen to display the operation
buttons again.
DisplayDescription
A
Video/Still Image
Mode
A/B
Switches between video and still image
modes.
B
h
Returns to the previous still image
0
You
can perform the same operation with the
zoom lever.
C
d / eStarts/pauses slideshow
D
g
Advances to the next still image
0
You
can perform the same operation with the
zoom lever.
E
3
Switches to the recording mode.
F
u
Returns to index screen
G
R
Deletes the currently displayed still image.
H
2Playback ZoomEnlarges the displayed video.
0
Tap the position of the image you want to
enlarge.
0
Zoom ratio changes by using the (+) and (-)
buttons.
I
MENUDisplays the menu screen
Memo :
0
Tap or drag on the operation area of the touch screen.
Caution :
0
This unit is a microcomputer-controlled device. Electrostatic discharge,
external noise and interference (from a TV, a radio, etc.) might prevent it
from
functioning properly. In such a case, close the monitor screen to turn
off the power and remove the AC adapter, then press the Reset button to
reset this unit.
“Resetting this Unit” (A p. 5)
Playback
58
Slideshow Playback
Still images can be played back in a slideshow.
Tap I during still image playback to start the slideshow.
.
“Operation Buttons for Still Image Playback” (A p. 58)
Memo :
0
Effects can be added to the transitions in slideshow playback.
“ SLIDE SHOW EFFECTS ” (A p. 95)
Connecting to and Viewing on TV
You can connect this unit to a TV for playback. The image quality on TV
varies with the type of TV and the connecting cable. Select the connector
that best suits your TV.
0
Refer also to the instruction manual of the TV in use.
“Connecting via the HDMI Mini Connector” (A p. 60
)
“Connecting via the AV Connector” (A p. 61)
0
To display the date and time on TV, set both “DISPLAY DATE/TIME” and
“DISPLAY ON TV” to “ON”.
(A p. 93)
“ DISPLAY ON TV ” (A p. 100)
Unnatural Displays on TV
TroubleAction
Images do not
appear on the TV
properly.
0
Disconnect the cable and connect again.
0
Turn off and on this unit again.
0
Images may not appear properly when the
remaining battery power is low. Use an AC
adapter.
Images are
projected vertically
on the TV.
0
Set “VIDEO OUTPUT” in the “CONNECTION
SETTINGS” menu to “4:3”.
“ VIDEO OUTPUT ” (A p. 100)
Images are
projected
horizontally on the
TV.
0
Adjust the TV's screen accordingly.
The color of images
looks strange.
0
Adjust the TV's screen accordingly.
HDMI-CEC
functions do not
work properly, and
the TV does not
work in conjunction
with this unit.
0
TVs may operate differently depending on the
specifications, even if they are HDMI-CEC
compliant. Therefore, the HDMI-CEC functions
of this unit cannot be guaranteed to operate in
combination with all the TVs. In such cases, set
“HDMI CONTROL” to “OFF”.
“ HDMI CONTROL ” (A p. 100)
The language on
the display
changed.
0
It may occur when you connect this unit to a TV
with different language setting using an HDMI
mini cable.
Caution :
0
Turn off this unit and the TV before making any connection.
0
Before inserting or removing the SD card, close the LCD monitor and
ensure that the POWER/ACCESS lamp goes off.
Playback
59
Connecting via the HDMI Mini Connector
If you are using an HDTV, you can play back in HD quality by connecting to
the HDMI mini connector.
“Optional Accessories” (A p. 19)
0
Use
a High Speed HDMI mini cable as the HDMI mini cable when not using
the provided one.
0
Refer also to the instruction manual of the TV in use.
1
Connect to a TV.
.
2
Connect the adapter cable and AC adapter to this unit.
.
3
Open the LCD monitor.
.
0
The unit turns on automatically.
4
Press
the external input button on the TV to switch to the input from this
unit via the connected connector.
.
5
Play back a file.
.
“Playing Back Videos” (A p. 50)
“Playing Back Still Images” (A p. 57)
Memo :
0
Change the settings in “HDMI OUTPUT” according to the connection.
“ HDMI OUTPUT ” (A p. 100)
0
When connected to the TV via the HDMI mini cable, images and sounds
may not be output properly depending on the TV connected.
In such cases, perform the following operations.
1) Disconnect the HDMI mini cable and connect it again.
2) Turn off and on this unit again.
0
For questions about the TV or method of connection, contact your TV's
manufacturer.
Playback
60
Operating in Conjunction with TV via HDMI
Connecting this unit to an HDMI-CEC enabled TV using the HDMI mini cable
allows linked operations with the TV to be performed.
0
HDMI-CEC (Consumer Electronics Control) is an industry standard that
enables interoperability between HDMI-CEC compliant devices that are
connected via HDMI cables.
Memo :
0
Not all HDMI control devices comply with the HDMI-CEC standard. The
HDMI control function of this unit will not work when connected to these
devices.
0
This
unit is not guaranteed to operate with all HDMI-CEC enabled devices.
0
Depending on the specifications of each HDMI-CEC enabled device,
some functions may not work with this unit. (For details, refer to the
instruction manual of your TV.)
0
Unintended operations may occur with some connected devices. In these
cases, set “HDMI CONTROL” to “OFF”.
“ HDMI CONTROL ” (A p. 100)
Preparations
0
Connect an HDMI mini cable between this unit and the TV.
“Connecting via the HDMI Mini Connector” (A p. 60)
0
Turn
on the TV and set the HDMI-CEC related setting to “ON”. (For details,
refer to the instruction manual of the TV.)
0
Set “HDMI CONTROL” in the CONNECTION SETTINGS menu to “ON”.
“ HDMI CONTROL ” (A p. 100)
Operation Method 1
1
Turn on this unit.
2
Select the playback mode.
3
Connect the HDMI mini cable.
0
TV turns on automatically and switches to HDMI input mode when
this unit is turned on.
Operation Method 2
1
Turn off the TV.
0
This unit turns off automatically.
Memo :
0
Depending on the TV connected, the display language of this unit will
automatically
switch to the language that is selected for the TV when this
unit is turned on.
(This is applicable only if this unit supports the language selected for the
TV.) To use this unit with a language that differs from the display language
of the TV, set “HDMI CONTROL” to “OFF”.
0
The display language of the TV will not switch automatically, even if the
display language of this unit is changed.
0
These functions may not work correctly when devices such as amplifier
and selector are connected. Set “HDMI CONTROL” to “OFF”.
0
If HDMI-CEC does not work properly, turn off and on this unit again.
Connecting via the AV Connector
To playback videos on TV, connect the AV cable (provided: E3A-0085-00)
to the AV terminal of this unit.
0
Refer also to the instruction manual of the TV in use.
1
Connect to a TV.
.
2
Connect the adapter cable and AC adapter to this unit.
.
3
Open the LCD monitor.
.
0
The unit turns on automatically.
4
Press
the external input button on the TV to switch to the input from this
unit via the connected connector.
.
5
Play back a file.
.
“Playing Back Videos” (A p. 50)
“Playing Back Still Images” (A p. 57)
Playback
61
Memo :
0
For questions about the TV or method of connection, contact your TV's
manufacturer.
0
AV cable (provided: E3A-0085-00)
Wiring
specifications (for video/audio) of the 4-pole mini plug are described
in the following.
To purchase, consult your nearest JVC dealer or JVC service center.
.
0
When
using the provided AV cable, attach the core filter provided with this
unit first.
“Attaching the Core Filter” (A p. 8)
Playback
62
Deleting Unwanted Files
Delete unwanted videos and still images when the space in the recording
media is running out.
Doing so frees up more space in the recording media.
“Deleting the Currently Displayed File” (A p. 63)
“Deleting Selected Files” (A p. 63
)
Memo :
0
Deleted files cannot be restored.
0
Files that are protected cannot be deleted.
Release protection before deleting the file.
“Protecting Files” (A p. 64
)
0
Be sure to back up important files on a computer.
“Backing Up All Files” (A p. 78)
Deleting the Currently Displayed File
Deletes the currently displayed file.
Caution :
0
Deleted files cannot be restored.
1
Tap R.
.
0
While the video mode is shown in the image, the same operations
apply for the still image mode.
2
Tap “YES”.
.
0
Tap h / g to select the previous or next file.
0
When no file remains, the screen returns to the index screen.
Deleting Selected Files
Deletes the selected files.
Caution :
0
Deleted files cannot be restored.
1
Open the LCD monitor.
.
0
Tap A or B to select the video or still image mode.
0
Tap B or A on the recording screen to display the mode switching
screen.
Tap A to switch to the video mode A.
Tap B to switch to the still image mode B.
2
Tap M to select the playback mode.
.
0
While the video mode is shown in the image, the same operations
apply for the still image mode.
3
Tap R.
.
4
Tap on the files to delete.
.
0
P appears on the selected files.
To remove P from a file, tap on the file again.
0
Tap “SEL ALL” to select all files.
0
Tap “REL ALL” to release all selections.
Editing
63
5
Tap “SET”.
.
0
If no file is selected, the “SET” button cannot be pressed.
6
Tap “EXECUTE” to confirm the deletion.
.
0
After deleting is complete, tap “OK”.
0
To cancel the deletion, tap “QUIT”.
Protecting Files
Prevent important videos/still images from being deleted accidently by
protecting them.
“Protecting/Releasing Protection of the Currently Displayed File”
(A p. 64)
“Protecting/Releasing Protection of Selected Files” (A p. 65
)
Caution :
0
When the recording media is formatted, even the protected files will be
deleted.
Protecting/Releasing Protection of the Currently Displayed
File
Protects or releases protection of the currently displayed file.
1
Tap “MENU”.
.
0
While the video mode is shown in the image, the same operations
apply for the still image mode.
2
Tap “EDIT”.
.
3
Tap “PROTECT/CANCEL”.
.
4
Tap “YES”.
.
0
Tap h / g to select the previous or next file.
0
After setting, tap “OK”.
Editing
64
Protecting/Releasing Protection of Selected Files
Protects or releases protection of the selected files.
1
Open the LCD monitor.
.
0
Tap A or B to select the video or still image mode.
0
Tap B or A on the recording screen to display the mode switching
screen.
Tap A to switch to the video mode A.
Tap B to switch to the still image mode B.
2
Tap M to select the playback mode.
.
0
While the video mode is shown in the image, the same operations
apply for the still image mode.
3
Tap “MENU”.
.
4
Tap “EDIT”.
.
5
Tap “PROTECT/CANCEL”.
.
6
Tap on the files to protect or release protection of.
.
0
P appears on the selected files.
To remove P from a file, tap on the file again.
0
I
and P are displayed on the files that are already protected.
To release protection of a file, tap on the file such that P is removed.
0
Tap “SEL ALL” to select all files.
0
Tap “REL ALL” to release all selections.
7
Tap “SET” to complete the setting.
.
0
Protect marks I
appear on the selected files.
Protect marks I disappear from the deselected files.
Editing
65
Capturing a Still Image in the Video During
Playback
You can capture still images of the scenes you like in the recorded videos.
1
Open the LCD monitor.
.
0
Check if the recording mode is A.
0
If
the mode is B still image, tap B on the recording screen to display
the mode switching screen.
Tap A to switch the mode to video.
2
Tap M to select the playback mode.
.
3
Tap on the desired video.
.
4
Tap pause e at the desired scene during playback.
.
0
After pausing the video, you can fine-tune the point to capture by
tapping forward slow-motion k and reverse slow-motion l.
5
Tap the A button.
.
Memo :
0
Still images are captured with a size of 1920×1080.
0
Captured still images are stored in the media where the video is being
played back from.
Editing
66
Combining Videos Recorded by Seamless
Recording
Videos that are recorded on two separate media and with “SEAMLESS
RECORDING” in the video recording menu enabled can be combined into
a single video.
“ SEAMLESS RECORDING ” (A p. 88)
1
Open the LCD monitor.
.
0
Check if the recording mode is A.
0
If
the mode is B still image, tap B on the recording screen to display
the mode switching screen.
Tap A to switch the mode to video.
2
Tap M to select the playback mode.
.
3
Tap “MENU”.
.
4
Tap “EDIT”.
.
5
Tap “SEAMLESS REC CTRL”.
.
6
Tap “COMBINE SCENES”.
.
0
This unit starts a search to detect seamless videos.
Combining cannot be performed if no seamless videos are found.
7
Tap “YES”.
.
8
Tap the media to store to.
.
9
Tap “YES”.
.
0
Combining of the videos starts.
0
After videos are combined, tap “OK”.
Memo :
0
Seamless videos cannot be combined if there is not enough free space in
the built-in memory or SD card. Check the amount of remaining free space
before combining.
How to Enable Seamless Video Recording Again
To start seamless recording again after the previous session is complete, it
is necessary to combine seamless videos, or delete the combination
information of the seamless videos.
To delete the combination information of seamless videos, select “DEL
COMBINED SCENES” in step 6.
Editing
67
Capturing a Required Part in the Video
(TRIMMING)
Select the required part of a video and save it as a new video file.
0
The original video remains in its existing location.
1
Open the LCD monitor.
.
0
Check if the recording mode is A.
0
If
the mode is B still image, tap B on the recording screen to display
the mode switching screen.
Tap A to switch the mode to video.
2
Tap M to select the playback mode.
.
3
Tap “MENU”.
.
4
Tap “EDIT”.
.
5
Tap “TRIMMING”.
.
6
Tap the video to edit.
.
7
Tap e to pause playback at the desired start point, then tap “A”.
.
0
When “A” is tapped, the start point is set.
0
After setting the start point, tap d to continue playback.
8
Tap e to pause playback at the desired end point, then tap “B”.
.
0
When “B” is tapped, the end point is set.
0
To reset the start or end point, tap “A” or “B” at the desired scene
(position).
0
You can fine adjust the position by pressing l
and k while
playback is paused.
9
Tap “SET”.
.
0
When “SET” is tapped, the trimming area is confirmed.
10
Tap “YES”.
.
0
After copying, tap “OK”.
0
When copying finishes, the copied file is added to the index screen.
Memo :
0
The division point may deviate slightly from the selected scene.
Editing
68
Dubbing Files to a Disc by Connecting to a
Blu-ray Recorder
You
can dub videos in the high definition quality by connecting an AVCHD-
compliant Blu-ray recorder to this unit via a USB cable. For details on creating
the disc, refer to the instruction manual of your Blu-ray recorder.
0
This operation cannot be completed if the remaining battery power is not
enough. Charge the battery fully first.
1
Open the terminal cover.
2
Connect to a Blu-ray recorder.
0
Connect using the USB cable provided with this unit.
0
Before
making any connection, close the LCD monitor to turn off this
unit.
.
3
Open the LCD monitor.
.
0
This unit turns on and the “SELECT DEVICE” screen appears.
4
Tap “CONNECT TO OTHER”.
.
5
Tap the desired media.
.
0
The following screen is displayed after the camera operation is
completed.
.
0
Operations are to be performed on the Blu-ray recorder after the
screen switches.
6
Perform dubbing on the Blu-ray recorder.
0
Refer also to the instruction manual of the Blu-ray recorder.
0
After dubbing is complete, close the LCD monitor of this unit and
check
that the POWER/ACCESS lamp goes off before disconnecting
the USB cable. Operations cannot be performed on this unit until the
USB cable is disconnected.
Copying
69
Copying Files to an SD Card
You can copy videos and still images from the built-in memory to SD card.
Copying
still images to cards makes it convenient to bring them to the shop
for printing (developing).
0
This operation cannot be completed if the remaining battery power is not
enough. Charge the battery fully first.
Caution :
0
Make sure that there is enough space left in the destination medium.
0
Videos in the SD card cannot be copied to the built-in memory.
1
Open the LCD monitor.
.
0
Tap A or B to select the video or still image mode.
2
Tap M to select the playback mode.
.
0
The
mode changes between recording and playback with every tap.
3
Tap “MENU”.
.
4
Tap “EDIT”.
.
5
Tap “COPY”.
.
6
Tap on the files to copy.
.
0
P appears on the selected files.
To remove P from a file, tap on the file again.
0
Tap “SEL ALL” to select all files.
0
Tap “REL ALL” to release all selections.
7
Tap “SET”.
.
0
“SET” is deactivated when no file is selected.
8
Tap “YES”.
.
0
Copying starts.
0
After copying, tap “OK”.
Copying
70
Copying to Windows PC
You can copy files to a computer using the provided software.
Discs can also be created using the computer’s DVD or Blu-ray drive.
If the provided software is not installed, this unit will be recognized as an external storage when connected.
Memo :
0
To record to discs, a recordable DVD or Blu-ray drive is required for the computer in use.
0
To create DVD-Video discs using the provided software, it is necessary to install the additional software (software for creating DVD-Video).
For details, refer to the Pixela homepage.
http://www.pixela.co.jp/oem/jvc/mediabrowser/e/
0
Backing up of files using other softwares is not supported.
Trouble with Using the Provided Software Everio MediaBrowser 4
Consult the customer service center below.
0
Pixela User Support Center
TelephoneUSA and Canada (English): +1-800-458-4029 (toll-free)
Europe (UK, Germany, France, and Spain)
(English):+800-1532-4865 (toll-free)
Other Countries in Europe
(English):+44-1489-564-764
Asia (Philippines) (English): +63-2-438-0090
Homepage
http://www.pixela.co.jp/oem/jvc/mediabrowser/e/
0
For details on how to use the software, refer to “MediaBrowser Help” in the “Help” menu of Everio MediaBrowser 4.
.
Verifying System Requirements (Guideline)
Windows 10
1
Right-click the “start button”, then select and click “System”.
.
.
0
If a “This PC” icon is shown on desktop, right-click the icon and select “Properties” in the menu to display your computer information.
Copying
71
Windows 8/Windows 8.1
1
Display “Apps”.
(For Windows 8) Click the “Search” charm.
(For Windows 8.1) Click F.
.
2
Right-click “Computer” or “PC” in the “Windows System Tool” menu to select the checkbox.
.
3
Click “Properties” on the bottom bar to display.
.
0
If a “Computer” icon is shown on desktop, right-click the icon and select “Properties” in the menu to display your computer information.
Copying
72
Windows 7
1
Click the start button.
.
2
Right-click Computer.
.
3
Click “Properties”.
.
Copying
73
4
Check the items with the table below.
.
Windows 10/Windows 8/Windows 8.1Windows 7
OSWindows 10 64-bit
Windows 10 Home or Windows 10 Pro
(Pre-installed versions, desktop mode only)
Windows 8 64-bit
Windows 8 or Windows 8 Pro
(Pre-installed versions, desktop mode only)
Windows8.1 64-bit
Windows8.1 or Windows8.1 Pro
(Pre-installed versions, desktop mode only)
Windows 7 32/64-bit
Home Premium
(Pre-installed versions only) Service Pack 1
CPUIntel Core Duo, CPU 1.66 GHz or higher
(Intel Core 2 Duo, CPU 2.13 GHz or higher recommended)
Intel Core Duo, CPU 1.66 GHz or higher
(Intel Core 2 Duo, CPU 2.13 GHz or higher recommended)
RAMAt least 2 GBAt least 2 GB
Video editingIntel Core i7, CPU 2.53 GHz or higher recommendedIntel Core i7, CPU 2.53 GHz or higher recommended
o
Other requirements
Display: 1024×768 pixels or above (1280×1024 pixels or above recommended)
Graphic: Intel G965 or higher recommended
Memo :
0
If your PC does not meet the above system requirements, operations of the provided software cannot be guaranteed.
0
For more information, contact your PC's manufacturer.
Copying
74
Installing the Provided Software (Built-in)
You can display the recorded images in calendar format and perform editing
using the provided software.
0
This operation cannot be completed if the remaining battery power is not
enough. Charge the battery fully first.
Preparations
Connect this unit to a computer with a USB cable.
o
Windows 10
1
Open the terminal cover.
2
Connect to your PC using the provided USB cable.
0
Before connecting the cable, close the LCD monitor to turn off this
unit.
.
3
Open the LCD monitor.
.
0
This unit turns on and the “SELECT DEVICE” menu appears.
4
Tap “CONNECT TO PC”.
.
5
Tap “PLAYBACK ON PC”.
.
0
Disconnect the USB cable to return to the recording or playback
screen.
0
“Everio Software Setup” appears on the computer.
Operations are to be performed on the computer after the screen
switches.
6
Perform the following operations on your computer.
A
Open the “Start menu”, then click “All apps”.
.
B
Click “This PC” in the “Windows System” menu.
.
0
If
a “This PC” icon is shown on desktop, double-click the icon to open “This
PC”.
C
Double-click the “JVCCAM_APP” icon in “Devices with Removable
Storage”.
.
D
Double-click “install (or Install.exe)”.
.
E
Click “Yes” on the User Account Control screen.
0
“Software Setup” appears after a while.
7
Click “Everio MediaBrowser 4”.
.
0
Follow the on-screen instructions to finish the installation.
Copying
75
8
Click “Finish”.
.
9
Click “Quit”.
.
0
Installation is complete, and two icons are created on the desktop.
10
Remove this unit from your PC.
“Disconnecting this Unit from Computer” (A p. 79)
Memo :
0
If “Everio Software Setup” doesn’t appear, double-click “JVCCAM_APP”
in
“My Computer” or “Computer”, then double-click “install (or Install.exe)”.
0
If the auto play dialog box appears, select “Open folder to view files” and
click “OK”. Then, click “install (or Install.exe)” in the folder.
o
Windows 8/Windows 8.1
1
Open the terminal cover.
2
Connect to your PC using the provided USB cable.
0
Before connecting the cable, close the LCD monitor to turn off this
unit.
.
3
Open the LCD monitor.
.
0
This unit turns on and the “SELECT DEVICE” menu appears.
4
Tap “CONNECT TO PC”.
.
5
Tap “PLAYBACK ON PC”.
.
0
Disconnect the USB cable to return to the recording or playback
screen.
0
“Everio Software Setup” appears on the computer.
Operations are to be performed on the computer after the screen
switches.
6
Perform the following operations on your computer.
A
Display “Apps”.
(For Windows 8) Click the “Search” charm.
(For Windows 8.1) Click F.
.
B
Click “Computer” or “PC” in the “Windows System Tool” menu.
.
0
If a “Computer” icon is shown on desktop, double-click the icon to open
“Computer”.
C
Double-click the “JVCCAM_APP” icon in “Devices with Removable
Storage”.
.
D
Double-click “install (or Install.exe)”.
.
E
Click “Yes” on the User Account Control screen.
0
“Software Setup” appears after a while.
Copying
76
7
Click “Everio MediaBrowser 4”.
.
0
Follow the on-screen instructions to finish the installation.
8
Click “Finish”.
.
9
Click “Quit”.
.
0
Installation is complete, and two icons are created on the desktop.
10
Remove this unit from your PC.
“Disconnecting this Unit from Computer” (A p. 79)
Memo :
0
If “Everio Software Setup” doesn’t appear, double-click “JVCCAM_APP”
in
“My Computer” or “Computer”, then double-click “install (or Install.exe)”.
0
If the auto play dialog box appears, select “Open folder to view files” and
click “OK”. Then, click “install (or Install.exe)” in the folder.
o
Windows 7
1
Open the terminal cover.
2
Connect to your PC using the provided USB cable.
0
Before connecting the cable, close the LCD monitor to turn off this
unit.
.
3
Open the LCD monitor.
.
0
This unit turns on and the “SELECT DEVICE” menu appears.
4
Tap “CONNECT TO PC”.
.
5
Tap “PLAYBACK ON PC”.
.
0
“Everio Software Setup” appears on the computer.
Operations are to be performed on the computer after the screen
switches.
6
Perform the following operations on your computer.
A
Click “Open folder to view files” on the auto play dialog box, and then
double-click “install.exe”.
B
Click “Yes” on the User Account Control screen.
.
0
“Software Setup” appears after a while.
0
If it doesn’t appear, double-click “JVCCAM_APP” in “Computer” or “My
Computer”, then double-click “install.exe”.
Copying
77
7
Click “Everio MediaBrowser 4”.
.
0
Follow the on-screen instructions to finish the installation.
8
Click “Finish”.
.
9
Click “Quit”.
.
0
Installation is complete, and two icons are created on the desktop.
10
Remove this unit from your PC.
“Disconnecting this Unit from Computer” (A p. 79)
Memo :
0
If “Everio Software Setup” doesn’t appear, double-click “JVCCAM_APP”
in
“My Computer” or “Computer”, then double-click “install (or Install.exe)”.
0
If the auto play dialog box appears, select “Open folder to view files” and
click “OK”. Then, click “install (or Install.exe)” in the folder.
Backing Up All Files
Before making backup, make sure that enough free space is left in the
computer's hard disk (HDD).
Backup will not start if there is not enough free space.
0
This operation cannot be completed if the remaining battery power is not
enough. Charge the battery fully first.
1
Open the terminal cover.
2
Connect to your PC using the provided USB cable.
0
Before connecting the cable, close the LCD monitor to turn off this
unit.
.
3
Open the LCD monitor.
.
0
This unit turns on and the “SELECT DEVICE” menu appears.
4
Tap “CONNECT TO PC”.
.
5
Tap “BACK UP”.
.
0
Disconnect the USB cable to return to the recording or playback
screen.
0
The provided software Everio MediaBrowser 4 starts up on the
computer.
The subsequent operations are to be performed on the computer.
Copying
78
6
Select the source of the image file.
.
7
Start backup.
.
0
Backup starts.
8
After backup is complete, click “OK”.
.
9
Remove this unit from your PC.
Memo :
0
Before making backup, load the SD card in which the videos and still
images are stored on this unit.
0
If you encounter any problems with the provided software Everio
MediaBrowser 4, please consult the “Pixela User Support Center”.
TelephoneUSA and Canada (English): +1-800-458-4029 (toll-free)
Europe (UK, Germany, France, and Spain)
(English):+800-1532-4865 (toll-free)
Other Countries in Europe
(English):+44-1489-564-764
Asia (Philippines) (English): +63-2-438-0090
Homepage
http://www.pixela.co.jp/oem/jvc/mediabrowser/e/
0
Delete unwanted videos before making backup.
It takes time to back up many videos.
“Deleting Unwanted Files” (A p. 63
)
Disconnecting this Unit from Computer
.
1
Click “Safely Remove Hardware and Eject Media”.
2
Click all “JVCCAM~”.
3
Disconnect the USB cable and close the LCD monitor.
Copying
79
Organizing Files
After backing up your files, organize them by adding labels such as “Family
Trip” or “Athletic Meet”.
This is useful not only for creating discs, but for viewing the files too.
1
Double-click on the Everio MediaBrowser 4 icon.
0
The provided software starts up.
.
2
Display the month of the files to organize.
.
3
Create a user list.
.
.
0
A new user list is added to the user list library.
4
Click on the recording day.
0
The thumbnails of the files recorded on the day are displayed.
.
5
Register files to the created user list.
.
Identifying Video or Still Image:
0
You can select files using the “SELECT” menu on the top right of the
screen.
0
Check the video/still image icon on the top right corner of the thumbnail.
.
Memo :
0
If you encounter any problems with the provided software Everio
MediaBrowser 4, please consult the “Pixela User Support Center”.
TelephoneUSA and Canada (English): +1-800-458-4029 (toll-free)
Europe (UK, Germany, France, and Spain)
(English):+800-1532-4865 (toll-free)
Other Countries in Europe
(English):+44-1489-564-764
Asia (Philippines) (English): +63-2-438-0090
Homepage
http://www.pixela.co.jp/oem/jvc/mediabrowser/e/
Copying
80
Recording Videos to Discs
Copy the files that are arranged using the user list to discs.
1
Insert a new disc into the PC’s recordable DVD drive.
2
Select the desired user list.
.
3
Select the disc type.
.
4
Select the files to copy to disc in order.
.
0
Click “Settings” to select the disc type.
0
Click “Select all” to select all the displayed files.
0
After selecting, click “Next”.
5
Set the title of the top menu of the disc.
.
0
Click “Settings” to select the menu background.
0
After setting, click “Start”.
6
After copying is complete, click “OK”.
.
Memo :
0
The
following types of discs can be used on the provided software Everio
MediaBrowser 4.
DVD-R
DVD-R DL
DVD-RW
DVD+R
DVD+R DL
DVD+RW
0
The following formats are supported by the provided software Everio
MediaBrowser 4.
AVCHD
DVD-Video*
* To create DVD-Video discs using the provided software, it is necessary to
install the additional software (software for creating DVD-Video).
For details, refer to the Pixela homepage.
http://www.pixela.co.jp/oem/jvc/mediabrowser/e/
0
Use commercially-available software to create a Blu-ray disc.
0
Use
Everio MediaBrowser 4 Player to play back an AVCHD disc. Refer to
the help file of the provided Everio MediaBrowser 4 software to operate.
0
When copying videos recorded in UXP recording mode to create an
AVCHD disc, the videos need to be converted to XP recording mode
before copying. Therefore, it may take a longer time than copying videos
recorded in other modes.
0
To view the help file of Everio MediaBrowser 4, select “Help” from the
Everio MediaBrowser 4’s menu bar or press F1 on the keyboard.
0
If you encounter any problems with the provided software Everio
MediaBrowser 4, please consult the “Pixela User Support Center”.
TelephoneUSA and Canada (English): +1-800-458-4029 (toll-free)
Europe (UK, Germany, France, and Spain)
(English):+800-1532-4865 (toll-free)
Other Countries in Europe
(English):+44-1489-564-764
Asia (Philippines) (English): +63-2-438-0090
Homepage
http://www.pixela.co.jp/oem/jvc/mediabrowser/e/
Copying
81
Backing Up Files Without Using Provided Software
Copy the files to a computer using the following method.
0
This operation cannot be completed if the remaining battery power is not
enough. Charge the battery fully first.
1
Open the terminal cover.
2
Connect to your PC using the provided USB cable.
0
Before connecting the cable, close the LCD monitor to turn off this
unit.
.
3
Open the LCD monitor.
.
0
This unit turns on and the “SELECT DEVICE” menu appears.
4
Tap “CONNECT TO PC”.
.
5
Tap “PLAYBACK ON PC”.
.
0
Disconnect the USB cable to return to the recording or playback
screen.
0
Close the Everio MediaBrowser 4 program, if it starts.
0
The following screen is displayed after the camera operation is
completed.
.
0
Operations are to be performed on the computer after the screen
switches.
6
(Windows10)
Click
“This PC” in “Windows System”, then click the “JVCCAM_SD” icon
of “This PC”.
(Windows 8/8.1)
Right-click “Computer” in the “Windows System Tool” menu to select
the checkbox, and then click the “JVCCAM_SD” icon.
(Windows 7)
Select “Computer” from the “Start” menu, then click on the
“JVCCAM_SD” icon.
0
Open the folder with the desired files.
“List of Files and Folders” (A p. 83)
7
Copy the files to any folder in the computer (desktop, etc).
Caution :
0
When the camera and PC are connected by an USB cable, recorded
media are read-only.
Memo :
0
To edit/view the files, use a software that supports AVCHD (video)/JPEG
(still image) files.
0
The above operations on computer may vary with the system used.
Disconnecting this Unit from Computer
.
1
Click “Safely Remove Hardware and Eject Media”.
2
Click all “JVCCAM~”.
3
Disconnect the USB cable and close the LCD monitor.
Copying
82
List of Files and Folders
Folders and files are created in the built-in memory and SD card as shown below.
They are created only when necessary.
.
Caution :
0
When the camera and PC are connected by an USB cable, recorded media are read-only.
Copying
83
Copying to Mac Computer
Copy the files to a Mac computer using the following method.
Caution :
0
This operation cannot be completed if the remaining battery power is not
enough. Charge the battery fully first.
1
Open the terminal cover.
2
Connect to your PC using the provided USB cable.
0
Before connecting the cable, close the LCD monitor to turn off this
unit.
.
3
Open the LCD monitor.
.
4
Tap “CONNECT TO PC”.
.
5
Tap “PLAYBACK ON PC”.
.
0
Disconnect the USB cable to return to the recording or playback
screen.
0
The following screen is displayed after the camera operation is
completed.
.
0
The “JVCCAM_MEM” or “JVCCAM_SD” icon appears on the
desktop.
6
Load image file to iPhoto.
0
iPhoto
launches automatically and videos recorded in the camera are
displayed. Load the necessary images.
0
Images on the built-in memory and SD card are displayed separately.
Switch between JVCCAM_MEM (built-in memory) and JVCCAM-SD
(SD card) displayed under “Devices” in the iPhoto “Source list”.
0
Videos loaded using iPhoto cannot be edited using iMovie. To edit
videos, load the files from iMovie.
7
Edit the video using iMovie.
0
Run iMovie and load the necessary videos to iMovie.
0
Videos loaded using iPhoto cannot be imported to iMovie.
0
For details on operating iMovie, refer to the help file of iMovie.
Caution :
0
Do not remove the cable or turn off this unit before image loading is
complete.
0
When the camera and PC are connected by an USB cable, recorded
media are read-only.
0
MTS files that are copied to a Mac computer cannot be imported to iMovie.
To use MTS files with iMovie, import the files using iMovie.
Memo :
0
To edit/view the files, use a software that supports AVCHD (video) files.
0
When removing this unit from the computer, drag and drop the
“JVCCAM_MEM” or “JVCCAM_SD” icon on the desktop to the trash bin.
iMovie and iPhoto
You can import files from this unit to a computer using Apple’s iMovie ’8,
iMovie ’9, iMovie ’11, iMovie version 10 (video), or iPhoto (still image).
For the PC operating system of iMovie and iPhoto, check the information
provided by Apple.
0
For the latest information on iMovie or iPhoto, refer to the Apple website.
0
For details on how to use iMovie or iPhoto, refer to the help file of the
respective softwares.
0
There is no guarantee that the operations will work with all computer
environments.
Copying
84
Operating the Menu
The following menu is available on this unit.
0
TOP MENU: Menu that contains all the items specific to the video
recording,
still image recording, video playback, and still image playback
modes respectively.
Operating the Top Menu
You can configure various settings using the menu.
1
Tap “MENU”.
.
0
The top menu appears.
0
The menu differs according to the mode in use.
2
Tap the desired menu.
.
3
Tap the desired setting.
.
Memo :
0
To display the previous/next menu
Tap 0 or 1.
0
To return to the previous screen
Tap J.
0
To exit the screen
Tap L (quit).
Settings Menu
85
RECORD SETTING Menu (video)
.
FOCUS
Focus can be adjusted manually.
“Adjusting Focus Manually (FOCUS)” (A p. 28)
*Displayed only in the manual recording mode.
BRIGHTNESS ADJUST
Adjusts the overall brightness of the screen.
“Adjusting Brightness” (A p. 29)
*Displayed only in the manual recording mode.
BACKLIGHT COMP.
Corrects the image when the subject appears dark due to backlight.
“Setting Backlight Compensation” (A p. 30)
*Displayed only in the manual recording mode.
WHITE BALANCE
Adjusts the color according to the light source.
“Setting White Balance” (A p. 31)
*Displayed only in the manual recording mode.
TELE MACRO
Enables close-up shots when using the telephoto (T) end of the zoom.
“Taking Close-up Shots (TELE MACRO)” (A p. 32)
*Displayed only in the manual recording mode.
TOUCH PRIORITY AE/AF
Automatically adjusts focus and brightness based on the subjects’ faces or selected area.
“Capturing Subjects Clearly (TOUCH PRIORITY AE/AF)” (A p.
39)
DIS
Camera shake during video recording can be effectively reduced.
“Reducing Camera Shake” (A p. 40
)
GAIN UP
Makes the subject appear bright automatically when recording in dark places.
SettingDetails
OFFDeactivates the function.
ONElectrically brightens the scene when it is dark.
AUTO SLOW-SHUTTERSlows down the shutter speed to brighten the scene when it is dark.
Memo :
0
Although “AUTO SLOW-SHUTTER” brightens the scene more than “ON”, movements of the subject may become unnatural.
Settings Menu
86
WIND CUT
Reduces the noise caused by wind.
SettingDetails
OFFDeactivates the function.
ONActivates the function.
AUTOActivate the function automatically.
SELF-TIMER
Use this function when you wish to include the photographer in the picture or video.
“Using the Self-timer in Video Mode” (A p. 43
)
TIME-LAPSE RECORDING
This function enables the changes of a scene that occur slowly over a long period to be shown within a short time by taking frames of it at a certain interval.
This is useful for making observations such as the opening of a flower bud.
“Recording at Intervals (TIME-LAPSE RECORDING)” (A p. 41)
SELF-CHECK REC/PLAY
After recording for a specified duration, this unit automatically plays back the scene and then repeats the recording process and the playback process over
and over again.
“Recording at a Fixed Interval and Playing Back Repeatedly” (A p. 45
)
DATE/TIME RECORDING
You can record videos together with the date and time.
Set this when you want to save the file with date and time display.
(The date and time cannot be deleted after recording.)
“Recording Videos with Date and Time” (A p.
46)
TIME COUNTER RECORDING
You can take a video with a stopwatch recorded. You can start, stop and reset the stopwatch as with any stopwatch.
“Recording Videos with Time Counter” (A p. 47
)
RECORDING EFFECT
You can add and record various effects to the images. Once setting is done, you can easily record images that are suitable for each image.
o
GRAINY MONOCHROME
You can record images with a grainy black and white photo feel.
“Recording Images Like an Old Black and White Photo (GRAINY MONOCHROME)” (A p. 35
)
o
FOOD
You can capture images of the food to make the food look appetizing.
“Recording Food Images (FOOD)” (A p. 36)
o
BABY
You can capture soft images by enhancing the clarity and brightness of skin color. This effect is suitable for capturing images of a baby.
“Recording Images of a Baby (BABY)” (A p. 37)
SHUTTER MODE
Continuous shooting settings can be adjusted.
SettingDetails
RECORD ONE SHOTRecords one still image.
CONTINUOUS SHOOTINGRecords still images continuously while the A button on the LCD screen is tapped.
Memo :
0
The size of the still image that is captured in the video mode is 1,920 x 1,080.
0
Some SD cards may not support continuous shooting.
0
The continuous shooting speed will drop if this function is used repeatedly.
Settings Menu
87
SEAMLESS RECORDING
Continues recording on the SD card without stopping when the remaining space on the built-in memory runs out.
SettingDetails
OFFDoes not switch recording media automatically.
ONSwitches recording media automatically.
Memo :
0
Seamless recording cannot be performed if there is not enough free space in the SD card.
0
q appears if seamless recording cannot be performed.
0
To
start seamless recording again after the previous session is complete, it is necessary to combine seamless videos, or delete the combination information
of the seamless videos.
“Combining Videos Recorded by Seamless Recording” (A p. 67)
VIDEO QUALITY
Sets the video quality.
SettingDetails
UXPEnables recording in the best picture quality.
XPEnables recording in high picture quality.
EPEnables long recordings.
Memo :
0
Set to “UXP” or “XP” mode when recording fast-moving scenes or scenes with extreme changes of brightness to avoid noise.
0
Copy videos recorded with the video quality set to “UXP” in blu-ray discs.
ZOOM
Sets the maximum zoom ratio.
SettingDetails
40x OPTICALEnables recording with 1 - 40x optical zoom. Set this when digital zoom is not desired.
60x DYNAMICEnables recording with 1 - 40x optical zoom and 41 - 60x digital zoom.
80x DIGITAL (GZ-R430)
120x DIGITAL (GZ-R435)
Enables recording with 1 - 40x optical zoom and 41 - 80x digital zoom. (GZ-R430)
Enables recording with 1 - 40x optical zoom and 41 - 120x digital zoom. (GZ-R435)
100x DIGITAL (GZ-R430)
200x DIGITAL (GZ-R435)
Enables recording with 1 - 40x optical zoom and 41 - 100x digital zoom. (GZ-R430)
Enables recording with 1 - 40x optical zoom and 41 - 200x digital zoom. (GZ-R435)
Memo :
0
When digital zoom is used, the image becomes grainy as it is digitally enlarged.
0
The angle of view changes when the image stabilizer is turned on or off.
ZOOM MIC
Sets the zoom microphone.
SettingDetails
OFFDeactivates the zoom microphone.
ONRecords audio sounds in the same direction as the zoom operation.
Memo :
0
When “ON” is selected, the volume of the wide angle (W) end is lower than the telephoto (T) end.
Settings Menu
88
MIC LEVEL
Make the adjustments such that “MIC LEVEL” does not turn red.
SettingDetails
OFFHides display of microphone input level.
ONShows display of microphone input level.
MIC LEVEL SETTING
Sets the microphone level.
Make the adjustments such that “MIC LEVEL” does not turn red.
SettingDetails
+1Increases the microphone input level.
0The microphone input level is not changed.
-1Decreases the microphone input level.
K2 TECHNOLOGY
Reduces the degradation of sound quality caused by digital signal processing, and records a sound quality close to the original.
SettingDetails
OFFDeactivates K2 TECHNOLOGY.
ONActivates K2 TECHNOLOGY.
SCREEN LOCK
When shooting under water, lock the touch screen to prevent operation errors.
“Locking the Screen (when Shooting Underwater)” (A p. 10)
Settings Menu
89
LCD CLOSED RECORDING
This unit does not turn off even when the LCD monitor is closed during recording.
SettingDetails
OFFThe unit is turned off when the LCD monitor is closed.
ONActivates LCD CLOSED RECORDING.
Memo :
0
If “LCD CLOSED RECORDING” is set to “ON”, stop the recording before turning off the unit.
0
When
“LCD CLOSED RECORDING” set to “ON” and recording is in progress with the LCD monitor closed (or LCD monitor reversed), the zoom lever and
the START/STOP button cannot be operated.
Settings Menu
90
RECORD SETTING Menu (still image)
.
FOCUS
Focus can be adjusted manually.
“Adjusting Focus Manually (FOCUS)” (A p. 28)
*Displayed only in the manual recording mode.
BRIGHTNESS ADJUST
Adjusts the overall brightness of the screen.
“Adjusting Brightness” (A p. 29)
*Displayed only in the manual recording mode.
BACKLIGHT COMP.
Corrects the image when the subject appears dark due to backlight.
“Setting Backlight Compensation” (A p. 30)
*Displayed only in the manual recording mode.
WHITE BALANCE
Adjusts the color according to the light source.
“Setting White Balance” (A p. 31)
*Displayed only in the manual recording mode.
TELE MACRO
Enables close-up shots when using the telephoto (T) end of the zoom.
“Taking Close-up Shots (TELE MACRO)” (A p. 32)
*Displayed only in the manual recording mode.
TOUCH PRIORITY AE/AF
Automatically adjusts focus and brightness based on the subjects’ faces or selected area.
“Capturing Subjects Clearly (TOUCH PRIORITY AE/AF)” (A p.
39)
SELF-TIMER
Use this when taking a group photo.
“Using the Self-timer” (A p. 43
)
GAIN UP
Makes the subject appear bright automatically when recording in dark places.
SettingDetails
OFFDeactivates the function.
ONElectrically brightens the scene when it is dark.
Memo :
0
Setting can be adjusted separately for videos.
“GAIN UP (Video)” (A p. 86)
Settings Menu
91
RECORDING EFFECT
You can add and record various effects to the images. Once setting is done, you can easily record images that are suitable for each image.
o
GRAINY MONOCHROME
You can record images with a grainy black and white photo feel.
“Recording Images Like an Old Black and White Photo (GRAINY MONOCHROME)” (A p. 35)
o
FOOD
You can capture images of the food to make the food look appetizing.
“Recording Food Images (FOOD)” (A p. 36
)
o
BABY
You can capture soft images by enhancing the clarity and brightness of skin color. This effect is suitable for capturing images of a baby.
“Recording Images of a Baby (BABY)” (A p. 37)
SHUTTER MODE
Continuous shooting settings can be adjusted.
SettingDetails
RECORD ONE SHOTRecords one still image.
CONTINUOUS SHOOTINGRecords still images continuously while the START/STOP button is pressed.
Records still images continuously while the START/STOP button is pressed, or while the A button on the
LCD screen is tapped.
Memo :
0
Some SD cards may not support continuous shooting.
0
The continuous shooting speed will drop if this function is used repeatedly.
IMAGE SIZE
Sets the image size (number of pixels) for still images.
SettingDetails
1920X1080(2M)Takes still images with aspect ratio 16:9.
0
The sides of still images recorded in 16:9 aspect ratio may be cut off when printed.
3680X2760(10M)
1440X1080(1.5M)
640X480(0.3M)
Takes still images with aspect ratio 4:3.
*12 Megapixel Still Picture by Ultra Resolution Technology
SCREEN LOCK
When shooting under water, lock the touch screen to prevent operation errors.
“Locking the Screen (when Shooting Underwater)” (A p. 10
)
Settings Menu
92
PLAYBACK SETTING Menu (video)
.
DISPLAY DATE/TIME
Sets whether to display the recording date and time during video playback.
SettingDetails
OFFDoes not display the date and time during playback.
ONDisplays the date and time during playback.
TIME COUNTER PLAYBACK
A time counter that can be reset can be displayed during playback.
“TIME COUNTER PLAYBACK” (A p. 54)
SLOW-MOTION SPEED
For specifying the playback speed of slow playback.
SettingDetails
1/2Sets the speed of slow playback to 1/2 normal playback speed.
1/4Sets the speed of slow playback to 1/4 normal playback speed.
1/8Sets the speed of slow playback to 1/8 normal playback speed.
DIGEST PLAYBACK
Plays back a digest of the recorded videos.
“ DIGEST PLAYBACK ” (A p. 55)
PLAYBACK OTHER FILE
Plays videos with defective management information.
“ PLAYBACK OTHER FILE ” (A p. 56)
Settings Menu
93
EDIT Menu (video)
.
PROTECT/CANCEL
Protects files from being deleted accidently.
“Protecting/Releasing Protection of the Currently Displayed File” (A p. 64)
“Protecting/Releasing Protection of Selected Files” (A p. 65)
COPY
Copies files from the built-in memory to the SD card.
“Copying Files to an SD Card” (A p. 70
)
TRIMMING
Select the required part of a video and save it as a new video file.
The original video remains in its existing location.
“Capturing a Required Part in the Video (TRIMMING)” (A p. 68)
SEAMLESS REC CTRL
Videos that are recorded on two separate media and with “SEAMLESS RECORDING” in the video recording menu enabled can be combined into a single
video.
“Combining Videos Recorded by Seamless Recording” (A p. 67)
Settings Menu
94
PLAYBACK SETTING Menu (still image)
.
SLIDE SHOW EFFECTS
Sets the transition effects in slideshow playback.
SettingDetails
SLIDESwitches the screen by sliding in from right to left.
BLINDSSwitches the screen by dividing into vertical strips.
CHECKERBOARDSwitches the screen by changing through a checkered pattern.
RANDOMSwitches the screen with a random effect from SLIDE, “BLINDS”, and “CHECKERBOARD”.
Memo :
0
Slideshow effects are not available when playing back still images in external devices (such as USB external hard disk drives).
Settings Menu
95
EDIT Menu (still image)
.
PROTECT/CANCEL
Protects files from being deleted accidently.
“Protecting/Releasing Protection of the Currently Displayed File” (A p. 64)
“Protecting/Releasing Protection of Selected Files” (A p. 65)
COPY
Copies files from the built-in memory to the SD card.
“Copying Files to an SD Card” (A p. 70
)
Settings Menu
96
SETUP (video/still image)
.
Mobile User Guide
Displays the QR code to access the Mobile User Guide.
.
0
The portal site appears when the QR code has been read correctly.
Select the model name of your camera to display its Mobile User Guide.
Memo :
0
To read the QR code, a relevant application is required. Enter the URL in the internet browser manually if the QR code cannot be read.
0
The
Mobile User Guide is supported by Android devices and iPhone. You can view it on standard browsers such as Google Chrome (Android) and Mobile
Safari (iPhone).
0
QR Code is a registered trademark of Denso Wave Incorporated.
DATE & TIME
Resets the current time or sets to the local time when using this unit overseas.
“Clock Setting” (A p. 15)
“Setting the Clock to Local Time when Traveling” (A p. 18
)
“Setting Daylight Saving Time” (A p. 19)
DATE DISPLAY STYLE
Sets the order of year, month, day and the time display format (24H/12H).
Sorting OrderTime Display
year.month.day12h
month.day.year24h
day.month.year-
LANGUAGE
The language on the display can be changed.
“Changing the Display Language” (A p. 16)
Settings Menu
97
MONITOR BRIGHTNESS
Sets the brightness of the LCD monitor.
SettingDetails
AUTOSets the brightness automatically to “4” when using outdoors and to “3” when using indoors.
4Brightens the backlight of the monitor regardless of the surrounding conditions.
3Sets to the standard brightness.
2Darkens the backlight of the monitor regardless of the surrounding conditions.
1Sets to dim brightness.
Helps to save battery life when selected.
OPERATION SOUND
Turns on or off the operation sound.
SettingDetails
OFFTurns off the operation sound.
ONTurns on the operation sound.
AUTO POWER OFF
When no operation is made for 5 minutes, this function turns off this unit or sets this unit to standby mode when using the AC adapter in case you forgot to
turn off the power.
SettingDetails
OFFPower is not turned off even if this unit is not operated for 5 minutes.
ONTurns off the power automatically if this unit is not operated for 5 minutes.
Memo :
0
Turns off the power automatically if this unit is not operated for 5 minutes.
0
When using the AC adapter, this unit goes into standby mode.
DEMO MODE
Plays a demonstration of the special features of this unit.
SettingDetails
OFFDeactivates the function.
ONPlays a demonstration of the special features of this unit.
Memo :
0
This mode is not available in the playback mode.
TOUCH SCREEN ADJUST
Adjusts the response position of the buttons on the touch screen.
“Adjusting the Touch Screen” (A p. 11)
REC MEDIA FOR VIDEO
Sets the recording/playback media of videos.
SettingDetails
I BUILT-IN MEMORYRecords videos to this unit's built-in memory.
G SD CARDRecords videos to the SD card.
Settings Menu
98
REC MEDIA FOR IMAGE
Sets the recording/playback media of still images.
SettingDetails
I BUILT-IN MEMORYRecords still images to this unit’s built-in memory.
G SD CARDRecords still images to the SD card.
FORMAT BUILT-IN MEM.
Deletes all files on the built-in memory.
SettingDetails
FILEDeletes all files on the built-in memory.
FILE + MANAGEMENT NODeletes all files on the built-in memory and resets the folder and file numbers to "1".
(File number of the AVCHD video file starts from “0”.)
Caution :
0
All data on the built-in memory will be deleted when it is formatted.
Copy all files on the built-in memory to a computer before formatting.
0
Make sure that the battery pack is fully charged or connect the AC adapter as the formatting process may take some time.
FORMAT SD CARD
Deletes all files on the SD card.
SettingDetails
FILEDeletes all files on the SD card.
FILE + MANAGEMENT NODeletes all files on the SD card and resets the folder and file numbers to "1".
Caution :
0
Not available for selection when no SD card is inserted.
0
All data on the SD card will be deleted when it is formatted.
Copy all files on the SD card to a computer before formatting.
0
Make sure that the battery pack is fully charged or connect the AC adapter as the formatting process may take some time.
FACTORY PRESET
Returns all the settings to their default values.
FIRMWARE UPDATE
Updates the functions of this unit to the latest version.
For details, refer to the JVC homepage.
(When no program to update the software of this unit is available, nothing will be provided on the homepage.)
Libble takes abuse of its services very seriously. We're committed to dealing with such abuse according to the laws in your country of residence. When you submit a report, we'll investigate it and take the appropriate action. We'll get back to you only if we require additional details or have more information to share.
Product:
Forumrules
To achieve meaningful questions, we apply the following rules:
First, read the manual;
Check if your question has been asked previously;
Try to ask your question as clearly as possible;
Did you already try to solve the problem? Please mention this;
Is your problem solved by a visitor then let him/her know in this forum;
To give a response to a question or answer, do not use this form but click on the button 'reply to this question';
Your question will be posted here and emailed to our subscribers. Therefore, avoid filling in personal details.
Register
Register getting emails for JVC GZ-R430 at:
new questions and answers
new manuals
You will receive an email to register for one or both of the options.
Get your user manual by e-mail
Enter your email address to receive the manual of JVC GZ-R430 in the language / languages: English as an attachment in your email.
The manual is 5,14 mb in size.
You will receive the manual in your email within minutes. If you have not received an email, then probably have entered the wrong email address or your mailbox is too full. In addition, it may be that your ISP may have a maximum size for emails to receive.
If you have not received an email with the manual within fifteen minutes, it may be that you have a entered a wrong email address or that your ISP has set a maximum size to receive email that is smaller than the size of the manual.
The email address you have provided is not correct.
Please check the email address and correct it.
Your question is posted on this page
Would you like to receive an email when new answers and questions are posted? Please enter your email address.