“Computer” (Windows 7) from the “Start” menu, then click on the
“JVCCAM_MEM” or “JVCCAM_SD” icon.
0
Open the folder with the desired files.
“List of Files and Folders” (A p. 72)
0
“JVCCAM_MEM” is applicable to GZ-HM690/GZ-HM670/GZ-
HM650/GZ-HM450 only.
6
Copy the files to any folder in the computer (desktop, etc).
Caution :
0
When the folders or files are deleted/moved/renamed in the computer,
they cannot be played back on this unit anymore.
Memo :
0
To edit/view the files, use a software that supports AVCHD (video)/JPEG
(still image) files.
0
The above operations on computer may vary with the system used.
Disconnecting this Unit from Computer
1
Click “Safely Remove Hardware and Eject Media”.
.
2
Click “Safely Remove USB Mass Storage Device”.
3
(For Windows Vista) Click “OK”.
4
Disconnect the USB cable and close the LCD monitor.
List of Files and Folders
Folders and files are created in the built-in memory and SD card as shown
below.
They are created only when necessary.
.
Caution :
0
When the folders or files are deleted/moved/renamed in the computer,
they cannot be played back on this unit anymore.
Copying
72
Copying to Mac Computer
Copy the files to a Mac computer using the following method.
1
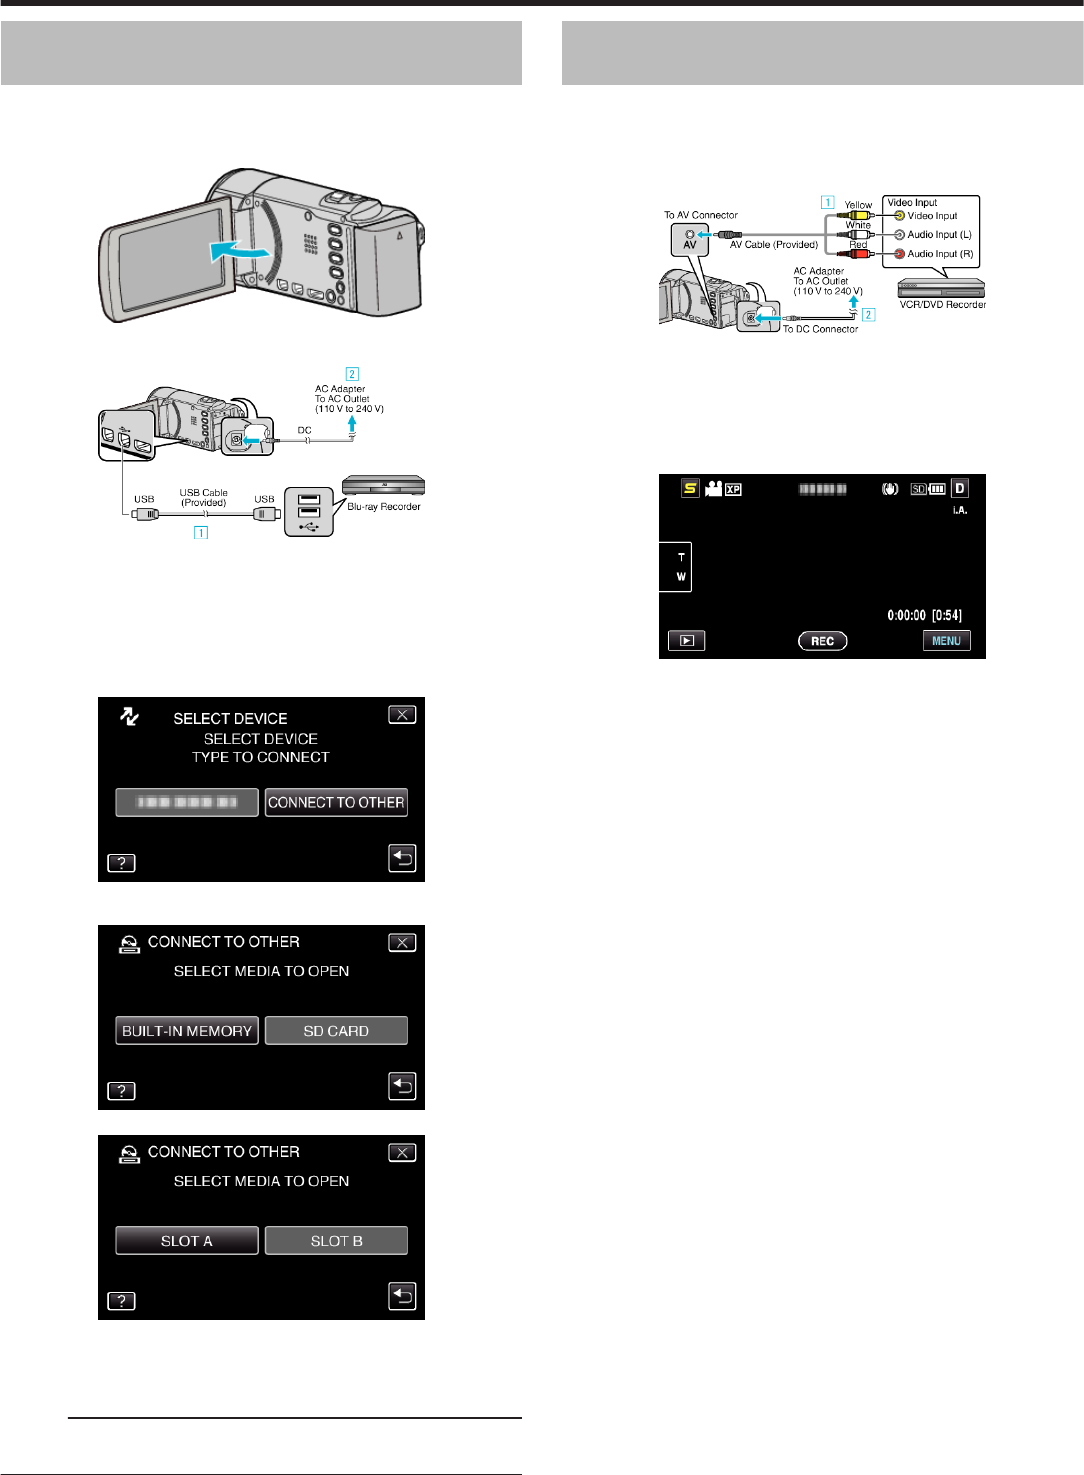
Open the LCD monitor.
.
2
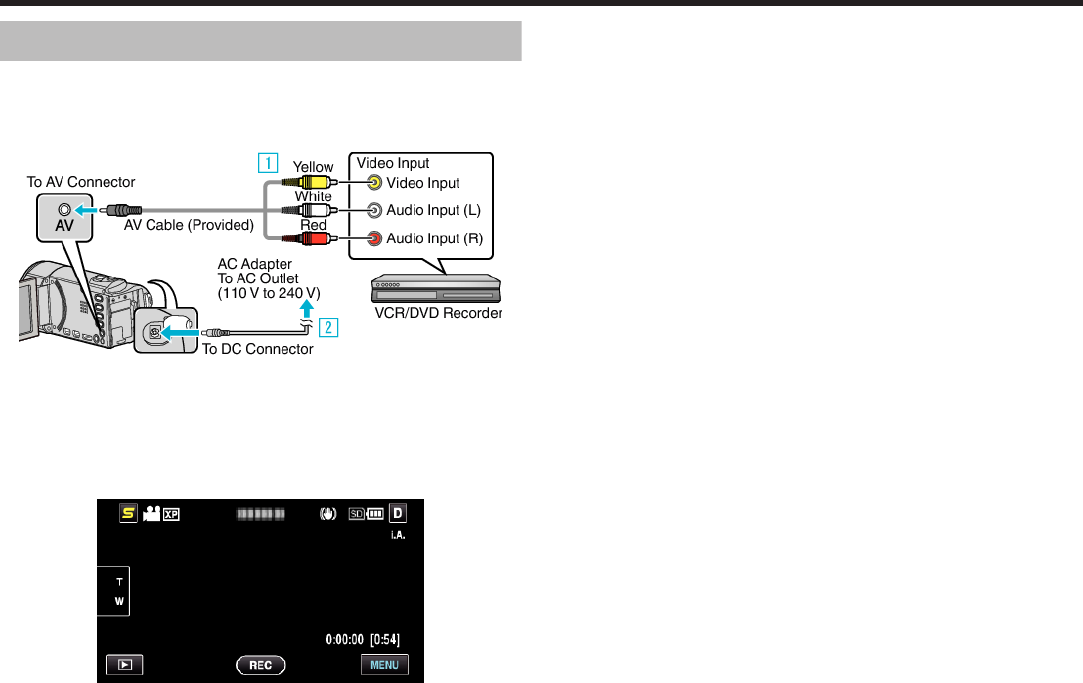
Connect the USB cable and the AC adapter.
.
A Connect using the provided USB cable.
B Connect the AC adapter to this unit.
0
This unit powers on automatically when the AC adapter is connected.
0
Be sure to use the supplied JVC AC adapter.
C The “SELECT DEVICE” menu appears.
3
Tap “CONNECT TO PC”.
.
4
Tap “PLAYBACK ON PC”.
.
0
Tap L to exit the menu.
0
Tap J to return to the previous screen.
0
Close the Everio MediaBrowser 3 program, if it starts.
0
The subsequent operations are to be performed on the computer.
5
Click on the “JVCCAM_MEM” or “JVCCAM_SD” icon on the desktop.
0
The folder opens.
0
“JVCCAM_MEM” is applicable to GZ-HM690/GZ-HM670/GZ-
HM650/GZ-HM450 only.
6
Click on the column display icon.
.
0
Open the folder with the desired files.
“List of Files and Folders” (A p. 72)
7
Copy the files to any folder in the computer (desktop, etc).
.
Caution :
0
When the folders or files are deleted/moved/renamed in the computer,
they cannot be played back on this unit anymore.
0
MTS files that are copied to a Mac computer cannot be imported to iMovie.
To use MTS files with iMovie, import the files using iMovie.
Memo :
0
To edit/view the files, use a software that supports AVCHD (video)/JPEG
(still image) files.
0
When removing this unit from the computer, drag and drop the
“JVCCAM_MEM” or “JVCCAM_SD” icon on the desktop to the trash bin.
iMovie and iPhoto
You can import files from this unit to a computer using Apple's iMovie '08,
'09, '11 (video) or iPhoto (still image).
To verify the system requirements, select “About This Mac” from the Apple
menu. You can determine the operating system version, processor and
amount of memory.
0
For the latest information on iMovie or iPhoto, refer to the Apple website.
0
For details on how to use iMovie or iPhoto, refer to the help file of the
respective software.
0
There is no guarantee that the operations will work with all computer
environments.
Copying
73
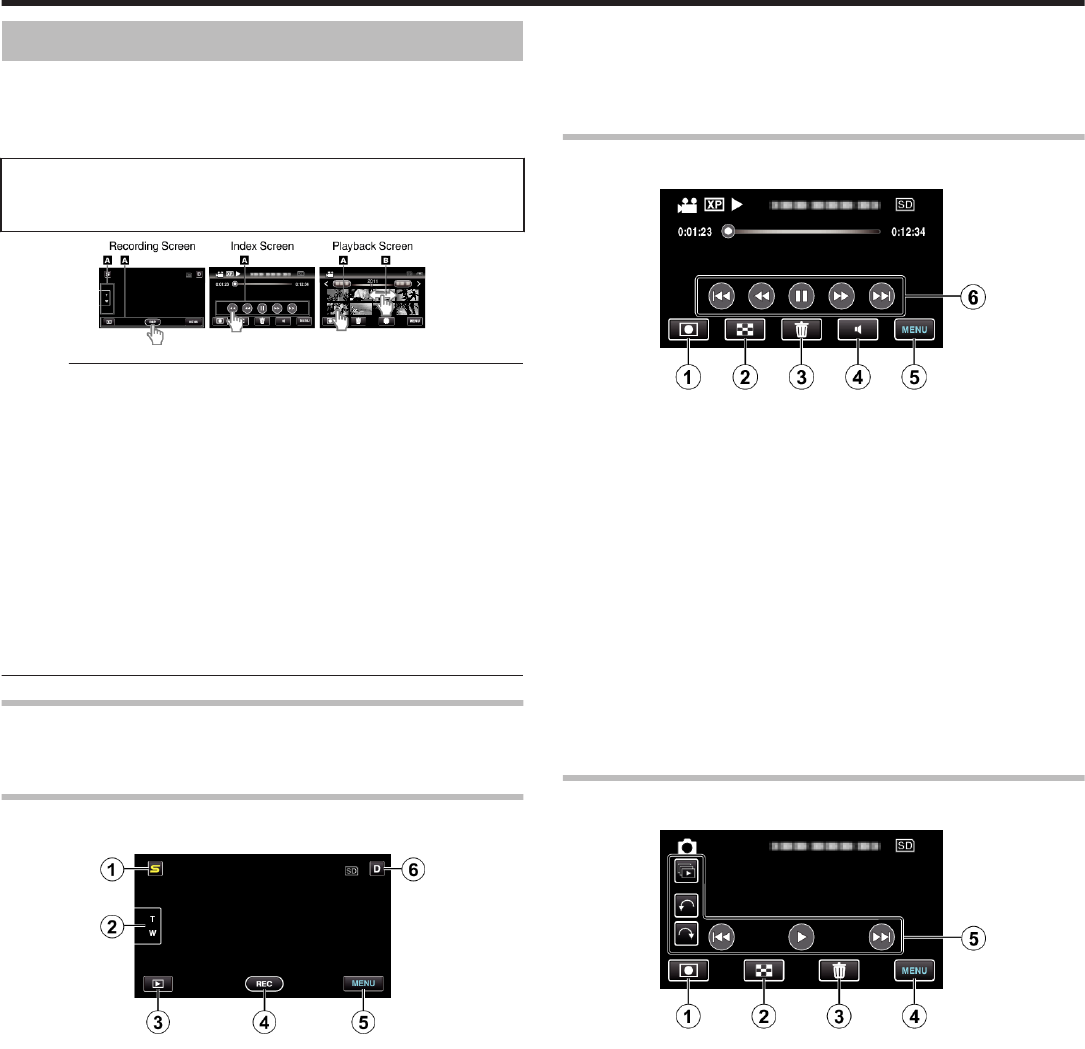
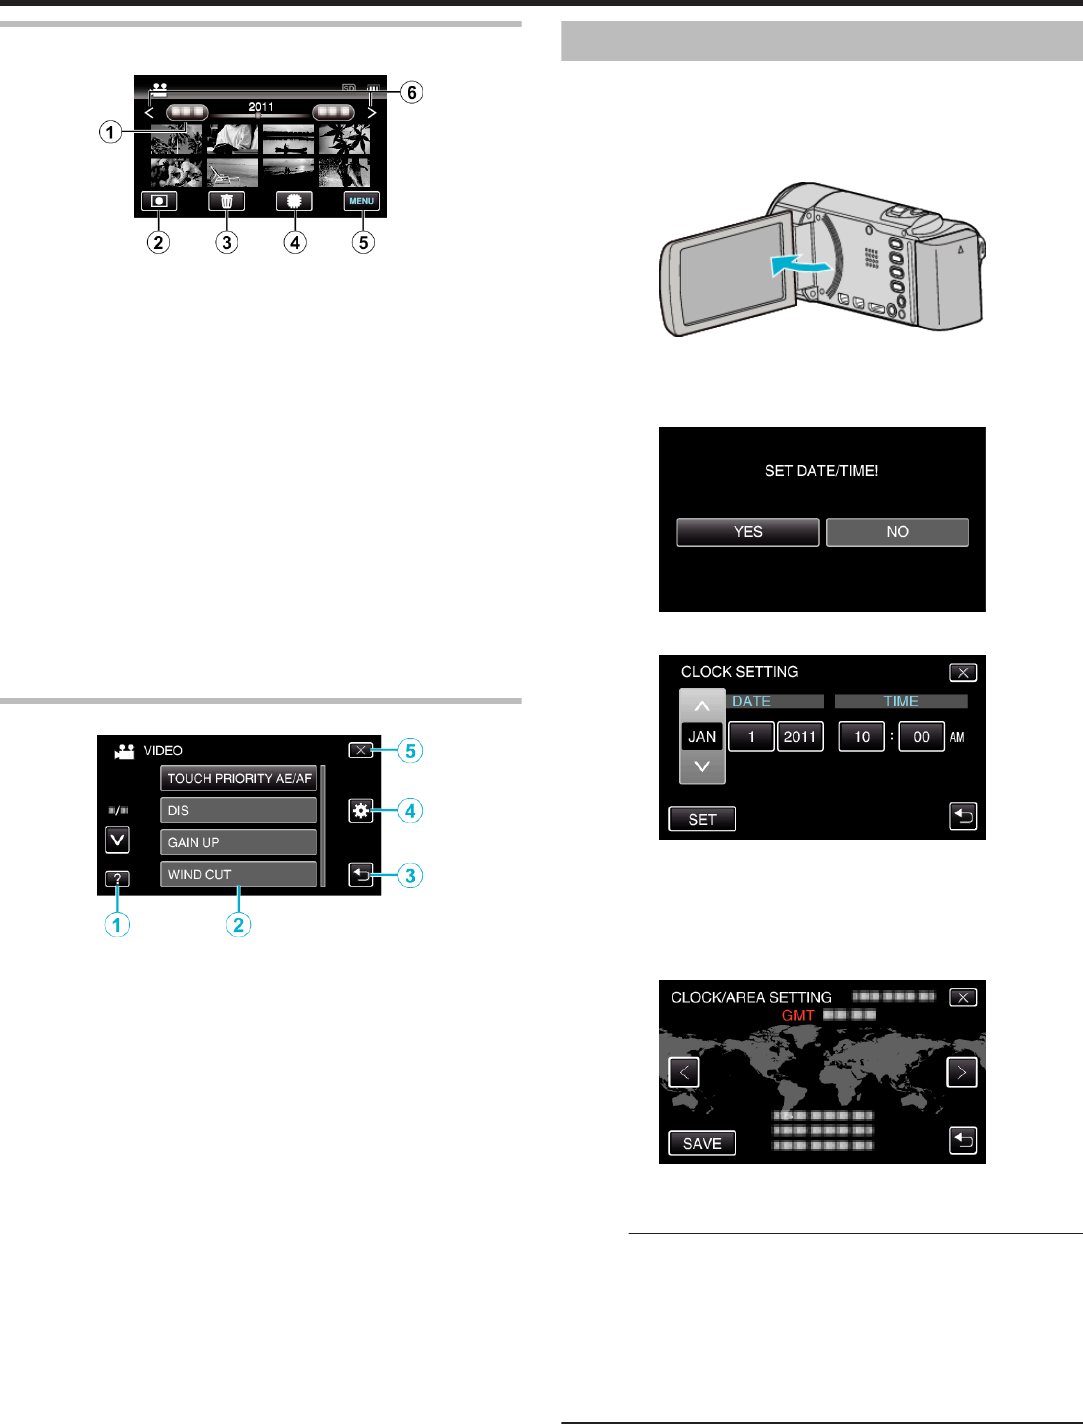
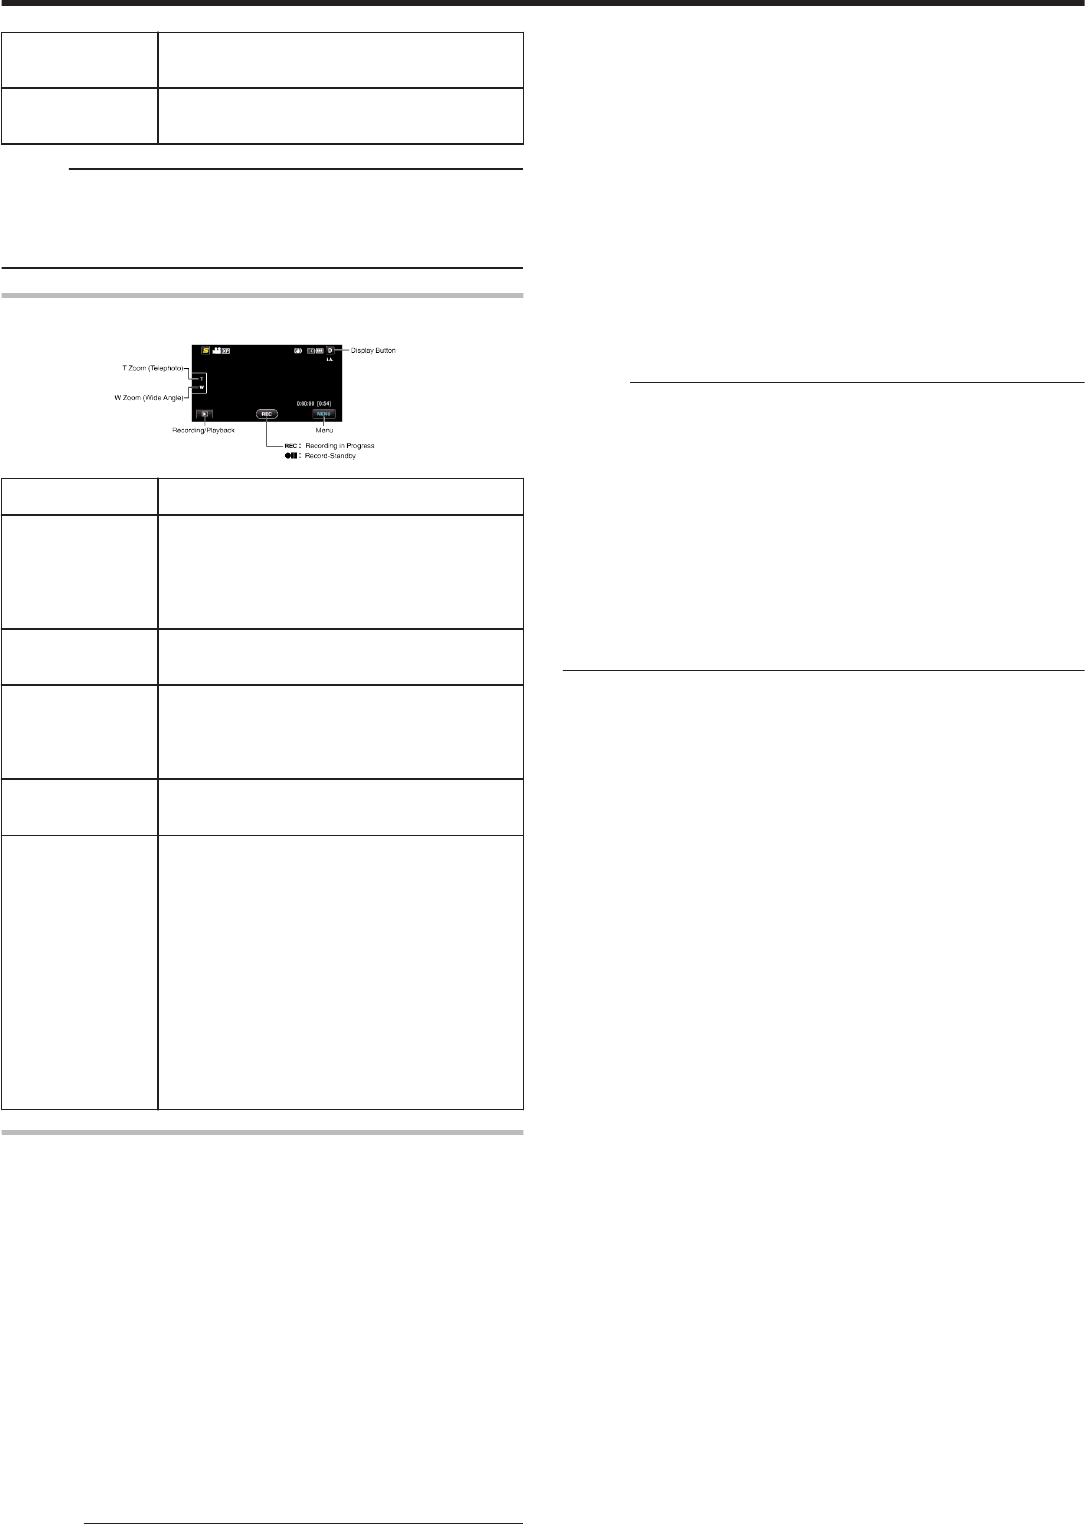
Operating the Menu
There are three types of menus in this unit.
0
Main menu - Menu that contains all the items specific to the video
recording, still image recording, video playback, and still image playback
modes respectively.
0
Q (COMMON) menu in the main menu - Menu that contains all common
items in the video recording, still image recording, video playback, and still
image playback modes.
0
V (face short cut) menu - Menu that picks up the face-related functions
in the main menu in either the video or still image recording mode.
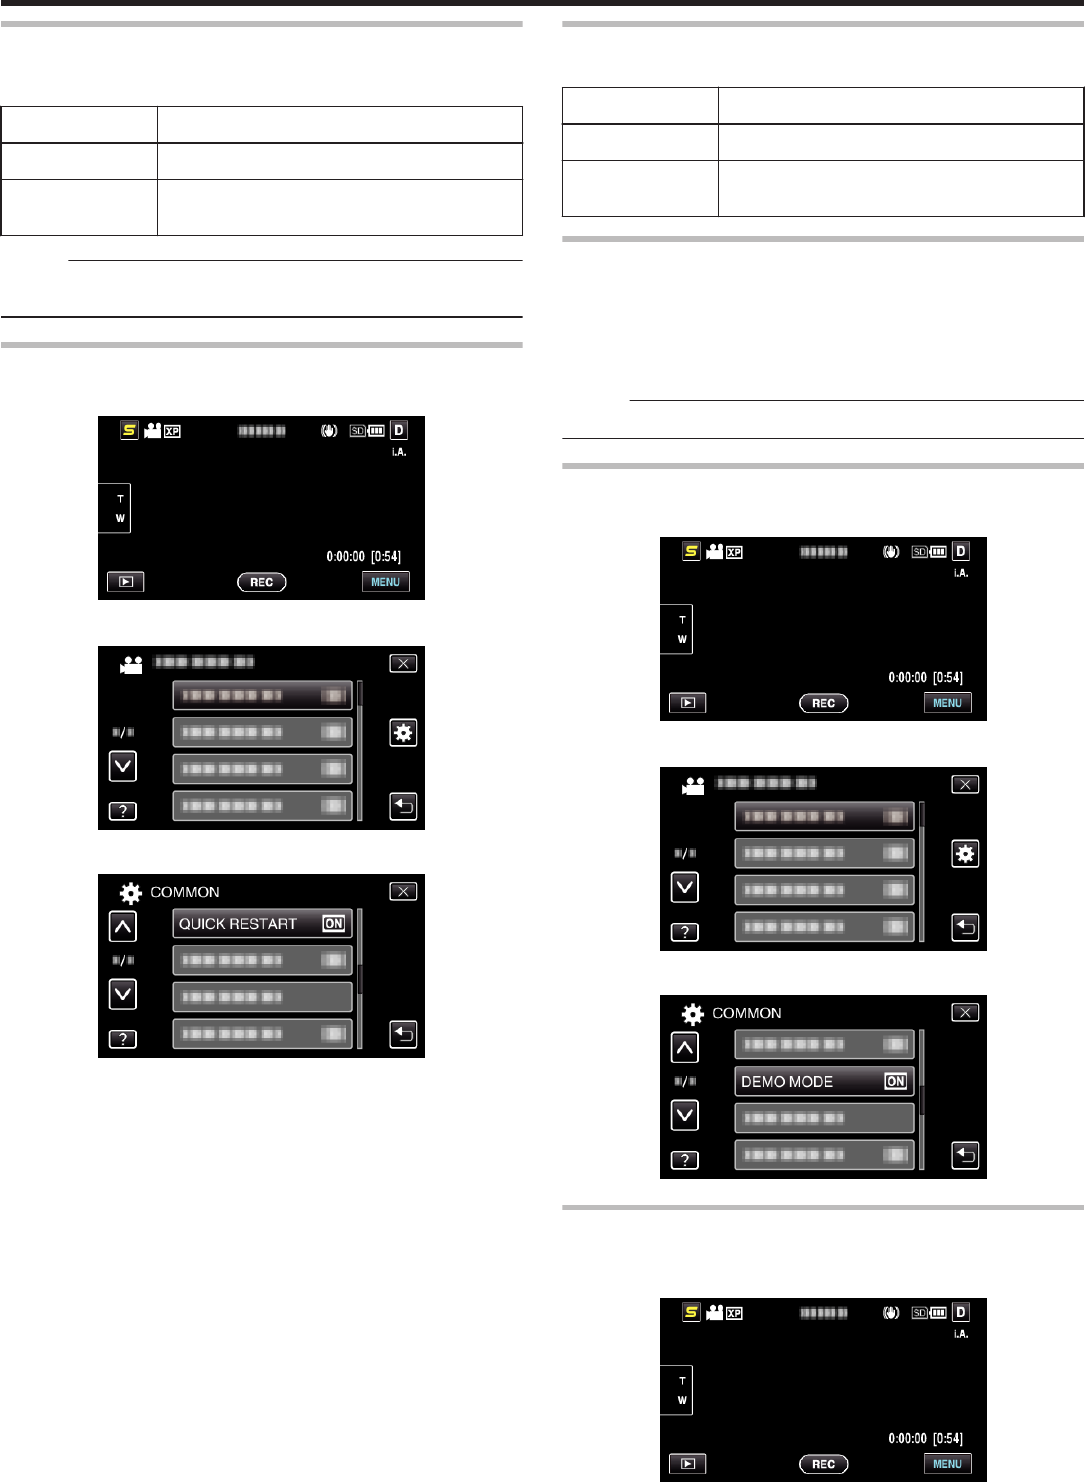
Operating the Common Menu
You can configure common setting items regardless of the mode using the
common menu.
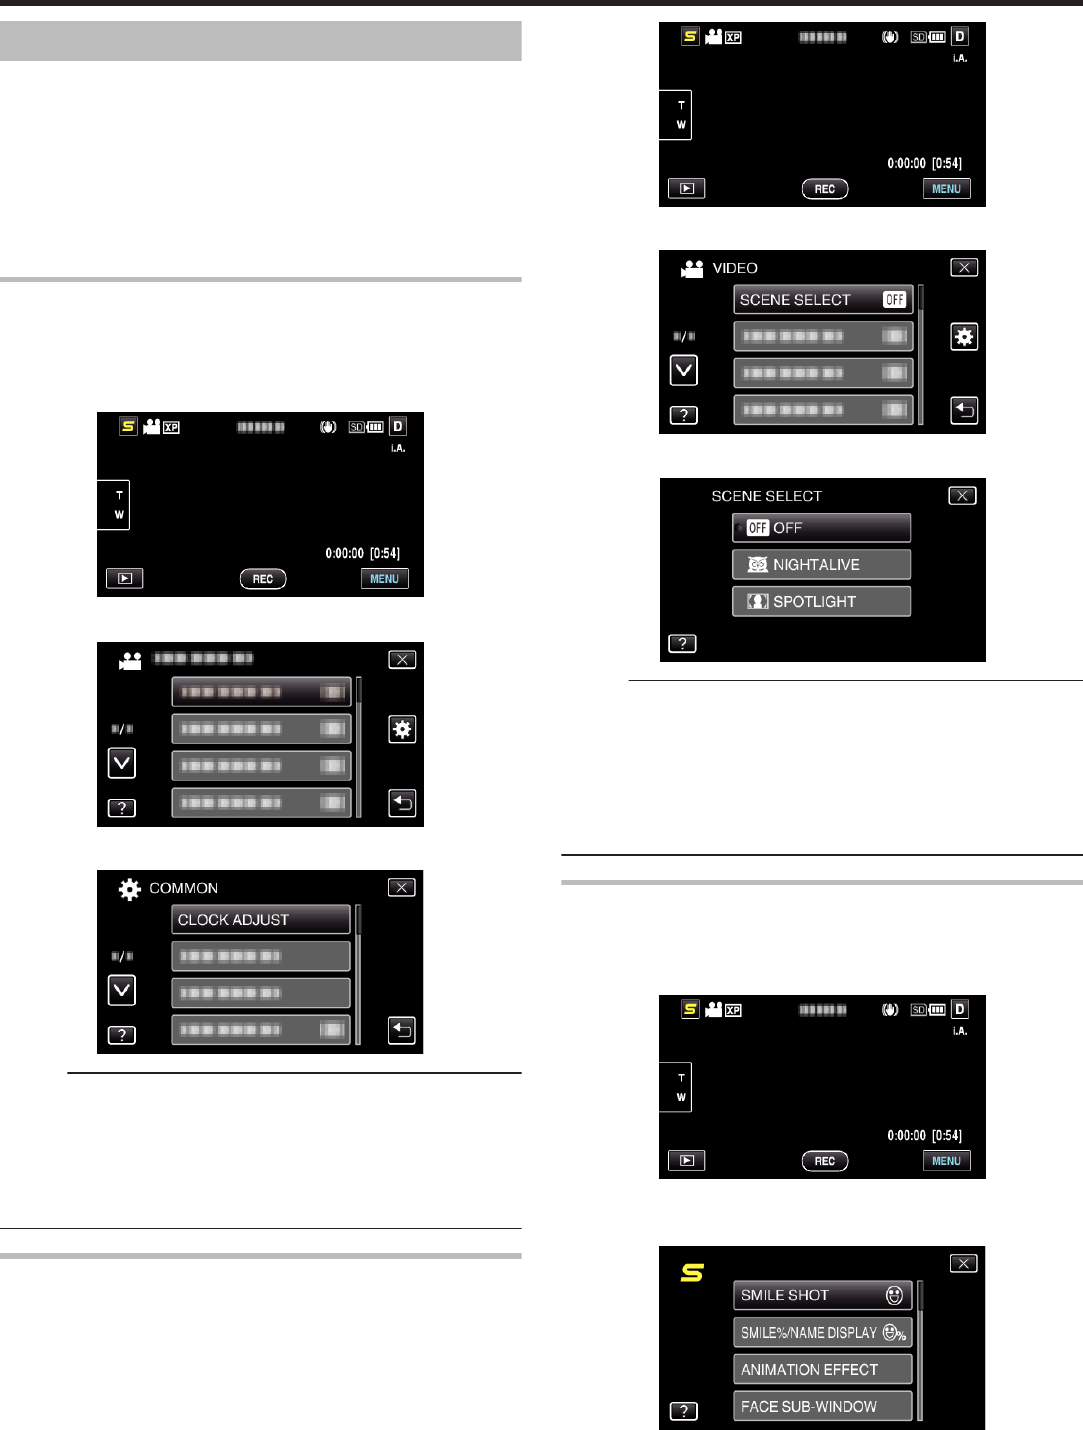
1
Tap “MENU”.
0
The menu differs according to the mode in use.
.
2
Tap “Q”.
.
3
Tap the desired setting.
.
Memo :
0
To exit the screen
Tap “L” (quit).
0
To return to the previous screen
Tap “J” (return).
0
To display the help file
Tap “K” (help) and tap the item.
Operating the Main Menu
You can configure various settings using the menu.
1
Tap “MENU”.
0
The menu differs according to the mode in use.
.
2
Tap the desired menu.
.
3
Tap the desired setting.
.
Memo :
0
To exit the screen
Tap “L” (quit).
0
To return to the previous screen
Tap “J” (return).
0
To display the help file
Tap “K” (help) and tap the item.
Help file may not be available for some items.
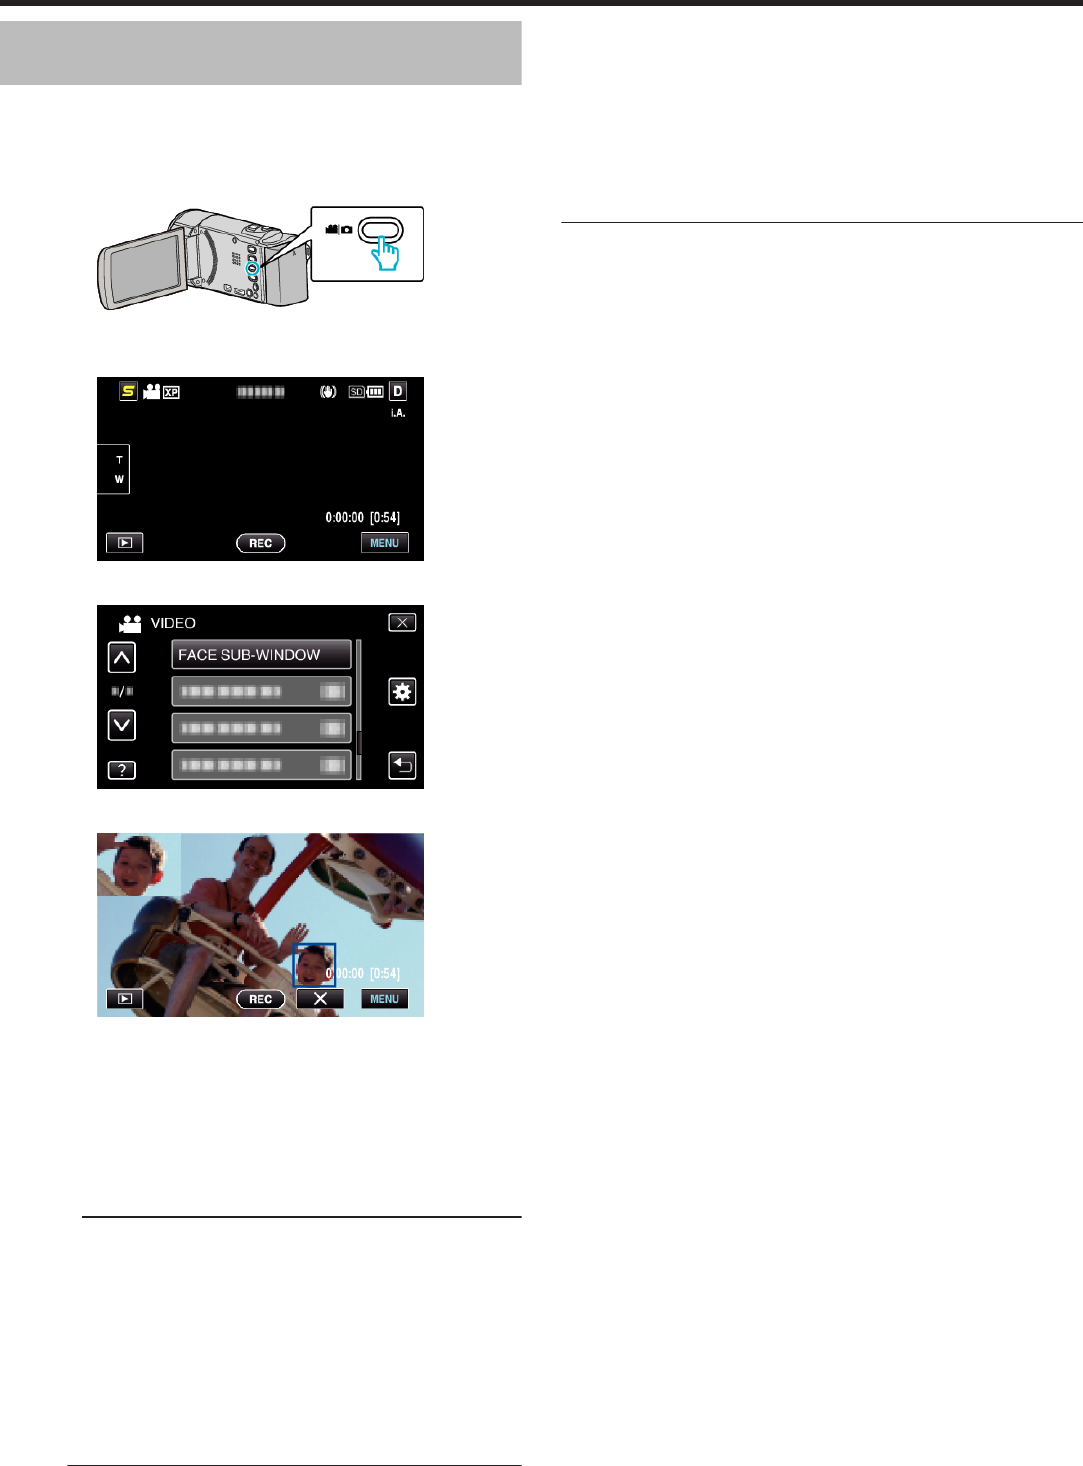
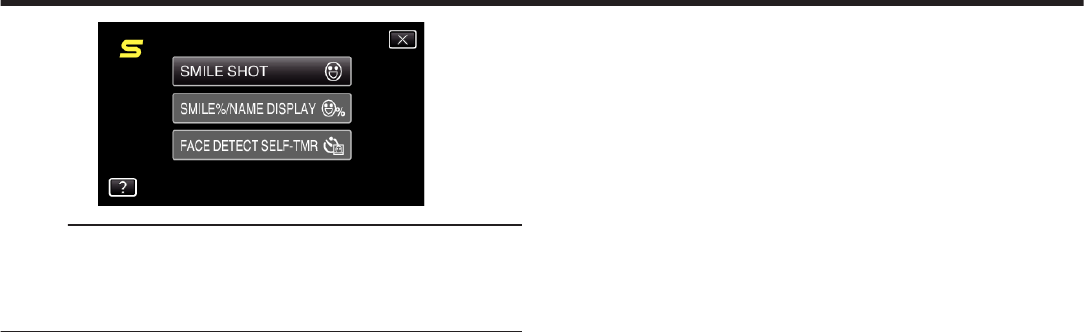
Operating the Face Short Cut Menu
You can configure various settings of face-related functions in either the
video or still image recording mode using the face short cut menu.
1
Tap “V” in the video or still image recording mode.
.
2
Tap the desired menu and setting.
0
Face Short Cut Menu During Video Recording Mode
.
0
Face Short Cut Menu During Still Image Recording Mode
Menu Settings
74
.
Memo :
0
To exit the screen
Tap “L” (quit).
0
To display the help file
Tap “K” (help) and tap the item.
Menu Settings
75
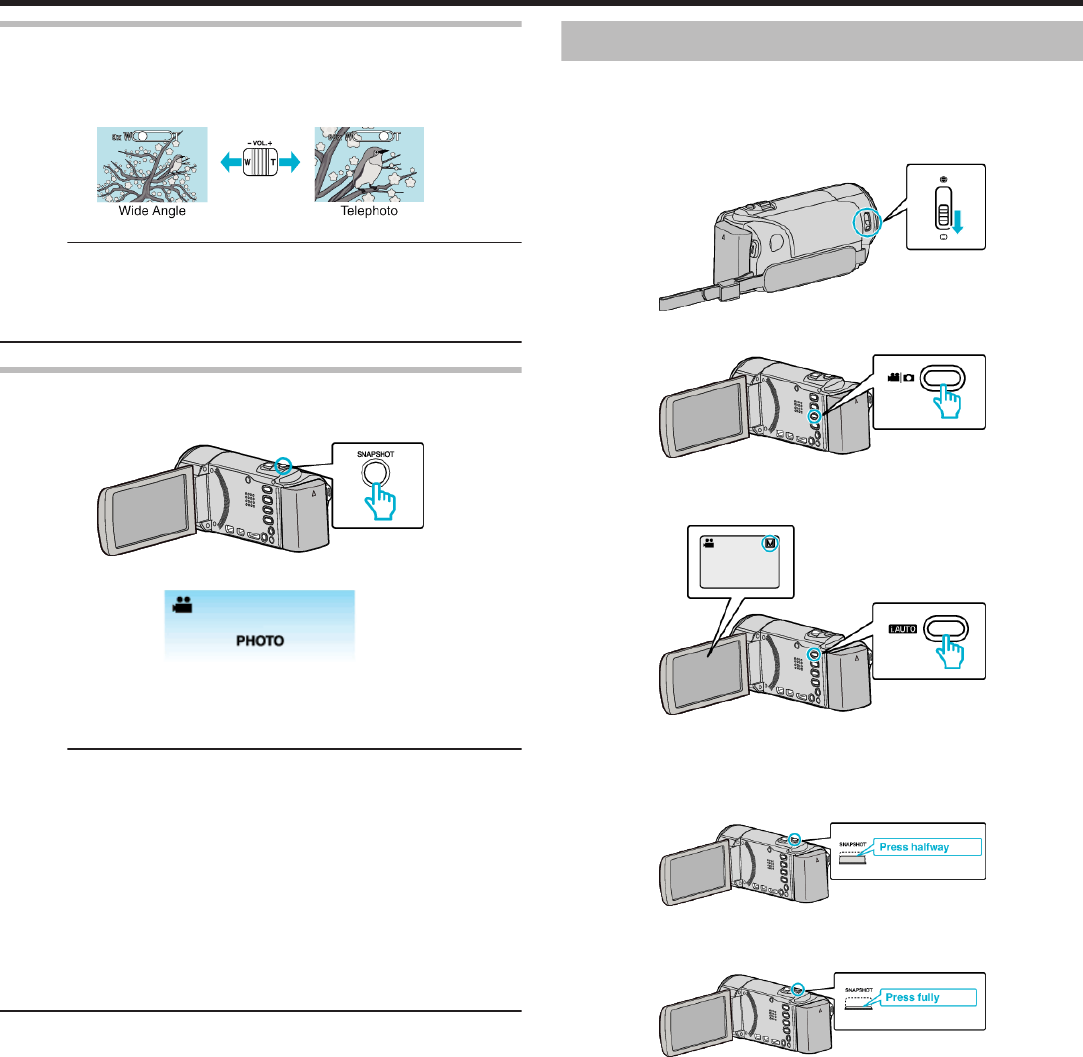
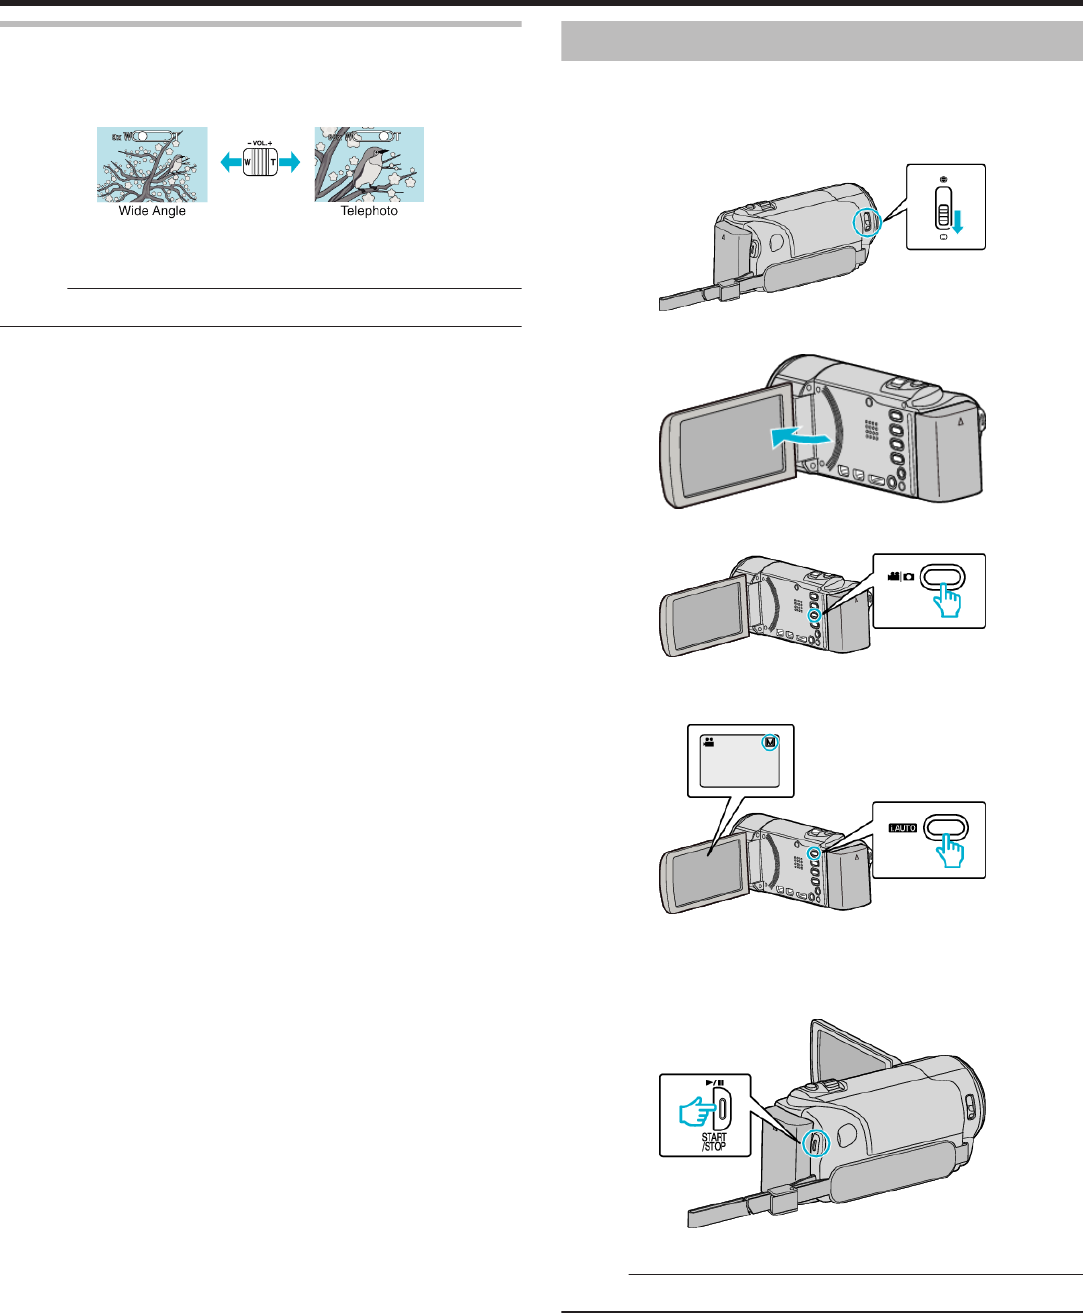
Main Menu for Video Recording
You can adjust various settings, such as brightness and white balance, to suit the subject or purpose. You can also change settings such as picture quality
and gain.
1
Select video mode.
.
2
Tap R to select the recording mode.
.
0
The mode changes between recording and playback with every tap.
3
Tap “MENU”.
.
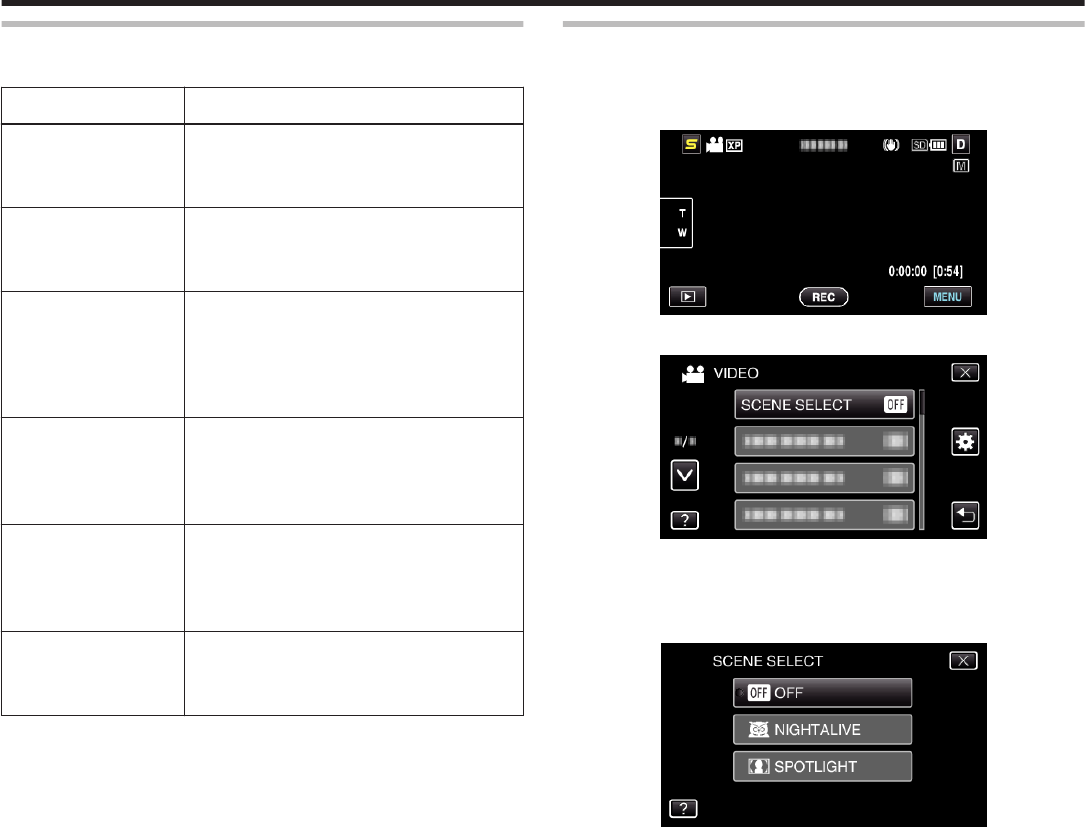
Setting
Details
SCENE SELECTSettings to suit the shooting condition can be selected.
“Scene Selection” (A p. 31)
*Displayed only in the manual recording mode.
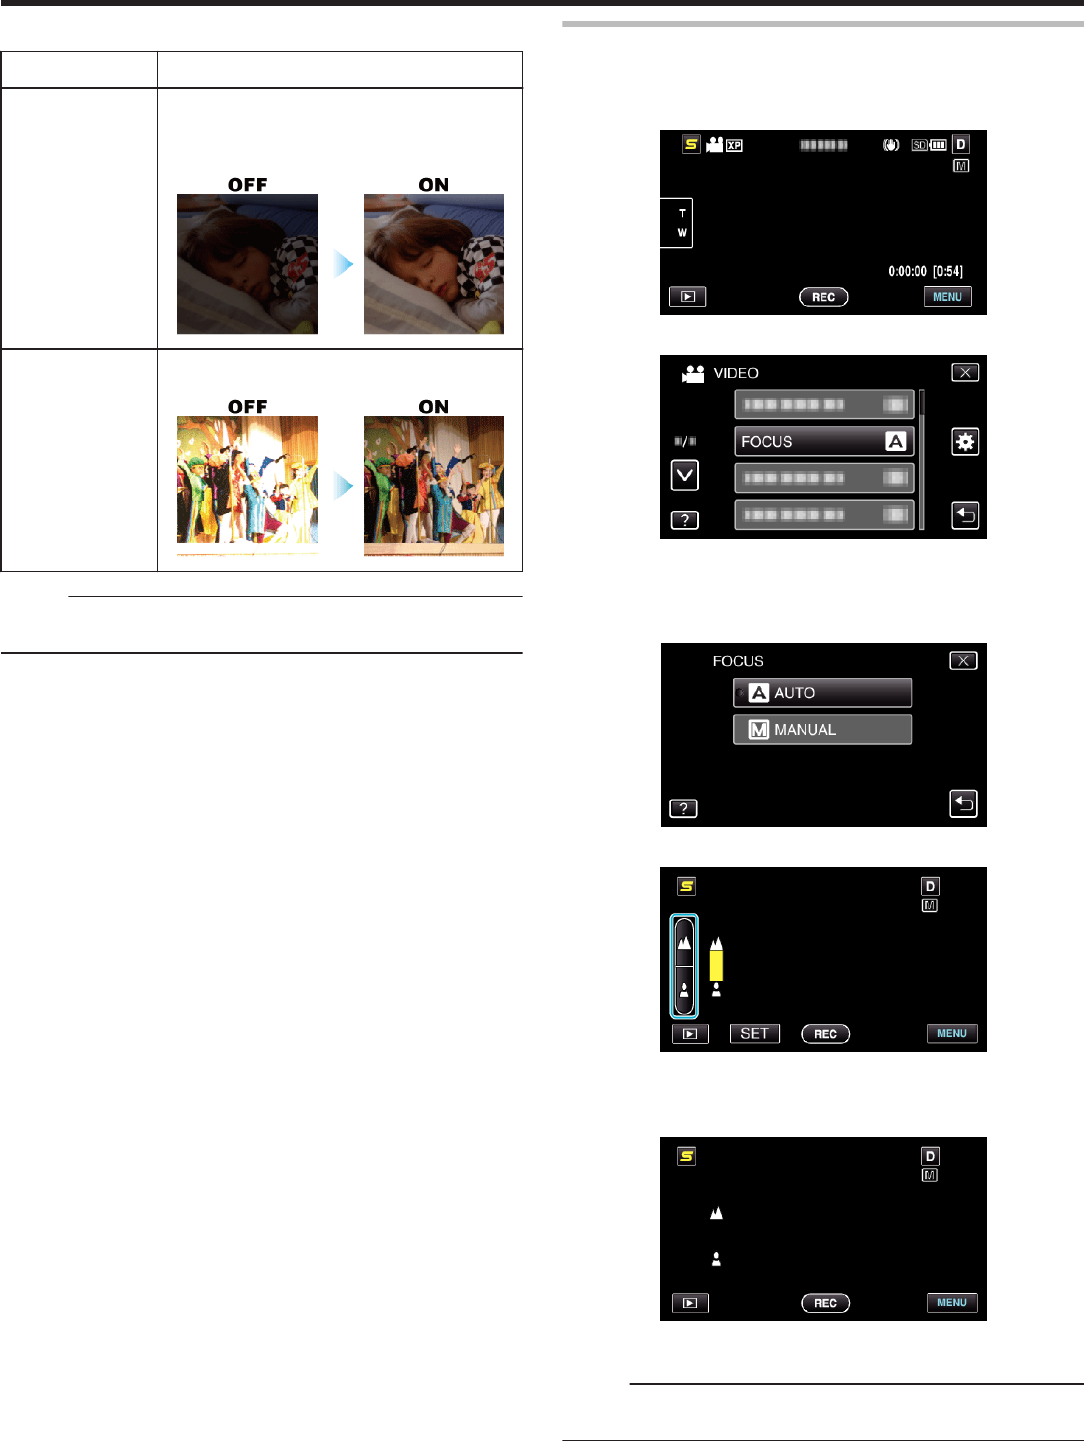
FOCUSFocus can be adjusted manually.
“Adjusting Focus Manually” (A p. 32)
*Displayed only in the manual recording mode.
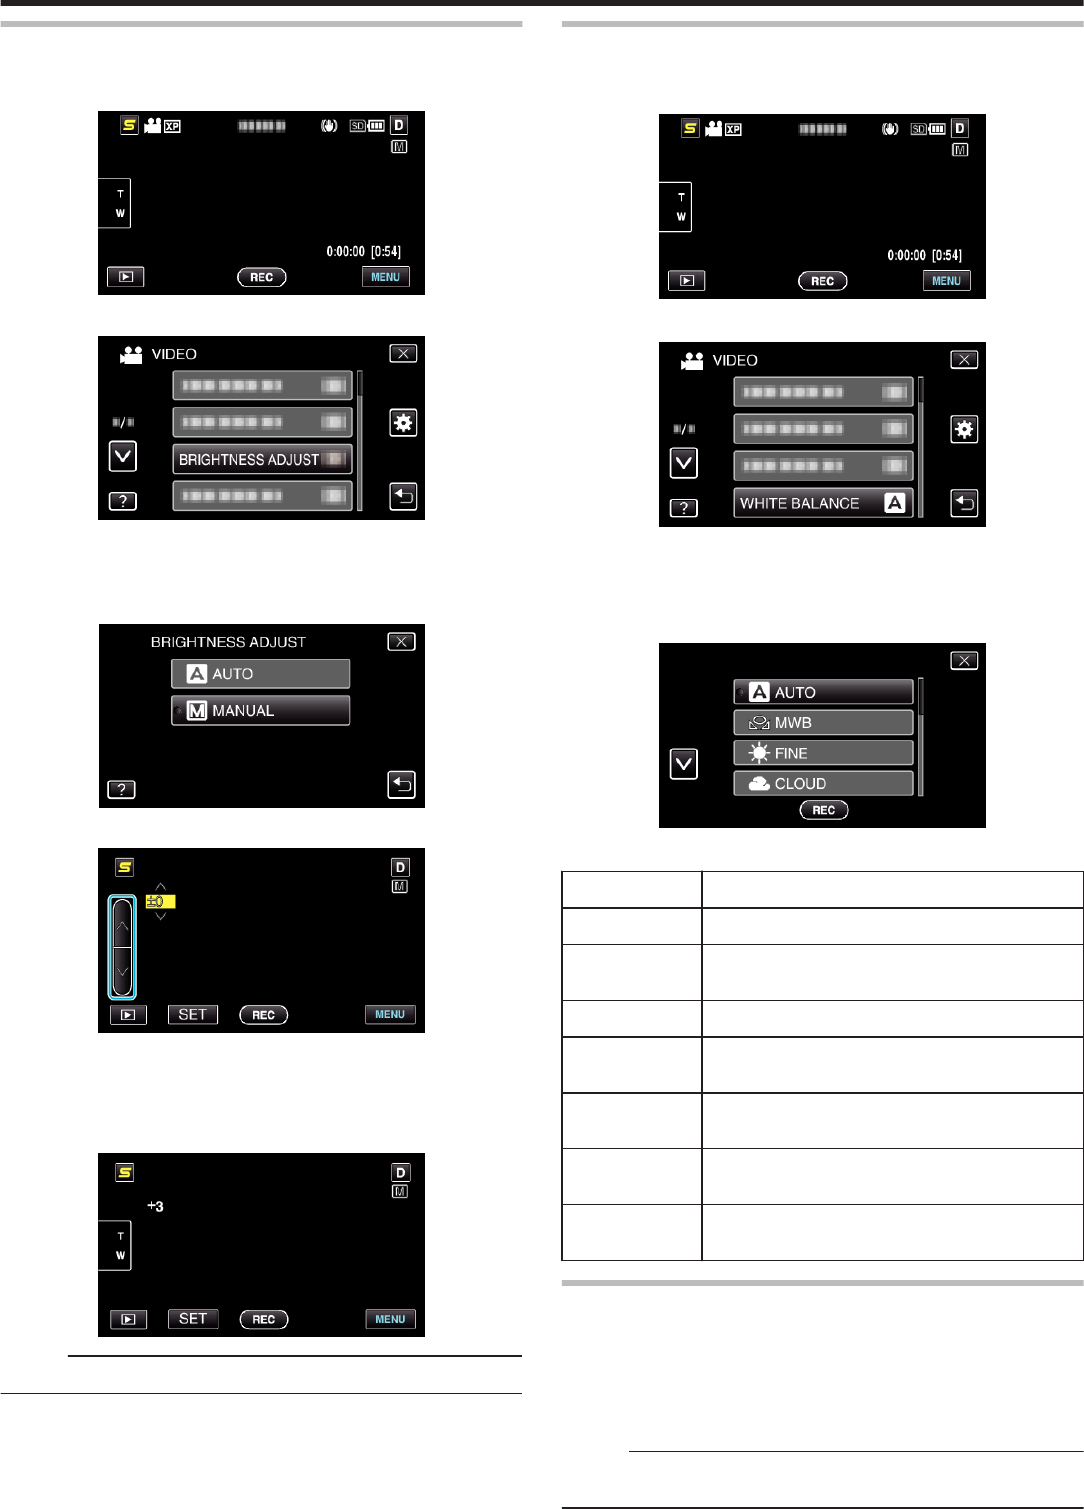
BRIGHTNESS ADJUSTAdjusts the overall brightness of the screen.
“Adjusting Brightness” (A p. 33)
*Displayed only in the manual recording mode.
WHITE BALANCEAdjusts the color according to the light source.
“Setting White Balance” (A p. 33)
*Displayed only in the manual recording mode.
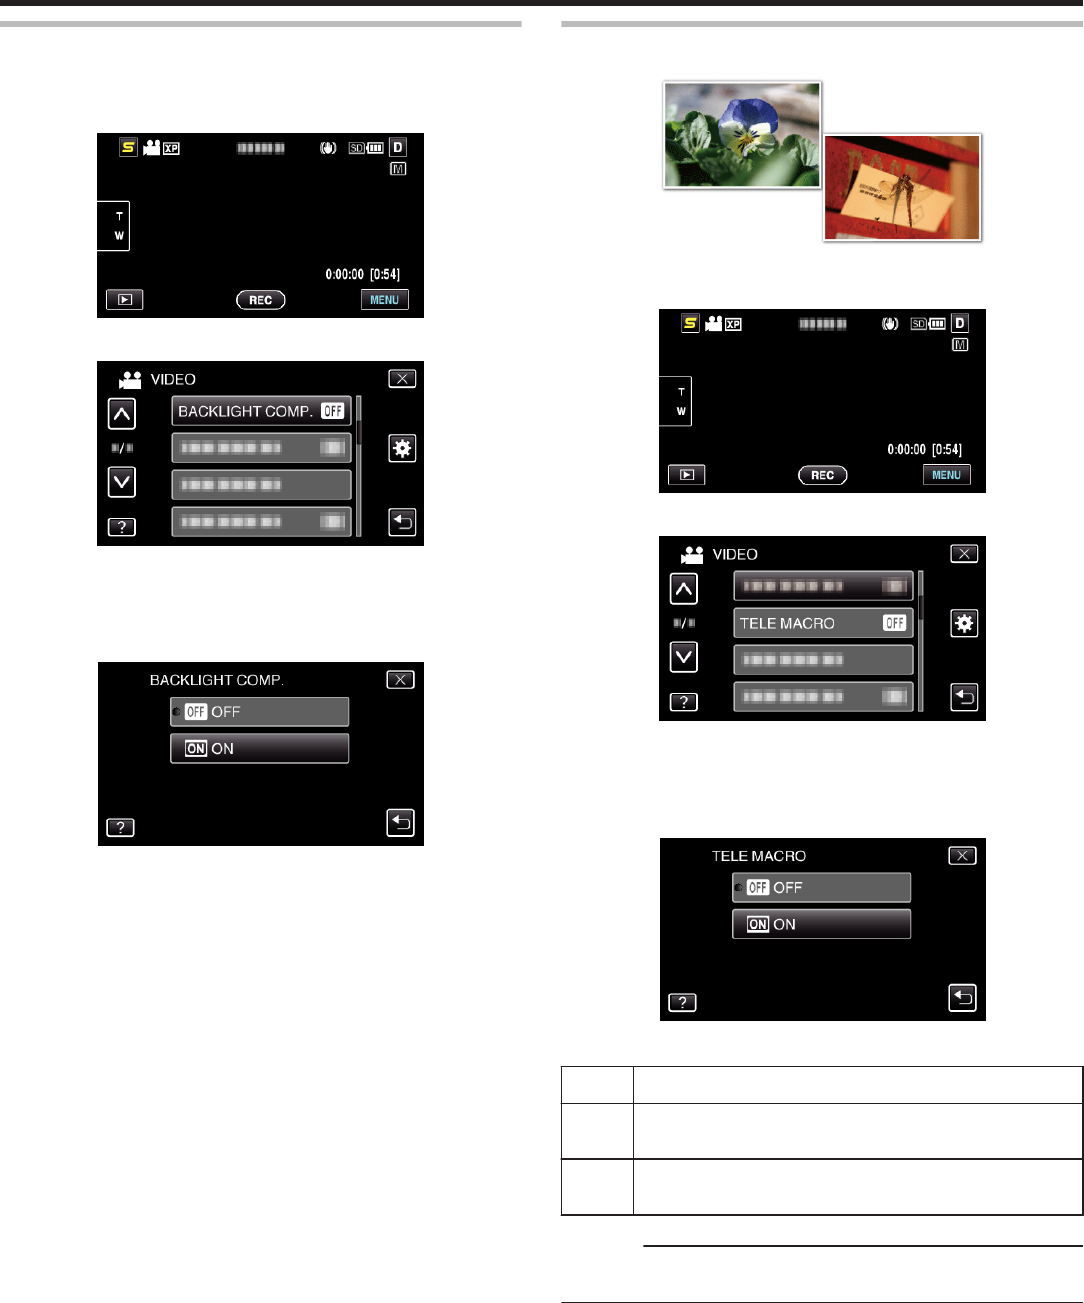
BACKLIGHT COMP.Corrects the image when the subject appears dark due to backlight.
“Setting Backlight Compensation” (A p. 34)
*Displayed only in the manual recording mode.
TELE MACROEnables close-up shots when using the telephoto (T) end of the zoom.
“Taking Close-up Shots” (A p. 34)
*Displayed only in the manual recording mode.
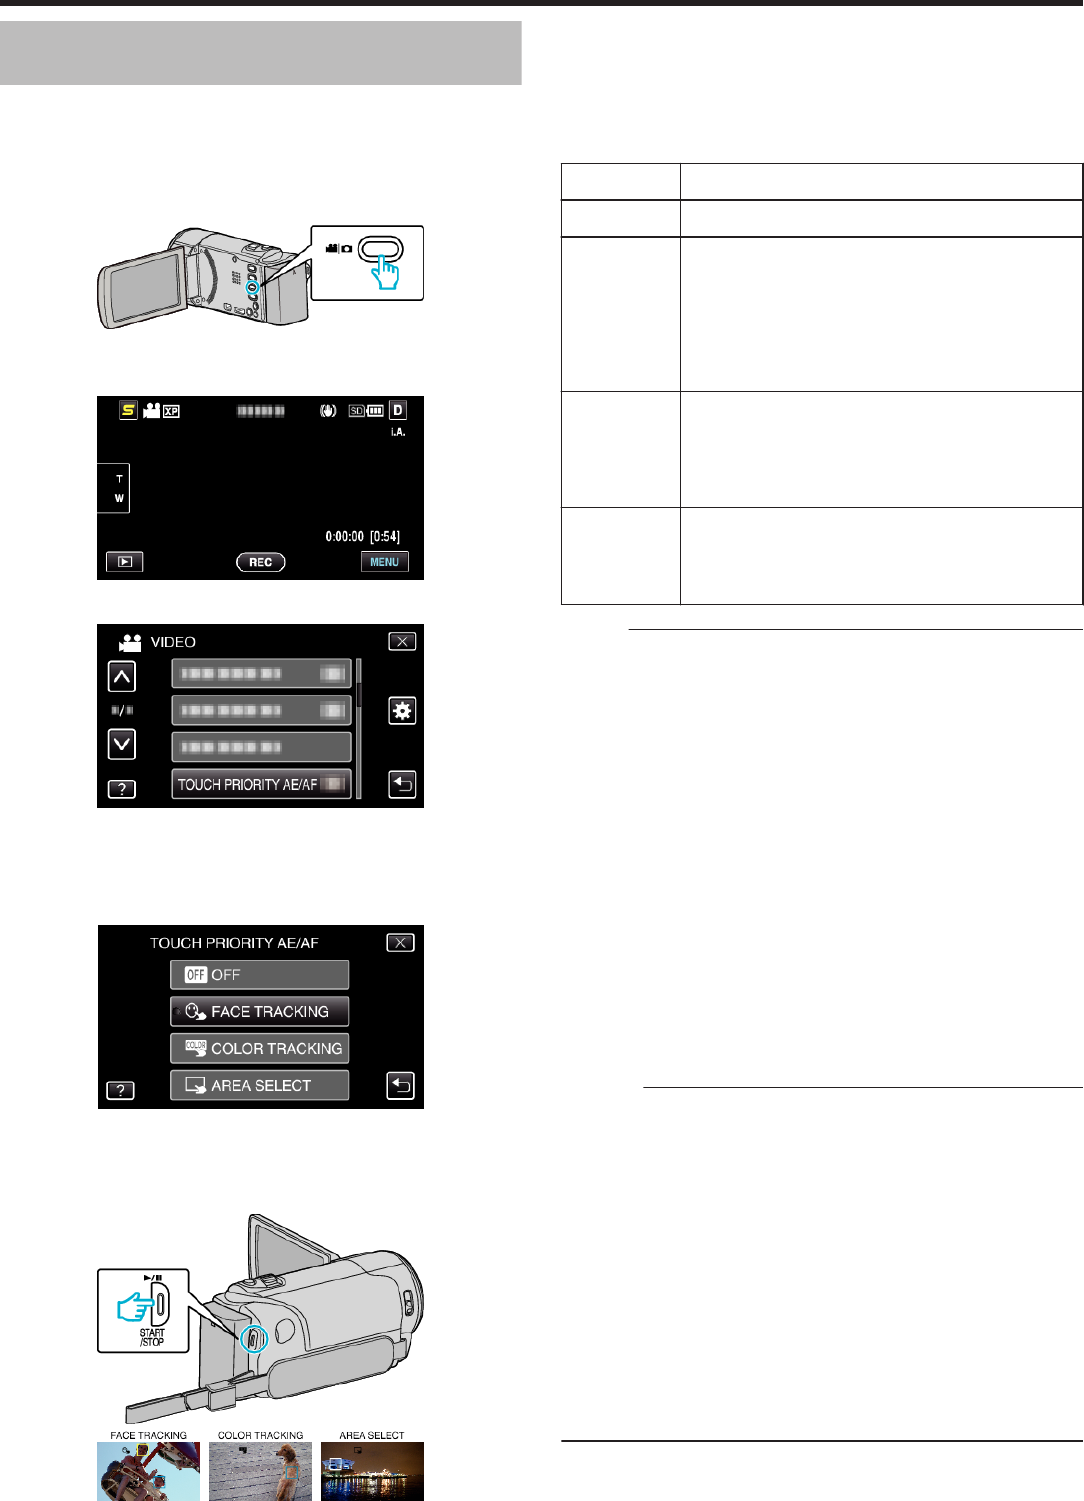
TOUCH PRIORITY AE/AFAutomatically adjusts focus and brightness based on the subjects’ faces or selected area.
“Capturing Subjects Clearly (TOUCH PRIORITY AE/AF)” (A p. 40)
LIGHTTurns on/off the light.
“LIGHT (GZ-HM650/GZ-HM670/GZHM690)” (A p. 78)
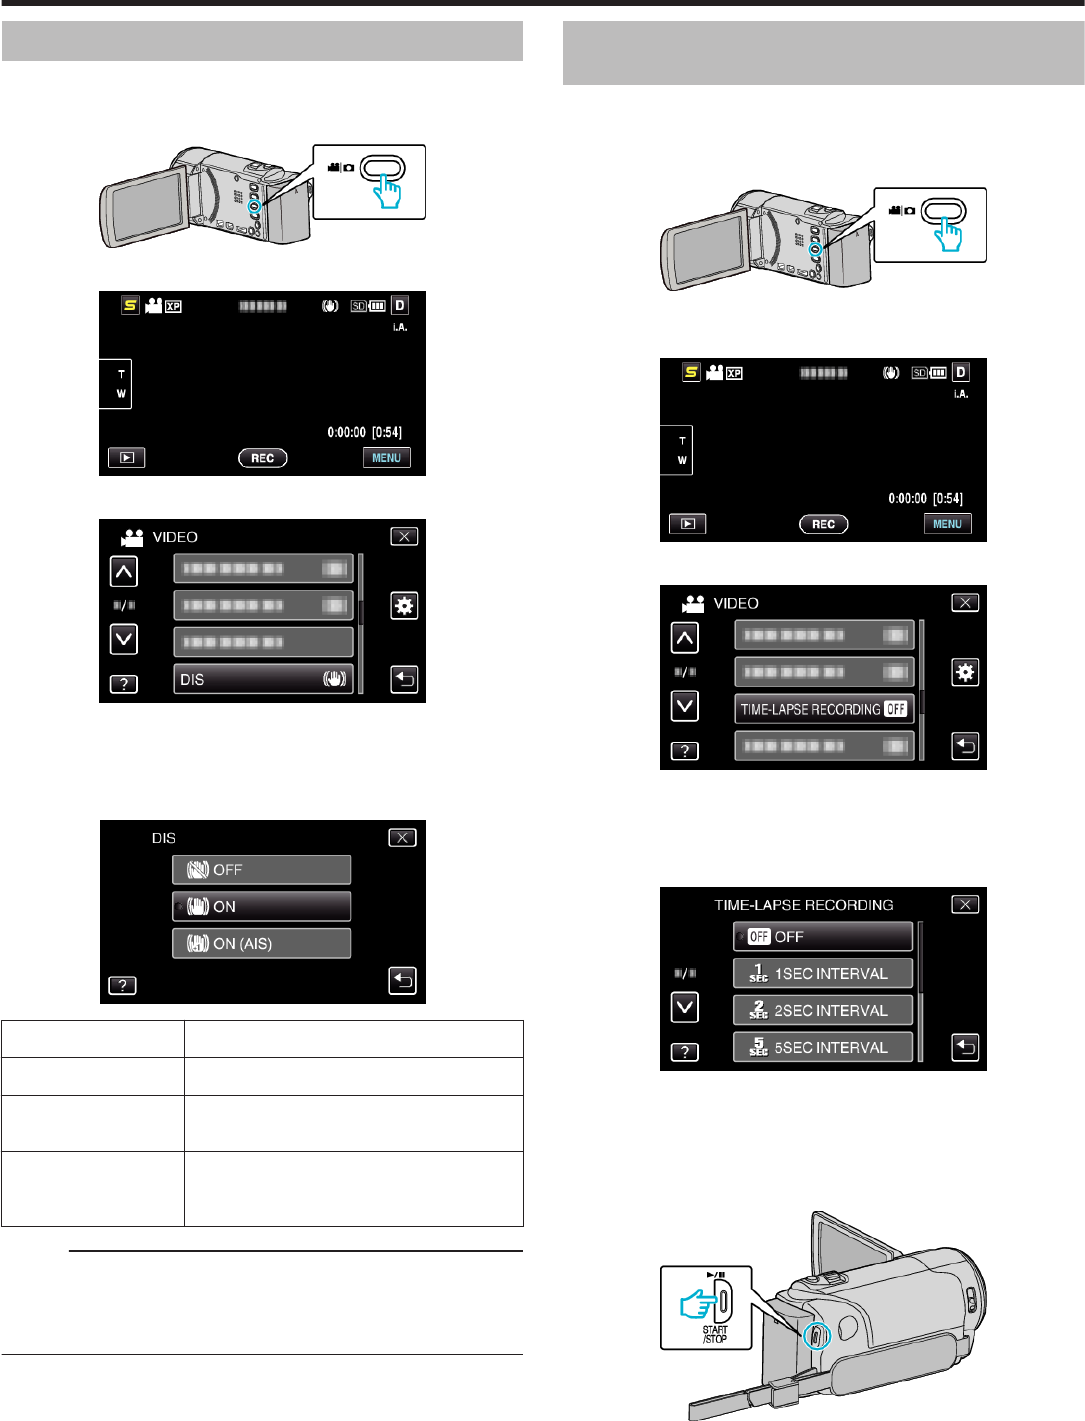
DISCamera shake during recording can be effectively reduced.
“Reducing Camera Shake” (A p. 43)
GAIN UPMakes the subject appear bright automatically when recording in dark places.
“GAIN UP” (A p. 78)
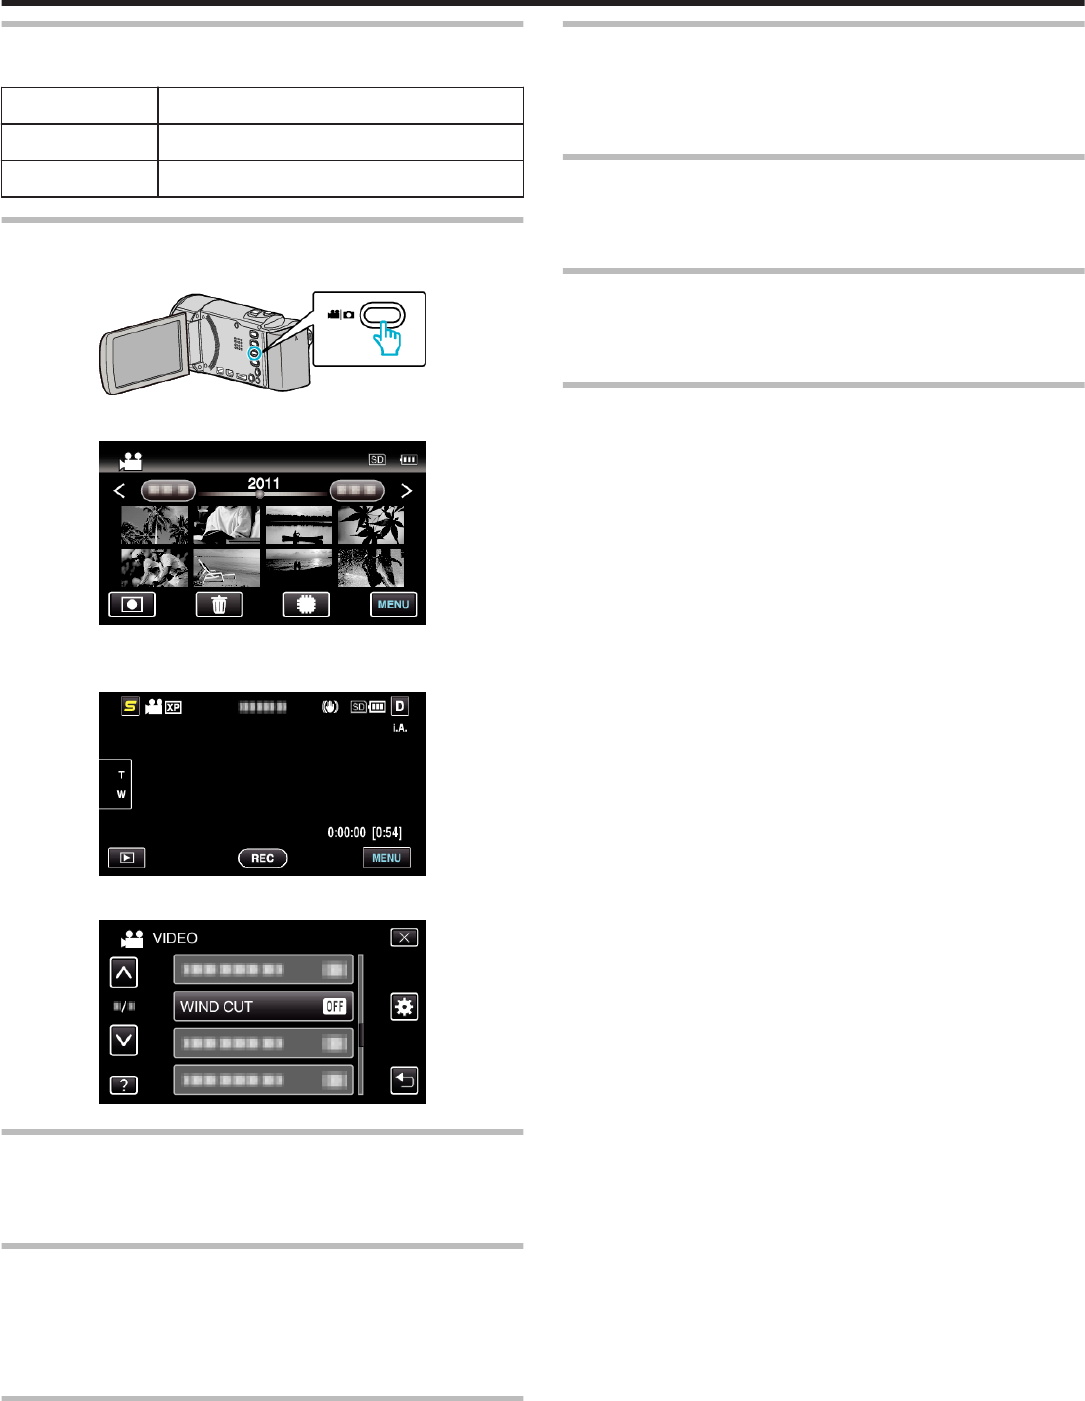
WIND CUTReduces the noise caused by wind.
“WIND CUT” (A p. 79)
Menu Settings
76
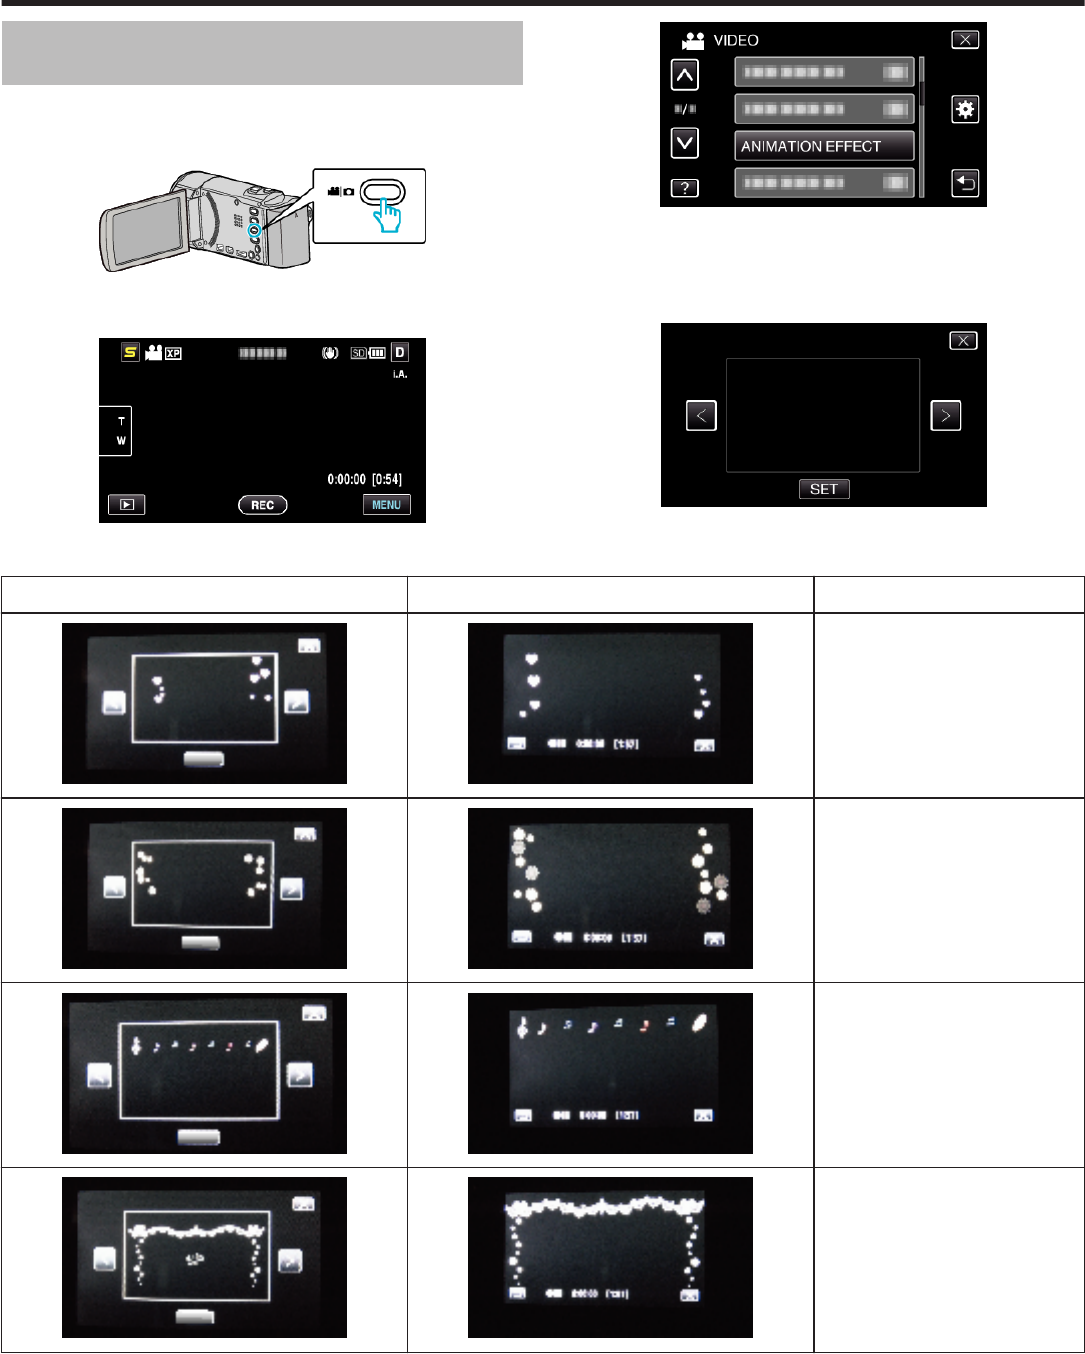
ANIMATION EFFECTRecords videos or still images with special effects.
“Creating Animation Effects (ANIMATION EFFECT)” (A p. 35)
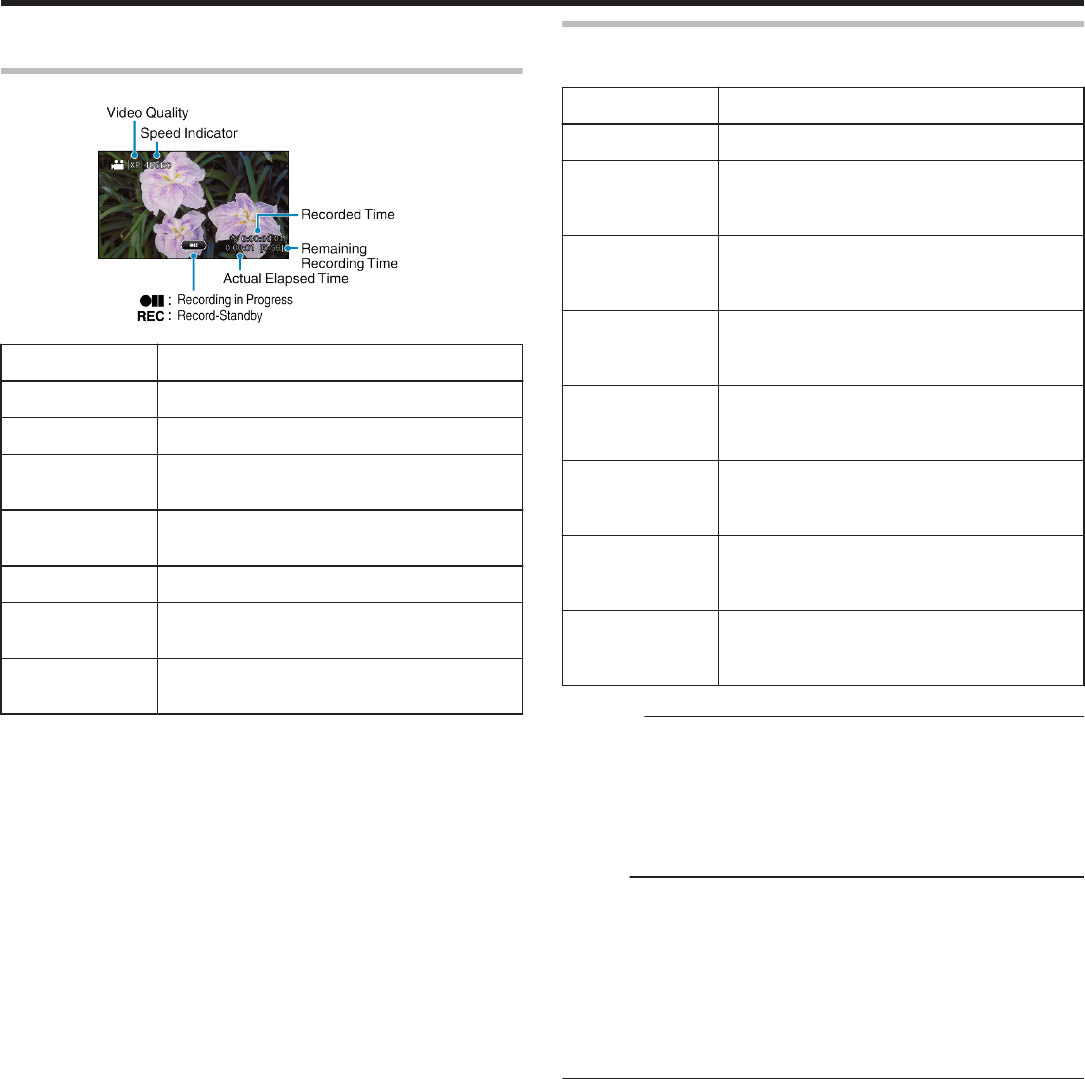
TIME-LAPSE RECORDINGEnables the changes of a scene that occur slowly over a long period to be shown within a short time by taking
frames of it at a certain interval.
“Recording at Intervals (TIME-LAPSE RECORDING)” (A p. 43)
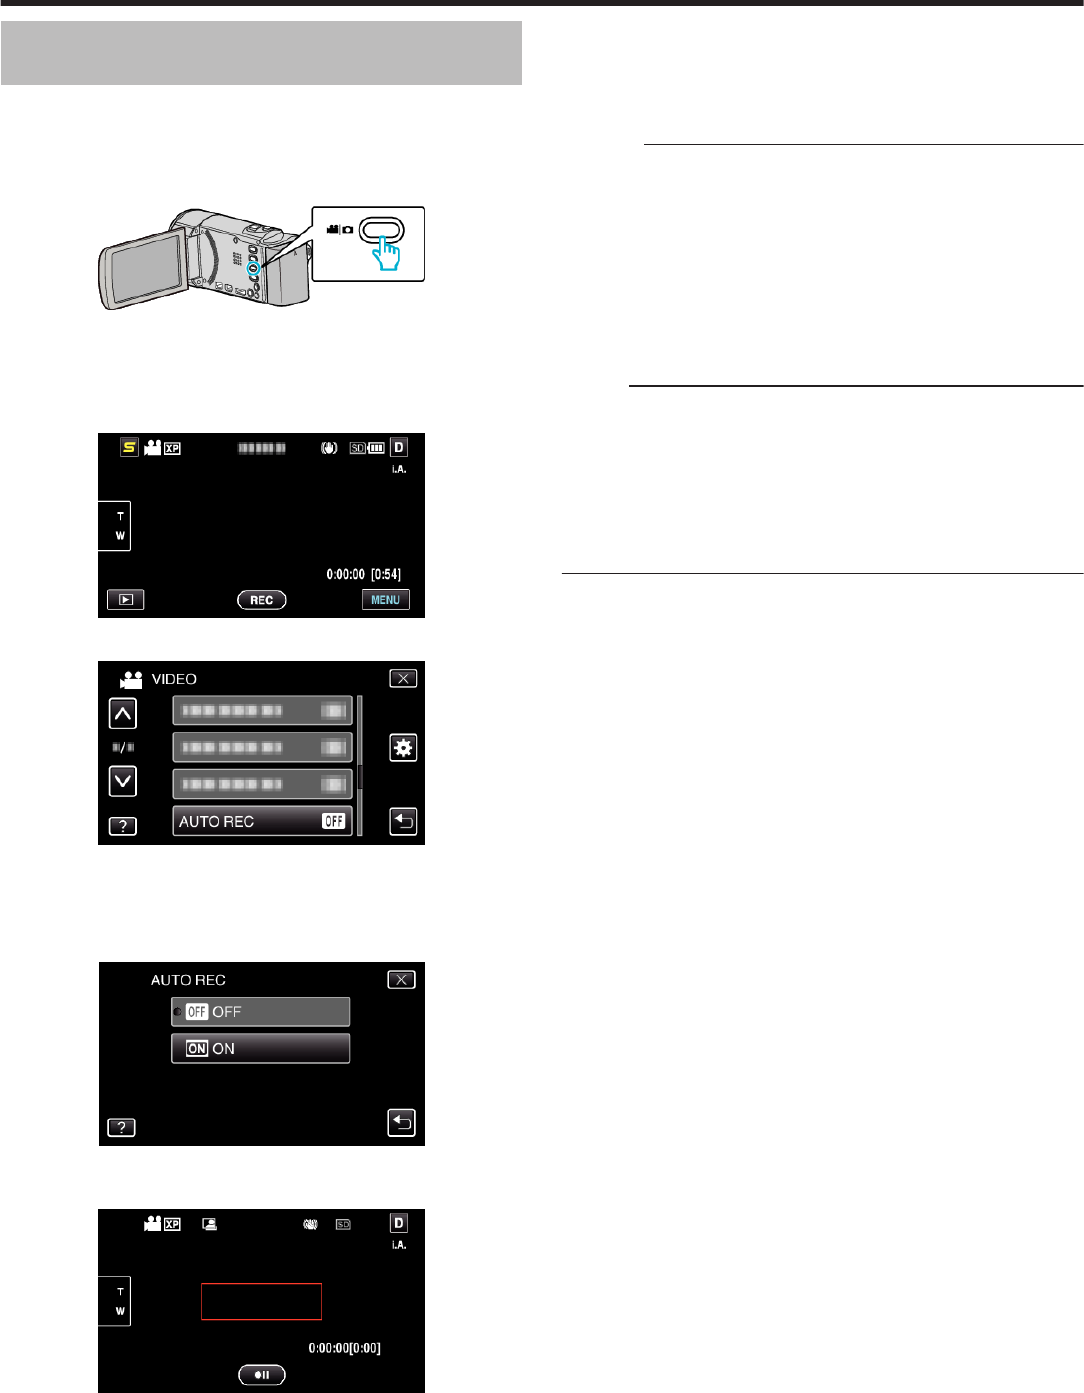
AUTO RECThis function enables the unit to record automatically by sensing the changes in subject’s movement
(brightness) within the red frame displayed on the LCD monitor.
“Recording Automatically by Sensing Movements (AUTO REC)” (A p. 45)
FACE SUB-WINDOWMagnifies and displays a registered face in a sub-window.
“Recording while Displaying a Magnified View of a Selected Face (FACE SUB-WINDOW)” (A p. 42)
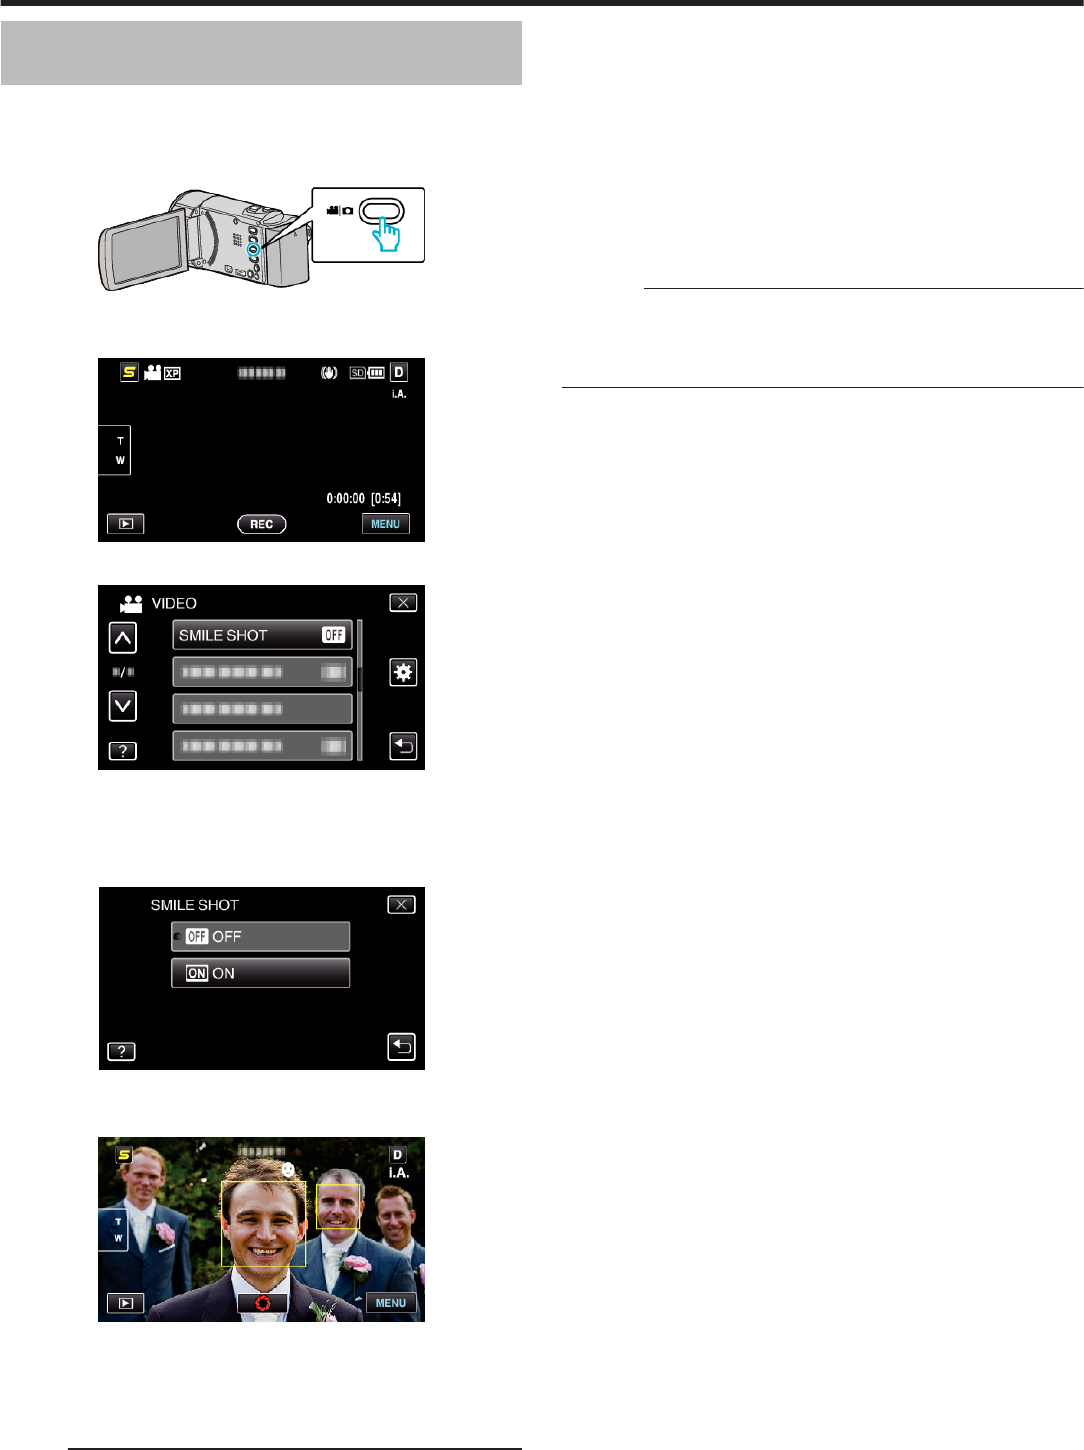
SMILE SHOTAutomatically captures a still image upon detection of a smile.
“Capturing Smiles Automatically (SMILE SHOT)” (A p. 41)
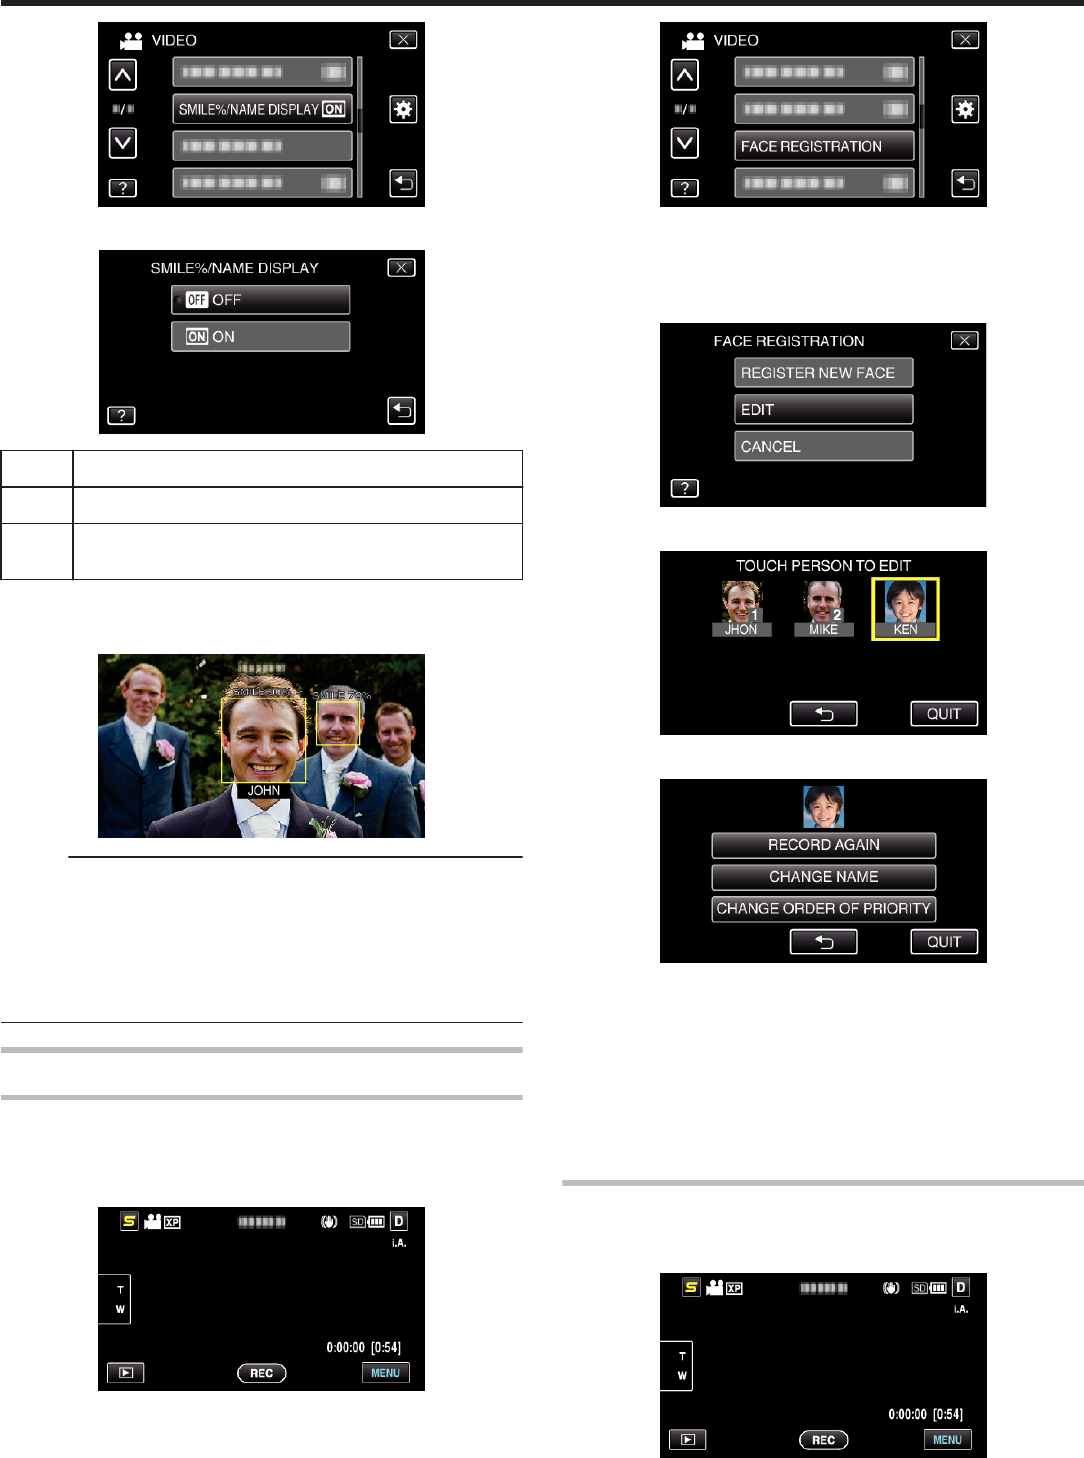
SMILE%/NAME DISPLAYSets the items to display when faces are detected.
“Setting SMILE%/NAME DISPLAY” (A p. 37)
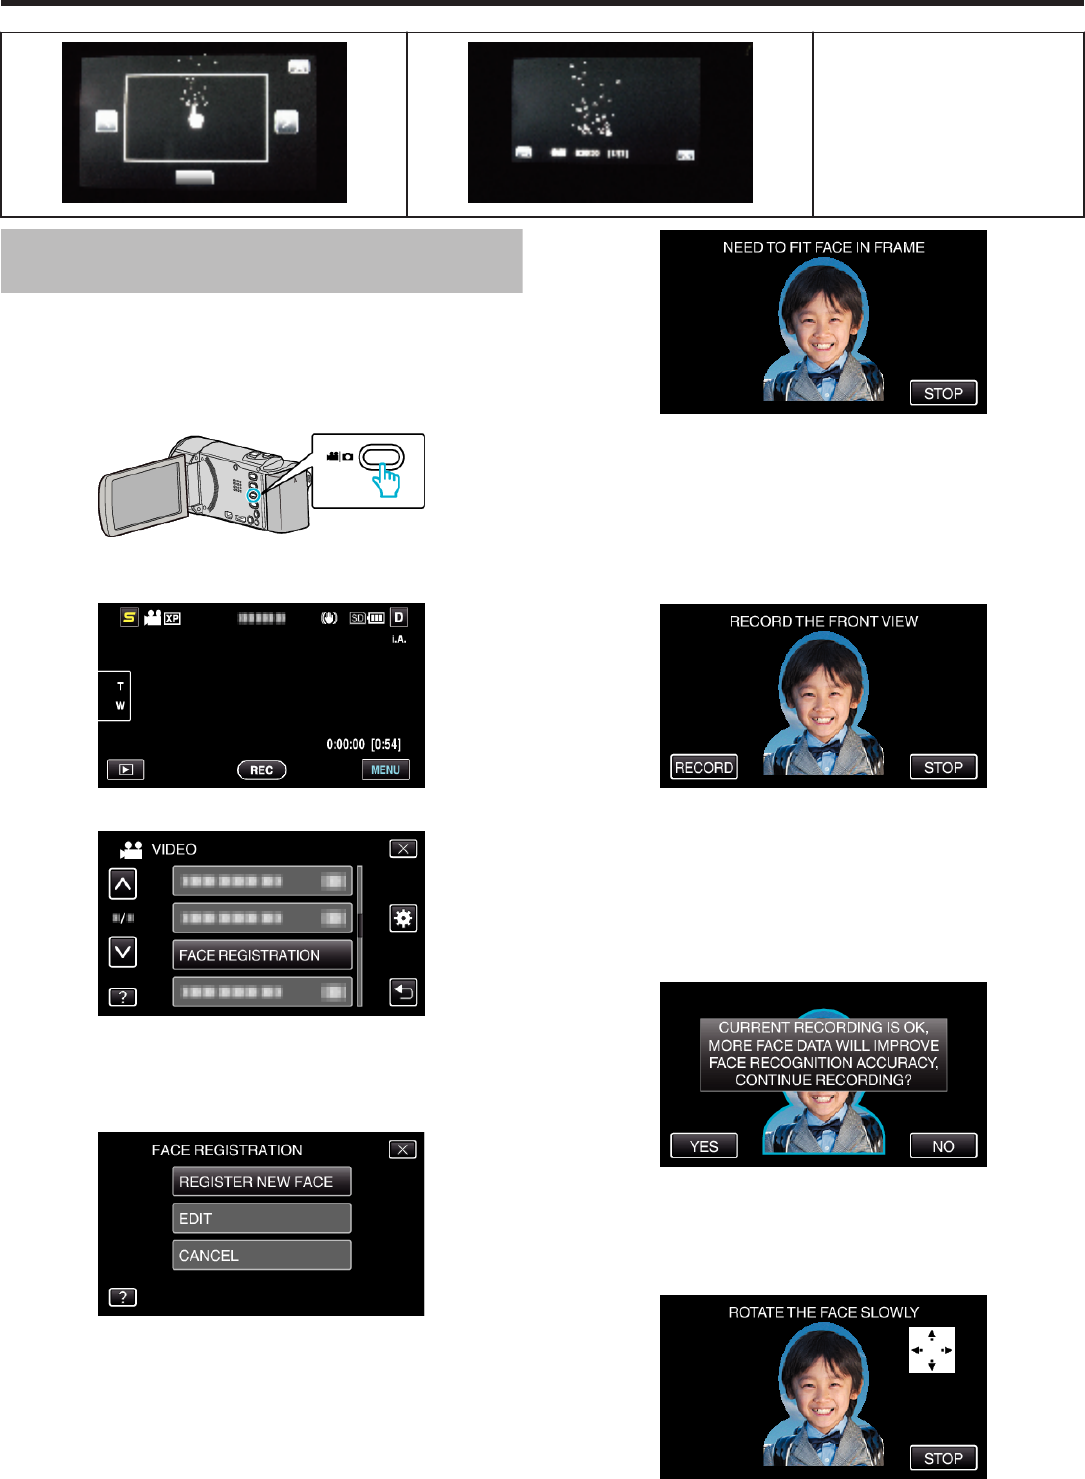
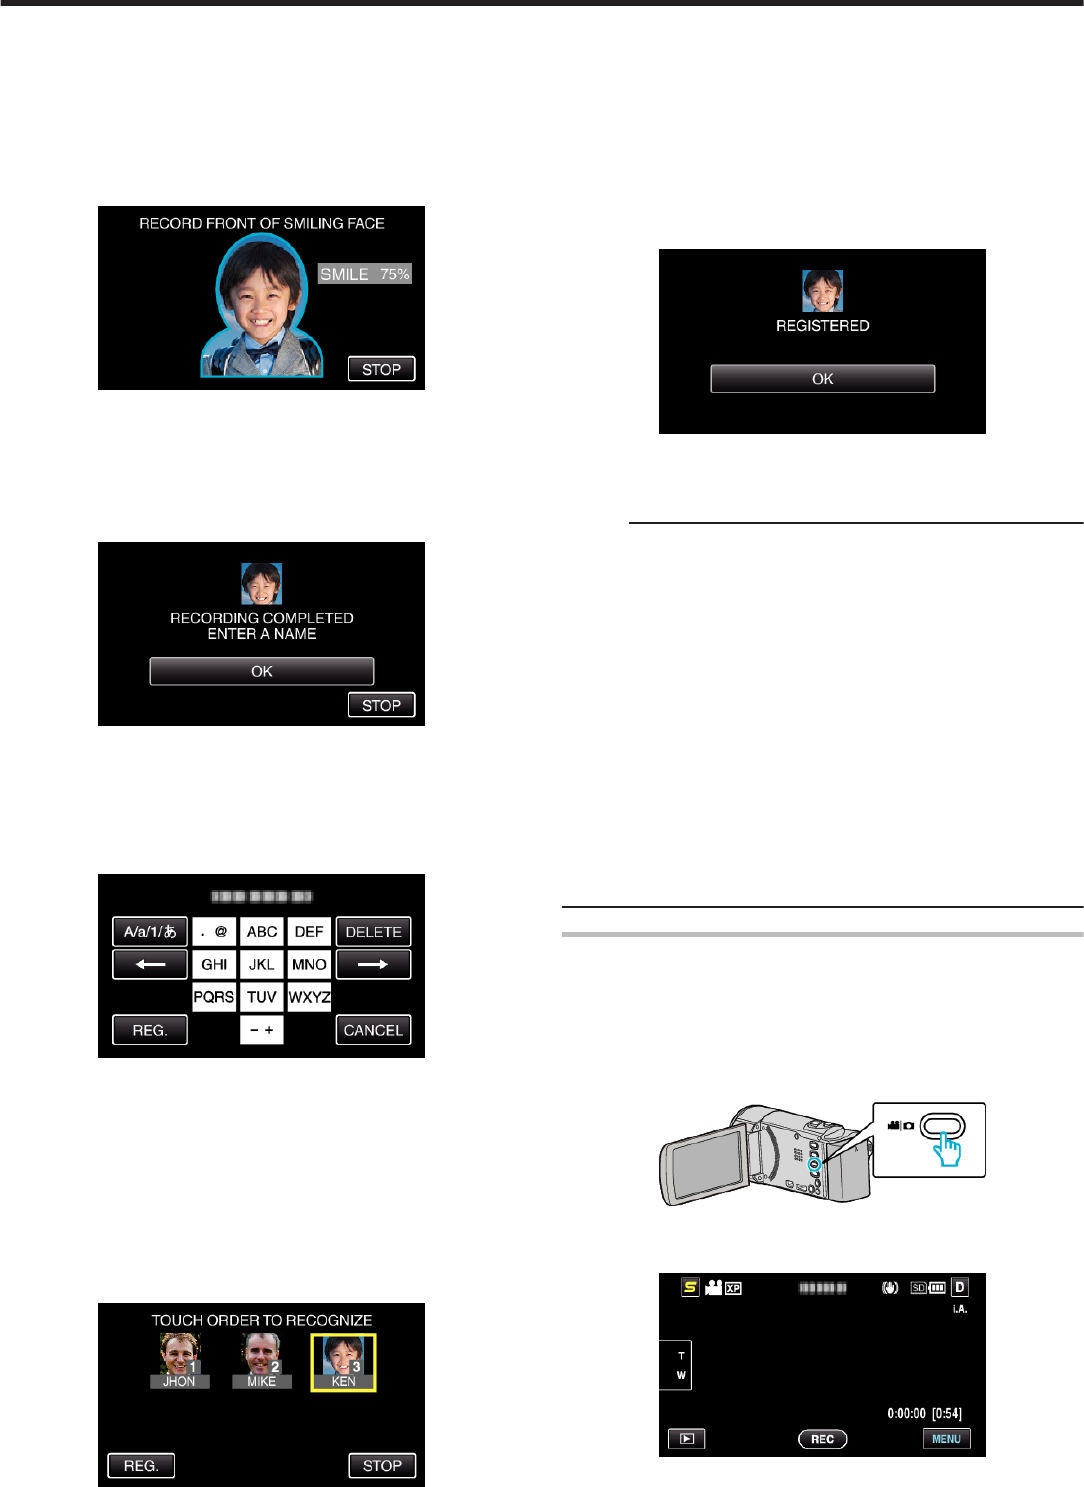
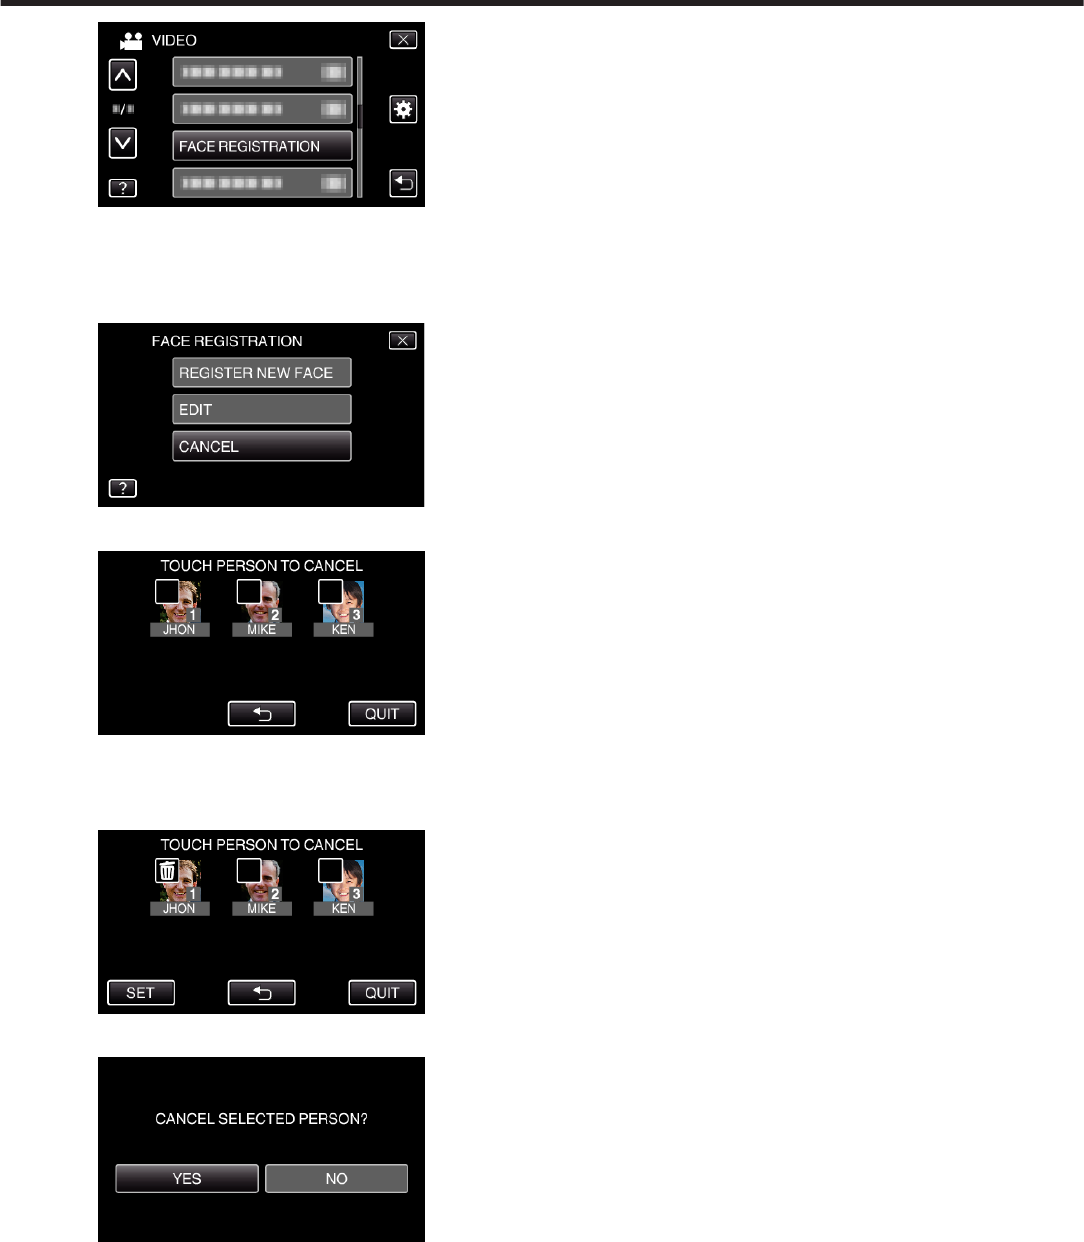
FACE REGISTRATIONRegisters the faces of people who are often shot with this unit.
“Registering Human Face Personal Authentication Information” (A p. 36)
VIDEO QUALITYSets the video quality.
“VIDEO QUALITY” (A p. 80)
ZOOMSets the maximum zoom ratio.
“ZOOM” (A p. 80)
SEAMLESS RECORDINGContinues recording on the SD card without stopping when the remaining space on the built-in memory or
slot A runs out.
“SEAMLESS RECORDING” (A p. 81)
x.v.ColorCaptures the true colors.
(Use an x.v.Color compatible TV for playback.)
“x.v.Color” (A p. 81)
USER BUTTON SETTINGAssigns a frequently used function to the USER button.
“Setting the USER Button” (A p. 47)
SCENE SELECT
Settings to suit the shooting condition can be selected.
Operating Details
“Scene Selection” (A p. 31)
FOCUS
Focus can be adjusted manually.
Operating Details
“Adjusting Focus Manually” (A p. 32)
BRIGHTNESS ADJUST
Adjusts the overall brightness of the screen.
Operating Details
“Adjusting Brightness” (A p. 33)
WHITE BALANCE
Adjusts the color according to the light source.
Operating Details
“Setting White Balance” (A p. 33)
BACKLIGHT COMP.
Corrects the image when the subject appears dark due to backlight.
Operating Details
“Setting Backlight Compensation” (A p. 34)
TELE MACRO
Enables close-up shots when using the telephoto (T) end of the zoom.
Operating Details
“Taking Close-up Shots” (A p. 34)
TOUCH PRIORITY AE/AF
Automatically adjusts focus and brightness based on the subjects’ faces or
selected area.
Operating Details
“Capturing Subjects Clearly (TOUCH PRIORITY AE/AF)” (A p. 40)
Menu Settings
77
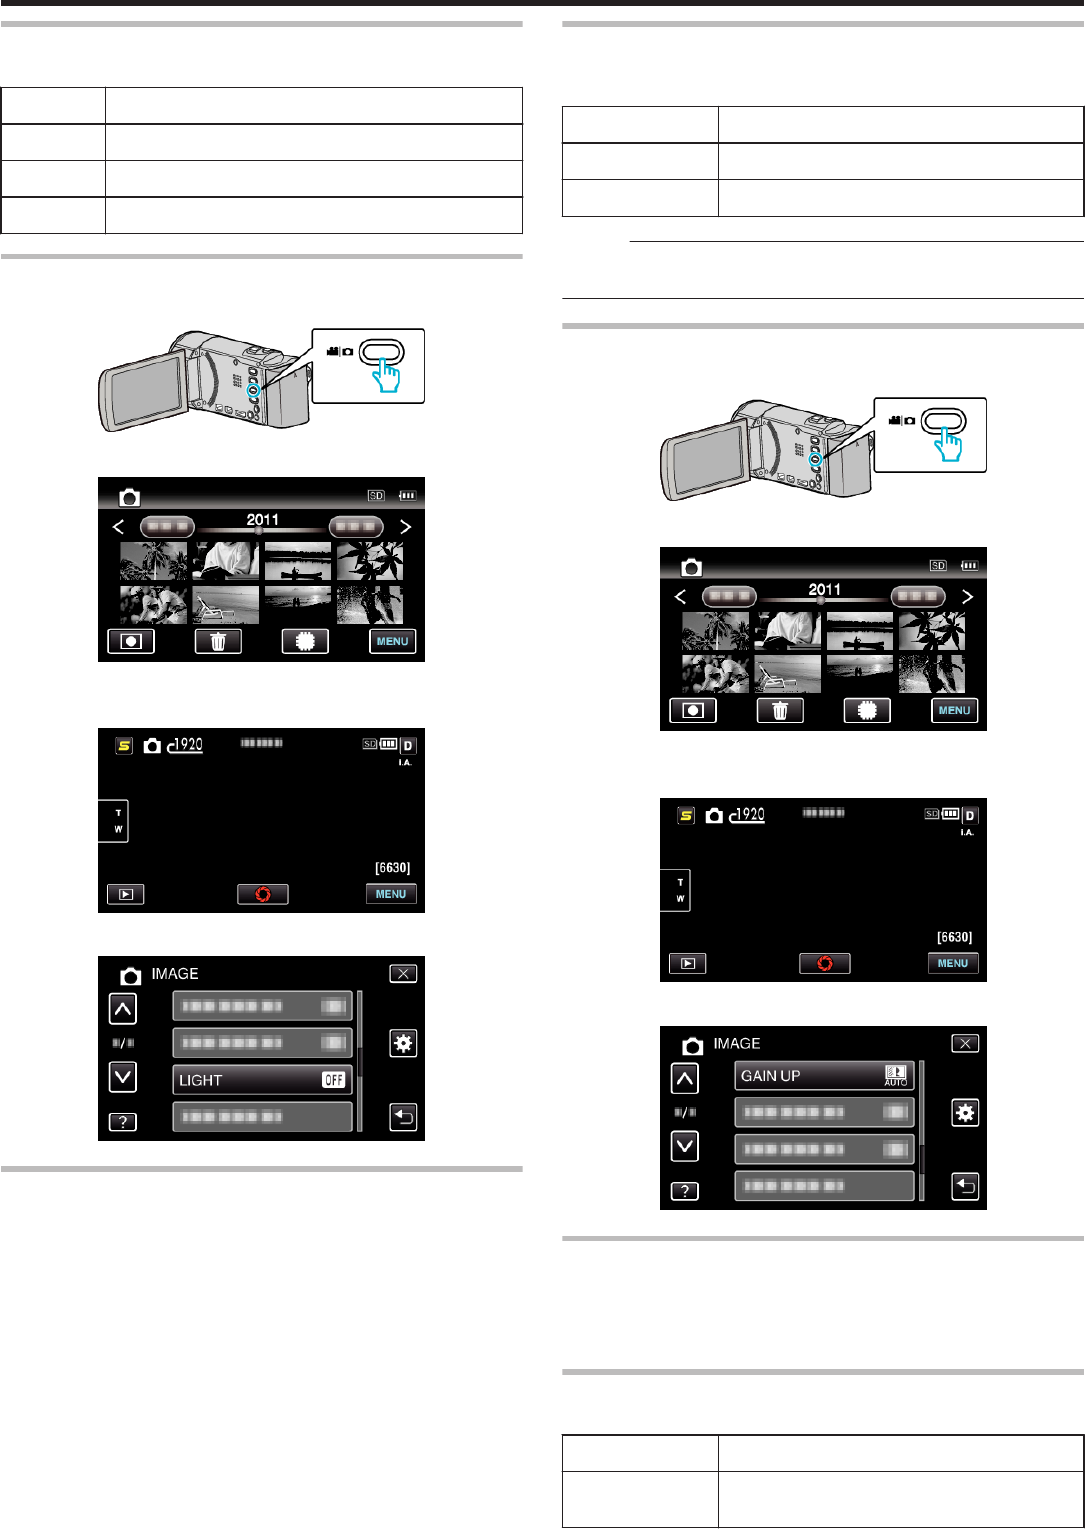
LIGHT (GZ-HM650/GZ-HM670/GZHM690)
Turns on/off the light.
SettingDetails
OFFDoes not light up.
AUTOLights up automatically when the surrounding is
dark.
ONLights up at all times.
Displaying the Item
1
Select video mode.
.
2
Tap R to select the recording mode.
.
0
The mode changes between recording and playback with every tap.
3
Tap “MENU”.
.
4
Tap “LIGHT”.
.
DIS
Camera shake during recording can be effectively reduced.
Operating Details
“Reducing Camera Shake” (A p. 43)
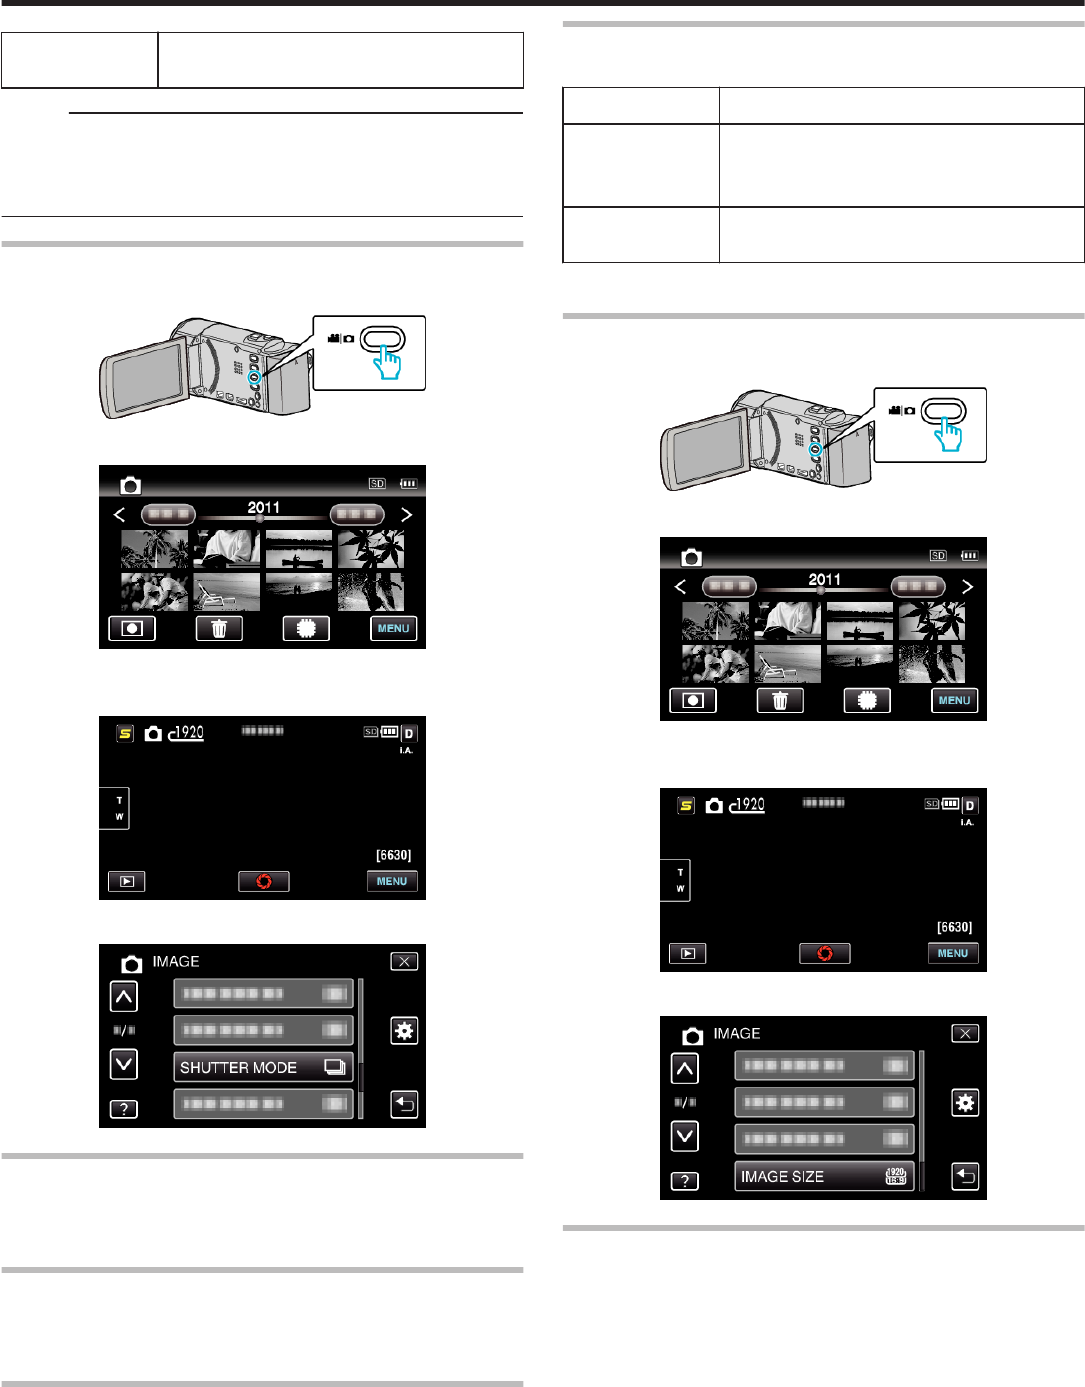
GAIN UP
Makes the subject appear bright automatically when recording in dark
places.
SettingDetails
OFFDeactivates the function.
ONElectrically brightens the scene when it is dark.
AUTO SLOW-
SHUTTER
Automatically brightens the scene when it is dark.
Memo :
0
Although “AUTO SLOW-SHUTTER” brightens the scene more than
“AGC”, movements of the subject may become unnatural.
0
Setting can be adjusted separately for still images.
“GAIN UP (Still Image)” (A p. 84)
Displaying the Item
1
Select video mode.
.
2
Tap R to select the recording mode.
.
0
The mode changes between recording and playback with every tap.
3
Tap “MENU”.
.
4
Tap “GAIN UP”.
.
Menu Settings
78
WIND CUT
Reduces the noise caused by wind.
SettingDetails
OFFDeactivates the function.
ONActivates the function.
Displaying the Item
1
Select video mode.
.
2
Tap R to select the recording mode.
.
0
The mode changes between recording and playback with every tap.
3
Tap “MENU”.
.
4
Tap “WIND CUT”.
.
ANIMATION EFFECT
Records videos or still images with special effects.
Operating Details
“Creating Animation Effects (ANIMATION EFFECT)” (A p. 35)
TIME-LAPSE RECORDING
Enables the changes of a scene that occur slowly over a long period to be
shown within a short time by taking frames of it at a certain interval.
This is useful for making observations such as the opening of a flower bud.
Operating Details
“Recording at Intervals (TIME-LAPSE RECORDING)” (A p. 43)
AUTO REC
Starts/stops recording automatically by sensing the changes in subject’s
movement (brightness) within the red frame displayed on the LCD monitor.
Operating Details
“Recording Automatically by Sensing Movements (AUTO REC)” (A p. 45)
FACE SUB-WINDOW
Magnifies and displays a registered face in a sub-window.
Operating Details
“Recording while Displaying a Magnified View of a Selected Face (FACE
SUB-WINDOW)” (A p. 42)
SMILE SHOT
Automatically captures a still image upon detection of a smile.
Operating Details
“Capturing Smiles Automatically (SMILE SHOT)” (A p. 41)
SMILE%/NAME DISPLAY
Sets the items to display when faces are detected.
Operating Details
“Setting SMILE%/NAME DISPLAY” (A p. 37)
FACE REGISTRATION
Registers the faces of people who are often shot with this unit.
Operating Details
“Registering Human Face Personal Authentication Information” (A p. 36)
Menu Settings
79
VIDEO QUALITY
Sets the video quality.
SettingDetails
UXPEnables recording in the best picture quality.
0
Applies to Blu-ray discs only. Videos taken in
high-definition quality cannot be saved to DVDs.
XPEnables recording in high picture quality.
SPEnables recording in standard quality.
EPEnables long recordings.
SSWEnables recording in standard definition (16:9).
SEWEnables recording in standard definition (16:9) with
a lower bit rate than “SSW”.
Memo :
0
Set to “UXP” or “XP” mode when recording fast-moving scenes or scenes
with extreme changes of brightness to avoid noise.
0
Use an external Blu-ray drive to save videos recorded in “UXP” mode.
0
You can change to the desired “VIDEO QUALITY” by tapping on it from
the remaining recording time display.
0
“SSW” and “SEW” are not available when “FACE SUB-WINDOW”,
“LIGHT”, or “x.v.Color” are set.
Displaying the Item
1
Select video mode.
.
2
Tap R to select the recording mode.
.
0
The mode changes between recording and playback with every tap.
3
Tap “MENU”.
.
4
Tap “VIDEO QUALITY”.
.
ZOOM
Sets the maximum zoom ratio.
SettingDetails
40x/OPTICALEnables zooming up to 40x.
70x/DYNAMICEnables zooming up to 70x.
80x/DIGITALEnables zooming up to 80x.
200x/DIGITALEnables zooming up to 200x.
Memo :
0
When digital zoom is used, the image becomes grainy as it is digitally
enlarged.
Displaying the Item
1
Select video mode.
.
2
Tap R to select the recording mode.
.
0
The mode changes between recording and playback with every tap.
3
Tap “MENU”.
.
4
Tap “ZOOM”.
.
Menu Settings
80
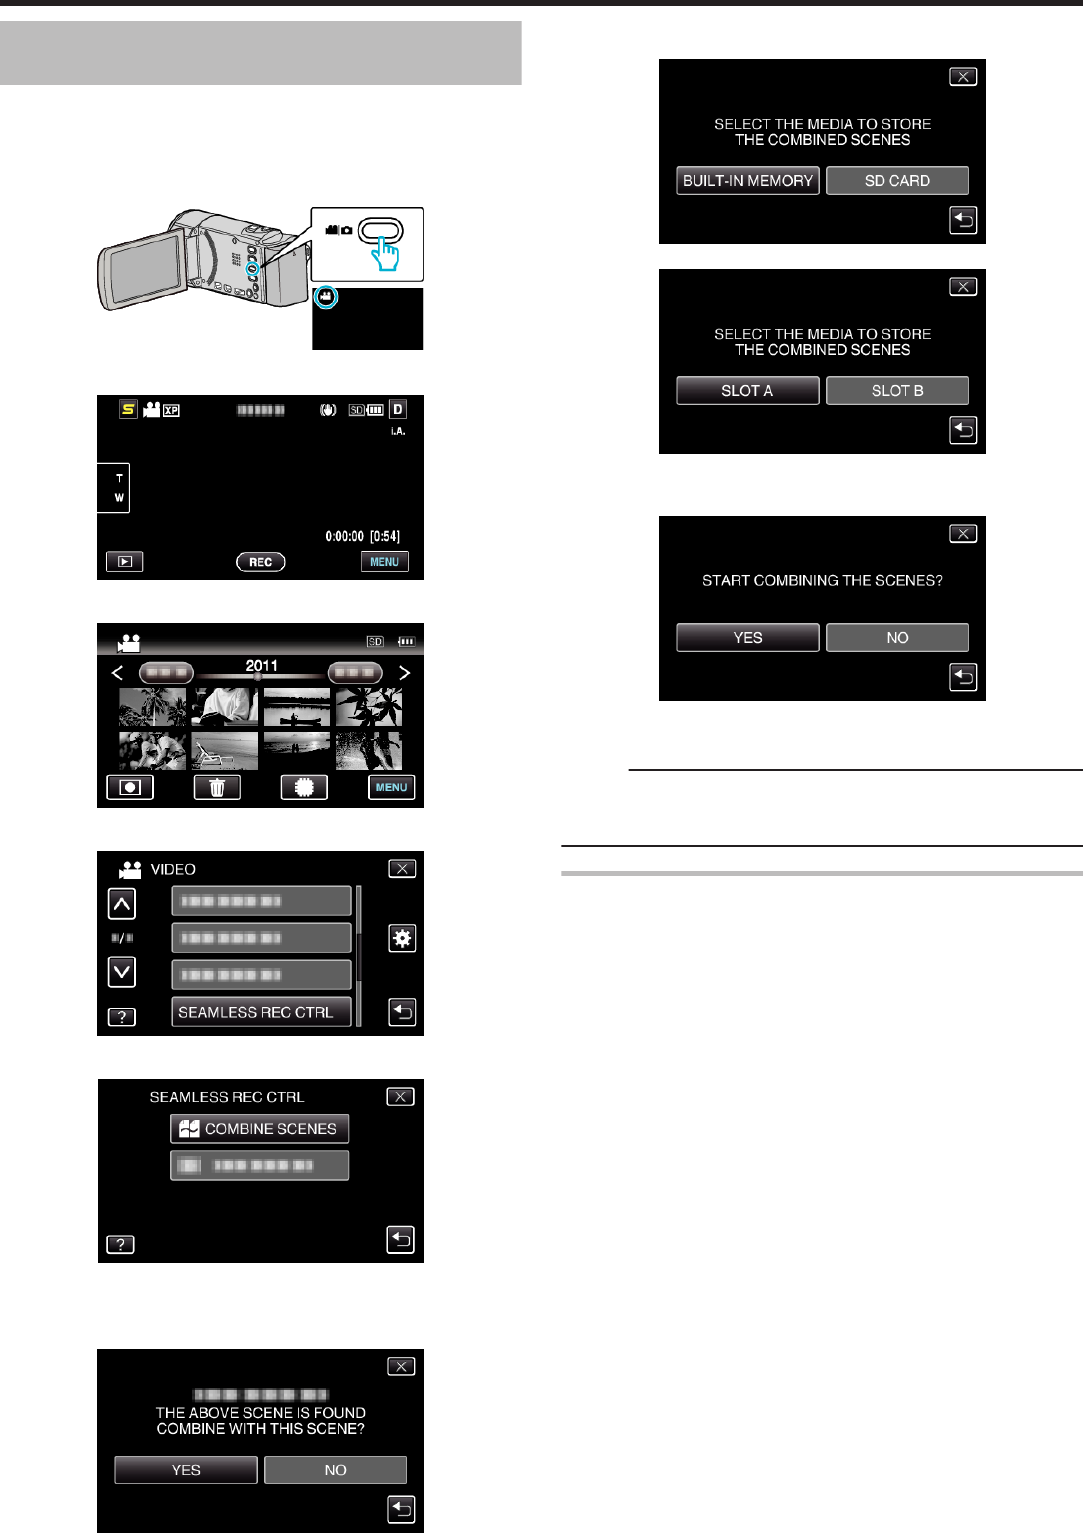
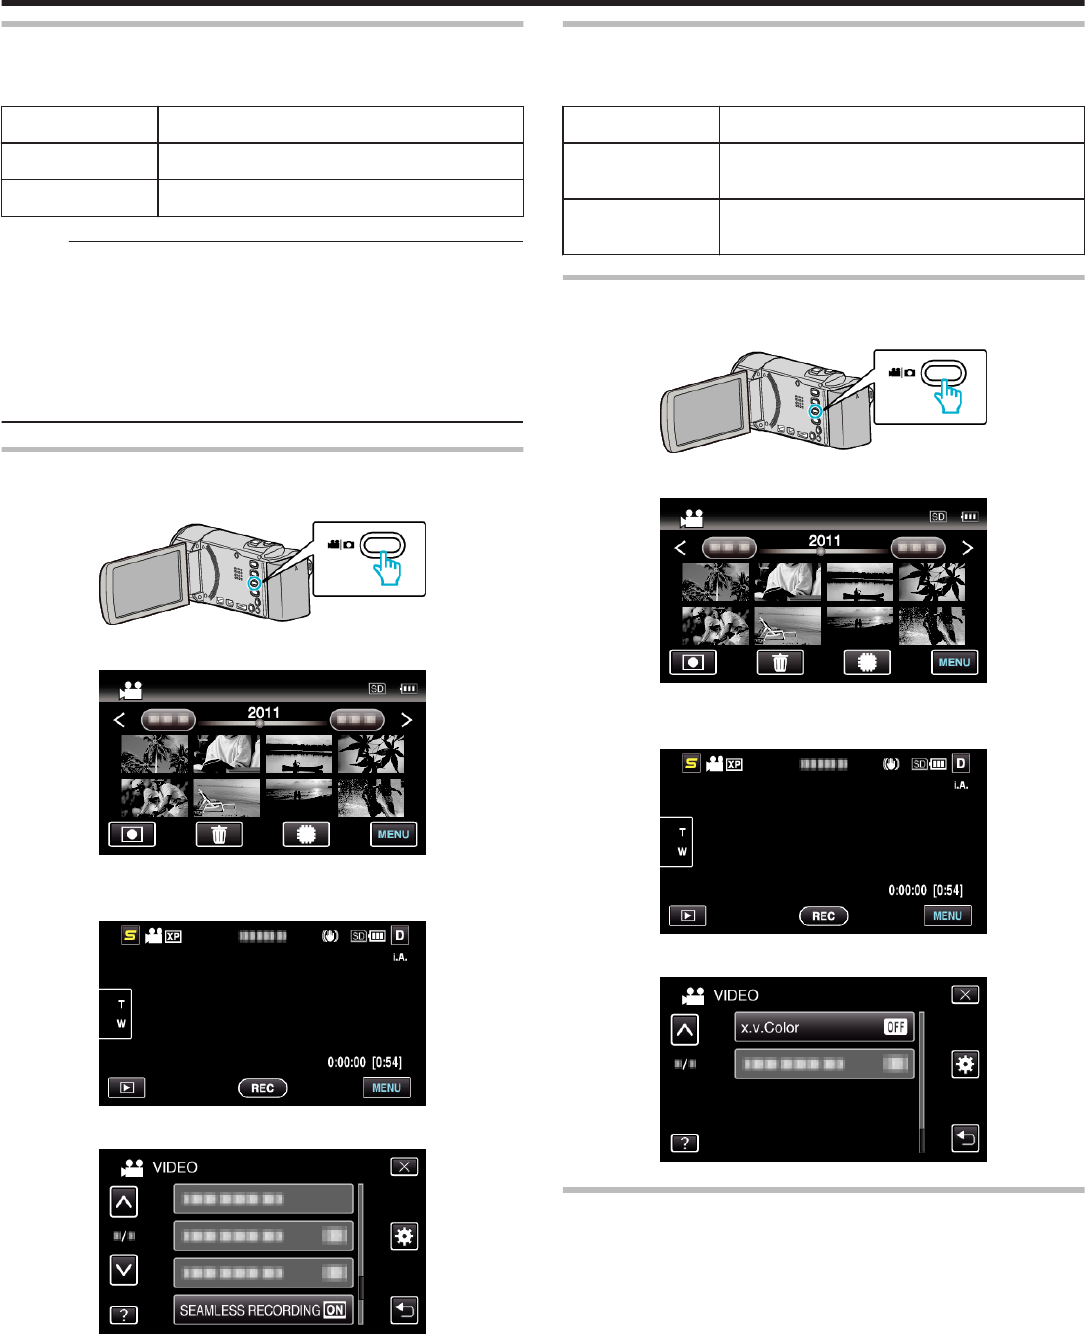
SEAMLESS RECORDING
Continues recording on the SD card without stopping when the remaining
space on the built-in memory or slot A runs out.
SettingDetails
OFFDoes not switch recording media automatically.
ONSwitches recording media automatically.
Memo :
0
Seamless recording cannot be performed if there is not enough free space
in the SD card.
0
The seamless recording setting switches to “OFF” automatically after
seamless recording is complete.
0
To start seamless recording again after the previous session is complete,
it is necessary to combine seamless videos, or delete the combination
information of the seamless videos.
“Combining Videos Recorded by Seamless Recording” (A p. 60)
Displaying the Item
1
Select video mode.
.
2
Tap R to select the recording mode.
.
0
The mode changes between recording and playback with every tap.
3
Tap “MENU”.
.
4
Tap “SEAMLESS RECORDING”.
.
x.v.Color
Captures the true colors.
(Use an x.v.Color compatible TV for playback.)
SettingDetails
OFFCaptures colors with the same standard as TV
broadcasting.
ONCaptures the true colors. (for TVs that supports
x.v.Color)
Displaying the Item
1
Select video mode.
.
2
Tap R to select the recording mode.
.
0
The mode changes between recording and playback with every tap.
3
Tap “MENU”.
.
4
Tap “x.v.Color”.
.
USER BUTTON SETTING
Assigns a frequently used function to the USER button.
Operating Details
“Setting the USER Button” (A p. 47)
Menu Settings
81
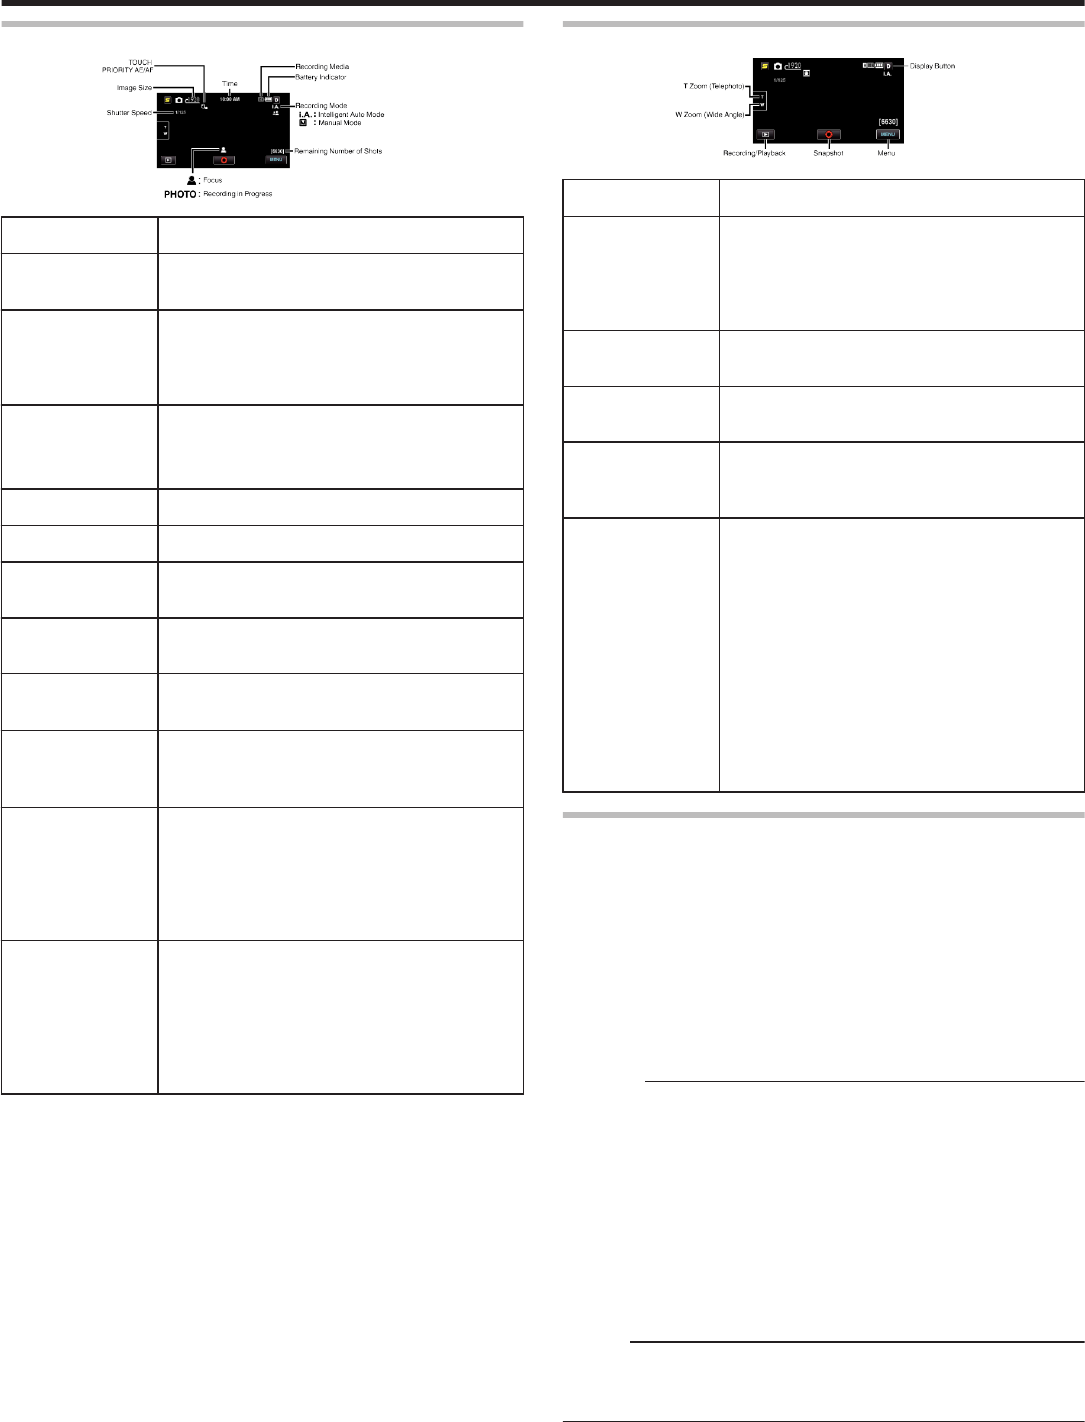
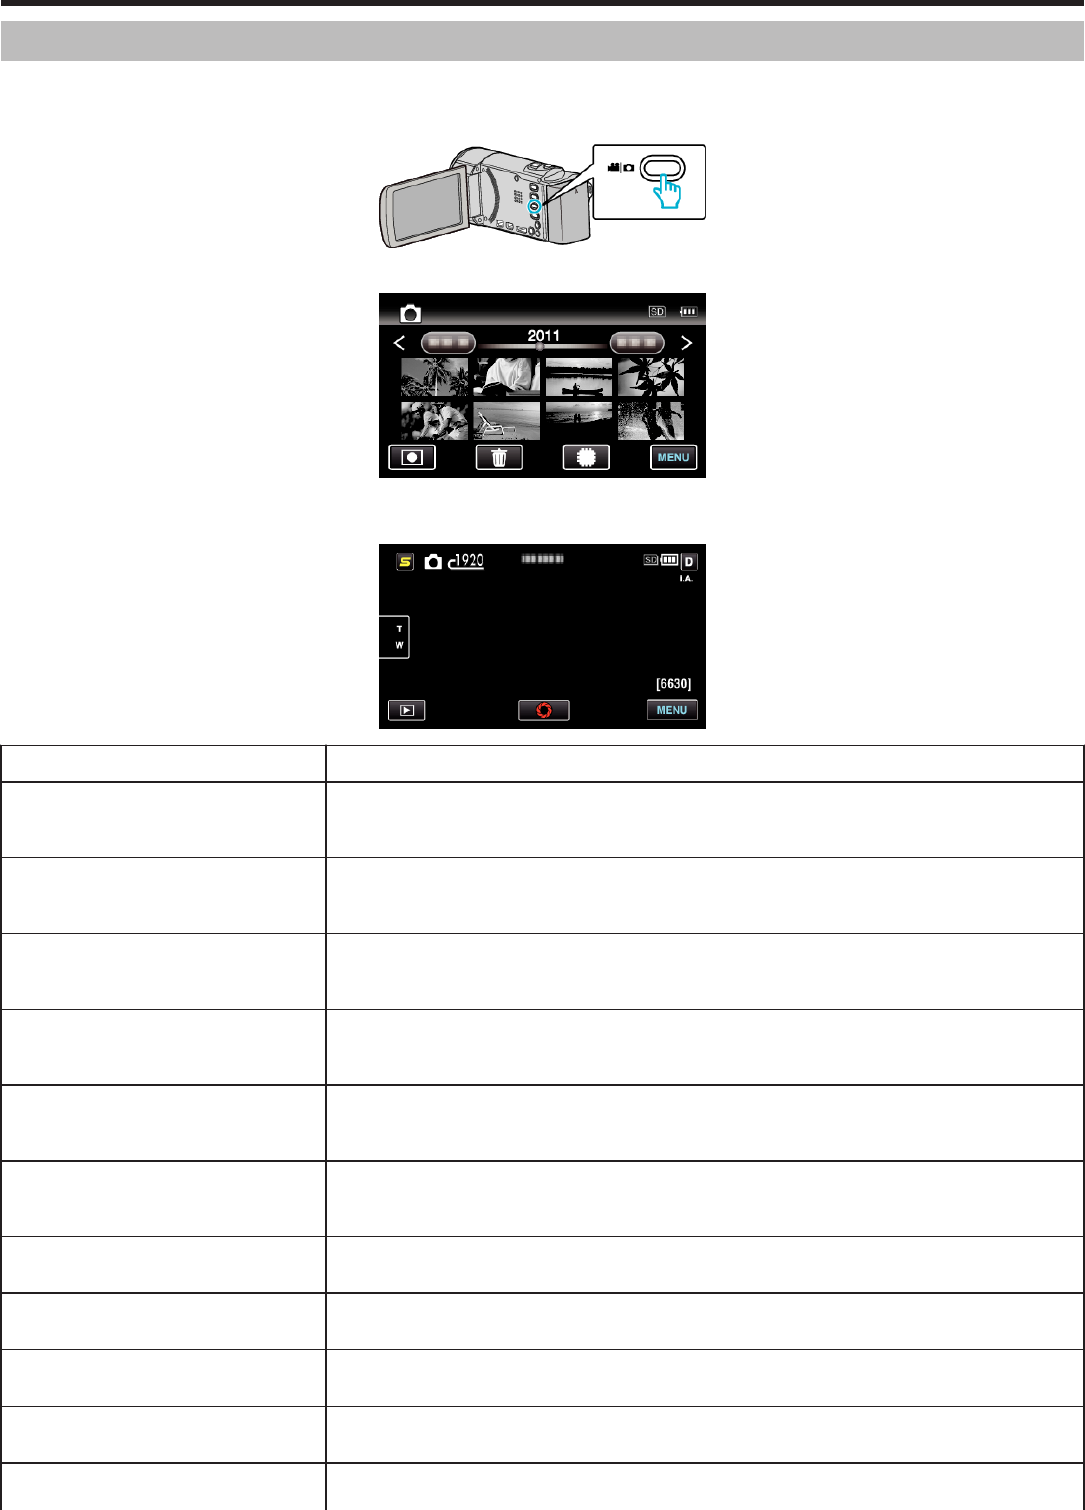
Main Menu for Still Image Recording
You can adjust various settings, such as brightness and white balance, to suit the subject or purpose. You can also change settings such as picture quality
and gain.
1
Select still image mode.
.
2
Tap R to select the recording mode.
.
0
The mode changes between recording and playback with every tap.
3
Tap “MENU”.
.
Setting
Details
SCENE SELECTSettings to suit the shooting condition can be selected.
“Scene Selection” (A p. 31)
*Displayed only in the manual recording mode.
FOCUSFocus can be adjusted manually.
“Adjusting Focus Manually” (A p. 32)
*Displayed only in the manual recording mode.
BRIGHTNESS ADJUSTAdjusts the overall brightness of the screen.
“Adjusting Brightness” (A p. 33)
*Displayed only in the manual recording mode.
WHITE BALANCEAdjusts the color according to the light source.
“Setting White Balance” (A p. 33)
*Displayed only in the manual recording mode.
BACKLIGHT COMP.Corrects the image when the subject appears dark due to backlight.
“Setting Backlight Compensation” (A p. 34)
*Displayed only in the manual recording mode.
TELE MACROEnables close-up shots when using the telephoto (T) end of the zoom.
“Taking Close-up Shots” (A p. 34)
*Displayed only in the manual recording mode.
TOUCH PRIORITY AE/AFAutomatically adjusts focus and brightness based on the subjects’ faces or selected area.
“Capturing Subjects Clearly (TOUCH PRIORITY AE/AF)” (A p. 40)
LIGHTTurns on/off the light.
“LIGHT (GZ-HM650/GZ-HM670/GZHM690)” (A p. 84)
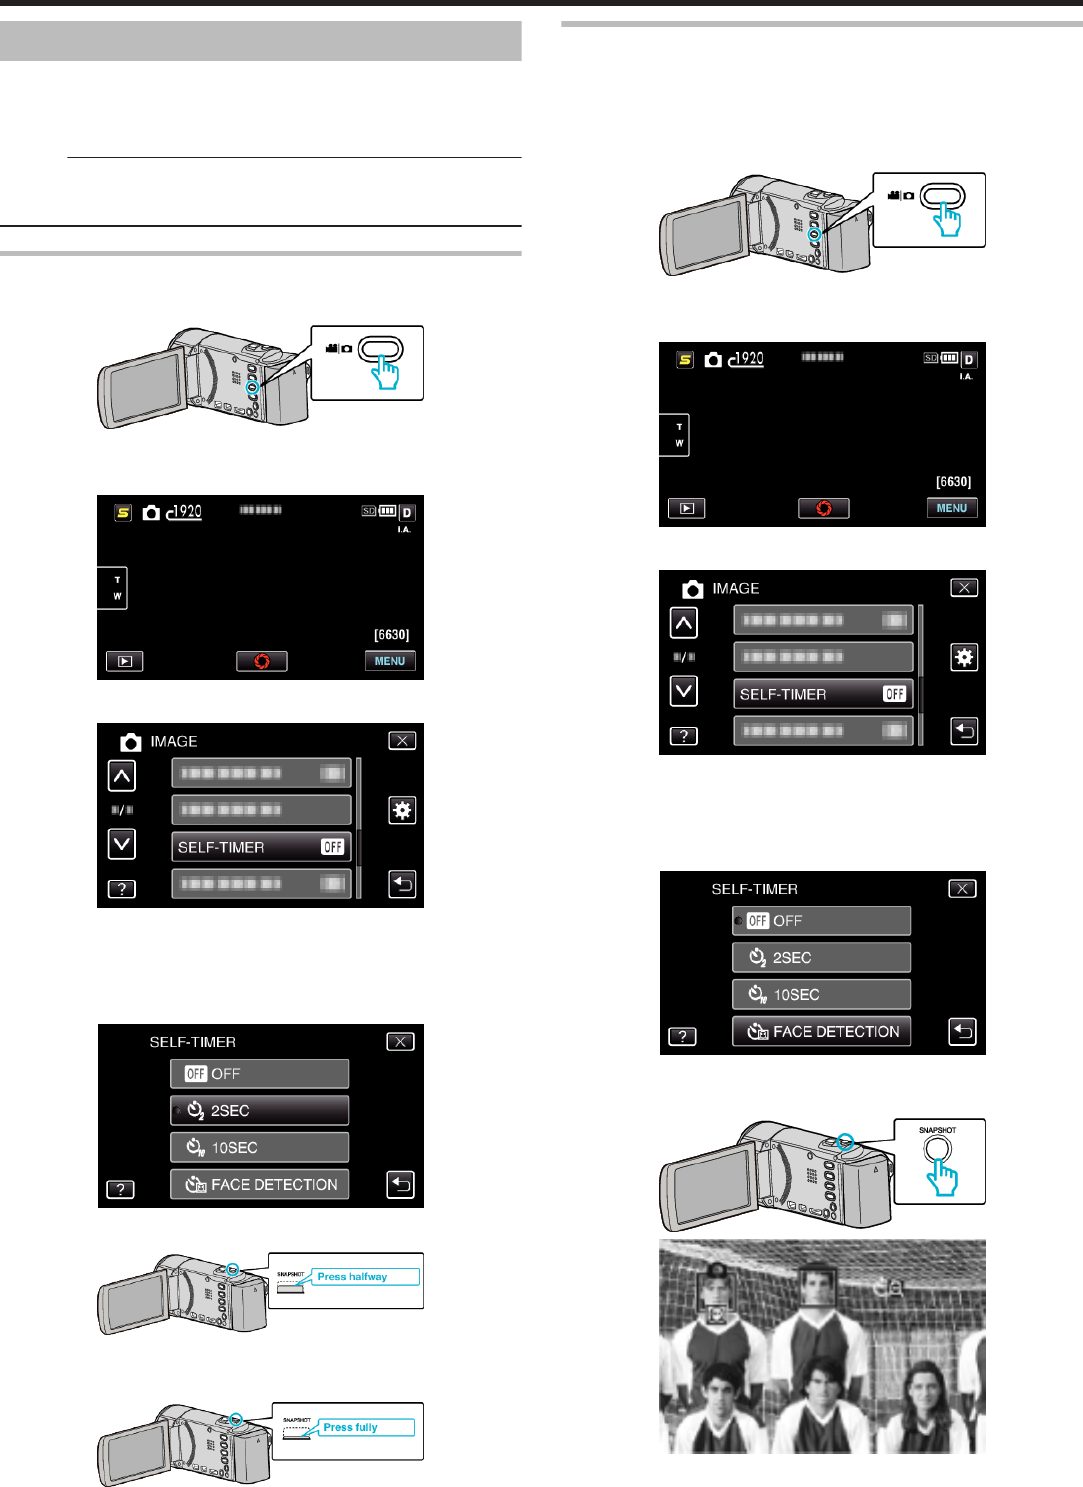
SELF-TIMERUse this when taking a group photo.
“Taking Group Shots (Self-timer)” (A p. 46)
GAIN UPMakes the subject appear bright automatically when recording in dark places.
“GAIN UP” (A p. 84)
AUTO RECEnables the unit to record still images automatically by sensing the changes in brightness within the red
frame displayed on the LCD monitor.
Menu Settings
82
“Recording Automatically by Sensing Movements (AUTO REC)” (A p. 45)
SHUTTER MODEContinuous shooting settings can be adjusted.
“SHUTTER MODE” (A p. 84)
SMILE SHOTAutomatically captures a still image upon detection of a smile.
“Capturing Smiles Automatically (SMILE SHOT)” (A p. 41)
SMILE%/NAME DISPLAYSets the items to display when faces are detected.
“Setting SMILE%/NAME DISPLAY” (A p. 37)
FACE REGISTRATIONRegisters the faces of people who are often shot with this unit.
“Registering Human Face Personal Authentication Information” (A p. 36)
IMAGE SIZESets the image size (number of pixels) for still images.
“IMAGE SIZE” (A p. 85)
USER BUTTON SETTINGAssigns a frequently used function to the USER button.
“Setting the USER Button” (A p. 47)
SCENE SELECT
Settings to suit the shooting condition can be selected.
Operating Details
“Scene Selection” (A p. 31)
FOCUS
Focus can be adjusted manually.
Operating Details
“Adjusting Focus Manually” (A p. 32)
BRIGHTNESS ADJUST
Adjusts the overall brightness of the screen.
Operating Details
“Adjusting Brightness” (A p. 33)
WHITE BALANCE
Adjusts the color according to the light source.
Operating Details
“Setting White Balance” (A p. 33)
BACKLIGHT COMP.
Corrects the image when the subject appears dark due to backlight.
Operating Details
“Setting Backlight Compensation” (A p. 34)
TELE MACRO
Enables close-up shots when using the telephoto (T) end of the zoom.
Operating Details
“Taking Close-up Shots” (A p. 34)
TOUCH PRIORITY AE/AF
Automatically adjusts focus and brightness based on the subjects’ faces or
selected area.
Operating Details
“Capturing Subjects Clearly (TOUCH PRIORITY AE/AF)” (A p. 40)
Menu Settings
83
LIGHT (GZ-HM650/GZ-HM670/GZHM690)
Turns on/off the light.
SettingDetails
OFFDoes not light up.
AUTOLights up automatically when the surrounding is dark.
ONLights up at all times.
Displaying the Item
1
Select still image mode.
.
2
Tap R to select the recording mode.
.
0
The mode changes between recording and playback with every tap.
3
Tap “MENU”.
.
4
Tap “LIGHT”.
.
SELF-TIMER
Use this when taking a group photo.
Operating Details
“Taking Group Shots (Self-timer)” (A p. 46)
GAIN UP
Makes the subject appear bright automatically when recording in dark
places.
SettingDetails
OFFDeactivates the function.
ONElectrically brightens the scene when it is dark.
Memo :
0
Setting can be adjusted separately for videos.
“GAIN UP (Video)” (A p. 78)
Displaying the Item
1
Select still image mode.
.
2
Tap R to select the recording mode.
.
0
The mode changes between recording and playback with every tap.
3
Tap “MENU”.
.
4
Tap “GAIN UP”.
.
AUTO REC
Starts/stops recording automatically by sensing the changes in subject’s
movement (brightness) within the red frame displayed on the LCD monitor.
Operating Details
“Recording Automatically by Sensing Movements (AUTO REC)” (A p. 45)
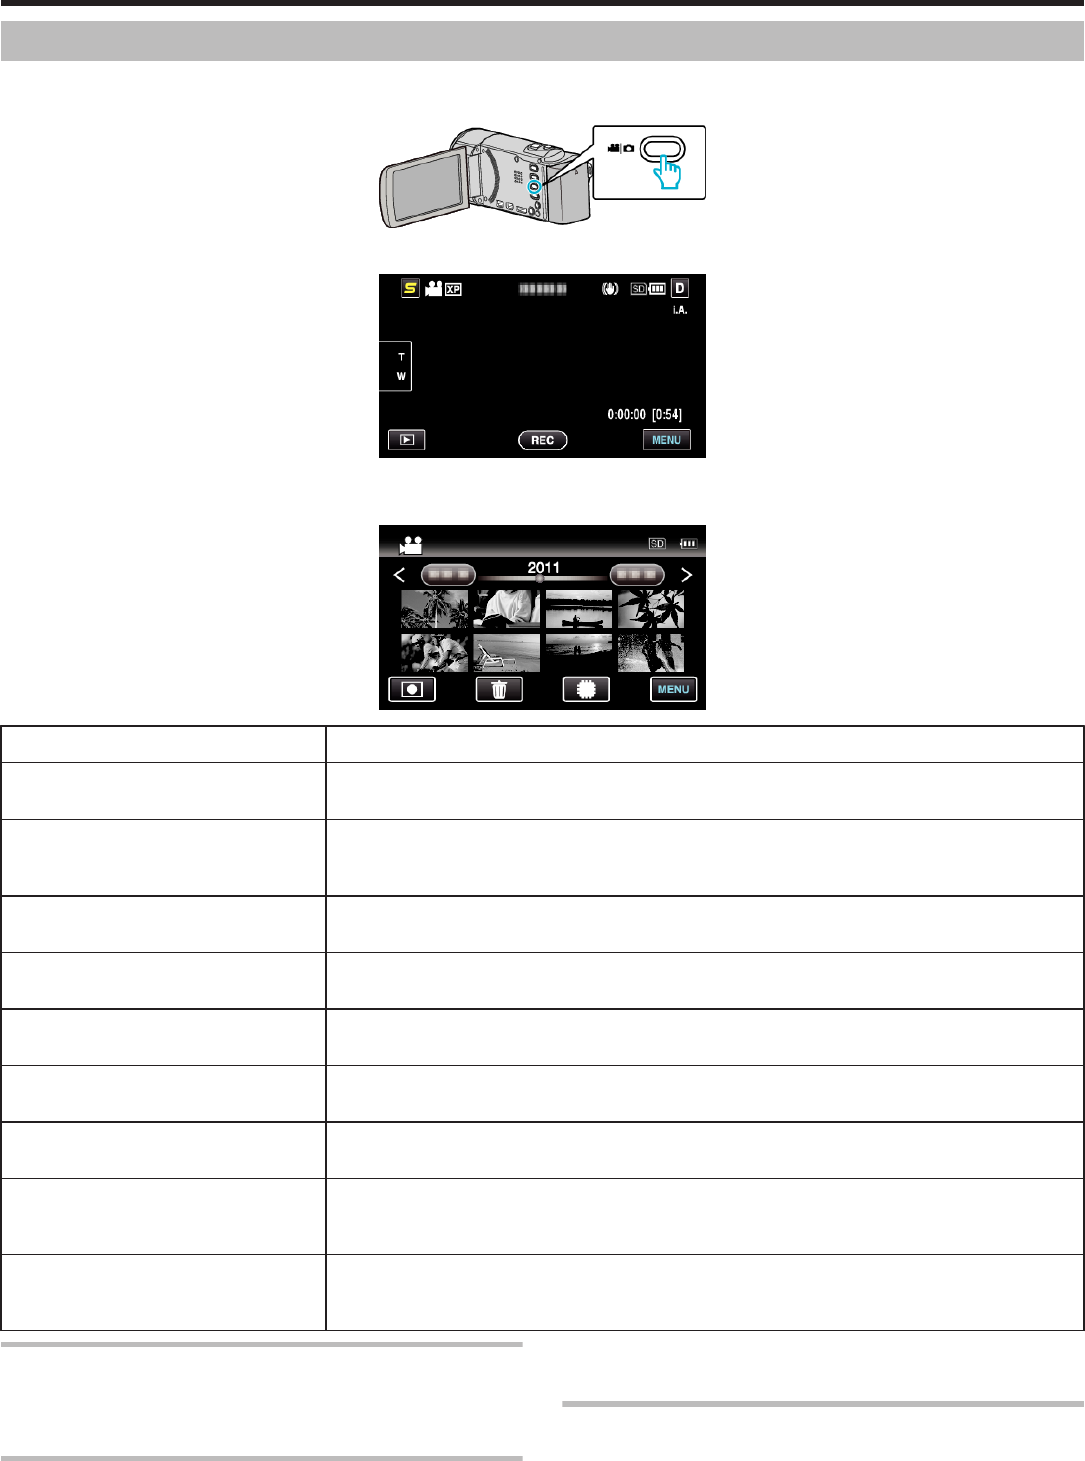
SHUTTER MODE
Continuous shooting settings can be adjusted.
Setting
Details
RECORD ONE
SHOT
Records one still image.
Menu Settings
84
CONTINUOUS
SHOOTING
Records still images continuously while the
SNAPSHOT button is pressed.
Memo :
0
Some SD cards may not support continuous shooting.
0
The continuous shooting speed will drop if this function is used repeatedly.
0
“CONTINUOUS SHOOTING” may not work when “IMAGE SIZE” is set to
“2400X1344(3.2M)”. (GZ-HM650/GZ-HM670/GZ-HM690)
Displaying the Item
1
Select still image mode.
.
2
Tap R to select the recording mode.
.
0
The mode changes between recording and playback with every tap.
3
Tap “MENU”.
.
4
Tap “SHUTTER MODE”.
.
SMILE SHOT
Automatically captures a still image upon detection of a smile.
Operating Details
“Capturing Smiles Automatically (SMILE SHOT)” (A p. 41)
SMILE%/NAME DISPLAY
Sets the items to display when faces are detected.
Operating Details
“Setting SMILE%/NAME DISPLAY” (A p. 37)
FACE REGISTRATION
Registers the faces of people who are often shot with this unit.
Operating Details
“Registering Human Face Personal Authentication Information” (A p. 36)
IMAGE SIZE
Sets the image size (number of pixels) for still images.
SettingDetails
2400X1344(3.2M) *
1920X1080(2M)
Takes still images with aspect ratio 16:9.
0
The sides of still images recorded in 16:9 aspect
ratio may be cut off when printed.
1440X1080(1.5M)
640X480(0.3M)
Takes still images with aspect ratio 4:3.
* GZ-HM650/GZ-HM670/GZ-HM690
Displaying the Item
1
Select still image mode.
.
2
Tap R to select the recording mode.
.
0
The mode changes between recording and playback with every tap.
3
Tap “MENU”.
.
4
Tap “IMAGE SIZE”.
.
USER BUTTON SETTING
Assigns a frequently used function to the USER button.
Operating Details
“Setting the USER Button” (A p. 47)
Menu Settings
85
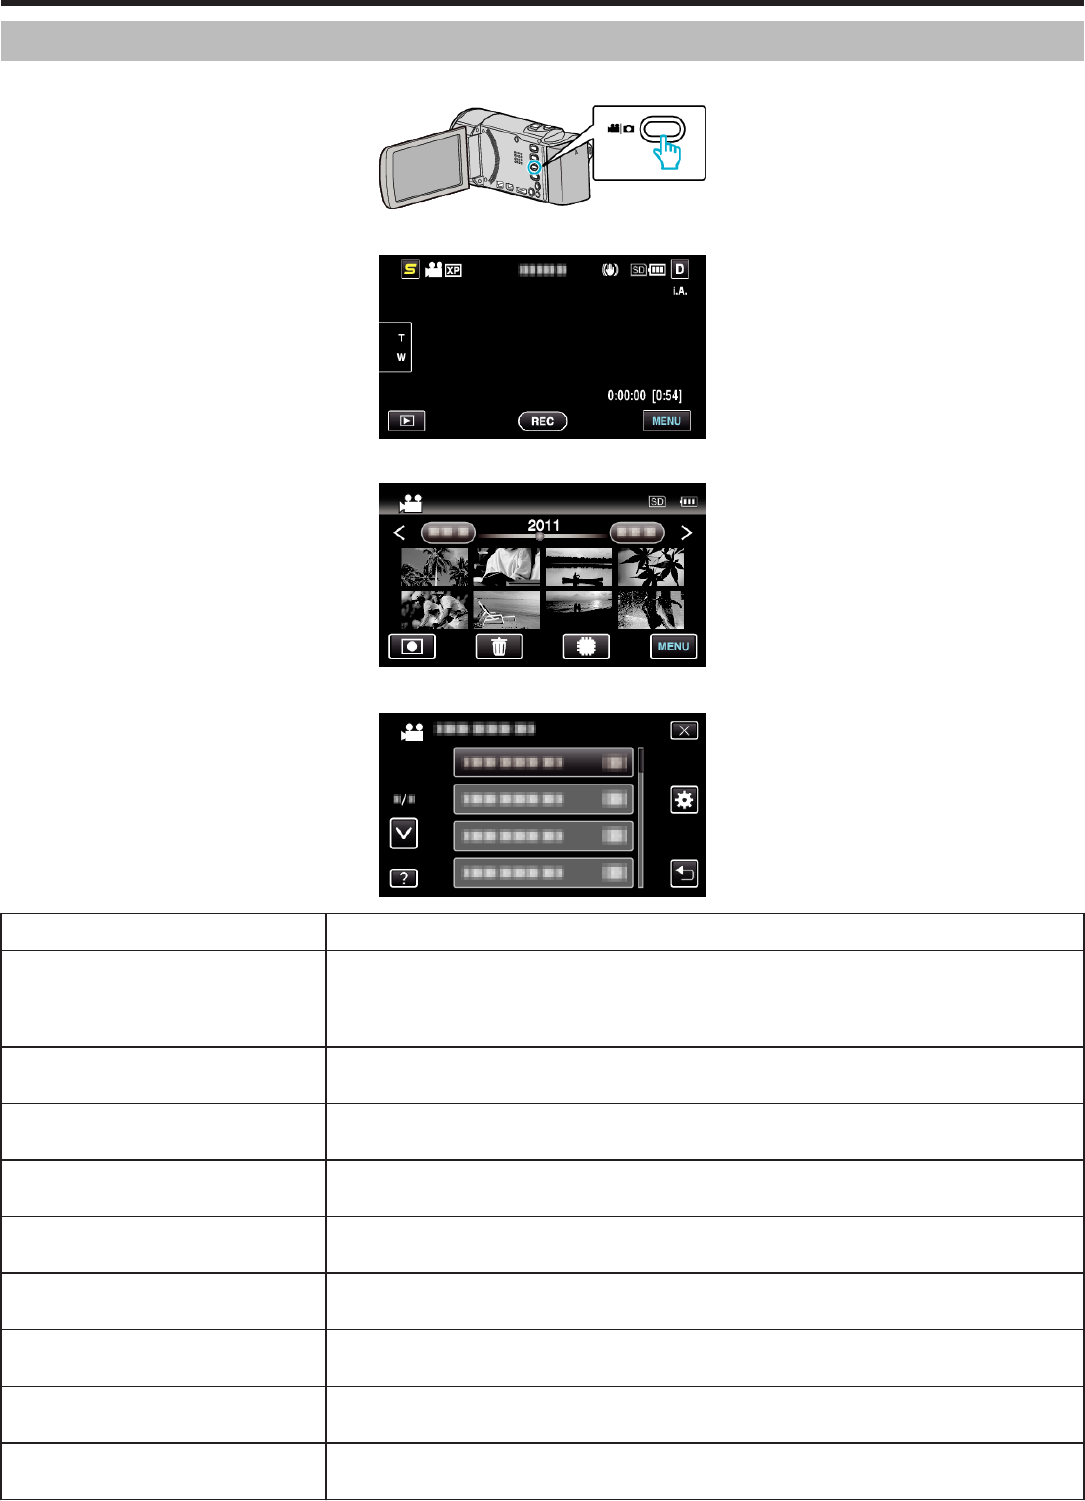
Main Menu for Video Playback
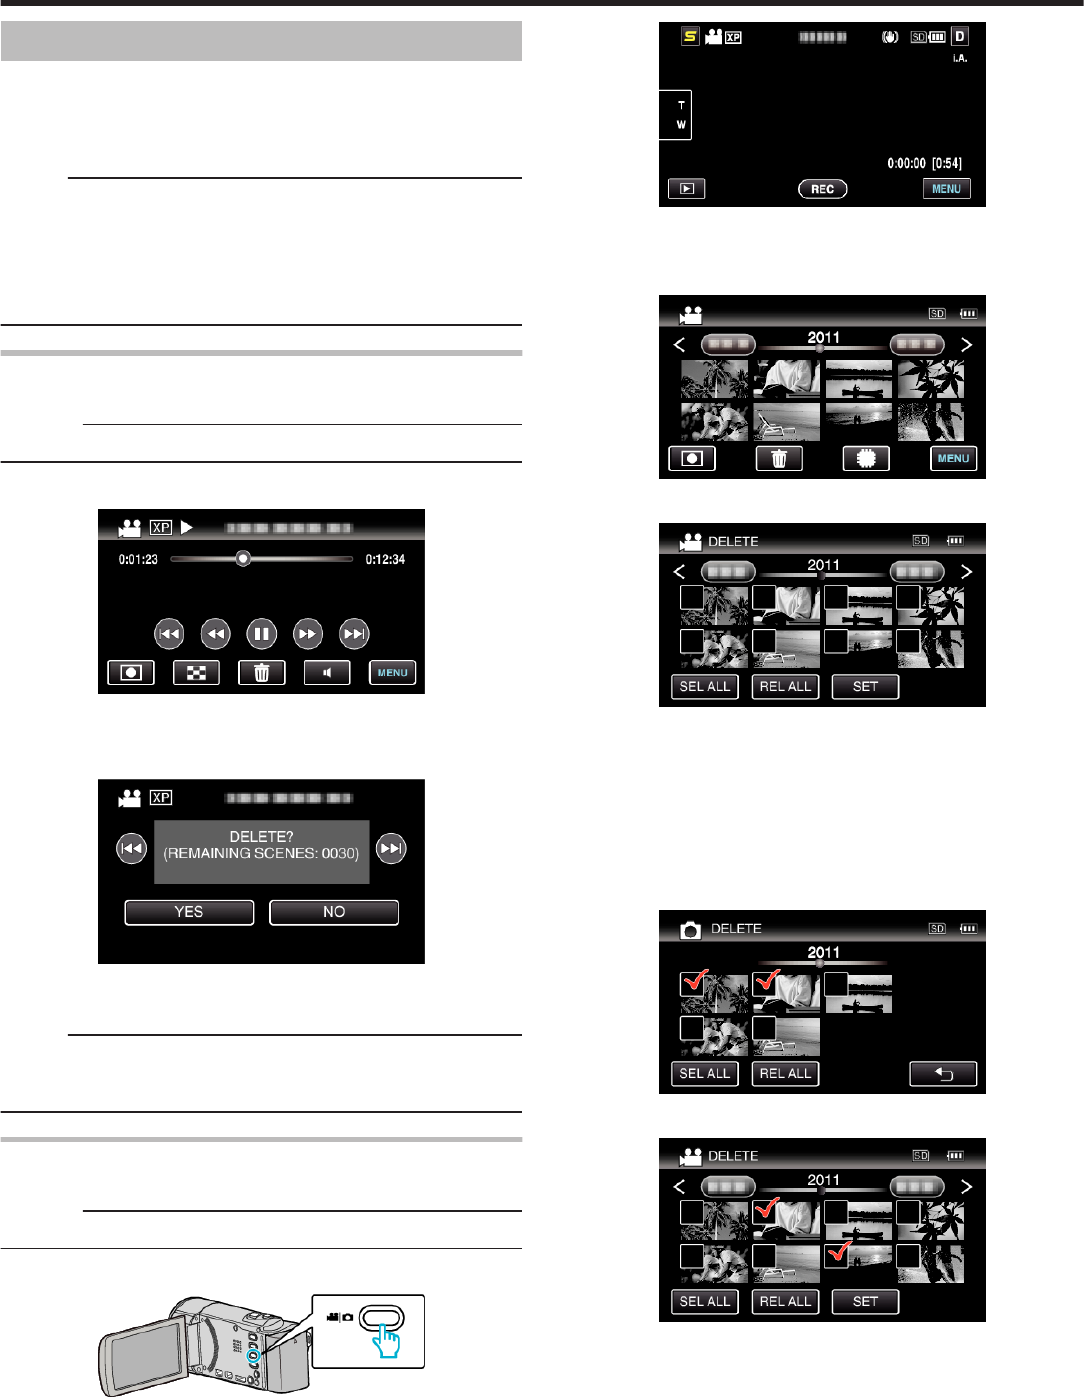
You can delete or look for specific videos.
1
Select video mode.
.
2
Tap L to select the playback mode.
.
0
The mode changes between recording and playback with every tap.
3
Tap “MENU”.
.
Setting
Details
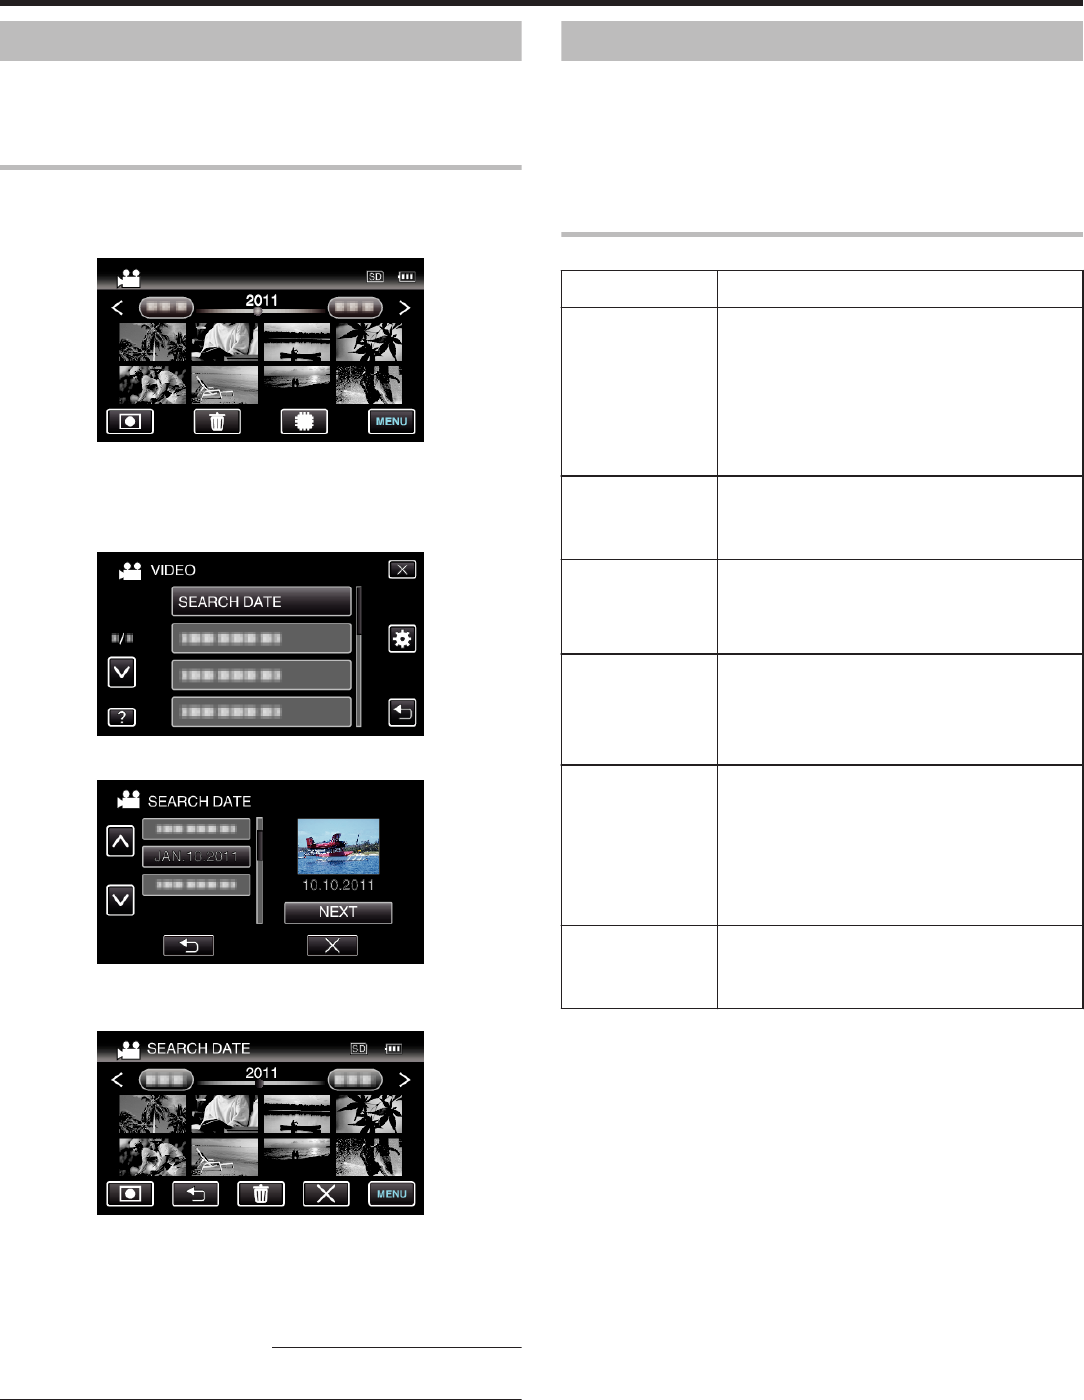
SEARCH DATEYou can search and play videos or still images according to recording dates.
“Date Search” (A p. 54)
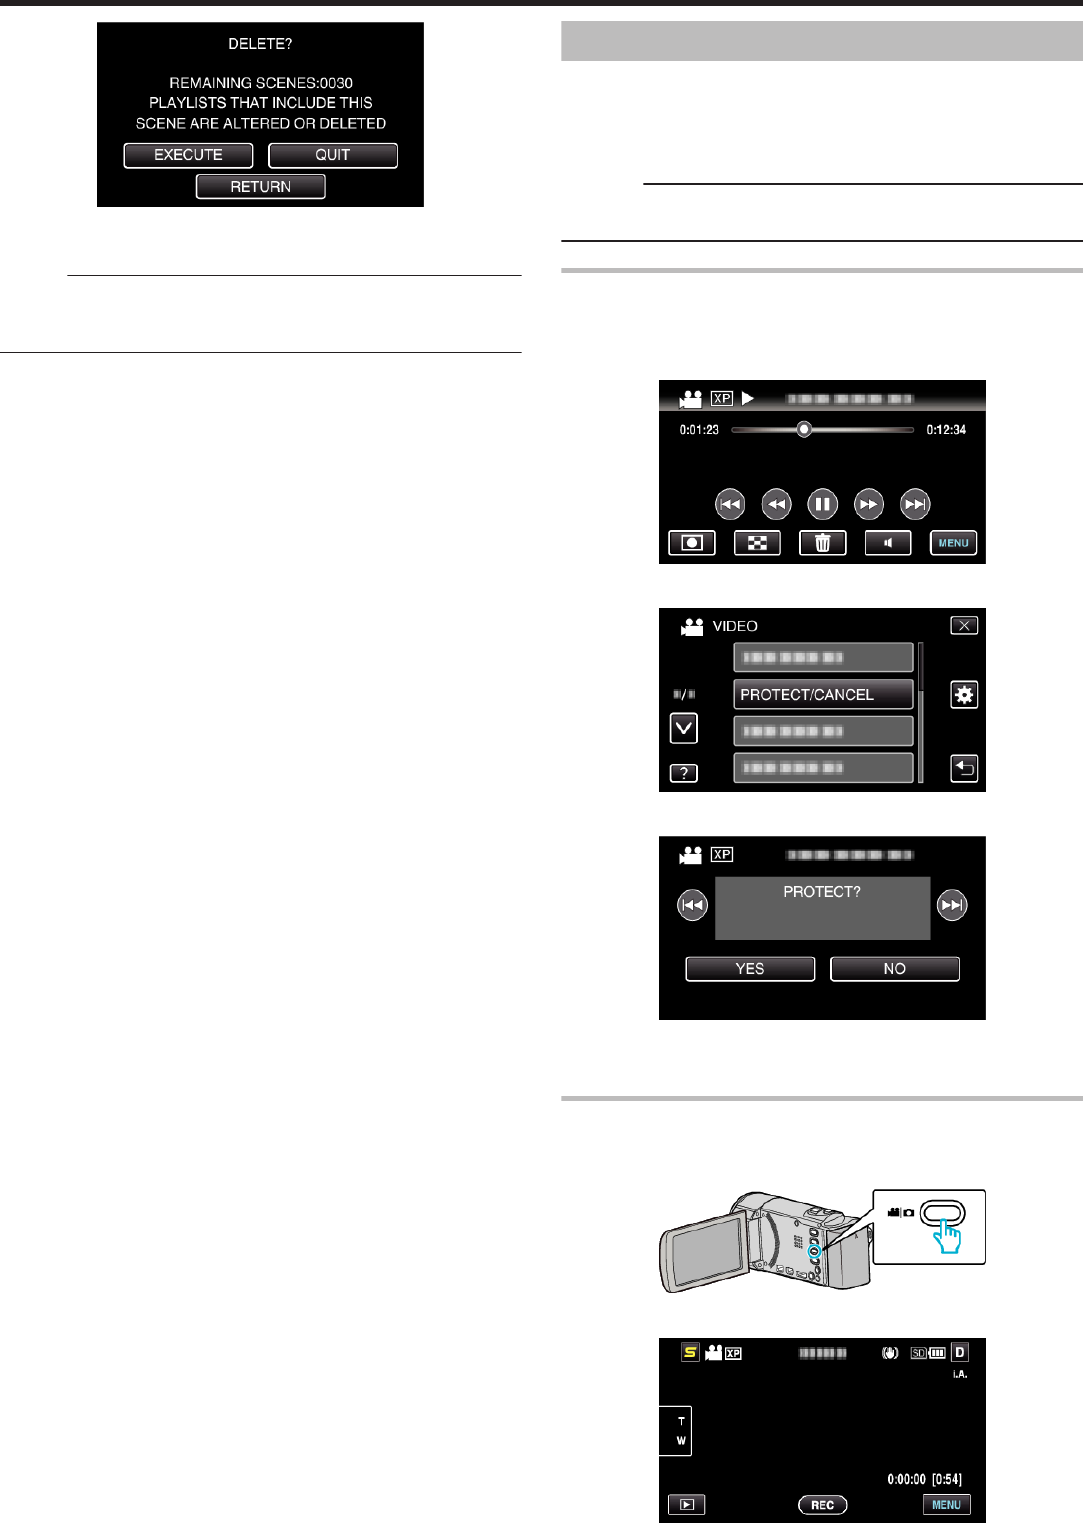
PROTECT/CANCELProtects files from being deleted accidently.
“Protecting/Releasing Protection of the Currently Displayed File” (A p. 58)
“Protecting/Releasing Protection of Selected Files” (A p. 58)
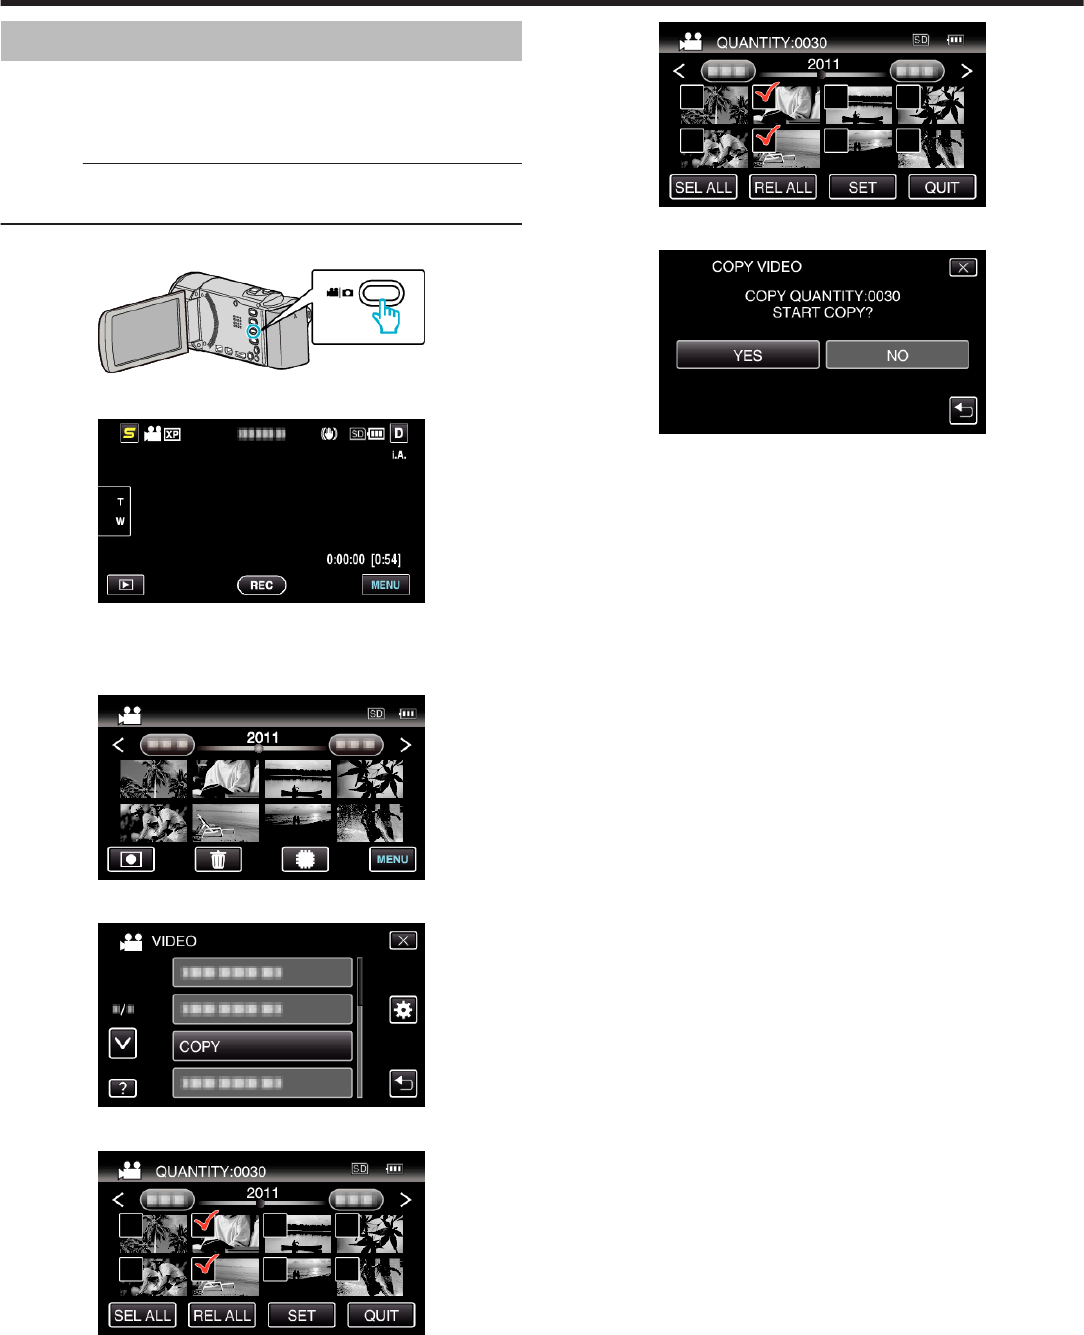
COPYCopies files to another media.
“Copying Files to an SD Card” (A p. 65)
MOVEMoves files to another media.
“Moving Files to an SD Card” (A p. 66)
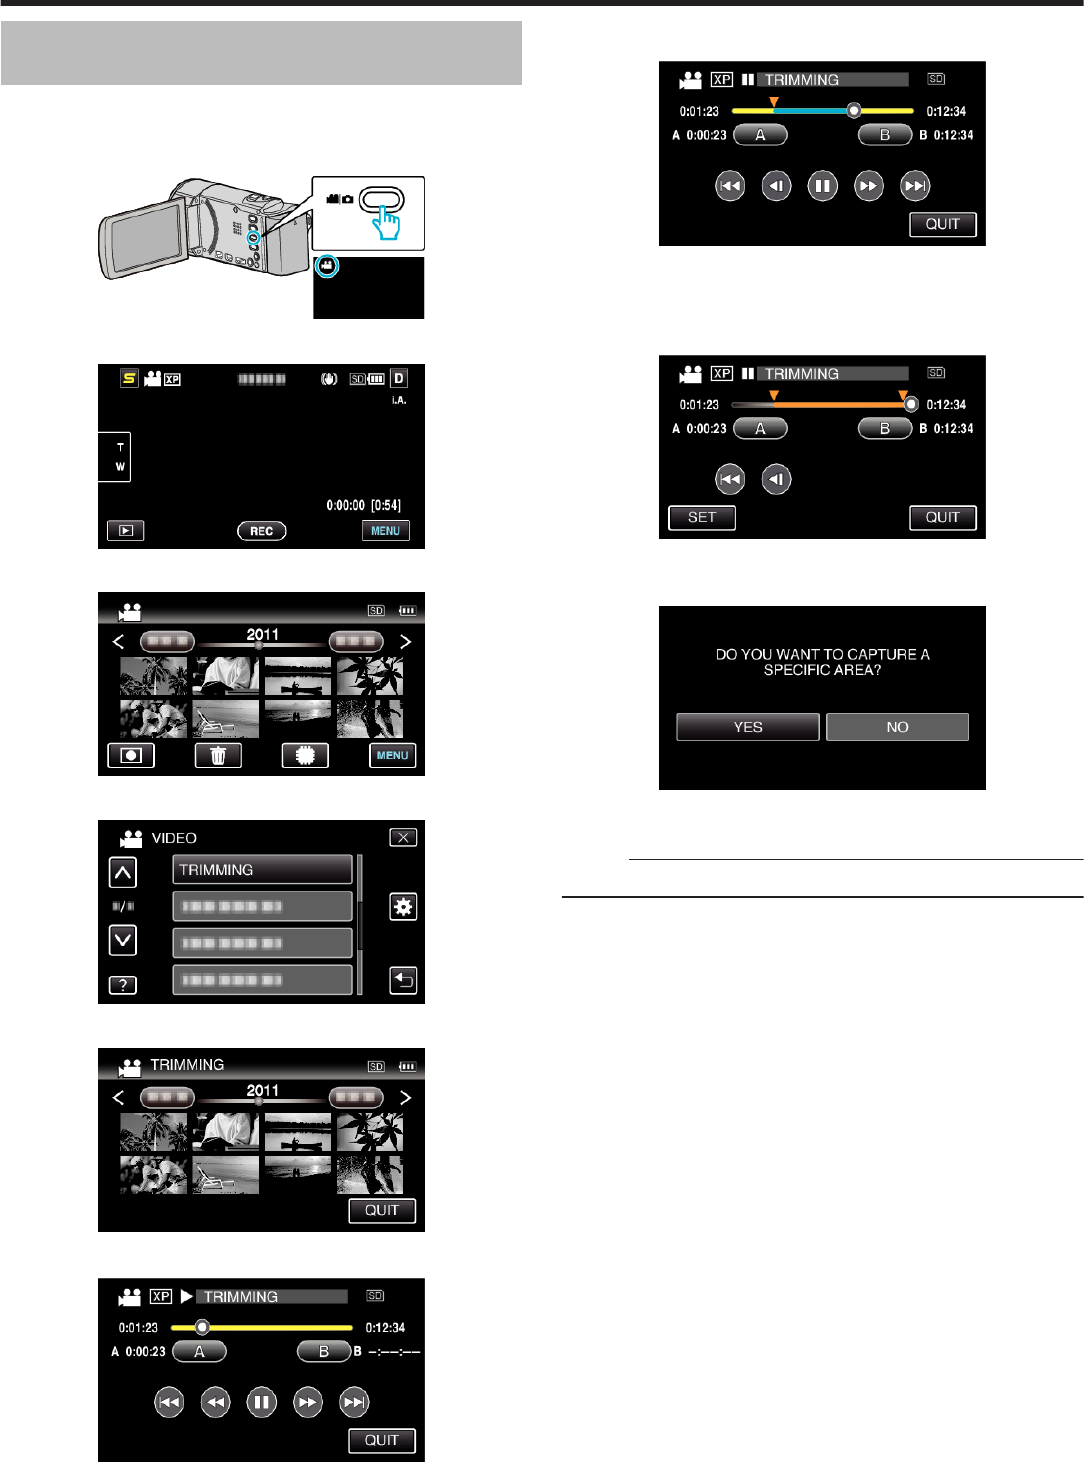
TRIMMINGSelect the required part of a video and save it as a new video file.
“Capturing a Required Part in the Video (TRIMMING)” (A p. 61)
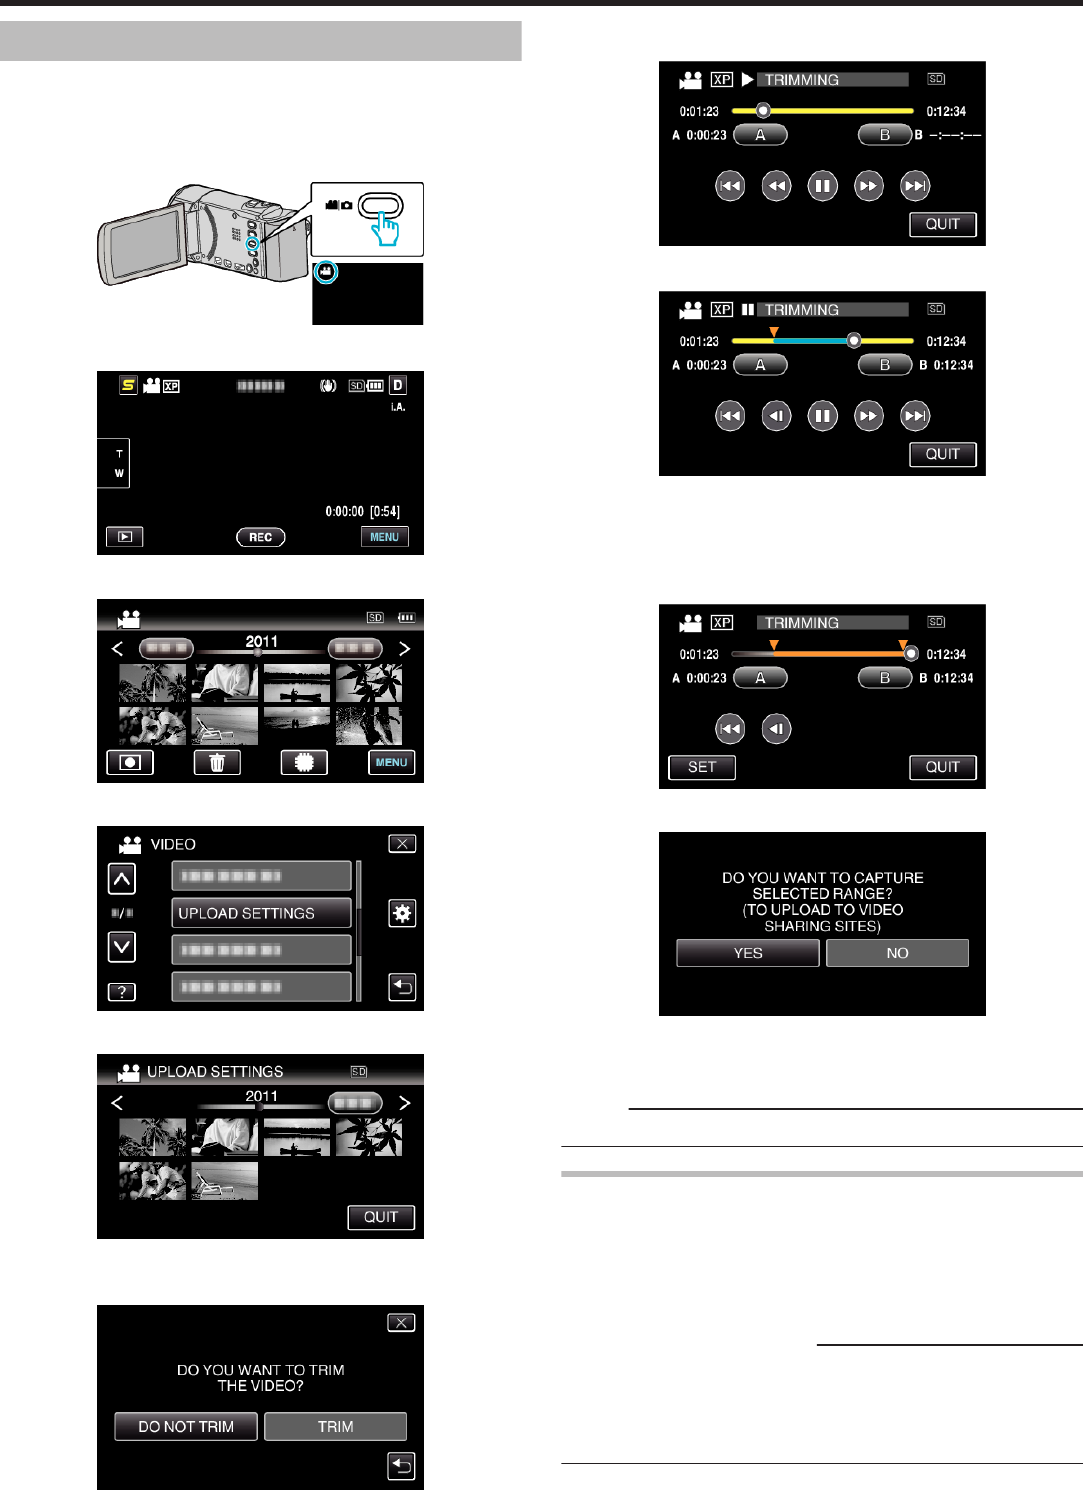
UPLOAD SETTINGSCapture and copy a part of a recorded video (maximum 15 minutes) for uploading to YouTube.
“UPLOAD SETTINGS” (A p. 87)
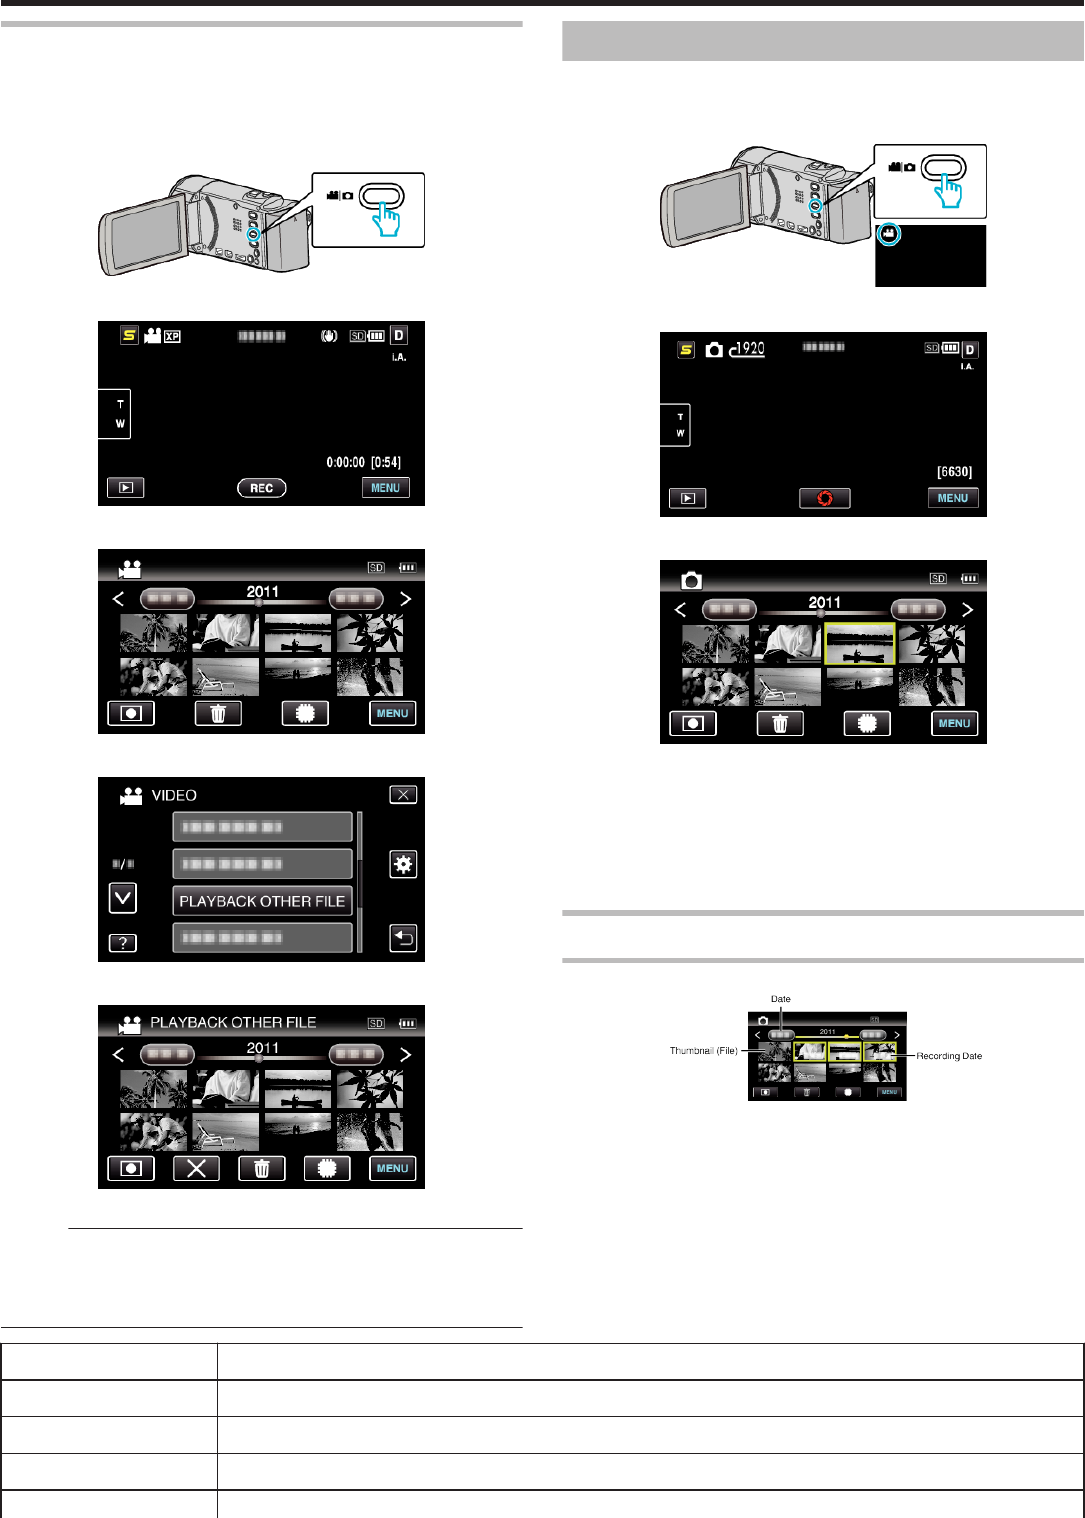
PLAYBACK OTHER FILEPlays videos with defective management information.
“Playing a Video with Defective Management Information” (A p. 52)
SEAMLESS REC CTRLVideos that are recorded on two separate media and with “SEAMLESS RECORDING” in the video recording
menu enabled can be combined into a single video.
“Combining Videos Recorded by Seamless Recording” (A p. 60)
K2 TECHNOLOGYReproduces small or high-pitched sounds that cannot be recorded during recording, and plays back with a
sound quality close to the original.
“K2 TECHNOLOGY” (A p. 87)
SEARCH DATE
Narrows down the video index screen according to recording dates.
Operating Details
“Date Search” (A p. 54)
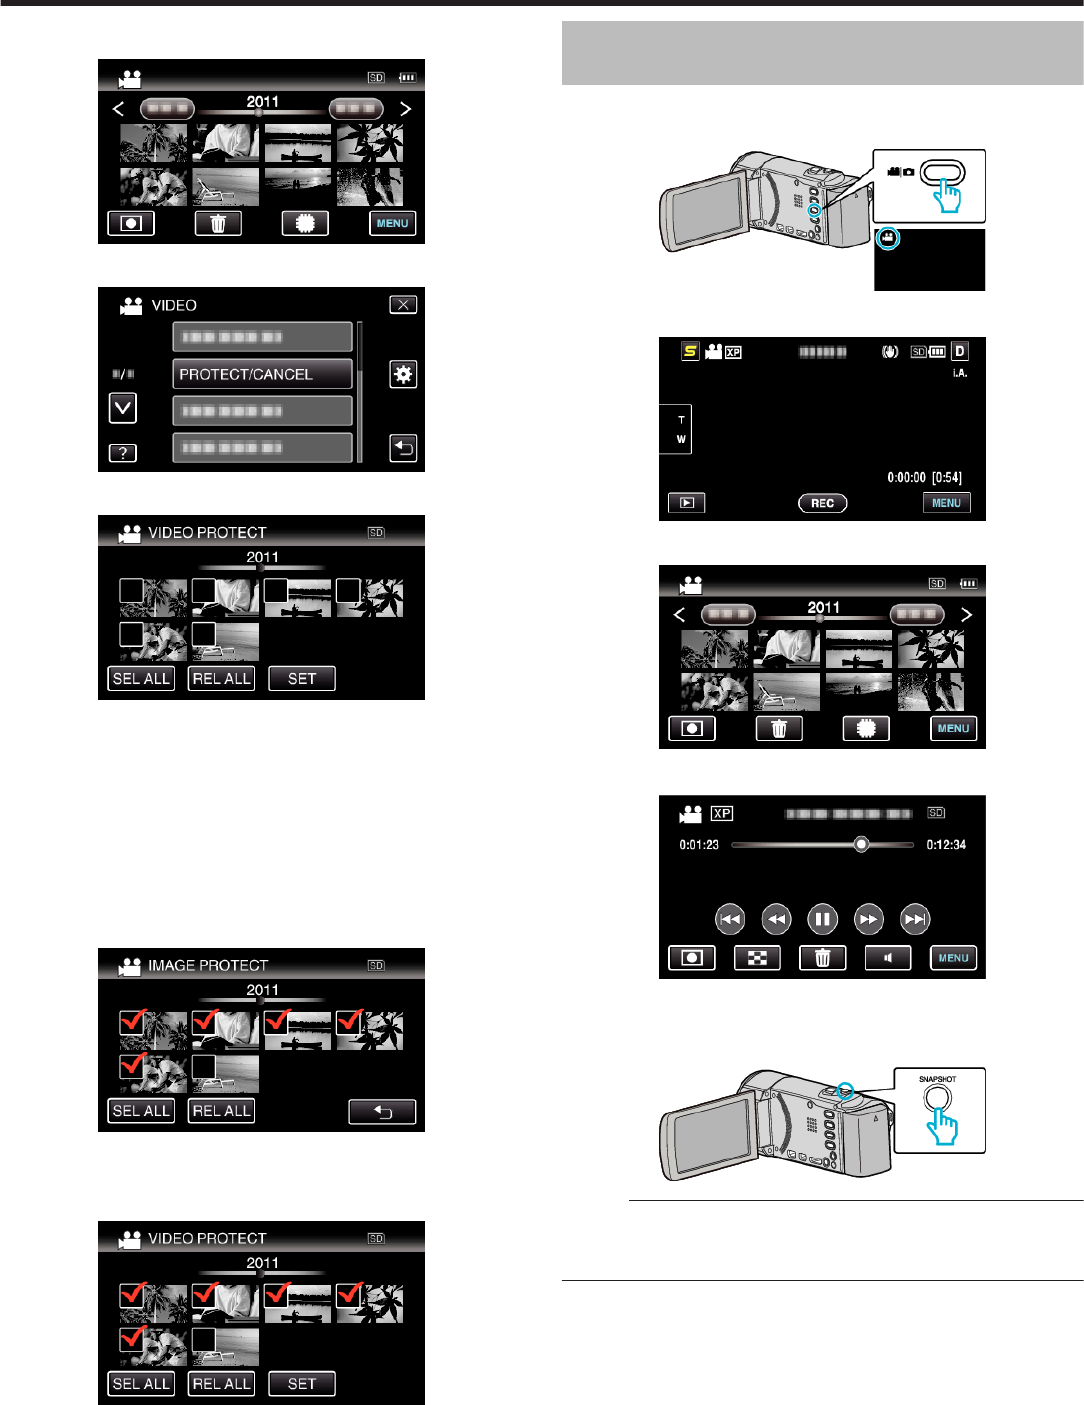
PROTECT/CANCEL
Protects files from being deleted accidently.
Operating Details
“Protecting/Releasing Protection of the Currently Displayed File” (A p. 58)
“Protecting/Releasing Protection of Selected Files” (A p. 58)
COPY
Copies files to another media.
Operating Details
“Copying Files to an SD Card” (A p. 65)
Menu Settings
86
MOVE
Moves files to another media.
Operating Details
“Moving Files to an SD Card” (A p. 66)
TRIMMING
Select the required part of a video and save it as a new video file.
Operating Details
“Capturing a Required Part in the Video (TRIMMING)” (A p. 61)
UPLOAD SETTINGS
Capture and copy a part of a recorded video (maximum 15 minutes) for
uploading to YouTube.
Operating Details
“Capturing Videos for Uploading to YouTube” (A p. 62)
PLAYBACK OTHER FILE
Plays videos with defective management information.
Operating Details
“Playing a Video with Defective Management Information” (A p. 52)
SEAMLESS REC CTRL
Videos that are recorded on two separate media and with “SEAMLESS
RECORDING” in the video recording menu enabled can be combined into
a single video.
Operating Details
“Combining Videos Recorded by Seamless Recording” (A p. 60)
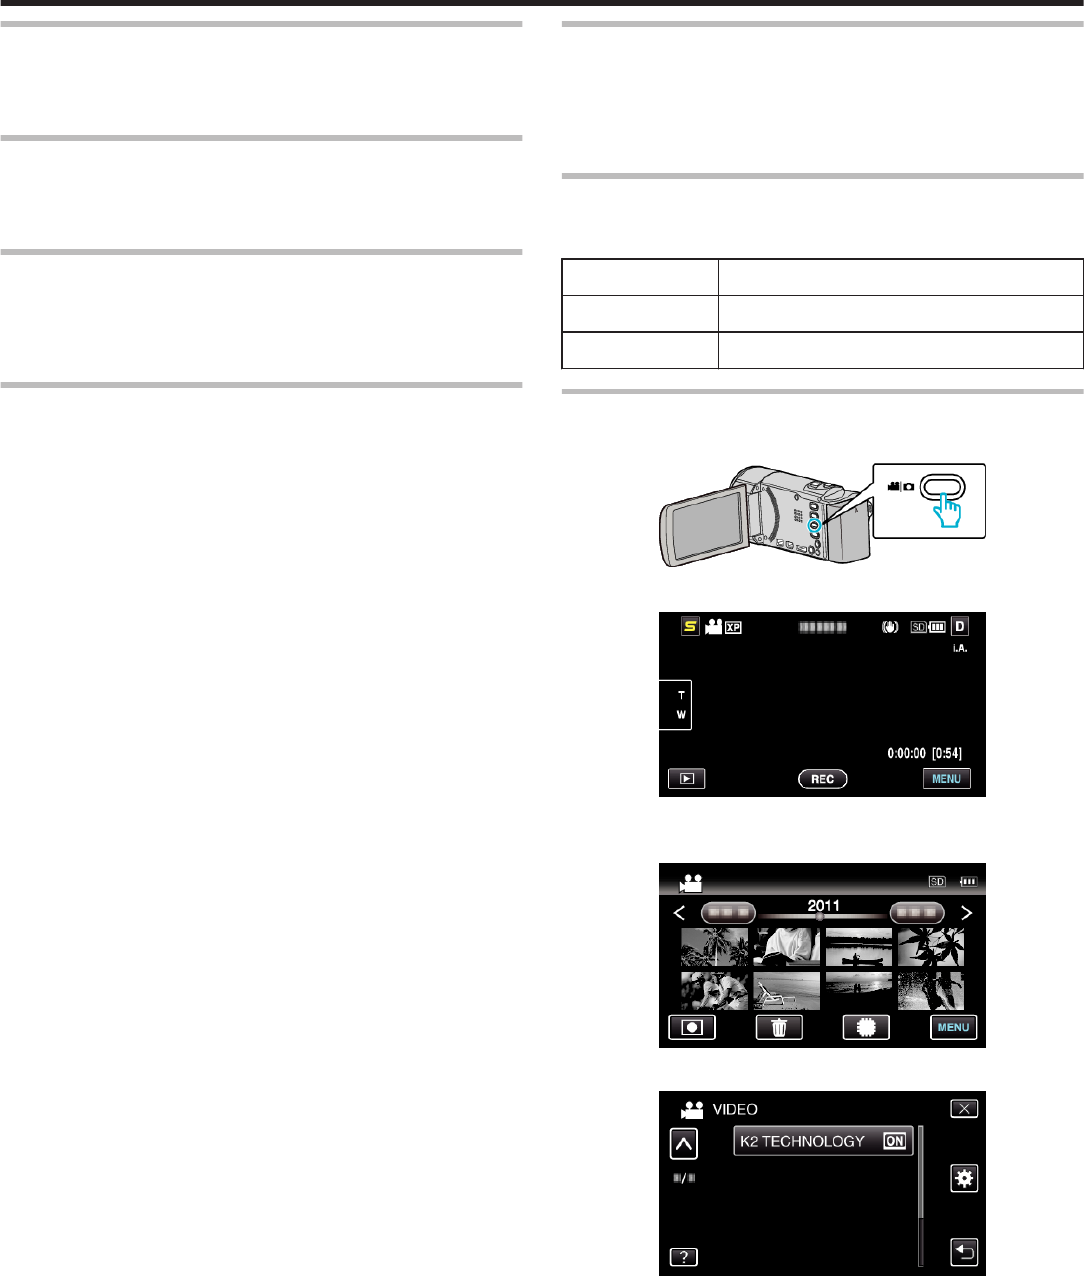
K2 TECHNOLOGY
Reproduces small or high-pitched sounds that cannot be recorded during
recording, and plays back with a sound quality close to the original.
SettingDetails
OFFDeactivates K2 TECHNOLOGY.
ONActivates K2 TECHNOLOGY.
Displaying the Item
1
Select video mode.
.
2
Tap L to select the playback mode.
.
0
The mode changes between recording and playback with every tap.
3
Tap “MENU”.
.
4
Tap “K2 TECHNOLOGY”.
.
Menu Settings
87
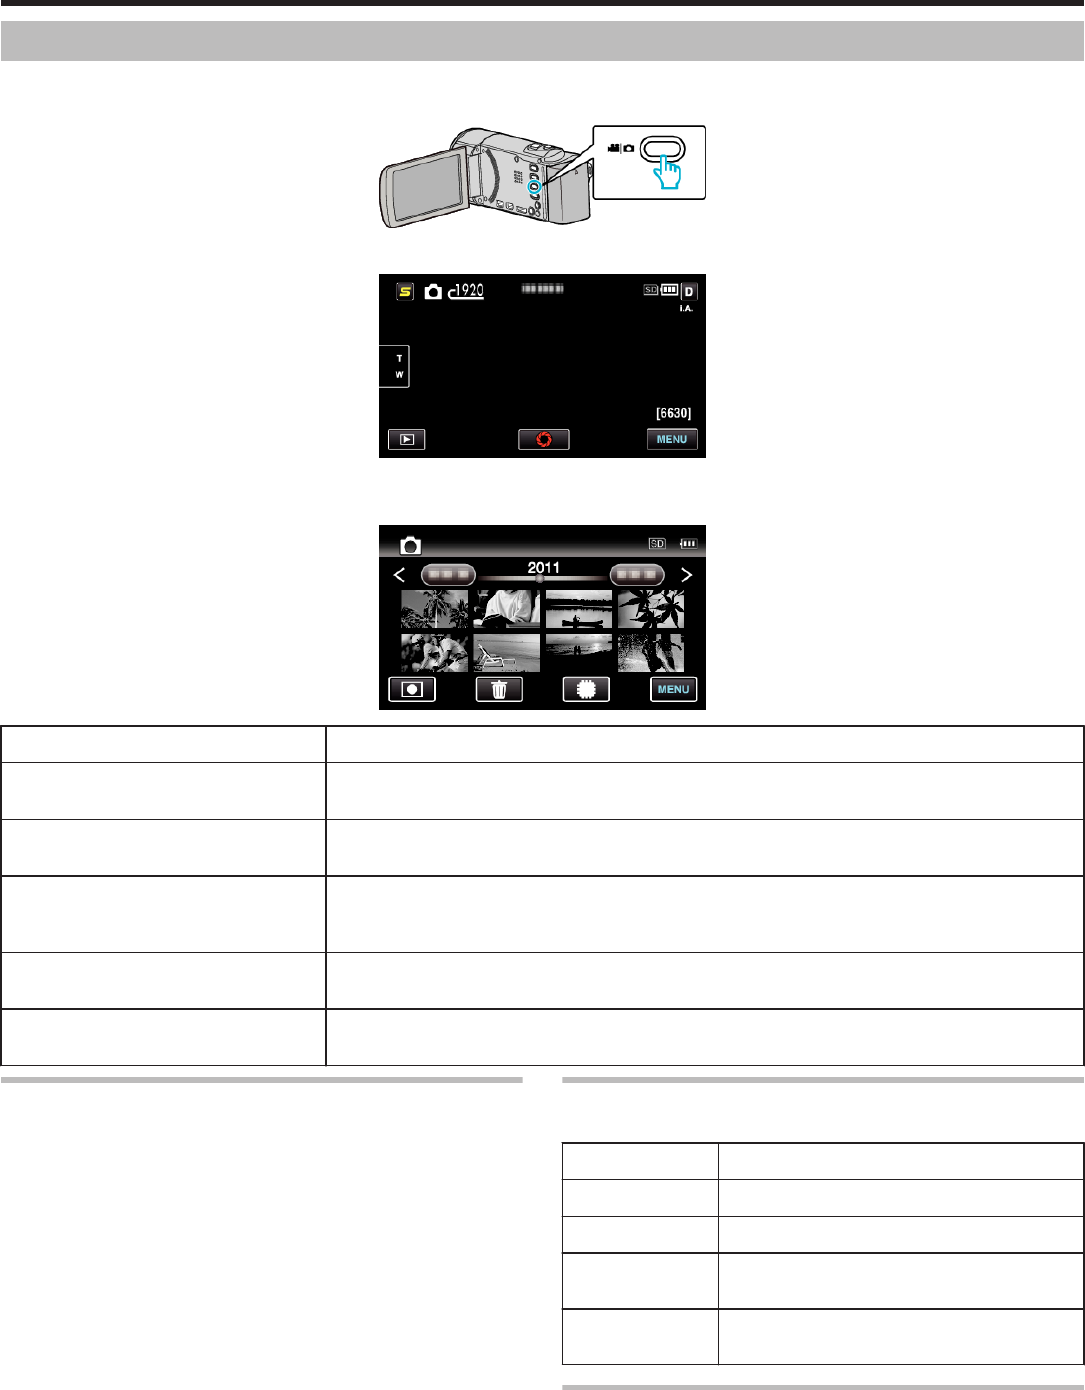
Main Menu for Still Image Playback
You can delete or look for specific still images.
1
Select still image mode.
.
2
Tap L to select the playback mode.
.
0
The mode changes between recording and playback with every tap.
3
Tap “MENU”.
.
Setting
Details
SEARCH DATEYou can search and play videos or still images according to recording dates.
“Date Search” (A p. 54)
SLIDE SHOW EFFECTSSets the transition effects in slideshow playback.
“SLIDE SHOW EFFECTS” (A p. 88)
PROTECT/CANCELProtects files from being deleted accidently.
“Protecting/Releasing Protection of the Currently Displayed File” (A p. 58)
“Protecting/Releasing Protection of Selected Files” (A p. 58)
COPYCopies files to another media.
“Copying Files to an SD Card” (A p. 65)
MOVEMoves files to another media.
“Moving Files to an SD Card” (A p. 66)
SEARCH DATE
Narrows down the still image index screen according to recording dates.
Operating Details
“Date Search” (A p. 54)
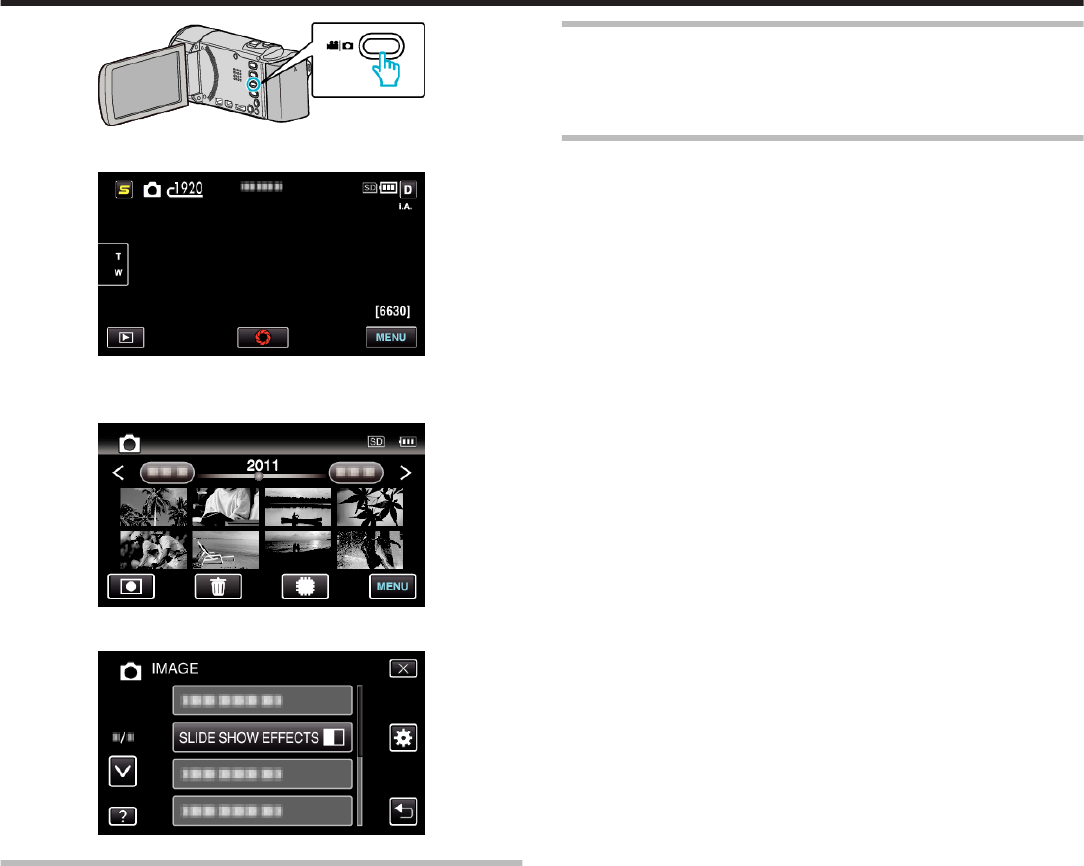
SLIDE SHOW EFFECTS
Sets the transition effects in slideshow playback.
SettingDetails
SLIDESwitches the screen by sliding in from right to left.
BLINDSSwitches the screen by dividing into vertical strips.
CHECKERBOARDSwitches the screen by changing through a
checkered pattern.
RANDOMSwitches the screen with a random effect from
“SLIDE”, “BLINDS”, and “CHECKERBOARD”.
Displaying the Item
1
Select still image mode.
Menu Settings
88
.
2
Tap L to select the playback mode.
.
0
The mode changes between recording and playback with every tap.
3
Tap “MENU”.
.
4
Tap “SLIDE SHOW EFFECTS”.
.
PROTECT/CANCEL
Protects files from being deleted accidently.
Operating Details
“Protecting/Releasing Protection of the Currently Displayed File” (A p. 58)
“Protecting/Releasing Protection of Selected Files” (A p. 58)
COPY
Copies files to another media.
Operating Details
“Copying Files to an SD Card” (A p. 65)
MOVE
Moves files to another media.
Operating Details
“Moving Files to an SD Card” (A p. 66)
Menu Settings
89
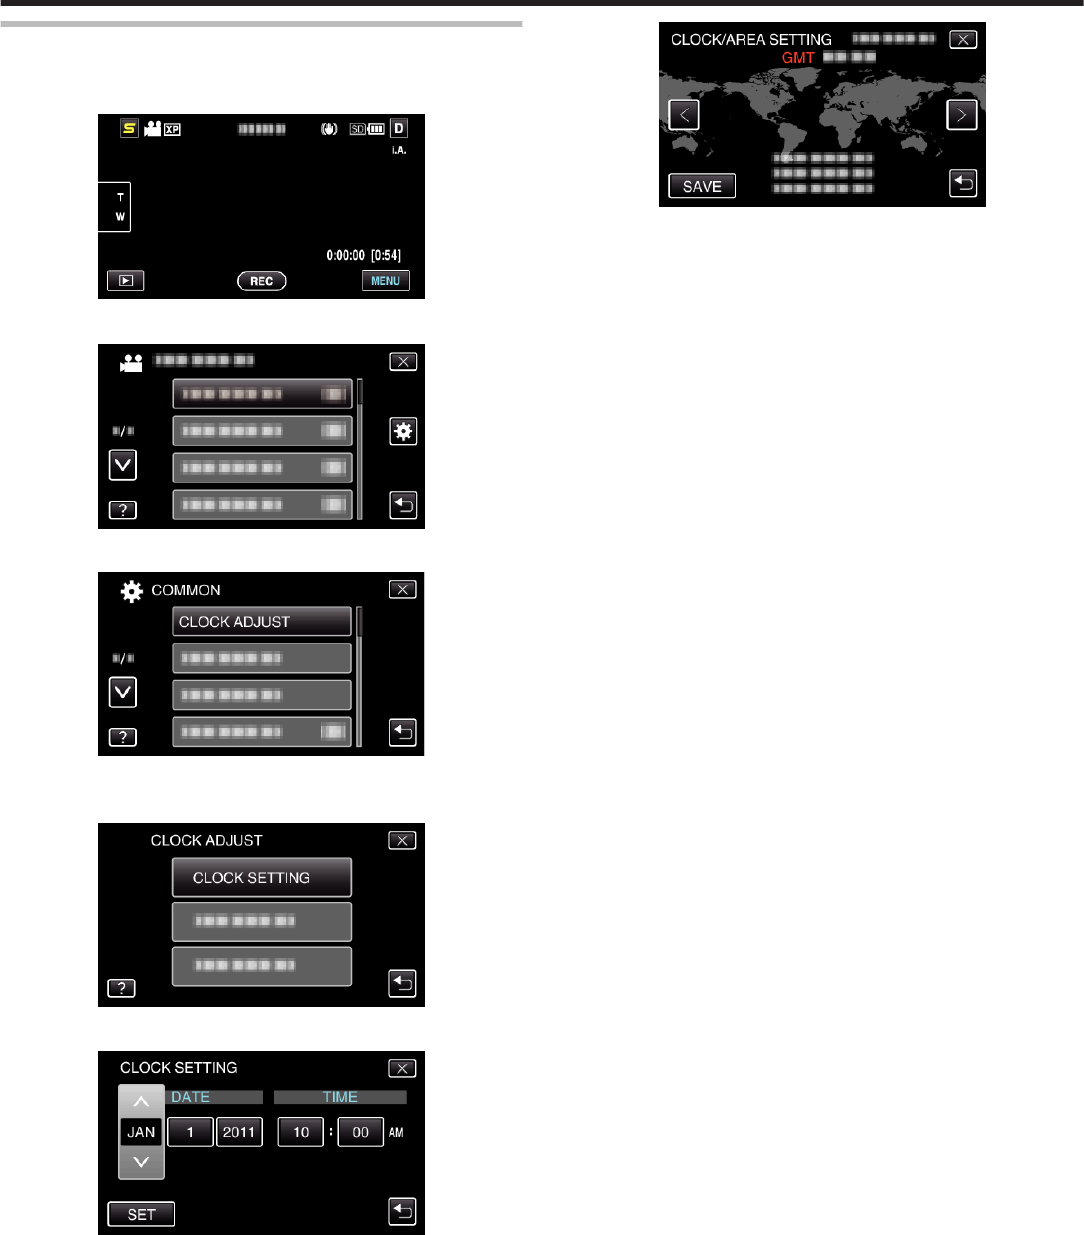
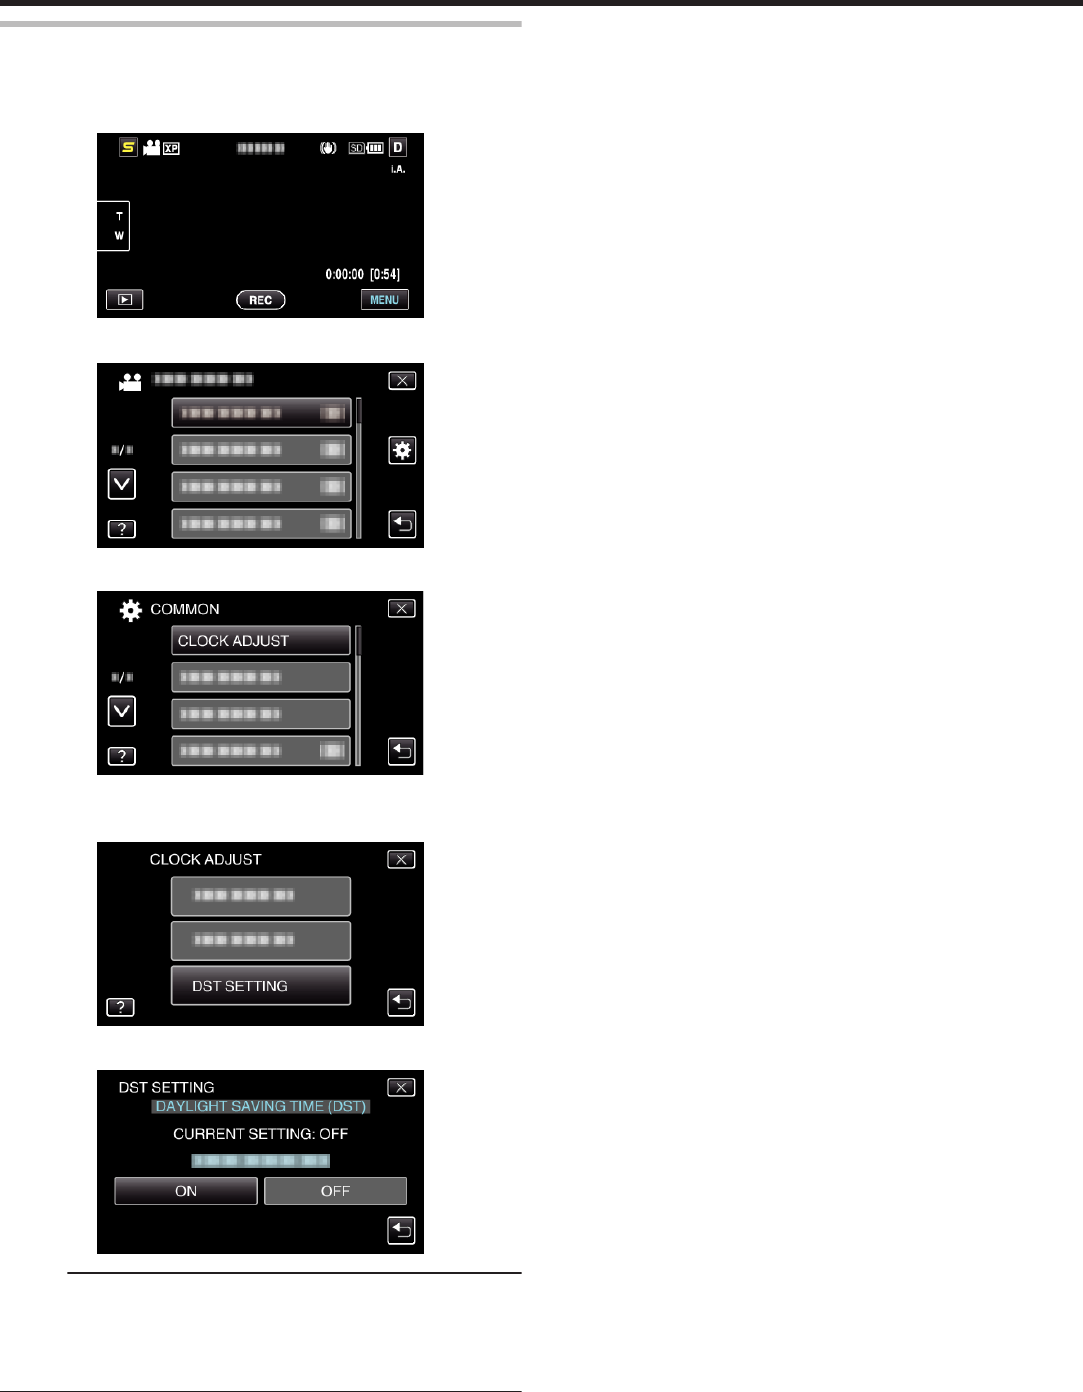
Common Menu
1
Select video or still image mode.
.
2
Tap L to select the playback mode.
.
3
Tap “MENU”.
.
4
Tap “Q”.
.
Setting
Details
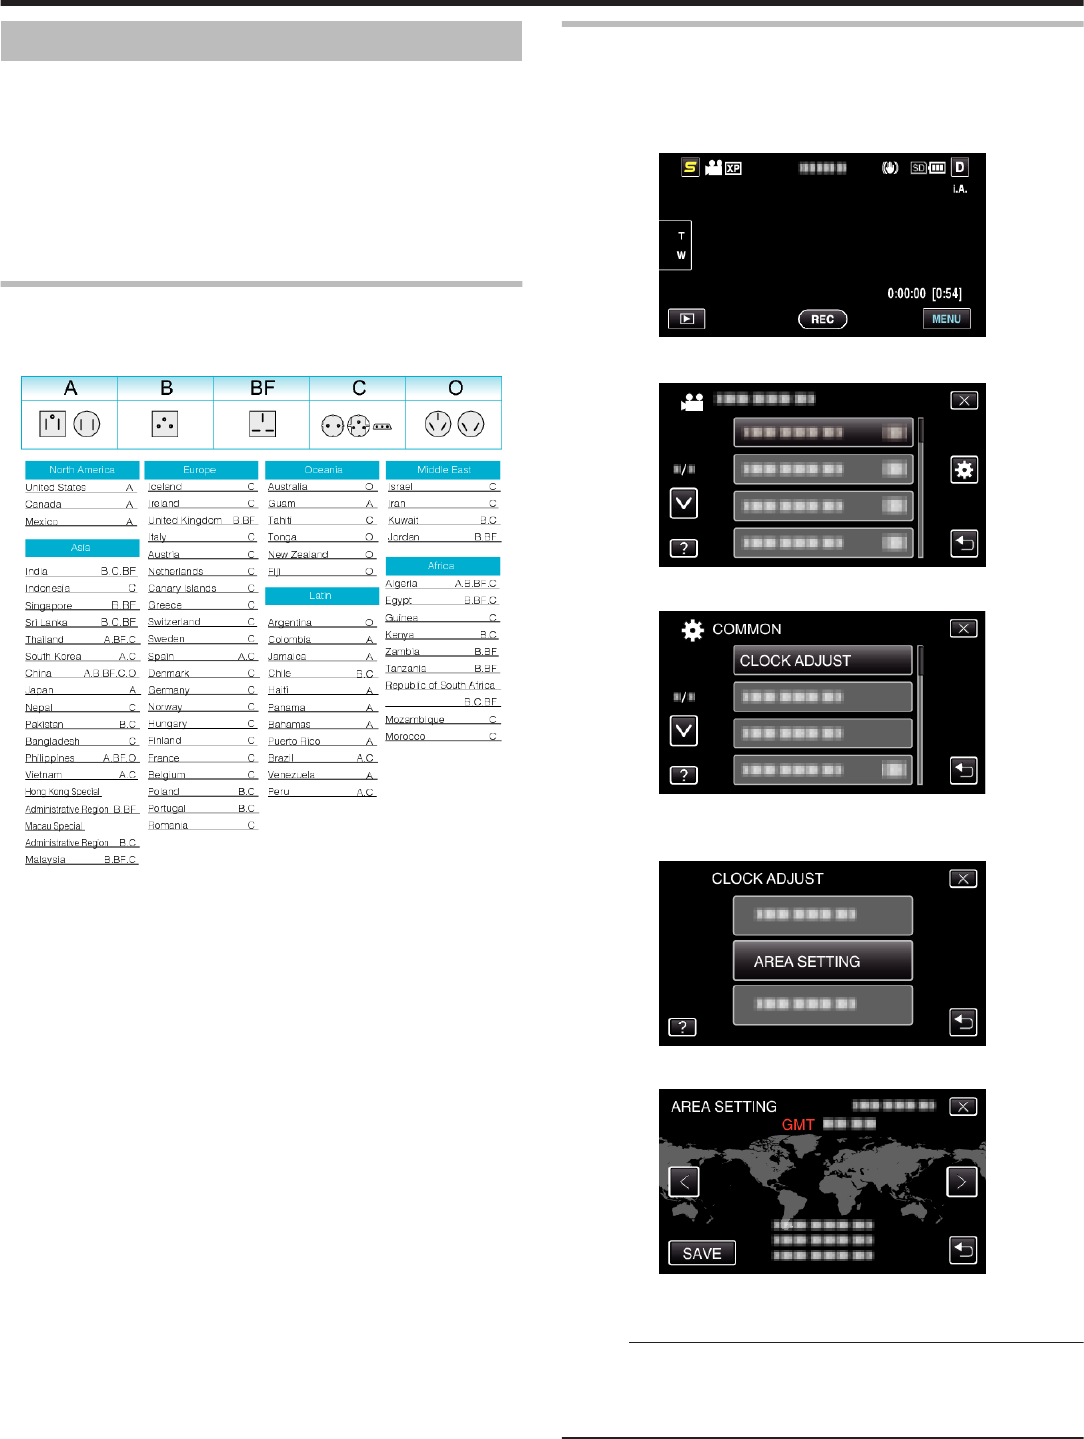
CLOCK ADJUSTResets the current time or sets to the local time when using this unit overseas.
“Clock Setting” (A p. 20)
“Setting the Clock to Local Time when Traveling” (A p. 23)
“Setting Daylight Saving Time” (A p. 24)
DATE DISPLAY STYLESets the order of year, month, day and the time display format (24H/12H).
“DATE DISPLAY STYLE” (A p. 91)
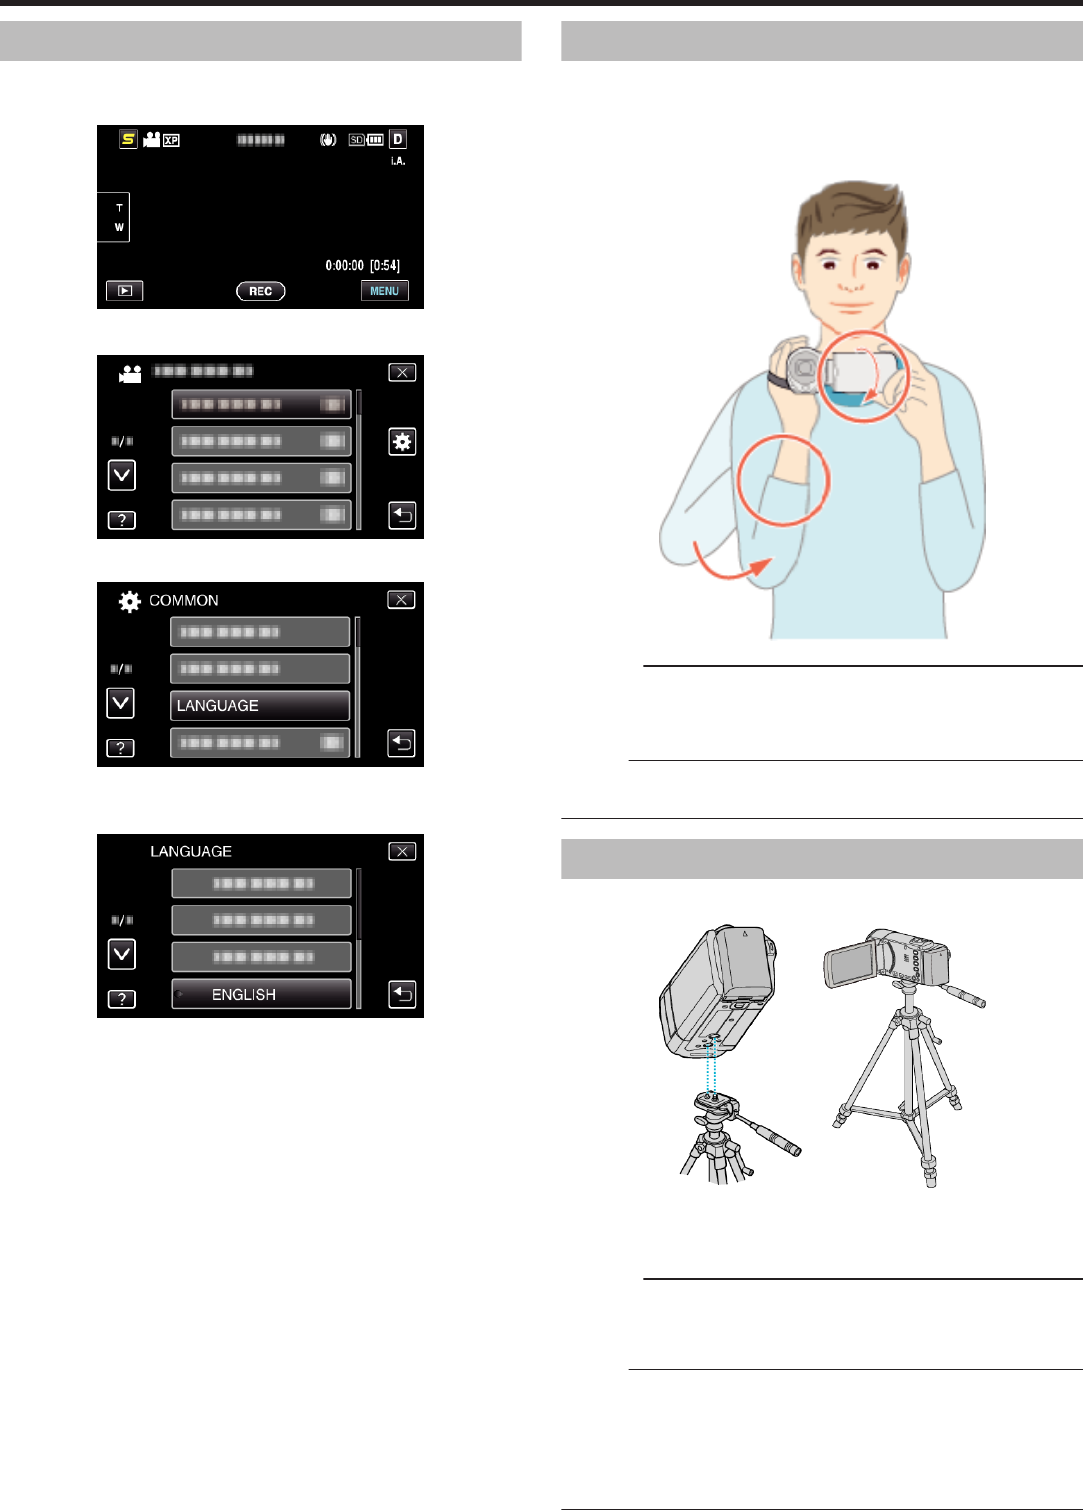
LANGUAGEThe language on the display can be changed.
“Changing the Display Language” (A p. 22)
MONITOR BRIGHTNESSSets the brightness of the LCD monitor.
“MONITOR BRIGHTNESS” (A p. 92)
REC MEDIA FOR VIDEOSets the recording/playback media of videos.
“REC MEDIA FOR VIDEO (GZ-HM450/GZ-HM650/GZ-HM670/GZ-HM690)” (A p. 93)
REC MEDIA FOR IMAGESets the recording/playback media of still images.
“REC MEDIA FOR IMAGE (GZ-HM450/GZ-HM650/GZ-HM670/GZ-HM690)” (A p. 93)
REC VIDEO TO SLOTSSets the recording/playback SD card slot of videos.
“REC VIDEO TO SLOTS (GZ-HM440)” (A p. 94)
REC STILLS TO SLOTSSets the recording/playback SD card slot of still images.
“REC STILLS TO SLOTS (GZ-HM440)” (A p. 94)
OPERATION SOUNDTurns on or off the operation sound.
“OPERATION SOUND” (A p. 95)
Menu Settings
90
AUTO POWER OFFPrevents the situation of forgetting to turn off the power when this is set.
“AUTO POWER OFF” (A p. 95)
QUICK RESTARTReduces the power consumption within 5 minutes after the LCD monitor is closed to 1/3 of that used during
recording.
“QUICK RESTART” (A p. 96)
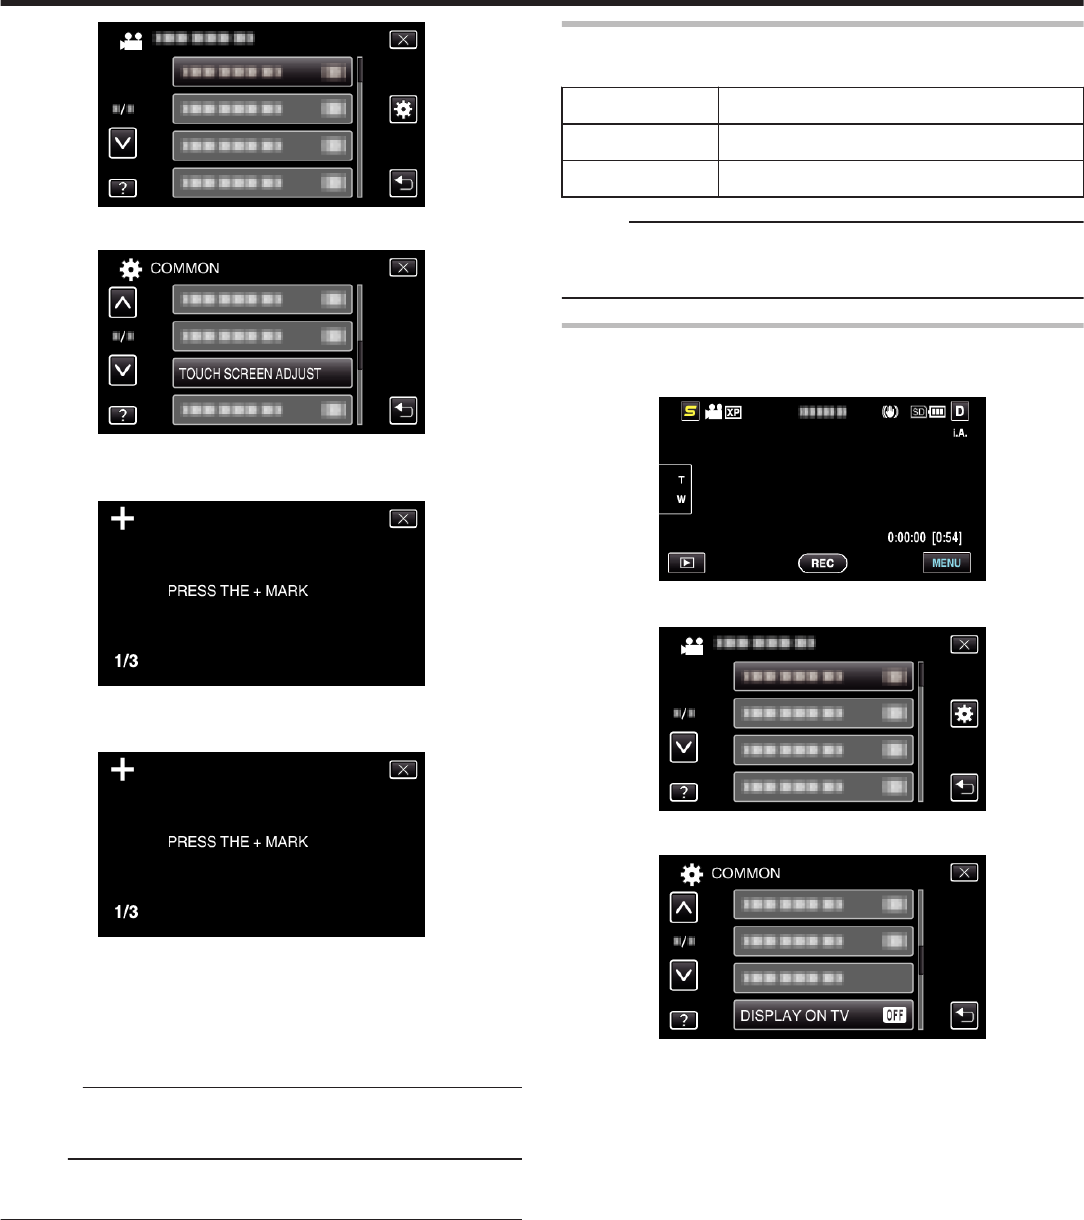
DEMO MODEIntroduces the special features of this unit in digest form.
“DEMO MODE” (A p. 96)
TOUCH SCREEN ADJUSTAdjusts the response position of the buttons on the touch screen.
“TOUCH SCREEN ADJUST” (A p. 96)
DISPLAY ON TVDisplays icons and date/time on a TV screen.
“DISPLAY ON TV” (A p. 97)
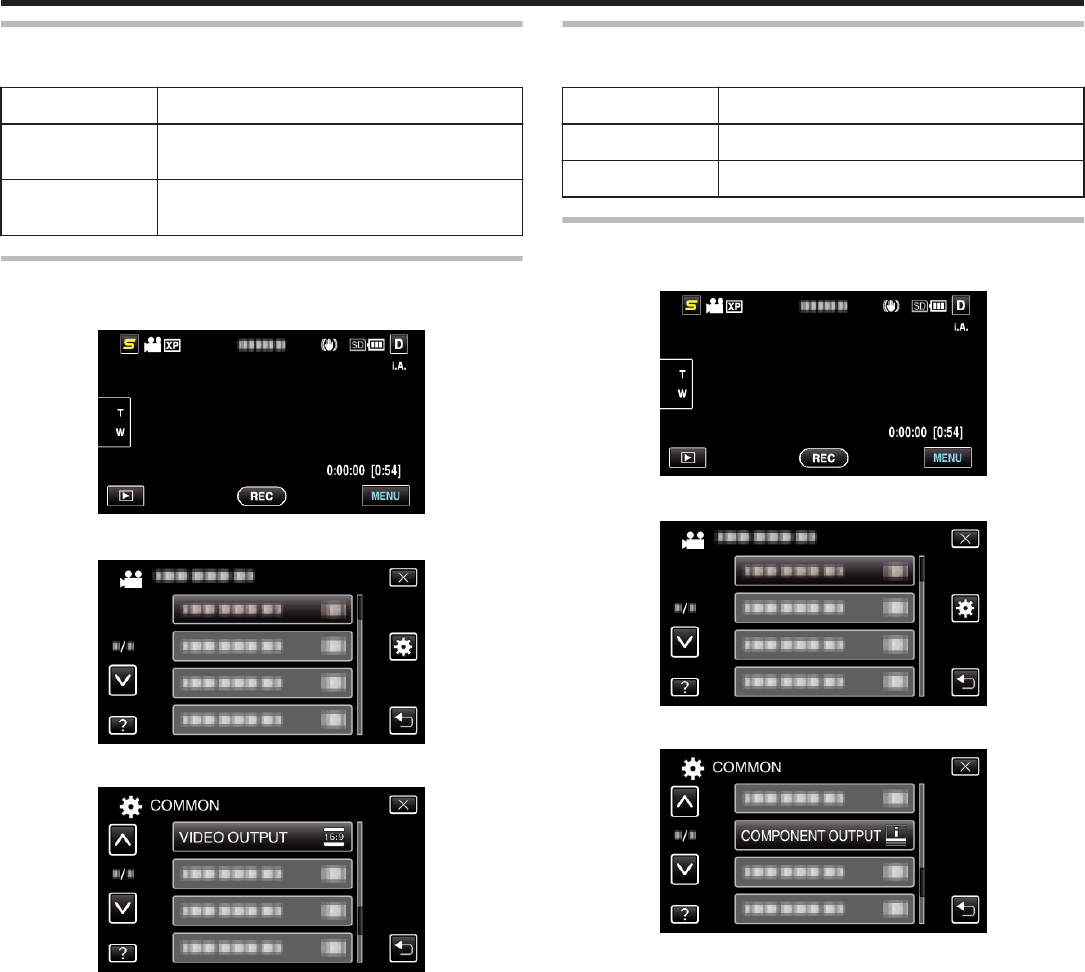
VIDEO OUTPUTSets the aspect ratio (16:9 or 4:3) according to the connecting TV.
“VIDEO OUTPUT” (A p. 98)
COMPONENT OUTPUTSets the definition of the video output from the COMPONENT connector.
“COMPONENT OUTPUT” (A p. 98)
HDMI OUTPUTSets the definition of the video output from the HDMI mini connector.
“HDMI OUTPUT” (A p. 99)
HDMI CONTROLSets the linked operations ON/OFF when the TV and this unit are connected using the HDMI mini connector.
“HDMI CONTROL” (A p. 99)
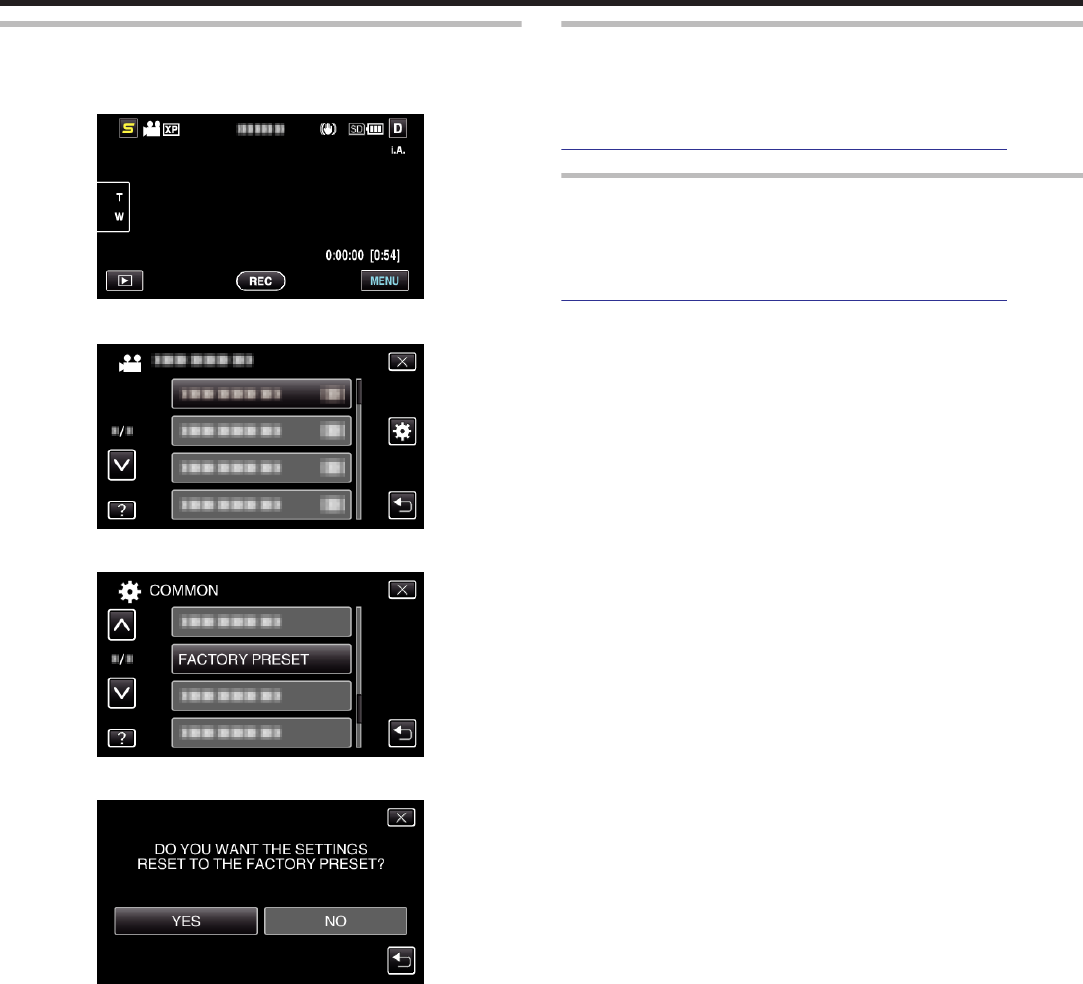
FACTORY PRESETReturns all the settings to their default values.
“FACTORY PRESET” (A p. 100)
UPDATEUpdates the functions of this unit to the latest version.
“UPDATE” (A p. 100)
PC SOFTWARE UPDATEUpdates the built-in PC software of this unit to the latest version.
“PC SOFTWARE UPDATE” (A p. 100)
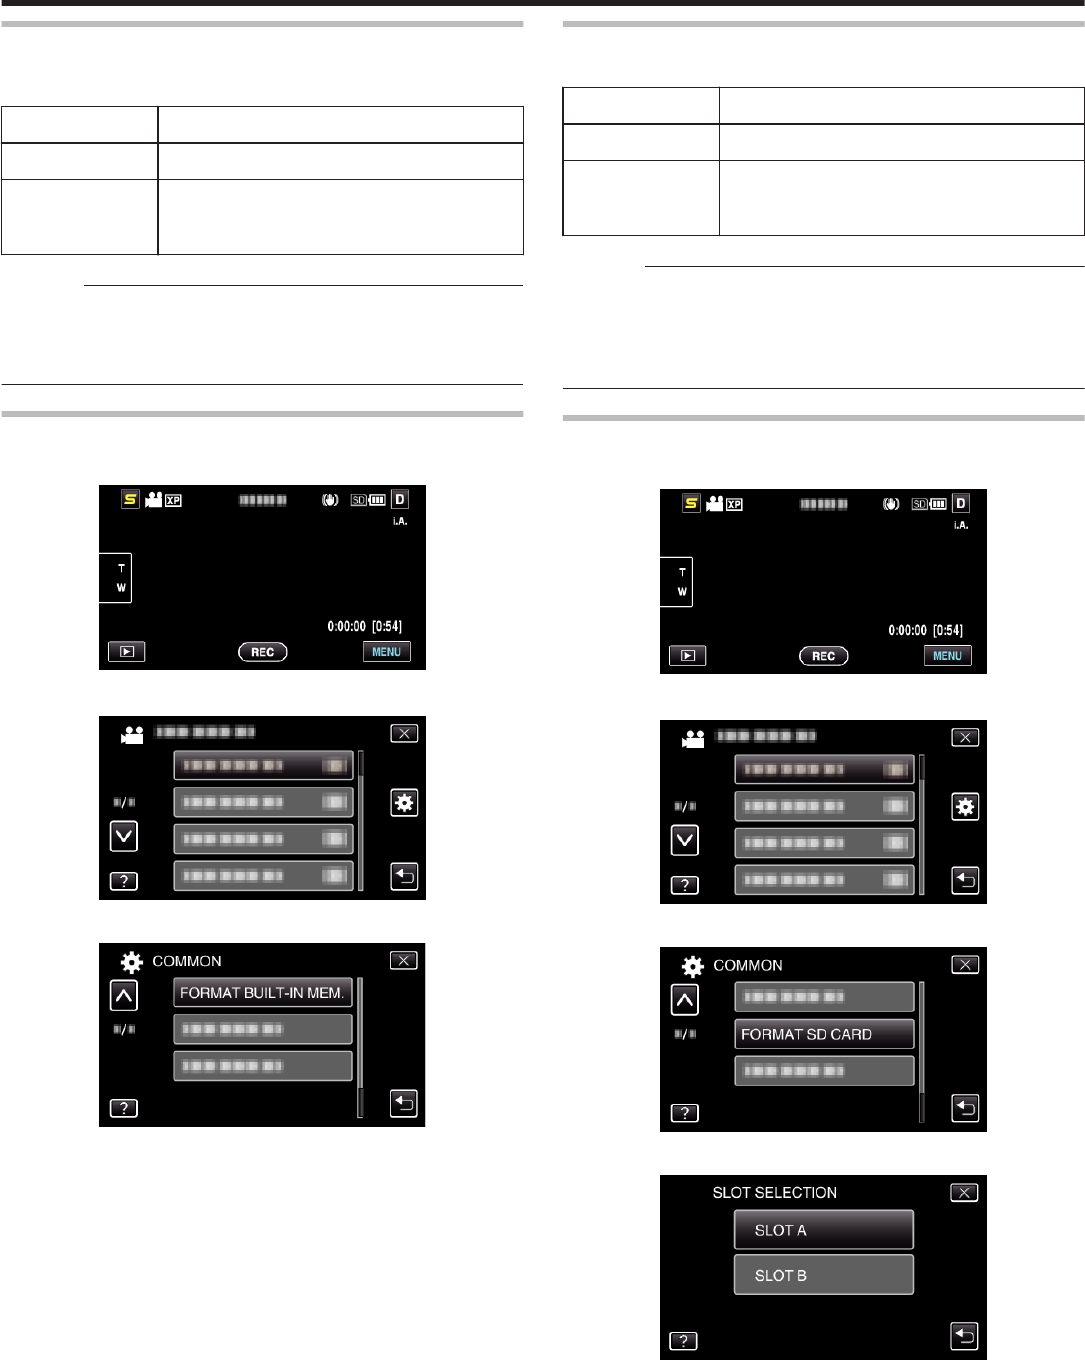
FORMAT BUILT-IN MEM.Deletes all files on the built-in memory.
“FORMAT BUILT-IN MEM. (GZ-HM450/GZ-HM650/GZ-HM670/GZ-HM690)” (A p. 101)
FORMAT SD CARDDeletes all files on the SD card.
“FORMAT SD CARD” (A p. 101)
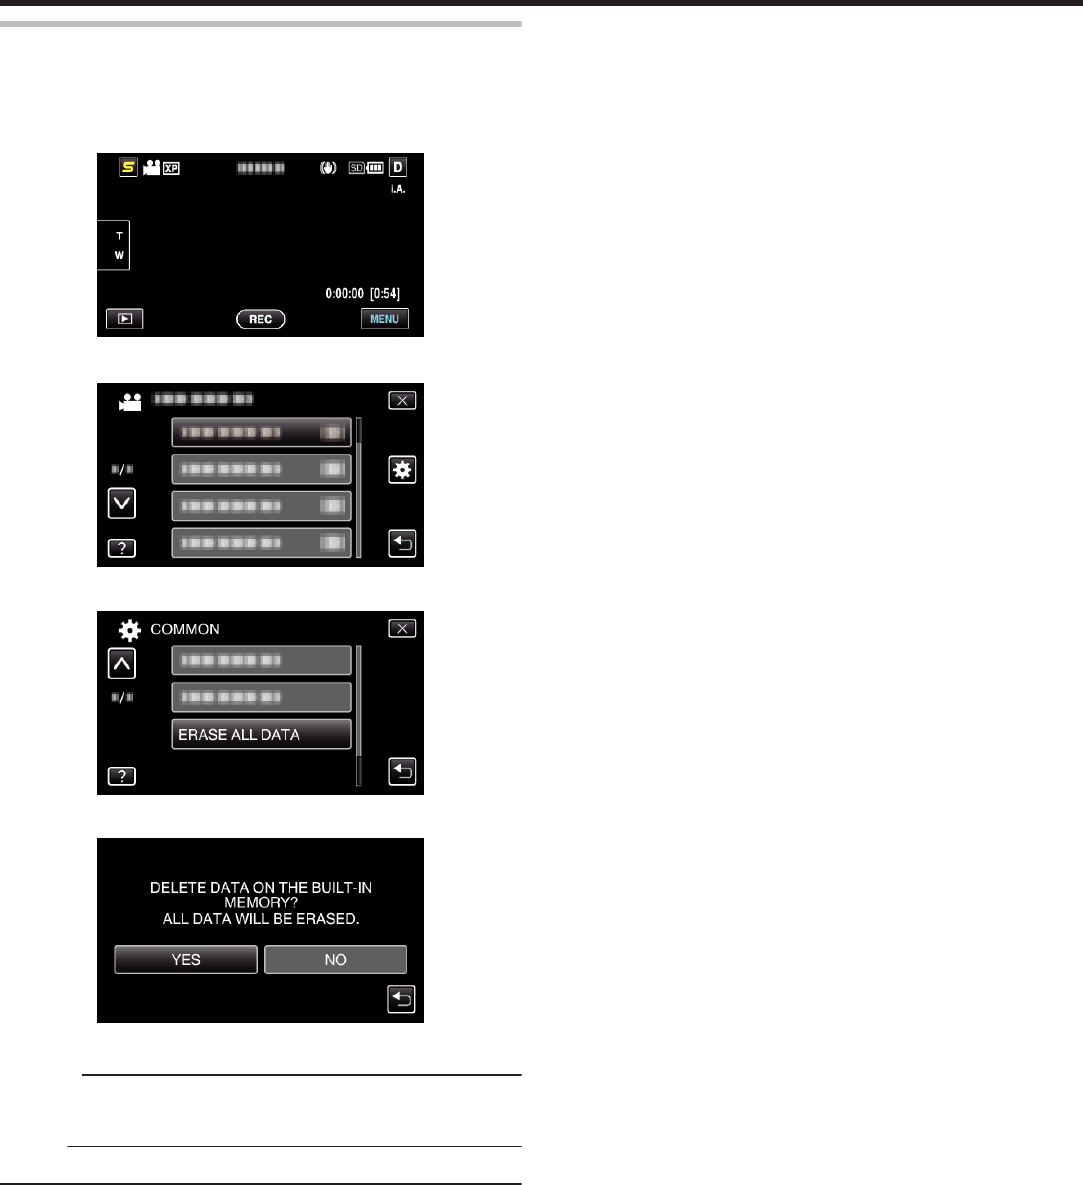
ERASE ALL DATAExecute this process when disposing of this unit or passing it to another person.
“ERASE ALL DATA (GZ-HM450/GZ-HM650/GZ-HM670/GZ-HM690)” (A p. 102)
CLOCK ADJUST
Resets the current time or sets to the local time when using this unit overseas.
Operating Details
“Clock Setting” (A p. 20)
“Setting the Clock to Local Time when Traveling” (A p. 23)
“Setting Daylight Saving Time” (A p. 24)
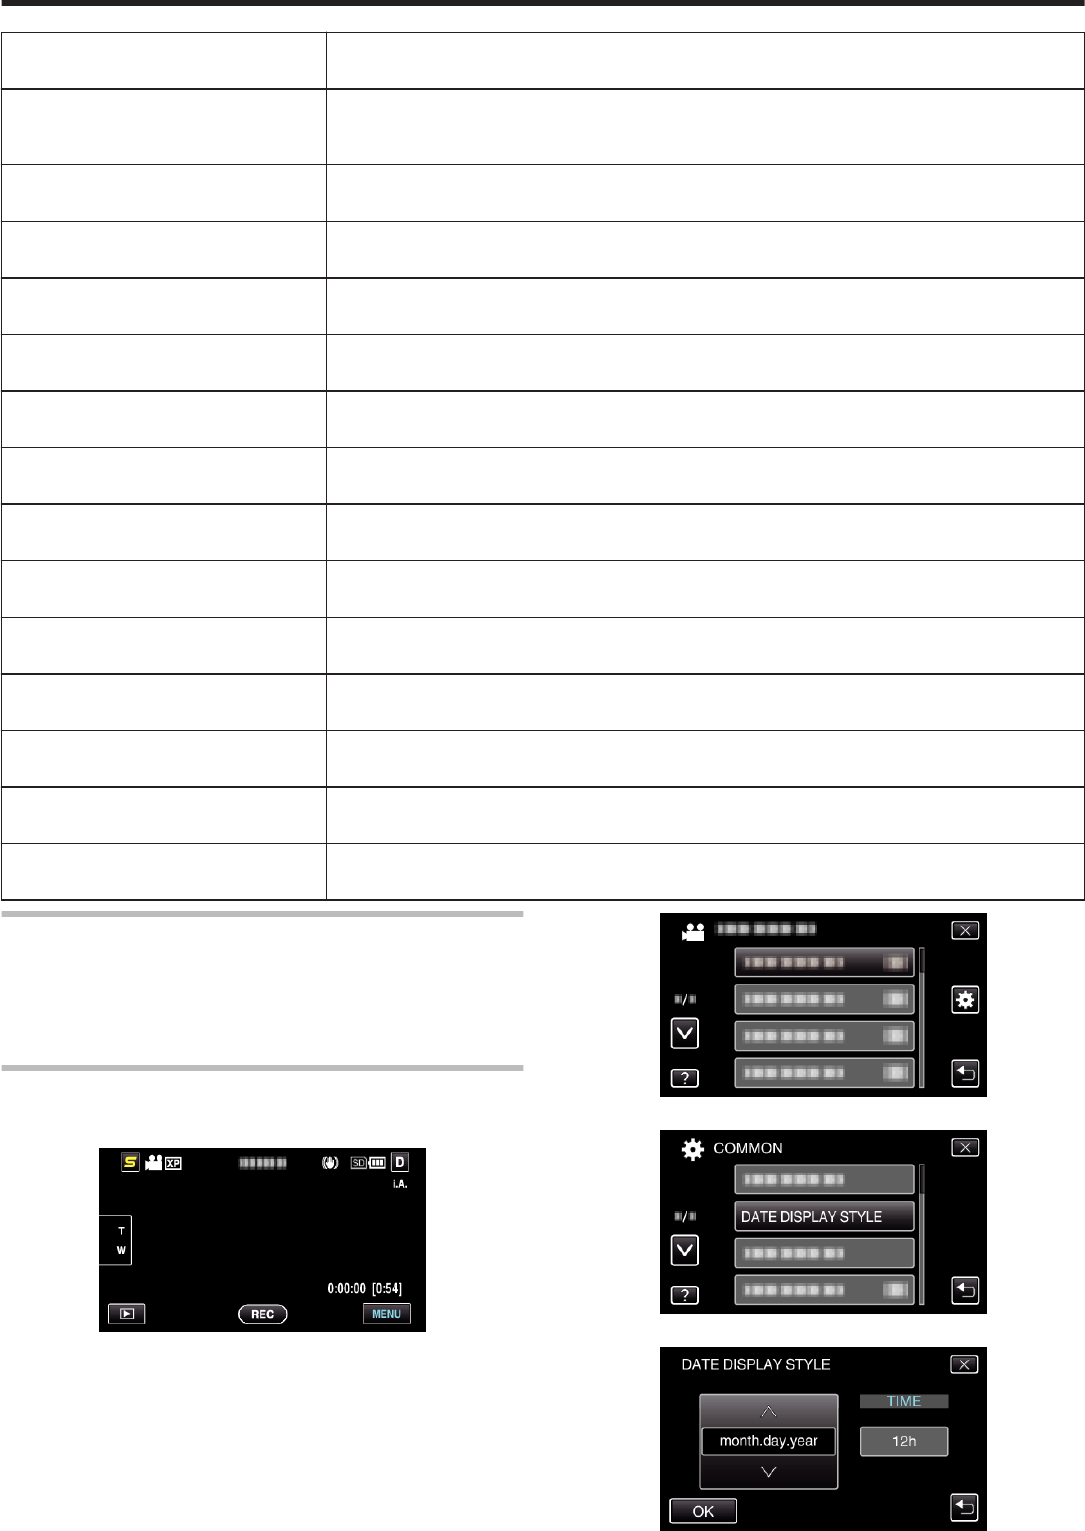
DATE DISPLAY STYLE
Sets the order of year, month, day and the time display format (24H/12H).
1
Tap “MENU”.
.
2
Tap “Q”.
.
3
Tap “DATE DISPLAY STYLE”.
.
4
Tap to set the style of date and time display.
.
Menu Settings
91
0
For date display, set to any format from “month.day.year”,
“year.month.day”, and “day.month.year”.
0
For time display, set to any format from “12h” and “24h”.
0
Tap the operation buttons ∧ or ∨ to move the cursor.
0
After setting, tap “OK”.
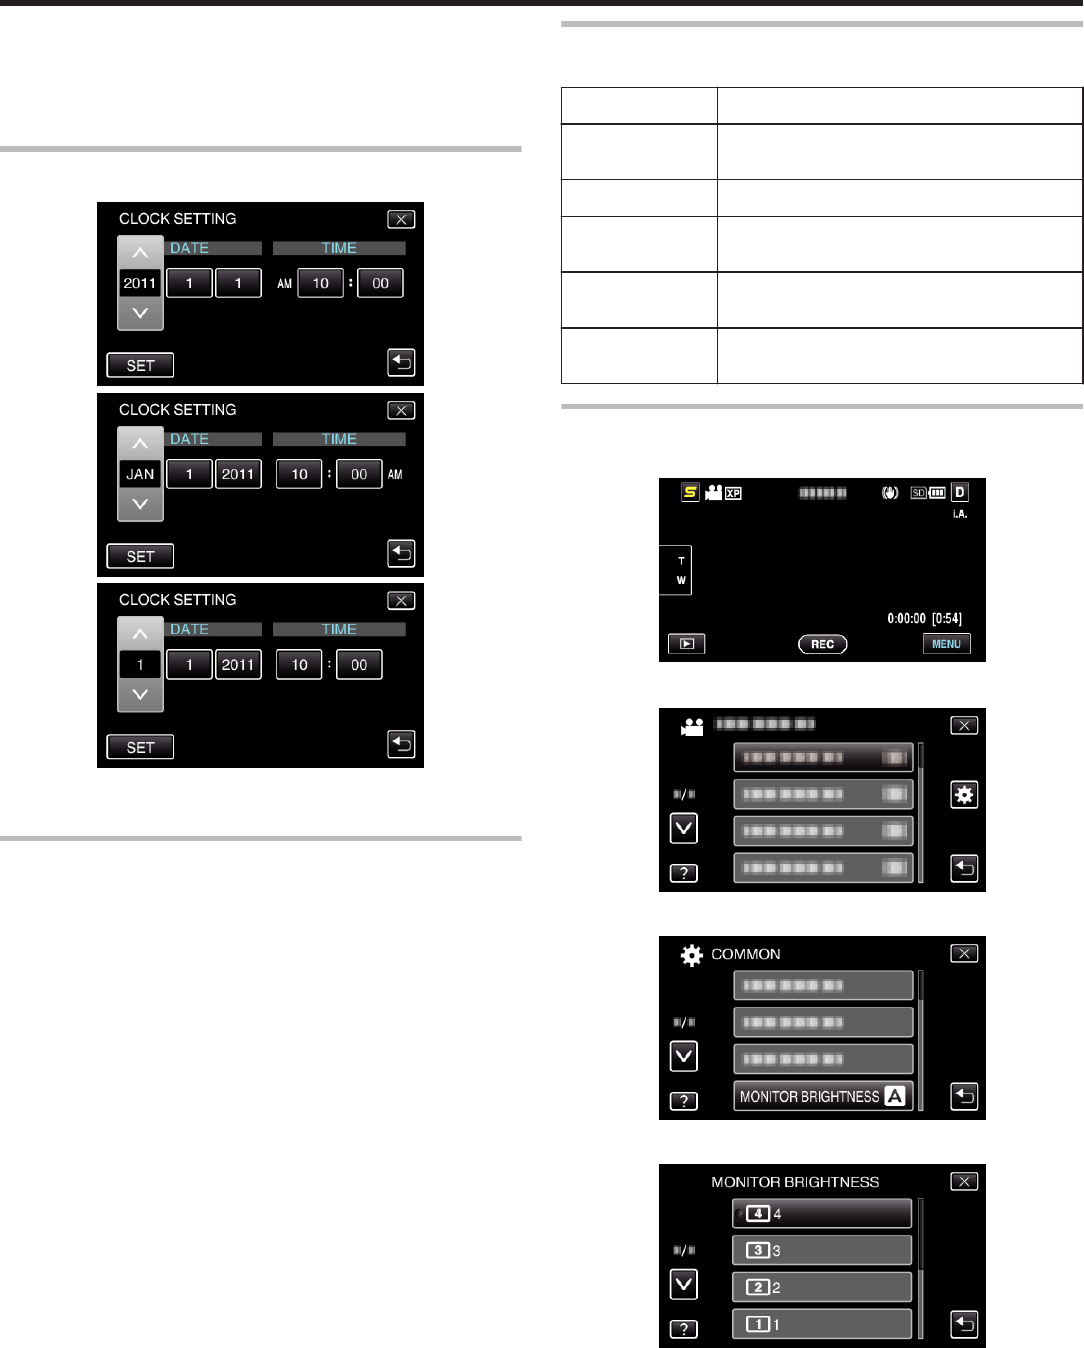
Clock Set Style
The clock set style of this unit varies with the models.
.
.
.
0
The order of "Year, Month, Day, Time" changes according to the date
display style.
LANGUAGE
The language on the display can be changed.
Operating Details
“Changing the Display Language” (A p. 22)
MONITOR BRIGHTNESS
Sets the brightness of the LCD monitor.
SettingDetails
4Brightens the backlight of the monitor regardless
of the surrounding conditions.
3Sets to the standard brightness.
2Darkens the backlight of the monitor regardless of
the surrounding conditions.
1Sets to dim brightness.
Helps to save battery life when selected.
AUTOSets the brightness automatically to “4” when using
outdoors and to “3” when using indoors.
Adjusting Monitor Brightness
1
Tap “MENU”.
.
2
Tap “Q”.
.
3
Tap “MONITOR BRIGHTNESS”.
.
4
Tap the desired monitor brightness.
.
0
By default, “MONITOR BRIGHTNESS” is set to “AUTO”. To adjust
the brightness, tap ∧, then tap a value between “1” to “4”.
0
Tap ∧ or ∨ to move upward or downward for more selection.
Menu Settings
92
REC MEDIA FOR VIDEO (GZ-HM450/GZ-HM650/GZ-HM670/
GZ-HM690)
Sets the recording/playback media of videos.
SettingDetails
BUILT-IN
MEMORY
Records videos to this unit's built-in memory.
SD CARDRecords videos to the SD card.
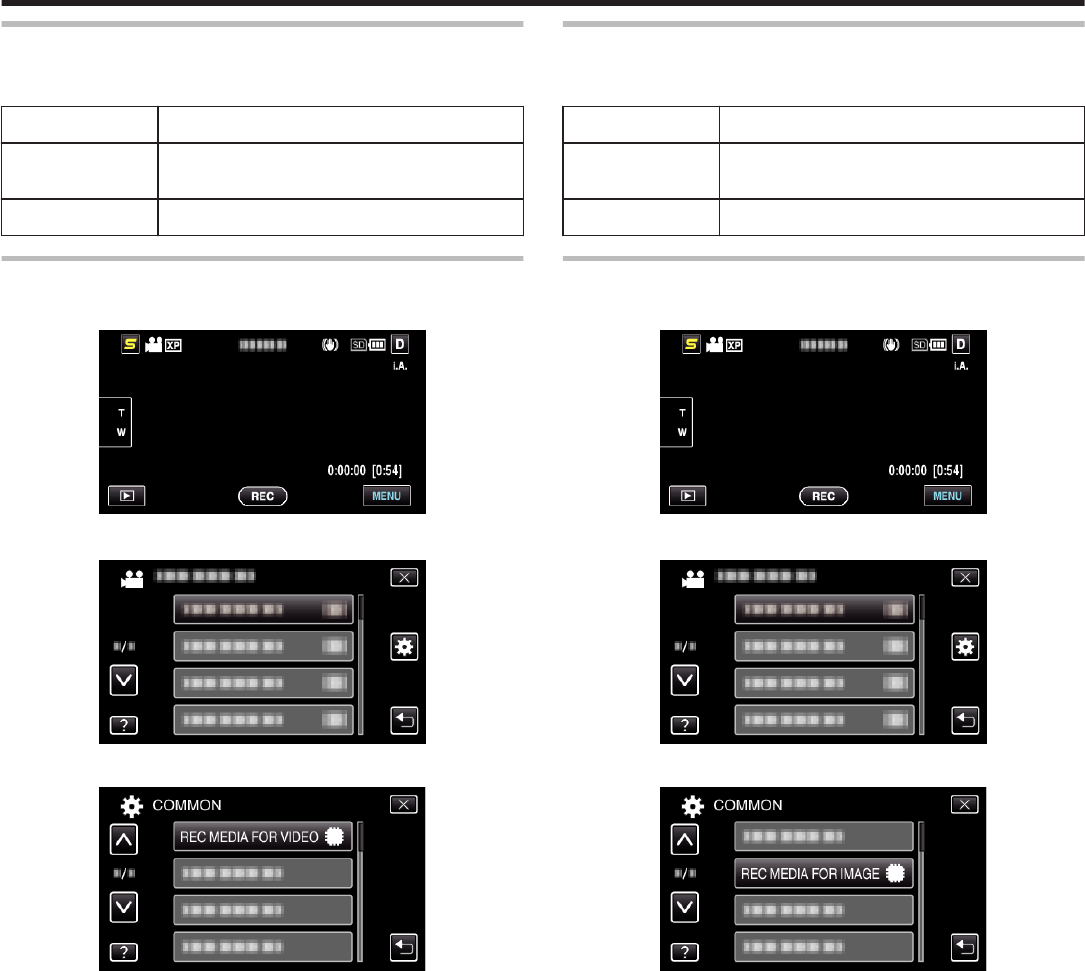
Displaying the Item
1
Tap “MENU”.
.
2
Tap “Q”.
.
3
Tap “REC MEDIA FOR VIDEO”.
.
REC MEDIA FOR IMAGE (GZ-HM450/GZ-HM650/GZ-HM670/
GZ-HM690)
Sets the recording/playback media of still images.
SettingDetails
BUILT-IN
MEMORY
Records still images to this unit's built-in memory.
SD CARDRecords still images to the SD card.
Displaying the Item
1
Tap “MENU”.
.
2
Tap “Q”.
.
3
Tap “REC MEDIA FOR IMAGE”.
.
Menu Settings
93
REC VIDEO TO SLOTS (GZ-HM440)
Sets the recording/playback SD card slot of videos.
SettingDetails
SLOT ARecords videos to the SD card in slot A.
SLOT BRecords videos to the SD card in slot B.
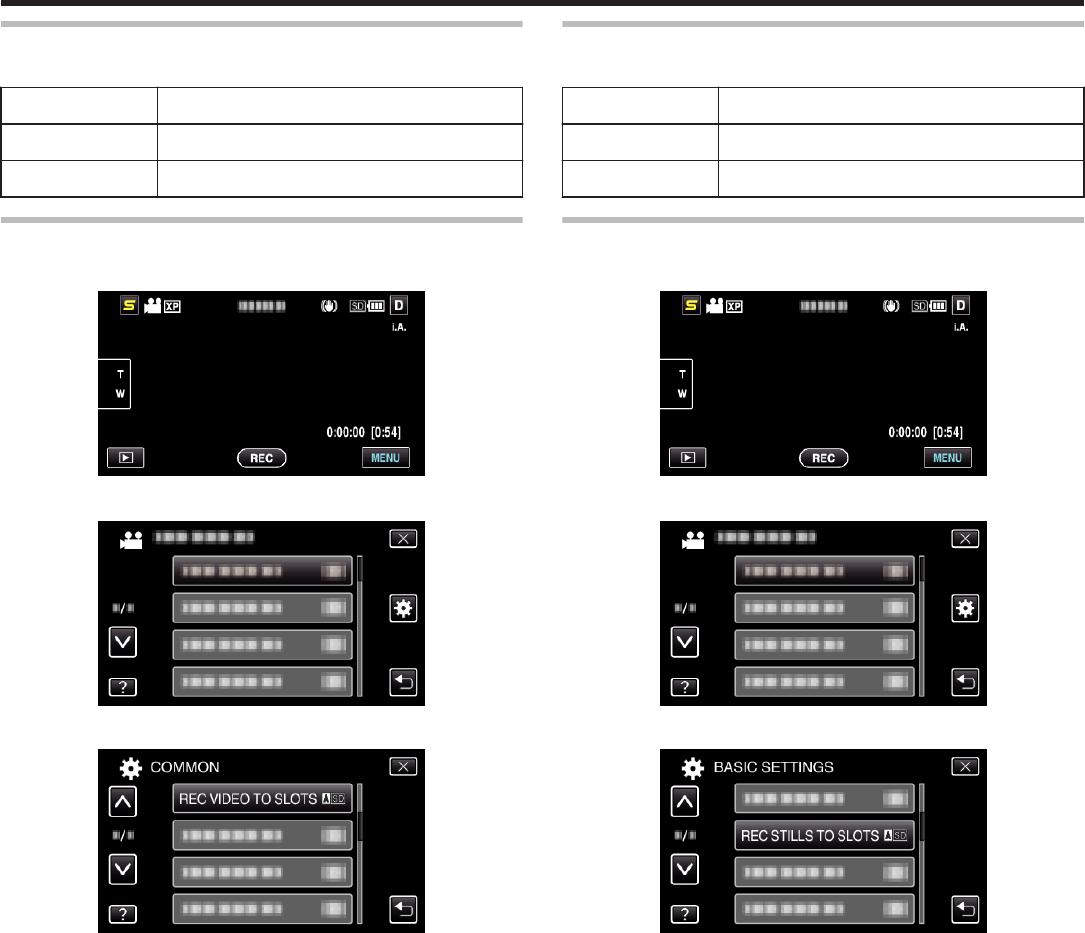
Displaying the Item
1
Tap “MENU”.
.
2
Tap “Q”.
.
3
Tap “REC VIDEO TO SLOTS”.
.
REC STILLS TO SLOTS (GZ-HM440)
Sets the recording/playback SD card slot of still images.
SettingDetails
SLOT ARecords still images to the SD card in slot A.
SLOT BRecords still images to the SD card in slot B.
Displaying the Item
1
Tap “MENU”.
.
2
Tap “Q”.
.
3
Tap “REC STILLS TO SLOTS”.
.
Menu Settings
94
OPERATION SOUND
Turns on or off the operation sound.
SettingDetails
OFFTurns off the operation sound.
ONTurns on the operation sound.
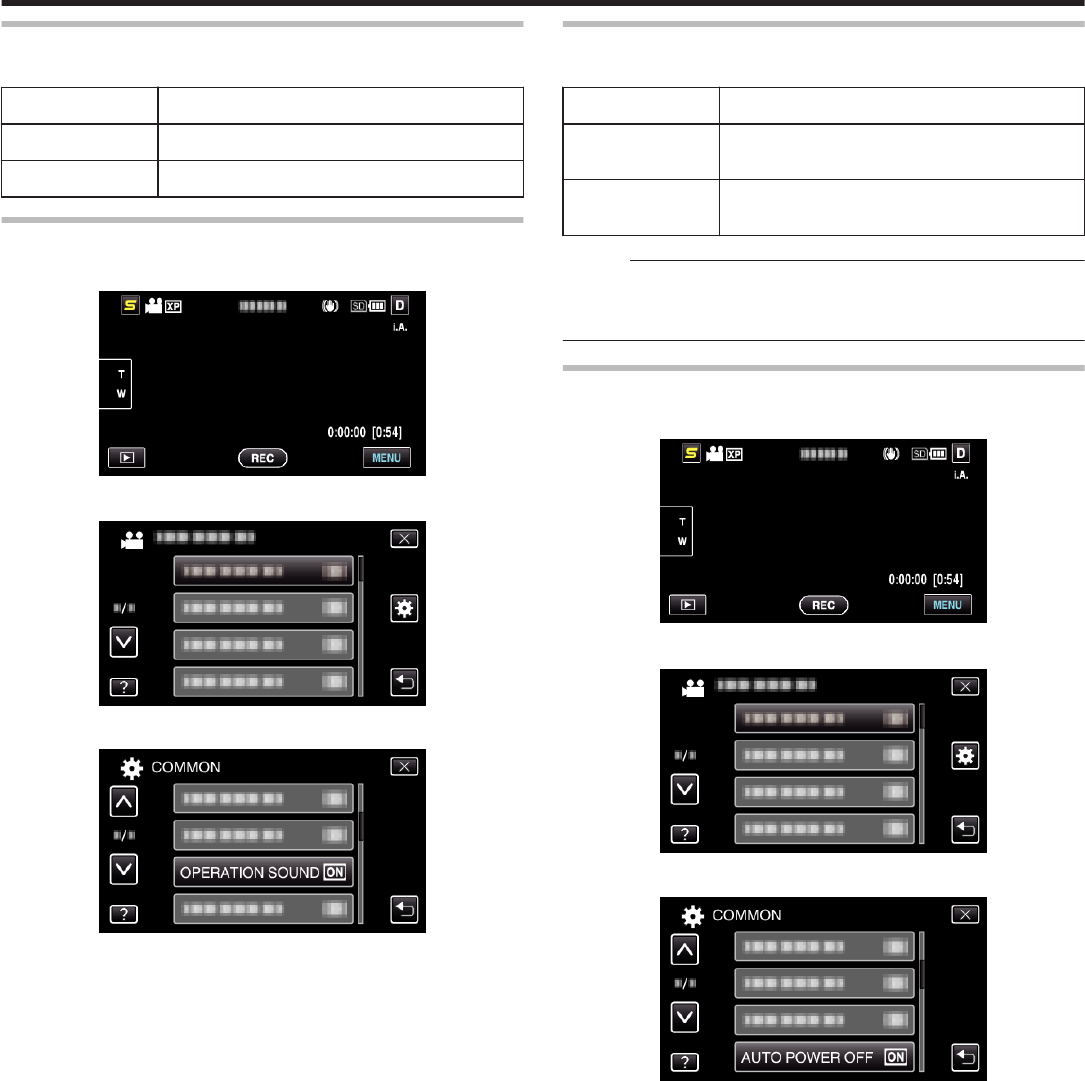
Displaying the Item
1
Tap “MENU”.
.
2
Tap “Q”.
.
3
Tap “OPERATION SOUND”.
.
AUTO POWER OFF
Prevents the situation of forgetting to turn off the power when this is set.
SettingDetails
OFFPower is not turned off even if this unit is not
operated for 5 minutes.
ONTurns off the power automatically if this unit is not
operated for 5 minutes.
Memo :
0
When using battery, power is turned off automatically if this unit is not
operated for 5 minutes.
0
When using the AC adapter, this unit goes into standby mode.
Displaying the Item
1
Tap “MENU”.
.
2
Tap “Q”.
.
3
Tap “AUTO POWER OFF”.
.
Menu Settings
95
QUICK RESTART
Enables the power to turn on quickly when the LCD monitor is opened again
within 5 minutes.
SettingDetails
OFFDeactivates the function.
ONEnables the power to turn on quickly when the LCD
monitor is opened again within 5 minutes.
Memo :
0
The power consumption within 5 minutes after the LCD monitor is closed
is reduced.
Displaying the Item
1
Tap “MENU”.
.
2
Tap “Q”.
.
3
Tap “QUICK RESTART”.
.
0
The power consumption within 5 minutes after the LCD monitor is
closed is reduced.
DEMO MODE
Plays a demonstration of the special features of this unit.
SettingDetails
OFFDeactivates the function.
ONPlays a demonstration of the special features of
this unit.
Displaying Demo Mode
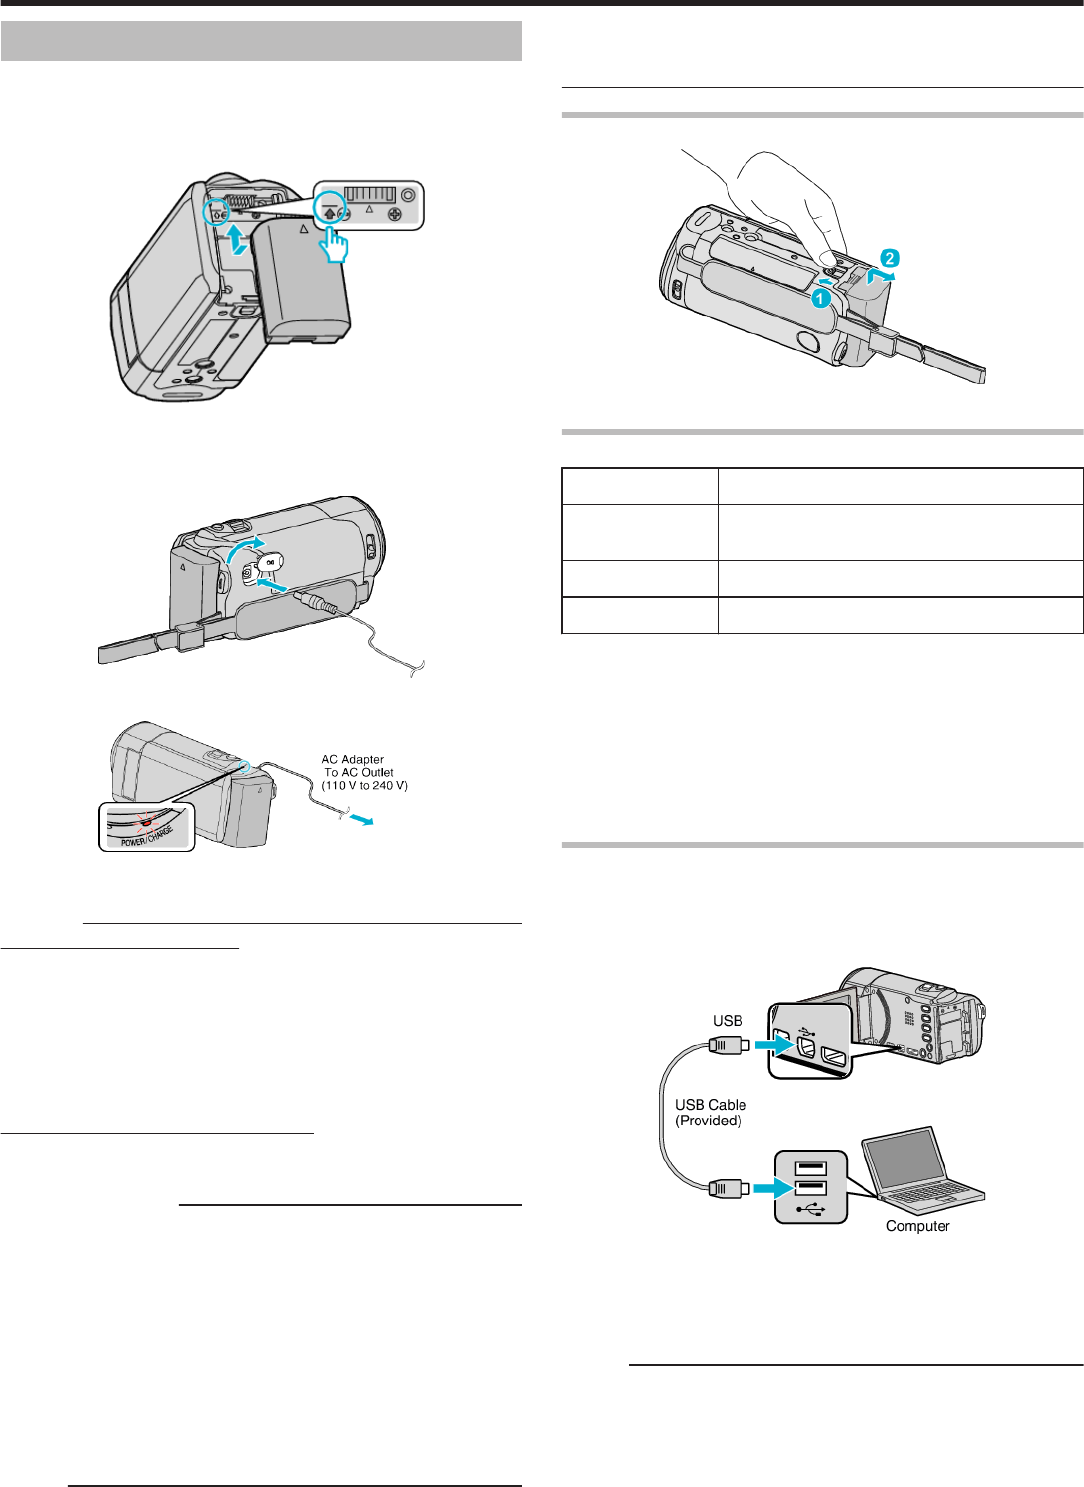
A Remove the battery pack and SD card.
B Connect the AC adapter.
C Open the LCD monitor and turn on the power.
0
Demonstration starts playing after 3 minutes.
0
To stop playback, tap on the screen.
Memo :
0
This mode is not available in the playback mode.
Displaying the Item
1
Tap “MENU”.
.
2
Tap “Q”.
.
3
Tap “DEMO MODE”.
.
TOUCH SCREEN ADJUST
Adjusts the response position of the buttons on the touch screen.
1
Tap “MENU”.
.
2
Tap “Q”.
Menu Settings
96
.
3
Tap “TOUCH SCREEN ADJUST”.
.
0
The touch screen adjustment screen appears.
4
Tap “+”. (3 times in total)
.
0
Keep tapping “+” as its position changes with every tap.
5
Tap “+” again to confirm the adjusted positions. (3 times in total)
.
0
Keep tapping “+” as its position changes with every tap.
0
If areas on the adjustment screen other than the “+” mark are tapped,
errors will occur. In this case, try again from step 4.
6
Tap “OK”.
0
Setting ends and returns to the menu screen.
Caution :
0
Do not tap areas other than the “+” mark during touch screen adjustment
(steps 4 - 5). Doing so may cause the touch screen to malfunction.
Memo :
0
Adjust by lightly tapping with a corner of an SD card, etc.
0
Do not press with an object with a sharp tip or do not press hard.
DISPLAY ON TV
Displays icons and date/time on a TV screen.
SettingDetails
OFFDoes not display icons and date/time on TV.
ONDisplays icons and date/time on TV.
Memo :
0
If connected to a TV via the HDMI connector, buttons (icons) and date/
time will not be displayed on the TV during video playback even if set to
“ON”.
Displaying the Item
1
Tap “MENU”.
.
2
Tap “Q”.
.
3
Tap “DISPLAY ON TV”.
.
Menu Settings
97
VIDEO OUTPUT
Sets the aspect ratio (16:9 or 4:3) according to the connecting TV.
SettingDetails
4:3Select this when connecting to a conventional TV
(4:3).
16:9Select this when connecting to a widescreen TV
(16:9).
Displaying the Item
1
Tap “MENU”.
.
2
Tap “Q”.
.
3
Tap “VIDEO OUTPUT”.
.
COMPONENT OUTPUT
Sets the definition of the video output from the COMPONENT connector.
SettingDetails
480iOutputs at 480i.
1080iOutputs at 1080i.
Displaying the Item
1
Tap “MENU”.
.
2
Tap “Q”.
.
3
Tap “COMPONENT OUTPUT”.
.
Menu Settings
98
HDMI OUTPUT
Sets the output from the HDMI connector of this unit when it is connected to
a TV.
SettingDetails
AUTOIt is recommended to select “AUTO” usually.
480pSelect this when the video is not output in “AUTO”
correctly.
Displaying the Item
1
Tap “MENU”.
.
2
Tap “Q”.
.
3
Tap “HDMI OUTPUT”.
.
HDMI CONTROL
Sets whether to link operations with an HDMI-CEC compliant TV.
SettingDetails
OFFTurns off linked operations.
ONTurns on linked operations.
Displaying the Item
1
Tap “MENU”.
.
2
Tap “Q”.
.
3
Tap “HDMI CONTROL”.
.
Menu Settings
99
FACTORY PRESET
Returns all the settings to their default values.
1
Tap “MENU”.
.
2
Tap “Q”.
.
3
Tap “FACTORY PRESET”.
.
4
Tap “YES”.
.
0
All settings return to their default values.
UPDATE
Updates the functions of this unit to the latest version.
For details, refer to the JVC homepage.
(When no program to update the software of this unit is available, nothing
Remove the AC adapter and battery pack, then remove and re-insert the SD
card.
Remove any dirt from the SD card terminals.
If the above does not solve the problem, back up your files and execute
“FORMAT SD CARD” in the “COMMON” menu. (All data will be deleted.)
“FORMAT SD CARD” (A p. 101)
NOT FORMATTED
Select “OK”, then select “YES” on the “DO YOU WANT TO FORMAT?”
screen.
RECORDING FAILURE
Turn off and on this unit again.
CANNOT TAKE MORE STILL IMAGES AT THE MOMENT
Stop video recording before taking still images. (If the SD card is removed
and inserted during video recording, still images cannot be recorded.)
PLAYBACK FAILED
Remove and re-insert the SD card.
“Inserting an SD Card (GZ-HM450/GZ-HM650/GZ-HM670/GZ-HM690)”
(A p. 15)
Remove any dirt from the SD card terminals.
Insert the SD card before turning on the power.
Do not subject this unit to any strong impact or vibration.
VIDEO MANAGEMENT FILE IS DAMAGED, RECOVERY IS
REQUIRED TO RECORD/PLAYBACK, RECOVER?
Select “OK” to restore. (Videos that cannot be restored will not be displayed
on the index screen, but you may be able to play them back using
“PLAYBACK OTHER FILE” in the menu.)
“Playing a Video with Defective Management Information” (A p. 52)
UNSUPPORTED FILE!
Use files recorded with this unit. (Files recorded with other devices may not
be playable.)
UNSUPPORTED SCENE!
Use files recorded with this unit. (Files recorded with other devices may not
be playable.)
THIS FILE IS PROTECTED
Switch off the “PROTECT/CANCEL” function in the “EDIT” menu.
“Protecting Files” (A p. 58)
CHECK CARD'S WRITE PROTECTION SWITCH
Set the write protect switch of the SD card to off.
INSUFFICIENT AVAILABLE SPACE
Delete files, or move files to a computer or other devices.
Replace the SD card with a new one.
Seamless videos cannot be combined if there is not enough free space in
the built-in memory or SD card. Check the amount of remaining free space
before combining.
MAXIMUM QUANTITY RECORDING FOLDERS/ FILES HAS
BEEN REACHED
A Move the files or folders to a computer or other device. (Back up your
files.)
B Select “FILE + MANAGEMENT NO” in “FORMAT BUILT-IN MEM.” or
“FORMAT SD CARD” of the media settings menu. (All data on the built-in
memory or SD card will be deleted.)
SCENE QUANTITY EXCEEDED LIMIT
A Move the files or folders to a computer or other device. (Back up your
files.)
B Select “FILE + MANAGEMENT NO” in “FORMAT BUILT-IN MEM.” or
“FORMAT SD CARD” of the media settings menu. (All data on the built-in
memory or SD card will be deleted.)
NUMBER OF FOLDERS OVERFLOW
A Move the files or folders to a computer or other device. (Back up your
files.)
B Select “FILE + MANAGEMENT NO” in “FORMAT BUILT-IN MEM.” or
“FORMAT SD CARD” of the media settings menu. (All data on the built-in
memory or SD card will be deleted.)
FILE QUANTITY LIMIT EXCEEDED
A Move the files or folders to a computer or other device. (Back up your
files.)
B Select “FILE + MANAGEMENT NO” in “FORMAT BUILT-IN MEM.” or
“FORMAT SD CARD” of the media settings menu. (All data on the built-in
memory or SD card will be deleted.)
CAMERA TEMPERATURE IS TOO COLD KEEP CAMERA
POWER ON PLEASE WAIT
Leave this unit turned on for a while.
If the warning still does not disappear, turn off the power and move the unit
to a warm place while taking care to avoid a sudden temperature change.
Turn on the power again after a while.
Troubleshooting
113
NO FILES
Change the setting of “REC MEDIA FOR IMAGE”, “REC MEDIA FOR
VIDEO”, “REC VIDEO TO SLOTS”, or “REC STILLS TO SLOTS” in the
“COMMON” menu, and check that files are not recorded to the other media.
“REC MEDIA FOR VIDEO (GZ-HM450/GZ-HM650/GZ-HM670/GZ-
HM690)” (A p. 93)
“REC MEDIA FOR IMAGE (GZ-HM450/GZ-HM650/GZ-HM670/GZ-
HM690)” (A p. 93)
“REC VIDEO TO SLOTS (GZ-HM440)” (A p. 94)
“REC STILLS TO SLOTS (GZ-HM440)” (A p. 94)
RECORDING CANCELLED
Set “REC MEDIA FOR VIDEO” to “SD”, then record to an SD card.
“REC MEDIA FOR VIDEO (GZ-HM450/GZ-HM650/GZ-HM670/GZ-
HM690)” (A p. 93)
Turn off and on this unit again.
Protect the unit from vibration and shock.
Troubleshooting
114
Perform regular maintenance of this unit to enable it to be used for a long time.
Caution :
0
Be sure to detach the battery pack, AC adapter, and power plug before performing any maintenance.
Camcorder
0
Wipe this unit with a dry, soft cloth to remove any dirt.
0
When it is extremely dirty, soak the cloth in a solution of neutral detergent, wipe the body with it, and then use a clean cloth to remove the detergent.
Caution :
0
Do not use benzene or thinner. Doing so may cause damage to the unit.
0
When using a chemical cloth or cleaner, be sure to observe the warning labels and instructions of the product.
0
Do not leave the device in contact with rubber or plastic products for a long time.
Lens/LCD Monitor
0
Use a lens blower (commercially available) to remove any dust, and a cleaning cloth (commercially available) to wipe off any dirt.
Mold may form if the lens is left dirty.
Maintenance
115
Camera
ItemDetails
Power supplyUsing AC adapter: DC 5.2 V
Using battery pack: DC 3.5 V - 3.6 V
Power consumptionGZ-HM440/GZ-HM450:
2.3 W (when “MONITOR BRIGHTNESS” is set to
“3” (standard))
2.5 W (when “MONITOR BRIGHTNESS” is set to
“4” (brighter))
GZ-HM650/GZ-HM670/GZ-HM690:
2.4 W (when “MONITOR BRIGHTNESS” is set to
“3” (standard))
2.6 W (when “MONITOR BRIGHTNESS” is set to
“4” (brighter))
Rated Current Consumption: 1A
Dimensions (mm)51 mm x 55 mm x 111 mm (2-1/8" x 2-1/4" x 4-3/8")
(W x H x D: excluding grip belt)
MassApprox. 195 g (0.43 lbs) (camera only),
Approx. 235 g (0.52 lbs) (including supplied battery
pack)
Operating
environment
Allowable operating temperature: 0°C to 40°C
(32°F to 104°F)
Allowable storage temperature: -20°C to 50°C
(-4°F to 122°F)
Allowable relative humidity: 35 % to 80 %
Image pickup
device
GZ-HM440/GZ-HM450:
1/5.8” 1,500,000 pixels (progressive CMOS)
GZ-HM650/GZ-HM670/GZ-HM690:
1/4.1” 3,320,000 pixels (progressive CMOS)
Recording area
(Video)
GZ-HM440/GZ-HM450:
(UXP/XP/SP/EP)
630,000 to 1,050,000 pixels (AIS ON)
630,000 to 1,250,000 pixels (AIS OFF)
(SSW/SEW)
340,000 to 1,050,000 pixels (dynamic zoom ON)
630,000 to 1,050,000 pixels (dynamic zoom OFF)
GZ-HM650/GZ-HM670/GZ-HM690:
(UXP/XP/SP/EP)
1,220,000 pixels (AIS ON)
1,440,000 pixels (AIS OFF)
(SSW/SEW)
390,000 to 1,220,000 pixels (dynamic zoom ON)
1,220,000 pixels (dynamic zoom OFF)
Recording area
(Still image)
GZ-HM440/GZ-HM450:
(4:3) 470,000 to 930,000 pixels
(16:9) 630,000 to 1,250,000 pixels
GZ-HM650/GZ-HM670/GZ-HM690:
(4:3) 1,080,000 pixels
(16:9) 1,440,000 pixels
LensF1.8 - 6.3, f= 2.9 mm to 116.0 mm
GZ-HM440/GZ-HM450:
(UXP/XP/SP/EP)
35 mm conversion: 45.6 mm to 1,824 mm (AIS ON)
35 mm conversion: 42.0 mm to 1,680 mm (AIS
OFF)
(SSW/SEW)
35 mm conversion: 45.6 mm to 3,182 mm (dynamic
zoom ON)
35 mm conversion: 45.6 mm to 1,824 mm (dynamic
zoom OFF)
GZ-HM650/GZ-HM670/GZ-HM690:
(UXP/XP/SP/EP)
35 mm conversion: 45.0 mm to 1,800 mm (AIS ON)
35 mm conversion: 41.4 mm to 1,656 mm (AIS
OFF)
(SSW/SEW)
35 mm conversion: 45.0 mm to 3,150 mm (dynamic
zoom ON)
35 mm conversion: 45.0 mm to 1,800 mm (dynamic
zoom OFF)
Lowest illuminationGZ-HM440/GZ-HM450:
9 lux
1 lux (SCENE SELECT: NIGHTALIVE)
GZ-HM650/GZ-HM670/GZ-HM690:
4 lux
1 lux (SCENE SELECT: NIGHTALIVE)
Zoom (during video
recording)
Optical zoom: Up to 40x
Dynamic zoom: Up to 70x (SSW/SEW)
Digital zoom: Up to 200x
Zoom (during still
image recording)
Optical zoom: Up to 40x
LCD monitor2.7”, 23 megapixels, color LCD
Recording mediaGZ-HM440:
SDHC/SDXC card (commercially available)
Eye-Fi card (commercially available)
GZ-HM450/GZ-HM650:
Built-in memory (8 GB)
SDHC/SDXC card (commercially available)
Eye-Fi card (commercially available)
GZ-HM670:
Built-in memory (32 GB)
SDHC/SDXC card (commercially available)
Eye-Fi card (commercially available)
GZ-HM690:
Built-in memory (64 GB)
SDHC/SDXC card (commercially available)
Eye-Fi card (commercially available)
“Types of Usable SD Card” (A p. 15)
Clock batteryRechargeable battery
Specifications
116
Connectors
ItemDetails
HDMI output
connector
HDMI™ mini connector
Component output
connector
Y, Pb, Pr component output
Y: 1.0 V (p-p), 75 Ω
Pb/Pr: 0.7 V (p-p), 75 Ω
AV output
connector
Video output: 1.0 V (p-p), 75 Ω
Audio output: 300 mV (rms), 1 KΩ
USB connectorMini USB Type B, USB 2.0 compliant
Video
ItemDetails
Recording/
Playback format
AVCHD standard
Video: AVC/H.264
Audio: Dolby Digital 2ch
Extension.MTS
Signal systemNTSC standard
Image quality
(Video)
UXP
1920 x 1080 pixels
Average Approximate 24 Mbps
XP
1920 x 1080 pixels
Average Approximate 17 Mbps
SP
1920 x 1080 pixels
Average Approximate 12 Mbps
EP
1920 x 1080 pixels
Average Approximate 4.8 Mbps
SSW (16:9)
720 x 480 pixels (Interlaced)
Average Approximate 6.2 Mbps
SEW (16:9)
720 x 480 pixels (Interlaced)
Average Approximate 3 Mbps
Sound quality
(Audio)
48 kHz, 256 kbps
Still Image
ItemDetails
Recording formatJPEG standard
Extension.JPG
Image size“Approximate Number of Still Images (Unit:
Number of Shots)” (A p. 49)
QualityFINE / STANDARD
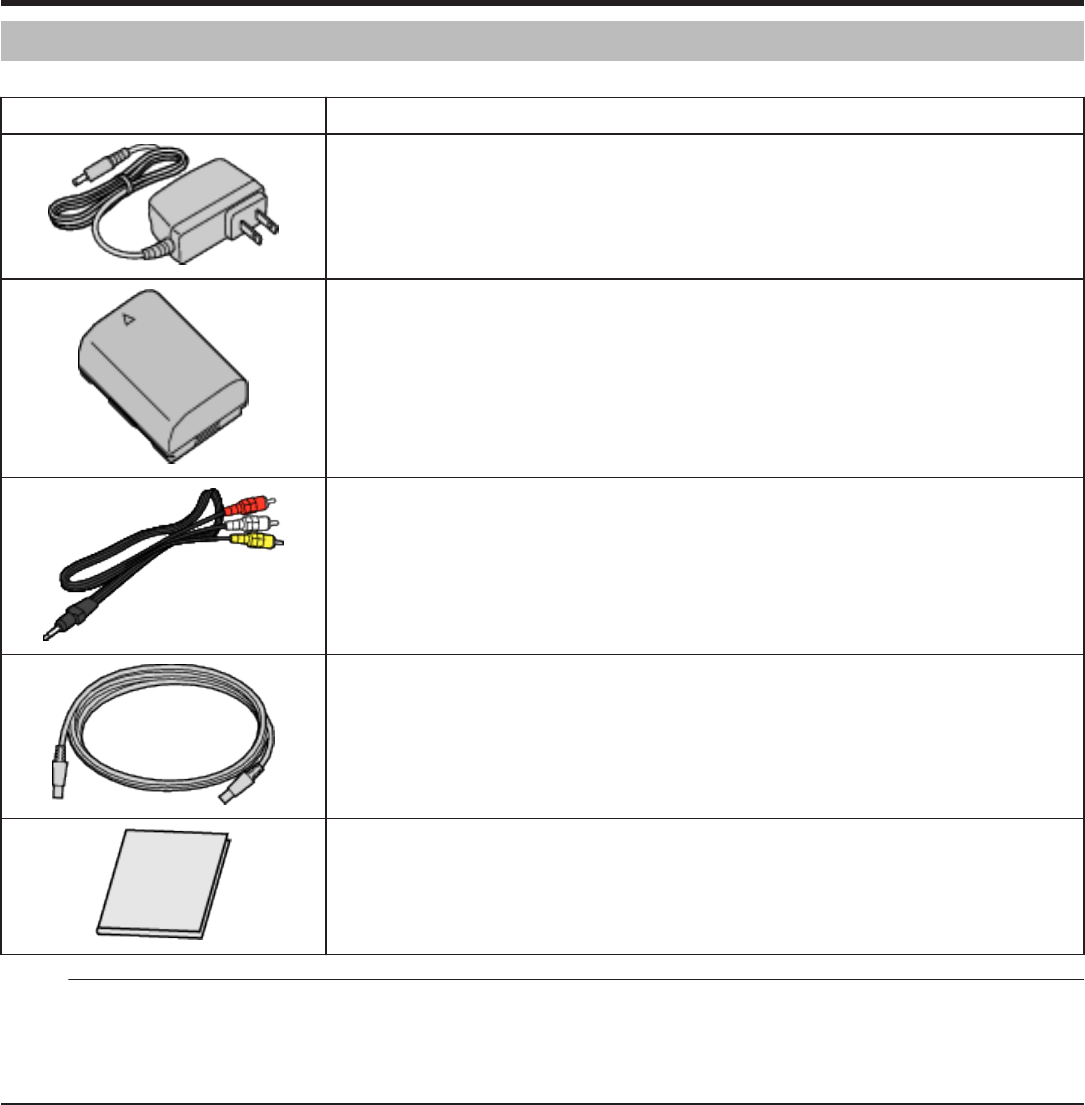
AC Adapter (AC-V11U)
ItemDetails
Power supplyAC 110 V to 240 V, 50 Hz/60 Hz
OutputDC 5.2 V, 1 A
Allowable operating
temperature
0°C to 40°C (32°F to 104°F)
(10°C to 35°C (50°F to 95°F) during charging)
Dimensions (mm)66 mm x 28 mm x 47 mm (2-5/8" x 1-1/8" x 1-7/8")
(W x H x D: excluding cord and AC plug)
MassApprox. 71 g (0.15 lbs)
Battery Pack (BN-VG114U)
ItemDetails
Power voltage3.6 V
Capacity1400 mAh
Dimensions (mm)31 mm x 21.5 mm x 43 mm (1-1/4" x 7/8" x 1-3/4")
(W x H x D)
MassApprox. 40 g (0.09 lbs)
Memo :
0
The specifications and appearance of this product are subject to changes
Libble takes abuse of its services very seriously. We're committed to dealing with such abuse according to the laws in your country of residence. When you submit a report, we'll investigate it and take the appropriate action. We'll get back to you only if we require additional details or have more information to share.
Product:
Forumrules
To achieve meaningful questions, we apply the following rules:
First, read the manual;
Check if your question has been asked previously;
Try to ask your question as clearly as possible;
Did you already try to solve the problem? Please mention this;
Is your problem solved by a visitor then let him/her know in this forum;
To give a response to a question or answer, do not use this form but click on the button 'reply to this question';
Your question will be posted here and emailed to our subscribers. Therefore, avoid filling in personal details.
Register
Register getting emails for JVC GZ-HM670 at:
new questions and answers
new manuals
You will receive an email to register for one or both of the options.
Get your user manual by e-mail
Enter your email address to receive the manual of JVC GZ-HM670 in the language / languages: English as an attachment in your email.
The manual is 8,35 mb in size.
You will receive the manual in your email within minutes. If you have not received an email, then probably have entered the wrong email address or your mailbox is too full. In addition, it may be that your ISP may have a maximum size for emails to receive.
The manual is sent by email. Check your email
If you have not received an email with the manual within fifteen minutes, it may be that you have a entered a wrong email address or that your ISP has set a maximum size to receive email that is smaller than the size of the manual.
The email address you have provided is not correct.
Please check the email address and correct it.
Your question is posted on this page
Would you like to receive an email when new answers and questions are posted? Please enter your email address.