Refer to the operating instructions found in the animation on the Detailed
User Guide.
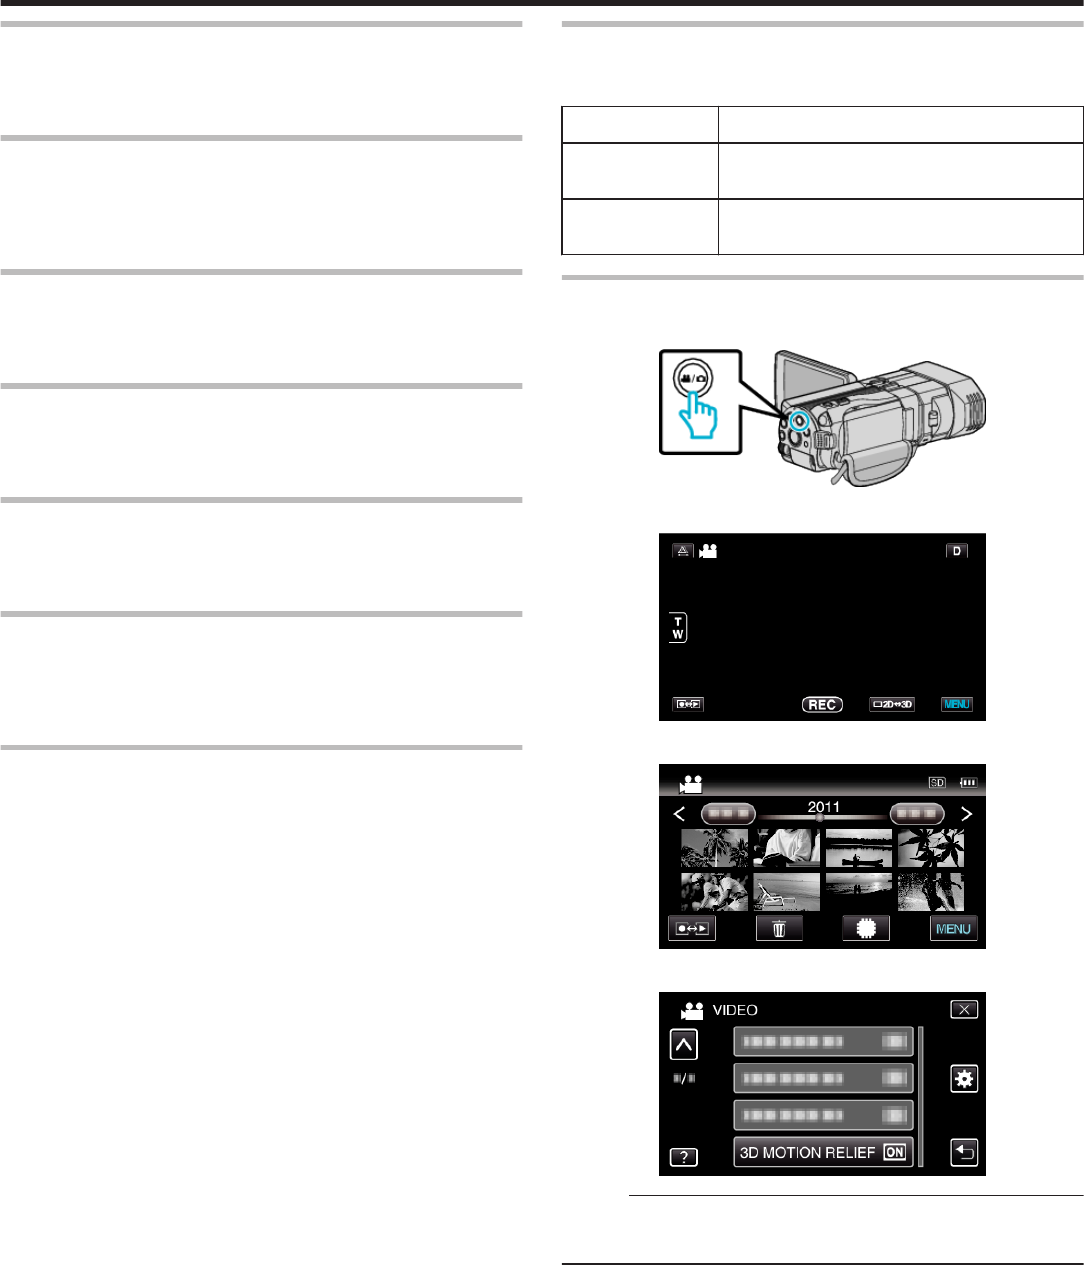
Recording
0
Refer to the operating instructions found in the animation on the Detailed
User Guide.
Playback
0
Refer to the operating instructions found in the animation on the Detailed
User Guide.
Shooting Tips
Basic Way to Hold a Camcorder
~ Recording Stable Images ~
.
This is the standard way of shooting while standing up.
Be sure to master this basic technique in order to achieve stable images.
o
[Getting Ready]
A Open your feet to the width of your shoulders.
B Keep the elbow of your right arm, which is holding the camcorder, close
to your side.
C Hold the LCD monitor with your left hand and adjust the angle
accordingly.
Extending Your Hands to Shoot
~ High-Angle Shooting ~
.
Extend your hand when your subject is being hidden behind a crowd of
people.
o
[Getting Ready]
A Open your feet to the width of your shoulders.
B Extend your right hand and hold the camcorder over your head.
C Hold the LCD monitor with your left hand and adjust the angle
accordingly.
Caution :
0
Use this way of shooting only as a last resort as it is difficult to achieve
stable images.
0
Set to the wide angle as much as possible as the image will be prone to
camera shake.
0
Be considerate. Do not inconvenience the people around you.
Squatting and Shooting at Eye Level
.
Staying low is a common position to take when shooting small children.
By recording from the eye level of the child, you can capture all his cute
expressions clearly.
o
[Getting Ready]
A Kneel down with your left knee while keeping your right foot on the
ground.
B Place the elbow of your right arm, which is holding the camcorder, on
your right knee.
C Hold the LCD monitor with your left hand and adjust the angle
accordingly.
Caution :
0
To record 3D images, refer also to “Precautions on Recording and Playing
Back 3D Images”.
“Precautions on Recording and Playing Back 3D Images” (A p. 11)
Beginner's Guide
4
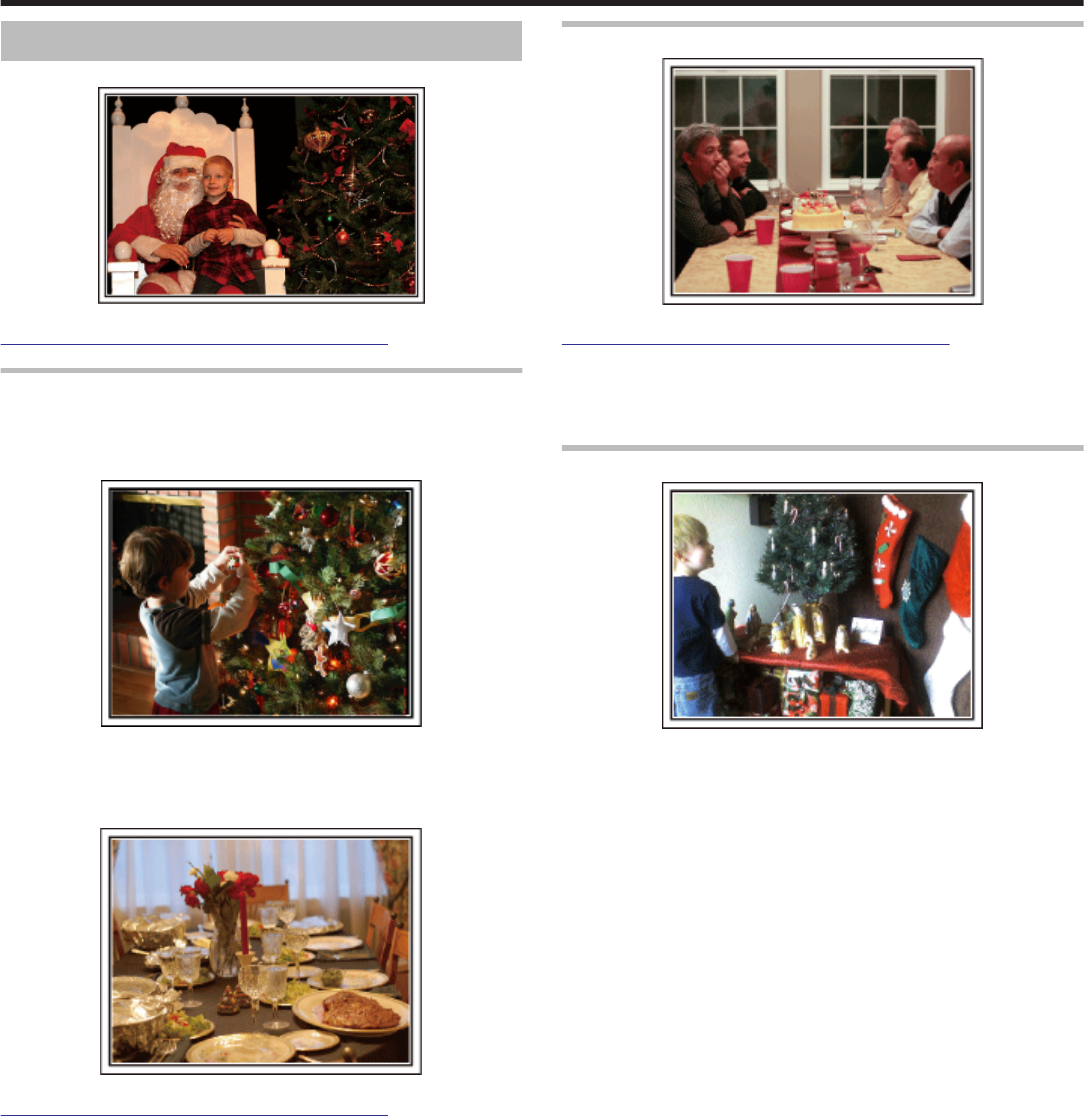
Holiday Season/Christmas
Record the happy Christmas celebration with your family!
.
Photo by 101st CAB, Wings of Destiny
Creative Commons Attribution-No Derivative Works 3.0
Decorating the Tree and Preparing the Dinner
The decoration of tree and preparation of dinner are part of the joy of
Christmas. Be sure to record these happy family times!
o
Decorating the tree
.
A tree is the most important thing to bring out the mood of Christmas.
Simply the scene of all family members engaging in the decorating of a fir
tree with various colorful ornaments is full of the feeling of happiness.
o
Preparing the Dinner
.
Photo by Manicosity
Creative Commons Attribution-No Derivative Works 3.0
Record the scenes as everyone helps to prepare the feast of the night.
You can film the mother who is cooking, the children who are helping, and
of course, the process of making a cake!
Recording the Christmas Party
.
Photo by InnerSpirit
Creative Commons Attribution-No Derivative Works 3.0
After all preparations, it is finally the Christmas party itself.
Not only should you record the candle-blowing scene, but also the smiles of
the family while being surrounded by good food, or even the father who is
slightly drunk from champagne!
Finding the Presents
.
For children, the greatest joy of Christmas is receiving presents the next
morning.
Their expression of delight when finding a present next to their pillow is a
recording opportunity not to be missed. Get ready to shoot before the
children wake up!
Useful Shooting Techniques
5
Wedding
Create an awesome wedding video for the bride and groom!
.
Discussing and Planning Before the Event
Before the day of the wedding reception, it is important to discuss with the
bride and groom about various details such as the order of the ceremony
and whether there are any entertainment programs or change of clothes.
By understanding the preferences of the bride and groom, you will be able
to shoot more appropriately.
Finding the Right Angle to Capture Both Bride and Groom
o
Composing the picture with the groom in front and the
guests at the back
.
The main characters of a wedding are of course the bride and groom. Record
their expressions clearly during the toast, speech, entertainment programs,
and other scenes.
Another recommendation is to capture the face shots of the guests, then pan
towards the groom. Picture composition containing the crowd of guests only
lacks fun, so be sure to pay attention to the shooting angle and size.
Recording the Expressions and Comments of Guests
o
Setting the shot from eye level to chest level
.
You can record comments from the guest by going around asking, "Please
say a few words for the bride and groom".
This can be done at the guests' waiting room, when the bride and groom are
changing, or during the entertainment programs.
Closing Up on the Bride's Face During the Thank You Speech
The climax of the event finally comes during the bride and groom's thank you
speech and presentation of flowers. The touching words of appreciation from
the bride and tears of joy from the parents are scenes that must not be
missed.
Start by closing up on the bride's face using zoom. As the tears start to form
in the bride's eyes, continue shooting for a little longer. Then, slowly zoom
out to the wide angle to show the parents who are moved by the speech.
Advanced Operation with Two Camcorders
If video-editing is to be done, record using two camcorders so that a video
with varying scenes can be created. You can try asking a close friend who
has a camcorder at home.
Set the borrowed camcorder on a tripod to focus on taking close-up shots
of the bride and groom. In this way, the other camcorder can be moved
around to record other scenes, enabling an interesting video with changing
scenes to be created through editing and compilation.
As most people own at least a digital camera nowadays, even if you are really
unable to find an extra camcorder, inserting still pictures to the video at
various points is also a good way to add variety. Do give it a try!
o
<Camcorder 1>
Closing up on the bride and groom all the time
o
<Camcorder 2>
Recording the congratulatory messages from friends at the
same time
.
Useful Shooting Techniques
6
Travel
Capture all the good times of your domestic or overseas trips!
.
Bringing the Necessary Equipment
The necessary things to bring on a trip depends on your traveling purpose
and the destination.
For overseas trips in particular, you have to think about what to bring in
accordance to the local conditions.
Here are some suggestions for your consideration.
o
Camcorder
Think about how many hours of shooting you will usually perform in a day.
Be sure to prepare enough recording medium especially for long overseas
trips.
If you are recording in SD cards, get ready the sufficient number of cards,
including some for backup.
o
Battery Pack
Prepare a battery pack that is ready for double the expected recording time
in a day. For example, if you plan to record for 2 hours a day, prepare a
battery pack that is ready for 4 hours (actual recording time).
For a day trip, you can prepare a battery with low capacity but for a long trip,
do prepare a few batteries with high capacities.
o
AC Adapter
The JVC AC adapter supports voltages from 100 V to 240 V, and hence can
be used anywhere in the world.
Bring along the adapter if you are traveling for a long time. Charge the battery
pack while sleeping so that you can record with full battery power the next
day.
o
Power Plug Adapter
.
The shape of the power plug varies according to countries. Be sure to check
the shape of the power plug beforehand, and bring the appropriate power
plug adapter.
“Charging the Battery Pack Overseas” (A p. 24)
o
Battery Charger
.
Recording cannot be performed when an AC adapter is connected to the
camcorder for battery charging.
You can bring an additional battery charger to charge battery packs if you
plan to use the camcorder for recording at night. You can also charge
multiple battery packs by using both the battery charger and this camcorder
at the same time.
o
Tripod
.
A tripod is an essential item to take stable images. Select an appropriate
tripod in accordance to your purpose and style of traveling, such as a
compact one to be used on a table or one that is at least 1 m tall.
Recording the Excitement Before Departure
It may be a little abrupt to start your travel video at the destination suddenly.
Record also the preparations prior to departure if it is a family trip, or the time
when everyone is gathered at the meeting place if you are traveling with your
friends.
For overseas trips, taking a shot of the signs and displays at the airport of
the flight you are taking may be useful for future reference.
.
.
Useful Shooting Techniques
7
Using Pan at the Places of Interest
Tourists spots with beautiful scenery or historical sites are places that you
would certainly want to record.
To capture the magnificence of a scene which cannot be fitted into a single
frame, try the panning technique.
Refer to the "Shooting Tips" found in this website on how to use panning
effectively.
In addition, you may also like to take a shot of the signs or monuments that
can often be found at the tourist spots.
.
.
Showing Everyone Having a Good Time
When taking a video, it is rather dull to shoot only the scenery or historical
sites.
Talk about your feelings while recording the breath-taking scenery of an
attraction so that it will be an interesting scene to view later.
Useful Shooting Techniques
8
Amusement Park
Take more shots of the smiling faces of everyone in the family!
.
Taking Videos or Still Images According to the Attraction
You may choose to take videos all the time. However, you may want to take
some still images too.
The following section explains the scenarios suitable for taking videos or still
images.
o
Scenarios suitable for taking videos
.
Scenarios with changes in body movement are suitable for taking videos.
This includes situations where there are rapid changes in facial expressions
or voices of surprise and delight.
*Some amusement parks do not allow passengers to perform any recording.
Be sure to check beforehand.
[Examples]
0
Merry-go-round, go kart, coffee cup, etc.
o
Scenarios suitable for taking still images (photos)
.
Scenarios with little movement of the subject are suitable for taking still
images.
Try to take the still images from an angle such that the surroundings can be
seen clearly.
[Examples]
0
Carousal, ferris wheel, fun bicycle rides, etc.
Inducing Responses by Calling Out
.
Videos with no waving of hands nor laughter are not only dull when you view
them later, but also put the capability of the audio-recording function of the
camcorder to a waste.
When recording, induce more reactions by enthusiastically waving your
hands or shouting out "Is it fun?" and the like.
Capturing the Best Moment in a Video as a Still Image
Shots with the eyes closed are often taken by accident. To reduce such
mistakes, make use of the function to capture still images from videos.
As videos are actually continuous recording of 60 still images within 1 minute,
using this function allows you to select the best moment and save it as a still
image.
“Capturing a Still Image in the Video during Playback” (A p. 67)
.
Photo by just that good guy jim
Creative Commons Attribution-No Derivative Works 3.0
Video Playback in Progress
.
Photo by talk rhubarb
Creative Commons Attribution-No Derivative Works 3.0
Capturing a Still Image
.
Photo by just that good guy jim
Creative Commons Attribution-No Derivative Works 3.0
Video Playback in Progress
Useful Shooting Techniques
9
Advanced Operation with Backlight Compensation
When the subject’s face is in backlight or when the expression cannot be
seen clearly, the Intelligent Auto function of this unit automatically increases
its brightness for recording.
If Intelligent Auto fails to function as expected or if the brightness correction
is insufficient, you can increase the brighness by using backlight
compensation in the Manual mode.
“Setting Details” (A p. 41)
o
<Without backlight compensation>
.
o
<With backlight compensation>
.
Useful Shooting Techniques
10
Precautions on Recording and Playing Back 3D Images
3D images can be recorded and played back on this unit. You can enjoy realistic and powerful 3D images recorded on this unit by playing back on a 3D
compatible TV. Before use, please read the following precautions to ensure safe and comfortable viewing of the 3D images.
Recording 3D Images
This unit makes use of the misalignment between the images that enter the left and right eyes to create the 3D effect during 3D recording. As the images that
enter the left and right eyes are different, fatigue may be experienced. In addition, depending on the content of the video, an illusion of movement may be
experienced and result in motion sickness. Take note of the following when recording 3D images.
o
Basic Way to Hold a Camcorder During 3D Recording
(Recording Stable Images)
.
o
Shooting Distance During 3D Recording
(Achieving Comfortable 3D Images)
.
Memo :
0
Make sure that you have stable footing during recording.
0
Do not swing the camera horizontally or vertically during recording.
0
If the subject is not recorded within the recommended shooting distance, 3D effect may be weak.
0
When recording night scenes or landscapes, 3D effect of some subjects may be weak.
0
For subjects that appear at the side of the screen, 3D effect may be weak.
0
Operate slowly when using the zoom.
0
If the image is zoomed in too much, 3D effect may be weak.
0
It is recommended to make use of a tripod.
* If you do not take note of the above points during 3D recording, the recorded scenes may be played back in stop-motion during playback.
“3D MOTION RELIEF (3D mode only)” (A p. 117)
Getting Started
11
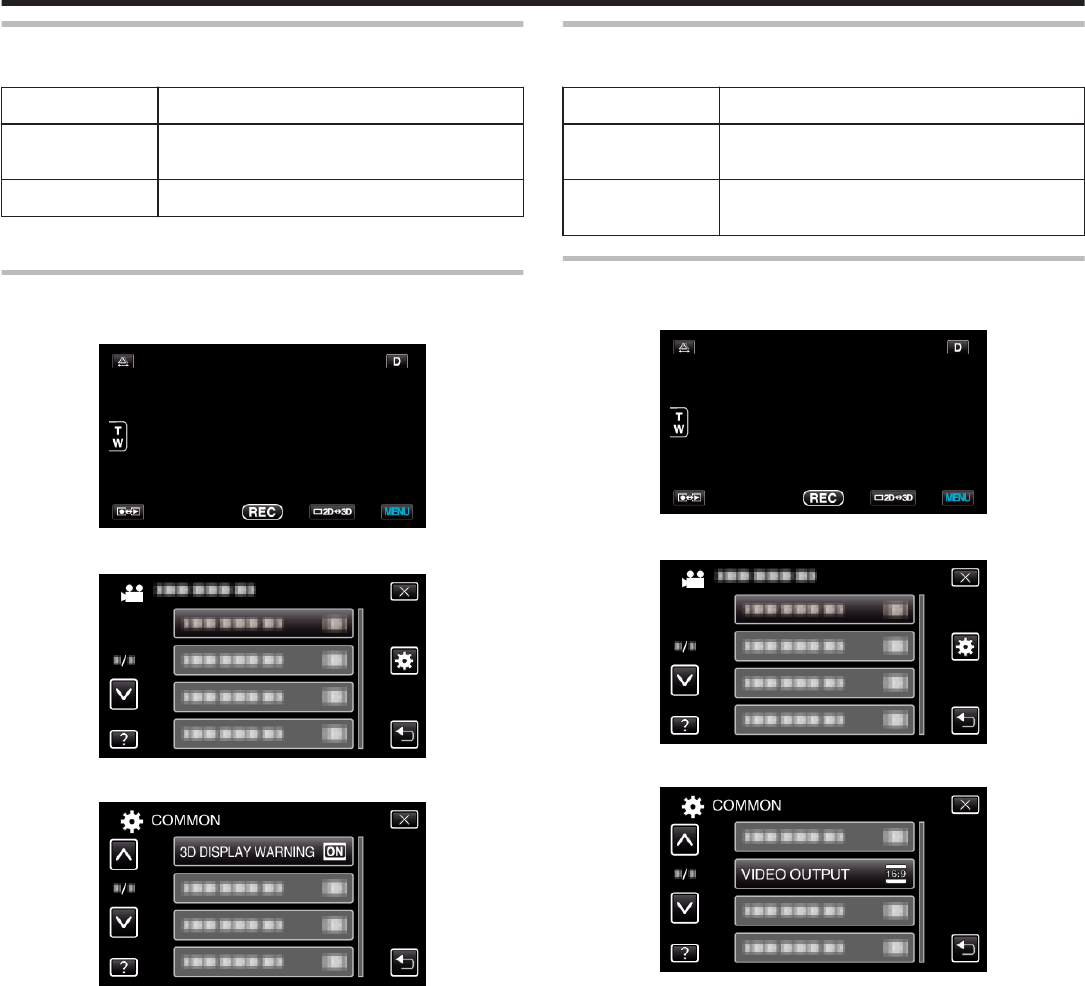
3D Display on the LCD Monitor
The LCD monitor supports 3D images during both recording and playback. Press the “3D/2D” button on the touch screen to change the display on the LCD
monitor between 3D and 2D.
0
When using the 3D recording mode, the image will be recorded in 3D even if the display on the LCD monitor is set to 2D.
0
3D effect appears stronger when viewed at approximately 30 cm (11-3/4”) from the front.
0
3D effect may be weak if viewed from an angle other than the front.
0
The LCD monitor appears darker when 3D images are displayed. Change the display to 2D when it is difficult to see, such as when using this unit outdoors.
Caution :
0
Recording and viewing of the 3D images is not recommended for people with medical history of photosensitivity, heart diseases, feel sick, suffer from lack
of sleep, suffer from fatigue, or are drunk.
Medical conditions may worsen.
0
Do not shoot a subject from a distance shorter than the minimum shooting distance.
The 3D effect may become stronger and result in fatigue or discomfort.
The minimum shooting distance of this camera is 80 cm (31-1/2”) (using wide angle).
0
Be careful not to shake the camera during recording.
Excessive shaking while riding in a vehicle or during walking may result in fatigue or discomfort.
To perform recording while moving the camera, keep the speed slow and steady.
Keep the camera in a horizontal position, as much as possible, during recording.
0
If you have vision problems such as short-sightedness, long-sightedness, varying vision in the left and right eyes, or astigmatism, it is recommended to
correct your vision by wearing glasses, etc.
Stop recording or viewing of the 3D images if you see double images.
3D images may appear differently for different people. Correct your vision appropriately before viewing the 3D images.
0
Stop recording or viewing of the 3D images if you experience fatigue or discomfort.
Continual recording or viewing of the 3D images may result in health problems.
Take an adequate rest.
Recording or viewing of the 3D images in an environment where shaking of the monitor is expected, such as while riding in a vehicle or during walking, may
result in fatigue or discomfort.
0
If you experience fatigue or discomfort while recording or viewing of the 3D images on the LCD monitor, set the display to 2D.
Continual recording and viewing of the 3D images may result in health problems.
0
Rest well after recording or viewing of the 3D images.
After recording or viewing of the 3D images, check that you do not experience fatigue or discomfort before driving, etc.
0
Take a break every 30 to 60 minutes when recording or viewing of the 3D images.
Long periods of recording or viewing may cause visual fatigue.
0
Keep a distance of at least 3 times the effective height of the screen when viewing of the 3D images on a 3D compatible TV.
Viewing of the 3D images from a distance shorter than the recommended distance may cause visual fatigue.
TV Size
Recommended Distance
54”Approx. 2.0 m (6’6-3/4”)
50”Approx. 1.9 m (6’2-3/4”)
46”Approx. 1.7 m (5’6-7/8”)
42”Approx. 1.6 m (5’3”)
0
Recording and viewing of the 3D images is only recommended for ages 5 to 6 and above.
Guardians should pay close attention to children as health problems may result if fatigue and discomfort are not noticed immediately.
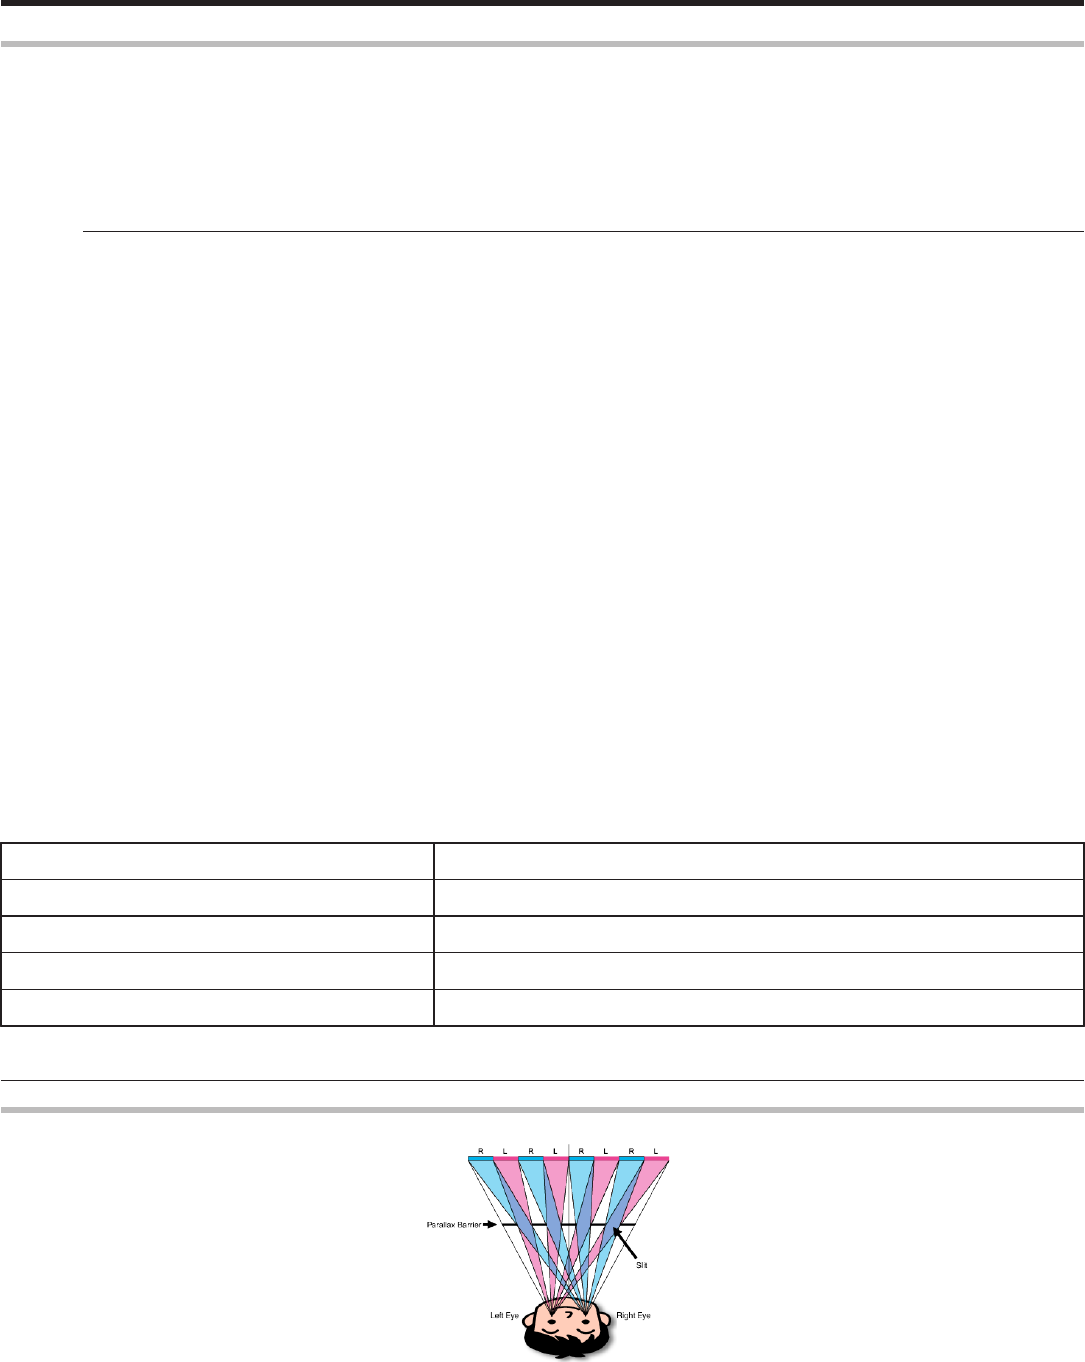
3D Effect Mechanism
.
3D images on the LCD monitor of this unit are displayed using the parallax barrier system. Placed in front of an image source, a parallax barrier consists of a
series of slits arranged alternately for the left and right eyes, allowing each eye to see a different image when viewing from a distance, thus creating the 3D
effect. As such, 3D effect may appear weak depending on the angle of viewing.
Getting Started
12
Verifying the Accessories
If any of the items are missing or defective, consult your JVC dealer or the nearest JVC service center.
IllustrationDescription
.
AC Adapter
AP-V20U
0
Connects to this unit to charge the battery pack.
It can also be used when recording or playing back videos indoors.
.
Battery Pack
BN-VF815U
0
Attaches to this unit to supply power.
.
Remote Control
RM-V760U
0
Operates certain functions from a distance.
.
HDMI Mini Cable
0
Connects this unit to a TV to play back recorded images on the TV in a better quality.
.
AV Cable
0
Connects this unit to a TV to play back recorded images on the TV.
.
USB Cable
(Type A - Mini Type B)
0
Connects this unit to a computer.
.
Basic User Guide
0
Read well and keep in a safe place where it can be accessed easily when necessary.
.
CD-ROM
0
For installing the provided software Everio MediaBrowser 3D on a computer.
Memo :
Getting Started
13
SD cards are sold separately.
“Types of Usable SD Card” (A p. 17)
When using the AC adapter overseas, please prepare a commercially available converter plug for the country or region of visit.
“Charging the Battery Pack Overseas” (A p. 24)
Getting Started
14
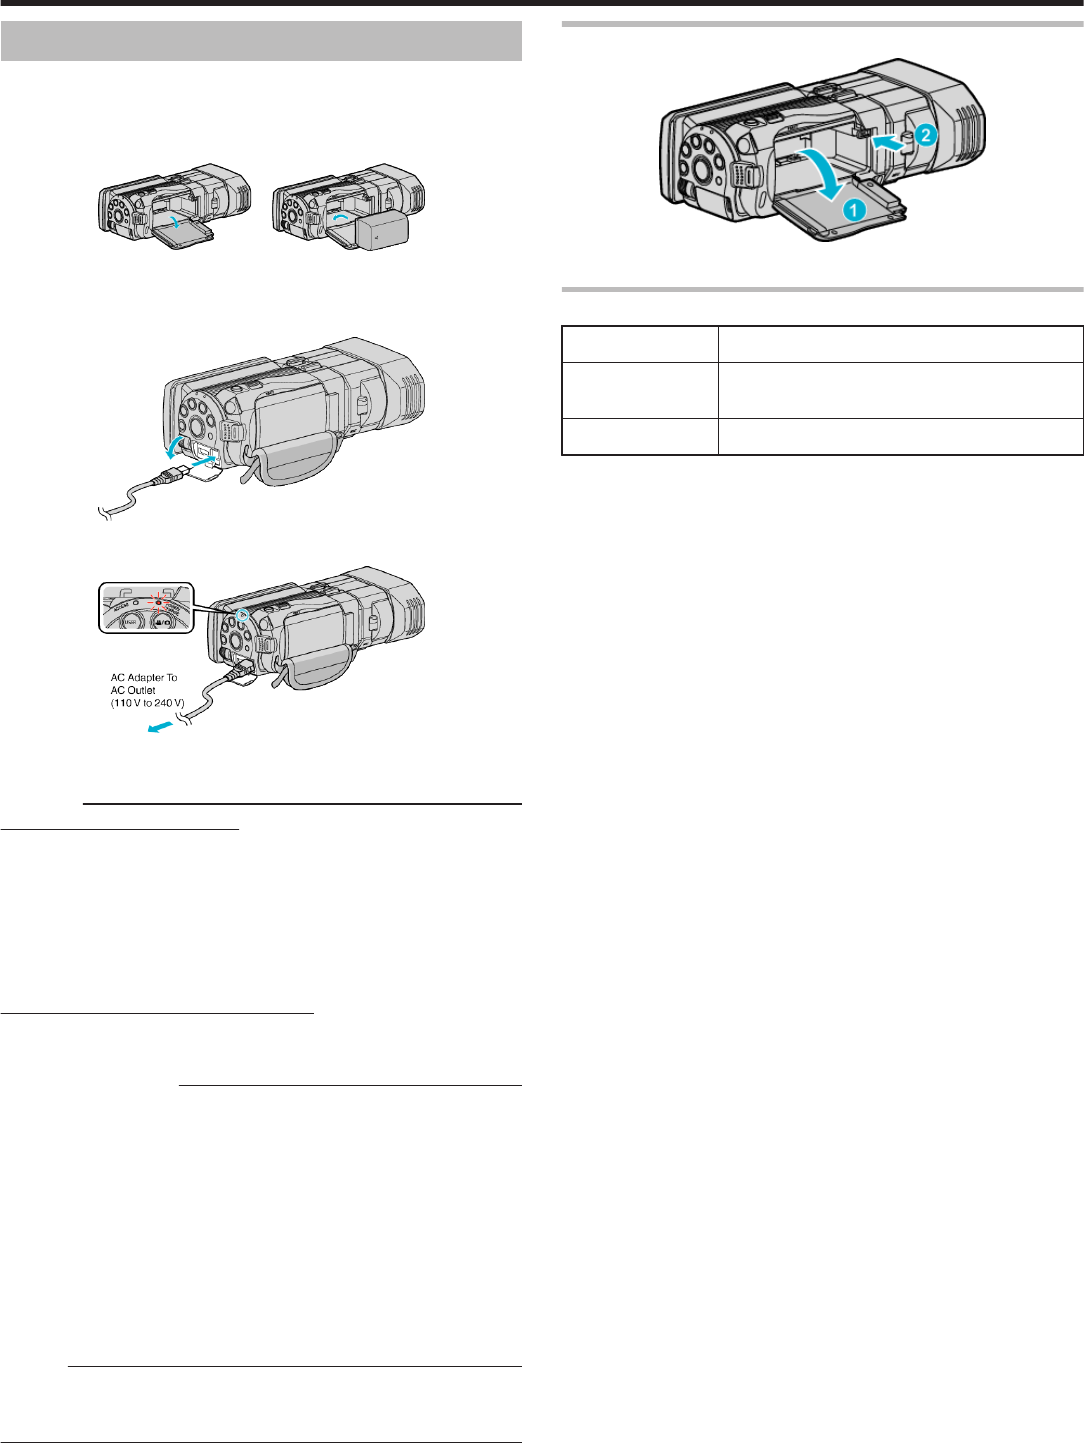
Charging the Battery Pack
Charge the battery pack immediately after purchase and when the remaining
battery power is low.
The battery pack is not charged at the time of purchase.
1
Attach the battery pack.
.
0
Align the top of the battery with the mark on this unit, and slide in until
the battery clicks into place.
2
Connect the AC adapter to the DC connector.
.
3
Plug in the power.
.
0
The charging lamp blinks when charging is in progress.
It goes out when charging is finished.
Caution :
Be sure to use JVC battery packs.
0
If you use any other battery packs besides JVC battery packs, safety and
performance cannot be guaranteed.
0
Charging time: Approx. 2 h 40 m (using supplied battery pack)
The charging time is when the unit is used at 25°C (77°F). If the battery
pack is charged outside the room temperature range of 10°C to 35°C (50°F
to 95°F), charging may take a longer time or it may not start. The
recordable and playable time may also be shortened under some usage
conditions such as at low temperature.
Be sure to use the supplied JVC AC adapter.
0
If you use any other AC adapters besides the supplied JVC AC adapter,
malfunctions may occur.
Rechargeable Batteries:
0
When using the battery in a low temperature environment (10°C (50°F) or
below), the operating time may be shortened, or it may not function
properly. When using this unit outdoors in the winter weather, warm the
battery, such as by placing it in the pocket, before attaching it. (Keep away
from direct contact with a warm pack.)
0
Do not expose the battery to excessive heat, such as direct sunlight or fire.
0
After removing the battery, store it in a dry place between 15°C to 25°C
(59°F to 77°F).
0
Keep a 30 % battery level (X) if the battery pack is not to be used for a
long period of time. In addition, fully charge and then fully discharge the
battery pack every 2 months, then continue to store it at a 30 % battery
level (X).
Memo :
0
You can connect this unit to the AC adapter to record for long hours
indoors.
(Battery charging begins when the LCD monitor is closed.)
Detaching the Battery Pack
.
Press the battery release lever to detach the battery from this unit.
Approximate Battery Charging Time (Using AC Adapter)
Battery PackCharging Time
BN-VF815U
(Supplied)
2 h 40 m
BN-VF823U3 h 40 m
0
When the battery life is reached, the recording time becomes shorter even
if the battery pack is fully charged.
(Replace the battery pack with a new one.)
* The charging time is when the unit is used at 25°C (77°F). If the battery
pack is charged outside the room temperature range of 10°C to 35°C (50°F
to 95°F), charging may take a longer time or it may not start. The recordable
and playable time may also be shortened under some usage conditions such
as at low temperature.
“Approximate Recording Time (Using Battery)” (A p. 51)
Getting Started
15
Grip Adjustment
.
A Pull back the belt
B Adjust the length
C Attach the belt
Caution :
0
Be sure to fasten the grip belt properly.
If the belt is loose, this unit may drop and result in injuries or damages.
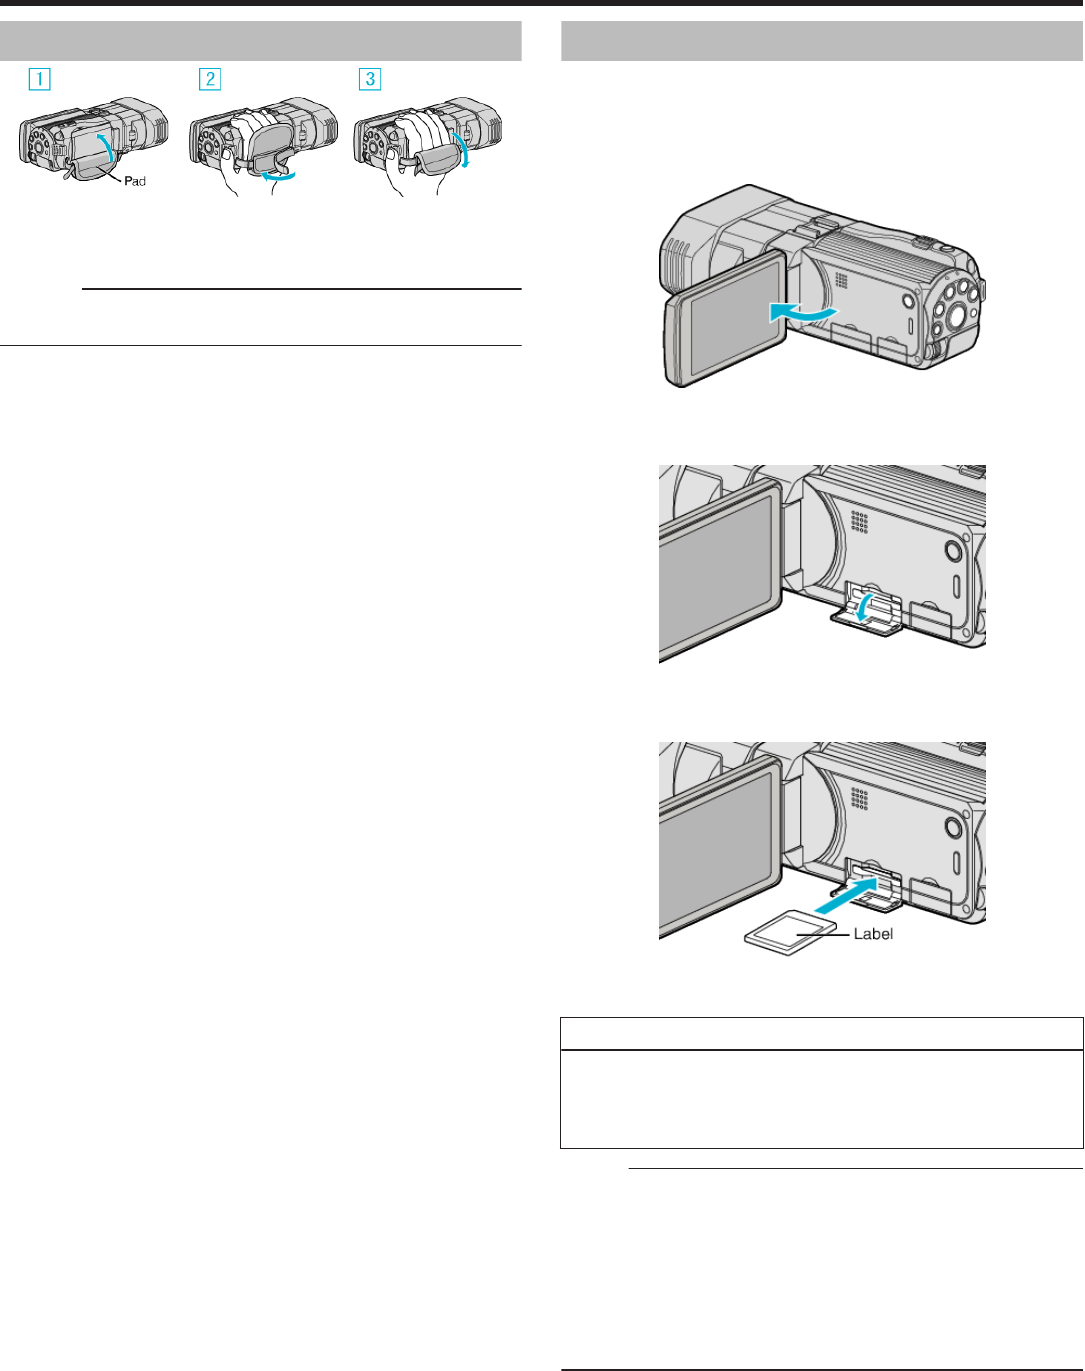
Inserting an SD Card
When a commercially available SD card is inserted, recordings can be made
to either the card or built-in memory separately.
“Types of Usable SD Card” (A p. 17)
“Approximate Video Recording Time” (A p. 50)
1
Open the LCD monitor.
.
2
Press and hold the M button for 2 seconds or more to turn off the power.
3
Open the cover.
.
4
Insert an SD card.
.
0
Insert with the label facing upwards.
Warning
0
Make sure not to insert the card in the wrong direction.
It may cause damage to the unit and card.
0
Turn off the power of this unit before inserting or removing a card.
0
Do not touch the metal contact area when inserting the card.
Memo :
0
To record to the card, it is necessary to perform media settings.
When no card is available, set media settings to “BUILT-IN MEMORY” for
recording.
“REC MEDIA FOR VIDEO” (A p. 122)
“REC MEDIA FOR IMAGE” (A p. 123)
0
To use cards that have been used on other devices, it is necessary to
format (initialize) the card using “FORMAT SD CARD” from media
settings.
“FORMAT SD CARD” (A p. 131)
Getting Started
16
Removing the Card
Push the SD card inward once, then pull it out straight.
.
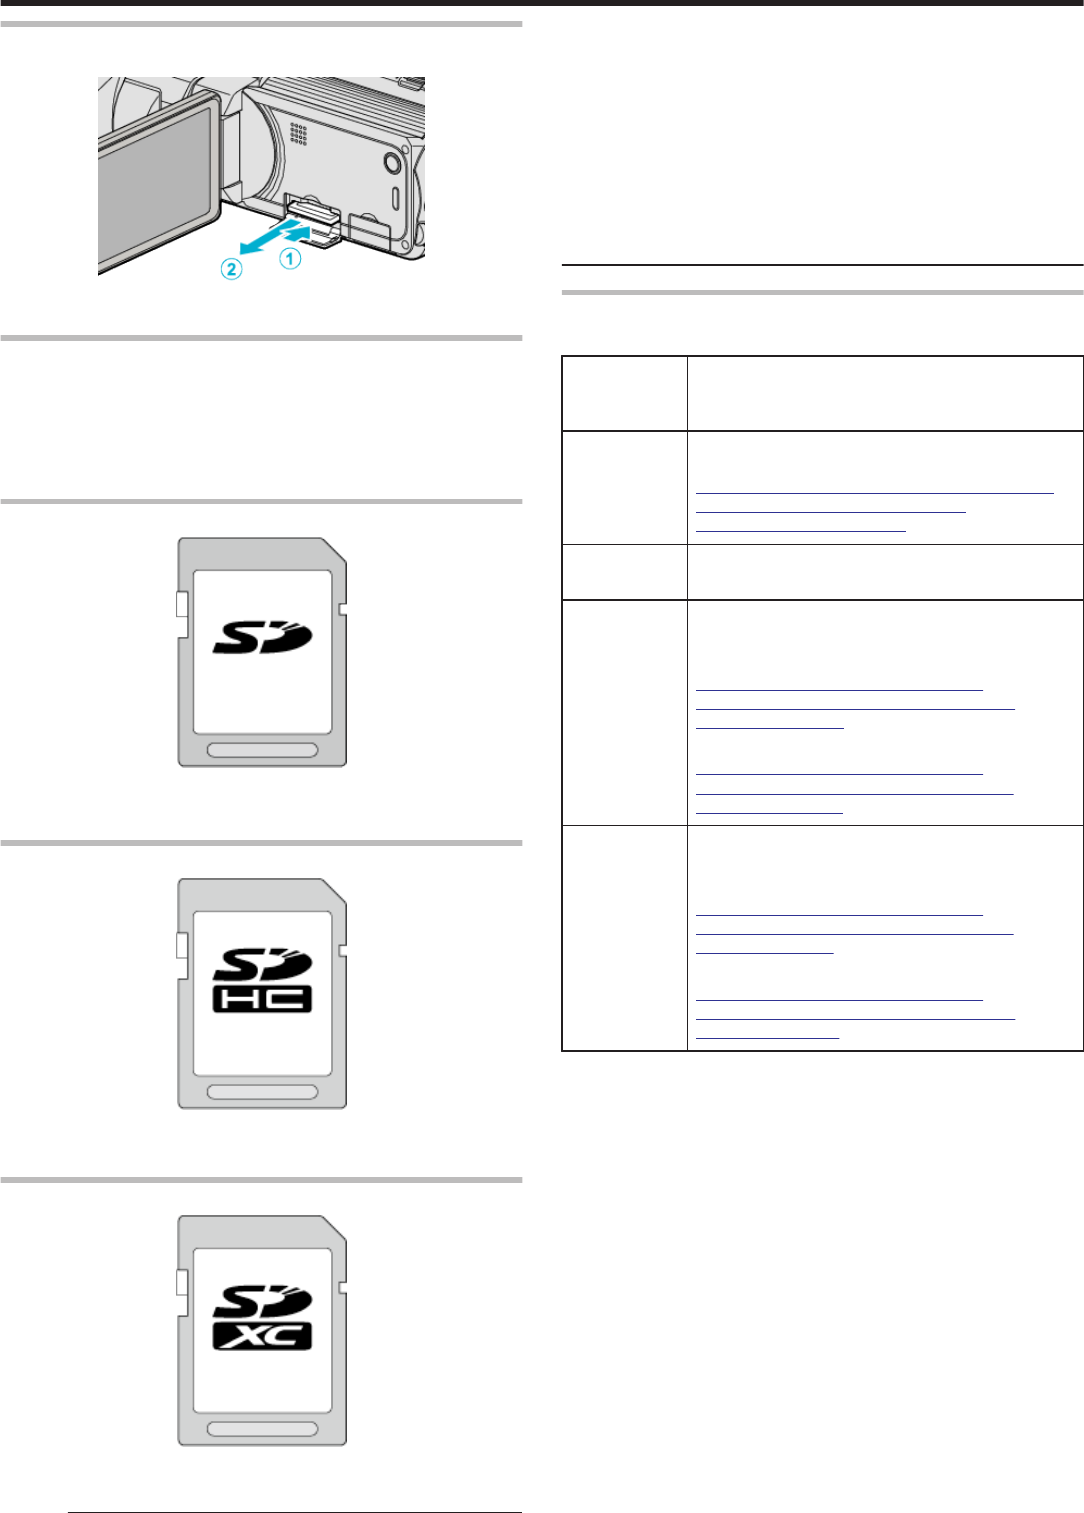
Types of Usable SD Card
The following SD cards can be used on this unit.
Operations are confirmed on the SD cards from the following manufacturers.
0
Panasonic
0
TOSHIBA
0
SanDisk
SD Card
.
0
This unit supports 256 MB to 2 GB SD cards.
0
Use a Class 4 or higher compatible SD card (2 GB) for video recording.
SDHC Card
.
0
Use a Class 4 or higher compatible SDHC card (4 GB to 32 GB) for video
recording.
SDXC Card
.
0
Use a Class 4 or higher compatible SDXC card (Max. 64 GB) for video
recording.
Memo :
0
Using SD cards (including SDHC/SDXC cards) other than those specified
above may result in recording failure or data loss.
0
To record videos with “VIDEO QUALITY” set to “THR”, use of a Class 10
card is recommended. (Class 6 or higher SDHC/SDXC card is required.)
0
To record videos with “VIDEO QUALITY” set to “UXP”, use of a Class 6
compliant SDHC/SDXC card is recommended.
0
Class 4 and Class 6 are guaranteed to have a minimum transfer rate of 4
MB/s and 6 MB/s respectively during reading or writing of data.
0
You can also use a Class 10 compliant SDHC/SDXC card.
0
To protect the data, do not touch the terminals of the SD card.
0
Both videos and still images can be recorded on one SD card.
When your computer cannot recognize the SDXC card
Confirm and update the OS of your computer.
Windows XP /
Windows XP
SP1
Necessary to update to SP2 or higher.
Windows XP
SP2 /
Windows XP
SP3
Necessary to download the update software.
(KB955704)
http://www.microsoft.com/downloads/details.aspx?
FamilyID=1cbe3906-ddd1-4ca2-b727-
c2dff5e30f61&displaylang=en
Windows
Vista
Necessary to update to SP1 or higher.
Windows
Vista SP1 /
Windows
Vista SP2
Necessary to download the update software.
(KB975823)
0
32 bit version
http://www.microsoft.com/downloads/en/
details.aspx?FamilyID=2d1abe01-0942-4f8a-
abb2-2ad529de00a1
0
64 bit version
http://www.microsoft.com/downloads/en/
details.aspx?FamilyID=7d54c53f-017c-4ea5-
ae08-34c3452ba315
Windows 7Necessary to download the update software.
(KB976422)
0
32 bit version
http://www.microsoft.com/downloads/en/
details.aspx?FamilyID=3ee91fc2-a9bc-4ee1-
aca3-2a9aff5915ea
0
64 bit version
http://www.microsoft.com/downloads/en/
details.aspx?FamilyID=73f766dd-7127-4445-
b860-47084587155f
Getting Started
17
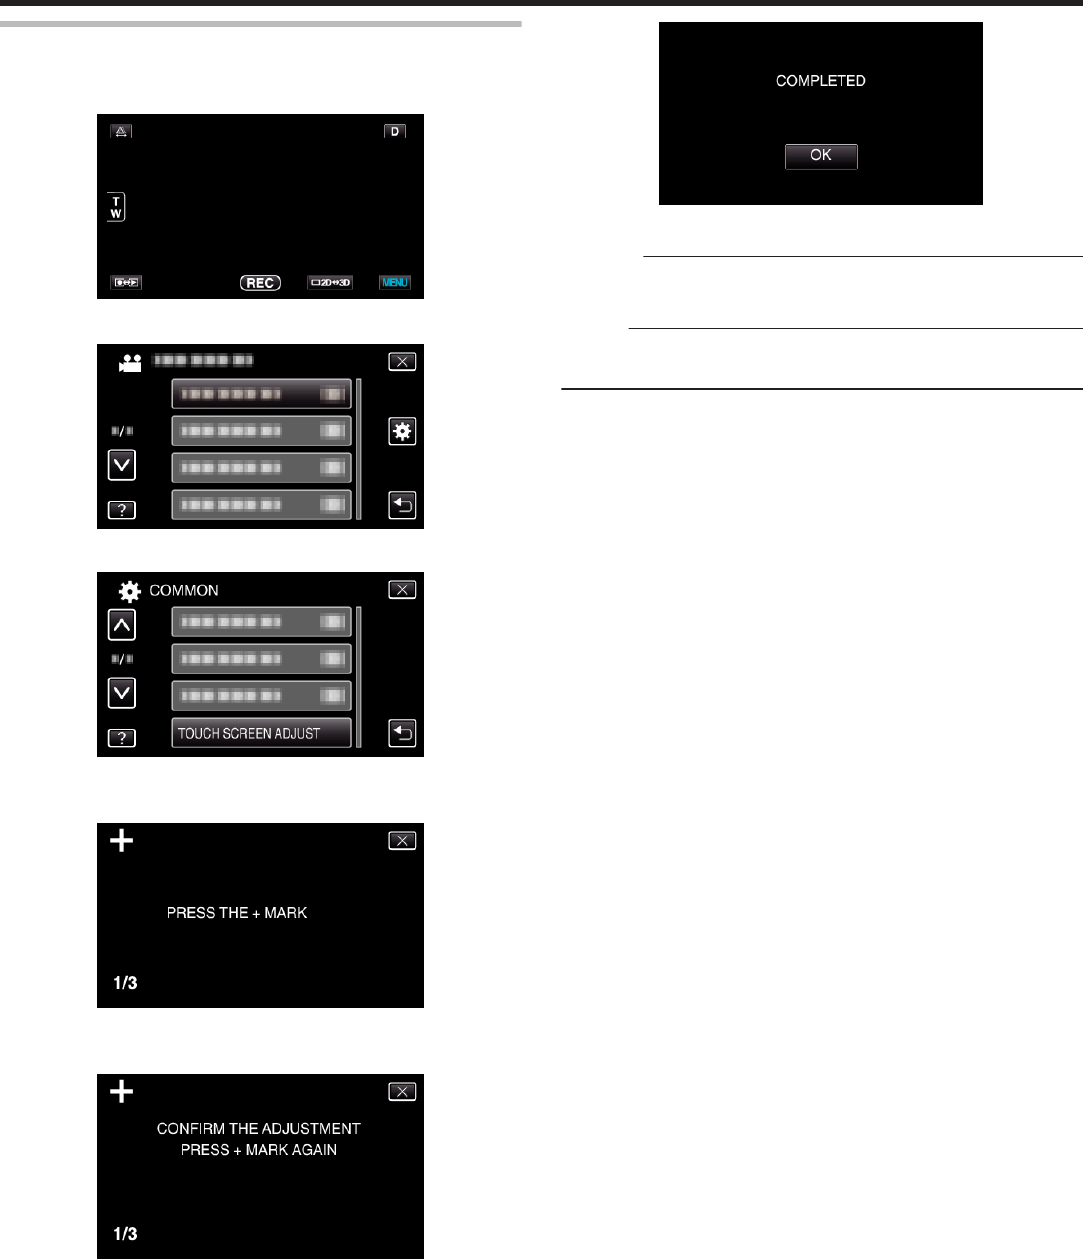
Using the Touch Screen
Icon operation buttons, thumbnails, and menu items are displayed on the
touch screen according to the mode in use.
0
To operate, tap the icon operation buttons, thumbnails, or menu items on
the touch screen lightly.
0
There are two ways to operate the touch screen, namely “tap” and “drag”.
The following are some examples.
0
A Tap the displayed button (icon) or thumbnail (file) on the touch screen
to make selection.
0
B Drag the thumbnails on the touch screen to search for the desired file.
.
0
The touch screen of this unit is pressure-sensitive. When the touch screen
does not respond smoothly, apply slightly more force to your fingertip.
0
Do not press or rub with excessive force.
0
If you apply a protect sheet or a sticker, the touch screen may not respond
smoothly.
0
Do not operate the touch screen using an object with a sharp or hard tip.
0
Pressing two or more places at a time may cause a malfunction.
0
Tap the buttons (icons) on the touch screen accurately. The buttons may
not respond if they are not tapped on the right area.
0
Perform “TOUCH SCREEN ADJUST” if the reactive area of the screen is
misaligned with the touched area. (Adjust by lightly tapping with a corner
of an SD card, etc. Do not press with an object with a sharp tip or do not
press hard.)
“TOUCH SCREEN ADJUST” (A p. 126)
Names of Buttons and Functions on the LCD Monitor
The following screens are displayed during the video and still image modes,
and operate as the touch screens.
Recording Screen (Video/Still Image)
.
1
Parallax Adjustment Button
0
Adjusts the 3D effect when 3D images are displayed on the LCD
monitor.
“Adjusting Parallax During Recording” (A p. 34)
2
Zoom Button
“Zooming” (A p. 31)
3
Recording/Playback Mode Button
0
Switches between recording and playback modes.
4
Recording Start/Stop Button
0
g: Video Recording Start Button
0
a: Video Recording Stop Button
0
Q: Still Image Recording Button
5
LCD Monitor 3D/2D Display Switching Button
0
Switches the display on the LCD monitor between 3D and 2D. The
image will be recorded in 3D even if the display on the LCD monitor
is set to 2D.
6
Menu Button
“Operating the Menu” (A p. 99)
7
Display Button
Some displays disappear after approximately 3 seconds.
Use the n button to change the displays as shown below.
0
Tap n button
Displays appear for approximately 3 seconds with every tap.
0
Tap and hold n button
Displays are fixed such that they do not disappear. After setting, the
display button changes from n to m.
Tap m to release the displays.
Playback Screen (Video)
.
1
Parallax Adjustment Button
0
Adjusts the 3D effect when 3D images are displayed on the LCD
monitor.
“Adjusting Parallax During Playback” (A p. 56)
2
Recording/Playback Mode Button
0
Switches between recording and playback modes.
3
Index Screen Button
“Operation Buttons for Video Playback” (A p. 53)
4
Delete Button
“Deleting the Currently Displayed File” (A p. 65)
5
LCD Monitor 3D/2D Display Switching Button
0
Switches the display on the LCD monitor between 3D and 2D.
6
Menu Button
“Operating the Menu” (A p. 99)
7
Operation Buttons
“Operation Buttons for Video Playback” (A p. 53)
Playback Screen (Still Image)
.
1
Group Playback Button
0
Continuous playback of grouped files (such as still images captured
by continuous shooting).
“Playing Back Still Images” (A p. 55)
2
Parallax Adjustment Button
0
Adjusts the 3D effect when 3D images are displayed on the LCD
monitor.
“Adjusting Parallax During Playback” (A p. 56)
3
Recording/Playback Mode Button
0
Switches between recording and playback modes.
4
Index Screen Button
“Operation Buttons for Still Image Playback” (A p. 55)
5
Delete Button
Getting Started
18
“Deleting the Currently Displayed File” (A p. 65)
6
LCD Monitor 3D/2D Display Switching Button
0
Switches the display on the LCD monitor between 3D and 2D.
7
Menu Button
“Operating the Menu” (A p. 99)
8
Operation Buttons
“Operation Buttons for Still Image Playback” (A p. 55)
Index Screen
.
1
Date Button
“Operation Buttons for Video Playback” (A p. 53)
“Operation Buttons for Still Image Playback” (A p. 55)
2
Recording/Playback Mode Button
0
Switches between recording and playback modes.
3
Index Screen Switching Button (Still image only)
0
Switches between the group or full index screen displays.
4
Delete Button
“Deleting Selected Files” (A p. 65)
5
Playback Media Button
0
Switches between SD card and built-in memory.
6
Menu Button
“Operating the Menu” (A p. 99)
7
Page Forward/Back Button
“Operation Buttons for Video Playback” (A p. 53)
“Operation Buttons for Still Image Playback” (A p. 55)
Menu Screen
.
1
Help Button
2
Menu Items
3
Return Button
4
Common Menu Button
5
Close Button
“Operating the Menu” (A p. 99)
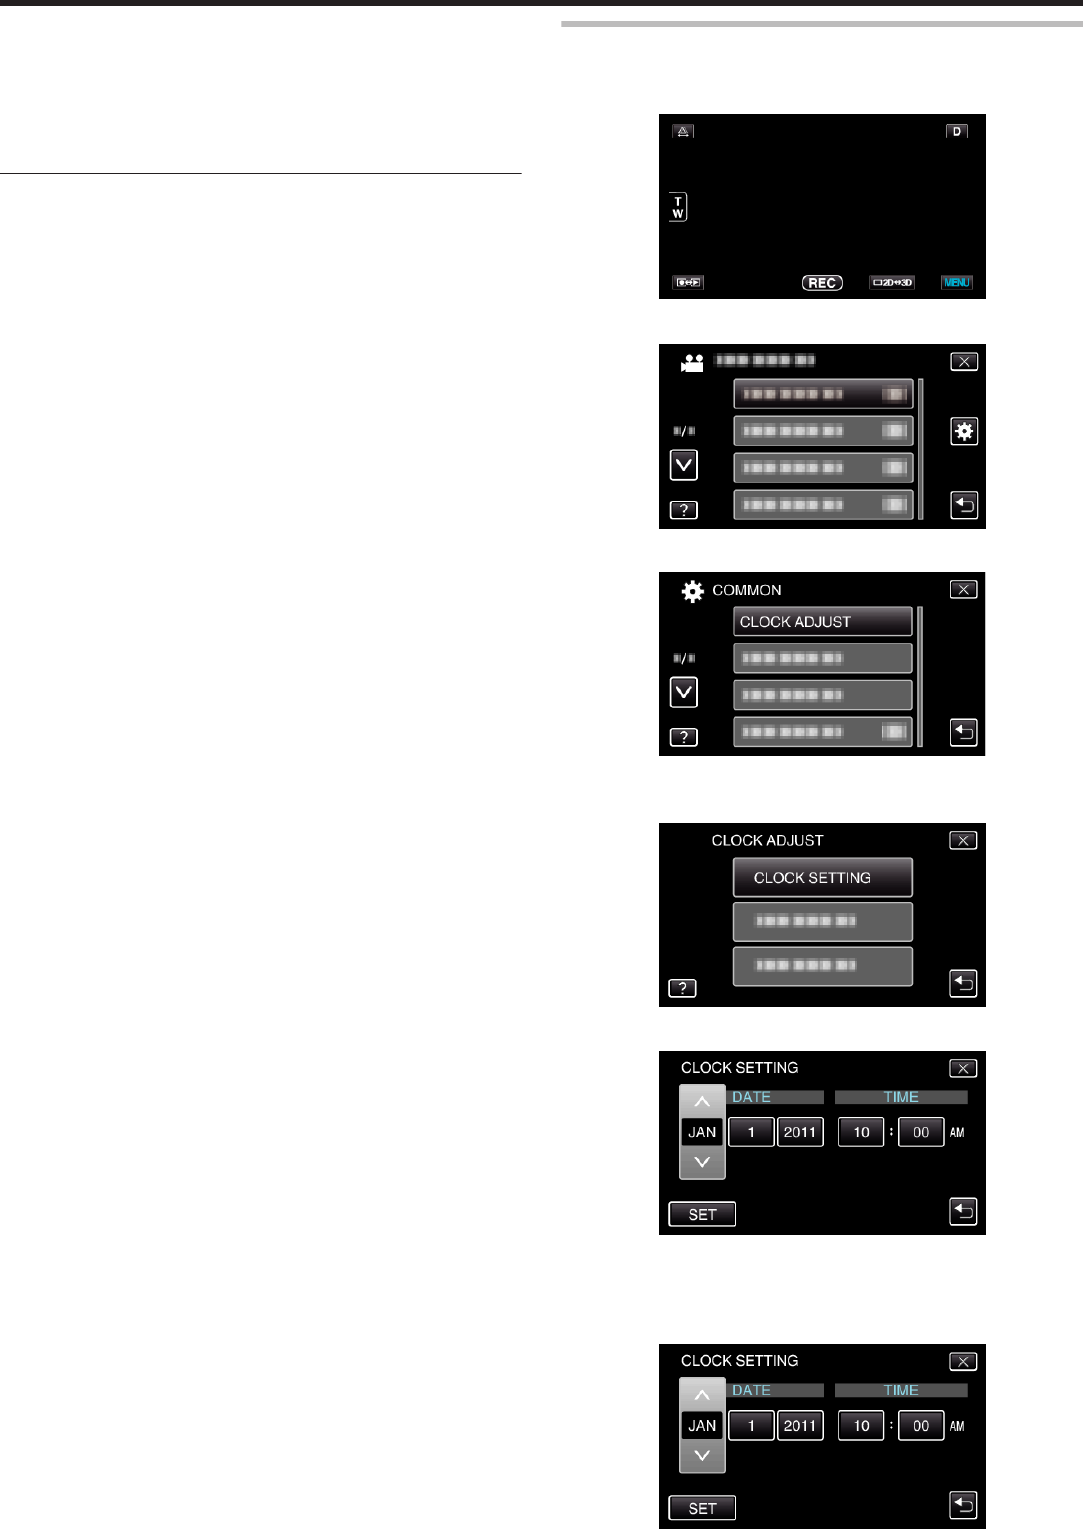
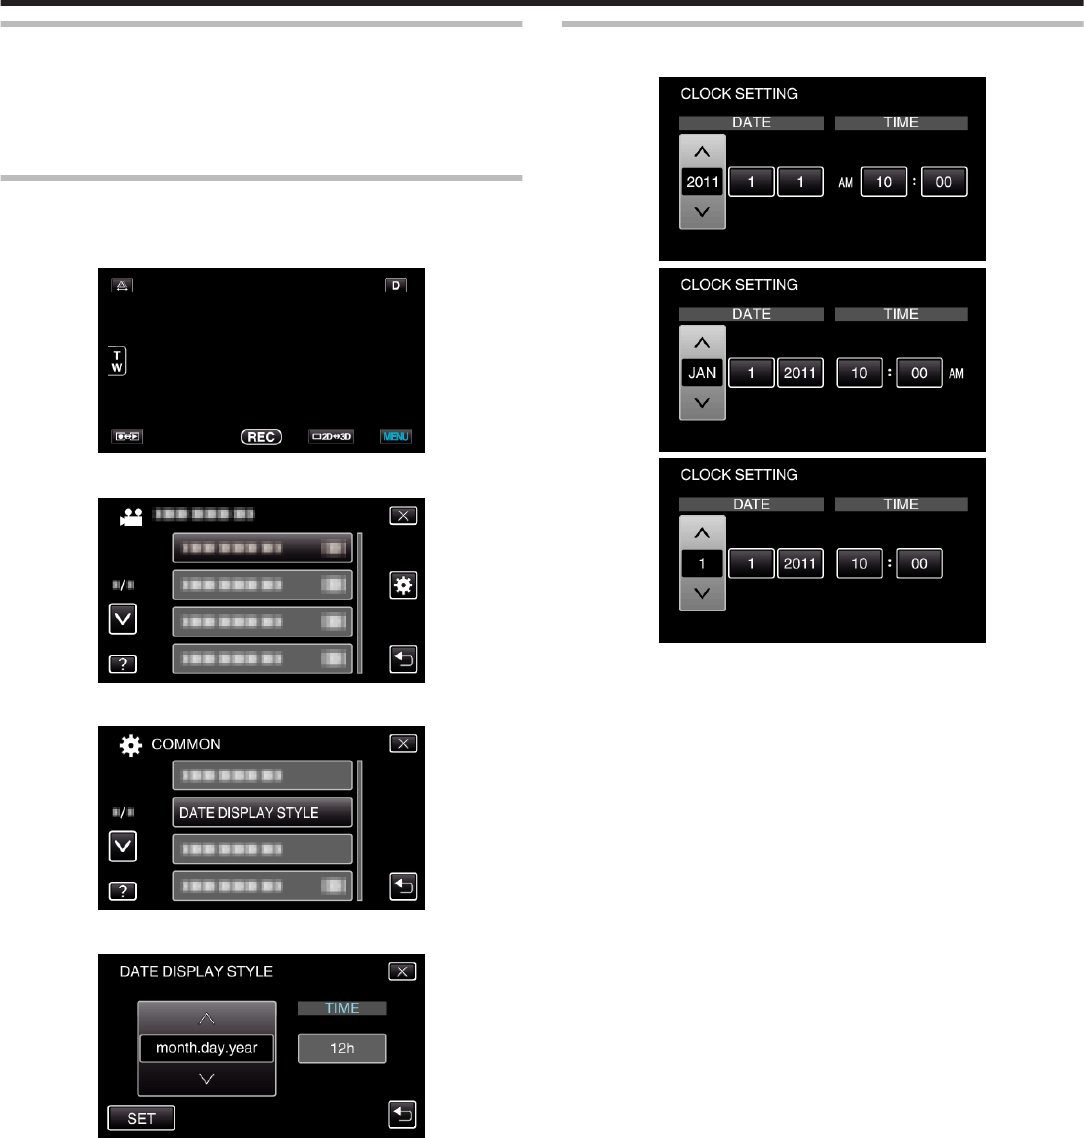
Clock Setting
The “SET DATE/TIME!” screen appears when you turn on this unit for the
first time after purchase, when it has not been used for a long time, or when
the clock is not set yet.
Set the clock before recording.
1
Open the LCD monitor.
.
0
The unit turns on.
0
When the LCD monitor is closed, the unit turns off.
2
Tap “YES” when “SET DATE/TIME!” is displayed.
.
3
Set the date and time.
.
0
When the year, month, day, hour, or minute item is tapped, “∧” and
“∨” will be displayed.
0
Tap ∧ or ∨ to adjust the year, month, day, hour, and minute.
4
After setting the date and time, tap “SET”.
.
5
Select the region where you live and tap “SAVE”.
.
0
The city name and time difference are displayed.
0
Tap “<” or “>” to select the city name.
Memo :
0
The clock can be reset again later.
“Resetting the Clock” (A p. 20)
Getting Started
19
0
When using this unit overseas, you can set it to the local time for recording.
“Setting the Clock to Local Time when Traveling” (A p. 25)
0
“SET DATE/TIME!” is displayed when you turn on this unit after it has not
been used for a prolonged period.
Connect the AC adapter for more than 24 hours to charge the internal clock
battery of this unit before setting the clock.
“Charging the Battery Pack” (A p. 15)
Resetting the Clock
Set the clock with “CLOCK ADJUST” from the menu.
1
Tap “MENU”.
.
2
Tap “Q”.
.
3
Tap “CLOCK ADJUST”.
.
0
Tap ∧ or ∨ to move upward or downward for more selection.
4
Tap “CLOCK SETTING”.
.
5
Set the date and time.
.
0
When the year, month, day, hour, or minute item is tapped, “∧” and
“∨” will be displayed.
0
Tap ∧ or ∨ to adjust the year, month, day, hour, and minute.
6
After setting the date and time, tap “SET”.
.
Getting Started
20
7
Select the region where you live and tap “SAVE”.
.
0
The city name and time difference are displayed.
0
Tap < or > to select the city name.
Changing the Display Language
The language on the display can be changed.
1
Tap “MENU”.
.
2
Tap “Q”.
.
3
Tap “LANGUAGE”.
.
0
Tap ∧ or ∨ to move upward or downward for more selection.
4
Tap to the desired language.
.
0
Tap ∧ or ∨ to move upward or downward for more selection.
Getting Started
21
Holding this Unit
When holding this unit, keep your elbows close to your sides to prevent
camera shake.
.
0
Hold the LCD monitor with your left hand and adjust the angle accordingly.
Holding the LCD monitor with your left hand helps to stabilize the camera
for recording.
Caution :
0
Be careful not to drop this unit during transportation.
0
Guardians should pay close attention when this unit is being used by
children.
Memo :
0
If camera shake is excessive, use the digital image stabilizer.
“Reducing Camera Shake” (A p. 44)
Tripod Mounting
This unit can be mounted on a tripod (or monopod). This is useful for
preventing camera shake.
.
0
To prevent this unit from falling off, check the tripod mounting screw holes
and positioning holes on the unit carefully before mounting, and turn the
screws until they are fastened firmly.
Caution :
0
To prevent injuries or damages which may result if this unit falls off, read
the instruction manual of the tripod (or monopod) to be used and make
sure that it is securely attached.
Memo :
0
It is recommended to use a tripod or monopod when recording in
conditions prone to camera shake (such as in dark places or when zoomed
to the telephoto end).
0
Set the digital image stabilizer to Z (OFF) when using a tripod for
recording.
“Reducing Camera Shake” (A p. 44)
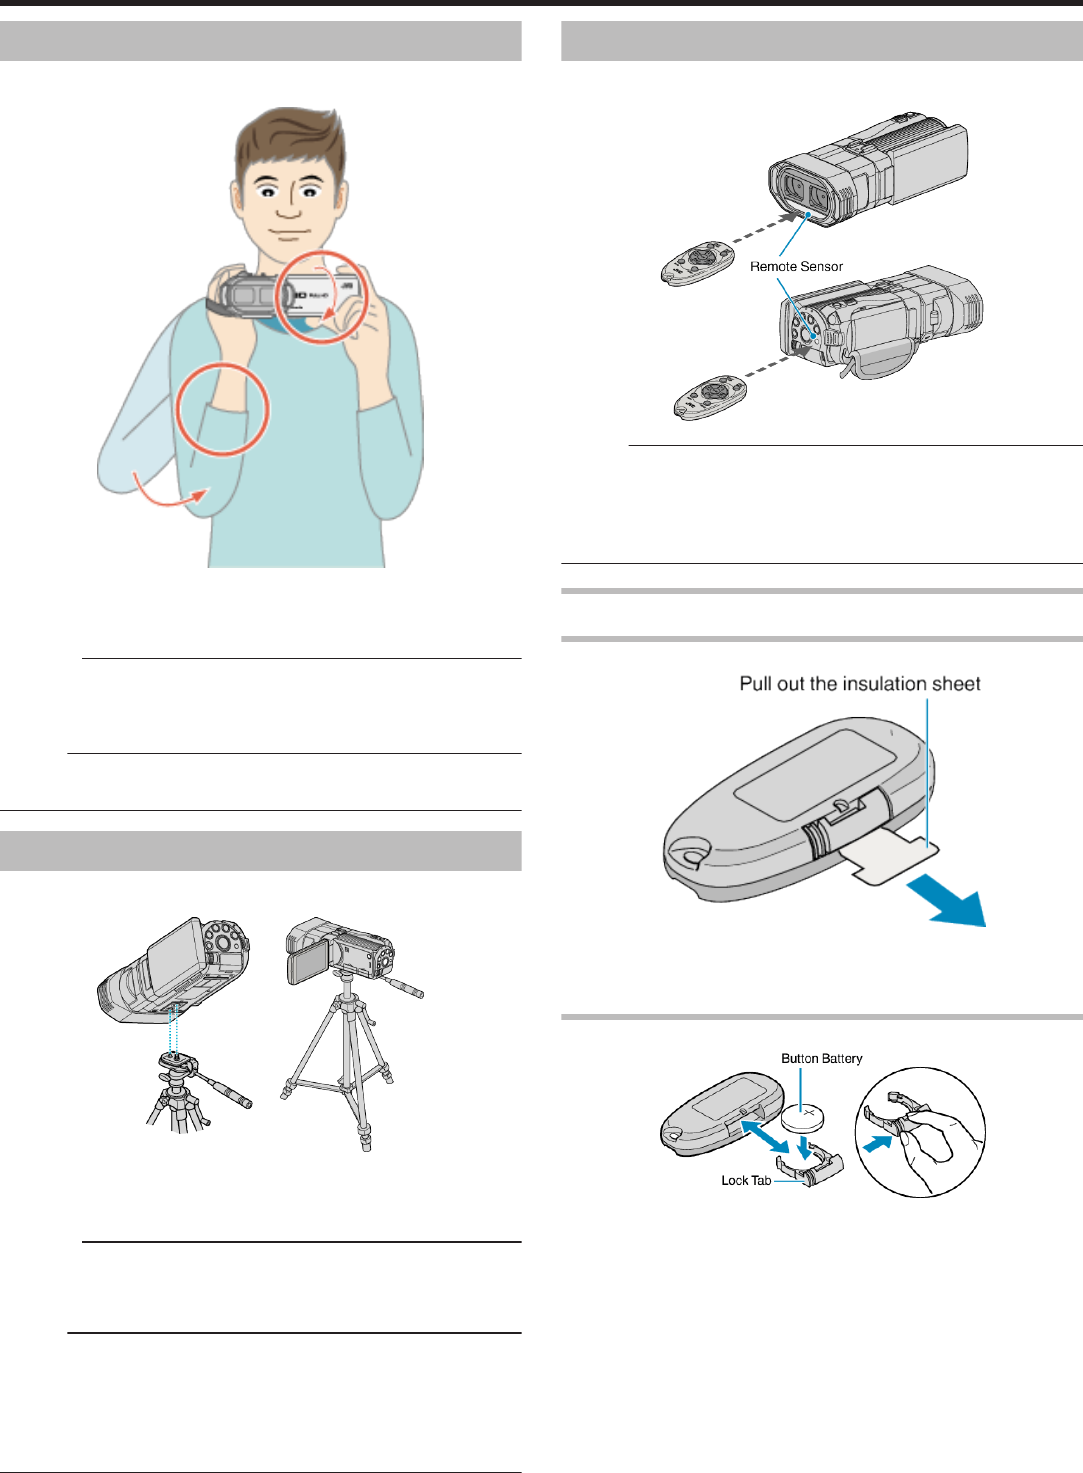
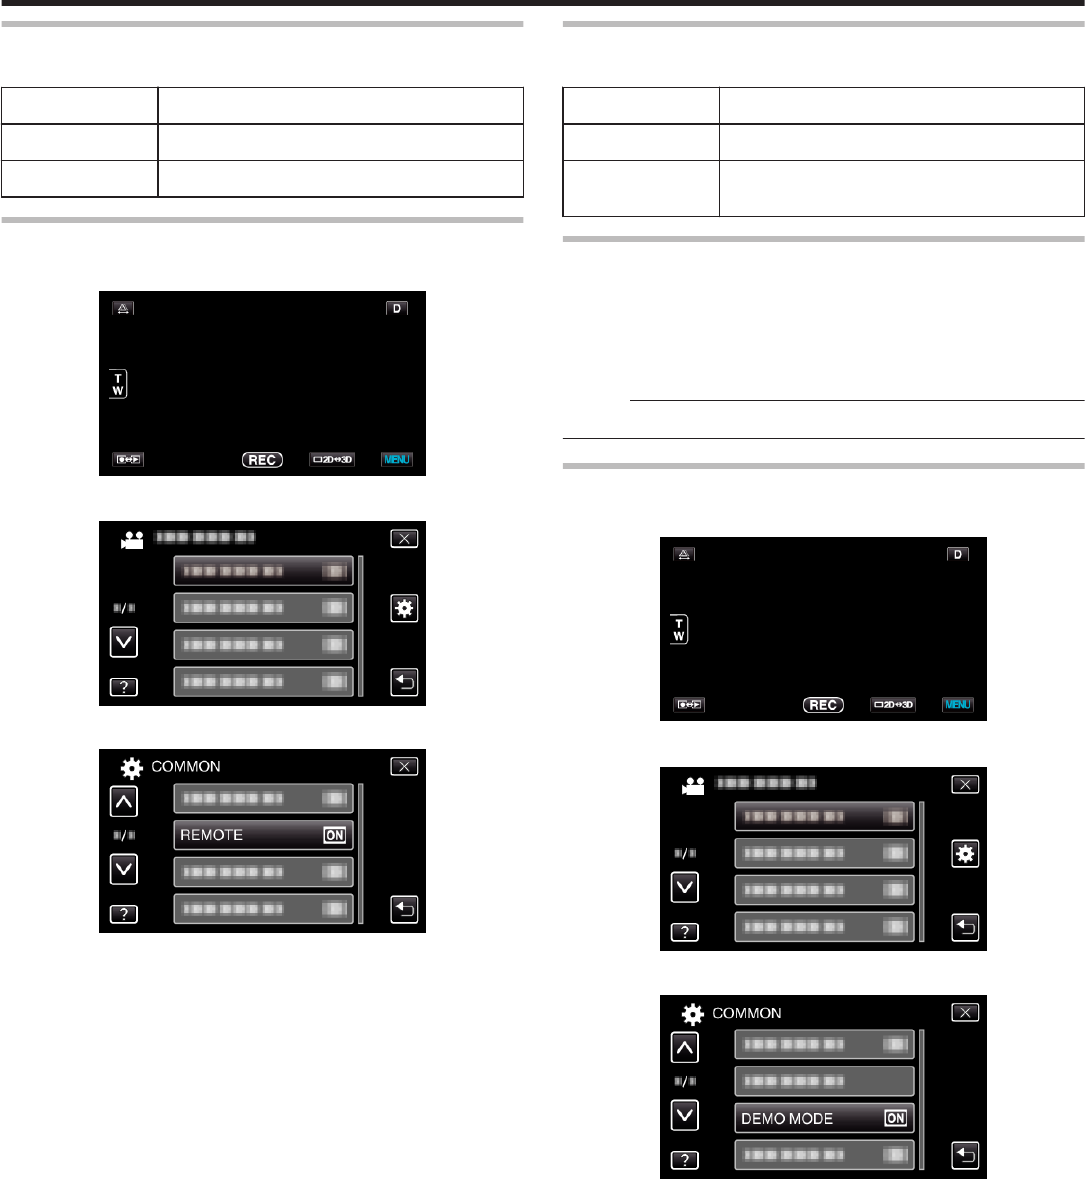
Using the Remote Control
You can operate this unit from a distance away using the supplied remote
control.
.
Memo :
0
Point the remote control toward the sensor directly and use it within 5 m
from this unit.
0
The transmitted beam may not be effective or may cause incorrect
operation when the sensor is directly exposed to sunlight or powerful
lighting.
Preparing the Remote Control
Using the Remote Control for the First Time
.
0
A button battery (CR2025) is included inside the remote control at the time
of purchase.
Remove the insulation sheet before use.
Reinserting the Battery
.
0
Pull out the battery holder by pressing the lock tab.
0
Insert the button battery with the + side facing upward.
Getting Started
22
Operation Buttons on Remote Control Unit
.
1
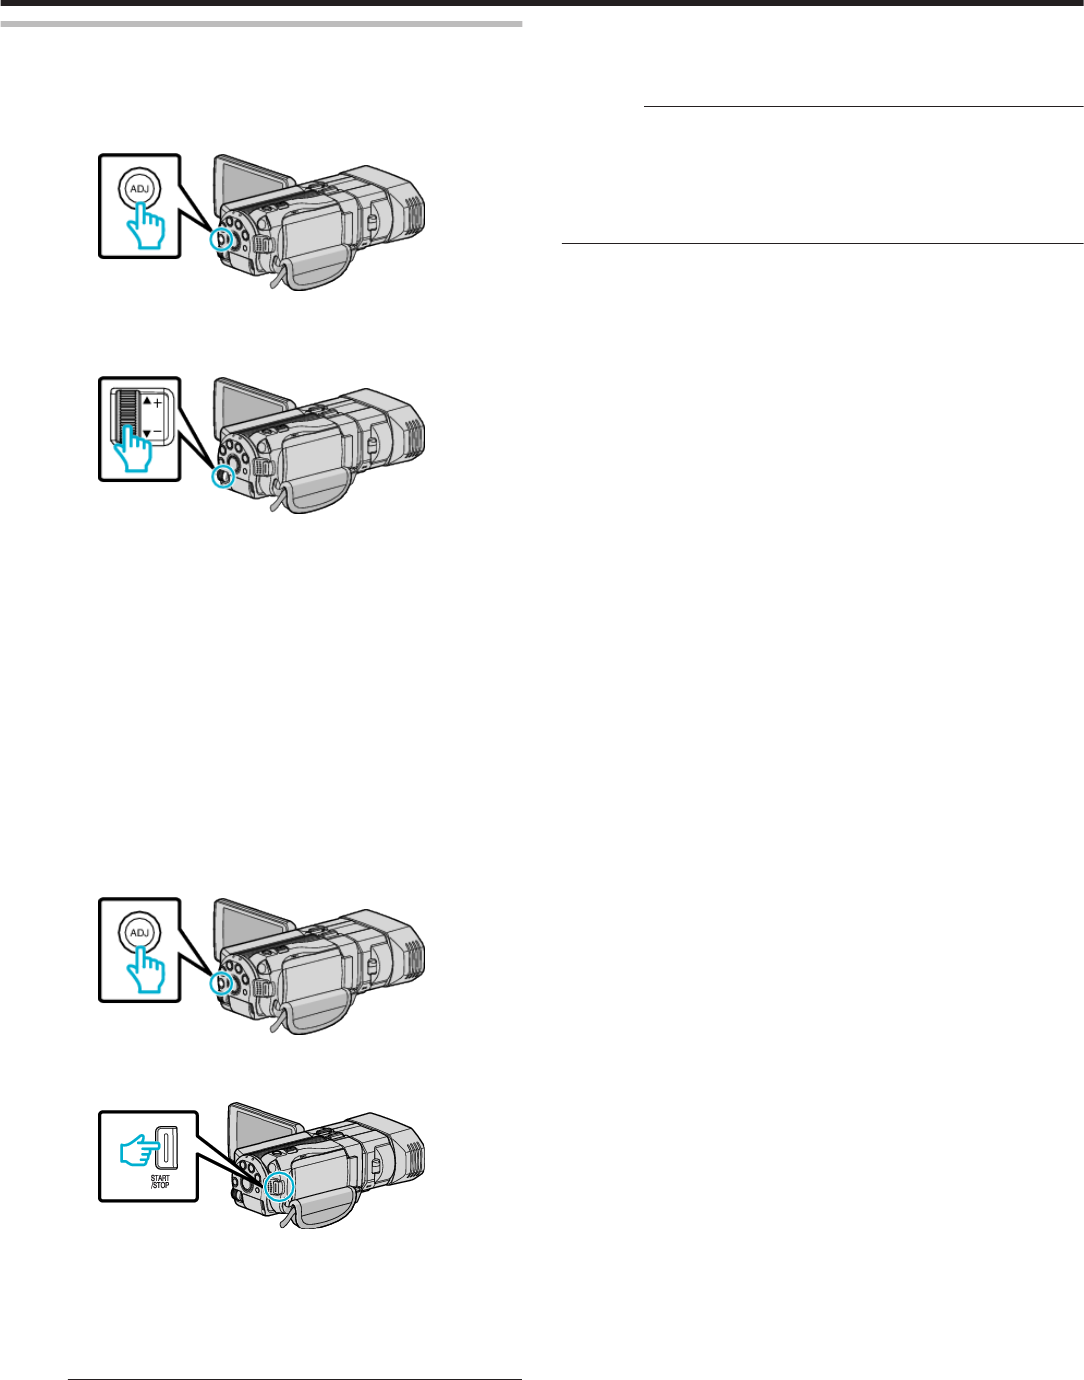
Recording Start/Stop Button
0
Starts/stops video recording.
2
Still Image Button
0
Takes a still image.
3
Zoom Button
0
T: Zooms in
0
W: Zooms out
4
Basic Playback Operations
Operation ButtonDescription
Playback/Pause
Button
d / e
0
Starts/pauses playback of videos or
slideshows.
Left Button j
0
Moves the cursor to the left.
0
Performs reverse search during playback.
Right Button i
0
Moves the cursor to the right.
0
Performs forward search during playback.
T Button N
0
Zooms in. (during pause)
0
Turns up (+) the volume during video playback.
W Button O
0
Zooms out. (during pause)
0
Turns down (-) the volume during video
playback.
5
Index Button
0
Stops playback and returns to thumbnail display.
6
Info Button
0
Recording: Displays the remaining time (for video only) and battery
power.
0
Playback: Displays file information such as recording date.
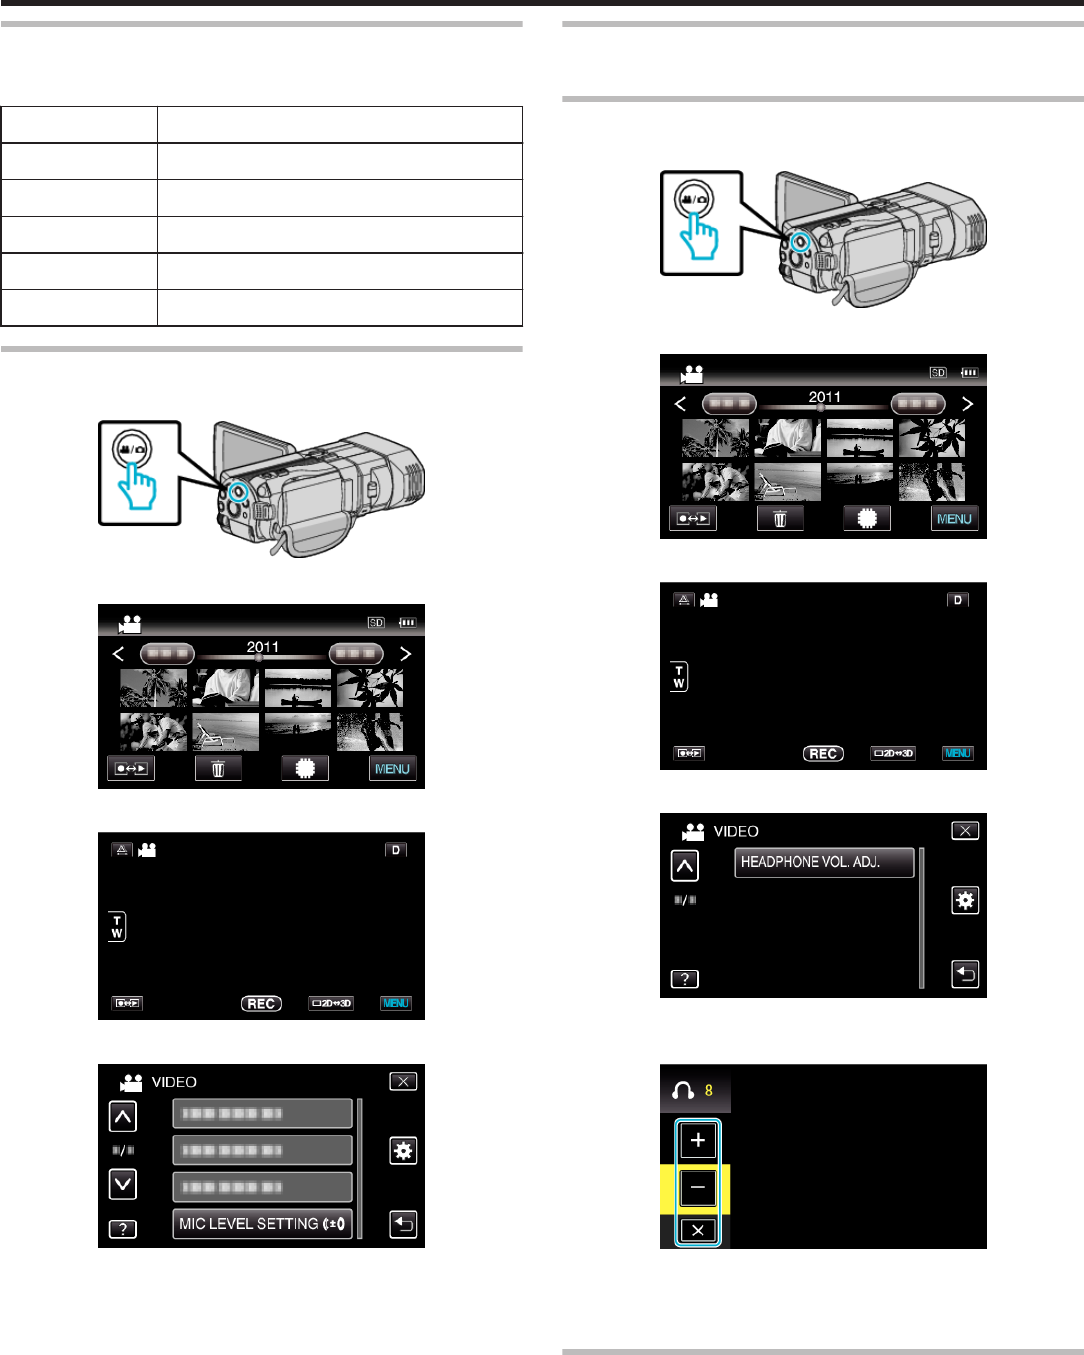
Attaching Headphones
You can attach optional headphones to this unit.
1
Open the cover of the headphones connector.
.
2
Connect the headphones to the headphones connector.
.
Memo :
0
The volume level of the headphones can be adjusted using
“HEADPHONE VOL. ADJ.” in the menu.
“HEADPHONE VOL. ADJ.” (A p. 108)
Getting Started
23
Attaching an External Microphone
You can attach an optional external microphone to this unit.
0
The recommended external microphone for this unit is MZ-V8. For details,
consult your JVC dealer.
1
Attach an external microphone (optional) to the shoe.
.
2
Open the cover of the microphone connector and connect the cable of
the external microphone.
.
Memo :
0
Do not apply too much force when attaching accessories such as an
external microphone.
0
The microphone level display and setting can be changed in the menu.
“MIC LEVEL” (A p. 107)
“MIC LEVEL SETTING” (A p. 108)
Using this Unit Overseas
The shape of the power outlet varies according to countries and regions.
To charge the battery pack, you need a converter plug that matches the
shape of the outlet.
“Charging the Battery Pack Overseas” (A p. 24)
Change the date and time display to the local time by selecting your travel
destination in “AREA SETTING” of “CLOCK ADJUST”.
“Setting the Clock to Local Time when Traveling” (A p. 25)
When “ON” is selected in “DST SETTING” of “CLOCK ADJUST”, the time is
set 1 hour ahead.
“Setting Daylight Saving Time” (A p. 25)
Charging the Battery Pack Overseas
The shape of the power outlet varies according to countries and regions.
To charge the battery pack, you need a converter plug that matches the
shape of the outlet.
.
Getting Started
24
Setting the Clock to Local Time when Traveling
Change the date and time display to the local time by selecting your travel
destination in “AREA SETTING” of “CLOCK ADJUST”.
Restore the region settings after you returned from the trip.
1
Tap “MENU”.
.
2
Tap “Q”.
.
3
Tap “CLOCK ADJUST”.
.
0
Tap ∧ or ∨ to move upward or downward for more selection.
4
Tap “AREA SETTING”.
.
5
Select the area you are traveling to and tap “SAVE”.
.
0
The city name and time difference are displayed.
0
Tap < or > to select the city name.
Memo :
0
Setting “AREA SETTING” changes the clock time such that time difference
is accounted for.
After returning to your country, re-select the region that was set initially to
restore the original clock settings.
Setting Daylight Saving Time
When “ON” is selected in “DST SETTING” of “CLOCK ADJUST”, the time is
set 1 hour ahead.
1
Tap “MENU”.
.
2
Tap “Q”.
.
3
Tap “CLOCK ADJUST”.
.
0
Tap ∧ or ∨ to move upward or downward for more selection.
4
Tap “DST SETTING”.
.
5
Tap “ON”.
.
Memo :
0
What is daylight saving time?
Daylight saving time is the system of setting the clock 1 hour ahead for a
fixed period in summer.
It is used mainly in the Western countries.
0
Restore the daylight saving time settings after you returned from the trip.
Getting Started
25
Optional Accessories
You can record for a longer time by using the optional battery pack.
Product NameDescription
Battery Pack
0
BN-VF815U
0
BN-VF823U
0
BN-VF815U is the same battery pack that comes
with this unit. BN-VF823U provides a longer
recording time than the provided battery pack. It
can also be used as a spare battery pack.
Battery Charger
0
AA-VF8
0
Enables the battery pack to be charged without
using this unit.
HDMI Cable
0
VX-HD310
0
VX-HD315
0
VX-HD320
0
VX-HD330
0
Allows viewing in high picture quality when
connected to a TV.
0
Transmits video, audio, and control signals
between devices.
Memo :
0
For more information, consult your JVC dealer.
0
For details on the provided accessories, refer to “Verifying the
Accessories”.
“Verifying the Accessories” (A p. 13)
Approximate Recording Time (Using Battery)
o
3D Display on LCD Monitor
Battery PackActual Recording TimeContinuous Recording Time
3D Recording MP4(MVC)3D Recording AVCHD3D Recording MP4(MVC)3D Recording AVCHD
BN-VF815U
(Supplied)
55 m1 h1 h 45 m2 h
BN-VF823U1 h 20 m1 h 35 m2 h 40 m3 h 5 m
o
2D Display on LCD Monitor
Battery PackActual Recording Time
3D Recording MP4(MVC)3D Recording AVCHD2D Recording
BN-VF815U
(Supplied)
55 m1 h 5 m1 h 20 m
BN-VF823U1 h 25 m1 h 40 m1 h 55 m
Battery PackContinuous Recording Time
3D Recording MP4(MVC)3D Recording AVCHD2D Recording
BN-VF815U
(Supplied)
1 h 50 m2 h 10 m2 h 35 m
BN-VF823U2 h 45 m3 h 15 m3 h 50 m
0
The above are values when “MONITOR BRIGHTNESS” is set to “STANDARD”.
0
The actual recording time may be shorter if zooming is used or if recording is stopped repeatedly.
(It is recommended to prepare battery packs ready for three times the expected recording time.)
0
When the battery life is reached, the recording time becomes shorter even if the battery pack is fully charged.
(Replace the battery pack with a new one.)
Getting Started
26
Taking Videos in 3D Mode
You can record 3D images by pressing the 3D button to set to the 3D mode.
During 3D mode, “3D” is displayed on the LCD monitor.
1
Open the lens cover.
.
2
Open the LCD monitor and select the video mode.
.
0
The video mode icon A appears.
3
Check if the recording mode is P Intelligent Auto.
.
0
If the mode is H Manual, press the H/T button to switch to P
Intelligent Auto.
The mode changes between Intelligent Auto and Manual with every
press.
4
Press the 3D button to set to the 3D mode.
.
0
During 3D mode, “3D” is displayed on the LCD monitor.
0
3D images may be recorded when the 3D button lights up.
5
Start recording.
.
0
Press again to stop.
Memo :
0
To record 3D images, refer also to ““Precautions on Recording and Playing
Back 3D Images” (A p. 11) ”.
0
If the left and right images of an object close to the camera do not appear
to be in alignment, or the 3D effect of a distant object is weak, adjust the
parallax.
“Adjusting Parallax During Recording” (A p. 34)
0
When “PARALLAX ADJUSTMENT” is assigned to the ADJ button,
parallax can be adjusted manually using the ADJ button and control dial.
“Using the Control Dial for Recording” (A p. 43)
0
You can change the display on the LCD monitor between 3D and 2D
during recording by tapping on the 3D/2D icon. The image will be recorded
in 3D even if the display on the LCD monitor is set to 2D. To record 2D
images, press the 3D button to switch to the 2D mode before recording.
“Taking Videos in Intelligent Auto Mode” (A p. 29)
0
If the microphone level is frequently displayed in red, lower the setting in
“MIC LEVEL SETTING” such that the display turns green so that more
realistic audio sounds can be recorded.
“MIC LEVEL SETTING” (A p. 108)
3D recording formats
There are 2 types of 3D recording formats, namely “AVCHD” and
“MP4(MVC)”.
By default, “3D VIDEO REC FORMAT” is set to “AVCHD”.
“Changing the Setting” (A p. 104)
o
AVCHD
Set to this recording format for higher compatibility.
.
o
MP4(MVC)
Set to this recording format for higher video quality.
.
Memo :
0
Videos recorded in “MP4(MVC)” format are saved in full high definition
and can only be played back on this unit.
0
To record 3D images to a disc with a Blu-ray recorder or a computer, set
to “AVCHD”.
0
By dubbing videos recorded in “AVCHD” format to a Blu-ray recorder, the
left and right images will be recorded or played back separately, allowing
3D images to be enjoyed when connected to a 3D compatible TV.
0
Videos recorded in “MP4(MVC)” and “AVCHD” are displayed on the
playback index screen separately.
Recording
27
Taking Still Images in 3D Mode
You can record 3D images by pressing the 3D button to set to the 3D mode.
During 3D mode, “3D” is displayed on the LCD monitor.
1
Open the lens cover.
.
2
Open the LCD monitor and select the still image mode.
.
0
The still image icon B appears.
3
Press the 3D button to set to the 3D mode.
.
0
During 3D mode, “3D” is displayed on the LCD monitor.
0
3D images may be recorded when the 3D button lights up.
4
Set the focus on the subject.
.
0
When focused, the focus icon lights up in green.
5
Take a still image.
.
0
PHOTO lights up when a still image is being captured.
Memo :
0
When 3D recording is performed, still images will be saved in both 3D and
2D formats.
0
3D still images are saved as MP files (*.mpo).
0
3D still images cannot be printed. To print, make use of the 2D still image
that is captured at the same time.
0
Use the provided software (Everio Media Browser 3D) to transfer 3D still
images to a computer for playback.
“Copying to Windows PC” (A p. 91)
0
To record 3D images, refer also to ““Precautions on Recording and Playing
Back 3D Images” (A p. 11) ”.
0
If the left and right images of an object close to the camera do not appear
to be in alignment, or the 3D effect of a distant object is weak, adjust the
parallax.
“Adjusting Parallax During Recording” (A p. 34)
0
When “PARALLAX ADJUSTMENT” is assigned to the ADJ button,
parallax can be adjusted manually using the ADJ button and control dial.
“Using the Control Dial for Recording” (A p. 43)
Recording
28
Taking Videos in Intelligent Auto Mode
You can record without worrying about the setting details by using the
Intelligent Auto mode.
0
Before recording an important scene, it is recommended to conduct a trial
recording.
1
Open the lens cover.
.
2
Open the LCD monitor and select the video mode.
.
0
The video mode icon A appears.
3
Check if the recording mode is P Intelligent Auto.
.
0
If the mode is H Manual, press the H/T button to switch to P
Intelligent Auto.
The mode changes between Intelligent Auto and Manual with every
press.
4
Start recording.
.
0
Press again to stop.
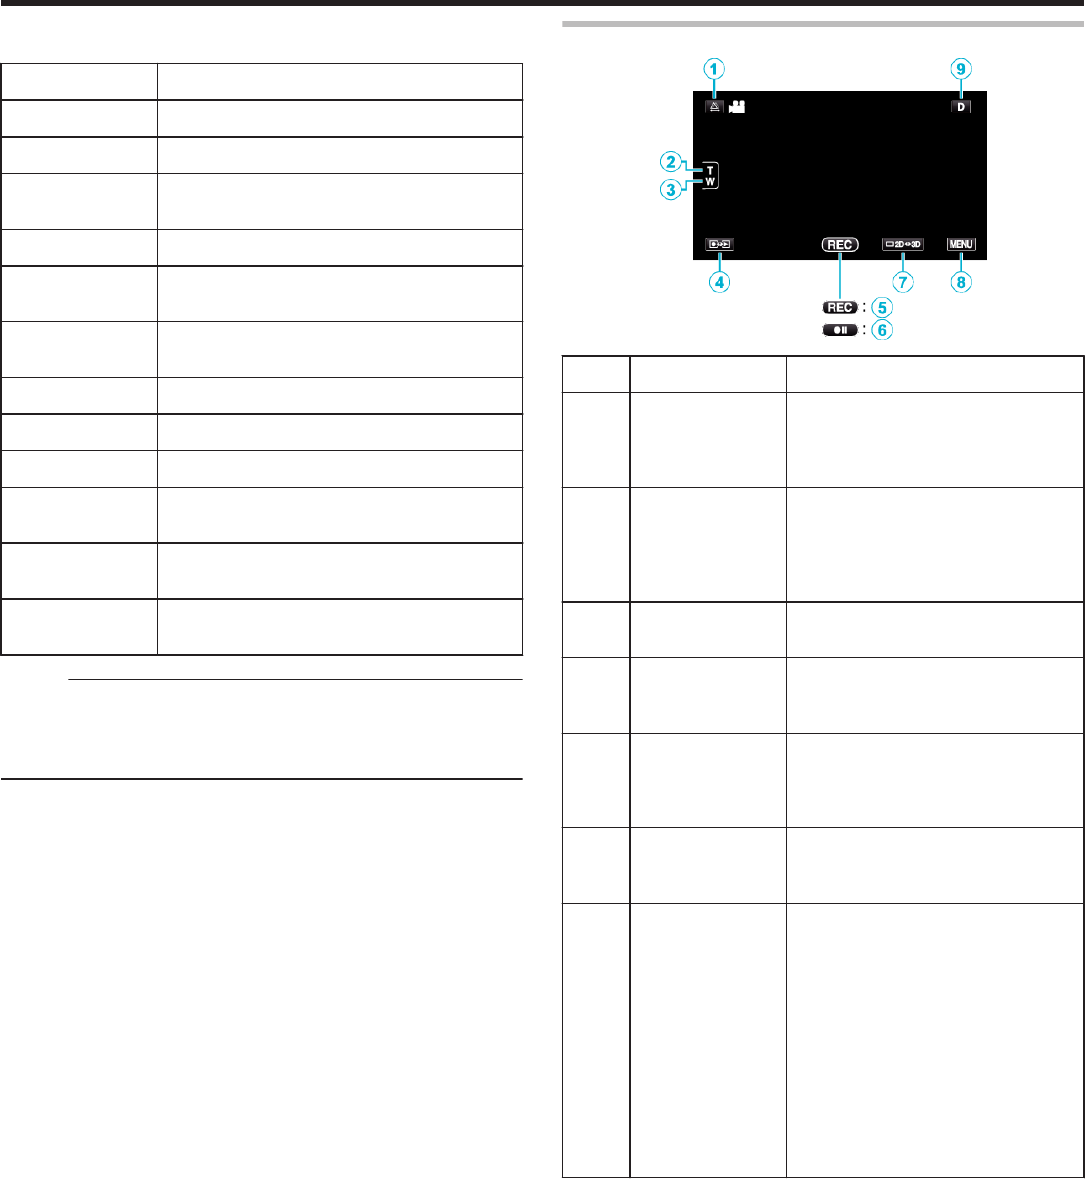
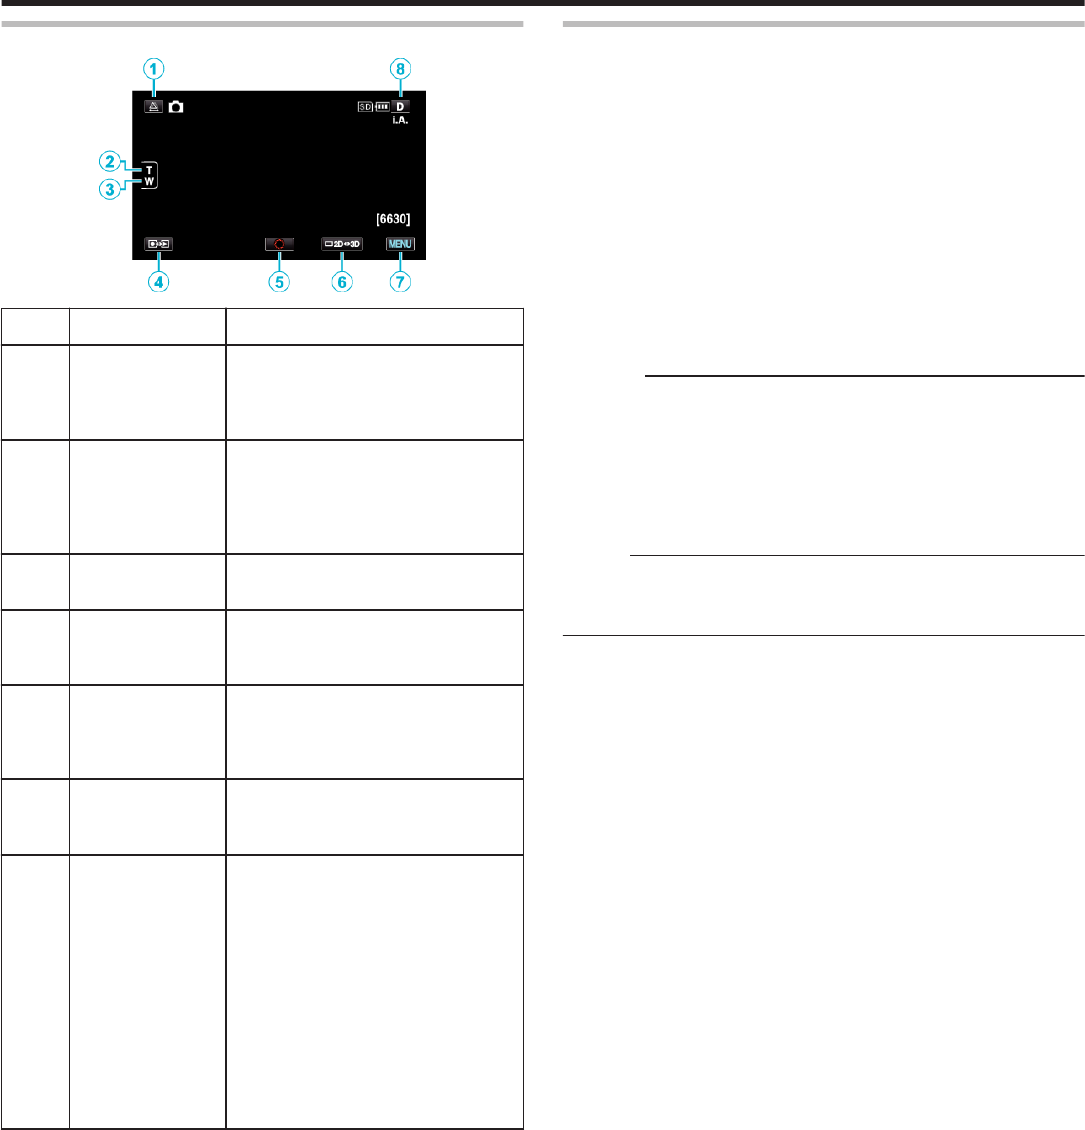
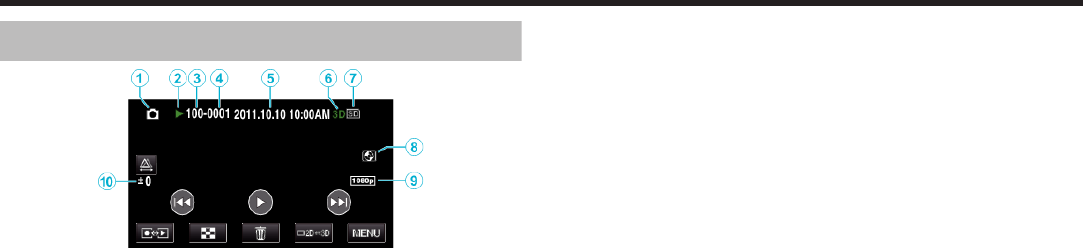
Indications During Video Recording
.
Display IconDescription
1
Parallax
Adjustment Value
(3D mode only)
Displays the adjusted value when performing
parallax adjustment manually.
“Adjusting Parallax During Recording”
(A p. 34)
2
3D VIDEO REC
FORMAT (3D mode
only)
Displays the recording format for 3D video
recording.
3
Video QualityDisplays the icon of the “VIDEO QUALITY”
setting selected in the recording menu.
“VIDEO QUALITY” (A p. 105)
4
3D/2D ModeDisplays the current recording mode of 3D or
2D. “3D” is displayed during 3D recording,
while “2D” is displayed during 2D recording.
5
Image StabilizerDisplays the icon of the “DIS” setting selected
in the recording menu.
“Reducing Camera Shake” (A p. 44)
6
Recording MediaDisplays the icon of the media where videos
are recorded to.
You can change the setting with “REC MEDIA
FOR VIDEO”.
“REC MEDIA FOR VIDEO” (A p. 122)
7
Battery IndicatorDisplays the approximate remaining battery
power.
Details of the battery power can be displayed
by pressing the INFO button.
“Remaining Recording Time/Battery Power”
(A p. 49)
8
Recording Mode
Displays the current recording mode of P
(Intelligent Auto) or H (Manual).
The mode changes with every press of the
i.AUTO button.
9
Remaining
Recording Time
Displays the remaining time for video
recording.
0
Scene Counter
(Recorded Time)
Displays the elapsed time of the video that is
currently being recorded.
Recording
29
o
Scenes of Intelligent Auto
Display IconDescription
E
Captures one’s skin beautifully.
A
Allows people to be captured naturally.
D
Focuses at a far distance and captures a sharp
image with vivid colors.
I
Records with minimal noise in the overall image.
B
Allows night scenes to be captured accurately with
minimal noise in the overall image.
J
Prevents colors from fading even when recording
in a bright environment.
G
Records while focusing on a near object.
H
Reproduces the green color of trees vividly.
F
Reproduces the colors of sunset naturally.
C
Adjusts settings so that the subject does not
appear too dark due to backlight.
K
Allows people to be captured naturally with minimal
noise in the overall image.
L
Records while focusing on a near object even in a
dark environment.
Memo :
0
Scenes can be detected according to the shooting conditions and
automatically adjusted in Intelligent Auto mode.
0
Some functions may not work properly depending on the shooting
conditions.
Operation Buttons for Video Recording
.
Operation ButtonDescription
1
Parallax
Adjustment
Adjusts the 3D effect when 3D images
are displayed on the LCD monitor.
“Adjusting Parallax During Recording”
(A p. 34)
2 / 3
T/W ZoomAllows the same functions as the zoom
lever to be performed.
Camera shake that often occurs when
using the zoom lever can be minimized.
“Zooming” (A p. 31)
4
Recording/
Playback Mode
Switches between recording and
playback modes.
5 / 6
Recording Start g
Record-Standby
a
Functions as the START/STOP button.
7
LCD Monitor 3D/2D
Display
Switches the display on the LCD monitor
between 3D and 2D. The image will be
recorded in 3D even if the display on the
LCD monitor is set to 2D.
8
MENUDisplays the various menus of video
recording.
“Operating the Menu” (A p. 99)
9
Display Button n
Some displays disappear after
approximately 3 seconds.
Use the n button to change the displays
as shown below.
0
Tap n button
Displays appear for approximately 3
seconds with every tap.
0
Tap and hold n button
Displays are fixed such that they do not
disappear. After setting, the display
button changes from n to m.
Tap m to release the displays.
Recording
30
Useful Settings for Recording
0
When “AUTO POWER OFF” is set to “ON”, this unit turns itself off
automatically to conserve power when it is not operated for 5 minutes.
(only when using the battery pack)
“AUTO POWER OFF” (A p. 124)
0
When “TOUCH PRIORITY AE/AF” is set to “FACE TRACKING”, this unit
detects faces and automatically adjusts its brightness and focus to record
the faces more clearly.
“Capturing Subjects Clearly (TOUCH PRIORITY AE/AF)” (A p. 44)
Caution :
0
Do not expose the lens to direct sunlight.
0
Do not use this unit in the rain, snow, or places with high humidity like the
bathroom.
0
Do not use this unit in places subject to excessive humidity or dust, as well
as places exposed to steam or smoke directly.
0
Do not remove the battery pack, AC adapter, or SD card when the access
lamp is lighted. The recorded data may become unreadable.
“Playing a Video with Defective Management Information” (A p. 54)
0
Make a backup of important recorded data.
It is recommended to copy your important recorded data to a DVD or other
recording media for storage.
JVC will not be responsible for any lost data.
Memo :
0
Before recording an important scene, it is recommended to conduct a trial
recording.
0
Check the remaining recording time in the media before you start shooting.
If there is not enough space, move (copy) the data to a computer or disc.
0
Do not forget to make copies after recording!
0
Recording stops automatically as it cannot be performed for 12 or more
consecutive hours according to specifications.
(It may take some time to resume recording.)
0
For long recordings, the file is split into two or more files if the size exceeds
4 GB.
0
You can connect this unit to the AC adapter to record for long hours
indoors.
0
The maximum number of files that can be recorded to the same media is
9999 for MP4 video and still image files respectively.
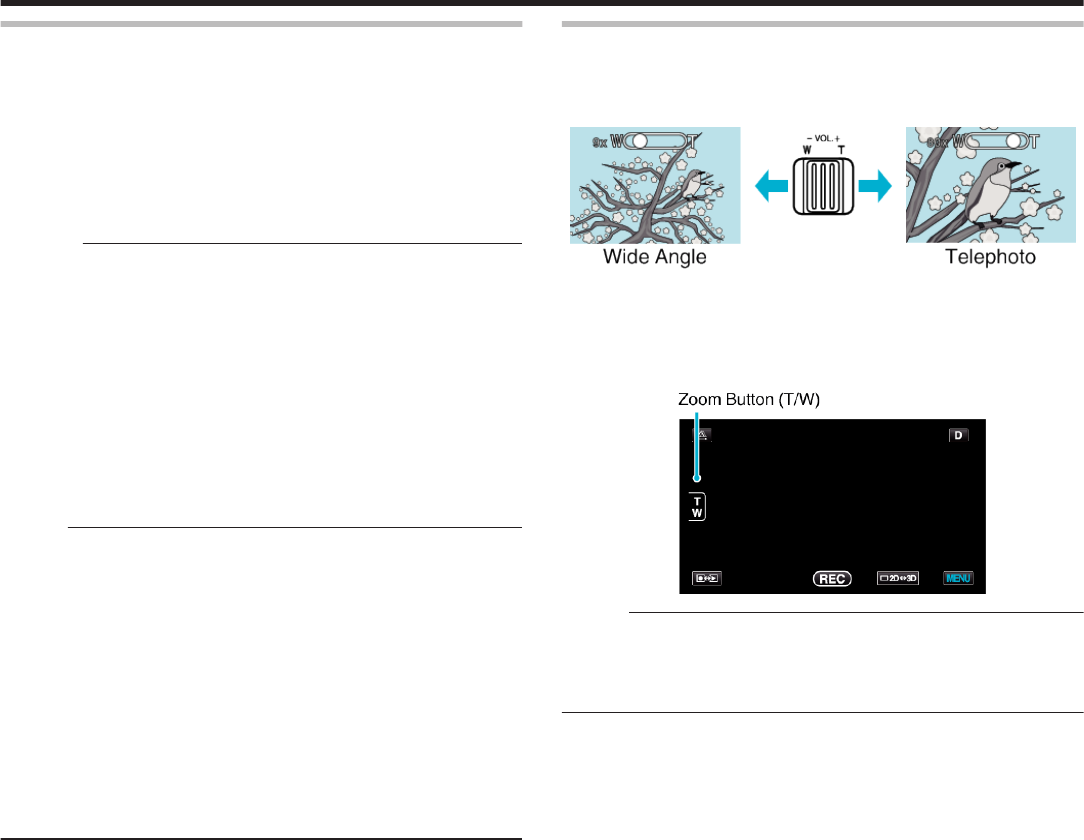
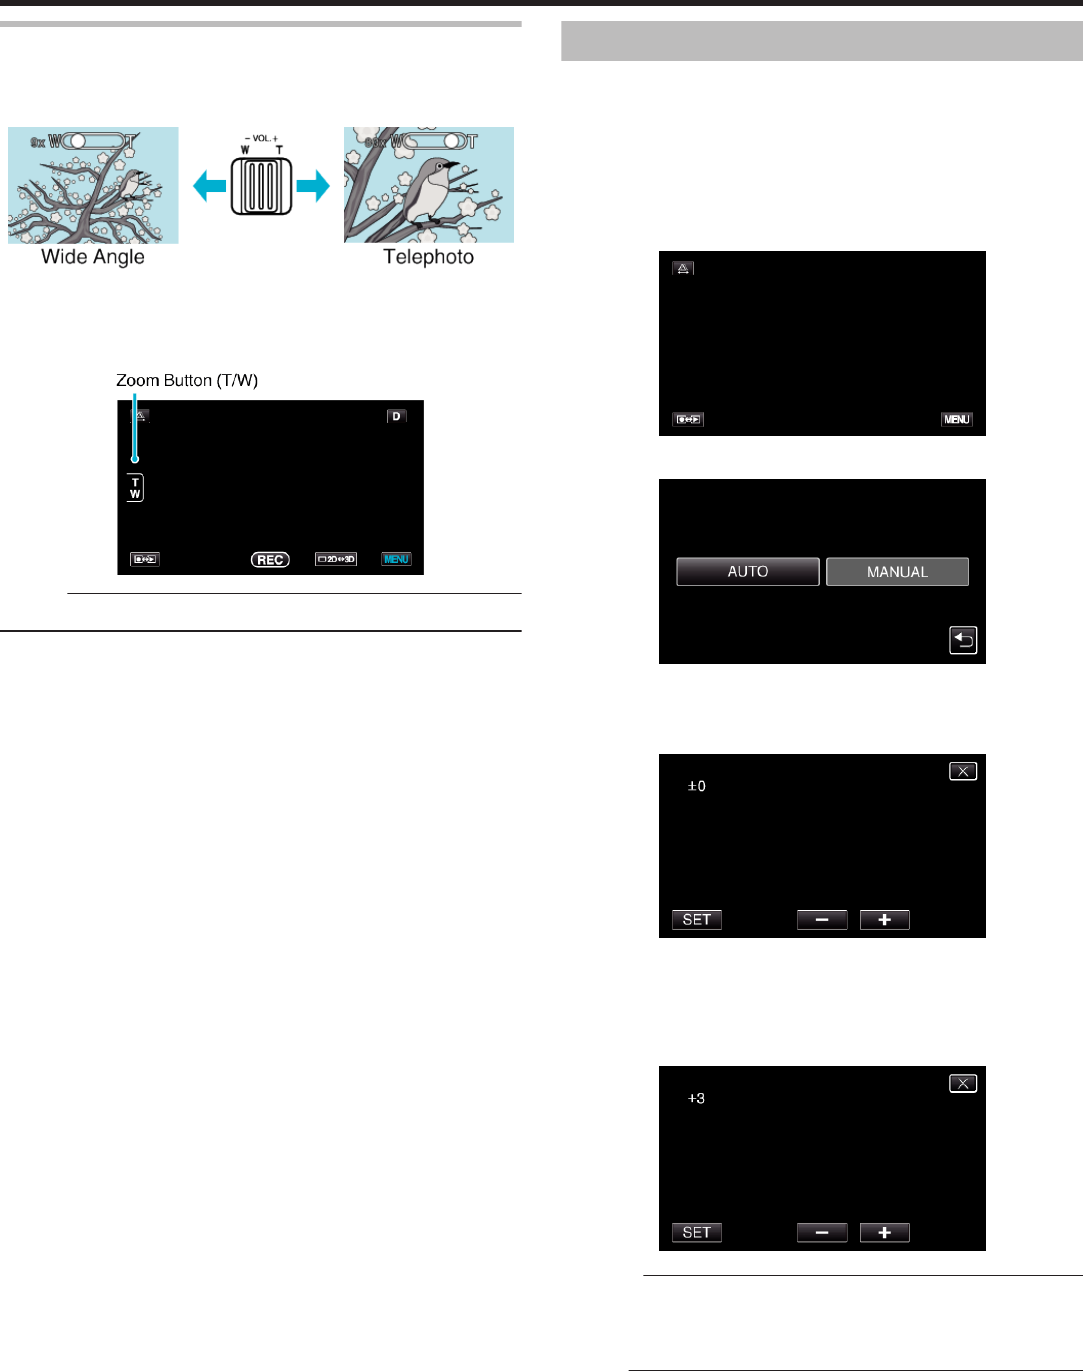
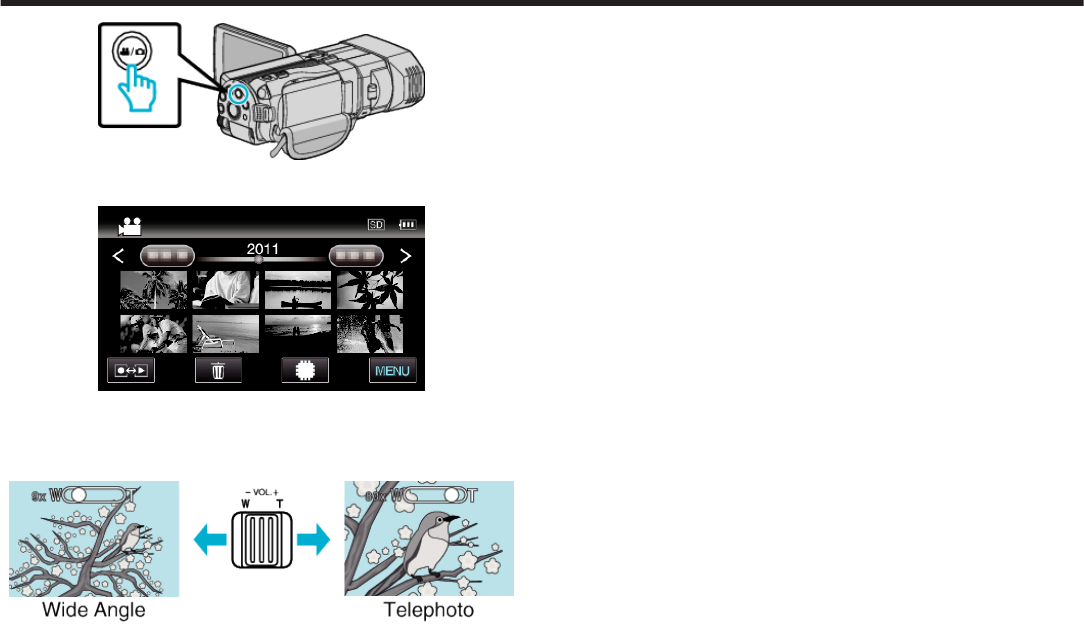
Zooming
The angle of view can be adjusted using zoom.
0
Use the W end (wide angle end) to shoot a wider field of view.
0
Use the T end (telephoto end) to magnify the subject for shooting.
.
0
The following zoom options are available:
- Optical Zoom (1 – 5x) *During 3D recording
- Optical Zoom (1 – 10x) *During 2D recording
- Digital Zoom (11 – 200x) *During 2D recording
0
You can also use the zoom (T/W) button on the touch screen to zoom.
.
Memo :
0
When digital zoom is used, the image becomes grainy as it is digitally
enlarged.
0
The zoom ratio range can be changed.
“ZOOM (2D mode only)” (A p. 106)
Recording
31
Taking Still Images in Intelligent Auto Mode
You can record without worrying about the setting details by using the
Intelligent Auto mode.
1
Open the lens cover.
.
2
Open the LCD monitor and select the still image mode.
.
0
The still image icon B appears.
3
Check if the recording mode is P Intelligent Auto.
.
0
If the mode is H Manual, press the H/T button to switch to P
Intelligent Auto.
The mode changes between Intelligent Auto and Manual with every
press.
4
Set the focus on the subject.
.
0
When focused, the focus icon lights up in green.
5
Take a still image.
.
0
PHOTO lights up when a still image is being captured.
Indications During Still Image Recording
.
Display IconDescription
1
Image SizeDisplays the icon of the image size.
0
The size of still images can be changed.
“IMAGE SIZE” (A p. 115)
2
Shutter SpeedDisplays the shutter speed.
3
FocusLights up in green when focused.
4
Recording in
Progress
Appears when a still image is being captured.
5
Remaining Number
of Shots
Displays the remaining number of shots for still
image recording.
6
Recording ModePress the i.AUTO button to switch the
recording mode between P (Intelligent Auto)
and H (Manual).
7
Display Button n
Some displays disappear after approximately
3 seconds.
Use the n button to change the displays as
shown below.
0
Tap n button
Displays appear for approximately 3
seconds with every tap.
0
Tap and hold n button
Displays are fixed such that they do not
disappear. After setting, the display button
changes from n to m.
Tap m to release the displays.
8
Battery IndicatorDisplays the approximate remaining battery
power.
Details of the battery power can be displayed
by pressing the INFO button.
“Remaining Recording Time/Battery Power”
(A p. 49)
9
Recording MediaDisplays the icon of the media where still
images are recorded to.
The recording media can be changed.
“REC MEDIA FOR IMAGE” (A p. 123)
0
3D/2D ModeDisplays the current recording mode of 3D or
2D. “3D” is displayed during 3D recording,
while “2D” is displayed during 2D recording.
Recording
32
Operation Buttons for Still Image Recording
.
Operation ButtonDescription
1
Parallax
Adjustment
Adjusts the 3D effect when 3D images
are displayed on the LCD monitor.
“Adjusting Parallax During Recording”
(A p. 34)
2 / 3
T/W ZoomAllows the same functions as the zoom
lever to be performed.
Camera shake that often occurs when
using the zoom lever can be minimized.
“Zooming” (A p. 31)
4
Recording/
Playback Mode
Switches between recording and
playback modes.
5
Snapshot
Q
Functions as the SNAPSHOT button.
However, focus cannot be set by
pressing halfway.
6
LCD Monitor 3D/2D
Display
Switches the display on the LCD monitor
between 3D and 2D. The image will be
recorded in 3D even if the display on the
LCD monitor is set to 2D.
7
MENUDisplays the various menus of still image
recording.
“Operating the Menu” (A p. 99)
8
Display Button n
Some displays disappear after
approximately 3 seconds.
Use the n button to change the displays
as shown below.
0
Tap n button
Displays appear for approximately 3
seconds with every tap.
0
Tap and hold n button
Displays are fixed such that they do not
disappear. After setting, the display
button changes from n to m.
Tap m to release the displays.
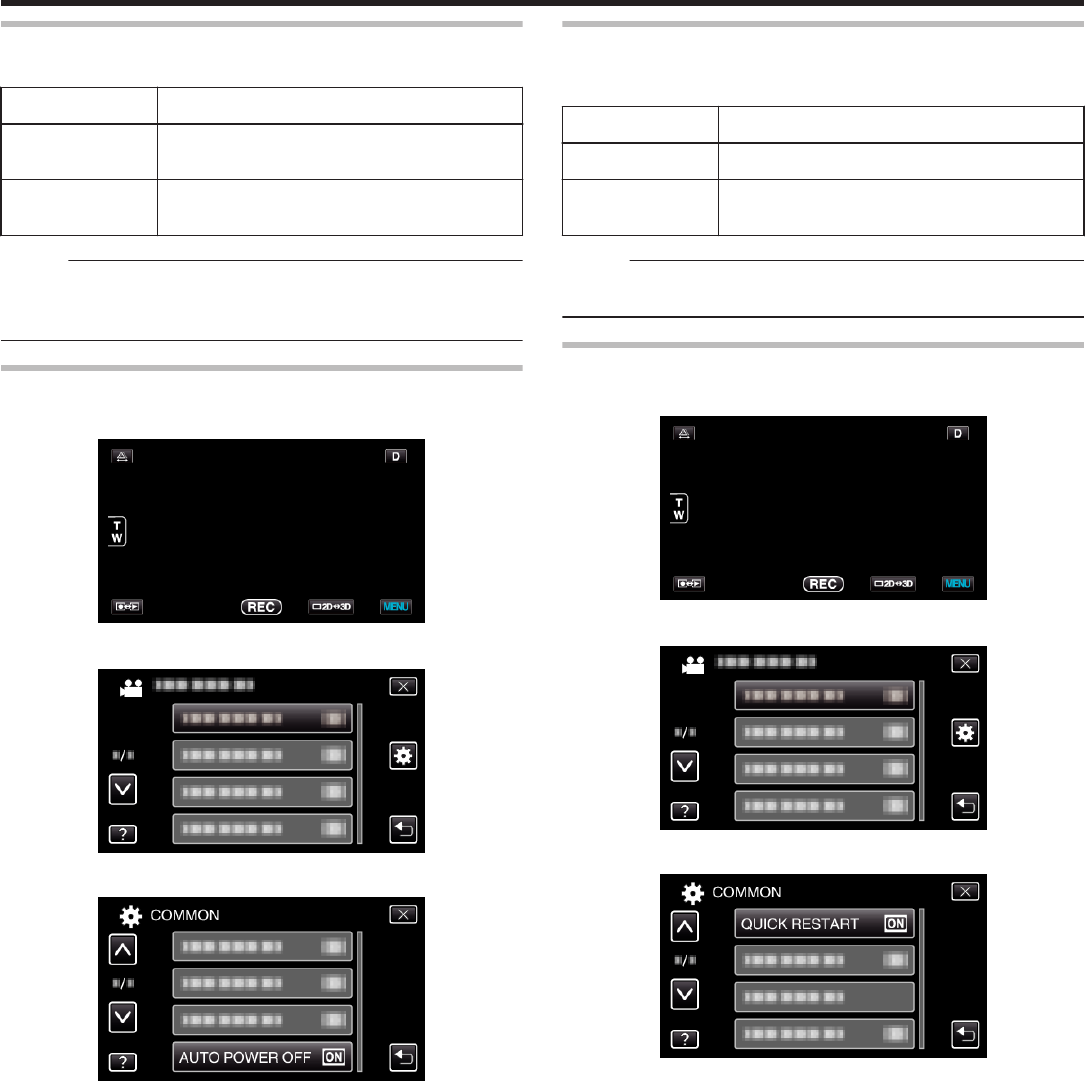
Useful Settings for Recording
0
When “QUICK RESTART” is set to “ON”, this unit turns on immediately if
you open the LCD monitor within 5 minutes after the power is turned off
by closing the monitor.
“QUICK RESTART” (A p. 124)
0
When “AUTO POWER OFF” is set to “ON”, this unit turns itself off
automatically to conserve power when it is not operated for 5 minutes.
(only when using the battery pack)
“AUTO POWER OFF” (A p. 124)
0
When “TOUCH PRIORITY AE/AF” is set to “FACE TRACKING”, this unit
detects faces and automatically adjusts its brightness and focus to record
the faces more clearly.
“Capturing Subjects Clearly (TOUCH PRIORITY AE/AF)” (A p. 44)
0
The image resolution can be changed.
“IMAGE SIZE” (A p. 115)
Caution :
0
Do not expose the lens to direct sunlight.
0
Do not use this unit in the rain, snow, or places with high humidity like the
bathroom.
0
Do not use this unit in places subject to excessive humidity or dust, as well
as places exposed to steam or smoke directly.
0
Do not remove the battery pack, AC adapter, or SD card when the access
lamp is lighted. The recorded data may become unreadable.
Memo :
0
Before recording an important scene, it is recommended to conduct a trial
recording.
0
The digital image stabilizer does not work when recording still images.
Recording
33
Zooming
The angle of view can be adjusted using zoom.
0
Use the W end (wide angle end) to shoot a wider field of view.
0
Use the T end (telephoto end) to magnify the subject for shooting.
.
0
The following zoom options are available:
- Optical Zoom (1 – 5x) *During 3D recording
- Optical Zoom (1 – 10x) *During 2D recording
0
You can also use the zoom (T/W) button on the touch screen to zoom.
.
Memo :
0
Only optical zoom is available in the still image recording mode.
Adjusting Parallax During Recording
When recording 3D images, parallax is automatically adjusted. If the left and
right images of an object close to the camera do not appear to be in
alignment, or the 3D effect of a distant object is weak, you can make
adjustments by bringing the left and right images closer to each other.
0
Parallax can only be adjusted when 3D images are displayed on the unit’s
LCD monitor.
“3D VIDEO REC FORMAT (3D mode only)” (A p. 104)
1
Tap k.
.
2
Tap “MANUAL”.
.
0
The parallax adjustment screen appears.
0
To set parallax adjustment to auto (default), tap “AUTO”.
3
Adjust the parallax.
.
0
To increase the amount of correction, tap “+”. Doing so increases the
value of the parallax display.
0
To reduce the amount of correction, tap “-”. Doing so decreases the
value of the parallax display.
4
Tap “SET” to confirm.
.
Caution :
0
Too much parallax may cause the 3D effect to be lost.
0
If you see double images even after parallax adjustment, set the display
on the LCD monitor to 2D immediately.
Memo :
0
While this unit is equipped with the function to adjust parallax
automatically, it may not work properly for the following subjects.
- Subjects beyond the recommended shooting distance (especially
subjects that are extremely close to the camera)
- Numerous subjects of the similar shape arrayed in a line, such as the
windows of a building
- Straight subjects such as electric wires
In these cases, adjust the parallax manually.
Recording
34
0
When the power of this unit is turned off or the mode is switched to
playback after parallax is manually adjusted, the “PARALLAX
ADJUSTMENT” setting returns to “AUTO”.
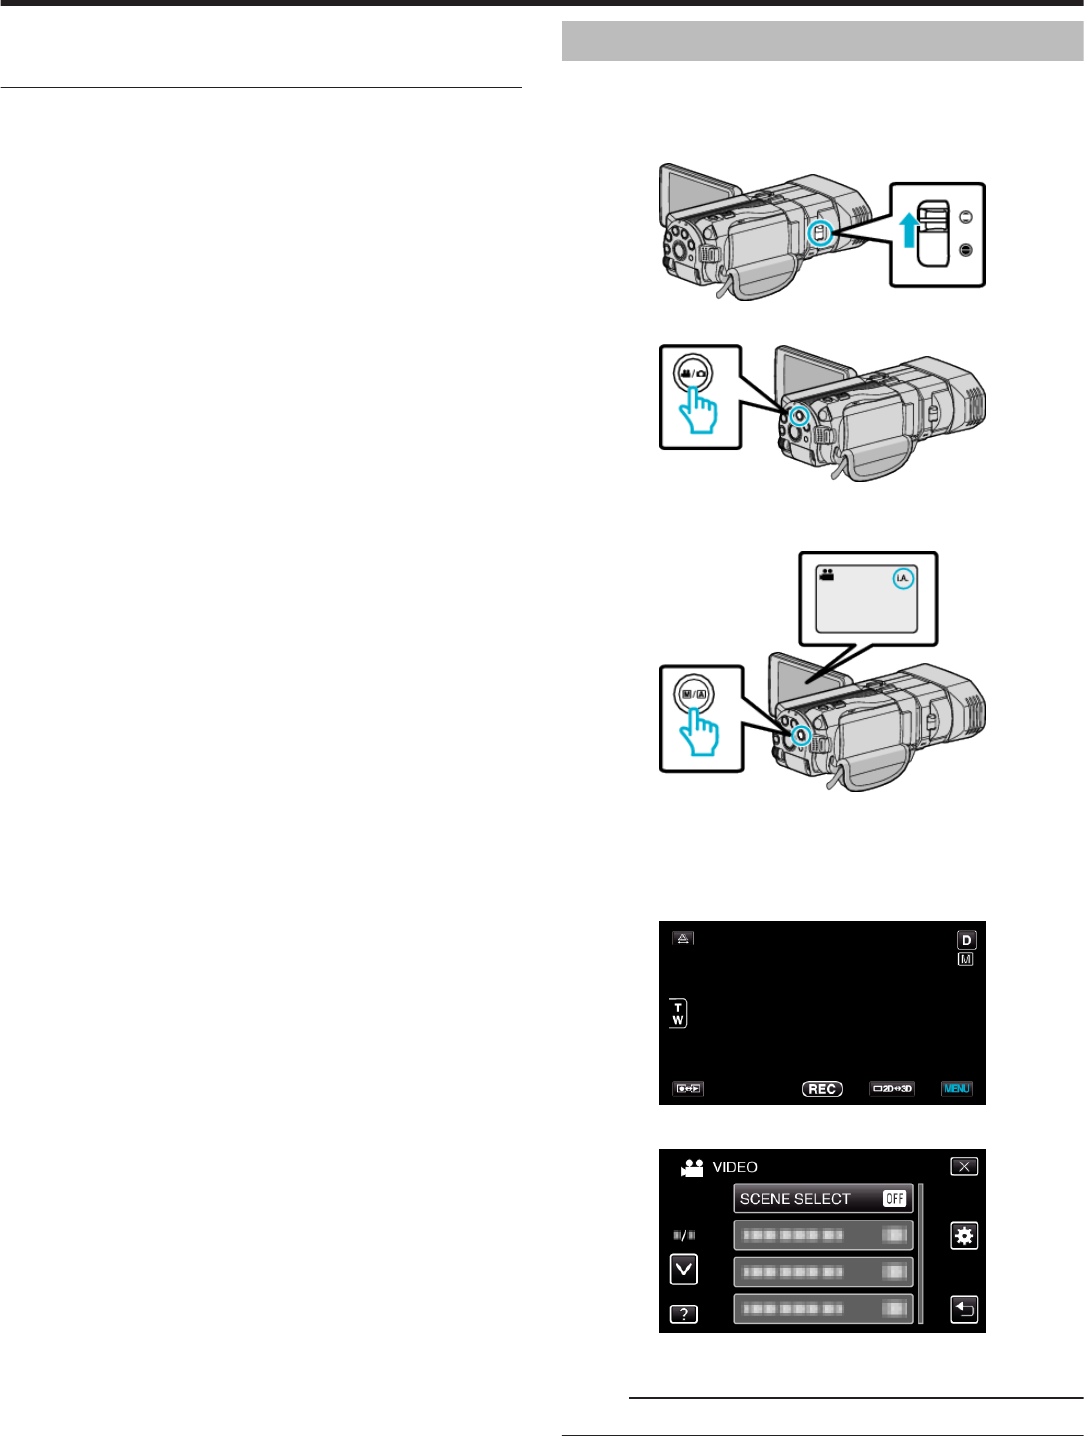
Manual Recording
You can adjust settings, such as brightness and shutter speed, by using the
manual mode.
Manual recording can be set for both video and still image modes.
1
Open the lens cover.
.
2
Open the LCD monitor and select the video or still image mode.
.
0
The video A or still image B icon appears.
3
Select the Manual recording mode.
.
0
If the mode is P Intelligent Auto, press the H/T button to switch to
H Manual.
The mode changes between Intelligent Auto and Manual with every
press.
4
Tap “MENU”.
.
5
Tap the item to set manually.
.
0
For details on the various manual settings, refer to “Manual Recording
Menu”.
Memo :
0
The manual settings are displayed only in the manual recording mode.
Recording
35
Manual Recording Menu
The following items can be set.
NameDescription
SCENE SELECT
0
Recordings that suit the shooting conditions
can be performed easily.
“Scene Selection” (A p. 36)
FOCUS
0
Use manual focus if the subject is not
focused automatically.
“Adjusting Focus Manually” (A p. 37)
FOCUS ASSIST
0
Focused subject is outlined in color for more
precise focus.
“Using Focus Assist” (A p. 38)
FOCUS ASSIST
COLOR
0
Sets the color of the outline of a focused
object when Focus Assist is used.
“FOCUS ASSIST COLOR” (A p. 112)
BRIGHTNESS
ADJUST
0
Overall brightness on the screen can be
adjusted.
0
Use this when recording in a dark or bright
location.
“Adjusting Brightness” (A p. 38)
SHUTTER SPEED
0
Shutter speed can be adjusted.
0
Use this when shooting a fast-moving
subject or to emphasize the subject's
movement.
“Setting Shutter Speed” (A p. 39)
APERTURE PRIORITY
0
You can adjust the aperture to capture an
image with only the subject in focus while
blurring the surroundings.
“Setting Aperture” (A p. 39)
WHITE BALANCE
0
Overall color on the screen can be adjusted.
0
Use this when the color on the screen
appears differently from the actual color.
“Setting White Balance” (A p. 40)
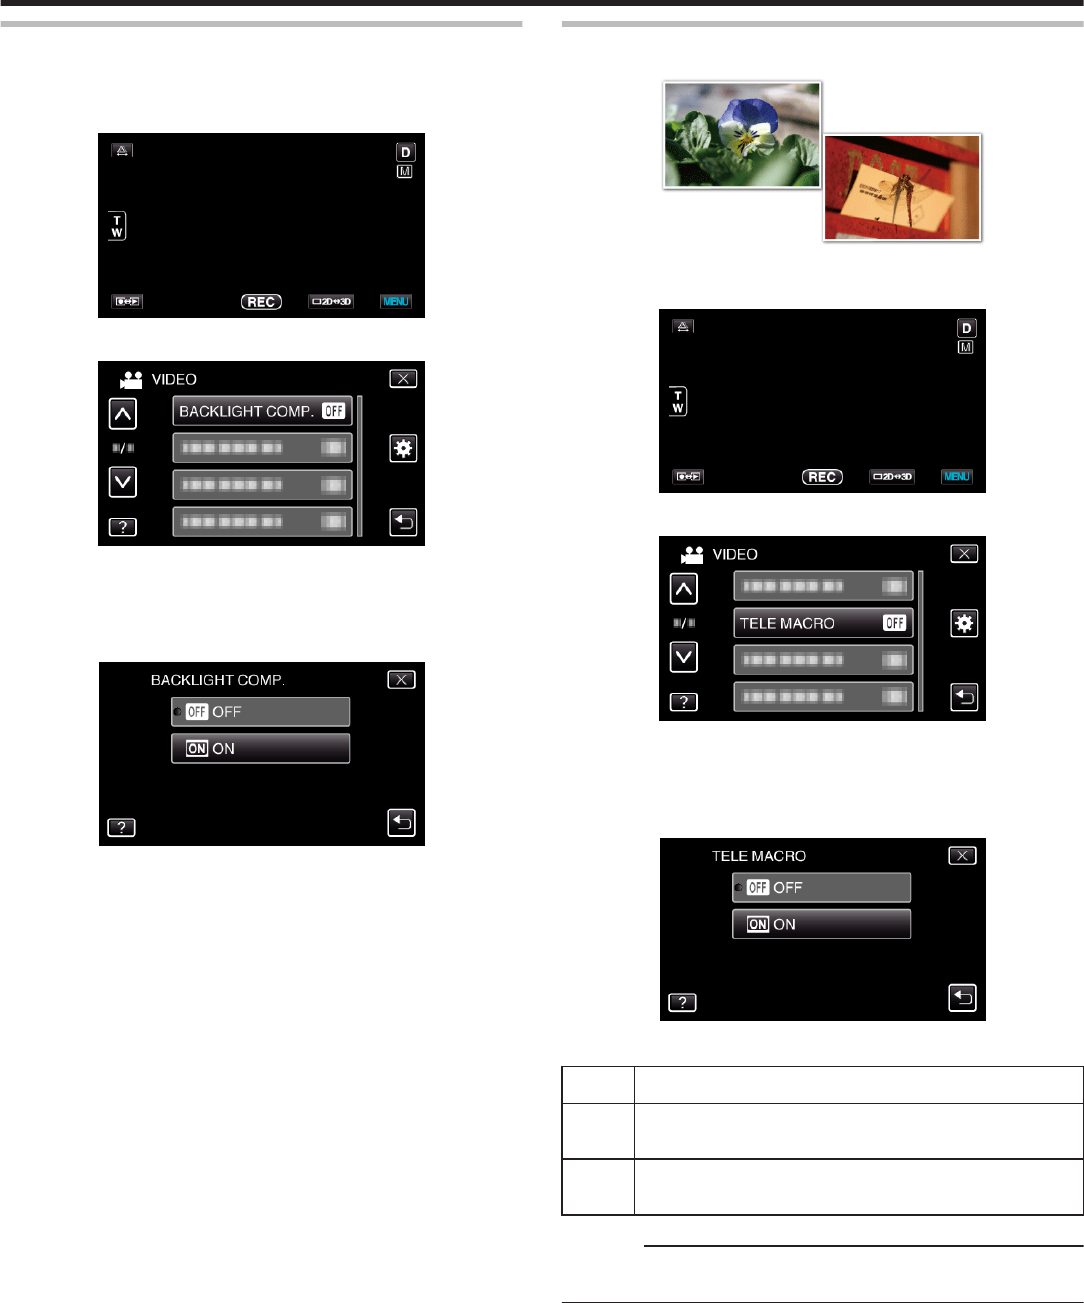
BACKLIGHT COMP.
0
Corrects the image when the subject
appears dark due to backlight.
0
Use this when shooting against the light.
“Setting Backlight Compensation” (A p. 41)
TELE MACRO
0
Use this to take close-up (macro) shots of the
subject.
“Taking Close-up Shots” (A p. 41)
*Displayed only in the 2D recording mode.
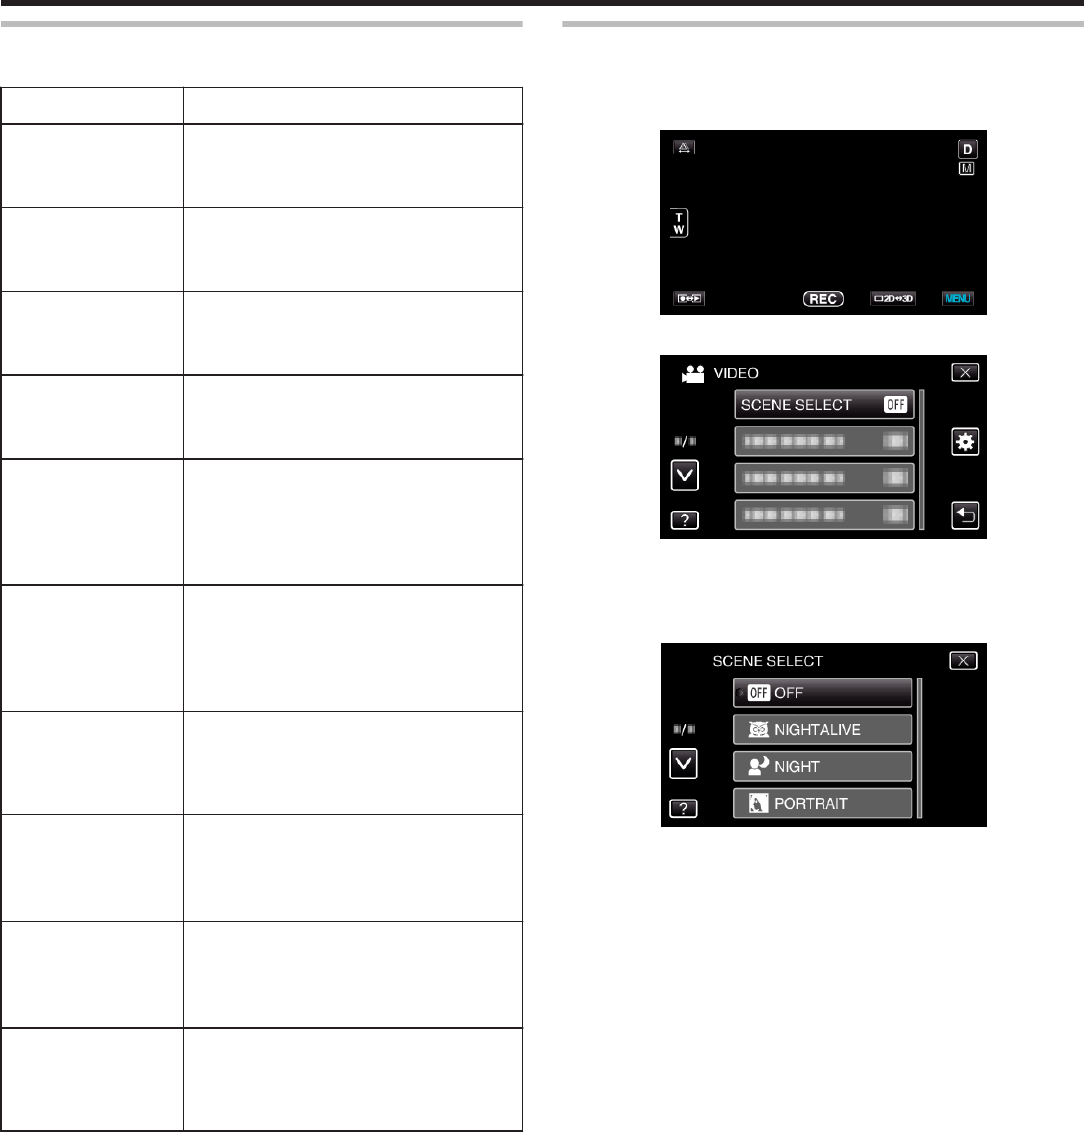
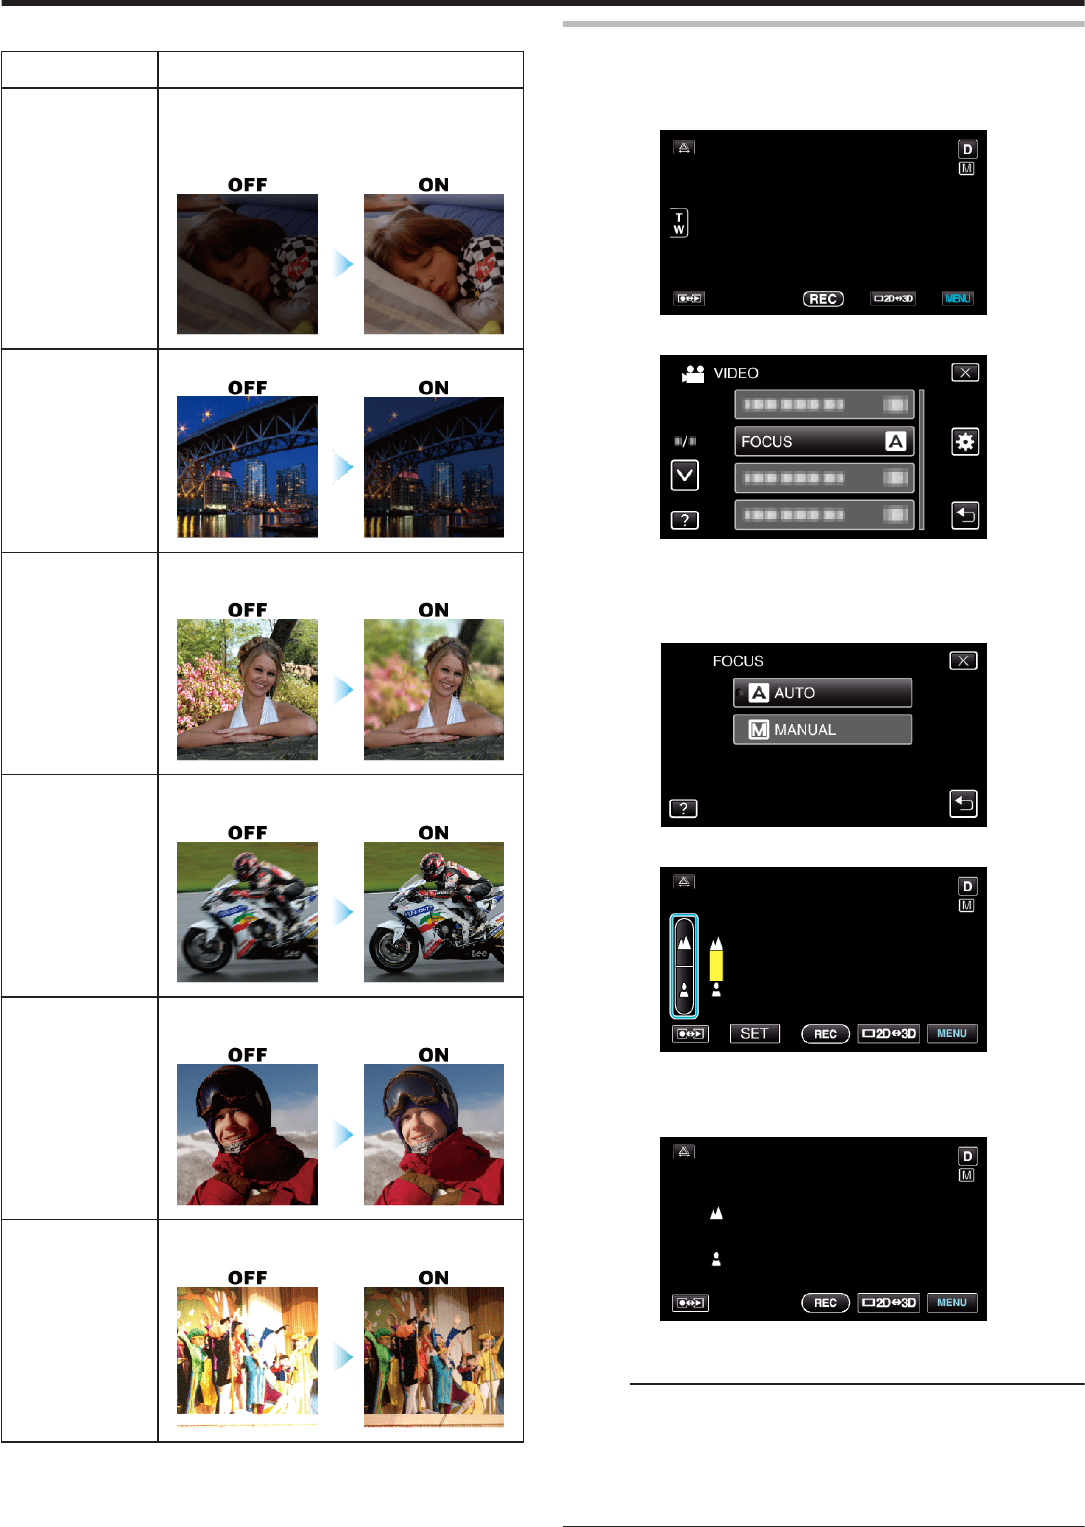
Scene Selection
Common scenes that are often encountered can be recorded with the most
suitable settings.
1
Tap “MENU”.
.
2
Tap “SCENE SELECT”.
.
0
Tap ∧ or ∨ to move upward or downward for more selection.
0
Tap L to exit the menu.
0
Tap J to return to the previous screen.
3
Tap the appropriate scene.
.
0
After setting, the selected scene is immediately put on view.
0
Tap “OFF” to cancel the selection.
0
Tap ∧ or ∨ or flick on the list to move upward or downward for more
scene selection.
0
Tap L to exit the menu.
Recording
36
*The image is only an impression.
SettingEffect
b NIGHTALIVE
Increases gain and brightens the scene
automatically using a slow shutter when the
surrounding is dark.
To prevent camera shake, use a tripod.
.
c NIGHT
Captures night scenes naturally.
.
w PORTRAIT
Blurs the background to bring out the people in the
picture.
.
e SPORTS
Captures fast-moving subjects clearly in every
single frame.
.
f SNOW
Prevents the subject from appearing too dark when
recording snow scenes on a sunny day.
.
g SPOTLIGHT
Prevents the human subject from appearing too
bright under light.
.
Adjusting Focus Manually
Set this when the focus is not clear in Intelligent Auto or when manual
focusing is desired.
1
Tap “MENU”.
.
2
Tap “FOCUS”.
.
0
Tap ∧ or ∨ to move upward or downward for more selection.
0
Tap L to exit the menu.
0
Tap J to return to the previous screen.
3
Tap “MANUAL”.
.
4
Adjust the focus.
.
0
Tap E to focus on a distant subject.
0
Tap p to focus on a near subject.
5
Tap “SET” to confirm.
.
0
When focus is confirmed, the focusing frame disappears and E and
p are displayed. (The icons may appear blinking.)
Memo :
0
A subject that is focused at the telephoto (T) end remains in focus when
it is zoomed out to the wide angle (W) end.
0
Focus cannot be achieved on a distant or near object beyond limit. ∧ or
∨ will appear blinking.
0
You can also use the control dial to adjust the focus.
“Using the Control Dial for Recording” (A p. 43)
Recording
37
Using Focus Assist
Focused subject is outlined in color for more precise focus.
1
Tap “MENU”.
.
2
Tap “FOCUS ASSIST”.
.
0
Tap ∧ or ∨ to move upward or downward for more selection.
0
Tap L to exit the menu.
0
Tap J to return to the previous screen.
3
Adjust the focus.
.
0
Tap E to focus on a distant subject.
0
Tap p to focus on a near subject.
4
Tap “SET” to confirm.
.
Memo :
0
The image becomes black and white while the outline of the focused object
is displayed in the selected color. Change outline color if it becomes
difficult to see.
“FOCUS ASSIST COLOR” (A p. 112)
Adjusting Brightness
You can adjust the brightness to your preferred level.
1
Tap “MENU”.
.
2
Tap “BRIGHTNESS ADJUST”.
.
0
Tap ∧ or ∨ to move upward or downward for more selection.
0
Tap L to exit the menu.
0
Tap J to return to the previous screen.
3
Tap “MANUAL”.
.
4
Adjust the brightness value.
.
0
Compensation range during video recording: -6 to +6
0
Compensation range during still image recording: -2.0 to +2.0
0
Tap ∧ to increase the brightness.
0
Tap ∨ to decrease the brightness.
5
Tap “SET” to confirm.
.
Memo :
0
Settings can be adjusted separately for videos and still images.
Recording
38
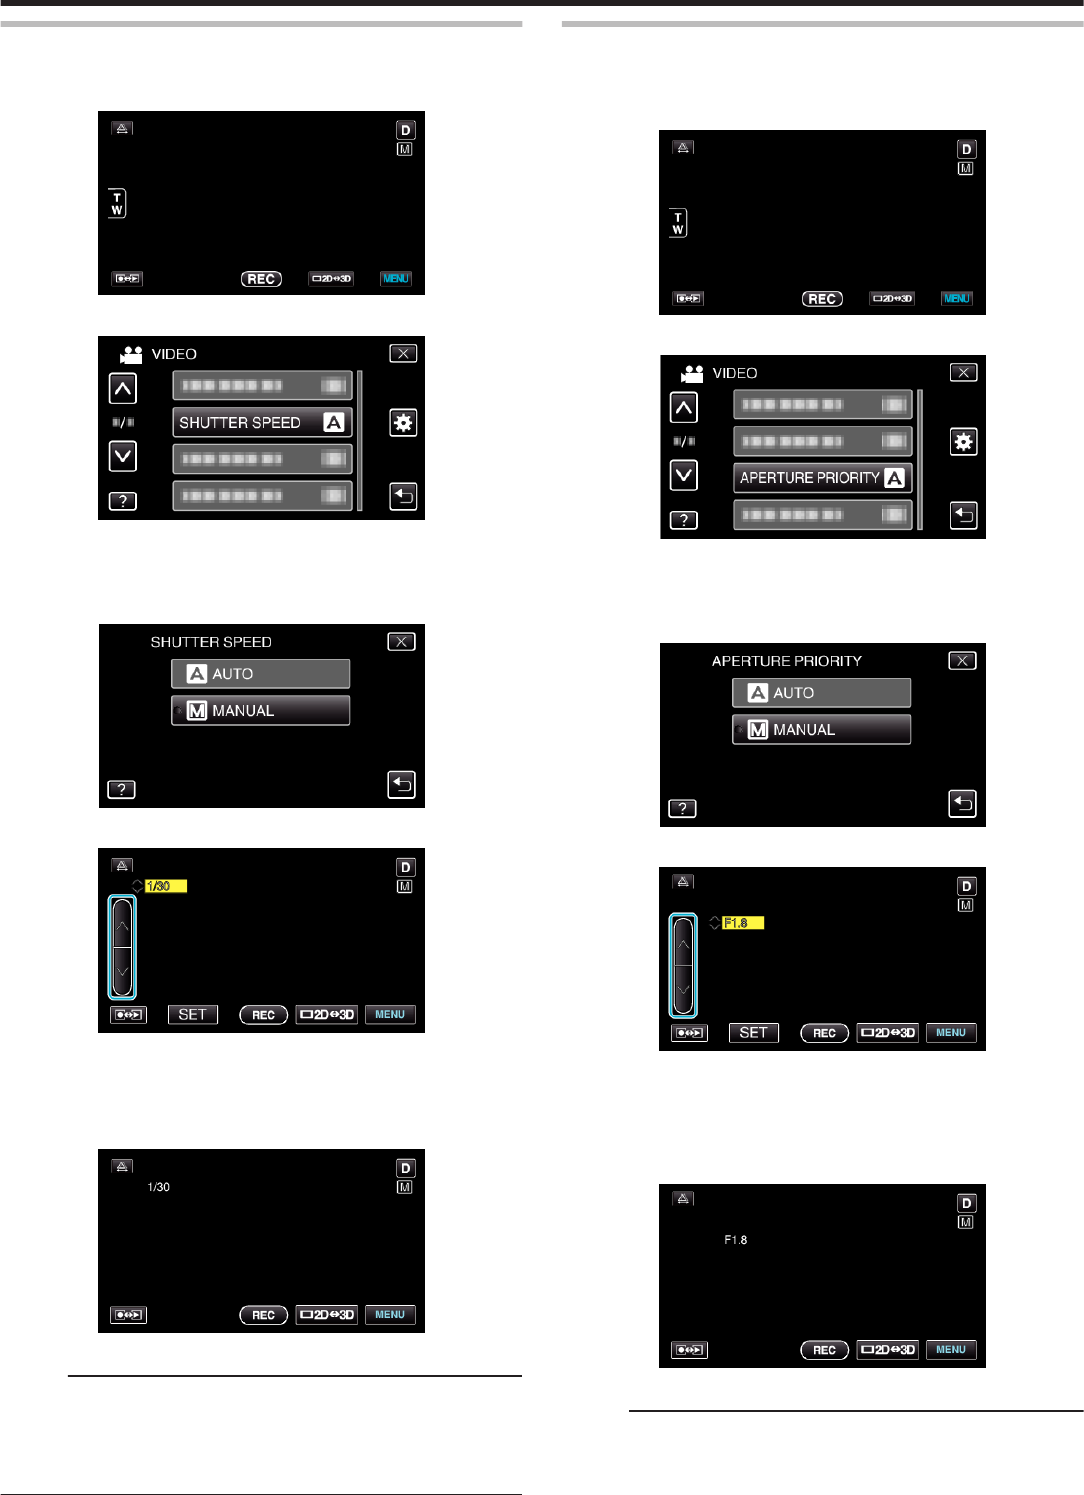
Setting Shutter Speed
You can set the shutter speed to suit the type of subject.
1
Tap “MENU”.
.
2
Tap “SHUTTER SPEED”.
.
0
Tap ∧ or ∨ to move upward or downward for more selection.
0
Tap L to exit the menu.
0
Tap J to return to the previous screen.
3
Tap “MANUAL”.
.
4
Adjust the shutter speed.
.
0
Shutter speed can be set from 1/2 to 1/4000.
(Up to 1/500 for still image.)
0
Tap ∧ to increase the shutter speed.
0
Tap ∨ to decrease the shutter speed.
5
Tap “SET” to confirm.
.
0
After confirmation, the display for adjusting shutter speed disappears.
Memo :
0
Settings can be adjusted separately for videos and still images.
0
While fast-moving subjects can be captured clearly by increasing
“SHUTTER SPEED”, the screen appears darker. When recording in dark
places such as indoors, check the brightness of the LCD monitor and set
“SHUTTER SPEED” accordingly.
Setting Aperture
You can adjust the aperture to capture an image with only the subject in
focus.
1
Tap “MENU”.
.
2
Tap “APERTURE PRIORITY”.
.
0
Tap ∧ or ∨ to move upward or downward for more selection.
0
Tap L to exit the menu.
0
Tap J to return to the previous screen.
3
Tap “MANUAL”.
.
4
Adjust the aperture.
.
0
Aperture can be set from F1.2 to F5.6.
0
If you want the background to be in focus as well (larger aperture
value), tap ∧.
0
If you want the background to appear blurry (smaller aperture value),
tap ∨.
5
Tap “SET” to confirm.
.
0
After confirmation, the display for adjusting aperture disappears.
Memo :
0
Settings can be adjusted separately for videos and still images.
0
When zoomed to the telephoto end, setting the aperture to the minimum
value (F1.2) does not stop it down all the way. In this case, the aperture
value is set according to the zoom and indicated in yellow. Set the zoom
Recording
39
to the wide angle end to enable the aperture to be stopped down all the
way.
0
The larger the aperture value, the darker the subject appears.
Setting White Balance
You can set the color tone to suit the light source.
1
Tap “MENU”.
.
2
Tap “WHITE BALANCE”.
.
0
Tap ∧ or ∨ to move upward or downward for more selection.
0
Tap L to exit the menu.
0
Tap J to return to the previous screen.
3
Tap the appropriate shooting environment.
.
0
Tap ∧ or ∨ to move upward or downward to select.
Setting
Details
AUTOAdjusts automatically to the natural colors.
MWBUse this when the problem of unnatural colors is not
resolved.
FINESet this when shooting outdoors on a sunny day.
CLOUDSet this when shooting on a cloudy day or inside a
shade.
HALOGENSet this when shooting under illumination such as a
video light.
MARINE:BLUESet this when shooting the sea at deep water area
(water appears blue).
MARINE:GREENSet this when shooting the sea at shallow water area
(water appears green).
Using MWB
1
Hold a sheet of plain white paper in front of the lens so that the white
paper fills the screen.
2
Tap “MWB” and keep touching while the icon appears and blinks.
3
Release your touch after the menu disappears and o lights up.
Memo :
0
The setting will not change if “MWB” is being tapped too fast (less than 1
second).
0
Manual setting is temporarily canceled in the Intelligent Auto mode.
Recording
40
Setting Backlight Compensation
You can correct the image when the subject appears too dark due to
backlight.
1
Tap “MENU”.
.
2
Tap “BACKLIGHT COMP.”.
.
0
Tap ∧ or ∨ to move upward or downward for more selection.
0
Tap L to exit the menu.
0
Tap J to return to the previous screen.
3
Tap “ON”.
.
0
After setting, the backlight icon l appears.
Taking Close-up Shots
You can take close-up shots of an object using the tele macro function.
.
*The image is only an impression.
1
Tap “MENU”.
.
2
Tap “TELE MACRO”.
.
0
Tap ∧ or ∨ to move upward or downward for more selection.
0
Tap L to exit the menu.
0
Tap J to return to the previous screen.
3
Tap “ON”.
.
0
After setting, the tele macro icon o appears.
Setting
Details
OFFEnables close-up shots up to 1 m at the telephoto (T) end.
Enables close-up shots up to 5 cm at the wide angle (W) end.
ONEnables close-up shots up to 40 cm at the telephoto (T) end.
Enables close-up shots up to 5 cm at the wide angle (W) end.
Caution :
0
When you are not taking close-up shots, set “TELE MACRO” to “OFF”.
Otherwise, the image may be blur.
Recording
41
Setting the USER Button
By assigning one of manual adjustment functions that you frequently use to
the USER button, you can access the function quickly.
Assigning a Function to the USER Button
1
Tap “MENU”.
.
2
Tap “USER BUTTON SETTING”.
.
0
Tap ∧ or ∨ to move upward or downward for more selection.
0
Tap L to exit the menu.
0
Tap J to return to the previous screen.
3
Select the desired function.
.
0
You can select one of the following functions.
0
Video mode:
- NIGHTALIVE
- TOUCH PRIORITY AE/AF
- FOCUS
- BRIGHTNESS ADJUST
- SHUTTER SPEED
- APERTURE PRIORITY
- BACKLIGHT COMP.
- WHITE BALANCE
- FOCUS ASSIST
- DIS
0
Still image mode:
- NIGHTALIVE
- TOUCH PRIORITY AE/AF
- FOCUS
- BRIGHTNESS ADJUST
- SHUTTER SPEED
- APERTURE PRIORITY
- BACKLIGHT COMP.
- WHITE BALANCE
- FOCUS ASSIST
- SELF-TIMER
Making Adjustments with the USER Button
Operate as follows.
0
In the case of functions that are turned on or off (NIGHTALIVE,
Press the ADJ button for about 3 seconds to display the control menu.
.
0
A menu screen containing the functions that can adjusted by the
control dial is displayed.
2
Select the function with the control dial.
.
0
For details on setting the items and values of each function, refer to
the following.
A BRIGHTNESS ADJUST
“Adjusting Brightness” (A p. 38)
B FOCUS
“Adjusting Focus Manually” (A p. 37)
C SHUTTER SPEED
“Setting Shutter Speed” (A p. 39)
D APERTURE PRIORITY
“Setting Aperture” (A p. 39)
E WHITE BALANCE
“Setting White Balance” (A p. 40)
F PARALLAX ADJUSTMENT
“Adjusting Parallax During Recording” (A p. 34)
G CLEAR
Select this to set all values adjusted by the ADJ button to “AUTO”.
3
Press the ADJ button.
.
0
The setting screen for the selected function appears.
4
Adjust the assigned function and record.
.
0
Change the setting using the control dial.
0
Press the ADJ button to set to “AUTO” or activate an assigned
function.
0
To change the setting of a different function, press the ADJ button for
about 3 seconds. The control menu appears. Go back to step 2 and
select a different function.
Memo :
0
By assigning “BRIGHTNESS ADJUST”, “FOCUS”, “SHUTTER SPEED”,
or “APERTURE PRIORITY” to the control dial, you can adjust the function
while recording.
0
Only one function can be operated by the control dial. The settings of all
other functions will remain unchanged. (Example: When focus is being
adjusted, the settings of brightness and shutter speed remain
unchanged.)
0
When “CLEAR” is selected, all values adjusted by the ADJ button will be
set to “AUTO”.
(Exits the control menu.)
Caution :
0
Settings cannot be changed by tapping on the screen while the control
dial is being used. Change the setting with the control dial.(except
PARALLAX ADJUSTMENT)
0
When “3D VIDEO REC FORMAT” is set to “MP4(MVC)” and recording is
performed together with HDMI output, the control menu will not be
displayed.
Recording
43
Reducing Camera Shake
When the image stabilizer is set, camera shake during recording can be
effectively reduced.
1
Tap “MENU”.
.
2
Tap “DIS”.
.
3
Tap “ON” or “ON (AIS)”.
.
0
Tap ∧ or ∨ to move upward or downward for more selection.
0
Tap L to exit the menu.
0
Tap J to return to the previous screen.
Display
Setting
Z (OFF)
Deactivates image stabilizer.
X (ON)
Reduces camera shake under normal shooting
conditions.
r (ON (AIS))
Reduces camera shake more effectively when
shooting bright scenes on the wide angle end.
Only on the wide angle end (during 3D
recording: approx. 5x, during 2D recording:
approx. 10x).
Memo :
0
It is recommended to set the image stabilizer to “OFF” when shooting a
subject of little movement with the unit on a tripod.
0
Complete stabilization may not be possible if camera shake is excessive.
0
This setting is effective for video recording only.
Setting with the USER Button
When “DIS” is assigned to the USER button, the setting changes with every
press of the button.
“Setting the USER Button” (A p. 42)
0
“OFF”F“ON”F“ON (AIS)”F“OFF”F
The setting changes as above with every press of the USER button.
Capturing Subjects Clearly (TOUCH
PRIORITY AE/AF)
“TOUCH PRIORITY AE/AF” is a function that adjusts focus and brightness
based on a tapped position.
This function is available for both videos and still images.
1
Select video or still image mode.
.
0
The video or still image mode icon appears.
2
Tap “MENU”.
.
3
Tap “TOUCH PRIORITY AE/AF”.
.
0
Tap ∧ or ∨ to move upward or downward for more selection.
0
Tap L to exit the menu.
0
Tap J to return to the previous screen.
4
Tap the desired setting.
.
5
Start recording and tap the desired position.
.
0
Focus and brightness will be adjusted automatically based on the
tapped position (face/color/area). A blue frame appears around the
selected subject (face/color), while a white frame appears around the
selected area.
0
To reset, tap the desired position (face/color/area) again.
0
To cancel “FACE TRACKING”, tap the blue frame.
0
To cancel “COLOR TRACKING”, tap the blue frame.
0
To cancel “AREA SELECT”, tap the white frame.
Setting
Details
Recording
44
OFFDeactivates the function.
FACE
TRACKING
e appears on the screen. Recording is performed
while tracking and automatically adjusting the tapped
face (subject) with appropriate focus and brightness. In
addition, a blue frame appears around the tapped face
(subject).
COLOR
TRACKING
f appears on the screen. Recording is performed
while tracking and automatically adjusting the tapped
color (subject) with appropriate focus and brightness. In
addition, a blue frame appears around the tapped color
(subject).
AREA
SELECT
g appears on the screen. Recording is performed
while automatically adjusting the tapped area (fixed
position) with appropriate focus and brightness. In
addition, a white frame appears around the tapped area.
Memo :
0
When “TOUCH PRIORITY AE/AF” is set, “FOCUS” will be set to “AUTO”
automatically.
0
If the camera loses track of a subject, tap the subject again.
0
Settings are canceled when zoom operation is performed. (“AREA
SELECT” only)
0
When “COLOR TRACKING” is set, the targeted subject (color) may
change if similar colors are detected. In this case, tap the subject again.
The targeted subject (color) may also be tracked back again if it appears
in the center of the screen within a specific time.
Caution :
0
Subjects near the sides of the LCD monitor may not respond or be
recognized when tapped. In this case, move the subject to the center and
tap again.
0
“COLOR TRACKING” may not function properly in the following cases:
- when recording subjects with no contrast
- when recording subjects that are moving at high speed
- when recording in a dark place
- when the surrounding brightness changes
0
When “FACE TRACKING” is set, the subject may be lost if the camera is
moved vertically or horizontally very fast. To track back the subject, tap on
it again.
Capturing Smiles Automatically (SMILE SHOT)
“SMILE SHOT” automatically captures a still image upon detection of a
smile.
1
Select still image mode.
.
0
The still image mode icon appears.
2
Tap “MENU”.
.
3
Tap “SMILE SHOT”.
.
0
Tap ∧ or ∨ to move upward or downward for more selection.
0
Tap L to exit the menu.
0
Tap J to return to the previous screen.
4
Tap “ON”.
.
5
Point the camera toward the human subject.
0
A still image is automatically captured when smiles are detected.
.
0
PHOTO lights up when a still image is being captured.
0
You can display the smile level (%) together with the frame by setting
“SMILE LEVEL” in the menu to ON before recording.
“Setting SMILE LEVEL Display (Still image only)” (A p. 46)
Memo :
0
The camera is able to detect up to 16 faces. Smile levels will be displayed
for up to 3 of the largest faces displayed on the screen.
0
This function may not work properly depending on the shooting conditions
(distance, angle, brightness, etc.) and the subject (direction of face, smile
level, etc.). It is also difficult to detect a smile in backlight.
0
After a smile is detected and captured, it takes time before the next
recording may be performed.
Caution :
0
When “TOUCH PRIORITY AE/AF” is set to “AREA SELECT” or “COLOR
TRACKING”, “SMILE SHOT” does not work.
0
If appropriate results cannot be obtained, record with “SMILE SHOT” set
to “OFF”.
Recording
45
Setting SMILE LEVEL Display (Still image only)
“SMILE LEVEL” allows you to set the items to display when faces are
detected.
This item is only displayed when “TOUCH PRIORITY AE/AF” is set to “FACE
TRACKING”.
1
Open the LCD monitor and select the still image mode.
.
2
Tap “MENU”.
.
3
Tap “SMILE LEVEL”.
.
4
Tap “ON”.
.
Setting
Details
OFFDisplays only the frames when faces are detected.
ONDisplays the frames and smile levels (%) when faces are
detected.
0
Frame: Appears around detected faces.
Smile level: Appears in value (0 % - 100 %) for detected smiles.
Recording at Intervals (TIME-LAPSE
RECORDING)
Enables the changes of a scene that occur slowly over a long period to be
shown within a short time by taking frames of it at a certain interval.
This is useful for making observations such as the opening of a flower bud.
1
Open the LCD monitor and select the video mode.
.
0
The video mode icon A appears.
2
Tap “MENU”.
.
3
Tap “TIME-LAPSE RECORDING”.
.
0
Tap ∧ or ∨ to move upward or downward for more selection.
0
Tap L to exit the menu.
0
Tap J to return to the previous screen.
4
Tap to select a recording interval (1 to 80 seconds).
.
0
The greater the number of seconds, the longer the recording interval.
0
Tap ∧ or ∨ to move upward or downward for more selection.
0
Tap L to exit the menu.
0
Tap J to return to the previous screen.
5
Start recording.
.
0
A frame is taken at intervals of the selected period.
0
When the recording interval is set to “80SEC INTERVAL”, this unit
switches to the power-saving mode between recordings.
At the next point to record, the power-saving mode will be turned off
and recording will start automatically.
0
Press the START/STOP button again to stop recording.
Recording
46
Indications During Time-Lapse Recording
.
DisplayDescription
1
Speed IndicatorDisplays the recording interval that is set.
2
Video QualityDisplays the icon of the video quality that is set.
3
Recorded TimeDisplays the actual recorded time of the video.
Recorded time increases in units of frames.
4
Actual Elapsed
Time
Displays the actual elapsed time after
recording starts.
5
Remaining
Recording Time
Remaining time left to record with the currently
selected video quality.
Time-Lapse Setting
The greater the number of seconds, the longer the recording interval.
SettingDetails
OFFDeactivates the function.
1SEC INTERVALTakes a frame at 1-second intervals.
Recorded videos will be played back at 30 times
speed.
10SEC INTERVALTakes a frame at 10-second intervals.
Recorded videos will be played back at 300 times
speed.
80SEC INTERVALTakes a frame at 80-second intervals.
Recorded videos will be played back at 2 400 times
speed.
Caution :
0
Audio cannot be recorded during time-lapse recording.
0
Zooming, simultaneous still image recording, and image stabilizer are not
available in time-lapse recording.
0
When recording is stopped with the recorded time less than “0:00:00:17”
, the video will not be saved.
Memo :
0
Settings of time-lapse recording are reset when the power is turned off.
To start time-lapse recording again, it is necessary to make the selection
once more.
0
Recording stops automatically 99 hours after it is started.
0
Make use of a tripod and AC adapter for time-lapse recordings with long
intervals.
It is also recommended to fix the focus and white balance manually.
“Tripod Mounting” (A p. 22)
“Adjusting Focus Manually” (A p. 37)
“Setting White Balance” (A p. 40)
Recording
47
Taking Group Shots (Self-timer)
The 10-second self-timer and Face Detection self-timer are convenient
functions for taking group photos.
The 2-second self-timer is useful for preventing camera shake caused by
pressing the shutter button.
Memo :
When shooting a photo using the self-timer function, use of a tripod is
recommended.
“Tripod Mounting” (A p. 22)
Using the 2-/10-second Self-timer
1
Select still image mode.
.
0
The still image icon B appears.
2
Tap “MENU”.
.
3
Tap “SELF-TIMER”.
.
0
Tap ∧ or ∨ to move upward or downward for more selection.
0
Tap L to exit the menu.
0
Tap J to return to the previous screen.
4
Tap “2SEC” or “10SEC”.
.
5
Set the focus on the subject.
.
0
When focused, the focus icon lights up in green.
6
Take a still image.
.
0
A timer appears and countdown to shooting starts.
0
To stop the self-timer, press the SNAPSHOT button again.
Using the Face Detection Self-timer
Pressing the SNAPSHOT button starts face detection, and shooting is
performed three seconds after another person enters the frame.
This function is useful when you want to include the photographer in the
group photo.
1
Select still image mode.
.
0
The still image icon B appears.
2
Tap “MENU”.
.
3
Tap “SELF-TIMER”.
.
0
Tap ∧ or ∨ to move upward or downward for more selection.
0
Tap L to exit the menu.
0
Tap J to return to the previous screen.
4
Tap “FACE DETECTION”.
.
Recording
48
5
After making sure that everyone is facing the camera, press the
SNAPSHOT button.
.
.
0
Frames appear around the faces of the subjects.
0
Pressing the SNAPSHOT button again starts the 10-second self-
timer.
6
The photographer enters the frame.
.
0
The frames around the faces disappear when the photographer is
detected, and a countdown timer appears.
0
The shutter is released three seconds after the photographer enters
the frame.
0
To stop the self-timer, press the SNAPSHOT button again.
Memo :
0
The “FACE DETECTION” function may fail to detect faces depending on
the shooting environment.
Remaining Recording Time/Battery Power
You can check the remaining video recording time on the built-in memory
and SD card as well as the remaining battery power.
1
Open the LCD monitor and select the video or still image mode.
.
0
The video A or still image B icon appears.
2
Press the INFO button.
.
0
If in the still image mode, go directly to step 4.
3
Display the remaining recording time.
.
0
The remaining recording time is displayed only in the video recording
mode.
0
Press the INFO button to check the remaining recording time of each
recording media.
0
To display the remaining battery power, tap l.
0
Tap J to return to the recording mode.
0
To exit the display, tap L.
4
Display the remaining battery power.
.
0
For video recording, tap J to return to the remaining recording time
display. For still image recording, tap to return to the recording mode.
0
To exit the display, press the INFO button or tap L.
0
Remaining battery power will not be displayed when the AC adapter
is connected.
Memo :
0
You can change to the desired video quality by tapping on it from the
remaining recording time display.
Recording
49
Approximate Video Recording Time
o
3D Mode (MP4(MVC))
QualityBuilt-in Memory
(64 GB)
SDHC/SDXC Card
4 GB8 GB16 GB32 GB48 GB64 GB
THR4 h10 m30 m1 h2 h3 h4 h 10 m
TSR6 h 10 m20 m40 m1 h 30 m3 h 10 m4 h 40 m6 h 20 m
o
3D Mode (AVCHD)
QualityBuilt-in Memory
(64 GB)
SDHC/SDXC Card
4 GB8 GB16 GB32 GB48 GB64 GB
TXP8 h 10 m30 m1 h2 h4 h 10 m6 h 10 m8 h 20 m
TSP11 h 40 m40 m1 h 20 m2 h 50 m5 h 50 m8 h 40 m11 h 50 m
o
2D Mode
QualityBuilt-in Memory
(64 GB)
SDHC/SDXC Card
4 GB8 GB16 GB32 GB48 GB64 GB
UXP5 h 50 m20 m40 m1 h 20 m2 h 50 m4 h 20 m5 h 50 m
XP8 h 10 m30 m1 h2 h4 h 10 m6 h 10 m8 h 20 m
SP11 h 40 m40 m1 h 20 m2 h 50 m5 h 50 m8 h 40 m11 h 50 m
EP29 h 10 m1 h 40 m3 h 40 m7 h 10 m14 h 50 m21 h 50 m29 h 50 m
0
The actual recording time may shorten depending on the shooting environment.
Approximate Number of Still Images (Unit: Number of Shots)
o
3D Mode
Image SizeSDHC CardBuilt-in Memory
(64 GB)
4 GB8 GB16 GB32 GB
1920X1080(2M)(16:9)1,0002,2004,4004,9994,999
o
2D Mode
Image SizeSDHC CardBuilt-in Memory
(64 GB)
4 GB8 GB16 GB32 GB
2304X1296(2.9M)(16:9)2,2004,6009,1009,9999,999
1920X1080(2M)(16:9)3,2006,7009,9999,9999,999
1728X1296(2.2M)(4:3)3,0006,2009,9999,9999,999
640X480(0.3M)(4:3)9,9999,9999,9999,9999,999
0
Regardless of image size and quality, up to 9999 still images may be recorded on the built-in memory (during 2D mode) and SD cards with at least 16 GB
capacity (except for “2,304 x 1,296 (2.9M) (16:9)”).
Recording
50
Approximate Recording Time (Using Battery)
o
3D Display on LCD Monitor
Battery PackActual Recording TimeContinuous Recording Time
3D Recording MP4(MVC)3D Recording AVCHD3D Recording MP4(MVC)3D Recording AVCHD
BN-VF815U
(Supplied)
55 m1 h1 h 45 m2 h
BN-VF823U1 h 20 m1 h 35 m2 h 40 m3 h 5 m
o
2D Display on LCD Monitor
Battery PackActual Recording Time
3D Recording MP4(MVC)3D Recording AVCHD2D Recording
BN-VF815U
(Supplied)
55 m1 h 5 m1 h 20 m
BN-VF823U1 h 25 m1 h 40 m1 h 55 m
Battery PackContinuous Recording Time
3D Recording MP4(MVC)3D Recording AVCHD2D Recording
BN-VF815U
(Supplied)
1 h 50 m2 h 10 m2 h 35 m
BN-VF823U2 h 45 m3 h 15 m3 h 50 m
0
The above are values when “MONITOR BRIGHTNESS” is set to “STANDARD”.
0
The actual recording time may be shorter if zooming is used or if recording is stopped repeatedly.
(It is recommended to prepare battery packs ready for three times the expected recording time.)
0
When the battery life is reached, the recording time becomes shorter even if the battery pack is fully charged. (Replace the battery pack with a new one.)
Recording
51
Playing Back Videos
You can select and play back the recorded videos from an index screen
(thumbnail display).
1
Select video mode.
.
0
The video mode icon A appears.
2
Tap q to select the playback mode.
.
3
Press the 3D button to select 3D or 2D mode.
.
0
Images recorded in 3D mode and 2D mode are displayed on the index
screen separately. Press the 3D button to switch to the desired mode
for playback.
0
During 3D mode, “3D” is displayed on the LCD monitor.
0
During 2D mode, “2D” is displayed on the LCD monitor.
4
Tap on the file to start playback.
.
0
Tap I/J to select the media for playback and change the index
screen (thumbnail display).
0
Tap e to pause.
0
Tap u to return to the index screen.
Memo :
0
Images recorded in 2D mode cannot be displayed as 3D images.
0
3D images may be played back when the 3D button lights up.
0
Images recorded in 3D mode and 2D mode are displayed on the index
screen separately. Press the 3D button to switch to the desired mode for
playback.
0
3D images recorded in “MP4(MVC)” format and “AVCHD” format are
displayed on the index screen separately.
Change the setting of 3D VIDEO REC FORMAT to the desired format for
playback.
“3D VIDEO REC FORMAT (3D mode only)” (A p. 104)
0
Scenes that are likely to cause motion sickness during 3D playback may
be played back in stop-motion, but this is not a malfunction. To play back
normally, set “3D MOTION RELIEF” to “OFF”.
“3D MOTION RELIEF (3D mode only)” (A p. 117)
Caution :
0
To play back 3D images, refer also to “Precautions on Recording and
Playing Back 3D Images”.
“Precautions on Recording and Playing Back 3D Images” (A p. 11)
Playback
52
Operation Buttons for Video Playback
During Index Screen Display
.
DisplayDescription
1
DateMoves to the previous/next date
2
3D/2D ModeDisplays the current playback mode of 3D or
2D. “3D” is displayed during 3D playback, while
“2D” is displayed during 2D playback.
3
<Displays the previous index screen (thumbnail
display)
4
>Displays the next index screen (thumbnail
display)
5
Thumbnail (File)Tap on thumbnail - Starts playback
Drag to right - Scrolls to the right to show the
previous index screen (thumbnail display)
Drag to left - Scrolls to the left to show the next
index screen (thumbnail display)
6
Recording/
Playback Mode
q
Switches between recording and playback
modes.
7
A
Displays the index screen (thumbnail display)
to perform deletion
8
I/J
Switches between the index screen of the built-
in memory and SD card
9
MENUDisplays the menu screen
During Video Playback
.
DisplayDescription
1
3D/2D ModeDisplays the current playback mode of 3D or
2D. “3D” is displayed during 3D playback, while
“2D” is displayed during 2D playback.
2
PointerDisplays the current estimated playback
position within the scene
3
k
Enables manual parallax adjustment
4
h
Returns to the beginning of the scene
5
j
Reverse search
6
d / e
Playback/pause
7
i
Forward search
8
g
Advances to the next video
9
Recording/
Playback Mode
q
Switches between recording and playback
modes.
0
u
Stop (returns to index screen)
a
A
Displays the index screen (thumbnail display)
to perform deletion
b
x
Switches between 3D and 2D modes.
c
MENUDisplays the menu screen
Memo :
0
Tap or drag on the operation area of the touch screen.
0
Operations buttons on the touch screen disappear if the unit is not
operated for about 5 seconds. Tap on the screen to display the operation
buttons again.
0
Operation buttons on the touch screen are displayed as long as there is
contact with the effective operation area.
0
You can search for a specific file by the recording date.
“Date Search” (A p. 58)
Caution :
0
Make a backup of important recorded data.
It is recommended to copy your important recorded data to a DVD or other
recording media for storage.
JVC will not be responsible for any lost data.
Playback
53
Adjusting the Volume of Videos
A Press the zoom lever during video playback.
.
Checking the Recording Date and Other Information
A Select a file and press the INFO button while playback is paused.
You can display the recording date and duration of the selected file.
.
Playing a Video with Defective Management Information
Plays videos with defective management information.
1
Select video mode.
.
2
Tap q to select the playback mode.
.
3
Tap “MENU”.
.
4
Tap “PLAYBACK OTHER FILE”.
.
5
Tap on the file to start playback.
.
“Playing Back Videos” (A p. 53)
Memo :
0
An MTS file is created in the EXTMOV folder when management
information is corrupted.
0
The thumbnails of the 3D files in the EXTMOV folder will be shown as
images separated into left and right on the index screen but this is not a
malfunction.
0
Depending on the condition of the damaged file, playback might fail or
may not run smoothly.
Playback
54
Playing Back Still Images
You can select and play back the recorded still images from an index screen
(thumbnail display).
The contents of the selected media are displayed on the index screen.
“REC MEDIA FOR IMAGE” (A p. 123)
1
Select still image mode.
.
2
Tap q to select the playback mode.
.
3
Press the 3D button to select 3D or 2D mode.
.
0
Images recorded in 3D mode and 2D mode are displayed on the index
screen separately. Press the 3D button to switch to the desired mode
for playback.
0
During 3D mode, “3D” is displayed on the LCD monitor.
0
During 2D mode, “2D” is displayed on the LCD monitor.
4
Tap on the file to start playback.
.
0
Tap I/J to select the media for playback and change the index
screen (thumbnail display).
0
Tap u to return to the index screen.
0
Tap W to show all the thumbnails that are displayed in a group.
Tap again to restore the group.
Memo :
0
Only 3D images are displayed during the 3D mode. Similarly, only 2D
images are displayed during the 2D mode.
0
3D images may be played back when the 3D button lights up.
0
You can search for a specific file by the recording date.
This is useful when searching from a large number of files.
“Date Search” (A p. 58)
Caution :
0
To play back 3D images, refer also to “Precautions on Recording and
Playing Back 3D Images”.
“Precautions on Recording and Playing Back 3D Images” (A p. 11)
Operation Buttons for Still Image Playback
During Index Screen Display
.
DisplayDescription
1
DateMoves to the previous/next date
2
3D/2D ModeDisplays the current playback mode of 3D or
2D. “3D” is displayed during 3D playback, while
“2D” is displayed during 2D playback.
3
Thumbnail (File)Tap on thumbnail - Starts playback
Drag to right - Scrolls to the right to show the
previous index screen (thumbnail display)
Drag to left - Scrolls to the left to show the next
index screen (thumbnail display)
4
Recording/
Playback Mode
q
Switches between recording and playback
modes.
5
W
Switches between the group or full index
screen displays.
6
A
Displays the index screen (thumbnail display)
to perform deletion
7
I/J
Switches between the index screen of the built-
in memory and SD card
8
MENUDisplays the menu screen
9
Recording DateRecording date (only displayed on the first file
of each date)
Playback
55
During Still Image Playback
.
DisplayDescription
1
3D/2D ModeDisplays the current playback mode of 3D or
2D. “3D” is displayed during 3D playback, while
“2D” is displayed during 2D playback.
2
T
Continuous playback of grouped files (such as
still images captured by continuous shooting).
3
k
Enables manual parallax adjustment
4
h
Returns to the previous still image
5
Recording/
Playback Mode
q
Switches between recording and playback
modes.
6
u
Returns to index screen
7
A
Displays the index screen (thumbnail display)
to perform deletion
8
x
Switches between 3D and 2D modes.
9
MENUDisplays the menu screen
0
g
Advances to the next still image
a
d
Starts/pauses slideshow
“Slideshow Playback” (A p. 57)
Memo :
0
Tap or drag on the operation area of the touch screen.
0
Operations buttons on the touch screen disappear if the unit is not
operated for about 5 seconds. Tap on the screen to display the operation
buttons again.
0
Operation buttons on the touch screen are displayed as long as there is
contact with the effective operation area.
Checking the Recording Date and Other Information
A Press the INFO button.
You can display the recording date of the selected file.
.
Adjusting Parallax During Playback
When playing back 3D images of scenes where there are multiple objects
arrayed in a line from near to far, or objects that are extremely close to the
camera, you can change the way they appear to the eye.
0
Parallax can only be adjusted when 3D images are displayed on the unit’s
LCD monitor.
1
Tap k.
.
2
Tap “MANUAL”.
.
0
The parallax adjustment screen appears.
0
To set parallax adjustment to auto (default), tap “AUTO”.
3
Adjust the parallax.
.
0
To increase the amount of correction, tap “+”. Doing so increases the
value of the parallax display.
0
To reduce the amount of correction, tap “-”. Doing so decreases the
value of the parallax display.
4
Tap “SET” to confirm.
.
Caution :
0
Too much parallax may cause the 3D effect to be lost.
0
If you see double images even after parallax adjustment, set the display
on the TV to 2D immediately. In addition, set the LCD monitor to 2D display
accordingly.
Memo :
0
While this unit is equipped with the function to adjust parallax
automatically, it may not work properly for the following subjects.
- Subjects beyond the recommended shooting distance (especially
subjects that are extremely close to the camera)
- Numerous subjects of the similar shape arrayed in a line, such as the
windows of a building
- Straight subjects such as electric wires
In these cases, adjust the parallax manually.
Playback
56
0
When the power of this unit is turned off or the mode is switched to
recording after parallax is manually adjusted, the “PARALLAX
ADJUSTMENT” setting returns to “AUTO”.
Slideshow Playback
Still images can be played back in a slideshow.
1
Select still image mode.
.
2
Tap q to select the playback mode.
.
3
Press the 3D button to select 3D or 2D mode.
.
0
Images recorded in 3D mode and 2D mode are displayed on the index
screen separately. Press the 3D button to switch to the desired mode
for playback.
0
During 3D mode, “3D” is displayed on the LCD monitor.
0
During 2D mode, “2D” is displayed on the LCD monitor.
4
Tap on the thumbnail and tap d.
.
“Operation Buttons for Still Image Playback” (A p. 55)
Playback
57
Searching for a Specific Video/Still Image
When there is a large number of recorded videos and still images, it is difficult
to look for the desired file from the index screen.
Use the search function to find the file you want.
0
For both videos and still images, you can search by “SEARCH DATE”
(recording date).
“To search by recording dates” (A p. 58)
Date Search
You can search and play videos or still images according to recording dates.
0
The contents of the media selected in “REC MEDIA FOR VIDEO” or “REC
MEDIA FOR IMAGE” are searched.
1
Tap “MENU”.
.
0
Searching can be performed in both the video and still image modes.
*The image shows the video mode.
2
Tap “SEARCH DATE”.
.
3
Select a recording date and tap “NEXT”.
.
0
Tap again to cancel the selected date.
4
Tap on the file to start playback.
.
0
You can select videos in the video mode and still images in the still
image mode.
0
Only the files recorded on the selected date are displayed.
Deleting Files of a Selected Date
:
Tap A on the index screen (thumbnail display) to delete unwanted files.
“Deleting Unwanted Files” (A p. 65)
Connecting to and Viewing on TV
You can connect this unit to a TV for playback. Select the most suitable way
of connecting to the TV based on the image to view (3D/2D image).
0
Refer also to the instruction manual of the TV in use.
“Playing Back 3D Images” (A p. 58)
“Playing Back 2D Images” (A p. 60)
Unnatural Displays on TV
TroubleAction
Images do not
appear on the TV
properly.
0
Disconnect the cable and connect again.
0
Turn off and on this unit again.
Images are
projected vertically
on the TV.
0
Set “VIDEO OUTPUT” in the “COMMON” menu
to “4:3”.
“VIDEO OUTPUT (2D mode only)” (A p. 127)
Images are
projected
horizontally on the
TV.
0
Adjust the TV's screen accordingly.
The color of images
looks strange.
0
If the video was recorded with “x.v.Color” set to
“ON”, set the x.v.Color setting of the TV to on.
“x.v.Color (2D mode only)” (A p. 106)
0
Adjust the TV's screen accordingly.
HDMI-CEC
functions do not
work properly, and
the TV does not
work in conjunction
with this unit.
0
TVs may operate differently depending on the
specifications, even if they are HDMI-CEC
compliant. Therefore, the HDMI-CEC functions
of this unit cannot be guaranteed to operate in
combination with all the TVs. In such cases, set
“HDMI CONTROL” to “OFF”.
“HDMI CONTROL” (A p. 129)
The language on
the display
changed.
0
It may occur when you connect this unit to a TV
with different language setting using an HDMI
mini cable.
3D images are not
displayed in 3D.
0
Set “HDMI OUTPUT” in the “COMMON” menu
to “CERTAIN TV TYPES”.
“HDMI OUTPUT” (A p. 128)
Memo :
0
Fatigue or discomfort may be experienced if you view 3D images for a long
period of time. When viewing 3D images on this unit, a message will be
displayed every 30 minutes. To turn off the message display, set “3D
DISPLAY WARNING” to “OFF”.
“3D DISPLAY WARNING (3D mode only)” (A p. 127)
0
When recording 3D images, parallax is automatically adjusted. If the left
and right images of an object close to the camera do not appear to be in
alignment, or the 3D effect of a distant object is weak, you can change the
way they appear to the eye by adjusting the parallax.
“Adjusting Parallax During Playback” (A p. 56)
0
You can enjoy realistic audio sounds by viewing the video from the center
of the TV or center of the right and left speakers.
Playing Back 3D Images
If you are using a 3D compatible TV, you can play back 3D images by
connecting to the HDMI connector.
0
Use the provided HDMI mini cable or an optional High Speed HDMI mini
cable.
0
Refer also to the instruction manual of the TV in use.
1
Close the LCD monitor.
Playback
58
.
0
Close the LCD monitor to turn off the camcorder before connecting
to a TV.
2
Connect to a TV.
.
3
Connect the AC adapter to this unit.
.
0
This unit powers on automatically when the LCD monitor is opened.
4
Press the external input button on the TV to switch to the input from this
unit via the connected connector.
.
5
Play back a file.
.
“Playing Back Videos” (A p. 52)
“Playing Back Still Images” (A p. 55)
Caution :
0
To play back 3D images, refer also to “Precautions on Recording and
Playing Back 3D Images”.
“Precautions on Recording and Playing Back 3D Images” (A p. 11)
0
If you experience fatigue or discomfort while viewing 3D images, set
“HDMI OUTPUT” in the “COMMON” menu to “2D OUTPUT”. In addition,
set the TV to 2D display accordingly.
“HDMI OUTPUT” (A p. 128)
Memo :
0
When connected to the TV via the provided HDMI mini cable, images and
sounds may not be output properly depending on the TV connected.
In such cases, perform the following operations.
1) Disconnect the HDMI mini cable and connect it again.
2) Turn off and on this unit again.
0
If 3D images cannot be seen properly, change the setting in “HDMI
OUTPUT”. Refer also to the instruction manual of the TV in use.
“HDMI OUTPUT” (A p. 128)
0
The displayed 3D images may vary depending on the size of the TV
connected.
0
For questions about the TV or method of connection, contact your TV's
manufacturer.
Playback
59
Operating in Conjunction with TV via HDMI
Connecting this unit to an HDMI-CEC-enabled TV using the HDMI cable
allows linked operations with the TV to be performed.
0
HDMI-CEC (Consumer Electronics Control) is an industry standard that
enables interoperability between HDMI-CEC compliant devices that are
connected via HDMI cables.
Memo :
0
Not all HDMI-control devices comply with the HDMI-CEC standard. The
HDMI control function of this unit will not work when connected to these
devices.
0
This unit is not guaranteed to operate with all HDMI-CEC-enabled
devices.
0
Depending on the specifications of each HDMI-CEC-enabled device,
some functions may not work with this unit. (For details, refer to the
instruction manual of your TV.)
0
Unintended operations may occur with some connected devices. In these
cases, set “HDMI CONTROL” to “OFF”.
“HDMI CONTROL” (A p. 129)
Preparations
0
Close the LCD monitor to turn off the camcorder before connecting to a
TV.
0
Connect an HDMI cable between this unit and the TV.
“Connecting via the HDMI Mini Connector” (A p. 61)
0
Turn on the TV and set the HDMI-CEC related setting to “ON”. (For details,
refer to the instruction manual of the TV.)
0
Turn on this unit and set “HDMI CONTROL” in the “COMMON” menu to
“ON”.
“HDMI CONTROL” (A p. 129)
Operation Method 1
1
Turn on this unit.
2
Select the playback mode.
3
Connect the HDMI cable.
0
TV turns on automatically and switches to HDMI input mode when
this unit is turned on.
Operation Method 2
1
Turn off the TV.
0
This unit turns off automatically.
Memo :
0
Depending on the TV connected, the display language of this unit will
automatically switch to the language that is selected for the TV when this
unit is turned on.
(This is applicable only if this unit supports the language selected for the
TV.) To use this unit with a language that differs from the display language
of the TV, set “HDMI CONTROL” to “OFF”.
0
The display language of the TV will not switch automatically, even if the
display language of this unit is changed.
0
These functions may not work correctly when devices such as amplifier
and selector are connected. Set “HDMI CONTROL” to “OFF”.
0
If HDMI-CEC does not work properly, turn off and on this unit again.
Caution :
0
Do not remove the recording medium or perform any other operation (such
as turning off the power) while accessing files. Also, be sure to use the
provided AC adapter, as the data on the recording medium may be
corrupted if the battery becomes exhausted during operation. If the data
on the recording medium becomes corrupted, format the recording
medium to use the medium again.
Playing Back 2D Images
The image quality on TV varies with the type of TV and the connecting cable.
Select the connector that best suits your TV.
0
Refer also to the instruction manual of the TV in use.
“Connecting via the HDMI Mini Connector” (A p. 61)
“Connecting via the AV Connector” (A p. 62)
Playback
60
Connecting via the HDMI Mini Connector
If you are using an HDTV, you can play back in HD quality by connecting to
the HDMI connector.
0
Use a High Speed HDMI Cable.
0
Refer also to the instruction manual of the TV in use.
1
Close the LCD monitor.
.
0
Close the LCD monitor to turn off the camcorder before connecting
to a TV.
2
Connect to a TV.
.
3
Connect the AC adapter to this unit.
.
0
This unit powers on automatically when the LCD monitor is opened.
4
Press the external input button on the TV to switch to the input from this
unit via the connected connector.
.
5
Play back a file.
.
“Playing Back Videos” (A p. 52)
“Playing Back Still Images” (A p. 55)
Memo :
0
Change the settings in “HDMI OUTPUT” according to the connection.
“HDMI OUTPUT” (A p. 128)
0
When connected to the TV via the HDMI mini cable, images and sounds
may not be output properly depending on the TV connected.
In such cases, perform the following operations.
1) Disconnect the HDMI mini cable and connect it again.
2) Turn off and on this unit again.
0
For questions about the TV or method of connection, contact your TV's
manufacturer.
Playback
61
Connecting via the AV Connector
By connecting the supplied AV cable to the AV connector, videos can be
played back on a TV.
0
Refer also to the instruction manual of the TV in use.
1
Open the LCD monitor, then press and hold the power button for 2
seconds or more to turn off the power.
.
2
Connect to a TV.
.
A Connect using the provided AV cable.
B Connect the AC adapter to this unit.
0
This unit powers on automatically when the AC adapter is connected.
3
Press the external input button on the TV to switch to the input from this
unit via the connected connector.
.
4
Play back a file.
.
“Playing Back Videos” (A p. 52)
“Playing Back Still Images” (A p. 55)
Memo :
0
For questions about the TV or method of connection, contact your TV's
manufacturer.
Playback
62
Playing Back a DVD or Blu-ray Disc Created on this Unit
BD/DVDs created using the backup function on this unit can be played back on TV using an optional DVD writer (DVDs only) with playback function (CU-
VD50U) or a normal BD/DVD player. DVDs can also be played back on this unit by connecting the optional DVD writer with playback function.
“Playing Back with a DVD Writer” (A p. 77)
“Playing Back with an External Blu-ray Drive” (A p. 82)
“Playing Back Files in the USB External Hard Disk Drive” (A p. 85)
0
For details on how to play back on a normal DVD or Blu-ray disc player, refer to the instruction manual of the player.
o
3D (AVCHD) Files
Playback DeviceDVD
(DVD-Video format)
DVD
(AVCHD format)
Blu-ray DiscDevice’s Internal HDD
DVD writer with playback function (CU-VD3U,
CU-VD50U)
-
P
--
External Blu-ray drive connected to this unit-
PP
-
DVD player/
DVD recorder
-
P*1
-
P
Blu-ray player/
Blu-ray recorder
-
P*1P*1P
USB external hard disk drive---
P
Computer-*2*2*2
*1: Only on AVCHD compatible devices.
*2: Use Everio MediaBrowser 3D Player to play back an AVCHD file on the computer. Refer to the help file of the provided Everio MediaBrowser 3D software
to operate.
Memo :
0
When AVCHD files recorded in 3D are played back on a normal recorder or player, the left and right images will be displayed separately.
0
When there are many files in the disc, it may take time for them to be displayed on the screen. Wait for a while as the access lamp appears blinking, which
indicates normal operation.
o
3D (MP4(MVC)) Files
Playback Device
DVD
(DVD-Video format)
DVD
(AVCHD format)
Blu-ray DiscDevice’s Internal HDD
DVD writer with playback function (CU-VD3U,
CU-VD50U)
----
External Blu-ray drive connected to this unit--
P
-
DVD player/
DVD recorder
----
Blu-ray player/
Blu-ray recorder
----
USB external hard disk drive---
P
Computer---*
* Use Everio MediaBrowser 3D Player to play back an MP4(MVC) file on the computer. Refer to the help file of the provided Everio MediaBrowser 3D software
to operate.
Memo :
0
Videos recorded in MP4(MVC) format can be copied or played back only when dubbed to a Blu-ray disc or hard disk drive.
Copy or play back by connecting this unit to an external Blu-ray drive or USB external hard disk drive.
0
When there are many files in the disc, it may take time for them to be displayed on the screen. Wait for a while as the access lamp appears blinking, which
indicates normal operation.
Playback
63
o
2D Files
Playback DeviceDVD
(DVD-Video format)
DVD
(AVCHD format)
Blu-ray DiscDevice’s Internal HDD
DVD writer with playback function (CU-VD3U,
CU-VD50U)
PP
--
External Blu-ray drive connected to this unit
PPP
-
DVD player/
DVD recorder
PP*1
-
P
Blu-ray player/
Blu-ray recorder
PP*1P*1P
USB external hard disk drive---
P
Computer
P
*2*2
P
*1: Only on AVCHD compatible devices.
*2: Use Everio MediaBrowser 3D Player to play back an AVCHD file on the computer. Refer to the help file of the provided Everio MediaBrowser 3D software
to operate.
Memo :
0
When there are many files in the disc, it may take time for them to be displayed on the screen. Wait for a while as the access lamp appears blinking, which
indicates normal operation.
Caution :
0
DVDs that are created in AVCHD format cannot be played back on DVD players with standard quality. You may not be able to remove the disc from the
player.
Digest Playback on a Blu-ray or DVD Player
You can play back a few seconds from each scene of the recorded videos in the created disc.
1
Load the created disc on a player.
2
Select “DIGEST PLAYBACK” on the TV.
0
The digest is played back continuously.
.
(The screen does not appear on this unit.)
Memo :
0
To normal playback/To index menu
1) Press the top menu button on the remote control of the player during digest playback.
2) Select the desired item.
0
“DIGEST PLAYBACK” menu is not available when the DVD is created using the provided Everio MediaBrowser 3D software.
0
Digest Playback is not available when playing back by connecting this unit to a DVD writer or external Blu-ray drive.
0
Digest Playback is not available for MP4(MVC) videos recorded to discs.
Playback
64
Deleting Unwanted Files
Delete unwanted videos and still images when the space in the recording
media is running out.
The remaining space in the recording media increases after deleting the files.
“Deleting the Currently Displayed File” (A p. 65)
“Deleting Selected Files” (A p. 65)
Memo :
0
Deleted files cannot be restored.
0
Files that are protected cannot be deleted.
Release protection before deleting the file.
“Protecting Files” (A p. 66)
0
Be sure to back up important files on a PC.
“Backing Up All Files” (A p. 93)
Caution :
0
Do not remove the recording medium or perform any other operation (such
as turning off the power) while accessing files.
0
Be sure to use the supplied JVC AC adapter.
0
If the data on the recording medium becomes corrupted, format the
recording medium to use the medium again.
“FORMAT SD CARD” (A p. 131)
Deleting the Currently Displayed File
Deletes the currently displayed file.
Caution :
0
Deleted files cannot be restored.
1
Tap A.
.
0
While the video mode is shown in the image, the same operations
apply for the still image mode.
2
Tap “YES”.
.
0
Tap h / g to select the previous or next file.
0
When no file remains, the screen returns to the index screen.
Memo :
0
Files that are protected cannot be deleted.
Release protection before deleting the file.
“Protecting Files” (A p. 66)
Deleting Selected Files
Deletes the selected files.
Caution :
0
Deleted files cannot be restored.
1
Select video or still image mode.
.
2
Tap q to select the playback mode.
.
0
While the video mode is shown in the image, the same operations
apply for the still image mode.
3
Tap A.
.
4
Tap on the files to delete.
.
0
P appears on the selected files.
To remove P from a file, tap on the file again.
0
Tap “SEL ALL” to select all files.
0
Tap “REL ALL” to release all selections.
0
Still images that are recorded continuously within 2 seconds or with
the continuous shooting mode will be grouped together. Only the first
recorded file is shown and the group is displayed with a green frame.
When this is tapped, an index screen of the grouped files appears.
Tap on the files to delete, then tap “J”.
5
Tap “SET”.
.
6
Tap “EXECUTE” to confirm the deletion.
.
Editing
65
0
After deleting is complete, tap “OK”.
0
To cancel the deletion, tap “QUIT”.
Memo :
0
Files that are protected cannot be deleted.
Release protection before deleting the file.
“Protecting Files” (A p. 66)
Protecting Files
Prevent important videos/still images from being deleted accidently by
protecting them.
“Protecting/Releasing Protection of the Currently Displayed File”
(A p. 66)
“Protecting/Releasing Protection of Selected Files” (A p. 66)
Caution :
0
When the recording media is formatted, even the protected files will be
deleted.
Protecting/Releasing Protection of the Currently Displayed
File
Protects or releases protection of the currently displayed file.
1
Tap “MENU”.
.
2
Tap “PROTECT/CANCEL”.
.
3
Tap “YES”.
.
0
Tap h / g to select the previous or next file.
0
After setting, tap “OK”.
Protecting/Releasing Protection of Selected Files
Protects or releases protection of the selected files.
1
Select video or still image mode.
.
2
Tap q to select the playback mode.
Editing
66
.
3
Tap “MENU”.
.
4
Tap “PROTECT/CANCEL”.
.
5
Tap on the files to protect or release protection of.
.
0
I and P are displayed on the files that are already protected.
To release protection of a file, tap on the file such that P is removed.
0
P appears on the selected files.
To remove P from a file, tap on the file again.
0
Tap “SEL ALL” to select all files.
0
Tap “REL ALL” to release all selections.
0
Still images that are recorded continuously within 2 seconds or with
the continuous shooting mode will be grouped together. Only the first
recorded file is shown and the group is displayed with a green frame.
When this is tapped, an index screen of the grouped files appears.
Tap on the files to protect or release protection of, then tap “J”.
6
Tap “SET”.
.
0
Protect marks I appear on the selected files.
Protect marks I disappear from the deselected files.
Capturing a Still Image in the Video during
Playback
You can capture still images of the scenes you like in the recorded videos.
1
Select video mode.
.
2
Tap q to select the playback mode.
.
3
Tap on the desired video.
.
4
Tap pause e at the desired scene during playback.
.
0
After pausing the video, you can fine-tune the point to capture by
tapping forward slow-motion k and reverse slow-motion l.
5
Press the SNAPSHOT button.
.
Memo :
0
Still images are captured with a size of 1920×1080.
0
Captured still images are stored in the media where the video is being
played back from.
0
Still images cannot be captured from 3D videos.
Editing
67
Capturing a Required Part in the Video
(TRIMMING)
Select the required part of a video and save it as a new video file.
0
The original video remains in its existing location.
1
Select video mode.
.
2
Tap q to select the playback mode.
.
3
Tap “MENU”.
.
4
Tap “TRIMMING”.
.
0
Tap ∧ or ∨ to move upward or downward for more selection.
5
Tap on the video to edit.
.
6
Tap e to pause playback at the desired start point, then tap “A”.
.
7
Tap e to pause playback at the desired end point, then tap “B”.
.
0
To reset the start or end point, tap “A” or “B” at the desired scene
(position).
8
Tap “SET”.
.
9
Tap “SET”.
.
0
When copying finishes, the copied file is added to the index screen.
0
After copying, tap “OK”.
Memo :
0
The division point may deviate slightly from the selected scene.
Editing
68
Capturing Videos for Uploading to YouTube
Capture and copy a part of a recorded video (maximum 15 minutes) for
uploading to YouTube, and save it as a YouTube video.
When capturing videos for YouTube, the duration cannot be longer than 15
minutes.
1
Select video mode.
.
2
Tap q to select the playback mode.
.
3
Tap “MENU”.
.
4
Tap “UPLOAD SETTINGS”.
.
0
Tap ∧ or ∨ to move upward or downward for more selection.
5
Tap on the desired video.
.
6
Tap “TRIM”.
0
When trimming is not necessary, tap “DO NOT TRIM”.
.
0
If the selected video is more than 15 minutes, trimming is necessary.
7
Tap e to pause playback at the desired start point, then tap “A”.
.
8
Tap e to pause playback at the desired end point, then tap “B”.
.
0
To reset the start or end point, tap “A” or “B” at the desired scene
(position).
0
When capturing videos for YouTube, the duration cannot be longer
than 15 minutes.
9
Tap “SET”.
.
10
Tap “YES”.
.
0
After copying, tap “OK”.
0
When copying finishes, the copied file is added to the index screen.
0
To exit upload settings, tap “STOP” on the upload settings screen.
0
After copying, tap “OK”.
Memo :
0
The division point may deviate slightly from the selected scene.
Uploading Videos to YouTube
You can upload your videos to YouTube using the provided software Everio
MediaBrowser 3D. Install the software on your PC and connect this unit to
the PC.
0
For details on how to use the software, refer to the help file.
“Installing the Provided Software” (A p. 92)
“Connecting this Unit to PC” (A p. 93)
Trouble with Uploading Videos
:
0
Check if you have created an account with YouTube. (You need a
YouTube account to upload files to YouTube.)
0
Refer to “Q&A”, “Latest Information”, “Download Information”, etc. in “Click
for Latest Product Info” in the help file of the provided software Everio
MediaBrowser 3D.
Editing
69
Copying Files
You can create discs or copy the files on this unit by connecting it to various devices.
0
Select the appropriate method of copying according to the device. If you are unsure about the method of copying, refer to “Copying Your Files”.
“Copying Your Files” (A p. 0)
o
3D (AVCHD) Files
P: Can be copied, -: Cannot be copied
Recording DeviceDVD
(AVCHD)
Blu-ray DiscDevice’s Internal HDD
DVD writer connected to this unit
“Creating Discs with a DVD Writer” (A p. 72)
P
--
External Blu-ray drive connected to this unit
“Creating Discs with an External Blu-ray Drive” (A p. 78)
PP
-
Blu-ray recorder
“Creating a Disc Using a Connected Blu-ray Recorder”
(A p. 83)
-
P*1P
DVD recorder
“Dubbing Files by Connecting to a DVD Recorder”
(A p. 83)
--
P
USB external hard disk drive
“Using a USB External Hard Disk Drive” (A p. 84)
--
P
Computer
“Copying to Windows PC” (A p. 91)
*2*2*2
*1: Only on AVCHD compatible devices.
*2: When creating a disc with 3D images, there may be certain limitations due to the recording format. Refer to the help file of the provided Everio MediaBrowser
3D software to operate.
Memo :
0
When AVCHD files recorded in 3D are played back on a normal recorder or player, the left and right images will be displayed separately.
0
3D images cannot be copied to a VHS tape. Copy them to a Blu-ray disc, DVD, or USB external hard disk drive.
0
To record to discs with a computer, a recordable DVD or Blu-ray drive is required for the computer in use.
o
3D (MP4(MVC)) Files
P: Can be copied, -: Cannot be copied
Recording Device
DVD
(AVCHD)
Blu-ray DiscDevice’s Internal HDD
DVD writer connected to this unit
“Creating Discs with a DVD Writer” (A p. 72)
---
External Blu-ray drive connected to this unit
“Creating Discs with an External Blu-ray Drive” (A p. 78)
-
P
-
Blu-ray recorder
“Creating a Disc Using a Connected Blu-ray Recorder”
(A p. 83)
---
DVD recorder
“Dubbing Files by Connecting to a DVD Recorder”
(A p. 83)
---
USB external hard disk drive
“Using a USB External Hard Disk Drive” (A p. 84)
--
P
Computer
“Copying to Windows PC” (A p. 91)
--*
*: When creating a disc with 3D images, there may be certain limitations due to the recording format. Refer to the help file of the provided Everio MediaBrowser
3D software to operate.
Memo :
0
3D images cannot be copied to a VHS tape.
0
Videos recorded in MP4(MVC) format can be copied or played back only when dubbed to a Blu-ray disc or hard disk drive.
Copy or play back by connecting this unit to an external Blu-ray drive or USB external hard disk drive.
Copying
70
o
2D Files
P: Can be copied, -: Cannot be copied
Recording DeviceVHS TapeDVD
(DVD-Video)
DVD
(AVCHD)
Blu-ray DiscDevice’s
Internal HDD
DVD writer connected to this unit
“Creating Discs with a DVD Writer” (A p. 72)
-
PP
--
External Blu-ray drive connected to this unit
“Creating Discs with an External Blu-ray Drive”
(A p. 78)
-
PPP
-
Blu-ray recorder
“Creating a Disc Using a Connected Blu-ray
Recorder” (A p. 83)
-
P
-
P*1P
DVD recorder
“Dubbing Files by Connecting to a DVD Recorder”
(A p. 83)
-
P
--
P
USB external hard disk drive
“Using a USB External Hard Disk Drive” (A p. 84)
----
P
VCR
“Dubbing Files to a VHS Tape Using a VCR”
(A p. 88)
P
----
Computer
“Copying to Windows PC” (A p. 91)
-*2*2*2
P
*1: Only on AVCHD compatible devices.
*2: Use Everio MediaBrowser 3D to record to discs on the computer. Refer to the help file of the provided Everio MediaBrowser 3D software to operate.
Memo :
0
To record to discs with a computer, a recordable DVD or Blu-ray drive is required for the computer in use.
Copying
71
Creating Discs with a DVD Writer
You can copy the recorded files to discs or play back the created discs using
an optional DVD writer.
Compatible DVD Writers
Product NameDescription
DVD Writer
0
CU-VD3U
0
Enables the images recorded on this unit to be
copied to a DVD without using a PC.
DVD Writer
0
CU-VD50U
0
Creates DVDs and functions as an external DVD
drive when connected to a PC. In addition,
created DVDs can be played back by connecting
the CU-VD50U to a TV.
Creating Discs with a DVD Writer
o
Preparing a DVD Writer
“Preparing a DVD Writer (CU-VD50U)” (A p. 73)
“Preparing a DVD Writer (CU-VD3U)” (A p. 73)
o
Copying to Discs
“Copying All Files” (A p. 73)
“Copying Files by Date (2D mode only)” (A p. 75)
“Copying Selected Files” (A p. 76)
o
Other Operations
“Playing Back with a DVD Writer” (A p. 77)
“Finalizing Discs After Copying” (A p. 78)
Memo :
0
When there are many files to back up, it may take time for the backup to
be completed. Wait for a while as the access lamp appears blinking, which
indicates normal operation.
0
Recording date and time will not be displayed when playing back a disc
that contains videos recorded in 3D mode.
Caution :
0
3D images in MP4(MVC) format cannot be copied to a DVD writer.
Changing the Media of the DVD Writer
Set the type of media according to the loaded DVD.
1
Prepare a DVD writer.
“Preparing a DVD Writer (CU-VD50U)” (A p. 73)
“Preparing a DVD Writer (CU-VD3U)” (A p. 73)
2
Tap “CHANGE REC. MEDIA” in the “BACK-UP” menu.
.
3
Tap “DVD(AVCHD)” or “DVD-Video”.
.
0
The media changes to the tapped item. Select the appropriate setting
according to the disc.
0
Selecting “DVD(AVCHD)” enables you to save videos in a DVD in the
high definition quality.
0
Selecting “DVD-Video” enables you to save videos in a DVD after
converting to the standard image quality.
Caution :
0
When copying 3D images in AVCHD format, the media of the DVD writer
cannot be changed.
Copying
72
Preparing a DVD Writer (CU-VD50U)
1
Connect the USB cable and the AC adapter.
0
Turn off the camcorder by pressing the M button for about 2 seconds.
.
A Connect the USB cable provided with the DVD writer.
B Connect the AC adapter of the DVD writer.
C Connect the AC adapter to this unit.
0
This unit powers on automatically when the AC adapter is connected.
0
This unit turns on and the “BACK-UP” menu appears.
0
While the USB cable is connected, the “BACK-UP” menu is
displayed.
0
Refer also to the instruction manual of the DVD writer.
2
Turn on the DVD writer and insert a new disc.
.
A Press the power button to turn on the power.
B Press the eject button to open the disc tray.
C Pull out the tray completely and load a new disc properly.
D Push the disc tray in until it clicks into place.
Caution :
0
Be sure to turn off the power when connecting the devices.
Otherwise, electric shocks or malfunctions may occur.
Memo :
0
When connected to this unit, all buttons on the DVD writer CU-VD50, other
than the power and eject buttons, will not work.
Preparing a DVD Writer (CU-VD3U)
1
Connect the USB cable and the AC adapter.
0
Turn off the camcorder by pressing the M button for about 2 seconds.
.
A Connect the USB cable of the DVD writer to this unit.
B Connect the AC adapter of the DVD writer.
C Connect the AC adapter to this unit.
0
This unit powers on automatically when the AC adapter is connected.
0
This unit turns on and the “BACK-UP” menu appears.
0
While the USB cable is connected, the “BACK-UP” menu is
displayed.
0
Refer also to the instruction manual of the DVD writer.
2
Insert a new disc.
.
A Press the eject button to open the disc tray.
B Pull out the tray completely and load a new disc properly.
C Push the disc tray in until it clicks into place.
Caution :
0
Be sure to turn off the power when connecting the devices.
Otherwise, electric shocks or malfunctions may occur.
Creating a Disc
1
Prepare a DVD writer.
0
Insert a new disc into the DVD writer.
“Preparing a DVD Writer (CU-VD50U)” (A p. 73)
“Preparing a DVD Writer (CU-VD3U)” (A p. 73)
2
Copy files to the disc with the following methods.
“Copying All Files” (A p. 73)
“Copying Files by Date (2D mode only)” (A p. 75)
“Copying Selected Files” (A p. 76)
Copying All Files
All videos or still images recorded on this unit will be copied.
You can also select and copy only the videos or still images that have never
been copied.
1
Select 3D or 2D mode.
Copying
73
.
2
Select video or still image mode.
.
3
Tap “CREATE FROM ALL” (video) or “SAVE ALL” (still image).
.
0
While the video mode is shown in the image, the same operations
apply for the still image mode.
4
Tap on the media to copy.
.
5
Tap the desired method.
.
0
While the video mode is shown in the image, the same operations
apply for the still image mode.
0
“ALL SCENES” (video)/“ALL IMAGES” (still image):
All videos or still images in this unit are copied.
0
“UNSAVED SCENES” (video)/“UNSAVED IMAGES” (still
image):
Videos or still images that have never been copied are automatically
selected and copied.
6
Tap “EXECUTE”.
.
0
The number of discs required to copy the files is displayed.
Prepare the discs accordingly.
7
Tap “YES” or “NO”. (A mode only)
.
0
When “YES” is selected, videos with similar recording dates are
displayed in groups.
0
When “NO” is selected, videos are displayed according to recording
dates.
8
Tap “EXECUTE”.
.
0
When “INSERT NEXT DISC” appears, change the disc.
9
After copying, tap “OK”.
.
10
Press and hold the M button for 2 seconds or more to turn off this unit
and disconnect the USB cable.
Caution :
0
Do not turn off the power or remove the USB cable until copying is
complete.
0
Files that are not on the index screen during playback cannot be copied.
Memo :
0
To check the created disc, refer to “Playing Back with a DVD Writer”.
“Playing Back with a DVD Writer” (A p. 77)
When “DO YOU WANT TO FINALIZE?” appears
This appears when “AUTO FINALIZE” in the basic settings menu is set to
OFF.
“AUTO FINALIZE” (A p. 129)
0
To play back on other devices, tap “YES”.
0
To add more files to the DVD later, tap “NO”.
Memo :
0
When two or more DVDs are created simultaneously, all the discs other
than the last one will be finalized automatically even when “AUTO
FINALIZE” is set to “OFF”.
0
You can finalize a DVD even when “FINALIZE” is selected in the “BACK-
UP” menu.
“Finalizing Discs After Copying” (A p. 78)
0
To play back a BD-R disc on other devices, select “FINALIZE” after
creating the disc.
(The “AUTO FINALIZE” function on the basic settings menu can only be
used for creating DVDs.)
Copying
74
Copying Files by Date (2D mode only)
Videos or still images are sorted and copied according to the date on which
they were recorded.
0
Only 2D videos or still images can be sorted and copied according to the
date on which they were recorded.
1
Select 2D mode.
.
2
Select video or still image mode.
.
3
Tap “SELECT AND CREATE” (video) or “SELECT AND SAVE” (still
image).
.
0
While the video mode is shown in the image, the same operations
apply for the still image mode.
4
Tap on the media to copy.
.
5
Tap “CREATE BY DATE” (video) or “SAVE BY DATE” (still image).
.
0
While the video mode is shown in the image, the same operations
apply for the still image mode.
6
Tap to select a recording date.
.
7
Tap “EXECUTE”.
.
0
The number of discs required to copy the files is displayed.
Prepare the discs accordingly.
8
Tap “YES” or “NO”. (A mode only)
.
0
When “YES” is selected, videos with similar recording dates are
displayed in groups.
0
When “NO” is selected, videos are displayed according to recording
dates.
9
Tap “EXECUTE”.
.
0
When “INSERT NEXT DISC” appears, change the disc.
10
After copying, tap “OK”.
.
11
Press and hold the M button for 2 seconds or more to turn off this unit
and disconnect the USB cable.
Caution :
0
Do not turn off the power or remove the USB cable until copying is
complete.
0
Files that are not on the index screen during playback cannot be copied.
0
3D videos cannot be copied.
Memo :
0
To check the created disc, refer to “Playing Back with a DVD Writer”.
“Playing Back with a DVD Writer” (A p. 77)
When “DO YOU WANT TO FINALIZE?” appears
This appears when “AUTO FINALIZE” in the basic settings menu is set to
OFF.
“AUTO FINALIZE” (A p. 129)
0
To play back on other devices, tap “YES”.
0
To add more files to the DVD later, tap “NO”.
Memo :
Copying
75
0
When two or more DVDs are created simultaneously, all the discs other
than the last one will be finalized automatically even when “AUTO
FINALIZE” is set to “OFF”.
0
You can finalize a DVD even when “FINALIZE” is selected in the “BACK-
UP” menu.
“Finalizing Discs After Copying” (A p. 78)
0
To play back a BD-R disc on other devices, select “FINALIZE” after
creating the disc.
(The “AUTO FINALIZE” function on the basic settings menu can only be
used for creating DVDs.)
Copying Selected Files
Select and copy the desired videos or still images individually.
1
Select 3D or 2D mode.
.
2
Select video or still image mode.
.
3
Tap “SELECT AND CREATE” (video) or “SELECT AND SAVE” (still
image).
.
0
While the video mode is shown in the image, the same operations
apply for the still image mode.
4
Tap on the media to copy.
.
5
Tap “SELECT FROM SCENES” (video) or “SELECT FROM IMAGES”
(still image).
.
0
While the video mode is shown in the image, the same operations
apply for the still image mode.
6
Tap on the videos or still images to copy.
.
0
A check mark appears on the selected file.
To remove the check mark, tap on the file again.
0
Tap “CHECK” to check the file.
0
While the video mode is shown in the image, the same operations
apply for the still image mode.
7
After selecting all the files, tap “SAVE”.
.
0
While the video mode is shown in the image, the same operations
apply for the still image mode.
8
Tap “EXECUTE”.
.
0
The number of discs required to copy the files is displayed.
Prepare the discs accordingly.
9
Tap “YES” or “NO”. (A mode only)
.
0
When “YES” is selected, videos with similar recording dates are
displayed in groups.
0
When “NO” is selected, videos are displayed according to recording
dates.
10
Tap “EXECUTE”.
.
0
When “INSERT NEXT DISC” appears, change the disc.
11
After copying, tap “OK”.
Copying
76
.
12
Press and hold the M button for 2 seconds or more to turn off this unit
and disconnect the USB cable.
Caution :
0
Do not turn off the power or remove the USB cable until copying is
complete.
0
Files that are not on the index screen during playback cannot be copied.
Memo :
0
To check the created disc, refer to “Playing Back with a DVD Writer”.
“Playing Back with a DVD Writer” (A p. 77)
When “DO YOU WANT TO FINALIZE?” appears
This appears when “AUTO FINALIZE” in the basic settings menu is set to
OFF.
“AUTO FINALIZE” (A p. 129)
0
To play back on other devices, tap “YES”.
0
To add more files to the DVD later, tap “NO”.
Memo :
0
When two or more DVDs are created simultaneously, all the discs other
than the last one will be finalized automatically even when “AUTO
FINALIZE” is set to “OFF”.
0
You can finalize a DVD even when “FINALIZE” is selected in the “BACK-
UP” menu.
“Finalizing Discs After Copying” (A p. 78)
0
To play back a BD-R disc on other devices, select “FINALIZE” after
creating the disc.
(The “AUTO FINALIZE” function on the basic settings menu can only be
used for creating DVDs.)
Playing Back with a DVD Writer
You can play back the DVDs created on this unit.
1
Prepare a DVD writer.
0
Insert the DVD to play back into the DVD writer.
“Preparing a DVD Writer (CU-VD50U)” (A p. 73)
“Preparing a DVD Writer (CU-VD3U)” (A p. 73)
2
Tap “PLAYBACK” in the BACK-UP menu.
.
0
An index screen (thumbnail display) of the videos in the disc appears.
0
Tap “J” to return to the “BACK-UP” menu.
0
Images recorded in 3D mode and 2D mode are displayed on the index
screen separately. Press the 3D button to switch to the desired mode
for playback.
0
During 3D mode, “3D” is displayed on the LCD monitor.
0
During 2D mode, “2D” is displayed on the LCD monitor.
3
Tap on the file to start playback.
.
0
For details on video playback, refer to ““Operation Buttons for Video
Playback” (A p. 53) ”.
“Operation Buttons for Video Playback” (A p. 53)
0
To exit, stop playback and turn off the camcorder by pressing the M
button for about 2 seconds. Then, disconnect the USB cable.
Memo :
0
3D images may be played back when the 3D button lights up.
0
Scenes that are likely to cause motion sickness during 3D playback may
be played back in stop-motion, but this is not a malfunction. To play back
normally, set “3D MOTION RELIEF” to “OFF”.
“3D MOTION RELIEF (3D mode only)” (A p. 117)
0
When playing back a disc created in DVD-Video format, no information
such as date and time will be displayed.
Copying
77
Finalizing Discs After Copying
Finalize the disc after copying is finished. This enables the disc to be played
back using this unit, PC, DVD writer, DVD player, or external Blu-ray drive
that supports the BD-MV and AVCHD formats.
1
Select video or still image mode.
.
2
Tap “FINALIZE”.
.
3
Tap “YES”.
.
0
After finalizing, tap “OK”.
Creating Discs with an External Blu-ray Drive
You can copy the recorded files to discs or play back the created discs using
an optional external Blu-ray drive.
Compatible External Blu-ray Drives
You can use BE08LU20 from LG. (as of December, 2010)
Creating Discs with an External Blu-ray Drive
o
Preparing an External Blu-ray Drive
“Preparing an External Blu-ray Drive” (A p. 79)
o
Copying to Discs
“Copying All Files” (A p. 79)
“Copying Files by Date (2D mode only)” (A p. 80)
“Copying Selected Files” (A p. 81)
o
Other Operations
“Playing Back with an External Blu-ray Drive” (A p. 82)
Memo :
0
Discs that are recorded in MP4(MVC) format cannot be played back on
AVCHD compatible Blu-ray recorders. Play it back on an external Blu-ray
drive.
“Playing Back with an External Blu-ray Drive” (A p. 82)
0
The recordable time on the disc varies according to the way of recording.
0
When there are many files to back up, it may take time for the backup to
be completed. Wait for a while as the access lamp appears blinking, which
indicates normal operation.
0
Recording date and time will not be displayed when playing back a disc
that contains videos recorded in 3D mode.
Changing the Media of the External Blu-ray Drive
Set the type of media according to the loaded Blu-ray disc or DVD.
1
Prepare an external Blu-ray drive.
0
Insert a disc into the external Blu-ray drive.
“Preparing an External Blu-ray Drive” (A p. 79)
2
Tap “CHANGE REC. MEDIA” in the “BACK-UP” menu.
.
3
Tap “Blu-ray DISC”, “DVD(AVCHD)”, or “DVD-Video”.
0
The media changes to the tapped item. Select the appropriate setting
according to the disc.
0
Selecting “Blu-ray DISC” enables you to save videos in a Blu-ray disc
in the high definition quality.
0
Selecting “DVD(AVCHD)” enables you to save videos in a DVD in the
high definition quality.
0
Selecting “DVD-Video” enables you to save videos in a DVD after
converting to the standard image quality.
Caution :
0
“DVD-Video” cannot be selected when saving AVHCD(3D) videos.
0
Media cannot be changed when saving MP4(MVC) videos. (Only
recordable to BD)
Copying
78
Preparing an External Blu-ray Drive
Memo :
When connecting to the external Blu-ray drive, use a USB cable with Mini-
A (Male) – B (Male) connectors.
The USB cable provided with this unit cannot be used.
0
To use the USB cable provided with the external Blu-ray drive, purchase
the USB extension cable.
Mini-A (Male) – A (Female)
(Part number: QAM0852-001)
1
Connect the USB cable and the AC adapter.
0
Turn off the camcorder by pressing the M button for about 2 seconds.
.
A Connect the USB cable of the external Blu-ray drive to this unit.
B Connect the AC adapter of the external Blu-ray drive.
C Connect the AC adapter to this unit.
0
This unit powers on automatically when the AC adapter is connected.
0
This unit turns on and the “BACK-UP” menu appears.
0
While the USB cable is connected, the “BACK-UP” menu is
displayed.
0
Refer also to the instruction manual of the external Blu-ray drive.
2
Insert a new disc.
0
Press the power button on the external Blu-ray drive to turn on the
power.
.
A Press the eject button to open the disc tray.
B Pull out the tray completely and load a new disc properly.
C Push the disc tray in until it clicks into place.
Caution :
0
Be sure to turn off the power when connecting the devices.
Otherwise, electric shocks or malfunctions may occur.
Creating a Disc
Creating a Disc
1
Prepare an external Blu-ray drive.
0
Insert a new disc into the external Blu-ray drive.
“Preparing an External Blu-ray Drive” (A p. 79)
2
Copy files to the disc with the following methods.
“Copying All Files” (A p. 79)
“Copying Files by Date (2D mode only)” (A p. 80)
“Copying Selected Files” (A p. 81)
Copying All Files
All videos or still images recorded on this unit will be copied.
You can also select and copy only the videos or still images that have never
been copied.
1
Select 3D or 2D mode.
.
2
Select video or still image mode.
.
3
Tap “CREATE FROM ALL” (video) or “SAVE ALL” (still image).
.
4
Tap on the media to copy.
.
5
Tap the desired method.
.
0
“ALL SCENES” (video)/“ALL IMAGES” (still image):
All videos or still images in this unit are copied.
0
“UNSAVED SCENES” (video)/“UNSAVED IMAGES” (still
image):
Videos or still images that have never been copied are automatically
selected and copied.
6
Tap “EXECUTE”.
.
0
The number of discs required to copy the files is displayed.
Prepare the discs accordingly.
7
Tap “YES” or “NO”. (A mode only)
Copying
79
.
0
When “YES” is selected, videos with similar recording dates are
displayed in groups.
0
When “NO” is selected, videos are displayed according to recording
dates.
8
Tap “EXECUTE”.
.
0
When “INSERT NEXT DISC” appears, change the disc.
9
After copying, tap “OK”.
.
10
Press and hold the M button for 2 seconds or more to turn off this unit
and disconnect the USB cable.
Caution :
0
Do not turn off the power or remove the USB cable until copying is
complete.
0
Files that are not on the index screen during playback cannot be copied.
Memo :
0
To check the created disc, refer to “Playing Back with an External Blu-ray
Drive”.
“Playing Back with an External Blu-ray Drive” (A p. 82)
Copying Files by Date (2D mode only)
Videos or still images are sorted and copied according to the date on which
they were recorded.
1
Select 3D or 2D mode.
.
2
Select video or still image mode.
.
3
Tap “SELECT AND CREATE” (video) or “SELECT AND SAVE” (still
image).
.
0
While the video mode is shown in the image, the same operations
apply for the still image mode.
4
Tap on the media to copy.
.
5
Tap “CREATE BY DATE” (video) or “SAVE BY DATE” (still image).
.
0
While the video mode is shown in the image, the same operations
apply for the still image mode.
6
Tap to select a recording date.
.
7
Tap “EXECUTE”.
.
0
The number of discs required to copy the files is displayed.
Prepare the discs accordingly.
Copying
80
8
Tap “YES” or “NO”. (A mode only)
.
0
When “YES” is selected, videos with similar recording dates are
displayed in groups.
0
When “NO” is selected, videos are displayed according to recording
dates.
9
Tap “EXECUTE”.
.
0
When “INSERT NEXT DISC” appears, change the disc.
10
After copying, tap “OK”.
.
11
Press and hold the M button for 2 seconds or more to turn off this unit
and disconnect the USB cable.
Caution :
0
Do not turn off the power or remove the USB cable until copying is
complete.
0
Files that are not on the index screen during playback cannot be copied.
0
3D videos cannot be copied.
Memo :
0
To check the created disc, refer to “Playing Back with an External Blu-ray
Drive”.
“Playing Back with an External Blu-ray Drive” (A p. 82)
Copying Selected Files
Select and copy the desired videos or still images individually.
1
Select 3D or 2D mode.
.
2
Select video or still image mode.
.
3
Tap “SELECT AND CREATE” (video) or “SELECT AND SAVE” (still
image).
.
4
Tap on the media to copy.
.
5
Tap “SELECT FROM SCENES” (video) or “SELECT FROM IMAGES”
(still image).
.
0
While the video mode is shown in the image, the same operations
apply for the still image mode.
6
Tap on the videos or still images to copy.
.
0
A check mark appears on the selected file.
To remove the check mark, tap on the file again.
0
Tap “CHECK” to check the file.
7
After selecting all the files, tap “SAVE”.
.
Copying
81
8
Tap “EXECUTE”.
.
0
The number of discs required to copy the files is displayed.
Prepare the discs accordingly.
9
Tap “YES” or “NO”. (A mode only)
.
0
When “YES” is selected, videos with similar recording dates are
displayed in groups.
0
When “NO” is selected, videos are displayed according to recording
dates.
10
Tap “EXECUTE”.
.
0
When “INSERT NEXT DISC” appears, change the disc.
11
After copying, tap “OK”.
.
12
Press and hold the M button for 2 seconds or more to turn off this unit
and disconnect the USB cable.
Caution :
0
Do not turn off the power or remove the USB cable until copying is
complete.
0
Files that are not on the index screen during playback cannot be copied.
Memo :
0
To check the created disc, refer to “Playing Back with an External Blu-ray
Drive”.
“Playing Back with an External Blu-ray Drive” (A p. 82)
Playing Back with an External Blu-ray Drive
You can play back the Blu-ray discs created on this unit.
1
Prepare an external Blu-ray drive.
0
Insert the Blu-ray disc to play back into the external Blu-ray drive.
“Preparing an External Blu-ray Drive” (A p. 79)
2
Tap “PLAYBACK” in the BACK-UP menu.
.
0
An index screen (thumbnail display) of the videos in the disc appears.
0
Tap “J” to return to the “BACK-UP” menu.
0
Images recorded in 3D mode and 2D mode are displayed on the index
screen separately. Press the 3D button to switch to the desired mode
for playback.
0
During 3D mode, “3D” is displayed on the LCD monitor.
0
During 2D mode, “2D” is displayed on the LCD monitor.
3
Tap on the file to start playback.
.
0
For details on video playback, refer to ““Operation Buttons for Video
Playback” (A p. 53) ”.
“Operation Buttons for Video Playback” (A p. 53)
0
To exit, stop playback and turn off the camcorder by pressing the M
button for about 2 seconds. Then, disconnect the USB cable.
Memo :
0
Images recorded in 2D mode cannot be displayed as 3D images.
0
3D images may be played back when the 3D button lights up.
0
3D images recorded in “MP4(MVC)” format and “AVCHD” format are
displayed on the index screen separately.
Change the setting of 3D VIDEO REC FORMAT to the desired format for
playback.
“3D VIDEO REC FORMAT (3D mode only)” (A p. 104)
0
Scenes that are likely to cause motion sickness during 3D playback may
be played back in stop-motion, but this is not a malfunction. To play back
normally, set “3D MOTION RELIEF” to “OFF”.
“3D MOTION RELIEF (3D mode only)” (A p. 117)
0
Videos recorded in MP4(MVC) format can only be played back when
dubbed to a Blu-ray disc.
0
Videos recorded in AVCHD format can be played back from either a Blu-
ray disc or DVD.
0
When playing back a disc created in DVD-Video format, no information
such as date and time will be displayed.
Copying
82
Creating a Disc Using a Connected Blu-ray
Recorder
You can create discs using a Blu-ray recorder by connecting it to this unit
using a USB cable.
1
Connect the USB cable and the AC adapter.
0
Turn off the camcorder by pressing the M button for about 2 seconds.
.
A Connect using the provided USB cable.
B Connect the AC adapter to this unit.
0
This unit powers on automatically when the AC adapter is connected.
0
Be sure to use the supplied JVC AC adapter.
0
The “SELECT DEVICE” screen appears.
2
Tap “CONNECT TO OTHER”.
.
3
Tap the desired media.
.
4
Perform dubbing on the Blu-ray recorder.
0
Refer also to the instruction manual of the Blu-ray recorder.
Caution :
0
MP4(MVC) videos cannot be copied.
Memo :
0
The created discs are playable only on AVCHD compatible devices (such
as Blu-ray recorders).
Dubbing Files by Connecting to a DVD
Recorder
You can dub videos in standard quality by connecting to a DVD recorder.
0
Refer also to the instruction manuals of the TV and DVD recorder.
1
Open the LCD monitor, then press and hold the power button for 2
seconds or more to turn off the power.
.
2
Connect to a DVD recorder.
.
A Connect using the provided AV cable.
B Connect the AC adapter to this unit.
0
This unit powers on automatically when the AC adapter is connected.
3
Tap q to select the playback mode.
4
Prepare the TV/DVD recorder for recording.
0
Switch to a compatible external input.
0
Insert a disc (DVD-R, etc.) into the DVD recorder.
5
Prepare this unit for playback.
0
Set “VIDEO OUTPUT” in the “COMMON” menu to the aspect ratio
(“4:3” or “16:9”) of the connecting TV.
“VIDEO OUTPUT (2D mode only)” (A p. 127)
6
Start recording.
0
Start playback on this unit and press the record button on the
recorder.
“Playing Back Videos” (A p. 52)
0
After playback is complete, stop the recording.
Caution :
0
3D videos cannot be dubbed.
Copying
83
Using a USB External Hard Disk Drive
You can copy video and still image files to a USB external hard disk drive
from this unit. You can also play the files in the USB external hard disk drive
on this unit.
0
Refer also to the instruction manual of the external hard disk drive.
Compatible External Hard Disk Drives
You can use the “LaCie Hard Disk Sleek black design USB2.0” series from
LaCie.
Memo :
Before purchasing, check the compatible devices on the LaCie website.
0
LaCie
http://www.lacie.com/home.htm?cc=1
0
USB external hard disk drives up to 2 TB can be used.
Copying and Playback with a USB External Hard Disk Drive
“Preparing a USB External Hard Disk Drive” (A p. 84)
“Copying All Files” (A p. 84)
“Playing Back Files in the USB External Hard Disk Drive” (A p. 85)
“Deleting Folders in the USB External Hard Disk Drive” (A p. 86)
Importing Files from the USB External Hard Disk Drive
“Importing Files from the USB External Hard Disk Drive” (A p. 87)
Memo :
0
Format the USB external hard disk drive when connecting it to this unit for
the first time. (All data will be deleted.)
“Formatting the USB External Hard Disk Drive” (A p. 87)
0
Refer to the help file of the provided Everio MediaBrowser 3D software
when you use the PC to operate the data in the USB external hard disk
drive directly copied from this unit.
0
USB external hard disk drives with the capacity over 2 TB cannot be used.
0
Copying may take time. (For example, saving 1 hour video in XP mode
takes about 20 minutes.)
0
When there are many files to back up, it may take time for the backup to
be completed. Wait for a while as the access lamp appears blinking, which
indicates normal operation.
0
Sound or video may be interrupted during playback.
Caution :
0
Do not connect a USB hub between this unit and the USB external hard
disk drive.
0
Disconnect the USB external hard disk drive when using other USB
devices such as DVD writer, external Blu-ray drive, or another USB
external hard disk drive.
0
Avoid the following operations during copying and playing back.
- Turning off the unit or the USB external hard disk drive.
- Disconnecting the USB cable.
0
Do not format the USB external hard disk drive using the PC. If you did,
format again using this unit. (All the data in the USB external hard disk
drive will be erased.)
0
Avoid the following operations using the PC.
- Deleting files or folders in the USB external hard disk drive.
- Moving files or folders in the USB external hard disk drive.
- Changing the name of files or folders in the USB external hard disk drive.
These operations make the data impossible to be played back on this unit.
0
When you use the PC to edit the data in the USB external hard disk drive,
copy the data to the PC before editing. Editing the data in the USB external
hard disk drive directly from the PC makes the data impossible to be
played back on this unit.
Preparing a USB External Hard Disk Drive
Memo :
0
When connecting to the external hard disk drive, use a USB cable with
Mini-A (Male) – B (Male) connectors.
The USB cable provided with this unit cannot be used.
0
To use the USB cable provided with the external hard disk drive, purchase
the following USB extension cable.
Mini-A (Male) – A (Female)
(Part number: QAM0852-001)
1
Connect the USB cable and the AC adapter.
0
Turn off the camcorder by pressing the M button for about 2 seconds.
.
*Consult your nearest JVC service center.
A Connect the USB cable with the USB external hard disk drive.
B Connect the AC adapter of the USB external hard disk drive.
C Connect the AC adapter to this unit.
0
This unit powers on automatically when the AC adapter is connected.
0
This unit turns on and the “BACK-UP” menu appears.
0
While the USB cable is connected, the “BACK-UP” menu is
displayed.
0
Refer also to the instruction manual of the external hard disk drive.
2
Turn on the external hard disk drive.
Caution :
0
Be sure to turn off the power when connecting the devices.
Otherwise, electric shocks or malfunctions may occur.
0
Do not connect a USB hub between this unit and the USB external hard
disk drive.
Copying All Files
All videos or still images recorded on this unit will be copied.
You can also select and copy only the videos or still images that have never
been copied.
1
Select 3D or 2D mode.
.
2
Select video or still image mode.
.
Copying
84
3
Tap “BACK UP”.
.
4
Tap on the media to copy.
.
5
Tap the desired method.
.
0
“ALL SCENES” (video)/“ALL IMAGES” (still image):
All videos or still images in this unit are copied.
0
“UNSAVED SCENES” (video)/“UNSAVED IMAGES” (still
image):
Videos or still images that have never been copied are automatically
selected and copied.
6
Check that there is sufficient remaining space on the hard disk drive and
tap “YES”.
.
0
Backup starts when “YES” is tapped.
7
After copying, tap “OK”.
.
8
Press and hold the M button for 2 seconds or more to turn off this unit
and disconnect the USB cable.
Caution :
0
Do not turn off the power or remove the USB cable until copying is
complete.
0
Files that are not on the index screen during playback cannot be copied.
0
Copying may take time. (For example, saving 1 hour video in XP mode
takes about 20 minutes.)
Playing Back Files in the USB External Hard Disk Drive
Videos or still images saved in an external hard disk drive can be played
back on this unit.
1
Select 3D or 2D mode.
.
2
Select video or still image mode.
.
3
Tap “PLAYBACK”.
.
4
Tap on the folder to play back.
.
0
Tap “J” to return to the “BACK-UP” menu.
5
Tap on the file to play back.
.
0
Tap “J” to return to the folder index screen.
0
For details on video playback, refer to ““Operation Buttons for Video
Playback” (A p. 53) ”.
“Operation Buttons for Video Playback” (A p. 53)
0
To exit, stop playback and turn off the camcorder by pressing the M
button for about 2 seconds. Then, disconnect the USB cable.
Memo :
0
Sound or video may be interrupted during playback.
0
Images recorded in 3D mode and 2D mode are displayed on the index
screen separately. Press the 3D button to switch to the desired mode for
playback.
0
3D images recorded in “MP4(MVC)” format and “AVCHD” format are
displayed on the index screen separately.
Change the setting of 3D VIDEO REC FORMAT to the desired format for
playback.
“3D VIDEO REC FORMAT (3D mode only)” (A p. 104)
Copying
85
Caution :
0
To play back 3D images, refer also to “Precautions on Recording and
Playing Back 3D Images”.
“Precautions on Recording and Playing Back 3D Images” (A p. 11)
Deleting Folders in the USB External Hard Disk Drive
Files that are copied to the external hard disk drive can be deleted.
Caution :
0
Deleted files cannot be restored.
0
Be sure to back up important files on a PC.
“Backing Up All Files” (A p. 93)
1
Select 3D or 2D mode.
.
2
Select video or still image mode.
.
3
Tap “DELETE”.
.
4
Tap on the folder to delete.
.
5
Tap “YES”.
.
0
After deleting, tap “OK”.
Memo :
0
Images recorded in 3D mode and 2D mode are displayed on the index
screen separately. Press the 3D button to switch to the desired mode for
deletion.
0
3D images recorded in “MP4(MVC)” format and “AVCHD” format are
displayed on the index screen separately.
Change the setting of 3D VIDEO REC FORMAT to the desired format for
deletion.
“3D VIDEO REC FORMAT (3D mode only)” (A p. 104)
Copying
86
Formatting the USB External Hard Disk Drive
All files on the external hard disk drive can be deleted.
Caution :
0
All data on the external hard disk drive will be deleted when it is formatted.
Copy all files on the card to a PC before formatting.
1
Select video or still image mode.
.
2
Tap “FORMAT”.
.
3
Tap “YES”.
.
0
After formatting, tap “OK”.
Importing Files from the USB External Hard Disk Drive
You can copy video and still image files from a USB external hard disk drive
to the built-in memory of this unit or an SD card.
1
Select 3D or 2D mode.
.
2
Select video or still image mode.
.
3
Tap “IMPORT FROM DEVICE” in “BACK-UP”.
.
4
Tap “USB HDDFBUILT-IN MEM” or “USB HDDFSD”.
.
0
Files will be imported to the selected media.
5
Tap on the folder to import.
.
6
Tap on the files to import.
.
0
P appears on the selected files.
To remove P from a file, tap on the file again.
0
Tap “SEL ALL” to select all files.
0
Tap “REL ALL” to release all selections.
0
“SET” is deactivated when no file is selected.
7
Tap “SET”.
.
8
Tap “YES”.
.
0
Importing starts when “YES” is tapped.
0
To cancel importing of files, tap “STOP”, then tap “YES”.
9
After importing, tap “OK”.
Copying
87
.
10
Press and hold the M button for 2 seconds or more to turn off this unit
and disconnect the USB cable.
Memo :
0
Images recorded in 3D mode and 2D mode are displayed on the index
screen separately. Press the 3D button to switch to the desired mode for
importing.
0
3D images recorded in “MP4(MVC)” format and “AVCHD” format are
displayed on the index screen separately.
Change the setting of 3D VIDEO REC FORMAT to the desired format for
importing.
“3D VIDEO REC FORMAT (3D mode only)” (A p. 104)
Dubbing Files to a VHS Tape Using a VCR
You can dub videos in standard quality by connecting to a VCR.
0
Refer also to the instruction manuals of the TV and VCR.
Caution :
0
3D images cannot be copied to a VHS tape. Images recorded in 3D mode
cannot be copied as 2D images.
1
Open the LCD monitor, then press and hold the power button for 2
seconds or more to turn off the power.
.
2
Connect to a VCR/DVD recorder.
.
A Connect using the provided AV cable.
B Connect the AC adapter to this unit.
0
This unit powers on automatically when the AC adapter is connected.
3
Tap q to select the playback mode.
4
Prepare the TV/VCR for recording.
0
Switch to a compatible external input.
0
Insert a video tape.
5
Prepare this unit for playback.
0
Set “VIDEO OUTPUT” in the “COMMON” menu to the aspect ratio
(“4:3” or “16:9”) of the connecting TV.
“VIDEO OUTPUT (2D mode only)” (A p. 127)
6
Start recording.
0
Start playback on this unit and press the record button on the
recorder.
“Playing Back Videos” (A p. 52)
0
After playback is complete, stop the recording.
Copying
88
Copying Files to an SD Card
You can copy videos and still images from the built-in memory to SD card.
Copying still images to cards makes it convenient to bring them to the shop
for printing (developing).
Caution :
0
Make sure that there is enough space left in the destination medium.
0
Videos and still images in the SD card cannot be copied to the built-in
memory.
1
Select 3D or 2D mode.
.
2
Select video or still image mode.
.
3
Tap q to select the playback mode.
.
4
Tap “MENU”.
.
5
Tap “COPY”.
.
6
Tap on the files to copy.
.
0
P appears on the selected files.
To remove
P from a file, tap on the file again.
0
Tap “SEL ALL” to select all files.
0
Tap “REL ALL” to release all selections.
0
“SET” is deactivated when no file is selected.
7
Tap “SET”.
.
8
Tap “YES”.
.
0
Copying starts.
0
After copying, tap “OK”.
Copying
89
Moving Files to an SD Card
You can move videos and still images from the built-in memory to SD card.
Files that are moved will be deleted from the built-in memory.
Moving still images to SD cards makes it convenient to bring them to the
shop for printing (developing).
Caution :
0
Make sure that there is enough space left in the destination medium.
0
Videos and still images in the SD card cannot be moved to the built-in
memory.
1
Select 3D or 2D mode.
.
2
Select video or still image mode.
.
3
Tap q to select the playback mode.
.
4
Tap “MENU”.
.
5
Tap “MOVE”.
.
6
Tap on the files to move.
.
0
P appears on the selected files.
To remove P from a file, tap on the file again.
0
Tap “SEL ALL” to select all files.
0
Tap “REL ALL” to release all selections.
0
“SET” is deactivated when no file is selected.
7
Tap “SET”.
.
8
Tap “YES”.
.
0
Moving of files starts.
0
After moving, tap “OK”.
Copying
90
Copying to Windows PC
You can copy files to a computer using the provided software.
DVDs can also be created using the computer's DVD drive.
If the provided software is not installed, this unit will be recognized as an external storage when connected.
Memo :
0
To record to discs, a recordable DVD or Blu-ray drive is required for the computer in use.
0
Still images cannot be recorded to discs using the provided software.
Trouble with Using the Provided Software Everio MediaBrowser 3D
Consult the customer service center below.
0
Pixela User Support Center
TelephoneUSA and Canada (English): +1-800-458-4029 (toll-free)
“Computer” (Windows 7) from the “Start” menu, then click on the
“JVCCAM_MEM” or “JVCCAM_SD” icon.
0
Open the folder with the desired files.
“List of Files and Folders” (A p. 97)
5
Copy the files to any folder in the computer (desktop, etc).
Caution :
0
When the folders or files are deleted/moved/renamed in the computer,
they cannot be played back on this unit anymore.
Memo :
0
To edit/view the files, use a software that supports AVCHD (video)/MP4
(video)/MPF (3D still image)/JPEG (2D still image) files.
0
The above operations on computer may vary with the system used.
Disconnecting this Unit from Computer
1
Click “Safely Remove Hardware and Eject Media”.
.
2
Click “Safely Remove USB Mass Storage Device”.
3
(For Windows Vista) Click “OK”.
4
Disconnect the USB cable and close the LCD monitor.
Copying
96
List of Files and Folders
Folders and files are created in the built-in memory and SD card as shown below.
They are created only when necessary.
.
Caution :
0
When the folders or files are deleted/moved/renamed in the computer, they cannot be played back on this unit anymore.
Copying
97
JVC Software Licence Agreement
IMPORTANT
TO CUSTOMERS: PLEASE MAKE SURE TO READ THIS CAREFULLY
BEFORE INSTALLING OR USING THE SOFTWARE PROGRAM NAMED
"DIGITAL PHOTO NAVIGATOR" ("Program") ON YOUR PC.
The right to use the Program is granted by Victor Company of Japan, Limited
("JVC") to You only on the condition that You agree to the following.
Should You not agree to the terms hereof, You may not install or use the
Program. HOWEVER, INSTALLING OR USING THE PROGRAM
INDICATES YOUR ACCEPTANCE OF THESE TERMS AND
CONDITIONS.
1
COPYRIGHT; OWNERSHIP
You acknowledge that all copyrights and other intellectual property
rights in the Program are owned by JVC and its licensor, and remain
vested in JVC and such licensor. The Program is protected under the
copyright law of Japan and other countries, and related Conventions.
2
GRANT OF LICENCE
A Subject to the conditions of this Agreement, JVC grants to You a non-
exclusive right to use the Program. You may install and use the
Program on a HDD or other storage devices incorporated in Your PC.
B You may make one (1) copy of the Program solely for your personal
backup or archival purposes.
3
RESTRICTION ON THE PROGRAM
A You may not reverse engineer, decompile, disassemble, revise or
modify the Program, except to the extent that expressly permitted by
applicable law.
B You may not copy or use the Program, in whole or in part, other than
as expressly specified in this Agreement.
C You have no right to grant a licence to use the Program, and may not
distribute, rent, lease or transfer the Program to any third party or
otherwise let them use the Program.
4
LIMITED WARRANTY
JVC warrants that any media in which the Program is embodied are free
from any defects in materials and workmanship for a period of thirty (30)
days from the date of Your purchasing any our products accompanying
the Program. JVC's entire liability and your exclusive remedy in
connection with the Program shall be replacement of such defective
media. EXCEPT FOR THE EXPRESS WARRANTIES STATED
HEREIN AND TO THE EXTENT PERMITTED BY APPLICABLE LAW,
JVC AND ITS LICENSORS DISCLAIM ANY OTHER WARRANTIES,
EITHER EXPRESS OR IMPLIED, INCLUDING BUT NOT LIMITED TO
IMPLIED WARRANTIES OF MERCHANTABILITY AND FITNESS FOR
A PARTICULAR PURPOSE IN REGARD TO THE PROGRAM AND
THE ACCOMPANYING PRINTED MATERIALS. SHOULD THERE BE
ANY PROBLEM ARISING FROM OR CAUSED BY THE PROGRAM,
YOU SHOULD SETTLE ALL SUCH PROBLEM AT YOUR OWN COST
AND EXPENSE.
5
LIMITED LIABILITY
TO THE EXTENT PERMITTED BY APPLICABLE LAW, IN NO EVENT
SHALL JVC AND ITS LICENSORS BE LIABLE FOR ANY INDIRECT,
SPECIAL, INCIDENTAL OR CONSEQUENTIAL DAMAGES
WHATSOEVER, REGARDLESS OF THE FORM OF ACTION
WHETHER IN CONTRACT, TORT OR OTHERWISE ARISING OUT
OF OR IN CONNECTION WITH THE USE OF OR INABILITY TO USE
THE PROGRAM, EVEN IF JVC HAS BEEN ADVISED OF THE
POSSIBILITY OF SUCH DAMAGES. YOU WILL INDEMNIFY AND
HOLD HARMLESS JVC FROM ANY LOSS, LIABILITY OR COST
ARISING OUT OF OR IN ANY WAY CONNECTED TO CLAIMS FROM
ANY THIRD PARTY RELATING TO THE USE OF THE PROGRAM.
6
TERM
This Agreement will become effective on the date when You install and
use the Program on Your machine, and continue to be in effect until the
termination under the following provision.
Should You breach any provision of this Agreement, JVC may terminate
this Agreement without giving any notice to You. In this event, JVC may
claim against You for any damages caused by Your breach. Should this
Agreement be terminated, You must immediately destroy the Program
stored in Your machine (including the erasing from any memory in Your
PC), and no longer own such Program.
7
EXPORT CONTROL
You agree that You will not ship, transfer or export the Program or
underlying information and technology to any countries to which Japan
and other relevant countries have initiated an embargo on such goods.
8
U.S. GOVERNMENT USER
If You are an agency of the United States of America (the
"Government"), You acknowledge JVC's representation that the
Program is a "Commercial Item" as defined in Federal Acquisition
Regulation (FAR) part 2.101 (g) consisting unpublished "Commercial
Computer Software" as those items are used at FAR part 12.212 and is
only licenced to You with the same use rights JVC grants all commercial
end users pursuant to the terms of this Agreement.
9
GENERAL
A No modification, change, addition, deletion or other alternation of or to
this Agreement will be valid unless reduced to writing and signed by
an authorized representative of JVC.
B If any part of this Agreement is held invalid by or in conflict with any law
having jurisdiction over this Agreement, the remaining provisions will
remain in full force and effect.
C This Agreement shall be governed by and interpreted under the laws
of Japan. The Tokyo District Court has jurisdiction over all disputes
which may arise with respect to the execution, interpretation and
performance of this Agreement.
Victor Company of Japan, Limited
Memo :
0
If You acquired the Program in Germany, the provisions of Sections 4
(Limited Warranty) and 5 (Limited Liability) provided above will be
replaced with those of the German version of this Agreement.
Caution :
0
Operate this equipment according to the operating procedures described
in this manual.
0
Use only the provided CD-ROM. Never use any other CD-ROM to run this
software.
0
Do not attempt to modify this software.
0
Changes or modifications not approved by JVC could void user's authority
to operate the equipment.
How to handle a CD-ROM:
0
Take care not to soil or scratch the mirror surface (opposite to the printed
surface). Do not write anything or put a sticker on either the front or back
surface. If the CD-ROM gets dirty, gently wipe it with a soft cloth outward
from the center hole.
0
Do not use conventional disc cleaners or cleaning spray.
0
Do not bend the CD-ROM or touch its mirror surface.
0
Do not store your CD-ROM in a dusty, hot or humid environment. Keep it
away from direct sunlight.
Copying
98
Operating the Menu
There are two types of menus in this unit.
0
Main menu:
Menu that contains all the items specific to the video recording, still image
recording, video playback, and still image playback modes respectively.
0
Q menu in main (common) menu:
Menu that contains all common items in the video recording, still image
recording, video playback, and still image playback modes.
Operating the Main Menu
You can configure various settings using the menu.
1
Tap “MENU”.
0
The menu differs according to the mode in use.
.
2
Tap the desired menu.
.
0
Tap ∧ or ∨ to move upward or downward for more selection.
3
Tap the desired setting.
.
Memo :
0
To exit the screen
Tap “L” (quit).
0
To return to the previous screen
Tap “J” (return).
0
To display the help file
Tap “K” (help) and tap the item.
0
Help file may not be available for some items.
Operating the Common Menu
You can configure common setting items regardless of the mode using the
common menu.
1
Tap “MENU”.
0
The menu differs according to the mode in use.
.
2
Tap “Q”.
.
3
Tap the desired setting.
.
0
Tap ∧ or ∨ to move upward or downward for more selection.
Memo :
0
To exit the screen
Tap “L” (quit).
0
To return to the previous screen
Tap “J” (return).
0
To display the help file
Tap “K” (help) and tap the item.
0
Help file may not be available for some items.
Menu Settings
99
Main Menu for Video Recording
You can adjust various settings, such as brightness and white balance, to suit the subject or purpose. You can also change settings such as picture quality
and gain.
1
Select video mode.
.
2
Tap q to select the recording mode.
.
3
Tap “MENU”.
.
Setting
Details
SCENE SELECTSettings to suit the shooting condition can be selected.
“Scene Selection” (A p. 36)
*Displayed only in the manual recording mode.
FOCUSFocus can be adjusted manually.
“Adjusting Focus Manually” (A p. 37)
*Displayed only in the manual recording mode.
FOCUS ASSISTFocused subject is outlined in color for more precise focus.
“Using Focus Assist” (A p. 38)
*Displayed only in the manual recording mode.
FOCUS ASSIST COLORSets the color of the outline of a focused object when Focus Assist is used.
“FOCUS ASSIST COLOR” (A p. 102)
*Displayed only in the manual recording mode.
BRIGHTNESS ADJUSTAdjusts the overall brightness of the screen.
“Adjusting Brightness” (A p. 38)
*Displayed only in the manual recording mode.
SHUTTER SPEEDShutter speed can be adjusted.
“Setting Shutter Speed” (A p. 39)
*Displayed only in the manual recording mode.
APERTURE PRIORITYAdjusts the aperture value.
“Setting Aperture” (A p. 39)
*Displayed only in the manual recording mode.
WHITE BALANCEAdjusts the color according to the light source.
“Setting White Balance” (A p. 40)
*Displayed only in the manual recording mode.
Menu Settings
100
SettingDetails
BACKLIGHT COMP.Corrects the image when the subject appears dark due to backlight.
“Setting Backlight Compensation” (A p. 41)
*Displayed only in the manual recording mode.
TELE MACROEnables close-up shots when using the telephoto (T) end of the zoom.
“Taking Close-up Shots” (A p. 41)
*Displayed only in the 2D manual recording mode.
TOUCH PRIORITY AE/AFAutomatically adjusts focus and brightness based on the subjects’ faces or selected area.
“Capturing Subjects Clearly (TOUCH PRIORITY AE/AF)” (A p. 44)
DISCamera shake during recording can be effectively reduced.
“Reducing Camera Shake” (A p. 44)
GAIN UPMakes the subject appear bright automatically when recording in dark places.
“GAIN UP” (A p. 103)
WIND CUTReduces the noise caused by wind.
“WIND CUT” (A p. 103)
GRIDDisplays gridlines to make it easier to detect when the subject appears slanted.
“GRID” (A p. 104)
TIME-LAPSE RECORDINGEnables the changes of a scene that occur slowly over a long period to be shown within a short time by taking
frames of it at a certain interval.
“Recording at Intervals (TIME-LAPSE RECORDING)” (A p. 46)
3D VIDEO REC FORMATYou can select a recording format for 3D video recording.
“3D VIDEO REC FORMAT (3D mode only)” (A p. 104)
*Displayed only in the 3D recording mode.
VIDEO QUALITYSets the video quality.
“VIDEO QUALITY” (A p. 105)
ZOOMSets the maximum zoom ratio.
“ZOOM (2D mode only)” (A p. 106)
*Displayed only in the 2D recording mode.
x.v.ColorCaptures the true colors.
(Use an x.v.Color compatible TV for playback.)
“x.v.Color (2D mode only)” (A p. 106)
*Displayed only in the 2D recording mode.
USER BUTTON SETTINGAssigns a frequently used function to the USER button.
“Setting the USER Button” (A p. 42)
3D SOUNDRecords realistic audio sounds.
You can enjoy more realistic audio sounds during playback of a video by recording it with “3D SOUND” set
to “ON”.
“3D SOUND” (A p. 107)
MIC LEVELMake the adjustments such that “MIC LEVEL” does not turn red.
“MIC LEVEL” (A p. 107)
MIC LEVEL SETTINGSets the microphone level.
“MIC LEVEL SETTING” (A p. 108)
HEADPHONE VOL. ADJ.Sets the volume level of the connected headphones.
“HEADPHONE VOL. ADJ.” (A p. 108)
Menu Settings
101
SCENE SELECT
Settings to suit the shooting condition can be selected.
Operating Details
“Scene Selection” (A p. 36)
FOCUS
Focus can be adjusted manually.
Operating Details
“Adjusting Focus Manually” (A p. 37)
FOCUS ASSIST
Focused subject is outlined in color for more precise focus.
Operating Details
“Using Focus Assist” (A p. 38)
FOCUS ASSIST COLOR
Sets the color of the outline of a focused object when Focus Assist is used.
SettingDetails
REDOutlines the focused object in red.
GREENOutlines the focused object in green.
BLUEOutlines the focused object in blue.
Displaying the Item
1
Select video mode.
.
2
Tap q to select the recording mode.
.
3
Tap “MENU”.
.
4
Tap “FOCUS ASSIST COLOR”.
.
BRIGHTNESS ADJUST
Adjusts the overall brightness of the screen.
Operating Details
“Adjusting Brightness” (A p. 38)
SHUTTER SPEED
Shutter speed can be adjusted.
Operating Details
“Setting Shutter Speed” (A p. 39)
APERTURE PRIORITY
Adjusts the aperture value.
Operating Details
“Setting Aperture” (A p. 39)
WHITE BALANCE
Adjusts the color according to the light source.
Operating Details
“Setting White Balance” (A p. 40)
BACKLIGHT COMP.
Corrects the image when the subject appears dark due to backlight.
Operating Details
“Setting Backlight Compensation” (A p. 41)
TELE MACRO (2D mode only)
Enables close-up shots when using the telephoto (T) end of the zoom.
Operating Details
“Taking Close-up Shots” (A p. 41)
TOUCH PRIORITY AE/AF
Automatically adjusts focus and brightness based on the subjects’ faces or
selected area.
Operating Details
“Capturing Subjects Clearly (TOUCH PRIORITY AE/AF)” (A p. 44)
DIS
Camera shake during recording can be effectively reduced.
Operating Details
“Reducing Camera Shake” (A p. 44)
Menu Settings
102
GAIN UP
Makes the subject appear bright automatically when recording in dark
places.
SettingDetails
OFFDeactivates the function.
ONElectrically brightens the scene when it is dark.
AUTO SLOW-
SHUTTER
Automatically brightens the scene when it is dark.
Memo :
0
Although AUTO SLOW-SHUTTER brightens the scene more than ON,
movements of the subject may become unnatural.
0
Setting can be adjusted separately for still images.
“GAIN UP (Still Image)” (A p. 113)
Displaying the Item
1
Select video mode.
.
2
Tap q to select the recording mode.
.
3
Tap “MENU”.
.
4
Tap “GAIN UP”.
.
WIND CUT
Reduces the noise caused by wind.
SettingDetails
OFFDeactivates the function.
ONActivates the function.
Displaying the Item
1
Select video mode.
.
2
Tap q to select the recording mode.
.
3
Tap “MENU”.
.
4
Tap “WIND CUT”.
.
Menu Settings
103
GRID
Displays gridlines to make it easier to detect when the subject appears
slanted.
SettingDetails
OFFTurns off grid display.
ONTurns on grid display.
Displaying the Item
1
Select video mode.
.
2
Tap q to select the recording mode.
.
3
Tap “MENU”.
.
4
Tap “GRID”.
.
TIME-LAPSE RECORDING
Enables the changes of a scene that occur slowly over a long period to be
shown within a short time by taking frames of it at a certain interval.
This is useful for making observations such as the opening of a flower bud.
Operating Details
“Recording at Intervals (TIME-LAPSE RECORDING)” (A p. 46)
3D VIDEO REC FORMAT (3D mode only)
You can select a recording format for 3D video recording.
SettingDetails
AVCHDRecords in AVCHD format. Set to this recording
format for higher compatibility.
MP4(MVC)Records in MP4(MVC) format. Set to this recording
format for higher video quality.
Displaying the Item
1
Select video mode.
.
2
Tap q to select the recording mode.
.
3
Tap “MENU”.
.
4
Tap “3D VIDEO REC FORMAT”.
.
Menu Settings
104
VIDEO QUALITY
Sets the video quality.
o
3D Mode (MP4(MVC))
SettingDetails
THREnables recording in high picture quality.
TSREnables long recordings.
o
3D Mode (AVCHD)
SettingDetails
TXPEnables recording in high picture quality.
TSPEnables long recordings.
o
2D Mode
SettingDetails
UXPEnables recording in the best picture quality.
0
Applies to Blu-ray discs only. Videos taken in
high-definition quality cannot be saved to DVDs.
XPEnables recording in high picture quality.
SPEnables recording in standard quality.
EPEnables long recordings.
Memo :
0
To avoid noise when recording fast-moving scenes or scenes with
extreme changes of brightness, set to “THR” or “TXP” during 3D mode or
“UXP” or “XP” during 2D mode.
0
Use an external Blu-ray drive to save videos recorded in “UXP” mode.
0
You can change to the desired video quality by tapping on it from the
remaining recording time display.
Displaying the Item
1
Select video mode.
.
2
Tap q to select the recording mode.
.
3
Tap “MENU”.
.
4
Tap “VIDEO QUALITY”.
.
Menu Settings
105
ZOOM (2D mode only)
Sets the maximum zoom ratio.
SettingDetails
10x/OPTICALEnables recording with 1 - 10x optical zoom. Set
this when digital zoom is not desired.
40x/DIGITALEnables recording with 1 - 10x optical zoom and 11
- 40x digital zoom.
200x/DIGITALEnables recording with 1 - 10x optical zoom and 11
- 200x digital zoom.
Memo :
0
When digital zoom is used, the image becomes grainy as it is digitally
enlarged.
Displaying the Item
1
Select video mode.
.
2
Tap q to select the recording mode.
.
3
Tap “MENU”.
.
4
Tap “ZOOM”.
.
x.v.Color (2D mode only)
Captures the true colors.
(Use an x.v.Color compatible TV for playback.)
SettingDetails
OFFCaptures colors with the same standard as TV
broadcasting.
ONCaptures the true colors. (for TVs that supports
x.v.Color)
Displaying the Item
1
Select video mode.
.
2
Tap q to select the recording mode.
.
3
Tap “MENU”.
.
4
Tap “x.v.Color”.
.
USER BUTTON SETTING
Assigns a frequently used function to the USER button.
Operating Details
“Setting the USER Button” (A p. 42)
Menu Settings
106
3D SOUND
Records realistic audio sounds.
SettingDetails
OFFDoes not record with 3D sound effects.
ONRecords with 3D sound effects.
Displaying the Item
1
Select video mode.
.
2
Tap q to select the recording mode.
.
3
Tap “MENU”.
.
4
Tap “3D SOUND”.
.
MIC LEVEL
Make the adjustments such that “MIC LEVEL” does not turn red.
SettingDetails
OFFHides display of microphone input level.
ONShows display of microphone input level.
Caution :
0
When “3D VIDEO REC FORMAT” is set to “MP4(MVC)” and recording is
performed together with HDMI output, the microphone input level will not
be displayed. (It will be displayed after recording stops.)
Displaying the Item
1
Select video mode.
.
2
Tap q to select the recording mode.
.
3
Tap “MENU”.
.
4
Tap “MIC LEVEL”.
.
Menu Settings
107
MIC LEVEL SETTING
Sets the microphone level.
Make the adjustments such that “MIC LEVEL” does not turn red.
SettingDetails
+2Increases the microphone input level.
+1Increases the microphone input level slightly.
0The microphone input level is not changed.
-1Decreases the microphone input level slightly.
-2Decreases the microphone input level.
Displaying the Item
1
Select video mode.
.
2
Tap q to select the recording mode.
.
3
Tap “MENU”.
.
4
Tap “MIC LEVEL SETTING”.
.
HEADPHONE VOL. ADJ.
Sets the volume level of the connected headphones.
Adjusting the Volume Level of Headphones During Recording
1
Select video mode.
.
2
Tap q to select the recording mode.
.
3
Tap “MENU”.
.
4
Tap “HEADPHONE VOL. ADJ.”.
.
0
The volume adjustment screen appears.
5
Adjust the volume level of the headphones.
.
0
To turn up the volume, tap “+” on the touch screen.
0
To turn down the volume, tap “-” on the touch screen.
0
Tap L to exit the volume adjustment screen.
Adjusting the Volume Level of Headphones During Playback
1
Select video mode.
Menu Settings
108
.
2
Tap q to select the playback mode.
.
3
Adjust the volume level of the headphones.
0
To turn up the volume, set the zoom lever to the T end.
0
To turn down the volume, set the zoom lever to the W end.
.
Menu Settings
109
Main Menu for Still Image Recording
You can adjust various settings, such as brightness and white balance, to suit the subject or purpose. You can also change settings such as picture quality
and gain.
1
Select still image mode.
.
2
Tap q to select the recording mode.
.
3
Tap “MENU”.
.
Setting
Details
SCENE SELECTSettings to suit the shooting condition can be selected.
“Scene Selection” (A p. 36)
*Displayed only in the manual recording mode.
FOCUSFocus can be adjusted manually.
“Adjusting Focus Manually” (A p. 37)
*Displayed only in the manual recording mode.
FOCUS ASSISTFocused subject is outlined in color for more precise focus.
“Using Focus Assist” (A p. 38)
*Displayed only in the manual recording mode.
FOCUS ASSIST COLORSets the color of the outline of a focused object when Focus Assist is used.
“FOCUS ASSIST COLOR” (A p. 112)
*Displayed only in the manual recording mode.
BRIGHTNESS ADJUSTAdjusts the overall brightness of the screen.
“Adjusting Brightness” (A p. 38)
*Displayed only in the manual recording mode.
SHUTTER SPEEDShutter speed can be adjusted.
“Setting Shutter Speed” (A p. 39)
*Displayed only in the manual recording mode.
APERTURE PRIORITYAdjusts the aperture value.
“Setting Aperture” (A p. 39)
*Displayed only in the manual recording mode.
WHITE BALANCEAdjusts the color according to the light source.
“Setting White Balance” (A p. 40)
*Displayed only in the manual recording mode.
Menu Settings
110
SettingDetails
BACKLIGHT COMP.Corrects the image when the subject appears dark due to backlight.
“Setting Backlight Compensation” (A p. 41)
*Displayed only in the manual recording mode.
TELE MACROEnables close-up shots when using the telephoto (T) end of the zoom.
“Taking Close-up Shots” (A p. 41)
*Displayed only in the 2D manual recording mode.
TOUCH PRIORITY AE/AFAutomatically adjusts focus and brightness based on the subjects’ faces or selected area.
“Capturing Subjects Clearly (TOUCH PRIORITY AE/AF)” (A p. 44)
SMILE SHOTAutomatically captures a still image upon detection of a smile.
“Capturing Smiles Automatically (SMILE SHOT)” (A p. 45)
SMILE LEVELSets the items to display when faces are detected.
“Setting SMILE LEVEL Display (Still image only)” (A p. 46)
SELF-TIMERUse this when taking a group photo.
“Taking Group Shots (Self-timer)” (A p. 48)
GAIN UPMakes the subject appear bright automatically when recording in dark places.
“GAIN UP” (A p. 113)
GRIDDisplays gridlines to make it easier to detect when the subject appears slanted.
“GRID” (A p. 113)
SHUTTER MODEContinuous shooting settings can be adjusted.
“SHUTTER MODE” (A p. 114)
CONT. SHOOTING SPEEDSets the speed for continuous shooting.
“CONT. SHOOTING SPEED” (A p. 114)
IMAGE SIZESets the image size (number of pixels) for still images.
“IMAGE SIZE” (A p. 115)
*Displayed only in the 2D recording mode.
USER BUTTON SETTINGAssigns a frequently used function to the USER button.
“Setting the USER Button” (A p. 42)
Menu Settings
111
SCENE SELECT
Settings to suit the shooting condition can be selected.
Operating Details
“Scene Selection” (A p. 36)
FOCUS
Focus can be adjusted manually.
Operating Details
“Adjusting Focus Manually” (A p. 37)
FOCUS ASSIST
Focused subject is outlined in color for more precise focus.
Operating Details
“Using Focus Assist” (A p. 38)
FOCUS ASSIST COLOR
Sets the color of the outline of a focused object when Focus Assist is used.
SettingDetails
REDOutlines the focused object in red.
GREENOutlines the focused object in green.
BLUEOutlines the focused object in blue.
Displaying the Item
1
Select still image mode.
.
2
Tap q to select the recording mode.
.
3
Tap “MENU”.
.
4
Tap “FOCUS ASSIST COLOR”.
.
BRIGHTNESS ADJUST
Adjusts the overall brightness of the screen.
Operating Details
“Adjusting Brightness” (A p. 38)
SHUTTER SPEED
Shutter speed can be adjusted.
Operating Details
“Setting Shutter Speed” (A p. 39)
APERTURE PRIORITY
Adjusts the aperture value.
Operating Details
“Setting Aperture” (A p. 39)
WHITE BALANCE
Adjusts the color according to the light source.
Operating Details
“Setting White Balance” (A p. 40)
BACKLIGHT COMP.
Corrects the image when the subject appears dark due to backlight.
Operating Details
“Setting Backlight Compensation” (A p. 41)
TELE MACRO (2D mode only)
Enables close-up shots when using the telephoto (T) end of the zoom.
Operating Details
“Taking Close-up Shots” (A p. 41)
TOUCH PRIORITY AE/AF
Automatically adjusts focus and brightness based on the subjects’ faces or
selected area.
Operating Details
“Capturing Subjects Clearly (TOUCH PRIORITY AE/AF)” (A p. 44)
SMILE SHOT
Automatically captures a still image upon detection of a smile.
Operating Details
“Capturing Smiles Automatically (SMILE SHOT)” (A p. 45)
SMILE LEVEL
Sets the items to display when faces are detected.
Operating Details
“Setting SMILE LEVEL Display (Still image only)” (A p. 46)
SELF-TIMER
Use this when taking a group photo.
Operating Details
“Taking Group Shots (Self-timer)” (A p. 48)
Menu Settings
112
GAIN UP
Makes the subject appear bright automatically when recording in dark
places.
SettingDetails
OFFDeactivates the function.
ONElectrically brightens the scene when it is dark.
Memo :
0
Setting can be adjusted separately for videos.
“GAIN UP (Video)” (A p. 103)
Displaying the Item
1
Select still image mode.
.
2
Tap q to select the recording mode.
.
3
Tap “MENU”.
.
4
Tap “GAIN UP”.
.
GRID
Displays gridlines to make it easier to detect when the subject appears
slanted.
SettingDetails
OFFTurns off grid display.
ONTurns on grid display.
Displaying the Item
1
Select still image mode.
.
2
Tap q to select the recording mode.
.
3
Tap “MENU”.
.
4
Tap “GRID”.
.
Menu Settings
113
SHUTTER MODE
Continuous shooting settings can be adjusted.
SettingDetails
RECORD ONE
SHOT
Records one still image.
CONTINUOUS
SHOOTING
Records still images continuously while the
SNAPSHOT button is pressed.
Memo :
0
You can change the continuous shooting speed with “CONT. SHOOTING
SPEED” in the “COMMON” menu.
“CONT. SHOOTING SPEED” (A p. 114)
0
Some SD cards may not support continuous shooting.
0
The continuous shooting speed will drop if this function is used repeatedly.
Displaying the Item
1
Select still image mode.
.
2
Tap q to select the recording mode.
.
3
Tap “MENU”.
.
4
Tap “SHUTTER MODE”.
.
CONT. SHOOTING SPEED
Sets the speed for continuous shooting.
SettingDetails
HIGH SPEED
0
Shoots up to 12 still images continuously in the
3D still image mode at approximately 12 images/
second.
0
Shoots up to 40 still images continuously in the
2D still image mode at approximately 12 images/
second.
LOW SPEEDShoots continuously until the recording media is
full.
Memo :
0
Shooting speed slows down gradually as continuous shooting goes on in
the “LOW SPEED” mode.
Displaying the Item
1
Select still image mode.
.
2
Tap q to select the recording mode.
.
3
Tap “MENU”.
.
4
Tap “CONT. SHOOTING SPEED”.
.
Menu Settings
114
IMAGE SIZE
Sets the image size (number of pixels) for still images.
o
3D Mode
SettingDetails
1920X1080(2M)
(16:9)
Takes still images with aspect ratio 16:9.
Memo :
0
During 3D mode, IMAGE SIZE is fixed at 1920X1080(2M) (16:9) and
cannot be changed.
0
When still images are captured in the 3D mode, they will be saved in both
3D and 2D formats. IMAGE SIZE of both the 3D and 2D images will be set
to 1920X1080(2M) (16:9).
o
2D Mode
SettingDetails
2304X1296(2.9M)
1920X1080(2M)
(16:9)
Takes still images with aspect ratio 16:9.
0
The sides of still images recorded in 16:9 aspect
ratio may be cut off when printed.
1728X1296(2.2M)
640X480(0.3M)
(4:3)
Takes still images with aspect ratio 4:3.
Displaying the Item
1
Select still image mode.
.
2
Tap q to select the recording mode.
.
3
Tap “MENU”.
.
4
Tap “IMAGE SIZE”.
.
USER BUTTON SETTING
Assigns a frequently used function to the USER button.
Operating Details
“Setting the USER Button” (A p. 42)
Menu Settings
115
Main Menu for Video Playback
You can delete or look for specific videos.
1
Select video mode.
.
2
Tap q to select the playback mode.
.
3
Tap “MENU”.
.
Setting
Details
SEARCH DATENarrows down the video index screen according to recording dates.
“SEARCH DATE” (A p. 117)
PROTECT/CANCELProtects files from being deleted accidently.
“Protecting/Releasing Protection of the Currently Displayed File” (A p. 66)
“Protecting/Releasing Protection of Selected Files” (A p. 66)
COPYCopies files from the built-in memory to the SD card.
“COPY” (A p. 117)
MOVEMoves files from the built-in memory to the SD card.
“MOVE” (A p. 117)
TRIMMINGSelect the required part of a video and save it as a new video file.
“Capturing a Required Part in the Video (TRIMMING)” (A p. 68)
UPLOAD SETTINGSCapture and copy a part of a recorded video (maximum 15 minutes) for uploading to YouTube.
“UPLOAD SETTINGS” (A p. 117)
PLAYBACK OTHER FILEPlays videos with defective management information.
“Playing a Video with Defective Management Information” (A p. 54)
3D MOTION RELIEFPlays back in stop-motion the scenes that are likely to cause motion sickness to prevent its occurrence.
“3D MOTION RELIEF (3D mode only)” (A p. 117)
*Displayed only in the 3D playback mode.
Menu Settings
116
SEARCH DATE
Narrows down the video index screen according to recording dates.
Operating Details
“Date Search” (A p. 58)
PROTECT/CANCEL
Protects files from being deleted accidently.
Operating Details
“Protecting/Releasing Protection of the Currently Displayed File” (A p. 66)
“Protecting/Releasing Protection of Selected Files” (A p. 66)
COPY
Copies files from the built-in memory to the SD card.
Operating Details
“Copying Files to an SD Card” (A p. 89)
MOVE
Moves files from the built-in memory to the SD card.
Operating Details
“Moving Files to an SD Card” (A p. 90)
TRIMMING
Select the required part of a video and save it as a new video file.
Operating Details
“Capturing a Required Part in the Video (TRIMMING)” (A p. 68)
UPLOAD SETTINGS
Capture and copy a part of a recorded video (maximum 15 minutes) for
uploading to YouTube.
Operating Details
“Capturing Videos for Uploading to YouTube” (A p. 69)
PLAYBACK OTHER FILE
Plays videos with defective management information.
Operating Details
“Playing a Video with Defective Management Information” (A p. 54)
3D MOTION RELIEF (3D mode only)
Plays back in stop-motion the scenes that are likely to cause motion sickness
to prevent its occurrence.
SettingDetails
OFFPlays back normally even for the scenes that are
likely to cause motion sickness.
ONPlays back in stop-motion the scenes that are likely
to cause motion sickness.
Displaying the Item
1
Select video mode.
.
2
Tap q to select the playback mode.
.
3
Tap “MENU”.
.
4
Tap “3D MOTION RELIEF”.
.
Memo :
To avoid recording scenes that will be played back in stop-motion, refer to
“Precautions on Recording and Playing Back 3D Images”.
“Precautions on Recording and Playing Back 3D Images” (A p. 11)
Menu Settings
117
Main Menu for Still Image Playback
You can delete or look for specific still images.
1
Select still image mode.
.
2
Tap q to select the playback mode.
.
3
Tap “MENU”.
.
Setting
Details
SEARCH DATENarrows down the still image index screen according to recording dates.
“Date Search” (A p. 58)
PROTECT/CANCELProtects files from being deleted accidently.
“Protecting/Releasing Protection of the Currently Displayed File” (A p. 66)
“Protecting/Releasing Protection of Selected Files” (A p. 66)
COPYCopies files from the built-in memory to the SD card.
“COPY” (A p. 118)
MOVEMoves files from the built-in memory to the SD card.
“MOVE” (A p. 118)
SEARCH DATE
Narrows down the still image index screen according to recording dates.
Operating Details
“Date Search” (A p. 58)
PROTECT/CANCEL
Protects files from being deleted accidently.
Operating Details
“Protecting/Releasing Protection of the Currently Displayed File” (A p. 66)
“Protecting/Releasing Protection of Selected Files” (A p. 66)
COPY
Copies files from the built-in memory to the SD card.
Operating Details
“Copying Files to an SD Card” (A p. 89)
MOVE
Moves files from the built-in memory to the SD card.
Operating Details
“Moving Files to an SD Card” (A p. 90)
Menu Settings
118
Common Menu
1
Select video or still image mode.
.
2
Tap “MENU”.
.
3
Tap “Q”.
.
Setting
Details
CLOCK ADJUSTResets the current time or sets to the local time when using this unit overseas.
“Clock Setting” (A p. 19)
“Setting the Clock to Local Time when Traveling” (A p. 25)
“Setting Daylight Saving Time” (A p. 25)
DATE DISPLAY STYLESets the order of year, month, day and the time display format (24H/12H).
“DATE DISPLAY STYLE” (A p. 121)
LANGUAGEThe language on the display can be changed.
“Changing the Display Language” (A p. 21)
MONITOR BRIGHTNESSSets the brightness of the LCD monitor.
“MONITOR BRIGHTNESS” (A p. 122)
REC MEDIA FOR VIDEOSets the recording/playback media of videos.
“REC MEDIA FOR VIDEO” (A p. 122)
REC MEDIA FOR IMAGESets the recording/playback media of still images.
“REC MEDIA FOR IMAGE” (A p. 123)
OPERATION SOUNDTurns on or off the operation sound.
“OPERATION SOUND” (A p. 123)
AUTO POWER OFFPrevents the situation of forgetting to turn off the power when this is set.
“AUTO POWER OFF” (A p. 124)
QUICK RESTARTReduces the power consumption within 5 minutes after the LCD monitor is closed to 1/3 of that used during
recording.
“QUICK RESTART” (A p. 124)
REMOTEEnables remote control operation.
“REMOTE” (A p. 125)
Menu Settings
119
SettingDetails
DEMO MODEIntroduces the special features of this unit in digest form.
“DEMO MODE” (A p. 125)
TOUCH SCREEN ADJUSTAdjusts the response position of the buttons on the touch screen.
“TOUCH SCREEN ADJUST” (A p. 126)
3D DISPLAY WARNING (3D mode only)Sets whether to display warnings during 3D playback.
“3D DISPLAY WARNING (3D mode only)” (A p. 127)
VIDEO OUTPUT (2D mode only)Sets the aspect ratio (16:9 or 4:3) according to the connecting TV.
“VIDEO OUTPUT (2D mode only)” (A p. 127)
HDMI OUTPUTSets the definition of the video output from the HDMI mini connector.
“HDMI OUTPUT” (A p. 128)
HDMI CONTROLSets the linked operations ON/OFF when the TV and this unit are connected using the HDMI mini connector.
“HDMI CONTROL” (A p. 129)
AUTO FINALIZEFinalizes the discs created automatically so that they can be played back on compatible devices.
“AUTO FINALIZE” (A p. 129)
FACTORY PRESETReturns all the settings to their default values.
“FACTORY PRESET” (A p. 130)
UPDATEUpdates the functions of this unit to the latest version.
“UPDATE” (A p. 130)
FORMAT BUILT-IN MEM.Deletes all files on the built-in memory.
“FORMAT BUILT-IN MEM.” (A p. 130)
FORMAT SD CARDDeletes all files on the SD card.
“FORMAT SD CARD” (A p. 131)
ERASE ALL DATAExecute this process when disposing of this unit or passing it to another person.
“ERASE ALL DATA” (A p. 131)
Menu Settings
120
CLOCK ADJUST
Resets the current time or sets to the local time when using this unit overseas.
Operating Details
“Clock Setting” (A p. 19)
“Setting the Clock to Local Time when Traveling” (A p. 25)
“Setting Daylight Saving Time” (A p. 25)
DATE DISPLAY STYLE
Sets the order of year, month, day and the time display format (24H/12H).
1
Tap “MENU”.
.
2
Tap “Q”.
.
3
Tap “DATE DISPLAY STYLE”.
.
4
Tap to set the style of date and time display.
.
0
Tap the bottom of “DATE STYLE”, then tap ∧ or ∨ to set the order of
year, month, and day.
0
Tap the bottom of TIME, then tap ∧ or ∨ to set the time display format.
0
For date display, set to any format from “month.day.year”,
“year.month.day”, and “day.month.year”.
0
For time display, set to any format from “12h” and “24h”.
0
After setting, tap “SET”. This confirms the setting of the order of year,
month, day and the time display format.
0
To cancel the setting, tap “L” or “J”.
Clock Set Style
The clock set style of this unit varies with the models.
.
.
.
0
The order of "Year, Month, Day, Time" changes according to the date
display style.
Menu Settings
121
LANGUAGE
The language on the display can be changed.
Operating Details
“Changing the Display Language” (A p. 21)
MONITOR BRIGHTNESS
Sets the brightness of the LCD monitor.
SettingDetails
4Brightens the backlight of the monitor regardless
of the surrounding conditions.
3Sets to the standard brightness.
2Darkens the backlight of the monitor regardless of
the surrounding conditions.
1Sets to dim brightness.
Helps to save battery life when selected.
AUTOSets the brightness automatically to “4” when using
outdoors and to “3” when using indoors.
Displaying the Item
1
Tap “MENU”.
.
2
Tap “Q”.
.
3
Tap “MONITOR BRIGHTNESS”.
.
REC MEDIA FOR VIDEO
Sets the recording/playback media of videos.
SettingDetails
BUILT-IN
MEMORY
Records videos to this unit's built-in memory.
SD CARDRecords videos to the SD card.
Displaying the Item
1
Tap “MENU”.
.
2
Tap “Q”.
.
3
Tap “REC MEDIA FOR VIDEO”.
.
Menu Settings
122
REC MEDIA FOR IMAGE
Sets the recording/playback media of still images.
SettingDetails
BUILT-IN
MEMORY
Records still images to this unit's built-in memory.
SD CARDRecords still images to the SD card.
Displaying the Item
1
Tap “MENU”.
.
2
Tap “Q”.
.
3
Tap “REC MEDIA FOR IMAGE”.
.
OPERATION SOUND
Turns on or off the operation sound.
SettingDetails
OFFTurns off the operation sound.
ONTurns on the operation sound.
Displaying the Item
1
Tap “MENU”.
.
2
Tap “Q”.
.
3
Tap “OPERATION SOUND”.
.
Menu Settings
123
AUTO POWER OFF
Prevents the situation of forgetting to turn off the power when this is set.
SettingDetails
OFFPower is not turned off even if this unit is not
operated for 5 minutes.
ONTurns off the power automatically if this unit is not
operated for 5 minutes.
Memo :
0
When using battery, power is turned off automatically if this unit is not
operated for 5 minutes.
0
When using the AC adapter, this unit goes into standby mode.
Displaying the Item
1
Tap “MENU”.
.
2
Tap “Q”.
.
3
Tap “AUTO POWER OFF”.
.
QUICK RESTART
Enables the power to turn on quickly when the LCD monitor is opened again
within 5 minutes.
SettingDetails
OFFDeactivates the function.
ONEnables the power to turn on quickly when the LCD
monitor is opened again within 5 minutes.
Memo :
0
The power consumption within 5 minutes after the LCD monitor is closed
is reduced.
Displaying the Item
1
Tap “MENU”.
.
2
Tap “Q”.
.
3
Tap “QUICK RESTART”.
.
0
The power consumption within 5 minutes after the LCD monitor is
closed is reduced.
Menu Settings
124
REMOTE
Enables remote control operation.
SettingDetails
OFFDisables remote control operation.
ONEnables remote control operation.
Displaying the Item
1
Tap “MENU”.
.
2
Tap “Q”.
.
3
Tap “REMOTE”.
.
DEMO MODE
Plays a demonstration of the special features of this unit.
SettingDetails
OFFDeactivates the function.
ONPlays a demonstration of the special features of
this unit.
Displaying Demo Mode
A Remove the battery pack and SD card.
B Connect the AC adapter.
C Open the LCD monitor and turn on the power.
0
Demonstration starts playing after 3 minutes.
0
To stop playback, tap on the screen.
Memo :
0
This mode is not available in the playback mode.
Displaying the Item
1
Tap “MENU”.
.
2
Tap “Q”.
.
3
Tap “DEMO MODE”.
.
Menu Settings
125
TOUCH SCREEN ADJUST
Adjusts the response position of the buttons on the touch screen.
1
Tap “MENU”.
.
2
Tap “Q”.
.
3
Tap “TOUCH SCREEN ADJUST”.
.
0
The touch screen adjustment screen appears.
4
Tap “+”. (3 times in total)
.
0
Keep tapping “+” as its position changes with every tap.
5
Tap “+” again to confirm the adjusted positions. (3 times in total)
.
0
Keep tapping “+” as its position changes with every tap.
0
If areas on the adjustment screen other than the “+” mark are tapped,
errors will occur. In this case, try again from step 4.
6
Tap “OK”.
.
0
Setting ends and returns to the menu screen.
Caution :
0
Do not tap areas other than the “+” mark during touch screen adjustment
(steps 4 - 5). Doing so may cause the touch screen to malfunction.
Memo :
0
Adjust by lightly tapping with a corner of an SD card, etc.
0
Do not press with an object with a sharp tip or do not press hard.
Menu Settings
126
3D DISPLAY WARNING (3D mode only)
Sets whether to display warnings during 3D playback.
SettingDetails
OFFShows a 3D warning icon (*) instead of the 3D
warning message.
ONShows a 3D warning message at a regular interval.
*3D warning icon: y
Displaying the Item
1
Tap “MENU”.
.
2
Tap “Q”.
.
3
Tap “3D DISPLAY WARNING”.
.
VIDEO OUTPUT (2D mode only)
Sets the aspect ratio (4:3 or 16:9) according to the connecting TV.
SettingDetails
4:3Select this when connecting to a conventional TV
(4:3).
16:9Select this when connecting to a widescreen TV
(16:9).
Displaying the Item
1
Tap “MENU”.
.
2
Tap “Q”.
.
3
Tap “VIDEO OUTPUT”.
.
Menu Settings
127
HDMI OUTPUT
Sets the output from the HDMI connector of this unit when it is connected to
a TV.
o
3D Mode
SettingDetails
AUTOOutput images according to the supported monitor
output format.
SIDE-BY-SIDE
OUTPUT
Outputs images from the HDMI connector in
“SIDE-BY-SIDE OUTPUT” (960x1080ix2ch)
regardless of the supported monitor output format.
CERTAIN TV
TYPES
Outputs images from the HDMI connector in
“SIDE-BY-SIDE OUTPUT” (960x1080ix2ch) if the
format “1080i” is supported by the monitor.
Outputs images from the HDMI connector in “2D”
(480p or 480i) if “1080i” is not supported by the
monitor.
2D OUTPUTOutputs images from the HDMI connector in “2D”
(“1080i”, “480p”, or “480i”) regardless of the
supported monitor output format.
Recorded 3D Video Format and Display on TV via HDMI Output
o
When HDMI OUTPUT is set to “2D OUTPUT”
3D VIDEO REC
FORMAT
Video Output
2D TV3D Compatible TVLCD Monitor of
this Unit
AVCHD2D2D3D
MP4(MVC)2D2D3D
o
When HDMI OUTPUT is set to “AUTO”
3D VIDEO REC
FORMAT
Video Output
2D TV3D Compatible TVLCD Monitor of
this Unit
AVCHD2D3D3D
MP4(MVC)2D3D3D
0
If 3D images cannot be seen even when connected to a 3D compatible
TV, set “HDMI OUTPUT” to “CERTAIN TV TYPES” or “SIDE-BY-SIDE
OUTPUT”.
0
If “HDMI OUTPUT” is set to “CERTAIN TV TYPES” when connected to a
2D TV, the left and right images will appear side by side.
0
For details on the settings of your TV, refer to its instruction manual.
o
2D Mode
Setting
Details
AUTOIt is recommended to select “AUTO” usually.
480pSelect this when the video is not output in “AUTO”
correctly.
Displaying the Item
1
Tap “MENU”.
.
2
Tap “Q”.
.
3
Tap “HDMI OUTPUT”.
.
Menu Settings
128
HDMI CONTROL
Sets whether to link operations with an HDMI-CEC compliant TV.
SettingDetails
OFFTurns off linked operations.
ONTurns on linked operations.
Displaying the Item
1
Tap “MENU”.
.
2
Tap “Q”.
.
3
Tap “HDMI CONTROL”.
.
AUTO FINALIZE
Finalizes the discs created automatically so that they can be played back on
compatible devices.
SettingDetails
OFFDoes not finalize the disc. Data can be added to
the disc later.
ONFinalizes the disc and sets it to a readable state.
Displaying the Item
1
Tap “MENU”.
.
2
Tap “Q”.
.
3
Tap “AUTO FINALIZE”.
.
Menu Settings
129
FACTORY PRESET
Returns all the settings to their default values.
1
Tap “MENU”.
.
2
Tap “Q”.
.
3
Tap “FACTORY PRESET”.
.
4
Tap “YES”.
.
0
All settings return to their default values.
UPDATE
Updates the functions of this unit to the latest version.
For details, refer to the JVC homepage.
(When no program to update the software of this unit is available, nothing
will be provided on the homepage.)
http://www.jvc-victor.co.jp/english/global-e.html
FORMAT BUILT-IN MEM.
Deletes all files on the built-in memory.
SettingDetails
FILEDeletes all files on the built-in memory.
FILE +
MANAGEMENT
NO
Deletes all files on the built-in memory and resets
the folder and file numbers to "1".
Caution :
0
All data on the built-in memory will be deleted when it is formatted.
Copy all files on the built-in memory to a PC before formatting.
0
Make sure that the battery pack is fully charged or connect the AC adapter
as the formatting process may take some time.
Displaying the Item
1
Tap “MENU”.
.
2
Tap “Q”.
.
3
Tap “FORMAT BUILT-IN MEM.”.
.
Menu Settings
130
FORMAT SD CARD
Deletes all files on the SD card.
SettingDetails
FILEDeletes all files on the SD card.
FILE +
MANAGEMENT
NO
Deletes all files on the SD card and resets the folder
and file numbers to "1".
Caution :
0
Not available for selection when no SD card is inserted.
0
All data on the card will be deleted when it is formatted.
Copy all files on the card to a PC before formatting.
0
Make sure that the battery pack is fully charged or connect the AC adapter
as the formatting process may take some time.
Displaying the Item
1
Tap “MENU”.
.
2
Tap “Q”.
.
3
Tap “FORMAT SD CARD”.
.
ERASE ALL DATA
Execute this process when disposing of this unit or passing it to another
person.
1
Tap “MENU”.
.
2
Tap “Q”.
.
3
Tap “ERASE ALL DATA”.
.
4
Tap “YES”.
.
0
After deleting is complete, tap “OK”.
Caution :
0
Connect the AC adapter as it may take some time to delete data.
Memo :
0
Repeat the process to make data restoration even more difficult.
Menu Settings
131
Front
.
1
SNAPSHOT (Still Image Recording) Button
0
Takes a still image.
2
Zoom/Volume Lever
0
During shooting: Adjusts the shooting range.
0
During playback (index screen): Moves to the next or previous page.
0
During video playback: Adjusts the volume.
3
Shoe
0
Enables an optional external microphone to be attached.
“Attaching an External Microphone” (A p. 24)
4
Stereo Microphone
0
Do not cover the microphone with your fingers during video recording.
5
Lens Cover
0
Do not touch the lens.
0
Do not cover the lens with your fingers during recording.
6
Remote Sensor
Rear
.
1
Headphones Connector
0
Connects to optional headphones.
“Attaching Headphones” (A p. 23)
2
ACCESS (Access) Lamp
0
Lights up/blinks during recording or playback.
Do not remove the battery pack, AC adapter, or SD card.
3
POWER/CHARGE (Power/Charge) Lamp
0
Lights up: Power "ON"
0
Blinks: Charging in progress
0
Goes out: Charging finished
4
HDMI Connector
0
Connects to an HDMI TV.
5
DC Connector
0
Connects to an AC adapter to charge the battery.
6
START/STOP (Video Recording) Button
0
Starts/stops video recording.
7
Grip Belt
0
Pass your hand through the grip belt to hold this unit firmly.
“Grip Adjustment” (A p. 16)
8
Microphone Connector
0
Connects to an optional microphone.
“Attaching an External Microphone” (A p. 24)
9
Lens Cover Switch
0
Opens and closes the lens cover.
10
Battery Cover
“Attach the battery pack.” (A p. 15)
Names of Parts
132
Bottom
.
1
Tripod Mounting Hole
“Tripod Mounting” (A p. 22)
Interior
.
1
LCD Monitor
0
Turns the power on/off by opening and closing.
0
Enables self-portraits to be taken by rotating the monitor.
2
USER Button
“Setting the USER Button” (A p. 42)
3
A / B (Video/Still Image) Button
0
Switches between video and still image modes.
4
i.AUTO Button
0
Switches between Intelligent Auto and Manual modes.
5
3D Button
0
Switches between 3D and 2D modes.
0
Press and hold until the LED of the button lights up/goes out.
6
Remote Sensor
7
INFO (Information) Button
0
Recording: Displays the remaining time (for video only) and battery
power.
0
Playback: Displays file information such as recording date.
8
ADJ (Adjustment) Button
0
Enables adjustment of “FOCUS”, “BRIGHTNESS ADJUST”, etc.
9
Control Dial
“Using the Control Dial for Recording” (A p. 43)
10
M (Power) Button
0
Press and hold to turn the power on/off while the LCD monitor is
opened.
11
AV Connector
0
Connects to a TV, etc.
12
USB Connector
0
Connects to computer using a USB cable.
13
SD Card Slot
0
Insert an optional SD card.
“Inserting an SD Card” (A p. 16)
14
Speaker
0
Outputs audio sound during video playback.
Names of Parts
133
Common Recording Indications
.
1
Shutter Speed
“Setting Shutter Speed” (A p. 39)
2
Tele Macro (2D mode only)
“Taking Close-up Shots” (A p. 41)
3
Scene Select
“Scene Selection” (A p. 36)
4
White Balance
“Setting White Balance” (A p. 40)
5
Date/Time
“Clock Setting” (A p. 19)
6
3D/2D Mode
“3D Button” (A p. 133)
7
Media
“REC MEDIA FOR VIDEO” (A p. 122)
“REC MEDIA FOR IMAGE” (A p. 123)
8
Battery Indicator
“Remaining Recording Time/Battery Power” (A p. 49)
9
3D DISPLAY WARNING (3D mode only)
“3D DISPLAY WARNING (3D mode only)” (A p. 127)
10
Recording Mode
“Taking Videos in Intelligent Auto Mode” (A p. 29)
“Manual Recording” (A p. 35)
11
Focus Assist
“Using Focus Assist” (A p. 38)
12
Touch Priority AE/AF
“Capturing Subjects Clearly (TOUCH PRIORITY AE/AF)” (A p. 44)
13
Zoom
“ZOOM (2D mode only)” (A p. 106)
14
Monitor Backlight
“MONITOR BRIGHTNESS” (A p. 122)
15
Focus
“Adjusting Focus Manually” (A p. 37)
16
APERTURE PRIORITY
“Setting Aperture” (A p. 39)
17
Brightness
“Adjusting Brightness” (A p. 38)
18
Backlight Compensation
“Setting Backlight Compensation” (A p. 41)
19
Parallax Adjustment (3D mode only)
“Adjusting Parallax During Recording” (A p. 34)
Video Recording
.
1
Video Mode
“A / B (Video/Still Image) Button” (A p. 133)
2
3D VIDEO REC FORMAT
“3D VIDEO REC FORMAT (3D mode only)” (A p. 104)
3
Video Quality
“VIDEO QUALITY” (A p. 105)
4
Time-Lapse Recording
“Recording at Intervals (TIME-LAPSE RECORDING)” (A p. 46)
5
Digital Image Stabilizer
“Reducing Camera Shake” (A p. 44)
6
x.v.Color (2D mode only)
“x.v.Color (2D mode only)” (A p. 106)
7
Wind Cut
“WIND CUT” (A p. 103)
8
Time-Lapse Recording Counter
“Recording at Intervals (TIME-LAPSE RECORDING)” (A p. 46)
9
Remaining Recording Time
“Remaining Recording Time/Battery Power” (A p. 49)
10
Scene Counter
11
MIC LEVEL
“MIC LEVEL” (A p. 107)
Indications on the LCD monitor
134
Still Image Recording
.
1
Still Image Mode
“A / B (Video/Still Image) Button” (A p. 133)
2
Image Size
“IMAGE SIZE” (A p. 115)
3
Continuous Shooting
“SHUTTER MODE” (A p. 114)
“CONT. SHOOTING SPEED” (A p. 114)
4
Self-Timer
“Taking Group Shots (Self-timer)” (A p. 48)
5
Focus
“Taking Still Images in Intelligent Auto Mode” (A p. 32)
6
Remaining Number of Shots
7
Recording in Progress
Video Playback
.
1
Scene Counter
2
Video Mode
“A / B (Video/Still Image) Button” (A p. 133)
3
Operation Indicator
“Playing Back Videos” (A p. 53)
4
Date/Time
“Clock Setting” (A p. 19)
5
3D/2D Mode
“3D Button” (A p. 133)
6
Media
“REC MEDIA FOR VIDEO” (A p. 122)
7
Playback Time
“Playing Back Videos” (A p. 52)
8
Time-Lapse Playback
0
Displays the recording interval of time-lapse recording with an icon.
“Time-Lapse Setting” (A p. 47)
9
External Storage Playback
“Playing Back with a DVD Writer” (A p. 77)
“Playing Back with an External Blu-ray Drive” (A p. 82)
“Playing Back Files in the USB External Hard Disk Drive” (A p. 85)
10
x.v.Color (2D mode only)
“x.v.Color (2D mode only)” (A p. 106)
11
Output with 1080p
“HDMI OUTPUT” (A p. 128)
12
3D MOTION RELIEF (3D mode only)
“3D MOTION RELIEF (3D mode only)” (A p. 117)
13
Parallax Adjustment (3D mode only)
“Adjusting Parallax During Playback” (A p. 56)
Indications on the LCD monitor
135
Still Image Playback
.
1
Still Image Mode
“A / B (Video/Still Image) Button” (A p. 133)
2
Operation Indicator
“Playing Back Still Images” (A p. 55)
3
Folder Number
4
File Number
5
Date/Time
“Clock Setting” (A p. 19)
6
3D/2D Mode
“3D Button” (A p. 133)
7
Media
“REC MEDIA FOR IMAGE” (A p. 123)
8
External Storage Playback
“Playing Back with a DVD Writer” (A p. 77)
“Playing Back with an External Blu-ray Drive” (A p. 82)
“Playing Back Files in the USB External Hard Disk Drive” (A p. 85)
9
Output with 1080p
“HDMI OUTPUT” (A p. 128)
10
Parallax Adjustment (3D mode only)
“Adjusting Parallax During Playback” (A p. 56)
Indications on the LCD monitor
136
Battery Pack
Unable to turn on the power when using the battery pack.
Recharge the battery pack.
“Charging the Battery Pack” (A p. 15)
If the terminal of this unit or the battery pack is dirty, wipe it with a cotton swab
or something similar.
If you use any other battery packs besides JVC battery packs, safety and
performance cannot be guaranteed. Be sure to use JVC battery packs.
Short usage time even after charging.
Battery deterioration occurs when a battery pack is charged repeatedly.
Replace the battery pack with a new one.
“Optional Accessories” (A p. 26)
Unable to charge the battery pack.
When the battery pack is fully charged, the lamp does not flash.
If the terminal of this unit or the battery pack is dirty, wipe it with a cotton swab
or something similar.
Using a non-original battery pack may result in damage to this unit. Be sure
to use an original battery pack.
The remaining battery display is not correct.
Remaining battery power is not displayed when the AC adapter is
connected.
If this unit is used for long periods of time in high or low temperatures, or if
the battery pack is repeatedly charged, the amount of remaining battery may
not be displayed correctly.
The battery depletes even when the AC adapter is connected.
Please use a JVC AC adapter (AP-V20U).
Recording
Recording cannot be performed.
Check the A/B button.
“Interior” (A p. 133)
Set to the recording mode with the q button.
“Names of Buttons and Functions on the LCD Monitor” (A p. 18)
Recording stops automatically.
Recording stops automatically as it cannot be performed for 12 or more
consecutive hours according to specifications. (It may take some time to
resume recording.)
Turn off this unit, wait for a while, and turn it on again. (This unit stops
automatically to protect the circuit when the temperature rises.)
The continuous shooting speed of still images is slow.
The continuous shooting speed will drop if this function is used repeatedly.
Continuous shooting speed may drop depending on the SD card or under
certain recording conditions.
The focus is not adjusted automatically.
If you are recording in a dark place or a subject that has no contrast between
dark and light, adjust the focus manually.
“Adjusting Focus Manually” (A p. 37)
Wipe the lens with a lens cleaning cloth.
Cancel manual focus on the manual recording menu.
“Adjusting Focus Manually” (A p. 37)
Zoom does not work.
Digital zoom is not available in the still image recording mode.
Zoom operation is not available in time-lapse recording. (Simultaneous still
image recording and image stabilizer are also not available.)
To use digital zoom, set “ZOOM” in the menu to “40x/DIGITAL” or “200x/
DIGITAL”.
“ZOOM (2D mode only)” (A p. 106)
Mosaic-type noise occurs when recording scenes with fast
movements or extreme changes in brightness.
Set “VIDEO QUALITY” to “THR” or “TXP” during 3D mode or “UXP” or “XP”
during 2D mode for recording.
“VIDEO QUALITY” (A p. 105)
Vertical lines appear on recorded images.
Such a phenomenon occurs when shooting a subject illuminated by bright
light. This is not a malfunction.
Troubleshooting
137
Card
Cannot insert the SD card.
Make sure not to insert the card in the wrong direction.
“Inserting an SD Card” (A p. 16)
Unable to copy to SD card.
To record to the card, it is necessary to perform media settings.
“REC MEDIA FOR VIDEO” (A p. 122)
To use cards that have been used on other devices, it is necessary to format
(initialize) the card using “FORMAT SD CARD” from media settings.
“FORMAT SD CARD” (A p. 131)
Playback
Sound or video is interrupted.
Sometimes playback is interrupted at the connecting section between two
scenes. This is not a malfunction.
The same image is displayed for a long time.
Replace the SD card. (When the SD card is damaged, difficulty in reading
the data occurs. This unit will try to play back as much as possible, but it will
stop eventually if the condition persists.)
Execute “FORMAT SD CARD” in the “COMMON” menu. (All data will be
deleted.)
“FORMAT SD CARD” (A p. 131)
The motion is choppy.
When “3D MOTION RELIEF” is set to “ON” during playback, scenes that are
likely to cause motion sickness will be skipped. To play back normally even
for the scenes that are likely to cause motion sickness, set “3D MOTION
RELIEF” to “OFF”.
“3D MOTION RELIEF (3D mode only)” (A p. 117)
To avoid recording scenes that will be played back in stop-motion, refer to
“Precautions on Recording and Playing Back 3D Images”.
“Precautions on Recording and Playing Back 3D Images” (A p. 11)
Replace the SD card. (When the SD card is damaged, difficulty in reading
the data occurs. This unit will try to play back as much as possible, but it will
stop eventually if the condition persists.)
Execute “FORMAT SD CARD” in the “COMMON” menu. (All data will be
deleted.)
“FORMAT SD CARD” (A p. 131)
Verify the system requirements of your PC when using Everio MediaBrowser
3D to play back.
“Verifying System Requirements (Guideline)” (A p. 92)
Cannot find a recorded file.
Press the 3D button to switch to the desired mode for playback.
“Playing Back Videos” (A p. 52)
Set “3D VIDEO REC FORMAT” in the video recording menu to “MP4(MVC)”
or “AVCHD”.
“3D VIDEO REC FORMAT (3D mode only)” (A p. 104)
Change the playback media by tapping I/J on the index screen.
“Operation Buttons for Video Playback” (A p. 53)
“Operation Buttons for Still Image Playback” (A p. 55)
Select “PLAYBACK OTHER FILE” in the menu. (Video files that have
damaged management information can be played back.)
“Playing a Video with Defective Management Information” (A p. 54)
No date/time display.
Recording date and time will not be displayed when playing back a disc that
contains videos recorded in 3D mode.
When playing back a disc created in DVD-Video format, no information such
as date and time will be displayed.
Images do not appear on the TV properly.
Disconnect the cable and connect again.
“Connecting via the HDMI Mini Connector” (A p. 61)
Turn off and on this unit again.
Images are projected vertically on the TV.
Set “VIDEO OUTPUT” in the “COMMON” menu to “4:3”.
“VIDEO OUTPUT (2D mode only)” (A p. 127)
Adjust the TV's screen accordingly.
The image displayed on TV is too small.
Set “VIDEO OUTPUT” in the “COMMON” menu to “16:9”.
“VIDEO OUTPUT (2D mode only)” (A p. 127)
Unable to delete file.
Files (videos/still images) that are protected cannot be deleted. Release
protection before deleting the file.
“Protecting Files” (A p. 66)
When connected to the TV via the HDMI mini cable, proper
images and sounds are not output.
Images and sounds may not be output properly depending on the TV
connected. In such cases, perform the following operations.
A Disconnect the HDMI mini cable and connect it again.
B Turn off and on this unit again.
“Connecting via the HDMI Mini Connector” (A p. 61)
3D images cannot be seen on a 3D compatible TV properly.
Set “HDMI OUTPUT” in the “COMMON” menu accordingly.
“HDMI OUTPUT” (A p. 128)
Troubleshooting
138
Editing/Copying
Unable to delete file.
Files (videos/still images) that are protected cannot be deleted. Release
protection before deleting the file.
“Protecting Files” (A p. 66)
Unable to copy/move files to SD card.
If the SD card is write protected, set it to off.
BACK-UP menu does not disappear.
While the USB cable is connected, the “BACK-UP” menu is displayed.
Unable to turn off the BACK-UP menu.
Turn off the power of this unit and the DVD writer, or remove the AC adapter.
Computer
Unable to copy files to DVD with a PC.
To record to discs, a recordable DVD drive is required for the PC in use.
Troubleshooting
139
Screen/Image
The LCD monitor is difficult to see.
The LCD monitor may be difficult to see if used in bright areas such as under
direct sunlight.
The LCD monitor appears darker when 3D images are displayed. Change
the display to 2D when it is difficult to see, such as when using this unit
outdoors.
A band or a ball of bright light appears on the LCD monitor.
Change the direction of this unit to prevent the light source from coming into
view. (A band or a ball of bright light may appear when there is a bright light
source near this unit, but this is not a malfunction.)
The recorded subject is too dark.
Use backlight compensation when the background is bright and the subject
is dark.
“Setting Backlight Compensation” (A p. 41)
Use “NIGHTALIVE” in SCENE SELECT.
“Scene Selection” (A p. 36)
Use “GAIN UP” in the menu.
“GAIN UP” (A p. 103)
Set “BRIGHTNESS ADJUST” in the recording menu to the “+” side.
“Adjusting Brightness” (A p. 38)
The recorded subject is too bright.
Set the backlight compensation to “OFF” if it is being used.
“Setting Backlight Compensation” (A p. 41)
Set “BRIGHTNESS ADJUST” in the recording menu to the “-” side.
“Adjusting Brightness” (A p. 38)
The color looks strange. (Too bluish, too reddish, etc.)
Wait for a while until natural colors are achieved. (It may take some time for
white balance to be adjusted.)
Set “WHITE BALANCE” in the recording menu to “MANUAL”. Select from
“FINE”/“CLOUD”/“HALOGEN” according to the light source.
Select “MWB” and adjust accordingly.
“Setting White Balance” (A p. 40)
The color looks different.
Set “WHITE BALANCE” in the recording menu to “MANUAL”. Select from
“FINE”/“CLOUD”/“HALOGEN” according to the light source.
Select “MWB” and adjust accordingly.
“Setting White Balance” (A p. 40)
When the video was recorded with “x.v.Color” set to “ON”, change the setting
as desired on TV.
“x.v.Color (2D mode only)” (A p. 106)
Other Problems
The buttons on the touch screen do not work.
Tap the buttons on the touch screen with your fingers.
The buttons may not respond if you touch them with your fingernails or with
gloves on.
The unit operates slowly when switching between video mode
and still image mode, or when switching the power on or off.
It is recommended that you copy all videos and still images onto your
computer, and erase the files from this unit. (If there are many recorded files
on this unit, it takes time for the unit to respond.)
The image is grainy.
When digital zoom is used, the image becomes grainy as it is digitally
enlarged.
This unit heats up.
This is not a malfunction. (This unit may become warm when used for a long
time.)
Make a backup of important recorded data.
It is recommended to copy your important recorded data to a DVD or other
recording media for storage.
JVC will not be responsible for any lost data.
When connected to the TV via the HDMI mini cable, proper
images and sounds are not output.
Images and sounds may not be output properly depending on the TV
connected. In such cases, perform the following operations.
A Disconnect the HDMI mini cable and connect it again.
B Turn off and on this unit again.
“Connecting via the HDMI Mini Connector” (A p. 61)
The language on the display changed.
It may occur when you connect this unit to a TV with different language setting
using an HDMI mini cable.
“Operating in Conjunction with TV via HDMI” (A p. 60)
HDMI-CEC functions do not work properly, and the TV does
not work in conjunction with this unit.
TVs may operate differently depending on the specifications, even if they
are HDMI-CEC compliant. Therefore, the HDMI-CEC functions of this unit
cannot be guaranteed to operate in combination with all the TVs. In such
cases, set “HDMI CONTROL” to “OFF”.
“Operating in Conjunction with TV via HDMI” (A p. 60)
Troubleshooting
140
Error Message?
CHECK LENS COVER
Open the lens cover.
SET DATE/TIME!
Connect the AC adapter, charge the battery for more than 24 hours and set
the clock. (If the message still appears, the clock battery is exhausted.
Consult your nearest JVC dealer.)
“Clock Setting” (A p. 19)
COMMUNICATION ERROR
Reconnect the USB cable.
Turn off this unit and the devices connected to it, and turn them on again.
Reattach the battery pack.
FORMAT ERROR!
Check the operating procedure, and perform once again.
“FORMAT BUILT-IN MEM.” (A p. 130)
Turn off and on this unit again.
DATA DELETION ERROR
Check the operating procedure, and perform once again.
“ERASE ALL DATA” (A p. 131)
Turn off and on this unit again.
ERROR IN BUILT-IN MEMORY!
Turn off and on this unit again.
If the above does not solve the problem, back up your files and execute
“FORMAT BUILT-IN MEM.” in the “COMMON” menu. (All data will be
deleted.)
“FORMAT BUILT-IN MEM.” (A p. 130)
MEMORY CARD ERROR!
Turn off and on this unit again.
Remove the AC adapter and battery pack, then remove and re-insert the SD
card.
Remove any dirt from the SD card terminals.
If the above does not solve the problem, back up your files and execute
“FORMAT SD CARD” in the “COMMON” menu. (All data will be deleted.)
“FORMAT SD CARD” (A p. 131)
NOT FORMATTED
Select “OK”, then select “YES” on the “DO YOU WANT TO FORMAT?”
screen.
RECORDING FAILURE
Turn off and on this unit again.
PLAYBACK FAILED
Remove and re-insert the SD card.
“Inserting an SD Card” (A p. 16)
Remove any dirt from the SD card terminals.
Insert the SD card before turning on the power.
Do not subject this unit to any strong impact or vibration.
VIDEO MANAGEMENT FILE IS DAMAGED, RECOVERY IS
REQUIRED TO RECORD/PLAYBACK, RECOVER?
Select “OK” to restore. (Videos that cannot be restored will not be displayed
on the index screen, but you may be able to play them back using
“PLAYBACK OTHER FILE” in the menu.)
“Playing a Video with Defective Management Information” (A p. 54)
UNSUPPORTED FILE!
Use files recorded with this unit. (Files recorded with other devices may not
be playable.)
THIS FILE IS PROTECTED
Switch off the “PROTECT/CANCEL” function in the “EDIT” menu.
“Protecting Files” (A p. 66)
CHECK CARD'S WRITE PROTECTION SWITCH
Set the write protect switch of the SD card to off.
INSUFFICIENT AVAILABLE SPACE
Delete files, or move files to a PC or other devices.
Replace the SD card with a new one.
SCENE QUANTITY EXCEEDED LIMIT
A Move the files or folders to a PC or other device. (Back up your files.)
B Select “FILE + MANAGEMENT NO” in “FORMAT BUILT-IN MEM.” or
“FORMAT SD CARD” of the “COMMON” menu. (All data on the built-in
memory or SD card will be deleted.)
NUMBER OF FOLDERS OVERFLOW
A Move the files or folders to a PC or other device. (Back up your files.)
B Select “FILE + MANAGEMENT NO” in “FORMAT BUILT-IN MEM.” or
“FORMAT SD CARD” of the “COMMON” menu. (All data on the built-in
memory or SD card will be deleted.)
FILE QUANTITY LIMIT EXCEEDED
A Move the files or folders to a PC or other device. (Back up your files.)
B Select “FILE + MANAGEMENT NO” in “FORMAT BUILT-IN MEM.” or
“FORMAT SD CARD” of the “COMMON” menu. (All data on the built-in
memory or SD card will be deleted.)
CAMERA TEMPERATURE IS TOO COLD KEEP CAMERA
POWER ON PLEASE WAIT
Leave this unit turned on for a while.
If the warning still does not disappear, turn off the power and move the unit
to a warm place while taking care to avoid a sudden temperature change.
Turn on the power again after a while.
RECORDING CANCELLED
Set “REC MEDIA FOR VIDEO” to “SD”, then record to an SD card.
“REC MEDIA FOR VIDEO” (A p. 122)
Turn off and on this unit again.
Protect the unit from vibration and shock.
UNABLE TO RECORD PROPERLY IN 3D PLEASE SWITCH TO
2D FOR RECORDING
Consult your JVC dealer or the JVC service center.
TOO MUCH PARALLAX BETWEEN LEFT & RIGHT IMAGES.
YOU MAY NOT BE ABLE TO VIEW THE 3D IMAGES
Check the shooting distance during 3D recording such that recording is
performed within the optimal zone.
“Precautions on Recording and Playing Back 3D Images” (A p. 11)
Troubleshooting
141
Perform regular maintenance of this unit to enable it to be used for a long time.
Caution :
0
Be sure to detach the battery pack, AC adapter, and power plug before performing any maintenance.
Camcorder
0
Wipe this unit with a dry, soft cloth to remove any dirt.
0
When it is extremely dirty, soak the cloth in a solution of neutral detergent, wipe the body with it, and then use a clean cloth to remove the detergent.
Caution :
0
Do not use benzene or thinner. Doing so may cause damage to the unit.
0
When using a chemical cloth or cleaner, be sure to observe the warning labels and instructions of the product.
0
Do not leave the device in contact with rubber or plastic products for a long time.
Lens/LCD Monitor
0
Use a lens blower (commercially available) to remove any dust, and a cleaning cloth (commercially available) to wipe off any dirt.
Mold may form if the lens is left dirty.
Maintenance
142
Camera
ItemDetails
Power supplyUsing AC adapter: DC 11 V
Using BN-VF815U battery pack: DC 7.2 V
Power consumption
0
3D Mode (AVCHD)
4.8 W (when display on LCD monitor is set to “3D”
and “MONITOR BRIGHTNESS” is set to
“STANDARD”), Rated Current Consumption: 1.0 A
4.5 W (when display on LCD monitor is set to “2D”
and “MONITOR BRIGHTNESS” is set to
“STANDARD”), Rated Current Consumption: 1.0 A
0
3D Mode (MP4(MVC))
5.5 W (when display on LCD monitor is set to “3D”
and “MONITOR BRIGHTNESS” is set to
“STANDARD”), Rated Current Consumption: 1.0 A
5.2 W (when display on LCD monitor is set to “2D”
and “MONITOR BRIGHTNESS” is set to
“STANDARD”), Rated Current Consumption: 1.0 A
0
2D Mode
3.8 W (when “MONITOR BRIGHTNESS” is set to
“STANDARD”), Rated Current Consumption: 1.0 A
Dimensions (mm)102 x 64 x 186 (4-1/8” x 2-5/8” x 7-3/8”) (W x H x
D: excluding grip belt)
MassApprox. 590 g (1.3 lbs) (camera only),
Approx. 675 g (1.43lbs) (including supplied battery
pack)
Operating
environment
Allowable operating temperature: 0°C to 40°C
(32°F to 104°F)
Allowable storage temperature: -20°C to 50°C
(-4°F to 122°F)
Allowable relative humidity: 35 % to 80 %
Image pickup
device
1/4.1" 3,320,000 pixels (progressive CMOS) x2
Recording area
(Video)
0
3D Mode
2,360,000 pixels (when “DIS” is set to “OFF”)
2,070,000 pixels (when “DIS” is set to “ON”)
1,820,000 pixels (when “DIS” is set to “ON (AIS)”)
0
2D Mode
2,980,000 pixels (when “DIS” is set to “OFF”)
2,070,000 to 2,980,000 pixels (when “DIS” is set to
“ON”)
2,070,000 to 2,360,000 pixels (when “DIS” is set to
“ON (AIS)”)
Recording area
(Still image)
0
3D Mode
2,070,000 pixels (16:9)
0
2D Mode
2,980,000 pixels (16:9)
2,240,000 pixels (4:3)
ItemDetails
Lens
0
3D Mode
F1.2 - 2.28, f= 3.76 mm to 18.8 mm
35 mm conversion: 44.8 mm to 224 mm (when
“DIS” is set to “ON”)
35 mm conversion: 42 mm to 210 mm (when “DIS”
is set to “OFF”)
0
2D Mode
F1.2 - 2.8, f= 3.76 mm to 37.6 mm
35 mm conversion: 37.3 mm to 373 mm (when
“DIS” is set to “ON”)
35 mm conversion: 37.3 mm to 373 mm (when
“DIS” is set to “OFF”)
35 mm conversion: 42.0 mm to 420 mm (when
“DIS” is set to “ON (AIS)”)
Lowest illumination8 lux (“GAIN UP”: “ON”)
4 lux (“GAIN UP”: AUTO SLOW-SHUTTER)
1 lux (“SCENE SELECT”: “NIGHTALIVE” mode)
Zoom (during video
recording)
Optical zoom: Up to 5x (during 3D recording), Up
to 10x (during 2D recording)
Digital zoom: 11 - 200x (during 2D recording)
Zoom (during still
image recording)
Optical zoom: Up to 5x (during 3D recording), Up
to 10x (during 2D recording)
Continuous
shooting speed
(during still image
recording)
0
3D Mode
HIGH SPEED: Approx. 12 images/second (Up to
12 images)
LOW SPEED: Approx. 1.4 images/second
(Maximum)
0
2D Mode
HIGH SPEED: Approx. 12 images/second (Up to
40 images)
LOW SPEED: Approx. 1.4 images/second
(Maximum)
LCD monitor3.5”, 92.16 megapixels, polysilicon color LCD
Libble takes abuse of its services very seriously. We're committed to dealing with such abuse according to the laws in your country of residence. When you submit a report, we'll investigate it and take the appropriate action. We'll get back to you only if we require additional details or have more information to share.
Product:
Forumrules
To achieve meaningful questions, we apply the following rules:
First, read the manual;
Check if your question has been asked previously;
Try to ask your question as clearly as possible;
Did you already try to solve the problem? Please mention this;
Is your problem solved by a visitor then let him/her know in this forum;
To give a response to a question or answer, do not use this form but click on the button 'reply to this question';
Your question will be posted here and emailed to our subscribers. Therefore, avoid filling in personal details.
Register
Register getting emails for JVC GS-TD1 at:
new questions and answers
new manuals
You will receive an email to register for one or both of the options.
Get your user manual by e-mail
Enter your email address to receive the manual of JVC GS-TD1 in the language / languages: English as an attachment in your email.
The manual is 8,07 mb in size.
You will receive the manual in your email within minutes. If you have not received an email, then probably have entered the wrong email address or your mailbox is too full. In addition, it may be that your ISP may have a maximum size for emails to receive.
If you have not received an email with the manual within fifteen minutes, it may be that you have a entered a wrong email address or that your ISP has set a maximum size to receive email that is smaller than the size of the manual.
The email address you have provided is not correct.
Please check the email address and correct it.
Your question is posted on this page
Would you like to receive an email when new answers and questions are posted? Please enter your email address.