(264IO) SPA (JET + BUBBLE) GERMAN 7.5” X 10.3” PANTONE 295U 08/06/2015
Deutsch
Seite 3
WICHTIGE SICHERHEITSVORSCHRIFTEN
Bei der Installation und der Benutzung von elektrischen Geräten müssen die grundlegenden Sicherheitsbestimmungen einschließlich der folgenden immer beachtet werden:
ALLE INSTRUKTIONEN LESEN UND BEFOLGEN
• Die Therme muss mit einer Isoliertransformator oder einer Fehlerstromeinrichtung, deren Fehlerstrom 10mA nicht
übersteigt, ausgestattet. Wenn die Fehlerstrom mehr als 10mA entdeckt ist, die Fehlerstromeinrichtung (RCD) wird
bewirkt und schaltet das Geräte sofort aus. In disem Fall, bitte stecken Sie die Stecker aus und aufhören Sie das
Geräte weiter zu benutzen. Kontaktieren Sie Ihren lokalen Kundendienst bezüglich der weiteren Vorgehensweise.
• Personen im Whirlpool dürfen nicht an spannungsführende Teile, ausgenommen Teile mit Niederspannung mit nicht
mehr als 12V, gelangen.
• Die elektrische Installation erfüllt die Anforderungen der nationalen Normen.
• Teile mit elektrischen Komponenten, außer Fernbedienungen müssen entfernt oder fi xiert werden, so dass sie nicht
in den Whirlpool fallen können.
• Um das Risiko von Verletzungen zu verringern, erlauben Sie Kindern nicht, dieses Produkt ohne ganzzeitige
Überwachung, zu benutzen.
• Kinder sollten den Spa oder Whirlpool nicht ohne Aufsicht eines Erwachsenen benutzen.
• Um das Risiko zu verringern, dass Kinder darin ertrinken, beaufsichtigen Sie die Kinder durchgehend bei der
Benutzung. Sichern und verschließen Sie den Whirlpool nach jeder Benutzung immer durch die Abdeckung.
• ZUR REDUZIERUNG DER VERLETZUNGSGEFAHR:
a) Das Wasser in der Therme sollte 40°C (104°F) nie übersteigen. Wassertemperaturen zwischen 38°C(100°F) und
40°C(104°F) werden für einen gesunden Erwachsenen als sicher angesehen. Für Kleinkinder und falls die Therme
länger als 10 Minuten benutzt wird, werden niedrigere Wasser Temperaturen empfohlen.
b) Da hohe Wassertemperaturen in den ersten Schwangerschaftsmonaten eine große Gefahr der Schädigung des
Fötus aufweisen, sollten Schwangere die Wassertemperatur der Therme auf 38°C (100°F) begrenzen.
c) Vor dem Betreten der Therme sollte Sie die Wassertemperatur mit einem genauen Thermometer überprüfen, da die
Toleranz der Wassertemperaturregler variiert.
d) Die Einnahme von Alkohol, Drogen oder Arzneimitteln vor oder während der Benutzung der Therme kann zu
Bewusstlosigkeit und Ertrinkungsgefahr führen.
e) Übergewichtige Personen mit Herzbeschwerden, niedrigem oder hohem Blutdruck, Kreislaufproblemen oder Diabetes
sollte vor der Benutzung der herme einen Arzt konsultieren.
f) Personen, die Medikamente nehmen, sollte vor der Benutzung der Therme einen Arzt konsultieren, da einige
Arzneimittel zu Schläfrigkeit führen, während sich andere auf den Herzschlag, den Blutdruck und den Kreislauf
auswirken.
DEUTSCH
WARNUNG
• Ertrinkungsgefahr. Zur Vermeidung eines unbefugten Zugangs von Kindern muss die größtmögliche Vorsicht
angewendet werden. Stellen Sie sicher, dass Kinder die Therme nicht benutzen können, wenn sie nicht ständig
beaufsichtigt werden, um die Gefahr von Unfällen zu vermeiden.
• Gefahr des Ertrinkens. Überprüfen Sie regelmäßig die Abdeckung des Whirlpools auf Undichtigkeiten, vorzeitigen
Verschleiß, Schäden oder Anzeichen für Alterung. Verwenden Sie niemals eine abgenutzte oder beschädigte
Abdeckung, denn diese bietet Ihnen nicht das Ausmaß an Schutz, das erforderlich ist, damit nicht etwa Kinder den
Whirlpool unbeaufsichtigt benutzen können.
• VERLETZUNGSGEFAHR. Ersetzen Sie beschädigte Kabel sofort. Graben Sie die Kabel nicht ein.
• ELEKTROSCHLAGGEFAHR. Verwenden Sie keine elektronischen Geräte, wie Licht, Telefon, Radio oder Fernseher
innerhalb eines Umkreises von 3,5 m vom Whirlpool.
• ELEKTROSCHLAGGEFAHR. Gefahr eines elektrischen Schlags. Bitte benutzen Sie den Whirlpool nicht wenn es
regnet, donnert und blitzt.
264
B
HEBEN SIE DIESE BEDIENUNGSANLEITUNG AUF
(264IO) SPA (JET + BUBBLE) GERMAN 7.5” X 10.3” PANTONE 295U 08/06/2015
Deutsch
Seite 4
WARNUNG
g)Menschen die Medikamente einnehmen und/oder eine medizinische Vorgeschichte haben, sollten einen Arzt
konsultieren, bevor Sie einen Spa oder Whirlpool benutzen.
h) Konsultieren Sie einen Arzt bevor Sie den Whirlpool benutzen, wenn Sie schwanger, Diabetiker, bei schlechter
Gesundheit oder in medizinischer Behandlung sind.
• Menschen mit ansteckenden Krankheiten sollten die Therme nicht benutzen.
• Um Verletzungen zu vermeiden, passen Sie beim Ein- und Aussteigen gut auf.
• Verwenden Sie keine Drogen oder Alkohol vor oder während der Verwendung eines Spas oder Whirlpools um
Bewusstlosigkeit und mögliches Ertrinken zu vermeiden.
• Schwangere und mögliche schwangere Frauen sollten einen Arzt aufsuchen, bevor sie einen Spa oder Whirlpool
benutzen.
• Eine Wassertemperatur von mehr als 38°C kann für Ihre Gesundheit schädlich sein.
• Benutzen Sie die Therme nicht direkt nach körperlichen Anstrengungen.
• Ein längerer Aufenthalt in einem Spa oder Whirlpool kann für Ihre Gesundheit schädlich sein.
• Wenn Sie schwanger sind kann ein längerer Aufenthalt im Whirlpool Ihrem Fötus schaden. Messen Sie die Temperatur
des Wassers vor der Benutzung. Benutzen Sie nicht den Whirlpool wenn das Wasser heißer als 38°C ist. Bleiben Sie
nicht länger als 10 Minuten im Whirlpool.
• Whirlpool Wärme in Verbindung mit Alkohol, Drogen oder Medikamente kann zu Bewusstlosigkeit führen.
• Verlassen Sie sofort den Whirlpool wenn Ihnen unwohl, schwindelig oder wenn Sie schläfrig sind. Die Wärme des
Wassers im Whirlpool kann zu Hyperthermie und Bewusstlosigkeit führen.
• Die Ursachen, Symptome und Auswirkungen der Hyperthermie kann wie folgt beschrieben werden: Hyperthermie tritt
auf, wenn die Innentemperatur des Körpers einen Wert erreicht, der einige Grade über der normalen Körpertemperatur
von 37°C liegt. Die Symptome der Hyperthermie sind eine Erhöhung der Innentemperatur des Körpers, Schwindel,
Lethargie, Benommenheit und Ohnmacht. Die Auswirkungen der Hyperthermie sind fehlende Wahrnehmung
von Wärme; die Notwendigkeit nicht zu erkennen, den Spa oder Whirlpool zu verlassen; fehlendes Erkennen der
drohenden Gefahr, fetale Schäden bei Schwangeren; körperliche Unfähigkeit, den Spa oder Whirlpool zu verlassen;
und Bewusstlosigkeit woraus die Gefahr des Ertrinkens resultieren kann.
• Der Konsum von Alkohol, Drogen oder Medikamenten kann erheblich das Risiko einer tödlichen Hyperthermie in
einem Spa oder Whirlpool erhöhen.
• Fügen Sie immer Chemikalien ins Wasser, nie Wasser zu den Chemikalien. Die Zugabe von Wasser in die
Chemikalien kann starke Dämpfe oder heftige Reaktionen auslösen.
• Springen Sie niemals in ein Whirlpool. Tauchen Sie niemals in einem Whirlpool oder anderen seichten Gewässer.
• Montage und Demontage nur von Erwachsenen.
• Dieses Gerät kann von Kindern ab 8 Jahren und von Personen mit verminderten körperlichen, sensorischen oder
geistigen Fähigkeiten oder mit Mangel an Erfahrung und Wissen bedient werden, wenn sie beaufsichtigt werden oder
auf den sicheren Gebrauch des Gerätes hingewiesen wurden und die damit verbundenen Gefahren kennen. Kinder
dürfen nicht mit dem Gerät spielen. Reinigung und Instandhaltung muss von die Erwachsene mehr als 18 jährige
durchgeführt werden, die mit der Gefahr dem Stromschlag bekannt ist.
• Während der Nutzung des Spa’s sind keine elektrischen Geräte ober bzw. in unmittelbarer Nähe des Spa’s erlaubt.
• Halten Sie den Stecker des Anschlusskabels dieses Produktes mehr als 4 m vom Whirlpool entfernt bzw. positionieren
Sie diesen in einer Höhe von mind. 1,2 m.
• Ziehen Sie immer den Netzstecker, bevor Sie das Produkt reinigen, entfernen, warten, andere Anpassung vornehmen
und im Regentag.
• Das Stromkabel darf nicht eingegraben werden. Platzieren Sie das Kabel so, dass wo es nicht durch Rasenmäher,
Heckenscheren oder andere Geräte beschädigt werden kann.
• Wenn die Anschlussleitung dieses Gerätes beschädigt ist, muss sie durch einen qualifi zierten Elektriker ersetzt
werden. Verwenden Sie bei der Wartung lediglich Ersatzteile, die mit den Originalteilen identisch sind.
264
B
HEBEN SIE DIESE BEDIENUNGSANLEITUNG AUF
(264IO) SPA (JET + BUBBLE) GERMAN 7.5” X 10.3” PANTONE 295U 08/06/2015
Deutsch
Seite 5
ACHTUNG
• Verwenden Sie nur Wasserpfl egemittel die mit der Herstelleranweisung übereinstimmt.
WARNUNG
• Um das Risiko eines Stromschlags zu reduzieren, verwenden Sie keine Verlängerungskabel, Zeitschaltuhren, Adapter
oder Konverter Stecker um das Whirlpool an die Stromversorgung anzuschließen. Verwenden Sie eine richtig positionierte
Steckdose.
• Versuchen Sie nicht den Netzstecker an oder abzustecken während Sie sich im Wasser befi nden oder nasse Hände
haben.
• Lassen Sie den Whirlpool nicht für längere Zeit ohne Wasser stehen. Setzen Sie das Whirlpool nicht direkter
Sonneneinstrahlung aus.
• Wenn das Produkt not in Betrieb für lange Zeit ist, z.m. im Winter, disassemblieren Sie das Product und verwahren Sie es
im Innenraum.
• Damit überlaufendes Wasser kein Problem darstellt, sollte rund um das Whirlpool für eine ausreichende Entwässerung
gesorgt werden.
• Lassen Sie das Wasser im Whirlpool nicht gefrieren. Schalten Sie den Whirlpool nicht ein, wenn das Wasser gefroren ist.
• Verwenden Sie den Whirlpool nicht, wenn er bei der Lieferung beschädigt wurde und/oder in irgendeiner Weise
Fehlfunktionen aufweist. Kontaktieren Sie dann sofort das Servicecenter von Intex. Dort wird man Ihnen sagen, was Sie
tun müssen.
• Verwenden Sie niemals den Whirlpool alleine. Erlauben Sie auch anderen Personen nicht, den Whirlpool alleine zu
benutzen.
• Geben Sie niemals Wasser mit einer Temperatur höher als 40°C direkt in den Whirlpool.
• Halten Sie Tiere vom Whirlpool entfernt um Schäden zu vermeiden.
• Fügen Sie kein Badeöl oder Badesalz in das Whirlpool Wasser.
• Der Whirlpool muss auf einer ebenen, fl achen und glatten Oberfl äche aufgestellt werden, die in der Lage ist, die maximale
Belastung des mit Wasser gefüllten Pools mit vier erwachsenen Benutzern zu tragen; das Gewicht liegt bei 1136 kg (2500
lbs). 6 erwachsene: 1592 kg (3500 lbs).
• Damit überlaufendes Wasser kein Problem darstellt, sollte rund um das Whirlpool für eine ausreichende Entwässerung
gesorgt werden.
1.Drücken Sie RESET am Fehlerstromschutzschalter.
2.Schalten Sie die elektronische Einheit ein.
3.Drücken Sie den TEST Knopf am FI Schutzschalter. Der FI-Schutzschalter
sollte sich abschalten, und die elektrische Ausrüstung sollte abgeschaltet
sein. Wenn der FI-Schutzschalter nicht ausgeschaltet ist, und die elek-
trische Ausrüstung nicht abgeschaltet ist, ist der FI-Schutzschalter defekt.
Verwenden Sie das Whirlpool nicht. Kontaktieren Sie einen qualifi zierten
Elektriker, um den Fehler zu korrigieren.
4.Drücken Sie die RESET-Taste auf dem FI-Schutzschalter. Die
Anzeige auf dem FI-Schutzschalter sollte eingeschaltet sein. Wenn
der FI-Schutzschalter nicht leuchtet, ist der FI-Schutzschalter defekt.
Verwenden Sie das Whirlpool nicht. Kontaktieren Sie einen qualifi zierten
Elektriker sofort, um den Fehler zu korrigieren.
TEST
RESET
RESET
TEST
TEST
RESET
RESET
TEST
TEST
WARNUNG
• Dieses Produkt ist mit einer Fehlerstrom-Schutzeinrichtung bzw. FI-Schutzschalter am Ende Stromkabels
ausgestattet. Der FI Schutzschalter muss vor jedem Gebrauch geprüft werden Verwenden Sie das
Whirlpool nicht, wenn der FI Schutzschalter nicht richtig funktioniert. Ziehen Sie den Netzstecker bis der
Fehler gefunden und behoben wurde. Kontaktieren Sie einen qualifi zierten Elektriker um den Fehler zu
korrigieren. Überbrücken Sie nicht den FI Schutzschalter. Es gibt keine zu wartenden Teile im Inneren
des FI Schutzschalters. Wenn Sie den FI Schutzschalter öffnen erlischt die Garantie.
264
B
HEBEN SIE DIESE BEDIENUNGSANLEITUNG AUF
(264IO) SPA (JET + BUBBLE) GERMAN 7.5” X 10.3” PANTONE 295U 08/06/2015
Deutsch
Seite 6
TEILEREFERENZ
Bevor Sie mit dem Zusammenbauen Ihres Produktes beginnen, nehmen Sie sich bitte ein paar Minuten Zeit
sich mit den verschiedenen Einzelteilen vertraut zu machen und den Zusammenhang zu verstehen.
HINWEIS: Zeichnungen nur für Illustrationszwecke. Eventuelle Abweichungen zum Produkt möglich.
10
8
21
5
22
1
6
3
4
1213
16
11
14
26
A
B
C
A
B
C
15
23
30
29
28
20
313233
2
D
27
9
24
35
347
18
17
19
25
264
B
HEBEN SIE DIESE BEDIENUNGSANLEITUNG AUF
(264IO) SPA (JET + BUBBLE) GERMAN 7.5” X 10.3” PANTONE 295U 08/06/2015
Deutsch
Seite 7
Beachten Sie bei der Bestellung von Teilen, dass Modellnummer und Teilenummer angegeben werden müssen.
TEILEREFERENZ (Fortsetzung)
Bevor Sie mit dem Zusammenbauen Ihres Produktes beginnen, nehmen Sie sich bitte ein paar Minuten Zeit
sich mit den verschiedenen Einzelteilen vertraut zu machen und den Zusammenhang zu verstehen.
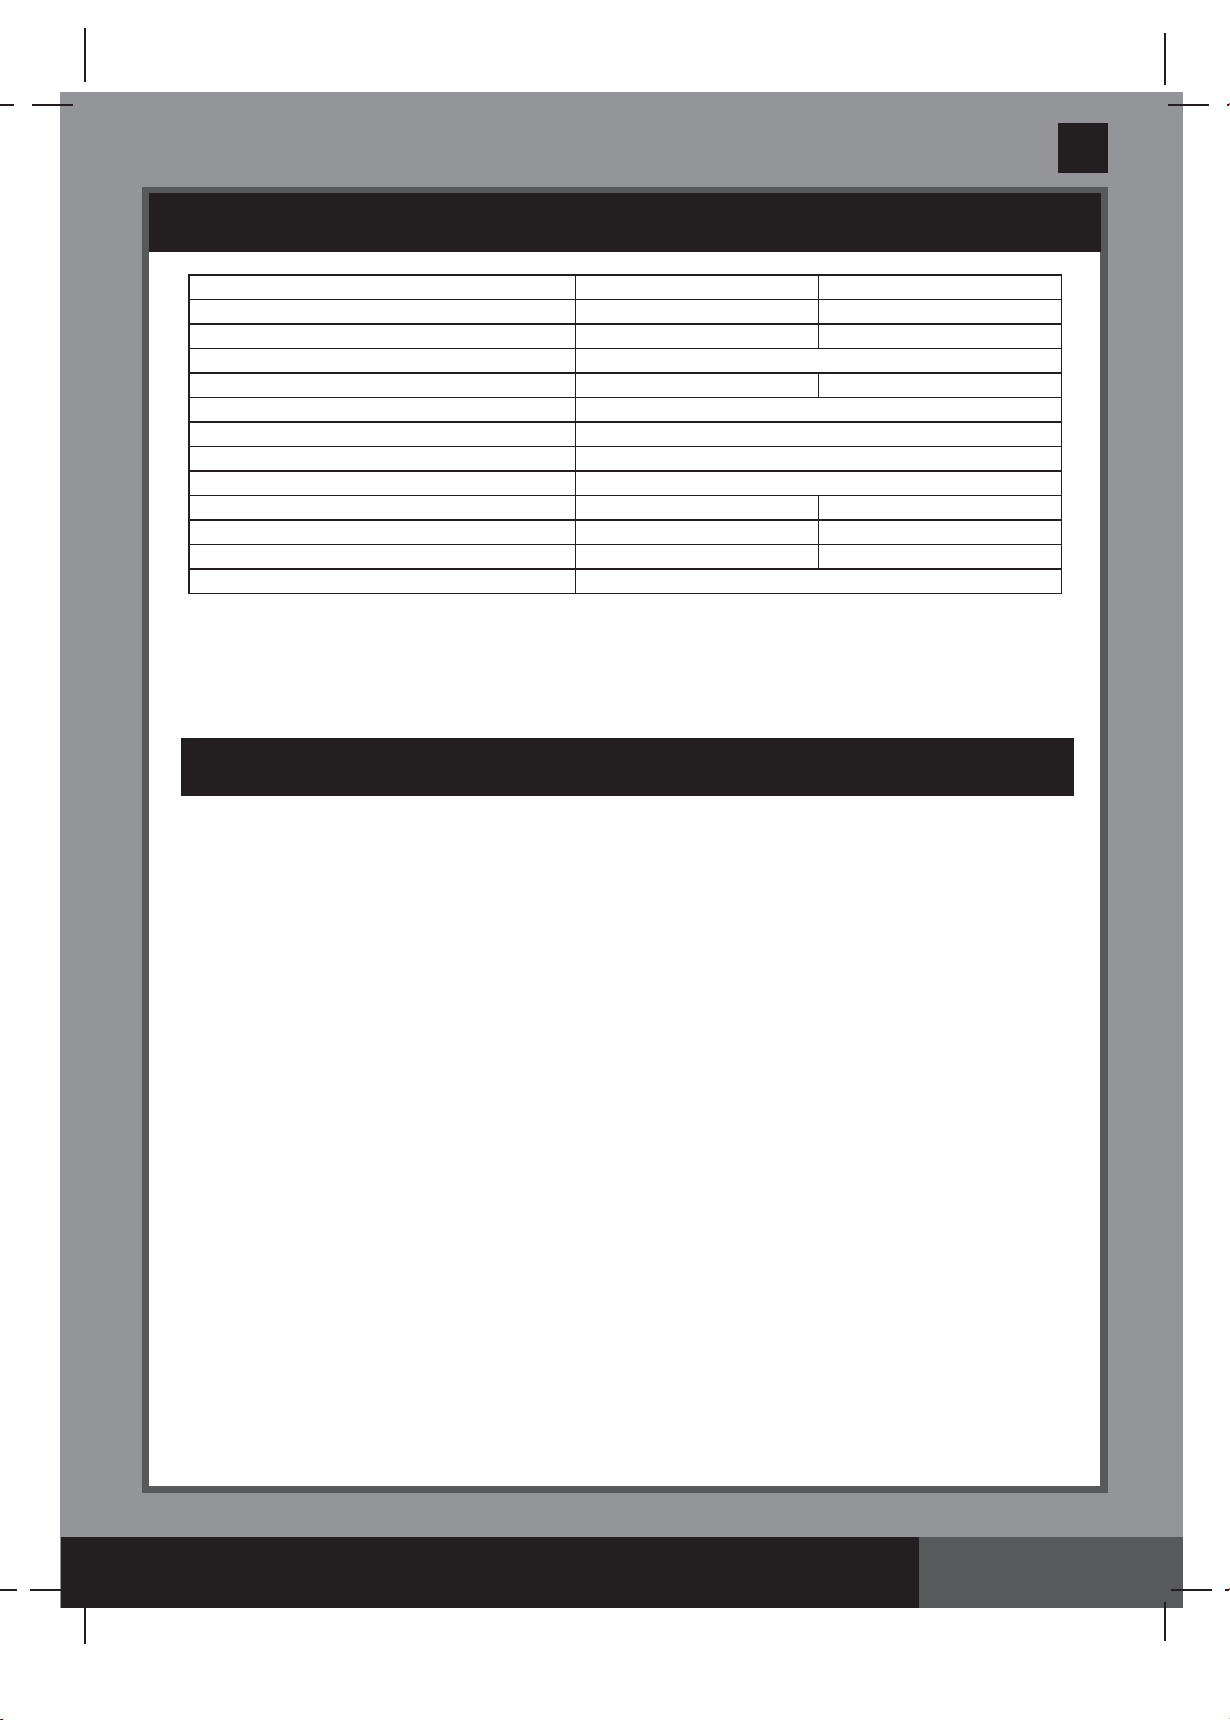
TEILENUMMER
BESCHREIBUNG
MENGE
ERSATZTEILNUMMER
4 ERWACHSENE6 ERWACHSENE
1 WHIRLPOOL STEUEREINHEIT11209612196
2 SPA FILTERMOTOR11188811888
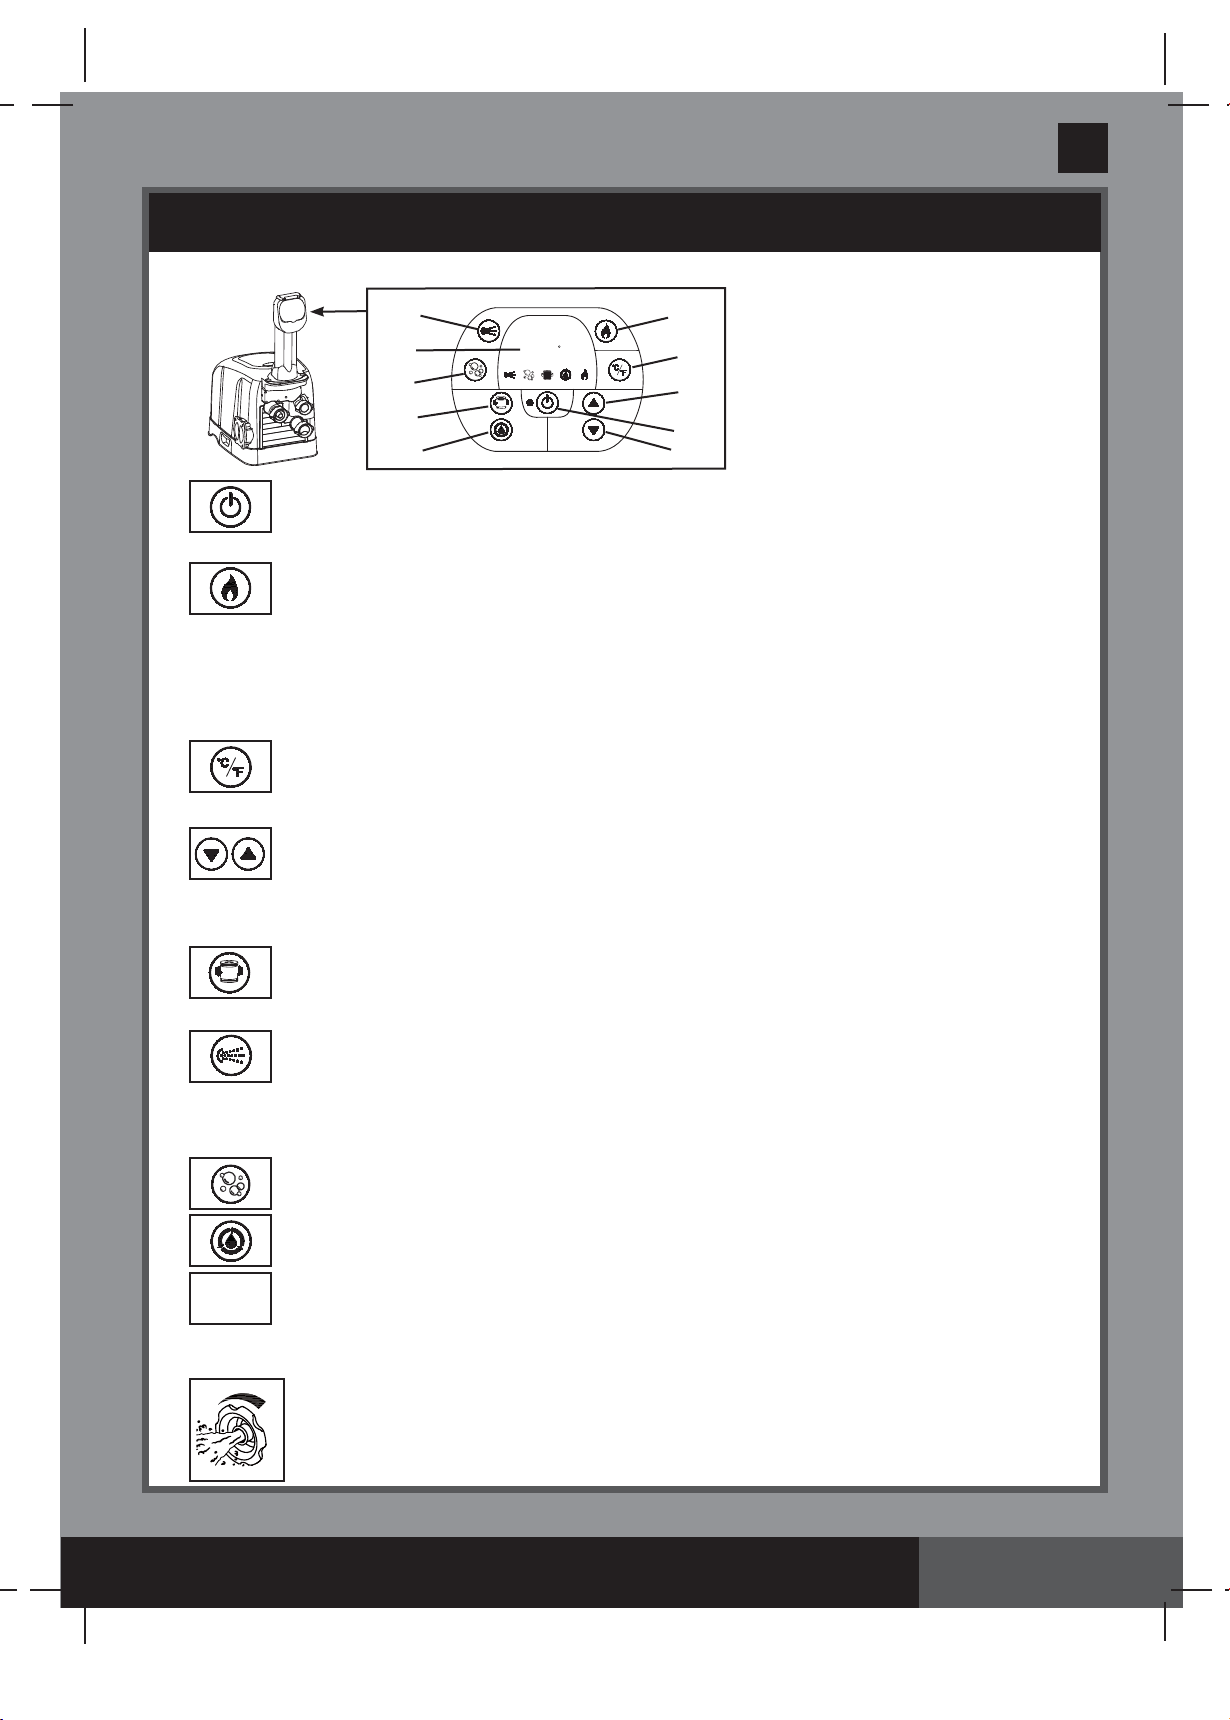
3 BEDIENFELD (INKLUSIVE #4)11194911949
4 BEDIENFELD-SCHRAUBE 31199611996
5 DRUCKPRÜFER11174111741
6 SCHRAUBENSCHLÜSSEL FÜR DAS BEDIENFELD11105311053
7 FÜLLSCHLAUCH FÜR WHIRLPOOL11183011830
8 SPA STEUERUNG O-RING21178811788
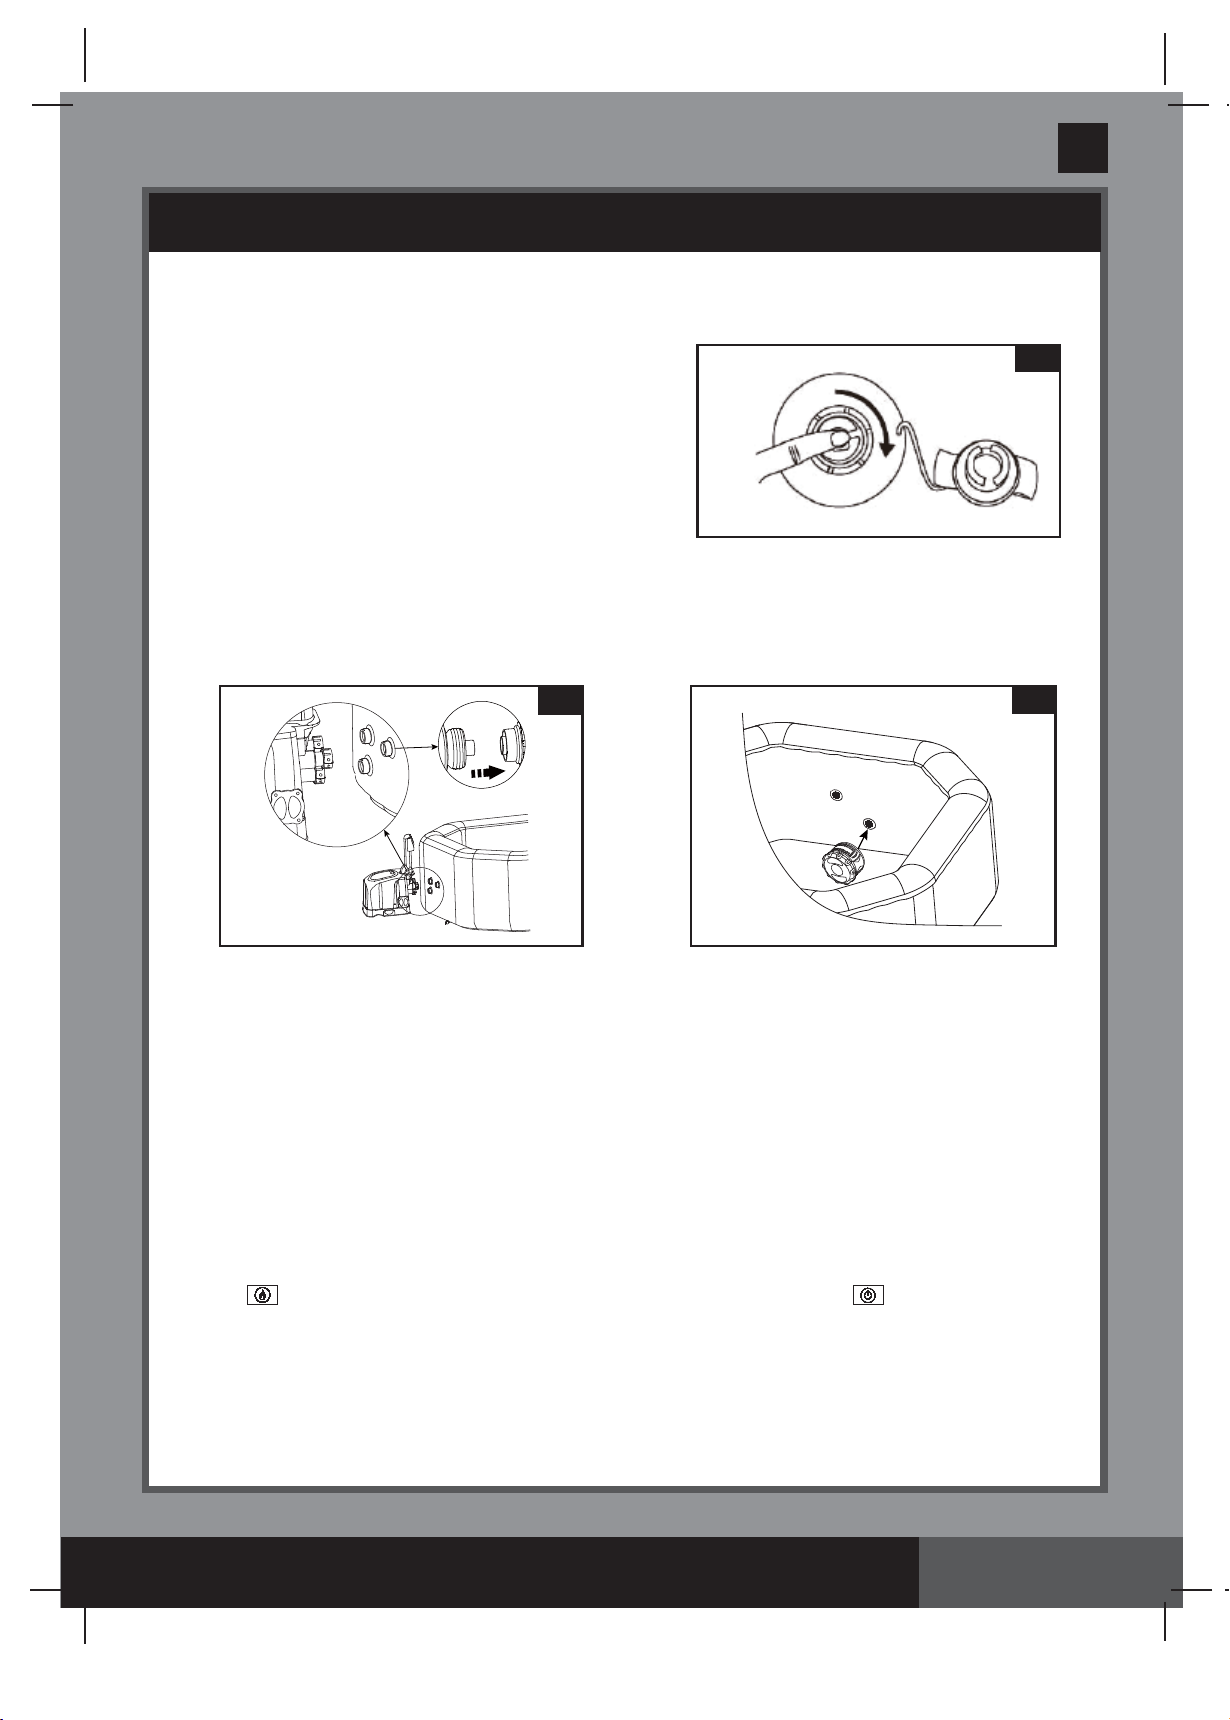
9 BASISSTATION VENTILKAPPE11199111991
10 WHIRLPOOL ABLASSSCHRAUBE11199511995
11 ABLASSVENTIL ADAPTER 11171811718
12 FILTERPATRONEN-GEHÄUSE11179811798
13 FILTERKARTUSCHE21169211692
14 DECKEL DES FILTERPATRONEN-GEHÄUSES11179711797
15 EINLASS-STÖPSEL11173911739
16 WHIRLPOOL11209012116
17 WHIRLPOOL ABDECKUNG11195112117
18
AUFBLASBARE WHIRLPOOL ABDECKUNG (IN WHIRLPOOL ABDECKUNG VORINSTALLIERT)
11188412114
19 UNTERGRUNDFOLIE11171712110
20 SCHRAUBENSCHLÜSSEL FÜR DIE ELEKTROLYSEZELLE11185411854
21 TESTSTREIFEN11185511855
22 SCHRAUBENSCHLÜSSEL11174211742
23 AUSLASS-STÖPSEL21178211782
24 FÜLLSCHLAUCHADAPTOR11182911829
25MÄNNLICHE SCHNALLE81199411994
26WEIBLICHE SCHNALLE81199311993
27 SPA STEUERUNG - O-RING FÜR DIE LUFTZUFUHR11168711687
28 SCHRAUBE FÜR DIE ABDECKUNG DER ELEKTROLYSEZELLE41171211712
29 ABDECKUNG DER ELEKTROLYSEZELLE11189011890
30 O-RING FÜR DIE ABDECKUNG DER ELEKTROLYSEZELLE11189711897
Libble takes abuse of its services very seriously. We're committed to dealing with such abuse according to the laws in your country of residence. When you submit a report, we'll investigate it and take the appropriate action. We'll get back to you only if we require additional details or have more information to share.
Product:
Forumrules
To achieve meaningful questions, we apply the following rules:
First, read the manual;
Check if your question has been asked previously;
Try to ask your question as clearly as possible;
Did you already try to solve the problem? Please mention this;
Is your problem solved by a visitor then let him/her know in this forum;
To give a response to a question or answer, do not use this form but click on the button 'reply to this question';
Your question will be posted here and emailed to our subscribers. Therefore, avoid filling in personal details.
Register
Register getting emails for Intex PureSpa SJB-HS-20 at:
new questions and answers
new manuals
You will receive an email to register for one or both of the options.
Get your user manual by e-mail
Enter your email address to receive the manual of Intex PureSpa SJB-HS-20 in the language / languages: German as an attachment in your email.
The manual is 2,02 mb in size.
You will receive the manual in your email within minutes. If you have not received an email, then probably have entered the wrong email address or your mailbox is too full. In addition, it may be that your ISP may have a maximum size for emails to receive.
If you have not received an email with the manual within fifteen minutes, it may be that you have a entered a wrong email address or that your ISP has set a maximum size to receive email that is smaller than the size of the manual.
The email address you have provided is not correct.
Please check the email address and correct it.
Your question is posted on this page
Would you like to receive an email when new answers and questions are posted? Please enter your email address.