! This instruction manual should be kept in a safe
place for future reference. If the washing machine
is sold, transferred or moved, make sure that the
instruction manual remains with the machine so
that the new owner is able to familiarise himself/
herself with its operation and features.
! Read these instructions carefully: they contain
vital information relating to the safe installation
and operation of the appliance.
Unpacking and levelling
Unpacking
1. Remove the washing machine from its packaging.
2. Make sure that the washing machine has
not been damaged during the transportation
process. If it has been damaged, contact the
retailer and do not proceed any further with the
installation process.
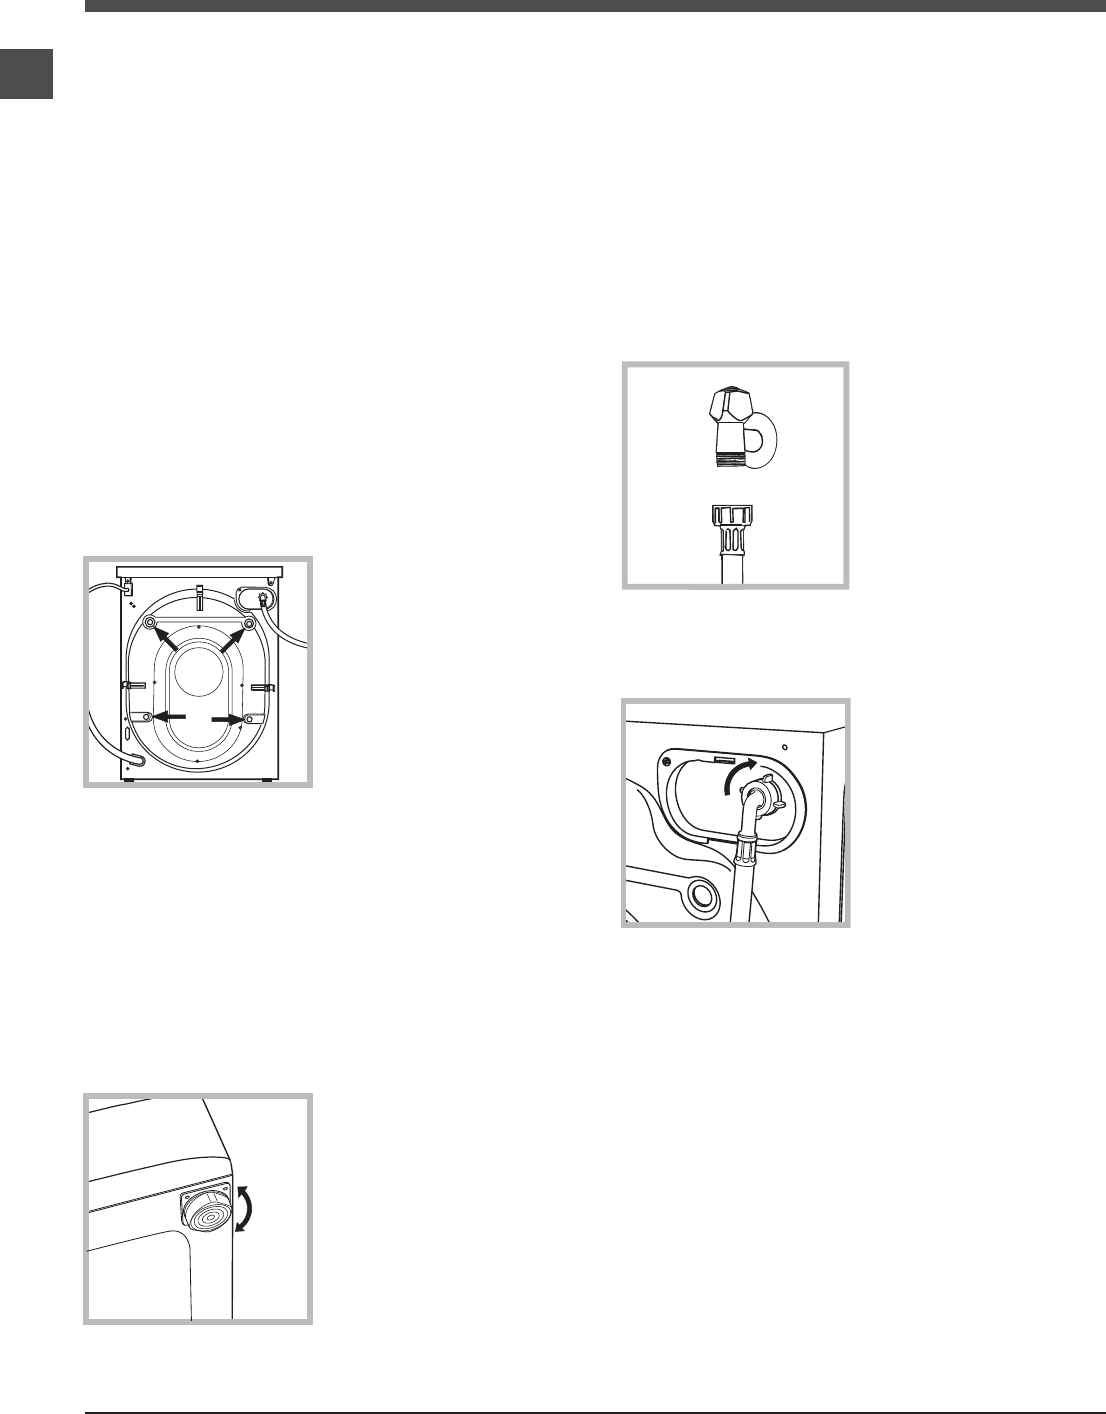
3.Removethe4
protective screws (used
during transportation)
and the rubber washer
with the corresponding
spacer, located on
the rear part of the
appliance (see figure).
4. Close off the holes using the plastic plugs
provided.
5. Keep all the parts in a safe place: you will need
them again if the washing machine needs to be
moved to another location.
!Packaging materials should not be used as
toys for children.
Levelling
1. Install the washing machine on a flat sturdy
floor, without resting it up against walls, furniture
cabinets or anything else.
2. If the floor is not
perfectlylevel,
compensatefor
any unevenness by
tightening or loosening
the adjustable front
feet (see figure); the
angle of inclination,
measured in relation
to the worktop, must
not exceed 2°.
Levelling the machine correctly will provide
it with stability, help to avoid vibrations and
excessive noise and prevent it from shifting
while it is operating. If it is placed on carpet or
a rug, adjust the feet in such a way as to allow
a sufficient ventilation space underneath the
washing machine.
Connecting the electricity and
water supplies
Connecting the water inlet hose
1. Connect the supply
pipe by screwing it
to a cold water tap
using a ¾ gas threaded
connection (see figure).
Before performing the
connection, allow the
water to run freely until
it is perfectly clear.
2.Connectthe
inlethosetothe
washing machine by
screwing it onto the
corresponding water
inlet of the appliance,
which is situated on
the top right-hand side
of the rear part of the
appliance (see figure).
3. Make sure that the hose is not folded over
or bent.
! The water pressure at the tap must fall within
the values indicated in the Technical details table
(see next page).
! If the inlet hose is not long enough, contact a
specialised shop or an authorised technician.
! Never use second-hand hoses.
! Use the ones supplied with the machine.
Installation
3
GB
Connecting the drain hose
Connect the drain
hose, without bending
it, to a drainage duct or
a wall drain located at a
height between 65 and
100 cm from the floor;
alternatively, rest it on
the side of a washbasin
or bathtub, fastening
the duct supplied to
the tap (see figure).
The free end of the
hose should not be
underwater.
! We advise against the use of hose extensions;
if it is absolutely necessary, the extension must
have the same diameter as the original hose and
must not exceed 150 cm in length.
Electrical connections
Before plugging the appliance into the electricity
socket, make sure that:
• the socket is earthed and complies with all
applicable laws;
• the socket is able to withstand the maximum
power load of the appliance as indicated in the
Technical data table (see opposite);
• the power supply voltage falls within the values
indicated in the Technical data table(see
opposite);
• the socket is compatible with the plug of
the washing machine. If this is not the case,
replace the socket or the plug.
!The washing machine must not be installed
outdoors, even in covered areas. It is extremely
dangerous to leave the appliance exposed to
rain, storms and other weather conditions.
! When the washing machine has been installed,
the electricity socket must be within easy reach.
! Do not use extension cords or multiple sockets.
! The cable should not be bent or compressed.
! The power supply cable must only be replaced
by authorised technicians.
Warning! The company shall not be held responsible
in the event that these regulations are not respected.
The first wash cycle
Once the appliance has been installed, and before
you use it for the first time, run a wash cycle
with detergent and no laundry, using the wash
cycle “Auto Clean” (see “Cleaning the washing
machine”).
65 - 100 cm
Technical data
Model
XWE 71451
Dimensions
width 59.5 cm
height 85 cm
depth 54 cm
Capacity
from 1 to 7 kg
Electrical
connections
please refer to the technical
data plate fixed to the ma-
chine
Water
connections
maximum pressure
1 MPa (10 bar)
minimum pressure
0.05 MPa (0.5 bar)
drum capacity 52 litres
Spin speed
up to 1400 rotations per minute
Test wash
cycles in
accordan-
ce with
directives
1061/2010
and
1015/2010
Programme 8:
Cotton Standard 60°.
Programme 9:
Cotton Standard 40°.
This appliance conforms to
the following EC Directives:
- 2004/108/EC (Electroma-
gnetic Compatibility)
- 2006/95/EC (Low Voltage)
- 2012/19/EU
4
GB
Care and maintenance
Cleaning the pump
The washing machine is fitted with a self-
cleaning pump which does not require any
maintenance. Sometimes, small items (such
as coins or buttons) may fall into the protective
pre-chamber at the base of the pump.
! Make sure the wash cycle has finished and
unplug the appliance.
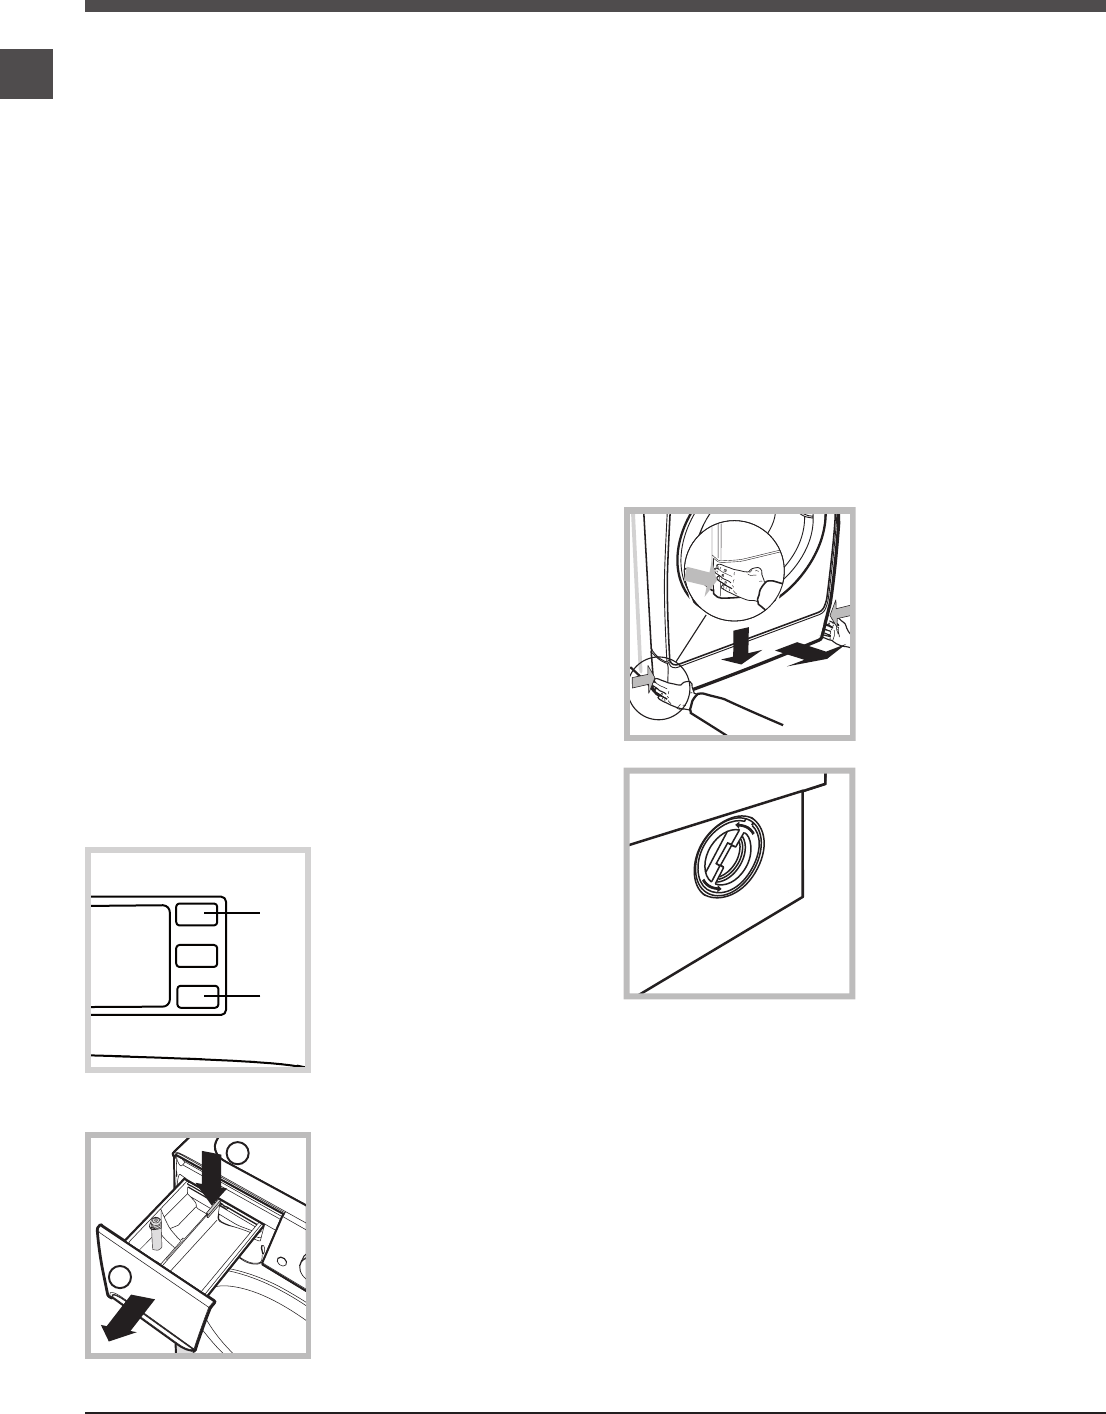
To access the pre-chamber:
1. Take off the cover
panel on the front
of the machine by
first pressing it in
the centre and then
pushing downwards
on both sides until
you can remove it
(see figures).
2. Unscrew the lid
by rotating it anti-
clockwise (seefigure):
a little water may
trickle out. This is
perfectly normal.
3. Clean the inside thoroughly.
4. Screw the lid back on.
5. Reposition the panel, making sure the hooks
are securely in place before you push it onto
the appliance.
Checking the water inlet hose
Check the inlet hose at least once a year. If
there are any cracks, it should be replaced
immediately: during the wash cycles, water
pressure is very strong and a cracked hose
could easily split open.
! Never use second-hand hoses.
Cutting off the water and electricity
supplies
• Turn off the water tap after every wash cycle.
This will limit wear on the hydraulic system inside
the washing machine and help to prevent leaks.
• Unplug the washing machine when cleaning it
and during all maintenance work.
Cleaning the washing machine
• The outer parts and rubber components
of the appliance can be cleaned using a soft
cloth soaked in lukewarm soapy water. Do not
use solvents or abrasives.
• The washing machine has a “Auto Clean”
programme for its internal parts that must be
run with no load in the drum.
For maximum performance you may want
to use either the detergent (i.e. a quantity
10% the quantity specified for lightly-soiled
garments) or special additives to clean the
washing machine. We recommend running a
cleaning programme every 40 wash cycles.
To start the programme press buttons A and
B simultaneously for 5 seconds (see figure).
The programme will start automatically and
will last approximately 70 minutes. To stop the
cycle press the START/PAUSE button.
Cleaning the detergent dispenser
drawer
To remove the drawer,
press lever (1) and pull
the drawer outwards
(2) (see figure).
Wash it under running
water; this procedure
should be repeated
frequently.
Caring for the door and drum of your
appliance
• Always leave the porthole door ajar in order to
prevent unpleasant odours from forming.
2
1
1
2
3
A
B
5
GB
Precautions and tips
! This washing machine was designed and constructed
in accordance with international safety regulations. The
following information is provided for safety reasons and
must therefore be read carefully.
General safety
• This appliance was designed for domestic use only.
• This appliance can be used by children
aged from 8 years and above and
persons with reduced physical, sensory or
mental capabilities or lack of experience
and knowledge if they have been given
supervision or instruction concerning use of
the appliance in a safe way and understand
the hazards involved. Children shall not
play with the appliance. Cleaning and user
maintenance shall not be made by children
without supervision.
• The washing machine must only be used by adults, in
accordance with the instructions provided in this manual.
• Do not touch the machine when barefoot or with wet or
damp hands or feet.
• Do not pull on the power supply cable when unplugging
the appliance from the electricity socket. Hold the plug
and pull.
• Do not open the detergent dispenser drawer while the
machine is in operation.
• Do not touch the drained water as it may reach
extremely high temperatures.
• Never force the porthole door. This could damage the
safety lock mechanism designed to prevent accidental
opening.
• If the appliance breaks down, do not under any
circumstances access the internal mechanisms in an
attempt to repair it yourself.
• Always keep children well away from the appliance while
it is operating.
• The door can become quite hot during the wash cycle.
• If the appliance has to be moved, work in a group of two
or three people and handle it with the utmost care. Never
try to do this alone, because the appliance is very heavy.
• Before loading laundry into the washing machine, make
sure the drum is empty.
Disposal
• Disposing of the packaging materials: observe local
regulations so that the packaging may be re-used.
• The European Directive 2012/19/EU on Waste
Electrical and Electronic Equipment, requires that
old household electrical appliances must not be
disposed of in the normal unsorted municipal waste
stream. Old appliances must be collected
separately in order to optimise the recovery and
recycling of the materials they contain and reduce
the impact on human health and the environment.
The crossed out “wheeled bin” symbol on the
product reminds you of your obligation, that when
you dispose of the appliance it must be separately
collected.
Consumers should contact their local authority or
retailer for information concerning the correct
disposal of their old appliance.
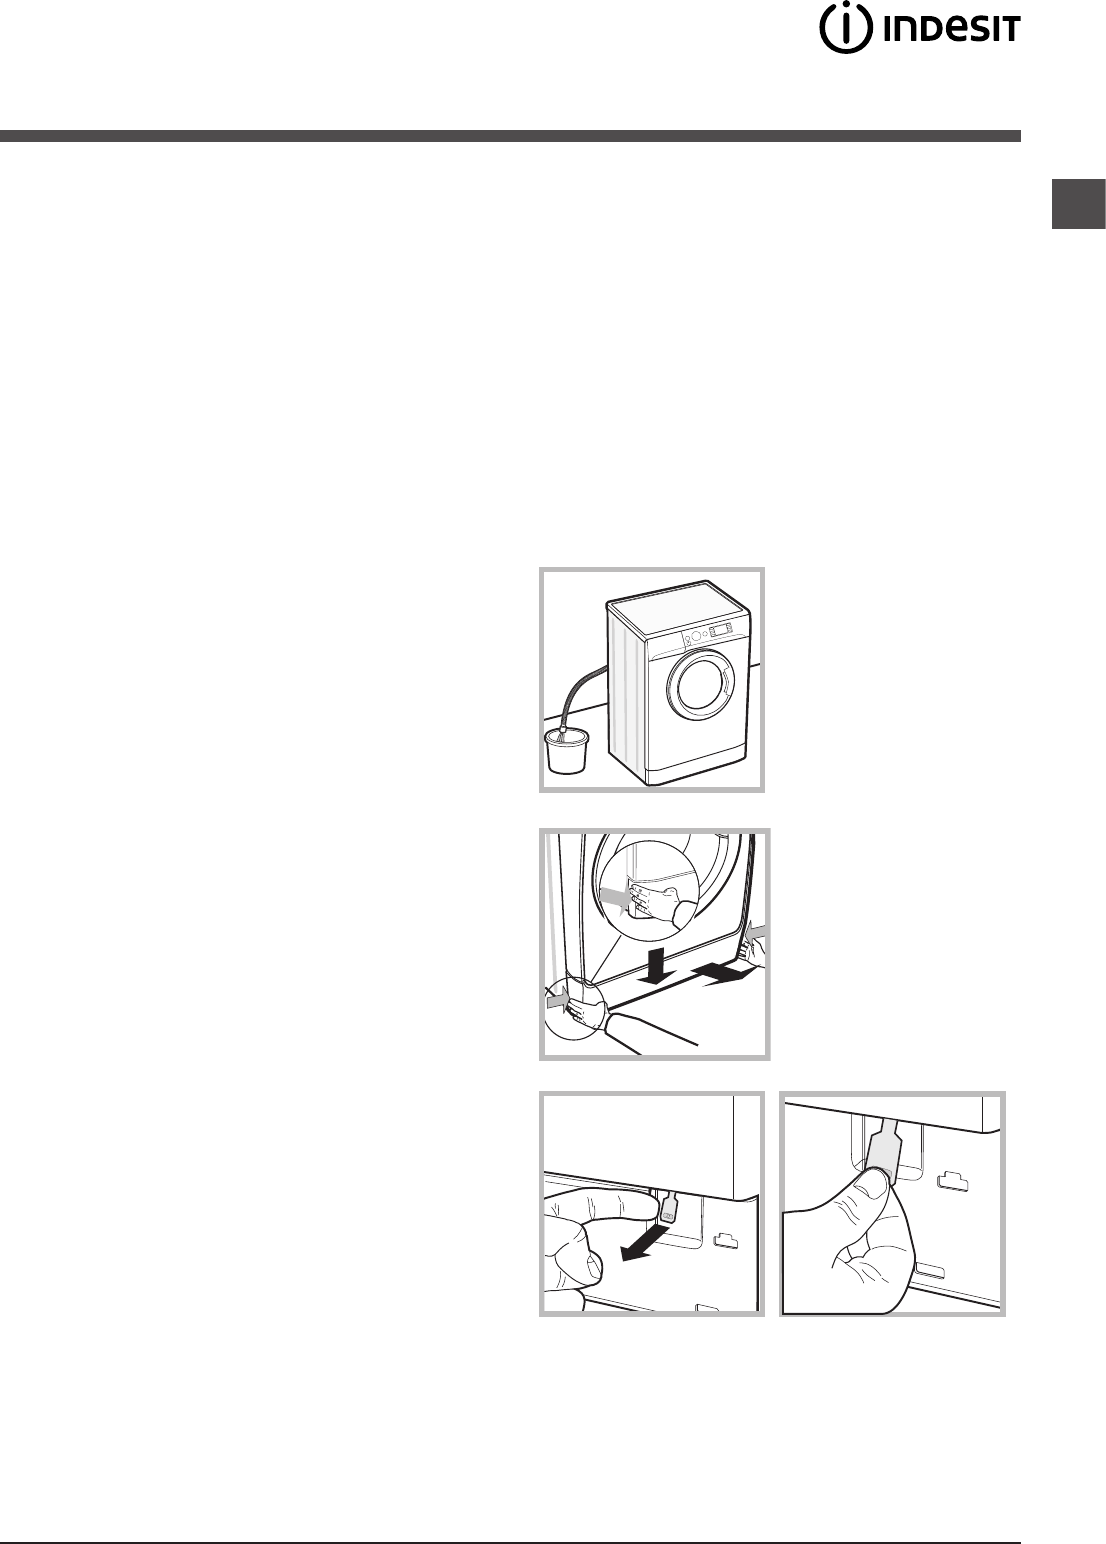
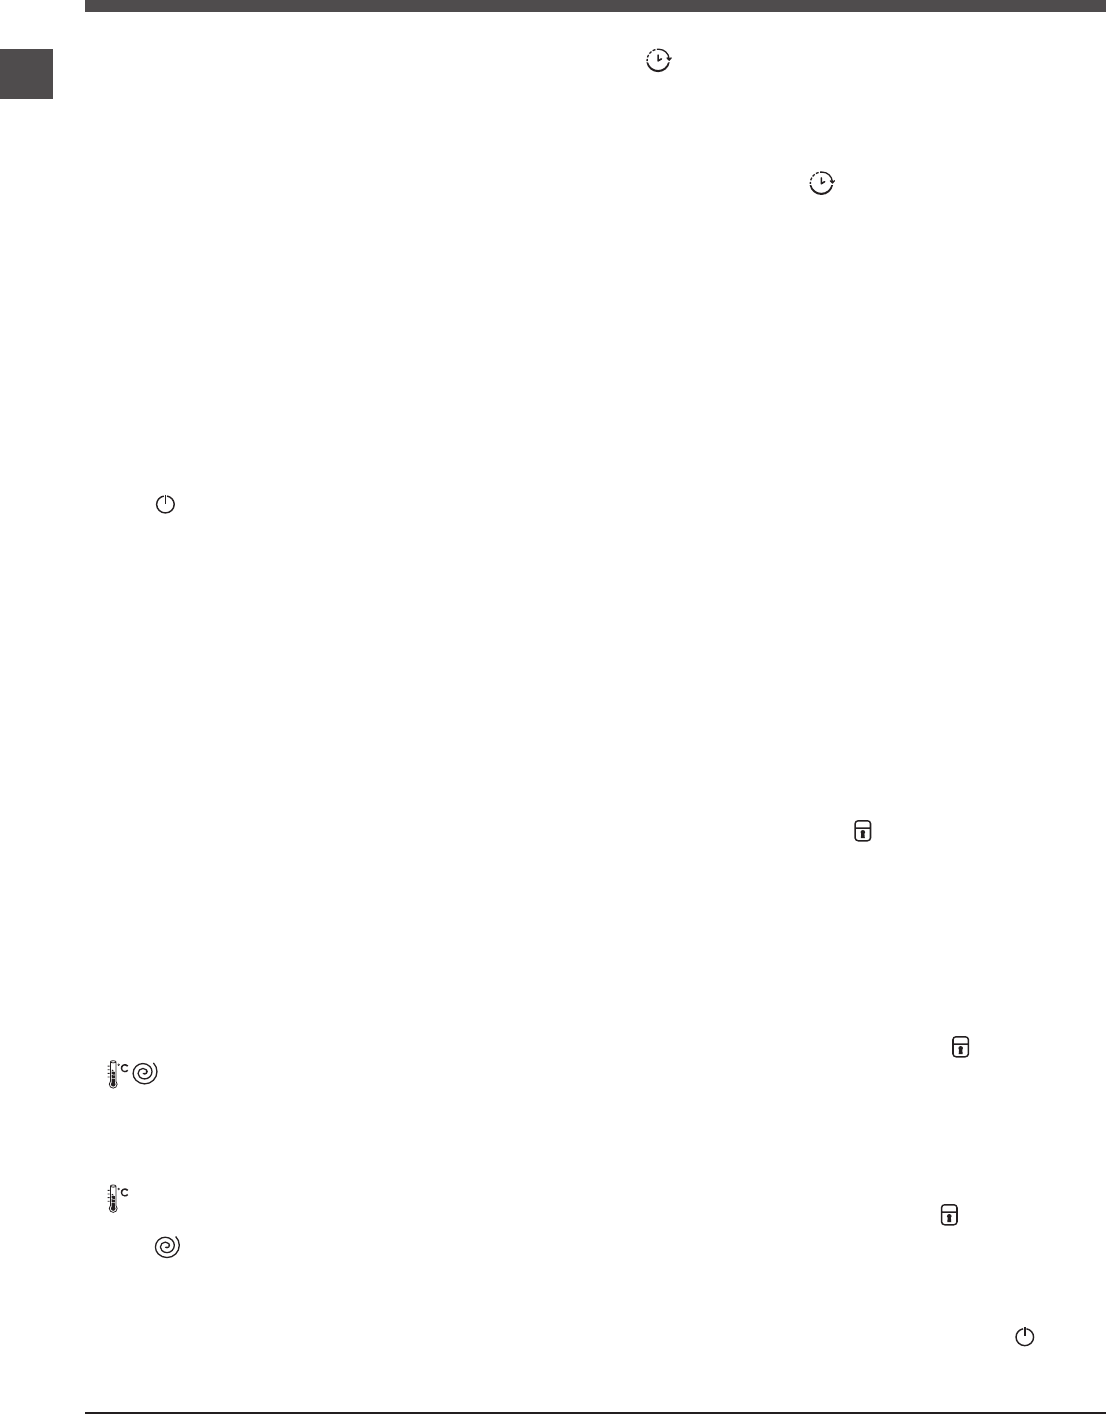
Opening the porthole door manually
In the event that it is not possible to open the porthole
door due to a powercut, and if you wish to remove the
laundry, proceed as follows:
1. remove the plug from the
electrical socket.
2. make sure the water level
inside the machine is lower
than the door opening; if
it is not, remove excess
water using the drain hose,
collecting it in a bucket as
indicated in the figure.
3. remove the cover panel
on the lower front part of
the washing machine (see
figure).
4. pull outwards using the tab as indicated in the figure,
until the plastic tie-rod is freed from its stop position; pull
downwards and open the door at the same time.
5. reposition the panel, making sure the hooks are securely
in place before you push it onto the appliance.
20
1
2
3
6
GB
Description of the washing
machine
Control panel
TEMPERATURE
button
WASH
CYCLE
SELECTOR
KNOB
Detergent dispenser drawer
ON/OFF
button
SPIN
button
START/PAUSE
button
and indicator light
DELAYED
START
button
OPTION
buttons
Detergent dispenser drawer: used to dispense
detergents and washing additives (see “Detergents and
laundry”).
ON/OFF button: press this briefly to switch the
machine on or off. The START/PAUSE indicator light which
flashes slowly in a green colour shows that the machine is
switched on. To switch off the washing machine during the
wash cycle, press and hold the button for approximately 3
seconds; if the button is pressed briefly or accidentally the
machine will not switch off.
If the machine is switched off during a wash cycle, this
wash cycle will be cancelled.
PUSH & WASH button:(see “Wash cycles and options”).
WASH CYCLE SELECTOR KNOB: used to set the
desired wash cycle (see “Table of wash cycles”).
OPTIONbuttons:press to select the available options.
The indicator light corresponding to the selected option will
remain lit.
TEMPERATURE button: press to reduce or
completely exclude the temperature; the value appears on
the display.
SPIN button: press to reduce or completely exclude
the spin cycle; the value appears on the display.
DELAYED START button: press to set a delayed
start for the selected wash cycle; the delay period appears
on the display.
START/PAUSE button and indicator light: when the
green indicator light flashes slowly, press the button to
start a wash cycle. Once the cycle has begun the indicator
light will remain lit in a fixed manner. To pause the wash
cycle, press the button again; the indicator light will flash
in an amber colour. If the symbol is not illuminated, the
door may be opened. To start the wash cycle from the
point at which it was interrupted, press the button again.
Standby mode
This washing machine, in compliance with new energy
saving regulations, is fitted with an automatic standby
system which is enabled after about 30 minutes if no
activity is detected. Press the ON-OFF button briefly and
wait for the machine to start up again.
Consumption in off-mode: 0,5 W
Consumption in Left-on: 8 W
DISPLAY
PUSH & WASH
button
7
GB
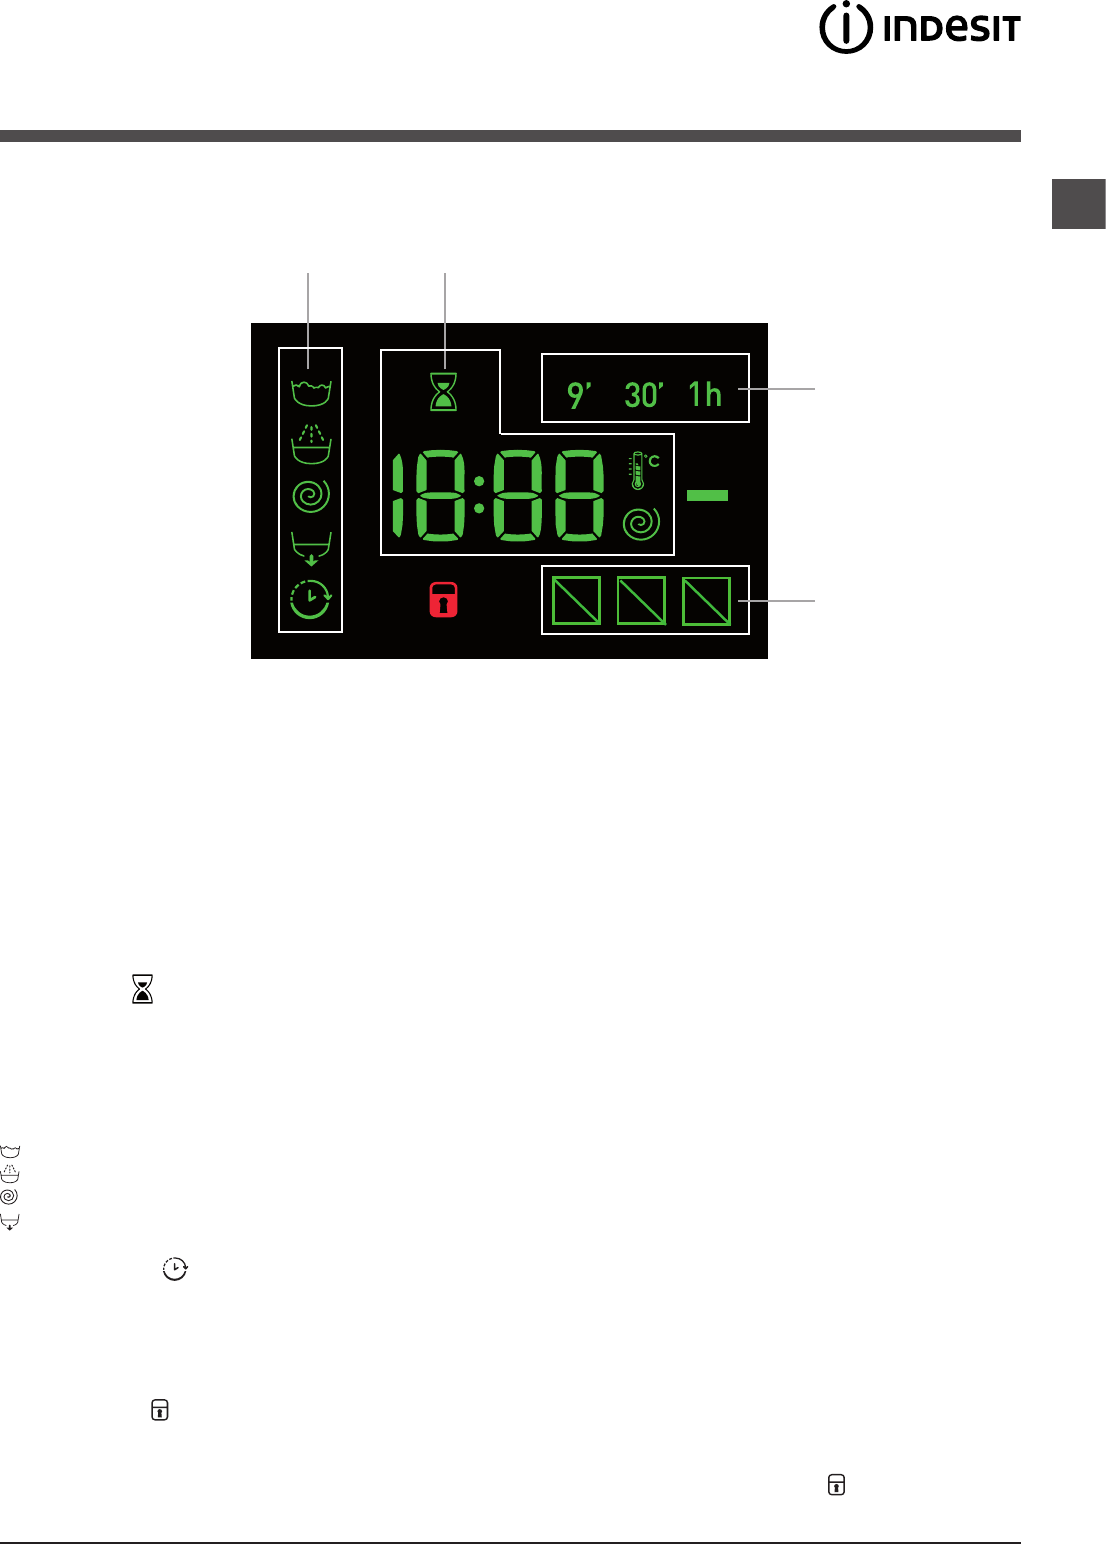
The display is useful when programming the machine and provides a great deal of information.
The duration of the available wash cycles and the remaining time of a running cycle appear in section A; if the DELAYED
START option has been set, the countdown to the start of the selected wash cycle will appear.
Pressing the corresponding button allows you to view the maximum spin speed and temperature values attained by the
machine during the set wash cycle, or the values selected most recently, if these are compatible with the set wash cycle.
The hour-glass flashes while the machine processes the data on the basis of the selected programme. After a maximum of
10 minutes, the icon remains lit in a fixed manner and the final amount of time remaining is displayed. The hour-glass icon
will then switch off approximately 1 minute after the final amount of time remaining has appeared.
The “wash cycle phases” corresponding to the selected wash cycle and the “wash cycle phase” of the running wash cycle
appear in section B:
Main wash
Rinse
Spin
Drain
The “delay” symbol, when lit, indicates that the set “delayed start” value has appeared on the display.
There are three levels in section C concerning the washing options.
DOOR LOCKED indicator light:
The lit symbol indicates that the door is locked. To prevent any damage, wait until the symbol turns off before opening the
door.
To open the door while a cycle is in progress, press the START/PAUSE button; if the DOOR LOCKED symbol is switched
off the door may be opened.
Display
B
C
A
C
8
GB
Running a wash cycle
Rapid programming
1. LOAD THE LAUNDRY. Open the porthole door.
Load the laundry, making sure you do not exceed
the maximum load value indicated in the table of
programmes and wash cycles on the following page.
2. ADD THE DETERGENT. Pull out the detergent
dispenser drawer and pour the detergent into the
relevant compartments as described in “Detergents and
laundry”.
3. CLOSE THE DOOR.
4. Press the “PUSH & WASH” button to start the wash
programme.
Traditional programming
1. SWITCH THE MACHINE ON. Press the button;
the START/PAUSE indicator light will flash slowly in a
green colour.
2. LOAD THE LAUNDRY. Open the porthole door.
Load the laundry, making sure you do not exceed
the maximum load value indicated in the table of
programmes and wash cycles on the following page.
3. ADD THE DETERGENT. Pull out the detergent
dispenser drawer and pour the detergent into the relevant
compartments as described in “Detergents and laundry”.
4. CLOSE THE DOOR.
5. SELECT THE WASH CYCLE. Use the WASH CYCLE
SELECTOR knob to select the desired wash cycle. A
temperature and spin speed is set for each wash cycle;
these values may be adjusted. The duration of the cycle
will appear on the display.
6. CUSTOMISE THE WASH CYCLE. Use the relevant
buttons:
Modify the temperature and/or spin
speed. The machine automatically displays the
maximum temperature and spin speed values set for
the selected cycle, or the most recently-used settings
if they are compatible with the selected cycle. The
temperature can be decreased by pressing the
button, until the cold wash “OFF” setting is reached.
The spin speed may be progressively reduced by
pressing the button, until it is completely excluded
(the “OFF” setting). If these buttons are pressed again,
the maximum values are restored.
!Exception: if the 8 programme is selected, the
temperature can be increased up to a value of 90°C.
Setting a delayed start.
To set a delayed start for the selected cycle, press the
corresponding button repeatedly until the required delay
period has been reached. When this option has been
activated, the symbol lights up on the display. To
remove the delayed start setting, press the button until
the text “OFF” appears on the display.
Modify the cycle settings.
• Press the button to enable the option; the indicator
light corresponding to the button will switch on.
• Press the button again to disable the option; the
indicator light will switch off.
! If the selected option is not compatible with the set
wash cycle, the indicator light will flash and the option
will not be activated.
! If the selected option is not compatible with another
previously selected option, the indicator light will
flash accompanied by a buzzer (3 beeps), and only
the latter option will be activated; the indicator light
corresponding to the activated option will turn on.
! The options may affect the recommended load value
and/or the duration of the cycle.
7. START THE WASH CYCLE. Press the START/
PAUSE button. The corresponding indicator light will
turn green, remaining lit in a fixed manner, and the door
will be locked (the DOOR LOCKED symbol will be lit).
To change a wash cycle while it is in progress, pause
the washing machine using the START/PAUSE button
(the START/PAUSE indicator light will flash slowly in an
amber colour); then select the desired cycle and press
the START/PAUSE button again.
To open the door while a cycle is in progress, press
the START/PAUSE button; if the DOOR LOCKED
symbol is switched off the door may be opened. Press
the START/PAUSE button again to restart the wash
cycle from the point at which it was interrupted.
8. THE END OF THE WASH CYCLE. This will be
indicated by the text “END” on the display; when the
DOOR LOCKED symbol switches off the door may
be opened. Open the door, unload the laundry and
switch off the machine.
! If you wish to cancel a cycle which has already begun,
press and hold the button. The cycle will be stopped
and the machine will switch off.
9
GB
Wash cycles and options
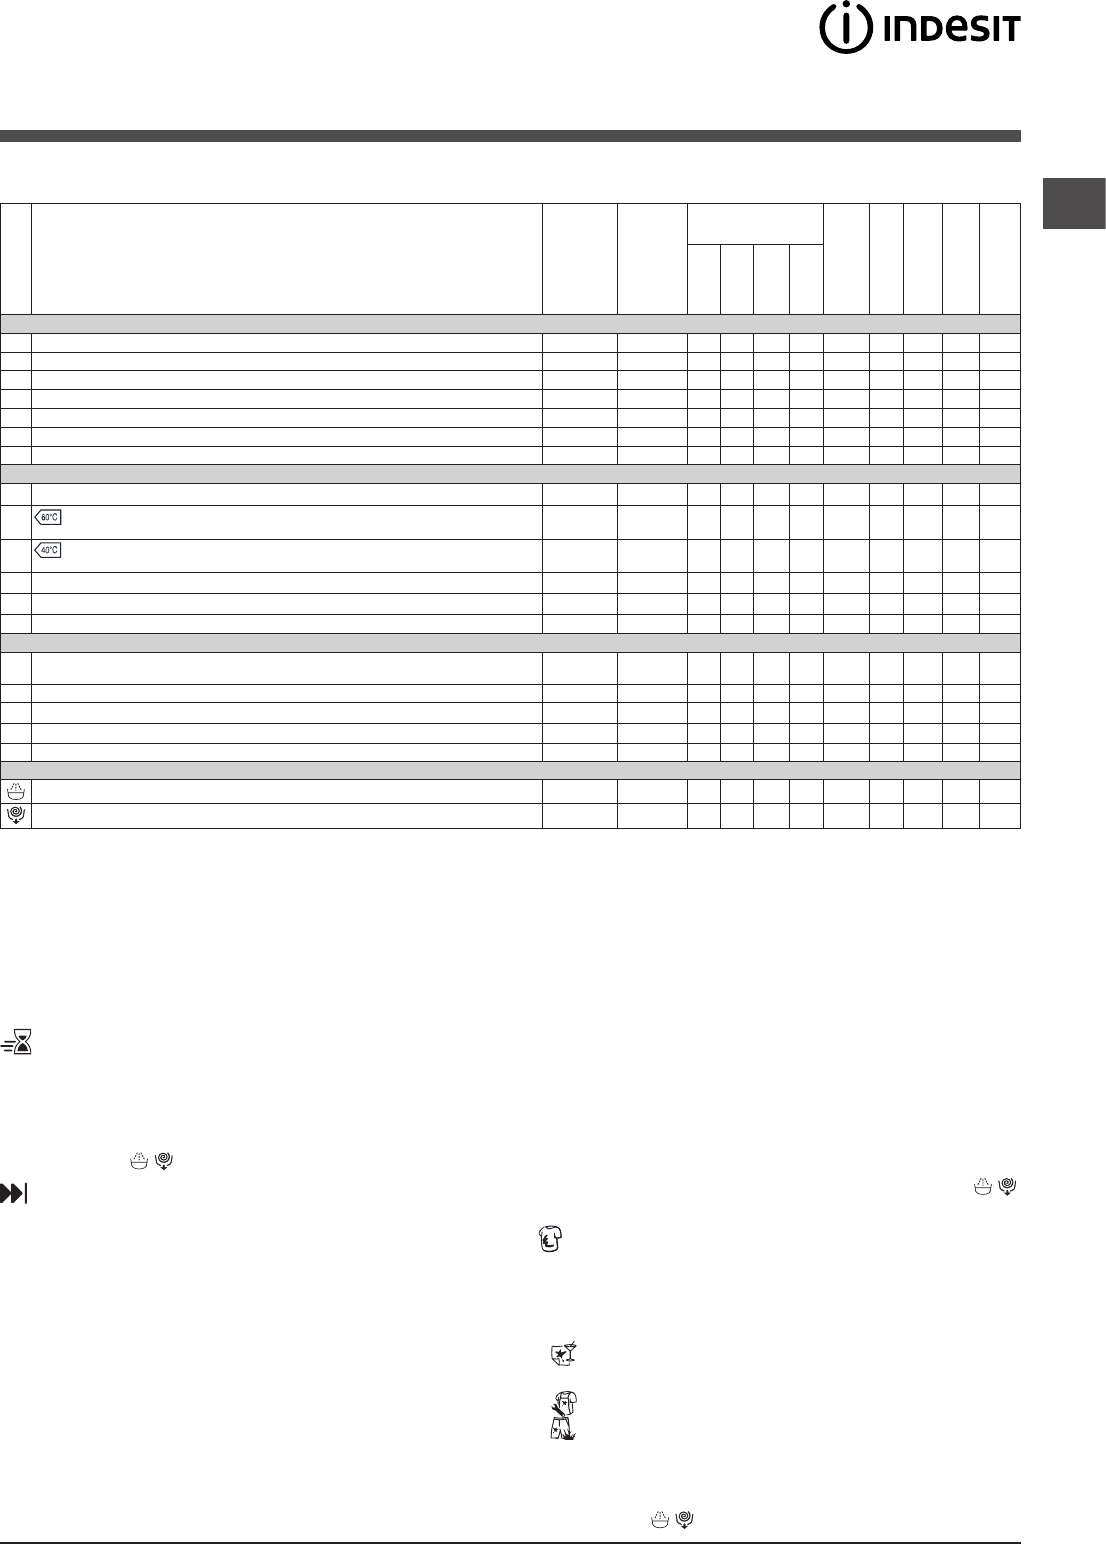
Table of wash cycles
The length of cycle shown on the display or in this booklet is an estimation only and is calculated assuming standard working conditions. The actual duration can vary accor-
ding to factors such as water temperature and pressure, the amount of detergent used, the amount and type of load inserted, load balancing and any wash options selected.
1) Test wash cycle in compliance with directive 1061/2010: set wash cycle 8 with a temperature of 60°C.
This cycle is designed for cotton loads with a normal soil level and is the most efficient in terms of both electricity and water consumption; it should
be used for garments which can be washed at 60°C. The actual washing temperature may differ from the indicated value.
2) Test wash cycle in compliance with directive 1061/2010: set wash cycle 9 with a temperature of 40°C.
This cycle is designed for cotton loads with a normal soil level and is the most efficient in terms of both electricity and water consumption; it should
be used for garments which can be washed at 40°C. The actual washing temperature may differ from the indicated value.
For all Test Institutes:
2) Long wash cycle for cottons: set wash cycle 9 with a temperature of 40°C.
3) Synthetic program along: set wash cycle 10 with a temperature of 40°C.
Wash cycles
Description of the wash cycle
Max.
temp.
(°C)
Max.
speed
(rpm)
Detergents
Max. load (kg)
Residual
dampness %
Energy
consumption
kWh
Total water lt
Cycle duration
Prewash
Wash
Fabric
softener
Bleach
Special
1
Sport
30°600-
-3,5---55’
2
Dark
30°800-
-4---70’
3
Anti-odour (Cotton)60°1000-
-3,5---110’
3
Anti-odour (Synthetic)40°1000-
-3,5---100’
4
Delicate
30°0-
-1---80’
5
Wool: for wool, cashmere, etc.40° 800-
-1,5---70’
6
Duvet: for down-stuffed garments.30°1000-
-2---110’
Standard
7
Cottons with Pre-wash: extremely soiled whites.90°1400
-7532,1577170’
8
Cotton Standard 60° (1): heavily soiled whites and resistant colours.
60°
(Max. 90°)
1400-
-7531,1352,5180’
9
Cotton Standard 40° (2): lightly soiled whites and delicate colours.
Cotton Standard 20°: lightly soiled whites and delicate colours.20°1400-
-7---170’
13
Eco Synthetic
20°800-
-7---120’
14
Rapid
-800--
-1,5---9’
14
Rapid
30°800-
-3800,223430’
14
Rapid
60°1000-
-7---60’
Partials
Rinse/Bleach-1400--
7---50’
Spin + Drain-1400----7---25’
Wash options
Rapid
When this button is pressed the first time, the 9’ icon will
light up, when pressed the second time the 30’ icon lights
up and the third time the 1h icon lights up. When pressed
the fourth time the 9’ icon lights up again.
! It cannot be used in conjunction with wash cycles 1-2-3-
4-5-6-7-8-9-10-11-12-13--.
Fast Forward
During a wash programme and under certain conditions,
pressing this button allows for ending the wash
programme after only 20’ if necessary, by performing a
brief rinse cycle followed by a spin cycle at maximum 800
rpm or lower, if reduced manually during the programme
customisation phase. In this case, washing and rinsing
performance will be reduced. After pressing the button, the
relative indicator light turns on together with the indicator
light of the rinse phase. If the selected temperature is
equal to 40° and/or the button is pressed during the initial
phase of the programme, the “Fast Forward” option lasts
longer so that the detergent can dissolve properly and
avoid damaging the fabrics. In this case, the rinse phase
indicator light flashes while the wash indicator light remains
fixed until the necessary activation conditions are fulfilled.
If less than 20’ remain of the wash programme, the option
will be disabled.
! It cannot be used in conjunction with wash cycles 2-4-5-
6-14--.
Stain removal
This option allows for selecting the type of dirt so as to
optimally adjust the cycle for removing the stains. The
following types of dirt can be selected:
- Food, for stains caused by foodstuffs and beverages,
for example.
- Work, for grease and ink stains, for example.
- Outdoor, for mud and grass stains, for example.
! The wash cycle duration varies according to the type of
selected dirt.
! It cannot be used in conjunction with wash cycles 1-2-3-
4-5-6-7-11-12-13-14--.
10
GB
Push & Wash
This function allows for starting a wash cycle even when the machine is switched off without having to press the ON/OFF
button in advance, or after switching on the machine, without having activated any button and/or selector (otherwise, the
Push & Wash function will be deactivated). To start the Push & Wash cycle press and hold the relative button for 2 seconds.
The lit indicator light indicates that the cycle has started. This wash cycle is ideal for cotton or synthetic fabrics, as it washes
at a temperature of 30° and a maximum spin speed of 1200 rpm. Maximum load 3,5 kg. (Cycle duration 50’).
How does it work?
1. Load the laundry (cotton and/or synthetic garments) and close the door.
2. Pour the detergent and additives.
3. Start the programme by pressing and holding the Push & Wash button for 2 seconds. The relative indicator light turns
green and the door will lock (the DOOR LOCKED symbol turns on).
N.B.: starting the wash cycle through the Push & Wash button activates an automatic non-customisable cycle
recommended for cotton and synthetic fabrics. This programme does not allow for setting any additional options.
To open the door while an automatic cycle is under way, press the START/PAUSE button; if the DOOR LOCKED symbol
is switched off the door may be opened. Press the START/PAUSE button again to restart the wash cycle from the point at
which it was interrupted.
4. Once the programme is finished, the END indicator light turns on.
11
GB
Detergents and laundry
Detergent dispenser drawer
Successful washing results also depend on the correct
dose of detergent: adding too much detergent will not
necessarily result in a more efficient wash, and may in
fact cause build up on the inside of your appliance and
contribute to environmental pollution.
! Do not use hand washing detergents because these
create too much foam.
! Use powder detergent for white cotton garments, for pre-
washing, and for washing at temperatures over 60°C.
! Follow the instructions given on the detergent packaging.
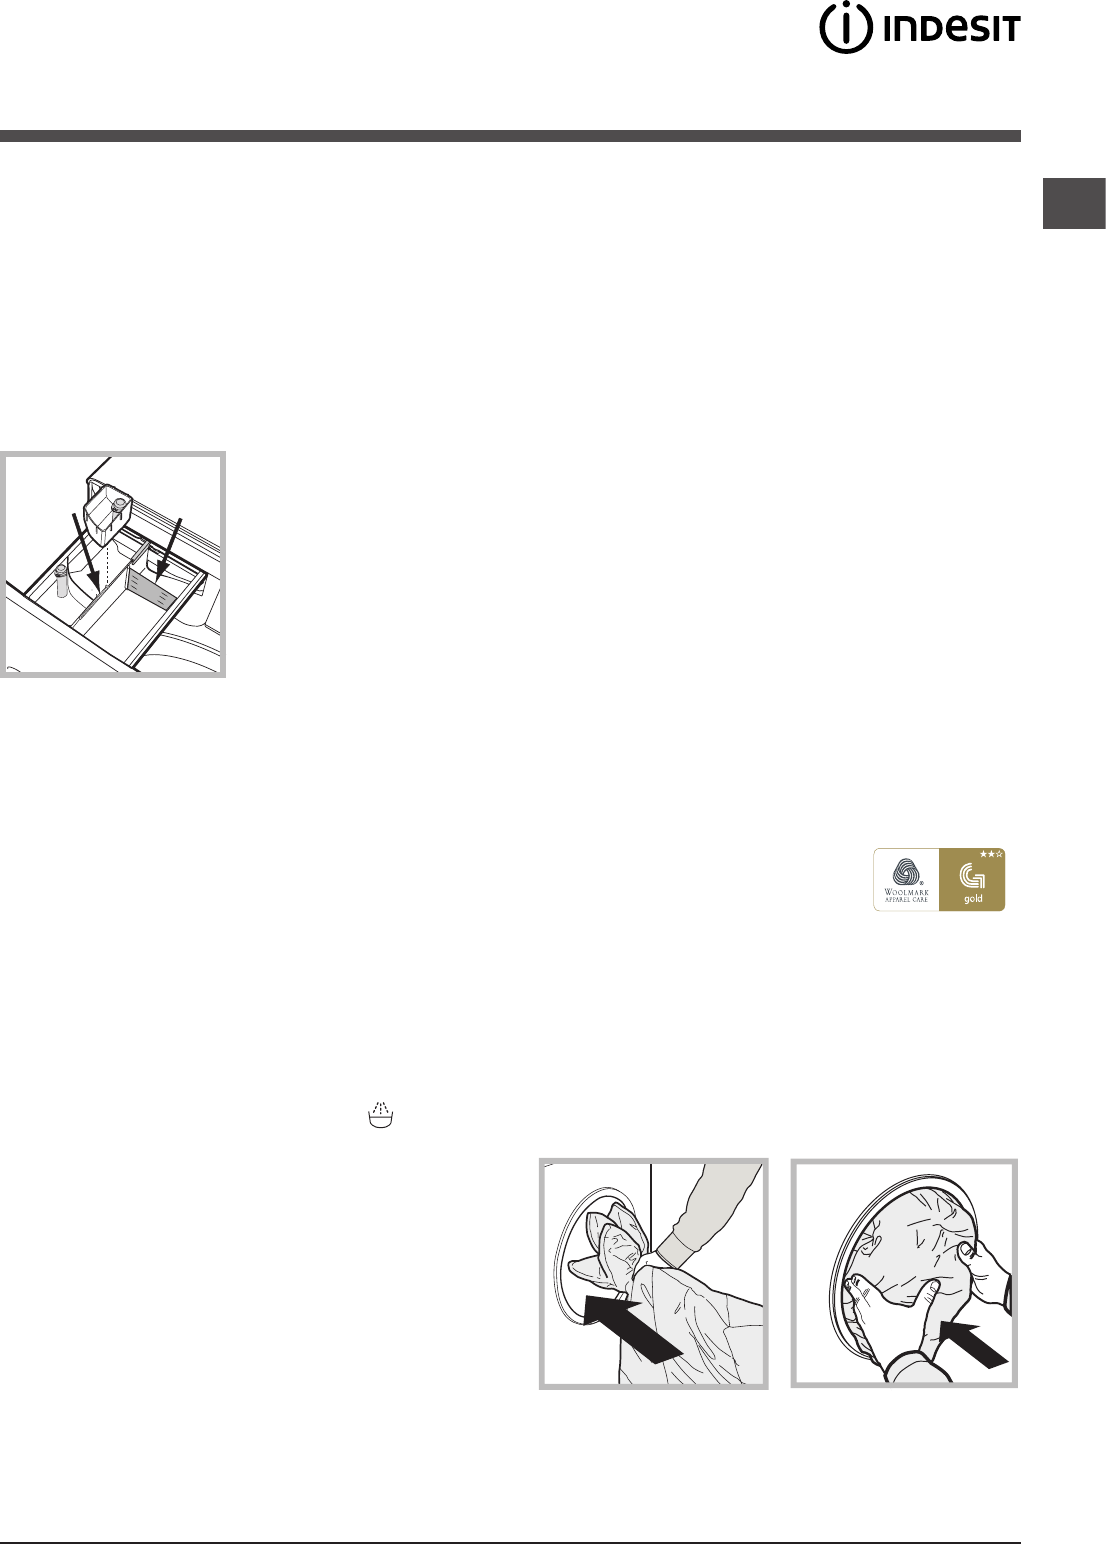
Open the detergent
dispenser drawer and pour
in the detergent or washing
additive, as follows.
Compartment 1: Pre-wash detergent (powder)
Before pouring in the detergent, make sure that extra
compartment 4 has been removed.
Compartment 2: Washing detergent (powder or liquid)
If liquid detergent is used, it is recommended that the
removable plastic partition A (supplied) be used for proper
dosage. If powder detergent is used, place the partition
into slot B.
Compartment 3: Additives (fabric softeners, etc.)
The fabric softener must not exceed the “max” level indicated
on the central pin.
Extra compartment 4: Bleach
Bleach cycle
Insert the additional compartment 4 (provided) into
compartment 1. In pouring the bleach do not exceed the
“max” level indicated on the central pin.
Perform bleaching by pouring the bleach into additional
compartment 4 and set the programme .
! Traditional bleach should be used on resistant white
fabrics, and delicate bleach for coloured and synthetics
fabrics and for wool.
Preparing the laundry
• Divide the laundry according to:
- the type of fabric/the symbol on the label
- the colours: separate coloured garments from whites.
• Empty all garment pockets and check the buttons.
• Do not exceed the values listed in the“Table of wash
cycles”, which refer to the weight of the laundry when dry.
How much does your laundry weigh?
1 sheet 400-500 g
1 pillow case 150-200 g
1 tablecloth 400-500 g
1 bathrobe 900-1.200 g
1 towel 150-250 g
Special wash cycles
Sport (programme 1) is designed for washing lightly soiled
sports clothing (tracksuits, shorts, etc.); for best results, we
recommend not exceeding the maximum load indicated
in the “Table of wash cycles”. We recommend using liquid
detergent, and adding the amount suitable for a half-load.
Dark: use programme 2 to wash dark-coloured garments.
This programme is designed to maintain dark colours over
time. We recommend using a liquid detergent for the best
results when washing dark-coloured garments.
Anti-odour: use programme 3 for washing garments
with bad odours (e.g. smoke, sweat, fried food). The
programme is designed to remove bad odours while
preserving the fabric fibres. Synthetics fabrics or mixed
loads should be washed at 40°, and resistant cotton
fabrics at 60°.
Delicate: use programme 4 to wash very delicate
garments. It is advisable to turn the garments inside out
before washing them. For best results, use liquid detergent
on delicate garments.
Wool: the wool wash programme of this machine has
been tested and approved by The Woolmark Company
for the washing of wool containing garments labelled as
“hand wash” provided that the garments are washed
according to the instructions on the garment label and
those issued by the manufacturer of this washing machine.
(M1126)
In UK, Eire, Hong Kong and India the Woolmark trade mark
is a Certification trade mark.
Duvet: to wash single duvets (the weight of which should
not exceed 2 kg), cushions or clothes padded with
goose down such as puffa jackets, use the special wash
programme number 6. We recommend that duvets are
placed in the drum with their edges folded inwards (see
figure) and that no more than ¾ of the total volume of the
drum is used. To achieve the best results, we recommend
that a liquid detergent is used and placed inside the
detergent dispenser drawer.
Coloured: use this programme 11 to wash bright
coloured clothes. The programme is designed to maintain
bright colours over time.
1
2
3
4
A
B
12
GB
Cotton Standard 20° (programme 12) ideal for lightly
soiled cotton loads. The effective performance levels
achieved at cold temperatures, which are comparable to
washing at 40°, are guaranteed by a mechanical action
which operates at varying speed, with repeated and
frequent peaks.
Eco Synthetic (programme 13) ideal for mixed loads
(cotton and synthetics) with a normal soil level. The
effective performance levels achieved at cold temperatures
are guaranteed by a mechanical action which operates at
varying speed, across set average intervals.
Rapid (programme 14)allows for varying the garment
treatment duration from 9’ to 1h. Pressing the
corresponding “Rapid” button allows for varying the cycle
duration between 9’ (refresh), 30’ (wash), 1h (wash).
The 9’ cycle refreshes garments using fabric softener
only; it is advisable not to add any detergent into
the machine. The 30’ programme is designed to wash
lightly soiled garments at 30° (excluding wool and silk)
with a 3 kg maximum load in a short time: it only lasts 30
minutes and allows for saving time and energy. The “1h”
cycle is designed to wash moderately soiled resistant
cotton garments at 60° in an hour, with good washing
performance. For synthetic or mixed garments, we
recommend lowering the temperature down to 40°.
Load balancing system
Before every spin cycle, to avoid excessive vibrations
before every spin and to distribute the load in a uniform
manner, the drum rotates continuously at a speed which
is slightly greater than the washing rotation speed. If,
after several attempts, the load is not balanced correctly,
the machine spins at a reduced spin speed. If the load is
excessively unbalanced, the washing machine performs
the distribution process instead of spinning. To encourage
improved load distribution and balance, we recommend
small and large garments are mixed in the load.
13
GB
Troubleshooting
Your washing machine could occasionally fail to work. Before contacting the Technical Assistance Service (see “ Service”),
make sure that the problem cannot be solved easily using the following list.
Problem:
The washing machine does not
switch on.
The wash cycle does not start.
The washing machine does not fill
with water (the text “H2O” on the
display).
The washing machine
continuously takes in and drains
water.
The washing machine does not
drain or spin.
The washing machine vibrates a
lot during the spin cycle.
The washing machine leaks.
The “option” and START/PAUSE
indicator lights flash rapidly and an
error code appears on the display
(e.g.: F-01, F-..).
There is too much foam.
Push & Wash does not activate.
The programme lasts a lot less
that expected.
Possible causes / Solutions:
• The appliance is not plugged into the socket fully, or not enough to make contact.
• There is no power in the house.
• The washing machine door is not closed properly.
• The ON/OFF button has not been pressed.
• The START/PAUSE button has not been pressed.
• The water tap has not been opened.
• A delayed start has been set.
• The water inlet hose is not connected to the tap.
• The hose is bent.
• The water tap has not been opened.
• There is no water supply in the house.
• The pressure is too low.
• The START/PAUSE button has not been pressed.
• The drain hose is not fitted at a height between 65 and 100 cm from the floor
(see “Installation”).
• The free end of the hose is under water (see “Installation”).
• The wall drainage system is not fitted with a breather pipe.
If the problem persists even after these checks, turn off the water tap, switch the
appliance off and contact the Technical Assistance Service. If the dwelling is on one
of the upper floors of a building, there may be problems relating to water drainage,
causing the washing machine to fill with water and drain continuously. Special anti-
draining valves are available in shops and help to prevent this inconvenience.
• The wash cycle does not include draining: some cycles require the draining
process to be enabled manually.
• The drain hose is bent (see “Installation”).
• The drainage duct is clogged.
• The drum was not unlocked correctly during installation (see “Installation”).
• The washing machine is not level (see “Installation”).
• The washing machine is trapped between cabinets and walls (see “Installation”).
• The water inlet hose is not screwed on properly (see “Installation”).
• The detergent dispenser drawer is blocked (for cleaning instructions, see “Care
and maintenance”).
• The drain hose is not fixed properly (see “Installation”).
• Switch off the machine and unplug it, wait for approximately 1 minute and then
switch it back on again.
If the problem persists, contact the Technical Assistance Service.
• The detergent is not suitable for machine washing (it should display the text “for
washing machines” or “hand and machine wash”, or the like).
• Too much detergent was used.
• After switching on the machine a control other than Push & Wash was activated.
Switch the machine off and press the Push & Wash button.
• The “Fast Forward” option was activated.
14
GB
Service
Before contacting the Technical Assistance Service:
• Check whether you can solve the problem alone (see “Troubleshooting”).
• Restart the wash cycle to check whether the problem has been solved.
• If this is not the case, contact an authorised Technical Assistance Centre.
! Always request the assistance of authorised technicians.
Have the following information to hand:
• the type of problem;
• the appliance model (Mod.);
• the serial number (S/N).
This information can be found on the data plate applied to the rear of the washing machine, and can also be found on the
front of the appliance by opening the door.
15
UK
Українська
UK
ПРАЛЬНА МАШИНА
Зміст
Встановлення, 16-17
Розпакування й вирiвнювання
Підключення води й електроенергії
Перший цикл прання
Технiчнi данi
Технічне обслуговування та догляд, 18
Виключення води й електричного живлення
Очищення пральної машини
Очищення касети для пральних засобів
Догляд за люком та барабаном
Миття насосу
Контроль труби для подачі води
Запобіжні заходи та поради, 19
Загальна безпека
Утилiзацiя
Ручне відкривання дверцят люку
Опис пральної машини, 20-21
Панель команд
Дисплей
Як здійснювати цикл прання, 22
Програми й опції, 23-24
Таблиця програм
Опції прання
Push & Wash
Пральні засоби і білизна, 25-26
Касета з пральним засобом
Цикл вiдбiлювання
Підготовка білизни
Спецiальнi програми
Система балансування завантаження
Несправності та засоби їх усунення, 27
Допомога, 28
XWE 71451
Довiдник користувача
16
UK
Встановлення
! Необхідно зберігати дану брошуру, щоб мати
нагоду звернутися до неї у будь-який момент.
У випадку продажу, передачі іншій особі
або переїзду переконайтеся, що інструкція
перебуває разом із пральною машиною й новий
власник може ознайомитися з її принципами
роботи й відповідними запобіжними заходами.
! Уважно вивчіть інструкцію: в ній міститься
важлива інформація щодо встановлення,
використання та безпеки.
Розпакування та вирівнювання
Розпакування
1. Розпакування пральної машини
2. Вдоскональтеся, що машина не зазнала
ушкоджень пiд час транспортування. Якщо
вона має пошкодження, не виконуйте
нiяких пiдключень та негайно зверніться
до постачальника.
3. Видаліть
4 запобіжнi
гвинти для
транспортування
та прокладку
з відповідною
розпірною деталлю,
якi знаходяться
позаду (див.
малюнок).
4. Закрийте отвори пластиковими
заглушками з комплекту постачання.
5. Збережіть усі деталі: якщо пральна
машина має перевозитися, їх потрібно
встановити знову.
! Забороняйте дiтям гратися з упаковками.
Вирівнювання
1. Встановіть пральну машину на рiвній та
твердій підлозі, не притуляючи її до стін,
меблів, тощо.
2. Якщо пiдлога
не є iдеально
горизонтальною,
компенсуйте
нерiвностi за
допомогою
переднiх нiжок
(див. малюнок)
– розкручуючи
чи закручуючи
їх; кут нахилу
вiдносно робочої поверхнi не повинен
перевищувати 2°.
Належне вирiвнювання надає стабільність
машині та запобігає вібрації, шуму
та пересуванню під час роботи. При
встановленнi машини на килимовому
покритті або килимi відрегулюйте
ніжки таким чином, щоб залишити під
пральною машиною достатній простір для
вентиляції.
Підключення води й електроенергії
Пiд’єднання труби подачі води
1. Підключити
живлячий
трубопровід,
прикрутивши його
до крану холодної
води за допомогою
штуцеру з газовою
різьбою 3/4 (див.
малюнок).
Перед
пiдключенням
спустiть воду, доки вона не стане
прозорою.
2. Підключіть трубу
подачі води до
пральної машини,
прикрутивши її до
роз’єму для води,
який знаходиться
угорі праворуч
на задньому боцi
машини (див.
малюнок).
3. Зверніть увагу, щоб труба не мала
згинів та утисків.
! Тиск води в крані має відповідати
значенням у таблиці Технічних даних (див.
сторінку поруч).
! Якщо довжини труби подачi води не
вистачає, зверніться у спеціалізовану
крамницю або до уповноваженого
фахівця.
!Не використовуйте ніколи труби, що вже
були у користуванні.
!Використовуйте труби з комплекту
постачання до машини.
17
UK
65 - 100 cm
Підключення зливного шланга
Підключіть
зливний шланг, не
згинаючи його, до
каналізаційного
каналу або до входу
до такого каналу
на стіні, на відстані
від 65 до 100 см від
підлоги;
або покладіть
його на край
вмивальника або
ванни, поєднавши
направляючу,
яка входить
до комплекту
постачання,
до крану (див.
малюнок). Не
залишайте вільний
кінець зливного шланга зануреним у воду.
! Використання подовжувача шланга
не рекомендоване. В разi необхiдностi
використання подовжувача шлангу,
переконайтеся у тому, що він має той
самий діаметр та його довжина не
перевищує 150 см.
Електричні підключення
Перш нiж вставити вилку в електричну
розетку, переконайтеся, що:
• розетка має заземлення у відповідності
до встановлених норм;
• розетка розрахована на максимальне
навантаження у межах потужності
машини, зазначене у таблиці Технічних
даних (див. малюнок поруч);
• напруга живлення перебуває у межах,
зазначених у таблиці Технічних даних
(див. малюнок поруч);
• розетка підходить до вилки пральної
машини. В іншому випадку замініть
розетку або вилку.
! Машину не можна встановлювати поза
приміщенням, навіть в захищених мiсцях,
тому що дуже небезпечно піддавати її
впливу дощу і грози.
! Коли машину вже встановлено, забезпечте
вільний доступ до електричної розетки.
! Не використовуйте подовжувачі й трійники.
! Шнур живлення не повинен мати згинів
або утисків.
! Проводити замiну шнуру живлення
можуть тiльки вповноваженi фахiвцi.
Увага! Компанія знімає з себе
відповідальність за умови недотримання
вказаних норм.
Перший цикл прання
Пiсля встановлення та перш нiж розпочати
використання м ашини, виконайте
цикл прання з миючим засобом але не
завантажуючи бiлизну, встановивши
програму «Самоочищення» (див.
“Очищення пральної машини”).
Технiчнi данi
МодельXWE 71451
Розмiри
ширина 59,5 см
висота 85 см
глибина 54 см
Кiлькiсть
бiлизни
вiд 1 до 7 кг
Електричні
підключення
див. шильдік з технiчними
даними на машинi
Водопровднi
пiдключення
максимальний тиск
1 мПа (10 бар)
мiнiмальний тиск
0,05 мПа (0,5 бар)
об’єм баку – 52 лiтри
Швидкiсть
центрифуги
до 1400 обертiв на хвилину
Програми
контролю
згiдно з
нормою
1061/2010
1015/2010
програма 8;
Бiла бавовна 60°C.
програма 9;
Бiла бавовна 40°C.
Цей прилад вiдповiдає таким
європейським директивам:
- 2004/108/CE
(Електромагнітна
сумiснiсть)
- 2012/19/EU
- 2006/95/CE (Низька напруга)
18
UK
Технічне обслуговування
та догляд
A
B
Як відключити воду й електричне
живлення
• Закривайте водопровідний кран
після кожного прання. У такий спосіб
зменшується знос гідравлічної частини
машини й усувається небезпека витоку.
• Виймайте штепсель з розетки під
час миття машини та під час робіт з
технічного обслуговування.
Очищення пральної машини
• Зовнішня частина і гумові деталі можуть
бути вимиті ганчiркою, змоченою у мильному
розчину теплої води. Не використовуйте
розчинники або абразивнi засоби.
• Пральна машина оснащена програмою
«Самоочищення» внутрішніх частин,
яку слід запускати без будь-яких речей
всередині барабану.
Пральний засіб (його кількість має
складати 10% від рекомендованої для
злегка забруднених речей) або спеціальні
засоби для очищення пральної машини
можна використовувати як допоміжні
у программі прання. Рекомендується
виконувати програму очищення через
кожні 40 циклів прання. Для пуску
програми слід одночасно натиснути
на кнопки A і B впродовж 5 сек. (див.
малюнок). Програма запускається
автоматично і триває приблизно 70
хвилин. Для припинення циклу натиснiть
на кнопку START/PAUSE.
Очищення касети для пральних
засобiв
Щоб витягти касету,
натисніть на важіль
(1) і потягніть касету
назовні (2) ( див.
малюнок).
Промийте під
проточною водою;
ця процедура
має проводитися
регулярно.
Догляд за люком та барабаном
• Завжди залишайте люк напiввідкритим
для запобігання утворенню неприємних
запахів.
Миття насосу
Пральну машину обладнано насосом з
автоматичним очищенням, який не вимагає
технічного обслуговування. Може трапитися
так, що малі предмети (монети, ґудзики)
потраплять до форкамери, що захищає
насос, розташований у її нижній частині.
! Переконайтеся у тому, що цикл прання
закінчено і витягніть вилку з розетки.
Щоб потрапити до форкамери:
1. знiмiть захисну
панель з передньої
частини машини
шляхом натискання
у центрi, потiм
натиснiть униз
з обох бокiв та
витягнiть її (див.
малюнки).
2. відкрутіть кришку,
обертаючи її проти
годинникової
стрілки (див.
малюнок): виток
незначної кiлькостi
води є нормальним;
3. ретельно очистіть всерединi;
4. знову закрутіть кришку;
5. встановiть панель на місце,
пересвідчiться у тому, що крюки були
вставлені у спеціальні петлі, пiсля чого
притиснiть її до машини.
Перевiрка шланга для подачі
води
Перевіряйте шланг для подачі води не
менше одного разу на рік. Якщо на ньому
є тріщини, він підлягає заміні: під час
прання високий тиск може призвести до
розірвання.
!Не користуйтеся шлангами, якi були вже
у вживаннi.
2
1
1
2
3
20
UK
Опис пральної машини
Панель команд
Кнопка
ТЕМПЕРАТУРА
РУЧКА
ПРОГРАМ
Касета з пральним засобом
Кнопка ON/OFF
Кнопка
ВIДЖИМУ
Кнопка з iндикаторною
лампою START/PAUSE
ДИСПЛЕЙ
Кнопка
ВIДСТРОЧЕНИЙ
ПУСК
Кнопки ОПЦIЯ
Касета з пральним засобом: для завантаження
пральних засобiв та присадок (див. “Пральнi засоби
та бiлизна”).
Кнопка ON/OFF : швидко натисніть і відпустіть
кнопку для увiмкнення або вимкнення машини.
Iндикаторна лампа START/PAUSE блимає зеленим
свiтлом з повільними інтервалами, вказуючи на те,
що машину ввiмкнено. Для вимикання пральної
машини під час прання необхідно утримувати
кнопку натиснутою більше 3 сек.; короткочасне
або випадкове натискання не дозволить вимкнути
машину. Вимикання машини під час циклу прання
вiдмiнює це прання.
Кнопка PUSH & WASH:(див. “Програми й опції”).
РУЧКА ПРОГРАМ: для задання бажаної програми
(див. “Таблиця програм”).
Кнопки ОПЦIЯ: для вибору наявних опцій.
Iндикаторна лампаопцiї залишається увiмкненою.
Кнопка ТЕМПЕРАТУРИ: натискання викликає
зменшення або виключення температури взагалi;
значення вiдображується на дисплеї.
Кнопка ВIДЖИМУ: натискання викликає
зменшення або виключення вiджиму взагалi;
значення вiдображується на дисплеї.
Кнопка ВIДКЛАДЕНОГО ПРАННЯ: натискання
викликає вiдкладення пуску обраної програми;
значення затримки вiдображується на дисплеї.
Кнопка з iндикаторною лампою START/PAUSE : коли
зеленим індикаторна лампа блимає з повільними
інтервалами, натисніть на кнопку для запуску
прання. Якщо цикл розпочався, індикаторна лампа
горить постійно. Щоб призупинити прання (режим
паузи), знову натисніть на кнопку; індикаторна лампа
блиматиме янтарним кольором. Якщо iндикаторна
лампа не свiтиться, люк можна вiдкрити. Щоб
продовжити прання з місця, де воно було перерване,
знову натисніть на кнопку.
Режим очiкування
Вiдповiдно до норм, пов’язаних з заощадження
енергiї, цю пральну машину оснащено системою
автовимкнення (stand by), яка активується через
декiлька (30) секунд вiдсутностi роботи з боку
машини. Швидко натиснiть кнопку ON/OFF та
зачекайте вiдновлення роботи машини.
Споживання у вимкненому режимі: 0,5 W
Споживання в увімкненому режимі: 8 W
Кнопка
PUSH & WASH
21
UK
Дисплей
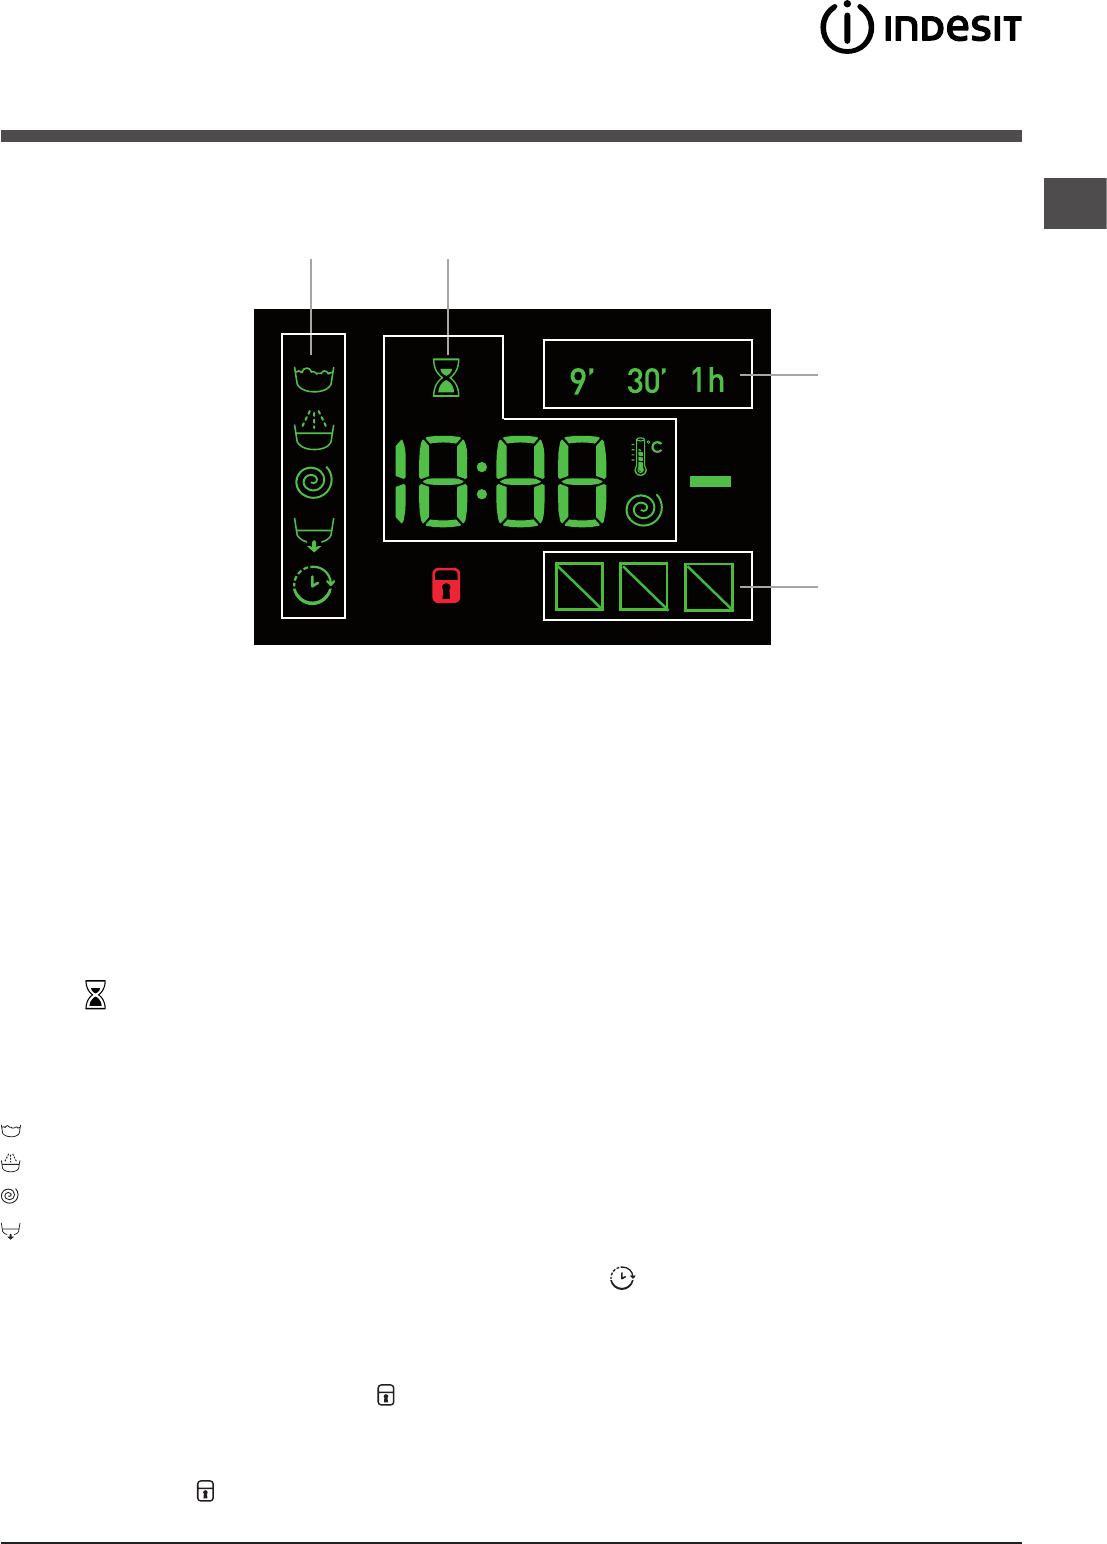
Дисплей є зручним для програмування машини; вiн надає рiзноманiтну iнформацiю.
В роздiлi A вiдображується тривалiсть рiзних наявних програм; при розпочатому циклi – відображується час, який
залишився до завершення цього циклу; якщо встановлено ВIДСТРОЧЕНИЙ ПУСК, вiдображується час, якого
бракує до початку вибраної програми.
Крiм того, при натисканнi на вiдповiдну кнопку з’являються максимальнi значення швидкостi центрифуги (вiджиму)
та температури, з якими машина може виконувати задану програму. Або з’являються останнi заданi значення,
сумiснi з обраною програмою.
Індикатор блиматиме пiд час обробки даних, вiдповiдно до обраної програми. Через 10 хвилин пiсля пуску
позначка почне горiти постiйним свiтлом та з’явиться остаточний час, який залишився. Позначка “клепсидри”
згасне приблизно через 1 хвилину пiсля показу остаточного часу.
В роздiлi B вiдображуються “стадiї прання”, передбаченi для обраного циклу, та при розпочатiй програмi “стадiї
прання”:
Прання
Ополiскування
Вiджим
Злив
Увiмкнена iндикаторна лампа вiдкладеного пуску “вiдкладений пуск” вказує на те, що на дисплеї
вiдображується значення запрограмованого “Вiдкладеного прання”.
В розділі C представлені три рівня, які відносяться до опцій прання.
Iндикаторна лампа ЛЮК ЗАБЛОКОВАНО
Якщо iндикаторна лампа свiтиться, це означає, що люк заблоковано. З метою запобiгання ушкодженням, перш нiж
вiдкрити люк, вдоскональтеся, що iндикаторна лампа не горить.
Щоб відкрити дверцята люку під час виконання циклу натисніть на кнопку START/PAUSE; якщо індикаторна лампа
ЛЮК ЗАБЛОКОВАНО згасне, це означає, що люк можна відкрити.
B
C
A
C
22
UK
Як здійснювати цикл прання
Швидке програмування
1. ЗАВАНТАЖИТИ БІЛИЗНУ. Вiдкрити люк.
Завантажити білизну, намагаючись не перевищити
кількість білизни, зазначену в таблиці програм на
наступній сторінці.
2. ВIДМIРЯТИ ПРАЛЬНИЙ ЗАСIБ. Витягнути касету
і додати пральний засіб у відповідні ванночки, як
вказано в роздiлi “Пральнi засоби i бiлизна”.
3. ЗАКРИТИ ЛЮК.
4. Натиснути на кнопку “PUSH & WASH”, щоб
запустити програму прання.
Традиційне програмування
1. УВІМКНУТИ МАШИНУ. Натиснути кнопку ;
iндикаторна лампа START/PAUSE блиматиме
зеленим свiтлом з повiльними iнтервалами.
2. ЗАВАНТАЖИТИ БІЛИЗНУ. Вiдкрити люк.
Завантажити білизну, намагаючись не перевищити
кількість білизни, зазначену в таблиці програм на
наступній сторінці.
3. ВIДМIРЯТИ ПРАЛЬНИЙ ЗАСIБ. Витягнути касету
і додати пральний засіб у відповідні ванночки, як
вказано в роздiлi “Пральнi засоби i бiлизна”.
4. ЗАКРИТИ ЛЮК.
5. ВИБРАТИ ПРОГРАМУ. Вибрати за допомогою
ручки ПРОГРАМ бажану програму ; кожна
програма має параметри температури та швидкостi
вiджиму (центрифуги), якi можна налаштовувати.
На дисплеї з’явиться тривалiсть циклу.
6. НАЛАШТУВАТИ ЦИКЛ ПРАННЯ ПIД ВЛАСНI
ПОТРЕБИ. Це здiйснюється за допомогою
вiдповiдних кнопок:
Змінити температуру і/або швидкість
віджиму. На дисплеї автоматично вiдображується
максимальна температура i швидкiсть центрифуги,
передбаченi для заданої програми. Або останнi
заданi параметри, якщо вони є сумiсними з
вибраною програмою. Натисканням на кнопку
отримується поступове зменшення температури аж
до холодного прання “OFF”. Натисканням на кнопку
отримується поступове зменшення швидкостi
вiджиму аж до його виключення взагалi “OFF”.
Наступне натискання на кнопки призводить до
повернення до максимальних значень.
! Виключення: при виборі програми 8, температура
може збільшитися до 90 градусів.
Задати вiдстрочений пуск.
Для встановлення вiдстроченого пуску обраної
програми натискати на вiдповiдну кнопку, доки
не з’явиться необхiдний час вiдстрочення. При
увiмкненiй опцiї на дисплеї горить iндикаторна лампа
. Щоб скасувати вiдстрочений пуск, натискати на
кнопку до появи на дисплеї напису “OFF”.
Змiнити характеристики циклу.
• Натиснути на кнопку для увiмкнення опцiї; при
цьому спалахне вiдповiдна iндикаторна лампа.
• Натиснути знову на кнопку, щоб скасувати вибір;
індикаторна лампа згасне.
! Якщо вибрана опція несумісна з заданою
програмою, індикаторна лампа почне блимати й
вибір не буде активований.
! Якщо вибрано опцiю, несумiсну з іншою,
попередньо заданою, надається сигнал блимання
iндикатору та звуковий сигнал (тричi); активується
лише друга опція, індикатор активованої опції
спалахує.
! Опцiї можутьзмiнювати рекомендоване
завантаження та/або тривалiсть циклу.
7. ЗАПУСТИТИ ПРОГРАМУ. Натиснути на кнопку
START/PAUSE. Вiдповiдна iндикаторна лампа
спалахує зеленим свiтлом, при цьому люк буде
заблоковано (свiтитиметься iндикаторна лампа
ЛЮК ЗАБЛОКОВАНО ). Для змiни програми
пiд час виконання циклу призупинiть машину,
натиснувши на кнопку START/PAUSE (iндикаторна
лампа START/PAUSE блиматиме янтарним свiтлом
з повiльними iнтервалами); виберiть бажаний
цикл та знову натиснiть на кнопку START/PAUSE.
Щоб відкрити дверцята люку під час виконання
циклу, натисніть на кнопку START/PAUSE;
якщо індикаторна лампа ЛЮК ЗАБЛОКОВАНО
згасне, це означає, що люк можна відкрити.
Знову натисніть на кнопку START/PAUSE, щоб
продовжити програму з того мiсця, де її було
перервано.
8. ЗАВЕРШЕННЯ ПРОГРАМИ. На це вказує напис
“END” на дисплеї; коли згасне iндикаторна лампа
ЛЮК ЗАБЛОКОВАНО , люк можна вiдкрити.
Відкрити люк, витягнути білизну й вимкнути
машину.
! Якщо необхідно анулювати вже розпочатий цикл,
утримуйте кнопку натиснутою відносно тривалий
час. Цикл буде перерваний, і машина вимкнеться.
23
UK
Програми й опції
Опції прання
Швидке
При першому натисканні спалахує іконка 9’, при
другому - іконка 30’ і при третьому - іконка 1h. При
четвертому натисканні знову спалахує іконка 9’.
! Не працює з програмами 1-2-3-4-5-6-7-8-9-10-11-12-
13--.
Закінчення швидкого циклу
Під час програми прання, за деяких умов, натискання
на цю кнопку дозволяє закінчити програму прання
лише за 20 хвилин в разі необхідності, виконуючи
швидке ополіскування і віджимання на максимальних
обертах - 800 або менше, що їх було обрано під час
індивідуального налаштування програми. В цьому
випадку якість прання й ополіскування знижується.
Після натискання на кнопку спалахує відповідний
індикатор, а також індикатор, який вказує на фазу
ополіскування. Якщо обрана температура дорівнює
або перебільшує 40°С і/або натискання на кнопку
відбулося на початку програми, опція “Закінчення
швидкого циклу” триватиме довше для забезпечення
правильного розчинення прального засобу для того,
щоб уникнути пошкодження тканини. В цьому випадку
блиматиме індикатор ополіскування і постійно
горітиме індикатор прання до тих пір, поки не будуть
задоволені необхідні умови для активації. У випадку,
коли час, який залишився до закінчення програми
прання, не досягає 20 хвилин, опція не працюватиме.
! Не працює з програмами 2-4-5-6-14--.
Видалення плям
Ця опція дозволяє вибрати тип забруднення для того,
щоб оптимально налаштувати цикл для видалення
плям. Типи забруднень:
- Їжа, плями від харчових продуктів або напоїв.
- Робота, плями від мастил або чорнил.
- Природа, плями від бруду або трави.
! Тривалість циклу прання залежить від обраного типу
забруднення.
! Не працює з програмами 1-2-3-4-5-6-7-11-12-13-14--.
Таблиця програм
Тривалість циклу, вказана на дисплеї або в керівництві, разрахована на основі стандартних умов роботи. Фактичний час може залежати від чисельних факторів, таких як температура і
тиск подаваної води, температура у приміщенні, кількість миючого засобу, кількість і тип завантаженої білизни, зрівноваження завантаженої білизни, додаткові обрані опції.
1) Програма керування згiдно до норми 1061/2010: встановити програму 8 з температурою 60°C.
Цей цикл призначений для прання бавовняних речей із звичайним ступенем забруднення. Ефективність циклу підвищується завдяки комбінованому споживанню енергії та води. Він
має використовуватися для речей, які придатні для прання при температурі 60°C. Фактична температура прання може дещо відрізнятися від заявленої.
2) Довга програма бавовна: встановити програму 9 з температурою 40°C.
Цей цикл призначений для прання бавовняних речей із звичайним ступенем забруднення. Ефективність циклу підвищується завдяки комбінованому споживанню енергії та води. Він
має використовуватися для речей, які придатні для прання при температурі 40°C. Фактична температура прання може дещо відрізнятися від заявленої.
Для всiх Установ з проведення випробувань:
2) Програма тривалого прання речей з бавовни: встановити програму 9 з температурою 40°C.
3) Програма тривалого прання синтетичних речей: встановити програму 10 з температурою 40°C.
Ïðîãðàìè
Опис програми
Макс.
темп.
(°С)
Макс.
швидкiсть
(обертiв за
хвилину)
Пральнi засоби та
додатковi засоби
Макс.
завантаження
(кг)
Остаточна
вологість (
%)
Споживання
електроенергії (
kWh)
Загальна
кількість води (
lt)
Тривалiсть
циклу
Попереднє
прання
Прання
Пом’якш-
увач
Відбіл-
ювач
Особливi
1
Sport30°600
-
-
3,5---55’
2
Темні речі30°800
-
-
4---70’
3
Проти неприємних запахів (бавовна)60°1000
-
-
3,5---110’
3
Проти неприємних запахів (Синтетичнi)40°1000
-
-
3,5---100’
4
Делікатні 30°0
-
-
1---80’
5
Вовна: для речей з вовни, кашемiру, тощо.40° 800
-
-
1,5---70’
6
Пухо-пiр`янi вироби: для пухо-пiр`яних вироб.30°1000
-
-
2---110’
Standard
7
Бавовна з попереднiм пранням: вкрай забруднен бiл.90°1400
-
7532,1577170’
8
Бiла бавовна (1): дуже забрудненi стiйкi бiлi та кольоровi тканини.
60°
(Max. 90°)
1400
-
-
7531,1352,5180’
9
Бiла бавовна (2): мало забрудненi делiкатнi бiлi та кольоровi тканини.
40°1400
-
-
7531,0075170’
10
Синтетичнi: дуже забрудненi кольоровi стiйкi тканини.60°800
Temperatur herabzusetzen oder auszuschließen; der Wert
wird auf dem Display angezeigt.
Taste SCHLEUDER : Drücken Sie die Taste, um
die Schleudergeschwindigkeit herabzusetzen oder die
Schleuder ganz auszuschließen. Der Wert wird auf dem
Display angezeigt.
Taste STARTZEITVORWAHL : Zur Vorwahl der
Startzeit des gewählten Programms drücken Sie bitte
diese Taste; Der Wert wird auf dem Display angezeigt.
Taste und Kontrollleuchte START/PAUSE : Sobald
die grün Kontrollleuchte auf langsames Blinklicht
schaltet, drücken Sie die Taste, um den Waschgang zu
starten. Nach Ingangsetzung des Programms schaltet
die Kontrollleuchte auf Dauerlicht. Um den Waschgang
zu unterbrechen, drücken Sie erneut die Taste; die
Kontrollleuchte schaltet auf bernsteinfarbenes Blinklicht.
Wenn das Symbol nicht leuchtet, kann die Gerätetür
geöffnet werden. Um das Programm an der Stelle, an
der es unterbrochen wurde, wieder in Gang zu setzen,
drücken Sie die Taste erneut.
Funktion Standby
Zur Erfüllung der neuen Richtlinien zum Energieverbrauch
ist diese Waschmaschine mit einem automatischen
Ausschaltsystem (Standby) ausgestattet, das nach 30
Minuten des Nichtgebrauchs in Funktion tritt. Drücken
Sie kurz die Taste ON/OFF und warten Sie, bis sich die
Maschine wieder einschaltet.
Verbrauch in Off-Betrieb: 0,5 W
Verbrauch in Left-On: 8 W
DISPLAY
Taste
PUSH & WASH
DE
35
Display
Das Display dient nicht nur zur Programmierung des Gerätes, sondern liefert auch zahlreiche Informationen.
Im Abschnitt A werden die Dauer der verschiedenen verfügbaren Programme sowie die Restzeit nach Zyklusstart angezeigt;
wurde eine STARTZEITVORWAHL eingestellt, dann wird die bis zum Start des ausgewählten Programms verbleibende Zeit
angezeigt.
Darüber hinaus werden durch Drücken der entsprechenden Taste die maximalen Werte der Schleudergeschwindigkeit
und der Temperatur angezeigt, die die Maschine mit dem eingestellten Programm ausführen kann, oder aber die zuletzt
ausgewählten Werte, wenn sie mit dem ausgewählten Programm kompatibel sind.
Die Sanduhr blinkt, während die Maschine die Daten entsprechend dem Programm verarbeitet. Nach max. 10 Minuten
bleibt das Symbol stehen und es wird die endgültige Restzeit angezeigt- Das Symbol Sanduhr schaltet sich dann etwa 1
Minute nach der Anzeige der endgültigen Restzeit aus.
Im Abschnitt B werden die für den ausgewählten Zyklus vorgesehenen “Waschphasen” angezeigt. Bei laufenden
Programmen wird die jeweilige Programmphase angezeigt.
Hauptwäsche
Spülen
Schleudern
Abpumpen
Das beleuchtete Symbol “STARTZEITVORWAHL” zeigt an, dass auf dem Display der Wert der eingestellten
“Startzeitvorwahl” angezeigt wird.
In Abschnitt C sind die drei Stufen hinsichtlich der Waschoptionen vorhanden.
Kontrollleuchte GERÄTETÜR GESPERRT
Das beleuchtete Symbol zeigt an, dass die Gerätetür gesperrt ist. Zur Vermeidung einer evtl. Beschädigung warten Sie bitten,
bis das Symbol erlischt, bevor Sie die Gerätetür öffnen.
Um während eines laufenden Programms die Gerätetür zu öffnen, drücken Sie die Taste START/PAUSE; wenn das Symbol
GERÄTETÜR GESPERRT erloschen ist, kann die Gerätetür geöffnet werden.
B
C
A
C
36
DE
Durchführung eines
Waschprogramms
Schnellprogrammierung
1. EINFÜLLEN DER WÄSCHE. Öffnen Sie die
Gerätetür. Füllen Sie die Wäsche ein. Achten Sie
hierbei bitte darauf, die in der Programmtabelle (auf der
nächsten Seite) angegebene Wäschemenge nicht zu
überschreiten.
2. DOSIERUNG DES WASCHMITTELS. Ziehen Sie
die Waschmittelschublade heraus und füllen Sie das
Waschmittel in die entsprechenden Kammern (siehe
“Waschmittel und Wäsche“).
3. SCHLIESSEN SIE DIE GERÄTETÜR.
4. Drücken sie die taste “PUSH & WASH”, um das
Waschprogramm zu starten.
Herkömmliche Programmierung
1. EINSCHALTEN DES GERÄTES. Drücken Sie die
Taste ; die Kontrollleuchte START/PAUSE blinkt
langsam grün.
2. EINFÜLLEN DER WÄSCHE. Öffnen Sie die
Gerätetür. Füllen Sie die Wäsche ein. Achten Sie
hierbei bitte darauf, die in der Programmtabelle (auf der
nächsten Seite) angegebene Wäschemenge nicht zu
überschreiten.
3. DOSIERUNG DES WASCHMITTELS. Ziehen Sie
die Waschmittelschublade heraus und füllen Sie das
Waschmittel in die entsprechenden Kammern (siehe
“Waschmittel und Wäsche“).
4. SCHLIESSEN SIE DIE GERÄTETÜR.
5. WAHL DES WASCHPROGRAMMS. Stellen Sie mit
dem Wählschalter PROGRAMME das gewünschte
Programm ein; die entsprechende Temperatur und
Schleudergeschwindigkeit werden automatisch
zugeschaltet, können jedoch geändert werden. Auf dem
Display wird die Programmdauer angezeigt.
6. INDIVIDUALISIERUNG DES WASCHGANGS.
Verwenden Sie hierzu die entsprechenden Tasten:
Änderung der Temperatur und/oder
der Schleuder. Das Gerät zeigt automatisch
die für das eingestellte Programm vorgesehene
maximale Temperatur sowie die maximale
Schleudergeschwindigkeit. Durch Drücken der Taste
kann die Temperatur Schritt für Schritt herabgesetzt
werden, bis auf Kaltwäsche “OFF”. Durch Drücken der
Taste kann die Schleudergeschwindigkeit allmählich
herabgesetzt werden, bis auf völliges Ausschließen der
Schleuder “OFF”. Ein weiterer Druck auf die Tasten bringt
die Werte wieder auf die maximalen Werte zurück.
! Ausnahme: Wird das Waschprogramm 8 eingestellt,
kann die Temperatur bis auf 90° erhöht werden.
Eine Startzeitvorwahl eingeben.
Zur Vorwahl der Startzeit des eingestellten Programms
drücken Sie die entsprechende Taste, bis die
gewünschte Zeitverzögerung angezeigt wird. Wenn
diese Option aktiv ist, dann schaltet sich auf dem
Display das Symbo ein. Um eine programmierte
Startzeit zu löschen, drücken Sie die Taste, bis auf dem
Display die Anzeige “OFF”.
Änderung der Eigenschaften des Waschgangs.
• Drücken Sie die Taste zum Aktivieren der Option; die
entsprechende Kontrollleuchte schaltet sich dabei ein.
• Durch erneutes Drücken der Taste kann die
Zusatzfunktion wieder ausgeschaltet werden; die
Kontrollleuchte erlischt.
! Ist die gewählte Zusatzfunktion nicht kompatibel
mit dem eingestellten Programm, schaltet die
Kontrollleuchte auf Blinklicht und die Zusatzfunktion wird
nicht aktiviert.
! Ist die gewählte Funktion nicht mit einer zuvor
ausgewählten vereinbar, schaltet die entsprechende
Kontrollleuchte auf Blinklicht, es ertönt ein akustisches
Signal (3 Signaltöne) und nur die zweite Funktion wird
aktiviert (die entsprechende Kontrollleuchte schaltet sich
ein).
! Die Zusatzfunktionen können eine Änderung der
empfohlenen Ladungsmenge und/oder Waschzeit
bewirken.
7. STARTEN DES PROGRAMMS. Drücken Sie die Taste
START/PAUSE. Die zugehörige Kontrollleuchte schaltet
auf grünes Dauerlicht und die Gerätetür sperrt (Symbol
GERÄTETÜR GESPERRT leuchtet). Um ein Programm
während eines laufenden Waschgangs zu ändern,
schalten Sie den Waschvollautomat mittels der Taste
START/PAUSE auf Pause (die Kontrollleuchte START/
PAUSE blinkt nun langsam bernsteinfarben); wählen Sie
daraufhin das gewünschte Programm aus und drücken
Sie erneut auf die Taste START/PAUSE .
Um während eines laufenden Programms die Gerätetür
zu öffnen, drücken Sie die Taste START/PAUSE ; wenn
das Symbol GERÄTETÜR GESPERRT erloschen ist,
kann die Gerätetür geöffnet werden. Drücken Sie die Taste
START/PAUSE erneut, um das Programm an der Stelle,
an der es unterbrochen wurde, wieder in Gang zu setzen.
8. ENDE DES PROGRAMMS. Das Programmende wird
durch die Anzeige “END” auf dem Display angezeigt. Wenn
das Symbol GERÄTETÜR GESPERRT erlischt, kann die
Gerätetür geöffnet werden. Öffnen Sie die Gerätetür, nehmen
Sie die Wäsche heraus und schalten Sie das Gerät aus.
! Möchten Sie ein bereits in Gang gesetztes
Waschprogramm löschen, drücken Sie die Taste etwas
länger. Der Waschgang wird unterbrochen und das Gerät
schaltet sich aus.
DE
37
Programme und
Zusatzfunktionen
Programmtabelle
Zusatzfunktionen
Schnell
Beim ersten Druck leuchtet das Symbol 9’, beim zweiten
Druck das Symbol 30’ und beim dritten Druck das Symbol
1h. Beim vierten Druck leuchtet erneut das Symbol 9’.
!Diese Funktion kann zu den Programmen 1-2-3-4-5-6-7-8-
9-10-11-12-13--nicht zugeschaltet werden.
Zyklus schnell beenden
Wird diese Taste während eines Waschprogramms und bei
bestimmten Bedingungen gedrückt, kann das Programm
bei Bedarf in nur 20’ abgeschlossen werden, wobei ein
kurzer Spülgang und ein Schleudergang bei maximal 800
Umdrehungen oder weniger, wenn manuell während der
Einstellungsphase des Programms reduziert, ausgeführt
wird. In diesem Fall sind die Wasch- und Spülqualität
etwas geringer. Nach Drücken der Taste schalten sich
sowohl die entsprechende Kontrollleuchte als auch die
Kontrollleuchte der Spülphase ein. Ist die ausgewählte
Temperatur über oder gleich 40° und/oder die Taste wird
während der Anfangsphase des Programms gedrückt,
erhöht sich die Dauer der Option “Zyklus schnell beenden”,
um das Auflösen des Waschmittels zu ermöglichen, damit
die Fasern nicht beschädigt werden. In diesem Fall blinkt
die Kontrollleuchte der Spülphase und die Kontrollleuchte
des Waschgangs bleibt eingeschaltet bis die für die
Aktivierung notwendigen Bedingungen eintreten. Ist die
Restdauer des Programms geringer als 20’ Minuten, ist
diese Option deaktiviert.
!Diese Funktion kann zu den Programmen 2-4-5-6-14--
nicht zugeschaltet werden.
Antiflecken
Mit dieser Option kann die Art der Verschmutzung
eingestellt werden, um den Waschzyklus optimal auf die
Entfernung der Flecken einzustellen. Die auswählbaren
Verschmutzungsarten sind:
- Lebensmittel, beispielsweise für Flecken durch
Lebensmittel und Getränke.
- Arbeit, beispielsweise für Fett- und Tintenflecken.
- Outdoor, beispielsweise für Schlamm- und Grasflecken.
! Die Dauer des Waschzyklus ändert sich je nach
ausgewählter Verschmutzungsart.
!Diese Funktion kann zu den Programmen 1-2-3-4-5-6-7-
11-12-13-14--nicht zugeschaltet werden.
Die auf dem Display und in der Bedienungsanleitung genannte Zyklusdauer wird ausgehend von Standardbedingungen berechnet. Die effektiv benötigte Zeit kann aufgrund zahlreicher Faktoren wie
Temperatur und Druck des Zulaufwassers, Raumtemperatur, Waschmittelmenge, Art, Menge und Verteilung der Waschladung sowie der gewählten Zusatzfunktionen variieren.
1) Prüfprogramm gemäß 1061/2010: Das Programm 8 mit einer Temperatur von 60°C.
Dieser Zyklus ist für den Waschvorgang von normal schmutziger Baumwollwäsche geeignet; es ist der wirksamste in Bezug auf den kombinierten Energie-Wasser-Verbrauch; für bei 60°C. zu
waschende Wäsche zu verwenden. Die effektive Waschtemperatur kann von der angegebenen abweichen.
2) Prüfprogramm gemäß 1061/2010: Das Programm 9 mit einer Temperatur von 40°C.
Dieser Zyklus ist für den Waschvorgang von normal schmutziger Baumwollwäsche geeignet; es ist der wirksamste in Bezug auf den kombinierten Energie-Wasser-Verbrauch; für bei 40°C. zu
waschende Wäsche zu verwenden. Die effektive Waschtemperatur kann von der angegebenen abweichen.
Für alle Testinstitute:
2) Langes Baumwollprogramm: Das Programm 9 mit einer Temperatur von 40°C.
3) Langes Synthetikprogramm: Programm 10 und eine Temperatur von 40°C einstellen.
Waschprogram-
me
Beschreibung des Programms
Max.
Temperatur
(°C)
Max.
Schleuder
Geschwin-
digkeit
(U/min)
Waschmittel
Max. Beladungs-
menge (kg)
Restfeuchtigkeit
%
Energieverbrauch
kWh
Wasser gesamt lt
Programmdauer
Vorwäsche
Hauptwä-
sche
Weichspü-
ler
Bleichen
Spezial
1
Sport
30°600-
-3,5---55’
2
Dunkles
30°800-
-4---70’
3
Anti-Geruch (Baumwolle)60°1000-
-3,5---110’
3
Anti-Geruch (Synthetik)40°1000-
-3,5---100’
4
Feine Wäsche
30°0-
-1---80’
5
Wolle: wolle, Kaschmir usw.40° 800-
-1,5---70’
6
Bettdecken
: wäsche- bzw. Kleidungsstücke mit Daunenfüllung.
30°1000-
-2---110’
Standard
7
Weiße Baumwolle 90° (mit Vorwäsche): stark verschmutzte Kochwäsche.90°1400
-7532,1577170’
8
Standard Baumwolle 60° (1): stark verschmutzte Weiß- und far-
bechte Buntwäsche.
60°
(Max. 90°)
1400-
-7531,1352,5180’
9
Standard Baumwolle 40° (2): leicht verschmutzte Weißwäsche und
empfindliche Buntwäsche.
40°1400-
-7531,0075170’
10
Synthetik: stark verschmutzte, farbechte Buntwäsche.60°800-
-3,5460,7946110’
10
Synthetik (3): stark verschmutzte, farbechte Buntwäsche.40°800-
-3,5460,5646100’
11
Bunte Wäsche
40°1400-
-7 530,8970100’
Eco & Schnell
12
Eco Baumwolle 20°: leicht verschmutzte Weißwäsche und empfindliche
Buntwäsche.
20°1400-
-7---170’
13
20° Mix-Fein
20°800-
-7---120’
14
Schnell
-800--
-1,5---9’
14
Schnell
30°800-
-3800,223430’
14
Schnell
60°1000-
-7---60’
Teilprogramme
Spülen/Bleichen-1400--
7---50’
Schleudern + Abpumpen-1400----7---25’
38
DE
Push & Wash
Mit dieser Funktion kann ein Waschzyklus auch bei ausgeschalteter Maschine gestartet werden, ohne zuerst die ON/OFF-
Taste zu drücken oder ohne, nach dem Einschalten der Maschine, weitere Tasten und/oder Drehschalter zu drücken (wird
doch eine Taste gedrückt, wird das Programm Push & Wash deaktiviert). Zum Starten des Zyklus Push & Wash halten Sie
die Taste 2 Sekunden gedrückt. Die eingeschaltete Kontrollleuchte zeigt an, dass der Zyklus gestartet ist. Der Waschzyklus
ist ideal für Baumwolle und Synthetik, da er mit einer Temperatur von 30° und einer maximalen Schleuderumdrehung von
1200 U/Min. arbeitet. Max. Wäschefüllung 3,5 kg. (Programmdauer 50’).
Wie funktioniert das?
1. Wäsche einfüllen (Baumwolle und/oder Synthetik) und Gerätetür schließen.
2. Waschmittel und Zusätze einfüllen.
3. Das Programm starten (die Taste Push & Wash 2 Sekunden lang gedrückt halten). Die zugehörige Kontrollleuchte schaltet
auf grünes Dauerlicht und die Gerätetür sperrt (Symbol GERÄTETÜR GESPERRT leuchtet).
N.B.: Der Programmstart mit der Taste Push & Wash aktiviert einen automatischen Zyklus für Baumwolle und Synthetik, der
nicht weiter individualisiert werden kann. Bei diesem Programm können keine weiteren Optionen eingestellt werden.
Um während eines laufenden Programms die Gerätetür zu öffnen, drücken Sie die Taste START/PAUSE; wenn das Symbol
GERÄTETÜR GESPERRT erloschen ist, kann die Gerätetür geöffnet werden. Drücken Sie die Taste START/PAUSE erneut,
um das Programm an der Stelle, an der es unterbrochen wurde, wieder in Gang zu setzen.
4. Nach Ablauf des Waschprogramms leuchtet die Kontrollleuchte END auf.
40
DE
Eco Baumwolle 20° (programm 12) ideal für
normalverschmutze Baumwolle. Die auch mit kaltem
Wasser erreichten Leistungen, vergleichbar mit einer
Wäsche bei 40°, werden mechanisch erzielt. Die Trommel
arbeitet mit wiederholten, kurz auf einander folgenden
Beschleunigungen.
20° Mix-Fein (programm 13) ideal für durchschnittlich
verschmutze Mischwäsche (Baumwolle und Synthetik). Die
guten Waschleistungen auch mit kaltem Wasser werden
mechanisch erzielt. Die Trommel arbeitet mit wiederholten,
gleichmäßigen Geschwindigkeitsänderungen.
Schnell (programm 14) hiermit kann die Waschdauer
von 9’ bis 1h eingestellt werden. Mit der entsprechenden
Libble takes abuse of its services very seriously. We're committed to dealing with such abuse according to the laws in your country of residence. When you submit a report, we'll investigate it and take the appropriate action. We'll get back to you only if we require additional details or have more information to share.
Product:
Forumrules
To achieve meaningful questions, we apply the following rules:
First, read the manual;
Check if your question has been asked previously;
Try to ask your question as clearly as possible;
Did you already try to solve the problem? Please mention this;
Is your problem solved by a visitor then let him/her know in this forum;
To give a response to a question or answer, do not use this form but click on the button 'reply to this question';
Your question will be posted here and emailed to our subscribers. Therefore, avoid filling in personal details.
Register
Register getting emails for Indesit XWE 71451 at:
new questions and answers
new manuals
You will receive an email to register for one or both of the options.
Get your user manual by e-mail
Enter your email address to receive the manual of Indesit XWE 71451 in the language / languages: English, German as an attachment in your email.
The manual is 3,46 mb in size.
You will receive the manual in your email within minutes. If you have not received an email, then probably have entered the wrong email address or your mailbox is too full. In addition, it may be that your ISP may have a maximum size for emails to receive.
The manual is sent by email. Check your email
If you have not received an email with the manual within fifteen minutes, it may be that you have a entered a wrong email address or that your ISP has set a maximum size to receive email that is smaller than the size of the manual.
The email address you have provided is not correct.
Please check the email address and correct it.
Your question is posted on this page
Would you like to receive an email when new answers and questions are posted? Please enter your email address.