670001
56
Zoom out
Zoom in
Previous page
1/107
Next page
User Guide
Contents
Exciting Features
Tips 1
App Twin: Log in to Two Social Media Accounts at Once 2
Use Portrait Mode to Capture Stunning Portraits 3
More Features 3
New Device
Connecting to the Internet
6
Getting Help 6
Gestures and Operation
Screenshots and Screen Recording
10
Home Screen
Quick Switch
14
Notication and Status Bar 15
Shortcuts 18
Screen Lock and Unlock 20
Go Back to Basics with Simple Mode 21
Home Screen Management 22
Contacts
Managing Business Cards
26
Managing Contacts 27
Merging Third-Party App Contacts 29
Dialling
Basic Calling Functions
30
Block Nuisance Calls: Get the Peace and Quiet You Deserve 32
Enable VoLTE to Enjoy HD Calls 32
Use VoWi-Fi for a New Calling Experience 32
Message
Basic Messaging Functions
34
Camera
Basic Camera Functions
36
Wide Aperture 40
Panorama 42
Pro Mode 43
Beautication 47
Light Painting Mode 48
Use Time-lapse to Condense Hours into Minutes 52
i
Discover New Possibilities with Customised Shooting Modes 53
Gallery
Photo Management 54
Phone Manager
Use One-touch Optimization 57
Manage Your Mobile Data 57
Optimize Power Consumption 58
Use Virus Scan to Keep Your Phone Safe 59
Email
Add Email Accounts
60
Manage Email Accounts 60
Manage VIP Email Contacts 61
Set Auto Response for Exchange Email 61
Calendar
Calendar: Your Event Management Centre
62
Navigate the Calendar 62
Import To-Dos to Keep Your Work Organised 63
View Global Holidays 64
Clock
Use the Clock
65
Notepad
Manage Your Notes to Keep Your Records in Order
67
Device Connection
Bluetooth
68
Multi-screen Display 70
Transfer Files Using Huawei Share 71
Security and Privacy
Fingerprint
73
Location Information Protection 75
Use App Lock to Lock Important Apps 76
More Security Settings 76
Backup and Restoration
Data Backup: Prevent Data Loss
78
Back Up Your Data to a microSD Card 78
Back Up Your Data to Internal Storage 78
Back Up Your Data to a USB Storage Device 79
Back Up Your Data to a Computer 79
Contents
ii
Wi-Fi and Network
Wi-Fi 80
Connecting to the Internet 82
Share Your Mobile Network with Other Devices 83
Apps and Notications
App Twin: Log in to Two Social Media Accounts at Once 85
Sound and Display
Congure
Do Not Disturb Mode 86
Congure Your Sound Settings 86
Enable Eye Comfort Mode to Prevent Eye Strain 87
Change the Display Settings 88
Storage
Storage Cleaner
90
Smart Assistance
Navigation Bar and Navigation Dock
92
Touch-disable Mode 92
System
Language and Input Method
95
Accessibility 95
General Settings 97
System Update
Performing an Online Update
102
Contents
iii
Exciting Features
Tips
Use Shortcuts to Access Frequently Used Features
Touch and hold an app icon to display a menu of frequently used features for quick access. You can
also touch and hold a feature and drag it to your home screen to create a shortcut.
If you touch and hold an app icon and a shortcut is not created, the app does not support home
screen shortcuts.
Quickly access frequently used app features: Touch and hold an app icon on your home screen,
and then touch a frequently used feature to access it. Each app supports up to four frequently used
features. These are preset by the app and cannot be changed. For example, to take a sele, touch and
hold the camera icon, and then touch Sele in the pop-up menu.
Add shortcuts to your home screen: Touch and hold an app icon on your home screen to bring up
the menu. Touch and hold the desired feature, and then drag it to your home screen to create a
shortcut. For example, you can add a shortcut for the camera's sele feature for quick access to the
sele camera.
1
Transfer Files Using Huawei Share
You can use Huawei Share to quickly transfer photos, videos and other les between Huawei devices.
Huawei Share uses Bluetooth to detect nearby Huawei devices and Wi-Fi to quickly transfer les
without using mobile data.
Huawei Share uses Wi-Fi and Bluetooth to transfer data. When Huawei Share is enabled, Wi-Fi
and Bluetooth are automatically enabled.
Huawei Share
Use Huawei Share to send les: Select the le you want to share and touch Share. Select the
receiving device from the list of nearby devices to send the le.
Use Huawei Share to receive les: Swipe down from the status bar, open the shortcuts panel, and
then touch to enable Huawei Share. Touch Accept when a le transfer notication is displayed.
Received les are saved to the Huawei Share folder in Files by default.
App Twin: Log in to Two Social Media Accounts at
Once
Have you ever wished you could log in to two WeChat and Facebook accounts on your Phone
without the hassle of constantly switching between them? App twin lets you log in to two WeChat
and Facebook accounts at the same time, allowing you to keep your work and private life separate.
Exciting Features
2
The App twin feature only works with WeChat, QQ, LINE, Facebook, Snapchat, WhatsApp, and
Messenger. Download the latest versions of these apps before using this feature.
Open Settings. Go to Apps & notications > App twin and enable App twin for WeChat, QQ,
LINE, Facebook, Snapchat, WhatsApp, or Messenger as required.
When App twin is enabled, two WeChat, QQ, LINE, Facebook, Snapchat, WhatsApp, or Messenger
app icons are displayed on the home screen. This means that you can log in to two accounts at the
same time. Touch and hold the twinned app icon on the home screen to quickly disable App twin.
Use Portrait Mode to Capture Stunning Portraits
Want to always look your best in your seles? Portrait mode lets you congure different beautication
settings and create an information database for custom beautication.
If you take a
sele at night or in low light conditions, your Phone will detect the low ambient light
and automatically enable Night mode to improve the quality of seles. This mode does not have a
switch and is automatically enabled when your device detects low ambient light. Your device will
prompt you when it enables this mode.
l Portrait mode: Enable Portrait mode to automatically apply beautication effects to everyone in
the frame.
l Perfect sele: Enable Perfect sele and your Phone will create a custom beauty plan for you. The
higher the beautication level, the more pronounced the effects.
More Features
Wi-Fi+: Your Smart Connectivity Assistant
Wi-Fi+ intelligently connects to Wi-Fi networks to save mobile data consumption. When your device
detects a known or free Wi-Fi network, it will automatically turn on Wi-Fi and connect to the network.
Your device will also automatically select the optimal network in the area for the best Internet
connection.
Exciting Features
3
Once you have enabled Wi-Fi+, your device will:
l Automatically select and connect to the optimal network: Automatically select and connect to
Wi-Fi networks you've previously connected to, free networks, or your mobile data network,
depending on the signal strength at your current location.
l Automatically turn Wi-Fi on and off: Depending on the Wi-Fi networks you have connected to
previously, Wi-Fi will be automatically enabled or disabled in specic locations. This will prevent your
device from constantly searching for new networks.
l Assess the quality of available networks: Evaluate currently available network hotspots and
prevent your device from automatically connecting to networks with no Internet connection.
Clean Up Memory for Faster Performance
Does your Phone slow down over time? Do you want to clean up your system storage but are unsure
which les to delete? Memory cleanup helps you quickly clear your cache, large and residual les, and
unused app les to speed up system performance and keep your Phone in top shape.
When your system performance slows down or remaining storage space is low, Phone Manager will
remind you to clean up. You can follow the onscreen prompts to clean up your Phone's memory and
free up storage space.
Clean: Scan for and clean up trash les and system cache to quickly free up memory and internal
storage space without affecting your Phone usage.
Deep clean: Scan for redundant les including WeChat les, large les, videos, images, app residual
les, music les, unnecessary installation packages, unused les, and les that take up a lot of space,
Exciting Features
4
and obtain cleaning suggestions based on the scan results. This helps you free up storage space
without accidentally deleting important les.
Exciting Features
5
New Device
Connecting to the Internet
Connect to Wi-Fi networks effortlessly with your device.
Connecting to a Wi-Fi network
1 Swipe down from the status bar to open the notication panel.
2 Touch and hold to open the Wi-Fi settings screen.
3 Switch on Wi-Fi. Your device will list all available Wi-Fi networks at your location.
4 Select the Wi-Fi network you want to connect to. If you select an encrypted network, you will also
need to enter the Wi-Fi password.
Connecting using mobile data
Before using mobile data, ensure that you have a data plan with your network provider to avoid
incurring excessive data charges.
1 Swipe down from the status bar to open the notication panel.
2 Touch to enable mobile data.
When you don't need to access the Internet, disable mobile data to save battery power and
reduce data usage.
Getting Help
Legal Notice
Copyright © Huawei Technologies Co., Ltd. 2018. All rights reserved.
This document, whether in part or whole, shall not be reproduced or transmitted in any way, shape,
or form without the prior written consent of Huawei Technologies Co., Ltd. and its
afliates
("Huawei").
The product described in this document may include software that is the copyright of Huawei or its
licensors. Such software shall not be reproduced, distributed, modied, decompiled, disassembled,
decrypted, extracted, reverse engineered, leased, assigned, or sublicensed unless such restrictions are
prohibited by law or such actions are approved by the copyright holder.
Trademarks and Permissions
, , and are trademarks or registered trademarks of Huawei Technologies Co., Ltd.
Android™ is a trademark of Google Inc.
The Bluetooth
®
word mark and logos are registered trademarks owned by Bluetooth SIG, Inc. and any
use of such marks by Huawei Technologies Co., Ltd. is under license.
6
and are registered trademarks of Qualcomm Inc.
(NASDAQ: QCOM).
is a registered trademark of Sony Corporation.
Other trademarks, products, services and company names mentioned herein may be the property of
their respective owners.
Notice
Some features of the product and its accessories described herein rely on the software installed or the
capacities and settings of the local network, and therefore may not be activated or may be limited by
local network operators or network service providers.
Therefore, the descriptions herein may not exactly match the purchased product or its accessories.
Huawei reserves the right to change or modify any information or specications contained in this
document at any time without prior notice and without any liability.
Third-Party Software Statement
Huawei does not own the intellectual property of the third-party software and applications that are
delivered with this product. Therefore, Huawei will not provide any warranty of any kind for third-
party software and applications. Neither will Huawei provide support to customers who use third-
party software and applications, nor be responsible or liable for the functions or performance of third-
party software and applications.
Third-party software and applications services may be interrupted or terminated at any time, and
Huawei does not guarantee the availability of any content or service. Third-party service providers
provide content and services through network or transmission tools outside of the control of Huawei.
To the greatest extent permitted by applicable law, it is explicitly stated that Huawei shall not
compensate or be liable for services provided by third-party service providers, or the interruption or
termination of third-party contents or services.
Huawei shall not be responsible for the legality, quality, or any other aspects of any third-party
software installed on this product, or for any uploaded or downloaded third-party works in any form,
including but not limited to texts, images, videos, or software etc. Customers shall bear the risk for
any and all effects, including incompatibility between the software and this product, which result from
installing software or uploading or downloading the third-party works.
This product is based on the open-source Android™ platform. Huawei has made necessary changes to
the platform. Therefore, this product may not support all the functions that are supported by the
standard Android platform or may be incompatible with third-party software. Huawei does not
provide any warranty or representation in connect with any such compatibility and expressly excludes
all liability in connection with such matters.
New Device
7
DISCLAIMER
ALL CONTENTS OF THIS DOCUMENT ARE PROVIDED “AS IS”. EXCEPT AS REQUIRED BY APPLICABLE
LAWS, NO WARRANTIES OF ANY KIND, EITHER EXPRESS OR IMPLIED, INCLUDING BUT NOT LIMITED
TO, THE IMPLIED WARRANTIES OF MERCHANTABILITY AND FITNESS FOR A PARTICULAR PURPOSE,
ARE MADE IN RELATION TO THE ACCURACY, RELIABILITY OR CONTENTS OF THIS DOCUMENT.
TO THE MAXIMUM EXTENT PERMITTED BY APPLICABLE LAW, UNDER NO CIRCUMSTANCES SHALL
HUAWEI BE LIABLE FOR ANY SPECIAL, INCIDENTAL, INDIRECT, OR CONSEQUENTIAL DAMAGES, OR
LOSS OF PROFITS, BUSINESS, REVENUE, DATA, GOODWILL SAVINGS OR ANTICIPATED SAVINGS
REGARDLESS OF WHETHER SUCH LOSSES ARE FORSEEABLE OR NOT.
THE MAXIMUM LIABILITY (THIS LIMITATION SHALL NOT APPLY TO LIABILITY FOR PERSONAL INJURY
TO THE EXTENT APPLICABLE LAW PROHIBITS SUCH A LIMITATION) OF HUAWEI ARISING FROM THE
USE OF THE PRODUCT DESCRIBED IN THIS DOCUMENT SHALL BE LIMITED TO THE AMOUNT PAID BY
CUSTOMERS FOR THE PURCHASE OF THIS PRODUCT.
Import and Export Regulations
All applicable export or import laws and regulations must be complied with and all necessary
governmental permits and licenses must be obtained before exporting or importing the product,
including the software and technical data, described in this document.
Personal Information and Data Security
The use of some functions or third-party applications on your device could result in your personal
information and data being lost or becoming accessible to others. Use the following measures to help
you protect your personal information:
l Put your device in a safe place to prevent unauthorised use.
l Set your device screen to lock and set a password or unlock pattern.
l Periodically back up personal information stored on your SIM card, memory card or your device
memory. If you change to a different device, be sure to move or delete any personal information on
your old device.
l Periodically back up personal information stored on your memory card or your device memory. If
you change to a different device, be sure to move or delete any personal information on your old
device.
l Do not open messages or emails from strangers to prevent your device from becoming infected
with a virus.
l When using your device to browse the Internet, do not visit websites that might pose a security risk
to avoid your personal information from being stolen.
l If you use services such as the portable Wi-Fi hotspot or Bluetooth, set passwords for these services
to prevent unauthorised access. Turn these services off when they are not in use.
l Install device security software and regularly scan for viruses.
l Be sure to obtain third-party applications from a legitimate source. Downloaded third-party
applications should be scanned for viruses.
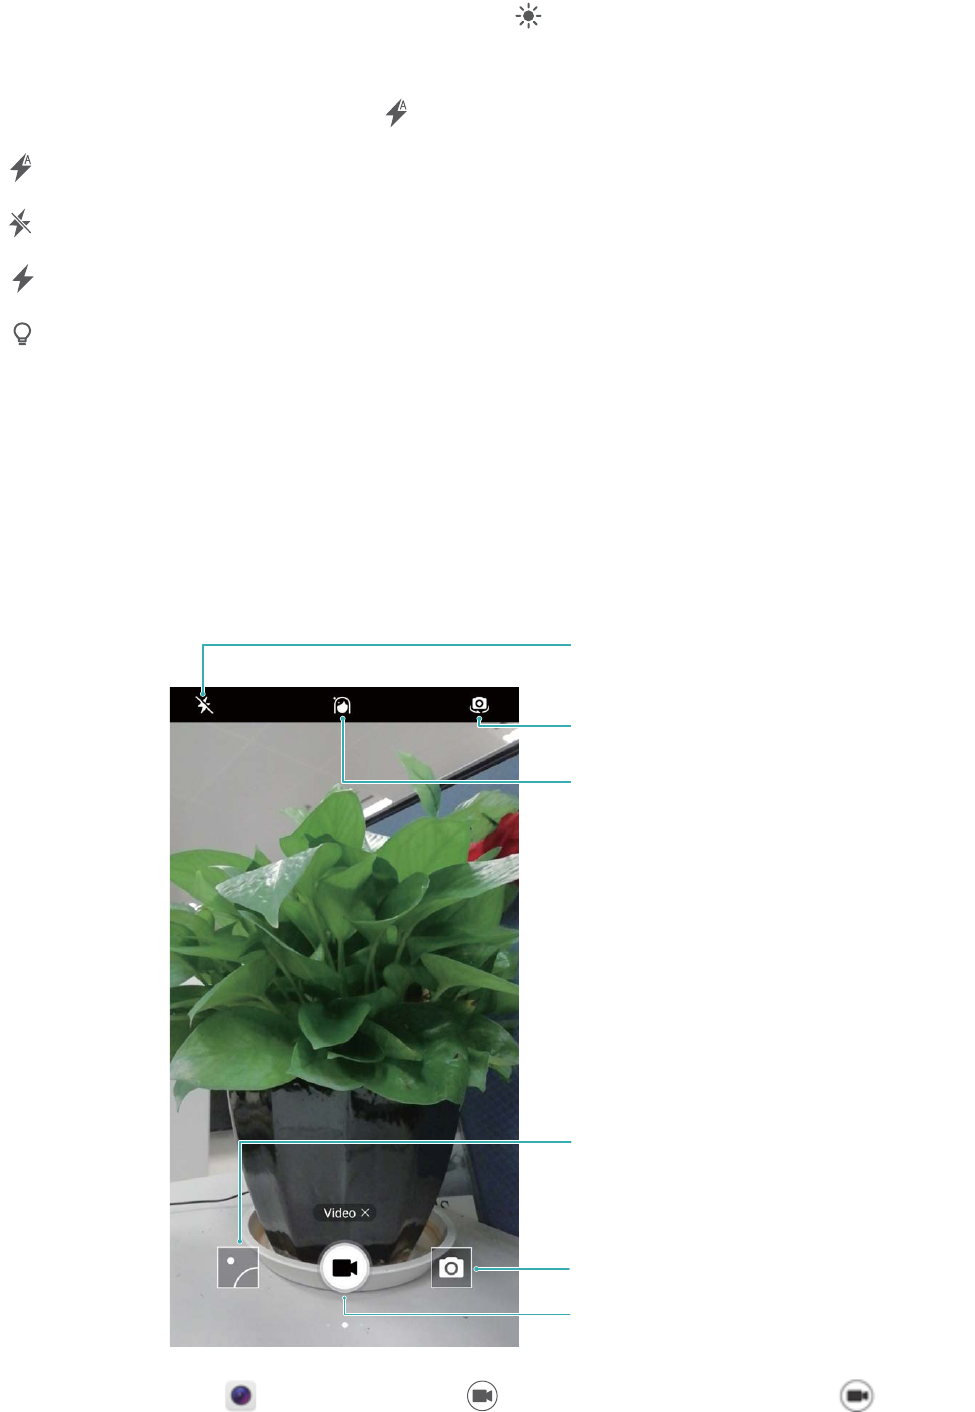
New Device
8
l Install security software or patches released by Huawei or authorised third-party application
providers.
l Using unauthorised third-party software to update your device may damage your device or put your
personal information at risk. It is recommended that you update through your device's online
update feature or download ofcial update packages for your device model from Huawei.
l Some applications require and transmit location information. As a result, a third-party may be able
to share your location information.
l Some third-party application providers may collect detection and diagnostic information on your
device to improve their products and services.
Obtaining help
Read the Quick Start Guide included with your phone.
Touch Settings > System > About phone > Legal to read the legal information.
Visit http://consumer.huawei.com/en/ for more information.
New Device
9
Gestures and Operation
Screenshots and Screen Recording
Take Scrolling Screenshots to Capture Entire Pages
Tired of having to take several screenshots to capture long articles or chat records? You can use your
Phone's scrolling screenshot feature to take a screenshot that scrolls down to the bottom of the page,
capturing all the information on the page in a single screenshot.
Use shortcuts to take scrolling screenshot: Swipe down from the status bar, open the shortcuts
panel, then touch to take a scrolling screenshot. Touch within three seconds of taking the
screenshot and the screen will automatically scroll down and keep taking the screenshot. During the
scrolling process, touch the scrolling area to end the screenshot.
After taking the screenshot, touch or to edit or share the screenshot. The screenshot will be
saved in Gallery by default.
10
Record Exciting Moments on Your Screen
The screen recording feature comes in handy when you are making tutorial videos or want to record
exciting gaming moments on your Phone.
Screen recording will end if you make or answer a call.
Use shortcut to start recording: Swipe down from the status bar and open the shortcuts panel,
then touch to start recording the screen. To end the recording, touch in the upper left
corner of the screen.
Use combo key to start recording: Simultaneously press the Power button and the Volume up
button to begin recording. To end the recording, simultaneously press the Power button and the
Volume up button again.
Gestures and Operation
11
You can view screen recordings in Gallery.
Capture a screenshot
Using a combination of buttons: Press the power and volume down buttons simultaneously to
capture a screenshot.
Using the shortcut icon: Swipe down from the status bar to open the notication panel. Touch
to take a screenshot.
Using Three-nger screenshot: Swipe down from the centre of the screen with three ngers to
capture a screenshot.
Gestures and Operation
12
After taking the screenshot, touch or to edit or share the screenshot. The screenshots are
saved in Gallery by default.
Gestures and Operation
13
Home Screen
Quick Switch
Use Shortcut Switches to Quickly Enable Frequently Used Features
Want to quickly enable or disable mobile data or Wi-Fi? Swipe down from the status bar and open the
shortcuts panel, then touch the corresponding shortcut switch to enable or disable a feature. Touch
and hold a shortcut switch icon to enter the feature's settings page.
Adjust the Position of Shortcut Switches to Your Liking
Adjust the positions of the shortcut switches to put the ones you use regularly at the top.
Swipe down from the status bar, open the shortcuts panel, and touch . From the shortcuts panel,
you can:
Rearrange shortcut switches: Touch and hold a shortcut switch and then drag the icon to a
position of your choice.
Add a shortcut switch: Drag a shortcut switch from the hidden area of the panel to the displayed
area, then touch BACK.
14
Delete shortcut switches: Drag a shortcut switch from the displayed area of the panel to the hidden
area, then touch BACK.
Notication and Status Bar
Understanding Status Bar Icons
Use the status bar to view connection information, check the remaining battery level, and check for
new notications.
Status icons: Status icons tell you about your Phone's status, including network connections, signal
strength, battery level, and time.
Status icons may vary according to your region or carrier.
Signal strength No signal
Connected over 4G Connected over 3G
Connected over 2G Connected over HSPA+
Connected over HSPA Connected over LTE
VoLTE enabled No SIM card found
Roaming Airplane mode enabled
Bluetooth enabled Connected over Wi-Fi
Wi-Fi network available Receiving location data from GPS
Vibration mode enabled Silent mode enabled
Home Screen
15
Alarms activated Charging
Battery full Battery low
Notication
icons: Notication icons are displayed on the left-hand side of the status bar when you
receive a new message, notication, or reminder.
Missed calls New emails
Downloading data New voicemail
Upcoming events Uploading data
Synchronizing data Phone memory full
Log in or synchronization error Synchronization failed
More notications
Open the Notication Panel to Get Important Information
Want to ensure that you do not miss out on any important notications? From your Phone's status
bar, you can view real time notication information and your device's operating status.
When there is a notication reminder, you can turn on the screen and swipe down from the status bar
to view the notication. You can access notication and status bar settings in the following ways:
l Access notication and status bar settings when the screen is locked: Turn on the screen and
swipe down from the status bar, touch , enter your password, and then go to Apps &
notications > Notications & status bar > Notication method.
Home Screen
16
l Access notication and status bar settings when the screen is unlocked: Go to Settings
and then go to Apps & notications > Notications & status bar > Notication method.
Disable Disruptive App Notications
Find it annoying to receive so many different types of app notications? You can set and disable app
notications to prevent this from happening.
Go to Settings, then go to Apps & notications > Notications management. From here,
you can disable all app notications. You can also select a particular app and disable its notications
by conguring the app's settings.
Customise Notications to Your Liking
Not a fan of the default notication reminders? You can customize notication reminders so that you
get notications the way you want them.
Go to
Settings, then go to Apps & notications > Notications & status bar. You can:
l Enable notications turn on screen: Enable Notications turn on screen. When your Phone
screen is off, it will turn on when a notication is received.
l Set notication light to pulse: Enable Pulse notication light and the notication light will
icker when you receive new notications.
Home Screen
17
l Display more information in the status bar: Depending on your preferences, you can enable
Display carrier name and Display network speed. You can also set the Notication method
and choose how the Battery percentage is displayed.
Shortcuts
Use Shortcuts to Access Frequently Used Features
Touch and hold an app icon to display a menu of frequently used features for quick access. You can
also touch and hold a feature and drag it to your home screen to create a shortcut.
If you touch and hold an app icon and a shortcut is not created, the app does not support home
screen shortcuts.
Quickly access frequently used app features: Touch and hold an app icon on your home screen,
and then touch a frequently used feature to access it. Each app supports up to four frequently used
features. These are preset by the app and cannot be changed. For example, to take a sele, touch and
hold the camera icon, and then touch Sele in the pop-up menu.
Add shortcuts to your home screen: Touch and hold an app icon on your home screen to bring up
the menu. Touch and hold the desired feature, and then drag it to your home screen to create a
shortcut. For example, you can add a shortcut for the camera's sele feature for quick access to the
sele camera.
Home Screen
18
Consolidated Settings: Making Customisation Simpler
Having a hard time nding the settings you need? Do you nd manually changing your settings too
frustrating? EMUI 8.0 has made things simpler by grouping related settings together. A clustered
display makes the main settings screen clearer, and voice activation of settings has been added.
Update 1: Simplication and consolidation of settings
EMUI 8.0's settings menu is responsive to your usage habits, and will change the settings order and
clustering accordingly. This helps keep everything simple and clear.
App Shortcuts: Making App Features Start Faster
Do you love to take seles, and want to be able to take them in just one step? EMUI 8.0 offers app
feature shortcuts for you to use with your most frequently used features, letting you add them to the
home screen and open them in a single step.
Using shortcuts to access frequently used features: EMUI 8.0 has added shortcuts to access
frequently used features. On the home screen, touch and hold the icon of a frequently used app, and
select the desired feature in the pop-up menu to quickly launch it.
How to add an App feature shortcut to the home screen: EMUI 8.0 supports adding app feature
shortcuts to the home screen. Touch and hold any app icon on your home screen, touch and hold the
desired feature in the pop-up menu, then drag it to your home screen to create a feature shortcut.
Home Screen
19
Screen Lock and Unlock
Set a Lock Screen Password to Protect Your Privacy
Personal photos, contact information, and banking apps, your Phone stores a lot of sensitive
information. Set a lock screen password so that a password is required each time you unlock your
Phone. A lock screen password helps to protect your private information if your Phone is lost or
accessed by an unauthorised user.
Set a lock screen password: Open Settings, go to Security & privacy > Screen lock &
passwords, and set the type of lock screen password you prefer.
l Set a PIN: A PIN number is a sequence of digits. Entering a PIN to unlock your device is quick and
simple. For better security, use a long sequence of random numbers as your PIN. Go to Password >
PIN, follow the prompts to set up a PIN, then touch OK.
l Set a pattern: Unlock your device by drawing a preset pattern on the screen. For better security,
use a pattern that includes overlapping line segments. Go to Password > Pattern and draw the
same pattern twice. The pattern must connect at least 4 dots.
l Set a password: A password made up of numbers, letters, and special characters is more secure
than a PIN or pattern. For better security, use a password with 8 or more characters that includes
numbers, letters, and special characters. Please memorise the password so that you don't get locked
out of your device if you forget it. Go to Password > Password, follow the prompts to set up a
password, then touch OK.
l Unlock your device using a
ngerprint: If your device supports ngerprint unlock, this is the
recommended unlock method. Using a ngerprint is a secure and quick way to unlock the
device. After setting a lock screen password, touch Enrol in the dialog box that pops up and
follow the onscreen prompts to enrol your ngerprints.
l For security reasons, please do not disable the lock screen password: A lock screen
password prevents unauthorised access to your device. For the security of your device, do not
select None as the screen lock method.
l Regular password prompts help you to remember your password: If you have not
entered your screen lock password for 3 days, the system will require that you enter the
password to unlock your device.
Lock the Screen to Quickly Secure Your Phone
If you don't use your Phone for a set period of time, the screen will turn off and lock. As long as the
screen stays on, you can use your Phone without needing to unlock the screen. Lock your screen
when you are not using your Phone to protect your privacy and prevent mistaken inputs.
Set a lock screen password to help protect your privacy. You can lock your device in the following
ways:
Home Screen
20
Lock the screen instantly with the Power button: Press the Power button to lock the screen at
any time.
Lock the screen with one-touch screen lock: Pinch two ngers together on the home screen to
enter the editing screen. Touch Widgets > Screen Lock and add the Screen Lock widget to your
home screen. This helps reduce wear and tear on your power button. After leaving the home screen
editing mode, touch the Screen Lock widget to instantly lock your screen. To lock your screen this
way, rst switch to the home screen page where the Screen Lock widget is located.
You can also customise the lock screen style according to your preferences:
Change the lock screen style: Your device uses Magazine unlock by default. Open Settings. Go
to Security & privacy > Screen lock & passwords > Screen lock style and select the lock screen
style you that suits you.
Set a custom message as your lock screen signature: Touch Lock screen signature to
display a custom message on the lock screen each time the screen lights up.
Go Back to Basics with Simple Mode
Does your home screen look cluttered with app icons and small text? Simple mode displays larger
icons and fonts on the home screen, adopting a more concise layout that allows you to navigate more
easily.
Open Settings, go to System > Simple mode, and touch .
In Simple mode, you can:
l Edit home screen icons: Touch and hold any of the icons to enter home screen editing mode, then
you can add or remove app icons accordingly.
l Exit Simple mode: To exit Simple mode, touch Standard mode.
Home Screen
21
Open app
Add contact/app
Exit Simple mode
Press and hold
the icon to enter
editing mode
View/open more apps
Home Screen Management
Manage Home Screen Icons
Is your home screen cluttered with app icons? You can move or delete icons from the home screen or
sort and move them to folders for more convenient use.
Move a home screen icon: From the home screen, touch and hold an app until your Phone vibrates,
then drag it to any position on the screen.
Delete an app: From the home screen, touch and hold the app you want to uninstall until your
Phone vibrates, then drag it to
. Follow the onscreen prompts to delete the app.
To ensure that the system runs normally, some preinstalled system apps cannot be uninstalled.
Create a folder to store app icons: From the home screen, touch and hold an app until your Phone
vibrates, then drag it on top of another app. The two apps will now be placed in a new folder.
Home Screen
22
Delete a folder: Open the folder, touch , deselect all the apps, then touch OK. The folder will be
deleted automatically and all the apps in the folder will be moved to your home screen.
Rename a folder: Open the folder, touch the folder name and enter a new name.
Add or delete app icons from a folder: Open the folder, touch , select or deselect apps as
required and then touch OK. The selected apps will be automatically added to the folder while the
deselected apps will be removed from the folder.
Another way to remove an app from a folder is to touch and hold the app in the folder until your
Phone vibrates, and then drag it to the home screen.
Manage Your Home Screen
Too many icons on your home screen? You can add a new page to your home screen and customise it
to your liking.
Touch and hold an empty area on the home screen to enter home screen editing mode. You can then:
l Add a new home screen page: Touch
at the left or right side of the screen to add a new
home screen page.
l Delete an empty home screen page: Touch on a blank screen to delete the page.
Home screen pages with app icons or widgets on them cannot be deleted.
l Modify home screen page order: Touch and hold the home screen page you want to shift, then
drag it to the position of your choice.
Home Screen
23
l Set a default home screen page: Touch in the upper part of the home screen to set the
selected home screen page as your default home screen page.
Set Your Home Screen Wallpaper
Want to set a picture you like as your home screen wallpaper? Personalise your wallpaper to make
your home screen stand out.
Go to Settings, then go to Display > Wallpaper. You can:
l Set a picture as your home screen wallpaper: Touch Set wallpaper. From More or Gallery,
select a picture that you like and follow the onscreen instructions to select Lock screen, Home
screen or Both.
l Randomly switch wallpaper: Enable Randomly change home screen wallpaper and set the
Interval and Album to display.
Set a picture in your Gallery as your wallpaper: Have a great picture you want to set as your
wallpaper? Open Gallery, open the picture that you like and then go to > Set as >
Wallpaper to set the picture as your home screen wallpaper.
Manage Your Home Screen Widgets
Want to quickly add widgets such as one-touch lock screen, memo browser, or diary to your home
screen? You can add, move or delete home screen widgets to tidy up your home screen and make it
easier to use.
Add widgets: Touch and hold an empty area on the home screen to enter home screen editing
mode. Touch Widgets, select a widget and drag it to an empty area on the home screen.
Home Screen
24
Check that there is enough empty space on the home screen to put the widget. If there is not
enough space, add another home screen page or free up some space on the current home screen
page.
Delete widgets: Touch and hold a widget on the home screen until your Phone vibrates. Drag the
widget to Remove at the top of the screen.
Move widgets: Touch and hold a widget on the main screen until your Phone vibrates, then drag the
widget to any position on the main screen.
Use App Drawer to Store Apps
Want to store your apps in one location on your home screen to give your home screen a neater look?
You can enable the app drawer on your home screen to store all your apps and free up space on your
home screen.
Open Settings, go to Display > Home screen style, and select Drawer. If you want to switch
back to a standard home screen, select Standard.
Add an app icon from the app drawer to the home screen
: After you enable the app drawer,
touch on the home screen to enter the app list. From the app list, touch and hold the app
icon that you want to add and drag it to any position on the home screen.
Home Screen
25
Contacts
Managing Business Cards
Business Card Management: Add and Share Business Cards with Ease
Find it time-consuming to input the content of business cards you receive into your contacts? Is
sharing mobile contacts with your friends a hassle? Business card manager gives you an easy way to
add and share business cards.
Business card manager supports the following features:
l Scan a QR code to add a contact: Scan the QR code on a business card to conveniently and
quickly save the information to your contacts.
l Create and share your own business card: Create a personal business card in your contacts and
your device will automatically generate a QR code for easy sharing with other people.
l Share contacts: Select the contact you want to share and touch the QR code at the top of the
contact details screen for quick and easy sharing.
Share Contacts Using Electronic Business Cards
Share your business card: Open
Contacts and touch Me to set your prole picture, enter your
name, work address, phone number and other information, then touch . Your device will
automatically create your QR code business card. To share your business card, use the QR code or
touch , select a sharing method, then follow the onscreen instructions.
26
Share contacts: Open Contacts, select the contact you want to share, then touch the QR code
in the upper right corner to share your contact using the QR code. You can also touch Share, select a
sharing method, and follow the onscreen instructions to share.
If the other party's device supports QR code analysis, they can directly take pictures or scan QR
codes to add contacts.
Managing Contacts
Import and Export Contacts
When you switch to a new phone, you'll need to transfer your existing contacts.
Open Contacts, go to > Import/Export, and then select one of the following:
l Import contacts: Select Import from storage, Import from another device or Import
fromSIM and follow the instructions.
l Export contacts: Select Export to storage or Export to SIM and follow the onscreen
instructions. By default, .vcf les exported through Export to storage are saved in the root
directory of your device's internal storage. Open Files to view exported les.
You can also import or export contacts using the Backup feature. Backup records are saved in the
Huawei folder of Files by default.
Contacts
27
Manage Your Contacts
The Contacts app gives you a host of features for managing your contacts. You can simplify your
contacts list, choose to only view contacts on your phone or SIM card, and easily nd your frequent
contacts.
Merge duplicate contacts: If there are duplicates in your contacts list, you can use the Merge
duplicate contacts function to merge duplicate contacts. From the contacts list, Go to >
Organise contacts > Merge duplicate contacts, select the contacts you want to merge, and then
touch .
Display contacts for different accounts: Want to only view contacts on your phone or SIM card?
Go to > Display preferences, and select the accounts that you want to display. You can also:
l Enable Simple layout: Want to hide the prole pictures, companies, and titles in the contacts list?
From the contacts list screen, go to
> Display preferences, and enable Simple layout.
l View contact storage space: Want to check your contact storage space? From the contacts list,
go to > Display preferences. In the Accounts section, you can see the total storage space
available on your device or SIM card.
Manage Contact Groups
Want to send a message to a group of colleagues or host a get-together? Smart groups automatically
groups your contacts by company, city, and most recent contact time, so you can quickly send a group
email or message.
Create a contact group: From the groups list, touch , enter the group name (such as Family or
Friends), and then touch OK. Follow the onscreen instructions to add contacts, and then touch .
Send a message to smart group contacts: From the groups list, from the Smart groups section,
open a group and touch to send a message or to send an email.
Edit a group: From the groups list, select the group you want to edit and touch
to add a
contact, or touch to Remove members, Group ringtone,Delete group or Rename.
Delete a group: From the groups list, touch and hold a group, and then touch Delete.
Add Contacts to the Blacklist
You can add a contact number to the blacklist to avoid receiving harassing or spam calls from them.
Open Contacts, touch and hold the contact you want to add to the blacklist, and then touch
Add to blacklist. Your device will block all calls and messages from contacts in the blacklist.
View blacklisted contacts: Open Phone Manager, go to Blocked > , and then touch
Numbers blacklist to view the blacklist.
Contacts
28
Remove a contact from the blacklist: Open Contacts, touch and hold the contact you want to
remove from the blacklist, and then touch Remove from blacklist.
Erase Call and Message Records
Use Erase traces to erase call and message records for a contact to protect your privacy.
Open Contacts, select a contact, and go to > Erase trace > Erase. All of your call and
message records for that contact will be erased.
Merging Third-Party App Contacts
Integrated Social Networks: Bring People Together
Want to expand your social network? Want to sync information from a social media account to your
contacts? You can log in to a social media account (such as LinkedIn) and sync your contacts'
information (including company, title, and email) to your local contacts and enrich your social
network.
Associate Contact Information with Your Social Account
What does each contact in your phone do? What are their emails? What are their job titles? You can
use third-party social media apps (such as LinkedIn) to
nd out more information about your contacts.
Associate LinkedIn account: Open Contacts, go to > Settings > Associate LinkedIn
account and follow the onscreen instructions to log in to your LinkedIn account. Once logged in,
your Phone will automatically update your local contacts information. To sync all your LinkedIn
contacts information, from the LinkedIn settings screen of Contacts, go to Sync LinkedIn contacts
> All LinkedIn contacts, and select Sync.
View contacts information provided by LinkedIn: Open a LinkedIn contact and touch View
LinkedIn prole.
Disassociate LinkedIn contacts: Go to
> Settings > LinkedIn, and select Disassociate.
View an Sender's Job Description
If you've just started a new job, you'll need to quickly gure out what all of your new colleagues do.
You can associate a social media account (such as LinkedIn) with your email contacts. The job
information of email senders will then be displayed on the email details screen.
From the Email inbox, open an email you have received. Go to email details, then touch the
sender's prole picture and select View LinkedIn prole.
Contacts
29
Dialling
Basic Calling Functions
Make Calls
On the dialler screen, enter part of the phone number or the rst letter or pinyin initials of the
contact's name. Your Phone will automatically search for the relevant contacts.
Open Dialler. From the dialler screen, enter the phone number or the rst letter or pinyin initials
of the contact's name (for example, enter hwkf for Huawei customer service). Your device will
automatically search Contacts, call logs, and the yellow pages. Touch the contact you want to call in
the list. If you have a dual-SIM device, touch
1
or
2
to make the call. You can check your
contact's status on your screen (such as ringing or call forwarding enabled). Touch to hang up.
Press the power button to hang up: Accidentally dialled the wrong number and hid the calling
screen, and want to hang up quickly? You can set Power button ends call. On the Dialler screen,
go to
> Settings, and enable Power button ends call to quickly hang up calls.
Make Emergency Calls
In an emergency situation, if your Phone is powered on and within the service area, you can make
emergency calls even if the screen is locked or there is no mobile reception.
The emergency call feature is subject to your local regulations and Internet service provider.
Network issues or environmental interference may lead to failed emergency calls. In emergency
situations, do not rely on your Phone as your only method of communication.
Open Dialler or touch Emergency call on the lock screen, enter the local emergency number on
the dialler, and then touch . If your location has strong mobile reception and your phone is
connected to the Internet, your location will be obtained and displayed on your screen for your
reference.
Enable Call Waiting to Never Miss Important Third-Party Calls
Receiving an incoming call while you're already on a call? Call waiting allows you to answer the new
call and then switch between the two calls.
Some carriers may not support this feature.
Open Dialler, go to > Settings > Additional settings, and enable Call waiting. When
receiving another call, touch
to answer the call and place your rst call on hold. Touch or
the call on hold in the call list to switch between calls.
30
Enable Call Forwarding and Never Miss a Call
If you are unavailable to answer calls, you can set your device to forward calls to another number.
Some carriers may not support this feature.
Open Dialler, and go to > Settings > Call forwarding. If you have a dual-SIM device, in the
SIM 1 or SIM 2 section, touch Call forwarding and select a forwarding method. Enter the number
you want to forward your calls to, then conrm. When call forwarding is enabled, your device will
automatically forward eligible calls to the preset number.
Delete Call Logs
You can delete call logs that you no longer need.
Open
Dialler and touch to hide the dialpad. You can now perform one of the following:
l Delete a single record: Touch and hold an entry, then touch Delete entry.
l Delete multiple records: Touch , select the entries you want to delete or touch Select all,
then touch .
Enable Voicemail
Worry about missing important calls when your phone is turned off? Voicemail records real-time
messages from callers so you'll never have to worry about missing an important call.
Dialling
31
Voicemail requires carrier support. Please check that you have enabled this service. Contact your
carrier to learn more about your voicemail number, service details, and fee information.
Enable voicemail: Open Dialler, go to > Settings touch Additional settings (for dual-SIM
phones, in the SIM 1 or SIM 2 section, touch Additional settings), then go to Voicemail >
Voicemail number and enter the voicemail number provided by your carrier.
Check voicemail messages: On the dialer, touch and hold 1 to call the voicemail and listen to
messages.
Activate International Roaming for Borderless Communication
When you travel abroad for work or a holiday, you can make calls when your phone is roaming
without having to dial the country code.
This feature requires carrier support. Please ensure that roaming or international roaming has
been enabled for your SIM card. For more information, contact your carrier.
Open Dialler or Contacts to make a call.
Block Nuisance Calls: Get the Peace and Quiet You
Deserve
Fed up of nuisance calls and telephone scams? Try using Blocked.
Congure interception rules: Open Dialler, go to > Blocked, and then touch .
Congure the interception rules and blacklist or whitelist according to your preferences.
Enable VoLTE to Enjoy HD Calls
Open Settings, and go to Wireless & networks > Mobile network. In the settings section for
SIM 1 or 2 (if supported by your network), you can:
l Enable 4G: Turn on Enable 4G. Due to carrier customization, there may not be a 4G switch on
your phone. This indicates 4G is already enabled and does not need to be turned on manually.
l Enable VoLTE calling: Turn on VoLTE calls.
l Enable Wi-Fi calling: Turn on Wi-Fi calling.
Use VoWi-Fi for a New Calling Experience
You can use VoWi-Fi to make voice and video calls in any location that has a Wi-Fi network, even
when there is no mobile phone network reception.
This feature must be supported by your carrier. Contact your carrier for more information,
including fees and charges.
Dialling
32
Open Dialler, go to > Settings > Wi-Fi calling, enable Wi-Fi calling. Touch Mode and
follow the onscreen instructions to set the preferred network.
Dialling
33
Message
Basic Messaging Functions
Send Messages
Text messages give you a quick and easy way to communicate with friends, family and colleagues. In
addition to text, you can also add emojis or insert pictures and audio les to enrich your messages.
Open Messaging. From the list of messages, go to > and select contacts or groups.
Enter your message content, touch to add other types of content, and touch to send the
message.
Save a draft message: Touch to save a message as a draft.
Manage Messages
The Messaging app makes it easy to stay on top of your messages.
Open
Messaging. From the list of messages, touch a contact or phone number to view your
conversations with them. Open an unread message and the system will automatically identify and
highlight the phone number, website address, email, time, and other information within the message.
Touch the relevant information to initiate an operation.
Reply to messages: Enter the message content in the text box and touch .
Add a message to favourites: Worried about accidentally deleting an important message? Touch
and hold a message and follow the onscreen prompts to add the message to favourites or lock it.
Forward a message: Want to share a message with your friends? Touch and hold a message and
follow the onscreen prompts to forward or share it.
Delete a message: Tired of the clutter created by too many messages? Delete unneeded
conversations or messages to clean up your message list. Swipe the message or conversation to the
left, then touch . To delete notication messages, touch and hold the message or conversation to
enter the editing screen, select the conversation or message, and go to > Delete. Deleted
messages cannot be recovered.
Quickly reply to a message: Want to quickly reply to a message you received? New messages will
be displayed in the notication panel. Touch to quickly reply.
Search messages: Want to quickly nd a message? From the list of messages, enter the keywords in
the search bar and the relevant results will be displayed beneath the search bar.
Pin to top: Want to pin an important message to the top of the list? From the list of messages, touch
and hold a message to select it, then touch
. Pinned messages will be displayed below
34
notication messages. To pin unread messages to the top, go to > Settings > Pin unread
messages.
Block Spam Messages
Tired of receiving spam messages? Enable message blocking to say goodbye to spam messages!
Open Messaging. On the list of messages, go to > Blocked, touch and congure the
interception rules, whitelist, and blacklist.
Attach a Signature to a Text Message
You can create a signature to add to the end of every text message to give your messages a more
formal touch.
Open Messaging, go to > Settings > Advanced > Signature, and enable Attach signature.
Touch Edit signature, enter your signature, and touch OK.
Message
35
Camera
Basic Camera Functions
Use Your Camera's Basic Functions
Understand your camera's basic functions to help you take better pictures.
5VSOGMBTIPOPGG
7JFXSFDPSEFEQIPUPTBOEWJEFPT
4XJUDIUPWJEFPNPEF
5BLFBQIPUP
4XJUDICFUXFFOGSPOUSFBSDBNFSB
&OBCMF.PWJOHQJDUVSFNPEF
&OBCMF8JEFBQFSUVSFNPEF
&OBCMF1PSUSBJUNPEF
Basic photo mode: Open Camera and in the viewnder, touch to take a picture. You can
also congure the Volume down button to work as a shutter button for your camera.
Select a photo mode: From the viewnder, swipe right to enter the photo mode screen. Here you
can change the photo mode according to your needs.
Zoom your camera in or out: From the viewnder, touch the screen with two ngers and pinch
them together to zoom in or move them apart to zoom out. If you zoom in beyond your camera's
optical zoom limit, the image quality will decrease. After you touch the screen with two ngers and
zoom in or out, a zoom bar will appear on the side of the screen, which you can also use to zoom
your camera in or out.
Adjust your camera's exposure: Your camera will adjust its exposure automatically depending on
the ambient light level. Increasing the exposure will make pictures appear brighter whereas decreasing
36
the exposure will make pictures appear darker. You can adjust the exposure manually from the
viewnder by touching the screen and dragging the icon up or down.
Enable or disable ash: Flash is used to provide extra lighting for taking photos in low light
conditions. From the viewnder, touch to select one of the following ash modes:
l Auto: The camera automatically enables or disables ash depending on the ambient light level.
l
Off: Disable ash.
l
On: Enable ash.
l
Always on: Flash is always on while you are in the viewnder.
Enable geolocation: Records your geographic location when you take a picture to allow you to
search through your pictures by location. From the viewnder, swipe left to enter the settings menu
and enable GPS tag.
Use Camera to Record Videos
Besides taking pictures, you can also use the camera to capture high resolution videos with sound.
Turn flash on/off
Enable Beauty mode
Switch between front/rear camera
View recorded video
Switch to photo mode
Record video
Record a video: Open Camera and touch to switch to video mode. Touch to start
recording a video.
Camera
37
Take a picture while recording a video: You can touch when recording a video to take a
picture.
Zoom your camera in or out: From the viewnder, touch the screen with two ngers and pinch
them together to zoom in or move them apart to zoom out. If you zoom in beyond your camera's
optical zoom limit, the image quality will decrease. After you touch the screen with two ngers and
zoom in or out, a zoom bar will appear on the screen, which you can also use to zoom your camera in
or out.
Turn on ash: When recording a video in low light conditions, you can touch and select to
turn on the ash.
Adjust Camera Settings
In the settings page of Camera you can adjust a variety of camera settings, modes, and specications
to suit your usage needs.
Touch viewnder to shoot: Open Camera, swipe left to open Settings and enable Touch to
capture. Now when you touch an object in the viewnder, the camera will focus and take a picture
automatically.
Capture smiles automatically: From Settings, enable Capture smiles. The camera will now take a
picture automatically when it detects a smile in the viewnder.
Lock focus distance: From Settings, touch Touch & hold shutter button and select Lock focal
length. Now when you touch and hold the shutter button, the camera will no longer auto focus.
Use the volume button to take pictures, focus a shot, or zoom in or out: From Settings, touch
Volume button function and select Shutter, Zoom, or Focus mode according to your usage needs.
Use an Assistive Grid to Help You Compose Your Photos
If you don't know where to place the subject in your photos, try using the assistive grid feature to
improve your composition.
To select an assistive grid, open
Camera and swipe left on the viewnder to open the Settings
screen. Touch Assistive grid and select a grid type.
The rule of thirds: Select the Grid or Phi grid grid. The four points where grid lines intersect are the
focal points of the photo. Position the subject under one of these points to create an interesting
composition.
Camera
38
The golden spiral: Select the Fibonacci spiral (left) or Fibonacci spiral (right) grid. The centre of
the spiral is the focal point of the photo. Position the subject here to lead the viewer around the
image in a natural ow.
Camera
39
Wide Aperture
Wide Aperture Mode: Emphasize Your Subject
Want to showcase a peony in a sea of owers, highlight your subject in a crowd, or increase the
brightness in a low light environment? Enable Wide aperture mode to blur the background and
highlight your subject to take crisp photos even in low light.
l Quick focus to capture eeting moments: Wide aperture mode can help you quickly capture a
eeting moment during your travels while avoiding any possible blurring caused by moving the lens
or focusing too slowly.
l Blur the background to highlight the subject: Unable to pick out the focus in a crowd? Enable
Wide aperture mode to blur the background, so you can stand out with ease even on a crowded
street.
l Capture moments with ease even at night: Are your photos blurry when taken at night or in low
light? Enable Wide aperture mode to increase the amount of light let in by your lens and customize
your photo brightness so you can capture the best lit moment even in low light.
Camera
40
Wide Aperture Mode: Make Your Subject Stand Out
Wide aperture mode produces photographs with a shallow depth of eld. This creates a blurred
background that lends greater emphasis to the photo's subject.
Take a wide aperture photo: Open Camera. Touch the icon at the top of the screen to
enable Wide aperture mode. Touch the icon again to exit Wide aperture mode. If the icon isn't
visible, swipe right on the screen and select Photo. When shooting, touch the screen to select a focal
point, and then touch
to take the photo.
l
For optimal results, ensure that the subject is positioned no more than 2 m (6 ft) away from the
camera.
l Touch and swipe left or right on the slider to adjust the aperture level. The lower the
aperture value, the more blurred the background will appear.
Edit a wide aperture photo: Open Gallery and touch a photo that is marked with the icon.
Touch to change the focal point and aperture value. Touch to save the photo.
Camera
41
Panorama
Use Panorama to Take Panoramic Seles
Want to t more friends or scenery in a sele? Use Panorama to take seles with a wider eld of view.
1 To take a panoramic sele, open Camera and touch to switch to the front camera.
2 Swipe right on the screen and touch Panorama.
3 Hold your Phone steady and touch to take the rst picture.
4 Follow the onscreen instructions and turn your Phone in one direction until the blue frame
overlaps with the square screen frame. The camera will automatically take another picture.
5 Follow the onscreen instructions and turn your Phone in the opposite direction until the blue frame
overlaps with the square screen frame. The camera will automatically take a nal picture.
6 Once complete, the camera will automatically combine the three pictures into a wide-angle
sele.
Panorama: Capture the World in Wide-angle
Panoramas provide a wider viewing angle than ordinary photos, letting you take sweeping landscape
shots.
To capture a panorama shot, the camera takes multiple photos of objects within our visual eld and
stitches them together into a single photo.
When taking a panorama,
nd a wide, open space that is some distance away from the subject
and try to avoid backgrounds that are all in one colour.
Open Camera. Swipe right on the screen, and then touch Panorama. In Panorama mode, touch
at the top of the screen to congure the shooting direction.
Hold your Phone steady, and then touch to start shooting. Slowly move the Phone in the
direction indicated, holding the device steady and ensuring that the arrow stays level with the centre
line. Touch when you are nished. The camera will automatically stitch the photos together to
create a panorama.
Camera
42
Pro Mode
Pro Camera: Use Light to Tell Your Story
Pro camera lets you adjust exposure, shutter speed, and a range of other settings, putting you in
charge of your camera.
Pro camera is a pre-installed camera mode in your Phone. In Pro camera mode, you can adjust various
camera parameters to produce photos and videos with results comparable to professional cameras.
Pro mode info
Select metering mode
Adjust ISO
Adjust shutter speed
Adjust exposure value
Select white balance mode
Select focus mode
Camera
43
Use Pro Camera Mode to Take Landscape Shots
Use Pro camera mode to customise camera settings and capture landscape shots that stand out.
Open Camera and swipe right, touch Pro photo to enable Pro camera mode.
Metering mode: In Pro camera mode, touch . Select the appropriate metering mode for the
scene.
Metering mode Scene
Matrix Wide landscapes (coastal views, mountains)
Centre Photos with a central subject that is separated from the background.
Spot Photos with subjects that you want to isolate, such as owers or trees.
Brightness settings
l ISO: In Pro camera mode, touch and then slide the ISO slider horizontally to change the value.
An ISO of 400 or less is recommended to prevent excessive noise. For daytime shooting, set the
ISO to 100200; for night scenes, set the ISO to around 400.
l Shutter speed: In Pro camera mode, touch and drag the slider until the desired value is
highlighted.
For static scenes (such as mountains), a shutter speed between 1/80 and 1/125 is
recommended; for moving scenes (such as waves), it is recommended that you mount your
phone on a tripod and set a slower shutter speed (less than one second).
l Exposure compensation: In Pro camera mode, touch
&7
and drag the EV slider until your
preferred value is highlighted.
White balance: In Pro camera mode, touch
AWB
and drag the AWB slider until your preferred value is
highlighted.
l If shooting in direct sunlight, select ; if conditions are dark or overcast, select .
l Select to change the colour temperature. To compose a photo with warmer tones or a
vintage look, set a higher K value; for colder light or a sense of stillness, set a lower K value.
Focus: In Pro camera mode, touch
"'
and drag the AF slider until your preferred value is
highlighted.
Focus mode
Scene
AF-S Static scenes (such as mountains)
AF-C Moving scenes (such as waves)
MF Isolated subjects (such as owers)
Camera
44
Keep your device level: In Pro camera mode, swipe left on the viewnder and enable Horizontal
level. This feature displays a spirit level in the viewnder. Ensure that the dotted line lines up with the
solid line. This indicates that your device is level.
l In Pro camera mode, when one setting is changed, other settings may also change
automatically.
l The above settings are guidelines only. For optimal results, adjust camera settings according to
the actual shooting conditions.
Use Pro camera mode to take portrait shots
Want to give your portrait shots more personality? Use Pro camera mode to customise camera
settings and fashion your own unique portrait style.
Open Camera and swipe right on the viewnder to enable Pro camera mode.
Metering mode: For portrait shots, select or and position the subject in the centre of the
photo.
Brightness settings
l ISO: For portrait shots, a low ISO setting is recommended to prevent excessive noise. In mixed light
conditions, you may need to experiment to nd the right ISO setting.
Scene
Recommended ISO value
Camera
45
Outdoors 100200
Indoors 400
Night scenes 400800
l Shutter speed: Use slower shutter speeds for dark scenes and higher shutter speeds for well-
illuminated scenes. For static subjects, use a shutter speed of 1/80 to 1/125. For moving subjects,
use a shutter speed of 1/125 or higher.
l Exposure compensation: If the subject and background are too dark, increase the EV value; if they
are too bright, lower the EV value.
Focus: For portrait shots, it is recommended that you select Manual Focus (MF) mode. Touch the part
of the photo that you want to isolate with the focus (such as a face) and then capture your shot.
l In Pro camera mode, when one setting is changed, other settings may also change
automatically.
l The above settings are guidelines only. For optimal results, adjust camera settings according to
the actual shooting conditions.
Camera
46
Beautication
Use Portrait Mode to Capture Stunning Portraits
Want to always look your best in your seles? Portrait mode lets you congure different beautication
settings and create an information database for custom beautication.
If you take a sele at night or in low light conditions, your Phone will detect the low ambient light
and automatically enable Night mode to improve the quality of seles. This mode does not have a
switch and is automatically enabled when your device detects low ambient light. Your device will
prompt you when it enables this mode.
l Portrait mode: Enable Portrait mode to automatically apply beautication effects to everyone in
the frame.
l Perfect sele: Enable Perfect sele and your Phone will create a custom beauty plan for you. The
higher the beautication level, the more pronounced the effects.
Use Beauty Mode to Take Stunning Portraits
Want to make your seles or group shots even more beautiful? Beauty mode provides you with
customised options to make every photo beautiful and forever-lasting.
Enable Beauty mode and make your photos shine: Open Camera, enable , and then
touch the icon in the viewnder. Drag the sliders left and right to adjust beautication settings. A
higher Beauty level will make the beautication effects more distinct. After making the adjustments,
touch to take photos.
Enable Perfect
sele mode to customise beautication settings: Open Camera, enable
, and then swipe left to enter the Camera settings screen. Touch Perfect sele and enable
Perfect sele, then follow the onscreen prompts to take photos of yourself looking to the front,
sides, and downwards, and then set the beauty parameters. Larger parameter values produce more
pronounced slimming and beautication effects. After conrming your settings, touch to save
your personalised beauty information.
l Re-entering personal information: In Camera settings screen, go to Perfect sele > Edit
personal info, then follow the onscreen prompts to re-take photos of yourself looking to the front,
sides, and downwards. This will reset the beauty parameters.
l Adjusting beauty parameters: In Camera settings screen, go to Perfect sele > Set beauty
effects to adjust parameters such as skin smoothness and tone.
Camera
47
Light Painting Mode
Light Painting: Shoot Light Trails
Light painting mode automatically sets a slow shutter speed to take long-exposure shots of light trails.
This mode produces stunning photos that have an ethereal quality.
Light painting mode offers four creative shooting modes for different subjects and light conditions:
l Tail light trails: Capture light trails created by cars at night.
l Light grafti: Capture trails created by a moving light source in low-light conditions.
l Silky water: Capture silky-smooth photos of waterfalls and
owing water.
l Star track: Capture stunning photos of star trails in the night sky.
Tail Light Trails: Capture the Lights of the City
Tail light trails lets you create artistic photos of car tail lights at night.
l
Shoot from a distance and slightly above your subject for best results. Ensure that car
headlights do not point directly at the camera, as this can overexpose the image.
l Position your device on a tripod so that it does not move during the exposure.
Camera
48
Open Camera. Swipe right on the screen and then go to Light painting > Tail light trails. Hold
your Phone steady, and then touch to start shooting. A preview of the image is displayed in the
viewnder. Touch when you are nished.
Light
Grafti: Paint a Photo with Light
Light
grafti lets you create patterns or write words by moving a light source in front of the camera.
l Find a dark location away from other light sources and ensure that the subject's silhouette is
not visible. Choose a suitably bright light source of an appropriate colour, such as a small torch
or glow stick.
l Position your device on a tripod so that it does not move during the exposure.
Open Camera. Swipe right on the screen and then go to Light painting > Light grafti. Hold
your Phone steady, and then touch to start shooting. A preview of the image is displayed in the
viewnder. Touch when you are nished.
Camera
49
Silky Water: Capture Silky-smooth Streams and Waterfalls
Silky water lets you capture silky smooth photographs of waterfalls and rivers.
l For better results,
nd a stream or waterfall with lots of water.
l Position your device on a tripod so that it does not move during the exposure.
Open Camera. Swipe right on the screen and then go to Light painting > Silky water. Hold
your Phone steady, and then touch to start shooting. A preview of the image is displayed in the
viewnder. Touch when you are nished.
Camera
50
Star Track: Capture the Beauty of the Stars
Star track lets you use your camera to capture the movement of stars in the night sky.
l For best results, choose a location free of light pollution with an unobstructed view of the sky,
and on a clear night.
l Position your device on a tripod so that it does not move during the exposure.
Open Camera. Swipe right on the screen and then go to Light painting > Star track. Hold your
Phone steady, and then touch to start shooting. A preview of the image is displayed in the
viewnder. Touch when you are nished.
Camera
51
Use Time-lapse to Condense Hours into Minutes
You can use time-lapse to capture images over a long period of time and condense them into a short
video, allowing you to view owers blooming, the ebb and ow of city trafc, and the formation of
clouds during the day and the movement of stars in the night sky.
l Avoid recording time-lapse for too long as it will use up your battery power and storage space.
l Use a sturdy tripod to reduce device movement during time-lapse recording.
Before starting the time-lapse, ensure that the scene is well lit and the camera is in focus. Position the
camera carefully to avoid capturing irrelevant background objects.
Open Camera. Swipe right on the screen, and then touch Time-lapse. Touch to start
recording. Touch to nish recording.
Go to Gallery to play your time-lapse video.
Camera
52
56


Need help? Post your question in this forum.

Forumrules
1

Forum

huawei-p-smart---fig-lx1
  • I have a Huawei p smart FIG-LX1 dual Sim and it has a fingerprint sensor at the back a I used to use it but not the fingerprint option is no longer available in my settings but there is a part which now say voice unlock, how do I restore fingerprint option t Submitted on 30-12-2024 at 16:20

    Reply Report abuse
  • My Optimiser app will not open but keeps crashing. Any suggestions? Submitted on 2-1-2022 at 13:08

    Reply Report abuse
  • Is there an sms inbox for text messages as well as messanger on this phone.

    My medical order form admin group have sent a 6 digit number to my phone number but I dont know how I can view it? Please help I am not a techy so need simple instructions Submitted on 5-11-2021 at 16:41

    Reply Report abuse
  • The battery is charged and there is a sim card in it. How do i turn it on and take a photograph? Submitted on 5-11-2020 at 17:46

    Reply Report abuse


Report abuse

Libble takes abuse of its services very seriously. We're committed to dealing with such abuse according to the laws in your country of residence. When you submit a report, we'll investigate it and take the appropriate action. We'll get back to you only if we require additional details or have more information to share.

Product:

For example, Anti-Semitic content, racist content, or material that could result in a violent physical act.

For example, a credit card number, a personal identification number, or an unlisted home address. Note that email addresses and full names are not considered private information.

Forumrules

To achieve meaningful questions, we apply the following rules:

Register

Register getting emails for Huawei P Smart - FIG-LX1 at:


You will receive an email to register for one or both of the options.


Get your user manual by e-mail

Enter your email address to receive the manual of Huawei P Smart - FIG-LX1 in the language / languages: English as an attachment in your email.

The manual is 15,81 mb in size.


You will receive the manual in your email within minutes. If you have not received an email, then probably have entered the wrong email address or your mailbox is too full. In addition, it may be that your ISP may have a maximum size for emails to receive.

Others manual(s) of Huawei P Smart - FIG-LX1

Huawei P Smart - FIG-LX1 Quick start guide - English - 80 pages

Huawei P Smart - FIG-LX1 User Manual - German - 116 pages

Huawei P Smart - FIG-LX1 Quick start guide - German - 80 pages

Huawei P Smart - FIG-LX1 User Manual - Dutch - 115 pages

Huawei P Smart - FIG-LX1 Quick start guide - Dutch, French, Italian, Portuguese, Spanish - 80 pages


The manual is sent by email. Check your email

If you have not received an email with the manual within fifteen minutes, it may be that you have a entered a wrong email address or that your ISP has set a maximum size to receive email that is smaller than the size of the manual.

The email address you have provided is not correct.

Please check the email address and correct it.

Your question is posted on this page

Would you like to receive an email when new answers and questions are posted? Please enter your email address.


Info