661144
14
Zoom out
Zoom in
Previous page
1/48
Next page
User Guide
© Copyright 2015, 2016 HP Development
Company, L.P.
Intel, Celeron, Pentium, and Thunderbolt are
trademarks of Intel Corporation in the U.S. and
other countries. Windows is either a registered
trademark or trademark of Microsoft
Corporation in the United States and/or other
countries.
For DTS patents, see http://patents.dts.com.
Manufactured under license from DTS
Licensing Limited. DTS, the Symbol, & DTS and
the Symbol together are registered
trademarks, and DTS Sound is a trademark of
DTS, Inc. © DTS, Inc. All Rights Reserved
.
For DTS patents, see http://patents.dts.com.
Manufactured under license from DTS
Licensing Limited. DTS, the Symbol, & DTS and
the Symbol together are registered
trademarks, and DTS Studio Sound is a
trademark of DTS, Inc. © DTS, Inc. All Rights
Reserved .
For DTS patents, see http://patents.dts.com.
Manufactured under license from DTS
Licensing Limited. DTS, the Symbol, & DTS and
the Symbol together are registered
trademarks, and DTS Sound+ is a trademark of
DTS, Inc. © DTS, Inc. All Rights Reserved
.
For DTS patents, see http://patents.dts.com.
Manufactured under license from DTS
Licensing Limited. Play-Fi and the icon are
trademarks of DTS, LLC. © DTS, Inc. All Rights
Reserved .
The information contained herein is subject to
change without notice. The only warranties for
HP products and services are set forth in the
express warranty statements accompanying
such products and services. Nothing herein
should be construed as constituting an
additional warranty. HP shall not be liable for
technical or editorial errors or omissions
contained herein.
Fourth Edition: June 2016
First Edition: August 2015
Document Part Number: 823891-004
Product notice
This guide describes features that are common
to most products. Some features may not be
available on your computer.
Not all features are available in all editions or
versions of Windows. Systems may require
upgraded and/or separately purchased
hardware, drivers, software or BIOS update to
take full advantage of Windows functionality.
Windows 10 is automatically updated, which is
always enabled. ISP fees may apply and
additional requirements may apply over time
for updates. Go to http://www.microsoft.com
for details.
To access the latest user guides or manuals for
your product, go to http://www.hp.com/
support, and select your country. Select Find
your product, and then follow the on-screen
instructions.
Software terms
By installing, copying, downloading, or
otherwise using any software product
preinstalled on this computer, you agree to be
bound by the terms of the HP End User License
Agreement (EULA). If you do not accept these
license terms, your sole remedy is to return the
entire unused product (hardware and software)
within 14 days for a full refund subject to the
refund policy of your seller.
For any further information or to request a full
refund of the price of the computer, please
contact your seller.
Safety warning notice
WARNING! To reduce the possibility of heat-related injuries or of overheating the computer, do not place the
computer directly on your lap or obstruct the computer air vents. Use the computer only on a hard, at
surface. Do not allow another hard surface, such as an adjoining optional printer, or a soft surface, such as
pillows or rugs or clothing, to block airow. Also, do not allow the AC adapter to come into contact with the
skin or a soft surface, such as pillows or rugs or clothing, during operation. The computer and the AC adapter
comply with the user-accessible surface temperature limits dened by the International Standard for Safety
of Information Technology Equipment (IEC 60950-1).
iii
iv Safety warning notice
Processor conguration setting (select products only)
IMPORTANT: Select products are congured with an Intel® Pentium® N35xx/N37xx series or a Celeron®
N28xx/N29xx/N30xx/N31xx series processor and a Windows® operating system. If your computer is
congured as described, do not change the processor conguration setting in mscong.exe from 4 or 2
processors to 1 processor. If you do so, your computer will not restart. You will have to perform a factory
reset to restore the original settings.
v
vi Processor conguration setting (select products only)
Table of contents
1 Getting information ....................................................................................................................................... 1
2 Getting to know your computer ...................................................................................................................... 3
Locating hardware ................................................................................................................................................. 3
Locating software .................................................................................................................................................. 3
3 Setting up your computer ............................................................................................................................... 4
Connecting to the Internet (select products only) ................................................................................................ 5
Shutting down (turning o) the computer ............................................................................................................ 6
4 Enjoying entertainment features .................................................................................................................... 7
Using the camera (select products only) ............................................................................................................... 7
Using audio ............................................................................................................................................................ 7
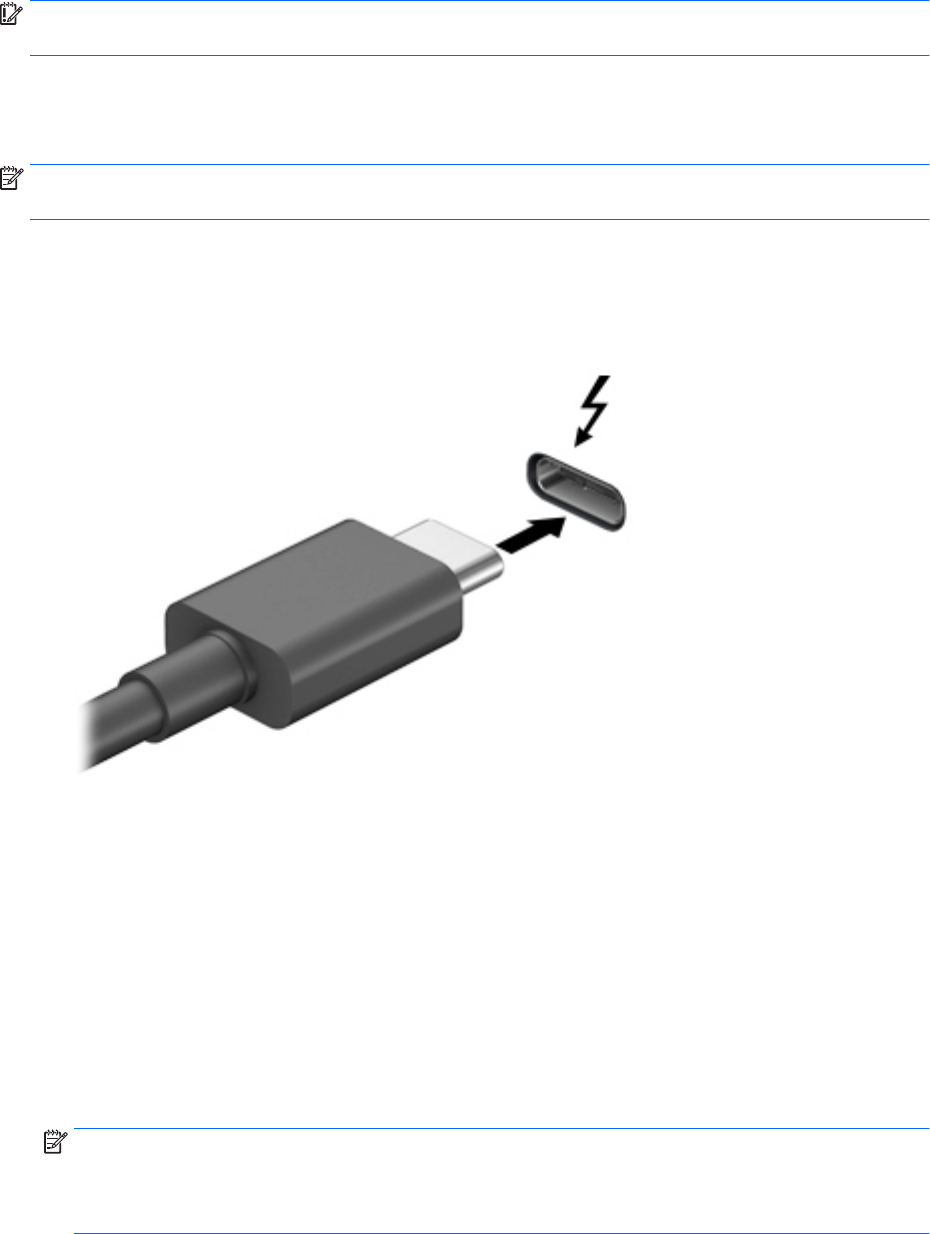
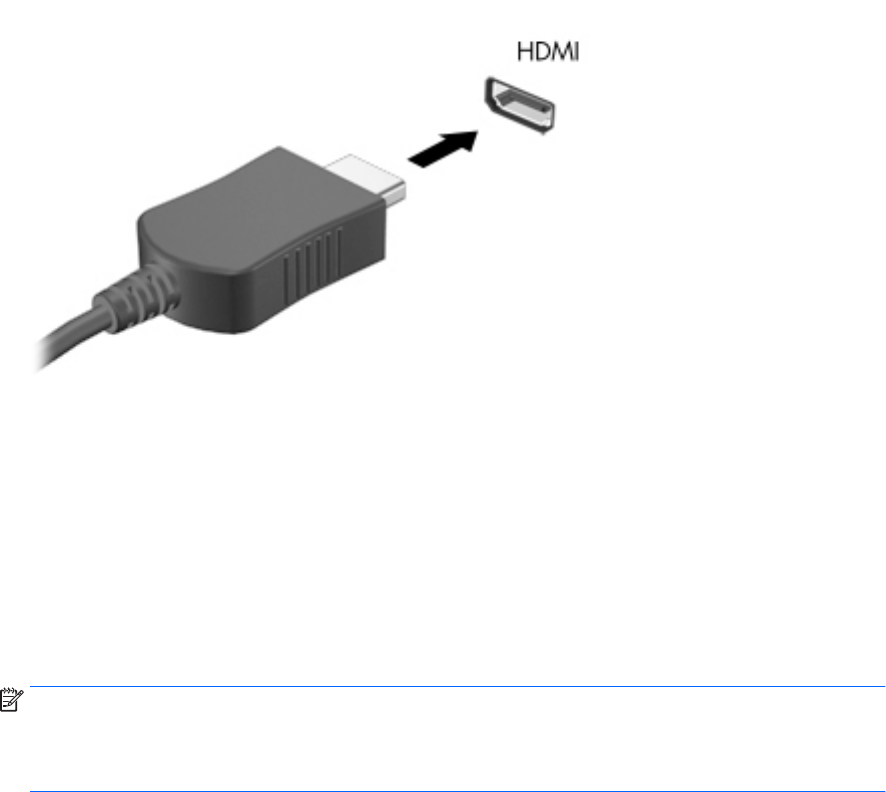
Using video ............................................................................................................................................................. 8
5 Navigating the screen .................................................................................................................................. 14
Using touch gestures ........................................................................................................................................... 14
Using the keyboard and mouse ........................................................................................................................... 14
6 Securing your computer and information ....................................................................................................... 16
Computer security features ................................................................................................................................. 16
7 Troubleshooting .......................................................................................................................................... 17
Computer does not start ..................................................................................................................................... 17
Power ................................................................................................................................................................... 18
Display (monitor) (select products only) ............................................................................................................. 18
Keyboard and mouse (with cable) ....................................................................................................................... 19
Keyboard and mouse (wireless) .......................................................................................................................... 19
Speakers and sound ............................................................................................................................................. 19
Internet access ..................................................................................................................................................... 20
Software troubleshooting ................................................................................................................................... 21
8 Backing up, restoring, and recovering ........................................................................................................... 23
Creating recovery media and backups ................................................................................................................ 23
Using Windows tools ........................................................................................................................................... 24
vii
Restore and recovery ........................................................................................................................................... 25
9 Maintenance ............................................................................................................................................... 29
Schedules and tasks ............................................................................................................................................ 29
Cleaning your computer ...................................................................................................................................... 30
10 Using HP PC Hardware Diagnostics (UEFI) ..................................................................................................... 32
Downloading HP PC Hardware Diagnostics (UEFI) to a USB device .................................................................... 32
11 Specications ............................................................................................................................................ 34
Operating specications ...................................................................................................................................... 34
12 Electrostatic Discharge .............................................................................................................................. 35
13 Accessibility .............................................................................................................................................. 36
Supported assistive technologies ....................................................................................................................... 36
Contacting support .............................................................................................................................................. 36
14 Support information .................................................................................................................................. 37
How to get help .................................................................................................................................................... 37
Where to get help ................................................................................................................................................ 37
Customer support for repairs .............................................................................................................................. 38
Before upgrading your hardware ........................................................................................................................ 38
Index ............................................................................................................................................................. 39
viii
1 Getting information
Tasks Instructions
Set up your computer Setup Instructions or Quick Setup poster
– or –
See Setting up your computer on page 4.
Connect to the Internet See Connecting to the Internet (select products only) on page 5.
Recover factory settings See Backing up, restoring, and recovering on page 23.
See how-to videos about using the
features of your computer
Go to http://www.hp.com/supportvideos (English only).
Learn how to use the Windows® operating
system
Find Windows password information
Find links to driver updates
Read frequently asked questions
Get started app:
Select the Start button, and then select the Get started app.
Troubleshoot the most common
computer hardware and software issues
See Troubleshooting on page 17.
Find electronic user guides and
specications for your computer model
To access the latest user guides or manuals for your product, go to http://www.hp.com/support,
and select your country. Select Find your product, and then follow the on-screen instructions.
Order parts and nd additional
troubleshooting help
Upgrade or replace components of your
computer
Connect to a TV (select products only)
For HP support, go to http://www.hp.com/support.
Get up-to-date information and help from
the Windows community
Go to http://www.hp.com/support/consumer-forum.
Maintain your computer HP Support Assistant maintains your computer performance and resolves problems quickly by
using automated updates, diagnostic tools, and guided assistance.
Type support in the taskbar search box, and then select the HP Support Assistant app.
– or –
See Maintenance on page 29.
Find safety and regulatory notices Regulatory, Safety and Environmental Notices
To access this document:
Select the Start button, select All apps (required on some products), select HP Help and
Support, and then select HP Documentation.
‒ or –
Select the Start button, select All apps (required on some products), select HP, and then
select HP Documentation.
Find ergonomic information Safety & Comfort Guide
1
Tasks Instructions
To access this guide:
Select the Start button, select All apps (required on some products), select HP Help and
Support, and then select HP Documentation.
‒ or –
Select the Start button, select All apps (required on some products), select HP, and then
select HP Documentation.
‒ or –
Go to http://www.hp.com/ergo.
IMPORTANT: You must be connected to the Internet to access the latest version of the user
guide.
Find computer warranty information Limited Warranty*
To access this document:
Select the Start button, select All apps (required on some products), select HP Help and
Support, and then select HP Documentation.
‒ or –
Select the Start button, select All apps (required on some products), select HP, and then
select HP Documentation.
‒ or –
Go to http://www.hp.com/go/orderdocuments.
IMPORTANT: You must be connected to the Internet to access the latest version of the user
guide.
*You can nd your HP Limited Warranty located with the user guides on your product and/or on the CD or DVD provided in the box. In some countries
or regions, HP may provide a printed warranty in the box. For countries or regions where the warranty is not provided in printed format, you can
request a copy from http://www.hp.com/go/orderdocuments. For products purchased in Asia Pacic, you can write to HP at POD, PO Box 161,
Kitchener Road Post Oice, Singapore 912006. Include your product name, and your name, phone number, and postal address.
2 Chapter 1 Getting information
2 Getting to know your computer
Locating hardware
To nd out what hardware is installed on your computer:
Type device manager in the taskbar search box, and then select the Device Manager app.
A list displays all the devices installed on your computer.
For information about system hardware components and the system BIOS version number, press fn+esc
(select products only).
Locating software
To nd out what software is installed on your computer:
Select the Start button, and then select All apps.
‒ or –
Select the Start button.
‒ or –
Right-click the Start button, and then select Programs and Features.
Locating hardware 3
3 Setting up your computer
WARNING! To reduce the risk of electrical shock or damage to your equipment:
Place the computer in a location away from water, dust, moisture, and soot. These environmental
factors can increase the temperature inside your computer or cause re or electrocution.
Do not disable the power cord grounding pin. The grounding pin is an important safety feature.
Plug the power cord into an AC outlet that is easily accessible at all times.
Disconnect power from the equipment by unplugging the power cord from the AC outlet. To prevent
direct exposure to the laser beam, do not try to open the enclosure of the CD or DVD drive.
The power supply is preset for the country or region in which you purchased your computer. If you move,
check the voltage requirements for your new location before plugging the computer into an AC outlet.
To reduce the risk of serious injury read the Safety & Comfort Guide. To access this guide, go to
http://www.hp.com/ergo.
1. Place the computer so that all ventilation openings are unobstructed and cabling is not in a walkway or
where it can be stepped on or damaged by placing furniture on it.
2. When connecting all power cords from the monitor, computer, and accessories to an uninterruptible
power supply (UPS), it is recommended that you use a power surge protection detection device. If the
computer has a television tuner, or a modem or telephone connection, protect the computer by using
surge protection with these signal inputs as well. Connect the television cable or the telephone line cord
to the surge protection device, and then connect the device to the computer.
3. Download and install operating system updates.
a. Find out what operating system and version your computer is currently running.
Select the Start button, select Settings, select System, and then select About.
b. Go to http://www.hp.com/support.
c. Select Find your product, and then follow the on-screen instructions.
4. Look in the computer box for additional printed details or updates.
After you complete the initial computer setup, you might want to install additional hardware devices or
software. Check the operating system, memory, and other requirements listed for these items before
purchasing them for your computer. Follow the software manufacturer's directions to install the new
software.
NOTE: Use only licensed original software. Installing copied software could result in an unstable
installation, infect the computer with a virus, or be illegal.
NOTE: A security solution is designed as a deterrent, but it might not be able to prevent theft, mishandling,
or software attacks.
4 Chapter 3 Setting up your computer
Connecting to the Internet (select products only)
To connect to a wireless network:
NOTE: To set up a wireless local area network (WLAN) and connect to the Internet, you need a broadband
modem (either DSL or cable) (purchased separately), high-speed Internet service purchased from an Internet
service provider, and a wireless router (purchased separately).
1. Be sure that the WLAN device is on.
2. Select the network status icon in the taskbar, and then connect to one of the available networks.
If the WLAN is a security-enabled WLAN, you are prompted to enter a security code. Enter the code, and
then select Next to complete the connection.
NOTE: If no WLANs are listed, you may be out of range of a wireless router or access point.
NOTE: If you do not see the WLAN you want to connect to, right-click or tap and hold the network
status icon in the taskbar, and then select Open Network and Sharing Center. Select Set up a new
connection or network. A list of options is displayed, allowing you to manually search for and connect to
a network or to create a new network connection.
3. Follow the on-screen instructions to complete the connection.
After the connection is made, select the network status icon in the notication area, at the far right of the
taskbar, to verify the name and status of the connection.
To connect to a wired network:
1. Plug an 8-pin, RJ-45 (network) cable into the network jack on the computer.
2. Plug the other end of the network cable into a network wall jack or router.
NOTE: If the network cable contains noise suppression circuitry, which prevents interference from TV
and radio reception, orient the circuitry end of the cable toward the computer.
If you have issues connecting to the Internet, see Internet access on page 20.
Connecting to the Internet (select products only) 5
Shutting down (turning o) the computer
CAUTION: Unsaved information is lost when the computer shuts down. Be sure to save your work before
shutting down the computer.
The Shut down command closes all open programs, including the operating system, and then turns o the
display and computer.
Shut down the computer under any of the following conditions:
When you need to access components inside the computer
When you are connecting an external hardware device that does not connect to a USB or video port or to
a headphone or microphone jack
When the computer will be unused and disconnected from external power for an extended period
Although you can turn o the computer with the power button, the recommended procedure is to use the
Windows Shut down command.
NOTE: If the computer is in the Sleep state or in Hibernation, rst exit Sleep or Hibernation by briey
pressing the power button.
1. Save your work and close all open programs.
2. Select the Start button, select the Power icon, and then select Shut down.
If the computer is unresponsive and you are unable to use the preceding shutdown procedures, try the
following emergency procedures in the sequence provided:
Press ctrl+alt+delete, select the Power icon, and then select Shut down.
Press and hold the power button for at least 10 seconds.
Disconnect the computer from external power.
6 Chapter 3 Setting up your computer
4 Enjoying entertainment features
Use your HP computer as an entertainment hub to socialize via the camera, enjoy and manage your music,
and download and watch movies. Or, to make your computer an even more powerful entertainment center,
connect external devices like a monitor, projector, TV, speakers, or headphones.
Using the camera (select products only)
Your computer may have one or more cameras that enable you to connect with others for work or play.
Cameras may be front facing, rear facing, or pop up. See the Setup Instructions or Quick Setup poster provided
with your product for camera details.
Most cameras allow you to video chat, record video, and record still images. Some also provide HD (high-
denition) or 3D capability, apps for gaming, or facial recognition software like Windows Hello. See Computer
security features on page 16 for details about using Windows Hello.
To use your camera:
1. Type camera in the taskbar search box, and then select Camera from the list of applications.
2. On select products, type Intel RealSense in the taskbar search box to explore additional features,
demos, and apps.
Using audio
On your computer, or on select products using an external optical drive, you can play music CDs, download
and listen to music, stream audio content from the web (including radio), record audio, or mix audio and video
to create multimedia. To enhance your listening enjoyment, attach external audio devices such as speakers or
headphones.
Connecting speakers (select products only)
On select products, you can attach wired speakers to your computer by connecting them to a USB port, to an
audio-out (headphone) or to an audio-out (headphone)/audio-in (microphone) combo jack on your computer.
To connect wireless speakers to your computer, follow the device manufacturer's instructions. To connect
high-denition speakers to the computer, see Setting up HDMI audio on page 11. Before connecting
speakers, lower the volume setting.
Connecting headphones (select products only)
WARNING! To reduce the risk of personal injury, lower the volume setting before putting on headphones,
earbuds, or a headset. For additional safety information, see the Regulatory, Safety and Environmental
Notices.
To access this document:
Select the Start button, select All apps (required on some products), select HP Help and Support, and
then select HP Documentation.
On select products, you can connect wired headphones to an audio-out (headphone) jack or to an audio-out
(headphone)/audio-in (microphone) combo jack on your computer.
Using the camera (select products only) 7
To connect wireless headphones to your computer, follow the device manufacturer's instructions.
Connecting a microphone (select products only)
On select products, connect a microphone to the audio-in (microphone) jack on the computer to record audio.
For best results when recording, speak directly into the microphone and record sound in a setting free of
background noise.
Connecting headsets (select products only)
WARNING! To reduce the risk of personal injury, lower the volume setting before putting on headphones,
earbuds, or a headset. For additional safety information, see the Regulatory, Safety and Environmental
Notices.
To access this document:
Select the Start button, select All apps (required on some products), select HP Help and Support, and
then select HP Documentation.
Headphones combined with a microphone are called headsets. On select products, you can connect wired
headsets to the audio-out (headphone)/audio-in (microphone) combo jack on your computer.
To connect wireless headsets to your computer, follow the device manufacturer's instructions.
Using sound settings
Use sound settings to adjust system volume, change system sounds, or manage audio devices.
To view or change sound settings:
Type control panel in the taskbar search box, select Control Panel, select Hardware and Sound,
and then select
Sound.
– or –
Right-click the Start button, select Control Panel, select Hardware and Sound, and then select Sound.
Your computer may include an enhanced sound system by Bang & Olufsen, B&O Play, DTS, Beats audio, or
another provider. As a result, your computer may include advanced audio features that can be controlled
through an audio control panel specic to your sound system.
Use the audio control panel to view and control audio settings.
Type control panel in the taskbar search box, select Control Panel, select Hardware and Sound,
and then select the audio control panel specic to your system.
– or –
Right-click the Start button, select Control Panel, select Hardware and Sound, and then select the
audio control panel specic to your system.
Using video
Your computer is a powerful video device that enables you to watch streaming video from your favorite
websites and download video and movies to watch on your computer when you are not connected to a
network.
To enhance your viewing enjoyment, use one of the video ports on the computer to connect an external
monitor, projector, or TV.
8 Chapter 4 Enjoying entertainment features
IMPORTANT: Be sure that the external device is connected to the correct port on the computer, using the
correct cable. Follow the device manufacturer's instructions.
For information on using your video features, refer to HP Support Assistant.
Connecting video devices using a USB Type-C cable (select products only)
NOTE: To connect a USB Type-C Thunderbolt® device to your computer, you need a USB Type-C cable,
purchased separately.
To see video or high-resolution display output on an external Thunderbolt device, connect the Thunderbolt
device according to the following instructions:
1. Connect one end of the USB Type-C cable to the USB Type-C Thunderbolt port on the computer.
2. Connect the other end of the cable to the external Thunderbolt device.
3. Press the switch screen key, for example f4, to alternate the computer screen image between 4 display
states.
PC screen only: View the screen image on the computer only.
Duplicate: View the screen image simultaneously on both the computer and external device.
Extend: View the screen image extended across both the computer and external device.
Second screen only: View the screen image on the external device only.
Each time you press the key, the display state changes.
NOTE: For best results, especially if you choose the "Extend" option, increase the screen resolution of
the external device, as follows. Type control panel in the taskbar search box, select Control Panel,
and then select Appearance and Personalization. Under Display, select Adjust resolution or Make text
and other items larger or smaller.
Using video 9
Connecting video devices by using a VGA cable (select products only)
NOTE: To connect a VGA video device to your computer, you need an VGA cable, purchased separately.
To see the computer screen image on an external VGA monitor or projected for a presentation, connect a
monitor or projector to the computer's VGA port.
1. Connect the VGA cable from the monitor or projector to the VGA port on the computer as shown.
2. Press the switch screen key, for example f4, to alternate the screen image between 4 display states:
PC screen only: View the screen image on the computer only.
Duplicate: View the screen image simultaneously on both the computer and the external device.
Extend: View the screen image extended across both the computer and the external device.
Second screen only: View the screen image on the external device only.
Each time you press the key, the display state changes.
NOTE: For best results, especially if you choose the "Extend" option, increase the screen resolution of
the external device, as follows. Type control panel in the taskbar search box, select Control Panel,
and then select Appearance and Personalization. Under Display, select Adjust resolution or Make text
and other items larger or smaller.
Connecting video devices using an HDMI cable (select products only)
NOTE: To connect an HDMI device to your computer, you need an HDMI cable, purchased separately.
To see the computer screen image on a high-denition TV or monitor, connect the high-denition device
according to the following instructions:
1. Connect one end of the HDMI cable to the HDMI port on the computer.
10 Chapter 4 Enjoying entertainment features
2. Connect the other end of the cable to the high-denition TV or monitor.
3. Press the switch screen key, for example f4, to alternate the computer screen image between 4 display
states:
PC screen only: View the screen image on the computer only.
Duplicate: View the screen image simultaneously on both the computer and the external device.
Extend: View the screen image extended across both the computer and the external device.
Second screen only: View the screen image on the external device only.
Each time you press the key, the display state changes.
NOTE: For best results, especially if you choose the "Extend" option, increase the screen resolution of
the external device, as follows. Type control panel in the taskbar search box, select Control Panel,
and then select Appearance and Personalization. Under Display, select Adjust resolution or Make text
and other items larger or smaller.
Setting up HDMI audio
HDMI is the only video interface that supports high-denition video and audio. After you connect an HDMI TV
to the computer, you can then turn on HDMI audio by following these steps:
1. Right-click or tap and hold the Speakers icon in the notication area, at the far right of the taskbar, and
then select Playback devices.
2. On the Playback tab, select the name of the digital output device.
3. Click Set Default, and then click OK.
To return the audio stream to the computer speakers:
1. Right-click or tap and hold the Speakers icon in the notication area, at the far right of the taskbar, and
then click Playback devices.
2. On the Playback tab, click Speakers.
3. Click Set Default, and then click OK.
Using video 11
Connecting digital display devices using a Dual-Mode DisplayPort cable (select
products only)
NOTE: To connect a digital display device to your computer, you need a Dual-Mode DisplayPort (DP-DP)
cable, purchased separately.
The Dual-Mode DisplayPort connects a digital display device such as a high-performance monitor or
projector. The Dual-Mode DisplayPort delivers higher performance than the VGA external monitor port and
improves digital connectivity.
1. Connect one end of the Dual-Mode DisplayPort cable to the Dual-Mode DisplayPort on the computer.
2. Connect the other end of the cable to the digital display device.
3. Press the switch screen key, for example f4, to alternate the computer screen image between 4 display
states:
PC screen only: View the screen image on the computer only.
Duplicate: View the same screen image simultaneously on both the computer and the external
device.
Extend: View the screen image extended across both the computer and the external device.
Second screen only: View the screen image on the external device only.
Each time you press the key, the display state changes.
NOTE: For best results, especially if you choose the "Extend" option, increase the screen resolution of
the external device, as follows. Type control panel in the taskbar search box, select Control Panel,
select Appearance and Personalization. Under Display, select Adjust resolution or Make text and
other items larger or smaller.
Discovering and connecting to Miracast-compatible wireless displays (select
products only)
To discover and connect to Miracast-compatible wireless displays without leaving your current apps, follow
the steps below.
12 Chapter 4 Enjoying entertainment features
To open Miracast:
Type project in the taskbar search box, and then click Project to a second screen. Click Connect to a
wireless display, and then follow the on-screen instructions.
Using video 13
5 Navigating the screen
You can navigate the computer screen in the following ways:
Using touch gestures (select products only)
Using the keyboard and mouse
Select computer models have special action keys or hot key functions on the keyboard to perform routine
tasks.
Using touch gestures
You can customize the touch gestures by changing settings, button congurations, click speed, and pointer
options.
Type control panel in the taskbar search box, and then select Control Panel. Select Hardware and
Sound
. Under Devices and Printers, select Mouse.
NOTE: Touch gestures are not supported in all apps.
Using the keyboard and mouse
The keyboard and mouse allow you to type, select items, scroll and to perform the same functions as you do
using touch gestures. The keyboard also allows you to use action keys and hot keys to perform specic
functions.
TIP:
The Windows key on the keyboard allows you to quickly return to the Start screen from an open
app or the Windows desktop. Press the key again to return to the previous screen.
NOTE: Depending on the country or region, the keys and keyboard functions of your keyboard may be
dierent from those discussed in this section.
Using the action keys or hot keys
You can quickly access information or perform functions by using certain keys and key combinations.
Action keys—Perform an assigned function. The icons on the function keys at the top of the keyboard
illustrate the assigned function for that key.
To use an action key function, press and hold the key.
Hot keys—A combination of the fn key and the esc key, the spacebar, or the appropriate action key.
To use a hot key, briey press the fn key, and then briey press the second key of the combination.
Depending on the computer model, your keyboard may support the following keys.
Icon
Description
Opens the Get started app.
14 Chapter 5 Navigating the screen
Icon Description
Decreases the screen brightness incrementally as long as you hold down the key.
Increases the screen brightness incrementally as long as you hold down the key.
Switches the screen image between display devices connected to the system. For example, if a monitor is
connected to the computer, repeatedly pressing this key alternates the screen image from the computer
display to the monitor display to a simultaneous display on both the computer and the monitor.
Turns the keyboard backlight o or on.
NOTE: To conserve battery power, turn o this feature.
Plays the previous track of an audio CD or the previous section of a DVD or a Blu-ray Disc (BD).
Starts, pauses, or resumes playback of an audio CD, a DVD, or a BD.
Plays the next track of an audio CD or the next section of a DVD or a BD.
Stops audio or video playback of a CD, a DVD, or a BD.
Decreases speaker volume incrementally while you hold down the key.
Increases speaker volume incrementally while you hold down the key.
Mutes or restores speaker sound.
Turns the wireless feature on or o.
NOTE: A wireless network must be set up before a wireless connection is possible.
Turns the airplane mode and wireless feature on or o.
NOTE: The airplane mode key is also referred to as the wireless button.
NOTE: A wireless network must be set up before a wireless connection is possible.
Using the keyboard and mouse 15
6 Securing your computer and information
Your computer includes features that help protect the integrity of your system and its data from unauthorized
access. Review these features to ensure proper use.
Computer security features
Computer risk Computer feature
Unauthorized use of the computer or
user account
User password
A password is a group of characters that you choose. These characters must be entered to authorize
access to your computer information.
‒ or –
Windows Hello (select products only)
On products equipped with a ngerprint reader or an infrared camera, you can use Windows Hello to sign
in by swiping your nger or looking at the camera.
To set up Windows Hello, follow these steps:
1. Select the Start button, select Settings, select Accounts, and then select Sign-in options.
2. Under Windows Hello, follow the on-screen instructions to add both a password and a 4-digit PIN,
and then enroll your ngerprint or facial ID.
Unauthorized access to Setup Utility,
BIOS settings, and other system
identication information
Administrator password
Computer viruses Antivirus software
The free trial antivirus software that is preinstalled on your computer can detect most viruses, remove
them, and, in most cases, repair damage caused by viruses. For protection against new viruses beyond the
trial period, purchase an extended service.
Unauthorized access to data and
ongoing threats to the computer
Firewall software
Windows includes rewall software preinstalled on the computer.
The antivirus software, which is preinstalled on the computer, includes rewall software.
Windows critical security updates
Updates to the Windows operating system
16 Chapter 6 Securing your computer and information
7 Troubleshooting
If you have problems using any peripheral devices such as a monitor, or a printer, with your computer, for
more extensive troubleshooting refer to the documentation provided by the product manufacturer. The
following tables present some issues you might encounter while installing, starting up, or using your
computer and suggest possible solutions.
For more information or for additional troubleshooting options, go to http://www.hp.com/support. Select
Find your product, and then follow the on-screen instructions.
Computer does not start
Symptom Possible solution
Error message: hard
drive error
1. Restart the computer.
a. Press ctrl+alt+delete.
b. Select the Power icon, and then select Restart.
– or –
Press and hold the power button on the computer for 5 or more seconds to turn o the computer, and then press the
button to turn on the computer.
2. If Windows opens, immediately back up all important data to a backup hard drive.
3. Contact support (regardless of whether Windows started or not).
Computer will not turn
on or start
Be sure that the cables connecting the computer to the AC outlet are plugged in properly. The green power supply light on
the computer should be on. If it is not, try a dierent AC outlet. If you are still having trouble, contact support.
Be sure that the operating voltage of the electrical outlet is appropriate for the electrical voltage of the computer.
Test the AC outlet by plugging a dierent electrical device into it.
If possible, remove any outlet lters and stabilizers, then insert the power plug directly into the electrical outlet.
Disconnect all peripheral devices, then press and hold the power button down for at least 15 seconds. Press the power
button to turn on the computer.
If the display (monitor) is blank, the monitor might not be properly connected. Connect the monitor to the computer, plug
the power cord into an AC outlet, and then turn the monitor on. See Display (monitor) (select products only) on page 18.
Computer is not
responding
1. Press ctrl+alt+delete.
2. Select Task Manager.
3. Select any programs that are not responding, and then select End task.
If closing programs does not resolve the problem, restart the computer.
1. Press ctrl+alt+delete.
2. Select the Power icon, and then select Restart.
– or –
Computer does not start 17
Symptom Possible solution
Press and hold the power button on the computer for 5 or more seconds to turn o the computer, and then press the power
button to turn on the computer.
Error message: Invalid
system disk or Non-
System disk or Disk
error
When drive activity stops, remove the optical disc inside the optical drive, and then press the spacebar on the keyboard.
Power
Symptom Possible solution
Computer does not
turn o when the
power button is
pressed
Press and hold the power button until the computer turns o. Then turn the computer on again.
Computer shuts down
automatically
The computer might be in an exceedingly hot environment. Let it cool down.
Be sure that computer air vents are not blocked. See Cleaning your computer on page 30.
NOTE: If your computer has an internal fan, be sure that the internal fan is running.
Display (monitor) (select products only)
Symptom Possible solution
Screen is blank, and
monitor power light is not
lit
Reconnect the power cable to the back of the monitor and to the AC outlet.
Press the power button on the monitor.
Screen is blank Press the space bar on the keyboard or move the mouse to redisplay the screen image.
Press the Sleep button (select products only), or esc, to resume from Sleep mode.
Press the power button to turn on the computer.
Inspect the monitor cable for bent pins.
If any of the pins are bent, replace the monitor cable.
If no pins are bent, reconnect the monitor cable to the computer.
Images on the screen are
too large or too small, or
the images are fuzzy
Adjust the monitor resolution setting in Windows.
1. Type screen resolution in the taskbar search box, and then select Change the screen resolution.
2. Select a dierent resolution from the drop-down menu.
3. Select Apply, and then select Keep changes.
NOTE: In addition to the information listed here, also refer to the documentation that came with your monitor.
18 Chapter 7 Troubleshooting
Keyboard and mouse (with cable)
Symptom Possible solution
Keyboard commands and
typing are not recognized
by the computer
Use the mouse to turn o the computer. Disconnect and reconnect the keyboard to the back of your computer, and
then restart your computer.
Mouse (with cable) does
not work or is not detected
Disconnect and reconnect the mouse cable to your computer.
If the mouse is still not detected, turn o the computer, disconnect and reconnect the mouse cable, and then restart
the computer.
Cursor does not respond to
the arrow keys on the
number keypad
Press num lock on the keyboard to turn o num lock, so that the arrow keys on the number keypad can be used.
Cursor does not respond to
mouse movement
1. Press alt+tab to navigate to an open program.
2. Press ctrl+s to save your changes in the selected program (ctrl+s is the keyboard shortcut for the Save command
on most—not all—programs).
3. Repeat step 1 and step 2 to save changes in all open programs.
4. Press the power button to turn o the computer.
5. After the shutdown is complete, disconnect and reconnect the mouse cable to the back of your computer, and
then restart your computer.
Keyboard and mouse (wireless)
Symptom Possible solution
Wireless keyboard or
mouse does not work or is
not detected
Be sure that you are using the wireless keyboard or wireless mouse within range of the transceiver,
approximately 10 meters (32 feet) for normal use, and within 30 cm (12 inches) during initial setup or for re-
synchronization.
Be sure that the mouse is not in Suspend mode, which occurs after 20 minutes of inactivity. Click the left mouse
button to reactivate the mouse.
Replace the batteries in the keyboard and/or mouse.
Speakers and sound
Symptom Possible solution
Volume is very low or
unsatisfactory
Be sure that you connected the speakers to the audio-out (black) jack on the back of the computer. (Additional audio
jacks are used for multiple-channel speakers.) Detached non-powered speakers (speakers without a separate power
source, such as batteries or a power cord) do not produce satisfactory sound. Replace the non-powered speakers with
powered speakers.
No sound is produced 1. Type control panel in the taskbar search box, and then select Control Panel. Select System and Security.
2. Under Security and Maintenance, select Troubleshoot common computer problems, and then select
Troubleshoot audio playback.
Be sure that you connected powered speakers and that they are turned on.
Turn o your computer, and then disconnect and reconnect the speakers. Be sure that the speakers are connected to
an audio jack, not a microphone or headphone jack.
Keyboard and mouse (with cable) 19
Symptom Possible solution
To resume from Sleep mode, press the Sleep button (select products only), or press esc.
Unplug headphones if they are connected to your computer (or speaker system).
Internet access
Symptom Possible solution
Cannot connect to the
Internet
1. Type control panel in the taskbar search box, and then select Control Panel.
2. Under Network and Sharing Center, select Connect to a network.
Verify that you are using the proper cables for your Internet connection type. Your computer might have a dial-up
modem and an Ethernet network adapter (also called a network interface card, or NIC). A modem uses a standard
telephone cable, whereas the network adapter uses a network cable, to connect to a local area network (LAN). Do not
connect a telephone cable to the network adapter, and do not connect a network cable to a telephone line; doing so
might damage the network adapter.
Run the wireless setup wizard.
1. Type control panel in the taskbar search box, and then select Control Panel. Select Network and Internet,
and then select Network and Sharing Center.
2. In the Network and Sharing Center window, select Set up a new connection or network to open the wizard, and
then follow the on-screen instructions.
If your system has an external antenna, try moving the antenna to a better position. If the antenna is internal, try
moving the computer.
Try to connect again later, or contact your ISP for assistance.
Cannot connect to the
Internet but there is no
error message
1. Right-click or tap and hold the network status icon in the notication area, at the far right of the taskbar.
2. Select Troubleshoot problems.
No network connection
icon in the notication area
1. Type repair in the taskbar search box, and then Select Identify and repair network problems.
2. Follow the on-screen instructions.
20 Chapter 7 Troubleshooting
Software troubleshooting
Symptom Possible solution
To resolve software
problems, try these
methods:
Turn the computer o completely, and then turn it on again.
Update the drivers. See “Updating device drivers,” in this table.
Restore your computer to a conguration that was in use before the software was installed. See "Microsoft System
Restore," in this table.
Reinstall the software program or hardware driver. See “Software program and hardware driver reinstallation,” in this
table.
Erase and reformat the hard drive, and then reinstall the operating system, programs, and drivers. This process erases
all the data les that you have created. See Backing up, restoring, and recovering on page 23.
Software programs
are slow to respond
Close unnecessary software programs.
Run virus scans and other system tools when the computer is not in use.
Stop startup applications (such as messaging software and multimedia applications) from loading.
1. Type msconfig in the taskbar search box, and then select System Conguration.
NOTE: If you are prompted for an administrator password or conrmation, type the password or provide
conrmation.
2. From the General tab, select Selective startup.
3. Select the Startup tab, and then select Open Task Manager.
4. Select the startup items that you want to prevent from loading, and then select Disable.
NOTE: If you are unsure about an item, do not disable it.
5. If prompted, select Restart to restart the computer.
NOTE: To enable a program to load at startup, restart the computer and reverse these steps.
Disable nonessential graphics capabilities.
1. Type file explorer in the taskbar search box, and then select File Explorer.
2. Right-click or tap and hold This PC, and then select Properties.
3. Select Advanced system settings.
NOTE: If you are prompted for an administrator password or conrmation, type the password or provide
conrmation.
4. From the Advanced tab under Performance, select Settings.
5. From the Visual Eects tab, select Adjust for best performance, and then select OK.
Updating device
drivers
Complete the following procedure to update a driver, or to revert to an earlier version of the driver if the new one does not
solve your problem.
1. Type device manager in the taskbar search box, and then select Device Manager.
2. Select the arrow to expand the list of the type of device you want to update or roll back (for example, DVD/CD-ROM
drives).
3. Double-click or double-tap the specic item (for example, HP DVD Writer 640b).
4. Select the Driver tab.
5. To update a driver, select Update Driver, and then follow the on-screen instructions.
– or –
To revert to an earlier version of a driver, select Roll Back Driver, and then follow the on-screen instructions.
Software troubleshooting 21
Symptom Possible solution
Microsoft System
Restore
If you have a problem that might be caused by software that you have installed on your computer, use System Restore to
return the computer to a previous restore point. You can also set restore points manually.
IMPORTANT: Always use this System Restore procedure before you use the System Recovery program.
For more information and steps, see the Get started app.
Select the Start button, and then select the Get started app.
Software program and
hardware driver
reinstallation
If any of your factory-installed software programs or hardware drivers are damaged, you can reinstall them by using HP
Recovery Manager (select products only).
NOTE: Do not use HP Recovery Manager to reinstall software programs provided on CDs or DVDs included in the computer
box. Reinstall these programs directly from the CDs or DVDs.
Before you uninstall a program, be sure that you have a way to reinstall it. Conrm that it is still available from the original
source (for example, discs or the Internet). Or, conrm that the program is in the list of programs you can reinstall from HP
Recovery Manager (see the steps directly below).
NOTE: Some features might not be available on systems that are shipped without a version of Windows.
To check the list of installable programs or to reinstall a program in HP Recovery Manager:
Type recovery in the taskbar search box, select HP Recovery Manager, select Reinstall drivers and/or
applications, and then follow the on-screen instructions.
For information and steps to uninstall a program, see the Get started app.
Select the Start button, and then select the Get started app.
22 Chapter 7 Troubleshooting
8 Backing up, restoring, and recovering
This chapter provides information about the following processes. The information in the chapter is standard
procedure for most products.
Creating recovery media and backups
Restoring and recovering your system
For additional information, refer to the HP support assistant app.
Type support in the taskbar search box, and then select the HP Support Assistant app.
‒ or –
Click the question mark icon in the taskbar.
IMPORTANT: If you will be performing recovery procedures on a tablet, the tablet battery must be at least
70% charged before you start the recovery process.
IMPORTANT: For a tablet with a detachable keyboard, connect the keyboard to the keyboard dock before
beginning any recovery process.
Creating recovery media and backups
The following methods of creating recovery media and backups are available on select products only. Choose
the available method according to your computer model.
Use HP Recovery Manager to create HP Recovery media after you successfully set up the computer. This
step creates a backup of the HP Recovery partition on the computer. The backup can be used to reinstall
the original operating system in cases where the hard drive is corrupted or has been replaced. For
information on creating recovery media, see Creating HP Recovery media (select products only)
on page 23. For information on the recovery options that are available using the recovery media, see
Using Windows tools on page 24.
Use Windows tools to create system restore points and create backups of personal information.
For more information, see Recovering using HP Recovery Manager on page 25.
NOTE: If storage is 32 GB or less, Microsoft System Restore is disabled by default.
Creating HP Recovery media (select products only)
If possible, check for the presence of the Recovery partition and the Windows partition. From the Start menu,
select File Explorer, and then select This PC.
If your computer does not list the Windows partition and the Recovery partition, you can obtain recovery
media for your system from support. See the Worldwide Telephone Numbers booklet included with the
computer. You can also nd contact information on the HP website. Go to http://www.hp.com/support,
select your country or region, and follow the on-screen instructions.
Creating recovery media and backups 23
You can use Windows tools to create system restore points and create backups of personal information,
see Using Windows tools on page 24.
If your computer does list the Recovery partition and the Windows partition, you can use HP Recovery
Manager to create recovery media after you successfully set up the computer. HP Recovery media can be
used to perform system recovery if the hard drive becomes corrupted. System recovery reinstalls the
original operating system and software programs that were installed at the factory and then congures
the settings for the programs. HP Recovery media can also be used to customize the system or restore
the factory image if you replace the hard drive.
Only one set of recovery media can be created. Handle these recovery tools carefully, and keep
them in a safe place.
HP Recovery Manager examines the computer and determines the required storage capacity for
the media that will be required.
To create recovery discs, your computer must have an optical drive with DVD writer capability, and
you must use only high-quality blank DVD-R, DVD+R, DVD-R DL, or DVD+R DL discs. Do not use
rewritable discs such as CD±RW, DVD±RW, double-layer DVD±RW, or BD-RE (rewritable Blu-ray)
discs; they are not compatible with HP Recovery Manager software. Or, instead, you can use a high-
quality blank USB ash drive.
If your computer does not include an integrated optical drive with DVD writer capability, but you
would like to create DVD recovery media, you can use an external optical drive (purchased
separately) to create recovery discs. If you use an external optical drive, it must be connected
directly to a USB port on the computer; the drive cannot be connected to a USB port on an external
device, such as a USB hub. If you cannot create DVD media yourself, you can obtain recovery discs
for your computer from HP. See the Worldwide Telephone Numbers booklet included with the
computer. You can also nd contact information on the HP website. Go to http://www.hp.com/
support, select your country or region, and follow the on-screen instructions.
Be sure that the computer is connected to AC power before you begin creating the recovery media.
The creation process can take an hour or more. Do not interrupt the creation process.
If necessary, you can exit the program before you have nished creating all of the recovery DVDs.
HP Recovery Manager will nish burning the current DVD. The next time you start HP Recovery
Manager, you will be prompted to continue.
To create HP Recovery media:
IMPORTANT: For a tablet with a detachable keyboard, connect the keyboard to the keyboard dock before
beginning these steps.
1. Type recovery in the taskbar search box, and then select HP Recovery Manager.
2. Select Create recovery media, and then follow the on-screen instructions.
If you ever need to recover the system, see Recovering using HP Recovery Manager on page 25.
Using Windows tools
You can create recovery media, system restore points, and backups of personal information using Windows
tools.
NOTE: If storage is 32 GB or less, Microsoft System Restore is disabled by default.
For more information and steps, see the Get started app.
Select the Start button, and then select the Get started app.
24 Chapter 8 Backing up, restoring, and recovering
Restore and recovery
There are several options for recovering your system. Choose the method that best matches your situation
and level of expertise:
IMPORTANT: Not all methods are available on all products.
Windows oers several options for restoring from backup, refreshing the computer, and resetting the
computer to its original state. For more information see the Get started app.
Select the Start button, and then select the Get started app.
If you need to correct a problem with a preinstalled application or driver, use the Reinstall drivers and/or
applications option (select products only) of HP Recovery Manager to reinstall the individual application
or driver.
Type recovery in the taskbar search box, select HP Recovery Manager, select Reinstall drivers
and/or applications
, and then follow the on-screen instructions.
If you want to recover the Windows partition to original factory content, you can choose the System
Recovery option from the HP Recovery partition (select products only) or use the HP Recovery media.
For more information, see Recovering using HP Recovery Manager on page 25. If you have not already
created recovery media, see Creating HP Recovery media (select products only) on page 23.
On select products, if you want to recover the computer's original factory partition and content, or if you
have replaced the hard drive, you can use the Factory Reset option of HP Recovery media. For more
information, see Recovering using HP Recovery Manager on page 25.
On select products, if you want to remove the recovery partition to reclaim hard drive space, HP
Recovery Manager oers the Remove Recovery Partition option.
For more information, see Removing the HP Recovery partition (select products only) on page 28.
Recovering using HP Recovery Manager
HP Recovery Manager software allows you to recover the computer to its original factory state by using the
HP Recovery media that you either created or that you obtained from HP, or by using the HP Recovery
partition (select products only). If you have not already created recovery media, see Creating HP Recovery
media (select products only) on page 23.
What you need to know before you get started
HP Recovery Manager recovers only software that was installed at the factory. For software not
provided with this computer, you must either download the software from the manufacturer's website or
reinstall the software from the media provided by the manufacturer.
IMPORTANT: Recovery through HP Recovery Manager should be used as a nal attempt to correct
computer issues.
HP Recovery media must be used if the computer hard drive fails. If you have not already created
recovery media, see Creating HP Recovery media (select products only) on page 23.
To use the Factory Reset option (select products only), you must use HP Recovery media. If you have not
already created recovery media, see Creating HP Recovery media (select products only) on page 23.
If your computer does not allow the creation of HP Recovery media or if the HP Recovery media does not
work, you can obtain recovery media for your system from support. See the Worldwide Telephone
Numbers booklet included with the computer. You can also nd contact information from the HP
Restore and recovery 25
website. Go to http://www.hp.com/support, select your country or region, and follow the on-screen
instructions.
IMPORTANT: HP Recovery Manager does not automatically provide backups of your personal data. Before
beginning recovery, back up any personal data you want to retain.
Using HP Recovery media, you can choose from one of the following recovery options:
NOTE: Only the options available for your computer display when you start the recovery process.
System Recovery—Reinstalls the original operating system, and then congures the settings for the
programs that were installed at the factory.
Factory Reset—Restores the computer to its original factory state by deleting all information from the
hard drive and re-creating the partitions. Then it reinstalls the operating system and the software that
was installed at the factory.
The HP Recovery partition (select products only) allows System Recovery only.
Using the HP Recovery partition (select products only)
The HP Recovery partition allows you to perform a system recovery without the need for recovery discs or a
recovery USB ash drive. This type of recovery can be used only if the hard drive is still working.
To start HP Recovery Manager from the HP Recovery partition:
IMPORTANT: For a tablet with a detachable keyboard, connect the keyboard to the keyboard dock before
beginning these steps (select products only).
1. Type recovery in the taskbar search box, select Recovery Manager, and then select HP Recovery
Environment
.
- or-
For computers or tablets with keyboards attached, press f11 while the computer boots, or press and
hold f11 as you press the power button.
For tablets without keyboards:
Turn on or restart the tablet, and then quickly hold down the volume up button; then select f11.
- or -
Turn on or restart the tablet, and then quickly hold down the volume down button; then select f11.
- or -
Turn on or restart the tablet, and then quickly hold down the Windows button; then select f11.
2. Select Troubleshoot from the boot options menu.
3. Select Recovery Manager, and then follow the on-screen instructions.
Using HP Recovery media to recover
You can use HP Recovery media to recover the original system. This method can be used if your system does
not have an HP Recovery partition or if the hard drive is not working properly.
26 Chapter 8 Backing up, restoring, and recovering
1. If possible, back up all personal les.
2. Insert the HP Recovery media, and then restart the computer.
NOTE: If the computer does not automatically restart in HP Recovery Manager, change the computer
boot order. See Changing the computer boot order on page 27.
3. Follow the on-screen instructions.
Changing the computer boot order
If your computer does not restart in HP Recovery Manager, you can change the computer boot order, which is
the order of devices listed in BIOS where the computer looks for startup information. You can change the
selection to an optical drive or a USB
ash drive.
To change the boot order:
IMPORTANT: For a tablet with a detachable keyboard, connect the keyboard to the keyboard dock before
beginning these steps.
1. Insert the HP Recovery media.
2. Access the system Startup menu.
For computers or tablets with keyboards attached:
Turn on or restart the computer or tablet, quickly press esc, and then press f9 for boot options.
For tablets without keyboards:
Turn on or restart the tablet, and then quickly hold down the volume up button; then select f9.
- or -
Turn on or restart the tablet, and then quickly hold down the volume down button; then select f9.
- or -
Turn on or restart the tablet, and then quickly hold down the Windows button; then select f9.
3. Select the optical drive or USB ash drive from which you want to boot.
4. Follow the on-screen instructions.
Restore and recovery 27
Removing the HP Recovery partition (select products only)
HP Recovery Manager software allows you to remove the HP Recovery partition to free up hard drive space.
IMPORTANT: After you remove the HP Recovery partition, you will not be able to perform System Recovery
or create HP recovery media from the HP Recovery partition. So before you remove the Recovery partition,
create HP Recovery media; see Creating HP Recovery media (select products only) on page 23.
NOTE: The Remove Recovery Partition option is only available on products that support this function.
Follow these steps to remove the HP Recovery partition:
1. Type recovery in the taskbar search box, and then select HP Recovery Manager.
2. Select Remove Recovery Partition, and then follow the on-screen instructions.
28 Chapter 8 Backing up, restoring, and recovering
9 Maintenance
It is important that you perform simple maintenance of your computer to be sure that it works at peak
performance.
Schedules and tasks
Timeframe Task Description
Follow these instructions at the recommended intervals for proper maintenance.
Weekly Software cleanup Use Disk Cleanup or safe third-party cleaning tools to remove junk les and temporary
les that accumulate and slow down your system. Also, check for programs you no
longer need and uninstall them.
To run Disk Cleanup:
1. Type disk in the taskbar search box, and then select Free up disk space by
deleting unnecessary les.
2. Follow the on-screen instructions.
Defragmenting and
optimizing
Use Disk Defragmenter to defragment and optimize your hard drive to keep your hard
disk in good condition and improve system performance. Frequently performing this
task does not harm your system.
To run Disk Defragmenter:
1. Connect the computer to AC power.
2. Type defragment in the taskbar search box, and then select Defragment and
Optimize Drives.
3. Follow the on-screen instructions.
Virus scan Perform a full virus scan every week to catch viruses that might have slipped through
unnoticed. Most antivirus products have a scheduling feature to keep track of this
automatically.
Monthly Hardware cleaning Thoroughly clean the outside of your computer.
Software updates Use Windows Update to x operating system bugs and improve performance. Also, be
sure to check for driver updates for your hardware and new versions of your favorite
programs.
Windows Update Run Windows Update to install updates.
Yearly System Recovery In time, your system might still slow down, depending on the computer usage. Use
System Recovery to wipe your Windows operating system installation clean, restoring it
to the original conguration when you rst started your system. Make a backup of
important data les before proceeding with a System Recovery. See Backing up,
restoring, and recovering on page 23 for further details.
As needed Backing up your data Use CD or DVD recording software that is installed on your computer to create (or
“burn”) backup discs of important information, including personal les, e-mail
messages, and Website bookmarks. You can also move data to an external hard drive or
to a USB ash drive.
Schedules and tasks 29
Cleaning your computer
Use the following products to safely clean your computer:
Dimethyl benzyl ammonium chloride 0.3 percent maximum concentration (for example, disposable
wipes, which come in a variety of brands)
Alcohol-free glass-cleaning uid
Water with mild soap solution
Dry microber cleaning cloth or a chamois (static-free cloth without oil)
Static-free cloth wipes
CAUTION: Avoid strong cleaning solvents that can permanently damage your computer. If you are not sure
that a cleaning product is safe for your computer, check the product contents to make sure that ingredients
such as alcohol, acetone, ammonium chloride, methylene chloride, and hydrocarbons are not included in the
product.
Fibrous materials, such as paper towels, can scratch the computer. Over time, dirt particles and cleaning
agents can get trapped in the scratches.
Cleaning procedures
Follow the procedures in this section to safely clean your computer.
WARNING! To prevent electric shock or damage to components, do not attempt to clean your computer
while it is turned on.
Turn o the computer.
Disconnect AC power.
Disconnect all powered external devices.
CAUTION: To prevent damage to internal components, do not spray cleaning agents or liquids directly on
any computer surface. Liquids dripped on the surface can permanently damage internal components.
Cleaning the display
CAUTION: Do not spray or place the cleaner directly on the screen.
Gently wipe the sides and the surface of the display using a soft, lint-free cloth moistened with an alcohol-
free glass cleaner.
Cleaning the computer vents
Air vents keep the computer cool. Keep these vents clean by using a small, battery-powered vacuum cleaner.
(A battery-powered vacuum cleaner eliminates the risk of electric shock.)
1. Vacuum the vents on the computer case.
2. Remove any debris that has accumulated in and around the computer connectors (for example, the
Ethernet and USB connectors).
30 Chapter 9 Maintenance
Cleaning the keyboard or mouse
WARNING! To reduce the risk of electric shock or damage to internal components, do not use a vacuum
cleaner attachment to clean the keyboard. A vacuum cleaner can deposit household debris on the keyboard
surface.
CAUTION: To prevent damage to internal components, do not allow liquids to drip between the keys.
To clean the keyboard or mouse, use a soft microber cloth or a chamois moistened with one of the
cleaning solutions listed previously or use an acceptable disposable wipe.
To prevent keys from sticking and to remove dust, lint, and particles from the keyboard, use a can of
compressed air with a straw extension.
If you have a roller-ball mouse, clean the ball and rollers inside.
1. Turn the mouse upside down, and rotate the ball-cover ring counterclockwise to remove the ring and
release the roller ball.
2. Rinse the roller ball with soap and warm water.
3. Clean the rollers inside the mouse with a cotton swab dampened with isopropyl (rubbing) alcohol.
4. After the roller ball and rollers are completely dry, replace the ball and ball-cover ring.
Cleaning your computer 31
10 Using HP PC Hardware Diagnostics (UEFI)
HP PC Hardware Diagnostics is a Unied Extensible Firmware Interface (UEFI) that allows you to run diagnostic
tests to determine whether the computer hardware is functioning properly. The tool runs outside the
operating system so that it can isolate hardware failures from issues that are caused by the operating system
or other software components.
When HP PC Hardware Diagnostics (UEFI) detects a failure that requires hardware replacement, a 24-digit
Failure ID code is generated. This ID code can then be provided to support to help determine how to correct
the problem.
NOTE: To start diagnostics on a convertible computer, your computer must be in notebook mode and you
must use the keyboard attached.
To start HP PC Hardware Diagnostics (UEFI), follow these steps:
1. Turn on or restart the computer, and quickly press esc.
2. Press f2.
The BIOS searches three places for the diagnostic tools, in the following order:
a. Connected USB drive
NOTE: To download the HP PC Hardware Diagnostics (UEFI) tool to a USB drive, see Downloading
HP PC Hardware Diagnostics (UEFI) to a USB device on page 32.
b. Hard drive
c. BIOS
3. When the diagnostic tool opens, select the type of diagnostic test you want to run, and then follow the
on-screen instructions.
NOTE: If you need to stop a diagnostic test, press esc.
Downloading HP PC Hardware Diagnostics (UEFI) to a USB device
NOTE: The HP PC Hardware Diagnostics (UEFI) download instructions are provided in English only, and you
must use a Windows computer to download and create the HP UEFI support environment because only .exe
les are oered.
There are two options to download HP PC Hardware Diagnostics to a USB device.
Download the latest UEFI version
1. Go to http://www.hp.com/go/techcenter/pcdiags. The HP PC Diagnostics home page is displayed.
2. In the HP PC Hardware Diagnostics section, select the Download link, and then select Run.
Download any version of UEFI for a specic product
1. Go to http://www.hp.com/support.
2. Select Get software and drivers.
32 Chapter 10 Using HP PC Hardware Diagnostics (UEFI)
3. Enter the product name or number.
– or –
Select Identify now to let HP automatically detect your product.
4. Select your computer, and then select your operating system.
5. In the Diagnostic section, follow the on-screen instructions to select and download the UEFI version
you want.
Downloading HP PC Hardware Diagnostics (UEFI) to a USB device 33
11 Specications
Operating specications
NOTE: To determine the exact electrical ratings of your computer, refer to the computer ratings label,
located on the outside of the computer.
Factor Metric U.S.
Operating temperature 5°C to 35°C 41°F to 95°F
Storage temperature -20°C to 60°C –22°F to 149°F
Operating humidity 15% to 80% @ 26°C 15% to 80% @ 78°F
Operating altitude 0 m to 2000 m 0 ft to 6561 ft
Storage altitude 0 m to 4572 m 0 ft to 15000 ft
34 Chapter 11 Specications
12 Electrostatic Discharge
Electrostatic discharge is the release of static electricity when two objects come into contact—for example,
the shock you receive when you walk across the carpet and touch a metal door knob.
A discharge of static electricity from ngers or other electrostatic conductors may damage electronic
components.
To prevent damage to the computer, damage to a drive, or loss of information, observe these precautions:
If removal or installation instructions direct you to unplug the computer, rst be sure that it is properly
grounded.
Keep components in their electrostatic-safe containers until you are ready to install them.
Avoid touching pins, leads, and circuitry. Handle electronic components as little as possible.
Use nonmagnetic tools.
Before handling components, discharge static electricity by touching an unpainted metal surface.
If you remove a component, place it in an electrostatic-safe container.
35
13 Accessibility
HP designs, produces, and markets products and services that can be used by everyone, including people with
disabilities, either on a stand-alone basis or with appropriate assistive devices.
Supported assistive technologies
HP products support a wide variety of operating system assistive technologies and can be congured to work
with additional assistive technologies. Use the Search feature on your device to locate more information
about assistive features.
NOTE: For additional information about a particular assistive technology product, contact customer support
for that product.
Contacting support
We are constantly rening the accessibility of our products and services and welcome feedback from users. If
you have an issue with a product or would like to tell us about accessibility features that have helped you,
please contact us at +1 (888) 259-5707, Monday through Friday, 6 a.m. to 9 p.m. North American Mountain
Time. If you are deaf or hard-of-hearing and use TRS/VRS/WebCapTel, contact us if you require technical
support or have accessibility questions by calling +1 (877) 656-7058, Monday through Friday, 6 a.m. to 9 p.m.
North American Mountain Time.
NOTE: Support is in English only.
36 Chapter 13 Accessibility
14 Support information
How to get help
HP support can help you get the most from your computer. You will nd what you need with tools located on
your computer and with information available on the Web, by phone, or through your local retailer.
Before contacting HP support, it’s important to have the following information handy:
Model number
Product number
Serial number
Software build number
Operating system
Purchase date
Please take a moment to write down your product information for future reference.
The rst four items on the list (model number, product number, serial number, and software build number)
can be viewed by using HP Support Information. Type support in the taskbar search box, and then select
the
HP Support Assistant app.
Don’t forget to register at http://www.hp.com/apac/register.
Where to get help
Use the Get started app for help with hardware and software questions. Select the Start button, and
then select the Get started app.
Use HP Support Assistant. Type support in the taskbar search box, and then select the HP Support
Assistant app.
HP Support Assistant provides useful troubleshooting and diagnostics information and includes the
following:
Online chat with an HP technician
Support telephone numbers
HP service center locations
For help online, go to http://www.hp.com/support.
Telephone assistance to get you up and running is covered for thirty (30) days from the time you purchase
your computer. After thirty (30) days, there may be a charge, but the helpful support is still available.
How to get help 37
Customer support for repairs
If your computer needs to be repaired, or to have parts replaced, you have two choices:
You can easily replace many of your computer parts that are considered consumer replaceable. This is
the fastest method of repair, because many times we can send the part directly to your home or
business in a few days. (This option may not be available in all countries or regions.)
If a repair is necessary, HP support will make arrangements to repair your computer.
These services are covered during the warranty period.
There are some limitations and exclusions to the warranty (as well as some important details), which are
described in the HP Worldwide Limited Warranty and Technical Support guide.
Before upgrading your hardware
If you intend to upgrade any of your hardware, do it only after you set up your new computer. For instructions
on setting up your computer, see the Setup Instructions or Quick Setup poster or Setting up your computer
on page 4. If you have any problems setting up your system and turning it on, immediately contact HP
support using the procedures given earlier in this chapter. This must be done rst before attempting to
upgrade your system.
By breaking the security seal on the back of the computer, you conrm that the computer was working
properly before you attempted to upgrade your system. After the security seal has been broken, your
computer is then, to the extent allowed by local law, covered under the terms and conditions listed in the HP
Worldwide Limited Warranty and Technical Support guide.
38 Chapter 14 Support information
Index
A
accessibility 36
action keys 14
airplane mode key 15
Audio 8
B
backups 23
boot order
changing 27
C
camera
using 7
caring for your computer 30
cleaning your computer 30
computer
security features 16
troubleshooting 17
D
Dual-Mode DisplayPort
connecting 12
E
electrostatic discharge 35
external monitor port 10
F
ngerprints, registering 16
fn key 14
H
HDMI port
connecting 10
HDMI, conguring audio 11
headphones, connecting 7
headsets, connecting 8
help and support 1, 37
high-denition devices, connecting
10, 12
hot keys 14
HP PC Hardware Diagnostics (UEFI)
using 32
HP Recovery Manager
correcting boot problems 27
starting 26
HP Recovery media
creating 23
recovery 26
HP Recovery partition
recovery 26
removing 28
I
internet, connecting 5
K
keys
airplane mode 15
L
locating information
hardware 3
software 3
M
maintenance, schedules and tasks
29
microphone, connecting 8
minimized image recovery 26
minimized image, creating 25
Miracast 12
O
operating specications 34
original system recovery 25
P
ports
external monitor 10
HDMI 10, 12
Miracast 12
USB Type-C Thunderbolt 9
VGA 10
R
recover
options 25
recovery
discs 24, 26
HP Recovery Manager 25
media 26
starting 26
supported discs 24
system 25
USB ash drive 26
using HP Recovery media 24
recovery media
creating 23
creating using HP Recovery
Manager 24
recovery partition
removing 28
S
security features 16
shutdown 6
sound settings, using 8
speakers
connecting 7
support 37
supported discs, recovery 24
system recovery 25
system restore point
creating 24
system restore point, creating 23
T
Thunderbolt
connecting USB Type-C 9
troubleshooting
computer does not start 17
display (monitor) 18
Internet access 20
keyboard and mouse (wireless)
19
keyboard and mouse (with
cable) 19
power 18
software 21
speakers and sound 19
turning o the computer 6
Index 39
U
unresponsive system 6
USB Type-C port, connecting 9
using sound settings 8
V
VGA port, connecting 10
video 8
W
Windows
system restore point 23, 24
Windows Hello
using 16
Windows tools
using 24
40 Index
14


Need help? Post your question in this forum.

Forumrules


Report abuse

Libble takes abuse of its services very seriously. We're committed to dealing with such abuse according to the laws in your country of residence. When you submit a report, we'll investigate it and take the appropriate action. We'll get back to you only if we require additional details or have more information to share.

Product:

For example, Anti-Semitic content, racist content, or material that could result in a violent physical act.

For example, a credit card number, a personal identification number, or an unlisted home address. Note that email addresses and full names are not considered private information.

Forumrules

To achieve meaningful questions, we apply the following rules:

Register

Register getting emails for HP Pavilion 27-a241 at:


You will receive an email to register for one or both of the options.


Get your user manual by e-mail

Enter your email address to receive the manual of HP Pavilion 27-a241 in the language / languages: English as an attachment in your email.

The manual is 0,84 mb in size.


You will receive the manual in your email within minutes. If you have not received an email, then probably have entered the wrong email address or your mailbox is too full. In addition, it may be that your ISP may have a maximum size for emails to receive.

Others manual(s) of HP Pavilion 27-a241

HP Pavilion 27-a241 User Manual - German - 51 pages

HP Pavilion 27-a241 User Manual - Dutch - 48 pages


The manual is sent by email. Check your email

If you have not received an email with the manual within fifteen minutes, it may be that you have a entered a wrong email address or that your ISP has set a maximum size to receive email that is smaller than the size of the manual.

The email address you have provided is not correct.

Please check the email address and correct it.

Your question is posted on this page

Would you like to receive an email when new answers and questions are posted? Please enter your email address.


Info