Finding information ............................................................................................................................... 2
2 Getting to know your computer ..................................................................................................................... 4
Top ....................................................................................................................................................... 4
Front ..................................................................................................................................................... 8
Right ..................................................................................................................................................... 9
Left ..................................................................................................................................................... 10
3 Connecting to a network .............................................................................................................................. 13
Connecting to a wireless network ....................................................................................................... 13
Using the wireless controls ................................................................................................ 13
Using the wireless button .................................................................................. 13
Using operating system controls ....................................................................... 14
Using a WLAN ................................................................................................................... 14
Using an Internet service provider .................................................................... 14
Setting up a WLAN ............................................................................................ 15
Configuring a wireless router ............................................................................ 15
Protecting your WLAN ....................................................................................... 15
Connecting to a WLAN ...................................................................................... 16
Using HP Mobile Broadband (select models only) ............................................................ 16
Inserting and removing a SIM ........................................................................... 17
Using GPS (select models only) ........................................................................................ 18
Using Bluetooth wireless devices ...................................................................................... 18
Connecting to a local area network (LAN) .......................................................................................... 18
4 Navigating using the keyboard, touch gestures and pointing devices ................................................... 20
Using pointing devices ....................................................................................................................... 20
Video .................................................................................................................................................. 32
6 Power management ...................................................................................................................................... 35
Shutting down the computer ............................................................................................................... 35
Setting power options ......................................................................................................................... 35
Using power-saving states ................................................................................................. 35
Navigating and selecting in Computer Setup ..................................................................... 76
Restoring factory settings in Computer Setup ................................................................... 77
Updating the BIOS ............................................................................................................. 78
Determining the BIOS version ........................................................................... 78
Downloading a BIOS update ............................................................................. 78
Using Advanced System Diagnostics ................................................................................................. 79
13 Support ........................................................................................................................................................ 81
Contacting support ............................................................................................................................. 81
Input power ......................................................................................................................................... 83
Appendix A Traveling with the computer ...................................................................................................... 84
Appendix B Troubleshooting .......................................................................................................................... 85
The computer is unable to start up .................................................................................... 85
The computer screen is blank ............................................................................................ 86
Software is functioning abnormally .................................................................................... 86
The computer is on but not responding ............................................................................. 86
The computer is unusually warm ....................................................................................... 86
ix
An external device is not working ...................................................................................... 87
The wireless network connection is not working ................................................................ 87
A movie is not visible on an external display ..................................................................... 87
Appendix C Electrostatic discharge .............................................................................................................. 88
Index ................................................................................................................................................................... 89
x
1Welcome
After you set up and register the computer, it is important to take the following steps:
●
Take a minute to browse the printed Windows 8 Basics guide to explore the new Windows®
features.
TIP:To quickly return to the computer Start screen from an open app or the Windows desktop,
press the Windows logo key
on your keyboard. Pressing the Windows logo key again will
return you to the previous screen.
●
Connect to the Internet—Set up your wired or wireless network so that you can connect to the
Internet. For more information, see
Connecting to a network on page 13.
●
Update your antivirus software—Protect your computer from damage caused by viruses. The
software is preinstalled on the computer. For more information, see
Using antivirus software
on page 63.
●
Get to know your computer—Learn about your computer features. Refer to
Getting to know
your computer on page 4 and Navigating using the keyboard, touch gestures and pointing
devices on page 20 for additional information.
●
Find installed software—Access a list of the software preinstalled on the computer:
From the Start screen, type a, click Apps, and then select from the displayed options. For
details about using the software included with the computer, see the software manufacturer's
instructions, which may be provided with the software or on the manufacturer's website.
●Back up your hard drive—Create recovery discs or a recovery flash drive. See
Backup and
recovery on page 71.
1
Finding information
The computer comes with several resources to help you perform various tasks.
ResourcesFor information about
Setup Instructions poster
●
How to set up the computer
●
Help to identify computer components
Windows 8 Basics guideOverview of using and navigating with Windows® 8.
Help and Support
To access Help and Support, type h, and then select
Help and Support.
To obtain the latest information in this guide, contact
support. For U.S. support, go to
http://www.hp.com/go/
contactHP. For worldwide support, go to
http://welcome.hp.com/country/us/en/
wwcontact_us.html.
●
Operating system information
●
Software, driver, and BIOS updates
●
Troubleshooting tools
●
How to access support
Regulatory, Safety, and Environmental Notices
To access this guide, from the Start screen, select the
HP Support Assistant app, select My computer, and
then select User guides.
●Regulatory and safety information
●
Battery disposal information
Safety & Comfort Guide
To access this guide, from the Start screen, select the
HP Support Assistant app, select My computer, and
then select User guides.
– or –
Go to
http://www.hp.com/ergo.
●Proper workstation setup, posture, health, and work habits
●
Electrical and mechanical safety information
Worldwide Telephone Numbers booklet
This booklet is provided with your computer.
HP support telephone numbers
HP website
To obtain the latest information in this guide, contact
support. For U.S. support, go to
http://www.hp.com/go/
contactHP. For worldwide support, go to
http://welcome.hp.com/country/us/en/
wwcontact_us.html.
●Support information
●
Ordering parts and finding additional help
●
Accessories available for the device
2Chapter 1 Welcome
ResourcesFor information about
Limited Warranty*
To access this guide, from the Start screen, select the
HP Support Assistant app, select My computer, and
then select Warranty and services.
– or –
Go to
http://www.hp.com/go/orderdocuments.
Warranty information
*You can find the expressly provided HP Limited Warranty applicable to your product located with the user guides on your
computer and/or on the CD/DVD provided in the box. In some countries/regions, HP may provide a printed HP Limited
Warranty in the box. For some countries/regions where the warranty is not provided in printed format, you may request a
printed copy from
http://www.hp.com/go/orderdocuments or write to:
●
North America: Hewlett-Packard, MS POD, 11311 Chinden Blvd., Boise, ID 83714, USA
●
Europe, Middle East, Africa: Hewlett-Packard, POD, Via G. Di Vittorio, 9, 20063, Cernusco s/Naviglio (MI), Italy
●
Asia Pacific: Hewlett-Packard, POD, P.O. Box 200, Alexandra Post Office, Singapore 911507
When you request a printed copy of your warranty, please include your product number, warranty period (found on your
service label), name, and postal address.
IMPORTANT:Do NOT return your HP product to the addresses above. For U.S. support, go to
http://www.hp.com/go/
contactHP. For worldwide support, go to http://welcome.hp.com/country/us/en/wwcontact_us.html.
Finding information3
2Getting to know your computer
Top
TouchPad
NOTE:Your computer may look slightly different from the illustration in this section.
ComponentDescription
(1)Pointing stickMoves the pointer and selects or activates items on the
screen.
(2)Left pointing stick buttonFunctions like the left button on an external mouse.
(3)TouchPad on/off buttonTurns the TouchPad on and off.
(4)TouchPad zoneMoves the pointer and selects or activates items on the
screen.
(5)Left TouchPad buttonFunctions like the left button on an external mouse.
(6)Right pointing stick buttonFunctions like the right button on an external mouse.
(7)Right TouchPad buttonFunctions like the right button on an external mouse.
4Chapter 2 Getting to know your computer
Lights
ComponentDescription
(1)
Wireless light
●
Off: An integrated wireless device, such as a wireless
local area network (WLAN) device and/or a Bluetooth®
device, is on (select models only).
●Amber: All wireless devices are off (select models
only).
(2)Num lock lightOn: Num lock is on.
(3)Caps lock lightOn: Caps lock is on.
(4) TouchPad light
●
Amber: The TouchPad is off.
●
Off: The TouchPad is on.
Top5
Buttons and fingerprint reader (select models only)
ComponentDescription
(1)TouchPad on/off buttonTurns the TouchPad on and off.
(2)Fingerprint reader (select models only)Allows a fingerprint logon to Windows, instead of a
password logon.
6Chapter 2 Getting to know your computer
Keys
ComponentDescription
(1)esc keyDisplays system information when pressed in combination
with the fn key.
(2)fn keyExecutes frequently used system functions when pressed
in combination with a function key, the num lk key, or the
esc key.
(3)
Windows logo keyReturns you to the Start screen from an open app or the
Windows desktop.
NOTE:Pressing the Windows logo key again will return
you to the previous screen.
(4)Function keysExecute frequently used system functions when pressed in
combination with the fn key.
(5)Embedded numeric keypad When the keypad is turned on, it can be used like an
external numeric keypad.
Each key on the keypad performs the function indicated by
the icon in the upper-right corner of the key.
(6)
Windows applications keyDisplays options for a selected object.
(7)num lk keyTurns the embedded numeric keypad on and off when
pressed in combination with the fn key.
Top7
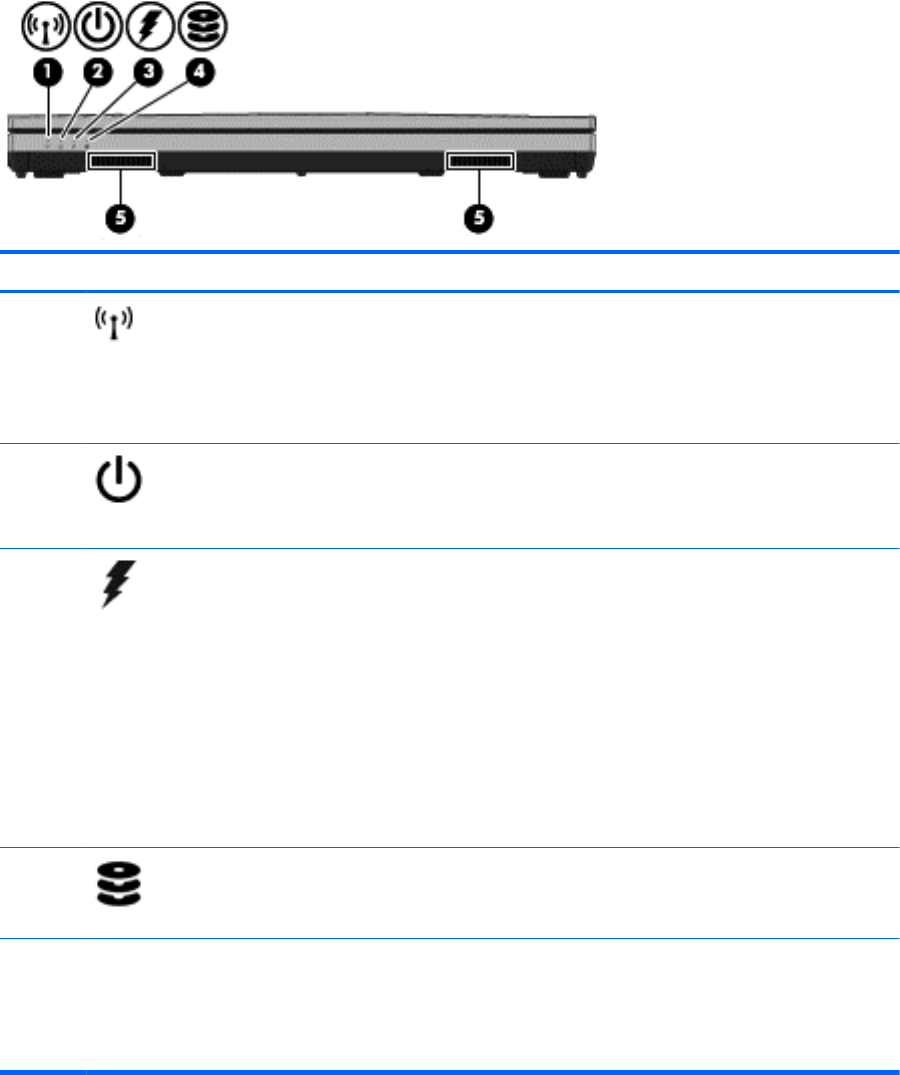
Front
ComponentDescription
(1)
Wireless light ●White: An integrated wireless device, such as a
wireless local area network (WLAN) device and/
or a Bluetooth® device, is on (select models
only).
●
Amber: All wireless devices are off (select
models only).
(2)
Power light
●
On: The computer is on.
●
Blinking: The computer is in the Sleep state.
●
Off: The computer is off.
(3)
AC adapter/Battery light
●
White: The computer is connected to external
power and the battery is charged from 90 to 99
percent.
●Amber: The computer is connected to external
power and the battery is charged from 0 to 90
percent.
●
Blinking amber: A battery that is the only
available power source has reached a low
battery level. When the battery reaches a critical
battery level, the battery light begins blinking
rapidly.
●
Off: The battery is fully charged.
(4)
Hard drive light●Blinking white: The hard drive is being accessed.
●
Amber: HP 3D DriveGuard has temporarily
parked the hard drive.
(5)Speakers (2)Produce SRS Premium Sound or SRS Premium
Sound PRO (select models only).
NOTE:To use the SRS Premium Sound software,
from the Start screen, type SRS, and then select SRS
Premium Sound.
8Chapter 2 Getting to know your computer
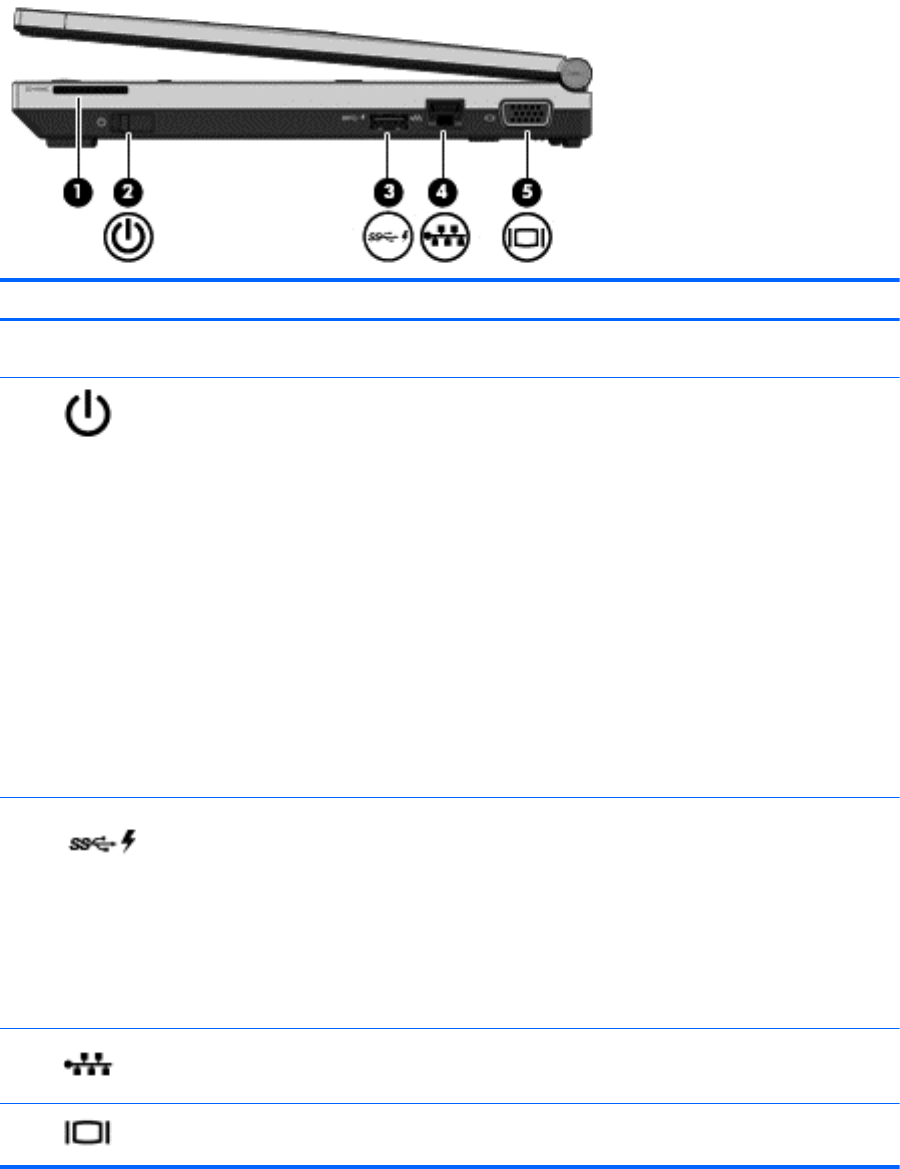
Right
ComponentDescription
(1)Media Card ReaderReads data from and writes data to digital memory cards
such as Secure Digital (SD).
(2)
Power switch
●
When the computer is off, slide the switch to turn on
the computer.
●
When the computer is in the Sleep state, slide the
switch briefly to exit Sleep.
●
When the computer is in Hibernation, slide the switch
briefly to exit Hibernation.
CAUTION:Sliding and holding the power switch will
result in the loss of unsaved information.
If the computer has stopped responding and Windows®
shutdown procedures are ineffective, slide and hold the
power switch for at least 5 seconds to turn off the
computer.
To learn more about your power settings:
To learn more about your power settings, see your power
options. From the Start screen, type power, select
Settings, and then select Power Options.
(3)
USB 3.0 charging portConnects an optional USB 3.0 device and provides
enhanced USB power performance. The USB 3.0 charging
port can also charge select models of cell phones and MP3
players, even when the computer is off.
NOTE:A USB charging port (also referred to as a
powered USB port) allows you to charge connected USB
devices. Standard USB ports will not charge all USB
devices or will charge using a low current. Some USB
devices require power and require you to use a powered
port.
(4)
RJ-45 (network) jackConnects a network cable.
(5)
External monitor portConnects an external VGA monitor or projector.
Right9
Left
ComponentDescription
(1)
Security cable slotAttaches an optional security cable to the computer.
NOTE:The security cable is designed to act as a
deterrent, but it may not prevent the computer from being
mishandled or stolen.
(2)
Power connectorConnects an AC adapter.
(3)
USB 3.0 portConnects an optional USB 3.0 device and provides
enhanced USB power performance.
NOTE:For details about different types of USB ports,
see
Using a USB device on page 45.
(4)VentEnables airflow to cool internal components.
NOTE:The computer fan starts up automatically to cool
internal components and prevent overheating. It is normal
for the internal fan to cycle on and off during routine
Libble takes abuse of its services very seriously. We're committed to dealing with such abuse according to the laws in your country of residence. When you submit a report, we'll investigate it and take the appropriate action. We'll get back to you only if we require additional details or have more information to share.
Product:
Forumrules
To achieve meaningful questions, we apply the following rules:
First, read the manual;
Check if your question has been asked previously;
Try to ask your question as clearly as possible;
Did you already try to solve the problem? Please mention this;
Is your problem solved by a visitor then let him/her know in this forum;
To give a response to a question or answer, do not use this form but click on the button 'reply to this question';
Your question will be posted here and emailed to our subscribers. Therefore, avoid filling in personal details.
Register
Register getting emails for HP Elitebook 2170p at:
new questions and answers
new manuals
You will receive an email to register for one or both of the options.
Get your user manual by e-mail
Enter your email address to receive the manual of HP Elitebook 2170p in the language / languages: English as an attachment in your email.
The manual is 4,6 mb in size.
You will receive the manual in your email within minutes. If you have not received an email, then probably have entered the wrong email address or your mailbox is too full. In addition, it may be that your ISP may have a maximum size for emails to receive.
If you have not received an email with the manual within fifteen minutes, it may be that you have a entered a wrong email address or that your ISP has set a maximum size to receive email that is smaller than the size of the manual.
The email address you have provided is not correct.
Please check the email address and correct it.
Your question is posted on this page
Would you like to receive an email when new answers and questions are posted? Please enter your email address.