IMPORTANT:Select computer products are congured with an Intel® Pentium® N35xx/N37xx series or a
Celeron® N28xx/N29xx/N30xx/N31xx series processor and a Windows® operating system. If your computer
is congured as described, do not change the processor conguration setting in mscong.exe from 4 or 2
processors to 1 processor. If you do so, your computer will not restart. You will have to perform a factory
reset to restore the original settings.
v
vi Processor conguration setting (select products only)
Table of contents
1 Getting started ............................................................................................................................................. 1
Finding information ............................................................................................................................................... 2
Right ....................................................................................................................................................................... 4
Left ......................................................................................................................................................................... 6
Top cover ................................................................................................................................................................ 9
Keyboard area ...................................................................................................................................................... 10
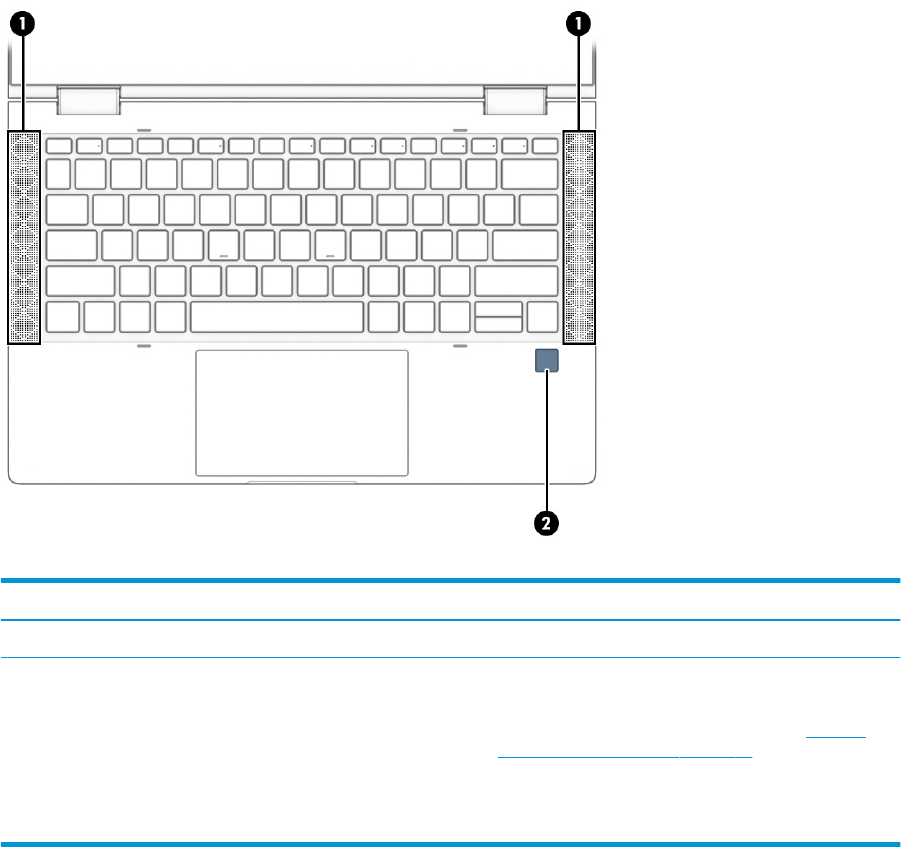
Speakers and ngerprint reader ....................................................................................................... 12
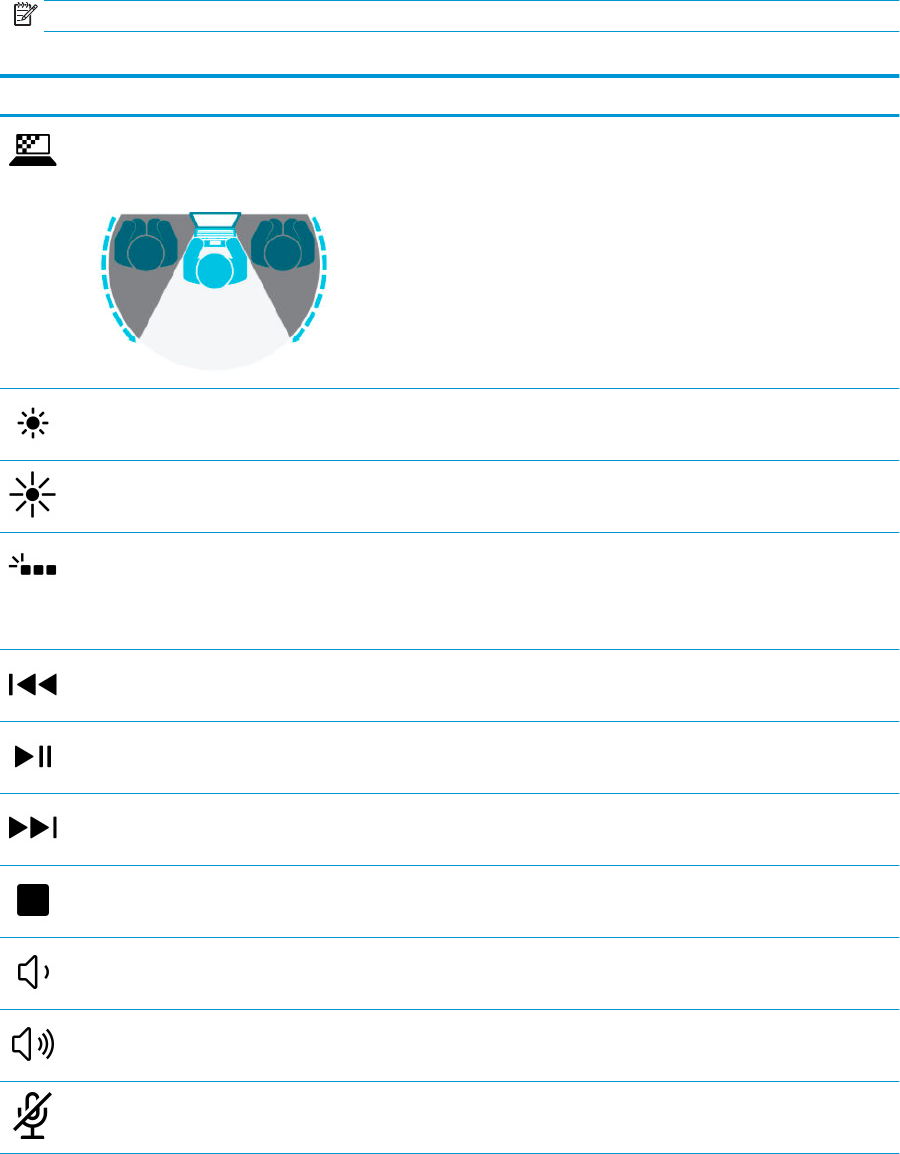
Special keys ....................................................................................................................................... 13
Connecting to a wireless network ....................................................................................................................... 22
Using the wireless controls ............................................................................................................... 22
Connecting to a wired network ............................................................................................................................ 25
vii
Connecting to a local area network (LAN) (select products only) .................................................... 25
Using HP LAN-Wireless Protection (select products only) ................................................................ 26
Turning on and customizing HP LAN-Wireless Protection ............................................. 26
Using HP MAC Address Pass Through to identify your computer on a network (select products only) ............. 27
Customizing MAC Address Pass Through .......................................................................................... 27
4 Navigating the screen .................................................................................................................................. 28
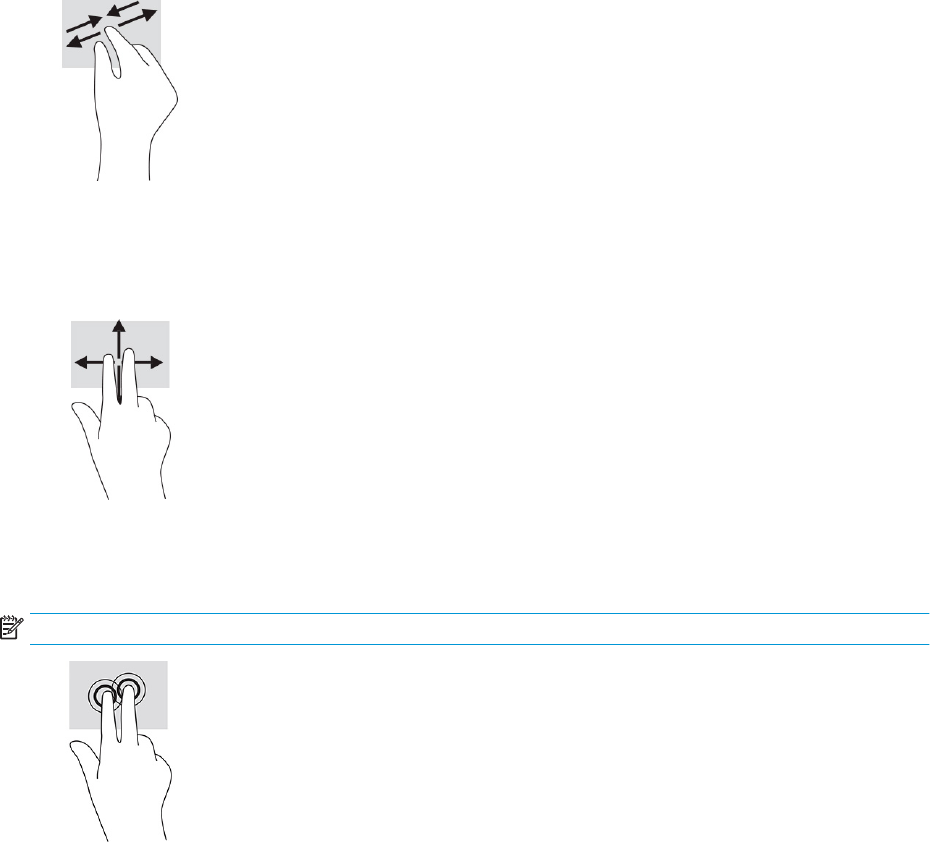
Using touchpad and touch screen gestures ........................................................................................................ 28
Tap ..................................................................................................................................................... 28
Using an optional keyboard or mouse ................................................................................................................. 32
Using an on-screen keyboard (select products only) .......................................................................................... 32
5 Entertainment features ............................................................................................................................... 33
Using a camera (select products only) ................................................................................................................ 33
Using audio .......................................................................................................................................................... 33
Using sound settings ......................................................................................................................... 34
Using video .......................................................................................................................................................... 34
Connecting a Thunderbolt device using a USB Type-C cable ........................................................... 35
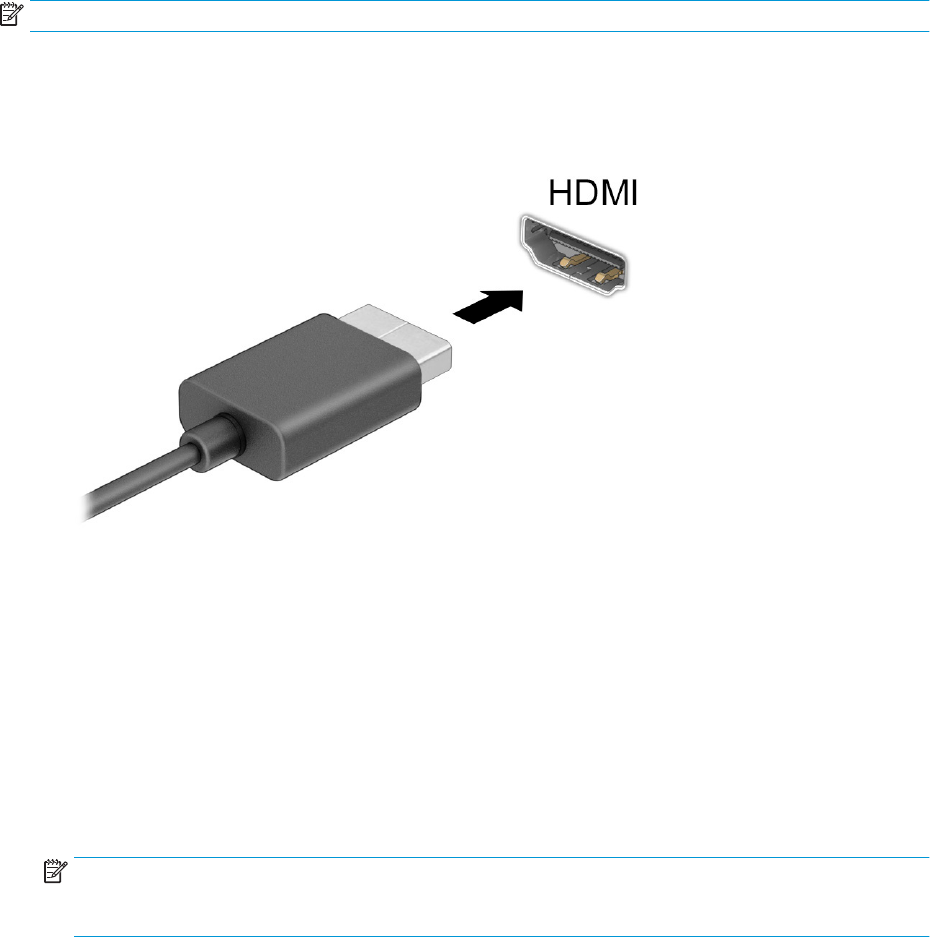
Connecting video devices using an HDMI cable ................................................................................ 36
Setting up HDMI audio .................................................................................................... 36
Discovering and connecting wired displays using MultiStream Transport ...................................... 37
Connect displays to computers with Intel graphics (with an optional hub) ................... 37
Connect displays to computers with Intel graphics (with a built-in hub) ...................... 37
Discovering and connecting to Miracast-compatible wireless displays (select products only) ...... 38
Discovering and connecting to Intel WiDi–certied displays (select Intel products only) ............... 38
Using data transfer .............................................................................................................................................. 38
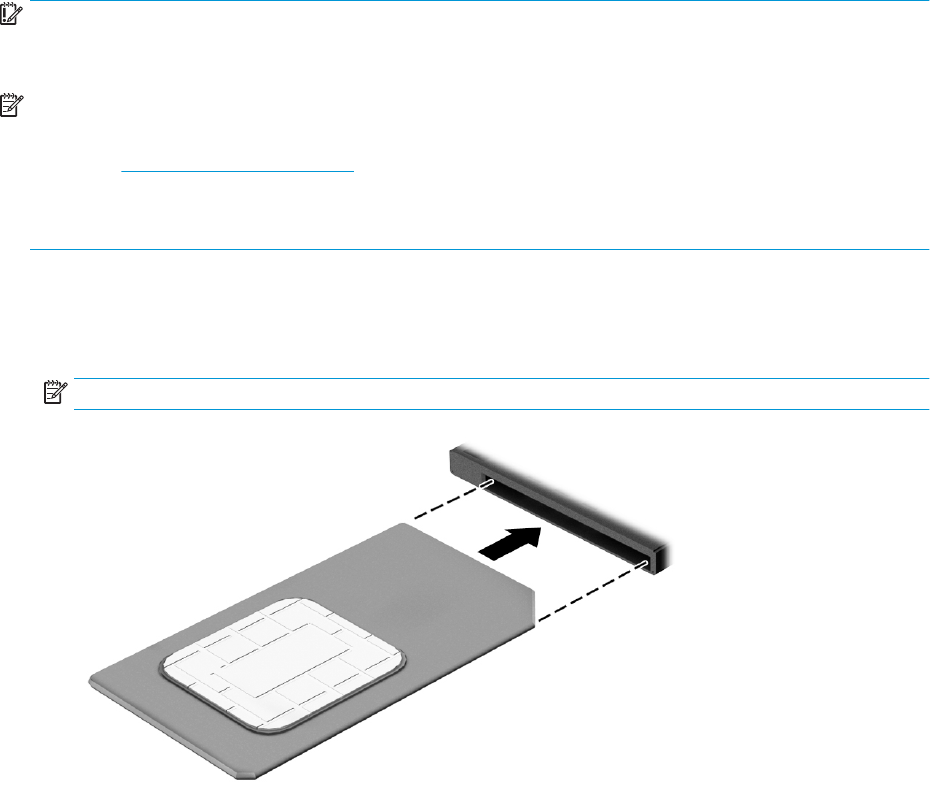
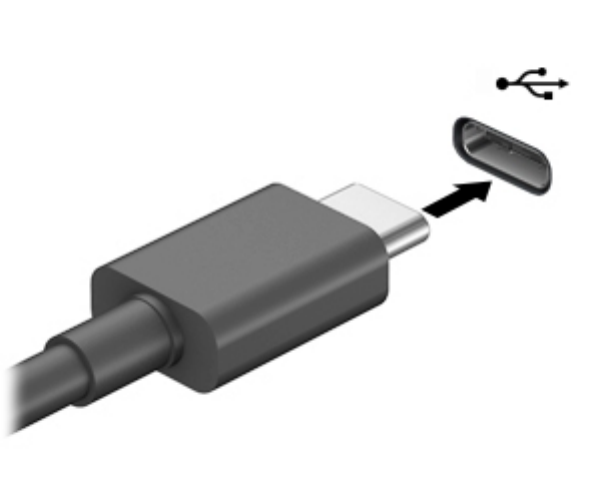
Connecting devices to a USB Type-C port (select products only) ..................................................... 38
viii
6 Managing power .......................................................................................................................................... 40
Using Sleep and Hibernation ............................................................................................................................... 40
Initiating and exiting Sleep ............................................................................................................... 40
Initiating and exiting Hibernation (select products only) ................................................................. 41
Shutting down (turning o) the computer .......................................................................................................... 41
Using the Power icon and Power Options ............................................................................................................ 42
Running on battery power ................................................................................................................................... 42
Using HP Fast Charge (select products only) .................................................................................... 42
Running on external power ................................................................................................................................. 44
Protecting the computer ..................................................................................................................................... 46
Using passwords .................................................................................................................................................. 46
Setting passwords in Windows ......................................................................................................... 47
Setting passwords in Computer Setup ............................................................................................. 47
Managing a BIOS administrator password ........................................................................................ 48
Entering a BIOS administrator password ....................................................................... 49
Using DriveLock Security Options ..................................................................................................... 49
Entering a DriveLock password ...................................................................................... 53
Changing a DriveLock password ..................................................................................... 53
Windows Hello (select products only) ................................................................................................................. 54
Using antivirus software ...................................................................................................................................... 54
Using rewall software ........................................................................................................................................ 54
Using Disk Defragmenter .................................................................................................................. 57
Using Disk Cleanup ............................................................................................................................ 57
Using HP 3D DriveGuard (select products only) ................................................................................ 58
Identifying HP 3D DriveGuard status .............................................................................. 58
Updating programs and drivers .......................................................................................................................... 58
Cleaning your computer ...................................................................................................................................... 58
Cleaning the display ........................................................................................................ 59
Cleaning the sides or cover ............................................................................................. 59
Cleaning the touchpad, keyboard, or mouse (select products only) ............................. 59
Traveling with or shipping your computer .......................................................................................................... 59
9 Backing up, restoring, and recovering ........................................................................................................... 61
Backing up information and creating recovery media ........................................................................................ 61
Using Windows tools ......................................................................................................................... 61
Using the HP Cloud Recovery Download Tool to create recovery media (select products only) ..... 61
Restoring and recovery ........................................................................................................................................ 62
Restoring, resetting, and refreshing using Windows tools .............................................................. 62
Recovering using HP Recovery media ............................................................................................... 62
Changing the computer boot order ................................................................................................... 62
Using HP Sure Recover (select products only) .................................................................................. 63
10 Computer Setup (BIOS), TPM, and HP Sure Start ........................................................................................... 64
Using Computer Setup ......................................................................................................................................... 64
Using HP Sure Start (select products only) ......................................................................................................... 67
11 Using HP PC Hardware Diagnostics .............................................................................................................. 68
Using HP PC Hardware Diagnostics Windows (select products only) ................................................................. 68
Downloading HP PC Hardware Diagnostics Windows ....................................................................... 68
Downloading the latest HP PC Hardware Diagnostics Windows version ....................... 69
Downloading HP Hardware Diagnostics Windows by product name or number
Input power .......................................................................................................................................................... 73
HP and accessibility ............................................................................................................................................. 76
Finding the technology tools you need ............................................................................................ 76
The HP commitment ......................................................................................................................... 76
International Association of Accessibility Professionals (IAAP) ....................................................... 76
Finding the best assistive technology .............................................................................................. 77
Assessing your needs ..................................................................................................... 77
Accessibility for HP products .......................................................................................... 77
Standards and legislation .................................................................................................................................... 78
Other disability resources ................................................................................................................. 79
HP links .............................................................................................................................................. 79
Contacting support .............................................................................................................................................. 80
Index ............................................................................................................................................................. 81
xii
1Getting started
After you set up and register the computer, HP recommends the following steps to get the most out of your
smart investment:
TIP:To quickly return to the computer Start screen from an open app or the Windows desktop, press the
Windows key on your keyboard. Pressing the Windows key again returns you to the previous screen.
●
Connect to the Internet—Set up your wired or wireless network so that you can connect to the Internet.
For more information, see Network connections on page 22.
●
Update your antivirus software—Protect your computer from damage caused by viruses. The software
is preinstalled on the computer. For more information, see Using antivirus software on page 54.
●
Get to know your computer—Learn about your computer features. See Components on page 3 and
Navigating the screen on page 28 for additional information.
●
Find installed software—Access a list of the software preinstalled on the computer:
Select the Start button.
‒ or –
Right-click the Start button, and then select Apps and Features.
●
Back up your hard drive—Create recovery discs or a recovery USB ash drive to back up your hard drive.
See Backing up, restoring, and recovering on page 61.
1
Finding information
To locate resources that provide product details, how-to information, and more, use this table.
Table 1-1 Additional information
ResourceContents
Setup Instructions
●
Overview of computer setup and features
HP support
For HP support, go to http://www.hp.com/support, and
follow the instructions to nd your product.
●
Online chat with an HP technician
●
Support telephone numbers
●
Replacement parts videos (select products only)
●
Maintenance and service guides
●
HP service center locations
Safety & Comfort Guide
To access this guide:
▲Type HP Documentation in the taskbar search
box, and then select HP Documentation.
‒ or –
▲Go to http://www.hp.com/ergo.
IMPORTANT:You must be connected to the Internet
to access the latest version of the user guide.
●
Proper workstation setup
●
Guidelines for posture and work habits that increase your comfort
and decrease your risk of injury
●
Electrical and mechanical safety information
Regulatory, Safety, and Environmental Notices
To access this document:
▲Type HP Documentation in the taskbar search
box, and then select HP Documentation.
●
Important regulatory notices, including information about proper
battery disposal, if needed.
Limited Warranty*
To access this document:
▲Type HP Documentation in the taskbar search
box, and then select HP Documentation.
‒ or –
▲Go to http://www.hp.com/go/orderdocuments.
IMPORTANT:You must be connected to the Internet
to access the latest version of the user guide.
●
Specic warranty information about this computer
*You can nd your HP Limited Warranty located with the user guides on your product and/or on the CD or DVD provided in the box. In
some countries or regions, HP might provide a printed warranty in the box. For countries or regions where the warranty is not provided
in printed format, you can request a copy from http://www.hp.com/go/orderdocuments. For products purchased in Asia Pacic, you can
write to HP at POD, PO Box 161, Kitchener Road Post Oce, Singapore 912006. Include your product name, and your name, phone
number, and postal address.
2Chapter 1 Getting started
2Components
Your computer features top-rated components. This chapter provides details about your components, where
they are located, and how they work.
Locating hardware
To nd out what hardware is installed on your computer:
▲
Type device manager in the taskbar search box, and then select the Device Manager app.
A list displays all the devices installed on your computer.
For information about system hardware components and the system BIOS version number, press fn+esc
(select products only).
Locating software
To nd out what software is installed on your computer:
▲
Right-click the Start button, and then select Apps and Features.
Locating hardware3
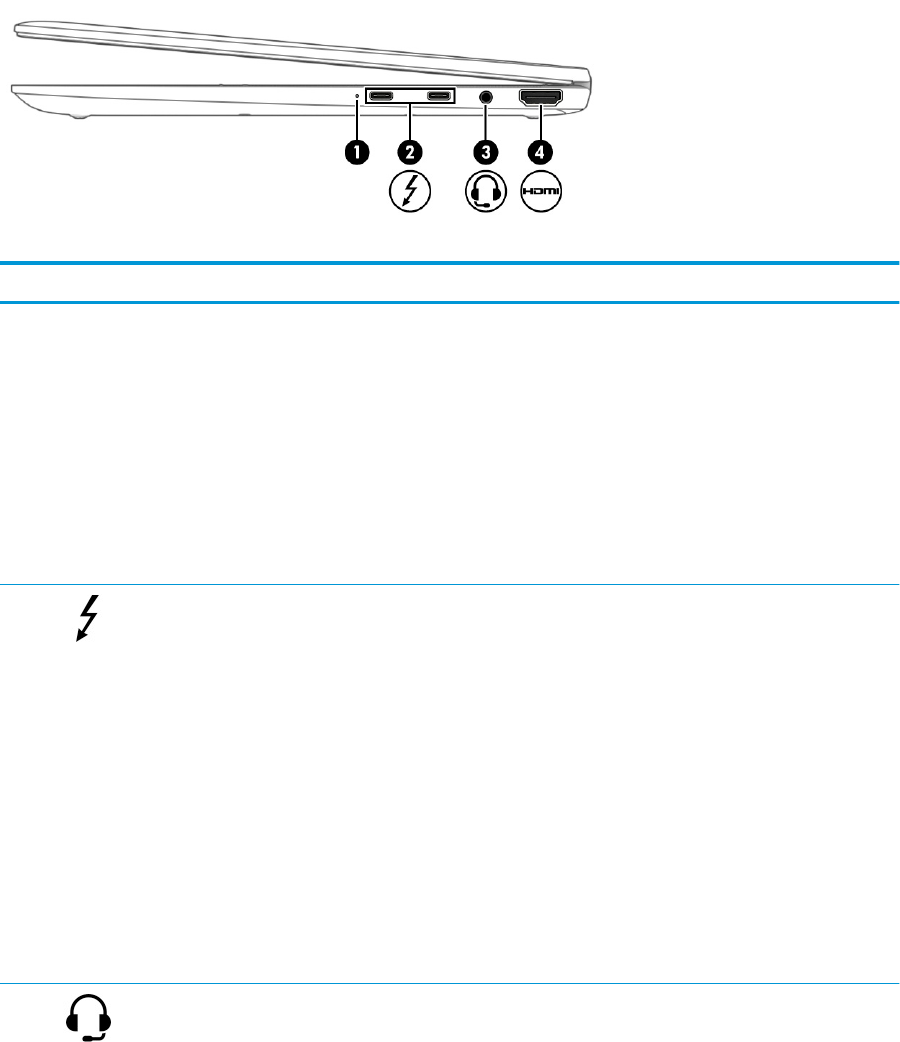
Right
Table 2-1 Right-side components and their descriptions
ComponentDescription
(1)Battery lightWhen AC power is connected:
●
White: The battery charge is greater than 90 percent.
●
Amber: The battery charge is from 0 to 90 percent.
●
O: The battery is not charging.
When AC power is disconnected (battery not charging):
●
Blinking amber: The battery has reached a low battery
level. When the battery has reached a critical battery level,
the battery light begins blinking rapidly.
●
O: The battery is not charging.
(2)USB Type-C power connectors and
Thunderbolt™ ports with HP Sleep and Charge
(2)
Connect AC adapters that have a USB Type-C connector,
supplying power to the computer and, if needed, charging the
computer battery.
– and –
Even when the computer is o, connect and charge most USB
devices that have a Type-C connector, such as a cell phone,
camera, activity tracker, or smartwatch, and provide high-speed
data transfer.
– and –
Connect display devices that have a USB Type-C connector,
providing DisplayPort™ output.
NOTE:Your computer may also support a Thunderbolt
docking station.
NOTE:Cables and/or adapters (purchased separately) may be
Libble takes abuse of its services very seriously. We're committed to dealing with such abuse according to the laws in your country of residence. When you submit a report, we'll investigate it and take the appropriate action. We'll get back to you only if we require additional details or have more information to share.
Product:
Forumrules
To achieve meaningful questions, we apply the following rules:
First, read the manual;
Check if your question has been asked previously;
Try to ask your question as clearly as possible;
Did you already try to solve the problem? Please mention this;
Is your problem solved by a visitor then let him/her know in this forum;
To give a response to a question or answer, do not use this form but click on the button 'reply to this question';
Your question will be posted here and emailed to our subscribers. Therefore, avoid filling in personal details.
Register
Register getting emails for HP Elite Dragonfly at:
new questions and answers
new manuals
You will receive an email to register for one or both of the options.
Get your user manual by e-mail
Enter your email address to receive the manual of HP Elite Dragonfly in the language / languages: English as an attachment in your email.
The manual is 8,95 mb in size.
You will receive the manual in your email within minutes. If you have not received an email, then probably have entered the wrong email address or your mailbox is too full. In addition, it may be that your ISP may have a maximum size for emails to receive.
If you have not received an email with the manual within fifteen minutes, it may be that you have a entered a wrong email address or that your ISP has set a maximum size to receive email that is smaller than the size of the manual.
The email address you have provided is not correct.
Please check the email address and correct it.
Your question is posted on this page
Would you like to receive an email when new answers and questions are posted? Please enter your email address.