668577
103
Zoom out
Zoom in
Previous page
1/128
Next page
HP DeskJet 2600 All-in-One series
Table of contents
1 HP DeskJet 2600 series Help ........................................................................................................................... 1
2 Get started .................................................................................................................................................... 3
Printer parts ........................................................................................................................................................... 4
Control panel features ........................................................................................................................................... 5
Control panel lights and display icons status ....................................................................................................... 8
Print reports from control panel ......................................................................................................................... 10
Load media .......................................................................................................................................................... 11
Change the default paper size detected by printer ............................................................................................. 15
Load an original on the scanner glass ................................................................................................................. 16
Paper basics ......................................................................................................................................................... 17
Open the HP printer software (Windows) ............................................................................................................ 20
Use the HP Smart app to print, scan, and troubleshoot from an iOS, Android, or Windows 10 device ............. 21
Sleep mode .......................................................................................................................................................... 22
Quiet Mode ........................................................................................................................................................... 23
Auto-O ............................................................................................................................................................... 24
3 Print ........................................................................................................................................................... 25
Print documents .................................................................................................................................................. 26
Print photos ......................................................................................................................................................... 28
Print using the HP Smart app .............................................................................................................................. 29
Print envelopes .................................................................................................................................................... 30
Print using the maximum dpi .............................................................................................................................. 31
Print with mobile devices .................................................................................................................................... 33
Tips for print success ........................................................................................................................................... 34
4 Use Web Services ......................................................................................................................................... 37
What are Web Services? ....................................................................................................................................... 38
Set up Web Services ............................................................................................................................................. 39
Print with HP ePrint ............................................................................................................................................. 40
Remove Web Services .......................................................................................................................................... 41
ENWW iii
5 Copy and scan .............................................................................................................................................. 43
Copy documents .................................................................................................................................................. 44
Scan using the HP printer software ..................................................................................................................... 45
Scan using HP Smart ............................................................................................................................................ 49
Scan using Webscan ............................................................................................................................................ 51
Tips for copy and scan success ............................................................................................................................ 52
6 Manage cartridges ....................................................................................................................................... 53
Check estimated ink levels .................................................................................................................................. 54
Order ink supplies ................................................................................................................................................ 55
Replace cartridges ............................................................................................................................................... 56
Use single cartridge mode ................................................................................................................................... 58
Cartridge warranty information .......................................................................................................................... 59
Tips for working with cartridges ......................................................................................................................... 60
7 Connect your printer .................................................................................................................................... 61
Connect your printer to a wireless network with a router .................................................................................. 62
Connect wirelessly to the printer without a router ............................................................................................. 65
Connect your printer by using the HP Smart app ................................................................................................ 68
Wireless settings ................................................................................................................................................. 69
Connect your printer to your computer with a USB cable (non-wireless connection) ....................................... 70
Change from a USB connection to a wireless network ....................................................................................... 71
Advanced printer management tools (for wireless printers) ............................................................................. 72
Tips for setting up and using a wireless printer .................................................................................................. 74
8 Solve a problem ........................................................................................................................................... 75
Jams and paper-feed issues ................................................................................................................................ 76
Cartridge issues ................................................................................................................................................... 81
Printing issues ..................................................................................................................................................... 83
Copy issues .......................................................................................................................................................... 91
Scan issues ........................................................................................................................................................... 92
Network and connection issues .......................................................................................................................... 93
Get help from the HP Smart app ......................................................................................................................... 95
Printer hardware issues ....................................................................................................................................... 96
Control panel error codes and status .................................................................................................................. 97
HP support ......................................................................................................................................................... 101
Appendix A Technical information ................................................................................................................. 103
HP Company notices .......................................................................................................................................... 104
Specications ..................................................................................................................................................... 105
iv ENWW
Regulatory notices ............................................................................................................................................. 107
Environmental product stewardship program .................................................................................................. 114
Index ........................................................................................................................................................... 121
ENWW v
vi ENWW
1 HP DeskJet 2600 series Help
Learn how to use your HP DeskJet 2600 series.
Get started on page 3
Print on page 25
Use Web Services on page 37
Copy and scan on page 43
Manage cartridges on page 53
Connect your printer on page 61
Technical information on page 103
Solve a problem on page 75
ENWW 1
2 Chapter 1 HP DeskJet 2600 series Help ENWW
2 Get started
Printer parts
Control panel features
Control panel lights and display icons status
Print reports from control panel
Load media
Change the default paper size detected by printer
Load an original on the scanner glass
Paper basics
Open the HP printer software (Windows)
Use the HP Smart app to print, scan, and troubleshoot from an iOS, Android, or Windows 10 device
Sleep mode
Quiet Mode
Auto-O
ENWW 3
Printer parts
1 Paper-width guide
2 Input tray
3 Input tray shield
4 Scanner lid
5 Scanner glass
6 Control panel
7 Cartridge access door
8 Cartridges
9 Output tray
10 Output tray extender (also referred to as the tray extender)
11 Power connection
12 USB port
4 Chapter 2 Get started ENWW
Control panel features
Overview of buttons and lights
Feature Description
1 Power button: Turns the printer on or o.
2 Control panel display : Indicates number of copies, wireless status and signal strength, Wi-Fi Direct status,
warnings or errors, and ink levels.
3 Ink Alert light: Indicates low ink or cartridge problems. For more information, see Control panel error codes
and status on page 97.
4 Cancel button: Stops the current operation.
5 Resume button: Resumes a job after a disruption (for example, after loading paper or clearing a paper jam).
Resume light: Indicates the printer is in a warning or error state. For more information, see Control panel
error codes and status on page 97.
6 Wireless button: Turns on or o the printer wireless capabilities.
Wireless light: Indicates whether the printer is connected to a wireless network.
ENWW Control panel features 5
Feature Description
7 Information button: Prints out a printer information page on its current status.
Information light: If the light is blinking in white and the Wi-Fi Direct icon on the display is blinking fast at
the same time, press the Information button to conrm a connection.
8 Start Copy Color button: Starts a color copy job. To increase the number of color copies, press the button
multiple times quickly.
9 Start Copy Black button: Starts a black-and-white copy job. To increase the number of black-and-white
copies, press the button multiple times quickly.
Control panel display icons
Icon Description
Number of copies icon: 1-digit counter showing the number of copies when you are copying
documents. The maximum count is nine.
When the letter E is displayed to the left side of the counter, it indicates the printer is in an error state.
For more information, see Control panel error codes and status on page 97.
Error icon: Indicates a warning or an error.
Paper Error icon: Indicates a paper-related error.
Wireless status icons: Show the status of a wireless connection.
The wireless status icons consist of three icons, the Wireless icon ( ), the Wireless Attention icon
( ), and the Signal Bars icon ( ).
6 Chapter 2 Get started ENWW
Icon Description
Wi-Fi Direct icon: Indicates the current Wi-Fi Direct status.
If the Wi-Fi Direct icon is on, Wi-Fi Direct is on and ready for use.
If the Wi-Fi Direct icon is o, Wi-Fi Direct is o. To turn it on, press and hold the Wireless button
( ) and the Resume button ( ) together for three seconds.
If the Wi-Fi Direct icon is blinking in sync with the white blinking Information light, the Wi-Fi
Protected Setup (WPS) push button mode is in progress. Press the Information button ( )
within two minutes to connect.
If the Wi-Fi Direct icon is blinking fast in sync with the blinking Error icon for three seconds, and
then stays on, Wi-Fi Direct has reached the maximum of ve connections.
If the Wi-Fi Direct icon is blinking fast in sync with the blinking Error icon for three seconds, and
then turns o, Wi-Fi Direct is disabled by your network administrator.
Ink Level icons: The left ink icon shows the estimated ink level of the tri-color cartridge, and the right
icon shows the estimated ink level of the black cartridge.
NOTE: Ink level warnings and indicators provide estimates for planning purposes only. When you
receive a low-ink warning message, consider having a replacement cartridge available to avoid
possible printing delays. You do not need to replace cartridges until the print quality becomes
unacceptable.
ENWW Control panel features 7
Control panel lights and display icons status
Power button light
Status Description
On The printer is on.
O The printer is powered o.
Dimmed The printer is in Sleep mode. The printer automatically enters Sleep mode after ve minutes of
inactivity.
Blinking
The printer is processing a job. To cancel the job, press the Cancel button ( ).
Blinking fast If the cartridge access door is open, close it. If the cartridge access door is closed and the light
is blinking fast, the printer is in an error state that you can resolve by following the onscreen
messages from the computer. If you do not see any onscreen messages, try printing a
document to generate an onscreen message.
Wireless light and icons
The Wireless light next to the Wireless button ( ) and the wireless status icons on the control panel
display work together to indicate the status of a wireless connection.
Status Description
The Wireless light, the Wireless icon, and the Signal Bars icon
are on.
The printer is connected to a wireless network.
The Wireless light and the Wireless status icons are o. The wireless capability of the printer is o. To turn on the
wireless capability, press the Wireless button ( ).
The Wireless light is blinking, the Wireless icon is on, and the
signal bars are cycling.
The printer is in the Auto Wireless Connect setup mode
through the HP printer software.
The Wireless light is blinking, the Wireless icon is on, and the
signal bars are blinking together in sync with the Wireless
light.
The printer is in the Wi-Fi Protected Setup (WPS) progress
mode.
8 Chapter 2 Get started ENWW
Status Description
The Wireless light blinks fast for three seconds and then turns
o. At the same time, the Wireless icon and the Wireless
Attention icon on the display blink fast for three seconds and
then turn o.
The wireless capability of the printer is disabled.
Change the wireless settings. For more information, see
Wireless settings on page 69.
During the wireless setup, the Wireless light is blinking, the
Wireless icon and Wireless Attention icon are on, and the
signal bars are cycling.
There is no wireless signal.
Make sure your wireless router or access point is
powered on.
Move the printer closer to the wireless router.
The Wireless light is blinking, the Wireless icon is on, and the
Wireless Attention icon is blinking in sync with the Wireless
light.
One of the following might have occurred.
The printer has a problem connecting to the wireless
network.
An error occurs or an overlap session is detected when
using WPS.
Press the Wireless button ( ) and the Information button
( ) together to run the wireless test, and then review the
test report for information on how to solve the problem.
ENWW Control panel lights and display icons status 9
Print reports from control panel
Printer report How to print Description
Printer
Information
Page
Press the Information button ( ).
Printer Information Page provides a summary of the
printer information and its current status.
Printer Status
Report
Press and hold the Cancel button ( ) for three
seconds.
Printer Status Report provides the current printer
information, cartridge status, or recent events. It can
also help troubleshooting printer problems.
Wireless
Network Test
Report and
Network
Conguration
Page
Press the Wireless button ( ) and the Information
button ( ) at the same time.
Wireless Network Test Report shows the diagnostics
results for the status of the wireless network, wireless
signal strength, detected networks, and more.
Network Conguration Page shows the network status,
hostname, network name, and more.
Wireless Quick
Start Guide
Press and hold the Information button ( ) for three
seconds.
Wireless Quick Start Guide provides the step-by-step
instructions to help you set up the wireless connection.
Wi-Fi Direct
Guide
Press the Information button ( ) and Resume
button ( ) at the same time.
Wi-Fi Direct Guide provides the instructions to help you
set up and use Wi-Fi Direct.
Web Services
Reports
Press the Information button ( ) and Cancel button
(
) at the same time.
Depending on Web Services status, Web Services
Reports provide dierent instructions to help you turn
on Web Services, set up Web Services, or x connection
issues, and more.
10 Chapter 2 Get started ENWW
Load media
Select a paper size to continue.
To load full-size paper
1. Raise the input tray.
2
. Slide the paper-width guide to the left.
3. Insert a stack of paper into the input tray with the short edge down and the print side up, and slide the
stack of paper down until it stops.
ENWW Load media 11
4. Slide the paper-width guide to the right until it stops at the edge of the paper.
5. Lower the output tray and pull out the output tray extender.
To load small-size paper
1. Raise the input tray.
2. Slide the paper-width guide to the left.
12 Chapter 2 Get started ENWW
3. Insert a stack of photo paper into the far-right side of the input tray with the short edge down and the
print side up, and slide the stack of paper down until it stops.
4. Slide the paper-width guide to the right until it stops at the edge of the paper.
5. Lower the output tray and pull out the output tray extender.
To load envelopes
1. Raise the input tray.
ENWW Load media 13
2. Slide the paper-width guide to the left.
3. Insert one or more envelopes into the far-right side of the input tray and slide the stack of envelopes
down until it stops. The side to be printed on should face up.
4. Slide the paper-width guide to the right against the stack of envelopes until it stops.
5. Lower the output tray and pull out the output tray extender.
14 Chapter 2 Get started ENWW
Change the default paper size detected by printer
The printer can automatically detect whether the input tray has paper loaded and detect whether the loaded
paper is large, small, or medium width. You can change the default large, medium, or small paper size
detected by the printer.
To change the default paper size detected by the printer
1. Open the embedded web server (EWS). For more information, see Open the embedded web server
on page 72.
2. Click the Settings tab.
3. In the Preferences section, click Tray and Paper Management, and then select the desired option.
4. Click Apply.
ENWW Change the default paper size detected by printer 15
Load an original on the scanner glass
To load an original on the scanner glass
1. Lift the scanner lid.
2. Load the original print-side down on the right front corner of the scanner glass.
3. Close the scanner lid.
16 Chapter 2 Get started ENWW
Paper basics
The printer is designed to work well with most types of oice paper. It is best to test a variety of print paper
types before buying large quantities. Use HP paper for optimum print quality. Visit the HP website at
www.hp.com for more information about HP paper.
HP recommends plain papers with the ColorLok logo for printing everyday documents. All
papers with the ColorLok logo are independently tested to meet high standards of
reliability and print quality, and produce documents with crisp, vivid color, bolder blacks,
and that dry faster than ordinary plain papers. Look for papers with the ColorLok logo in
a variety of weights and sizes from major paper manufacturers.
This section contains the following topics:
Recommended papers for printing
Order HP paper supplies
Recommended papers for printing
If you want the best print quality, HP recommends using HP papers that are specically designed for the type
of project you are printing.
Depending on your country/region, some of these papers might not be available.
Photo printing
HP Premium Plus Photo Paper
HP Premium Plus Photo Paper is HP’s highest-quality photo paper for your best photos. With HP
Premium Plus Photo Paper, you can print beautiful photos that are instant-dry so you can share them
right o the printer. It is available in several sizes, including A4, 8.5 x 11 inches (216 x 279 mm), 4 x 6
inches (10 x 15 cm), and 5 x 7 inches (13 x 18 cm), and in two nishes - glossy or soft gloss (semi-gloss).
Ideal for framing, displaying, or gifting your best photos and special photo projects. HP Premium Plus
Photo Paper delivers exceptional results with professional quality and durability.
HP Advanced Photo Paper
This glossy photo paper features an instant-dry nish for easy handling without smudging. It resists
water, smears, ngerprints, and humidity. Your prints have a look and feel comparable to a store-
processed photo. It is available in several sizes, including A4, 8.5 x 11 inches (216 x 279 mm), 4 x
6 inches (10 x 15 cm), and 5 x 7 inches (13 x 18 cm). It is acid-free for longer lasting documents.
HP Everyday Photo Paper
Print colorful, everyday snapshots at a low cost, using paper designed for casual photo printing. This
aordable photo paper dries quickly for easy handling. Get sharp, crisp images when you use this paper
with any inkjet printer. It is available in glossy nish in several sizes, including A4, 8.5 x 11 inches (216 x
279 mm), 5 x 7 inches (13 x 18 cm), and 4 x 6 inches (10 x 15 cm). It is acid-free for longer lasting
documents.
HP Photo Value Packs
ENWW Paper basics 17
HP Photo Value Packs conveniently package original HP ink cartridges and HP Advanced Photo Paper to
save you time and take the guesswork out of printing aordable, lab-quality photos with your HP
printer. Original HP inks and HP Advanced Photo Paper have been designed to work together so your
photos are long lasting and vivid, print after print. Great for printing out an entire vacation's worth of
photos or multiple prints to share.
Business documents
HP Premium Presentation Paper 120g Matte or HP Professional Paper 120 Matte
This paper is a heavy two-sided matte paper perfect for presentation, proposals, reports, and
newsletters. It is heavyweight for an impressive look and feel.
HP Brochure Paper 180g Glossy or HP Professional Paper 180 Glossy
These papers are glossy-coated on both sides for two-sided use. They are the perfect choice for near-
photographic reproductions and business graphics for report covers, special presentations, brochures,
mailers, and calendars.
HP Brochure Paper 180g Matte or HP Professional Paper 180 Matte
These papers are matte-coated on both sides for two-sided use. They are the perfect choice for near-
photographic reproductions and business graphics for report covers, special presentations, brochures,
mailers, and calendars.
Everyday printing
All the papers listed for everyday printing feature ColorLok Technology for less smearing, bolder blacks, and
vivid colors.
HP Bright White Inkjet Paper and Color Inkjet Paper
HP Bright White Inkjet Paper and Color Inkjet Paper deliver high-contrast colors and sharp text. They are
opaque enough for two-sided color usage with no show-through, making them ideal for newsletters,
reports, and yers.
HP Multipurpose and All-in-One Printing Paper
HP Multipurpose and All-in-One Printing Paper is a high-quality multifunction paper. It produces
documents that look and feel more substantial than documents printed on standard multipurpose or
copy paper. It is acid-free for longer lasting documents.
HP Oice, Copy, and Copy & Print Paper
These varieties of HP paper high-quality multifunction paper are suitable for copies, drafts, memos, and
other everyday documents. They are acid-free for longer lasting documents.
HP Oice Recycled Paper
HP Oice Recycled Paper is a high-quality multifunction paper made with 30% recycled ber.
Order HP paper supplies
The printer is designed to work well with most types of oice paper. Use HP paper for optimum print quality.
To order HP papers and other supplies, go to www.hp.com . At this time, some portions of the HP website are
available in English only.
18 Chapter 2 Get started ENWW
HP recommends plain papers with the ColorLok logo for printing and copying of everyday documents. All
papers with the ColorLok logo are independently tested to meet high standards of reliability and print quality,
and produce documents with crisp, vivid color, bolder blacks and shorter dry-time than ordinary plain papers.
Look for papers with the ColorLok logo in a variety of weights and sizes from major paper manufacturers.
ENWW Paper basics 19
Open the HP printer software (Windows)
After installing the HP printer software, double-click the printer icon on the desktop or do one of the following
to open the printer software:
Windows 10: From the computer desktop, click Start, select HP from the app list, and then select the
icon with the printer name.
Windows 8.1: Click the down arrow in lower left corner of the Start screen, and then select the printer
name.
Windows 8: Right-click an empty area on the Start screen, click All Apps on the app bar, and then select
the printer name.
Windows 7, Windows Vista, and Windows XP: From the computer desktop, click Start, select All
Programs, click HP, click the folder for the printer, and then select the icon with the printer name.
20 Chapter 2 Get started ENWW
Use the HP Smart app to print, scan, and troubleshoot from an
iOS, Android, or Windows 10 device
HP Smart (formerly known as HP All-in-One Printer Remote) helps you to set up, scan, print, share, and
manage your HP printer. You can share documents and images through email, text messages, and popular
cloud and social media services (such as iCloud, Google Drive, Dropbox, and Facebook). You can also set up
new HP printers, as well as monitor and order supplies.
NOTE: The HP Smart app might not be available in all languages. Some features might not be available with
all printer models.
To install the HP Smart app
The HP Smart app is supported on iOS, Android, and Windows 10 devices. To install the app on your
device, go to 123.hp.com and follow the onscreen instructions to access your devices app store.
To open the HP Smart app on a Windows 10 computer
After installing the HP Smart app, from the device desktop, click Start, and then select HP Smart from
the app list.
Connect to your printer
Make sure that the printer is turned on and is connected to the same network as your device. Then HP
Smart will automatically detect the printer.
Get more information about the HP Smart app
For basic instructions on how to print, scan, and troubleshoot using HP Smart, see Print using the HP Smart
app on page 29, Scan using HP Smart on page 49 and Get help from the HP Smart app on page 95.
For more information about using HP Smart for printing, scanning, accessing printer features, and
troubleshooting issues, go to:
iOS/Android: www.hp.com/go/hpsmart-help
Windows: www.hp.com/go/hpsmartwin-help
ENWW Use the HP Smart app to print, scan, and troubleshoot from an iOS, Android, or Windows 10 device 21
Sleep mode
Power usage is reduced while in Sleep mode.
After initial setup of printer, the printer will enter Sleep mode after 5 minutes of inactivity.
To change the time to Sleep mode
1. Open the embedded web server (EWS). For more information, see Open the embedded web server
on page 72.
2. Click the Settings tab.
3. In the Power Management section, click Energy Save Mode, and select the desired option.
4. Click Apply.
22 Chapter 2 Get started ENWW
Quiet Mode
Quiet Mode slows down printing to reduce overall noise without aecting print quality. Quiet Mode only works
for printing with Normal print quality on plain paper. To reduce printing noise, turn on Quiet Mode. To print at
normal speed, turn Quiet Mode o. Quiet Mode is o by default.
NOTE: In Quiet Mode, if you print on plain paper with the Draft or Best print quality, or if you print photos or
envelopes, the printer works in the same way as when Quiet Mode is o.
To turn Quiet Mode on or o from the printer software (Windows)
1. Open the HP printer software. For more information, see Open the HP printer software (Windows)
on page 20.
2. Click the Quiet Mode tab.
3. Select On or O .
4. Click Save Setting.
To turn Quiet Mode on or o from the printer software (OS X and macOS)
1. Open HP Utility.
NOTE: HP Utility is located in the HP folder in the Applications folder.
2. Select the printer.
3. Click Quiet Mode .
4. Select On or O .
5. Click Apply Now.
To turn Quiet Mode on or o from the embedded web server (EWS)
1. Open the EWS. For more information, see Open the embedded web server on page 72.
2. Click the Settings tab.
3. In the Preferences section, select Quiet Mode, and then select On or O.
4. Click Apply.
ENWW Quiet Mode 23
Auto-O
This feature turns the printer o after 2 hours of inactivity to help reduce energy use. Auto-O turns the
printer o completely, so you must use the Power button to turn the printer back on. If your printer
supports this energy saving feature, Auto-O is automatically enabled or disabled depending on printer
capabilities and connection options. Even when Auto-O is disabled, the printer enters Sleep mode after 5
minutes of inactivity to help reduce energy use.
Auto-O is enabled when the printer is turned on, if the printer does not have network or fax capability,
or is not using these capabilities.
Auto-O is disabled when a printer’s wireless or Wi-Fi Direct capability is turned on or when a printer
with fax, USB, or Ethernet network capability establishes a fax, USB, or Ethernet network connection.
24 Chapter 2 Get started ENWW
3 Print
Print documents
Print photos
Print using the HP Smart app
Print envelopes
Print using the maximum dpi
Print with mobile devices
Tips for print success
ENWW 25
Print documents
Before printing documents, make sure you have paper loaded in the input tray and the output tray is open.
For more information about loading paper, see Load media on page 11.
To print a document (Windows)
1. From your software, select Print.
2. Make sure your printer is selected.
3. Click the button that opens the Properties dialog box.
Depending on your software application, this button might be called Properties, Options, Printer Setup,
Printer Properties, Printer, or Preferences.
4. Select the appropriate options on the Printing Shortcuts or Printing Shortcut tab.
To change other print settings, click the other tabs.
For more printing tips, see Printer settings tips on page 35.
NOTE: If you change the paper size, ensure that you have loaded the correct paper in the input tray.
5. Click OK to close the Properties dialog box.
6. Click Print or OK to begin printing.
To print documents (OS X and macOS)
1. From the File menu in your software, choose Print.
2. Make sure your printer is selected.
3. Set the print options.
If you do not see options on the Print dialog, click Show Details.
Choose the appropriate paper size in the Paper Size pop-up menu.
NOTE: If you change the paper size, ensure that you have loaded the correct paper.
Select the orientation.
Enter the scaling percentage.
4. Click Print.
To print on both sides of the page (Windows)
1. From your software, select Print.
2. Make sure your printer is selected.
3. Click the button that opens the Properties dialog box.
Depending on your software application, this button might be called Properties, Options, Printer Setup,
Printer Properties, Printer, or Preferences.
26 Chapter 3 Print ENWW
4. On the Printing Shortcuts or Printing Shortcut tab, select the Two-sided (Duplex) Printing shortcut.
To change other print settings, click the other tabs.
For more printing tips, see Printer settings tips on page 35.
NOTE: If you change the paper size, ensure that you have loaded the correct paper in the input tray.
5. After you print the rst side, follow the onscreen instructions to reload the paper, and then click
Continue.
6. Click OK to print.
To print on both sides of the page (OS X and macOS)
1. From the File menu in your software, choose Print.
2. In the Print dialog, choose Paper Handling from the pop-up menu and set Page Order to Normal.
3. Set Pages to Print to Odd Only.
4. Click Print.
5. After all of the odd numbered pages have printed, remove the document from the output tray.
6. Reload the document so that the end that came out of the printer is now going into the printer and the
blank side of the document is facing toward the front of the printer.
7. In the Print dialog, return to the Paper Handling pop-up menu and set the page order to Normal and the
pages to print to Even Only.
8. Click Print.
ENWW Print documents 27
Print photos
Before printing photos, make sure you have photo paper loaded in the input tray and the output tray is open.
For more information about loading paper, see Load media on page 11.
To print a photo on photo paper (Windows)
1. From your software, select Print.
2. Make sure your printer is selected.
3. Click the button that opens the Properties dialog box.
Depending on your software application, this button might be called Properties, Options, Printer Setup,
Printer Properties, Printer, or Preferences.
4. Select the appropriate options on the Printing Shortcuts or Printing Shortcut tab.
To change other print settings, click the other tabs.
For more printing tips, see Printer settings tips on page 35.
NOTE: If you change the paper size, ensure that you have loaded the correct paper in the input tray.
5. Click OK to return to the Properties dialog box.
6. Click OK, and then click Print or OK in the Print dialog box.
NOTE: After the printing is nished, remove unused photo paper from the input tray. Store the photo paper
so it does not start to curl, which could reduce the quality of your printout.
To print a photo from the computer (OS X and macOS)
1. From the File menu in your software, choose Print.
2. Make sure your printer is selected.
3. Set the print options.
If you do not see options on the Print dialog, click Show Details.
Choose the appropriate paper size in the Paper Size pop-up menu.
NOTE: If you change the paper size ensure that you have loaded the correct paper.
Select the orientation.
4. From the pop-up menu, choose Paper Type/Quality, and then choose the following settings:
Paper Type: The appropriate photo paper type
Quality: Select the option that provides the best quality or maximum dpi.
Click the Color Options disclosure triangle, and then choose the appropriate Photo Fix option.
O: applies no changes to the image.
On: automatically focuses the image; moderately adjusts image sharpness.
5. Select any other print settings you want, and then click Print.
28 Chapter 3 Print ENWW
Print using the HP Smart app
This section provides basic instructions for using the HP Smart app to print from your Android, iOS, or
Windows 10 device. For more information about using the HP Smart app, go to:
iOS/Android: www.hp.com/go/hpsmart-help
Windows: www.hp.com/go/hpsmartwin-help
To print from a Windows 10 device
1. Load paper in the input tray. For more information, see Load media on page 11.
2. Open HP Smart. For more information, see Use the HP Smart app to print, scan, and troubleshoot from
an iOS, Android, or Windows 10 device on page 21.
3. On the HP Smart Home screen, make sure your printer is selected.
TIP: If you want to select a dierent printer, click or tap the Printer icon on the toolbar at the left side
of the screen, and then select Select a Dierent Printer to view all available printers.
4. At the bottom of the Home screen, click or tap Print.
5. Select Print Photo, locate a photo you want to print, and then click or tap Select Photos to Print.
Select Print Document, locate a PDF document you want to print, and then click or tap Print.
6. Select the appropriate options. To view more settings, click or tap More settings. For more information
about printing settings, see Printer settings tips on page 35.
7. Click or tap Print to begin printing.
To print from an Android or iOS device
1. Open the HP Smart app.
2. Tap the Plus icon if you need to change to a dierent printer, or add a new printer.
3. Tap a printing option (for example, Print Photos or Print Facebook Photos, etc.). You can print photos
and documents from your device, cloud storage, or social media sites.
4. Select the photo or document you want to print.
5. Tap Print.
ENWW Print using the HP Smart app 29
Print envelopes
Before printing envelopes, make sure you have envelopes loaded in the input tray and the output tray is open.
You can load one or more envelopes into the input tray. Do not use shiny or embossed envelopes or envelopes
that have clasps or windows. For more information about loading envelopes, see Load media on page 11.
NOTE: For specic details on how to format text for printing on envelopes, consult the help les in your
word application.
To print an envelope (Windows)
1. From your software, select Print.
2. Make sure your printer is selected.
3. Click the button that opens the Properties dialog box.
Depending on your software application, this button might be called Properties, Options, Printer Setup,
Printer Properties, Printer, or Preferences.
4. Select appropriate options from the Paper/Quality and Layout tabs and Advanced Options dialog box.
From the Paper type or Media drop-down list, select the appropriate paper type.
From the Paper sizes or Paper Size drop-down list, select the appropriate envelope size.
Select Portrait or Landscape orientation.
For more printing tips, see Printer settings tips on page 35.
5. Click OK, and then click Print or OK in the Print dialog box.
To print envelopes (OS X and macOS)
1. From the File menu in your software, choose Print.
2. Make sure your printer is selected.
3. Select the appropriate envelope size from the Paper Size pop-up menu.
If you do not see options on the Print dialog, click Show Details.
NOTE: If you change the paper size, ensure that you have loaded the correct paper.
4. From the pop-up menu, choose Paper Type/Quality, and verify the paper type setting is set to Plain
Paper.
5. Click Print.
30 Chapter 3 Print ENWW
Print using the maximum dpi
Use maximum dots per inch (dpi) to print high-quality, sharp images on photo paper.
Printing in maximum dpi takes longer than printing with other settings and requires a large amount of disk
space.
For a list of supported print resolutions, visit the product support website at www.support.hp.com.
To print in maximum dpi mode (Windows)
1. From your software, select Print.
2. Make sure your printer is selected.
3. Click the button that opens the Properties dialog box.
Depending on your software application, this button might be called Properties, Options, Printer Setup,
Printer Properties, Printer, or Preferences.
4. Select the appropriate options.
Windows 10, Windows 8.1, and Windows 8
Click Paper/Quality tab. From the Paper sizes drop-down list, select the appropriate paper size.
From the Paper type drop-down list, select the appropriate paper type.
Click the Advanced tab. Select Print in Max DPI.
Windows 7, Windows Vista, and Windows XP
Click Paper/Quality tab. From the Media drop-down list, select the appropriate paper type.
Click the Advanced button. Select the appropriate paper size from the Paper Size drop-down list.
In the Printer Features area, select Yes from the Print in Max DPI drop-down list. Then click OK to
close the Advanced Options dialog box.
For more printing tips, see Printer settings tips on page 35.
5. Conrm the paper orientation on the Layout tab, and then click OK to print.
To print using maximum dpi (OS X and macOS)
1. From the File menu in your software, choose Print.
2. Make sure your printer is selected.
3. Set the print options.
If you do not see options on the Print dialog, click Show Details.
Choose the appropriate paper size in the Paper Size pop-up menu.
NOTE: If you change the paper size ensure that you have loaded the correct paper.
Select the orientation.
4. From the pop-up menu, choose Paper Type/Quality, and then choose the following settings:
ENWW Print using the maximum dpi 31
Paper Type: The appropriate paper type
Quality: Maximum dpi
5. Select any other print settings that you want, and then click Print.
32 Chapter 3 Print ENWW
Print with mobile devices
Print from mobile devices
You can print documents and photos directly from your mobile devices, including iOS, Android, Windows
Mobile, Chromebook and Amazon Kindle.
NOTE: You can also use the HP Smart app to print from mobile devices. For more information, see Print
using the HP Smart app on page 29.
To print from mobile devices
1. Make sure your printer is connected to the same network as your mobile device.
TIP: If you want to print without connecting to a router, use Wi-Fi Direct to print from mobile device.
For more information, see Connect wirelessly to the printer without a router on page 65.
2. Enable printing on your mobile device:
iOS: Use the Print option from the Share menu ( ).
NOTE: Devices running iOS 4.2 or later have AirPrint preinstalled.
Android: Download the HP Print Service Plugin (supported by most Android devices) from the
Google Play Store and enable it on your device.
NOTE: Devices running Android 4.4 or later are supported by the HP Print Service Plugin. Devices
running Android 4.3 or earlier can print using the HP ePrint app, available in the Google Play Store.
Windows Mobile: Tap Print from the Device menu.
NOTE: If your printer is not listed, you might need to do a one-time setup of the printer using the
Add Printer wizard.
Chromebook: Download and install the HP Print for Chrome app from the Chrome Web Store to
enable both Wi-Fi and USB printing.
Amazon Kindle Fire HD9 and HDX: The rst time you select Print on your device, the HP Print
Service Plugin is automatically downloaded to enable mobile printing.
NOTE: For detailed information about enabling printing from your mobile devices, visit the HP Mobile
Printing website ( www.hp.com/go/mobileprinting ). If a local version of this website is not available in
your country/region or language, you might be directed to the HP Mobile Printing website in another
country/region or language.
3. Make sure the loaded paper matches the paper settings of the printer (see Load media on page 11 for
more information). Accurately setting the paper size for the paper that is loaded enables your mobile
device to know what paper size it is printing.
ENWW Print with mobile devices 33
Tips for print success
Ink tips
Paper loading tips
Printer settings tips
To print successfully, the HP cartridges should be functioning properly with suicient ink, the paper should be
loaded correctly, and the printer should have the appropriate settings.
Print settings do not apply to copying or scanning.
Ink tips
Use original HP cartridges.
Install both the black and tri-color cartridges correctly.
For more information, see Replace cartridges on page 56.
Check the estimated ink levels in the cartridges to make sure there is suicient ink.
For more information, see Check estimated ink levels on page 54.
If the print quality is not acceptable, see Printing issues on page 83 for more information.
NOTE: Original HP cartridges are designed and tested with HP printers and papers to help you easily
produce great results, time after time.
HP cannot guarantee the quality or reliability of non-HP supplies. Product service or repairs required as a
result of using a non-HP supply will not be covered under warranty.
If you see a 'Non-HP Cartridge' message displayed from the printer software and you believe you purchased
original HP cartridges, go to: www.hp.com/go/anticounterfeit .
Paper loading tips
Load a stack of paper (not just one page). All of the paper in the stack should be in the same size and
type to avoid a paper jam.
Load the paper with side to be printed on facing up.
Ensure that paper loaded in the input tray lays at, and the edges are not bent or torn.
Adjust the paper-width guide in the input tray to t snugly against all paper. Make sure the paper-width
guide does not bend the paper in the input tray.
For more information, see Load media on page 11.
34 Chapter 3 Print ENWW
Printer settings tips
Printer settings tips (Windows)
To change default print settings, open the HP printer software, click Print & Scan , and then click Set
Preferences. For information how to open the printer software, see Open the HP printer software
(Windows) on page 20.
You can use printing shortcuts to save time setting desired printing preferences. A printing shortcut
stores the settings that are appropriate for a particular type of job, so that you can set all the options
with a single click. To use a shortcut, go to the Printing Shortcuts or Printing Shortcut tab, select the
desired shortcut, and then click
OK.
To add a new printing shortcut, select an existing shortcut similar to the one you want to create, set the
desired printing preferences in the Printing Shortcuts or Printing Shortcut tab, click Save As and enter
a name, and then click OK.
To delete a printing shortcut, select it, and then click Delete.
NOTE: You cannot delete the default printing shortcuts.
To understand paper and paper tray settings:
Paper sizes or Paper Size: Select the paper size you loaded in the input tray.
Paper type or Media: Select the paper type you are using.
To understand color or black and white settings:
Color: Uses ink from all cartridges for full color prints.
Black & White or Black Ink Only: Uses the black ink only for normal or lower quality black and
white prints.
High Quality Grayscale: Uses ink from both the color and black cartridges to produce a wider range
of black and grey tones for high quality black and white prints.
To understand print quality settings:
The print quality is measured in print resolution dots per inch (dpi). Higher dpi produces clearer and
more detailed prints, but slows print speed and might use more ink.
Draft: Lowest dpi typically used when ink levels are low or when high quality prints are not needed.
Normal: Suitable for most print jobs.
Best: Better dpi than Normal.
Print in Max DPI: Highest dpi setting available for print quality.
HP Real Life Technologies: This feature smooths and sharpens images and graphics for improved
print quality.
To understand page and layout settings:
Orientation: Select Portrait for vertical prints or Landscape for horizontal prints.
Print on Both Sides Manually: Manually ip the pages after one side of the paper prints out so that
you can print on both sides of the paper.
ENWW Tips for print success 35
Flip on Long Edge: Select it if you want to ip pages by the long edge of the paper when
printing on both sides of the paper.
Flip on Short Edge: Select it if you want to ip pages by the short edge of the paper when
printing on both sides of the paper.
Booklet Layout or Booklet: Allows you to print a multiple-page document as a booklet. It places
two pages on each side of a sheet that can then be folded into a booklet in half size of the paper.
Left binding or Booklet-LeftBinding: The binding side after folded into a booklet appears at
the left side. Select this option if your reading habit is from left to right.
Right binding or Booklet-RightBinding: The binding side after folded into a booklet appears
at the right side. Select this option if your reading habit is from right to left.
Page Borders: Allows you to add borders to the pages if you print the document with two or more
pages per sheet.
Pages per Sheet Layout: Helps you specify the order of the pages if you print the document with
more than two pages per sheet.
Pages to Print: Allows you to print the odd pages only, print the even pages only, or print all pages.
Reverse page order or Page Order: Allows you to print pages from front to back or in reverse
order.
Printer settings tips (OS X and macOS)
On the Print dialog, use the Paper Size pop-up menu to select the size of paper loaded in the printer.
On the Print dialog, choose the Paper Type/Quality pop-up menu and select the appropriate paper type
and quality.
To print a black and white document using only black ink, choose the Paper Type/Quality from the pop-
up menu and choose Grayscale from the Color pop-up menu.
36 Chapter 3 Print ENWW
4 Use Web Services
What are Web Services?
Set up Web Services
Print with HP ePrint
Remove Web Services
ENWW 37
What are Web Services?
The printer oers innovative, web-enabled solutions that can help you quickly access the Internet, obtain
documents, and print them faster and with less hassle—and all without using a computer.
NOTE: To use these web features, the printer must be connected to the Internet (using wireless
connection). You cannot use these web features if the printer is connected using a USB cable.
HP ePrint
HP ePrint is a free service from HP that allows you to print to your HP ePrint-enabled printer anytime,
from any location. It's as simple as sending an email to the email address assigned to your printer when
you enable Web Services on the printer. No special drivers or software are needed. If you can send an
email, you can print from anywhere, using HP ePrint.
Once you have signed up for an account on HP Connected (might not be available in all countries/
regions), you can sign in to view your HP ePrint job status, manage your HP ePrint printer queue, control
who can use your printer's HP ePrint email address to print, and get help for HP ePrint.
38 Chapter 4 Use Web Services ENWW
Set up Web Services
Before you set up Web Services, make sure your printer is connected to the Internet using a wireless
connection.
To set up Web Services
1. Open the embedded web server (EWS). For more information, see Open the embedded web server
on page 72.
2. Click the Web Services tab.
3. In the Web Services Settings section, click Setup , click Continue, and follow the onscreen instructions
to accept the terms of use.
4. If prompted, choose to allow the printer to check for and install printer updates.
NOTE: If a printer update is available, the printer downloads and installs the update, and then restarts.
Repeat the instructions from step 1 to set up Web Services.
NOTE: If prompted for proxy settings and if your network uses proxy settings, follow the onscreen
instructions to set up a proxy server. If you do not have the proxy details, contact your network
administrator or the person who set up the network.
5. When the printer is connected to the server, the printer prints an information page. Follow the
instructions on the information page to nish the setup.
ENWW Set up Web Services 39
Print with HP ePrint
HP ePrint allows you to print to your HP ePrint-enabled printer anytime, from any location.
Before you can use HP ePrint, make sure the printer is connected to an active network providing Internet
access.
To print a document using HP ePrint
1. Make sure you have set up Web Services.
For more information, see Set up Web Services on page 39.
2.
Press the Information button ( ) and Cancel button ( ) at the same time to print an information
page, and then nd the email address for your printer from the page.
3. Email your document to the printer.
a. On your computer or mobile device, open your email application.
NOTE: For information about using the email application on your computer or mobile device, see
the documentation provided with the application.
b. Create a new email and attach the document to print.
c. Send the email to the printer email address.
The printer prints the attached document.
NOTE:
Enter only the HP ePrint email address in the "To" eld. Do not enter any additional email
addresses in the other elds. The HP ePrint server does not accept email print jobs if there are
multiple addresses in the "To" eld or any address in the "Cc" eld."
The email will be printed once it is received. As with any email, there is no guarantee when or
whether it will be received. You can check the print status on HP Connected (might not be available
in all countries/regions).
Documents printed with HP ePrint may appear dierent from the original. Style, formatting, and
text
ow may dier from the original document. For documents that need to be printed with a
higher quality (such as legal documents), we recommend that you print from the software
application on your computer, where you will have more control over what your printout looks like.
40 Chapter 4 Use Web Services ENWW
Remove Web Services
To remove Web Services, complete the following steps:
1. Open the embedded web server (EWS). For more information, see Open the embedded web server
on page 72.
2. Click the Web Services tab, and then click Remove Web Services in the Web Services Settings section.
3. Click Remove Web Services.
4. Click Yes to remove Web Services from your printer.
ENWW Remove Web Services 41
42 Chapter 4 Use Web Services ENWW
5 Copy and scan
Copy documents
Scan using the HP printer software
Scan using HP Smart
Scan using Webscan
Tips for copy and scan success
ENWW 43
Copy documents
To copy documents
1. Load paper in the input tray.
For information about how to load paper, see Load media on page 11.
2. Load the original print side down on the right front corner of the scanner glass.
For more information, see Load an original on the scanner glass on page 16.
3.
Press either the Start Copy Black button ( ) or the Start Copy Color button ( ) to make a copy.
Copying will start two seconds after the last button press.
TIP: You can increase the number of copies by pressing the button multiple times.
44 Chapter 5 Copy and scan ENWW
Scan using the HP printer software
Scan to a computer
Create a new scan shortcut (Windows)
Change scan settings (Windows)
Scan to a computer
Before scanning to a computer, make sure you have already installed the HP recommended printer software.
The printer and computer must be connected and turned on.
To scan a document or photo to a le (Windows)
1. Load the original print side down on the right front corner of the scanner glass.
2. Double-click the printer icon on the desktop or do one of the following to open the printer software:
Windows 10: From the computer desktop, click Start, select HP from the app list, and then select
the icon with the printer name.
Windows 8.1: Click the down arrow in lower left corner of the Start screen, and then select the
printer name.
Windows 8: Right-click an empty area on the Start screen, click All Apps on the app bar, and then
select the printer name.
Windows 7, Windows Vista, and Windows XP: From the computer desktop, click Start, select All
Programs, click HP, click the folder for the printer, and then select the icon with the printer name.
3. In the printer software, click Scan , and then click Scan a Document or Photo .
4. Select the type of scan you want and then click Scan .
Choose Save as PDF to save the document (or photo) as a PDF le.
Choose Save as JPEG to save the photo (or document) as an image le.
NOTE: The initial screen allows you to review and modify basic settings. Click the More link at the top
right corner of the Scan dialog to review and modify detailed settings.
For more information, see Change scan settings (Windows) on page 47.
If Show Viewer After Scan is selected, you can make adjustments to the scanned image in the preview
screen.
To scan a document or photo to email (Windows)
1. Load the original print side down on the right front corner of the scanner glass.
2. Double-click the printer icon on the desktop or do one of the following to open the printer software:
Windows 10: From the computer desktop, click Start, select HP from the app list, and then select
the icon with the printer name.
Windows 8.1: Click the down arrow in lower left corner of the Start screen, and then select the
printer name.
ENWW Scan using the HP printer software 45
Windows 8: Right-click an empty area on the Start screen, click All Apps on the app bar, and then
select the printer name.
Windows 7, Windows Vista, and Windows XP: From the computer desktop, click Start, select All
Programs, click HP, click the folder for the printer, and then select the icon with the printer name.
3. In the printer software, click Scan , and then click Scan a Document or Photo .
4. Select the type of scan you want and then click Scan .
Choose Email as PDF or Email as JPEG to open your email software with the scanned le as an
attachment.
NOTE: Click the More link at the top right corner of the Scan dialog to review and modify settings for
any scan.
For more information, see Change scan settings (Windows) on page 47.
If Show Viewer After Scan is selected, you can make adjustments to the scanned image in the preview
screen.
To scan an original from HP printer software (OS X and macOS)
1. Open HP Easy Scan.
HP Easy Scan is located in the Applications folder.
2. Choose the type of scan prole you want.
3. Click Scan.
Create a new scan shortcut (Windows)
You can create your own scan shortcut to make scanning easier. For example, you might want to regularly
scan and save photos in PNG format, rather than JPEG.
1. Load the original print side down on the right front corner of the scanner glass.
2. Double-click the printer icon on the desktop or do one of the following to open the printer software:
Windows 10: From the computer desktop, click Start, select HP from the app list, and then select
the icon with the printer name.
Windows 8.1: Click the down arrow in lower left corner of the Start screen, and then select the
printer name.
Windows 8: Right-click an empty area on the Start screen, click All Apps on the app bar, and then
select the printer name.
Windows 7, Windows Vista, and Windows XP: From the computer desktop, click Start, select All
Programs, click HP, click the folder for the printer, and then select the icon with the printer name.
3. In the printer software, click Scan , and then click Scan a Document or Photo .
4. Click Create New Scan Shortcut .
46 Chapter 5 Copy and scan ENWW
5. Enter a descriptive name, choose an existing shortcut on which to base your new shortcut, and then click
Create .
For example, if you are creating a new shortcut for photos, choose either Save as JPEG or Email as
JPEG . This makes available the options for working with graphics when scanning.
6. Change the settings for your new shortcut to meet your needs, and then click the save icon to the right
of the shortcut.
NOTE: Click the More link at the top right corner of the Scan dialog to review and modify settings for
any scan.
For more information, see Change scan settings (Windows) on page 47.
Change scan settings (Windows)
You can modify any of the scan settings either for a singular use or save the changes to use permanently.
These settings include options such as page size and orientation, scan resolution, contrast, and the folder
location for saved scans.
1. Load the original print side down on the right front corner of the scanner glass.
2. Double-click the printer icon on the desktop or do one of the following to open the printer software:
Windows 10: From the computer desktop, click Start, select HP from the app list, and then select
the icon with the printer name.
Windows 8.1: Click the down arrow in lower left corner of the Start screen, and then select the
printer name.
Windows 8: Right-click an empty area on the Start screen, click All Apps on the app bar, and then
select the printer name.
Windows 7, Windows Vista, and Windows XP: From the computer desktop, click Start, select All
Programs, click HP, click the folder for the printer, and then select the icon with the printer name.
3. In the printer software, click Scan , and then click Scan a Document or Photo .
4. Click the More link in the top right corner of the HP Scan dialog.
The detailed settings pane appears on the right. The left column summarizes the current settings for
each section. The right column allows you to change the settings in the highlighted section.
5. Click each section at the left of the detailed settings pane to review the settings in that section.
You can review and change most settings using drop-down menus.
Some settings allow greater exibility by displaying a new pane. These are indicated by a + (plus sign) at
the right of the setting. You must either accept or cancel any changes on this pane to return to the
detailed settings pane.
6. When you have nished changing settings, do one of the following.
Click Scan . You are prompted to save or reject the changes to the shortcut after the scan is
nished.
Click the save icon to the right of the shortcut, and then click Scan .
ENWW Scan using the HP printer software 47
Go online to learn more about using the HP Scan software. Learn how to:
customize scan settings, such as image le type, scan resolution, and contrast levels.
preview and adjust images before scanning.
48 Chapter 5 Copy and scan ENWW
Scan using HP Smart
You can use the HP Smart app to scan documents or photos from the printer's scanner, and you can also scan
using your device camera. HP Smart includes editing tools that allow you to adjust the scanned image before
saving or sharing. You can print, save your scans locally or in cloud storage, and share them via email, SMS,
Facebook, Instagram, etc. To scan with HP Smart, follow the instructions provided in the appropriate section
below, depending on the type of device you are using.
Scan from a Windows 10 device
Scan from an Android or iOS device
This section provides basic instructions for using the HP Smart app to scan from your Android, iOS, or
Windows 10 device. For more information about using the HP Smart app, go to:
iOS/Android: www.hp.com/go/hpsmart-help
Windows: www.hp.com/go/hpsmartwin-help
Scan from a Windows 10 device
To scan a document or photo using the printer scanner
1. Load the original print side down on the right front corner of the scanner glass.
2. Open HP Smart. For more information, see Use the HP Smart app to print, scan, and troubleshoot from
an iOS, Android, or Windows 10 device on page 21.
3. Select Scan, and then select Scanner.
4. Click or tap the Settings icon to modify the basic settings.
NOTE: Be sure to select the correct input source if your printer supports scan from both the document
feeder and scanner glass.
5. Click or tap the Preview icon to preview and adjust the image if necessary.
6. Click or tap the Scan icon.
7. Make other adjustments if necessary:
Click or tap Add to add more documents or photos.
Click or tap Edit to rotate or crop the document or image, or adjust its contrast, brightness,
saturation, or angle.
8. Select the le type you want, and then click or tap the Save icon to save it or click or tap the Share icon
to share it with others.
To scan a document or photo using the device camera
If your device has a camera, you can use the HP Smart app to scan a printed document or photo with the
device camera. You can then use HP Smart to edit, save, print or share the image.
1. Open HP Smart. For more information, see Use the HP Smart app to print, scan, and troubleshoot from
an iOS, Android, or Windows 10 device on page 21.
2. Select Scan, and then select Camera.
ENWW Scan using HP Smart 49
3. Put a document or photo in front of the camera, and then click or tap the round button at the bottom of
the screen to take an image.
4. Adjust boundaries if needed. Click or tap the Apply icon.
5. Make other adjustments if necessary:
Click or tap Add to add more documents or photos.
Click or tap Edit to rotate or crop the document or image, or adjust its contrast, brightness,
saturation, or angle.
6. Select the le type you want, and then click or tap the Save icon to save it or click or tap the Share icon
to share it with others.
To edit a previously scanned document or photo
HP Smart provides editing tools, such as crop or rotate, so that you can use to adjust a previously scanned
document or photo on your device.
1. Open HP Smart. For more information, see Use the HP Smart app to print, scan, and troubleshoot from
an iOS, Android, or Windows 10 device on page 21.
2. Select Scan, and then select Import Local.
3. Select the document or photo that you want to adjust, and then click or tap Open.
4. Adjust boundaries if needed. Click or tap the Apply icon.
5. Make other adjustments if necessary:
Click or tap Add to add more documents or photos.
Click or tap Edit to rotate or crop the document or image, or adjust its contrast, brightness,
saturation, or angle.
6. Select the le type you want, and then click or tap Save or Share to save the le or share it with others.
Scan from an Android or iOS device
To scan from an Android or iOS device
1. Open the HP Smart app.
2. Tap the Plus icon if you need to change to a dierent printer, or add a new printer.
3. Tap the scanning option you want to use.
If you select to scan using the camera, the built-in camera will open. Scan your photo or document
using the camera.
If you select to scan using the printer scanner, tap the Settings icon to select the input source and
change the scan settings, and then tap the Scan icon.
NOTE: Be sure to select the correct input source if your printer supports scan from both the
document feeder and scanner glass.
4. When you have nished adjusting the scanned document or photo, save, share, or print it.
50 Chapter 5 Copy and scan ENWW
Scan using Webscan
Webscan is a feature of the embedded web server that lets you scan photos and documents from your printer
to your computer using a web browser.
This feature is available even if you did not install the printer software on your computer.
NOTE: By default, Webscan is o. You can enable this feature from the EWS.
If you are unable to open Webscan in the EWS, your network administrator might have turned it o. For more
information, contact your network administrator or the person who set up your network.
To enable Webscan
1. Open the embedded web server. For more information, see Open the embedded web server
on page 72.
2. Click the Settings tab.
3. In the Security section, click Administrator Settings.
4. Select Webscan from EWS to enable Webscan.
5. Click Apply.
To scan using Webscan
Scanning using Webscan oers basic scan options. For additional scan options or functionality, scan from the
HP printer software.
1. Load the original print side down on the right front corner of the scanner glass.
2. Open the embedded web server. For more information, see Open the embedded web server
on page 72.
3. Click the Scan tab.
4. Click Webscan in the left pane, change any settings, and then click Start Scan .
ENWW Scan using Webscan 51
Tips for copy and scan success
Use the following tips to copy and scan successfully:
Keep the glass and the back of the lid clean. The scanner interprets anything it detects on the glass as
part of the image.
Load your original, print side down, on the right front corner of the glass.
To make a large copy of a small original, scan the original into the computer, resize the image in the
scanning software, and then print a copy of the enlarged image.
To avoid incorrect or missing scanned text, make sure the brightness is set appropriately in the
software.
52 Chapter 5 Copy and scan ENWW
6 Manage cartridges
This section contains the following topics:
Check estimated ink levels
Order ink supplies
Replace cartridges
Use single cartridge mode
Cartridge warranty information
Tips for working with cartridges
ENWW 53
Check estimated ink levels
You can easily check the ink supply level to determine how soon you might need to replace a cartridge. The
ink supply level shows an estimate of the amount of ink remaining in the cartridges.
NOTE:
If you have installed a relled or remanufactured cartridge, or a cartridge that has been used in another
printer, the ink level indicator might be inaccurate or unavailable.
Ink level warnings and indicators provide estimates for planning purposes only. When you receive a low-
ink warning message, consider having a replacement cartridge available to avoid possible printing
delays. You do not have to replace the cartridges until the print quality is unacceptable.
Ink from the cartridges is used in the printing process in a number of dierent ways, including in the
initialization process, which prepares the printer and cartridges for printing, and in printhead servicing,
which keeps print nozzles clear and ink
owing smoothly. In addition, some residual ink is left in the
cartridge after it is used. For more information, see www.hp.com/go/inkusage.
You can check the estimated ink levels from the printer software or from the printer control panel.
To check the ink levels from the printer control panel
The Ink Level icons on the printer display show an estimate of ink remaining in the cartridges.
To check the ink levels from the HP printer software (Windows)
1. Open the HP printer software. For more information, see Open the HP printer software (Windows)
on page 20.
2. In the printer software, click the Estimated Levels tab.
To check the ink levels from the HP printer software (OS X and macOS)
1. Open HP Utility.
NOTE: HP Utility is located in the HP folder in the Applications folder.
2. Select the HP DeskJet 2600 series from the list of devices at the left of the window.
3. Click Supplies Status.
The estimated ink levels appear.
4. Click All Settings to return to the Information and Support pane.
54 Chapter 6 Manage cartridges ENWW
Order ink supplies
Before ordering cartridges, locate the correct cartridge number.
To locate the cartridge number on the printer
The cartridge number is located inside the cartridge access door.
To locate the cartridge number from the printer software (Windows)
1. Open the HP printer software. For more information, see Open the HP printer software (Windows)
on page 20.
2. In the printer software, click Shop, click Shop For Supplies Online, and then follow the onscreen
instructions.
To nd the print cartridge reorder numbers (OS X and macOS)
1. Open HP Utility.
NOTE: HP Utility is located in the HP folder in the Applications folder.
2. Click Supplies Info.
The print cartridge ordering numbers appear.
3. Click All Settings to return to the Information and Support pane.
To order original HP supplies for the HP DeskJet 2600 series, go to www.hp.com/buy/supplies . If prompted,
choose your country/region, and then follow the prompts to nd the right cartridges for your printer.
NOTE: Ordering cartridges online is not supported in all countries/regions. If it is not available in your
country/region, you may still view supplies information and print a list for reference when shopping at a local
HP reseller.
ENWW Order ink supplies 55
Replace cartridges
To replace the cartridges
1. Check that power is on.
2. Remove the cartridge.
a. Open the cartridge access door and wait for the print carriage to move to the center of the printer.
b. Press down to release the cartridge, and then pull it toward you out of the slot.
3. Insert a new cartridge.
a. Remove the cartridge from the packaging.
56 Chapter 6 Manage cartridges ENWW
b. Remove the plastic tape using the pull tab.
NOTE: Do not touch the electrical contacts on the cartridge.
c. Slide the cartridge into the slot at a slight upward angle, and then push up on the cartridge until it
clicks into place.
d. Close the cartridge access door.
ENWW Replace cartridges 57
Use single cartridge mode
Use the single cartridge mode to operate the printer with only one cartridge. The single cartridge mode is
initiated when one of the following occurs.
There is only one cartridge installed in the carriage.
A cartridge is removed from the carriage if there are two cartridges installed previously.
NOTE: If the printer enters the single cartridge mode when two cartridges are installed in the printer,
verify that the protective piece of plastic tape has been removed from each cartridge. When the plastic
tape covers the cartridge contacts, the printer cannot detect that the cartridge is installed. If there is no
plastic tape on the cartridges, try cleaning the cartridge contacts. For information about cleaning
cartridge contacts, see Cartridge issues on page 81.
To exit the single cartridge mode
Install both the black and tri-color cartridges in the printer.
58 Chapter 6 Manage cartridges ENWW
Cartridge warranty information
The HP cartridge warranty is applicable when the cartridge is used in its designated HP printing device. This
warranty does not cover HP cartridges that have been relled, remanufactured, refurbished, misused, or
tampered with.
During the warranty period, the cartridge is covered as long as the HP ink is not depleted and the end of
warranty date has not been reached. The end of warranty date, in YYYY/MM/DD format, may be found on the
cartridge as indicated:
For a copy of the HP Limited Warranty Statement, see the printed documentation that came with the printer.
ENWW Cartridge warranty information 59
Tips for working with cartridges
Use the following tips to work with cartridges:
To protect the cartridges from drying out, always turn the printer o using the Power button, and wait
until the Power button light goes out.
Do not open or untape cartridges until you are ready to install them. Leaving tape on the cartridges
reduces ink evaporation.
Insert the cartridges into the correct slots. Match the color and icon of each cartridge to the color and
icon for each slot. Make sure the cartridges snap into place.
Align the printer for best print quality. See Printing issues on page 83 for more information.
When the Estimated Cartridge Levels screen in the printer software shows one or both cartridges in a
low state, consider getting replacement cartridges to avoid possible printing delays. You do not need to
replace the cartridges until print quality becomes unacceptable. See Replace cartridges on page 56 for
more information.
If you remove a cartridge from the printer for any reason, try to replace it again as soon as possible. If a
cartridge is left unprotected outside the printer, its nozzles might dry out and clog up.
60 Chapter 6 Manage cartridges ENWW
7 Connect your printer
Connect your printer to a wireless network with a router
Connect wirelessly to the printer without a router
Connect your printer by using the HP Smart app
Wireless settings
Connect your printer to your computer with a USB cable (non-wireless connection)
Change from a USB connection to a wireless network
Advanced printer management tools (for wireless printers)
Tips for setting up and using a wireless printer
ENWW 61
Connect your printer to a wireless network with a router
TIP: To print Wireless Quick Start Guide, press and hold the Information button ( ) for three seconds.
Connect your printer to a wireless network using Wi-Fi Protected Setup (WPS)
Connect your printer to a wireless network using HP printer software
Connect your printer to a wireless network using Wi-Fi Protected Setup (WPS)
Before you can connect your printer to a wireless network using WPS, make sure you have following:
A wireless 802.11b/g/n network that includes a WPS-enabled wireless router or access point.
NOTE: The printer only supports connections using 2.4GHz.
A computer connected to the wireless network that you intend to connect the printer to. Be sure you
have installed the HP printer software on the computer.
If you have a WPS router with a WPS push button, follow the Push Button method. If you are not certain your
router has a push button, follow the PIN method.
To use the Push Button Conguration (PBC) method
1.
Press and hold the Wireless button ( ) on the printer for more than three seconds to start WPS push
mode. The Wireless light starts blinking.
2. Press the WPS button on your router.
NOTE: The product begins a timer for approximately two minutes while a wireless connection is established.
If the printer connects successfully, the blue Wireless light stops blinking and remains on.
To use the PIN method
1.
Press the Wireless button ( ) and Information button ( ) at the same time to print the network
conguration page, and then locate a WPS PIN.
2.
Press and hold the Wireless button ( ) from the printer control panel for more than three seconds.
The wireless light starts blinking.
3. Open the conguration utility or software for the wireless router or wireless access point, and then enter
the WPS PIN.
62 Chapter 7 Connect your printer ENWW
NOTE: For more information about using the conguration utility, see the documentation provided
with the router or wireless access point.
Wait for about two minutes. If the printer connects successfully, the blue Wireless light stops blinking and
remains on.
Connect your printer to a wireless network using HP printer software
To connect the printer to an integrated wireless WLAN 802.11 network, you will need the following:
A wireless 802.11b/g/n network that includes a wireless router or access point.
NOTE: The printer only supports connections using 2.4GHz.
A computer connected to the wireless network that you intend to connect the printer to.
Network name (SSID).
WEP key or WPA Passphrase (if needed).
To connect your printer using HP printer software (Windows)
1. Depending on whether you have installed the HP printer software or not, do one of the following:
If you have not installed the HP printer software on your computer
a. Visit 123.hp.com to download and install the printer software.
NOTE: During the software installation, a USB cable might be required for temporary connection
between the printer and the computer. Do not connect the USB cable until the printer software
prompts to do so.
b. When you are prompted, select Wireless, and then follow the onscreen instructions.
If you have the HP printer software installed on your computer
a. Open the printer software. For more information, see Open the HP printer software (Windows)
on page 20.
b. In the printer software, click Tools.
c. Click Device Setup & Software.
d. Click Connect a new device, click Wireless, and then follow the onscreen instructions.
2. After the printer connects successfully, the blue Wireless light stops blinking and remains on.
To connect your printer using HP printer software (OS X and macOS)
1. Depending on whether you have installed the HP printer software or not, do one of the following:
If you have not installed the HP printer software on your computer
Visit 123.hp.com to download and install the printer software.
ENWW Connect your printer to a wireless network with a router 63
If you have the HP printer software installed on your computer
a. Double-click HP Utility in the HP folder in the Applications folder.
b. On the menu bar at the top of the screen, choose Setup New Device from the Devices menu, and
then follow the onscreen instructions.
2. After the printer connects successfully, the blue Wireless light stops blinking and remains on.
64 Chapter 7 Connect your printer ENWW
Connect wirelessly to the printer without a router
With Wi-Fi Direct, you can print wirelessly from a computer, smart phone, tablet, or other wireless-capable
device—without connecting to an existing wireless network.
Guidelines for using Wi-Fi Direct
Make sure your computer or mobile device has the necessary software.
If you are using a computer, make sure you have installed the printer software provided with the
printer.
If you have not installed the HP printer software on the computer, connect to Wi-Fi Direct rst and
then install the printer software. Select Wireless when prompted by the printer software for a
connection type.
If you are using a mobile device, make sure you have installed a compatible printing app. For more
information, visit the HP Mobile Printing website at www.hp.com/go/mobileprinting. If a local
version of this website is not available in your country/region or language, you might be directed to
the HP Mobile Printing website in another country/region or language.
Make sure Wi-Fi Direct for your printer is turned on.
Up to ve computers and mobile devices can use the same Wi-Fi Direct connection.
Wi-Fi Direct can be used while the printer is also connected either to a computer using a USB cable or to
a network using a wireless connection.
Wi-Fi Direct cannot be used to connect a computer, mobile device, or printer to the Internet.
To turn Wi-Fi Direct on or o
On the printer control panel, press and hold the Wireless button ( ) and the Resume button ( )
together for three seconds.
When Wi-Fi Direct is turned on, the Wi-Fi Direct icon on the display stays on. To nd the Wi-Fi Direct
name and password, press the Information button ( ) to print a printer information page.
NOTE: When you turn on Wi-Fi Direct the rst time, the printer automatically prints a Wi-Fi Direct
guide. The guide provides instructions about how to use Wi-Fi Direct. After that, you can press the
Information button ( ) and the Resume button ( ) together to print the Wi-Fi Direct guide. The
guide may not be available in all languages.
When Wi-Fi Direct is turned o, the Wi-Fi Direct icon on the display is o.
For more information about the Wi-Fi Direct icon status, see Control panel display icons on page 6.
To print from a wireless-capable mobile device that supports Wi-Fi Direct
Make sure you have installed the latest version of HP Print Service Plugin on your mobile device. You can
download this plugin from the Google Play application store.
1. Make sure you have turned on Wi-Fi Direct on the printer.
2. Turn on Wi-Fi Direct on your mobile device. For more information, see the documentation provided with
the mobile device.
ENWW Connect wirelessly to the printer without a router 65
3. From your mobile device, select a document from a print enabled application, and then select the option
to print the document.
The list of available printers appears.
4. From the list of available printers, choose the Wi-Fi Direct name shown such as DIRECT-**-HP DeskJet
2600 series (where ** are the unique characters to identify your printer). And then print your document.
If the Wi-Fi Direct connection security for the printer is Automatic (the default setting), the mobile
device will connect to the printer automatically and send the print job.
If the Wi-Fi Direct connection security for the printer is set to Manual, do one of the following to
connect to the printer and print.
If the Wi-Fi Direct icon on the printer display is blinking in sync with the white blinking
Information light, press the Information button ( ) within 60 seconds. After your mobile
connects to the printer, the Wi-Fi Direct icon stops blinking and stays on.
If the printer prints out a page with a PIN code, follow the instruction on the page.
TIP: You can change the Wi-Fi Direct connection security setting for the printer from the embedded
web server (EWS). For more information, see Open the embedded web server on page 72.
To print from a wireless-capable mobile device that does not support Wi-Fi Direct
Make sure you have installed a compatible printing app on your mobile device. For more information, visit the
HP Mobile Printing website at www.hp.com/go/mobileprinting. If a local version of this website is not
available in your country/region or language, you might be directed to the HP Mobile Printing website in
another country/region or language.
1. Make sure you have turned on Wi-Fi Direct on the printer.
2. Turn on the Wi-Fi connection on your mobile device. For more information, see the documentation
provided with the mobile device.
NOTE: If your mobile device does not support Wi-Fi, you are not able to use Wi-Fi Direct.
3. From the mobile device, connect to a new network. Use the process you normally use to connect to a
new wireless network or hotspot. Choose the Wi-Fi Direct name from the list of wireless networks
shown such as DIRECT-**-HP DeskJet 2600 series (where ** are the unique characters to identify your
printer).
Enter the Wi-Fi Direct password when prompted.
4. Print your document.
To print from a wireless-capable computer (Windows)
1. Make sure you have turned on Wi-Fi Direct on the printer.
2. Turn on the computer's Wi-Fi connection. For more information, see the documentation provided with
the computer.
NOTE: If your computer does not support Wi-Fi, you are not able to use Wi-Fi Direct.
66 Chapter 7 Connect your printer ENWW
3. From the computer, connect to a new network. Use the process you normally use to connect to a new
wireless network or hotspot. Choose the Wi-Fi Direct name from the list of wireless networks shown
such as DIRECT-**-HP DeskJet 2600 series (where ** are the unique characters to identify your printer).
Enter the Wi-Fi Direct password when prompted.
4. Proceed to step 5 if the printer has been installed and connected to the computer over a wireless
network. If the printer has been installed and connected to your computer with a USB cable, follow the
steps below to install the printer software using the Wi-Fi Direct connection.
a. Depending on your operating system, do one of the following:
Windows 10: From the computer desktop, click Start, select HP from the app list, and then
select the icon with the printer name.
Windows 8.1: Click the down arrow in lower left corner of the Start screen, and then select
the printer name.
Windows 8: Right-click an empty area on the Start screen, click All Apps on the app bar, and
then select the printer name.
Windows 7, Windows Vista, and Windows XP: From the computer desktop, click Start, select
All Programs, click HP, click the folder for the printer, and then select the icon with the printer
name.
b. In the printer software, click Tools.
c. Click Device Setup & Software, and then select Connect a new device.
d. When the Connection Options software screen appears, select Wireless.
Select your HP printer from the list of detected printers.
e. Follow the onscreen instructions.
5. Print your document.
To print from a wireless-capable computer (OS X and macOS)
1. Make sure you have turned on Wi-Fi Direct on the printer.
2. Turn on Wi-Fi on the computer.
For more information, see the documentation provided by Apple.
3. Click the Wi-Fi icon and choose the Wi-Fi Direct name, such as DIRECT-**-HP DeskJet 2600 series (where
** are the unique characters to identify your printer).
If Wi-Fi Direct is turned on with security, enter the password when prompted.
4. Add the printer.
a. Open System Preferences .
b. Depending on your operating system, click Printers & Scanners .
c. Click + below the list of printers at the left.
d. Select the printer from the list of detected printers (the word “Bonjour” is listed the right column
beside the printer name), and click Add.
ENWW Connect wirelessly to the printer without a router 67
Connect your printer by using the HP Smart app
To set up using the HP Smart app
You can use the HP Smart to set up the printer on your wireless network. The HP Smart app is supported on
iOS, Android, and Windows devices. For information about this app, see Use the HP Smart app to print, scan,
and troubleshoot from an iOS, Android, or Windows 10 device on page 21.
1. If you are using an iOS or Android mobile device, make sure that Bluetooth is turned on. (HP Smart uses
Bluetooth to make the setup process faster and easier on iOS and Android mobile devices.)
NOTE: HP Smart uses Bluetooth for printer setup only. Printing using Bluetooth is not supported.
2. Open the HP Smart app.
3. Windows: On the home screen, click or tap Setup a new printer and follow the onscreen instructions to
add a printer to your network.
iOS/Android: On the home screen, tap the Plus icon and then tap Add Printer. Follow the onscreen
instructions to add a printer to your network.
68 Chapter 7 Connect your printer ENWW
Wireless settings
You can set up and manage your printer wireless connection and perform a variety of network management
tasks. This includes printing information about network settings, turning the wireless function on or o, and
changing wireless settings.
To turn on or o the wireless capability of the printer
Press the Wireless button ( ) to turn on or o the printer wireless capabilities.
If the printer has an active connection to a wireless network, the blue Wireless light is solid on, and the
printer display shows the Wireless icon and the Signal Bars icon.
If wireless is turned o, the Wireless light is o.
For more information about the wireless status, see Control panel lights and display icons status
on page 8.
To print the wireless network test report and network conguration page, see Print reports from control
panel on page 10.
To change wireless settings (Windows)
This method is available if you have already installed the printer software.
NOTE: This method requires a USB cable. Do not connect the USB cable until prompted to do so.
1. Open the HP printer software. For more information, see Open the HP printer software (Windows)
on page 20.
2. In the printer software, click Tools.
3. Click Device Setup & Software.
4. Select Recongure Wireless Settings. Follow the onscreen instructions.
To restore network settings to default settings
Press and hold the Wireless button ( ) and the Cancel button ( ) from the printer control panel
together for three seconds.
ENWW Wireless settings 69
Connect your printer to your computer with a USB cable (non-
wireless connection)
The printer supports a rear USB 2.0 High Speed port for connection to a computer.
To connect the printer with the USB cable
1. Visit 123.hp.com to download and install the printer software.
NOTE: Do not connect the USB cable to the printer until you are prompted to do so.
2. Follow the onscreen instructions. When you are prompted, connect the printer to the computer by
selecting USB on the Connection Options screen.
3. Follow the onscreen instructions.
If the printer software has been installed, the printer will operate as a plug-and-play device.
70 Chapter 7 Connect your printer ENWW
Change from a USB connection to a wireless network
If you rst set up your printer and installed the software with a USB cable, directly connecting the printer to
your computer, you can easily change to a wireless network connection. You will need a wireless 802.11b/g/n
network that includes a wireless router or access point.
NOTE: The printer only supports connections using 2.4GHz.
Before changing from a USB connection to a wireless network, make sure that:
The printer is connected to your computer with the USB cable until you are prompted to disconnect the
cable.
The computer is connected to the wireless network that you intend to install the printer on.
Change from a USB connection to a wireless network (Windows)
1. Open the HP printer software. For more information, see Open the HP printer software (Windows)
on page 20.
2. In the printer software, click Tools.
3. Click Device Setup & Software.
4. Select Convert a USB connected printer to wireless. Follow the onscreen instructions.
To change from a USB connection to a wireless connection (OS X and macOS)
1. Remove the USB cable from the printer.
2. Restore the printer to its network defaults. For more information, see Wireless settings on page 69.
3. Download the most recent version of HP Easy Start from 123.hp.com.
4. Open HP Easy Start and follow the onscreen instructions to connect your printer.
To change from a USB connection to a wireless network using the HP Smart app on a Windows 10 computer
(Windows)
1. Before you proceed, make sure your computer and printer meet the following requirements:
Your printer is currently connected to your computer through USB.
Your computer is currently connected to a wireless network.
2. Open the HP Smart app. For information about how to open the app on a Windows 10 computer, see Use
the HP Smart app to print, scan, and troubleshoot from an iOS, Android, or Windows 10 device
on page 21.
3. Make sure your printer is selected.
TIP: If you want to select a dierent printer, click the Printer icon on the toolbar at the left side of the
screen, and then select Select a Dierent Printer to view all available printers.
4. Click Learn More when you see “Make printing easier by connecting your printer wirelessly” on top of the
home page of the app.
ENWW Change from a USB connection to a wireless network 71
Advanced printer management tools (for wireless printers)
When the printer is connected to a network, you can use the embedded web server (EWS) to view status
information, change settings, and manage the printer from your computer.
NOTE: You can open and use the EWS without being connected to the Internet. However, some features are
not available.
NOTE: To view or change some settings, you might need a password.
Open the embedded web server
About cookies
Open the embedded web server
You can use one of the following ways to open the embedded web server.
To open the embedded web server through a network
1.
From the printer control panel, press the Wireless button ( ) and the Information button ( )
together to print the network conguration page.
2. Find out the IP address or hostname of the printer from the network conguration page.
3. In a supported web browser on your computer, type the IP address or hostname assigned to the printer.
For example, if the IP address is 192.168.0.12, type the following address into a web browser: http://
192.168.0.12.
To open the embedded web server from the HP printer software (Windows)
1. Open the printer software. For more information, see Open the HP printer software (Windows)
on page 20.
2. Click Print & Scan , and then click Printer Home Page (EWS).
To open the embedded web server through Wi-Fi Direct
1.
If the Wi-Fi Direct icon on the printer display is o, press and hold the Wireless button ( ) and the
Resume button ( ) together for three seconds to turn it on. To nd the Wi-Fi Direct name and
password, press the
Information button ( ) to print a printer information page.
2. From your wireless computer, turn wireless on, search for and connect to the Wi-Fi Direct name, for
example: DIRECT-**-HP DeskJet 2600 series. Enter the Wi-Fi Direct password when prompted.
3. In a supported web browser on your computer, type the following address: http://
192.168.223.1.
About cookies
The embedded web server (EWS) places very small text les (cookies) on your hard drive when you are
browsing. These les let the EWS recognize your computer the next time you visit. For example, if you have
congured the EWS language, a cookie helps remember which language you have selected so that the next
72 Chapter 7 Connect your printer ENWW
time you access the EWS, the pages are displayed in that language. Some cookies (such as the cookie that
stores customer-specic preferences) are stored on the computer until you clear them manually.
You can congure your browser to accept all cookies, or you can congure it to alert you every time a cookie is
oered, which allows you to decide which cookies to accept or refuse. You can also use your browser to
remove unwanted cookies.
NOTE: Depending on your printer, if you disable cookies, you also disable one or more of the following
features:
Starting where you left the application (especially useful when using setup wizards)
Remembering the EWS browser language setting
Personalizing the EWS Home page
For information about how to change your privacy and cookie settings and how to view or delete cookies, see
the documentation available with your web browser.
ENWW Advanced printer management tools (for wireless printers) 73
Tips for setting up and using a wireless printer
Use the following tips to set up and use a wireless printer:
When setting up the wireless networked printer, make sure your wireless router or access point is
powered on. The printer searches for wireless routers, then lists the detected network names on the
computer.
If your computer is connected to a Virtual Private Network (VPN), you need to disconnect from the VPN
before you can access any other device on your network, including the printer.
Learn more about conguring your network and the printer for wireless printing. Click here to go online
for more information.
Learn how to nd your network security settings. Click here to go online for more information.
Learn about the HP Print and Scan Doctor. Click here to go online for more information.
NOTE: This utility is only available for Windows operating system.
Learn how to change from a USB to wireless connection. Click here to go online for more information.
Learn how to work with your rewall and antivirus programs during printer setup. Click here to go online
for more information.
74 Chapter 7 Connect your printer ENWW
8 Solve a problem
This section contains the following topics:
Jams and paper-feed issues
Cartridge issues
Printing issues
Copy issues
Scan issues
Network and connection issues
Get help from the HP Smart app
Printer hardware issues
Control panel error codes and status
HP support
ENWW 75
Jams and paper-feed issues
What do you want to do?
Clear a paper jam
Solve paper jam issues. Use an HP online troubleshooting wizard.
Instructions for clearing paper jams and resolving issues with paper or the paper feed.
NOTE: The HP online troubleshooting wizards may not be available in all languages.
Read general instructions in the Help for clearing paper jams
NOTE: Paper jams can occur in several areas. Clear paper jam from the input tray rst. It helps to clear the
paper path and make clearing jams from other areas easier. Then continue to the next area until all paper
jams are located and cleared.
To clear a paper jam from the input tray
1. Remove all the paper from the input tray, including both loose and jammed paper.
2. Lift and hold the input tray shield, use a ashlight to check for any jammed paper or foreign objects in
the paper path, and then remove any jammed paper or foreign objects you nd.
To avoid tearing any whole sheets of paper, pull the paper with both hands gently.
NOTE: The input tray shield can prevent foreign debris from falling into the paper path and causing
serious paper jams. Do not take down the input tray shield.
3.
Press the Cancel button ( ). The printer tries to clear the jam automatically.
To clear a paper jam from the output tray
1. Remove all the paper from the output tray, including both loose and jammed paper.
76 Chapter 8 Solve a problem ENWW
2. Use a ashlight to check for any jammed paper or foreign objects in the output tray area, and then
remove any jammed paper or foreign objects you nd.
To avoid tearing any whole sheets of paper, pull the paper with both hands gently.
To clear a paper jam from the cartridge access area
1.
Press the Cancel button ( ) to try to clear the jam automatically. If this does not work, complete the
following steps to clear the jam manually.
2. Open the cartridge access door.
3. Wait until the carriage is idle and silent.
4.
Press the Power button ( ) to turn o the printer. Then disconnect the power cord and any other
cables from the rear of the printer.
CAUTION: To avoid the risk of electrical shock, you must unplug the power cord to move the carriage
by hand and reset the paper feed mechanism.
ENWW Jams and paper-feed issues 77
5. Use a ashlight to check for any jammed paper or foreign objects in the cartridge access area, and then
remove any jammed paper or foreign objects you nd.
To avoid tearing any whole sheets of paper, pull the paper with both hands gently.
6. If the carriage is in the center of the printer, slide it to the right, and then remove any paper or objects
blocking the carriage path.
7. Close the cartridge access door.
8. Reconnect the power cord and any other cables to the rear of the printer, and then press the Power
button ( ) to turn on the printer.
To clear a paper jam from underneath the printer
1.
Press the Cancel button ( ) to try to clear the jam automatically. If this does not work, complete the
following steps to clear the jam manually.
2.
Press the Power button ( ) to turn o the printer. Then disconnect the power cord and any other
cables from the rear of the printer.
3. Lower the input tray back into the printer, close the output tray extender, and then push the output tray
into the printer.
4. Turn the printer over, locate the cleanout door on the bottom of the printer, and then pull both tabs on
the cleanout door to open it.
78 Chapter 8 Solve a problem ENWW
5. Remove the jammed paper.
6. Use a ashlight to check for torn pieces of jammed paper inside the cleanout area, and then remove any
jammed paper you nd.
7. Close the cleanout door. Gently push the door towards the printer until both latches snap into place.
8. Turn the printer over to its normal position.
9. Reconnect the power cord and any other cables to the rear of the printer, and then press the Power
button ( ) to turn on the printer.
After clearing jammed paper in all areas, reload paper into the input tray. Press the Resume button ( ) on
the control panel to continue the current job.
Clear a print carriage jam
Resolve a print carriage jam. Use an HP online troubleshooting wizard.
If something is blocking the print carriage or it does not move easily, get step-by-step instructions.
NOTE: The HP online troubleshooting wizards may not be available in all languages.
Read general instructions in the Help for clearing a print carriage jams
Remove any objects, such as paper, that are blocking the print carriage.
NOTE: Do not use any tools or other devices to remove jammed paper. Always use caution when
removing jammed paper from inside the printer.
Learn how to avoid paper jams
To help avoid paper jams, follow these guidelines.
Do not overll the input tray.
Remove printed papers from the output tray frequently.
ENWW Jams and paper-feed issues 79
Ensure that paper loaded in the input tray lays at, and the edges are not bent or torn.
Do not combine dierent paper types and paper sizes in the input tray; the entire stack of paper in the
input tray must be the same size and type.
Adjust the paper-width guide in the input tray to t snugly against all paper. Make sure the paper-width
guide does not bend the paper in the input tray.
Do not force paper too far down in the input tray.
Do not add paper while the printer is printing. If the printer is about to run out of paper, wait until the out
of paper message appears before adding paper.
Solve paper-feed problems
What kind of problem are you having?
Paper is not picked up from the input tray
Make sure paper is loaded in the input tray. For more information, see Load media on page 11.
Adjust the paper-width guide in the input tray to t snugly against all paper. Make sure the paper-
width guide does not bend the paper in the input tray.
Make sure paper in the input tray is not curled. Uncurl paper by bending it in the opposite direction
of the curl.
Pages are skewing
Make sure the paper is loaded in the far-right side of the input tray and the paper-width guide is t
against the left side of the paper.
Load paper into the printer only when it is not printing.
Multiple pages are being picked up
Adjust the paper-width guide in the input tray to t snugly against all paper. Make sure the paper-
width guide does not bend the paper in the input tray.
Make sure the input tray is not overloaded with paper.
Make sure the pieces of the loaded paper are not sticking together.
Use HP paper for optimum performance and eiciency.
80 Chapter 8 Solve a problem ENWW
Cartridge issues
Identify whether a cartridge has a problem
To identify whether a cartridge has a problem, check the status of the Ink Alert light and the corresponding
Ink Level icon. For more information, see Control panel error codes and status on page 97.
If you get a cartridge problem message from the printer software that states at least one of the cartridges
has a problem, do the following to identify whether a cartridge has a problem.
1. Remove the black cartridge and then close the cartridge access door.
If the Ink Level icon for the tri-color cartridge blinks, the tri-color cartridge has a problem.
If the Ink Level icon for the tri-color cartridge does not blink, the tri-color cartridge does not have a
problem.
2. Install the black cartridge back in the printer, remove tri-color cartridge, and then close the cartridge
access door.
If the Ink Level icon for the black cartridge blinks, the black cartridge has a problem.
If the Ink Level icon for the black cartridge does not blink, the black cartridge does not have a
problem.
Fix cartridge problems
If an error occurs after a cartridge is installed, or if a message indicates a cartridge problem, try removing the
cartridges, verifying the protective piece of plastic tape has been removed from each cartridge, and then
reinserting the cartridges. If this does not work, clean the cartridge contacts. If the problem is still not
resolved, replace the cartridges. For information about replacing cartridges, see Replace cartridges
on page 56.
To clean cartridge contacts
CAUTION: The cleaning procedure should take only a few minutes. Make sure that the cartridges are
reinstalled in the printer as soon as possible. It is not recommended to leave the cartridges outside the printer
longer than 30 minutes. If cartridges are left unprotected outside the printer, their nozzles might dry out and
clog up.
1. Check that power is on.
2. Open the cartridge access door and wait for the print carriage to move to the center of the printer.
ENWW Cartridge issues 81
3. Remove the cartridge indicated in the error message.
4. Clean the cartridge contacts and printer contacts.
a. Hold the cartridge by its sides with the bottom pointing up and locate the electrical contacts on the
cartridge.
The electrical contacts are the small gold-colored dots on the cartridge.
b. Wipe only the contacts with a dry swab or lint-free cloth.
CAUTION: Be careful to wipe only the contacts, and do not smear any of the ink or other debris
elsewhere on the cartridge.
c. On the inside of the printer, locate the contacts for the cartridge.
The printer contacts are the set of gold-colored bumps positioned to meet the contacts on the
cartridge.
d. Use a dry swab or lint-free cloth to wipe the contacts.
5. Reinstall the cartridge.
6. Close the cartridge access door.
7. Check if the error message has gone away. If you still receive the error message, turn the printer o, and
then on.
NOTE: If one cartridge is causing problems, you can remove it and use the single cartridge mode to operate
the printer with only one cartridge.
82 Chapter 8 Solve a problem ENWW
Printing issues
What do you want to do?
Fix problems with page not printing (unable to print)
HP Print and Scan Doctor The HP Print and Scan Doctor is a utility that will try to diagnose and x the issue automatically.
NOTE: This utility is only available for Windows operating system.
Troubleshoot problems with
print jobs not printing.
Use an HP online troubleshooting wizard.
Get step-by-step instructions if the printer is not responding or printing.
NOTE: The HP Print and Scan Doctor and the HP online troubleshooting wizards may not be available in all
languages.
Read general instructions in the Help for unable to print issues
To resolve print issues (Windows)
Make sure that the printer is turned on and that there is paper in the input tray. If you are still unable to print,
try the following in order:
1. Check for error messages from the printer software and resolve them by following the onscreen
instructions.
2. If your computer is connected to the printer with a USB cable, disconnect and reconnect the USB cable. If
your computer is connected to the printer with a wireless connection, conrm that the connection is
working.
3. Verify that the printer is not paused or oine.
To verify that the printer is not paused or oine
a. Depending upon your operating system, do one of the following:
Windows 10: From the Windows Start menu, select Windows System from the app list, select
Control Panel, and then click View devices and printers under Hardware and Sound.
Windows 8.1 and Windows 8: Point to or tap the upper-right corner of the screen to open the
Charms bar, click the Settings icon, click or tap Control Panel, and then click or tap View
devices and printers.
Windows 7: From the Windows Start menu, click Devices and Printers.
Windows Vista: From the Windows Start menu, click Control Panel, and then click Printers.
Windows XP: From the Windows Start menu, click Control Panel, and then click Printers and
Faxes.
b. Either double-click the icon for your printer or right-click the icon for your printer and select See
what's printing to open the print queue.
ENWW Printing issues 83
c. On the Printer menu, make sure there are no check marks next to Pause Printing or Use Printer
Oine.
d. If you made any changes, try to print again.
4. Verify that the printer is set as the default printer.
To verify that the printer is set as the default printer
a. Depending upon your operating system, do one of the following:
Windows 10: From the Windows Start menu, select Windows System from the app list, select
Control Panel, and then click View devices and printers under Hardware and Sound.
Windows 8.1 and Windows 8: Point to or tap the upper-right corner of the screen to open the
Charms bar, click the Settings icon, click or tap Control Panel, and then click or tap View
devices and printers.
Windows 7: From the Windows Start menu, click Devices and Printers.
Windows Vista: From the Windows Start menu, click Control Panel, and then click Printers.
Windows XP: From the Windows Start menu, click Control Panel, and then click Printers and
Faxes.
b. Make sure the correct printer is set as the default printer.
The default printer has a check mark in a black or green circle next to it.
c. If the wrong printer is set as the default printer, right-click the correct printer and select Set as
Default Printer.
d. Try using your printer again.
5. Restart the print spooler.
To restart the print spooler
a. Depending upon your operating system, do one of the following:
Windows 10
i. From the Windows Start menu, select Windows Administrative Tools from the app list, and
then select Services.
ii. Right-click the Print Spooler, and then click Properties.
iii. On the General tab, next to Startup type, make sure that Automatic is selected.
iv. If the service is not already running, under Service status, click Start, and then click OK.
Windows 8.1 and Windows 8
i. Point to or tap the upper-right corner of the screen to open the Charms bar, and then click the
Settings icon.
ii. Click or tap Control Panel, and then click or tap System and Security.
iii. Click or tap Administrative Tools, and then double-click or double-tap Services.
84 Chapter 8 Solve a problem ENWW
iv. Right-click or touch and hold Print Spooler, and then click Properties.
v. On the General tab, next to Startup type, make sure that Automatic is selected.
vi. If the service is not already running, under Service status, click or tap Start, and then click or
tap OK.
Windows 7
i. From the Windows Start menu, click Control Panel, System and Security, and then
Administrative Tools.
ii. Double-click Services.
iii. Right-click the Print Spooler, and then click Properties.
iv. On the General tab, next to Startup type, make sure that Automatic is selected.
v. If the service is not already running, under Service status, click Start, and then click OK.
Windows Vista
i. From the Windows Start menu, click Control Panel, System and Maintenance,
Administrative Tools.
ii. Double-click Services.
iii. Right-click the Print Spooler service, and then click Properties.
iv. On the General tab, next to Startup type, make sure that Automatic is selected.
v. If the service is not already running, under Service status, click Start, and then click OK.
Windows XP
i. From the Windows Start menu, right click My Computer.
ii. Click Manage, and then click Services and Applications.
iii. Double-click Services, and then select Print Spooler.
iv. Right-click Print Spooler, and click Restart to restart the service.
b. Make sure the correct printer is set as the default printer.
The default printer has a check mark in a black or green circle next to it.
c. If the wrong printer is set as the default printer, right-click the correct printer and select Set as
Default Printer.
d. Try using your printer again.
6. Restart the computer.
7. Clear the print queue.
To clear the print queue
a. Depending upon your operating system, do one of the following:
ENWW Printing issues 85
Windows 10: From the Windows Start menu, select Windows System from the app list, select
Control Panel, and then click View devices and printers under Hardware and Sound.
Windows 8.1 and Windows 8: Point to or tap the upper-right corner of the screen to open the
Charms bar, click the Settings icon, click or tap Control Panel, and then click or tap View
devices and printers.
Windows 7: From the Windows Start menu, click Devices and Printers.
Windows Vista: From the Windows Start menu, click Control Panel, and then click Printers.
Windows XP: From the Windows Start menu, click Control Panel, and then click Printers and
Faxes.
b. Double-click the icon for your printer to open the print queue.
c. On the Printer menu, click Cancel all documents or Purge Print Document, and then click Yes to
conrm.
d. If there are still documents in the queue, restart the computer and try printing again after the
computer has restarted.
e. Check the print queue again to make sure it is clear, and then try to print again.
To resolve print issues (OS X and macOS)
1. Check for error messages and resolve.
2. Disconnect and reconnect the USB cable.
3. Verify that the product is not paused or oine.
To verify that the product is not paused or oine
a. In System Preferences, click Printers & Scanners .
b. Click the Open Print Queue button.
c. Click a print job to select it.
Use the following buttons to manage the print job:
Delete: Cancel the selected print job.
Hold: Pause the selected print job.
Resume: Continue a paused print job.
Pause Printer: Pause all print jobs in the print queue.
d. If you made any changes, try to print again.
4. Restart the computer.
Fix print quality issues
Step-by-step instructions for resolving most print quality issues.
Troubleshoot print quality issues online.
86 Chapter 8 Solve a problem ENWW
Read general instructions in the Help for resolving print quality issues
NOTE: To protect the cartridges from drying out, always turn the printer o using the Power button, and
wait until the Power button light goes out.
To improve print quality (Windows)
1. Make sure you are using original HP cartridges.
2. Check the paper type.
For best print quality, use high quality HP paper, or papers that adhere to the ColorLok® standard. For
more information, see Paper basics on page 17.
Always make sure the paper you are printing on is at. For best results when printing images, use HP
Advanced Photo Paper.
Store specialty paper in its original packaging inside a resealable plastic bag on a at surface in a cool,
dry place. When you are ready to print, remove only the paper you plan to use immediately. When you
have nished printing, return any unused photo paper to the plastic bag. This prevents the photo paper
from curling.
3. Check the printer software to make sure you have selected the appropriate paper type from the Media
drop-down list and print quality from the Quality Settings drop-down list.
In the printer software, click Print & Scan , and then click Set Preferences to access the print properties.
4. Check the estimated ink levels to determine if the cartridges are low on ink.
For more information, see Check estimated ink levels on page 54. If the cartridges are low on ink
consider replacing them.
5. Align the cartridges.
To align the cartridges
a. Load letter or A4 unused plain white paper into the input tray.
b. Open the printer software. For more information, see Open the HP printer software (Windows)
on page 20.
c. In the printer software, click Print & Scan and then click Maintain Your Printer to access the
printer toolbox.
The printer toolbox appears.
d. Click Align Cartridges on the Device Services tab.
The printer prints an alignment page.
e. Follow the onscreen instructions to align the cartridges. Recycle or discard the cartridge alignment
sheet later.
6. Print a diagnostics page if the cartridges are not low on ink.
ENWW Printing issues 87
To print a diagnostics page
a. Load letter or A4 unused plain white paper into the input tray.
b. Open the printer software. For more information, see Open the HP printer software (Windows)
on page 20.
c. In the printer software, click Print & Scan and then click Maintain Your Printer to access the
printer toolbox.
d. Click Print Diagnostic Information on the Device Reports tab to print a diagnostics page.
e. Examine the color blocks on the diagnostics page.
If any of the color blocks show white lines, are faded, or are missing completely, continue to the
next step.
Figure 8-1 Color blocks without defects
Figure 8-2 Example of color blocks with defects
7. Clean the cartridges.
To clean the cartridges
a. Load letter or A4 unused plain white paper into the input tray.
b. Open the printer software. For more information, see Open the HP printer software (Windows)
on page 20.
c. In the printer software, click Print & Scan and then click Maintain Your Printer to access the
printer toolbox.
d. Click Clean Cartridges on the Device Services tab. Follow the onscreen instructions.
88 Chapter 8 Solve a problem ENWW
To improve print quality (OS X and macOS)
1. Make sure you are using original HP cartridges.
2. Check the paper type.
For best print quality, use high quality HP paper, or papers that adhere to the ColorLok® standard. For
more information, see Paper basics on page 17.
Always make sure the paper you are printing on is at. For best results when printing images, use HP
Advanced Photo Paper.
Store specialty paper in its original packaging inside a resealable plastic bag on a at surface in a cool,
dry place. When you are ready to print, remove only the paper you plan to use immediately. When you
have nished printing, return any unused photo paper to the plastic bag. This prevents the photo paper
from curling.
3. Make sure you have selected the appropriate paper type and print quality in the Print dialog.
4. Check the estimated ink levels to determine if the cartridges are low on ink.
Consider replacing the print cartridges if they are low on ink.
5. Align the printhead.
To align the printhead from the software
a. Load Letter or A4 plain, white paper in the input tray.
b. Open HP Utility.
NOTE: HP Utility is located in the HP folder in the Applications folder.
c. Select your printer from the list of devices at the left of the window.
d. Click Align.
e. Click Align and follow the onscreen instructions.
f. Click All Settings to return to the Information and Support pane.
6. Print a test page.
To print a test page
a. Load Letter or A4 plain, white paper in the input tray.
b. Open HP Utility.
NOTE: HP Utility is located in the HP folder in the Applications folder.
c. Select your printer from the list of devices at the left of the window.
d. Click Test Page.
e. Click the Print Test Page button, and follow the onscreen instructions.
7. If the diagnostic page shows steaks or missing portions of the text or colored boxes, clean the printhead
automatically.
ENWW Printing issues 89
To automatically clean the printhead
a. Load Letter or A4 plain, white paper in the input tray.
b. Open HP Utility.
NOTE: HP Utility is located in the HP folder in the Applications folder.
c. Select your printer from the list of devices at the left of the window.
d. Click Clean Printheads.
e. Click Clean, and follow the onscreen instructions.
CAUTION: Clean the printhead only when necessary. Unnecessary cleaning wastes ink and
shortens the life of the print head.
NOTE: If print quality still seems poor after you complete cleaning, try aligning the printhead. If
print quality problems persist after cleaning and aligning, contact HP support.
f. Click All Settings to return to the Information and Support pane.
90 Chapter 8 Solve a problem ENWW
Copy issues
Troubleshoot copy problems. Use an HP online troubleshooting wizard.
Get step-by-step instructions if the printer does not create a copy, or if your printouts are low quality.
NOTE: The HP online troubleshooting wizards may not be available in all languages.
Tips for copy and scan success on page 52
ENWW Copy issues 91
Scan issues
HP Print and Scan
Doctor
The HP Print and Scan Doctor is a utility that will try to diagnose and x the issue automatically.
NOTE: This utility is only available for Windows operating system.
Solve scan problems Use an HP online troubleshooting wizard.
Get step-by-step instructions if you cannot create a scan or if your scans are low quality.
NOTE: The HP Print and Scan Doctor and the HP online troubleshooting wizards may not be available in all
languages.
Tips for copy and scan success on page 52
92 Chapter 8 Solve a problem ENWW
Network and connection issues
What do you want to do?
Fix wireless connection
Choose one of the following troubleshooting options.
HP Print and Scan Doctor The HP Print and Scan Doctor is a utility that will try to diagnose and x the issue automatically.
NOTE: This utility is only available for Windows operating system.
Use an HP online
troubleshooting wizard
Troubleshoot your wireless problem, whether your printer has never been connected or it was
connected and is no longer working.
Troubleshoot a rewall or antivirus issue, if you suspect that it is preventing your computer from
connecting to the printer.
NOTE: The HP Print and Scan Doctor and the HP online troubleshooting wizards may not be available in all
languages.
Read general instructions in the Help for wireless troubleshooting
Press the Wireless button ( ) and the Information button ( ) at the same time to print the
wireless network test report and network conguration page.
Find network settings for wireless connection
Choose one of the following troubleshooting options.
HP Print and Scan Doctor The HP Print and Scan Doctor is a utility that can tell you the network name (SSID) and
password (network key).
NOTE: This utility is only available for Windows operating system.
Use an HP online troubleshooting
wizard
Learn how to nd your network name (SSID) and wireless password.
NOTE: The HP Print and Scan Doctor and the HP online troubleshooting wizards may not be available in all
languages.
Fix Wi-Fi Direct connection
Use an HP online troubleshooting wizard
Troubleshoot your Wi-Fi Direct problem or learn how to congure Wi-Fi Direct.
NOTE: The HP online troubleshooting wizards may not be available in all languages.
ENWW Network and connection issues 93
Read general instructions in the Help for Wi-Fi Direct troubleshooting
1. Make sure that the Wi-Fi Direct icon on the printer control panel is on. If it is o, press and hold the
Wireless button ( ) and the Resume button ( ) together for three seconds to turn it on.
2. From your wireless computer or mobile device, turn on the Wi-Fi connection, and then search for and
connect to the Wi-Fi Direct name of your printer.
If you are using a mobile device that does not support Wi-Fi Direct, make sure you have installed a
compatible printing app. For more information, visit the HP Mobile Printing website at www.hp.com/go/
mobileprinting. If a local version of this website is not available in your country/region or language, you
might be directed to the HP Mobile Printing website in another country/region or language.
NOTE: If your mobile device does not support Wi-Fi, you are not able to use Wi-Fi Direct.
3. If the Wi-Fi Direct connection security for the printer is set to Manual, do one of the following to connect
to the printer.
Make sure to enter the correct Wi-Fi Direct password or PIN code when prompted.
If the Wi-Fi Direct icon on the printer display is blinking in sync with the white blinking Information
light, make sure to press the Information button ( ) within one minute to connect before
timeout.
4. Make sure that the number of Wi-Fi Direct connections has not reached the maximum of ve devices.
94 Chapter 8 Solve a problem ENWW
Get help from the HP Smart app
The HP Smart app provides alerts for printer issues (jams and other problems), links to help content, and
options to contact support for additional assistance.
ENWW Get help from the HP Smart app 95
Printer hardware issues
Close cartridge access door
Cartridge door must be closed to begin printing.
The printer shuts down unexpectedly
Check the power and power connections.
Make sure the power cord of the printer is connected rmly to a functioning power outlet.
NOTE: When Auto-O is enabled, the printer will automatically turn o after two hours of inactivity to help
reduce energy use. For more information, see Auto-O on page 24.
Resolve printer failure
Turn the printer o, then on. If that does not resolve the problem, contact HP.
96 Chapter 8 Solve a problem ENWW
Control panel error codes and status
Control panel error codes
If the Number of copies icon on the printer display changes to a number, blinking together with the
letter E at the left side, it indicates the printer is in an error state. The letter E and the number work as
error codes.
Light behavior Cause and Solution
The letter E and the number 1 are blinking. At the same time,
the Resume light is blinking.
The printer receives a printing job, starts feeding paper, and
detects that the paper width for the printing job is bigger than
the width of the loaded paper.
Press either the Resume button ( ) or the Cancel button
( ) to cancel the printing job and eject paper.
To avoid the paper size mismatch problem, do one of the
following before printing.
Change the paper size setting for the printing job to
match the paper loaded.
Remove all paper from the input tray, and then load
paper that matches the paper size setting for the
printing job.
TIP: You can change the default paper size automatically
detected by the printer. For more information, see Change the
default paper size detected by printer on page 15.
The letter E and the number 2 are blinking. At the same time,
the Resume light is blinking.
The printer receives a multipage printing job, detects that the
paper length for the printing job does not match the length of
the loaded paper, and then prints out the rst page of the job
with errors.
To cancel the printing job, press the Cancel button ( ).
To continue printing the remaining pages, press the
Resume button ( ). The remaining pages will have
the same errors as the rst page.
TIP: You can change the default paper size automatically
detected by the printer. For more information, see Change the
default paper size detected by printer on page 15.
The letter E and the number 3 are blinking. At the same time,
the Resume light and the Ink Alert light are blinking.
The carriage inside the printer has stalled.
Open the cartridge access door and make sure the carriage is
not obstructed. Move the carriage to the right, close the
cartridge access door, and then press the Resume button
(
) to continue printing. See Jams and paper-feed issues
on page 76 for more information.
ENWW Control panel error codes and status 97
Light behavior Cause and Solution
The letter E and the number 4 are blinking. At the same time,
the Resume light is blinking.
There is a paper jam.
Clear the jam, and then press the Resume button ( ) to
continue printing.
For more information, see Jams and paper-feed issues
on page 76.
The letter E and the number 5 are blinking. At the same time,
all lights on the control panel are blinking.
The scanner is not working.
Turn o the printer, and then turn it on again.
If the problem persists, contact HP. The printer still prints even
if the scanner is not working.
The letter E and the number 6 are blinking. The printer is in an error state.
1. Turn o the printer.
2. Unplug the power cord.
3. Wait a minute, and then plug the power cord back in.
4. Turn on the printer.
If the problem persists, contact HP.
Control panel ink error status
Light behavior Cause and Solution
One of the Ink Level icons without segment and the Error icon
are blinking, and the Ink Alert light is on.
One of the following might have occurred.
The corresponding cartridge is missing.
If one of the cartridges is missing, the printer enters
single cartridge mode. To exit the single cartridge mode,
insert the corresponding cartridge. For more information
about the single cartridge mode, see Use single cartridge
mode on page 58.
The corresponding cartridge is installed improperly, or
still has plastic tape on it.
Remove the corresponding cartridge, make sure there is
no plastic tape on it, and then reinsert the cartridge
securely. For more information, see Replace cartridges
on page 56.
98 Chapter 8 Solve a problem ENWW
Light behavior Cause and Solution
Both Ink Level icons without segment, the Error icon, and the
Ink Alert light are blinking.
One of the following might have occurred.
Both cartridges are missing.
Both cartridges are installed improperly, or still have
plastic tape on them.
Both cartridges are incompatible or damaged.
Try the following solutions to solve the problem.
If there is no cartridge installed in the printer, install the
cartridges.
If both cartridges are installed in the printer, remove the
cartridges, make sure there is no plastic tape on them,
and then reinsert the cartridges securely.
Make sure that you are using the correct HP cartridges
for your printer.
If the error persists, replace the cartridges. For
information about how to replace cartridges, see Replace
cartridges on page 56.
One of the Ink Level icons without segment, the Error icon,
and the Resume light are blinking, and the Ink Alert light is on.
One of the following might have occurred.
The counterfeit or previously used cartridge is installed.
The corresponding cartridge is very low on ink.
Try the following solutions to solve the problem.
If the corresponding cartridge is newly installed, it might
be counterfeit or previously used. Refer to the message
in the HP printer software for more information.
If the corresponding cartridge is not newly installed, it is
very low on ink. Press the Resume button ( ) to
continue printing, and replace the cartridge when the
print quality is no longer acceptable. For information
about how to replace cartridges, see Replace cartridges
on page 56.
Both Ink Level icons without segment, the Error icon, and the
Resume light are blinking, and the Ink Alert light is on.
One of the following might have occurred.
The counterfeit or previously used cartridges are
installed.
Both of the cartridges are very low on ink.
Try the following solutions to solve the problem.
If the cartridges are newly installed, they might be
counterfeit or previously used. Refer to the message in
the HP printer software for more information.
If the cartridges are not newly installed, they are very
low on ink. Press the Resume button ( ) to continue
printing, and replace the cartridges when the print
quality is no longer acceptable. For information about
how to replace cartridges, see Replace cartridges
on page 56.
ENWW Control panel error codes and status 99
Control panel paper error status
Light behavior Cause and Solution
The Error icon, the Paper Error icon, and the Resume light are
on.
There is no paper in the input tray.
Load paper in the input tray.
For information about how to load paper, see Load media
on page 11.
The Error icon, the Paper Error icon, and the Resume light are
blinking.
The printer receives a printing job, and detects that there is no
paper in the input tray.
Load paper, and then press the Resume button ( ) to
continue printing.
For information about how to load paper, see Load media
on page 11.
100 Chapter 8 Solve a problem ENWW
HP support
For the latest product updates and support information, visit the product support website at
www.support.hp.com. HP online support provides a variety of options for help with your printer:
Drivers & downloads: Download software drivers and updates, as well as product manuals and documentation
that came in the box with your printer.
HP support forums: Visit HP Support Forums for answers to common questions and issues. You can view
questions posted by other HP customers, or sign in and post your own questions and comments.
Troubleshooting: Use HP online tools to detect your printer and nd recommended solutions.
Contact HP
If you need help from an HP technical support representative to solve a problem, visit the Contact Support
website. The following contact options are available at no cost for in-warranty customers (HP agent-assisted
support for out-of warranty customers may require a fee):
Chat with an HP support agent online.
Call an HP support agent.
When contacting HP support, be prepared to provide the following information:
Product name (Located on the printer, such as HP DeskJet 2600)
Product number (located inside the cartridge access door)
Serial number (located on the back or bottom of the printer)
Register printer
By taking just a few quick minutes to register, you can enjoy quicker service, more eicient support, and
product support alerts. If you did not register your printer while installing the software, you can register now
at http://www.register.hp.com.
ENWW HP support 101
Additional warranty options
Extended service plans are available for the HP DeskJet 2600 series at additional costs. Go to
www.support.hp.com , select your country/region and language, then explore the extended warranty options
available for your printer.
102 Chapter 8 Solve a problem ENWW
A Technical information
The technical specications and international regulatory information for the HP DeskJet 2600 series are
provided in this section.
For additional specications, see the printed documentation that came with the HP DeskJet 2600 series.
This section contains the following topics:
HP Company notices
Specications
Regulatory notices
Environmental product stewardship program
ENWW 103
HP Company notices
The information contained herein is subject to change without notice.
All rights reserved. Reproduction, adaptation, or translation of this material is prohibited without prior
written permission of HP, except as allowed under the copyright laws. The only warranties for HP products
and services are set forth in the express warranty statements accompanying such products and services.
Nothing herein should be construed as constituting an additional warranty. HP shall not be liable for technical
or editorial errors or omissions contained herein.
© Copyright 2017 HP Development Company, L.P.
Microsoft and Windows are either registered trademarks or trademarks of Microsoft Corporation in the United
States and/or other countries.
104 Appendix A Technical information ENWW
Specications
Technical specications for the HP DeskJet 2600 series are provided in this section. For more product
specications, see the Product Data Sheet at www.support.hp.com .
System requirements
For information about software and system requirements or future operating system releases and
support, visit the HP online support website at www.support.hp.com .
Environmental specications
Recommended operating temperature range: 15°C to 30°C (59°F to 86°F)
Allowable operating temperature range: 5°C to 40°C (41°F to 104°F)
Humidity: 15% to 80% RH non-condensing; 28°C maximum dewpoint
Nonoperating (Storage) temperature range: –40°C to 60°C (–40°F to 140°F)
In the presence of high electromagnetic elds, it is possible the output from the HP DeskJet 2600 series
may be slightly distorted
HP recommends using a USB cable less than or equal to 3 m (10 feet) in length to minimize injected
noise due to potential high electromagnetic elds
Input tray capacity
Plain paper sheets (80 g/m2 [20lb]): Up to 60
Envelopes: Up to 5
Index cards: Up to 20
Photo paper sheets: Up to 20
Output tray capacity
Plain paper sheets (80 g/m2 [20lb]): Up to 25
Envelopes: Up to 5
Index cards: Up to 10
Photo paper sheets: Up to 10
Paper size
For a complete list of supported media sizes, see the printer software.
Paper weights
Plain Paper: 64 to 90 g/m² (16 to 24 lb)
Envelopes: 75 to 90 g/m² (20 to 24 lb bond envelope)
Cards: Up to 200 g/m² (110 lb index maximum)
Photo Paper: Up to 280 g/m² (75 lb)
ENWW Specications 105
Print specications
Print speeds vary according to the complexity of the document
Method: drop-on-demand thermal inkjet
Language: PCL3 GUI
Copy specications
Digital image processing
Copy speeds vary according to the complexity of the document and model
Scan specications
Resolution: up to 1200 x 1200 ppi optical
For more information about ppi resolution, see the scanner software.
Color: 24-bit color, 8-bit grayscale (256 levels of gray)
Maximum scan size from glass: 21.6 x 29.7 cm (8.5 x 11.7 inches)
Print resolution
For a list of supported print resolutions, visit the product support website at www.support.hp.com.
Cartridge yield
Visit www.hp.com/go/learnaboutsupplies for more information on estimated cartridge yields.
Acoustic information
If you have Internet access, you can access acoustic information from the HP website.
106 Appendix A Technical information ENWW
Regulatory notices
The printer meets product requirements from regulatory agencies in your country/region.
This section contains the following topics:
Regulatory model identication number
FCC statement
VCCI (Class B) compliance statement for users in Japan
Notice to users in Japan about the power cord
Notice to users in Korea
Noise emission statement for Germany
European Union Regulatory Notice
Visual display workplaces statement for Germany
Declaration of conformity
Regulatory wireless statements
Regulatory model identication number
For regulatory identication purposes, your product is assigned a Regulatory Model Number. The Regulatory
Model Number for your product is SNPRH-1602. This regulatory number should not be confused with the
marketing name (HP DeskJet 2600 All-in-One Printer series, HP DeskJet Ink Advantage 2600 All-in-One
Printer series, etc.) or product numbers (V1N01A, V1N02A, etc.).
FCC statement
The United States Federal Communications Commission (in 47 CFR 15.105) has specied that the following
notice be brought to the attention of users of this product.
This equipment has been tested and found to comply with the limits for a Class B digital device, pursuant to
Part 15 of the FCC Rules. These limits are designed to provide reasonable protection against harmful
interference in a residential installation. This equipment generates, uses and can radiate radio frequency
energy and, if not installed and used in accordance with the instructions, may cause harmful interference to
radio communications. However, there is no guarantee that interference will not occur in a particular
installation. If this equipment does cause harmful interference to radio or television reception, which can be
determined by turning the equipment o and on, the user is encouraged to try to correct the interference by
one or more of the following measures:
Reorient or relocate the receiving antenna.
Increase the separation between the equipment and the receiver.
Connect the equipment into an outlet on a circuit dierent from that to which the receiver is connected.
Consult the dealer or an experienced radio/TV technician for help.
For further information, contact: Manager of Corporate Product Regulations, HP Inc. 1501 Page Mill Road,
Palo Alto, CA 94304, U.S.A.
Modications (part 15.21)
ENWW Regulatory notices 107
The FCC requires the user to be notied that any changes or modications made to this device that are not
expressly approved by HP may void the user’s authority to operate the equipment.
This device complies with Part 15 of the FCC Rules. Operation is subject to the following two conditions: (1)
this device may not cause harmful interference, and (2) this device must accept any interference received,
including interference that may cause undesired operation.
VCCI (Class B) compliance statement for users in Japan
この装置は、クラス B 情報技術装置です。この装置は、家庭環境で使用することを目的としていますが、この装置がラジオ
やテレビジョン受信機に近接して使用されると、受信障害を引き起こすことがあります。取扱説明書に従って正しい取り扱
いをして下さい。
VCCI-B
Notice to users in Japan about the power cord
製品には、同梱された電源コードをお使い下さい。
同梱された電源コードは、他の製品では使用出来ません。
Notice to users in Korea
B 기기
(가정용 방송통신기자재)
기기는 가정용(B) 전자파적합기기로서 주로 가정에서 사용하는 것을 목적으로
하며, 모든 지역에서 사용할 있습니다.
Noise emission statement for Germany
Geräuschemission
LpA < 70 dB am Arbeitsplatz im Normalbetrieb nach DIN 45635 T. 19
European Union Regulatory Notice
Products bearing the CE marking comply to applicable EU Directives and related European Harmonised
Standards. The full Declaration of Conformity can be found at the following website:
www.hp.eu/certicates (Search with the product model name or its Regulatory Model Number (RMN), which
may be found on the regulatory label.)
The point of contact for regulatory matters is HP Deutschland GmbH, HQ-TRE, 71025, Boeblingen, Germany.
108 Appendix A Technical information ENWW
Products with wireless functionality
EMF
This product meets international guidelines (ICNIRP) for exposure to radio frequency radiation.
If it incorporates a radio transmitting and receiving device that in normal use, a separation distance of
20 cm ensures that radio frequency exposure levels comply with EU requirements.
Wireless functionality in Europe
For products with 802.11 b/g/n or Bluetooth radio:
This product operates on radio frequency between 2400 MHz and 2483.5 MHz, with a transmit
power of 20 dBm (100 mW) or less.
For products with 802.11 a/b/g/n radio:
CAUTION: IEEE 802.11x wireless LAN with 5.15-5.35 GHz frequency band is restricted for
indoor use only in all European Union member states, EFTA (Iceland, Norway, Liechtenstein) and
most other European countries (e.g. Switzerland, Turkey, Republic of Serbia). Using this WLAN
application outdoor might lead to interference issues with existing radio services.
This product operates on radio frequencies between 2400 MHz and 2483.5 MHz, and between
5170 MHz and 5710 MHz, with a transmit power of 20 dBm (100 mW) or less.
Visual display workplaces statement for Germany
GS-Erklärung (Deutschland)
Das Gerät ist nicht für die Benutzung im unmittelbaren Gesichtsfeld am Bildschirmarbeitsplatz vorgesehen.
Um störende Reexionen am Bildschirmarbeitsplatz zu vermeiden, darf dieses Produkt nicht im
unmittelbaren Gesichtsfeld platziert werden.
ENWW Regulatory notices 109
Declaration of conformity
110 Appendix A Technical information ENWW
Regulatory wireless statements
This section contains the following regulatory information pertaining to wireless products:
Exposure to radio frequency radiation
Notice to users in Brazil
Notice to users in Canada
Notice to users in Taiwan
Notice to users in Mexico
ENWW Regulatory notices 111
Notice to users in Japan
Notice to users in Korea
Exposure to radio frequency radiation
CAUTION: The radiated output power of this device is far below the FCC radio frequency exposure limits.
Nevertheless, the device shall be used in such a manner that the potential for human contact during normal
operation is minimized. This product and any attached external antenna, if supported, shall be placed in such
a manner to minimize the potential for human contact during normal operation. In order to avoid the
possibility of exceeding the FCC radio frequency exposure limits, human proximity to the antenna shall not be
less than 20 cm (8 inches) during normal operation.
Notice to users in Brazil
Este equipamento opera em caráter secundário, isto é, não tem direito à proteção contra interferência
prejudicial, mesmo de estações do mesmo tipo, e não pode causar interferência em sistemas operando em
caráter primário.
Notice to users in Canada
Under Industry Canada regulations, this radio transmitter may only operate using an antenna of a type and
maximum (or lesser) gain approved for the transmitter by Industry Canada. To reduce potential radio
interference to other users, the antenna type and its gain should be so chosen that the equivalent
isotropically radiated power (e.i.r.p.) is not more than that necessary for successful communication.
This device complies with Industry Canada licence-exempt RSS standard(s). Operation is subject to the
following two conditions: (1) this device may not cause interference, and (2) this device must accept any
interference, including interference that may cause undesired operation of the device.
WARNING! Exposure to Radio Frequency Radiation The radiated output power of this device is below the
Industry Canada radio frequency exposure limits. Nevertheless, the device should be used in such a manner
that the potential for human contact is minimized during normal operation.
To avoid the possibility of exceeding the Industry Canada radio frequency exposure limits, human proximity
to the antennas should not be less than 20 cm (8 inches).
Conformément au Règlement d'Industrie Canada, cet émetteur radioélectrique ne peut fonctionner qu'avec
une antenne d'un type et d'un gain maximum (ou moindre) approuvé par Industrie Canada. An de réduire le
brouillage radioélectrique potentiel pour d'autres utilisateurs, le type d'antenne et son gain doivent être
choisis de manière à ce que la puissance isotrope rayonnée équivalente (p.i.r.e.) ne dépasse pas celle
nécessaire à une communication réussie.
Cet appareil est conforme aux normes RSS exemptes de licence d'Industrie Canada. Son fonctionnement
dépend des deux conditions suivantes : (1) cet appareil ne doit pas provoquer d'interférences nuisibles et (2)
doit accepter toutes les interférences reçues, y compris des interférences pouvant provoquer un
fonctionnement non souhaité de l'appareil.
AVERTISSEMENT relatif à l'exposition aux radiofréquences. La puissance de rayonnement de cet appareil se
trouve sous les limites d'exposition de radiofréquences d'Industrie Canada. Néanmoins, cet appareil doit être
utilisé de telle sorte qu'il doive être mis en contact le moins possible avec le corps humain.
An d'éviter le dépassement éventuel des limites d'exposition aux radiofréquences d'Industrie Canada, il est
recommandé de maintenir une distance de plus de 20 cm entre les antennes et l'utilisateur.
112 Appendix A Technical information ENWW
Notice to users in Taiwan
低功率電波輻射性電機管理辦法
第十二條
經型式認證合格之低功率射頻電機,非經許可,公司、商號或使用者均不得擅自變更頻率、加大功率
或變更設計之特性及功能。
第十四條
低功率射頻電機之使用不得影響飛航安全及干擾合法通信;經發現有干擾現象時,應立即停用,並改
善至無干擾時方得繼續使用。
前項合法通信,指依電信法規定作業之無線電通信。低功率射頻電機須忍受合法通信或工業、科學及
醫藥用電波輻射性電機設備之干擾。
Notice to users in Mexico
La operación de este equipo está sujeta a las siguientes dos condiciones: (1) es posible que este equipo o
dispositivo no cause interferencia perjudicial y (2) este equipo o dispositivo debe aceptar cualquier
interferencia, incluyendo la que pueda causar su operación no deseada.
Para saber el modelo de la tarjeta inalámbrica utilizada, revise la etiqueta regulatoria de la impresora.
Notice to users in Japan
この機器は技術基準適合証明又は工事設計認証を受けた無線設備を搭載しています。
Notice to users in Korea
해당 무선설비는 전파혼신 가능성이 있으므로 인명안전과 관련된 서비스는 없음
(무선 모듈이 탑재된 제품인 경우)
ENWW Regulatory notices 113
Environmental product stewardship program
HP is committed to providing quality products in an environmentally sound manner. Design for recycling has
been incorporated into this product. The number of materials has been kept to a minimum while ensuring
proper functionality and reliability. Dissimilar materials have been designed to separate easily. Fasteners and
other connections are easy to locate, access, and remove using common tools. High priority parts have been
designed to access quickly for eicient disassembly and repair. For more information, visit HP's Commitment
to the Environment website at:
www.hp.com/hpinfo/globalcitizenship/environment
Eco-Tips
European Union Commission Regulation 1275/2008
Paper
Plastics
Safety data sheets
Recycling program
HP inkjet supplies recycling program
Power consumption
Disposal of waste equipment by users
Waste disposal for Brazil
Chemical substances
Declaration of the Presence Condition of the Restricted Substances Marking (Taiwan)
The Table of Hazardous Substances/Elements and their Content (China)
Restriction of hazardous substance (Ukraine)
Restriction of hazardous substance (India)
Restriction on hazardous substances statement (Turkey)
EPEAT
SEPA Ecolabel User Information (China)
China Energy Label for Printer, Fax and Copier
Eco-Tips
HP is committed to helping customers reduce their environmental footprint. Please visit the HP
Environmental Programs and Initiatives website for more information on HP’s environmental initiatives.
www.hp.com/hpinfo/globalcitizenship/environment/
114 Appendix A Technical information ENWW
European Union Commission Regulation 1275/2008
For product power data, including the power consumption of the product in networked standby if all wired
network ports are connected and all wireless network ports are activated, please refer to section P14
Additional Information’ of the product IT ECO Declaration at www.hp.com/hpinfo/globalcitizenship/
environment/productdata/itecodesktop-pc.html.
Paper
This product is suited for the use of recycled paper according to DIN 19309 and EN 12281:2002.
Plastics
Plastic parts over 25 grams are marked according to international standards that enhance the ability to
identify plastics for recycling purposes at the end of product life.
Safety data sheets
Safety Data Sheets, product safety and environmental information are available at www.hp.com/go/ecodata
or on request.
Recycling program
HP oers an increasing number of product return and recycling programs in many countries/regions, and
partners with some of the largest electronic recycling centers throughout the world. HP conserves resources
by reselling some of its most popular products. For more information regarding recycling of HP products,
please visit:
www.hp.com/recycle
HP inkjet supplies recycling program
HP is committed to protecting the environment. The HP Inkjet Supplies Recycling Program is available in
many countries/regions, and lets you recycle used print cartridges and ink cartridges free of charge. For more
information, go to the following website:
www.hp.com/hpinfo/globalcitizenship/environment/recycle/
Power consumption
HP printing and imaging equipment marked with the ENERGY STAR® logo is certied by the U.S.
Environmental Protection Agency. The following mark will appear on ENERGY STAR certied imaging
products:
Additional ENERGY STAR certied imaging product model information is listed at: www.hp.com/go/energystar
ENWW Environmental product stewardship program 115
Disposal of waste equipment by users
This symbol means do not dispose of your product with your other household waste. Instead,
you should protect human health and the environment by handing over your waste
equipment to a designated collection point for the recycling of waste electrical and electronic
equipment. For more information, please contact your household waste disposal service, or
go to http://www.hp.com/recycle.
Waste disposal for Brazil
Não descarte o produto eletronico em
lixo comum
Este produto eletrônico e seus componentes não devem ser descartados no lixo comum, pois
embora estejam em conformidade com padrões mundiais de restrição a substâncias nocivas,
podem conter, ainda que em quantidades mínimas, substâncias impactantes ao meio
ambiente. Ao nal da vida útil deste produto, o usuário deverá entregá-lo à HP. A não
observância dessa orientação sujeitará o infrator às sanções previstas em lei.
Após o uso, as pilhas e/ou baterias dos produtos HP deverão ser entregues ao
estabelecimento comercial ou rede de assistência técnica autorizada pela HP.
Para maiores informações, inclusive sobre os pontos de recebimento, acesse:
www.hp.com.br/reciclar
Chemical substances
HP is committed to providing our customers with information about the chemical substances in our products
as needed to comply with legal requirements such as REACH (Regulation EC No 1907/2006 of the European
Parliament and the Council). A chemical information report for this product can be found at: www.hp.com/go/
reach.
116 Appendix A Technical information ENWW
Declaration of the Presence Condition of the Restricted Substances Marking
(Taiwan)
限用物質含有情況標示聲明書
Declaration of the Presence Condition of the Restricted Substances Marking
單元 Unit
限用物質及其化學符號
Restricted substances and its chemical symbols
Lead
(Pb)
Mercury
(Hg)
Cadmium
(Cd)
六價鉻
Hexavalent
chromium
(Cr
+6
)
多溴聯苯
Polybrominated
biphenyls
(PBB)
多溴二苯
Polybrominate
d diphenyl
ethers
(PBDE)
外殼和紙匣
(External Casings and Trays)
0 0 0 0 0 0
電線 (Cables) 0 0 0 0 0 0
印刷電路板
(Printed Circuit Boards)
0 0 0 0 0
列印引擎(Print Engine) 0 0 0 0 0
列印機組件 (Print Assembly) 0 0 0 0 0
噴墨印表機墨水匣 (Print
Supplies)
0 0 0 0 0 0
列印機配件 (Print Accessory) 0 0 0 0 0
備考 1.〝超出 0.1 wt %〞及〝超出 0.01 wt %〞係指限用物質之百分比含量超出百分比含量基準
Note 1: “Exceeding 0.1 wt %” and “exceeding 0.01 wt %” indicate that the percentage content of the restricted substance exceeds the
reference percentage value of presence condition.
備考 2.0〞係指該項限用物質之百分比含量未超出百分比含量基準
Note 2: “0” indicates that the percentage content of the restricted substance does not exceed the percentage of reference value of
presence.
備考 3.〝-〞係指該項限用物質為排除項目。
Note 3: The “−” indicates that the restricted substance corresponds to the exemption.
若要存取品的最新使用指南或手冊,請前往 www.support.hp.com。選取搜尋您的,然後依照
面上的指示繼續執行。
To access the latest user guides or manuals for your product, go to www.support.hp.com. Select Find your
product, and then follow the onscreen instructions.
ENWW Environmental product stewardship program 117
The Table of Hazardous Substances/Elements and their Content (China)
品中有害物或元素的名称及含量
根据中国《品有害物限制使用管理法》
部件名称
有害物
(Pb)
(Hg)
(Cd)
六价
(Cr(VI))
多溴
(PBB)
多溴二苯
(PBDE)
外壳和托 0 0 0 0 0 0
电线 0 0 0 0 0 0
印刷路板 X 0 0 0 0 0
打印系 X 0 0 0 0 0
示器 X 0 0 0 0 0
墨打印机墨盒 0 0 0 0 0 0
驱动 X 0 0 0 0 0
X 0 0 0 0 0
配件 X 0 0 0 0 0
池板 X 0 0 0 0 0
双面打印系 0 0 0 0 0 0
外部 X 0 0 0 0 0
本表格依据 SJ/T 11364 制。
0:表示有害物部件所有均材料中的含量均在 GB/T 26572 定的限量要求以下。
X:表示有害物至少在部件的某一均材料中的含量超出 GB/T 26572 定的限量要求。
此表中所有名称中含 “X” 的部件均符合欧盟 RoHS 立法。
注:保使用期限的参考标识取决于品正常工作的温度和湿度等条件。
Restriction of hazardous substance (Ukraine)
Технічний регламент щодо обмеження використання небезпечних речовин (Украïна)
Обладнання відповідає вимогам Технічного регламенту щодо обмеження використання деяких
небезпечних речовин в електричному та електронному обладнанні, затвердженого постановою
Кабінету Міністрів України від 3 грудня 2008 № 1057
Restriction of hazardous substance (India)
This product, as well as its related consumables and spares, complies with the reduction in hazardous
substances provisions of the "India E-waste Rule 2016." It does not contain lead, mercury, hexavalent
chromium, polybrominated biphenyls or polybrominated diphenyl ethers in concentrations exceeding 0.1
118 Appendix A Technical information ENWW
weight % and 0.01 weight % for cadmium, except where allowed pursuant to the exemptions set in Schedule
2 of the Rule.
Restriction on hazardous substances statement (Turkey)
Türkiye Cumhuriyeti: EEE Yönetmeliğine Uygundur
EPEAT
Most HP products are designed to meet EPEAT. EPEAT is a comprehensive environmental rating that helps
identify greener electronics equipment. For more information on EPEAT go to
www.epeat.net. For information
on HP's EPEAT registered products go to www.hp.com/hpinfo/globalcitizenship/environment/pdf/
epeat_printers.pdf.
SEPA Ecolabel User Information (China)
中国标识认证产品用户说
噪声大于 63.0 dB(A) 设备不宜放置于公室内,在独立的隔离区域使用。
如需长时间使用本品或打印大量文件,确保在通良好的房内使用。
如您需要确于零能耗状按下源关,并将插源插座断开。
您可以使用再生,以减少源耗
China Energy Label for Printer, Fax and Copier
复印机、打印机和真机能源效率标识实规则
依据复印机、打印机和真机能源效率标识实规则打印机具有中国能效标识标识示的能
效等和操作模式根据复印机、打印机和真机能效限定及能效等准(“GB 21521”)来确定
算。
1. 能效等
品能效等 3 ,其中 1 能效最高。能效限定根据型和打印速度由准确定。能
效等级则根据基本功耗水平以及网接口和内存等附加件和功能的功率因子之和来算。
2. 能效信息
墨打印机
操作模式功率
睡眠状的能耗按照 GB 21521 准来衡量和算。数据以瓦特 (W) 表示。
待机功率
待机状接到源上功率最低的状可以延无限长时间,且使用者
无法改此状品的功率。成像设备品,待机通常相当于,但
也可能相当于或者睡眠数据以瓦特 (W) 表示。
睡眠状态预设迟时间
ENWW Environmental product stewardship program 119
出厂前由制造商置的时间决定了该产品在完成主功能后入低耗模式(例如睡眠、自
机)的时间数据以分表示。
附加功能功率因子之和
接口和内存等附加功能的功率因子之和。数据以瓦特 (W) 表示。
标识示的能耗数据是根据典型配置量得出的数据,此配置包含登记备案的打印机依据复印
机、打印机和真机能源效率标识实规则的所有配置。因此,特定品型号的实际能耗可能
标识示的数据有所不同。
要了解范的更多情,参考最新版的 GB 21521 准。
120 Appendix A Technical information ENWW
Index
B
buttons, control panel 5
C
carriage
clear carriage jams 79
control panel
buttons 5
features 5
status icons 6
copy
specications 106
customer support
warranty 102
E
embedded web server
opening 72
Webscan 51
environment
Environmental product
stewardship program 114
environmental specications
105
J
jams
clear 76
M
multi-feeds, troubleshoot 80
N
network connection
wireless connection 62
networks
view and print settings 10
O
operating systems supported 105
P
paper
clear jams 76
HP, order 18
skewed pages 80
troubleshoot feeding 80
paper-feed problems, troubleshoot
80
power
troubleshoot 96
print
specications 106
troubleshoot 96
printer software (Windows)
opening 20
R
recycle
ink cartridges 115
regulatory notices 107
regulatory model identication
number 107
wireless statements 111
S
scan
from Webscan 51
scan specications 106
skew, troubleshoot
print 80
software
Webscan 51
specications
system requirements 105
status icons 6
system requirements 105
T
technical information
copy specications 106
environmental specications
105
print specications 106
scan specications 106
trays
clear paper jams 76
troubleshoot feeding 80
troubleshoot
HP Smart 95
multiple pages are picked 80
paper not picked up from tray
80
paper-feed problems 80
power 96
print 96
skewed pages 80
V
view
network settings 10
W
warranty 102
Webscan 51
Windows
system requirements 105
ENWW Index 121
122 Index ENWW
103


Need help? Post your question in this forum.

Forumrules
1

Forum

hp-deskjet-2600-all-in-one-series
  • printer is not printing and not deleting the pages in the que. Submitted on 3-1-2023 at 10:18

    Reply Report abuse
  • I cannot the scanner to work through my PC which has Windows 11 installed Submitted on 6-6-2022 at 00:50

    Reply Report abuse
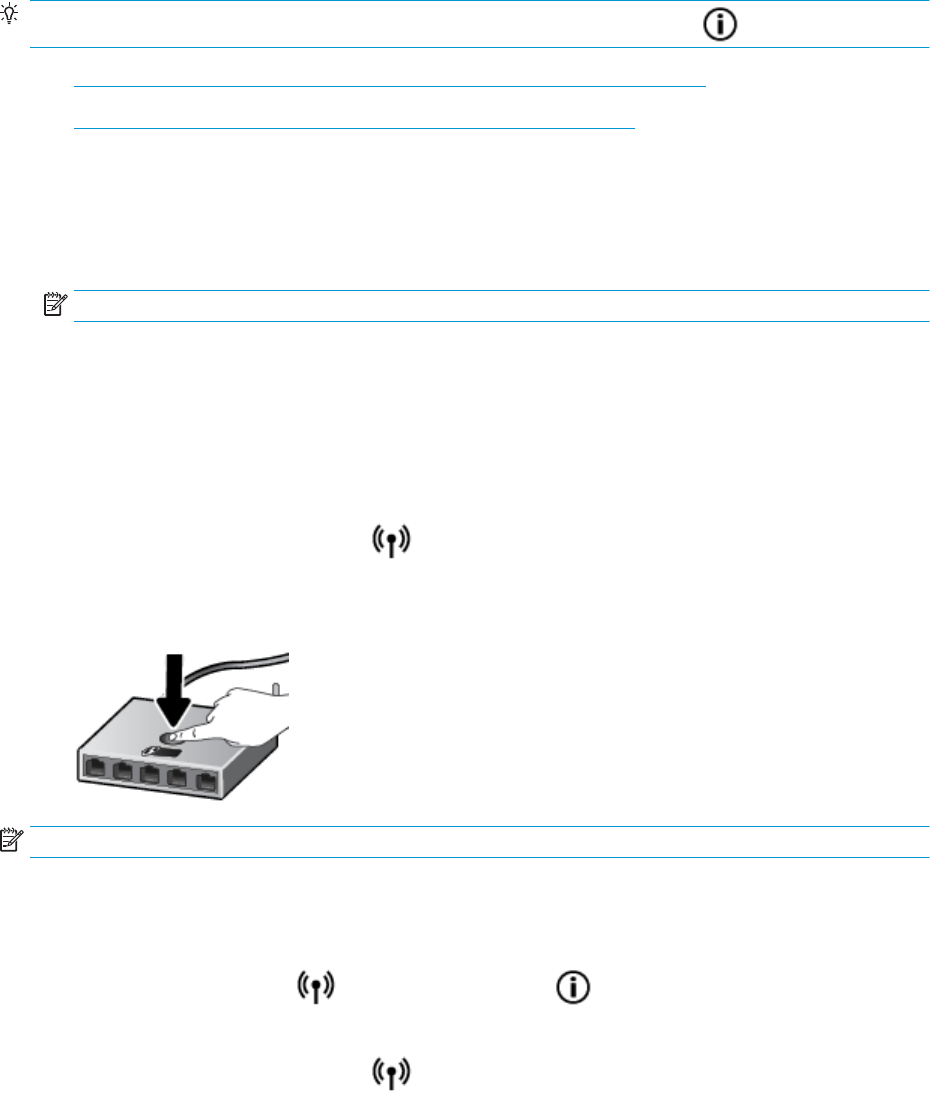
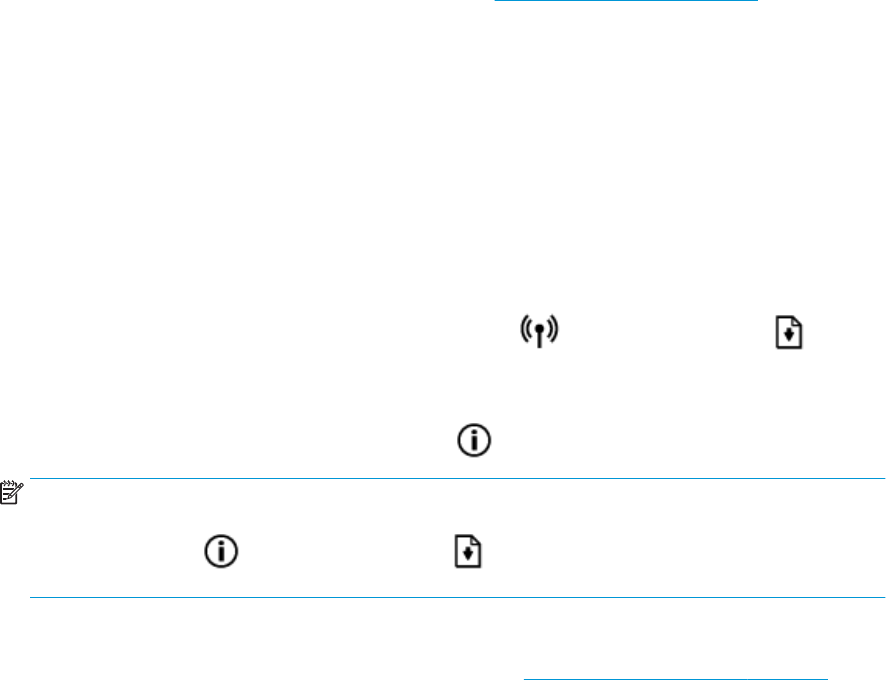
  • MY INFO BUTTON SHOWS STEADY RED LIGHT NOT MENTIONED IN MY MANUAL Submitted on 7-3-2022 at 22:09

    Reply Report abuse
  • My printer will not print. Why is the light flashing continually? Submitted on 19-9-2021 at 16:52

    Reply Report abuse
  • How do I resize paper size for photos on my 2600 printer Submitted on 16-2-2021 at 15:41

    Reply Report abuse
  • Hoe kan ik de format van een te scannen document aanpassen? Submitted on 18-1-2021 at 13:13

    Reply Report abuse
  • how do i download(print)a subject (drawing) from my computer Submitted on 25-10-2020 at 23:35

    Reply Report abuse
  • The printer has started to print with no margin on the left hand side so print is not central Submitted on 10-9-2020 at 09:26

    Reply Report abuse
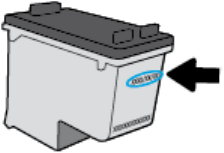
  • I have replaced both black and colour cartridges but orange colour light is still flashing . what shall I do ? Submitted on 2-6-2020 at 16:01

    Reply Report abuse
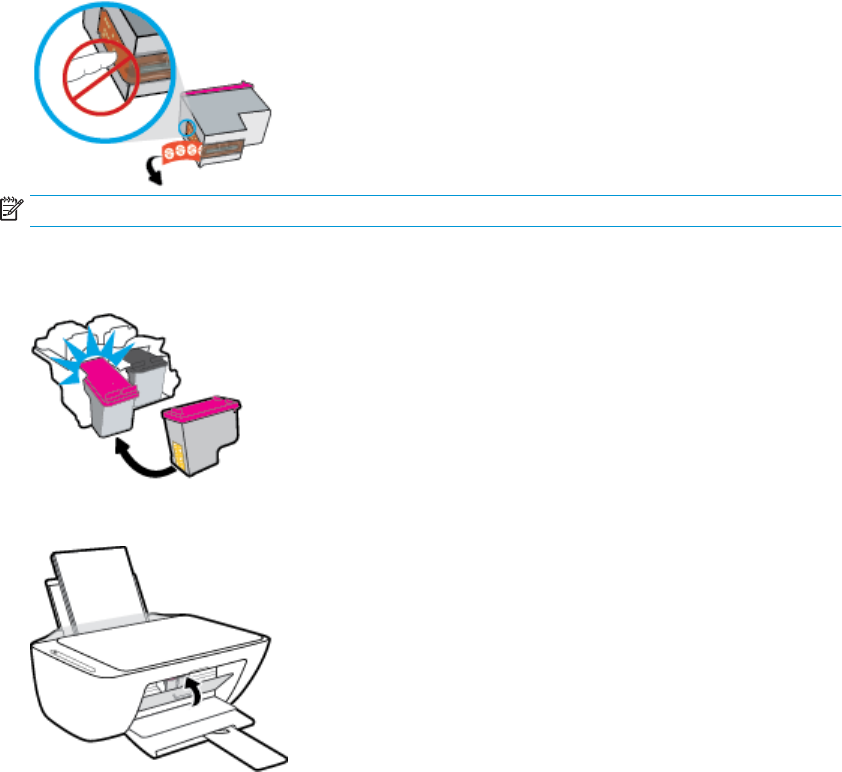
  • Hi ,I have just set up my print ,installed the ink cartridges removed the tape but when it prints the pages are blank,The manual is not in the box . Submitted on 8-4-2020 at 15:13

    Reply Report abuse


Report abuse

Libble takes abuse of its services very seriously. We're committed to dealing with such abuse according to the laws in your country of residence. When you submit a report, we'll investigate it and take the appropriate action. We'll get back to you only if we require additional details or have more information to share.

Product:

For example, Anti-Semitic content, racist content, or material that could result in a violent physical act.

For example, a credit card number, a personal identification number, or an unlisted home address. Note that email addresses and full names are not considered private information.

Forumrules

To achieve meaningful questions, we apply the following rules:

Register

Register getting emails for HP DeskJet 2600 All-in-One series at:


You will receive an email to register for one or both of the options.


Get your user manual by e-mail

Enter your email address to receive the manual of HP DeskJet 2600 All-in-One series in the language / languages: English as an attachment in your email.

The manual is 1,59 mb in size.


You will receive the manual in your email within minutes. If you have not received an email, then probably have entered the wrong email address or your mailbox is too full. In addition, it may be that your ISP may have a maximum size for emails to receive.

Others manual(s) of HP DeskJet 2600 All-in-One series

HP DeskJet 2600 All-in-One series User Manual - German - 138 pages

HP DeskJet 2600 All-in-One series User Manual - Dutch - 136 pages

HP DeskJet 2600 All-in-One series Quick start guide - All languages - 43 pages


The manual is sent by email. Check your email

If you have not received an email with the manual within fifteen minutes, it may be that you have a entered a wrong email address or that your ISP has set a maximum size to receive email that is smaller than the size of the manual.

The email address you have provided is not correct.

Please check the email address and correct it.

Your question is posted on this page

Would you like to receive an email when new answers and questions are posted? Please enter your email address.


Info