Printer front view ................................................................................................................................................. 3
Printer back view .................................................................................................................................................. 4
LED control-panel view ....................................................................................................................................... 5
Supported operating systems ........................................................................................................................... 8
Mobile printing solutions .................................................................................................................................. 10
Power consumption, electrical specications, and acoustic emissions .................................................... 12
Operating environmental range ...................................................................................................................... 12
Printer hardware setup and software installation ............................................................................................................ 13
2 Paper trays .............................................................................................................................................................................................. 15
3 Supplies, accessories, and parts .......................................................................................................................................................... 25
Order supplies, accessories, and parts ............................................................................................................................... 26
Supplies and accessories ................................................................................................................................. 26
Customer self-repair parts ............................................................................................................................... 26
Replace the toner cartridges ................................................................................................................................................ 28
How to print (Windows) .................................................................................................................................... 34
Manually print on both sides (Windows) ........................................................................................................ 34
Print multiple pages per sheet (Windows) .................................................................................................... 35
Select the paper type (Windows) .................................................................................................................... 35
How to print (macOS) ........................................................................................................................................ 37
Automatically print on both sides (macOS) ................................................................................................... 37
Manually print on both sides (macOS) ........................................................................................................... 37
Print multiple pages per sheet (macOS) ........................................................................................................ 38
Select the paper type (macOS) ........................................................................................................................ 38
Mobile printing ........................................................................................................................................................................ 39
Wi-Fi Direct (wireless models only) ................................................................................................................ 39
Enable or disable Wi-Fi Direct ..................................................................................................... 40
Change the printer Wi-Fi Direct name ....................................................................................... 41
HP ePrint via email ............................................................................................................................................ 41
HP ePrint software ............................................................................................................................................ 42
Make a copy ............................................................................................................................................................................. 46
Copy on both sides (duplex) ................................................................................................................................................. 48
Copy on both sides manually ........................................................................................................................... 48
Scan by using the HP Scan software (Windows) ............................................................................................................... 50
Scan by using the HP Smart Software (macOS) ................................................................................................................ 51
Set up to send and receive faxes ......................................................................................................................................... 54
Before starting ................................................................................................................................................... 54
Step 1: Identify the phone connection type .................................................................................................. 54
Step 2: Set up the fax ........................................................................................................................................ 55
Dedicated phone line .................................................................................................................... 55
Shared voice/fax line .................................................................................................................... 56
Shared voice/fax line with an answering machine .................................................................. 57
Step 3: Congure the fax time, date, and header ......................................................................................... 59
HP Fax Setup Wizard .................................................................................................................... 59
Printer control panel ..................................................................................................................... 59
HP Embedded Web Server (EWS) and HP Device Toolbox (Windows) ................................. 60
Step 4: Run a fax test ........................................................................................................................................ 61
Send a fax ................................................................................................................................................................................ 62
Fax from the atbed scanner .......................................................................................................................... 62
Fax from the document feeder (document feeder models only) .............................................................. 63
Use speed dials and group-dial entries ......................................................................................................... 63
Send a fax from the software .......................................................................................................................... 64
Send a fax from a third-party software program, such as Microsoft Word ............................................. 64
8 Manage the printer ................................................................................................................................................................................. 65
Change the printer connection type (Windows) ................................................................................................................ 66
Advanced conguration with HP Embedded Web Server (EWS) and HP Device Toolbox (Windows) ....................... 67
Congure IP network settings .............................................................................................................................................. 70
View or change network settings ................................................................................................................... 70
Rename the printer on a network ................................................................................................................... 71
Manually congure IPv4 TCP/IP parameters from the control panel ........................................................ 72
Printer security features ....................................................................................................................................................... 74
Print with EconoMode ....................................................................................................................................... 76
Set the Sleep/Auto O After Inactivity setting .............................................................................................. 76
Set the Shut Down After Inactivity delay and congure the printer to use 1 watt or less of power .... 77
Set the Delay Shut Down setting .................................................................................................................... 79
HP Web Jetadmin ................................................................................................................................................................... 81
Update the rmware .............................................................................................................................................................. 82
Method one: Update the rmware using the control panel (2-line control panels only) ....................... 82
ENWWv
Method two: Update the rmware using the Firmware Update Utility ..................................................... 82
Customer support .................................................................................................................................................................. 86
Interpret control-panel light patterns (LED control panels only) ................................................................................... 87
Restore the factory-set defaults ......................................................................................................................................... 91
A “Cartridge is low” or “Cartridge is very low” message displays on the printer control panel or EWS ................... 93
Change the “Very Low” settings ...................................................................................................................... 93
For printers with fax capability ................................................................................................... 95
Order supplies .................................................................................................................................................... 95
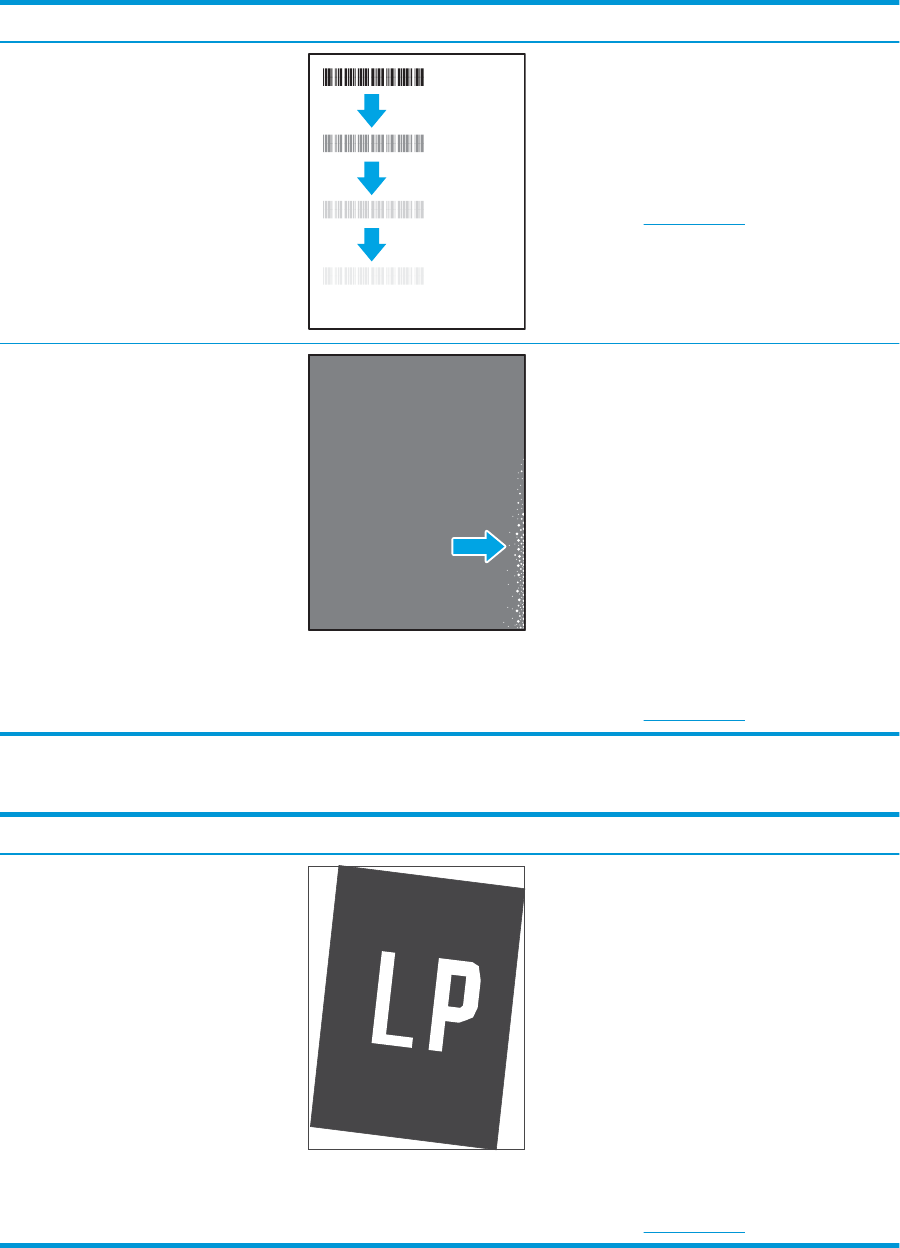
Printer does not pick up paper or misfeeds ....................................................................................................................... 96
The product does not pick up paper ............................................................................................................... 96
The product picks up multiple sheets of paper ............................................................................................ 96
The document feeder jams, skews, or picks up multiple sheets of paper ............................................... 96
Clear paper jams ..................................................................................................................................................................... 98
Paper jam locations ........................................................................................................................................... 98
Experiencing frequent or recurring paper jams? .......................................................................................... 99
Clear paper jams in the document feeder (fw models only) .................................................................... 102
Clear paper jams in Tray 1 ............................................................................................................................. 105
Clear paper jams in the rear door and the fuser area ............................................................................... 106
Clear paper jams in the output bin ............................................................................................................... 108
Update the printer rmware .......................................................................................................................... 111
Print from a dierent software program ..................................................................................................... 111
Check the paper-type setting for the print job ........................................................................................... 111
Check the paper type setting on the printer .......................................................................... 111
Check the paper type setting (Windows) ................................................................................ 111
Check the paper type setting (macOS) ................................................................................... 111
Check toner-cartridge status ........................................................................................................................ 112
Print a cleaning page ...................................................................................................................................... 113
Visually inspect the toner cartridge or cartridges ...................................................................................... 115
Check paper and the printing environment ................................................................................................ 115
Step one: Use paper that meets HP specications ............................................................... 115
Step two: Check the environment ............................................................................................ 115
Step three: Set the individual tray alignment ........................................................................ 116
Try a dierent print driver .............................................................................................................................. 117
Check the EconoMode settings ..................................................................................................................... 117
Adjust Print Density ........................................................................................................................................ 118
viENWW
Calibrate the printer to align the colors ....................................................................................................... 119
Adjust color settings (Windows) ................................................................................................................... 120
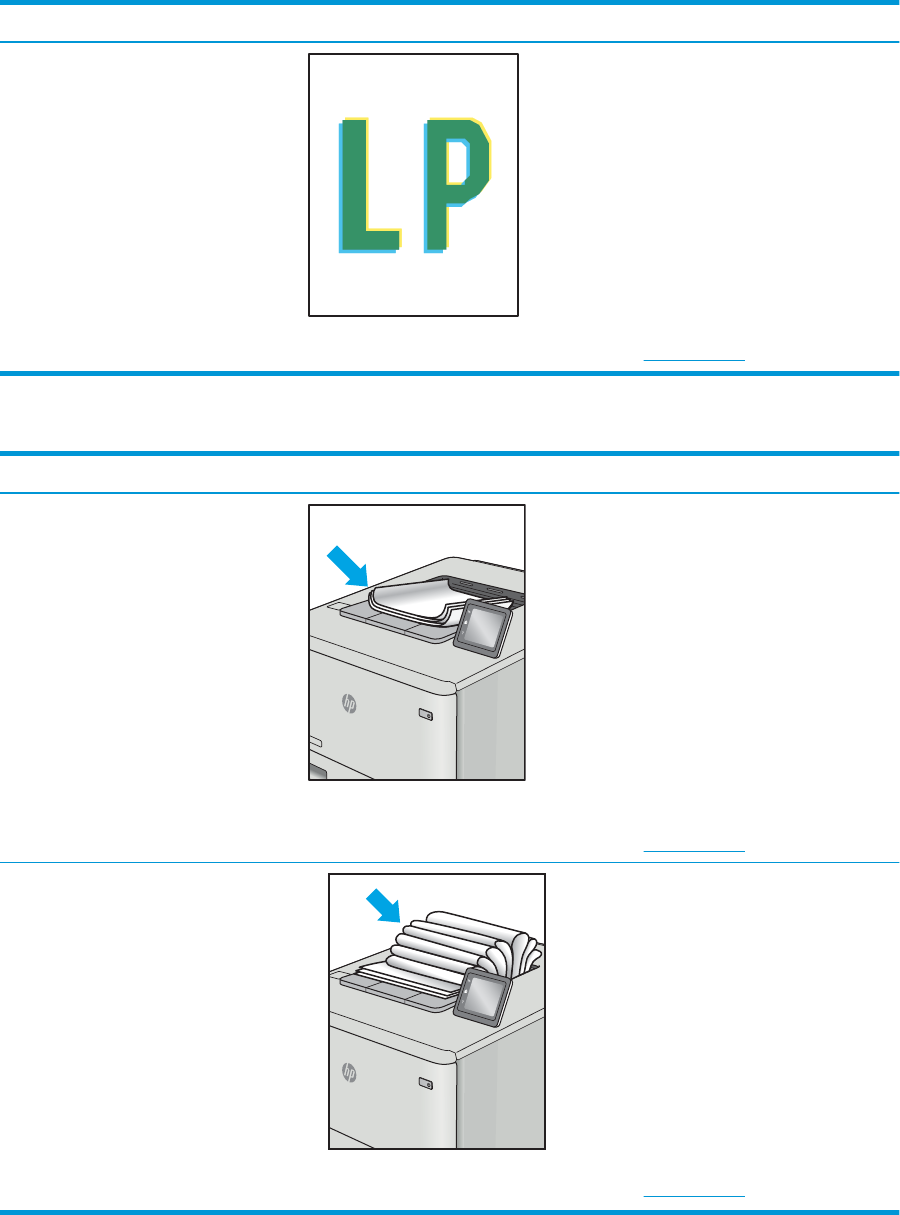
Print and interpret the print quality page ................................................................................................... 121
Check the scanner glass for dirt and smudges .......................................................................................... 131
Eliminate lines or streaks when using the document feeder .................................................................. 132
Check the paper settings ............................................................................................................................... 132
Check the image adjustment settings ......................................................................................................... 133
Optimize for text or pictures ......................................................................................................................... 135
Check the scanner resolution and color settings on the computer ........................................................ 136
Resolution and color guidelines ............................................................................................... 136
Color .............................................................................................................................................. 137
Check the scanner glass for dirt and smudges .......................................................................................... 139
Check the send-fax resolution settings ....................................................................................................... 139
Check the error-correction settings ............................................................................................................. 140
Check the t-to-page setting ........................................................................................................................ 140
Send to a dierent fax machine .................................................................................................................... 140
Check the sender's fax machine ................................................................................................................... 140
Solve general fax problems ........................................................................................................................... 148
Faxes are sending slowly ........................................................................................................... 148
Fax quality is poor ...................................................................................................................... 149
Fax cuts o or prints on two pages ......................................................................................... 149
Index ........................................................................................................................................................................................................... 151
viiiENWW
1Printer overview
●
Warning icons
●
Printer views
●
Printer specications
●
Printer hardware setup and software installation
For more information:
The following information is correct at the time of publication. For current information, see www.hp.com/
support/ljM182MFP.
HP's all-inclusive help for the printer includes the following information:
●Install and congure
●Learn and use
●Solve problems
●Download software and rmware updates
●Join support forums
●Find warranty and regulatory information
ENWW1
Warning icons
Warning icon denitions: The following warning icons may appear on HP products. Apply appropriate caution
where applicable.
●
Caution: Electric shock
●
Caution: Hot surface
●
Caution: Keep body parts away from moving parts
●
Caution: Sharp edge in close proximity
2Chapter 1 Printer overviewENWW
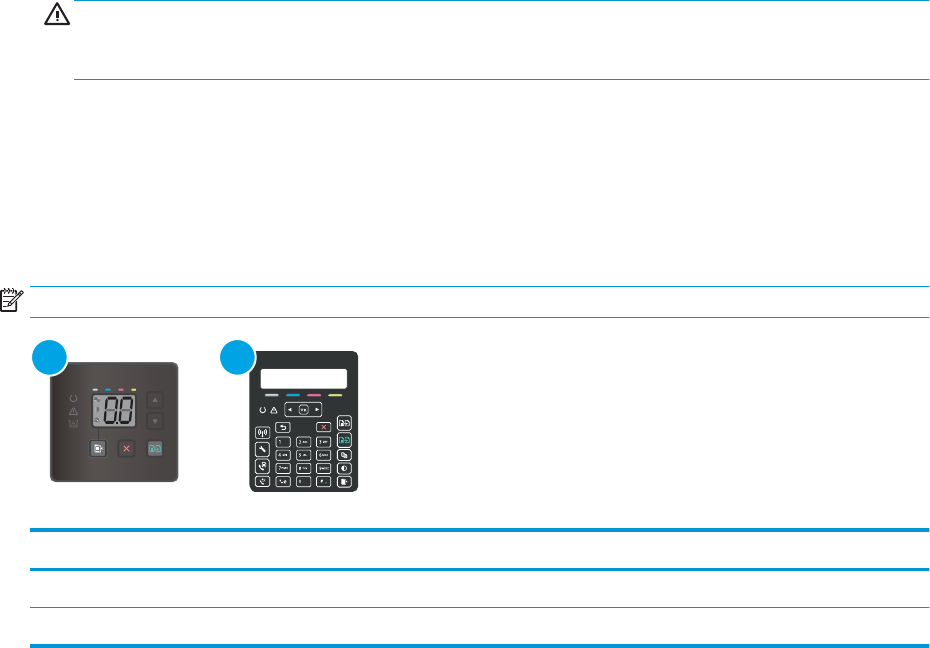
Printer views
●
Printer front view
●
Printer back view
●
LED control-panel view
●
2-line LCD control-panel view
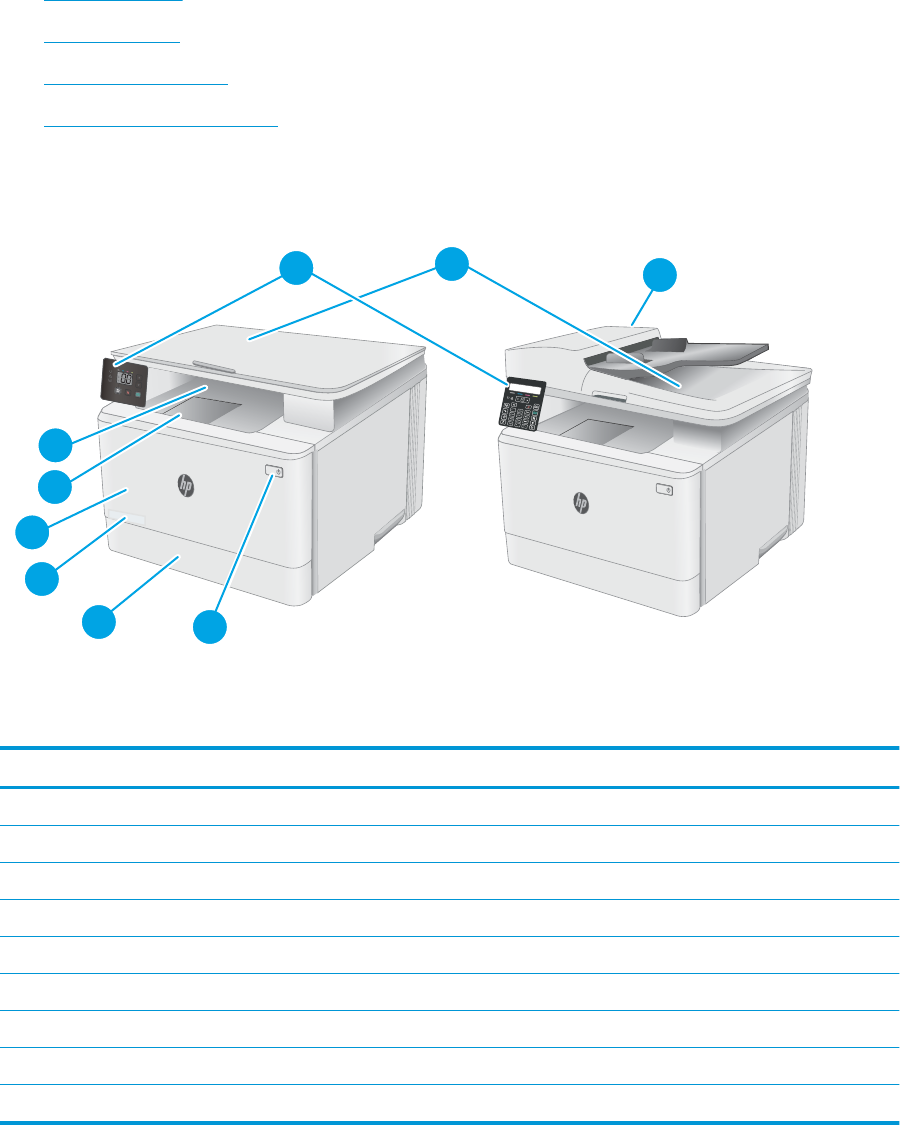
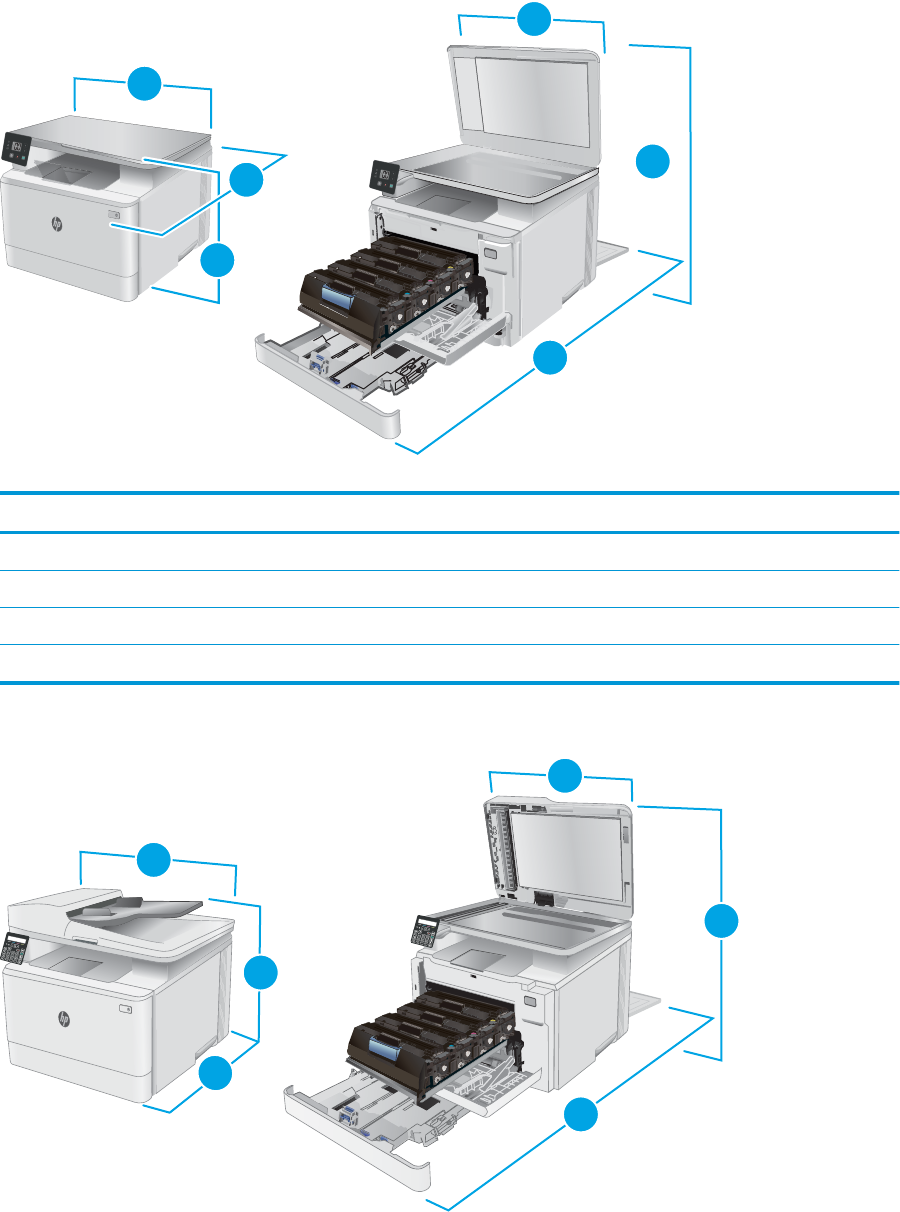
Printer front view
1
3
4
9
8
5
7
6
2
Table 1-1 Printer front view
NumberDescription
1Scanner
2Control panel (varies by model)
3Output bin
4Output bin extension
5Front door (access to the toner cartridges)
6Model number
7Tray 1
8Power button
9Document feeder (fw models only)
ENWWPrinter views3
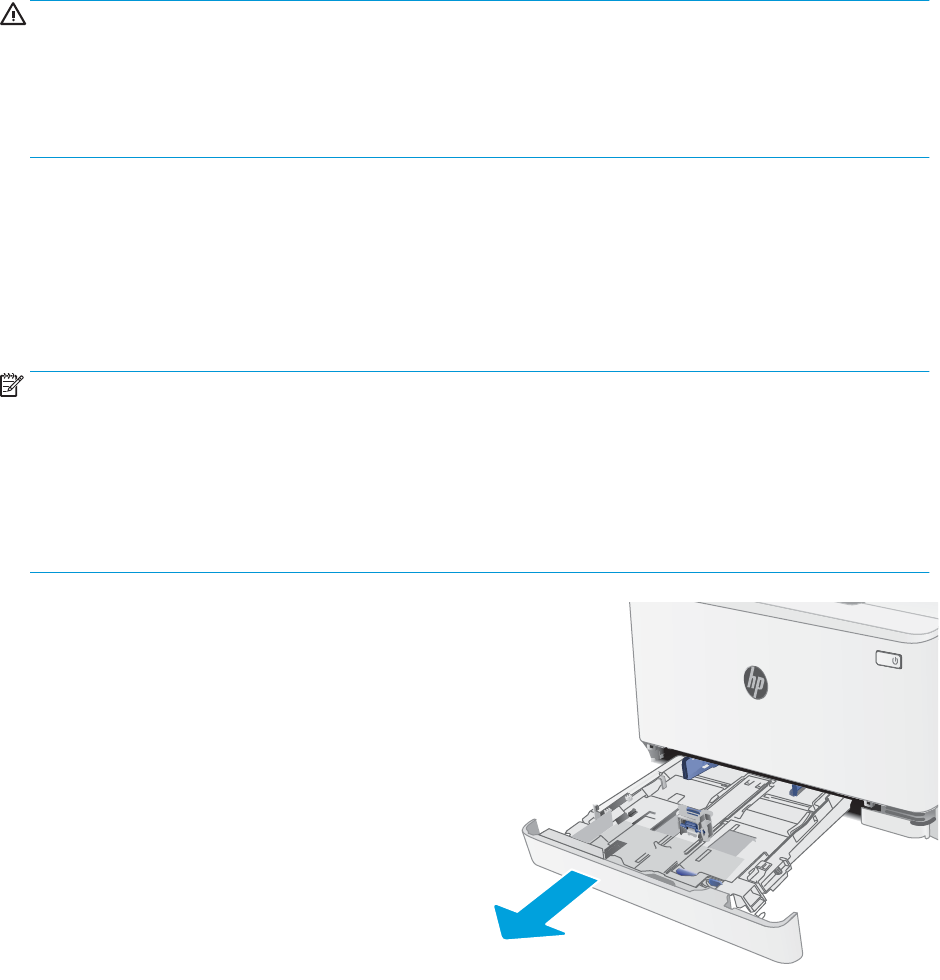
Printer back view
3
5
4
6
7
2
1
Table 1-2 Printer back view
NumberDescription
1Rear door (access for clearing jams)
2Serial number and product number label
3Power connection
4USB interface port
5Ethernet port
6Fax “line in” port for attaching the fax phone line to the printer (fax models only)
7Telephone “line out” port for attaching an extension phone, answering machine, or other device (fax models only)
4Chapter 1 Printer overviewENWW
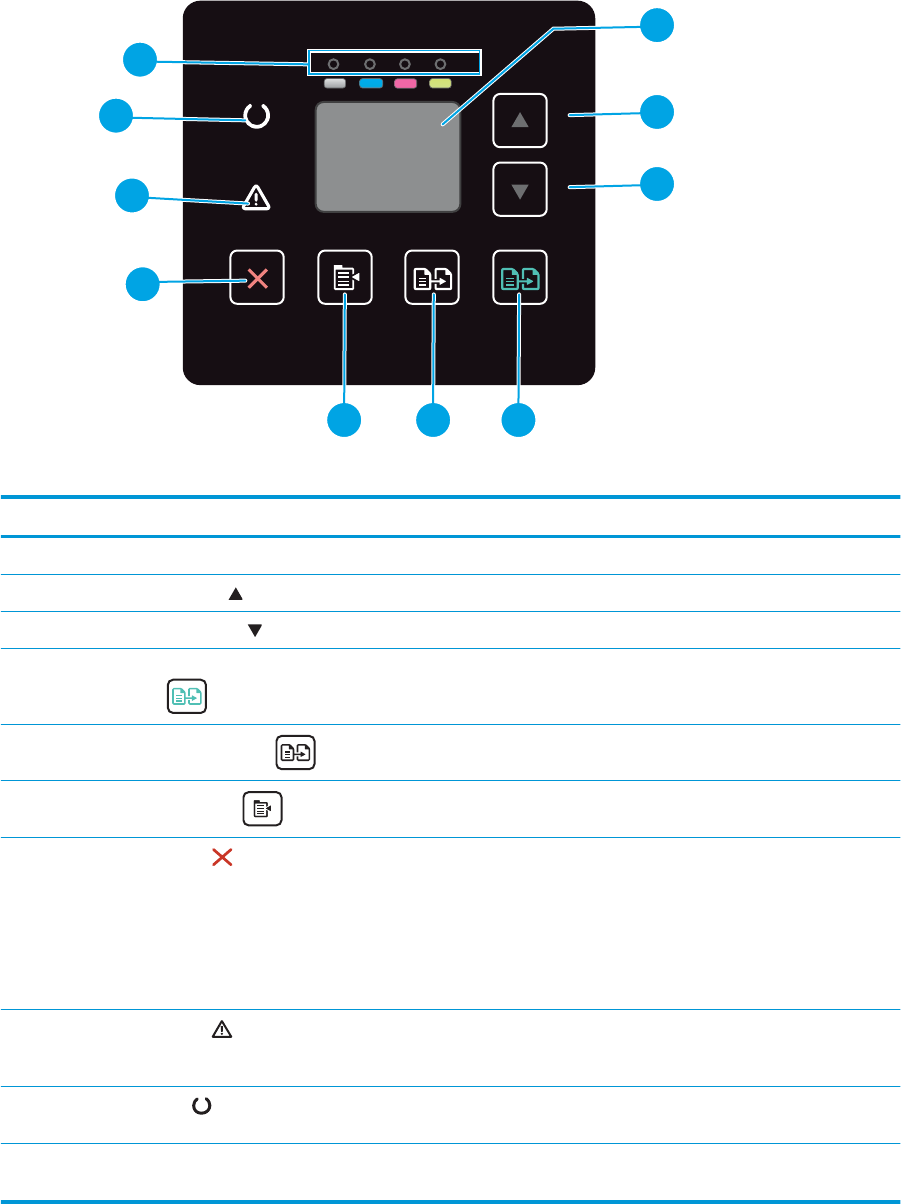
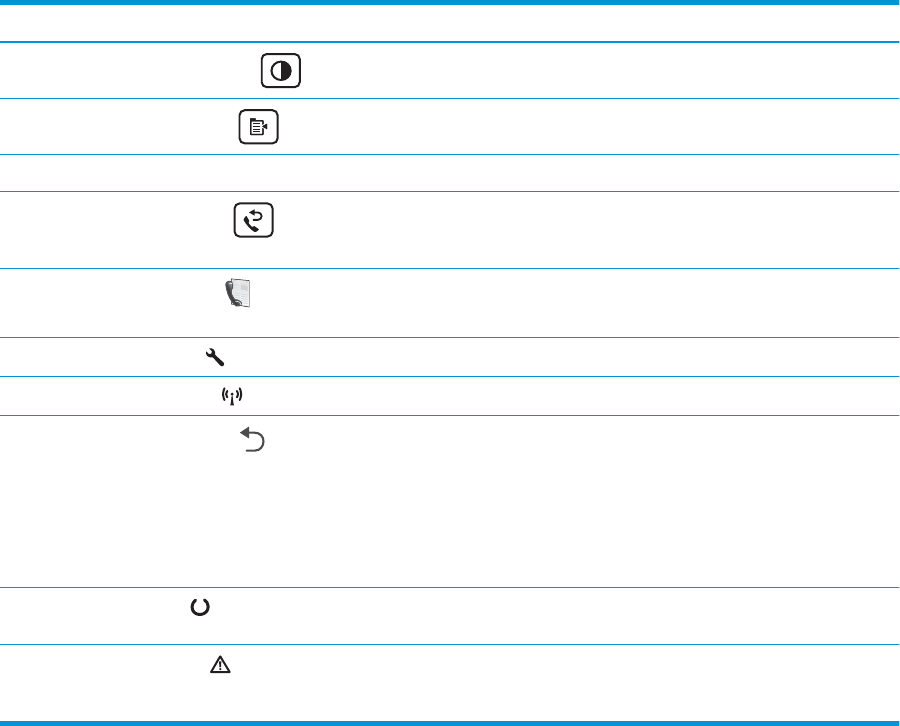
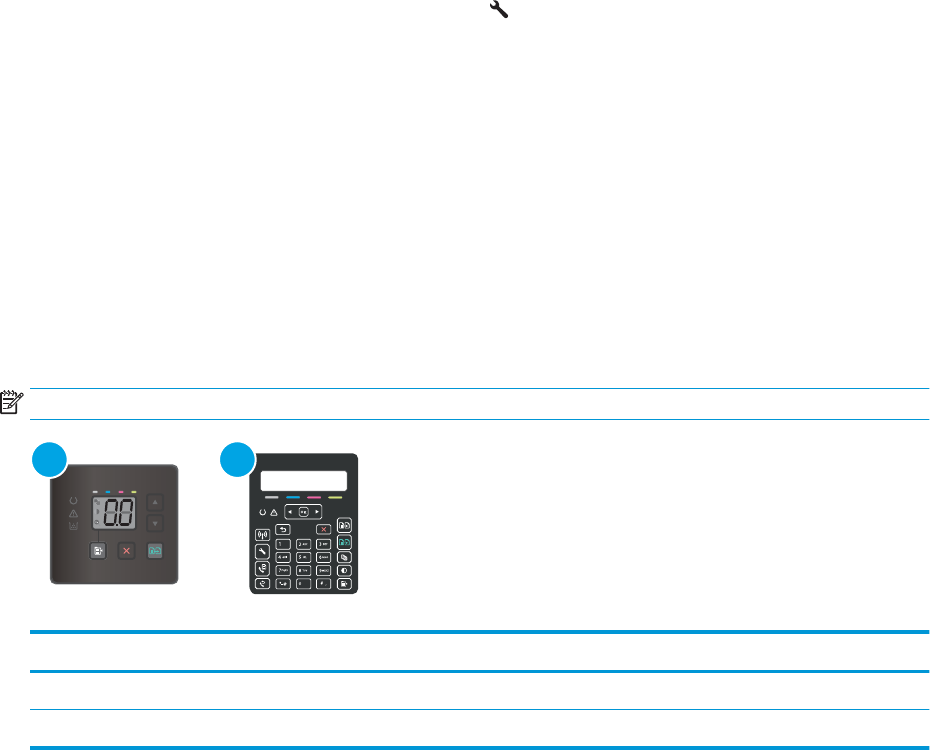
LED control-panel view
1
3
2
546
9
7
8
10
Table 1-3 LED control-panel view
NumberItemDescription
1Control panel LED displayThis screen displays error codes and numerical information for copy jobs.
2Up arrow button Use this button to increase the value that appears on the display.
3Down arrow button Use this button to decrease the value that appears on the display.
4Start Color Copy / Resume
button
Press this button to start a color copy job.
5
Start Mono Copy button
Press this button to start a mono copy job.
6
Copy Setup button
Use this button to navigate through the Number of Copies, Lighter/Darker, and
Reduce/Enlarge options. The default option is Number of Copies.
7
Cancel button
Press this button to perform the following actions:
●Cancel a print job when the printer is printing.
●Reset the current copy settings to the default values when the printer is idle.
●Exit Copy Default Setting mode without saving the value when the printer is in
Copy Default Setting mode.
8Attention LED The Attention light blinks when the printer requires user attention, such as when the
printer runs out of paper or a toner cartridge needs to be changed. If the light glows
without blinking, the printer has experienced an error.
9Ready LED The Ready light glows without blinking when the printer is ready to print. It blinks
when the printer is receiving print data or canceling a print job.
10Supplies LEDsA Supplies light blinks when a supply error occurs, and it glows without blinking when
the supply is very low and replacement is required.
ENWWPrinter views5
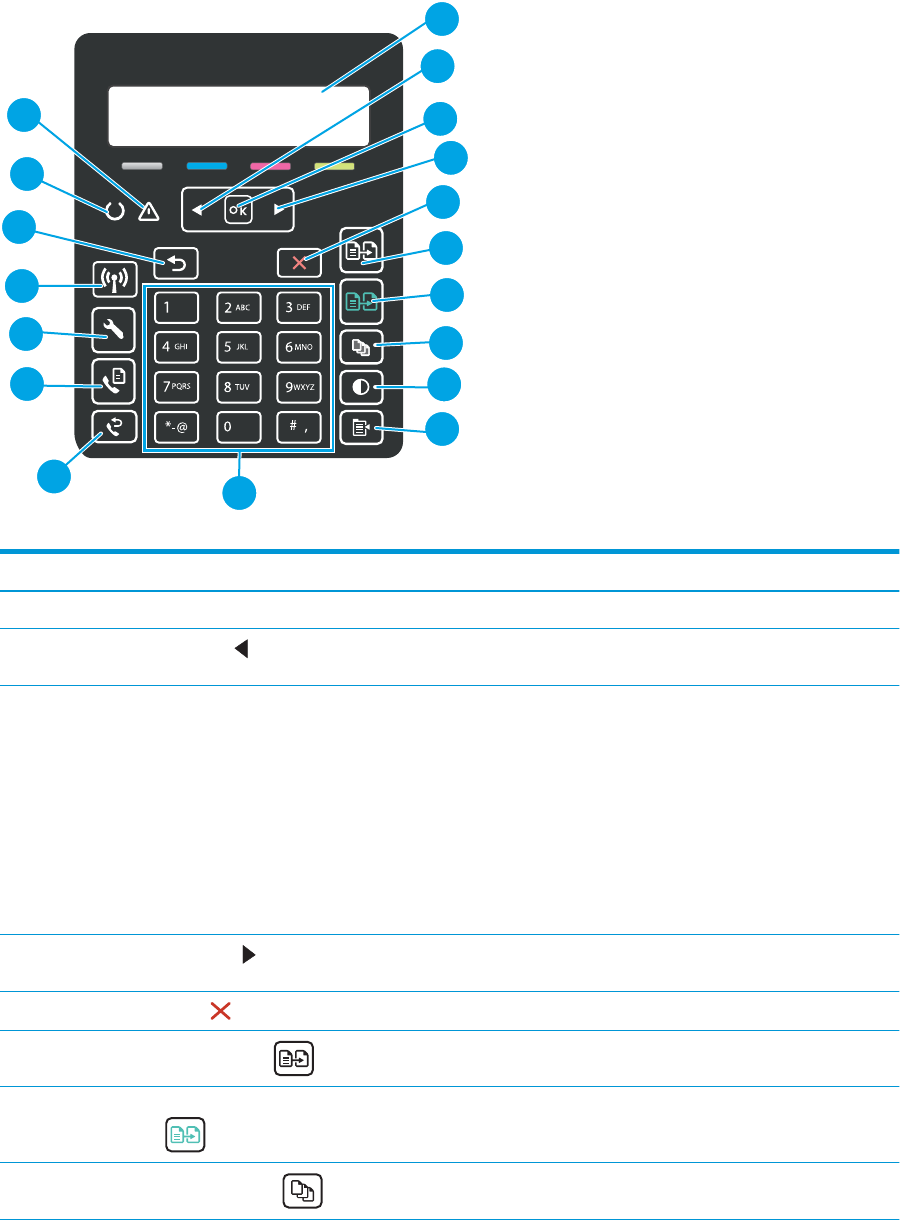
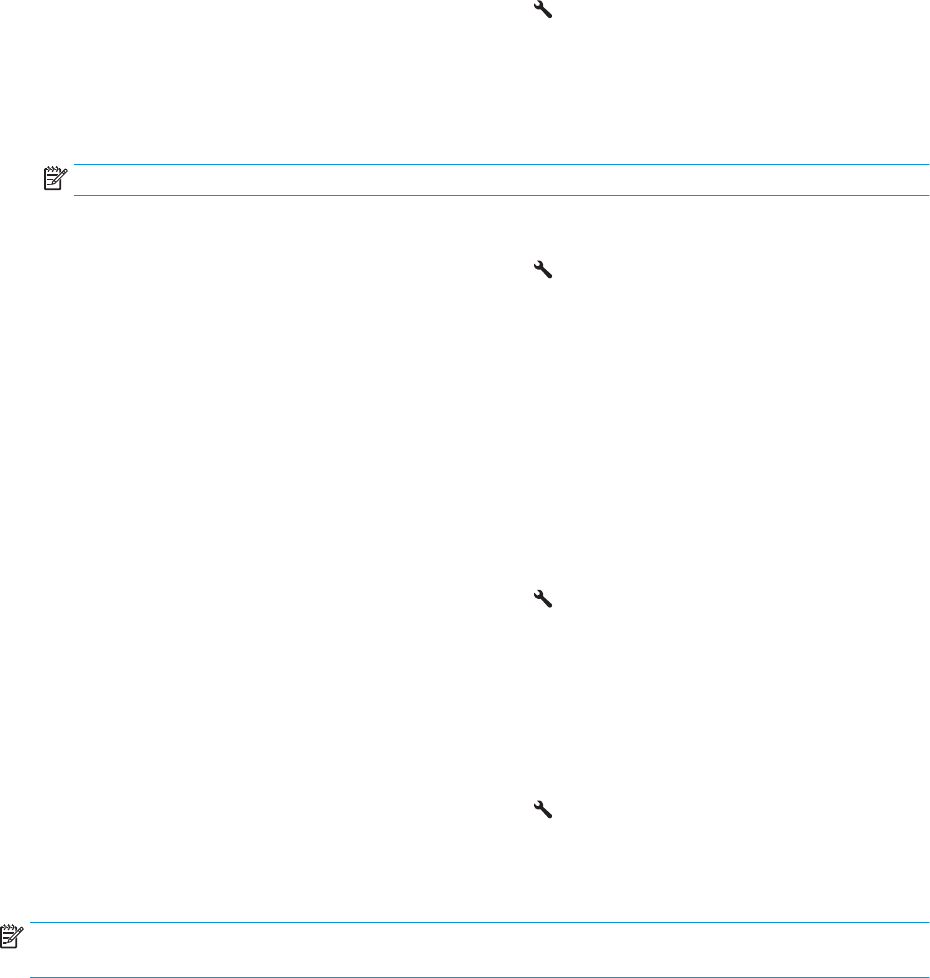
2-line LCD control-panel view
1
2
6
5
7
9
10
11
12
15
17
18
16
13
3
4
8
14
Table 1-4 2-line LCD control-panel view
NumberItemDescription
12-line control panel displayThis screen displays menus and printer information.
2
Left arrow button
Use this button to navigate through the menus or to decrease a value that appears on
the display.
3OK buttonUse the OK button for the following actions:
●Open the control-panel menus.
●Open a submenu displayed on the control-panel display.
●Select a menu item.
●Clear some errors.
●Begin a print job in response to a control-panel prompt (for example, when the
message Press [OK] to continue appears on the control-panel display).
4
Right arrow button
Use this button to navigate through the menus or to increase a value that appears on
the display.
5
Cancel button
Use this button to cancel a print job or to exit the control panel menus.
6
Start Mono Copy button
Use this button to start a mono copy job.
7Start Color Copy / Resume
button
Use this button to start a color copy job.
8
Number of Copies button
Use this button to set the number of copies to be produced.
Libble takes abuse of its services very seriously. We're committed to dealing with such abuse according to the laws in your country of residence. When you submit a report, we'll investigate it and take the appropriate action. We'll get back to you only if we require additional details or have more information to share.
Product:
Forumrules
To achieve meaningful questions, we apply the following rules:
First, read the manual;
Check if your question has been asked previously;
Try to ask your question as clearly as possible;
Did you already try to solve the problem? Please mention this;
Is your problem solved by a visitor then let him/her know in this forum;
To give a response to a question or answer, do not use this form but click on the button 'reply to this question';
Your question will be posted here and emailed to our subscribers. Therefore, avoid filling in personal details.
Register
Register getting emails for HP Color LaserJet Pro M184 at:
new questions and answers
new manuals
You will receive an email to register for one or both of the options.
Get your user manual by e-mail
Enter your email address to receive the manual of HP Color LaserJet Pro M184 in the language / languages: English as an attachment in your email.
The manual is 7,84 mb in size.
You will receive the manual in your email within minutes. If you have not received an email, then probably have entered the wrong email address or your mailbox is too full. In addition, it may be that your ISP may have a maximum size for emails to receive.
If you have not received an email with the manual within fifteen minutes, it may be that you have a entered a wrong email address or that your ISP has set a maximum size to receive email that is smaller than the size of the manual.
The email address you have provided is not correct.
Please check the email address and correct it.
Your question is posted on this page
Would you like to receive an email when new answers and questions are posted? Please enter your email address.