698833
3
Zoom out
Zoom in
Previous page
1/45
Next page
Mode d’emploi
Istruzioni per l’uso
Bedienungsanleitung
AAuuttoommaattiicckkáá pprraaöökkaa
User instructions
FR
IT
DE
CZ
EN
2
FR
IT
T
OUS NOS
COMPLIMENTS
En achetant cet appareil
ménager Hoover,vous avez
démontré que vous
n’acceptez aucun
compromis: vous voulez
toujours ce qu’il y a de
mieux.
Hoover a le plaisir de vous
proposer cette nouvelle
machine à laver qui est le
résultat d’années de
recherches et d’études des
besoins du consommateur.
Vous avez fait le choix de la
qualité,de la fiabilité et de
l’efficacité.
Hoover vous propose une
large gamme d’appareils
électroménagers: machines
à laver la vaisselle,machines
à laver et sécher le linge,
cuisinières, fours à micro-
ondes, fours et tables de
cuisson,hottes,réfrigerateurs
et congélateurs.
Demandez à votre
Revendeur le catalogue
complet des produits
Hoover.
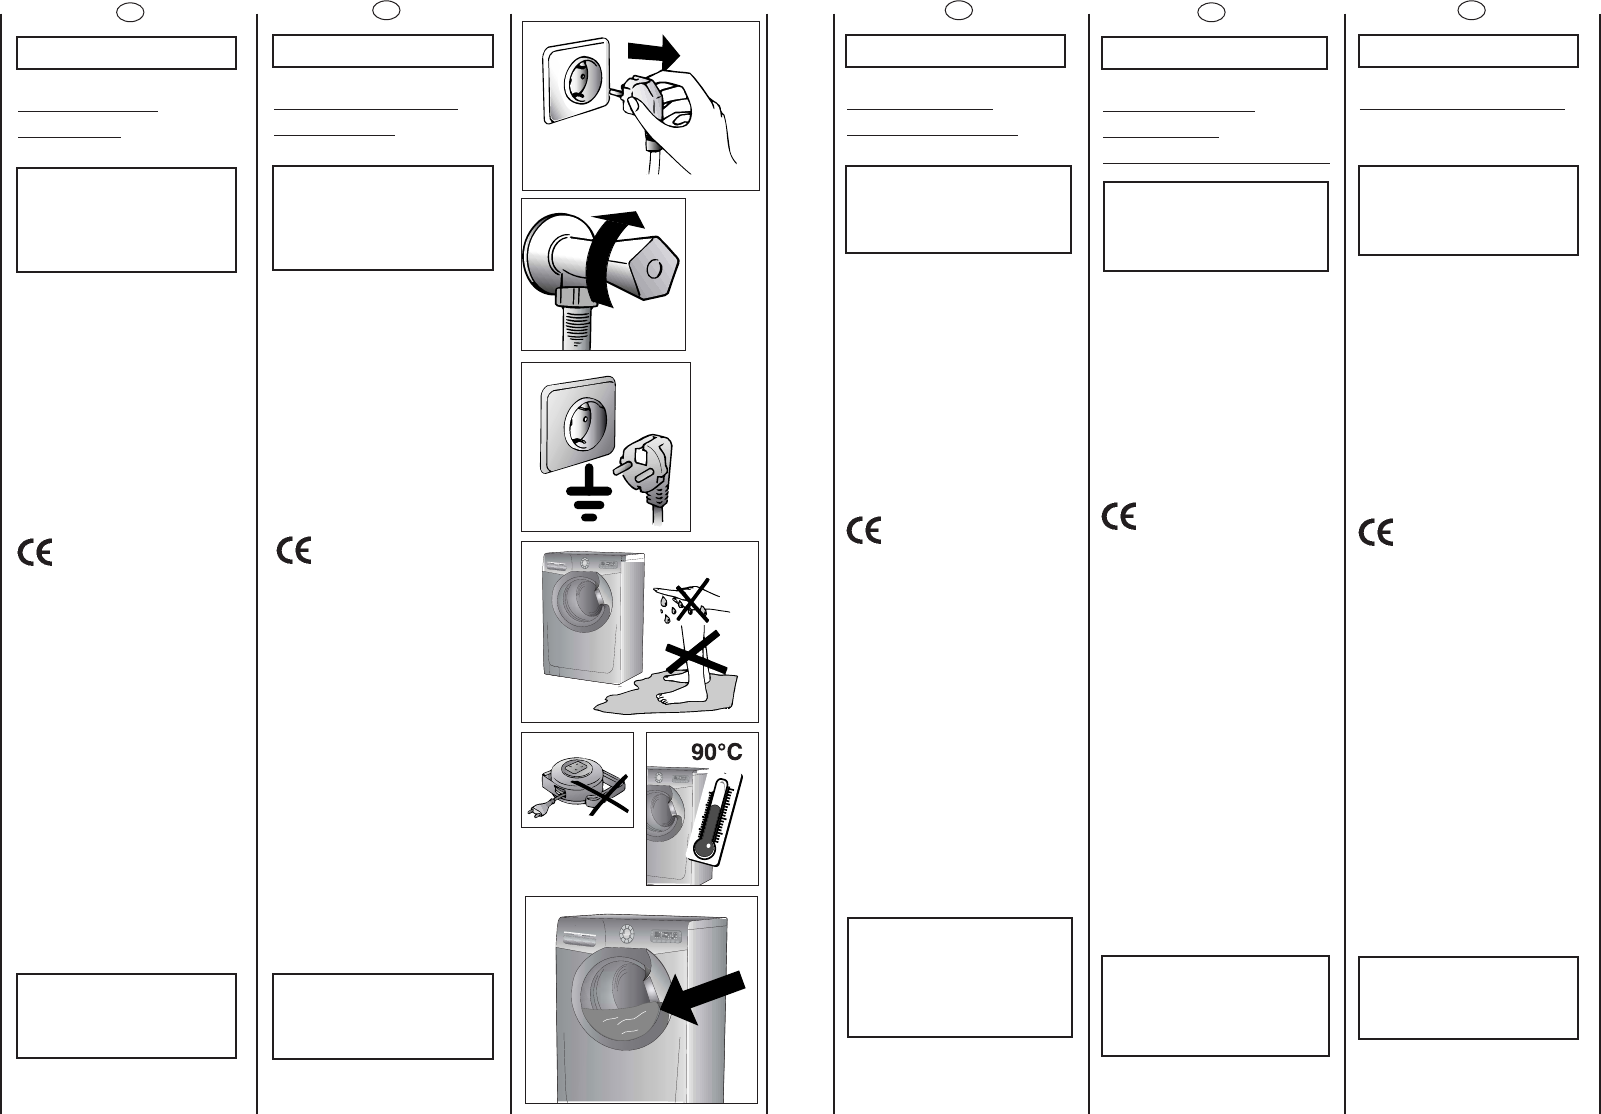
Nous vous prions de lire
attentivement les conseils
contenus dans ce livret.Il
contient d’importantes
indications concernant les
procédures d’installation,
d’emploi,d’entretien et
quelques suggestions utiles
en vue d’améliorer
l’utilisation de la machine à
laver.
Conservez avec soin ce
livret: vous pourrez le
consulter bien souvent.
Quand vous communiquez
avec Hoover,ou avec ses
centres d’assistance,veuillez
citer le Modèle,le n° et le
numéro G (éventuellement).
COMPLIMENTI
Con l’acquisto di questo
elettrodomestico Hoover;
Lei ha dimostrato di non
accettare compromessi:
Lei vuole il meglio.
Hoover é lieta di proporLe
questa nuova lavatrice
frutto di anni di ricerche e di
esperienze maturate sul
mercato,a contatto diretto
con i Consumatori.Lei ha
scelto la qualità,la durata e
le elevate prestazioni che
questa lavatrice Le offre.
Hoover Le propone inoltre
una vasta gamma di
elettrodomestici: lavatrici,
lavastoviglie,lavasciuga,
cucine,forni a microonde,
forni e piani di cottura,
frigoriferi e congelatori.
Chieda al Suo Rivenditore
il catalogo completo dei
prodotti Hoover
La preghiamo di leggere
attentamente le avvertenze
contenute nel presente
libretto in quanto forniscono
importanti indicazioni
riguardanti la sicurezza di
installazione,d’uso, di
manutenzione e alcuni utili
consigli per il migliore utilizzo
della lavatrice.
Conservi con cura questo
libretto per ogni ulteriore
consultazione.
Quando comunica con la
Hoover o con i suoi centri di
assistenza citi sempre il
Modello,il n° e il numero G
(se c’è).Praticamente tutto
ciò che é citato nel
riquadro.
3
DE
HERZLICHEN
GLÜCKWUNSCH!
Mit dem Kauf dieses Hoover
Elektrogerätes haben Sie
bewiesen,daß Sie stets nur
das Beste wählen - ohne
Kompromisse.
Hoover freut sich,Ihnen diese
neue Waschmaschine
anbieten zu können.Sie ist
das Ergebnis jahrelanger
Forschung und einer
Markterfahrung,die im
ständigen direkten Kontakt
mit dem Verbraucher gereift
ist.Sie haben mit diesem
Gerät Qualität,lange
Lebensdauer und einen
hohen Leistungsstandard
gewählt.
Hoover bietet Ihnen darüber
hinaus eine breite Palette
weiterer elektrischer
Haushaltsgeräte:
Waschmaschinen,
Geschirrspüler,
Wäschetrockner,
Elektroherde,
Mikrowellenherde,Backöfen
und Kochfelder,Kühl - und
Gefrierschränke.
Fragen Sie Ihren Fachhändler
nach dem kompletten
Hoover Katalog.
Lesen Sie bitte aufmerksam
die Anweisungen, die Sie in
diesem Heft finden. Sie finden
dort wichtige Hinweise zur
sicheren Installation,zur
Bedienung,zur Pflege und zur
optimalen Verwendung der
Waschmaschine.
Bewahren Sie das Heft für
eine spätere Nutzung gut auf.
Geben Sie bitte in allen
Mitteilungen an Hoover oder
an Ihre zuständige
Kundendienststelle stets das
Modell,die Nummer und die
G-Nummer (falls vorhanden),-
also praktisch alle Angaben
des Typenschildes -, an.
EN
OUR COMPLIMENTS
With the purchase of this
Hoover household
appliance, you have shown
that you will not accept
compromises: you want only
the best.
Hoover is happy to present
their new washing machine,
the result of years of
research and market
experience through direct
contact with Consumers.
You have chosen the quality,
durability and high
performance that this
washing machine offers.
Hoover is also able to offer a
vast range of other
household appliances:
washing machines,
dishwashers, washer-dryers,
cookers, microwave ovens.
Traditional ovens and hobs,
refrigerators and freezers.
Ask your local retailer for the
complete catalogue of
Hoover products.
Please read this booklet
carefully as it provides
important guide lines for
safe installation,use and
maintenance and some
useful advise for best results
when using your washing
machine.
Keep this booklet in a safe
place for further
consultation.
When contacting Hoover
or a Customer Services
Centre always refer to the
Model,No., and G number
(if applicable of the
appliance see panel).
ÚVOD
VáÏen˘ zákazníku,
Dûkujeme Vám, Ïe jste si
zakoupil v˘robek spoleãnosti
Hoover.
Pfied prvním pouÏitím
v˘robku si pozornû pfieãtûte
pfiiloÏen˘ ãesk˘ návod , kter˘
firma Hoover dodává, a
dÛslednû se jím fiiìte.
Návod, kter˘ jste k v˘robku
obdrÏel, vychází z
v‰eobecné v˘robkové fiady
a z tohoto dÛvodu mÛÏe
dojít k situaci, Ïe nûkteré
funkce, ovládací prvky a
pfiíslu‰enství nejsou urãeny
pro Vበv˘robek. Dûkujeme
za pochopení.
CZ
FR
IT
INDEX
Avant-propos
Notes générales à la
livraison
Garantie
Mesures de sécurité
Données techniques
Mise en place,installation
Description des commandes
Tableau des programmes
Sélection
Tiroir à lessive
Le produit
Lavage
Nettoyage et entretien
Recherche des pannes
INDICE
Prefazione
Note generali alla consegna
Garanzia
Prescrizioni di sicurezza
Dati tecnici
Messa in opera,installazione
Descrizione comandi
Tabella programmi
Selezione
Cassetto detersivo
Il prodotto
Lavaggio
Pulizia e manutenzione
ordinaria
Ricerca guasti
CHAPITRE
CAPITOLO
KAPITEL
KKAAPPIITTOOLLAA
CHAPTER
1
2
3
4
5
6
7
8
9
10
11
12
13
4 5
DE
INHAL
T
Einleitung
Allgemeine Hinweise zur
Lieferung
Garantie
Sicherheitsvorschriften
Technische Daten
Inbetriebnahme, Installation
Bedienungsanleitung
Programmtabelle
Programm/Temperaturwahl
Waschmittelbehälter
Das Produkt
Waschen
Reinigung und allgemeine
Wartung
Fehlersuche
EN
INDEX
Introduction
General points on delivery
Guarantee
Safety Measures
Technical Data
Setting up and Installation
Control Description
Table of Programmes
Selection
Detergent drawer
The Product
Washing
Cleaning and routine
maintenance
Faults Search
OBSAH :
Úvod
Väeobecné pokyny püi
püevzetí vÿrobku
Záruka
Pokyny pro bezpeöné
pouïívání praöky
Technické údaje
Instalace
Popis ovládacího panelu
Tabulka programå
Volba programå
Zásobník pracích prostüedkå
Prádlo
Praní
Öiätëní a bëïná udrïba
Neï zavoláte odbornÿ servis
CZ
8
DE
KAPITEL 2
GARANTIE
Die Vorlage der Original-
Kaufrechnung ist
Voraussetzung für die
Inanspruchnahme einer
Garantieleistung durch
den Werkskundendienst.
Die detaillierten
Garantiebedingungen
entnehmen Sie bitte den
beigefügten Unterlagen
"European Guarantee".
Bewahren Sie die
Kaufrechnung gut auf Und
zeigen Sie diese im
Servicefall dem
Kundendiensttechniker,um
Ihren
Garantieanspruch
nachzuweisen.
SERVICENUMMER FÜR DEN
KUNDENDIENST
Im Servicefall wenden Sie
sich bitte an unseren
autorisierten
Werkskundendienst. Bitte
schauen Sie in den
mitgelieferten
Garantieunterlagen nach.
WO KANN ICH DIE
MATRIKELNUMMER DES
GERÄTES FINDEN?
Um eine schnelle und
effektive Hilfe zu leisten,
braucht der Kundendienst
das Gerätemodell und die
Matrikelnummer laut
Typenschild.Das ist eine 16-
stellige Zahl,die mit 3
anfängt und sich im
Bullaugenbereich befindet.
Teilen Sie diese Nummer
stets dem Kundendienst
mit,wenn Sie ihn
benötigen.
9
FR
CHAPITRE 2
GARANTIE
L’ a ppareil est accompagné
par un certificat de
gàrantie.
GIAS SERVICE
0848-780.780 CH
0903-99109 BE
GIAS SERVICE
0820.220.224
0848.780.780
A
CH
DE
01805.625.562
EN
CHAPTER 2
GU
ARANTEE
The appliance is supplied
with a guarantee certificate
which allows free use of the
Technical Assistance Service.
KKAAPPIITTOOLLAA 22
RUKA
Pro poskytnutí kvalitního
záruãního a pozáruãního
servisu uschovejte v‰echny
doklady o koupi a
pfiípadn˘ch opravách
v˘robku . Doporuãujeme
Vám po dobu záruãní doby
uchovat pÛvodní obaly k
v˘robku. NeÏ budete
kontaktovat servisní
stfiedisko, peãlivû
prostudujte záruãní
podmínky v záruãním listû.
Obracejte se pouze na
autorizovaná servisní
stfiediska.
CZ
IT
CAPITOLO 2
Servizio Assistenza Clienti
CERTIFICATO DI GARANZIA CONVENZIONALE: cosa fare?
Il Suo prodotto è garantito, alle condizioni e nei termini riportati sul certificato inserito nel
prodotto ed in base alle previsioni del decreto legislativo 24/02, nonché del decreto
legislativo 6 settembre 2005, n. 206, per un periodo di 24 mesi decorrenti dalla data di
consegna del bene.
Così come riportato nei testi dei Decreti Legislativi citati, il certificato di garanzia dovrà
essere da Lei conservato, debitamente compilato, per essere mostrato al Servizio
Assistenza Tecnica Autorizzato, in caso di necessità, unitamente ad un documento
fiscalmente valido rilasciato dal rivenditore al momento dell’acquisto (bolla di consegna,
fattura, scontrino fiscale, altro) sul quale siano indicati il nominativo del rivenditore, la
data di consegna, gli estremi identificativi del prodotto ed il prezzo di cessione.
Resta pure inteso che, salvo prova contraria, poiché si presume che i difetti di
conformità che si manifestano entro sei mesi dalla consegna del bene esistessero già a
tale data, a meno che tale ipotesi sia incompatibile con la natura del bene o con la
natura del difetto di conformità, il Servizio di Assistenza Tecnica Autorizzato Gias,
verificato il diritto all’intervento, lo effettuerà senza addebitare il diritto fisso di intervento
a domicilio, la manodopera ed i ricambi. Per contro, nel successivo periodo di diciotto
mesi di vigenza della garanzia, sarà invece onere del consumatore che intenda fruire
dei rimedi accordati dalla garanzia stessa provare l’esistenza del difetto di conformità
del bene sin dal momento della consegna; nel caso in cui il consumatore non fosse in
grado di fornire detta prova, non potranno essere applicate le condizioni di garanzia
previste e pertanto il Servizio di Assistenza Tecnica Autorizzato Gias effettuerà
l’intervento addebitando al consumatore tutti i costi relativi.
ESTENSIONE DELLA GARANZIA FINO A 5 ANNI: come?
Le ricordiamo inoltre che sullo stesso certificato di garanzia convenzionale Lei troverà le
informazioni ed i documenti necessari per prolungare la garanzia dell’apparecchio sino
a 5 anni e così, in caso di guasto, non pagare il diritto fisso di intervento a domicilio, la
manodopera ed i ricambi.
Per qualsiasi informazione necessitasse, La preghiamo rivolgersi al numero telefonico
del Servizio Clienti 199 12 13 14.
ANOMALIE E MALFUNZIONAMENTI: a chi rivolgersi ?
Per qualsiasi necessità il centro assistenza autorizzato è a Sua completa disposizione
per fornirLe i chiarimenti necessari; comunque qualora il Suo prodotto presenti
anomalie o mal funzionamenti, prima di rivolgersi al Servizio Assistenza Autorizzato,
consigliamo vivamente di effettuare i controlli indicati nel capitolo "Ricerca guasti".
UN SOLO NUMERO TELEFONICO PER OTTENERE ASSISTENZA.
Qualora il problema dovesse persistere, componendo il “Numero Utile” sotto indicato,
sarà messo in contatto direttamente con il Servizio Assistenza Tecnica Autorizzato che
opera nella Sua zona di residenza.
Attenzione:
la chiamata è a pagamento; il costo verrà comunicato, tramite messaggio vocale, dal
Servizio clienti dell’operatore telefonico utilizzato. Dettagli sono presenti sul sito internet
www.hoover.it.
MATRICOLA DEL PRODOTTO. Dove si trova?
E’ indispensabile che comunichi al Servizio Assistenza Tecnica Autorizzato la sigla del
prodotto ed il numero di matricola (16 caratteri che iniziano con la cifra 3) che troverà
sul certificato di garanzia oppure sulla targa matricola posta sul frontale della
lavabiancheria (zona oblò). In questo modo Lei potrà contribuire ad evitare trasferte
inutili del tecnico, risparmiando oltretutto i relativi costi.
10
FR
CHAPITRE 3
MESURES DE
SECURITE
ATTENTION:
EN CAS
D’INTERVENTION DE
NETTOYAGE ET
D’ENTRETIEN
Débrancher la prise de
courant.
Fermer le robinet
d’alimentation d’eau.
Toutes les machines
Hoover sont pourvues de
mise à la terre.
Vérifier que l’installation
électrique soit alimentée par
une prise de terre, en cas
contraire demander
l’intervention du personnel
qualifié.
Produit compatible
avec les Directives
Européennes 73/23/EEC et
89/336/EEC,remplacé par
2006/95/EC et 2004/108/EC,
et les amendements
successifs.
Cette machine est conçue
uniquement pour usage
domestique.
Ne pas toucher l’appareil
pieds nus.
Autant que possible éviter
l’usage de rallonges dans les
salles de bains ou les
douches.
ATTENTION:
PENDANT LE LAVAGE
L’EAU PEUT ATTEINDRE
90°C.
Avant d’ouvrir le hublot
vérifier que le tambour soit
sans eau.
11
KAPITEL 3
SICHERHEITS-
VORSCHRIFTEN
ZUR BEACHTUNG:
BEI REINIGUNG UND
WARTUNG DES
GERÄTES
Netzstecker ziehen.
Wasserzufuhr sperren.
Alle Hoover Geräte sind
geerdet.
Versichern Sie sich, daß Ihr
Stromnetz geerdet ist.Sollte
dies nicht der Fall sein,rufen
Sie einen Fachmann.
Das Gerät entspricht
den Europäischen Richtlinien
73/23/CEE und 89/336/CEE,
ersetzt durch 2006/95/CE
bzw. 2004/108/CE , und deren
nachträglichen
Veränderungen.
Dieses Gerät ist nur für den
häuslichen Gebrauch
bestimmt.
Benutzen Sie nach
Mögkichkeit keine
Verlängerungskabel in
Feuchträumen.
ACHTUNG:
JE NACH
WASCHPROGRAMM
KANN SICH DAS
WASSER BIS AUF 90° C
AUFHEIZEN.
Vor dem Öffnen des
Bullauges sicherstellen, daß
kein Wasser mehr in der
Trommel steht.
DE
EN
CHAPTER 3
SAFETY MEASURES
IMPORTANT:
FOR ALL CLEANING
AND MAINTENANCE
WORK
Remove the plug
Turn off the water inlet tap.
All Hoover appliances are
earthed. Ensure that the
main electricity circuit is
earthed. Contact a qualified
electrician if this is not the
case.
Appliance complies
with European Directives
73/23/EEC and 89/336/EEC,
replaced by 2006/95/EC and
2004/108/EC,and
subsequent amendments.
This machine is solely for
domestic use.
Do not touch the
appliance with wet or damp
hands or feet.
Do not use the appliance
when bare-footed.
Extreme care should be
taken if extension leads are
used in bathrooms or shower
rooms.Avoid this where
possible.
WARNING: DURING THE
WASHING CYCLE, THE
WATER CAN REACH A
TEMPERATURE OF 90°C.
Before opening the
washing machine door,
ensure that there is no water
in the drum.
CZ
KKAAPPIITTOOLLAA 33
POKYNY PRO
BEZPEÖNÉ
POUÏÍVÁNÍ PRAÖKY
PPOOZZOORR!! NNÍÍÏÏEE UUVVEEDDEENNÉÉ
PPOOKKYYNNYY PPLLAATTÍÍ PPRROO
JJAAKKŸŸKKOOLLIIVV DDRRUUHH
ÖÖIIÄÄTTËËNNÍÍ AA ÚÚDDRRÏÏBBYY
Vytáhnëte vidlici el. äñåry
ze zásuvky el. sítë
Uzavüete kohout püívodu
vody
Väechny el.spotüebiöe
zn.Hoover jsou uemnëny.
Zajistëte, aby napájecí el.sít’
umoïñovala ochranu
uzemnëním.
V püípadë pochybnosti
nechte provëüit pracovníkem
odborné firmy.
Spotfiebiã odpovídá
evropsk˘m smûrnicím
73/23/CEE (Bezpeãnostní
smûrnice – nízké napûtí) a
89/336/CEE (Smûrnice pro
elektromagnetickou
kompatibilitu), které byli
nahrazené smûrnicemi
2006/95/CE a 2004/108/CE a
jejich pozdûj‰ími zmûnami.
Toto zafiízení je urãené k
pouÏití pouze v domácnosti.
Nedotÿkejte se praöky
mokrÿma öi vlhkÿma rukama
nebo nohama
Nepouïívejte praöku jste-li
bosí.
Nejvyääí pozornost vënujte
pouïívání råznÿch adaptérå,
rozdvojek a prodluïovacích
äñår v místnostech jako jsou
koupelny nebo v místnostech
se sprchou.
JJee--llii ttoo mmooïïnnéé,, vvyyhhnnëëttee ssee
jjeejjiicchh ppoouuïïíívváánníí vvååbbeecc..
UUPPOOZZOORRNNËËNNÍÍ::
BBËËHHEEMM CCYYKKLLUU PPRRAANNÍÍ
MMÅÅÏÏEE VVOODDAA
DDOOSSÁÁHHNNOOUUTT TTEEPPLLOOTTYY
AAÏÏ 9900°°CC
Püed otevüením praöky se
ujistëte, ïe v bubnu není
ïádná voda
IT
CAPITOLO 3
PRESCRIZIONI DI
SICUREZZA
ATTENZIONE:
PER QUALSIASI
INTERVENTO DI PULIZIA
E MANUTENZIONE
DELLA LAVATRICE
Tolga la spina.
Chiuda il rubinetto
dell’acqua.
La Hoover correda tutte le
sue macchine di messa a
terra.
Si assicuri che l’impianto
elettrico sia provvisto di
messa a terra in caso
contrario richieda
l’intervento di personale
qualificato.
Apparecchio
conforme alle Direttive
Europee 73/23/CEE e
89/336/CEE ,sostituite
rispettivamente da
2006/95/CE e 2004/108/CE ,
e successive modifiche.
Questo apparecchio
dovrà essere destinato solo
all’uso domestico.
Questo apparecchio
dovrà essere destinato solo
all’uso domestico
Non tocchi l’apparecchio
con mani,piedi bagnati o
umidi.
Non usi l’apparecchio a
piedi nudi.
Non usi,se non con
particolare cautela,
prolunghe in locali adibiti a
bagno o doccia.
ATTENZIONE:
DURANTE IL LAVAGGIO
L’ACQUA PUO’ ANDARE
A 90°C.
Prima di aprire l’oblò si
assicuri che non vi sia
acqua nel cestello.
16
FR
IT
CAPITOLO 5
MESSA IN OPERA
INSTALLAZIONE
Porti la macchina vicino al
luogo di utilizzo senza il
basamento dell’imballo.
Tagliare le fascette
fermatubo,prestando
attenzione di non
danneggiare il tubo e il
cavo elettrico
Svitare le 4 viti (A) sul lato
posteriore e rimuovere i 4
distanziali (B).
Richiudere i 4 fori utilizzando
i tappi contenuti nella busta
istruzione.
ATTENZIONE:
NON LASCI ALLA
PORTATA DI BAMBINI
GLI ELEMENTI
DELL’IMBALLAGGIO IN
QUANTO POTENZIALI
FONTI DI PERICOLO.
CHAPITRE 5
MISE EN PLA
CE
INSTALLATION
Placer la machine près du
lieu d’utilisation sans la base
d’emballage.
Couper avec précaution le
cordon qui maintient le
tuyeau d’évacuation et le
cable d’alimentation
Enlever les 4 vis de fixation
indiquées en (A) et enlever
les espaces indiqués en (B)
Couvrir les quatre trous en
utilisant les capuchons
prévus à cet effet dans le
sachet où se trouve la
notice
ATTENTION:
NE PAS LAISSER À LA
PORTÉE DES ENFANTS
DES ELEMENTS
D’EMBALLAGE QUI
PEUVENT CAUSER DES
RISQUES.
17
DE
KAPITEL 5
INBETRIEBNAHME
INSTALLATION
Gerät ohne
Verpackungsunterteil in die
Nähe des Aufstellungsortes
bringen.
Schneiden Sie das
Kunststoffband der
Schlauchbefestigung durch.
Achten Sie darauf, den
Schlauch und das Kabel
nicht zu beschädigen.
Schrauben Sie die 4
Schrauben (A) auf der
Rückseite ab und entfernen
Sie die 4 Distanzstücke (B).
Schließen Sie die 4
Öffnungen mit den im
Beipack mitgelieferten
Stöpseln.
ACHTUNG:
DIE VERPACKUNG IST IN
DEN HÄNDEN VON
KINDERN EINE
GEFAHRENQUELLE. BITTE
ENTSORGEN SIE DAS
VERPACKUNGS-
MATERIAL
ORDNUNGSGEMÄß.
EN
CHAPTER 5
SETTING UP
INSTALLATION
Move the machine near its
permanent position without
the packaging base.
Carefully cut the securing
strap that holds the main
cord and the drain hose.
Remove the 4 fixing screws
marked (A) and remove the
4 spacers marked (B)
Cover the 4 holes using the
caps provided in the
instruction booklet pack.
WARNING:
DO NOT LEAVE THE
PACKAGING IN THE
REACH OF CHILDREN
AS IT IS A POTENTIAL
SOURCE OF DANGER.
CZ
KKAAPPIITTOOLLAA 55
UVEDENÍ DO
PROVOZU
INSTALACE
Odstrañte ochrannou
podloïku z pënového
polystyrénu (souöást obalu)
a praöku umístëte nedaleko
místa trvalého pouïívání.
Odstfiihnûte pásku, která drÏí
hadici a dejte pozor abyste
nepo‰kodili hadici a
elektrick˘ kabel.
Od‰roubujte 4 ‰rouby (A) na
zadní stranû a odstraÀte 4
distanãní vloÏky.
Uzavfiete 4 otvory pouÏitím 4
krytek které jsou uloÏeny v
sáãku s návodem k pouÏití.
PPOOZZOORR::
OODDSSTTRRAAÑÑTTEE ZZBBYYTTKKYY
OOBBAALLUU ZZ DDOOSSAAHHUU DDËËTTÍÍ,,
MMOOHHLLYY BBYY BBŸŸTT
ZZDDRROOJJEEMM NNEEBBEEZZPPEEÖÖÍÍ..
18
min 50 cm
max 85 cm
+2,6 mt max
max 100 cm
min 4 cm
min 50 cm
max 85 cm
+2,6 mt max
max 100 cm
min 4 cm
19
EN
Fix the sheet of corrugated
material on the bottom as
shown in picture.
Connect the fill hose
to the tap.
The appliance must be
connected to the water
mains using new hose-sets.
The old hose-sets should not
be reused.
IMPORTANT:
DO NOT TURN THE TAP
ON AT THIS TIME.
Position the washing
machine next to the wall.
Hook the outlet tube to the
edge of the bath tub,
paying attention that there
are no bends or
contractions along the tube.
It is better to connect the
discharge hose to a fixed
outlet of a diameter greater
than that of the outlet tube
and at a height of min.50
cm.If is necessary to use the
plastic sleeve supplied.
Appliquer la feuille
supplémentaire sur le fond
comme dans la figure.
Raccorder le tuyau d’arrivée
d’eau au robinet.
L'appareil doit être relié à
l'arrivée d'eau exlusivement
avec les tuyaux fournis .
Ne pas réutiliser les anciens
tuyaux.
ATTENTION:
NE PAS OUVRIR LE ROBINET
Approcher la machine contre
le mur en faisant attention à
ce que le tuyau n’ait ni
coudes ni étranglements.
Raccorder le tuyau de
vidange au rebord de la
baignoire ou,mieux encore, à
un dispositif fixe d’évacuation,
hauteur mini.50 cm, et de
diamètre supérieur au tuyau
de la machine à laver.
En cas de besoin,utiliser le
coude rigide livré avec la
machine.
FR
IT
Applichi il foglio di polionda
sul fondo come mostrato in
figura.
Allacci il tubo dell’acqua al
rubinetto.
L’ a pparecchio deve essere
connesso alla rete idrica
solo con i nuovi tubi di
carico forniti in dotazione.I
vecchi tubi di carico non
devono essere riutilizzati.
ATTENZIONE:
NON APRA IL RUBINETTO
Accosti la lavatrice al muro
facendo attenzione che
non vi siano curve o
strozzature,allacci il tubo di
scarico al bordo della
vasca.
o meglio a uno scarico fisso;
altezza minima 50 cm,di
diametro superiore al tubo
della lavatrice.
In caso di necessità utilizzare
la curva rigida in dotazione.
Upevnëte ke dnu praöky
püiloïenÿ protihlukovÿ ätít z
vlnitého materiálu podle
obrázku.
Hadici püívodu vody
püípevnëte k vodovodnímu
kohoutu koncem s pojistnÿm
ventilem (Water stop system).
Spotüebiö musí bÿt püipojen k
püívodu vody novou hadicí,
která je souöástí vÿbavy
spotüebiöe. Staré hadice
nesmëjí bÿt znovu pouïívány.
DDÅÅLLEEÏÏIITTÉÉ::
VV TTÉÉTTOO FFÁÁZZII NNEEPPOOUUÄÄTTËËJJTTEE
VVOODDUU..
Opüete konec odtokové
hadice o vanu a dbejte na
to, aby na hadici nevznikly
zlomy nebo ohnutí. Odtoková
hadice má bÿt umístëna ve
vÿäce min. 50 cm.
Je lepäí pouïijete-li pevného
odpadu o vëtäím pråmëru,
neï je pråmër odtokové
hadice, tím umoïníte
pråchod vzduchu.
Pokud je potüeba, pouïijte
pevnÿ U-drïák k upevnëní
hadice.
Püípadné prodlouïení
odtokové hadice måïe zavinit
poruchy v chodu odtokového
öerpadla a filtru, zejména v
püípadë, je-li deläí neï 1 m.
CZ
DE
Befestigen Sie die gewellte
Bodenplatte wie in der
Abbildung dargestellt.
Den Zulaufschlauch an den
Wasserhahn anschließen.
Beim Anschließen des
Zulaufschlauchs ist die
Benutzung einer Rohrzange zu
vermeiden.Handfestes Ziehen
reicht völlig aus.
Das Gerät muß an die
Wasserversorgung mit neuen
Schläuchen angeschlossen
werden.
Alte Schläuche dürfen nicht
wiederverwendet werden.
ACHTUNG:
WASSERHAHN NOCH NICHT
ÖFFNEN.
Die Waschmaschine an die
Wand rücken,darauf achten,
daß dabei der Schlauch nicht
verkrümmt oder eingeengt
wird.
Ablaufschlauch am
Wannenrand
befestigen,oder an einem
festen Abfluß von mindestens
50 cm Höhe anbringen,dessen
Durchmesser größer ist als der
des
Waschmaschinenschlauchs.
Falls erforderlich den
mitgelieferten starren
Rohrbogen benutzen.
20
FR
IT
Mettre la machine à niveau
en reglant les 4 pieds:
a) Tourner dans le sens des
aiguilles d’une montre
l’écrou de façon à
dévérouiller la vis du pied.
b) Tourner le pied et le faire
monter ou descendre
jusqu’à obtenir une parfaite
adhérence au sol.
c) Enfin bloquer le pied en
revissant l’écrou dans le sens
inverse des aiguilles d’une
montre et le faire adhérer au
fond de la machine.
Brancher la prise.
ATTENTION:
Au cas où il serait nécessaire
de remplacer le cable
d’alimentation,assurez vous
de respecter les codes-
couleur suivants dans le
branchement de chacun
des fils:
BLEU - NEUTRE (N)
MARRON - PHASE (L)
VERT-JAUNE - TERRE ( )
Une fois l'appareil installé, la
prise électrique doit rester
accessible.
Livelli la macchina con i 4
piedini:
a) Girare in senso orario il
dado per sbloccare la vite
del piedino.
b) Ruotare il piedino e farlo
scendere o salire fino ad
ottenere la perfetta
aderenza al suolo.
c) Bloccare infine il piedino
riavvitando il dado in senso
antiorario,fino a farlo aderire
al fondo della lavatrice.
Inserisca la spina.
ATTENZIONE:
nel caso si renda necessario
sostituire il cavo di
alimentazione,assicurarsi di
rispettare il seguente codice-
colore durante il
collegamento dei singoli fili:
BLU - NEUTRO (N)
MARRONE - FASE (L)
GIALLO-VERDE - TERRA ( )
L’ a pparecchio deve essere
posto in modo che la spina
sia accessibile ad
installazione avvenuta.
21
DE
Richten Sie das Gerät mit
den 4 Verstellfüßen
waagerecht aus:
a) Kontermuttern im
Uhrzeigersinn lösen.
b) Standfuß einregulieren,bis
das Gerät genau
ausgerichtet ist (möglichst
mit der Wasserwaage
justieren!).
c) Kontermuttern (gegen
den Uhrzeigersinn) festziehen.
Wichtig: Sollte das Gerät auf
einen Sockel aufgestellt
werden,ist es durch eine
Sockelbefestigung zu sichern.
Erkundigen Sie sich bitte
hierfür im Fachhandel.
Der Hersteller haftet nicht für
unsachgemäße Aufstellung
und Installation.
Stecker einstecken.
ACHTUNG:
Falls das Netzkabel
ausgetauscht werden sollte,
achten Sie beim Anschluss
der einzelnen Kabel
unbedingt auf die folgende
Farbenbelegung:
BLAU - NULLLEITER (N)
BRAUN - PHASE (L)
GELB-GRÜN - ERDE ( )
Nach der Installation muß der
Anschluß zugänglich sein.
EN
Use the 4 feet to level the
machine with the floor:
a) Turn the nut clockwise to
release the screw adjuster of
the foot.
b) Rotate foot to raise or
lower it until it stands firmly on
the ground.
c) Lock the foot in position
by turning the nut anti-
clockwise until it comes up
against the bottom of the
machine.
Insert the plug.
ATTENTION:
should it be necessary to
replace the supply cord,
connect the wire in
accordance with the
following colours/codes:
BLUE - NEUTRAL (N)
BROWN - LIVE (L)
YELLOW-GREEN - EARTH ( )
After installation,the
appliance must be
positioned so that the plug is
accessible.
Umístûte praãku do roviny
pomocí 4 nastaviteln˘ch
noÏiãek:
aa))
Otáöejte maticí äroubu po
smëru hod. ruöiöek a pak
måïete püizpåsobit vÿäku
noïiöky.
bb))
Otáöením sniïujte nebo
zdvihejte noïiöku, dokud
perfektnë nepüilne k podlaze.
cc))
Upevnëte polohu noïiöky
otoöením matice äroubu proti
smëru hod. ruöiöek.
Zapojte záströku do sítë.
UPOZORNùNÍ:
V pfiípadû potfieby v˘mûny
pfiívodního kabelu pfiipojujte
vodiãe v souladu s
následujícím barvami/kódy:
MODR¯ - NEUTRÁLNÍ (N)
HNùD¯ - ÎIV¯ (L)
ÎLUTO-ZELEN¯ - UZEMNùNÍ ( )
Po instalaci spotüebiöe se
ujistëte, ïe spotüebiö je
umístën tak, aby byla snadno
püístupná zásuvka.
CZ
3


Need help? Post your question in this forum.

Forumrules


Report abuse

Libble takes abuse of its services very seriously. We're committed to dealing with such abuse according to the laws in your country of residence. When you submit a report, we'll investigate it and take the appropriate action. We'll get back to you only if we require additional details or have more information to share.

Product:

For example, Anti-Semitic content, racist content, or material that could result in a violent physical act.

For example, a credit card number, a personal identification number, or an unlisted home address. Note that email addresses and full names are not considered private information.

Forumrules

To achieve meaningful questions, we apply the following rules:

Register

Register getting emails for Hoover DST 10146P-84S at:


You will receive an email to register for one or both of the options.


Get your user manual by e-mail

Enter your email address to receive the manual of Hoover DST 10146P-84S in the language / languages: English, German, French, Italian as an attachment in your email.

The manual is 2,58 mb in size.


You will receive the manual in your email within minutes. If you have not received an email, then probably have entered the wrong email address or your mailbox is too full. In addition, it may be that your ISP may have a maximum size for emails to receive.

Others manual(s) of Hoover DST 10146P-84S

Hoover DST 10146P-84S User Manual - Dutch - 45 pages


The manual is sent by email. Check your email

If you have not received an email with the manual within fifteen minutes, it may be that you have a entered a wrong email address or that your ISP has set a maximum size to receive email that is smaller than the size of the manual.

The email address you have provided is not correct.

Please check the email address and correct it.

Your question is posted on this page

Would you like to receive an email when new answers and questions are posted? Please enter your email address.


Info