689554
12
Zoom out
Zoom in
Previous page
1/62
Next page
WIRELESS BINDING GUIDE
A step-by-step guide for binding wireless heating controls
This WIRELESS BINDING
GUIDE provides simple
step-by-step instructions
for binding wireless
heating controls.
It’s assumed the devices are
appropriately installed and
powered up ready for binding.
For full installation
instructions please refer
to the Installation Guide of
the individual devices.
2
Contents
Binding to a Wi-Fi evohome
Controller (ATC928G3000) ................................ 5
Digital Room Thermostat (DTS92) ................................ 6
Mixing Valve Controller (HM80) ..................................... 7
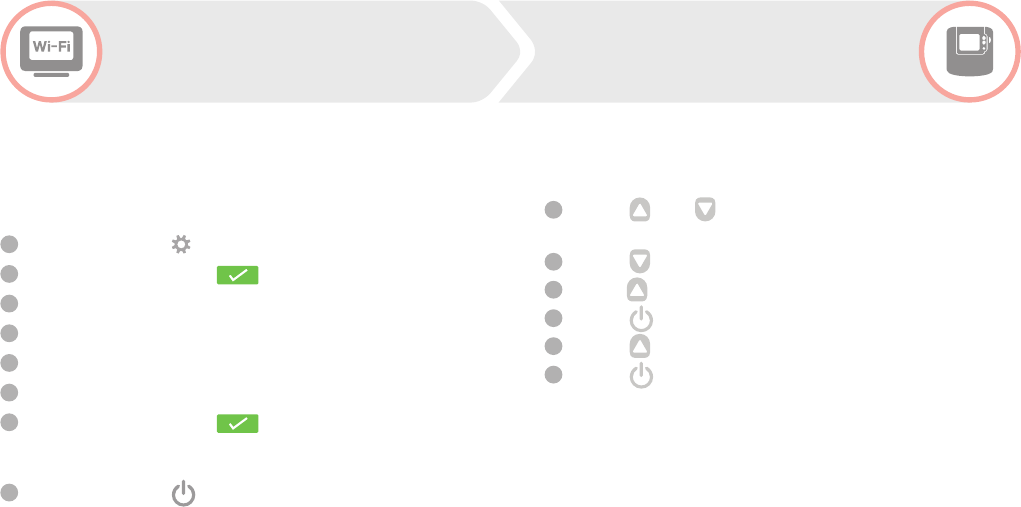
Radiator Controller (HR92) ................................................ 8
Radiator Controller (HR80) ................................................ 9
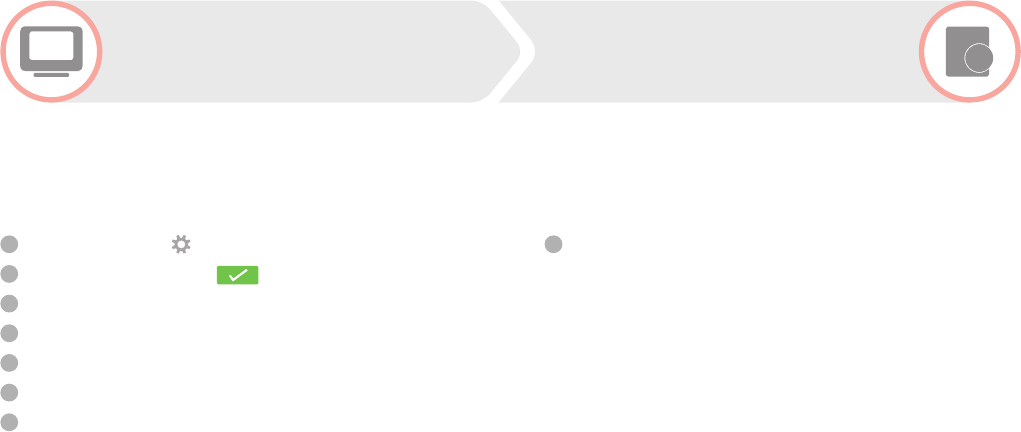
Room Temperature Sensor (HCF82) ..........................10
Room Temperature Sensor (HCW82) ....................... 11
Single Zone Thermostat (T87RF) ................................ 12
Underoor Heating Controller (HCE80/HCC80)
.. 13
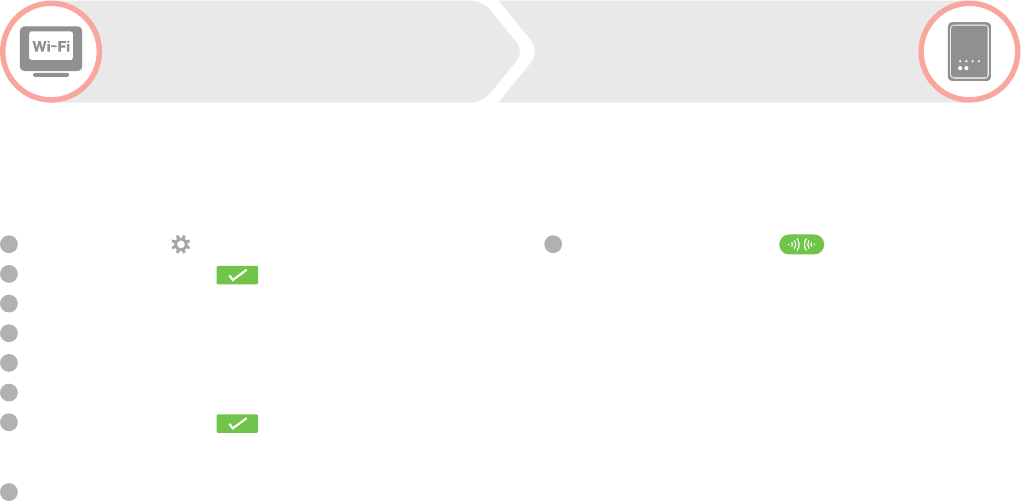
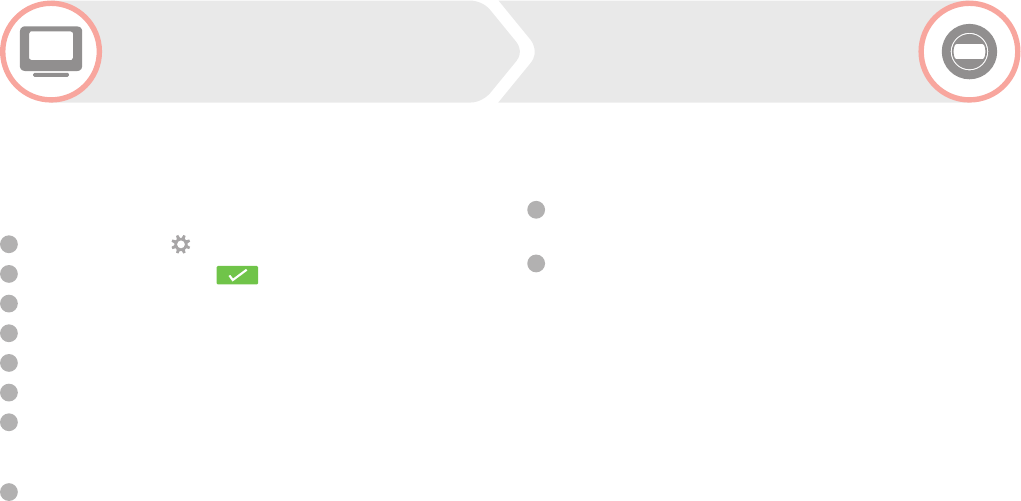
Wireless Cylinder Thermostat (CS92) .......................14
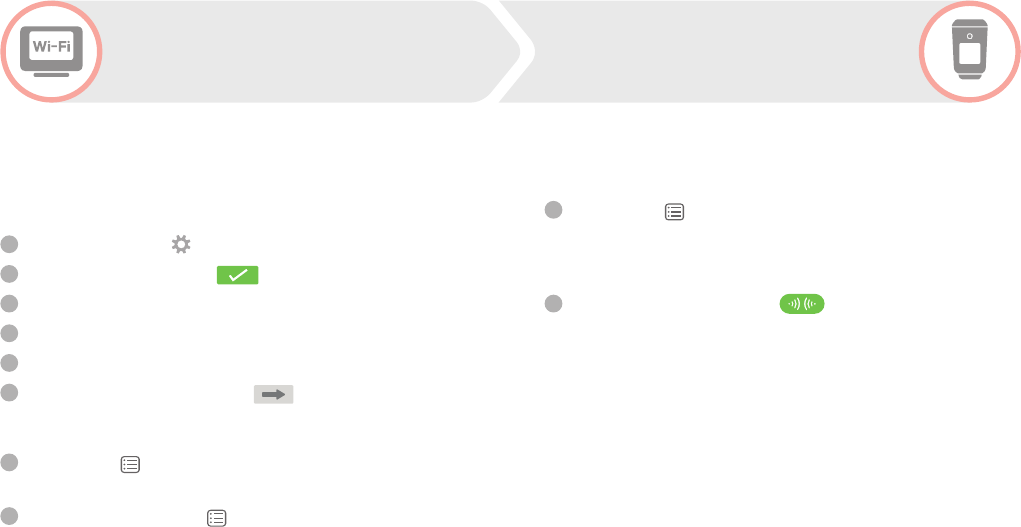
Wireless Relay Box (BDR91) Boiler ............................. 15
Wireless Relay Box (BDR91) Sundial Valve ..............16
Wireless Relay Box (BDR91) Zone Valve....................17
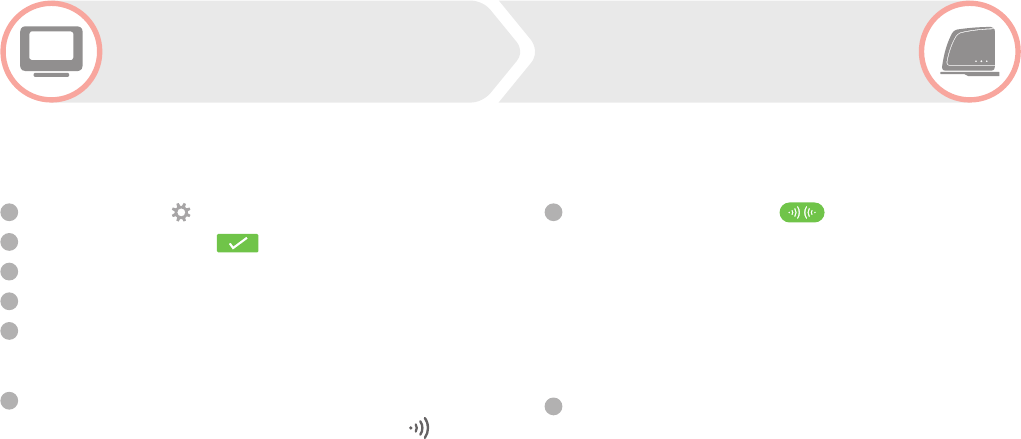
Wireless Relay Box (HC60NG) .......................................18
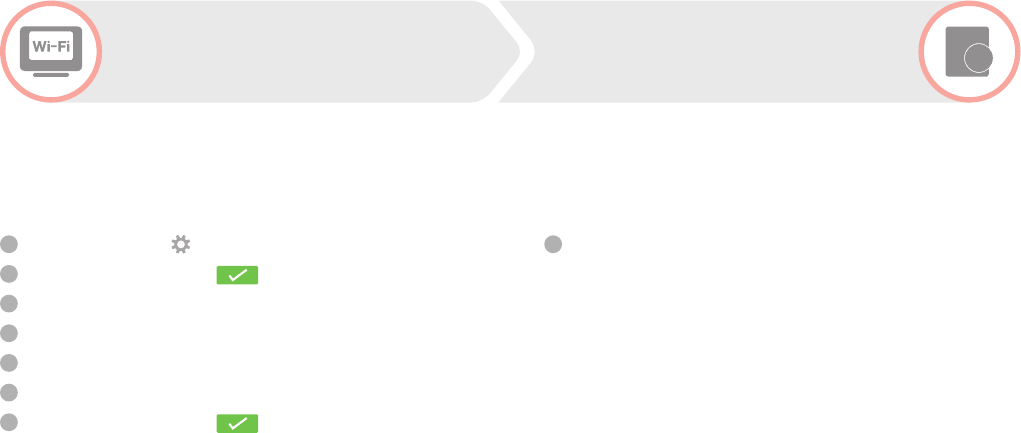
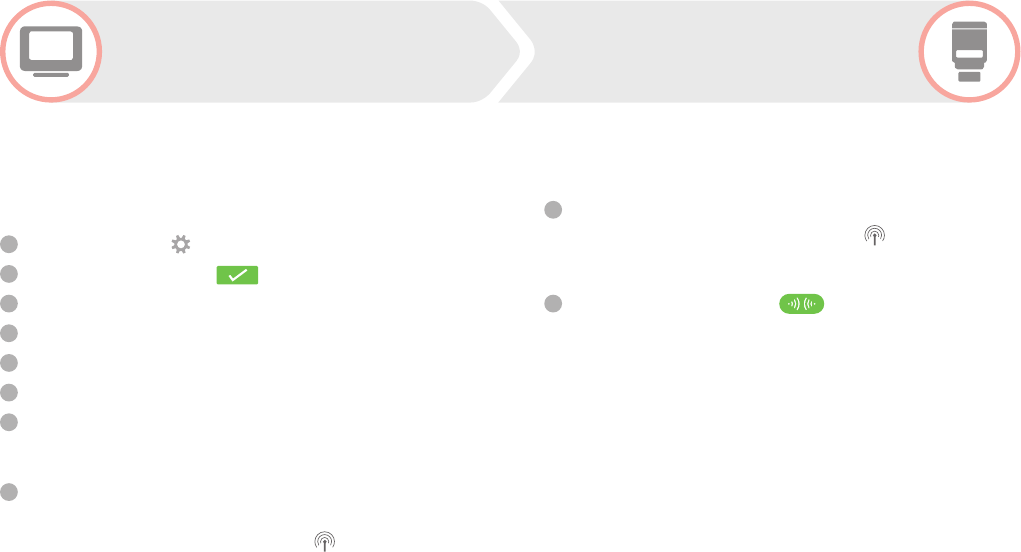
Wireless OpenTherm Bridge (R8810) ....................... 19
Binding to a evohome
Controller (ATC928G2000) ............................. 21
Digital Room Thermostat (DTS92) ............................. 22
Mixing Valve Controller (HM80) .................................. 23
Radiator Controller (HR92) ..............................................24
Radiator Controller (HR80) ............................................. 25
Remote Access Gateway (RFG100)............................ 26
Room Temperature Sensor (HCF82) ..........................27
Room Temperature Sensor (HCW82) ....................... 28
Single Zone Thermostat (T87RF) ................................ 29
Underoor Heating Controller (HCE80/HCC80)
.. 30
Wireless Cylinder Thermostat (CS92) .......................31
Wireless Relay Box (BDR91) Boiler ............................. 32
Wireless Relay Box (BDR91) Sundial Valve ............. 33
Wireless Relay Box (BDR91) Zone Valve................... 34
Wireless Relay Box (HC60NG) ...................................... 35
Wireless OpenTherm Bridge (R8810) ....................... 36
3
Contents
Binding to a Digital Room
Thermostat (DTS92) ............................................ 37
Wireless Relay Box (BDR91) ........................................... 38
Wireless OpenTherm Bridge (R8810) ....................... 39
Binding to a Single Zone
Thermostat (T87RF) ............................................ 41
Remote Access Gateway (RFG100).............................42
Wireless Relay Box (BDR91) ........................................... 43
Wireless OpenTherm Bridge (R8810) ....................... 44
Binding to a Programmable
Thermostat (CM900RF) .................................... 45
Wireless Relay Box (BDR91) ........................................... 46
Wireless Relay Box (HC60NG) .......................................47
Wireless OpenTherm Bridge (R8810) ....................... 48
Binding to a Programmable
Thermostat (CM700RF) ..................................... 49
Wireless Relay Box (BDR91) ........................................... 50
Wireless Relay Box (HC60NG) .......................................51
Wireless OpenTherm Bridge (R8810) ....................... 52
Binding to a Programmer or
Timer (ST9000RF) ................................................ 53
Digital Room Thermostat (DTS92) ............................. 54
Wireless Cylinder Thermostat (CS92) ...................... 55
Wireless Relay Box (BDR91) Boiler ............................. 56
Wireless Relay Box (BDR91) Sundial Valve ............. 57
Wireless OpenTherm Bridge (R8810) ....................... 58
4
5
Wi-Fi evohome Controller (ATC928G3000)
Binding to a
Wi-Fi evohome Controller (ATC928G3000)
6
Wireless connectivity Guide
To bind a Digital Room Thermostat (DTS92) to a Wi-Fi evohome Controller
(ATC928G3000) as the room temperature sensor in a zone...
On the evohome Controller
1
Press and hold SETTINGS for 5 seconds
2
Press the green tick
3
Press ZONE CONFIGURATION
4
Press on the required zone
5
Press TEMPERATURE SENSOR
6
Press REMOTE SENSOR
7
Press the green tick
On the Digital Room Thermostat
8
Press and hold for 2 seconds
to put the unit into standby
9
Press and together for 3
seconds – it should display 'INst'
10
Press – it should display 'COnt'
11
Press three times – it should display 'CLr'
12
Press once to clear any previous binding data
13
Press – it should display 'COnt'
14
Press once to send the binding
signal to the evohome Controller
You should receive a SUCCESS message on the
evohome Controller. If not go back and re-bind.
Digital Room
Thermostat (DTS92)
Wi-Fi evohome Controller
(ATC928G3000)
7
Wi-Fi evohome Controller (ATC928G3000)
To bind a Mixing Valve Controller (HM80) to a Wi-Fi evohome
Controller (ATC928G3000)mixing valve” zone...
On the evohome Controller
1
Press and hold SETTINGS for 5 seconds
2
Press the green tick
3
Press ZONE CONFIGURATION
4
Press on the required zone
5
Press HEATING T YPE
6
Press MIXING VALVE
7
Press the green tick
On the Mixing Valve Controller
8
Press and hold both buttons on the
Mixing Valve Controller for 4 seconds
until the red light flashes
On the evohome Controller
9
Press the bind button
You should receive a SUCCESS message on the
evohome Controller. If not go back and re-bind.
The Mixing Valve Controller will not provide a
heat demand to the boiler. If you want this zone to
provide a heat demand change the Heating Type
from 'MIXING VALVE' to 'ZONE VALVES' once the
Mixing Valve controller is bound. There's no need
to re-bind any device – The Mixing Valve Controller
will still operate as intended and the evohome
Controller will send the heat demand to the boiler.
Mixing Valve Controller
(HM80)
Wi-Fi evohome Controller
(ATC928G3000)
8
Wireless connectivity Guide
To bind a Radiator Controller (HR92) to a Wi-Fi evohome
Controller (ATC928G3000) “radiator valve” zone...
On the evohome Controller
1
Press and hold SETTINGS for 5 seconds
2
Press the green tick
3
Press ZONE CONFIGURATION
4
Press on the required zone
5
Press RF DEVICE BINDING
6
Press the forward arrow
On the Radiator Controller
7
Press the button once − it
should display UNBOUND
8
Press and hold the button for a further
5 seconds until it displays BIND
9
Press the button once – it
should display BINDING
On the evohome Controller
10
Press the bind button
You should receive a SUCCESS message on
both the evohome Controller and the Radiator
Controller. If not go back and re-bind.
Radiator Controller
(HR92)
Wi-Fi evohome Controller
(ATC928G3000)
9
Wi-Fi evohome Controller (ATC928G3000)
To bind a Radiator Controller (HR80) to a Wi-Fi evohome
Controller (ATC928G3000) “radiator valve” zone...
On the evohome Controller
1
Press and hold SETTINGS for 5 seconds
2
Press the green tick
3
Press ZONE CONFIGURATION
4
Press on the required zone
5
Press RF DEVICE BINDING
6
Press the forward arrow
On the Radiator Controller
7
Press the recessed bind button on the
underside of the Radiator Controller – it should
briefly show a flashing RF icon then SYNC.
8
Press the recessed bind button again – it
should show a flashing RF icon
On the evohome Controller
9
Press the bind button
The evohome Controller will not show a SUCCESS
message. Its recommended to perform a
quick functional check to validate the bind.
To do this, adjust the setpoint temperature on
the evohome controller for that zone to the
maximum and minimum, checking the radiator
controller responds to the new setpoint.
Radiator Controller
(HR80)
Wi-Fi evohome Controller
(ATC928G3000)
10
Wireless connectivity Guide
To bind a Room Temperature Sensor (HCF82) to a Wi-Fi evohome Controller
(ATC928G3000) as the room temperature sensor in a zone...
On the evohome Controller
1
Press and hold SETTINGS for 5 seconds
2
Press the green tick
3
Press ZONE CONFIGURATION
4
Press on the required zone
5
Press TEMPERATURE SENSOR
6
Press REMOTE SENSOR
7
Press the green tick
On the Room Temperature Sensor
8
Press the bind button on the bottom
right hand corner of the unit once
– the red LED light will flash
You should receive a SUCCESS message on the
evohome Controller. If not go back and re-bind.
Room Temperature
Sensor (HCF82)
Wi-Fi evohome Controller
(ATC928G3000)
11
Wi-Fi evohome Controller (ATC928G3000)
To bind a Room Temperature Sensor (HCW82) to a Wi-Fi evohome Controller
(ATC928G3000) as the room temperature sensor in a zone...
On the evohome Controller
1
Press and hold SETTINGS for 5 seconds
2
Press the green tick
3
Press ZONE CONFIGURATION
4
Press on the required zone
5
Press TEMPERATURE SENSOR
6
Press REMOTE SENSOR
7
Press the green tick
On the Room Temperature Sensor
8
Press the bind button on the bottom
right hand corner of the unit once
– the red LED light will flash
You should receive a SUCCESS message on the
evohome Controller. If not go back and re-bind.
Room Temperature
Sensor (HCW82)
Wi-Fi evohome Controller
(ATC928G3000)
12
Wireless connectivity Guide
To bind a Single Zone Thermostat (T87RF) to a Wi-Fi evohome Controller
(ATC928G3000) as the room temperature sensor in a zone...
On the evohome Controller
1
Press and hold SETTINGS for 5 seconds
2
Press the green tick
3
Press ZONE CONFIGURATION
4
Press on the required zone
5
Press TEMPERATURE SENSOR
6
Press REMOTE SENSOR
7
Press the green tick
On the Single Zone Thermostat
8
Press and hold on the left touch zone (just below
and to the left of the display) for approximately
10 seconds until a flashing ‘Bo’ is displayed
9
Turn the dial clockwise until a
ashing ‘Co’ is displayed
10
Press the left touch zone once to send the
binding signal to the evohome Controller
You should receive a message on the evohome
Controller to say the binding signal was
received. If not go back and re-bind.
Single Zone
Thermostat (T87RF)
Wi-Fi evohome Controller
(ATC928G3000)
13
Wi-Fi evohome Controller (ATC928G3000)
We recommend that you refer to the full
evohome Controller installation guide
when binding the Underoor Heating
Controller. This product will include a
range of different actuators and sensors
used across the underfloor heating zones,
with a variety of binding procedures.
Underoor Heating
Controller (HCE80/HCC80)
Wi-Fi evohome Controller
(ATC928G3000)
14
Wireless connectivity Guide
Wireless Cylinder
Thermostat (CS92)
To bind a Wireless Cylinder Thermostat (CS92) to a Wi-Fi evohome
Controller (ATC928G3000) to control a hot water cylinder...
On the evohome Controller
1
Press and hold SETTINGS for 5 seconds
2
Press the green tick
3
Press SYSTEM DEVICES
4
Press STORED HOT WATER
5
Press ENABLED
6
Press HOT WATER SENSOR BINDING
On the Wireless Cylinder Thermostat
7
Press and hold the button for 5
seconds. The green light should come
on and the red light should flash
8
Press the button again
You should receive a SUCCESS message on
the evohome Controller and the LED on the
Wireless Cylinder Thermostat should stop blinking
and turn OFF. If not, go back and re-bind.
Wi-Fi evohome Controller
(ATC928G3000)
15
Wi-Fi evohome Controller (ATC928G3000)
Wireless Relay Box
(BDR91) Boiler
To bind a Wireless Relay Box (BDR91) to a Wi-Fi evohome
Controller (ATC928G3000) to control a boiler...
On the evohome Controller
1
Press and hold SETTINGS for 5 seconds
2
Press the green tick
3
Press SYSTEM DEVICES
4
Press BOILER CONTROL
5
Press WIRELESS RELAY BOX
On the Wireless Relay Box
6
Press and hold the button for 15 seconds
(until the red LED blinks rapidly) to
clear any previous binding data
7
Press and hold the button again for 5
seconds (until the red LED blinks slowly)
On the evohome Controller
8
Press the bind button
You should receive a SUCCESS message
on the evohome Controller and the LED on
the Wireless Relay Box should stop blinking
and turn OFF. If not, go back and re-bind.
Wi-Fi evohome Controller
(ATC928G3000)
16
Wireless connectivity Guide
Wireless Relay Box
(BDR91) Sundial Valve
To bind a Wireless Relay Box (BDR91) to a Wi-Fi evohome Controller
(ATC928G3000) to control a Sundial valve (hot water or heating)...
On the evohome Controller
1
Press and hold SETTINGS for 5 seconds
2
Press the green tick
3
Press SYSTEM DEVICES
4
Press STORED HOT WATER
5
Press ENABLED
6
Press HOT WATER VALVE BINDING
or HEATING VALVE BINDING
On the Wireless Relay Box
7
Press and hold the button for 15 seconds
(until the red LED blinks rapidly) to
clear any previous binding data
8
Press and hold the button again for 5
seconds (until the red LED blinks slowly)
On the evohome Controller
9
Press the bind button
You should receive a SUCCESS message
on the evohome Controller and the LED on
the Wireless Relay Box should stop blinking
and turn OFF. If not, go back and re-bind.
Wi-Fi evohome Controller
(ATC928G3000)
17
Wi-Fi evohome Controller (ATC928G3000)
Wireless Relay Box
(BDR91) Zone Valve
To bind a Wireless Relay Box (BDR91) to a Wi-Fi evohome
Controller (ATC928G3000) Zone Valve zone...
On the evohome Controller
1
Press and hold SETTINGS for 5 seconds
2
Press the green tick
3
Press ZONE CONFIGURATION
4
Press on the required zone
5
Press HEATING T YPE
6
Press ZONE VALVE
7
Press the green tick
On the Wireless Relay Box
8
Press and hold the button for 15 seconds
(until the red LED blinks rapidly) to
clear any previous binding data
9
Press and hold the button again for 5
seconds (until the red LED blinks slowly)
On the evohome Controller
10
Press the bind button
You should receive a SUCCESS message
on the evohome Controller and the LED on
the Wireless Relay Box should stop blinking
and turn OFF. If not, go back and re-bind.
Wi-Fi evohome Controller
(ATC928G3000)
18
Wireless connectivity Guide
To bind a Wireless Relay Box (HC60NG) to a Wi-Fi evohome
Controller (ATC928G3000) to control a boiler...
On the evohome Controller
1
Press and hold SETTINGS for 5 seconds
2
Press the green tick
3
Press SYSTEM DEVICES
4
Press BOILER CONTROL
5
Press WIRELESS RELAY BOX
On the Wireless Relay Box
6
Press and hold the button for 15 seconds
(until the red LED blinks rapidly) to
clear any previous binding data
7
Press and hold the button again for 5
seconds (until the red LED blinks slowly)
On the evohome Controller
8
Press the bind button
You should receive a SUCCESS message
on the evohome Controller and the LED on
the Wireless Relay Box should stop blinking
and turn OFF. If not, go back and re-bind.
Wireless Relay Box
(HC60NG)
Wi-Fi evohome Controller
(ATC928G3000)
19
Wi-Fi evohome Controller (ATC928G3000)
To bind a OpenTherm Bridge (R8810) to a Wi-Fi evohome Controller
(ATC928G3000) to control an OpenTherm™ boiler...
On the evohome Controller
1
Press and hold SETTINGS for 5 seconds
2
Press the green tick
3
Press SYSTEM DEVICES
4
Press BOILER CONTROL
5
Press OPENTHERM BRIDGE
On the OpenTherm Bridge
6
Press and hold the button for 15 seconds
(until the red LED blinks rapidly) to
clear any previous binding data
7
Press and hold the button again for 5
seconds (until the red LED blinks slowly)
On the evohome Controller
8
Press the bind button
You should receive a SUCCESS message on
the evohome Controller and the LED on the
Wireless OpenTherm Bridge should stop blinking
and turn OFF. If not, go back and re-bind.
Wireless OpenTherm
Bridge (R8810)
Wi-Fi evohome Controller
(ATC928G3000)
20
Wireless connectivity Guide
21
evohome Controller (ATC928G2000)
Binding to a
evohome Controller (ATC928G2000)
22
Wireless connectivity Guide
To bind a Digital Room Thermostat (DTS92) to an evohome Controller
(ATC928G2000) as the room temperature sensor in a zone...
On the evohome Controller
1
Press and hold SETTINGS for 5 seconds
2
Press the green tick
3
Press ZONE SETTINGS
4
Press EDIT ZONE
5
Press on the required zone
6
Press the button next to “Sensor:
7
Press REMOTE RF DEVICE’S SENSOR
On the Digital Room Thermostat
8
Press and hold for 2 seconds
to put the unit into standby
9
Press and together for 3
seconds – it should display 'INst'
10
Press – it should display 'COnt'
11
Press three times – it should
display
'CLr'
12
Press once to clear any previous binding data
13
Press – it should display 'COnt'
14
Press once to send the binding
signal to the evohome Controller
You should receive a SUCCESS message on the
evohome Controller. If not, go back and re-bind.
Digital Room
Thermostat (DTS92)
evohome Controller
(ATC928G2000)
23
evohome Controller (ATC928G2000)
To bind a Mixing Valve Controller (HM80) to an evohome
Controller (ATC928G2000)mixing valve” zone...
On the evohome Controller
1
Press and hold SETTINGS for 5 seconds
2
Press the green tick
3
Press ZONE SETTINGS
4
Press EDIT ZONE
5
Press on the required zone
6
Press the button next to “Application:
7
Press MIXING VALVE
On the Mixing Valve Controller
8
Press and hold both buttons on the
Mixing Valve Controller for 4 seconds
until the red light flashes
On the evohome Controller
9
Press the bind button
You should receive a SUCCESS message on the
evohome Controller. If not go back and re-bind.
The Mixing Valve Controller will not provide
a heat demand to the boiler. If you want this
zone to provide a heat demand change the
Application Type from 'MIXING VALVE' to 'ZONE
VALVES' once the Mixing Valve controller is
bound. There is no need to re-bind any device
– The Mixing Valve Controller will still operate
as intended and the evohome Controller
will send the heat demand to the boiler.
Mixing Valve Controller
(HM80)
evohome Controller
(ATC928G2000)
24
Wireless connectivity Guide
To bind a Radiator Controller (HR92) to an evohome
Controller (ATC928G2000) “radiator valve” zone...
On the evohome Controller
1
Press and hold SETTINGS for 5 seconds
2
Press the green tick
3
Press ZONE SETTINGS
4
Press EDIT ZONE
5
Press on the required zone
6
Press the button next to “Application:
7
Press RADIATOR VALVE
On the Radiator Controller
8
Press the button once − it
should display UNBOUND
9
Press and hold the button for a further
5 seconds until it displays BIND
10
Press the button once – it
should display BINDING
On the evohome Controller
11
Press the bind button
You should receive a SUCCESS message on
both the evohome Controller and the Radiator
Controller. If not go back and re-bind.
Radiator Controller
(HR92)
evohome Controller
(ATC928G2000)
25
evohome Controller (ATC928G2000)
To bind a Radiator Controller (HR80) to an evohome
Controller (ATC928G2000) “radiator valve” zone...
On the evohome Controller
1
Press and hold SETTINGS for 5 seconds
2
Press the green tick
3
Press ZONE SETTINGS
4
Press EDIT ZONE
5
Press on the required zone
6
Press the button next to “Application:
7
Press RADIATOR VALVE
On the Radiator Controller
8
Press the recessed bind button on the
underside of the Radiator Controller – it should
briefly show a flashing RF icon then SYNC.
9
Press the recessed bind button again – it
should show a flashing RF icon
On the evohome Controller
10
Press the bind button
The evohome Controller will not show a SUCCESS
message. Its recommended to perform a
quick functional check to validate the bind.
To do this, adjust the setpoint temperature on
the evohome controller for that zone to the
maximum and minimum, checking the radiator
controller responds to the new setpoint.
Radiator Controller
(HR80)
evohome Controller
(ATC928G2000)
26
Wireless connectivity Guide
To bind a Remote Access Gateway (RFG100) to an evohome Controller (ATC928G2000)...
On the evohome Controller
1
Press and hold SETTINGS for 5 seconds
2
Press the green tick
3
Press SYSTEM DEVICES
4
Press the button next to “Remote Gateway:
5
Press REMOTE GATEWAY
On the Remote Access Gateway
6
Press and hold the bind button on the base until
you see a flashing green light next to the icon
On the evohome Controller
7
Press the bind button
You should receive a SUCCESS message
on the evohome Controller and the LED on
the Remote Access Gateway should turn
solid green. If not go back and re-bind.
Register the Remote Access Gateway
8
Go to mytotalconnectcomfort.com to
register the Remote Access Gateway.
Remote Access
Gateway (RFG100)
evohome Controller
(ATC928G2000)
27
evohome Controller (ATC928G2000)
To bind a Room Temperature Sensor (HCF82) to an evohome Controller
(ATC928G2000) as the room temperature sensor in a zone...
On the evohome Controller
1
Press and hold SETTINGS for 5 seconds
2
Press the green tick
3
Press ZONE SETTINGS
4
Press EDIT ZONE
5
Press on the required zone
6
Press the button next to “Sensor:
7
Press REMOTE RF DEVICE’S SENSOR
On the Room Temperature Sensor
8
Press the bind button on the bottom
right hand corner of the unit once – the
red LED light will flash once to indicate
the binding signal has been sent.
You should receive a SUCCESS message on the
evohome Controller. If not go back and re-bind.
Room Temperature
Sensor (HCF82)
evohome Controller
(ATC928G2000)
28
Wireless connectivity Guide
To bind a Room Temperature Sensor (HCW82) to an evohome Controller
(ATC928G2000) as the room temperature sensor in a zone...
On the evohome Controller
1
Press and hold SETTINGS for 5 seconds
2
Press the green tick
3
Press ZONE SETTINGS
4
Press EDIT ZONE
5
Press on the required zone
6
Press the button next to “Sensor:
7
Press REMOTE RF DEVICE’S SENSOR
On the Room Temperature Sensor
8
Press the bind button on the bottom
right hand corner of the unit once – the
red LED light will flash once to indicate
the binding signal has been sent.
You should receive a SUCCESS message on the
evohome Controller. If not go back and re-bind.
Room Temperature
Sensor (HCW82)
evohome Controller
(ATC928G2000)
29
evohome Controller (ATC928G2000)
To bind a Single Zone Thermostat (T87RF) to an evohome Controller
(ATC928G2000) as the room temperature sensor in a zone...
On the evohome Controller
1
Press and hold SETTINGS for 5 seconds
2
Press the green tick
3
Press ZONE SETTINGS
4
Press EDIT ZONE
5
Press on the required zone
6
Press the button next to “Sensor:
7
Press REMOTE RF DEVICE’S SENSOR
On the Single Zone Thermostat
8
Press and hold on the left touch zone (just below
and to the left of the display) for approximately
10 seconds until a flashing ‘Bo’ is displayed
9
Turn the dial clockwise until a
ashing ‘Co’ is displayed
10
Press the left touch zone once to send the
binding signal to the evohome Controller
You should receive a message on the evohome
Controller to say the binding signal was
received. If not go back and re-bind.
Single Zone
Thermostat (T87RF)
evohome Controller
(ATC928G2000)
30
Wireless connectivity Guide
We recommend that you refer to the full
evohome Controller installation guide
when binding the Underoor Heating
Controller. This product will include a
range of different actuators and sensors
used across the underfloor heating zones,
with a variety of binding procedures.
Underoor Heating
Controller (HCE80/HCC80)
evohome Controller
(ATC928G2000)
31
evohome Controller (ATC928G2000)
Wireless Cylinder
Thermostat (CS92)
To bind a Wireless Cylinder Thermostat (CS92) to an evohome
Controller (ATC928G2000) to control a hot water cylinder...
On the evohome Controller
1
Press and hold SETTINGS for 5 seconds
2
Press the green tick
3
Press SYSTEM DEVICES
4
Press the button next to “Sundial Valves:
5
Press STORED HOT WATER
6
Press HOT WATER SENSOR BINDING
On the Wireless Cylinder Thermostat
7
Press and hold the button for 5
seconds. The green light should come
on and the red light should flash
8
Press the button again
You should receive a SUCCESS message on
the evohome Controller and the LED on the
Wireless Cylinder Thermostat should stop blinking
and turn OFF. If not go back and re-bind.
evohome Controller
(ATC928G2000)
32
Wireless connectivity Guide
Wireless Relay Box
(BDR91) Boiler
To bind a Wireless Relay Box (BDR91) to an evohome
Controller (ATC928G2000) to control a boiler...
On the evohome Controller
1
Press and hold SETTINGS for 5 seconds
2
Press the green tick
3
Press SYSTEM DEVICES
4
Press the button next to “Boiler Demand:
5
Press BOILER RELAY
On the Wireless Relay Box
6
Press and hold the button for 15 seconds
(until the red LED blinks rapidly) to
clear any previous binding data
7
Press and hold the button again for 5
seconds (until the red LED blinks slowly)
On the evohome Controller
8
Press the bind button
You should receive a SUCCESS message
on the evohome Controller and the LED on
the Wireless Relay Box should stop blinking
and turn OFF. If not go back and re-bind.
evohome Controller
(ATC928G2000)
33
evohome Controller (ATC928G2000)
Wireless Relay Box
(BDR91) Sundial Valve
To bind a Wireless Relay Box (BDR91) to an evohome Controller
(ATC928G2000) to control a Sundial valve (hot water or heating)...
On the evohome Controller
1
Press and hold SETTINGS for 5 seconds
2
Press the green tick
3
Press SYSTEM DEVICES
4
Press the button next to “Sundial Valves:
5
Press STORED HOT WATER
6
Press HOT WATER VALVE BINDING
or HEATING VALVE BINDING
On the Wireless Relay Box
7
Press and hold the button for 15 seconds
(until the red LED blinks rapidly) to
clear any previous binding data
8
Press and hold the button again for 5
seconds (until the red LED blinks slowly)
On the evohome Controller
9
Press the bind button
You should receive a SUCCESS message
on the evohome Controller and the LED on
the Wireless Relay Box should stop blinking
and turn OFF. If not go back and re-bind.
evohome Controller
(ATC928G2000)
34
Wireless connectivity Guide
Wireless Relay Box
(BDR91) Zone Valve
To bind a Wireless Relay Box (BDR91) to an evohome
Controller (ATC928G2000) “zone valve” zone...
On the evohome Controller
1
Press and hold SETTINGS for 5 seconds
2
Press the green tick
3
Press ZONE SETTINGS
4
Press EDIT ZONE
5
Press on the required zone
6
Press the button next to “Application:
7
Press ZONE VALVES
On the Wireless Relay Box
8
Press and hold the button for 15 seconds
(until the red LED blinks rapidly) to
clear any previous binding data
9
Press and hold the button again for 5
seconds (until the red LED blinks slowly)
On the evohome Controller
10
Press the bind button
You should receive a SUCCESS message
on the evohome Controller and the LED on
the Wireless Relay Box should stop blinking
and turn OFF. If not go back and re-bind.
evohome Controller
(ATC928G2000)
35
evohome Controller (ATC928G2000)
To bind a Wireless Relay Box (HC60NG) to an evohome
Controller (ATC928G2000) to control a boiler...
On the evohome Controller
1
Press and hold SETTINGS for 5 seconds
2
Press the green tick
3
Press SYSTEM DEVICES
4
Press the button next to “Boiler Demand:
5
Press BOILER RELAY
On the Wireless Relay Box
6
Press and hold the button for 15 seconds
(until the red LED blinks rapidly) to
clear any previous binding data
7
Press and hold the button again for 5
seconds (until the red LED blinks slowly)
On the evohome Controller
8
Press the bind button
You should receive a SUCCESS message
on the evohome Controller and the LED on
the Wireless Relay Box should stop blinking
and turn OFF. If not go back and re-bind.
Wireless Relay Box
(HC60NG)
evohome Controller
(ATC928G2000)
36
Wireless connectivity Guide
To bind a OpenTherm Bridge (R8810) to an evohome Controller
(ATC928G2000) to control an OpenTherm™ boiler...
On the evohome Controller
1
Press and hold SETTINGS for 5 seconds
2
Press the green tick
3
Press SYSTEM DEVICES
4
Press the button next to “Boiler Demand:
5
Press OPENTHERM BRIDGE
On the OpenTherm Bridge
6
Press and hold the button for 15 seconds
(until the red LED blinks rapidly) to
clear any previous binding data
7
Press and hold the button again for 5
seconds (until the red LED blinks slowly)
On the evohome Controller
8
Press the bind button
You should receive a SUCCESS message on
the evohome Controller and the LED on the
Wireless OpenTherm Bridge should stop blinking
and turn OFF. If not go back and re-bind.
Wireless OpenTherm
Bridge (R8810)
evohome Controller
(ATC928G2000)
37
Digital Room Thermostat (DTS92)
Binding to a
Digital Room Thermostat (DTS92)
38
Wireless connectivity Guide
To bind a Wireless Relay Box (BDR91) to a Digital Room
Thermostat (DTS92) to control a boiler...
On the Wireless Relay Box
1
Press and hold the button for 15 seconds
(until the red LED blinks rapidly) to
clear any previous binding data
2
Press and hold the button again for 5
seconds (until the red LED blinks slowly)
On the Digital Room Thermostat
3
Press and hold the power button for 2
seconds to put the unit into standby
4
Press the up and down arrows together
for 3 seconds – it should display 'INst'
5
Press the down arrow – it should display 'COnt'
6
Press the up arrow three times
– it should display 'CLr'
7
Press the power button once to
clear any previous binding data
8
Press the up arrow – it should display 'COnt'
9
Press the power button once to send the
binding signal to the Wireless Relay Box
The LED on the Wireless Relay Box should stop
blinking and turn OFF. If not go back and re-bind.
Digital Room
Thermostat (DTS92)
Wireless Relay Box
(BDR91)
39
Digital Room Thermostat (DTS92)
To bind a OpenTherm Bridge (R8810) to a Digital Room
Thermostat (DTS92) to control an OpenTherm™ boiler...
On the OpenTherm Bridge
1
Press and hold the button for 15 seconds
(until the red LED blinks rapidly) to
clear any previous binding data
2
Press and hold the button again for 5
seconds (until the red LED blinks slowly)
On the Digital Room Thermostat
3
Press and hold the power button for 2
seconds to put the unit into standby
4
Press the up and down arrows together
for 3 seconds – it should display 'INst'
5
Press the down arrow – it should display 'COnt'
6
Press the up arrow three times
– it should display 'CLr'
7
Press the power button once to
clear any previous binding data
8
Press the up arrow – it should display 'COnt'
9
Press the power button once
to send the binding signal to the
Wireless OpenTherm Bridge
The LED on the Wireless OpenTherm
Bridge should stop blinking and turn
OFF. If not go back and re-bind.
Digital Room
Thermostat (DTS92)
Wireless OpenTherm
Bridge (R8810)
40
Wireless connectivity Guide
41
Single Zone Thermostat (T87RF)
Binding to a
Single Zone Thermostat (T87RF)
42
Wireless connectivity Guide
To bind a Remote Access Gateway (RFG100) to a Single Zone Thermostat (T87RF)...
On the Remote Access Gateway
1
Press and hold the bind button on
the base until you see a flashing
green light next to the icon
On the Single Zone Thermostat
2
Press and hold on the right touch
zone (just below and to the right of the
display) for approximately 10 seconds
until a flashing ‘Bnd’ is displayed
3
Press the right touch zone once to send the
binding signal to the Remote Access Gateway
The Single Zone Thermostat will briefly
show the signal strength and the LED on
the Remote Access Gateway should turn
solid green. If not go back and re-bind.
Remote Access
Gateway (RFG100)
Single Zone Thermostat
(T87RF)
43
Single Zone Thermostat (T87RF)
Single Zone Thermostat
(T87RF)
To bind a Wireless Relay Box (BDR91) to a Single Zone
Thermostat (T87RF) to control a boiler...
On the Wireless Relay Box
1
Press and hold the button for 15 seconds
(until the red LED blinks rapidly) to
clear any previous binding data
2
Press and hold the button again for 5
seconds (until the red LED blinks slowly)
On the Single Zone Thermostat
3
Press and hold on the left touch
zone (just below and to the left of the
display) for approximately 10 seconds
until a flashing ‘Bo’ is displayed
4
Turn the dial clockwise until a
ashing ‘Bo’ is displayed
5
Press the left touch zone once to send the
binding signal to the Wireless Relay Box
The LED on the Wireless Relay Box
should stop blinking and turn OFF.
If not go back and re-bind.
Wireless Relay Box
(BDR91)
44
Wireless connectivity Guide
Single Zone Thermostat
(T87RF)
To bind a OpenTherm Bridge (R8810) to a Single Zone
Thermostat (T87RF) to control an OpenTherm™ boiler...
On the OpenTherm Bridge
1
Press and hold the button for 15 seconds
(until the red LED blinks rapidly) to
clear any previous binding data
2
Press and hold the button again for 5
seconds (until the red LED blinks slowly)
On the Single Zone Thermostat
3
Press and hold on the left touch
zone (just below and to the left of the
display) for approximately 10 seconds
until a flashing ‘Bo’ is displayed
4
Turn the dial clockwise until a
ashing ‘Co’ is displayed
5
Press the left touch zone once
to send the binding signal to the
Wireless OpenTherm Bridge
The LED on the Wireless OpenTherm
Bridge should stop blinking and turn
OFF. If not go back and re-bind.
Wireless OpenTherm
Bridge (R8810)
45
Programmable Thermostat (CM900RF)
Binding to a
Programmable Thermostat (CM900RF)
46
Wireless connectivity Guide
Programmable
Thermostat (CM900RF)
To bind a Wireless Relay Box (BDR91) to a Programmable
Thermostat (CM900RF) to control a boiler...
On the Wireless Relay Box
1
Press and hold the button for 15 seconds
(until the red LED blinks rapidly) to
clear any previous binding data
2
Press and hold the button again for 5
seconds (until the red LED blinks slowly)
On the Programmable Thermostat
3
Move the setting slider to the OFF position
4
Press and hold the , and buttons
together for approximately 3 seconds until
‘InSt’ and ‘CONTROL BINDING’ is displayed
5
Press to send the binding signal
to the Wireless Relay Box
The LED on the Wireless Relay Box should stop
blinking and turn OFF. If not go back and re-bind.
Wireless Relay Box
(BDR91)
47
Programmable Thermostat (CM900RF)
Programmable
Thermostat (CM900RF)
To bind a Wireless Relay Box (HC60NG) to a Programmable
Thermostat (CM900RF) to control a boiler...
On the Wireless Relay Box
1
Press and hold the button for 15 seconds
(until the red LED blinks rapidly) to
clear any previous binding data
2
Press and hold the button again for 5
seconds (until the red LED blinks slowly)
On the Programmable Thermostat
3
Move the setting slider to the OFF position
4
Press and hold the , and buttons
together for approximately 3 seconds until
‘InSt’ and ‘CONTROL BINDING’ is displayed
5
Press to send the binding signal
to the Wireless Relay Box
The LED on the Wireless Relay Box should stop
blinking and turn OFF. If not go back and re-bind.
Wireless Relay Box
(HC60NG)
48
Wireless connectivity Guide
Programmable
Thermostat (CM900RF)
To bind a Wireless OpenTherm Bridge (R8810) to a Programmable
Thermostat (CM900RF) to control an OpenTherm™ boiler...
On the Wireless OpenTherm Bridge
1
Press and hold the button for 15 seconds
(until the red LED blinks rapidly) to
clear any previous binding data
2
Press and hold the button again for 5
seconds (until the red LED blinks slowly)
On the Programmable Thermostat
3
Move the setting slider to the OFF position
4
Press and hold the , and buttons
together for approximately 3 seconds until
‘InSt’ and ‘CONTROL BINDING’ is displayed
5
Press to send the binding signal to
the Wireless OpenTherm Bridge
The LED on the Wireless OpenTherm
Bridge should stop blinking and turn
OFF. If not go back and re-bind.
Wireless OpenTherm
Bridge (R8810)
49
Programmable Thermostat (CM700RF)
Binding to a
Programmable Thermostat (CM700RF)
50
Wireless connectivity Guide
Programmable
Thermostat (CM900RF)
To bind a Wireless Relay Box (BDR91) to a Programmable
Thermostat (CM900RF) to control a boiler...
On the Wireless Relay Box
1
Press and hold the button for 15 seconds
(until the red LED blinks rapidly) to
clear any previous binding data
2
Press and hold the button again for 5
seconds (until the red LED blinks slowly)
On the Programmable Thermostat
3
Press the OFF button
4
Press and hold the , and
buttons together for approximately 3
seconds until ‘InSt’ is displayed
5
Press to send the binding signal
to the Wireless Relay Box
The LED on the Wireless Relay Box should stop
blinking and turn OFF. If not go back and re-bind.
Wireless Relay Box
(BDR91)
51
Programmable Thermostat (CM700RF)
Programmable
Thermostat (CM700RF)
To bind a Wireless Relay Box (HC60NG) to a Programmable
Thermostat (CM700RF) to control a boiler...
On the Wireless Relay Box
1
Press and hold the button for 15 seconds
(until the red LED blinks rapidly) to
clear any previous binding data
2
Press and hold the button again for 5
seconds (until the red LED blinks slowly)
On the Programmable Thermostat
3
Press the OFF button
4
Press and hold the , and
buttons together for approximately 3
seconds until ‘InSt’ is displayed
5
Press to send the binding signal
to the Wireless Relay Box
The LED on the Wireless Relay Box should stop
blinking and turn OFF. If not go back and re-bind.
Wireless Relay Box
(HC60NG)
52
Wireless connectivity Guide
Programmable Thermostat
(CM700RF)
To bind a Wireless OpenTherm Bridge (R8810) to a Programmable
Thermostat (CM700RF) to control an OpenTherm™ boiler...
On the Wireless OpenTherm Bridge
1
Press and hold the button for 15 seconds
(until the red LED blinks rapidly) to
clear any previous binding data
2
Press and hold the button again for 5
seconds (until the red LED blinks slowly)
On the Programmable Thermostat
3
Press the OFF button
4
Press and hold the , and
buttons together for approximately 3
seconds until ‘InSt’ is displayed
5
Press to send the binding signal to
the Wireless OpenTherm Bridge
The LED on the Wireless OpenTherm
Bridge should stop blinking and turn
OFF. If not go back and re-bind.
Wireless OpenTherm
Bridge (R8810)
53
Central Heating Timer (ST9000RF)
Binding to a
Programmer or Timer (ST9000RF)
54
Wireless connectivity Guide
Programmer or Timer
(ST9000RF)
To bind a Digital Room Thermostat (DTS92) to a Programmer
or Timer (ST9000RF) as a room temperature sensor...
On the Programmer or Timer
1
Move the setting slider to RUN
2
Press and hold , and (right hand
side) MODE together for 8 seconds – it
should briefly show “BIND MENU
3
Press until and SENSOR
are flashing on the display
4
Press and hold for 8 seconds to
clear any previous bind data – it should
show “RESET” for a few seconds
5
Press once
On the Digital Room Thermostat
6
Press and hold for 2 seconds
to put the unit into standby
7
Press and together for 3
seconds – it should display 'INst'
8
Press – it should display 'COnt'
9
Press three times – it should display 'CLr'
10
Press once to clear any previous binding data
11
Press – it should display 'COnt'
12
Press once to send the binding
signal to the Programmer or Timer
You should receive a COMPLETE message on
the Programmer or Timer and the LED on the
Digital Room Thermostat should stop blinking
and turn OFF. If not go back and re-bind.
Digital Room
Thermostat (DTS92)
55
Central Heating Timer (ST9000RF)
Wireless Cylinder
Thermostat (CS92)
Programmer or Timer
(ST9000RF)
To bind a Wireless Cylinder Thermostat (CS92) to a Programmer
or Timer (ST9000RF) to control a hot water cylinder...
On the Programmer or Timer
1
Move the setting slider to RUN
1
Press and hold , and (right hand
side) MODE together for 8 seconds – it
should briefly show “BIND MENU
2
Press until and SENSOR
are flashing on the display
3
Press and hold for 8 seconds to
clear any previous bind data – it should
show “RESET” for a few seconds
4
Press once
On the Wireless Cylinder Thermostat
5
Press and hold the button for 5
seconds. The green LED should come
on and the red LED should blink
6
Press the button again
You should receive a COMPLETE message on
the Programmer or Timer and the LED on the
Wireless Cylinder Thermostat should stop blinking
and turn OFF. If not go back and re-bind.
*only available on specific models and/or system configurations
56
Wireless connectivity Guide
Programmer or Timer
(ST9000RF)
To bind a Wireless Relay Box (BDR91) to a Programmer
or Timer (ST9000RF) to control a boiler*...
On the Programmer or Timer
1
Move the setting slider to RUN
1
Press and hold , and (right hand
side) MODE together for 8 seconds – it
should briefly show “BIND MENU
2
Press until and BOILER
are flashing on the display
3
Press and hold for 8 seconds to
clear any previous bind data – it should
show “RESET” for a few seconds
4
Press once
On the Wireless Relay Box
5
Press and hold the button for 15 seconds
(until the red LED blinks rapidly) to
clear any previous binding data
6
Press and hold the button again for 5
seconds (until the red LED blinks slowly)
You should receive a COMPLETE message
on the Programmer or Timer and the LED on
the Wireless Relay Box should stop blinking
and turn OFF. If not go back and re-bind.
Wireless Relay Box
(BDR91)
*only available on specific models and/or system configurations
57
Central Heating Timer (ST9000RF)
Programmer or Timer
(ST9000RF)
To bind a Wireless Relay Box (BDR91) to a Programmer or
Timer (ST9000RF) to control a sundial valve*...
On the Programmer or Timer
1
Move the setting slider to RUN
1
Press and hold , and (right hand
side) MODE together for 8 seconds – it
should briefly show “BIND MENU
2
Press until (Heating valve) or
(Hot Water valve) and CONTROL
are flashing on the display
3
Press and hold for 8 seconds to
clear any previous bind data – it should
show “RESET” for a few seconds
4
Press once
On the Wireless Relay Box
5
Press and hold the button for 15 seconds
(until the red LED blinks rapidly) to
clear any previous binding data
6
Press and hold the button again for 5
seconds (until the red LED blinks slowly)
You should receive a COMPLETE message
on the Programmer or Timer and the LED on
the Wireless Relay Box should stop blinking
and turn OFF. If not go back and re-bind.
Wireless Relay Box
(BDR91)
*only available on specific models and/or system configurations
58
Wireless connectivity Guide
Programmer or Timer
(ST9000RF)
To bind a Wireless OpenTherm Bridge (R8810) to a Programmer
or Timer (ST9000RF) to control an OpenTherm™ boiler*...
On the Programmer or Timer
1
Move the setting slider to RUN
1
Press and hold and together for 8
seconds – it should briefly show “BIND MENU
2
Press until and BOILER
are flashing on the display
3
Press and hold for 8 seconds to
clear any previous bind data – it should
show “RESET” for a few seconds
4
Press once
On the Wireless OpenTherm Bridge
5
Press and hold the button for 15 seconds
(until the red LED blinks rapidly) to
clear any previous binding data
6
Press and hold the button again for 5
seconds (until the red LED blinks slowly)
You should receive a COMPLETE message on
the Programmer or Timer and the LED on the
Wireless OpenTherm Bridge should stop blinking
and turn OFF. If not go back and re-bind.
Wireless OpenTherm
Bridge (R8810)
*only available on specific models and/or system configurations
© 2016 Honeywell International Inc
Honeywell Control Systems Ltd.
Skimped Hill Lane,
Bracknell
Berkshire
RG12 1EB
www.honeywelluk.com
For the most up-to-date product information, please consult the following website: getconnected.honeywell.com
Product pictured and respective product information may differ from country to country.
www.getconnected.honeywell.com
www.honeywelluk.com
12


Need help? Post your question in this forum.

Forumrules


Report abuse

Libble takes abuse of its services very seriously. We're committed to dealing with such abuse according to the laws in your country of residence. When you submit a report, we'll investigate it and take the appropriate action. We'll get back to you only if we require additional details or have more information to share.

Product:

For example, Anti-Semitic content, racist content, or material that could result in a violent physical act.

For example, a credit card number, a personal identification number, or an unlisted home address. Note that email addresses and full names are not considered private information.

Forumrules

To achieve meaningful questions, we apply the following rules:

Register

Register getting emails for Honeywell Wi-Fi Evohome Controller ATC928G2000 at:


You will receive an email to register for one or both of the options.


Get your user manual by e-mail

Enter your email address to receive the manual of Honeywell Wi-Fi Evohome Controller ATC928G2000 in the language / languages: English as an attachment in your email.

The manual is 4,1 mb in size.


You will receive the manual in your email within minutes. If you have not received an email, then probably have entered the wrong email address or your mailbox is too full. In addition, it may be that your ISP may have a maximum size for emails to receive.

The manual is sent by email. Check your email

If you have not received an email with the manual within fifteen minutes, it may be that you have a entered a wrong email address or that your ISP has set a maximum size to receive email that is smaller than the size of the manual.

The email address you have provided is not correct.

Please check the email address and correct it.

Your question is posted on this page

Would you like to receive an email when new answers and questions are posted? Please enter your email address.


Info