−
−−
−
−
)sepytelbacilppa(RETSERRAKRAPSGULPKRAPS
Recommended Spark Plug:
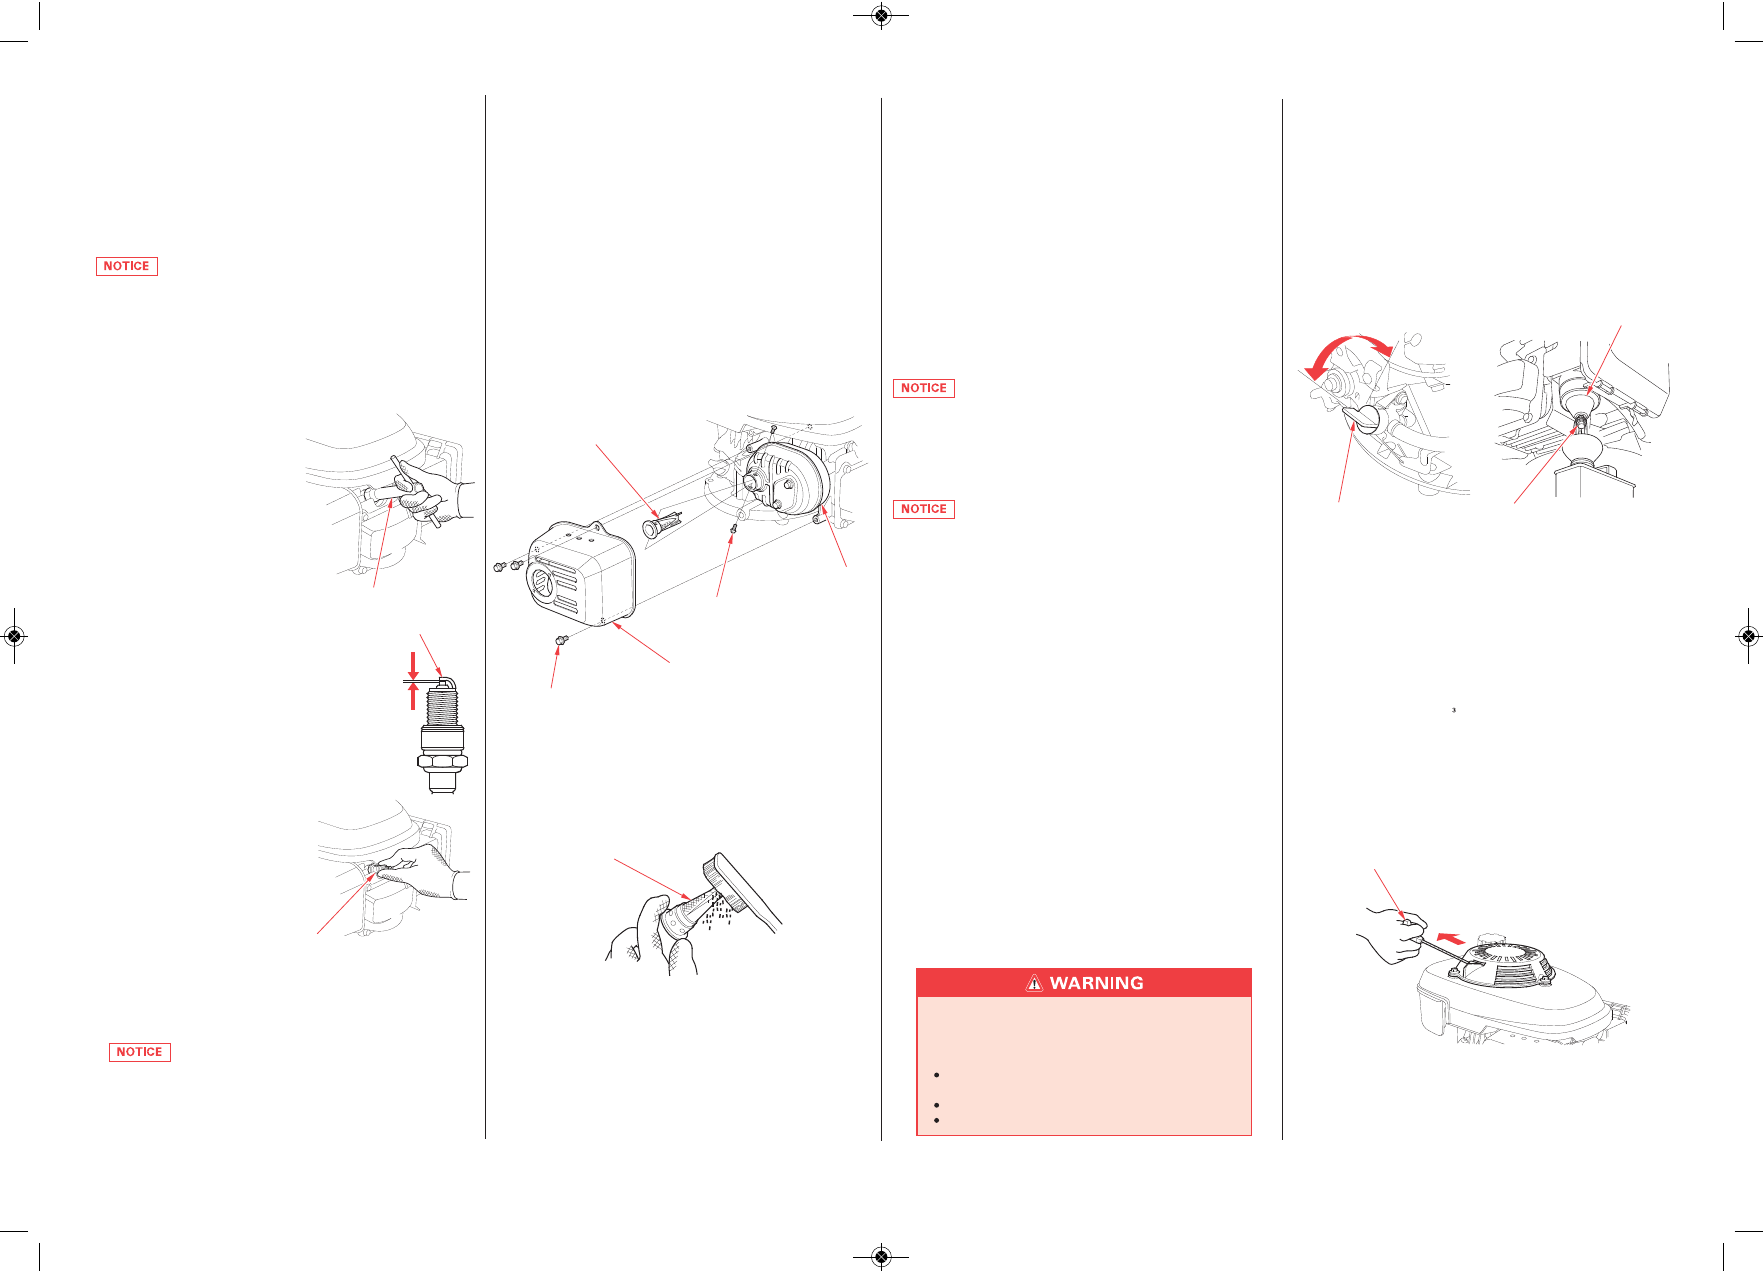
Spark Arrester Removal
Spark Arrester Cleaning & Inspection
For Hover Lawn mower:
SPARK PLUG WRENCH
SIDE ELECTRODE
0.7 0.8 mm
(0.028 0.031 in)
SPARK PLUG
MUFFLER PROTECTOR
SCREEN
6mmBOLT(3)
MUFFLER
SPARK ARRESTER
SCREW (2)
In some areas, it is illegal to operate an engine without a spark
arrester. Check local laws and regulations. A spark arrester is
available from authorized Honda servicing dealers.
The spark arrester must be serviced every 100 hours to keep it
functioning as designed.
If the engine has been running, the muffler will be hot. Allow it to
cool before servicing the spark arrester.
Remove the muffler protector by removing the three 6 mm bolts.
Remove the spark arrester from the muffler by removing the
two screws. (Taking care not to damage the wire mesh.)
Check for carbon deposits around the exhaust port and spark
arrester, and clean if necessary.
Use a brush to remove carbon deposits from the spark arrester
screen. Be careful not to damage the screen. Replace the spark
arrester if it has breaks or holes.
Install the spark arrester and the muffler in the reverse order of
disassembly.
Attach the spark plug cap to the spark plug.
A loose spark plug can overheat and damage the engine.
Overtightening the spark plug can damage the threads in the
cylinder head.
When reinstalling the original spark plug, tighten 1/8 1/4 turn
after the spark plug seats to compress the washer.
When installing a new spark plug, tighten 1/2 turn after the spark
plug seats to compress the washer.
BPR4ES (NGK)
BPR5ES (NGK)
The recommended spark plug has the correct heat range for
normal engine operating temperatures.
An incorrect spark plug can cause engine damage.
If the engine has been running, let it cool before servicing the
spark plug.
For good performance, the spark plug must be properly gapped
and free of deposits.
Disconnect the spark plug cap,
and remove any dirt from
around the spark plug area.
Remove the spark plug with the
spark plug wrench.
Visually inspect the spark plug.
Discard the spark plug if there is
apparent wear, or if the
insulator is cracked or chipped.
Clean the spark plug with a wire
brush if it is to be reused.
Measure the spark plug
electrode gap with a feeler
gauge. Correct as necessary by
bending the side electrode.
The gap should be:
0.7 0.8 mm (0.028 0.031 in)
Check that the spark plug
washer is in good condition and
thread the spark plug in by hand
to prevent cross-threading.
After the spark plug is seated,
tighten with the spark plug
wrench to compress the washer.
BPR6ES (NGK)
1.
2.
4.
3.
5.
6.
7.
1.
2.
2.
1.
GCV135E:
GCV160E:
GCV135E/GCV160E:
−
−
HELPFUL TIPS & SUGGESTIONS
STORING YOUR ENGINE
Storage Preparation
Engine Oil
Draining the Fuel Tank and Carburetor
Fuel
Cleaning
DRAIN BOLTFUEL VALVE LEVER
OOFFFF
OONN
FLOAT CHAMBER
STARTER GRIP
Drain the fuel tank and carburetor into an approved gasoline
container.
Coat areas that may rust with a light film of oil. Cover the engine
to keep out dust.
Pull the starter grip slowly until resistance is felt. This closes the
valves, and protects them from dust and corrosion.
Reinstall the spark plug.
Pull the starter grip several times to distribute the oil in the
cylinder.
Pour a teaspoon 5 10 cm
of clean engine oil into the cylinder.
Remove the spark plug (see page ).
Change the engine oil (see page ).
If you cannot drain from the carburetor, drain the fuel tank into
an approved gasoline container using a commercially available
hand pump. Do not use an electric pump.
Operate the engine until it stops from the lack of fuel.
Retighten the carburetor drain bolt so that the float chamber
cannot be warped, and turn the fuel valve lever to the OFF
position.
Turn the fuel valve lever to the ON position and drain the fuel in
thefueltankintothecontainer.
Loosen the carburetor drain bolt 1 1 1/2 turn and drain the
carburetor.
Turn the fuel valve lever to the OFF position.
Wipe up spills immediately.
Handle fuel only outdoors.
Stop the engine and keep heat, sparks, and flame
away.
Gasoline is highly flammable and explosive, and you
can be burned or seriously injured when handling
fuel.
Fuel system damage or engine performance problems resulting
from neglected storage preparation are not covered under the
Warranty.
The length of time that gasoline can be left in your fuel tank and
carburetor without causing functional problems will vary with
such factors as gasoline blend, your storage temperatures, and
whether the fuel tank is partially or completely filled. The air in a
partially filled fuel tank promotes fuel deterioration. Very warm
storage temperatures accelerate fuel deterioration. Fuel
deterioration problems may occur within 30 days from keeping the
fuel in the fuel tank, or even less if the gasoline was not fresh
when you filled the fuel tank.
Gasoline will oxidize and deteriorate in storage. Deteriorated
gasoline will cause hard starting, and it leaves gum deposits that
clog the fuel system. If the gasoline in your engine deteriorates
during storage, you may need to have the carburetor and other
fuel system components serviced or replaced.
Depending on the region where you operate your equipment, fuel
formulations may deteriorate and oxidize rapidly. Fuel
deterioration and oxidation can occur in as little as 30 days and
may cause damage to the carburetor and/or fuel system. Please
check with your servicing dealer for local storage
recommendations.
Using a garden hose or pressure washing equipment can force
water into the air cleaner or muffler opening. Water in the air
cleaner will soak the air filter, and water that passes through the
air filter or muffler can enter the cylinder, causing damage.
If the engine has been running, allow it to cool for at least half an
hour before cleaning. Clean all exterior surfaces, touch up any
damaged paint, and coat other areas that may rust with a light film
of oil.
Proper storage preparation is essential for keeping your engine
trouble-free and looking good. The following steps will help to
keep rust and corrosion from impairing your engine’s function and
appearance, and will make the engine easier to start when you use
it again.
1.
2.
3.
4.
5.
6.
7.
1.
2.
3.
4.
5.
5
6