spring (4) is 46 - 48 mm inside the washers. When the adjustment
has been made, tighten the nut (1).
For hydrostatic drive models:
Turn the nut (5) until the length of the spring (6) is 45 - 47 mm in-
side the washers.
Do not screw to below these values to avoid
overloading the brake unit.
ADJUSTING DRIVE ENGAGEMENT
For mechanical drive models:
If you should notice that forward
drive power has dropped, you
can adjust the regulating screw
(1) which is accessible through
the hatchway beneath the seat.
Undoing the screw and then
lengthening the spring (2) will
increase the drive ability. The
best length for the spring is 86
mm measured from the outer ends of the spring. Once the ad-
justment has been made, tighten the locknuts (3). Excessive
spring tension may cause too sudden engagement of the clutch,
resulting in the machine tipping up.
ADJUSTMENT TO BLADE ENGAGEMENT AND BRAKE
If there seem to be problems in engaging the blade or the time for
stopping when it has been disengaged is over 5 seconds, ask your
Dealer for adjustment.
For hydrostatic drive models:
ADJUSTING THE SPEED CHANGE LEVER
The speed change lever has a
clutch device which keeps it in
the position selected during for-
ward movement and which re-
turns the lever to neutral when
brake is operated.
If the lever does not stay in po-
sition during working and has
difficulty in returning to neutral,
the adjuster nut (1) will need to
be registered to restore normal functioning.
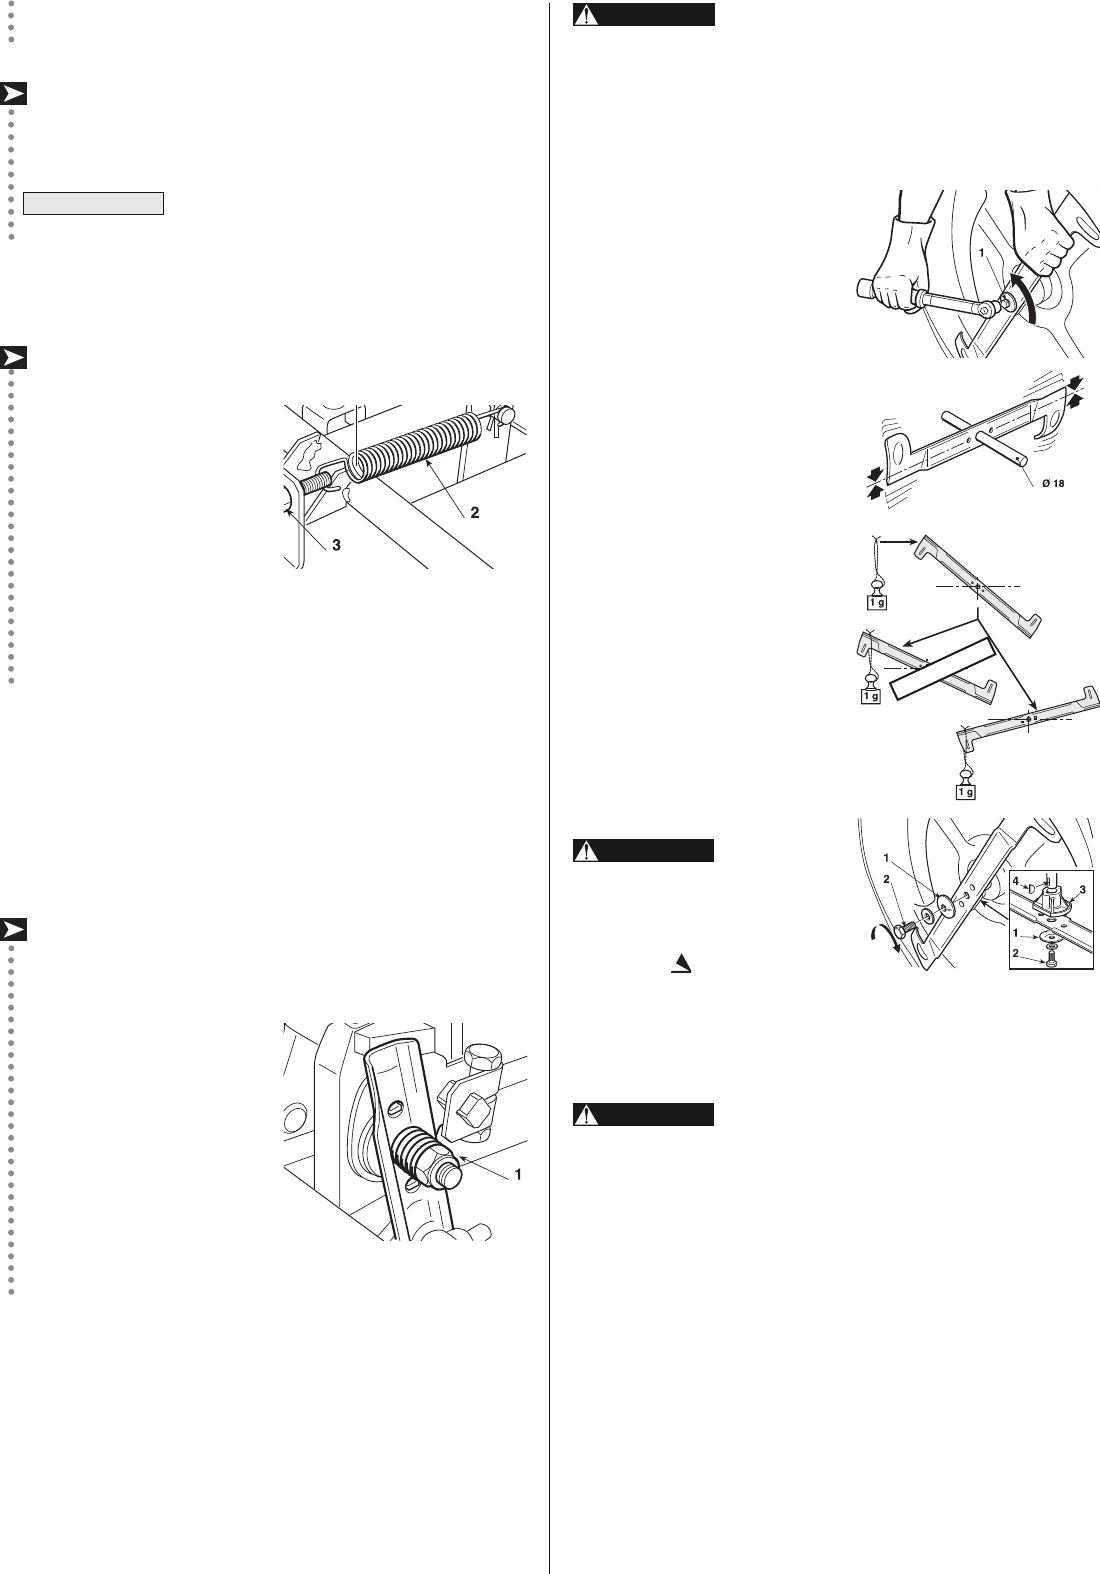
SHARPENING THE BLADE
Check that the blade is sharpened properly and firmly fixed to the
bracket.
– A badly sharpened blade pulls at the grass and causes the lawn
to turn yellow.
– A loose blade causes unusual vibrations and can be dangerous.
IMPORTANT
All operations on the blade (dismantling,
sharpening, balancing, remoun ting and/or replacing) require
a certain familiarity and special tools. For safety reasons, go
to a specialized cen tre if you do not have the right tools or ex-
perience.
To remove the blade, hold it firmly
wearing strong gloves and undo
the central screw (1).
Sharpen the two cutting edges us-
ing a medium grade grinding
wheel and check the balance by
holding the blade up with a round
18 mm diameter bar inserted in
the central hole.
To ensure that it works properly
without unusual vibrations any im-
balance between the two parts of
the blade must be below one
gram.
This can be easily ascertained by
putting a one gram weight on the
lightest end of the blade. If it tends
to go below the balanced position
it means that the balance is cor-
rect, while if it stays up then the
other end will have to be made
lighter.
A damaged or
bent blade must always be
replaced; never try to repair
it! ALWAYS USE MANUFAC-
TU RER'S GENUINE SPARE
BLADES !
Only blades with the following codes must be used on this machine:
84109503/0
When re-fitting the blade, always follow the
indicated sequence, making sure that the bladeʼs wings are
facing towards the interior of the cutting deck and that the
concave part of the cup spring (1) is pressing against the
blade. Tighten the fixing screw (2) using a torque wrench set
to 45-50 Nm. If the shaft hub (3) came off when dismantling
the blade, make sure that the key (4) is firmly in its right po-
sition.
GUIDE TO SCHEDULED MAINTENANCE
This table is to help you maintain your machineʼs safety and per-
formance. It shows the main maintenance and lubrication work, in-
dicating the frequency with which it should be carried out.
To the right of each one there is a box where you can write the date
or after how many hours of operation the work was carried out.
WARNING!
WARNING!
WARNING!
16EN
WRONG!
RIGHT!