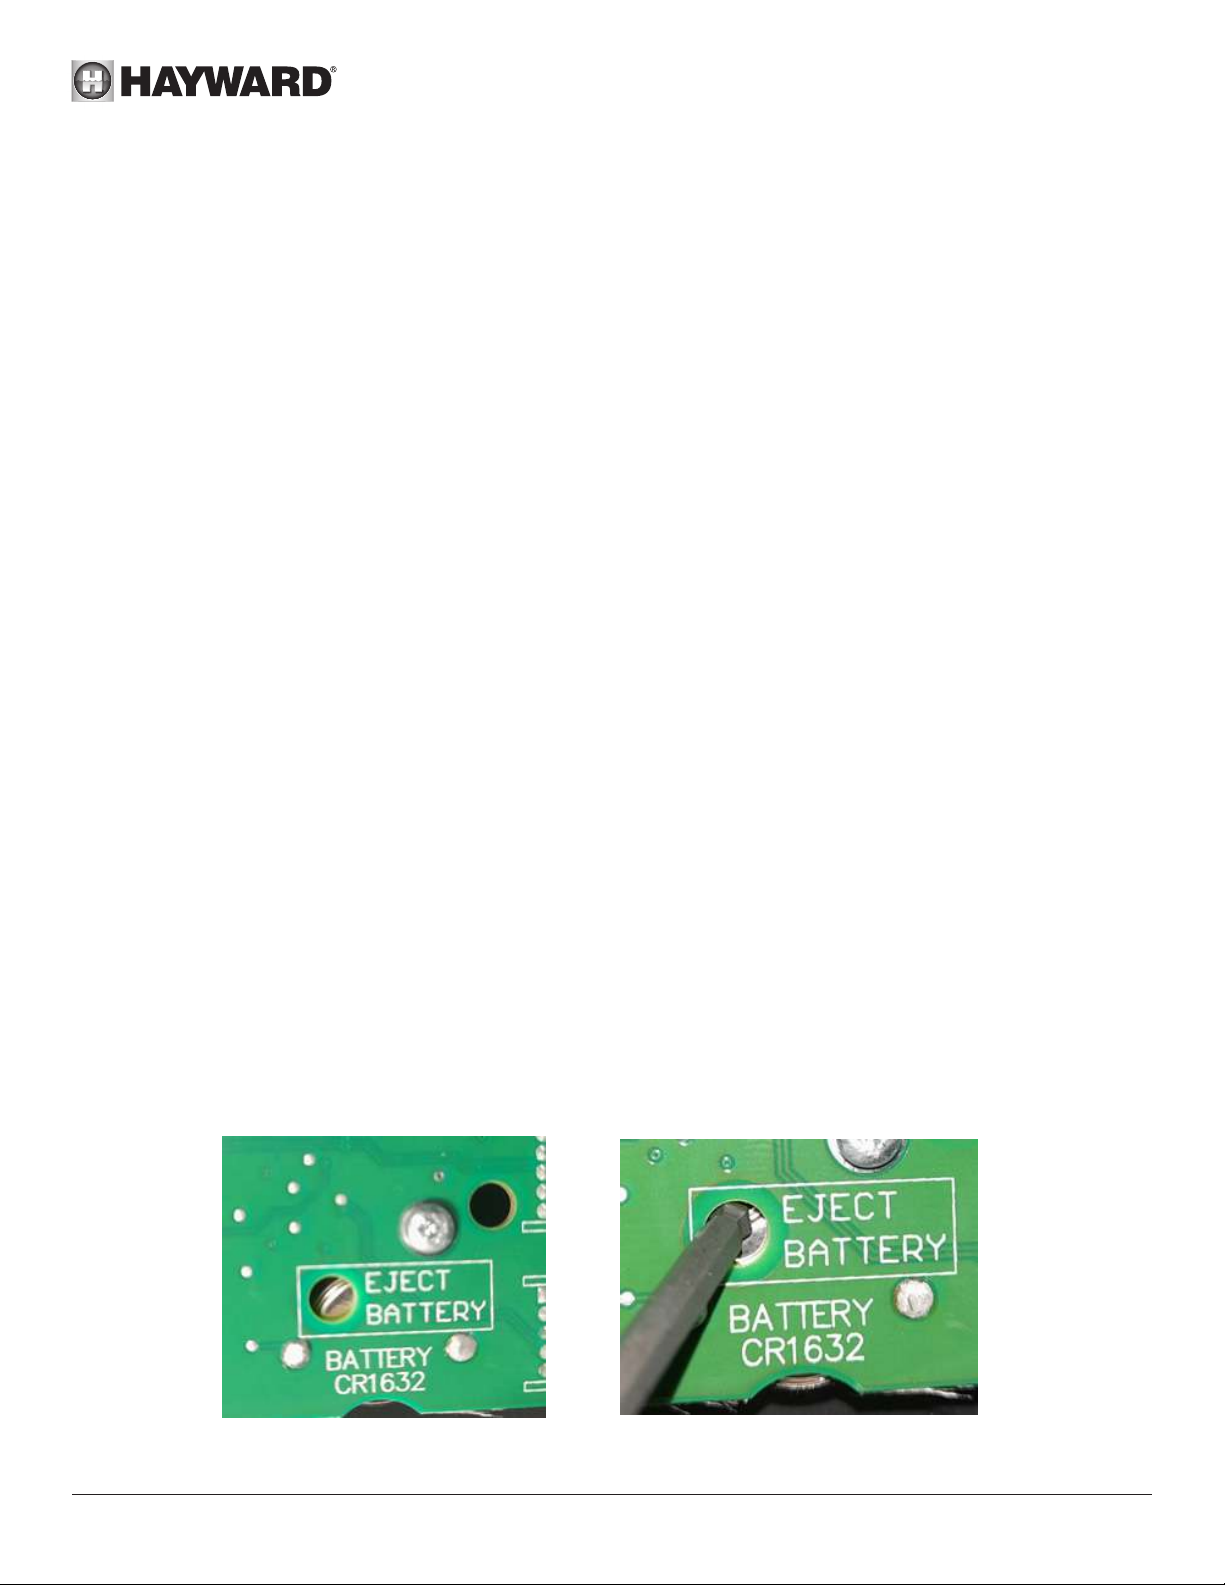
Using a tool (small screwdriver or similar) introduce it into the hole indicated in the board for this purpose and carefully push the battery from its place.
FR - ÉTAPE 4 : RETIREZ LA BATTERIE
A l'aide d'un outil (petit tournevis ou similaire), insérez-le dans le trou indiqué sur la plaque à cet eet et retirez délicatement la batterie de son
emplacement.
ES - PASO 4: RETIRAR LA PILA
Utilizando una herramienta (destornillador pequeño o similar), introducirla en el oricio indicado en la placa a tal efecto y sacar con cuidado la pila de su
lugar.
PT - PASSO 4: REMOVER A BATERIA
Use uma ferramenta (chave de fendas pequena ou semelhante) e introduza-a no orifício indicado na placa para este m e empurre cuidadosamente a
bateria para fora do seu lugar.
DE - SCHRITT 4: ENTNEHMEN SIE DIE BATTERIE
Fügen Sie einen kleinen Schraubendreher oder ein ähnliches Werkzeug in die an der Platine gekennzeichnete Önung ein und drücken Sie die Batterie
vorsichtig aus ihrer Stelle heraus
NL - STAP 4: DE BATTERIJ VERWIJDEREN
Steek een gereedschap (kleine schroevendraaier of iets dergelijks) in het daarvoor bestemde gat in de printplaat en duw de batterij voorzichtig van zijn
plaats.
IT - FASE 4: RIMUOVERE LA BATTERIA
Introdurre un utensile (un piccolo cacciavite o simile) nel foro indicato sulla scheda per questa operazione, e spingere con cautela la batteria da questo
punto.
SWE - STEG 4: TA UR BATTERIET
Använd ett verktyg (liten skruvmejsel eller liknande) för att föra in i hålet som anges för detta ändamål på panelen, och tryck försiktigt batteriet ut från sin
plats.
DA - TRIN 4: FJERN BATTERIET
Brug et værktøj (en lille skruetrækker eller lignende) til at føre det ind i det hul, der er angivet til dette formål, og skub forsigtigt batteriet ud
NO - TRINN 4: FJERN BATTERIET
Bruk et verktøy (lite skrujern eller lignende) og stikk det inn i hullet som indikeres i kortet til dette formål og skyv forsiktig batteriet ut av posisjon.
FI - VAIHE4: POISTA AKKU
Käytä työkalua (pieni ruuvimeisseli tai vastaava) ja vie se tähän tarkoitukseen levyssä olevaan reikään ja paina akku varovasti paikoiltaan.
RU - ШАГ 4. ИЗВЛЕЧЬ БАТАРЕЮ
Вставить инструмент (маленькую отвертку или что-то похожее) в указанное на плате отверстие и аккуратно сдвинуть батарею с места ее
Libble takes abuse of its services very seriously. We're committed to dealing with such abuse according to the laws in your country of residence. When you submit a report, we'll investigate it and take the appropriate action. We'll get back to you only if we require additional details or have more information to share.
Product:
Forumrules
To achieve meaningful questions, we apply the following rules:
First, read the manual;
Check if your question has been asked previously;
Try to ask your question as clearly as possible;
Did you already try to solve the problem? Please mention this;
Is your problem solved by a visitor then let him/her know in this forum;
To give a response to a question or answer, do not use this form but click on the button 'reply to this question';
Your question will be posted here and emailed to our subscribers. Therefore, avoid filling in personal details.
Register
Register getting emails for Hayward Max-Flo XL VSTD Pump at:
new questions and answers
new manuals
You will receive an email to register for one or both of the options.
Get your user manual by e-mail
Enter your email address to receive the manual of Hayward Max-Flo XL VSTD Pump in the language / languages: English, German, Dutch, Danish, French, Italian, Portuguese, Swedish, Spanish, Norwegian, Finnish as an attachment in your email.
The manual is 27.15 mb in size.
You will receive the manual in your email within minutes. If you have not received an email, then probably have entered the wrong email address or your mailbox is too full. In addition, it may be that your ISP may have a maximum size for emails to receive.
The manual is sent by email. Check your email
If you have not received an email with the manual within fifteen minutes, it may be that you have a entered a wrong email address or that your ISP has set a maximum size to receive email that is smaller than the size of the manual.
The email address you have provided is not correct.
Please check the email address and correct it.
Your question is posted on this page
Would you like to receive an email when new answers and questions are posted? Please enter your email address.