701207
99
Zoom out
Zoom in
Previous page
1/108
Next page
B. Estendere un’estremità del tubo di scarico, svitare l’estremità senza fessura del
connettore circolare su di esso facendo almeno 3 giri in senso antiorario.
C. Estendere l'altra estremità del tubo di scarico, avvitare l'adattatore su di esso in
senso antiorario con almeno 3 giri.
Nota: avvitare il connettore tondo e l’adattatore a destra, per almeno 3 giri, per
mantenere una buona connessione di assemblaggio al tubo di scarico.
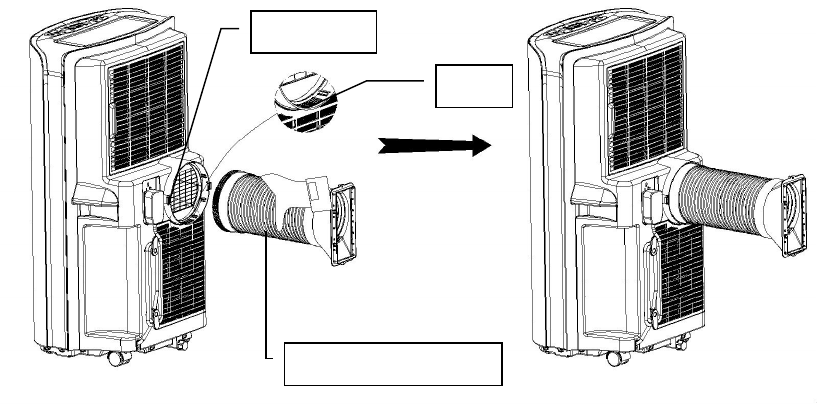
2) Installazione di assemblaggio tubo di scarico all'unità principale.
Mettere l’estremità anteriore del blocco del tubo di scarico sull’uscita dell'aria del
pannello posteriore; gli elementi di fissaggio potranno così bloccare il gruppo del
tubo di scarico.
Nota:
Mantenere la giusta direzione del lato inclinato dell’adattatore, per una facile
installazione sulla finestra con una piastra sigillata.
Mantenere il tubo di scarico collegato in buona posizione.
3) Istallazione della piastra sigillata
A. Tenere la finestra socchiusa, mettere la piastra sigillata nella finestra, o in
posizione verticale o orizzontale.
B. Estendere le parti della piastra sigillata e regolarla alla lunghezza della finestra, far
in modo che entrambe le estremità tocchino il bordo della finestra, poi, fissare con
le viti.
Nota:
l Assicurarsi che le due estremità della piastra sigillata siano stabilmente in
contatto con i bordi della finestra, per assicurare la tenuta stagna.
chiusura
Slot
Blocco tubo di scarico
99


Need help? Post your question in this forum.

Forumrules


Report abuse

Libble takes abuse of its services very seriously. We're committed to dealing with such abuse according to the laws in your country of residence. When you submit a report, we'll investigate it and take the appropriate action. We'll get back to you only if we require additional details or have more information to share.

Product:

For example, Anti-Semitic content, racist content, or material that could result in a violent physical act.

For example, a credit card number, a personal identification number, or an unlisted home address. Note that email addresses and full names are not considered private information.

Forumrules

To achieve meaningful questions, we apply the following rules:

Register

Register getting emails for H.Koenig KOL7012 at:


You will receive an email to register for one or both of the options.


Get your user manual by e-mail

Enter your email address to receive the manual of H.Koenig KOL7012 in the language / languages: English, German, Dutch, French, Italian, Spanish as an attachment in your email.

The manual is 4,53 mb in size.


You will receive the manual in your email within minutes. If you have not received an email, then probably have entered the wrong email address or your mailbox is too full. In addition, it may be that your ISP may have a maximum size for emails to receive.

The manual is sent by email. Check your email

If you have not received an email with the manual within fifteen minutes, it may be that you have a entered a wrong email address or that your ISP has set a maximum size to receive email that is smaller than the size of the manual.

The email address you have provided is not correct.

Please check the email address and correct it.

Your question is posted on this page

Would you like to receive an email when new answers and questions are posted? Please enter your email address.


Info