12914
10
Zoom out
Zoom in
Previous page
1/44
Next page
10
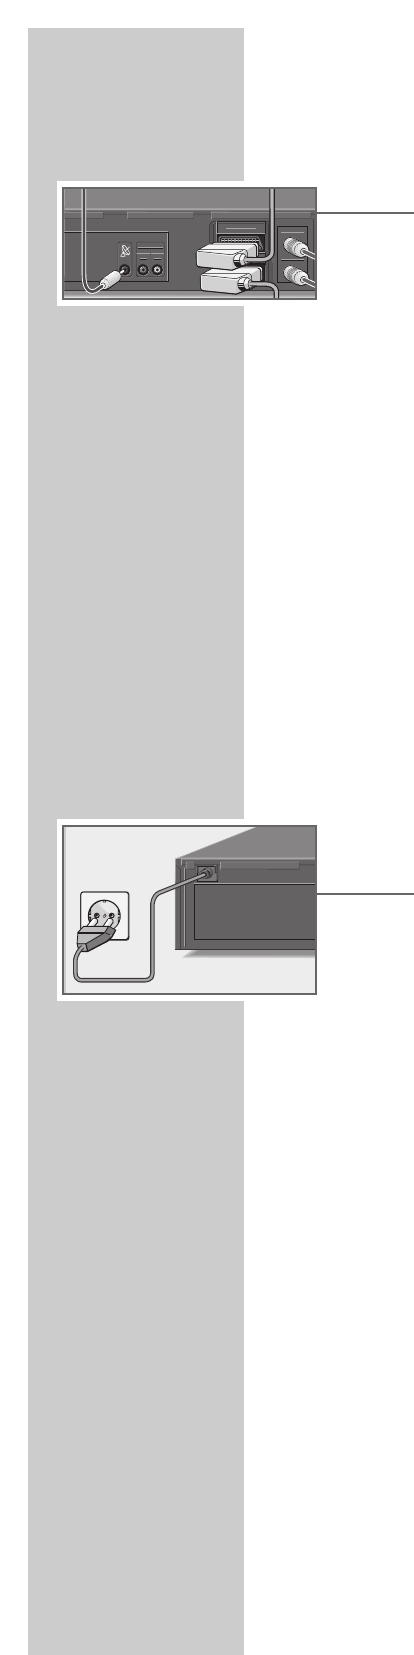
4 Als aan de videorecorder een satellietontvanger met SAT-besturingsbus is
aangesloten:
Verbind de aansluiting »LINE 2 (II) IN/DECODER« van de videorecorder
en de aansluiting VCR van de satellietontvanger door middel van een
standaard EURO-AV kabel met elkaar (aansluiting 4A).
Verbind de aansluiting »
ʐʐ
« van de videorecorder en de aansluiting »VIDEO
CONTROL« (besturingsleiding) van de satellietontvanger door middel van
een standaard cinch-kabel met elkaar (aansluiting 4B).
Steek de antennekabel van de huisantenne in de desbetreffende antenne-
aansluiting (
É) van de satellietontvanger.
Steek de antennekabel van de sattelietantenne in de desbetreffende antenne-
aansluiting (INPUT-SAT) van de satellietontvanger (aansluitingen 4C).
Verbind de aansluiting »ANTENNA IN« van de videorecorder en de
bijbehorende aansluiting (TV) van de satellietontvanger door middel van een
standaard antennekabel met elkaar (aansluiting 4D).
Verbind de EURO-AV-aansluiting (TV) van de satellietontvanger en de aans-
luiting AV2 van het televisietoestel door middel van een standaard EURO-AV-
kabel met elkaar (aansluiting 4E).
Aanwijzing:
Aan aansluiting »LINE 2 (II) IN/DECODER« kan als alternatief ook een
PAY-TV-decoder worden aangesloten.
Als op deze aansluiting een satellietontvanger is aangesloten, sluit de PAY-TV-
decoder dan aan op de decoderaansluiting van de satellietontvanger.
5 Steek de stekkers van de netkabels in het stopcontact.
– De videorecorder is nu klaar voor gebruik (stand-by).
Voorzichtig:
De videorecorder is alleen volledig van het stroomnet afgesloten als u de net-
stekker uit het stopcontact hebt gehaald.
Aanwijzing:
Als de videorecorder wordt aangesloten op een televisietoestel met het for-
maat 16:9, neem dan de instelling in het hoofdstuk ”Gebruik met een tele-
visietoestel met het formaat 16:9” op pagina 39 in acht.
AANSLUITEN EN VOORBEREIDEN
________________________________________
RF OUT
SORTIE ANTENNE
ANTENNA IN
ENTREE ANTENNE
AUDIO OUT
SORTIE SON
R
D
L
G
LINE1
(
I
)
IN/OUT
SON/ VIDEO
(
L1/
I
)
LINE2
(
II
)
IN/DECODER
CANAL PLUS/ L2
(
II
)
10


Need help? Post your question in this forum.

Forumrules


Report abuse

Libble takes abuse of its services very seriously. We're committed to dealing with such abuse according to the laws in your country of residence. When you submit a report, we'll investigate it and take the appropriate action. We'll get back to you only if we require additional details or have more information to share.

Product:

For example, Anti-Semitic content, racist content, or material that could result in a violent physical act.

For example, a credit card number, a personal identification number, or an unlisted home address. Note that email addresses and full names are not considered private information.

Forumrules

To achieve meaningful questions, we apply the following rules:

Register

Register getting emails for Grundig MADRID SE 9106 HIFI at:


You will receive an email to register for one or both of the options.


Get your user manual by e-mail

Enter your email address to receive the manual of Grundig MADRID SE 9106 HIFI in the language / languages: Dutch as an attachment in your email.

The manual is 1,72 mb in size.


You will receive the manual in your email within minutes. If you have not received an email, then probably have entered the wrong email address or your mailbox is too full. In addition, it may be that your ISP may have a maximum size for emails to receive.

The manual is sent by email. Check your email

If you have not received an email with the manual within fifteen minutes, it may be that you have a entered a wrong email address or that your ISP has set a maximum size to receive email that is smaller than the size of the manual.

The email address you have provided is not correct.

Please check the email address and correct it.

Your question is posted on this page

Would you like to receive an email when new answers and questions are posted? Please enter your email address.


Info