570085
35
Zoom out
Zoom in
Previous page
1/44
Next page
DEUTSCH
35
DIE TIMERFUNKTIONEN
__________________________________________
Das Untermenü Timer
Das Untermenü »Timer« dieses Digital-Receivers stellt insgesamt acht Timer-
plätze für vorprogrammierte Aufnahmen zur Verfügung.
Sie wählen Ihr „Wunschprogramm” aus, geben bestimmte Programmdaten ein,
danach werden die Daten schnell und problemlos in das Menü »Timer« über-
nommen.
Daten für einen Timerplatz manuell eingeben
Hinweis:
Uhrzeit kontrollieren – und wenn notwendig – Uhrzeit stellen (siehe Seiten
19 und 20 dieser Bedienungsanleitung).
1 Das Untermenü »Timer« mit »
Ȅ
« (grün) direkt aufrufen
oder
das Hauptmenü« mit »
i
Menu« am Bildschirm aufrufen.
2 Zeile »Timer« mit »
2
« direkt aufrufen oder mit »
P+, P-
« anwählen und mit
»OK« aufrufen.
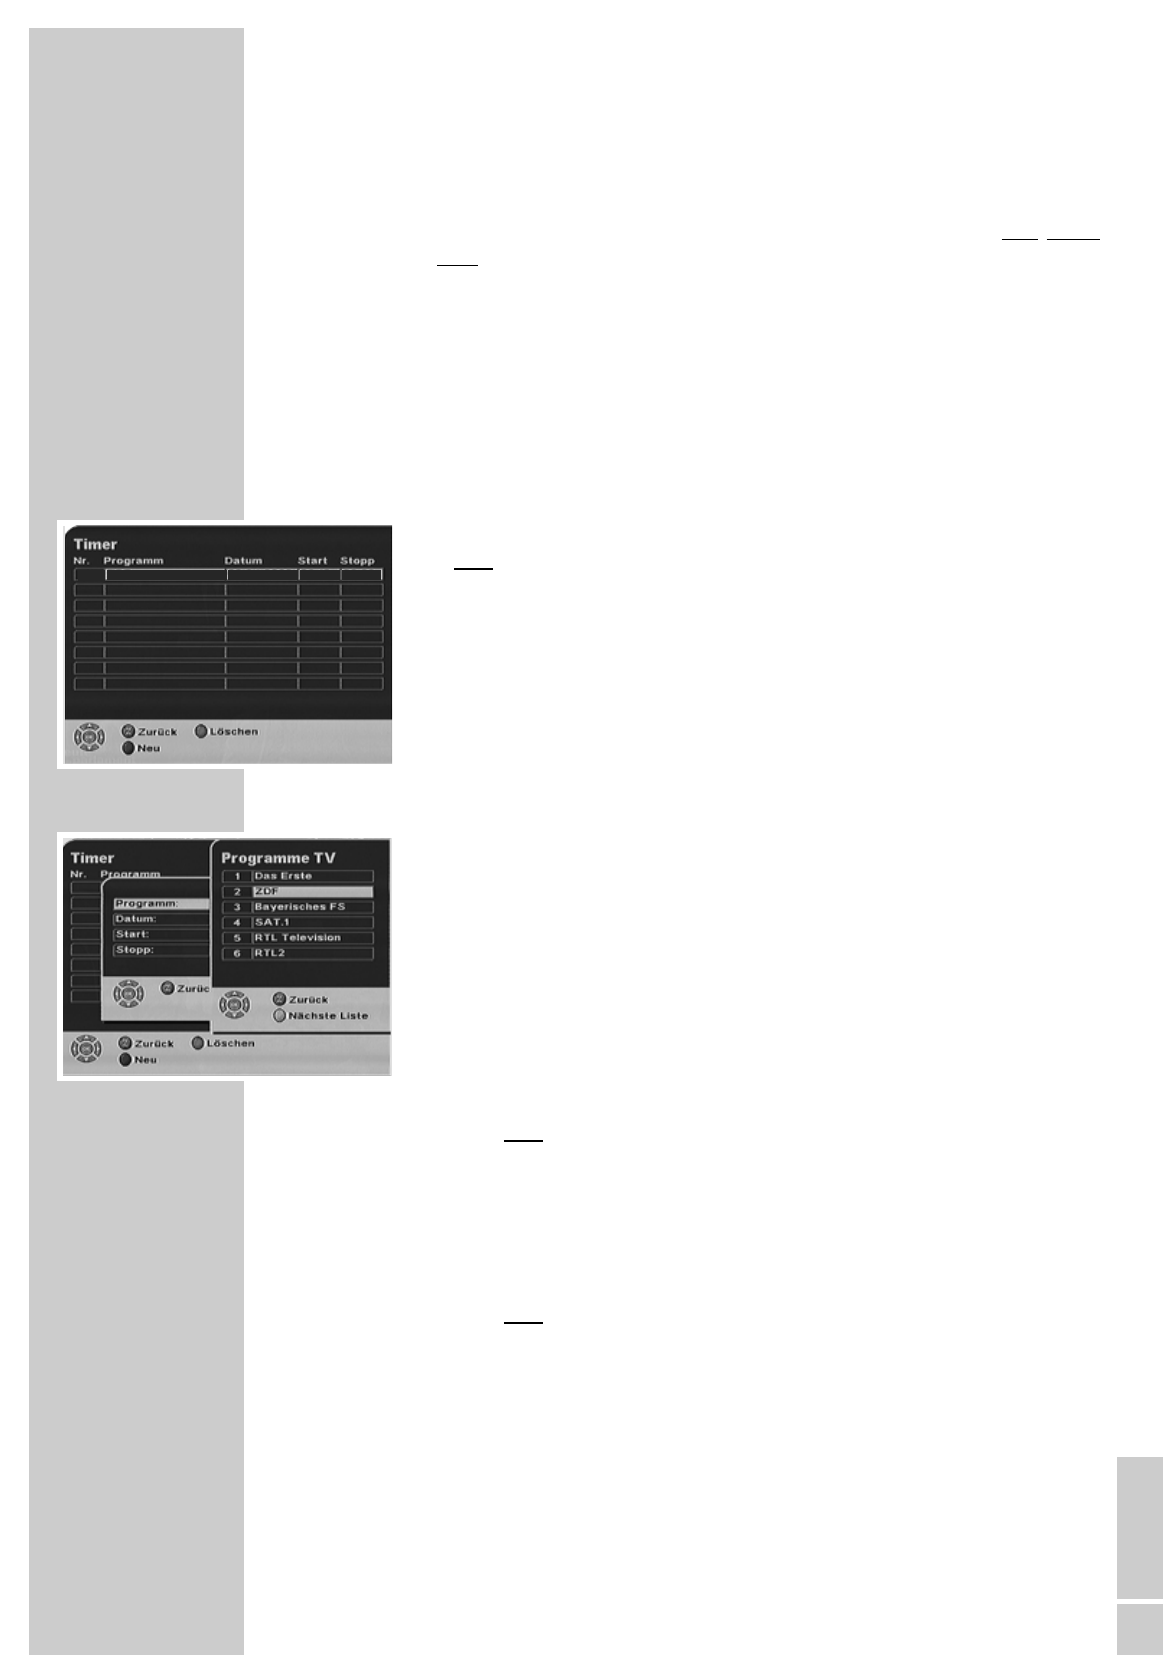
– Am Bildschirm erscheint das Untermenü »Timer«.
3 Timerdaten mit »
Ȅ
« (grün) aufrufen.
Am Bildschirm erscheint ein Auswahlfenster, die Zeile »Programm:« ist
markiert (hinterlegt).
4 Zeile »Programm:« mit »
OK
« aufrufen.
Die zuletzt gewählte Programmliste wird in das Untermenü »Timer« am
Bildschirm eingeblendet.
Mit »
@
« (gelb) kann zwischen den einzelnen Listen »Programme TV«,
»Programme RADIO«, »Fav 1« oder »Fav 2« gewählt werden.
5 Gewünschte Sendeanstalt (Programm) mit »
P+, P-
« anwählen und mit
»OK« übernehmen.
– Die jeweilige Liste wird am Bildschirm ausgeblendet.
6 Zeile »Datum:« mit »
P-
« anwählen und mit »
OK
« aufrufen.
– Die erste Eingabeposition des Datums ist markiert (unterstrichen).
Mit »
ǸǷ
« kann jede Eingabeposition schrittweise angewählt werden.
7 Mit »1 … 0« das Datum eingeben und nach der letzten Eingabe mit »
OK
«
bestätigen.
8 Zeile »Start:« mit »
P-
« anwählen und mit »
OK
« aufrufen.
– Die erste Eingabeposition der Startzeit ist markiert (unterstrichen).
Mit »
ǸǷ
« kann jede Eingabeposition schrittweise angewählt werden.
9 Mit »1 … 0« die Startzeit eingeben und nach der letzten Eingabe mit »
OK
«
bestätigen.
Lesen Sie bitte auf der folgenden Seite weiter!
35


Need help? Post your question in this forum.

Forumrules


Report abuse

Libble takes abuse of its services very seriously. We're committed to dealing with such abuse according to the laws in your country of residence. When you submit a report, we'll investigate it and take the appropriate action. We'll get back to you only if we require additional details or have more information to share.

Product:

For example, Anti-Semitic content, racist content, or material that could result in a violent physical act.

For example, a credit card number, a personal identification number, or an unlisted home address. Note that email addresses and full names are not considered private information.

Forumrules

To achieve meaningful questions, we apply the following rules:

Register

Register getting emails for Grundig Cinia DTR 2280 S at:


You will receive an email to register for one or both of the options.


Get your user manual by e-mail

Enter your email address to receive the manual of Grundig Cinia DTR 2280 S in the language / languages: German as an attachment in your email.

The manual is 2,49 mb in size.


You will receive the manual in your email within minutes. If you have not received an email, then probably have entered the wrong email address or your mailbox is too full. In addition, it may be that your ISP may have a maximum size for emails to receive.

The manual is sent by email. Check your email

If you have not received an email with the manual within fifteen minutes, it may be that you have a entered a wrong email address or that your ISP has set a maximum size to receive email that is smaller than the size of the manual.

The email address you have provided is not correct.

Please check the email address and correct it.

Your question is posted on this page

Would you like to receive an email when new answers and questions are posted? Please enter your email address.


Info