22
Gehen Sie so vor:
1 Das »Hauptmenü« mit »
i
Menu« am Bildschirm aufrufen.
2 Zeile »Installation« mit »
1
« oder »
OK
« aufrufen.
3 Zeile »Antennen Einstellungen« mit »
4
« direkt aufrufen oder mit »
P+, P-
«
anwählen und mit »
OK
« aufrufen.
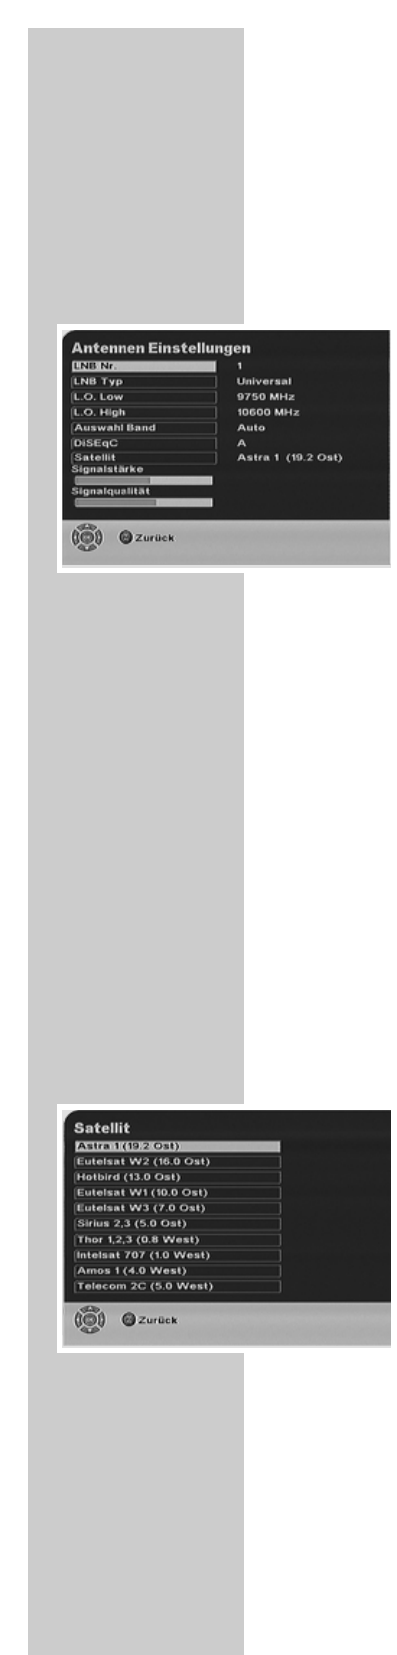
– Am Bildschirm erscheint das Untermenü »Antennen Einstellungen«, die
Zeile »LNB Nr.« ist markiert (hinterlegt).
4 Zeile »LNB Nr.« mit »OK« aufrufen.
– Die Eingabeposition ist markiert (unterstrichen).
Mit »
P+, P-
« die gewünschte LNB Nummer auswählen, z.B. »1« für Astra
(19.2 Ost) und »2« für Hotbird (13.0 Ost) und mit »OK« bestätigen.
5 Zeile »LNB Typ« mit »
P-
« anwählen und mit »OK« aufrufen.
Mit »
P+, P-
« den benötigten LNB Typ »Universal« oder »C-Band« aus-
wählen und mit »OK« bestätigen.
6 Zeile »L.O. Low« mit »
P-
« anwählen und mit »OK« aufrufen.
Mit »
P+, P-
« die benötigte Oszillatorfrequenz auswählen und mit »
OK
«
bestätigen.
7 Zeile »L.O. High« mit »
P-
« anwählen.
Mit »
P+, P-
« die benötigte Oszillatorfrequenz auswählen und mit »
OK
«
bestätigen.
8 Zeile »Auswahl Band« mit »
P-
« anwählen und mit »OK« aufrufen.
Mit »
P+, P-
« die Einstellung »Auto« oder – »22kHz ein« (Highband) oder
»22kHz aus« (Lowband) auswählen und mit »OK« bestätigen.
9 Zeile »DiSEqC« mit »
P-
« anwählen und mit »OK« aufrufen.
Mit »
P+, P-
« das benötigte DiSEqC-Schaltsignal auswählen, z.B. »A« für
Astra (19.2 Ost) und »B« für Hotbird (13.0 Ost) und mit »OK« bestätigen.
10 Zeile »Satellit« mit »
P-
« anwählen und mit »OK« aufrufen.
– Am Bildschirm erscheint das Untermenü »Satellit«.
Mit »
P+, P-
« den Satelliten auswählen und mit »OK« bestätigen.
Hinweis:
Die Statuszeile »Signalstärke« zeigt die „maximale Feldstärke“ des einge-
stellten Transponders an.
Die Statuszeile »Signalqualität« zeigt das Verhältnis Rauschsignal zu Nutz-
signal an.
11 Einstellungen beenden mit »Z Exit«.
– Am Bildschirm erscheint ein Auswahlfenster.
Einstellung »Ja« mit »
P+, P-
« anwählen und die Änderungen mit »
OK
«
speichern.
ANTENNEN EINSTELLUNGEN
_________________________________________________