10
DE
2 / INSTALLATION
• AUFSTELLEN DES GERÄTES
Abb. 10
Abb. 11
Hinweis:
Wir raten dringend davon ab, das
Gerät:
— in einem feuchten, schlecht belüfteten Raum
aufzustellen.
— an einem Ort aufzustellen, an dem es
Spritzwasser ausgesetzt sein könnte.
— auf Teppichboden aufzustellen. Sollte dies
dennoch nicht zu vermeiden sein, sind alle
notwendigen Vorkehrungen zu treffen, damit
zur Belüftung der internen Bauteile die
Luftzirkulation am Boden nicht behindert wird.
Abb. 12
AA
AA
BB
BB
••
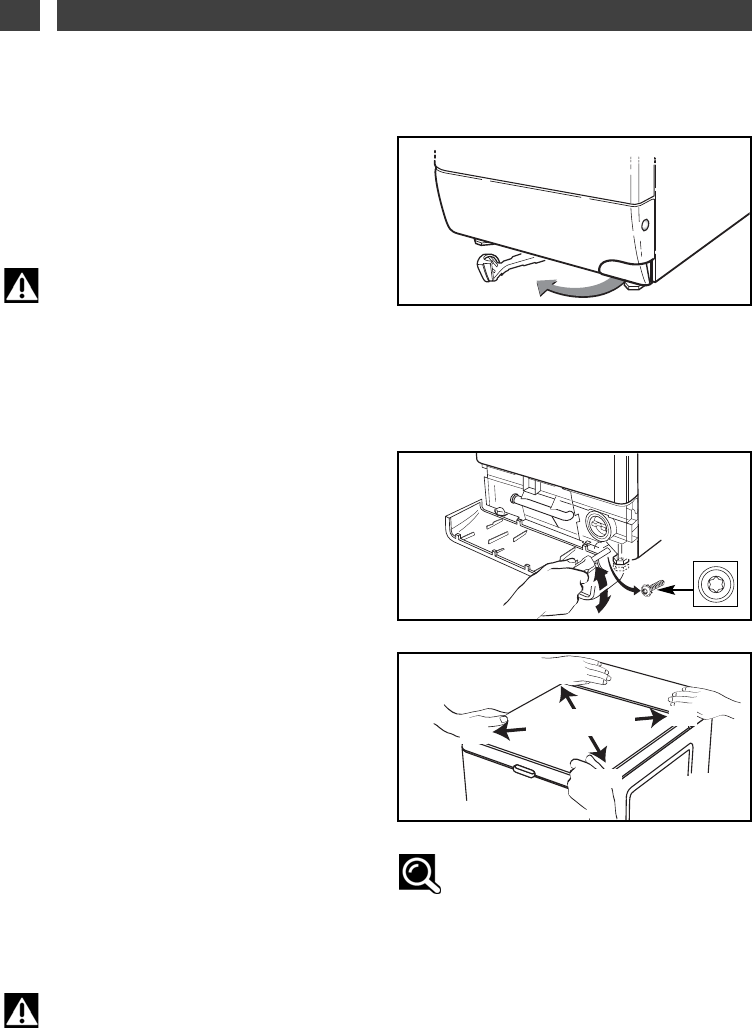
Auf Transportrollen stellen:
Um es leichter bewegen zu können, ist Ihr
Gerät mit versenkbaren Rollen ausgestattet.
Zum Herausfahren der Rollen den Hebel
unter dem Gerät von rechts ganz nach links
schieben
(Abb. 10).
Wichtig:
Während des Betriebs darf das Gerät
nicht auf den Transportrollen stehen:
Vergessen Sie nicht, den Hebel wieder in
seine Ausgangsstellung zurückzuführen.
••
Waagerechte Aufstellung:
Ihr Geräte ist vorne mit zwei einstellbaren
Füßen ausgestattet, mit denen
Bodenunebenheiten ausgeglichen werden
können. Den waagerechten Stand und die
Stabilität der Maschine wie folgt einstellen:
— Fußblende entfernen
(s Abb. 04, vorste-
hende Seiten).
— Maschine auf die Rollen stellen.
— Die 2 Schrauben zur Arretierung der Füße
mit einem TORX T20 Schraubenschlüssel
lösen
(Abb. 11).
— Zur waagerechten Ausrichtung die beiden
Füße mit einem flachen Schlüssel oder einer
Zange einstellen.
— Das Gerät auf seine Füße stellen und den
Hebel in die Ausgangsposition zurück führen.
— Durch diagonale Druckeinwirkung auf den
Deckel die Stabilität der Maschine prüfen
(Richtung AA, anschließend Richtung BB)
(Abb. 12).
Die Maschine darf sich nicht bewe-
gen.
— Wenn die korrekte Einstellung erreicht
wurde, die beiden Arretierschrauben der
Füße wieder anziehen und die Blende wieder
mit Klips befestigen.
••
Umfeld:
Wichtig:
Sollte die Maschine neben einem
anderen Gerät oder einem Möbelstück auf-
gestellt werden, muss immer ein Spalt für
die Luftzirkulation gelassen werden.