537360
8
Zoom out
Zoom in
Previous page
1/14
Next page
35
NL
5. Haal eventueel vuil weg.
6. Trek de draad
T
van de nieuwe draadspoel
S
uit het gat
van de kunststof ring
U
ca. 15 cm naar buiten.
7. Leid de draad
T
eerst door de metalen hulsen
X
en dan
langs de omkeerpen
W
.
8. Draadspoel
S
in de draadspoelhouder
V
leggen.
9. Zet het spoeldeksel
Q
zo op de draadspoelhouder
V
dat
de beide klikverbindingen
R
hoorbaar vastklikken.
Bij het opzetten van het spoeldeksel
Q
moet de draad
T
langs de omkeerpen
W
gelegd zijn en mag niet vastgeklemd
zitten.
v Als de deksel
Q
niet sluit, de draadspoel
S
heen en weer
draaien tot dat de draadspoel
S
zich compleet in de houder
voor de draadspoel
V
bevindt.
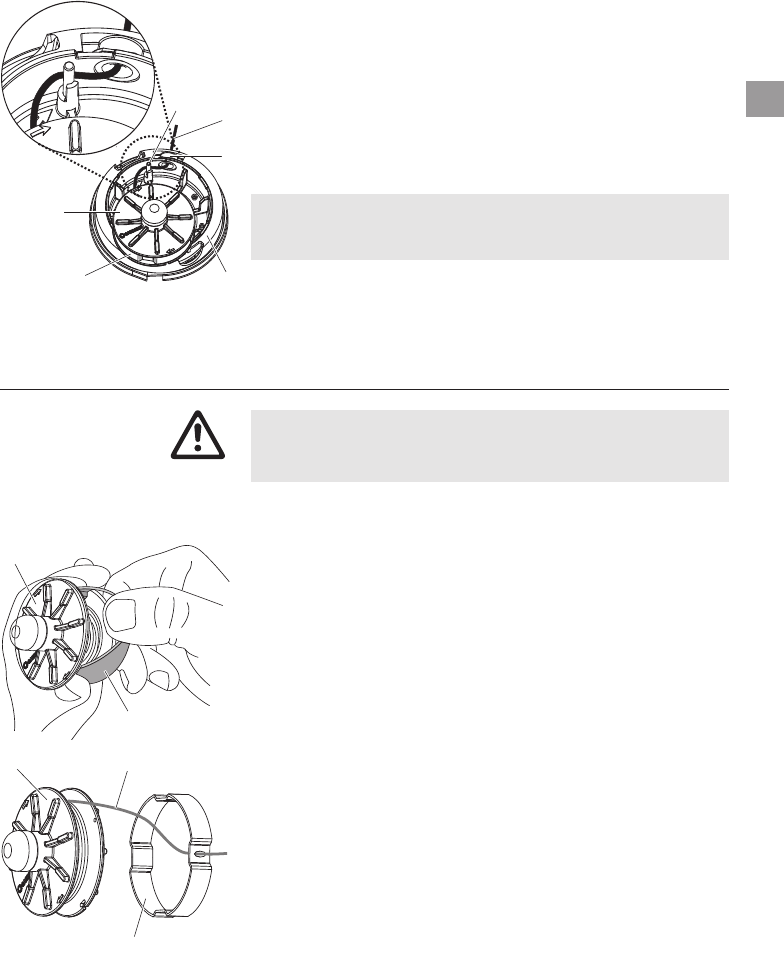
7. Opheffen van storingen
Verwondingsgevaar door de snijdraad!
V Voor het opheffen van storingen aan de trimmer de
stekker uit het stopcontact trekken!
Een draad die in de draadspoel is getrokken kan er weer
uitgetrokken worden.
1. Trek de stekker uit het stopcontact.
2. Haal de draadspoel
S
eruit zoals onder 6. Onderhoud
„Draadspoel vervangen”
aangegeven.
3. Druk de kunststof ring
U
op de draadspoel
S
tussen duim
en wijsvinger samen.
4. Trek de kunststof ring
U
over het zijdeel van de draadspoel
S
(eventueel een schroevendraaier gebruiken).
De ingetrokken draad ligt nu vrij.
5. Wikkel de draad
T
ca. 15 cm af haal hem door het oog van
de kunststof ring
U
. Eventueel een vastgeplakte draad tevoren
met een schroevendraaier losmaken.
6. Kunststof ring
U
weer over de draadspoel
S
trekken.
8. Draadspoel weer zoals onder 6. Onderhoud
„Draadspoel
vervangen”
terug plaatsen.
VERWONDINGS-
GEVAAR !
Draad uit de draadspoel
trekken:
T
U
U
S
S
T
W
U
S
X
V
8


Need help? Post your question in this forum.

Forumrules


Report abuse

Libble takes abuse of its services very seriously. We're committed to dealing with such abuse according to the laws in your country of residence. When you submit a report, we'll investigate it and take the appropriate action. We'll get back to you only if we require additional details or have more information to share.

Product:

For example, Anti-Semitic content, racist content, or material that could result in a violent physical act.

For example, a credit card number, a personal identification number, or an unlisted home address. Note that email addresses and full names are not considered private information.

Forumrules

To achieve meaningful questions, we apply the following rules:

Register

Register getting emails for Gardena EasyCut 480 - 8846-40 at:


You will receive an email to register for one or both of the options.


Get your user manual by e-mail

Enter your email address to receive the manual of Gardena EasyCut 480 - 8846-40 in the language / languages: Dutch as an attachment in your email.

The manual is 2,57 mb in size.


You will receive the manual in your email within minutes. If you have not received an email, then probably have entered the wrong email address or your mailbox is too full. In addition, it may be that your ISP may have a maximum size for emails to receive.

Others manual(s) of Gardena EasyCut 480 - 8846-40

Gardena EasyCut 480 - 8846-40 User Manual - German - 14 pages


The manual is sent by email. Check your email

If you have not received an email with the manual within fifteen minutes, it may be that you have a entered a wrong email address or that your ISP has set a maximum size to receive email that is smaller than the size of the manual.

The email address you have provided is not correct.

Please check the email address and correct it.

Your question is posted on this page

Would you like to receive an email when new answers and questions are posted? Please enter your email address.


Info