474427
5
Zoom out
Zoom in
Previous page
1/13
Next page
33
NL
B
0
A9
C
5
D
1. Beide duwers
9
tegelijkertijd indrukken en de stuurstang
0
opklappen.
2. Klemhendel
A
openen.
3. Stuurstang
0
op gewenste lengte uittrekken.
4. Klemhendel
A
weer sluiten.
Om veiligheidsreden moet het bovenstuk van de duwboom
de eerste keer helemaal worden uitgetrokken.
Het kan daarna niet meer worden ingeschoven tot de toe-
stand bij levering.
De klemkracht kan door de moer
B
ingesteld worden. Bij te
geringe klemwerking de moer, bij geopende klemhendel, naar
links draaien (bijv. met een tang).
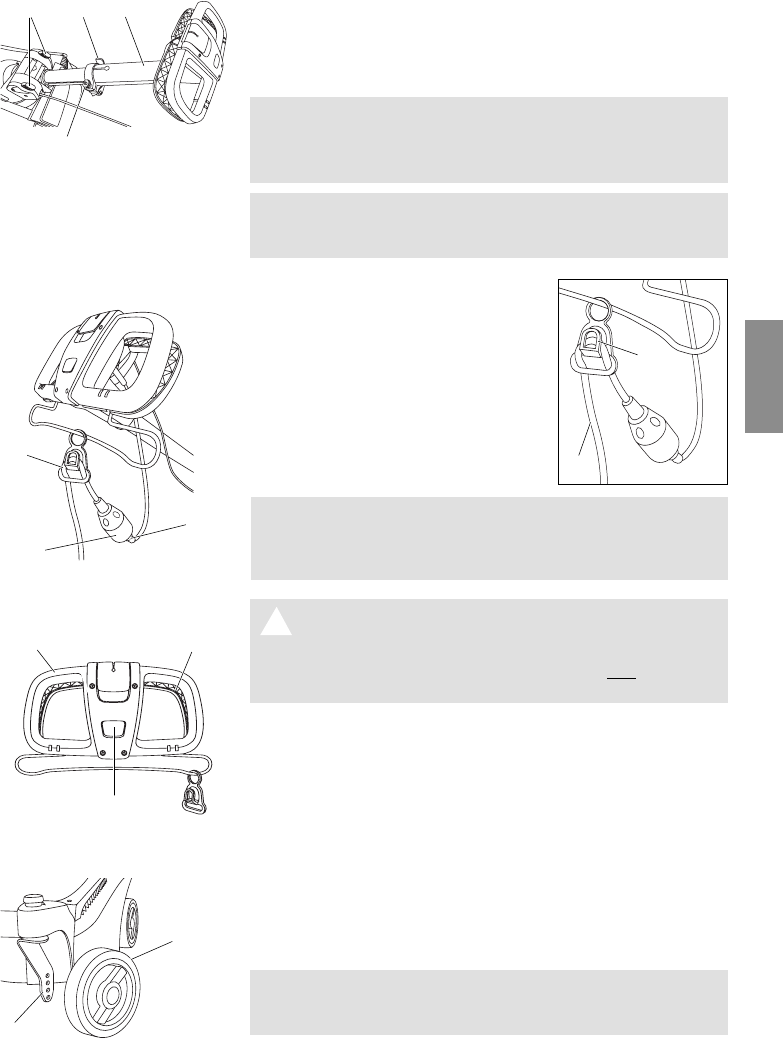
1. Koppeling
C
het verlengsnoer op
de stekker
D
van de maaier steken.
2. Met het verlengsnoer
E
een lus
vormen en deze door de kabeltre-
kontlasting
5
geleiden.
3. Verlengsnoer
E
er zo in hangen
dat het snoer licht doorhangt en de
kabeltrekontlasting over de gehele
lengte van de kabelbeugel kan glijden.
Aanwijzing: Om te voorkomen dat er over het verlengsnoer
wordt gereden moet het verlengsnoer altijd zo uitgelegd
worden dat het tijdens het werken altijd aan de gemaaide
zijde ligt.
GEVAAR! Gevaar op lichamelijk letsel als de maaier
A niet automatisch uitschakelt!
V De op de maaier aangebrachte veiligheidsin-
richtingen (starttoets, schakelbeugel niet
verwijderen of overbruggen.
1. Maaier op een vlakke plaats op het gazon neerzetten.
2. Starttoets
F
indrukken en aan de schakelbeugel
G
op het
stuur
H
trekken.
3. Nadat de motor gestart is de starttoets
F
weer loslaten.
4. Maaier nu vooruit en stapvoets geleiden.
Voor 34 E easyMove:
De snijhoogte kan van 2,0 tot 6,5 cm in 1,5 cm-stappen
(4 standen) ingesteld worden.
v Wielen
4
met de hand eruit schroeven en op de gewenste sni-
jhoogte weer vastschroeven; controleer of ze stevig zitten.
Alle 4 de wielen
4
moeten altijd op dezelfde maaihoogte vast-
geschroefd zitten (zie schaalverdeling
z
S
aan de achterkant van
de wielopname).
Stuurstang instellen:
Verlengsnoer aansluiten:
Maaier starten:
Instelling maaihoogtes:
F
G
H
E
5
4
z
S
5


Need help? Post your question in this forum.

Forumrules


Report abuse

Libble takes abuse of its services very seriously. We're committed to dealing with such abuse according to the laws in your country of residence. When you submit a report, we'll investigate it and take the appropriate action. We'll get back to you only if we require additional details or have more information to share.

Product:

For example, Anti-Semitic content, racist content, or material that could result in a violent physical act.

For example, a credit card number, a personal identification number, or an unlisted home address. Note that email addresses and full names are not considered private information.

Forumrules

To achieve meaningful questions, we apply the following rules:

Register

Register getting emails for Gardena 38 E mulchCut-4039 at:


You will receive an email to register for one or both of the options.


Get your user manual by e-mail

Enter your email address to receive the manual of Gardena 38 E mulchCut-4039 in the language / languages: Dutch as an attachment in your email.

The manual is 0,28 mb in size.


You will receive the manual in your email within minutes. If you have not received an email, then probably have entered the wrong email address or your mailbox is too full. In addition, it may be that your ISP may have a maximum size for emails to receive.

Others manual(s) of Gardena 38 E mulchCut-4039

Gardena 38 E mulchCut-4039 User Manual - German - 14 pages


The manual is sent by email. Check your email

If you have not received an email with the manual within fifteen minutes, it may be that you have a entered a wrong email address or that your ISP has set a maximum size to receive email that is smaller than the size of the manual.

The email address you have provided is not correct.

Please check the email address and correct it.

Your question is posted on this page

Would you like to receive an email when new answers and questions are posted? Please enter your email address.


Info