493073
88
Zoom out
Zoom in
Previous page
1/185
Next page
87
UITSLUITEND VOOR
UITTREKBARE LADEN:
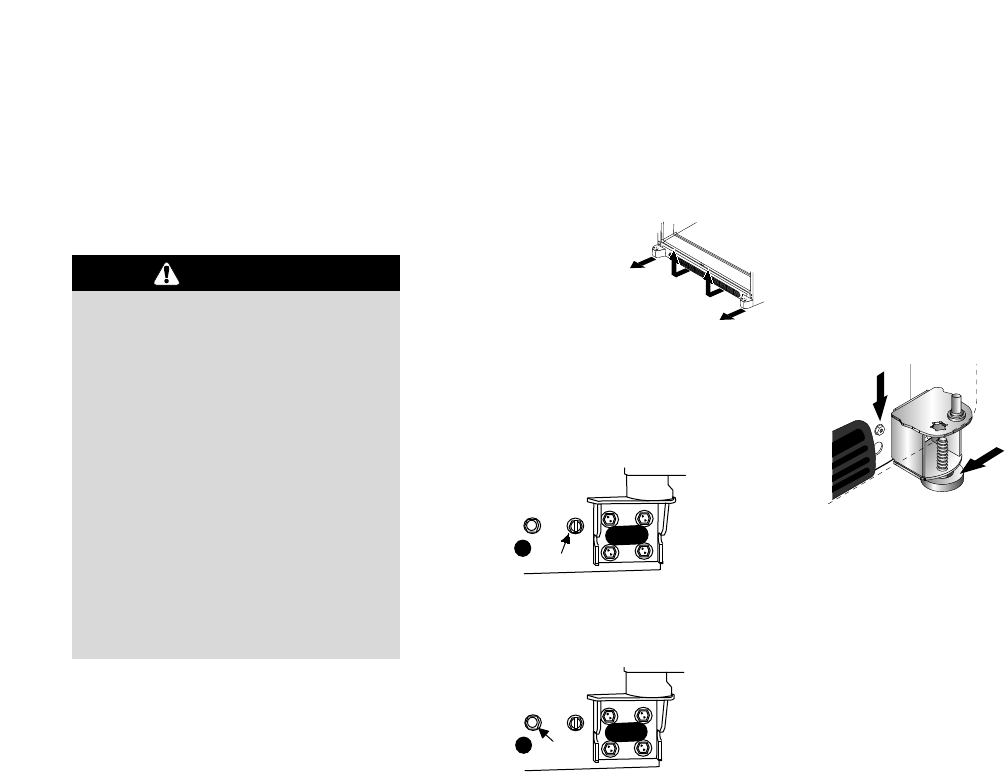
1. Draai beide stabilisatievoetjes naar rechts
totdat zij stevig de grond raken. Draai de
rolstelschroef 2 à 3 maal naar links zodat
het volledige gewicht van de koelkast op de
stabilisatievoetjes rust.
Bescherm zacht vinyl of andere
vloerbedekking met karton, tapijt of
ander beschermend materiaal om
schade aan muren en vloeren te
voorkomen.
Maak geen gebruik van elektrische
gereedschappen voor het corrigeren
van het niveau, om stelbouten niet te
beschadigen of te breken.
Laat de koelkast NIET zo laag zakken
dat de onderzijde van de koelkast die
de condensator ondersteunt, op de
grond rust. Indien dat toch het geval is,
kunnen onderdelen aan de onderkant
worden beschadigd.
OPGELET
Rolstelschroef
Stabilisatievoetje
2. Plaats de rooster onderaan en de
beugelafdekking(en) terug. Zie de
markeringen op de binnenzijde van de
rooster voor de juiste plaatsing.
Klik het onderste gedeelte eerst op
zijn plaats. Druk op de bovenkant van
de rooster totdat het bovenste gedeelte
op zijn plaats klikt.
WAT ALS DE KOELKAST
SCHUDT?
Draai de achterste stelschroef naar rechts
om de schuddende hoek te verhogen.
Plaats de rooster onderaan terug op zijn
plaats.
VEREISTE
GEREEDSCHAP:
Schroevendraaier voor
zeskantschroeven van
3
8 inch (9,5 mm)
•Waterpas
1. Verwijder de rooster onderaan en
de doppen op de onderste scharnieren.
2. Draai beide voorste stelschroeven (A) naar
rechts om de koelkast te verhogen en naar
links om deze te verlagen.
3. Draai beide achterste stelschroeven (B)
naar rechts om de koelkast te verhogen en
naar links om deze te verlagen.
4. Ga met de waterpas na of de koelkast
6 mm naar achteren helt zodat de deur
goed sluit.
Plaats de rooster terug zodra de
koelkast uitgelijnd is en stabiel staat.
Waterpas plaatsen van
koelkast
A
B
INSTALLATIE
, VERVOLG
88


Need help? Post your question in this forum.

Forumrules


Report abuse

Libble takes abuse of its services very seriously. We're committed to dealing with such abuse according to the laws in your country of residence. When you submit a report, we'll investigate it and take the appropriate action. We'll get back to you only if we require additional details or have more information to share.

Product:

For example, Anti-Semitic content, racist content, or material that could result in a violent physical act.

For example, a credit card number, a personal identification number, or an unlisted home address. Note that email addresses and full names are not considered private information.

Forumrules

To achieve meaningful questions, we apply the following rules:

Register

Register getting emails for Gaggenau SK 590 at:


You will receive an email to register for one or both of the options.


Get your user manual by e-mail

Enter your email address to receive the manual of Gaggenau SK 590 in the language / languages: English, German, Dutch, French, Italian as an attachment in your email.

The manual is 4,34 mb in size.


You will receive the manual in your email within minutes. If you have not received an email, then probably have entered the wrong email address or your mailbox is too full. In addition, it may be that your ISP may have a maximum size for emails to receive.

Others manual(s) of Gaggenau SK 590

Gaggenau SK 590 User Manual - Danish, Portuguese, Swedish, Turkish, Spanish, Norwegian, Finnish - 185 pages


The manual is sent by email. Check your email

If you have not received an email with the manual within fifteen minutes, it may be that you have a entered a wrong email address or that your ISP has set a maximum size to receive email that is smaller than the size of the manual.

The email address you have provided is not correct.

Please check the email address and correct it.

Your question is posted on this page

Would you like to receive an email when new answers and questions are posted? Please enter your email address.


Info