493073
46
Zoom out
Zoom in
Previous page
1/185
Next page
45
PARA LOS MODELOS CON
CAJON DESMONTABLE
SOLAMENTE:
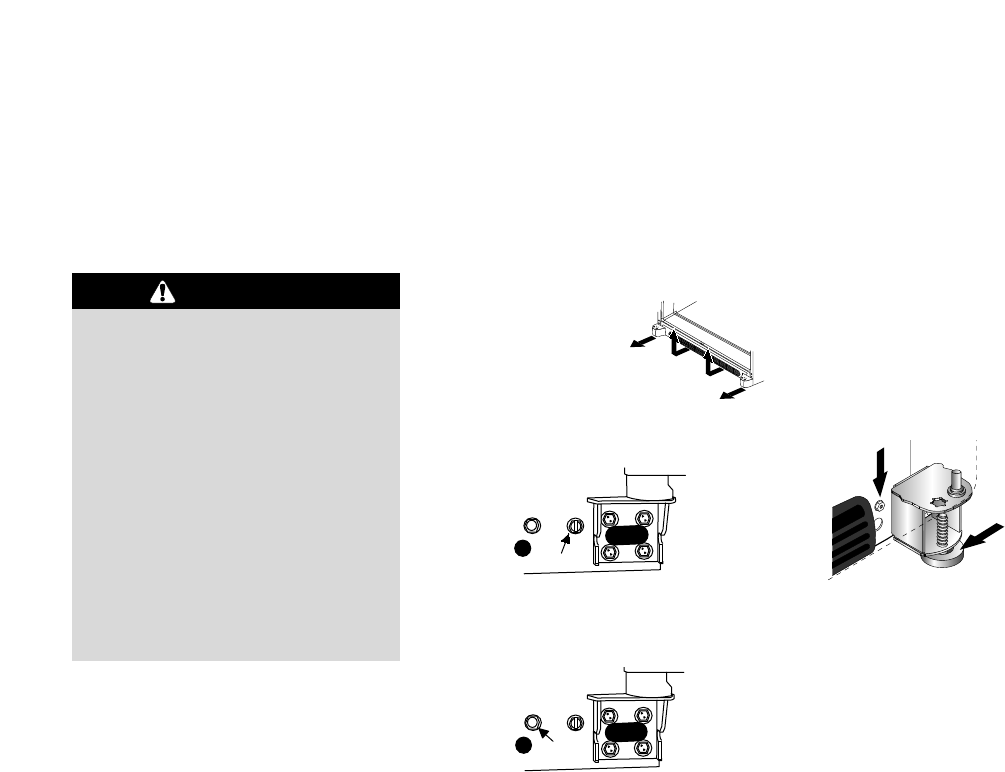
1. Gire ambos tornillos niveladores a la
derecha hasta que queden firmes contra el
piso. Gire los tornillos de ajuste de los
rodillos 2 o 3 veces a la izquierda, de modo
que el peso completo del frigorífico
descanse en los tornillos niveladores.
Tor nillo de Ajuste del Rodillo
Tor nillo Nivelador
2. Vuelva a colocar la rejilla inferior y la(s)
cubierta(s) del soporte. Vea las marcas en
el lado interior de la rejilla para asegurar su
instalación correcta.
Primero coloque a presión la porción
inferior. Empuje la parte superior de la
rejilla hasta que la porción superior
entre a presión en su lugar.
¿Qué hacer si el
frigorífico se balancea?
Gire a la derecha el tornillo de ajuste
posterior para elevar la esquina que se
balancea.
Vuelva a instalar la rejilla inferior.
HERRAMIENTAS
NECESARIAS:
Destornillador de punta hexagonal de 3/8”
(9,5 mm)
Nivel
1. Retire la rejilla inferior
y la cubierta de las
bisagras inferiores.
2. Gire ambos tornillos de ajuste
delanteros (A) a la derecha para elevar y a
la izquierda para bajar.
3. Gire ambos tornillos de ajuste traseros (B)
a la derecha para levantar y a la izquierda
para bajar.
4. Verifique con el nivel que haya una
inclinación de 6 mm hacia la parte trasera
para el cierre adecuado de las puertas.
Si el frigorífico está alineado y estable,
vuelva a colocar la rejilla inferior.
Nivelación del
frigorífico
A
B
INSTALACIÓN DEL FRIGORÍFICO
,CONT.
Para evitar daño a las paredes y al piso,
proteja los revestimientos de piso de vinilo
u otros revestimientos poco duros con
cartón, alfombras u otro material protector.
Para evitar daño o rotura del perno de
ajuste, no use herramientas eléctricas
para corregir la nivelación.
NO ajuste el frigorífico hacia abajo
hasta donde la base del frigorífico que
contiene el condensador quede
descansando sobre el piso. Al hacer
esto se pueden dañar los componentes
inferiores.
ATENCION
46


Need help? Post your question in this forum.

Forumrules


Report abuse

Libble takes abuse of its services very seriously. We're committed to dealing with such abuse according to the laws in your country of residence. When you submit a report, we'll investigate it and take the appropriate action. We'll get back to you only if we require additional details or have more information to share.

Product:

For example, Anti-Semitic content, racist content, or material that could result in a violent physical act.

For example, a credit card number, a personal identification number, or an unlisted home address. Note that email addresses and full names are not considered private information.

Forumrules

To achieve meaningful questions, we apply the following rules:

Register

Register getting emails for Gaggenau SK 590 at:


You will receive an email to register for one or both of the options.


Get your user manual by e-mail

Enter your email address to receive the manual of Gaggenau SK 590 in the language / languages: English, German, Dutch, French, Italian as an attachment in your email.

The manual is 4,34 mb in size.


You will receive the manual in your email within minutes. If you have not received an email, then probably have entered the wrong email address or your mailbox is too full. In addition, it may be that your ISP may have a maximum size for emails to receive.

Others manual(s) of Gaggenau SK 590

Gaggenau SK 590 User Manual - Danish, Portuguese, Swedish, Turkish, Spanish, Norwegian, Finnish - 185 pages


The manual is sent by email. Check your email

If you have not received an email with the manual within fifteen minutes, it may be that you have a entered a wrong email address or that your ISP has set a maximum size to receive email that is smaller than the size of the manual.

The email address you have provided is not correct.

Please check the email address and correct it.

Your question is posted on this page

Would you like to receive an email when new answers and questions are posted? Please enter your email address.


Info