590295
16
Zoom out
Zoom in
Previous page
1/72
Next page
INSTALLATION OVERVIEW
B1. Prepare Rear Wall
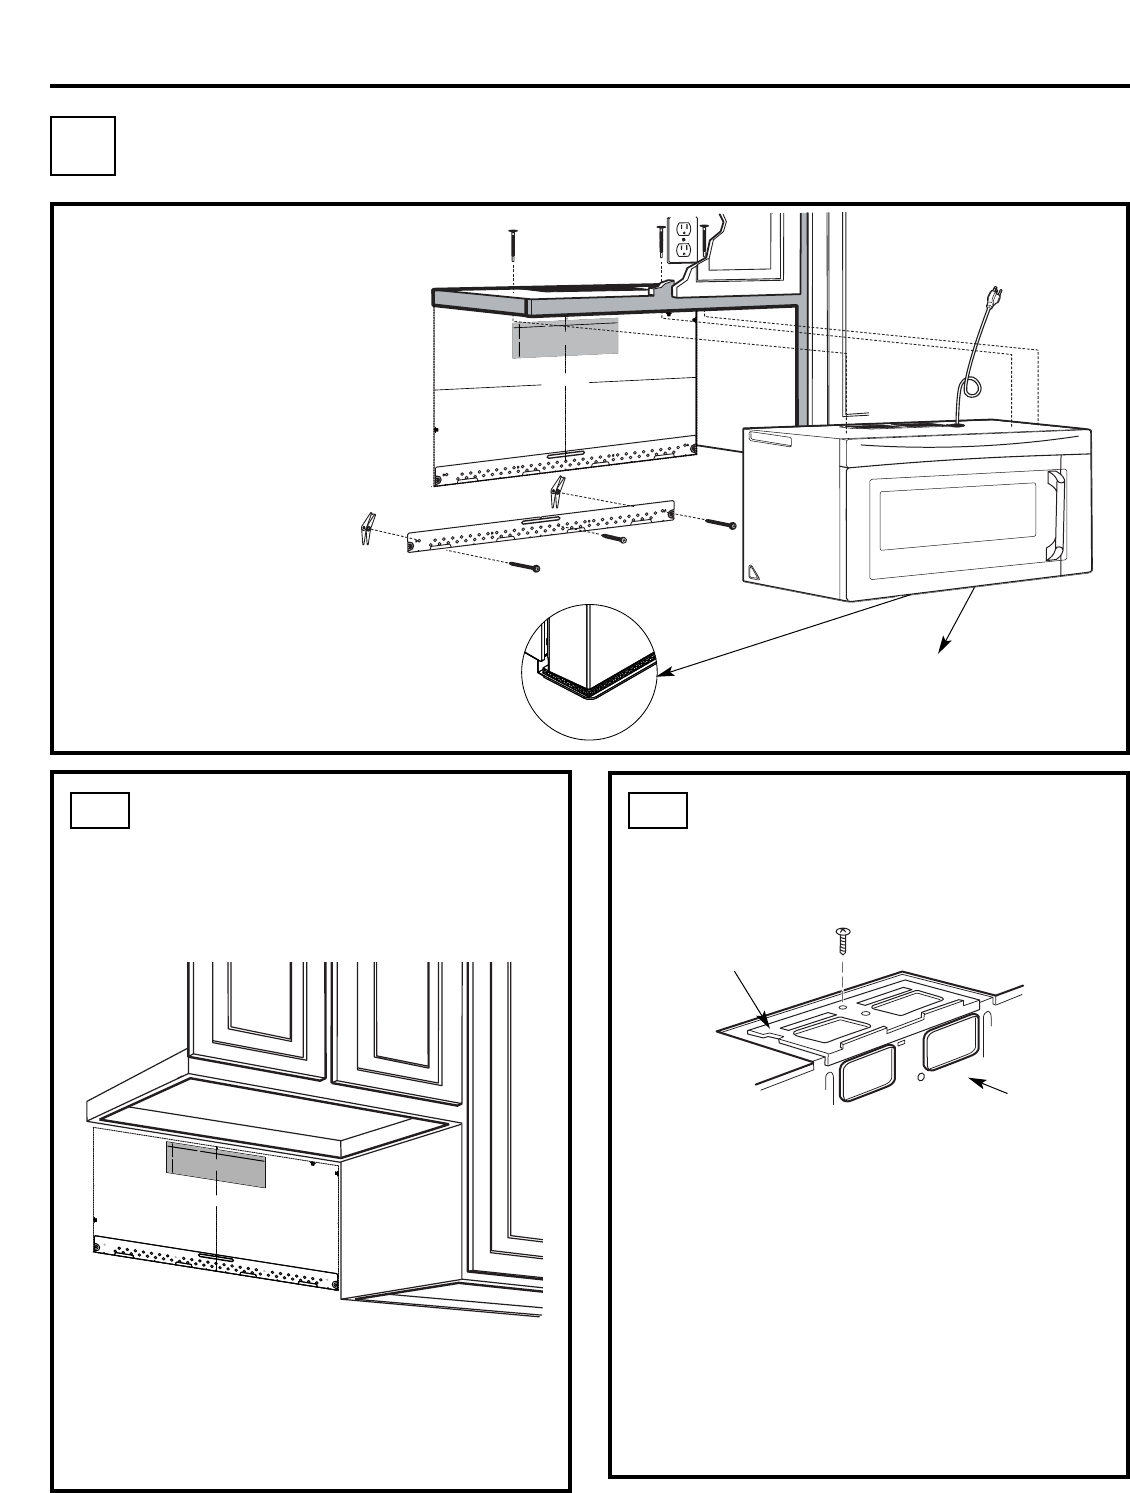
B3. Attach Mounting Plate to Wall
B4. Prepare Top Cabinet
B5. Adjust Blower
B6. Mount the Microwave Oven
IMPORTANT NOTES:
Make sure the screws for the
blower motor and blower plate
are securely tightened when
they are reinstalled. This will
help to prevent excessive
vibration.
been properly routed and secured,
and that the wires are not pinched.
Remove and save the screw that holds the blower
plate to the microwave. Lift off the blower plate.
Back of
Microwave
Installation Instructions
PREPARING THE REAR WALL
FOR OUTSIDE BACK EXHAUST
B1.
You need to cut an opening in the rear wall for
outside exhaust.
Read the instructions on the REAR
WALL TEMPLATE.
Tape it to the rear wall.
Cut the opening, following the instructions of the
REAR WALL TEMPLATE.
B2.
OUTSIDE BACK EXHAUST (Horizontal Duct)
B
Blower Plate
REMOVE BLOWER PLATE
B2. Remove Blower Plate
3
/
8" T
O E
D
GE


































NO
TE
: IT IS VE
RY IM
POR
T
AN
T
TO
RE
AD
A
ND
FOLL
OW
TH
E
DIR
EC
TIONS
IN T
HE IN
STA
L
LATIO
N
INS
TR
U
CTIO
NS
BEFO
RE
PR
OC
EED
ING
WITH
TH
I
S
RE
AR
W
ALL
TEMP
LA
TE
.
T
h
is
Re
ar
W
all
T
e
m
pl
a
t
e
s
erv
es
t
o
p
osit
i
on
t
h
e
bot
t
om
m
ount
ing
pla
t
e
a
nd
t
o
lo
c
a
t
e
t
he
h
or
i
z
o
nt
al
exhaust
ou
t
let
.
1.
Us
e
a
le
vel
t
o
check
t
hat
t
h
e
t
e
m
pla
t
e
is
posi
t
ione
d
accurat
ely.
2.
Loc
at
e
and
m
ark
a
t
l
ea
s
t
one
st
ud
on
t
he
l
ef
t
or
right
side
o
f
t
h
e
c
e
nt
er
l
ine.


I
t
is
im
port
ant
t
o
u
se
at
leas
t
on
e
woo
d
scr
e
w
m
oun
t
e
d
f
irmly
in
a
st
ud
t
o
s
up
port
t
he
wei
ght
of
t
h
e
m
i
crow
ave.
M
a
r
k
t
wo
a
ddit
ion
al
,
e
v
enly
spa
ced
loca
t
i
on
s
f
or
t
h
e
s
uppl
ied
t
og
g
le
bolt
s.
3.
Dr
i
ll
h
oles
in
t
h
e
m
ark
ed
l
oca
t
io
n
s.
Wh
ere
t
h
er
e
i
s
a st
ud,
dri
ll
a
3
/
1
6"
ho
le
f
o
r
wood
screws.
F
o
r
h
ol
es
t
hat
do
n
ot
li
ne
up
wit
h
a
st
u
d,
d
r
il
l
5
/
8
"
hole
s
f
or
t
oggle
b
olt
s
.


DO
NO
T
I
N
S
T
ALL
T
HE
M
O
UNT
I
NG
P
LAT
E
AT
T
HI
S
T
I
M
E.
4.
Rem
o
v
e
t
he
t
em
plat
e
f
rom
t
he
rear
wall.
5.
Review
t
h
e
I
nst
alla
t
io
n
I
n
s
truc
t
ion
boo
k
f
or
y
our
inst
allat
io
n
sit
u
a
t
io
n.
Lo
cate
and
mar
k hol
es to
a
lig
n w
ith ho
l
es
in the
mo
u
nti
ng p
late
.
IMP
O
RTA
NT:
LOCATE
AT LE
A
ST ON
E
STU
D
O
N
EITH
ER
S
ID
E
O
F
TH
E
C
E
NTER
LIN
E
.
M
A
R
K TH
E L
OC
AT
ION FOR
2 AD
D
IT
I
O
NAL
,
EVEN
LY
SP
ACE
D TOGG
LE BO
LTS IN
THE
MOU
NTIN
G
PLA
TE
AREA.
Lo
cate
and
mar
k hol
es to
a
lig
n w
ith h
o
les
in the
mo
unti
ng
p
late
.
IMPORTA
NT:
LO
CATE
AT LE
AST ON
E
STU
D O
N EIT
H
ER
SIDE
O
F
TH
E CE
N
TER
LIN
E.
MA
RK TH
E
L
OCAT
IO
N FOR
2 AD
DIT
I
O
NAL
, EVEN
LY
SP
AC
E
D
TOGG
LE
BO
LTS
IN
THE
M
OU
NTI
N
G PLA
TE
AR
EA.
Trim
the
r
ea
r wa
ll te
mpla
te a
l
o
n
g the d
otted
line
.
Tri
m
the
r
ea
r
wall
te
mpla
te
a
l
o
ng
the
d
otted
lin
e
.

















1
2
"
4
"
Dar
le
vu
elta
a
la
ho
ja
pa
r
a
co
n
sul
tar
la
ve
r
sión
en
E
spañ
ol.
Make sure the motor wiring has
EN-16
3
/8
"
TO
ED
G
E
%#
7
6
+
1
0
Ä
+
(
'
:*#
75
6
#
&
#
2
6
14
+5
2
1
5+6
+1
0
'&
1
7
6
5
+
&'

4'%
1/
/
'0
&'&
&
+
/
'
0
5
+
10

)
4'#
5
.
#
&
'
0
#
+
4
9
+
.
.




&
+
5
%
*
#
4
)
'
+0
6
1
*1
7
5
'
5
6
4
7
%6
7
4
'
/
+0+
/7/9+&
6*
4'3
7
+4'&
4'#49#..6'/2.#6'
NO
T
E:IT IS V
E
RY I
MPO
R
TANT TO
RE
A
D A
ND FOLLO
W
T
HE
D
IRE
CT
I
O
N
S
IN THE INSTALLA
T
I
ON INST
RU
CTIO
N
S
B
E
FO
R
E
PR
OC
E
EDI
NG
WI
T
H
TH
IS
R
E
A
R W
A
LL TE
MPLA
T
E
.
T
h
i
s
R
e
a
r
Wa
l
l
T
e
m
p
l
a
te
s
e
r
v
es
t
o p
o
s
it
i
o
n
th
e
b
o
tt
o
m
m
o
u
nt
in
g pl
a
t
e
a
nd
t
o
l
o
c
a
t
e
t
h
e
ho
r
i
z
on
t
al e
x
h
au
s
t
ou
t
l
e
t
.
1
. Us
e
a
l
e
v
el
to
c
h
ec
k
th
a
t
t
h
e
t
e
mpla
t
e
i
s
po
s
i
t
i
on
ed
a
c
cu
r
at
e
l
y
.
2.
L
o
c
at
e
a
nd
mar
k
a
t
leas
t o
ne
s
t
u
d
o
n the
l
e
f
t
o
r
r
i
gh
t
s
i
de o
f
the
c
e
n
ter
l
i
n
e
.
016
'

I
t
i
s
i
mp
o
r
t
an
t
to
u
s
e
a
t
l
e
as
t
o
ne
w
o
od
scr
e
w
mo
u
nted
fi
r
ml
y
i
n
a
s
t
u
d
to
sup
p
or
t t
h
e
weight
of
th
e
m
i
c
r
owa
v
e.
M
a
r
k
tw
o
a
d
di
ti
on
a
l,
e
v
e
n
l
y
s
pa
c
ed
l
o
c
at
io
n
s
fo
r
t
h
e
s
u
p
pl
i
ed
t
o
g
gl
e
b
o
l
t
s
.
3.
D
r
i
ll
h
ol
e
s
i
n
t
h
e
m
ar
k
ed l
o
c
a
ti
o
n
s
.
Whe
r
e
t
h
er
e
i
s
a
s
tu
d,
d
r
il
l
a
3/1
6"
h
ol
e
f
or
w
oo
d
s
c
r
e
w
s
.
Fo
rh
o
les
t
hat
do
n
o
t lin
e
up
w
i
t
h
a
s
tu
d,
dr
i
l
l
5
/
8
"
h
o
l
e
s
f
or
t
o
gg
l
e bo
l
ts
.
016
'

D
O
N
OT
I
NS
TA
L
L
T
HE
M
O
U
NTI
N
G
PL
A
TE
AT
TH
IS
T
IME.
4. Re
m
ove
th
e
te
mpla
te
f
r
o
m
t
h
e
r
ea
r
wal
l
.
5.
R
e
v
i
e
w
t
h
e
I
n
s
ta
l
l
a
t
i
on
I
n
s
t
r
u
c
t
i
o
n
bo
ok
for
y
ou
r
ins
t
a
l
l
a
ti
o
n
s
i
t
ua
t
i
o
n
.
Locat
e
a
n
d
m
ar
k
holes
to ali
gn wit
h hole
sin t
he
mounting
p
l
ate.
IMP
O
RTA
NT
:
LO
C
A
T
E
AT
LEA
ST
ONE STUD
O
N E
I
THER
S
I
D
E
O
F
T
H
E
CENT
ER
LI
N
E
.
M
ARK
T
HE LO
CATIO
N
F
O
R 2 A
DDIT
IO
N
A
L,
EV
ENLY
S
P
ACE
D TO
GGLE
BO
L
T
S
IN
THE MO
UNTING PLATE
ARE
A
.
Locate a
nd
mar
k
holes
to al
i
gn
w
it
h ho
les
in t
he
m
ounti
ngplate.
I
M
PO
RTANT
:
LO
C
A
T
E AT
LEA
ST
ON
E
ST
UD
O
N
EI
T
H
E
R SI
D
E
O
F
TH
E
CENT
E
R
LI
N
E
.
MARK
T
HE LO
C
A
TIO
N
F
OR 2 ADDITION
A
L,
E
V
E
N
L
Y
S
P
A
CED
TOG
GL
E
BO
LT
S IN
THE MO
UN
TING
PLATE
AR
EA
.
Trimt
he r
e
a
r
wall tem
p
l
ate
al
ong
t
he d
ott
ed
lin
e.
Tri
m
t
he rea
r
wal
l tem
pla
t
e alo
ng
t
h
e
dotted
lin
e.
%
(%76176(14*14+<106#.
1765+&'':*#756
%
7
6
*
1
.
'
6
*
4
1
7
)*
4
'
#
4
9
#.
.
(
14
'
:
*
#
7
5
6
#&#
26
1
4
12"
4"
D
a
r
l
e
v
u
e
lt
a
a
la
h
o
j
a
p
a
r
a
co
n
su
lt
ar
la
v
ers
i
ó
n
e
n
E
s
p
a
ño
l.
IMPORTANT :Do not remove the cardboard
spacers between the heat shield and door.
16


Need help? Post your question in this forum.

Forumrules


Report abuse

Libble takes abuse of its services very seriously. We're committed to dealing with such abuse according to the laws in your country of residence. When you submit a report, we'll investigate it and take the appropriate action. We'll get back to you only if we require additional details or have more information to share.

Product:

For example, Anti-Semitic content, racist content, or material that could result in a violent physical act.

For example, a credit card number, a personal identification number, or an unlisted home address. Note that email addresses and full names are not considered private information.

Forumrules

To achieve meaningful questions, we apply the following rules:

Register

Register getting emails for Frigidaire FPBM3077RF at:


You will receive an email to register for one or both of the options.


Get your user manual by e-mail

Enter your email address to receive the manual of Frigidaire FPBM3077RF in the language / languages: English, French as an attachment in your email.

The manual is 17,39 mb in size.


You will receive the manual in your email within minutes. If you have not received an email, then probably have entered the wrong email address or your mailbox is too full. In addition, it may be that your ISP may have a maximum size for emails to receive.

Others manual(s) of Frigidaire FPBM3077RF

Frigidaire FPBM3077RF User Manual - English - 35 pages


The manual is sent by email. Check your email

If you have not received an email with the manual within fifteen minutes, it may be that you have a entered a wrong email address or that your ISP has set a maximum size to receive email that is smaller than the size of the manual.

The email address you have provided is not correct.

Please check the email address and correct it.

Your question is posted on this page

Would you like to receive an email when new answers and questions are posted? Please enter your email address.


Info