4. WORKING WITH FRAMA MATRIX F4 / F6.......................................................................................21
4.1. GENERAL NOTES.............................................................................................................................................. 21
4.5. WORKING WITH SCALES.................................................................................................................................. 26
4.6. USING THE LABEL DISPENSER FUNCTION.......................................................................................................... 27
4.7. FRANKING MAIL ITEMS.................................................................................................................................... 28
4.8. ELIMINATING PAPER JAM WITH AUTOMATIC FEEDER AF6/AFS6.......................................................................29
5. USING MAIN MENU..........................................................................................................................30
5.1. CONTROLS OF AUTOMATIC FEEDER AF6/AFS6................................................................................................. 30
5.3. PRESORTING MAIL USING SCALES ................................................................................................................... 36
5.4. POSTDATING YOUR MAIL................................................................................................................................ 37
6. COUNTER READINGS AND COST CENTRES.....................................................................................44
6.1. COST CENTRE MODE....................................................................................................................................... 44
6.2. COST CENTRES AND COST CENTRE MANAGEMENT IN ADMINISTRATION MODE.............................................46
6.3. RENAMING COST CENTRES AND CHANGING PIN............................................................................................. 48
6.4. CHANGING COST CENTRE NAME.................................................................................................................... 48
7.1. SET-UP MENU 1............................................................................................................................................... 50
7.2. SET-UP MENU 2............................................................................................................................................... 51
7.3. SET-UP MENU 3............................................................................................................................................... 53
8.4. LAST MESSAGE................................................................................................................................................ 54
10.2. NOMINAL DATA OF POWER SUPPLY.............................................................................................................. 61
10.3. DIMENSIONS AND WEIGHT............................................................................................................................ 61
10.5. STORAGE AND OPERATING CONDITIONS....................................................................................................... 62
10.6. RECYCLING AND DISPOSAL........................................................................................................................... 62
DECLARATION OF CONFORMITY........................................................................................................63
Frama Matrix F4 / F6
6
1. Assembling and connecting Frama Matrix
1.1. Unpacking and connecting Frama Matrix F4 / F6
Unpack your Frama F4 / F6 franking system from its box. You will find all cables and accessories that are
necessary for you to assemble and immediately use your franking system in the box. Under separate
cover, you will have received the PIN you require to start up. Please also keep this information ready at
hand.
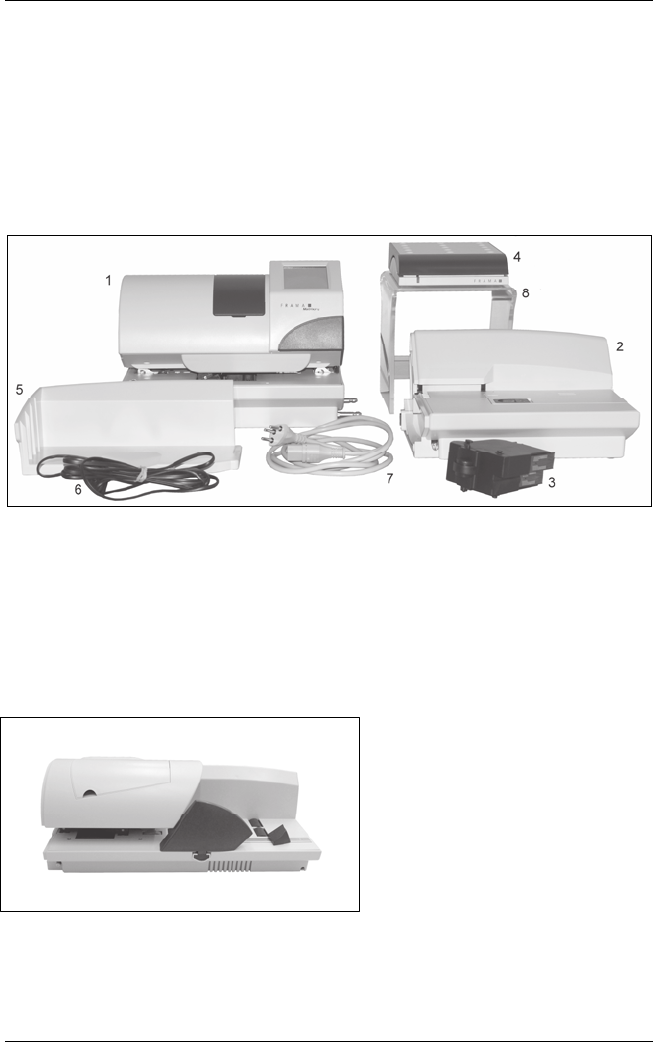
In the box, you will find a:
-Frama Matrix F4 / F6 (1)
-Manual feeder MF4 (not a part of the delivery with the Matrix F6) (2)
-Inkjet cassette (3)
-Optional letter scales with cable for scales (4)
-Letter catcher TF2 (5)
-Modem cable (6)
-Mains cable (power cord) (7)
-Optional acrylic support (8)
1.1.1. Unpacking automatic feeder AF6 / AFS6 for Matrix F6
The automatic feeder AF6/AFS6 for the Matrix F6 is supplied in a separate box. Unpack it.
Frama Matrix F4 / F6
7
1.1.2. Installing Frama Matrix F4 / F6
Install your Frama Matrix F4 / F6 in a place near a mains socket and a suitable telephone connection:
(Analogue direct modem). Select a place without direct sunshine and no heavy vibration. Take all parts
out of the box.
1.1.3. Installation notes
Your Frama franking system was manufactured for use in normal conditions. Please remember: Today’s
furniture is coated with a confusing variety of paints, lacquers and synthetic materials. In view of this, it is
quite possible that some of these materials contain constituents which can attack or soften the plastic feet
of our equipment. If changed in this way by foreign substances, the feet of our equipment can mark your
furniture. Frama is unable to accept any liability in this respect for obvious reasons.
With this in mind, use a non-slip underlay.
Frama Matrix F4 / F6
8
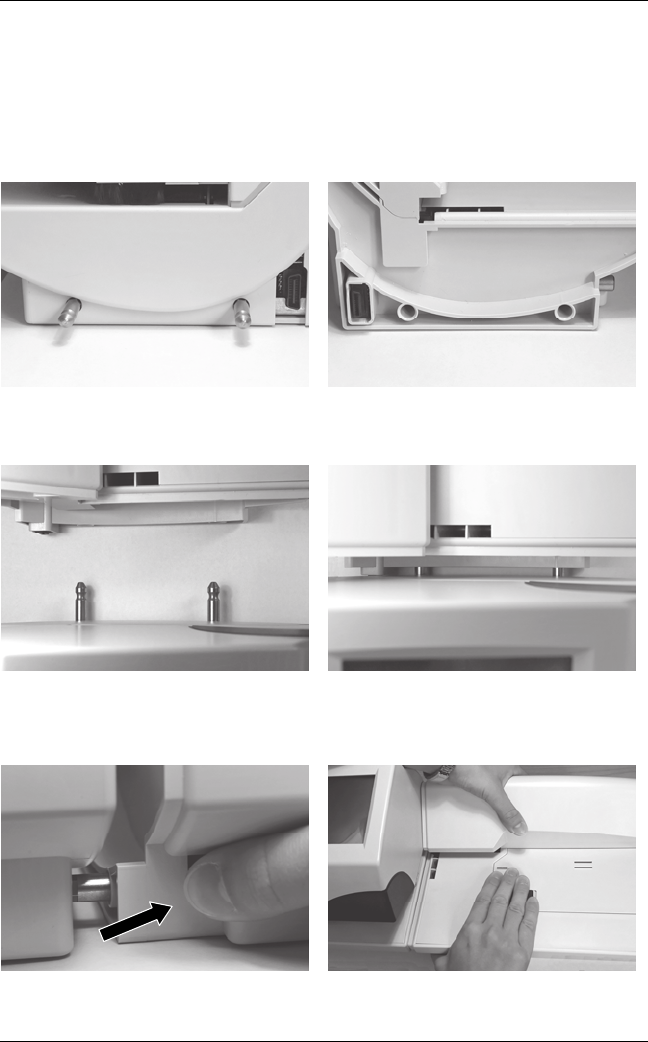
1.2. Installation notes for Matrix F4
Position the Matrix F4 and manual feeder MF4 next to each other at the place of installation, as shown in
photo 3. The connecting pins on the Matrix F4 must be inserted into the guide holes in the manual feeder
MF4.
Keep in mind the positions of the connecting pins on the F4 and the guide holes in the manual feeder
MF4:
Photo 1: Matrix F4 with connecting pins Photo 2: Manual feeder MF4 with guide holes
Align the Matrix F4 and the manual feeder MF4, as shown in photo 3, and then push the feed guide holes
carefully over the connecting pins.
Photo 3: Positioning of Matrix F4 and manual feeder MF4 Photo 4: Manual feeder MF4 not yet locked
Depress the silver-coloured button, shown in photo 5, and firmly push the manual feeder MF4 up against
the Matrix F4 housing. Release the silver-coloured button. The manual feeder MF4 will now be locked in
place.
Photo 5: Depress the silver-coloured locking button.Photo 6: Connecting manual feeder MF4 and Matrix F4
Frama Matrix F4 / F6
9
1.2.1. Inserting franking labels into manual feeder MF4
Open the label compartment on the manual feeder MF4 by pushing the
slide to the right. Now completely open the flap to the right.
Take a label box out of the packaging and push the box, left end first,
into the channel. Afterwards, press the label box on the right-hand end
into the guideway.
This is how it should look if you have put the label box properly into
place. You can keep a spare box in the compartment shown in front of
the in-place label box.
Frama Matrix F4 / F6
10
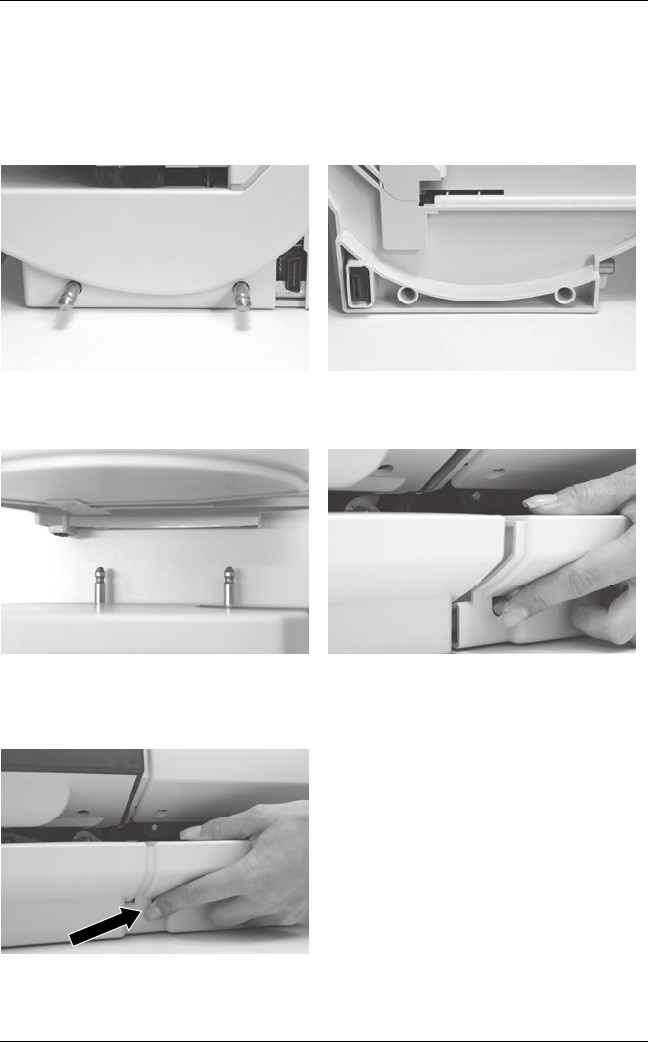
1.3. Installation notes Matrix F6 and AF6/AFS6
Position the Matrix F6 and automatic feeder AF6/AFS6 next to each other at the place of installation, as
shown in photo 9. The connecting pins on the Matrix F6 must be inserted into the guide holes in the
automatic feeder AF6/AFS6.
Keep in mind the positions of the connecting pins on the F6 and the guide holes in the feeder AF6/AFS6:
Photo 7: Matrix F6 with connecting pins Photo 8: Automatic feeder AF6 with guide holes
Align the Matrix F6 and the automatic feeder AF6/AFS6, as shown in photo 9, and then push the feed
guide holes carefully over the connecting pins.
Photo 9: Positioning of Matrix F4 and automatic feeder AF6 Photo 10: Automatic feeder AF6 not yet locked
Depress the silver-coloured button, shown in photo 11, and push the automatic feeder AF6/AFS6 firmly
up against the Matrix F6 housing. Release the silver-coloured button. The feeder AF6/AFS6 will now be
locked in place.
Photo 11: Depress the silver-coloured locking button
Frama Matrix F4 / F6
11
1.3.1. Fitting letter guide (optional)
The letter guide is an optional accessory for use when franking mail items larger than C4 with portrait
format. It is not an integral part of what is delivered with the feeder AF6.
The letter guide consists of two parts. Join the parts and fit the guide into the holders provided (one on
the AF6/AFS6 and one on the franking system).
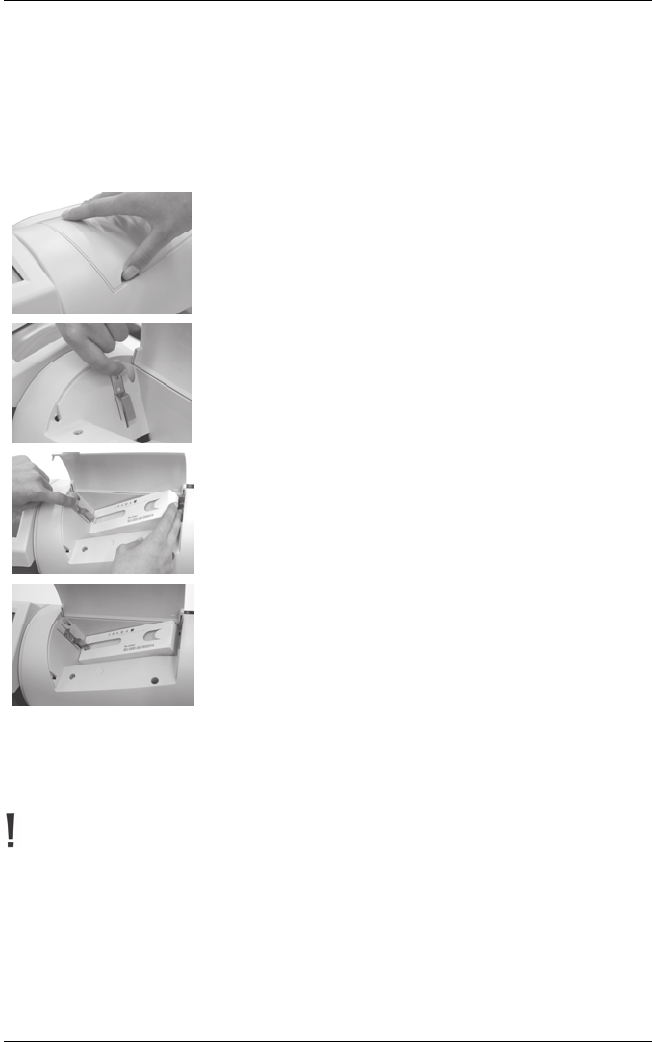
1.3.2. Inserting franking labels into automatic feeder AF6/AFS6
Open the label compartment on the feeder AF6 by lifting up the top
cover flap. Hook a finger under the cover flap and lift it up. Open the
flap completely, upwards.
Hold the top end of the hook clamp with the left hand and pull it up-
wards. Keep the hook clamp in this position.
Put the label box into the channel. Push the front open end of the label
box under the bottom part of the hook clamp. Then, you can release the
hook clamp.
This is how it should look if you have put the label box properly into
place. Close the top cover flap again. The label system is now functional.
1.3.3. Filling water into tank of automatic feeder AFS6 closing device (AFS6 only)
If you decided in favour of the option “Sealer” when purchasing your AF6 (it can also be added later), you
should now fill the water tank of the closing device. Please use distilled water (recommended).
Caution! Never use washing-up liquid additives or other additives which reduce the water
surface tension. Water with a high overall hardness causes a shortening of the servicing
intervals and should thus be avoided.
From time to time, the sealing felt must be cleaned or renewed. In this respect, please refer to chapter
5.1.1.2.
Frama Matrix F4 / F6
12
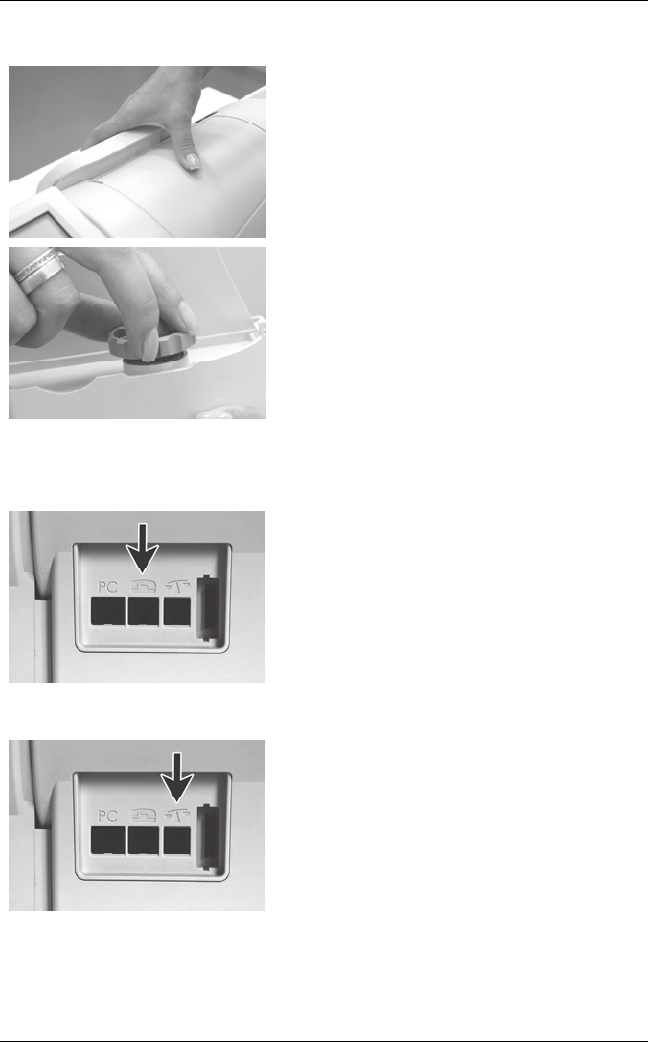
This is how you fill water into the tank of the sealing device.
Remove the tank from the back of the feeder AFS6 by pull-
ing it upwards.
Screw off the filler cap (it is at the bottom of the tank). Pour
in distilled water until the tank is three quarters full. Screw
on the filler cap again and put the tank back into place.
1.4. Further installation steps Matrix F4 and Matrix F6
1.4.1. Establishing modem link
Connect the modem cable (small square plug) with the
Matrix franking system at the socket (jack) marked with the
telephone symbol.
Afterwards, connect the other end of the telephone cable
into a suitable analogue modem telephone socket.
When starting up the first time, we recommend that you
use an existing analogue fax connection.
1.4.2. Connecting scales (optional)
Unpack the scales and, if required, the scales platform
(accessory for extra price). Position the scales next to your
Matrix franking system or on the scales support.
Connect the scales cable with the scales connection, which
is also at the back of the Matrix franking system and marked
with scales
Symbol.
Frama Matrix F4 / F6
13
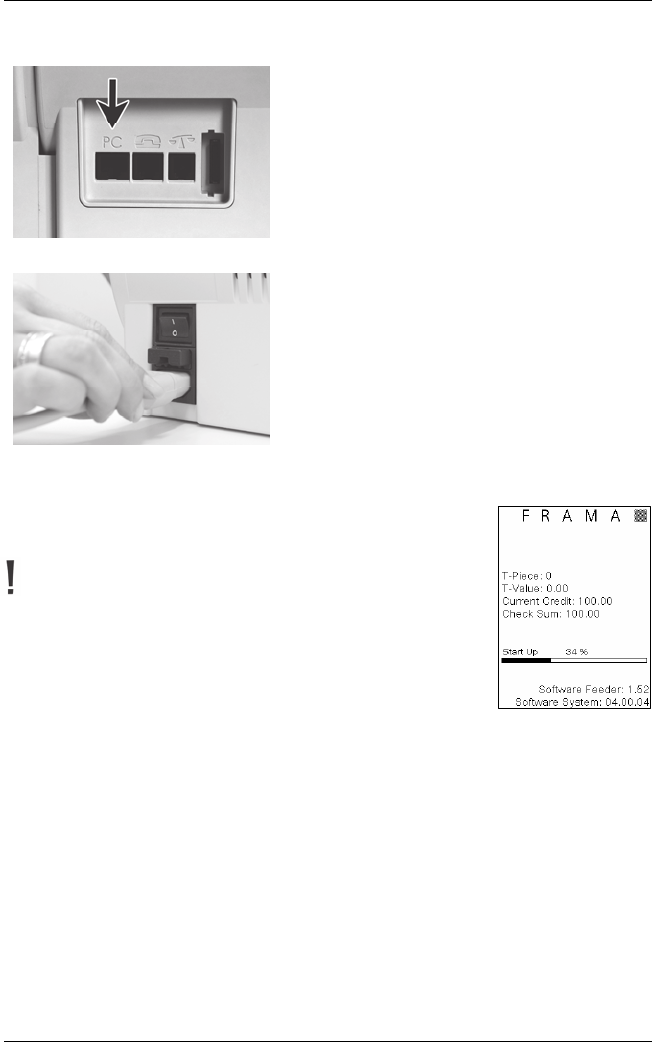
1.4.3. Connecting an external PC solution (optional)
Use the socket (jack) marked “PC“ for connecting an exter-
nal PC solution for data transfer. Please refer to the instruc-
tions in the operating manual of the external PC solution.
1.4.4. Connecting to main electric supply
Check that you have closed all covers and flaps on your
Matrix franking machine. Make sure the scales platform is
not obstructed. Check that the system is switched off (0
must be pressed in).
Pick up the mains cable (power cord). Plug the cable into
the mains socket (jack), as shown in the above photo.
Connect the other end of the mains cable to a suitable
earthing contact socket.
1.5. Switching on franking system
Switch on the franking system. You will hear various sounds after switching
on. All motors and sensors are being checked.
Caution! After switching on, some time might pass until the sytem
is ready. During this time, the Frama franking system will not
accept any input from you.
Your next step is to put in and calibrate the inkjet cassette. This process is ab-
solutely essential to obtain frank marks of excellent quality and it must there-
fore be carried out carefully.
Frama Matrix F4 / F6
14
2. Installing FramaOnline2
Loading your Frama Matrix franking system with new postage (credit) takes place through the telephone
line and a built-in analogue modem. Simultaneously, the postal rate information can be compared / ad-
justed. This process is convenient and gives you the assurance of always having postage and the latest
postal rates at your disposal.
You will require your PIN for the administration mode as well as your Frama on-line2
activation (safety) code which was mailed to you under separate cover. You cannot
activate your system for FramaOnline2 operation without this number.
The FramaOnline2 safety code is used solely for activation. Protect your PINs from misuse by keeping them
in a safe place. If you forget or mislay your PIN codes, they can be read out only in the Frama Central
Workshop.
2.1. Activating Frama Matrix on FramaOnline2 system
Check whether your Frama franking system is properly plugged into the telephone socket. If necessary,
read the chapter “Connection and start-up“ again. The franking system has to be connected to the tele-
phone socket only when linking with the framaonline2 system and re-crediting.
Fetching postage and communicating with FramaOnline2 are possible only in the administration mode.
Caution! The administration mode is password (PIN) protected. Use the PIN you received in a separate
letter.
We have preconfigured your Frama franking system to suit the most used telephone systems. Sometimes
though, it will be necessary for small changes to be made. The most frequent setting will be the dialling
code (official prefix for an outside line) to obtain the free line signal. Please refer to point 8.6.1 in this
respect. In the as-delivered state, NO dialling code (official prefix for an outside line) has been configured.
(i.e. 9 for outside line).
The following steps assume that you have correctly entered the dialling code (official prefix for an outside
line).
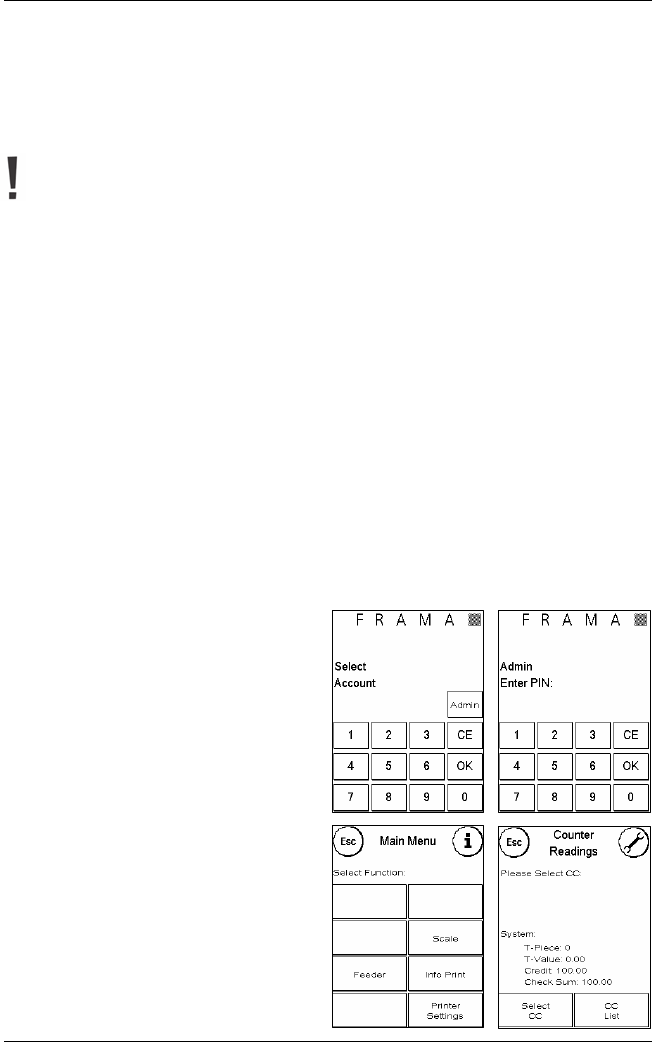
1.Press “Admin” in the cost centre selection
display.
2.Enter your PIN for the administration mode.
Then, press the OK key to get into the admini-
stration mode.
3.Press “i”.
4.Press the “Tool key”.
Frama Matrix F4 / F6
15
5.Press “Forward” (arrow symbol).
6.Select “FramaOnline2”.
7.Press the key “Activation PIN”.
8.Enter the FramaOnline2 Activation PIN using
the faded-in numerical keyboard and ac-
knowledge your entry by pressing OK. Later,
the FramaOnline2 activation code no longer
needs to be entered. Take care to enter the
code without an error otherwise it will be re-
jected by the Matrix franking system or the
FramaOnline2 data centre.
9.Select “Installation”. TER.
10.Your Frama Matrix franking system establishes a link with the FramaOnline2 data centre. This process
can take up to 2 minutes. If the link cannot be established, please check the modem settings. In this
respect, please refer to point 8.6.1.
11.You will now have been logged into the FramaOnline2 data centre. You will receive a corresponding
message in the display.
12.The display is shown for 8 seconds. After this time, you will find yourself
back in the FramaOnline2 menu.
13.Press “ESC” twice to go to the Set-up menu 1. Press “Start up/Log off” to
go to cost centre selection.
Frama Matrix F4 / F6
16
2.2. Loading postage credit
Check whether your Frama franking system is properly plugged into the telephone socket. If necessary,
read the chapter “Connection and start-up“again. The franking system needs to be connected at the
telephone socket only for the time required to load postage credit or for an inspection loading.
Fetching postage and communicating with FramaOnline2 are possible only in the
administration mode. Caution! The administration mode is password (PIN) protected. Use
the PIN you received in a separate letter.
The following steps assume that you have activated your Frama Matrix F4/6 using the FramaOnline2 acti-
vation code and a subsequent inspection loading.
1.Press “Admin” in the cost centre selection
display.
2.Enter your PIN. Then, press the ENTER key to
get into the administration mode.
3.Press “i”.
4.Press the “Tool” key.
5.Press“Forward” (arrow symbol).
6.Select “FramaOnline2”.
Frama Matrix F4 / F6
17
7.Select “Re-set”.
8.Press a preset key for a re-set value or enter
the desired re-set amount in GBP (using the
“Other Reset Amount” key) without using a
decimal point. Please observe any limits on
your contract with the Post Office and with
FramaOnline2.
9.Acknowledge the amount by pressing OK.
10.Your Frama franking system establishes a link with the FramaOnline2 data centre. If the link cannot
be established, please check the modem settings. Please refer to point 8.6.1 in this respect. The link
can last several minutes, depending on the amount of data to be transferred (postal rate
update, etc.).
11.The transaction data will be shown. The loading process has been completed satisfactorily. Wait until
the display exits itself and then press the ESC key twice.
12.Press the “Start up/Log off” key to go to cost centre selection.
13.Your Frama Matrix franking system is now ready for use.
Frama Matrix F4 / F6
18
3. Frama Matrix F4 / F6 printing system and inkjet cassette
Caution! Please first put the inkjet cassette in place before you press “Yes” on
the shown display.
Your Frama franking system uses a double inkjet cassette to frank your mail
items. The inkjet cassette also contains the printing head.
With this in mind, handle the inkjet cassette very carefully and make sure that
no pointed objects, such as paperclips, etc., can damage the sensitive surface
of the printing head. The shelf life of the cartridge used is 1 year. Please first
look at the latest date for use (expiry date/shelf life) before you put your car-
tridge in place.
3.1. Putting inkjet cassette in place
Unpack your inkjet cassette and remove the two protective strips from the
printing head.
Don’t touch the gold-coloured contact surfaces. Grease and
perspiration on your skin can leave a film which could result in
“messy” print marks.
On the top of the inkjet cassette you will find two grip surfaces. Press them
together between your thumb and forefinger.
Open the top cover flap. The printing carriage will already be in the standby
position, waiting for the inkjet cassette to be put in place.
Put in the inkjet cassette from above. When doing so, make your movement
trace the contour of the cover flap.
Push the new inkjet cassette fully into its guide.
Release the grip surfaces. Press back the inkjet cassette with one finger to
make sure the locking points are correctly positioned.
The locking points must engage at the side. Check that the inkjet
cassette is properly seated before you close the cover again (see
photo). The cover must close easily without you applying any
force.
Frama Matrix F4 / F6
19
3.2. Setting franking mark
If you have put the new cartridge properly into place, you can now press
“Yes” on the display.
The inkjet cassette will now be tested and calibrated. This process might take a
few seconds. During calibration, the display shown oppposite will appear.
If the inkjet cassette being used was already in place in your Matrix franking
system, you can choose between recalibration and taking over the existing
calibration data. Recalibration can be necessary if the initial calibration did not
result in a satisfactory franking mark, e.g. the printing head was too cold, etc.
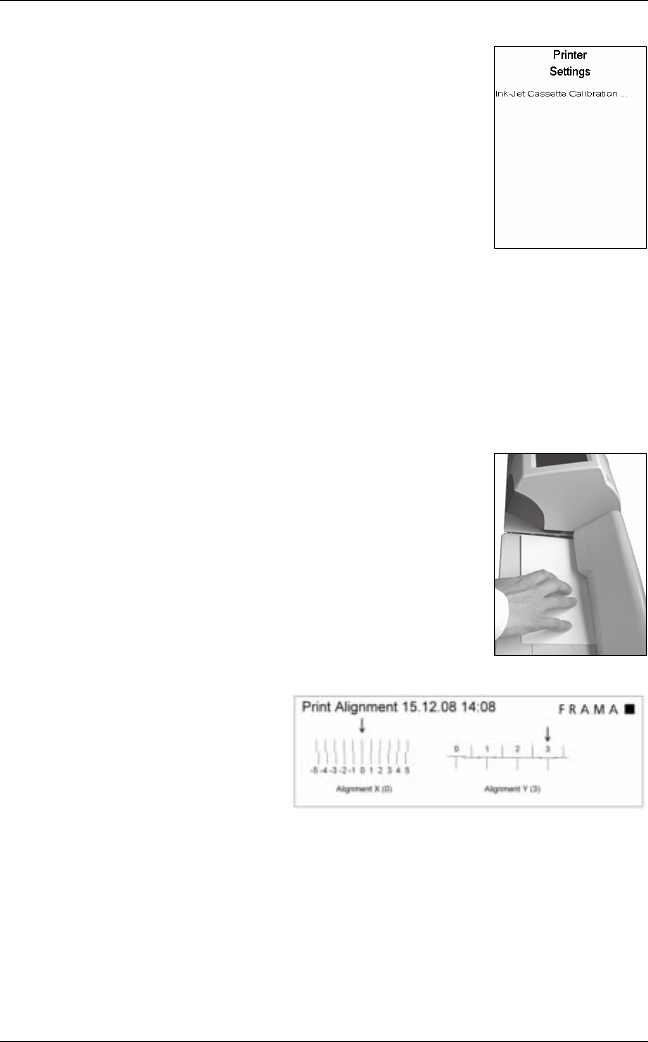
After calibration, you will be asked to print a test franking mark. Pick up an envelope or a folded A4 sheet
of paper. We recommend that you use a filled envelope.
Lay the envelope / paper to be franked on the manual feeder MF4 or in the
automatic feeder AF6.
The envelope / paper, etc. will be franked with a test mark and ejected to the
left.
This is how the test mark should look
:
On the left hand side, you can see setting X
and on the right-hand side setting Y. The
setting valid at the time is indicated by an
arrow. The arrows should point where the
lines appear to be “straightest”.
If this is already the case, you only need to confirm the following X and Y displays by pressing the ENTER
key. Sometimes however, it is necessary for you to change the setting to optimize the results. Simply carry
out the additional instructions.
Frama Matrix F4 / F6
20
This is how you should proceed: On the left-hand side of the test mark, X, look
for the line which seems to be “straightest. Note the number beneath it,
e.g. “0“.
Use the + and - keys to select the right number in the display and then press
ENTER to go to the Y setting.
Again, but this time for the Y setting, use the + and - keys to select the right
number in the display and then press ENTER.
Once more, as requested, print a test franking mark to check your settings.
The arrows will now point exactly at the settings you made, i.e. right where
the lines should be “straightest”.
If results are not satisfactory yet, you can repeat the setting procedure by an-
swering “NO”. To save your settings, confirm with “YES”.
If your franking system has a label dispenser, you can set the label printout
format the same way. Just follow the instructions on the monitor.
This completes your franking system installation.
Frama Matrix F4 / F6
21
4. Working with Frama Matrix F4 / F6
4.1. General notes
The following notes are intended to support you in achieving a sharp, professional mark with your Frama
franking system.
-Don’t frank mail items that are thicker than 10 mm. If you do, you will run the risk of the printing
head touching the surface of the mail item and thus smearing the franked mark. With this in mind,
always use Frama Matrix franking labels for thick mail items.
-Please make sure that no pointed objects, such as paper clips / staples etc, are near the franking
zone.
-Keep your fingers and other parts of the body as well as loose clothes, ties, scarves, bracelets and
necklaces away from the feed inlets of the system. A risk of injury exists.
-If you have the impression that lines are missing in the franked mark, please carry out a printing head
test.
-Don’t use very absorbent or fibrous envelopes which could prevent a sharp mark from being ob-
tained. This could make your franking invalid.
-A certain time after franking, the printing head is sealed to prevent the individual jets from drying.
During this time, “Touch and go” appears on the ComTouch (screen). Touch the ComTouch™ to
continue.
Your franking system protects you from unintentionally franking with high postage rates
(see Section “Settings”. As a standard procedure, all mail items which are franked in excess
of £ 10.00 must be released by touching the displayed postage amount (it is first shown
inverted).
4.2. Frama Matrix F4 / F6 display set-up for franking
The display of your Frama Matrix franking system is also the keypad. The benefits of this solution are ob-
vious: You see only the operating elements that you need at the moment.
The following describes the basic symbols and information that are shown in the respective displays. In
the key to the illustrations, you will find page references with further explanations.
4.2.1. Elements of franking mask
1
Log off or CE symbol. Serves to leave or abort the display
2
Label: Franking label printing
3
Scales: Actual weight and scales functions
4
Credit, Ink: Graphical display of remaining postage or ink remaining in
cartridge
5
Currency symbol (not shown)
6
Toolbar Ready for franking symbol , sealing symbol
7
Franking date (inverted, if post dated)
8
Postage display and forwarding to next OneTouch screens
9
i-key for forwarding to next main menu screen
10
Cost centre display and cost centre changes
11
Graphical displays for credit and remaining ink
12
OneTouch keys with quick access to postal rate control
4.2.2. Elements of postal rate module
1
CE / ESC symbol. Moves up one display level
2
Details about current postal product
3
Forward key
4
Detailed selection for changing chosen postal product
5
Feature keys for selecting an area for type of mailing, zone,
format, weight and additional letter services
Frama Matrix F4 / F6
22
4.3. Franking
4.3.1. Switching franking system on and off.
Always switch your franking system on or off at the mains switch.
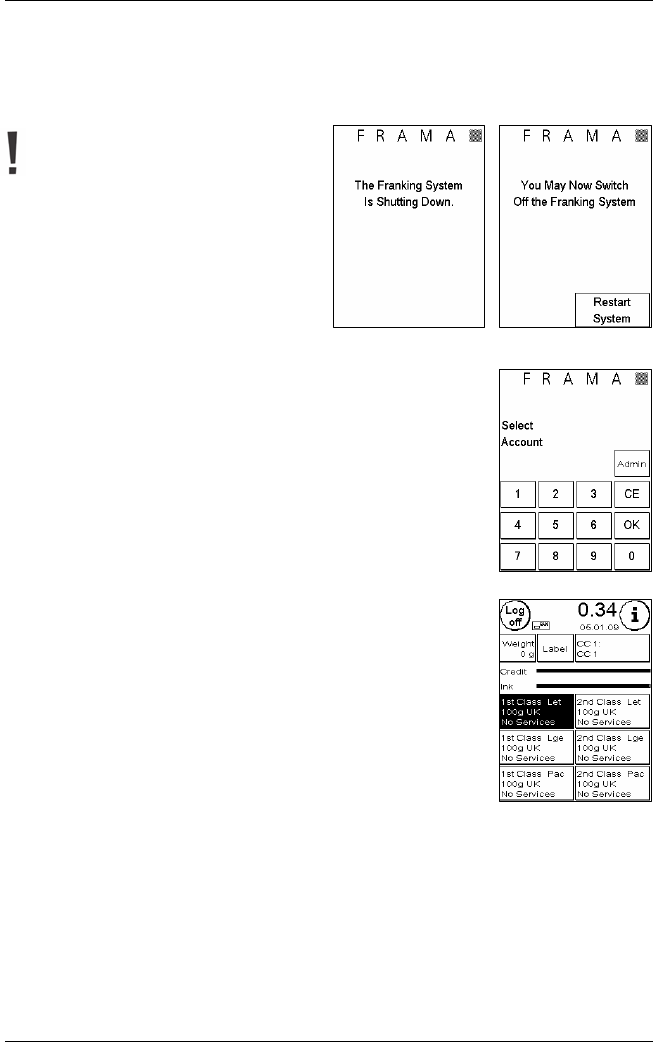
Before you switch off your Matrix
franking system, please “log off”.
Only switch off your Matrix when you are re-
quested to. By adopting this procedure, you make
sure that the printing head is properly sealed.
You can restart your system by pressing “Restart“,
without your first having to operate the mains
switch.
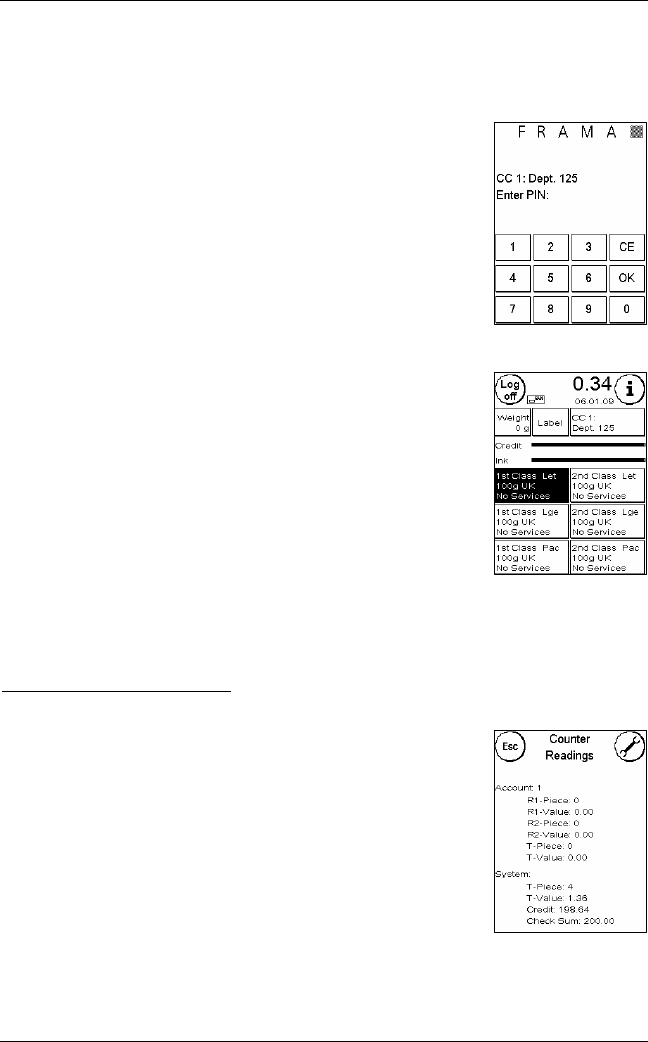
4.3.2. Logging in
To be able to work with your franking system, you have to enter a PIN for
every cost centre. If you have not defined any new PINS, PIN “1” is valid for
cost centre 1 and PIN “2” for cost centre 2, etc.
To select cost centre 1, press “1“ and then the OK key. Afterwards, the cost
centre designation will be displayed: (here CC1) and you can now enter the
PIN (here “1“): Press OK. The franking mask will be called and you can start.
4.3.3. Working with franking mask and OneTouch products
Your Matrix F4 / F6 makes use of so-called OneTouch keys. This means that
you don’t have to enter postal rates but, instead, you select the respective
postal product. Your Frama franking system has been preprogrammed with
the 30 most important postal products. Each one of these so-called OneTouch
keys can be reprogrammed to suit your needs.
The respective postal products are written on the OneTouch keys. The type of
the product is written in the first line. The weight and the destination can be
found on line 2. The third line displays the usage of any additional services.
On pressing a OneTouch key, it inverts and adjusts to the respective product
with the pertaining postage rate. The letter symbol appears, signalling that
your franking system is ready. You can now frank the mail. By touching the
postal rate, you can fetch further masks, each with 6 OneTouch products. Each time, a touch of the CE
key takes you to back to the first franking mask.
Frama Matrix F4 / F6
23
4.3.3.1 Calling detailed overview of postal products
Each postal product is made up of features predefined by the postal system. These are:
-Type of mailing, e.g. 1
st
class, 2
nd
class, airmail, parcel, etc.
-Zone, e.g. inland / domestic market, Europe, a country in the world, etc.
-Format, e.g. letter, large letter, packet, etc.
-Weight
-Letter extra services, e.g. signed for, special delivery, etc.
We have combined all these features in a single OneTouch key. As a result, you do not have to reenter all
these features when changing the product.
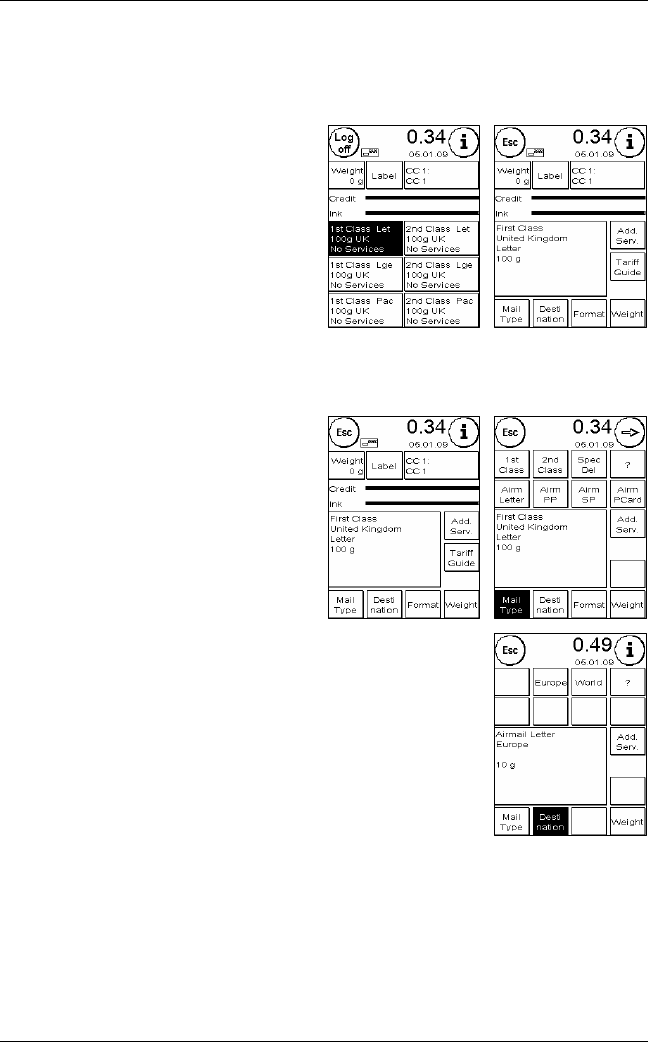
If you wish to call the details of a OneTouch key,
proceed as follows:
Select the OneTouch key of the desired postal
product. The OneTouch key is shown inverted.
Press the inverted OneTouch key again. The display
will change to the detailed overview and show you
all features of the selected postal product. You can
now frank the mail.
4.3.3.2. Changing features of postal products (quick selection function)
In the detailed overview of a postal product, you
have rapid access to all features of the shown
postal product. You can even change the type of
mailing. All changes you make here are deleted
again if you press CE, unless you wish to perma-
nently save the changes.
By proceeding in this way, you can process your
mail very efficiently. Basically, it will be sufficient to
file six postal products with various types of mailing
in the first franking mask. You simply change all
other features using the feature keys.
To change one or several features of a product, proceed as follows (example: Changing the letter format
from letter to packet):
To change the format, press the “Format“ key in the detailed overview. The “Format” key will be inverted
and the possible selections for “Format” will be shown.
Select “Packet”. That’s all. You can now frank the mail.
4.3.3.3. Permanently saving changed features
Press “Save 1-T” in the detailed overview to permanently save a changed selection in the current One-
Touch key.
Frama Matrix F4 / F6
24
4.3.4. Working with postal rate module (Tariff Guided Mode)
Apart from the OneTouch keys and the detailed overview with quick selection function, your Matrix has a
separate mode which supports you when dealing with complicated types of mailing. This mode is called
“Tariff guided” and it is an integral part of the postal rate module.
You fetch the postal rate module by pressing the
weight key in the franking mask. Here too, you can
quickly change features of the current postal prod-
uct, as described under point 4.3.3.2. You do not,
however, have the possibility of permanently saving
what you select on a OneTouch key.
The key “Tariff guided“ fetches a special function.
Here, you are guided through the postal rate jungle
step by step. Here, one after the other, you can
enter the type of mailing, the destination, the
weight and the services.
This procedure is ideal for seldom-used types of mailing.
Example of postal rate guidance: Airmail Letter to US, International signed for, 118g
Press “Tariff Guided“. The possible types of mailing
are shown in the top section of the display. Select
Airmail Letter .
You can now decide the destination. Press “World“.
Frama Matrix F4 / F6
25
Press the ‘’add serv’’ Button for extra services. You
wish to mail a “International signed for” letter.
You thus select “International signed for”. Confirm
this selection by pressing OK.
Ascertain the weight of the mail item.
1st possibility:
Put the mail item onto your scales S2
or S5 and accept the weight by pressing the scales
key (Scale 118g).
2nd possibility:
Press the key 120g.
3
rd
possibility:
Press the Manual entry key and enter the weight using the 10key
keyboard.
The detailed overview will be displayed and the letter symbol faded in. You can
now frank the mail. Press ESC to return to the franking mask with the One-
Touch keys.
4.3.5. Postal rate updates
Your Frama Matrix franking system obtains the postal rate data from the FramaOnline2 data centre. Postal
rate data is checked and, can if necessary, be downloaded every time postage is loaded or an inspection is
made.
The postal rate data is updated when the need arises. You will then be informed about the update. Touch
the display to confirm the message.
4.4. 1-10 Numeric keypad
Postal rates can be entered, irrespective of the
postal products, using the integrated 1-10 numeric
keypad.
1.Press the weight key followed by the postal
rate display to call the 1-10 numeric keypads.
2.Enter the required postal rate (value). Acknowledge the postal rate (value)
by pressing OK. The letter symbol will appear and you can frank the mail.
Frama Matrix F4 / F6
26
4.5. Working with scales
In connection with scales, a whole range of possibilities is open to you for determining the accurate
weight of a mail item.
4.5.1. Checking weight of mail item when franking
Information about the weight is displayed continuously in the top section of
the franking mask (in this case 118g). In view of this, you can have the weight
of a mail item conveniently displayed to you without your having to interrupt
the franking process.
Displaying the weight has no effect on the postal rate calculation.
4.5.2. Fetching mail item weight for postal rate calculation
In the detailed overview or the postal rate calculation, press the “Weight” key
and, at any time, by also pressing the “Scale 118g” key, you can fetch the
displayed weight for calculation of the postal rate.
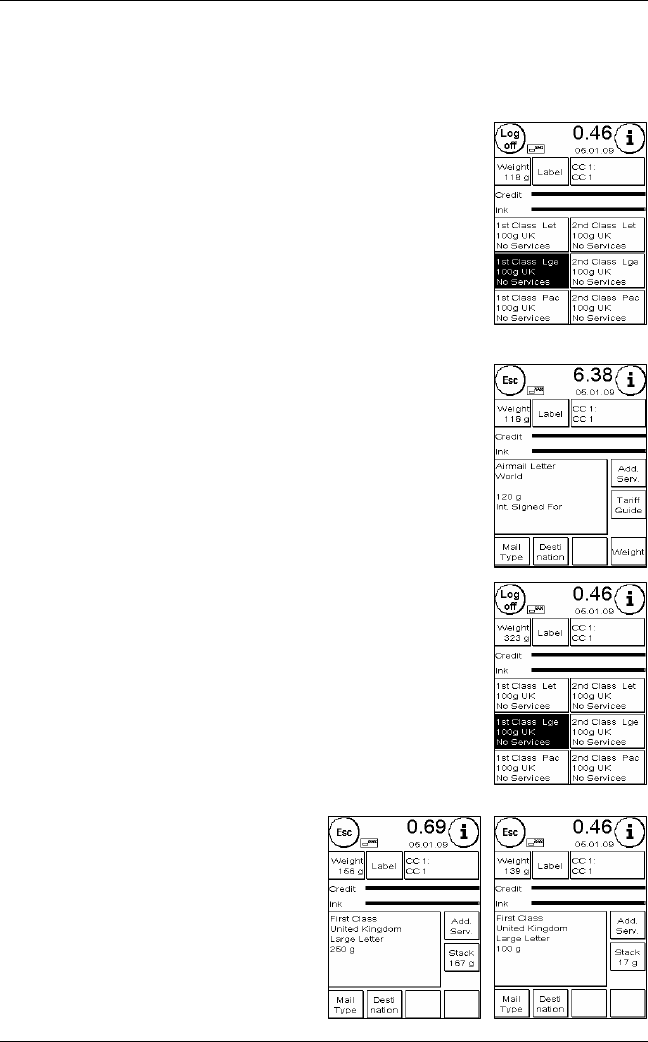
4.5.3. Weighing a stack of mail items (Option)
The so-called stack weighing mode is a special feature. You can frank a day’s
mail very efficiently in this mode.
Put a stack of mail items onto the scales (we recommend that they are pre-
sorted according to format). The total weight of the stack will be shown in the
top section of the display. Select a OneTouch key whose content is nearest to
the mail items in the stack. The letter format however will be upgraded auto-
matically if required.
Take a letter from the stack. The display changes to the multiple weighing
mode. The key “Weight” fades out. The postage is calculated on the basis of
the weight of the letter removed from the stack. Frank the letter.
Take the next letter from the stack. The weight of
the letter is displayed and the postage calculated
accordingly, etc. When you take the last letter (mail
item) from the stack, the multiple weighing mode
will quit itself after 3 seconds.
You also have access to the type of mailing, format,
destination and letter extra services when you are
in the stack weighing mode.
Frama Matrix F4 / F6
27
4.6. Using the label dispenser function
You should use the integrated label dispenser for
mail items 10 mm thick and above, e.g. small par-
cels.
Press the key “Label” for this purpose. Select the
desired number of franking labels using the 1-10
keypad and confirm your entry by pressing OK.
Your franking system will print the set postage rate
on the franking labels and eject the labels to the
left. Use only original Frama Matrix F4 / F6 franking
labels.
To remove the adhesive label, bend the label at the perforation and peel off the backing paper.
The function of the label dispenser is not available in the “Stack” mode of the feeder AF6/AFS6.
Frama Matrix F4 / F6
28
4.7. Franking mail items
4.7.1. Franking mail items with manual feeder MF4
The manual feeder MF4 supports FeedControl which makes sure that your mail items
are always franked correctly. As a result, invalid postage marks are now a thing of
the past.
To feed in mail items, lay the mail item flush against the rear boundary of the feed
table. Push the mail item to the left into the Matrix franking system. The feed rollers
pull in the mail item and it is franked.
Mail items fed in at an angle are not franked thanks to FeedControl. Feed in these
unfranked mail items again, but square, for franking.
4.7.2. Franking mail items with automatic feeder AF6/AFS6
You can process your mail items straight from the stack by using the automatic feeder AF6. It is not nec-
essary for the mail item thickness to be set. The mail items do not have to be fanned out in advanced.
Keep your fingers and other parts of the body as well as loose clothes, ties, scarves,
bracelets and necklaces away from the feed inlets of the system. There is a risk of injury
from rotating parts.
You only have to set the mail item width when using the automatic feeder AF6. The side stop is a help
when you do so:
Put a small part of the stack to be franked in the feed and hold the stack
firmly. Push the side stop up against the stack and let it go.
Pull back the side stop a little to give the stack some play for proper sin-
gling out of the mail items so that they can be drawn in without any dis-
ruption
Use of the supplied magnetic wedge is recommended when procesing
heavy and stiff mail items. It has to be mounted at the respective format
marking on the metal rail.
Frama Matrix F4 / F6
29
4.8. Eliminating paper jam with automatic feeder AF6/AFS6
The transporting area of the automatic feeder can be opened to eliminate malfunctions quickly, e.g. mail
item jams, pieces of paper left lying, etc.
Always switch off the franking system before you open the transporting area cover.
This is how to open the transporting area cover:
Slide the lock to the left, to the symbol showing that it is open.
Grip below the transporting area cover with one hand and pull it up until
it snaps into place. Remove what is causing the malfunction.
Press down the transporting area cover with
both
hands (to avoid angula-
tion / tilting) until the lock snaps into place and the interlock switch re-
turns to its right-hand position.
Frama Matrix F4 / F6
30
5. Using main menu
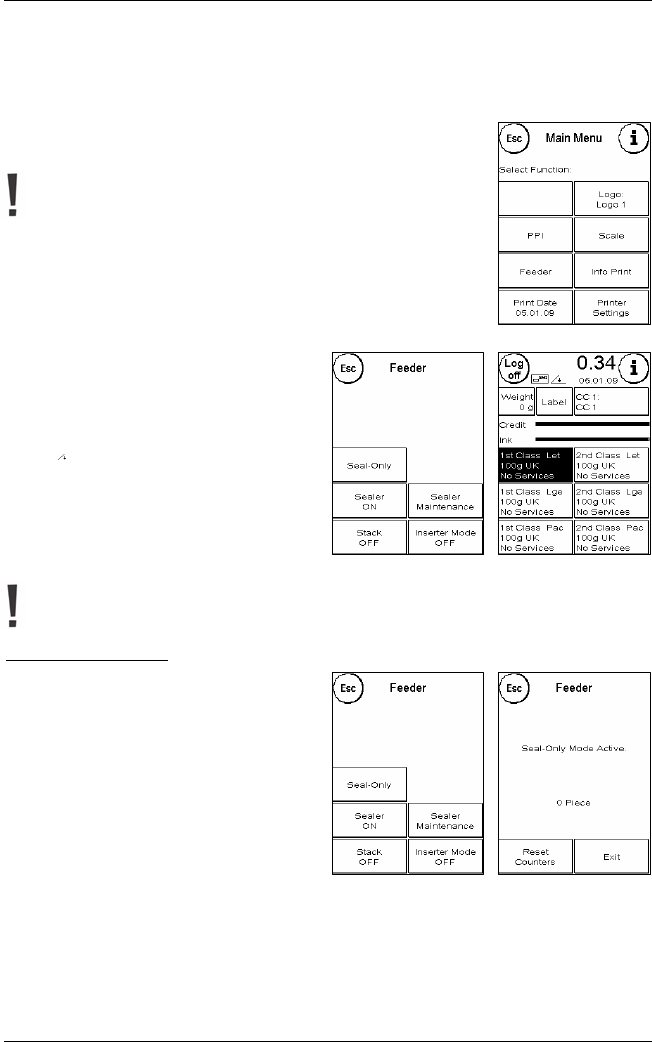
5.1. Controls of automatic feeder AF6/AFS6
The “Feeder” key is faded in only when the automatic feeder AF6 is con-
nected. This key is not provided when the manual feeder MF4 is used.
Always keep your fingers and other pars of the body as well as
loose ties, necklaces, bracelets, scarves, open sleeves and similar
things away from the feed entry area and the feed rollers. There is
a risk of injury from rotating parts.
5.1.1. Letter sealer (only AFS6)
On pressing the “Sealer ON/OFF“ key , you decide
whether mail items are sealed (ON) or not sealed
(OFF). There is no difference in putting sealed or
open envelopes in the feeder AF6. Functioning of
the letter sealer (Letter sealer ON) is shown in the
start menus by a stylized symbol next to the letter
symbol (
).
When the letter sealer is switched on, this key
automatically activates “Seal-Only” at the same
time. In this case, the mail items will be sealed, but
not franked.
Caution! If already sealed envelopes are used after you have pressed “Letter sealer ON”,
this can cause a paper jam because the feed tries to seal these envelopes again.
5.1.1.1. “Seal-Only” mode
The “Seal-Only” mode is fetched by pressing the
key bearing these words.
The number of envelopes sealed is counted in the
“Seal-Only”mode by a separate counter. This is an
easy way for you the keep check of the total num-
ber of sealed envelopes.
Press the “Reset Counters” key to set the quantity
displayed on the counter to zero.
On pressing “Exit”, you abandon the mode “Seal-
Only”.
Frama Matrix F4 / F6
31
5.1.1.2. Sealer Maintenance
From time to time, the letter sealer must be cleaned
or wearing parts replaced. To this end, press the
“Sealer Maintenance” key.
After the cleaning operation, press the “Restart”
key.
The letter sealer is beneath the water tank.
Caution! Always use the menu item “Sealer
Maintenance” to remove the letter sealer. Be
careful with the water bottle in order to keep
the environment in a dry shape.
If you don’t, you might damage the letter sealer mechanism.
This is how you clean the letter sealer:
Press the key “Clean letter sealer”. Don’t switch off the feeder AFS6.
Remove the water tank.
Localize the letter sealer. Grip the letter sealer at the side and pull it out of
the feeder AFS6.
Hold the letter sealer firmly in one hand and remove the wick moistener.
Clean or replace the moistener. Put the moistener back in place, fit the
letter sealer in the AFS6, top up the tank with distilled water and put back
the tank.
Press the “Restart” key.
Frama Matrix F4 / F6
32
5.1.2. Working with stack function
You can define a preselection counter with the
“Stack” function. The feed draws in the prese-
lected number of mail items to be franked and then
stops.
Press the “Stack“ key in the “Feeder“ menu to
switch on the function (Stack ON). Press “Stack”
again to switch off the function.
In the start menu, press the Stack” key to go into
the stack mode.
Enter the number of mail items per stack. Start to work through the stack by
pressing OK or the entered quantity.
When the stack is finished, you can restart the process by pressing OK or the
entered number.
5.1.3. Working with Inserter Mode
The inserter mode is a special function of the automatic feeder AF6/AFS6. This function is required for
interaction with an inserter system. Press the “Inserter Mode“ key to switch on this function. Press this
key again to deactivate the function.
Frama Matrix F4 / F6
33
5.2. Selecting advertising messages
5.2.1. Messages
Your Frama Matrix franking system already has three predefined advertising messages.
These messages are already incorporated:
1
st
message:2
nd
message:3
rd
message:
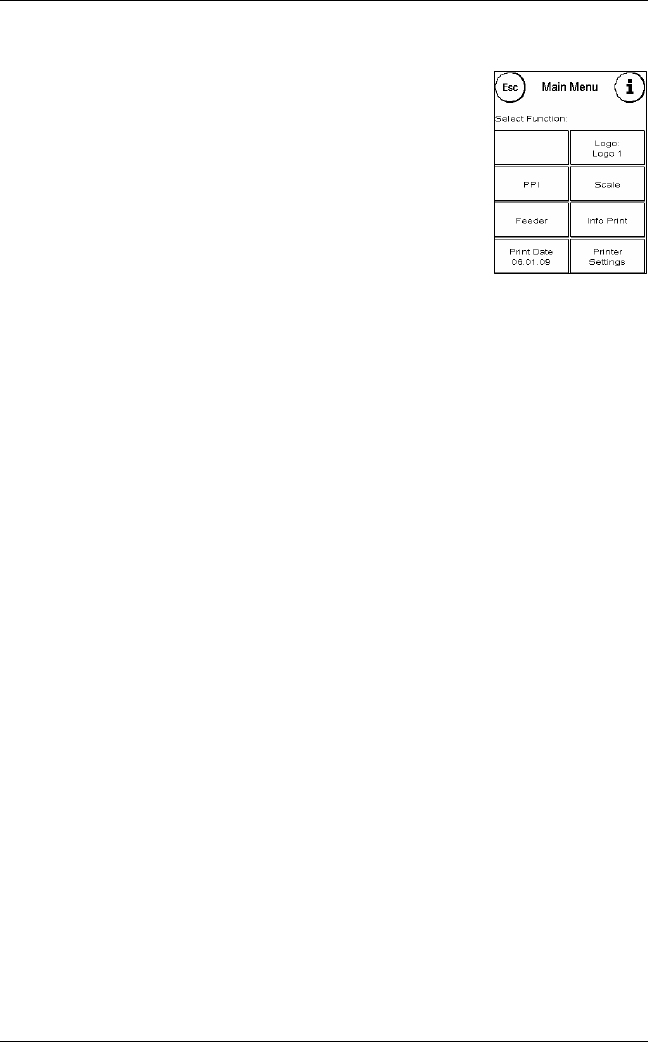
If you wish to use one of the messages, press the “i“ key in the franking mask
to fetch the main menu.
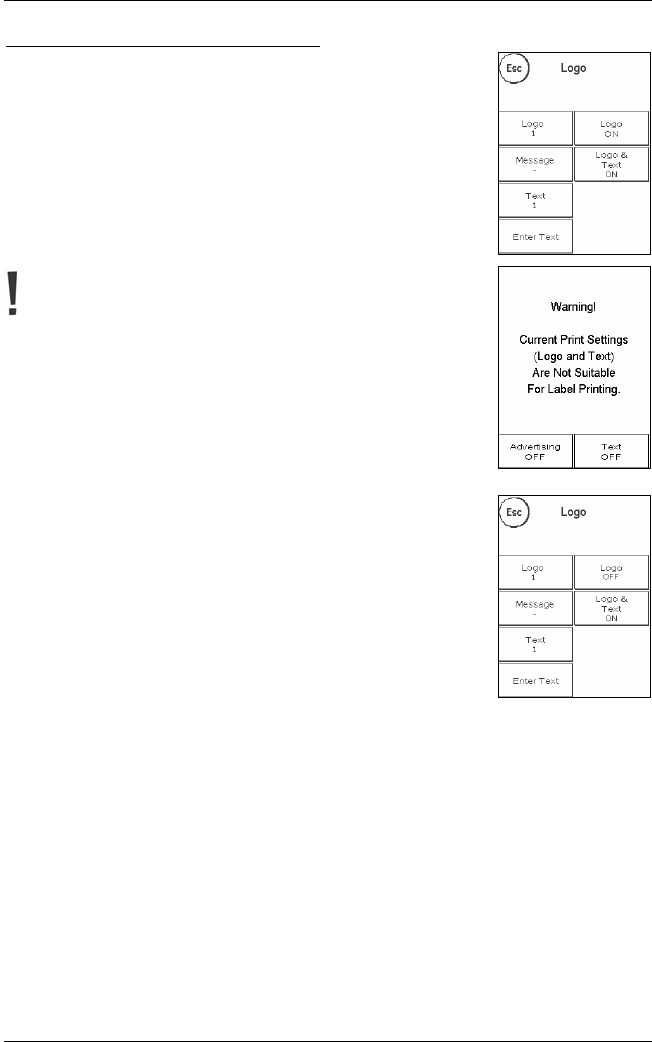
Press the key “Logo”.
This could also be worded Message or Text, depending
on the actual setting.
Press “Message” to select one of the predefined
messages.
Press the arrow key to go to the next message.
Briefly press twice on the desired message to select
this message.
5.2.2. Printing logos
In the same way as when selecting and printing
messages, you can save and print up to five adver-
tising messages, called logos, of your own.
Press “Logo” to select one of your own logos. Press
the arrow to go to the next logo.
Proceed in the same way as when selecting a mes-
sage.
Frama Matrix F4 / F6
34
5.2.3. Text logos
Your Matrix franking system gives you the possibil-
ity of producing your own text logos and thus of
drawing attention to holidays, special campaigns
and events with your mail.
A text can be printed instead of a message or ad-
vertisement logo or in addition to a message or an
advertisement logo.
Press “Text” in order to select a text for printing.
5.2.3.1. Entering text for printing block
Press the key “Enter text”.
Select the text to be written (text 1, 2 or 3). The
text entry mask will be activated.
In the text entry mask, you have the choice of upper and lower cases, num-
bers, special characters, punctuation marks and spaces.
By pressing “Enter“, you shift to the next line, whereas you finish the text en-
try with the ENTER key (symbol!). Use the CE key to delete a wrong entry.
This is how to proceed:
1.Press “A-Z” to enter a capital letter. By pressing the “Down arrow”, you can obtain other letters.
Press the desired letter. Press the “Arrow to left” key to shift to small letters (lower case).
2.Use the small letters in the same way as described under point 1.
3.Now press the “Enter” to write the next line.
4.To finish the text entry, press the ENTER key so that the text is saved at the desired key.
5.That’s all. You can now choose from your texts in the same way as for messages.
Frama Matrix F4 / F6
35
5.2.3.2. Printing advertising and text simultaneously
Your Frama Matrix franking system gives you the possibility of printing your
text messages in addition to the selected advertising. You can set this function
by pressing “Logo+Text”.
-Logo+Text ON: Your text will be printed additionally after the advertising.
-Logo+Text OFF: Your text will be printed instead of your advertising.
Note: make sure if logo + text on, ensure the envelope is of sufficient length
Caution! If labels are used, only restricted utilization of this func-
tion is posssible. Your Frama Matrix franking system checks the
length of the franking mark and will give you a cue if the permis-
sible total length is exceeded.
Press “Logo off“ to suppress printing of the advertising for the mark on the
label. As a result, the franking mark shows only the text message. Using the
same procedure, you can cancel printing of the text for the label.
This setting is valid only for the process being carried out at the time.
5.2.4. Canceling advertising
If you wish to frank your mail without advertising or text, you can switch the
advertising on or off by pressing “Logo ON or OFF”.
Frama Matrix F4 / F6
36
5.3. Presorting mail using scales
Connecting the S2 or S5 scales, automatically ex-
tends the functional scope of the Matrix F4 or F6,
i.e. you can use the scales functions immediately.
By using the electronic scales, you are able to calcu-
late postal rates and weigh your letters, small par-
cels as well as other mail items accurately. You thus
automatically avoid incorrect franking.
Supplementary to the previously explained func-
tions for weight determination in the postal rate
guide, your Matrix franking system has a special
weighing mode for quick presorting of your mail.
Using it, you can presort the mail items according
to postal products and then work through them without interruption using the OneTouch functions.
Select “Scale”. You will be in the scales menu. Put your mail items on the scales. The weight will be dis-
played. By pressing the “Tare”key, you can set your scales to zero.
5.3.1. Taring scales
It is possible for the zero setting of the scales to be wrongly adjusted, e.g. if you had something on the
scales while you were switching on the system. To tare the system, select the function “Tare“ in the scales
menu. Make sure the scales platform is empty before you press “Tare”.
When pressed, the “Info” key shows data pertaining to the software used for scales control which is
purely of an informative nature.
Frama Matrix F4 / F6
37
5.4. Postdating your mail
Sometimes, it might be necessary for your mail to be franked several days be-
fore the delivery date, e.g. when a small mailing campaign is being carried out.
Please don’t forget to reset the system to the current date when
you have finished franking with an advanced date. A change of
cost centre automatically resets the date.
In this respect, you can set the date printed in the frank mark up to thirty days
in advance with your Frama Matrix.
Press “Print Date” in the main menu.
You can advance the date using “Set Date +”.
You can backdate using “Set Date -“.
The “Reset” key brings back the current date.
Acknowledge your setting by pressing the ENTER key. Press “ESC” to return to
the main menu without acknowledging the setting.
The future date is shown inverted in the franking mask to draw attention to its
difference from the current date.
Frama Matrix F4 / F6
38
5.5. Frama Matrix F4 / F6 reports
You can print various reports for your Matrix franking system using the so-called “Info Prints”. The reports
are particularly important. These allow condensed information to be printed out. These reports support
you as overviews when you are programming or, for example, they serve as receipts after fetching post-
age via the FramaOnline2 data centre.
5.5.1. Printing out reports
Press “i” in the franking mask to fetch the main
menu. Press “Info Print”
You can now choose one of the various reports.
Press the respective key and feed an envelope or a
folded sheet of paper of the C5 format into your
Frama Matrix franking system for printing out the
selected report.
All functions will be described further down in
detail.
You can leave the “Info Print” menu by pressing
ESC.
5.5.2. Date Stamping
You can convert your Matrix franking system into a date stamping machine.
Select the function “Date Stamping” in the “Info Print” menu.
There is a shift to a different stamping mark in this mode. No postage is used.
5.5.3. Advertising block
The function “Logo“ in the “Print Info“ menu enables you to print only the
logo. All relevant postal information is faded out. This mode requires no post-
age.
Frama Matrix F4 / F6
39
5.5.4. Advertising block and text
The function “Advertising block and text” in the “Print info” menu enables
you to print the advertising block and the set text message at the time.
All relevant postal information is faded out. This mode requires no postage.
5.5.5. FramaOnline2 reports
The FramaOnline2 report serves as a receipt for the respective transaction. You
obtain information about the amount loaded and the make-up of the current
credit. The check amount corresponds to the total of all amounts loaded and it
also supports you when you check your transactions. There are also other
FramaOnline2 related reports available when you press the arrow key.
5.5.6. Counter readings
The counter reading report shows all relevant information pertaining to the
counter readings in a clear layout. The system piece counter (T-piece) shows all
pieces relevant in postal terms. Information and test prints are reported addi-
tionally. T-value designates the overall amount of postage used to date.
Frama Matrix F4 / F6
40
5.5.7. System (set-up settings)
The set-up report summarizes certain settings of Set-up menu 2 (administra-
tion mode) with a clear layout.
5.5.8. Statistics report
The statistics report is used to print out the statistics of the current period. The
collected data corresponds to what you have mailed in the time between two
connections with the FramaOnline2 data centre. The report extends over sev-
eral pages (depending on the amount of statistical input).
After a connection with the FramaOnline2 data centre, the statistics are auto-
matically deleted and then recompiled using your usage data.
5.5.9. Cost centre report
The cost centre report is a clear print-out of the
current cost centre data or that of a selected cost
centre (administration mode).You receive the cost
centre data for the periods and the overall counter
level (not resettable).
5.5.10. PPI report (Optional)
The built-in PPI report (accessable using the arrow key in the Info Print menu)
provides a summary of printed PPIs for first and second class PPI.
Frama Matrix F4 / F6
41
5.6. Frama Matrix F4 / F6 printing system
Your Frama Matrix franking system utilizes so-called colour cartridges to frank your mail items. The colour
cartrige also contains the printing head. With this in mind, handle the inkjet cassette very carefully and
make sure that no pointed objects, such as paperclips, etc. can damage the sensitive surface of the print-
ing head.
5.6.1. Changing inkjet cassette
If you wish to change your inkjet cassette, press “i”
in the franking mask.
Press the key “Printer settings”.
Press the key “Change Ink-Jet Cassette” and ac-
knowledge this by pressing YES.
Open the top cover flap. Remove the inkjet cassette
by squeezing together the grip surfaces on the
cartridge and pulling it out upwards.
Put in a new inkjet cassette. Make sure that you first remove the adhesive tape
from the printing head.
Push the new inkjet cassette fully into its guide. Adhere to the instructions on
chapter 3 to properly adjust the inkjet cassette. You can repeat this process at
any time if you fetch the function “Print Alignment”.
5.6.2. Adjusting and calibrating printing head
You can restart the processes which take place automatically when a new inkjet cassette is inserted by
pressing the keys “Print Alignment“ and “Print Head New Calibration.
Fetch “Print Head New Calibration” if the franking mark is generally not satisfactory.
Frama Matrix F4 / F6
42
5.6.3. Cleaning printing system
From time to time, it might become necessary for the print-
ing head jets to be cleaned. Your Frama franking system
provides a cleaning cycle for this purpose.
Blocked jets are often the result of the mains electric supply being switched off before the
jets have been properly sealed. As a matter of principle, use the log-off function so that
your franking system switches off properly.
You should clean the system if white lines show in
the franking mark. For this job, two cleaning pro-
grams are available:.
Nozzle Cleaning: A normal printing head cleaning
operation is carried out. The printing head and the
jets are cleaned.
Nozzle Cleaning + : This operation uses a great
deal of ink because the jets are flushed and cleaned
thoroughly.
To fetch the required program, press the appropri-
ate key. The cleaning program starts automatically. It is advisable to run the function “Nozzle Test” after-
wards to check how satisfactory the cleaning operation was.
5.6.4. Nozzle Test
A nozzle test is
incorporated in your
Frama Matrix franking
system.
In this test, each individual nozzle in the printing head can be activated. This
enables you to easily localize defective or blocked nozzles, and also to deter-
mine the scope of the cleaning program
Press the key “Nozzle Test”.
Introduce an envelope or something similar into the system for franking. A test
franking mark is made.
Check whether all lines have been printed. If not, let the printing head be cleaned.
5.6.5. Franking mark resolution
By pressing the key “Print Res.”, you can shift to the other of the two resolution modes. The following
then applies:
Print Resolution OPTIMAL: HQ franking mode for stiff demands. This mode consumes more ink than
the normal mode.
Print Resolution NORMAL: Franking mode with standard resolution. Basis for calculating the service life
of the inkjet cassette.
Frama Matrix F4 / F6
43
5.7. Printing PPI (Optional)
With Frama Matrix F4 and F6 you are able to produce PPI prints. This function
however is only available if you have applied for a PPI license with Royal Mail.
You can produce 1
st
and 2
nd
class PPI prints. A PPI report is available to inform
you about counter readings of produced PPI mail.
Press “PPI” in the main menu.
Select 1
st
Class or 2
nd
class PPI
Set the counter to your requirement.
Start franking.
Frama Matrix F4 / F6
44
6. Counter readings and cost centres
6.1. Cost centre mode
Your Frama Matrix franking system is equipped with various counters which
allow you to monitor the postage consumption and the number of mail items
franked.
The so-called cost centres allow you to specifically break down the postage
usage. Number of mail items franked can be booked under different periods.
These counters are designated as R1-number or R2-number as well as R1-value
and R2-value. The R stands for “Resettable”.
Two periods are available to you per cost centre. You can split up the periods
individually.
Examples of different periods:
Period 1: Daily report
Period 2: Weekly report
Period 1: Monthly report
Period 2: Annual report
Each cost centre can be given a separate name. You have 16 places at your
disposal. The cost centre active each time is shown in the top section of the
display in the “CC key”. You shift to another cost centre by pressing this key.
You set up the cost centres in the administration mode.
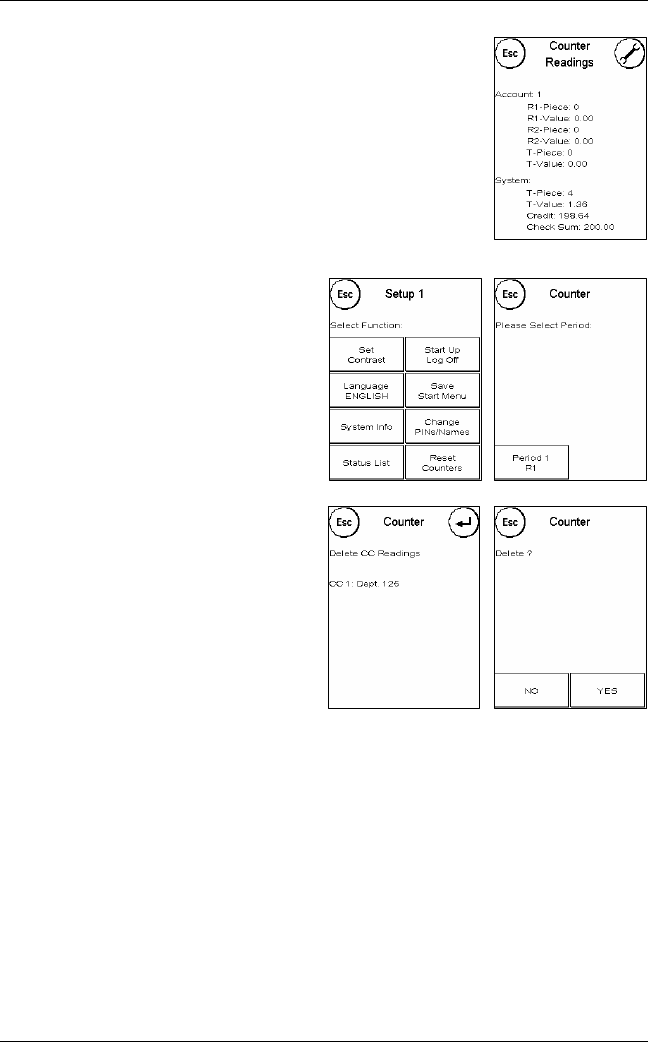
6.1.1. Viewing counter levels of current cost centre
You can have the current counter levels shown at any time. To do so, use the franking mask and press “i”
repeatedly until the counter readings appear. In addition, you can print out the counter readings via the
function “Info Print”.
6.1.1.1. Meanings of various counters
Cost centre:
R1-Value / R1-Piece: The resettable counter for period 1 “R1-Value” shows
the postage used since the counter was reset the last time. “R1-Piece” shows
the number of mail items franked since the counter was reset the last time.
R2-Value / R2-Piece: The resettable counter for period 2 “R2-Value” shows
the postage used since the counter was reset the last time. “R2-Piece” shows
the number of mail items franked since the counter was reset the last time.
T-Piece / T-Value: Total counter readings for the cost centre. (Number coun-
ter and franked value) since the cost centre became operational.
Frama Matrix F4 / F6
45
T-Piece / T-Value: Total counter readings for the franking system (number
counter and franked value) since the franking system was put into operation.
Owing to tests carried out before delivery of your Frama Matrix franking sys-
tem, the total number counter might already show an initial figure.
Credit: This is the postage still available in your franking system.
Check sum: This is the sum of the Credit and T-value. This amounts to the
total postage drawn from FramaOnline2.
6.1.2. Deleting counter readings of current cost centre
Press the tool key (symbol). This takes you into Set-
up menu 1. Here, select “Reset Counters”.
Select the period you wish to delete. The selection
of periods can be restricted in the administration
menu.
Press ENTER.
Acknowledge the security query. That’s all.
Frama Matrix F4 / F6
46
6.2. Cost centres and cost centre management in administration mode
Settings made in the administration mode always apply to all cost centres. In the administration mode,
furthermore, you have access to all cost centres and can thus conveniently make settings for these cost
centres (counter readings, name and PIN).
You can also make settings in the respective cost centre. When doing so though, not all
functions of the administration mode are available to you.
6.2.1. Displaying cost centre data in administration mode
In the administration mode, you have access to all cost centres and can thus name, change or issue new
PINs as well as print out the counter readings for these and let them be displayed as well as, of course,
reset them.
Choose “Admin” in the cost centre selection.
Enter your PIN. Then, press the OK key to get into
the administration mode.
Press “i”.
You can have the counter readings of every cost
centre shown to you in this menu. In this respect,
you can fetch one cost centre or a list of cost cen-
tres.
Select CC: Press the key to fetch the cost centre
selection menu. Select the cost centre.
CC list: In this case, you can define a range of cost
centres for the display of cost centre data.
First enter the number of the cost centre from
which the data should be shown. Press OK. After-
wards, select the number of the cost centre which
should be shown last.
Advance in the counter reading menu using the
arrow key. Press ESC to quit the display.
Frama Matrix F4 / F6
47
6.2.2. Deleting cost centre data in administration mode
In the administration mode, you have flexible acess
to all cost centres.
Choose “Admin” in the cost centre selection.
Enter your PIN. Then, press the OK key to get into
the administration mode.
Press “i” and then the “Tool key” to go into Set-up
menu 1.
Press “Reset Counters“ and select the period to be
deleted. Deleting period 2 automatically deletes
period 1.
Select the counters to be deleted of a cost centre (“Other CC”) or a range of
cost centres (“CC Range”). With the key “All CCs”, you can delete the se-
lected period of all cost centres.
Acknowledge the security queries to delete the desired cost centres.
Frama Matrix F4 / F6
48
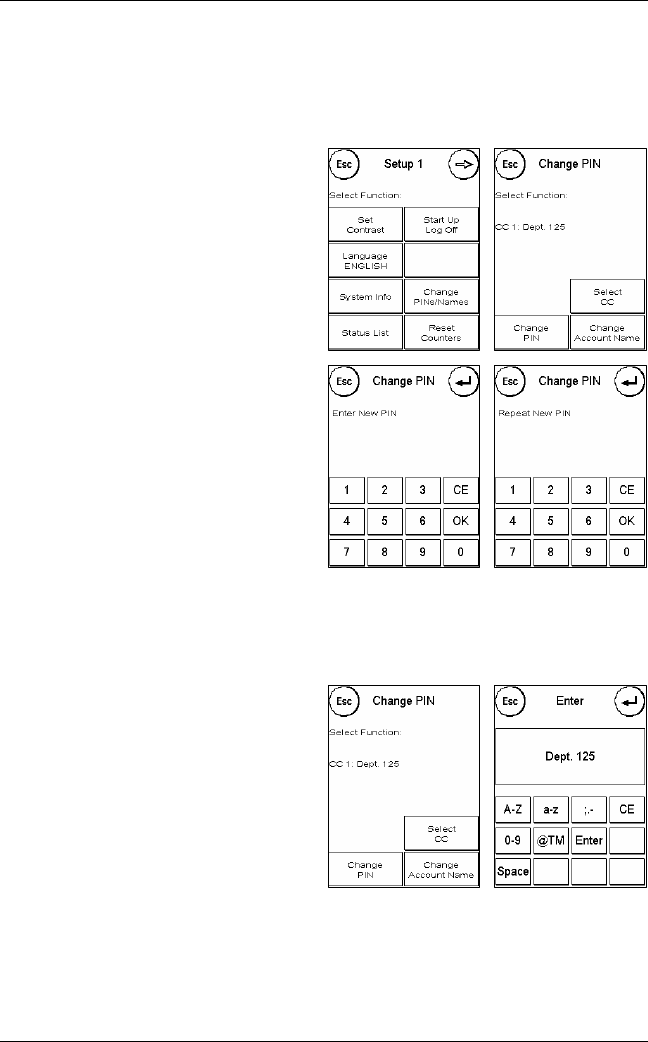
6.3. Renaming cost centres and changing PIN
6.3.1. Changing cost centre PIN
As standard, a PIN protects the cost centre. In the as-delivered state of the franking system, the PIN is the
same as the cost centre number. The PIN can have up to 8 digits.
To change a cost centre PIN, proceed as follows:
Press the key “Change PINs/Names”. In the admini-
stration mode, you can now select the cost centre
to be changed. In cost centre mode you can only
change the setting of the current cost centre.
Press “Change PIN”
Enter the new PIN.
Enter the new PIN again.
The PIN of the selected or current cost centre has
thus been changed.
In the administration mode, you have acess to all
cost centres.
6.4. Changing cost centre name
Your Frama Matrix franking system offers you the possibility of assigning an individual name to each cost
centre. It is already shown in the cost centre selection and simplifies your work.
Select “Change Account Name”.
Proceed further as described in chapter 5. Refer to
the section “Enter text”.
Frama Matrix F4 / F6
49
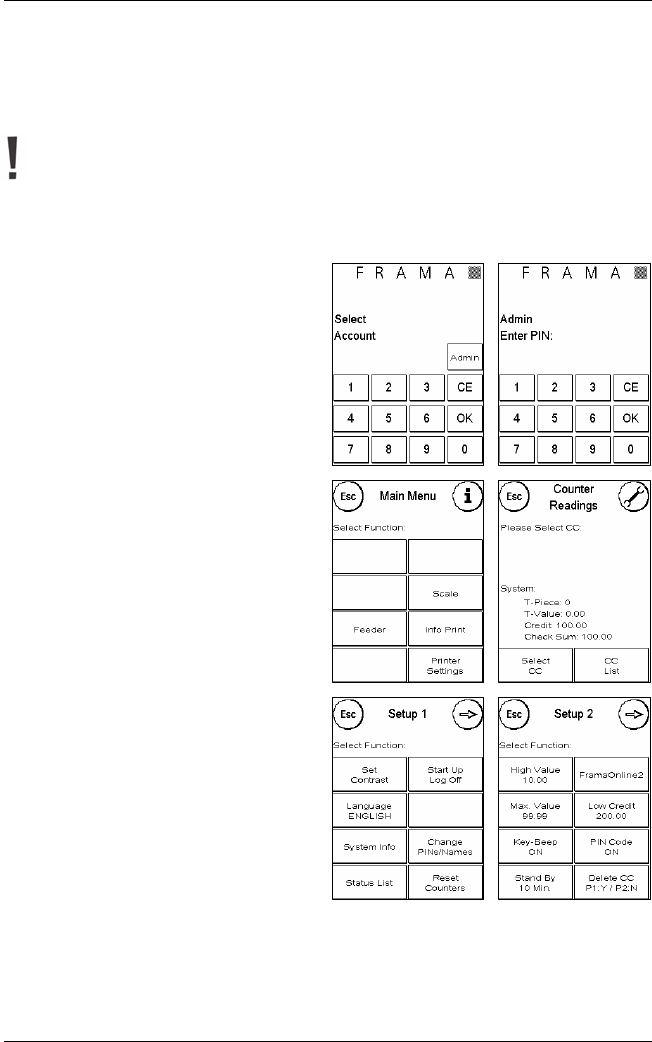
7. Set-up (settings)
In the Set-up menu, you can make various settings for your Frama MATRIX
franking system.
The Setup 1 menu is available in both, the cost centre and the administration
mode. Setup 2 and Setup 3 are only available in administration mode.
Use the arrow key to shift to two further Set-up
menus in the administration mode. Press ESC to
return.
Frama Matrix F4 / F6
50
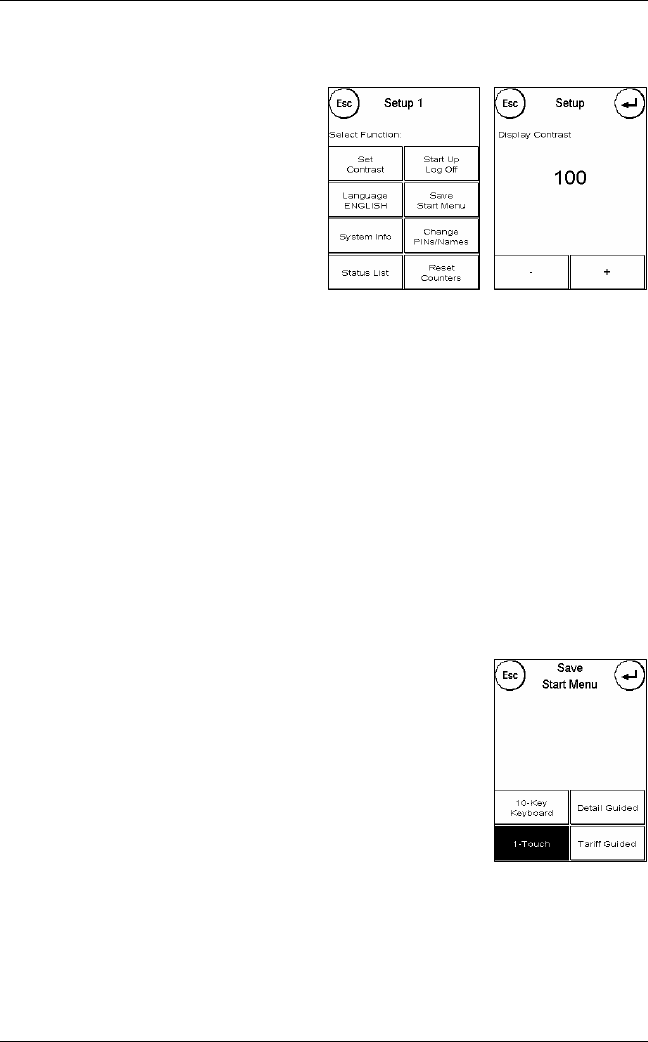
7.1. Set-up menu 1
7.1.1. Adjusting display
Using the function “Set Contrast”, you can adjust
the contrast to suit your needs. Simply press this
key and use “+“ or “-“ to obtain the desired con-
trast. Acknowledge this setting by pressing Enter.
7.1.2. Language
Several languages are incorporated in your Frama Matrix franking system. Shift to the desired language
using this function. Your current setting is shown in the key. When the administration language is speci-
fied, texts are reloaded that are needed for the postal rate module.
This key has no function in the United Kingdom.
7.1.3. System Info
This key fades in a system overview. This data and the data in the status list provide important input for
our customer service.
7.1.4. Status List
This key fades in a status list. This data and the data in the system information provide important input for
our customer service.
7.1.5. Start-up / Log-off
With this key, you can restart the system after you have made settings. Pressing “Start-up / Log-off”,
takes you straight to the cost centre selection.
7.1.6. Save Start Menu
Here, you can define and save a specific start menu. Possible selections are 1-
Touch, 10-Key Keyboard, Detail Guided or Tariff Guided. In this way, you make
sure that the chosen franking mask is displayed as standard when the cost
centre is selected.
7.1.7. Changing PINs
This serves the setting up of all cost centres in the administration mode or the alteration of the PIN and
name of the current cost centre. Please read chapter 6 “Cost centres and counters” for more detailed
information.
7.1.8. Deleting counters
Please read chapter 6 “Cost centres and counters” for more detailed information.
Frama Matrix F4 / F6
51
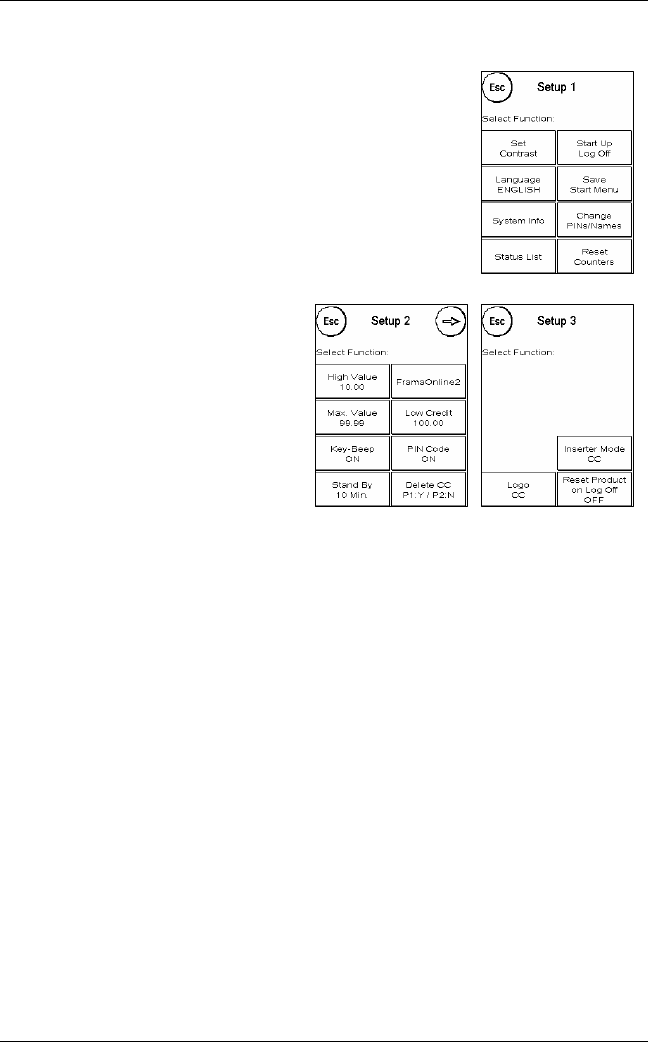
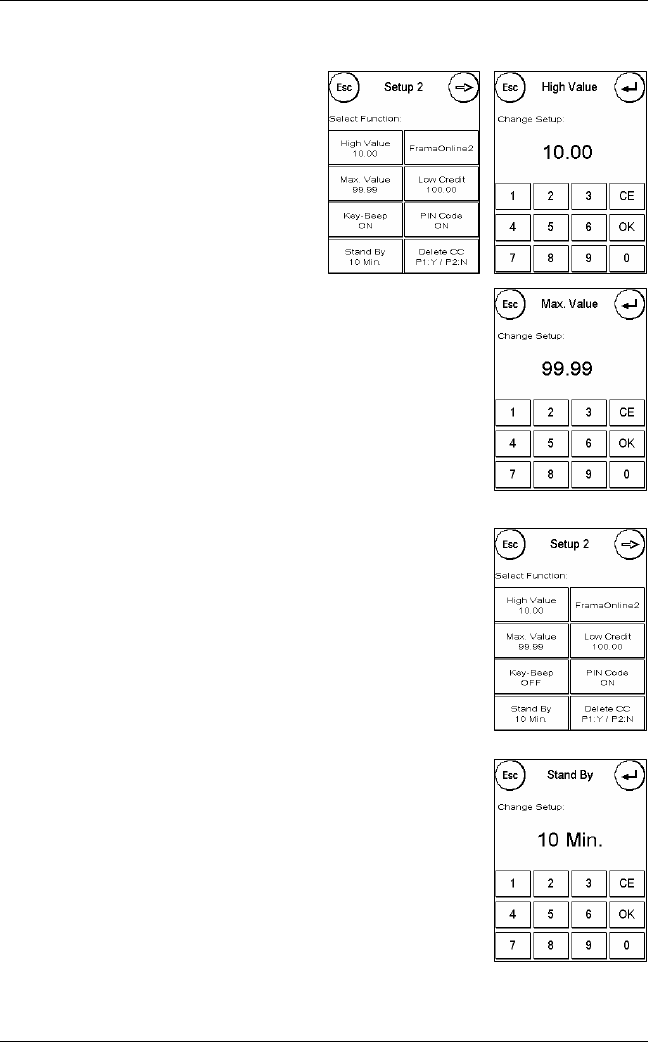
7.2. Set-up menu 2
Set-up menu 2 can be fetched only in the admini-
stration mode.
7.2.1. High Value
This setting stipulates that amount from which you
have to acknowledge the postage value for security
reasons before this amount can be franked. The
standard amount is £ 10.00. If you wish to change
this setting, simply enter the new, desired value
and acknowledge your entry by pressing ENTER.
7.2.2. Max. Value
Stipulate the max. Permissible value that may be franked with this setting.
Press the key, enter the value and acknowledge by pressing OK or ENTER. The
standard setting is £ 99.99.
7.2.3. Key beep
This serves to switch the key beep on and off. Press the key to switch the beep
ON or OFF.
7.2.4. Stand-by
Use this function to define the time until the system switches itself off to save
power. If “0 minutes” is entered, this function switches off.
7.2.5. FramaOnline2
The FramaOnline2 functions are explained in detail in chapter 8.
Frama Matrix F4 / F6
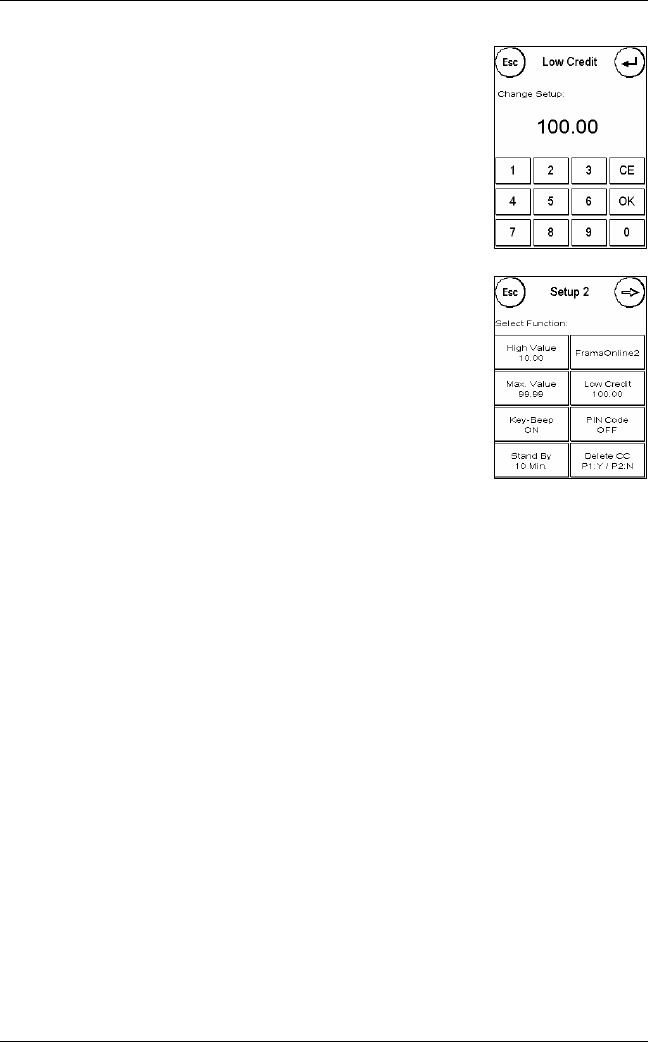
52
This setting checks the amount of postage available and warns you in good
time that the level is getting too low. To change this setting, press “Low
Credit”. Enter the new value. Acknowledge what you have changed by press-
ing OK.
The standard setting is £ 200.00.
This serves to switch the PIN entry on or off. If you have the setting “PIN code
ON“, a PIN must be entered in the cost centre selection. If you have the setting
“PIN code OFF“, a PIN doesn’t have to be entered. The administration mode is
not affected by this.
This serves to define the recording periods. Please read chapter 6 “Cost centres and counters” for more
detailed information.
Frama Matrix F4 / F6
53
7.3. Set-up menu 3
Set-up menu 3 can be fetched only in the administration mode.
7.3.1. Logo
This is a setting which stipulates whether all cost centres have to work with the
same advertising or whether each cost centre may use individual advertising.
Logo SYSTEM: All cost centres automatically use the advertising defined in
the administration mode. To enable you to stipulate the advertising, the ad-
ministration mode has a corresponding function in the main menu.
Logo CC: Each cost centre can use individual advertising. Whenever a cost
centre is refetched, the advertising is set appropriately.
7.3.2. Inserter Mode
Using this setting, the inserter mode can be predetermined.
Inserter Mode CC: The enveloping mode can be selected for each cost centre.
Inserter Mode SYSTEM: The enveloping mode is predetermined by the system.
7.3.3. Reset Product on Log Off
This setting defines the response of the postal rate module when a cost centre is changed.
Setting ON: The current product is reset and has to be re-entered if a cost centre is changed.
Setting OFF: The current product is kept if a cost centre has been changed.
Frama Matrix F4 / F6
54
8. FramaOnline2 settings
8.1. Loading credit
The procedure for loading credit has already been described in depth under
point 2.2.
8.2. Inspection
You can carry out so-called inspection loadings with your Frama Matrix frank-
ing system. You use them to transmit the counter readings, to check the postal
rate tables and to balance / compare data with the post office.
The inspection loading must be carried out whenever the franking system re-
quests a connection with the FramaOnline2 data centre, even if you need no
new postage credit. As a rule, this will be at least once a month (according to
current Royal Mail regulations) unless you requested new credit beforehand.
To carry out an inspection loading, press “Inspection” in the FramaOnline2
menu and follow the displayed instructions.
8.3. Activation code
The activation code is required only when loading the first time. The procedure has already been de-
scribed in detail under point 2.1. When your franking system has been activated satisfactorily, the key will
fade out.
8.4. Last Message
On pressing this key, you will see the last report transmitted from the FramaOnline2 data centre. Touch
the display to return.
8.5. Print report
On pressing this key, you will print out the last report transmitted from the FramaOnline2 data centre (see
print information “FramaOnline2”). Put an envelope or something similar in the franking system to print
out the report.
8.6 Uninstall
This calls a function to uninstall your franking system from the FramaOnline2 data centre. This function
can only be used if your FramaOnline2 account has been prepared for uninstallation.
Frama Matrix F4 / F6
55
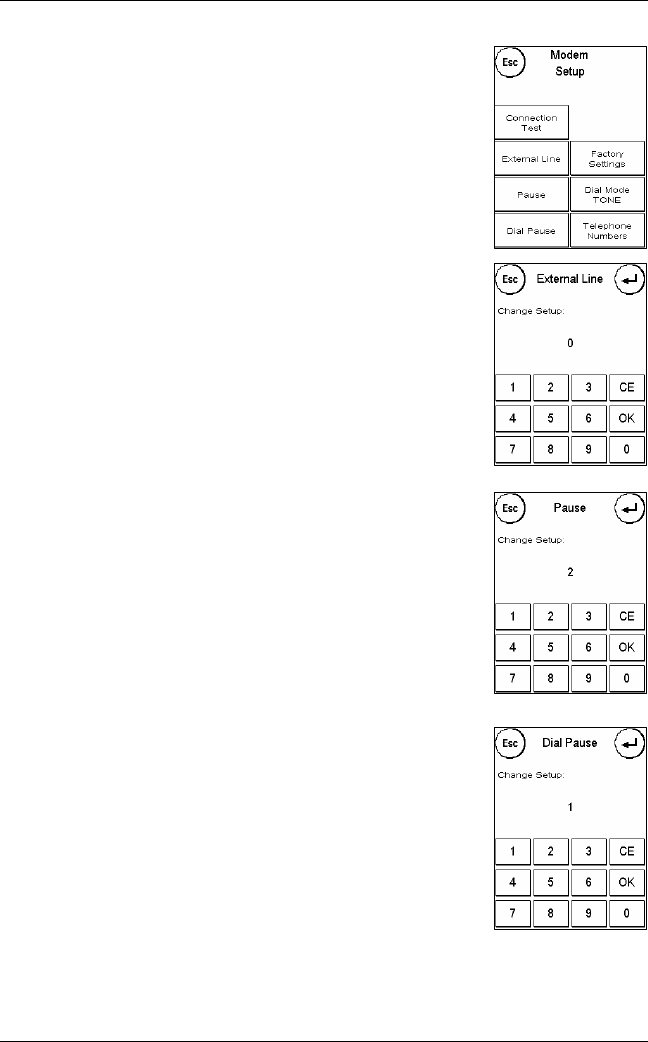
8.7. Modem Setup
Press “Modem Setup” to fetch the menu on the right. Here, you can adapt the
built-in modem to suit your telephone equipment if you do not obtain a con-
nection with the settings made at the factory.
Before you begin to change the standard settings, you should print them out.
In this respect, please read point 5.5. “Info Print”.
The individual points and their effects are described in detail in the following.
8.7.1. External Line
When using a franking system connected with telephone equipment, an ex-
change code often has to be preselected, e.g. “0” or “9”, to obtain a free
telephone line.
To enter the required exchange code, press “External Line”. At the same time,
this will show your current setting.
Enter the required exchange code and acknowledge your entry by pressing OK.
To delete any wrongly entered or unnecessary exchange code, press CE and
quit the display by pressing ENTER.
8.7.2. Pause
Some not-so-new telephone systems need a little time to send a call-connected
signal to the franking system. Using the function “Pause”, you can adjust the
desired time lag between “Picking up modem” and dialling the exchange
code. This adjustment is carried out as described in the procedure under point
9.6.1. “External Line”.
8.7.3. Dial Pause
Adjusting the dial pause supports the reliable dialling of telephone numbers,
especially in the case of not-so-new telephone systems. Using the function
“Dial Pause“, you can adjust the desired time lag between sending the ex-
change code and dialling the FramaOnline2 telephone number. This adjust-
ment is carried out as described in the procedure under point 9.6.1. “External
Line”.
8.7.4. Dial Mode
Your Frama Matrix franking system supports two different methods of dialling
telephone numbers. In case of doubt, please read the documation on your
telecommunication system. Press “Dial Mode” to shift between the two possi-
bilities.
Dial Mode TONE (standard): The modem uses tone dialling for calling telephone numbers.
Dial Mode PULSE: The modem uses pulse dialling for calling telephone numbers. This setting is intended
for not-so-new telephone systems.
Frama Matrix F4 / F6
56
8.7.5. Telephone numbers
Two different numbers are saved under the point “Telephone Numbers”. One of them is the
FramaOnline2 telephone number: 0080037262665 (00800FRAMAONL). Please note the double “00” at
the beginning of the number representing an international free-phone number.
You can delete the number by pressing CE. Enter the new telephone number using the 1-to-10 numeric
keypad and confirm your entry by pressing OK.
After entering the FramaOnline2 telephone number, you will see the hotline number of the FramaOnline2
data centre. Proceed here in the same way.
8.7.6. Factory settings
By pressing “Factory Settings”, you reset all modem settings to the factory settings.
8.8. FramaOnline2 notes on connection problems
Wrong activation PIN
Your Frama Matrix franking system requires the six-digit FramaOnline2 activation code to activate your
postage account. Please make sure you don’t confuse this with the PIN for the administration mode (four
digits). The FramaOnline2 activation PIN is required only once.
Connection interruption
This message appears if the connection between the FramaOnline2 data centre and your franking system
is suddenly interrupted. Try to make the connection again and repeat the procedure.
No answer
The FramaOnline2 data centre doesn’t answer. Possible causes are a disconnected telephone cable or an
incomplete telephone number for the data centre. Many telephone systems interpret an incomplete tele-
phone number as an engaged signal. This is identified by your Frama Matrix franking system and thus
displayed. The telephone number is made up of the exchange code for obtaining a free line (with tele-
phone systems) and the data centre telephone number.
Frama Matrix F4 / F6
57
9. Display messages and technical data
In the event of a malfunction, a message will appear in the display of your Frama Matrix F4 or F6. If you
are unable to eliminate the trouble yourself, you can obtain support on your Frama hotline or from your
local Frama dealer. In this case, keep your customer number and franking system number ready at hand.
9.1. FramaOnline2 messages
Display messageCauseElimination
Modem Init error;
Modem error: Dialing;
Wrong command;
The installed modem couldn’t
be initialized properly.
Switch the franking system off and then
on, and try to initialize it again. If the error
cannot be eliminated, contact us on the
Frama hotline.
Wrong activation PIN
You didn’t enter the
FramaOnline2 activation PIN
correctly.
Repeat the procedure. Enter the
FramaOnline2 activation PIN carefully.
No telephone number
The telephone number re-
quired for dialling the modem
is missing.
Enter the required telephone number. In
this respect, read the section “Modem
set-up“.
Line busyAll modem ports of the
FramaOnline2 server are occu-
pied.
Try again later. You might have to prese-
lect an exchange code because many
telephone systems acknowledge an in-
complete telephone number with an
engaged tone.
No connectionThe FramaOnline2 data centre
doesn’t answer.
Try again. Check your telephone cable
connection and that the modem settings
are correct for calling the exchange.
Connection lost!
Try again.
Your existing connection with
the FramaOnline2 data centre
was suddenly terminated.
Try again. Perhaps wait a few minutes and
then try again.
Connection lost!
Reconnect!
Your existing connection with
the FramaOnline2 data centre
was suddenly terminated.
Press the key “Reconnect“ to continue
the loading process. Don’t disconnect
your system from the main power supply.
No dialling toneNo dialling tone can be identi-
fied.
Check that the telephone cable is plugged
in properly.
Inspection required Your franking system requires
a connection to FramaOnline2.
According to the current Royal
Mail regulations (January 2009)
the franking system needs to
connect once a month.
Perform an inspection.
Franking system locked
The franking system cannot
continue to frank because a
data record required for frank-
ing wasn’t updated or the time
period given by Royal Mail for
uploading the statistics has
been passed.
Select “Inspection“ to allow a connection
to be made with the FramaOnline2 ser-
vice. The data record will be updated
during the inspection.
Frama Matrix F4 / F6
58
9.2. Frama Matrix F4 / F6 scales messages
Display messageCauseElimination
Scales communication errorInterfered communication
between Frama Matrix F4 / F6
and scales.
Check that the scales cable is plugged in
properly. Switch the franking system off
and then on. If the trouble cannot be
overcome, please contact us on our hot-
line.
No valid weightInterfered communication
between Frama Matrix F4 / F6
and scales.
Check that the scales cable is plugged in
properly. Switch the franking system off
and then on. If the trouble cannot be
overcome, please contact us on our hot-
line.
The scales don’t come to a standstillThe scales platform is not at
rest. Consequently, the weight
cannot be ascertained.
Scales should be installed in a vibration-
free place. The draught from fans, etc.
can cause this message.
Scale OverloadThe weight put on the plat-
form exceeds the capacity of
the scales.
Please remember: The maximum capacity
of the Frama S2 scales is 2 kg and 5 kg for
the Frama S5 scales. Avoid using the
scales platform as a place to keep things.
Scale UnderloadA weight was on the scales
when the franking system was
switched on.
Always make sure the scales platform is
empty when the franking system is
switched on.
9.3. Frama Matrix F4 / F6 postage messages
Display messageCauseElimination
High value not confirmed /
acknowledged!
Security query.Touch the postage value shown inverted
in the display. You can change the post-
age limit that activates the message in.
Set-up menu 2 in the administration
mode.
Max. postage value exceeded!Security query. The value ex-
ceeds the max. postage value.
You can change the postage limit that
activates the message in Set-up menu 2
in the administration mode.
Low Credit
The credit available in your F4 /
F6 has dropped below the set
limit of £200.00 (standard
amount).
Re-set postage credit.
If necessary, change the warning limit
using the corresponding function in the
administration mode.
No Credit!The remaining amount of
postage credit is not sufficient
for franking.
Load a new postage reserve into the
system.
Frama Matrix F4 / F6
59
9.4. Frama Matrix F4 / F6, Ink system messages
Display messageCauseElimination
Perform Calibration of Ink-Jet Cassette?You have put in a inkjet cas-
sette that was already installed
in your Matrix F4 or F6.
Select “YES” if you wish to recalibrate
the inkjet cassette or “NO” if you wish to
take over the existing calibration data.
Please put in an original Frama cartridge.Wrong type of cartridge.Please use only original Frama inkjet
cassettes.
Unknown Ink-Jet Cassette. Please use
only Frama ink cartridges which suit your
system.
The cartridge used by you is for
use in another country.
Put in a new inkjet cassette.
Inkjet cassette is nearly empty. Please
order a new ink-jet cassette.
The ink available in the car-
tridge is almost finished. (This
message appears when 20%
and less ink remains.)
Please order a new inkjet cassette.
Ink-Jet Cassette is empty.
Put in a new inkjet cassette.
Put in a new inkjet cassette.
Ink-Jet Cassette has reached the Expiry
Date. Please install a new Ink-Jet Cas-
sette.
The shelf life of the cartridge
has been exceeded.
Put in a new inkjet cassette. The date is
shown on the cartridge packaging.
Warning!
Missing or Defective
Ink-Jet Cassette.
Please Install a New
Cassette and Restart
the Franking System.
Cartridge changed without
using the appropriate menu or
the cartridge is defective.
Always use the respective point in the
menu in the printing system domain
when changing a cartridge.
Frama Matrix F4 / F6
60
9.5. Frama Matrix F4 / F6 mail item transport
Display messageCauseElimination
Feeder Error
Letter Feeding Error.
Please Adjust Side Guide.
The letter was angulated and
thus not franked.
Feed in the letter again.
Warning!
Current print settings
(Logo and Text)
Are Not Suitable
for Short Letters.
Warning!
Current print settings
(Logo and Text)
Are Not Suitable
for Labels
The printing mark does not fit
onto a short letter or a frank-
ing label.
Temporarily switch off the text or adver-
tising using the selection function.
Please Remove Paper Jam. Paper jamRemove paper jam (see chapter 4.8).
Please insert New Label BoxPlease insert a new label box
Label dispenser paper jam
Label box not put in place
properly.
Please check it for a correct seating.
Paper jam at feedYou are trying to reseal already
sealed envelopes.
Pieces of paper are in the
transport path.
Remove paper jam (see chapter 4.8).
The water tank is missingPut the water tank in place.
The water level is lowTop up the water tank.
The letter is too shortA letter of this length is not
suitable for the AF6 (min.
format A6).
Please use only envelopes of the A6
format and above.
No display message, but the letter was
not franked and the franking system
beeped three times.
The letter could not be identi-
fied.
Put the letter in place again.
Frama Matrix F4 / F6
61
10. Technical data
10.1. Miscellaneous
Speed (handling rate): 4,000 letters per hour using manual feeder MF4
5,500 letters per hour using automatic feeder AF6
Max. letter thickness: 10 mm
Display: graphical, touch keypad/screen
Preselect/default process: FramaOnline2
Number of integrated advertising messages: 3
Number of customer-specific advertising messages: 5
Number of freely definable texts: 3
Dimensions of advertising message: 56 x 25 mm
10.2. Nominal data of power supply
Matrix F4: 24V DC, 1.5 A
Matrix F6: 24V DC, 1.5 A
Manual feeder MF4: 90 - 264 V AC, 47-62 Hz, 0.75 A, T2A fused
Automatic feeder AF6: 90 - 264 V AC, 47-62 Hz, 0.75 A, T2A fused
Libble takes abuse of its services very seriously. We're committed to dealing with such abuse according to the laws in your country of residence. When you submit a report, we'll investigate it and take the appropriate action. We'll get back to you only if we require additional details or have more information to share.
Product:
Forumrules
To achieve meaningful questions, we apply the following rules:
First, read the manual;
Check if your question has been asked previously;
Try to ask your question as clearly as possible;
Did you already try to solve the problem? Please mention this;
Is your problem solved by a visitor then let him/her know in this forum;
To give a response to a question or answer, do not use this form but click on the button 'reply to this question';
Your question will be posted here and emailed to our subscribers. Therefore, avoid filling in personal details.
Register
Register getting emails for Frama Matrix F6 at:
new questions and answers
new manuals
You will receive an email to register for one or both of the options.
Get your user manual by e-mail
Enter your email address to receive the manual of Frama Matrix F6 in the language / languages: English as an attachment in your email.
The manual is 1,96 mb in size.
You will receive the manual in your email within minutes. If you have not received an email, then probably have entered the wrong email address or your mailbox is too full. In addition, it may be that your ISP may have a maximum size for emails to receive.
If you have not received an email with the manual within fifteen minutes, it may be that you have a entered a wrong email address or that your ISP has set a maximum size to receive email that is smaller than the size of the manual.
The email address you have provided is not correct.
Please check the email address and correct it.
Your question is posted on this page
Would you like to receive an email when new answers and questions are posted? Please enter your email address.