)-0/24!.4 As soon as you use pulse acquisition using the chest strap, this measurement takes priority over any other pulse rate
measurement possibility. In other words, the value is always displayed that results from the measurement by the chest strap.
12
3
4
You can set a DRINK FIT function during the setting of your personal datas. You can choose between OFF, 15, 20, 25
and 30minutes. The symbol will be shown for 3 seconds with an beep in the matrix, it doesn´t matter in which program
you are.
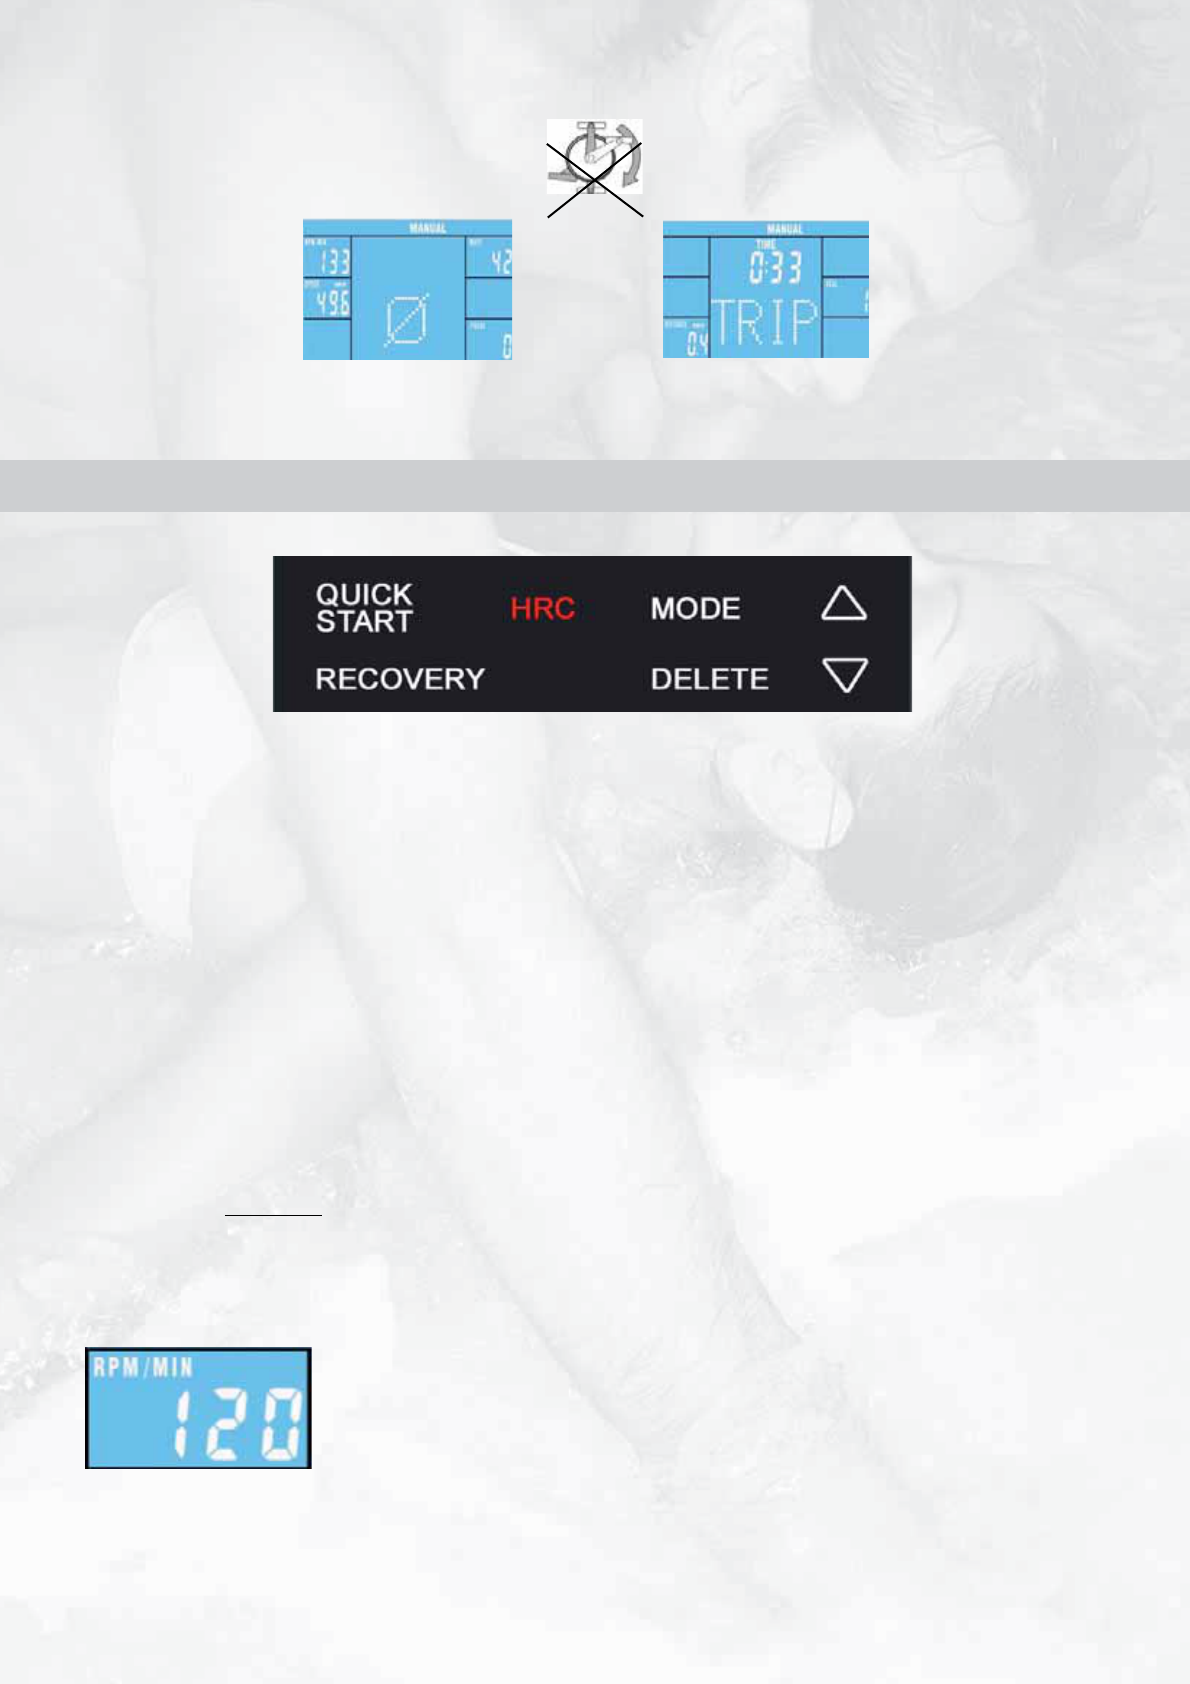
%XPLANATIONOFTHESYMBOLSANDNEEDTOKNOW
The symbol demand you to begin to pedal. the set values will be confirmed and you start your exercise.
!0EDALLING
"$RINK&)4
$3ETTINGVALUES
Target values: After achieving the target values, there will be a beep and the computer will stop counting. The monitor will show the average
and trip values. To continue your exercise, you have to reactivate the computer by pressing the DELETE button.
!TTENTION Except the heartrate value, you can set only one further value. If you set another value, the already set value will be set to OFF.
To start your exercise, beginn to pedal, after you have set the target value.
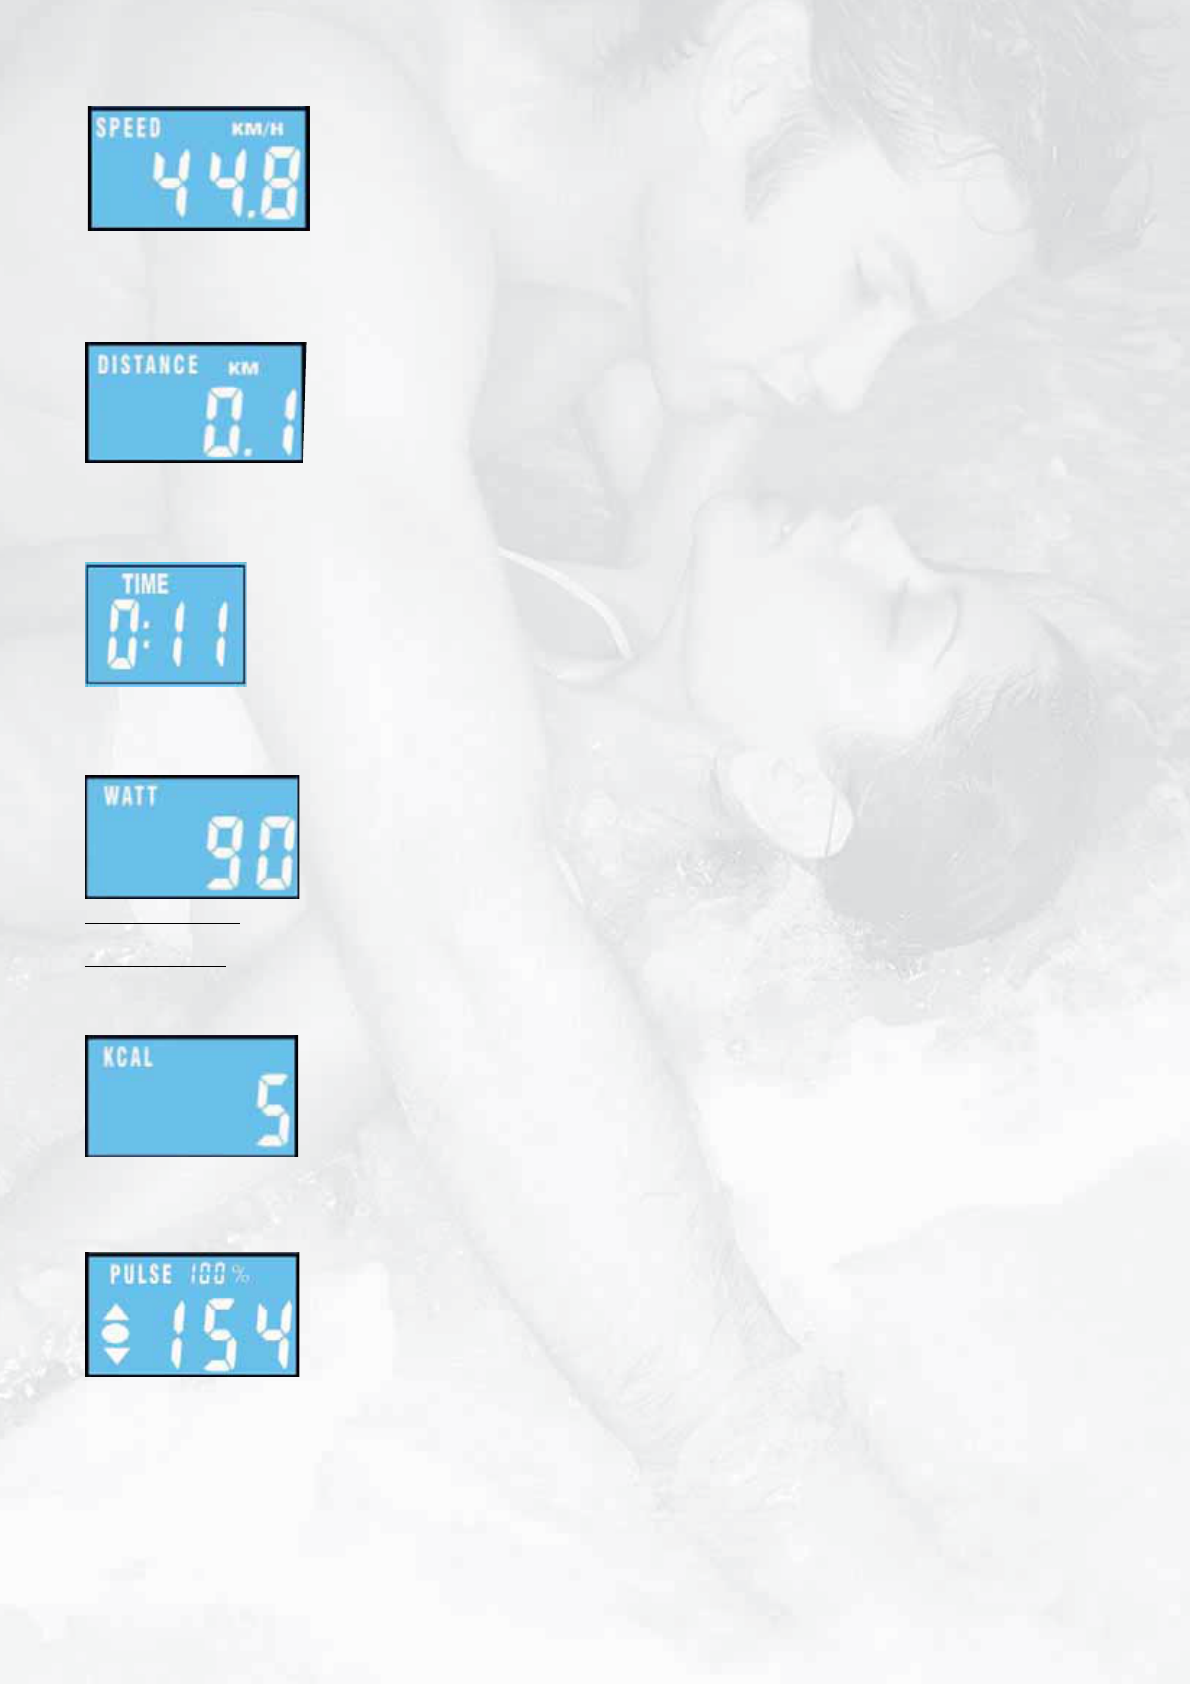
%()7ATT
In PROGRAM-Mode, you can set the max Watt resistance which will be reached during your exercise. All other Watt values will be calculatated
accordingly to the max value.
&2ECOVERY
After you finished your exercise press RECOVERY and stop pedalling. The computer will measure the heartrate for the next 60 seconds. If the
difference between the starting and end heartrate is around 20%, you will get the grade F1 (very good).
#7AKINGUPTHECOMPUTERFROMTHESNOOZEMODE
To reactivate the computer from the snooze mode, press any button, please. A pedalling has no function in this mode.
')NCREASINGOFTHE7ATTVALUEDURING(2#-ODE
The resistance (watt value) will be increase every 30 seconds for 10 Watt, till you reach a heart rate value, which is 5 beats lower than your
target. The resistance will stay at this level for 1 minute. If there is no further heartrate change, the resistance will increase again. If the actual
heartrate is for 5 seconds higher than your target, the resistance will decrease immediately for 20 Watt and than every 20 seconds for 10 Watt,
till your actual heartrate is lower than the target. If it is lower than the target heartrate, the resistance will increase again.
For IND: You can set a heartrate zone. The increasing is following the same procedure like above mentioned. Pay attention, that if your actual
heartrate cannot be under the LO limit, the resistance will not increase anymore. You have to stop your exercise and set new targets!
The arrows in the heartrate windows indicate, that the resistance cannot be increased or decreased and so you have to pedal slower (arrow
down) or pedal faster (arrow up).
If your actual heartrate is five beats lower than the set target, the circle between the two arrows start to blink. It indicates, that you are reaching
your target value. If your actual heartrate is higher than the high limit, there will be a beep and the actual heartrate starts blinking.
&!'%
Needed for max heartrate calculation.
'+CALCALCULATION
Shows the energy consumption, based on a efficiency of 22% to provide the mechanical power. Conversion Joule into Kcal: 1cal=4,1867J.
Example: 60Watt for 20minutes
60(Watt) x 20(Min) x 60Rpm=72000J= 17197cal.
17197cal is equal to a efficieny of 22%. Totally the calorie consumption is 78169cal oder 78Kcal.
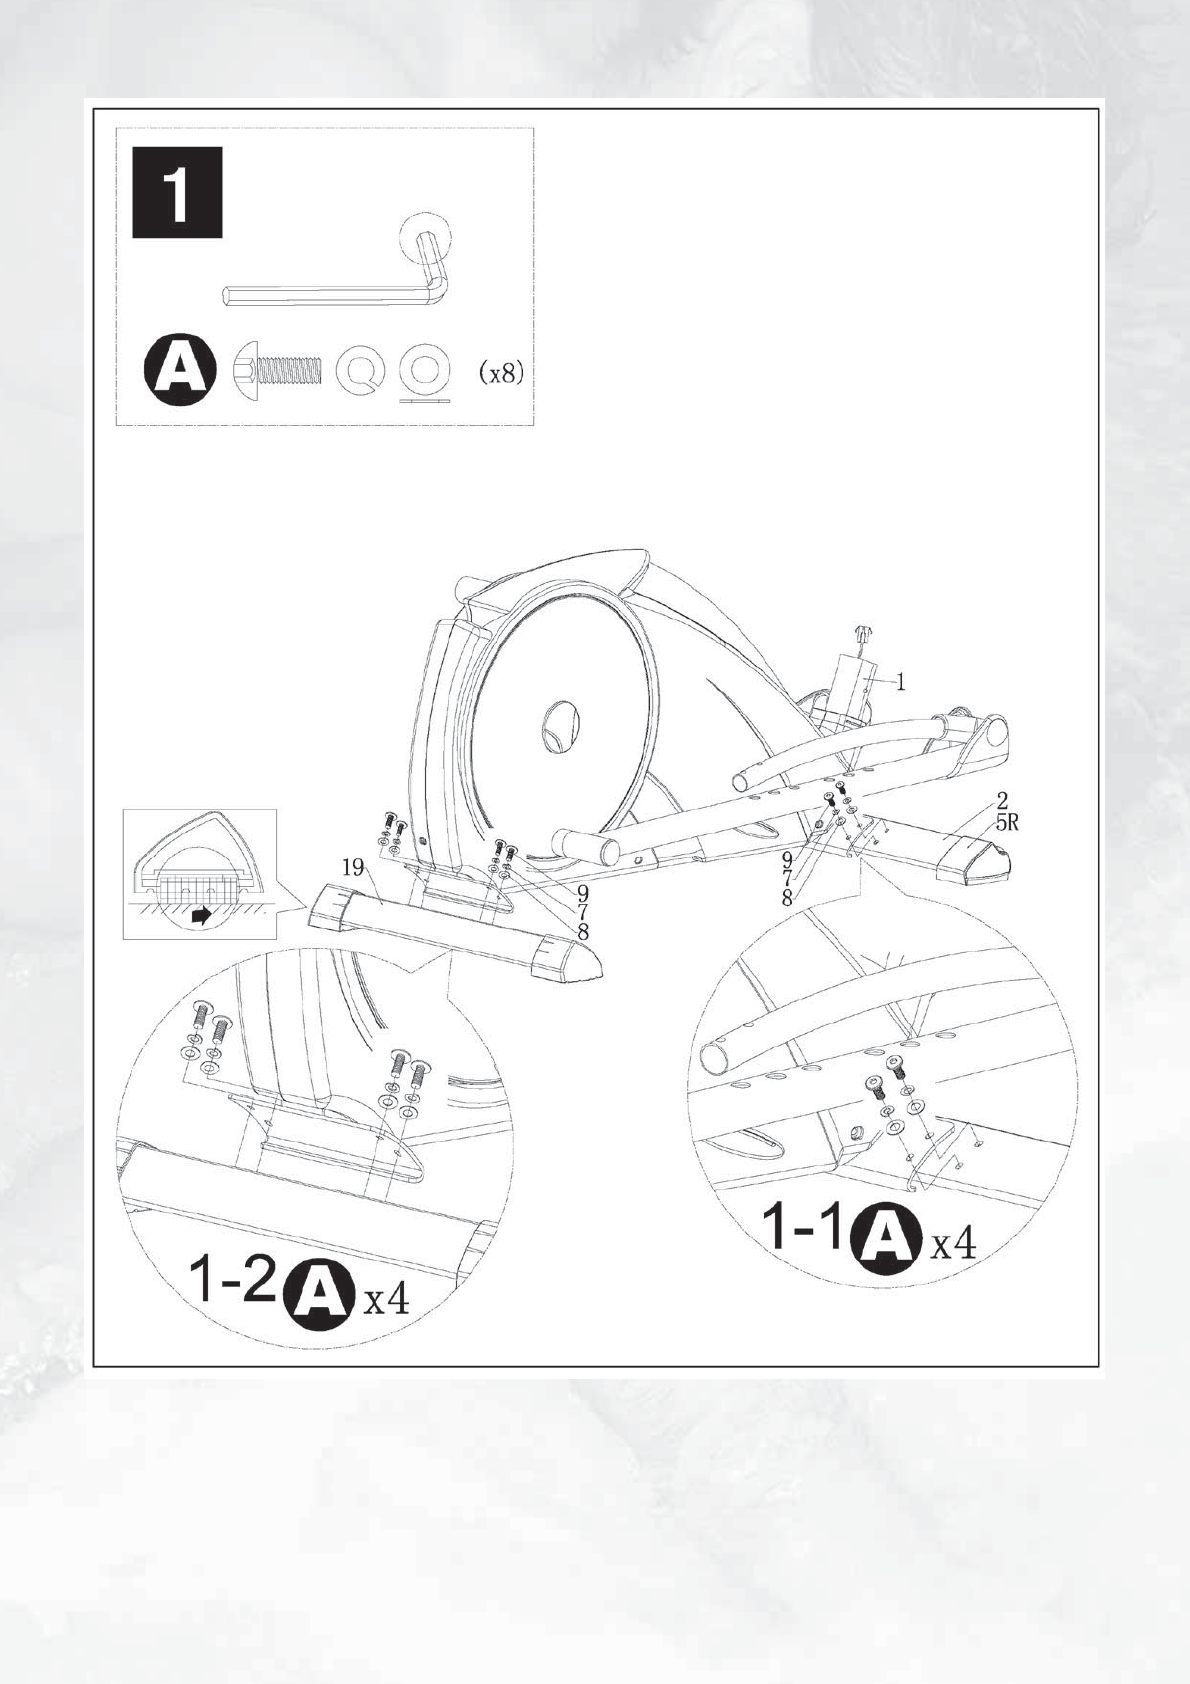
A)
#OMPUTER&UNCTIONS
5.3.1 Immediate-Start function
In order to provide optimum user friendliness of your training equipment, an opportunity for quick and uncomplicated initiation of training
was devised. Please do the following :
• Connect the power supply included in the scope of delivery to the bottom end of the equipment
, at the socket provided. A test image will
briefly appear on the computer. After a short time „U0, U1, U2, U3 or U4“ will appear in the center of the digital display.
• Start your exercise by pedalling. You have activated the last used, all values start counting up. After you have finished your exercise, the
reached values will not
be safed in the, if you have selected U0!
S< press: CHECK3ETTINGOFPERSONAL
DATAS
S press: CHECK7ATT-ODE
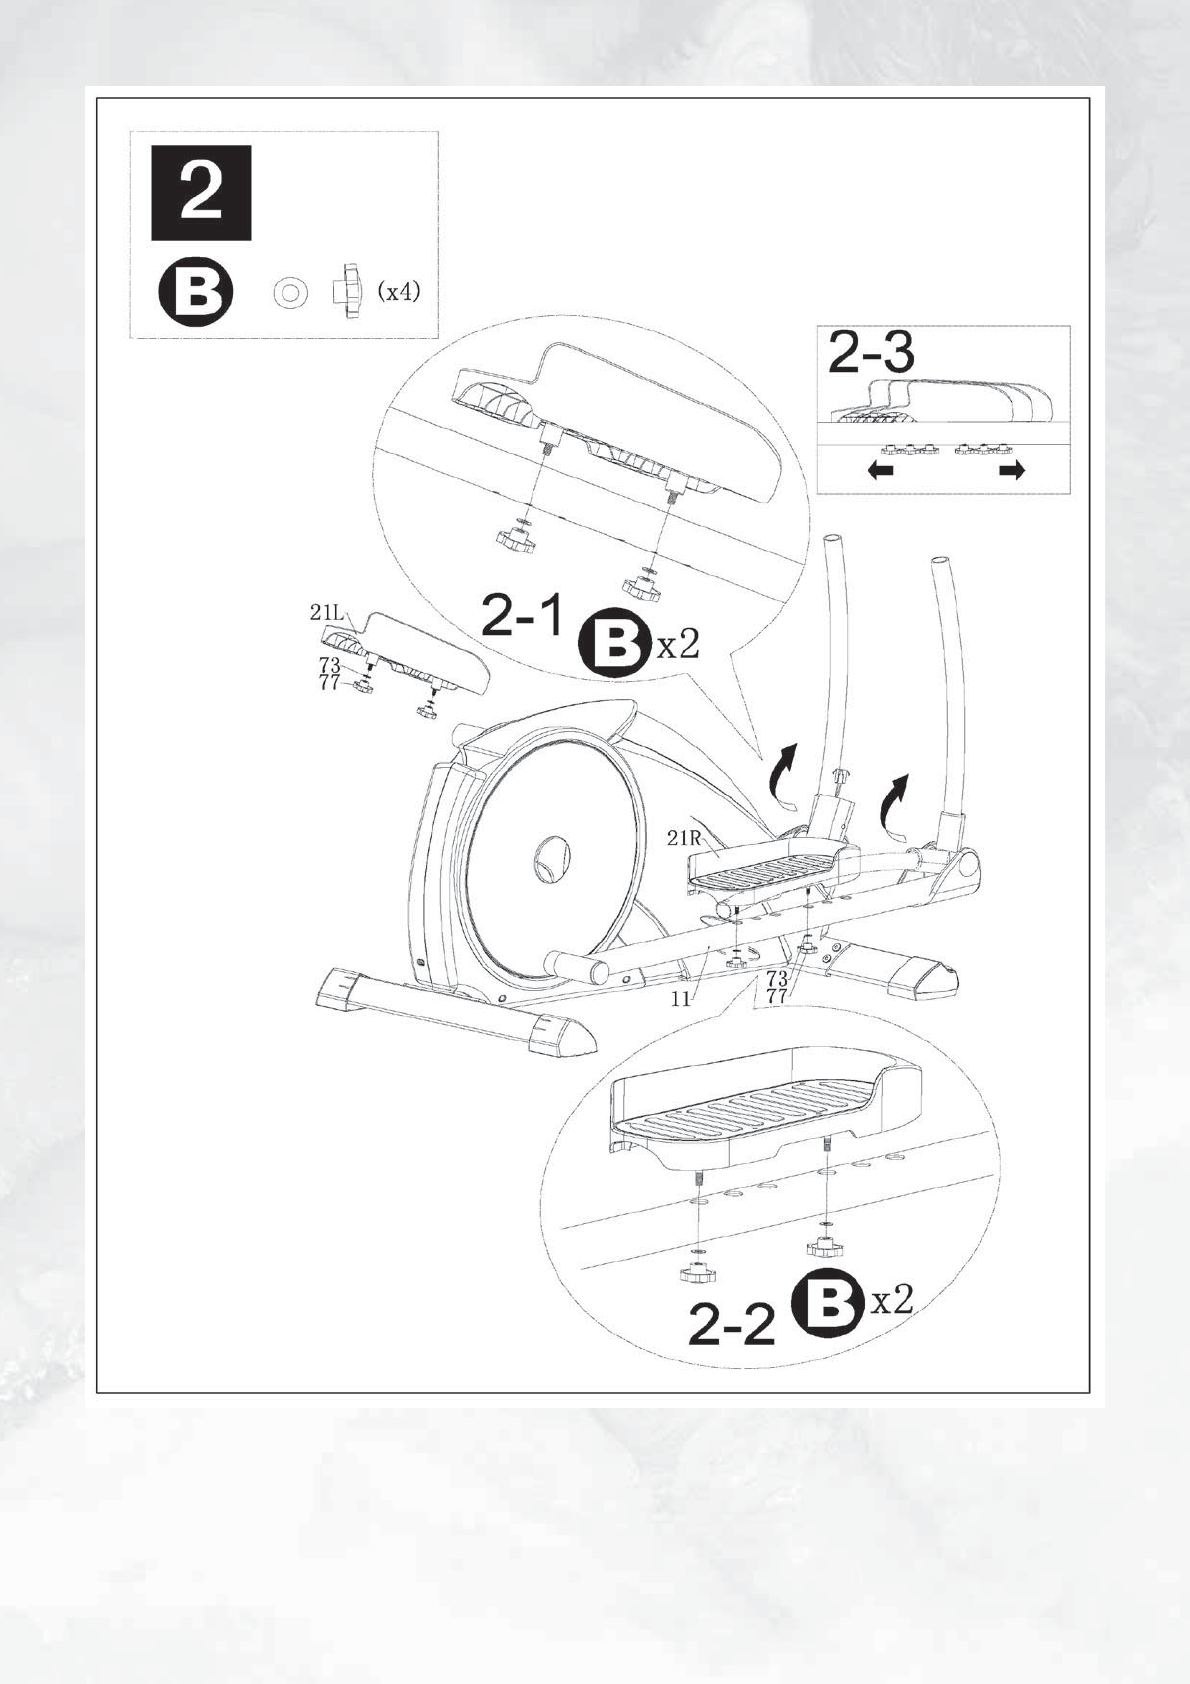
B)
→→
→
→
→
→
→→
1) USER-Selection
→
The selected User (U0-U4) will
be shown in the display.
or
5.4.1 User selection and setting of personal datas.
You are in the independant mode. The already
set data will start counting backwards. If the set
data reach 0, the computer will stop and a beep
will be heard. If you didn´t set any values, all
data will start counting up.
%XERCISEWITH5SERSETTING
→
Step 2
OFF, 15, 20, 25, 30min
20-90 years
A)
B)
You are in the main menue, check 5.4.2
WATT-Mode
5.4.2 WATT-Mode
2) Setting of personal datas
Menue, WATT is blinking.
Press quickly
Press quickly
Press quickly
1) WATT-selection
OFF, 01:00-99:00min
OFF, 1-999km
25-400Watt
OFF,10-9990Kcal.
OFF, 120-199bpm
Starting your exercise, the already set data will start
counting backwards. If the set data reach 0, the computer
will stop and a beep will be heard. If you didn´t set any
values, all data will start counting up.
→→
→
→
→
2) Setting of values
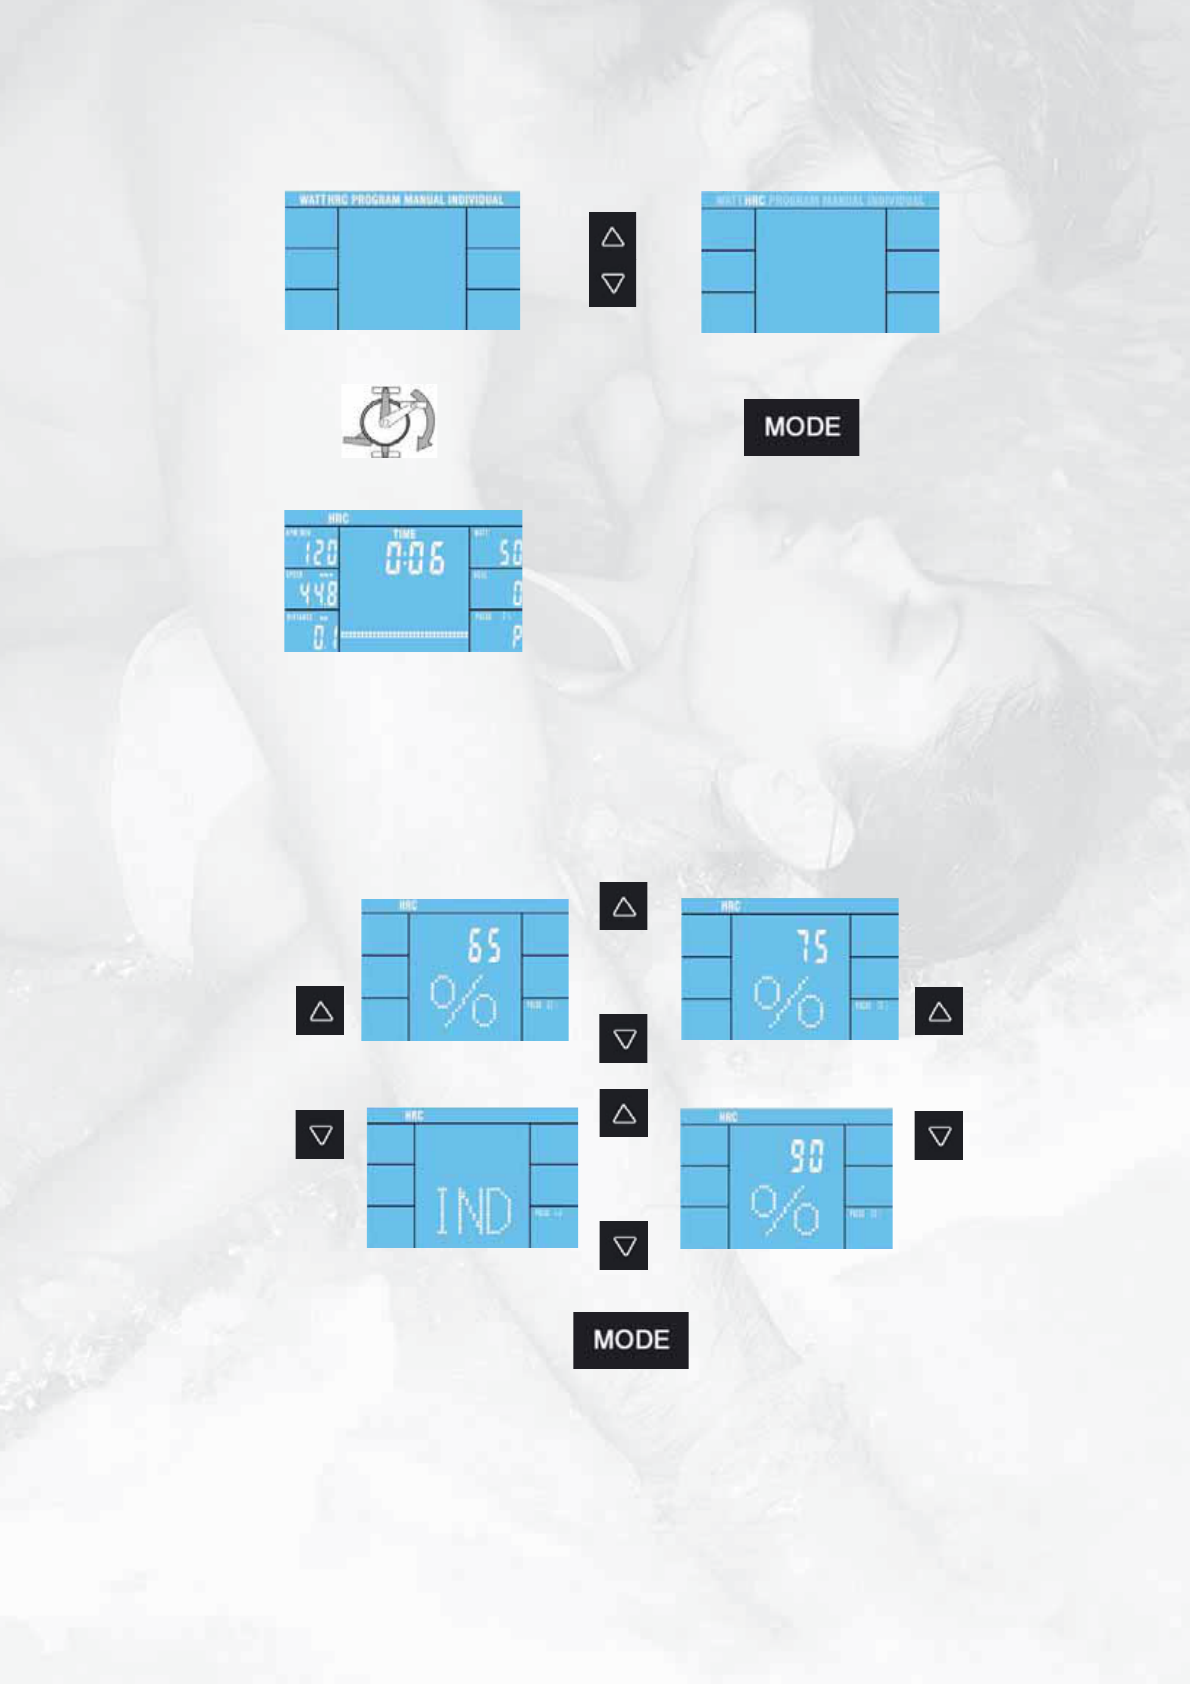
5.4.3 HRC-Mode
2) Setting of the max heartrate
check 2) Setting of the max heartrate.
→
→
→
→
1) HRC-Selection
→
→
→
→
Starting your exercise, the already set data will start
counting backwards. If the set data reach 0, the
computer will stop and a beep will be heard. If you
didn´t set any values, all data will start counting up.
Menue, HRC is blinking
3A) Setting of the values for the limits
65%, 75% und 90%
3B) Setting of the values for the
limit IND
OFF, 10:00-99:00min
OFF, 1-999km
OFF,10-9990Kcal.
→
→
OFF, 10:00-99:00min
OFF, 1-999km
OFF,10-9990Kcal.
OFF, 120-199bpm
→
→
→
→
→
→
OFF, 50-200Watt
OFF, 80-170bpm
→
⎯⎯⎯⎯⎯⎯⎯⎯⎯⎯⎯⎯⎯⎯
⏐
⏐
Starting your exercise, the already set data will start
counting backwards. If the set data reach 0, the
computer will stop and a beep will be heard. If you
didn´t set any values, all data will start counting up.
Starting your exercise, the already set data will start
counting backwards. If the set data reach 0, the
computer will stop and a beep will be heard. If you
didn´t set any values, all data will start counting up.
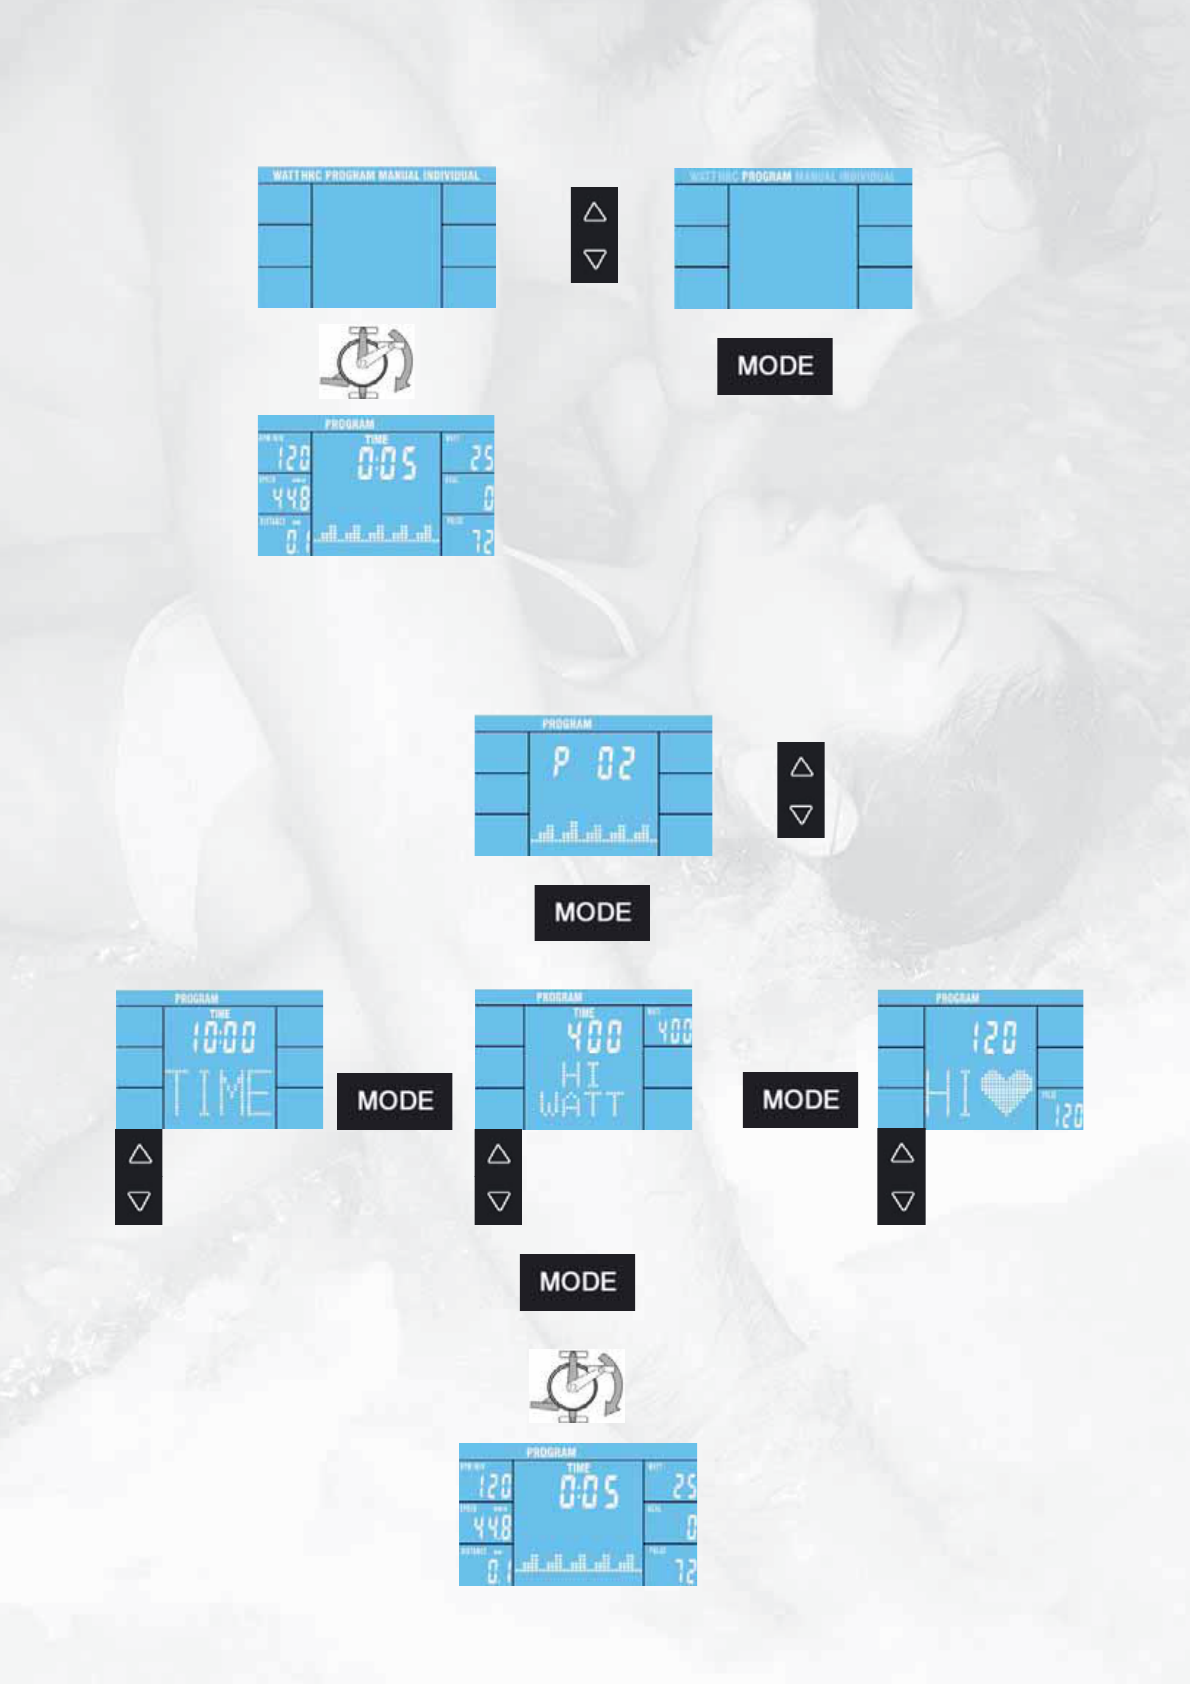
1) PROGRAM-Selection
5.4.4 PROGRAM-Mode
check 2) Profile selection
2) Profile selection
P1-P12
3) Setting of values
OFF, 10:00-99:00min
OFF, 125-400Watt
OFF, 120-199bpm
→
→
→
⎯⎯⎯⎯⎯⎯⎯⎯⎯⎯⎯⎯⎯⎯
⏐
⏐
Starting your exercise, the already set data will start
counting backwards. If the set data reach 0, the
computer will stop and a beep will be heard. If you
didn´t set any values, all data will start counting up.
Starting your exercise, the already set data will start counting
backwards. If the set data reach 0, the computer will stop and
a beep will be heard. If you didn´t set any values, all data will
start counting up.
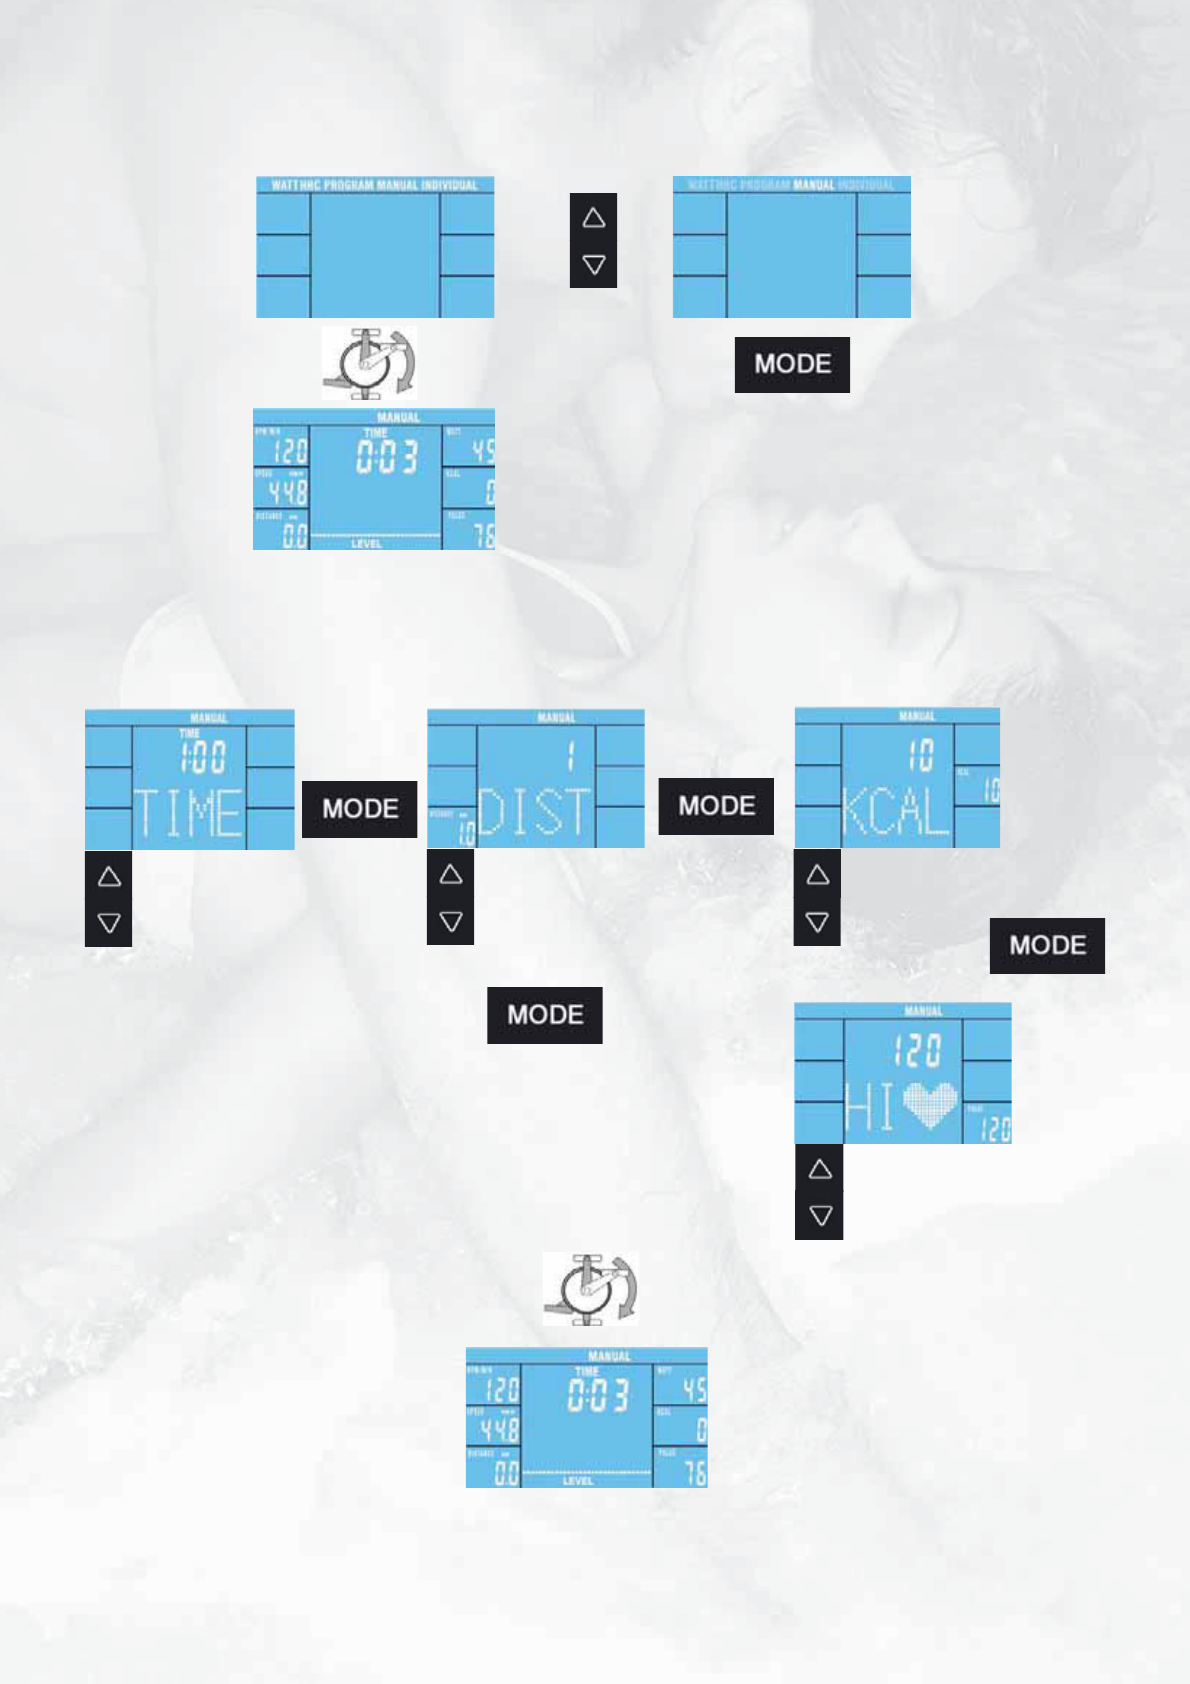
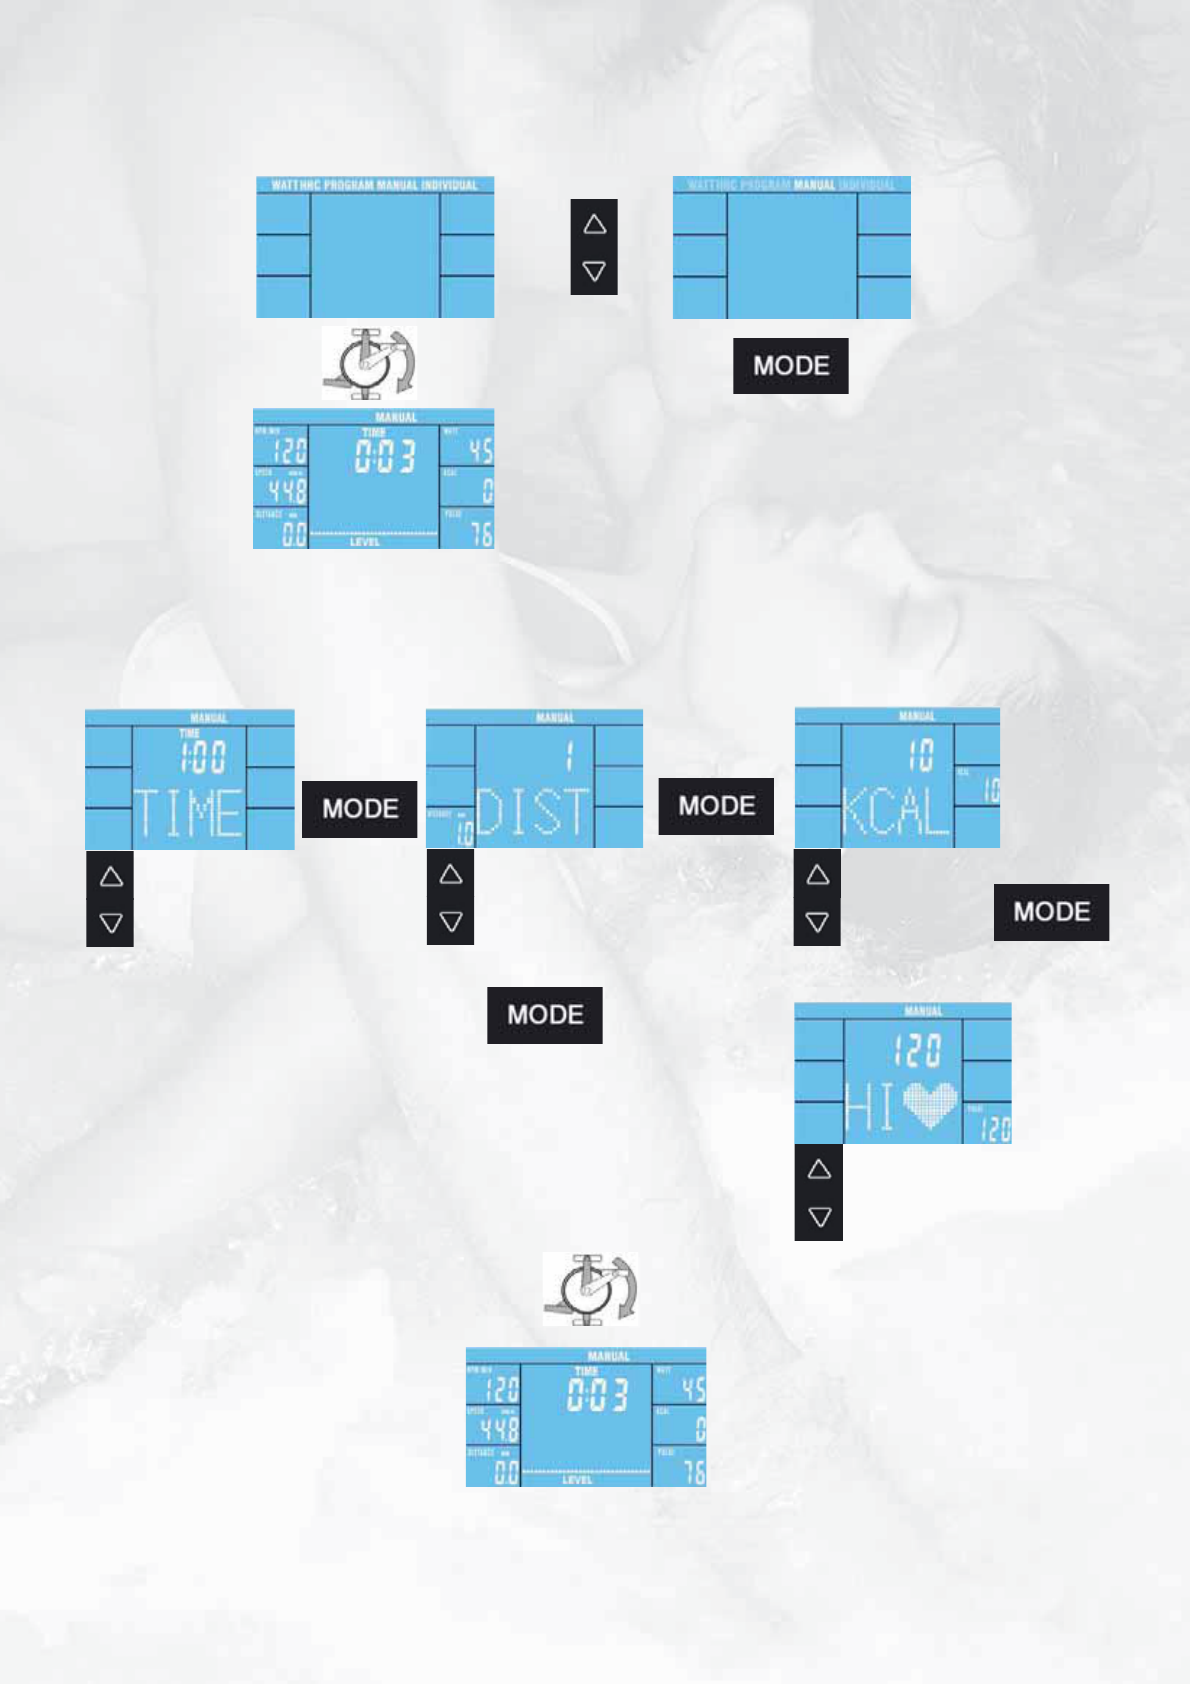
1) MANUAL-Selection
5.4.5 MANUAL-Mode
OFF, 01:00-99:00min
OFF, 1-999km
OFF, 10-9990Kcal
OFF, 120-199bpm
Starting your exercise, the already set data will start counting
backwards. If the set data reach 0, the computer will stop and
a beep will be heard. If you didn´t set any values, all data will
start counting up.
→→
→
→
⎯⎯⎯⎯⎯⎯⎯⎯⎯⎯⎯
⏐
⏐
⏐
⏐
⏐
⏐
check 2) Setting of values
2) Setting of values
Starting your exercise, the already set data will start counting backwards.
If the set data reach 0, the computer will stop and a beep will be heard. If
you didn´t set any values, all data will start counting up.
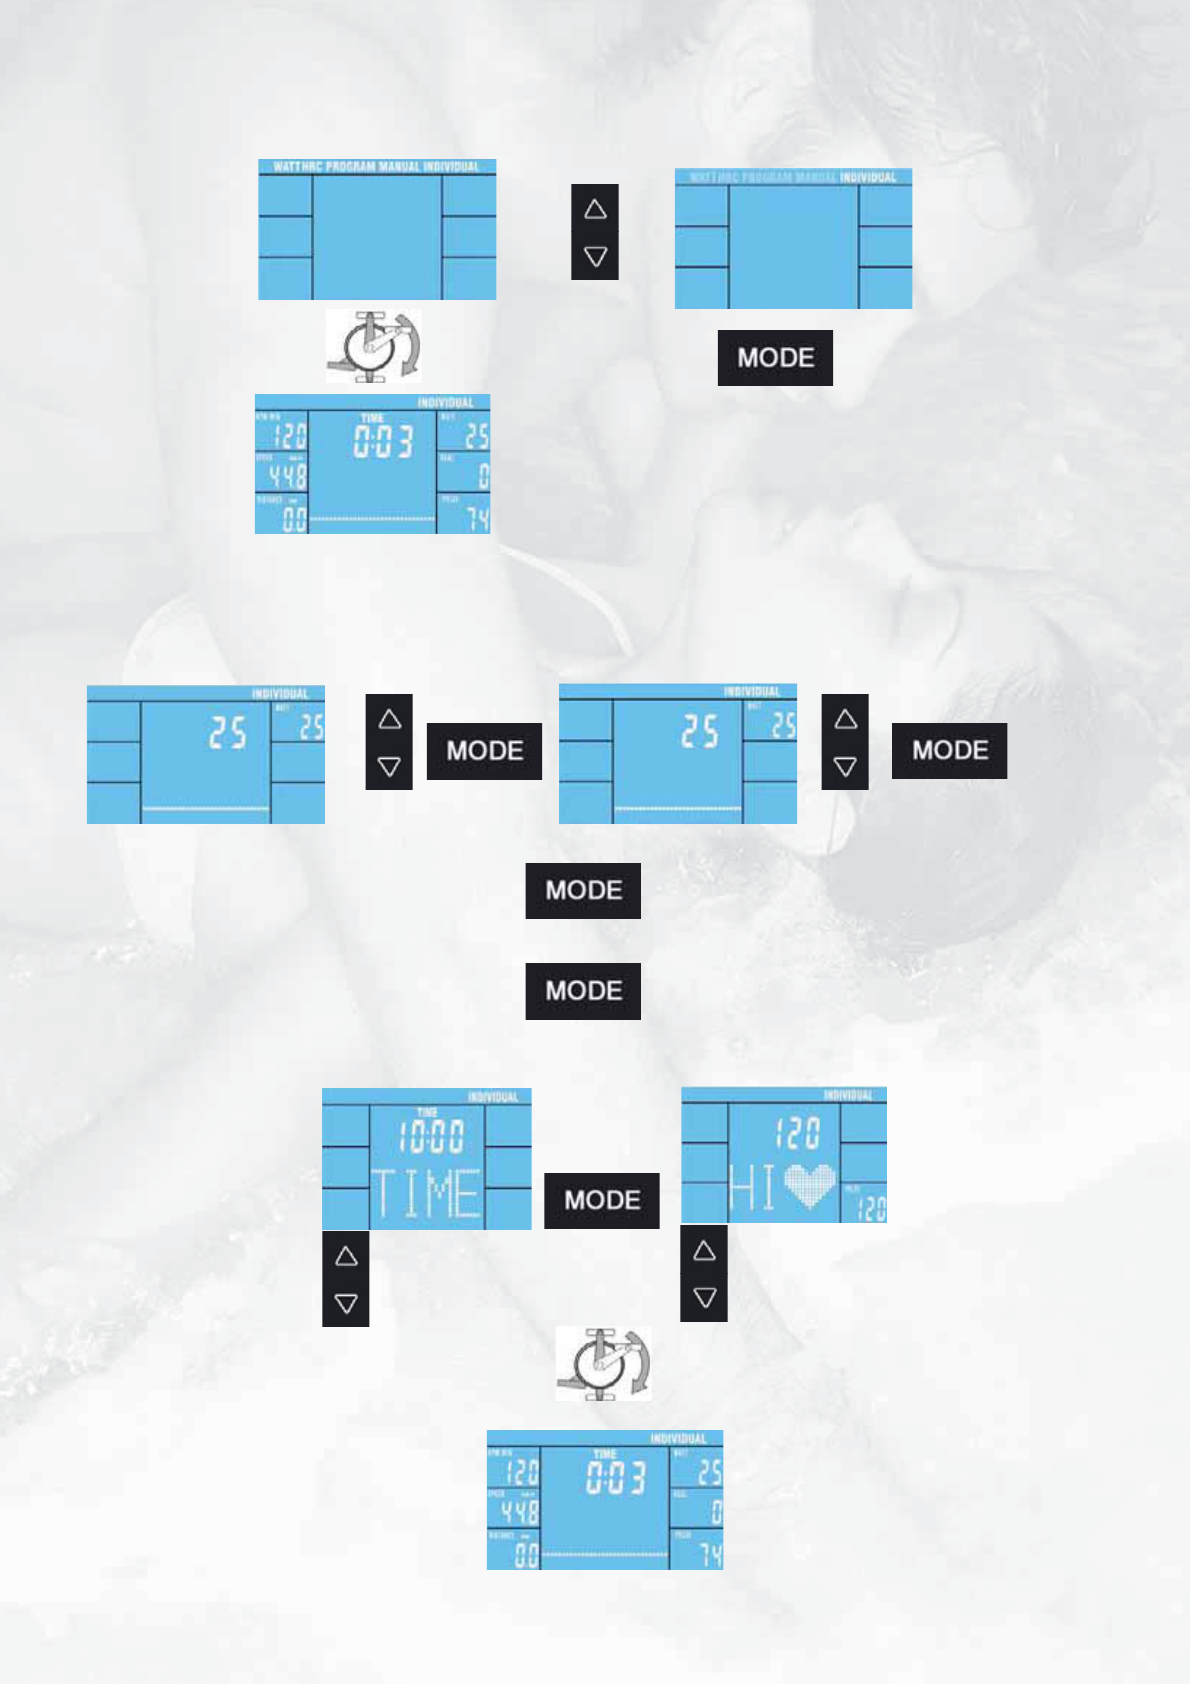
1) INDIVIDUAL-Selection
5.4.6 INDIVIDUAL-Mode
check 2) Setting of values
2) Setting of Watt values for each section
25-400WATT
3) Setting of values
OFF, 10:00-99:00min
OFF, 120-199bpm
→
→
Section 1
Section 2
25-400WATT
→
⎯⎯⎯⎯⎯⎯⎯⎯⎯⎯⎯⎯⎯⎯
⏐
⏐
2s<
Starting your exercise, the already set data will start
counting backwards. If the set data reach 0, the
computer will stop and a beep will be heard. If you
didn´t set any values, all data will start counting up.
Starting your exercise, the already set data will start counting
backwards. If the set data reach 0, the computer will stop and a
beep will be heard. If you didn´t set any values, all data will start
counting up.
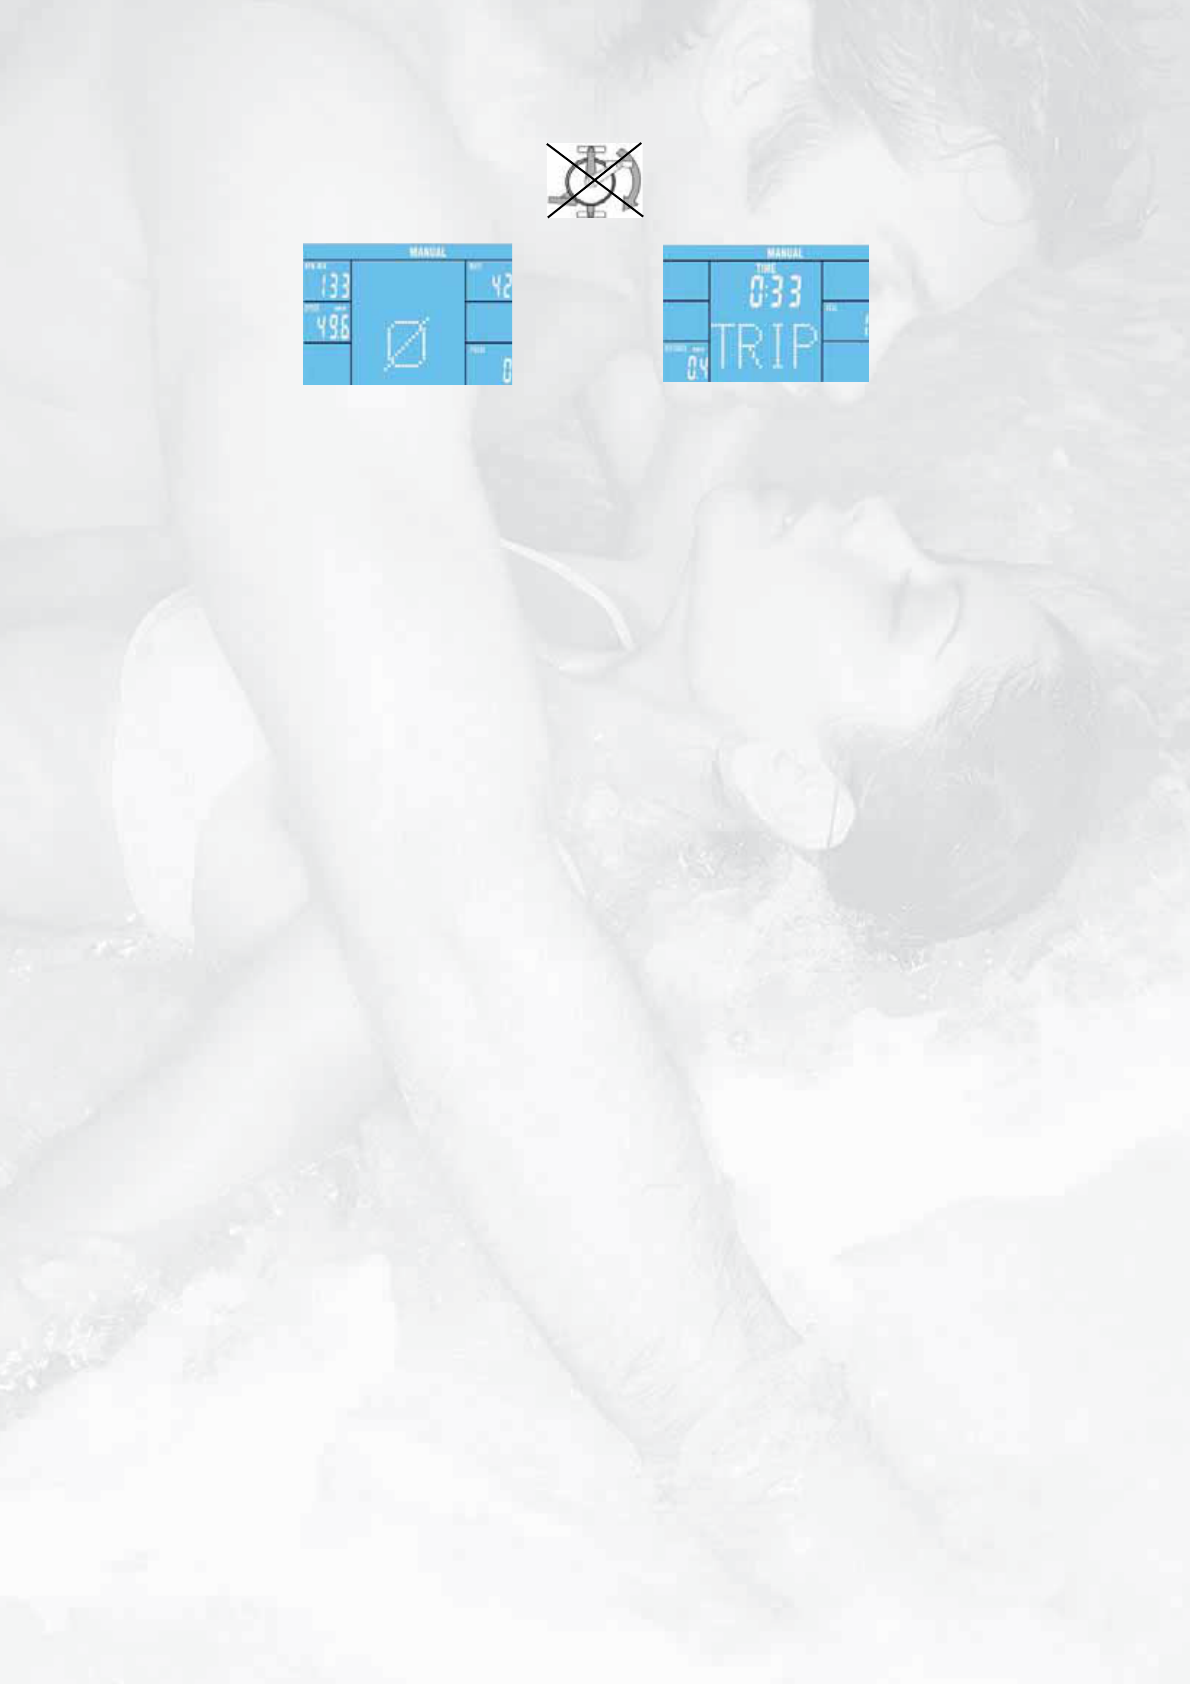
5.4.7 Display after finishing your exercise
→
→
4s
The average and final values will be shown rotatingly for four seconds after you have finished your exercise.
&EHLER
Keine Anzeige oder keine Funktion des Computers
5RSACHE
Keine Stromversorgung
&EHLER
Pulsanzeige fehlerhaft
5RSACHE
Kein Empfang
Störquellen im Raum
"EI/HRPULSMESSUNG
Schlechte Durchblutung des Ohr-
läppchens
Keine Pulswerterfassung
"EI"RUSTGURT
ungeeigneter Brustgurt
Brustgurt falsch positioniert
Batterien sind leer
&EHLER
Tretwiderstand nicht regelbar
5RSACHE
Mechanik / Steuerung
&EHLER
Anzeige zu schwach
5RSACHE
Ungünstiger Lichteinfall
&EHLER
Fehlende Teile
&EHLER
Wackelndes Gerät
5RSACHE
Unebener Boden
Standfüße locker
7ASTUN
Netzgerät in Steckdose
einstecken.
Netzgerätestecker in An-
schlussbuchse am Gehäuse
einstecken
Kabelverbindungen überprü-
fen
7ASTUN
Alle Anschlüsse überprüfen
Evtl. Störgrößen (z.B. Handy/
Lautsprecher) im Raum besei-
tigen
Ohrläppchen massieren
Korrekten Sitz des Ohrclips
prüfen und das Kabel an der
Kleidung befestigen.
Evtl. anderen Brustgurt ver-
wenden. Die Sendefrequenz
muss zw. 5,0 – 5,5 kHz
liegen!
Elektroden befeuchten und
korrekten Sitz überprüfen.
Durch Batterien desselben
Typs ersetzen
7ASTUN
Programm mit Quick-Start
starten Kabelverbindungen
prüfen
7ASTUN
Stellung des Gerätes ändern
7ASTUN
Verpackung überprüfen
Service anrufen
&EHLERDIAGNOSEUND&EHLERSUCHE
7ASTUN
Höhenverstellkappen drehen,
bis ein sicherer Stand
gewährleistet ist!
Hutmuttern festziehen!
$IAGNOSTICSAND4ROUBLESHOOTING
%RROR
No display or computer is not functioning
#AUSE
No power
%RROR
Pulse display defective
#AUSE
No reception
Interference with in the room
%ARPULSEMEASUREMENT
Poor blood circulation
No pulse rate acquisition
#HEST3TRAP
Incorrect chest strap
Chestbelt strap incorrectly
positioned
Batteries are dead
%RROR
Step resistance cannot be
regulated.
#AUSE
Mechanics/control system
%RROR
Computer display to weak
#AUSE
Detrimental light fall
%RROR
Missing parts
%RROR
Wobbly equipment
#AUSE
Uneven floor
Stand feet are loose
7HATTODO
Plug the power supply into
the socket, or plug the power
supply into the connection
port on the housing (see
Assembly Step 9), or Check
cable connections
7HATTODO
Check all connections
Remove (for example cell
phone/loud speakers)
in the room
Do some massage for your
earlope.
Check for correct seating of
the pulse grip cable and fix it
on your textile
Use another chest strap, if
necessary. The transmitting
frequency must be between
5.0 -5.5 kHz.
Moisten the electrodes and
check for correct positioning.
Replace the batteries with
ones of the same type.
7HATTODO
Start the program using
Quick Start. Check cable
connections
7HATTODO
Change the position of the
equipment
7HATTODO
Check the packing or
Call Service
7HATTODO
Rotate the height adjusting
caps until the stand is stable.
Tighten the cap nuts.
4ECHNISCHE$ETAILS
4ECHNICAL$ETAILS
.ETZGERÊTIM,IEFERUMFANGENTHALTEN
Schließen Sie das Kabel vom Netzgerät an der entsprechenden
Buchse am hinteren, unteren Ende des Gehäuses an.
.ETZTEIL3PEZIlKATION
Input: 230 V, 50Hz
Output: 26 V, 2500 mA
Verwenden Sie ausschließlich das im Lieferumfang
enthaltene Netzgerät! Sollten Sie ein Netzgerät eines
anderen Herstellers verwenden wollen, achten Sie
darauf, dass dieses bei Überbelastung automatisch
abschaltet, kurzschlussfest ist und elektronisch geregelt
wird. Bei Nichtbeachtung kann dies zu einem Kurzschluss
und Defekt des Computers führen.
Zur vollständigen Netztrennung ist der Netzstecker aus
der Steckdose zu ziehen. Das Gerät deshalb nur an leicht
zugängliche Steckdosen anschließen.
+ONFORMITÊTGEMÊ'ERÊTESICHERHEITSGESETZ
Hammer Sport AG erklärt hiermit, dass dieses Produkt die
folgenden Bestimmungen bezüglich der elektromagnetischen
Kompatibilität und der elektrischen Sicherheit erfüllt:
- 89 / 336 / EWG vom 3. Mai 1989 mit anschließenden
Änderungen (Richtlinie 92 / 31 / EWG vom 28. April 1992
und Richtlinie 93 / 68 / EWG vom 22. Juli 1993).
- 73 / 23 / EWG vom 19. Februar 1973 mit anschließender
Änderung (Richtlinie 93 / 68 / EWG vom 30. August 1993).
Libble takes abuse of its services very seriously. We're committed to dealing with such abuse according to the laws in your country of residence. When you submit a report, we'll investigate it and take the appropriate action. We'll get back to you only if we require additional details or have more information to share.
Product:
Forumrules
To achieve meaningful questions, we apply the following rules:
First, read the manual;
Check if your question has been asked previously;
Try to ask your question as clearly as possible;
Did you already try to solve the problem? Please mention this;
Is your problem solved by a visitor then let him/her know in this forum;
To give a response to a question or answer, do not use this form but click on the button 'reply to this question';
Your question will be posted here and emailed to our subscribers. Therefore, avoid filling in personal details.
Register
Register getting emails for Finnlo 3279 Loxon XTR at:
new questions and answers
new manuals
You will receive an email to register for one or both of the options.
Get your user manual by e-mail
Enter your email address to receive the manual of Finnlo 3279 Loxon XTR in the language / languages: English, German as an attachment in your email.
The manual is 2,61 mb in size.
You will receive the manual in your email within minutes. If you have not received an email, then probably have entered the wrong email address or your mailbox is too full. In addition, it may be that your ISP may have a maximum size for emails to receive.
If you have not received an email with the manual within fifteen minutes, it may be that you have a entered a wrong email address or that your ISP has set a maximum size to receive email that is smaller than the size of the manual.
The email address you have provided is not correct.
Please check the email address and correct it.
Your question is posted on this page
Would you like to receive an email when new answers and questions are posted? Please enter your email address.