For the most efficient air circulation, the oven should be fitted according to the dimensions shown in fig.1-2 of page 2.
The rear panel of the cabinet must be removed so that air can circulate freely. The panel to which the oven is fitted should have a gap of at least 70 mm at the rear.
NB: where ovens are to be matched with hobs, it is essential to follow the instructions contained in the booklet supplied with the other appliance.
IMPORTANT
For a built-in oven to work well the cabinet must be of the right type.
The panels of the adjoining furniture should be heat resistant. Particularly when the adjoining furniture is made of veneered wood, the adhesives should be able to withstand
a temperature of 120°C. Plastic materials or adhesive which cannot withstand this temperature will become deformed or unstuck.
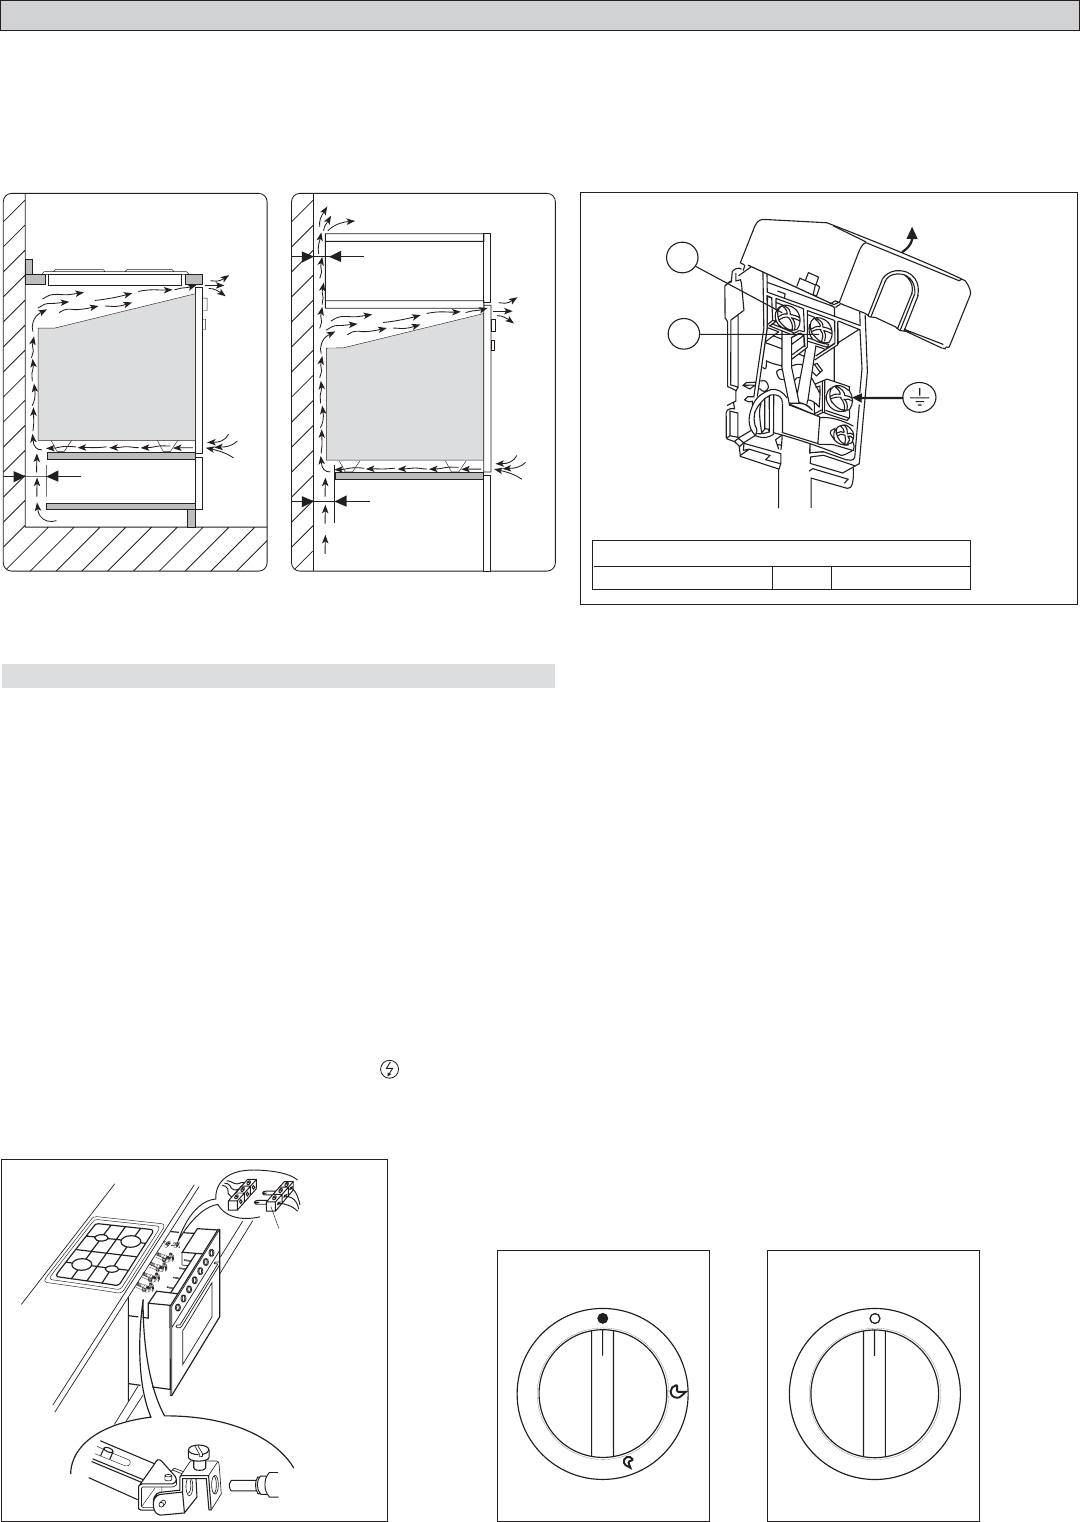
To comply with safety regulations, once the appliance has been fitted it should not be possible to make contact with the electrical parts.
All parts which offer protection should be fixed in such a way that they cannot be removed without the use of a tool.
Fig. 4
Fig. 5
70
CONNECTION TO THE MAINS SUPPLY
THE APPLIANCE MUST BE CONNECTED IN ACCORDANCE WITH THE RULES CURRENTLY IN FORCE, AND ONLY BY AN AUTHORIZED ELECTRICAL INSTALLER.
WARNING:THIS APPLIANCE MUST BE EARTHED
Check that the power rating of the mains supply and of the sockets are suitable for the maximum power of the appliance as indicated on the specification plate. Fit the
plug into a socket fitted with a third contact which corresponds with the earth connection. This should be properly connected. If the appliance does not come already fitted
with a plug, fit a regulation plug to the cable which is capable of taking the power indicated on the specification plate. The earth wire is yellow/green. If the plug fitted to
the appliance, and the socket, are incompatible, get a profesionnally qualified person to fit the correct type of plug. The same person should have also make sure that the
thickness of the cable is suitable for the power absorbed by the appliance. Mains connection can also be made by fitting a monophase switch with a minimum gap between
the contacts of 3 mm, proportionate to the load and complying with the regulations in force.
The yellow/green earth wire should not be controlled by the switch.
The plug or monophase switch used for mains supply connection should be easy to get at, once the appliance is in position.
Important: position the mains supply cable so that it is never subjected to a temperature which is more than 50°C above ambient temperature.
The electrical safety of the appliance can only be guaranteed when it has been correctly connected to an efficient earthed power supply, as laid down in the regulations
for electrical safety.
Important: the manufacturer cannot be held responsible for any damage to persons or objects due to the lack of an earth connection.
OVEN MAINTENANCE
ALWAYS UNPLUG THE PLUG FROM THE CURRENT SOCKET OR SWITCH OFF THE CURRENT ON THE POWER
SUPPLY LINE BY MEANS OF THE MAINS CIRCUIT SWITCH, BEFORE CARRYING OUT ANY MAINTENANCE ON THE
Fig.6
TYPE AND SECTION OF SUPPLY CABLE
70
70
230V~
H05RR-FØ3 x 1,5 mm
2
Special instructions for polyvalent models.
The models below can be matched with all types of built-in hobs of the gas-electric-combined gas/electric.
Sometimes on the control panel there is an ignition button for gas burners or an indicator light for the electric plates operation, or both of them.
In this case the ovens are supplied with terminal board A (see fig. 7), enabling the connection of these components to the hob.
Important: the control panels of the ovens can be fitted with 4 knobs, each with a surround suitable for controlling four-burners hobs (fig. b), or electric hobs (see fig. c ).
If the hob to be matched is of a different type (combined gas/electric), one or more of the surrounds need to be replaced using whether those of fig. b or those of fig. c.
N.B.: The surrounds are supplied with the oven, and the knobs, with their respective springs, are fitted to the control panel.
Fig. 7
NOTE: the oven control panel shows the positions of the hob components to be combined. As for
the gas burners, use the surrounds with the simbols of fig. b. As for the electric plates, use
Libble takes abuse of its services very seriously. We're committed to dealing with such abuse according to the laws in your country of residence. When you submit a report, we'll investigate it and take the appropriate action. We'll get back to you only if we require additional details or have more information to share.
Product:
Forumrules
To achieve meaningful questions, we apply the following rules:
First, read the manual;
Check if your question has been asked previously;
Try to ask your question as clearly as possible;
Did you already try to solve the problem? Please mention this;
Is your problem solved by a visitor then let him/her know in this forum;
To give a response to a question or answer, do not use this form but click on the button 'reply to this question';
Your question will be posted here and emailed to our subscribers. Therefore, avoid filling in personal details.
Register
Register getting emails for Etna A 7306 at:
new questions and answers
new manuals
You will receive an email to register for one or both of the options.
Get your user manual by e-mail
Enter your email address to receive the manual of Etna A 7306 in the language / languages: English, German, Dutch, French as an attachment in your email.
The manual is 0,6 mb in size.
You will receive the manual in your email within minutes. If you have not received an email, then probably have entered the wrong email address or your mailbox is too full. In addition, it may be that your ISP may have a maximum size for emails to receive.
The manual is sent by email. Check your email
If you have not received an email with the manual within fifteen minutes, it may be that you have a entered a wrong email address or that your ISP has set a maximum size to receive email that is smaller than the size of the manual.
The email address you have provided is not correct.
Please check the email address and correct it.
Your question is posted on this page
Would you like to receive an email when new answers and questions are posted? Please enter your email address.