- pour l’utilisation sans l’aide d’un ordinateur -
Benutzerhandbuch - Grundlagen
DE
- für die Verwendung ohne Computer -
Basishandleiding
NL
- voor gebruik zonder computer -
2
About This Guide
À propos de ce guide
Informationen zu diesem Handbuch
Deze handleiding
Follow these guidelines as you read your instructions:
Respectez les directives suivantes lorsque vous lisez les instructions :
Beachten Sie Folgendes beim Lesen der Anweisungen:
Houd u bij het lezen aan de volgende richtlijnen:
wc
QR&
Warning:
Warnings must be followed
carefully to avoid bodily injury.
Caution:
Cautions must be observed
to avoid damage to your
equipment.
Must be observed to avoid
bodily injury and damage to
your equipment.
Note:
Notes contain important
information and hints for using
the printer.
Indicates a page number where
additional information can be
found.
Attention :
avertissement à suivre à la
lettre pour éviter des blessures
corporelles.
Important :
mise en garde à respecter pour
éviter d’endommager votre
équipement.
À respecter pour éviter des
blessures corporelles et pour
éviter d’endommager votre
installation.
Remarque :
informations importantes et
conseils d’utilisation relatifs à
l’imprimante.
Indique un numéro de
page où des informations
supplémentaires sont
disponibles.
Warnung:
Warnhinweise müssen
genau befolgt werden, um
Verletzungen zu vermeiden.
Vorsicht:
Vorsichtshinweise müssen
befolgt werden, um
Geräteschäden zu vermeiden.
Muss befolgt werden, um
körperliche Schäden oder
Schäden an Ihren Geräten zu
vermeiden.
Hinweis:
Hinweise enthalten wichtige
Informationen und Tipps zur
Verwendung des Druckers.
Weist auf eine Seite hin, auf der
weitere Informationen zu nden
sind.
Waarschuwing:
Waarschuwingen moeten
zorgvuldig worden opgevolgd om
lichamelijk letsel te voorkomen.
Let op:
Voorzorgsmaatregelen worden aangegeven
met ‘Let op’ en moeten worden nageleefd
om schade aan de apparatuur te voorkomen.
Moet worden nageleefd om
lichamelijk letsel en schade aan
de apparatuur te voorkomen.
Opmerking:
Opmerkingen bevatten
belangrijke informatie en tips
voor het gebruik van de printer.
Een verwijzing naar een pagina
waar extra informatie te vinden
is.
3
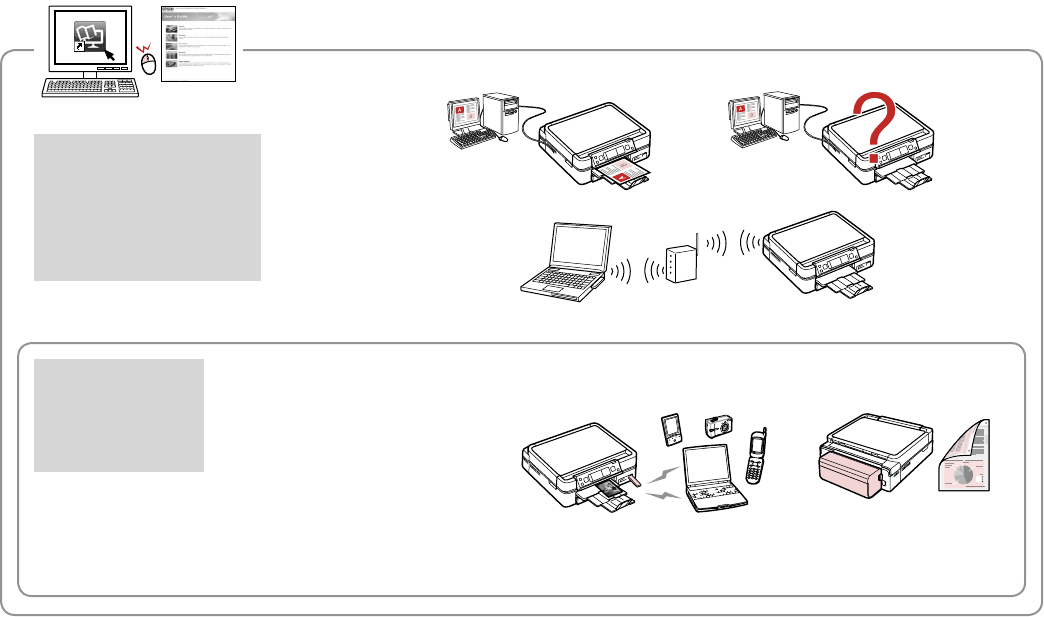
Getting More Information
Informations complémentaires
Hier erhalten Sie weitere Informationen
Meer informatie
User’s Guide
Guide d’utilisation
Benutzerhandbuch
Gebruikershandleiding
Options
Options
Optionen
Opties
BluetoothAuto Duplexer
The Auto Duplexer is bundled depending on the area.
Selon le pays, ils est possible que l’Auto Duplexer soit fourni.
Der Auto Duplexer ist je nach Land/Region im Lieferumfang enthalten.
Het verschilt per land of de optionele Auto Duplexer wordt
meegeleverd.
4
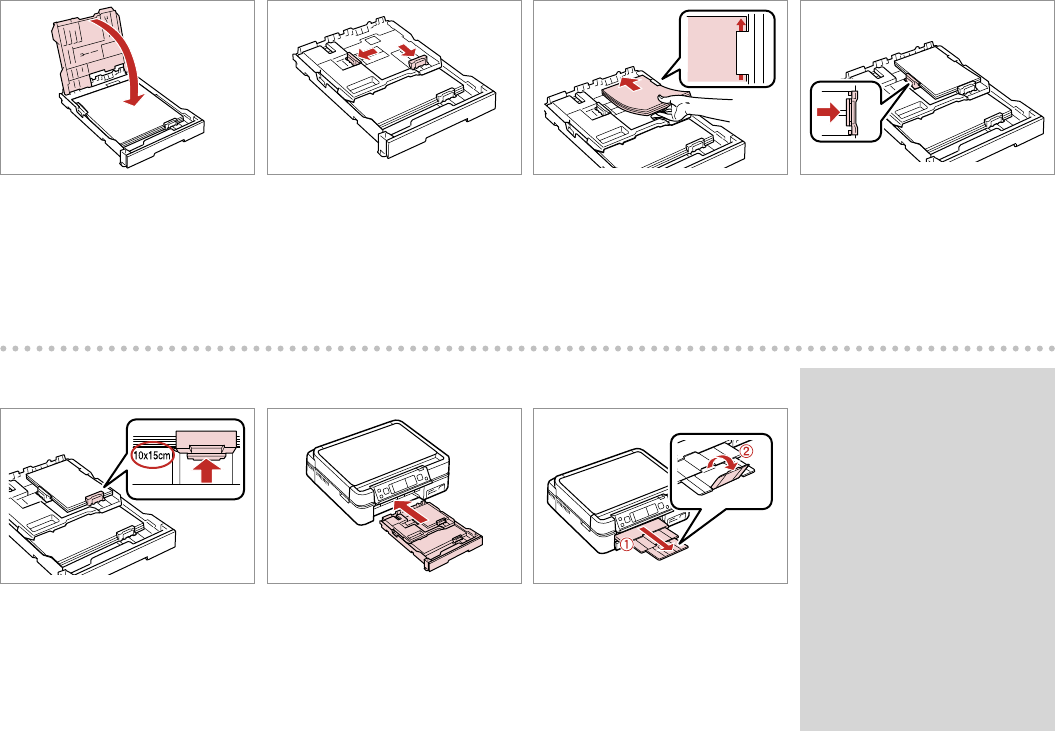
Handling Media
Selecting Paper ..................................................................................................................................................16
Loading Paper ....................................................................................................................................................18
Loading a CD/DVD ...........................................................................................................................................22
Inserting a Memory Card ...............................................................................................................................24
Copying a CD/DVD ...........................................................................................................................................34
Copy Mode Menu List .....................................................................................................................................36
Printing in Various Layouts ............................................................................................................................44
Printing on a CD/DVD .....................................................................................................................................46
Printing Photos from an Index Sheet ........................................................................................................52
Print Photos Mode Menu List .......................................................................................................................55
Other Mode
Printing Ruled Paper ........................................................................................................................................60
Printing a Coloring Sheet ...............................................................................................................................62
Scanning to a Memory Card .........................................................................................................................64
Scanning to a Computer ................................................................................................................................65
Backup to External Storage Device ............................................................................................................66
Other Mode Menu List ....................................................................................................................................67
Setup Mode (Maintenance)
Checking the Ink Cartridge Status ..............................................................................................................70
Checking/Cleaning the Print Head .............................................................................................................72
Aligning the Print Head ..................................................................................................................................74
Setup Mode Menu List ....................................................................................................................................78
Paper Jam ............................................................................................................................................................90
Other Problems ..............................................................................................................................................100
Index .......................................................................................................................................................................103
Contents
EN
Table des matières
FR
Gestion des supports
Sélection du papier ..........................................................................................................................................16
Chargement du papier ...................................................................................................................................18
Chargement d’un CD/DVD ............................................................................................................................22
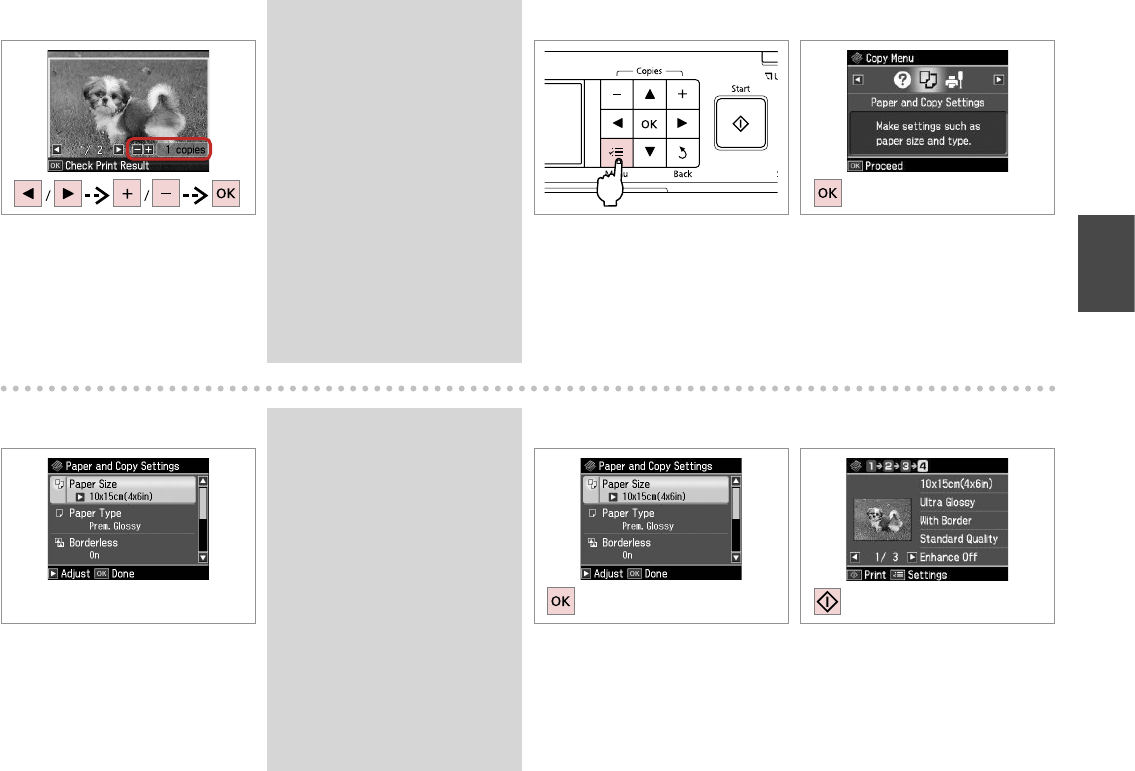
Insertion d’une carte mémoire ....................................................................................................................24
Mise en place des originaux .........................................................................................................................26
Copie
Copie de documents .......................................................................................................................................30
Copie d’un CD/DVD .........................................................................................................................................34
Liste de menus du mode Copie ...................................................................................................................36
Mode Impr photos
Impression de photos .....................................................................................................................................42
Problèmes de qualité/disposition d’impression ....................................................................................96
Autres problèmes ..........................................................................................................................................100
Contacter le service clientèle ....................................................................................................................101
Index .......................................................................................................................................................................104
Einlegen von Papier .........................................................................................................................................18
Einlegen einer CD/DVD ..................................................................................................................................22
Einsetzen einer Speicherkarte......................................................................................................................24
Kopieren einer CD/DVD ..................................................................................................................................34
Drucken mit verschiedenen Layouts .........................................................................................................44
Auf CD/DVD drucken .......................................................................................................................................46
Drucken einer Malvorlage .............................................................................................................................62
Auf eine Speicherkarte scannen..................................................................................................................64
Scannen auf einen Computer ......................................................................................................................65
Sicherung auf externes Speichergerät ......................................................................................................66
Sonstige Probleme ........................................................................................................................................100
Kontaktaufnahme mit dem Kundendienst...........................................................................................101
Index .......................................................................................................................................................................105
Geheugenkaart plaatsen ...............................................................................................................................24
Originelen plaatsen ..........................................................................................................................................26
Afdrukken in verschillende lay-outs ..........................................................................................................44
Afdrukken op een cd/dvd ..............................................................................................................................46
Scannen en opslaan op een geheugenkaart ..........................................................................................64
Scannen en opslaan op een computer .....................................................................................................65
Gegevens kopiëren naar een extern opslagapparaat .........................................................................66
Menu’s van overige modi ...............................................................................................................................67
Menu’s van de Inst.modus .............................................................................................................................78
Contact opnemen met de klantenservice ............................................................................................101
Index .......................................................................................................................................................................106
6
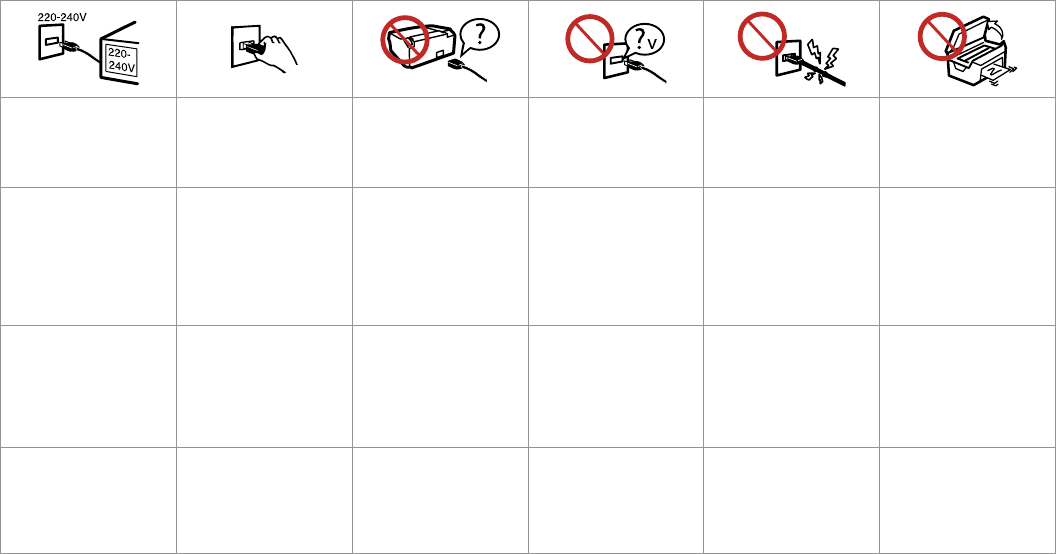
Important Safety Instructions
Consignes de sécurité importantes
Wichtige Sicherheitshinweise
Belangrijke veiligheidsvoorschriften
Make sure the power cord
meets all relevant local safety
standards.
Place the printer near a wall
outlet where the power cord
can be easily unplugged.
Use only the power cord that
comes with the printer. Use of
another cord may cause re or
shock. Do not use the cord with
any other equipment.
Use only the type of power
source indicated on the label.
Do not let the power cord
become damaged or frayed.
Do not open the scanner unit
while copying, printing, or
scanning.
Assurez-vous que le cordon
d’alimentation correspond
à l’ensemble des normes de
sécurité locales applicables.
Placez le produit à proximité
d’une prise de courant
permettant de débrancher
aisément le cordon
d’alimentation.
Utilisez uniquement le cordon
d’alimentation livré avec
l’imprimante. L’utilisation
d’un autre cordon pourrait
provoquer un incendie ou
une électrocution. N’utilisez
pas le cordon sur un autre
équipement.
Utilisez uniquement le type de
source d’alimentation indiqué
sur l’étiquette.
Veillez à éviter la détérioration
ou l’usure du cordon
d’alimentation.
N’ouvrez pas le module
scanner lorsqu’une opération
de copie, d’impression ou de
numérisation est en cours.
Sicherstellen, dass das
Stromkabel allen relevanten
lokalen Sicherheitsstandards
entspricht.
Den Drucker neben einer
Wandsteckdose aufstellen,
aus der das Stromkabel leicht
abgezogen werden kann.
Verwenden Sie nur das mit
diesem Drucker mitgelieferte
Netzkabel. Andere Kabel
können Feuer oder
Stromschläge verursachen.
Verwenden Sie das Kabel nicht
für andere Geräte.
Nur die auf dem Etikett
angegebene Art von
Stromquelle verwenden.
Abscheuerung oder
Beschädigung des Stromkabels
vermeiden.
Die Scanner-Einheit während
eines Kopier-, Druck- oder Scan-
Vorgangs nicht önen.
Controleer of het netsnoer aan
de lokale veiligheidsnormen
voldoet.
Plaats de printer in de buurt
van een stopcontact waar u
de stekker gemakkelijk kunt
uittrekken.
Gebruik alleen het netsnoer
dat bij de printer is geleverd.
Gebruik van andere snoeren
kan brand of schokken
veroorzaken. Gebruik het snoer
niet met andere apparatuur.
Gebruik alleen het type
voeding dat op het etiket is
aangegeven.
Zorg ervoor dat het netsnoer
niet beschadigd raakt.
Open de scannereenheid niet
tijdens het kopiëren, afdrukken
of scannen.
7
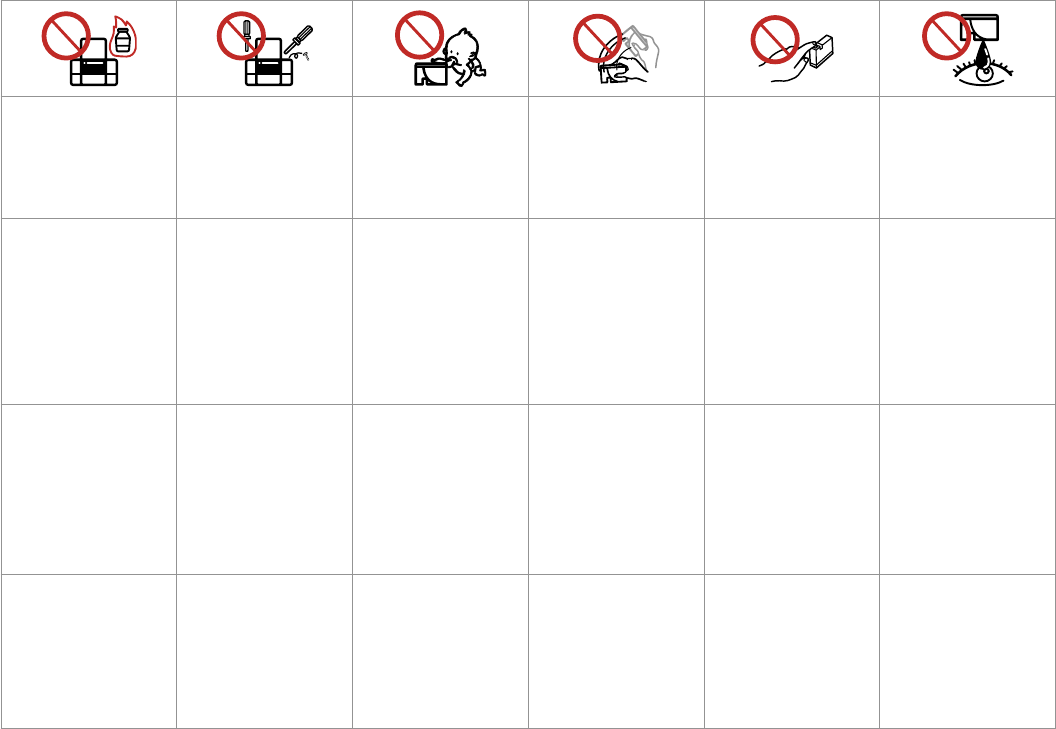
Do not use aerosol products
that contain ammable gases
inside or around the printer.
Doing so may cause re.
Except as specically explained
in your documentation, do not
attempt to service the printer
yourself.
Keep ink cartridges out of the
reach of children and do not
drink the ink.
Do not shake ink cartridges
after opening their packages;
this can cause leakage.
If you remove an ink cartridge
for later use, protect the ink
supply area from dirt and
dust and store it in the same
environment as the printer. Do
not touch the ink supply port
or surrounding area.
If ink gets on your skin, wash
it o with soap and water. If it
gets in your eyes, ush them
immediately with water. If
you still have discomfort or
vision problems, see a doctor
immediately.
N’utilisez pas de produits en
aérosol contenant des gaz
inammables à l’intérieur ou à
proximité du produit. Sinon, un
incendie risque de survenir.
Ne tentez jamais de réparer
le produit par vous-même,
sauf si cela est explicitement
mentionné dans la
documentation.
Maintenez les cartouches
d’encre hors de portée des
enfants et ne buvez pas l’encre.
An d’éviter tout risque de
fuite, ne secouez pas les
cartouches d’encre une fois les
emballages ouverts.
Si vous retirez une cartouche
d’encre pour la réutiliser
ultérieurement, protégez la
zone d’alimentation en encre
contre les salissures et la
poussière et stockez-la dans
le même environnement que
l’imprimante. Ne touchez pas
l’orice d’alimentation en encre
de la cartouche, ni la zone qui
l’entoure.
En cas de contact de l’encre
avec la peau, nettoyez à l’eau et
au savon. En cas de contact de
l’encre avec les yeux, rincez-les
abondamment avec de l’eau.
Si une gêne ou des problèmes
de vision persistent, consultez
immédiatement un médecin.
Innerhalb oder in der Nähe des
Druckers keine Sprühprodukte
verwenden, die entzündliche
Gase enthalten. Dies könnte ein
Feuer verursachen.
Nicht versuchen, den Drucker
selbst zu warten, es sei denn,
die Dokumentation enthält
ausdrückliche Erklärungen
dazu.
Tintenpatronen außerhalb
der Reichweite von Kindern
aufbewahren. Tinte nicht
trinken.
Nach dem Önen der
Verpackung dürfen
Tintenpatronen nicht
geschüttelt werden, da sonst
Tinte austreten kann.
Wird eine Tintenpatrone zum
späteren Gebrauch entfernt,
den Tintenzufuhrbereich
vor Staub und Schmutz
schützen und die Patrone in
derselben Umgebung wie den
Drucker aufbewahren. Die
Tintenversorgungsönung
oder den umgebenden Bereich
nicht berühren.
Im Falle von Hautkontakt
die Tinte mit Wasser und
Seife abwaschen. Im Falle
von Augenkontakt sofort
mit Wasser auswaschen. Bei
Sehstörungen oder anderen
Beschwerden, sofort einen Arzt
aufsuchen.
Gebruik in de printer of in de
buurt van de printer geen
spuitbussen die ontvlambare
gassen bevatten. Dit kan brand
veroorzaken.
Probeer de printer niet zelf
te repareren, tenzij in de
documentatie speciek wordt
uitgelegd hoe u dit moet doen.
Houd cartridges buiten het
bereik van kinderen. Inkt niet
drinken.
Schud cartridges niet na het
openen van de verpakking. Dit
kan lekkage veroorzaken.
Als u een cartridge wilt
verwijderen voor later, moet
u er wel voor zorgen dat de
inkttoevoer wordt beschermd
tegen stof en vuil. Bewaar
de cartridge in dezelfde
omgeving als de printer. Raak
de inkttoevoer of het gebied
eromheen niet aan.
Als u inkt op uw huid krijgt,
wast u de plek met water
en zeep. Als u inkt in uw
ogen krijgt, moet u uw ogen
onmiddellijk uitspoelen met
water. Raadpleeg onmiddellijk
een arts als u daarna nog
steeds ongemak ondervindt.
8
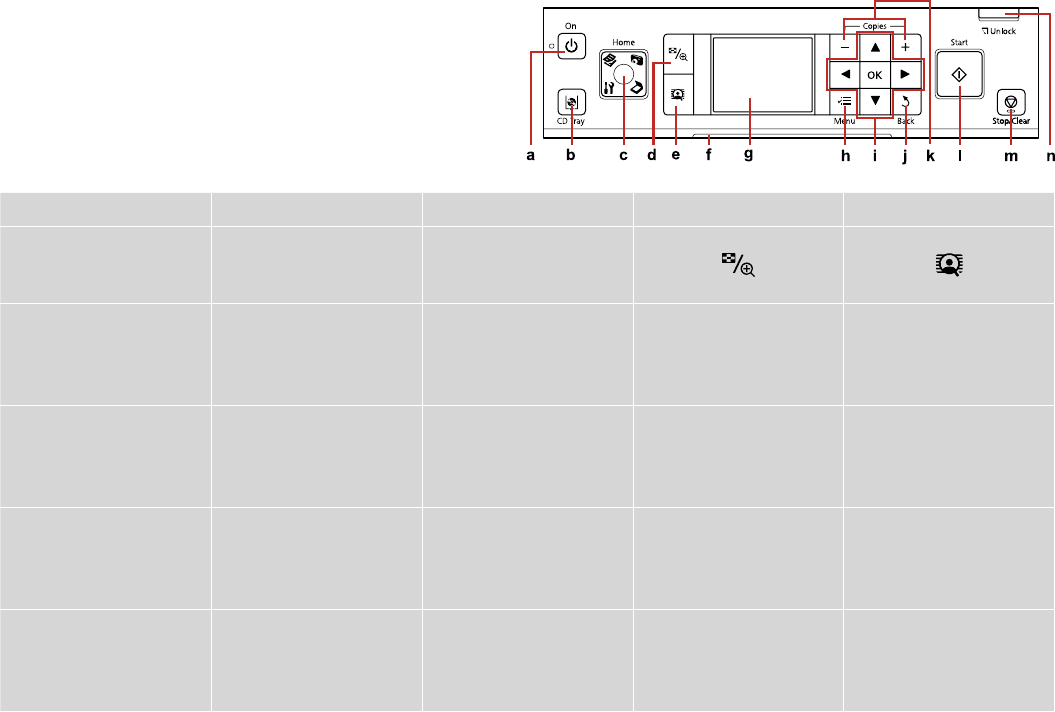
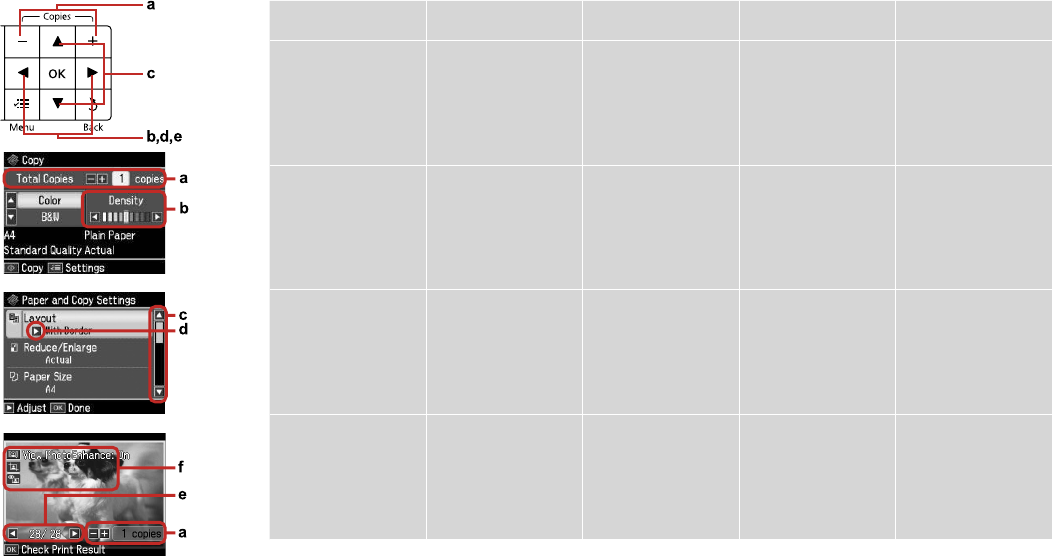
Guide to Control Panel
Guide du panneau de contrôle
Erläuterungen zum Bedienfeld
Bedieningspaneel
abcde
P
L
Home
Turns on/o printer.Eject and close the CD/DVD tray.Returns to the top menu. When
on the top menu, switches
between Copy, Print Photos,
Scan, and Setup mode.
Changes the view of photos or
crops the photos.
Switches View PhotoEnhance On
or O. R& 12
Met l’imprimante sous/hors
tension.
Éjectez et fermez le plateau
CD/DVD.
Permet de retourner au menu
principal. Lorsque le menu
principal est aché, permet de
commuter entre les modes Copie,
Impr photos, Numériser et Cong.
Permet de modier l’achage
des photos ou de rogner les
photos.
Permet d’activer ou de
désactiver l’option Acher
PhotoEnhanceOuiNon. R& 12
Schaltet Drucker ein/aus.Zum Aus- und Einfahren des
CD/DVD-Trägers.
Kehrt zum Hauptmenü zurück.
Schaltet im Hauptmenü
zwischen den Modi Kopie, Fotos
drucken, Scan und Setup um.
Ändert die Fotoansicht oder
schneidet Fotos zu.
Schaltet PhotoEnhance
anzeigen Ein oder Aus.
R& 12
Printer uit-/aanzetten.Cd-/dvd-lade uitwerpen en
sluiten.
Terugkeren naar hoofdmenu.
In het hoofdmenu: schakelen
tussen Kop., Foto’s afdr., Scan
en Inst.
Weergave van foto’s wijzigen of
foto’s bijsnijden.
PhotoEnhance weerg. Aan/Uit.
R& 12
9
fghi
--
x
l, u, r, d, OK
The status indicator light shows the
printer status.
The LCD screen displays a preview of the
selected images, or displays settings.
Displays detailed settings for each mode.Selects photos and menus.
Le voyant d’état indique l’état de
l’imprimante.
L’écran LCD ache un aperçu des images
sélectionnées ou ache les paramètres.
Ache les paramètres détaillés de chaque
mode.
Permettent de sélectionner les photos/
menus.
Leuchtmelder zur Anzeige des
Druckerstatus.
Der LCD-Bildschirm zeigt eine
Vorschau der ausgewählten Bilder oder
Einstellungen.
Zeigt detaillierte Einstellungen für jeden
Modus an.
Zur Auswahl von Fotos und Menüs.
Statuslampje dat de printerstatus
aangeeft.
Display waarop voorbeelden van
geselecteerde foto’s of instellingen
worden weergegeven.
Gedetailleerde instellingen per modus
weergeven.
Foto’s en menu’s selecteren.
Control panel design varies by area.
La conception du panneau de contrôle varie d’un pays à l’autre.
Bedienfeldaufbau variiert je nach Land/Region.
Het bedieningspaneel kan per land verschillen.
10
jklmn
y
+, -
xy
Cancels/returns to the previous
menu.
Sets the number of copies.Starts copying/printing.Stops copying/printing or reset
settings.
Lowers the control panel.
R& 11
Permet d’annuler/de retourner
au menu précédent.
Permet de dénir le nombre de
copies.
Permet de lancer la copie/
l’impression.
Permet d’arrêter la copie/
l’impression ou de réinitialiser les
paramètres.
Permet d’abaisser le panneau de
contrôle. R& 11
Bricht Vorgänge ab/geht zurück
zum vorherigen Menü.
Stellt die Anzahl der Kopien ein.Startet Kopier-/Druckvorgang.Hält Kopier-/Druckvorgang an
oder setzt Einstellungen zurück.
Zum Absenken des Bedienfeldes.
R& 11
Annuleren/terugkeren naar vorig
menu.
Aantal exemplaren instellen.Kopiëren/afdrukken starten.Kopiëren/afdrukken stoppen of
instellingen resetten.
Bedieningspaneel laten zakken.
R& 11
11
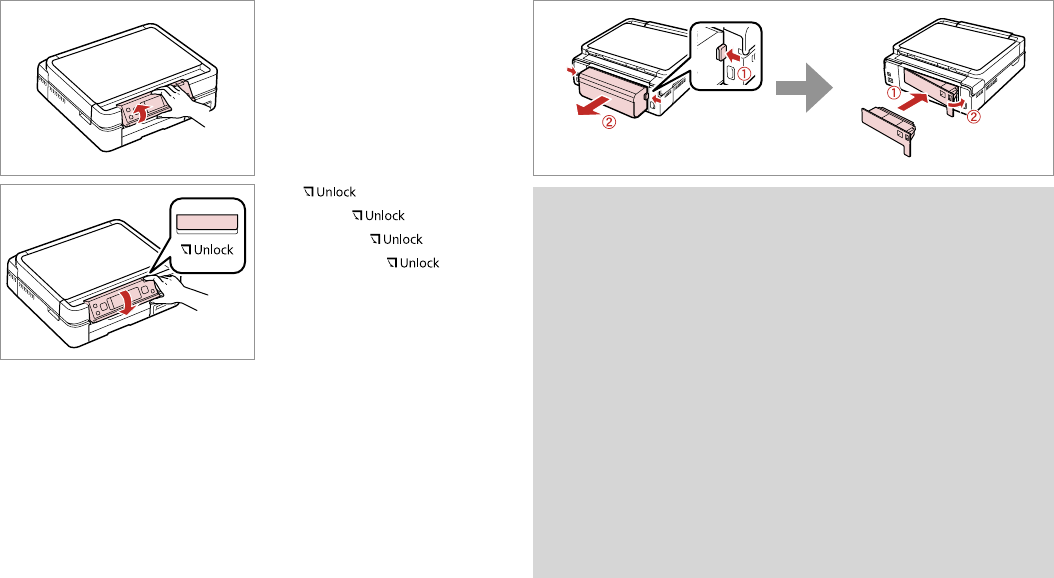
Adjusting Angle of Control Panel
Réglage de l’angle du panneau de contrôle
Einstellung des Bedienfeldwinkels
Bedieningspaneel verzetten
Raise manually.
Soulevez manuellement.
Manuell anheben.
Met de hand omhoog zetten.
Press to lower.
Appuyez sur pour abaisser.
Zum Absenken drücken.
Laten zakken met .
Attaching the optional rear cover
Installation du capot arrière en option
Anbringen der optionalen hinteren Abdeckung
Het optionele klepje aan de achterzijde aanbrengen
The optional Auto Duplexer is bundled with the printer depending on the
area. If not using 2-sided printing, you can remove the Auto Duplexer and
replace it with the rear cover. For details, see the online User’s Guide.
Selon le pays, il est possible que l’Auto Duplexer en option soit fourni avec
l’imprimante. Si vous n’utilisez pas l’impression recto-verso, vous pouvez
retirer l’Auto Duplexer et la remplacer par le capot arrière. Pour plus de
détails, reportez-vous au Guide d’utilisation en ligne.
Der optionale Auto Duplexer ist abhängig von Land/Region im
Lieferumfang des Druckers enthalten. Wird der 2-seitige Druck nicht
verwendet, kann der Auto Duplexer entfernt und mit der hinteren
Abdeckung ersetzt werden. Weitere Informationen dazu, siehe Online-
Benutzerhandbuch.
Het verschilt per land of de optionele Auto Duplexer wordt meegeleverd
met de printer. Als u niet dubbelzijdig afdrukt, kunt u de Auto Duplexer
verwijderen en het klepje aan de achterzijde aanbrengen. Zie de online-
Gebruikershandleiding voor meer informatie.
Q
12
Using the LCD Screen
Utilisation de l’écran LCD
Verwenden der LCD-Anzeige
Display gebruiken
abcde
Use Copies + or - to set
the number of copies for
the selected photo.
Press l or r to set the
density.
Press u or d to select
the menu item. The
highlight moves up or
down.
Press r to open the
setting item list.
Press l or r to change
the photo displayed on
the LCD screen.
Dénissez le nombre
de copies de la photo
sélectionnée à l’aide de
la touche Copies + ou -.
Appuyez sur l ou sur r
pour régler la densité.
Appuyez sur u ou sur
d pour sélectionner
l’élément de menu. La
surbrillance se déplace
vers le haut ou vers
le bas.
Appuyez sur r
pour ouvrir la liste
des éléments de
paramétrage.
Appuyez sur l ou sur r
pour changer la photo
achée sur l’écran LCD.
Verwenden Sie Copies
+ oder -, um die Anzahl
der Ausdrucke für das
ausgewählte Foto
festzulegen.
Drücken Sie l oder
r, um die Dichte
einzustellen.
Drücken Sie u oder d,
um den Menüpunkt
auszuwählen. Die
Markierung bewegt sich
nach oben oder unten.
Drücken Sie r, um die
Einstellungsliste zu
önen.
Drücken Sie l oder
r, um das in der LCD-
Anzeige angezeigte Foto
zu ändern.
Met Copies + of - stelt u
het aantal exemplaren
voor de geselecteerde
foto in.
Met l of r stelt u de
dichtheid in.
Met u of d selecteert
u een menu-item. De
markering gaat naar
boven of beneden.
Met r opent u een lijst
met instellingen.
Met l of r geeft u een
andere foto weer op het
display.
13
f
The PhotoEnhance function automatically corrects color and improves the quality of your images. You can preview the adjusted
images by pressing the button and changing View PhotoEnhance to On.
The icon is displayed on a cropped image.
The icon is displayed when the Fix Red-Eye setting is set for On-This photo or On-All photos.
La fonction PhotoEnhance corrige automatiquement les couleurs et améliore la qualité des images. Vous pouvez acher les images
ajustées en aperçu en appuyant sur la touche et en réglant l’option Acher PhotoEnhance sur Oui.
L’icône s’ache au niveau des images rognées.
L’icône s’ache lorsque le paramètre Correction yeus rouges est réglé sur Oui - Cette ph. ou Oui - Ttes photos.
Die Funktion PhotoEnhance korrigiert die Farbe automatisch und verbessert die Qualität der Bilder. Eine Vorschau der angepassten
Bilder können Sie durch Drücken von und Ändern von PhotoEnhance anzeigen auf Ein anzeigen.
Das Symbol wird auf einem zugeschnittenen Bild angezeigt.
Das Symbol wird angezeigt, wenn die Funktion Rotaugen korr. oder Ein:Dieses Foto oder Ein -Alle Fotos eingestellt ist.
De functie PhotoEnhance dient om de kleuren en kwaliteit van uw afbeeldingen automatisch te corrigeren en te verbeteren. U kunt
een voorbeeld van de aangepaste afbeeldingen weergeven door te drukken op de knop en PhotoEnhance weerg. op Aan te
zetten.
Bij een foto die is bijgesneden, wordt het pictogram weergegeven.
Het pictogram wordt weergegeven wanneer Rode-ogencor. is ingesteld op Aan: deze fot. of Aan: alle fot.
After 13 minutes of inactivity, the
screen turns black to save energy.
Press any button (except POn) to
return the screen to its previous
state.
L’écran s’éteint à l’issue de
13 minutes d’inactivité an
d’économiser l’énergie. Appuyez
sur n’importe quelle touche (à
l’exception de la touche POn)
pour rétablir l’état antérieur de
l’écran.
Wenn innerhalb von 13 Minuten
keine Aktivität erfolgt, erlischt der
Bildschirm, um Energie zu sparen.
Durch Drücken einer beliebigen
Taste (mit Ausnahme von POn)
kehrt der Bildschirm in seinen
vorherigen Zustand zurück.
Na 13 minuten inactiviteit wordt
het scherm zwart om energie
te besparen. Druk op een
willekeurige knop (behalve POn)
om terug te keren naar het laatst
weergegeven scherm.
Q
14
g
When you have more than 999 photos on your memory card, the LCD screen displays a
message to let you select a group. Images are sorted by the date they were taken. To select
and show images in a group, press u or d to select a group and then press OK. To re-select
a group or folder, select Setup, Select Location, and then select Group Select or Folder
Select.
Si la carte mémoire contient plus de 999 photos, l’écran LCD ache un message vous
permettant de sélectionner un groupe. Les images sont classées en fonction de la date à
laquelle elles ont été prises. Pour sélectionner et acher les images d’un groupe, appuyez
sur u ou d pour sélectionner le groupe, puis sur OK. Pour sélectionner de nouveau un
groupe ou un dossier, choisissez Cong, Sél. emplac., puis Sélect. grpe ou Sélec dossier.
Wenn mehr als 999 Fotos auf der Speicherkarte enthalten sind, wird in der LCD-Anzeige eine
Meldung zur Auswahl einer Gruppe angezeigt. Die Fotos werden nach Aufnahmedatum
sortiert. Zur Auswahl und Anzeige von Bildern in einer Gruppe, drücken Sie u oder d, um
eine Gruppe zu wählen und drücken Sie anschließend OK. Zur erneuten Auswahl einer
Gruppe oder eines Ordners wählen Sie Setup, Standort wählen und anschließend Gruppe
wählen oder Ordner wählen.
Als er meer dan 999 foto’s op uw geheugenkaart staan, wordt u op het display gevraagd
een groep te selecteren. De afbeeldingen worden gesorteerd op opnamedatum. Als u de
afbeeldingen in een groep wilt selecteren en weergeven, drukt u op u of d om een groep
te selecteren. Druk vervolgens op OK. Als u een groep of map opnieuw wilt selecteren,
selecteert u Inst. gevolgd door Locatie sel. en Groep sel. of Map select.
The actual screen display may
dier slightly from those shown in
this guide.
Les écrans achés peuvent être
légèrement diérents de ceux
indiqués dans ce guide.
Der tatsächliche Inhalt der LCD-
Anzeige kann leicht von dem in
dieser Anleitung dargestellten
Inhalt abweichen.
Wat u in werkelijkheid op het
display ziet, kan licht afwijken
van de afbeeldingen in deze
handleiding.
Q
15
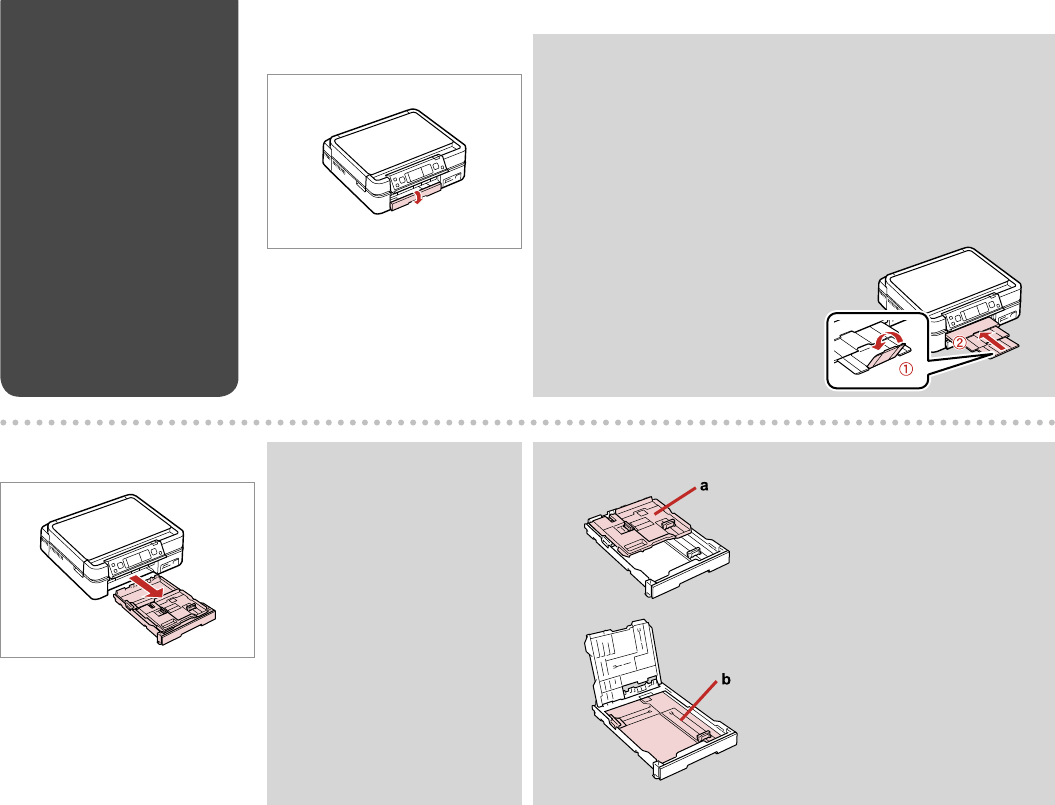
Handling Media
Gestion des supports
Handhabung von Medien
Media gebruiken
16
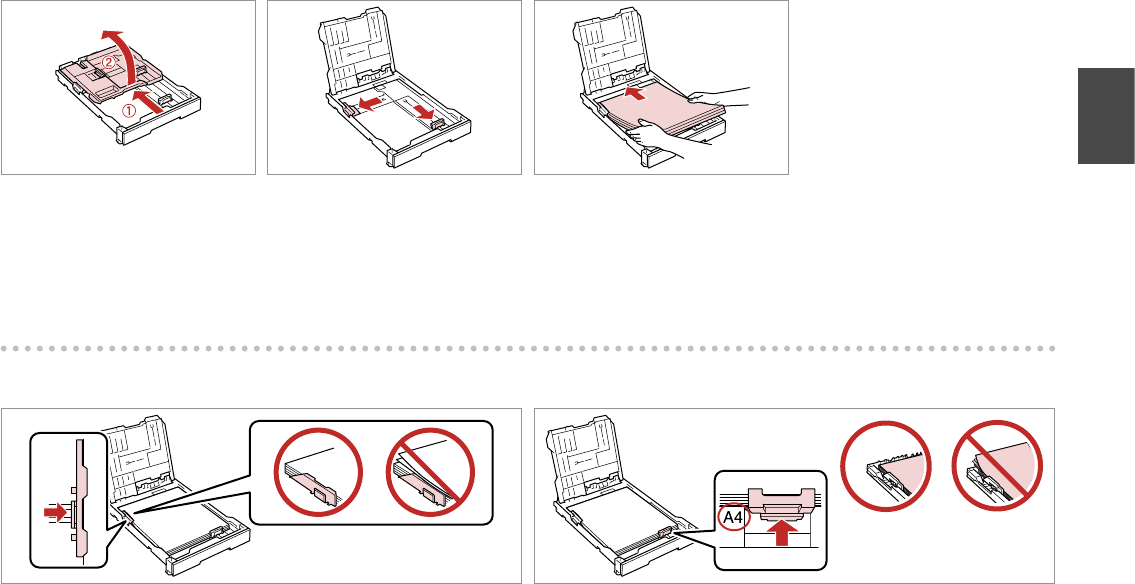
Selecting Paper
Sélection du papier
Papier auswählen
Papier selecteren
The availability of special paper
varies by area.
La disponibilité du papier spécial
varie selon les pays.
Die Verfügbarkeit von Spezialpapier
variiert je nach Land/Region.
De beschikbaarheid van speciaal
papier verschilt per land.
If you want to print
on this paper… *⁴
Choose this
Paper Type
on the LCD
screen
Loading
capacity
(sheets)
Tray
aPlain paper *¹Plain Paper[12 mm]
*² *³
Main
bEpson Premium Ink
Jet Plain Paper *¹
Plain Paper120 *³Main
cEpson Bright White
Ink Jet Paper *¹
Plain Paper100 *³Main
dEpson Photo
Quality Ink Jet
Paper
Matte100Main
eEpson Matte Paper
- Heavyweight
Matte20Main
fEpson Premium
Glossy Photo Paper
Prem.
Glossy
20A4: Main
Other than
A4: Photo
gEpson Premium
Semigloss Photo
Paper
Prem.
Glossy
hEpson Glossy
Photo Paper
Glossy
iEpson Photo PaperPhoto
Paper
jEpson Ultra Glossy
Photo Paper
Ultra
Glossy
kEpson Double-
Sided Matte Paper
Matte1Main
lEpson Photo
Stickers
Photo
Stickers
1Photo
*1 You can perform 2-sided printing with this paper.
*2 Paper with a weight of 64 to 90 g/m².
*3 For manual 2-sided printing, 30 sheets.
*4 See the table on the right-hand side for the English paper
names.
Si vous souhaitez
imprimer sur ce
papier... *⁴
Sélectionnez
ce type de
papier sur
l’écran LCD
Capacité de
chargement
(feuilles)
Bac
aPapier ordinaire *¹Papier
ordinaire
[12 mm]
*² *³
Princ.
bPapier ordinaire jet
d’encre Premium
Epson *¹
Papier
ordinaire
120 *³Princ.
cPapier jet d’encre
blanc brillant
Epson *¹
Papier
ordinaire
100 *³Princ.
d
Papier couché
qualité photo Epson
Mat100Princ.
ePapier mat épais
Epson
Mat20Princ.
fPapier photo glacé
Premium Epson
Glacé Prem20A4 :
principal
Sinon,
photo
gPapier photo semi-
glacé Premium
Epson
Glacé Prem
hPapier photo glacé
Epson
Glacé
i
Papier photo Epson
Papier ph
jPapier photo ultra-
glacé Epson
Ultra-glacé
kPapier mat recto
verso Epson
Mat1Princ.
lAutocollants photo
Epson
Autocol
photo
1Photo
*1 Vous pouvez eectuer une impression recto/verso avec ce papier.
*2 Papier dont le grammage est compris entre 64 et 90 g/m².
*3 30 feuilles pour l’impression recto/verso manuelle.
*4 Reportez-vous à la dernière colonne du tableau pour connaître
les noms des papiers en anglais.
17
aPlain paper
bEpson Premium Ink
Jet Plain Paper
cEpson Bright White
Ink Jet Paper
dEpson Photo
Quality Ink Jet
Paper
eEpson Matte Paper-
Heavyweight
fEpson Premium
Glossy Photo Paper
gEpson Premium
Semigloss Photo
Paper
hEpson Glossy
Photo Paper
iEpson Photo Paper
jEpson Ultra Glossy
Photo Paper
kEpson Double-
Sided Matte Paper
lEpson Photo
Stickers
Zum Drucken auf
diesem Papier... *⁴
Diese
Papiersorte
auf der LCD-
Anzeige
wählen
Ladekapazität
(Blatt)
Fach
aNormalpapier *¹Normalpap.[12 mm]
*² *³
Haupt
b
Epson Normalpapier *¹
Normalpap.120 *³Haupt
cEpson Weißes
Tintenstrahlpapier *¹
Normalpap.100 *³Haupt
dEpson Fotoqualität-
Tintenstrahlpapier
Matte100Haupt
eEpson Mattes Papier
- schwer
Matte20Haupt
fEpson Premium-
Hochglanz-
Fotopapier
Prem.
Glossy
20A4: Haupt
Andere
Formate:
Foto
gEpson Premium-
Seidenglanz-
Fotopapier
Prem.
Glossy
hEpson Fotopapier,
glänzend
Glossy
iEpson Fotopapier
Photo Paper
j
Epson Ultrahochglanz-
Fotopapier
Ultra
Glossy
kEpson
Doppelseitiges
mattes Papier
Matte1Haupt
lEpson Foto-
Aufkleber
Foto-
Aufkleber
1Foto
*1 Mit diesem Papier kann 2-seitig gedruckt werden.
Epson cannot guarantee the quality or reliability of non-genuine ink. If non-genuine ink cartridges are installed,
the ink cartridge status may not be displayed.
Epson ne peut garantir la qualité ou la abilité des encres non d’origine. Si des encres non d’origine sont
installées, il est possible que leur état ne s’ache pas.
Epson kann die Qualität und Zuverlässigkeit von Tinte von Drittanbietern nicht garantieren. Wenn keine Original-
Tintenpatronen installiert sind, wird der Tintenpatronenstatus möglicherweise nicht angezeigt.
De kwaliteit of betrouwbaarheid van niet-originele inkt kan niet door Epson worden gegarandeerd. Als niet-
originele cartridges zijn geïnstalleerd, wordt de cartridgestatus mogelijk niet weergegeven.
Q
72
Print head cleaning uses ink from all cartridges, so clean the print head
only if quality declines.
Le nettoyage de la tête d’impression consomme de l’encre. Par conséquent,
ne nettoyez la tête que si la qualité d’impression décline.
Da bei der Druckkopfreinigung Tinte aus allen Patronen verbraucht wird,
reinigen Sie den Druckkopf nur, wenn die Druckqualität nachlässt.
Een printkopreiniging kost inkt (uit alle cartridges). Reinig de printkop
daarom alleen als de afdrukkwaliteit afneemt.
Q
C
Select Maintenance.
Sélectionnez Maintenance.
Wartung wählen.
Onderhoud selecteren.
Load A4 size paper.
Chargez du papier A4.
A4-Papier einlegen.
A4-papier laden.
AR& 18
B
Select Setup.
Sélectionnez Cong.
Setup wählen.
Inst. selecteren.
Select Nozzle Check.
Sélectionnez Vérif. buses.
Düsentest wählen.
Spuitkan. contr. selecteren.
DE
Start the nozzle check.
Lancez la vérication des buses.
Düsentest starten.
Spuitkanaaltjescontrole starten.
Checking/Cleaning
the Print Head
Vérication/
nettoyage de la tête
d’impression
Druckkopf prüfen/
reinigen
Printkop
controleren/reinigen
73
G
Select Head Cleaning and start.
Sélectionnez Nettoy. tête et
démarrez.
Kopfreinigung wählen und starten.
Printkop rein. selecteren en starten.
H
Finish head cleaning.
Finalisez le nettoyage de la tête.
Kopfreinigung abschließen.
Printkopreiniging voltooien.
If quality does not improve after cleaning four times, turn o the printer for at least six hours. Then try cleaning the print head again. If quality still does not
improve, contact Epson support.
Si la qualité de l’impression ne s’améliore pas à l’issue de quatre nettoyages, mettez l’imprimante hors tension pendant au moins six heures. Nettoyez
ensuite de nouveau la tête d’impression. Si la qualité d’impression ne s’améliore toujours pas, contactez le service d’assistance de Epson.
Wenn sich die Druckqualität nach viermaliger Reinigung nicht verbessert, schalten Sie den Drucker für mindestens sechs Stunden aus. Reinigen Sie den
Druckkopf dann erneut. Verbessert sich die Druckqualität immer noch nicht, wenden Sie sich an den Epson-Kundendienst.
Als de afdrukkwaliteit na vier keer reinigen niet is verbeterd, moet u de printer uitzetten en ten minste zes uur zo laten staan. Reinig de printkop vervolgens
opnieuw. Raadpleeg de ondersteuning van Epson als de kwaliteit niet is verbeterd.
Q
F
Check the pattern.
Observez le motif.
Muster überprüfen.
Patroon controleren.
74
C
Select Maintenance.
Sélectionnez Maintenance.
Wartung wählen.
Onderhoud selecteren.
Load A4 size paper.
Chargez du papier A4.
A4-Papier einlegen.
A4-papier laden.
AR& 18B
Select Setup.
Sélectionnez Cong.
Setup wählen.
Inst. selecteren.
F
Select the most solid pattern.
Sélectionnez le motif le plus plein.
Dichtestes Muster auswählen.
Meest gelijkmatige patroon
selecteren.
Select Head Alignment.
Sélectionnez Align. tête.
Kopfausricht. wählen.
Printkop uitl. selecteren.
DE
Print patterns.
Imprimez les motifs.
Muster drucken.
Patronen afdrukken.
Aligning the Print
Head
Alignement de la
tête d’impression
Druckkopf
ausrichten
Printkop uitlijnen
75
H
Enter the number.
Saisissez le numéro.
Nummer eingeben.
Nummer invoeren.
I
Repeat G and H for all patterns.
Répétez les étapes G et H pour tous
les motifs.
Schritt G und H für alle Muster
wiederholen.
G en H herhalen voor alle patronen.
J
Finish aligning the print head.
Finalisez l’alignement de la tête
d’impression.
Druckkopfausrichtung abschließen.
Uitlijning van printkop voltooien.
G
Select the pattern number.
Sélectionnez le numéro du motif.
Musternummer auswählen.
Nummer van patroon selecteren.
76
C
Select PictBridge Setup.
Sélectionnez Param Pictbridge.
Setup Pictbridge wählen.
PictBridge inst. selecteren.
Remove.
Retirez.
Entfernen.
Verwijderen.
AB
Select Setup.
Sélectionnez Cong.
Setup wählen.
Inst. selecteren.
Select Print Settings.
Sélectionnez Param impr.
Druckeinst. wählen.
Afdrukinst. selecteren.
DR& 78F
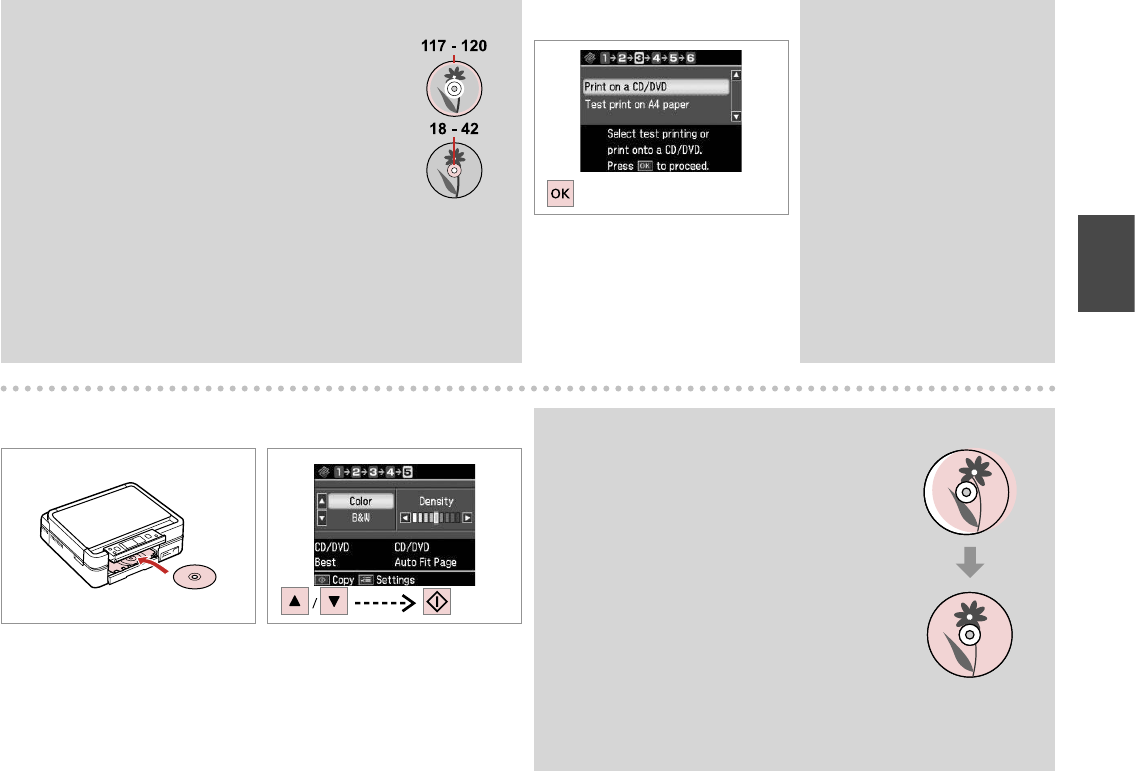
Connect and turn on the camera.
Connectez et mettez l’appareil photo
sous tension.
Kamera anschließen und
einschalten.
Camera aansluiten en aanzetten.
PictBridge Setup
Conguration
PictBridge
Setup Pictbridge
PictBridge-
instellingen
G
See your camera’s guide to print.
Reportez-vous au guide de l’appareil
photo pour l’impression.
Zum Drucken schlagen Sie im
Handbuch Ihrer Kamera nach.
Handleiding van camera raadplegen
voor afdrukfuncties.
E
Select appropriate print settings.
Sélectionnez les paramètres
d’impression adaptés.
Geeignete Druckeinstellungen
wählen.
Gewenste afdrukinstellingen
selecteren.
77
CompatibilityPictBridge
File FormatJPEG
Image size80 × 80 pixels to 9200 × 9200 pixels
Depending on the settings on this printer and the digital camera, some
combinations of paper type, size, and layout may not be supported.
Selon les paramètres de l’imprimante et de l’appareil photo numérique,
il est possible que certaines associations de types de papier, de tailles de
papier et de dispositions ne soient pas prises en charge.
Abhängig von den Einstellungen von Drucker und Digitalkamera werden
einige Papiertyp-, Größen- und Layout-Kombinationen unter Umständen
nicht unterstützt.
Afhankelijk van de instellingen op deze printer en de digitale camera
worden sommige combinaties van papiersoort, papierformaat en lay-out
niet ondersteund.
Q
Some of the settings on your digital camera may not be reected in the
output.
Il est possible que certains paramètres dénis au niveau de l’appareil photo
numérique ne soient pas visibles sur l’impression.
Einige Einstellungen Ihrer Digitalkamera werden in der Ausgabe ggf. nicht
wiedergegeben.
Sommige instellingen die u op de digitale camera vastlegt, worden
mogelijk niet zichtbaar op de afdruk.
Q
CompatibilitéPictBridge
Format du chierJPEG
Taille de l’image80 × 80 pixels à 9 200 × 9 200 pixels
KompatibilitätPictBridge
DateiformatJPEG
Bildgröße80 × 80 Pixel bis 9200 × 9200 Pixel
CompatibiliteitPictBridge
BestandsindelingJPEG
Afbeeldingsgrootte80 × 80 pixels tot 9200 × 9200 pixels
78
EN
Ink Levels
MaintenanceNozzle Check, Head Cleaning, Head Alignment, Automatic
Head Maintenance *¹
Printer SetupCD/DVD, Stickers, Thick Paper *², Screen Saver Settings,
Display Format *³, Language
Network SettingsSee your online User’s Guide for details.
Bluetooth SettingsSee your online User’s Guide for details.
PictBridge SetupPrint SettingsFor details on the setting
items, see the Print Photos
Mode Menu list. R& 55
Photo Adjustments
Select LocationFolder Select, Group Select
Restore Default
Settings
Reset Network Settings, Reset All except Network Settings,
Reset All Settings
Setup Mode
*1 This printer automatically checks the print head nozzle without printing a
pattern and cleans the nozzles if they are clogged. Some ink is consumed from all
cartridges while checking the print head nozzles.
*2 If the printout is smeared, set this function to
On.
*3 You can select the LCD screen display format from 1-up with Info, 1-up without Info,
and View Thumbnail Images.
Setup Mode Menu
List
Liste de menus du
mode Cong
Setup-Modus
Menüpunkte
Menu’s van de
Inst.modus
EN
R& 78
FR
DE
NL
R& 80
R& 79
R& 79
79
FR
Niv. encre
MaintenanceVérif. buses, Nettoy. tête, Align. tête, Maintenance auto tête *¹
Cong. imprimanteCD/DVD, Adhesif, Pap. épais *², Param économiseur, Format
achage *³, Langue/Language
Param réseauPour plus de détails, reportez-vous au Guide d’utilisation en
ligne.
Paramètres BluetoothPour plus de détails, reportez-vous au Guide d’utilisation en
ligne.
Param PictbridgeParam imprPour plus de détails au
sujet des éléments de
paramétrage, reportez-vous
à la liste de menus du mode
Impr photos. R& 55
Réglages photo
Sél. emplac.Sélec dossier, Sélect. grpe
Rétablir valeurs par
défaut
Rétablir param réseau, Réinit. tt sf paramètres réseau,
Rétablir ts param
Mode Cong
*1 L’imprimante vérie automatiquement les buses de la tête d’impression sans
imprimer aucun motif et nettoie les buses obstruées. La vérication des buses de la
tête d’impression consomme de l’encre.
*2 Si l’impression est tachée, réglez cette fonction sur
Oui.
*3 Vous pouvez sélectionner un des formats d’achage de l’écran LCD suivants : 1/1
My printer is only printing the first paragraph of a page, or on different occasions just the first sentence then stops
Submitted on 28-7-2022 at 20:18
Libble takes abuse of its services very seriously. We're committed to dealing with such abuse according to the laws in your country of residence. When you submit a report, we'll investigate it and take the appropriate action. We'll get back to you only if we require additional details or have more information to share.
Product:
Forumrules
To achieve meaningful questions, we apply the following rules:
First, read the manual;
Check if your question has been asked previously;
Try to ask your question as clearly as possible;
Did you already try to solve the problem? Please mention this;
Is your problem solved by a visitor then let him/her know in this forum;
To give a response to a question or answer, do not use this form but click on the button 'reply to this question';
Your question will be posted here and emailed to our subscribers. Therefore, avoid filling in personal details.
Register
Register getting emails for Epson Stylus Photo PX710W at:
new questions and answers
new manuals
You will receive an email to register for one or both of the options.
Get your user manual by e-mail
Enter your email address to receive the manual of Epson Stylus Photo PX710W in the language / languages: English, German, Dutch, French as an attachment in your email.
The manual is 3,94 mb in size.
You will receive the manual in your email within minutes. If you have not received an email, then probably have entered the wrong email address or your mailbox is too full. In addition, it may be that your ISP may have a maximum size for emails to receive.
The manual is sent by email. Check your email
If you have not received an email with the manual within fifteen minutes, it may be that you have a entered a wrong email address or that your ISP has set a maximum size to receive email that is smaller than the size of the manual.
The email address you have provided is not correct.
Please check the email address and correct it.
Your question is posted on this page
Would you like to receive an email when new answers and questions are posted? Please enter your email address.