Italiano
SOSTITUZIONE DEL SACCHETTO RACCOGLIPOLVERE S-BAG™
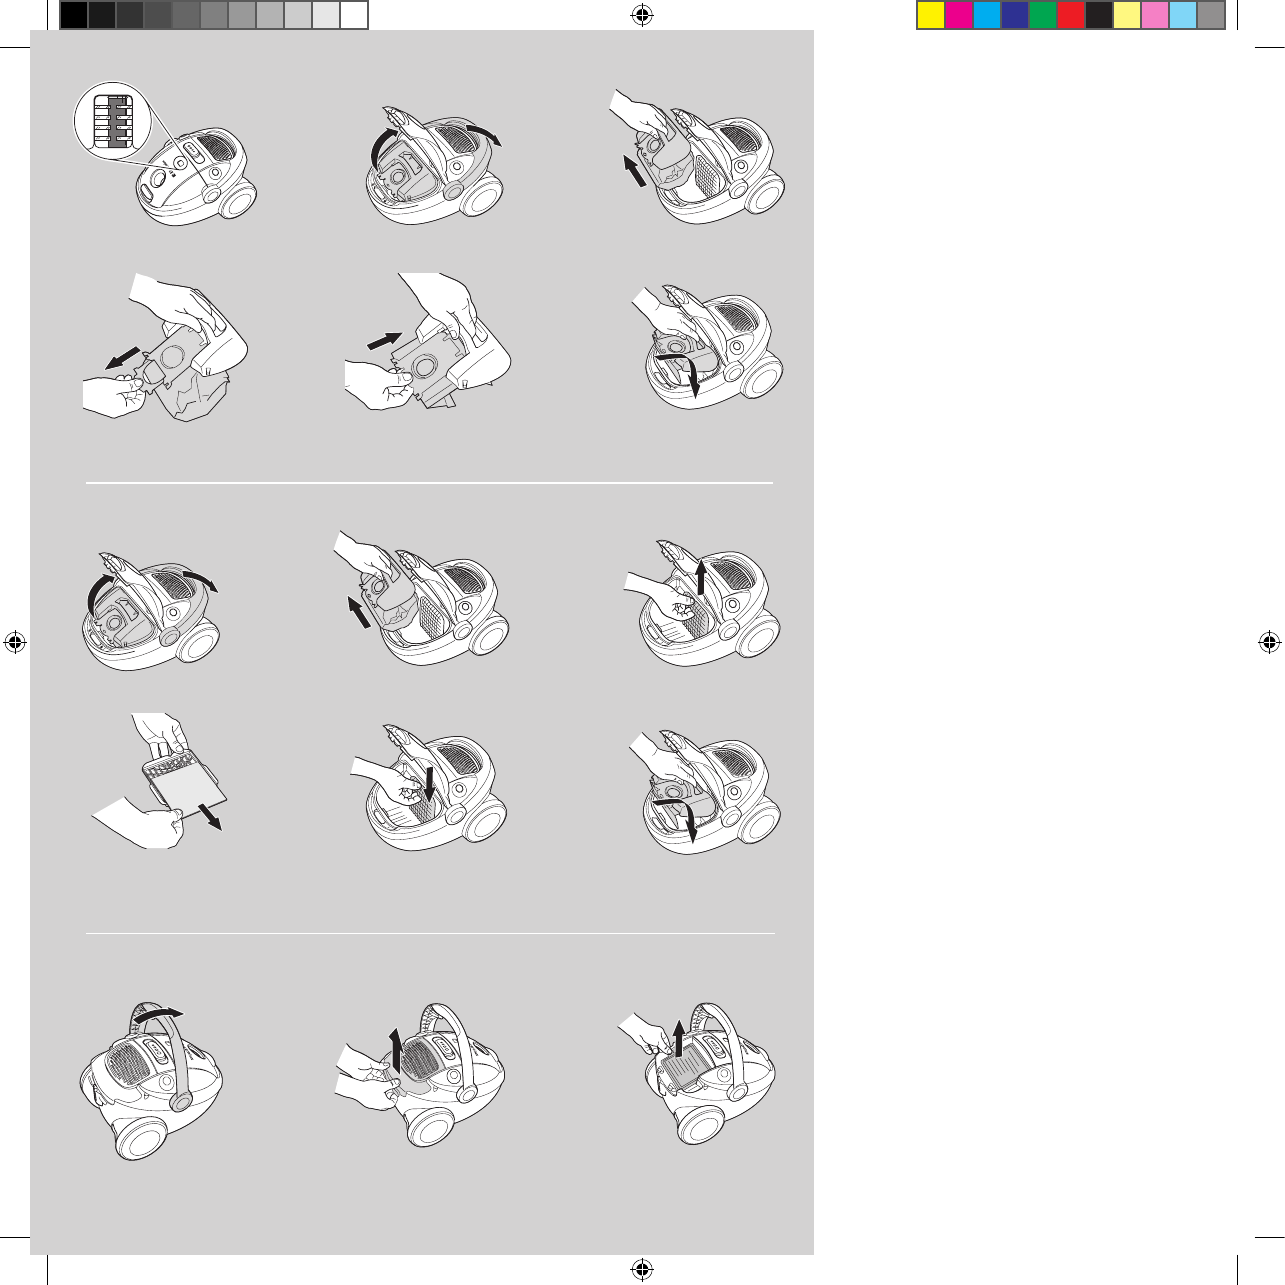
1 Il sacchetto raccoglipolvere s-bag™ deve essere sostitu-
ito quando la spia indicatrice diventa completamente
rossa. Controllare la spia con la bocchetta sollevata.
2 Abbassare la maniglia per il trasporto. Premere i fermi
sul flessibile, rimuoverlo e aprire il coperchio.
3 Sollevare il supporto della s-bag™.
4 Tirare il cartone per rimuovere la s-bag™ dal supporto.
In tal modo la s-bag™ si chiuderà automaticamente
evitando la fuoriuscita di polvere.
5A Inserire un nuovo sacchetto s-bag™ spingendo il
cartone lungo la scanalatura del supporto.
5 b Collegare il supporto posizionandolo sui sostegni
posteriori dell'alloggiamento del sacchetto. Abbassare
il supporto e chiudere il coperchio.
Nota: Sostituire il sacchetto s-bag™ anche se non dovesse
essere pieno (potrebbe essere ostruito). Sostituirlo anche dopo
l'eventuale pulizia a secco di un tappeto. Utilizzare esclusi-
vamente il sacchetto di ricambio originale Electrolux s-bag™
Classic o s-bag™ Clinic.
Sostituzione del filtro del motore (Codi-
ce EF54)
(Per ogni quinta sostituzione del sacchetto raccoglipolvere
s-bag™.)
6 Abbassare la maniglia per il trasporto. Premere i fermi
sul flessibile, rimuoverlo e aprire il coperchio anteriore.
7 Sollevare il supporto della s-bag™.
8 Sollevare il filtro del motore fino a estrarlo dalla scana
-
latura.
9 Estrarre delicatamente il filtro usato dal supporto e
sostituirlo con un nuovo filtro del motore.
10 Reinserire il supporto del filtro contenente il filtro del
motore nuovo.
11 Riposizionare il supporto del sacchetto s-bag™ e chiu
-
dere il coperchio.
Sostituzione del filtro di scarico
(Per ogni quinta sostituzione del sacchetto raccoglipolvere
s-bag™.)
Esistono due tipi di filtro di scarico:
• Hepa H12 (Codice EFH12)
• Microfiltro (Codice EF17)
I filtri devono essere sempre sostituiti e non è possibile
lavarli.*
12 Sollevare la maniglia per il trasporto finché non si
blocca con uno scatto.
13 Posizionare i pollici sul bordo posteriore del coperchio
e aprirlo tirando la maniglia indietro e verso l'alto
con il dito indice o medio.
14 Sollevare il filtro. Inserire un nuovo filtro e riposizionare
il coperchio come illustrato.
*Come accessorio opzionale è disponibile il filtro lavabile HEPA H13.