1
2
3
4a
5
6 7
4b
* Certain models only.
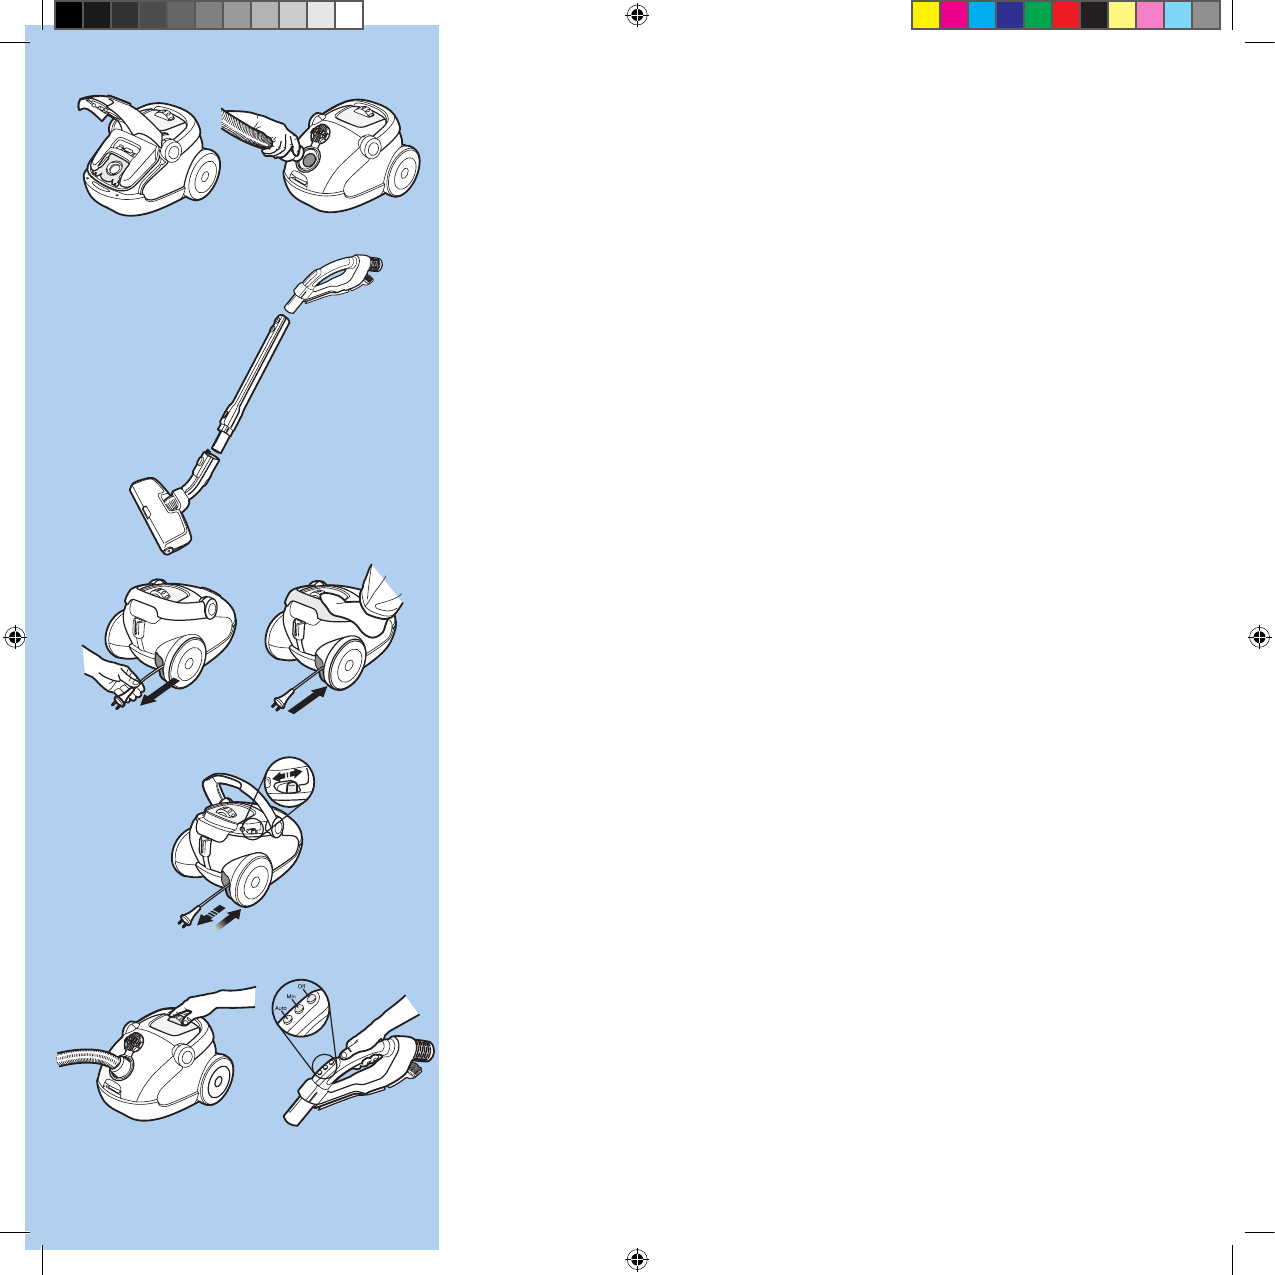
Before starting
1 Check that the s‑bag® is in place.
2 Insert the hose until the catches click to engage
(press the catches to release the hose).
3 Attach the telescopic tube to the hose handle and
the oor nozzle (when you want to remove it again,
press the lock button and pull the pieces apart). If
you have a vacuum cleaner with remote control*,
make sure that the switch is pressed in properly.
4a Pull out the power cable and plug into the mains.
4b Press the carrying handle to rewind the cable (hold
the plug to prevent it striking you).
5 Some vacuum cleaners, depending on the model,
are equipped with an automatic cable winder
(autoreverse). Pull out the cable and plug in the
vacuum. Move the control backwards in order
to wind the cable in and out as required. Move it
forwards to lock the cable once it is at the required
length.
6 Start the vacuum cleaner using the rolling control.
Increase/reduce the suction power by adjusting the
rolling control. In the auto‑position* the suction
power is automatically adjusted depending on the
surface.
7 If you have a vacuum cleaner with remote control*
the machine is started by gently pressing the auto or
min button. In the auto‑position the suction power
is automatically adjusted depending on the surface.
Increase the power to maximum power by pressing
in the auto button for more than one second. In
maximum position the suction power is not adjusted
automatically any more. Reduce the power by
pressing the min button.
Turn o the vacuum cleaner by pressing the OFF
button for more than one second.
Check lights at start
When the machine is started, all the check lights initially
light up. They will then all go out with the exception of
Optimum. If your Oxy3system is equipped with remote
control*, the min – auto – max lights ash as soon as you
plug it in. You then select the suction power by pressing
one of the buttons on the hose handle.
English
* Nur bestimmte Modelle.
Vorbereitungen
1 Prüfen, ob der s‑bag® richtig eingelegt ist.
2 Schlauch einführen, bis Verriegelung einrastet. Zur
Freigabe des Schlauches Verriegelung drücken.
3 Teleskoprohr an Schlauchgri und Bodendüse
anbringen (zum Lösen Verriegelungstaste drücken
und Teile auseinander ziehen). Bei Verwendung eines
Staubsaugers mit Saugsteuerung* sicherstellen, dass
der Schalter ordnungsgemäß eingedrückt ist.
4a Stromkabel herausziehen und in Steckdose stecken.
4b Zum Zurückspulen des Kabels Tragegri drücken
(Netzstecker festhalten, damit er unkontrolliert
herumschlägt).
5 Manche Staubsauger (modellabhängig) sind mit
einem automatischen Kabelspuler mit automatischer
Umkehr ausgestattet. Stromkabel herausziehen und
in Steckdose stecken. Regler nach hinten schieben,
um Kabel nach Bedarf auf‑ und abzuspulen. Regler
nach vorne schieben, um das Kabel nach Abspulen
der gewünschten Länge zu xieren.
6 Staubsauger mithilfe des Walzenreglers einschalten.
Saugleistung durch Einstellen des Walzenregler
steigern/reduzieren. In der Automatik‑Stellung*
erfolgt eine automatische Anpassung der
Saugleistung an den Untergrund.
7 Bei Verwendung eines Staubsaugers mit
Saugsteuerung* wird der Motor bei leichter
Betätigung einer der Tasten “auto” oder “min”
gestartet. In der Automatik‑Stellung erfolgt eine
automatische Anpassung der Saugleistung an den
Untergrund. Sie schalten auf maximale Leistung,
indem Sie den „Auto”‑Knopf länger als eine Sekunde
gedrückt halten. In der höchsten Leistungsstufe passt
sich die Saugleistung nicht mehr automatisch an
den Bodenbelag an. Sie können die Leistung wieder
reduzieren, indem Sie auf den „min”‑Knopf drücken.
Den Staubsauger schalten Sie aus, indem Sie den
„OFF”‑Knopf länger als eine Sekunde gedrückt halten.
Kontrollleuchten beim Start
Beim Einschalten des Staubsaugers leuchten alle
Kontrollleuchten kurz auf. Anschließend erlöschen alle
Kontrollleuchten mit Ausnahme der Kontrollleuchte
“Optimum”. Ist Ihr Oxy3system‑Staubsauger
mit Saugsteuerung* ausgestattet, blinken die
Kontrollleuchten “min”, “auto” und “max”, sobald Sie den
Netzstecker einstecken. Die Einstellung der Saugleistung
erfolgt dann durch Betätigung einer der Tasten am
Schlauchgri.
Deutsch