14
SOMMAIRE
Avertissements et conseils importants . . . . . . . . . . . . . . . . . . . . . . . . . . . . . . . . . . . . . . . . . . . . . . . .12
Renseignements pour lÕŽlimination des matŽriaux dÕemballage . . . . . . . . . . . . . . . . . . . . . . . . . . . .13
Utilisation / Nettoyage - Mise en service - RŽglage de la tempŽrature - RŽfrigŽration . . . . . . . . . . . . . .14
Utilisation / CongŽlation - Conservation des produits surgelŽs - DŽcongŽlation - Gla•ons - . . . . . . . . .
Interrupteur de ÒclimatisationÓ . . . . . . . . . . . . . . . . . . . . . . . . . . . . . . . . . . . . . . . . . . . . . . . . . . . . . . . . . .15
Tablettes amovibles - Positionnement des balconnets de la contre-porte - Conseils / Conseils pour . .
la rŽfrigŽration - Conseils pour la congŽlation . . . . . . . . . . . . . . . . . . . . . . . . . . . . . . . . . . . . . . . . . . . . .16
Conseils pour la surgŽlation / Entretien / Nettoyage - Arr•t prolongŽ . . . . . . . . . . . . . . . . . . . . . . . . . . .17
Entretien / Changement de lÕampoule - DŽgivrage . . . . . . . . . . . . . . . . . . . . . . . . . . . . . . . . . . . . . . . . .18
Anomalie de fonctionnement / Installation / Emplacement - Entretoises postŽrieures . . . . . . . . . . . .
Branchement Žlectrique . . . . . . . . . . . . . . . . . . . . . . . . . . . . . . . . . . . . . . . . . . . . . . . . . . . . . . . . . . . . . .19
Installation / RŽversibilitŽ des portes . . . . . . . . . . . . . . . . . . . . . . . . . . . . . . . . . . . . . . . . . . . . . . . . . . .20
Conditions de garantie . . . . . . . . . . . . . . . . . . . . . . . . . . . . . . . . . . . . . . . . . . . . . . . . . . . . . . . . . . . . . .21
RŽfrigŽration
Pour obtenir le meilleur rendement du compartiment
rŽfrigŽrateur:
¥ nÕintroduisez pas dÕaliments encore chauds ou de
liquides en Žvaporation dans la cuve;
¥ couvrez les aliments, surtout sÕils sont
aromatiques;
¥ placez les denrŽes de fa•on ˆ ce que l'air puisse
circuler tout autour.
Nettoyage
LÕappareil Žtant convenablement installŽ, nous vous
conseillons de le nettoyer soigneusement avec de
lÕeau ti•de savonneuse, pour enlever lÕodeur
caractŽristique de ÇneufÈ.
NÕutilisez pas de produits abrasifs, de
poudre ˆ rŽcurer ni dÕŽponge mŽtallique.
RŽglage de la tempŽrature
La tempŽrature est rŽglŽe automatiquement et peut
•tre augmentŽe (moins froid) en tournant le bouton
vers les numŽros les plus bas ou bien diminuŽe
(plus froid) en le tournant vers les numŽros les plus
ŽlevŽs.
En tout cas, lÕexacte position doit •tre repŽrŽe en
considŽrant que la tempŽrature interne dŽpend des
facteurs suivants:
¥ tempŽrature ambiante;
UTILISATION
¥ frŽquence dÕouverture des portes;
¥ quantitŽ dÕaliments conservŽs;
¥ emplacement de lÕappareil.
Une position moyenne est la plus indiquŽe.
Important
Si le thermostat est rŽglŽ sur la position de froid
maximum, lorsque la tempŽrature ambiante est
ŽlevŽe et que l'appareil est plein, il est possible
que le compresseur fonctionne en rŽgime
continu. Dans ce cas, il y a un risque de
formation excessive de givre sur la paroi
postŽrieure ˆ lÕintŽrieur de lÕappareil. Pour Žviter
cet inconvŽnient, placez le thermostat sur une
position moins ŽlevŽe, de fa•on ˆ permettre un
dŽgivrage automatique et, par consŽquent, des
Žconomies de courant.
Mise en service
Enfoncez la fiche dans la prise de courant
Tournez le bouton du thermostat vers la droite sur
une position moyenne.
Pour arr•ter lÕappareil tournez le bouton du
thermostat sur la position ÇOÈ.
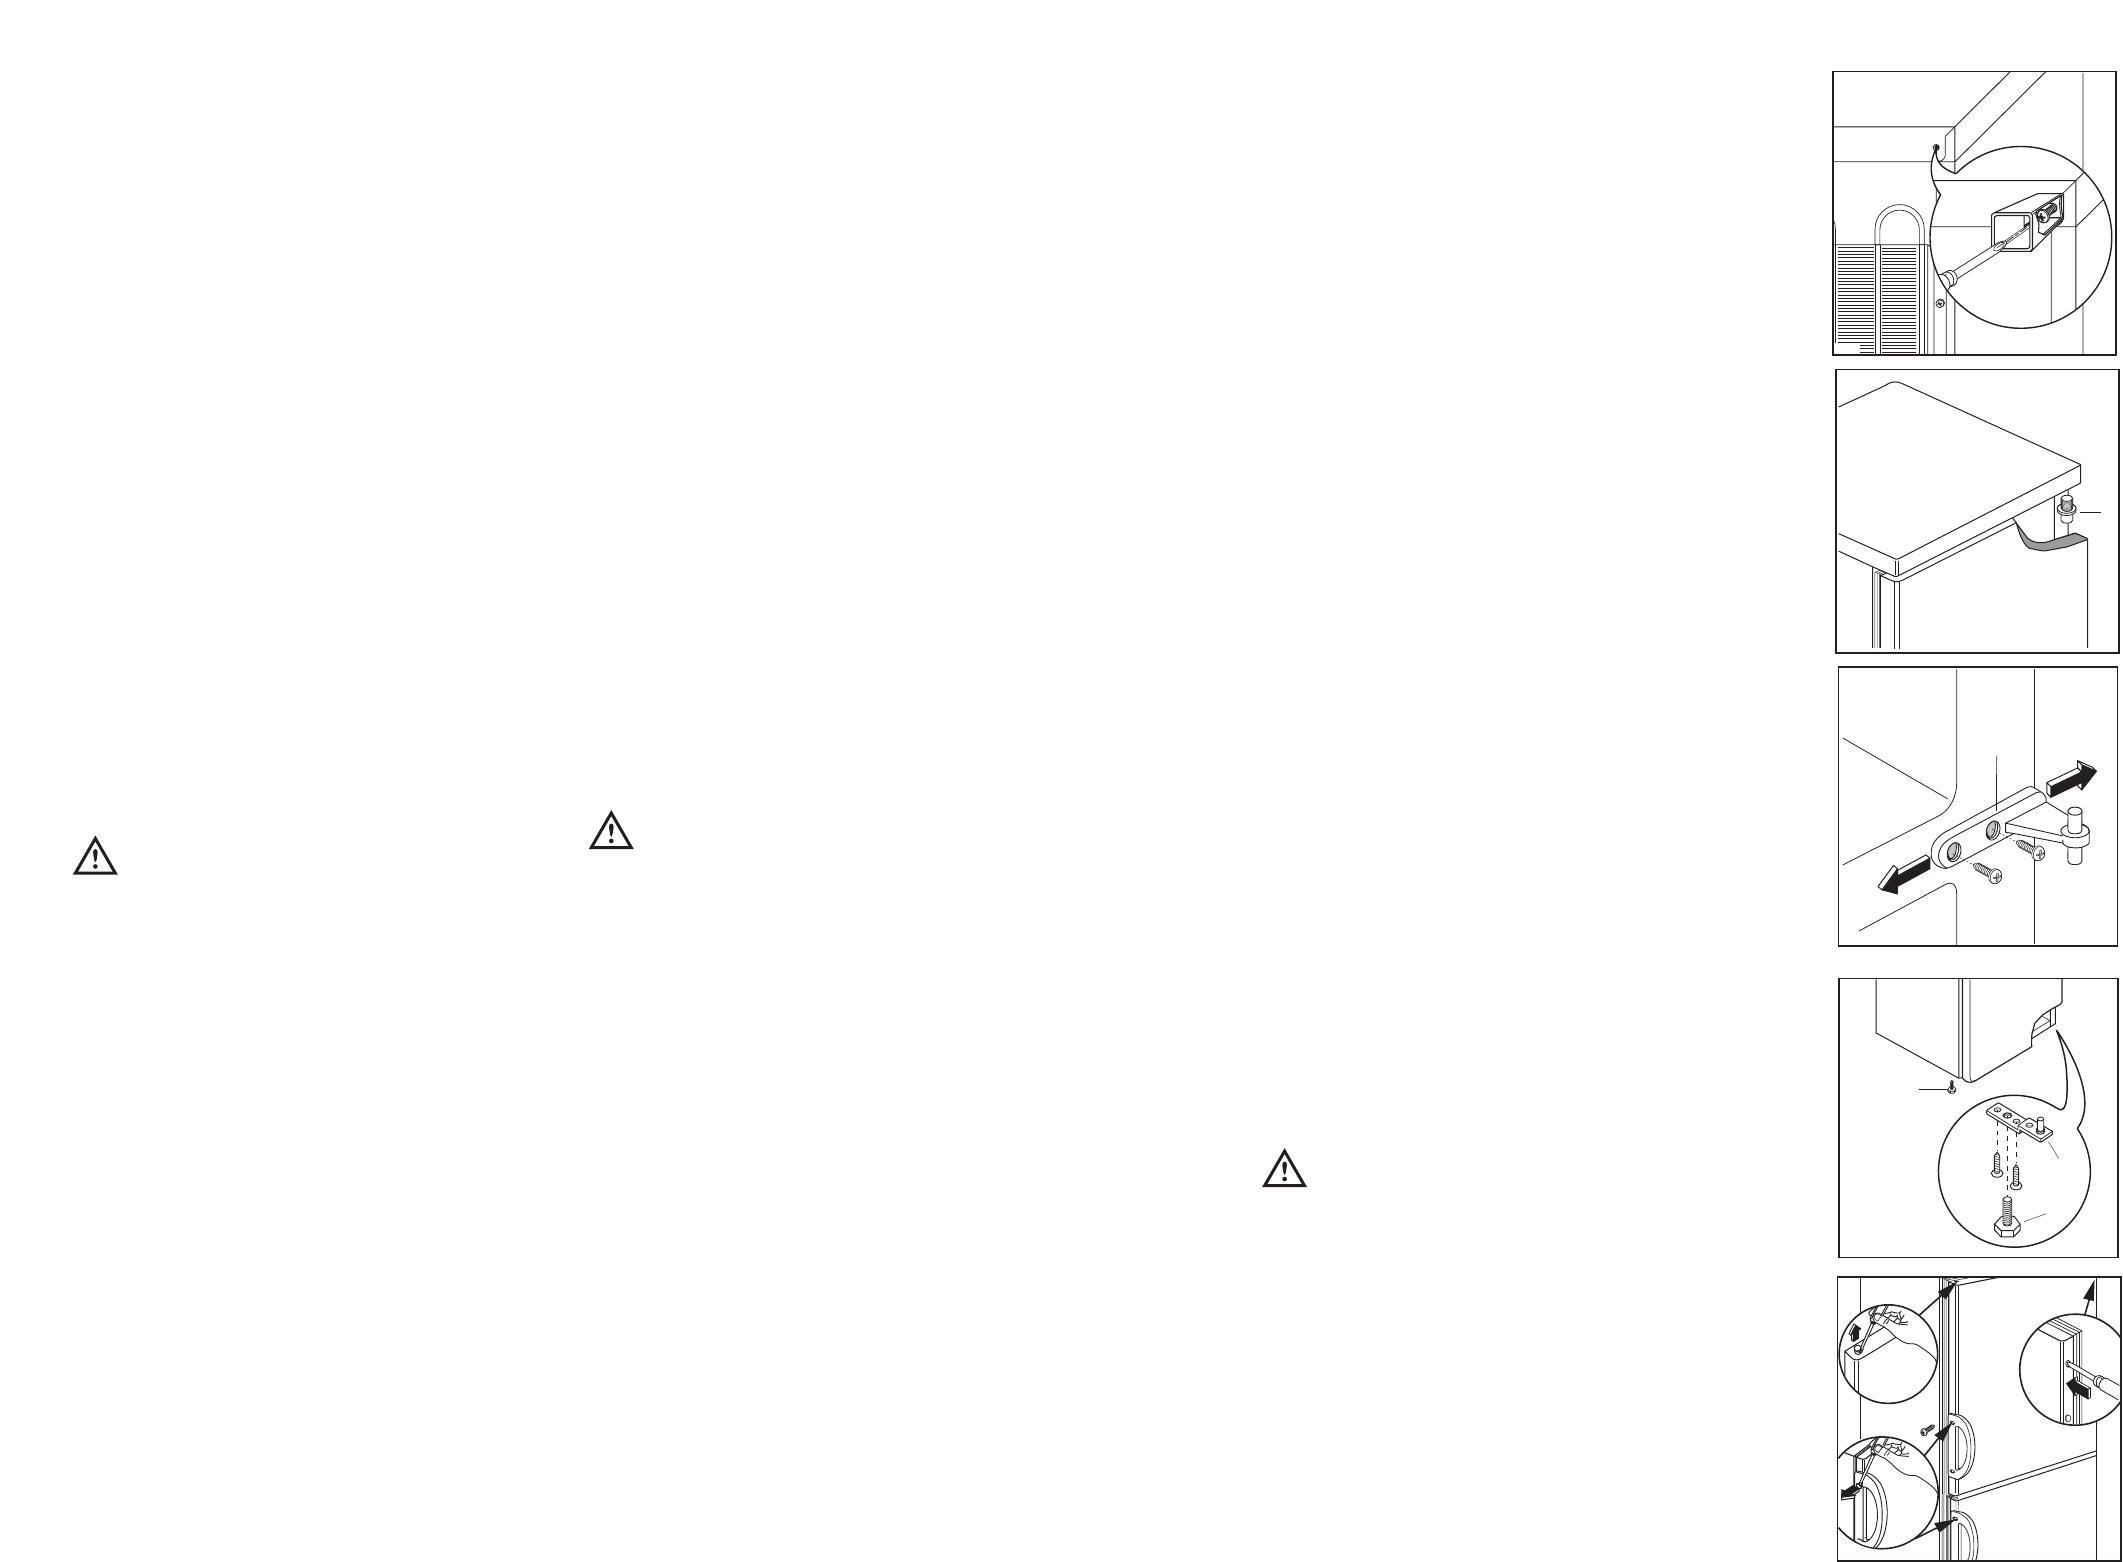
Door reversibility
Unplug the appliance from the power supply before
carrying out the below-mentioned operations.
1. Remove the lower hinge (1) and the support foot
(2);
2. Unsrew the front left support foot (3) and screw it
into the corresponding position on the opposite
side;
3. Unscrew the two screws which hide the fixing
holes of the hinge on the left-hand side;
4. Detach the lower door from the middle hinge (H);
5. Remove the middle hinge and detach the upper
door from the pin (G) Unscrew the pin (G) and
screw it into the corresponding position on the
opposite side.
6. After having removed the plugs which must be
refitted on the other side, re-assemble the upper
door, the middle hinge and the lower door.
7. Re-assemble the lower hinge (1) and the support
foot (2) on the opposite side.
8. Dismantle the handles and reassemble them on
the opposite side. Cover the holes left open with
the plugs contained in the documentation pack.
To line up the doors, it is possible to adjust the
middle hinge (H) horizontally by means of a tool,
after slackening the two screws (see figure).
Warning:
After having reversed the opening direction of
the doors check that all the screws are properly
tightened and that the magnetic seal adheres to
the cabinet. If the ambient temperature is cold
(i.e. in Winter), the gasket may not fit perfectly to
the cabinet. In that case, wait for the natural
fitting of the gasket or accelerate this process by
heating up the part involved with a normal
hairdrier.