516116
8
Zoom out
Zoom in
Previous page
1/161
Next page
English
Copyright© by Edimax Technology Co, LTD. all rights reserved. No part of
this publication may be reproduced, transmitted, transcribed, stored in a
retrieval system, or translated into any language or computer language, in any
form or by any means, electronic, mechanical, magnetic, optical, chemical,
manual or otherwise, without the prior written permission of this Company .
This company makes no representations or warranties, either expressed or
implied, with respect to the contents hereof and specifically disclaims any
warranties, merchantability or fitness for any particular purpose. Any
software described in this manual is sold or licensed "as is". Should the
programs prove defective following their purchase, the buyer (and not this
company, its distributor, or its dealer) assumes the entire cost of all necessary
servicing, repair, and any incidental or consequential damages resulting from
any defect in the software. Further, this company reserves the right to revise
this publication and to make changes from time to time in the contents hereof
without obligation to notify any person of such revision or changes.
The product you have purchased and the setup screen may appear slightly
different from those shown in this QIG. For more detailed information about this
product, please refer to the User Manual on the CD-ROM. The software and
specifications are subject to change without notice. Please visit our web site
www.edimax.com for the update. All rights reserved including all brand and
product names mentioned in this manual are trademarks and/or registered
trademarks of their respective holders .
Linux Open Source Code
Certain Edimax products include software code developed by third
parties, software code is subject to the GNU General Public License
("GPL") or GNU Lesser General Public License ("LGPL"). Please see
the GNU (www.gnu.org) and LPGL(www.gnu.org) Websites to view the
terms of each license.
The GPL Code and LGPL Code used in Edimax products are distributed
without any warranty and are subject to the copyrights of their authors.
For details, see the GPL Code and LGPL Code licenses. You can
download the firmware-files at http://www.edimax.com under
"Download" page.
C A T A L O G
Chapter I: Product Information.....................................................................................6
1-1 Introduction and safety information................................................................6
1-2 Safety Information...........................................................................................8
1-3 System Requirements......................................................................................9
1-4 Package Contents...........................................................................................10
1-5 Familiar with your new wireless broadband router.......................................11
Chapter II: System and Network Setup........................................................................13
2-1 Establish network connection........................................................................13
2-2 Setup client computers to obtain IP address automatically ...........................15
2-2-1 Windows 95/98/Me IP address setup: ................................................16
2-2-2 Windows 2000 IP address setup:........................................................18
2-2-3 Windows XP IP address setup:...........................................................20
2-2-4 Windows Vista IP address setup:........................................................22
2-3 Connect to broadband router by web browser...............................................24
2-4 Using ‘Quick Setup’......................................................................................28
2-4-1 Using ‘Cable Modem’ as broadband connection type........................32
2-4-2 Using ‘Fixed-IP xDSL as broadband connection type ......................34
2-4-3 Using ‘PPPoE xDSL as broadband connection type.........................36
2-4-4 Using ‘PPTP xDSL as broadband connection type ...........................38
2-4-5 Using 'L2TP xDSL' as broadband connection type............................41
2-4-6 Using 'Telstra Big Pond' as broadband connection type ....................44
Chapter III: General Setup..........................................................................................46
3-1 System ...........................................................................................................48
3-1-1 Time Zone ..........................................................................................48
3-1-2 Password Settings...............................................................................50
3-1-3 Remote Management..........................................................................51
3-2 WAN..............................................................................................................53
3-2-2 Static IP ..............................................................................................56
3-2-3 PPPoE.................................................................................................58
3-2-4 PPTP...................................................................................................60
3-2-5 L2TP...................................................................................................63
3-2-6 Telstra Big Pond.................................................................................66
3-3 LAN (Wired) .................................................................................................68
3-3-1 Before you start - Suggestions for deciding an IP address to be used
with this broadband router ...........................................................................68
3-3-2 LAN IP...............................................................................................69
3-3-2 LAN IP...............................................................................................70
3-3-3 DHCP Server......................................................................................71
3-3-4 Static DHCP Leases ...........................................................................72
3-4 Wireless .........................................................................................................74
3-4-1 Basic Settings.....................................................................................75
3-4-1-1 AP mode..................................................................................76
3-4-1-2 Station-Infrastructure..............................................................79
3-4-1-3 AP Bridge-Point to Point.........................................................82
3-4-1-4 AP Bridge-Point to Multi-Point ..............................................85
3-4-1-5 AP Bridge-WDS......................................................................87
3-4-1-6 Universal Repeater..................................................................90
3-4-1-7 Set Security.............................................................................94
3-4-2 Security Settings.................................................................................98
3-4-4 WPS..................................................................................................105
3-5 Advance Settings* .......................................................................................107
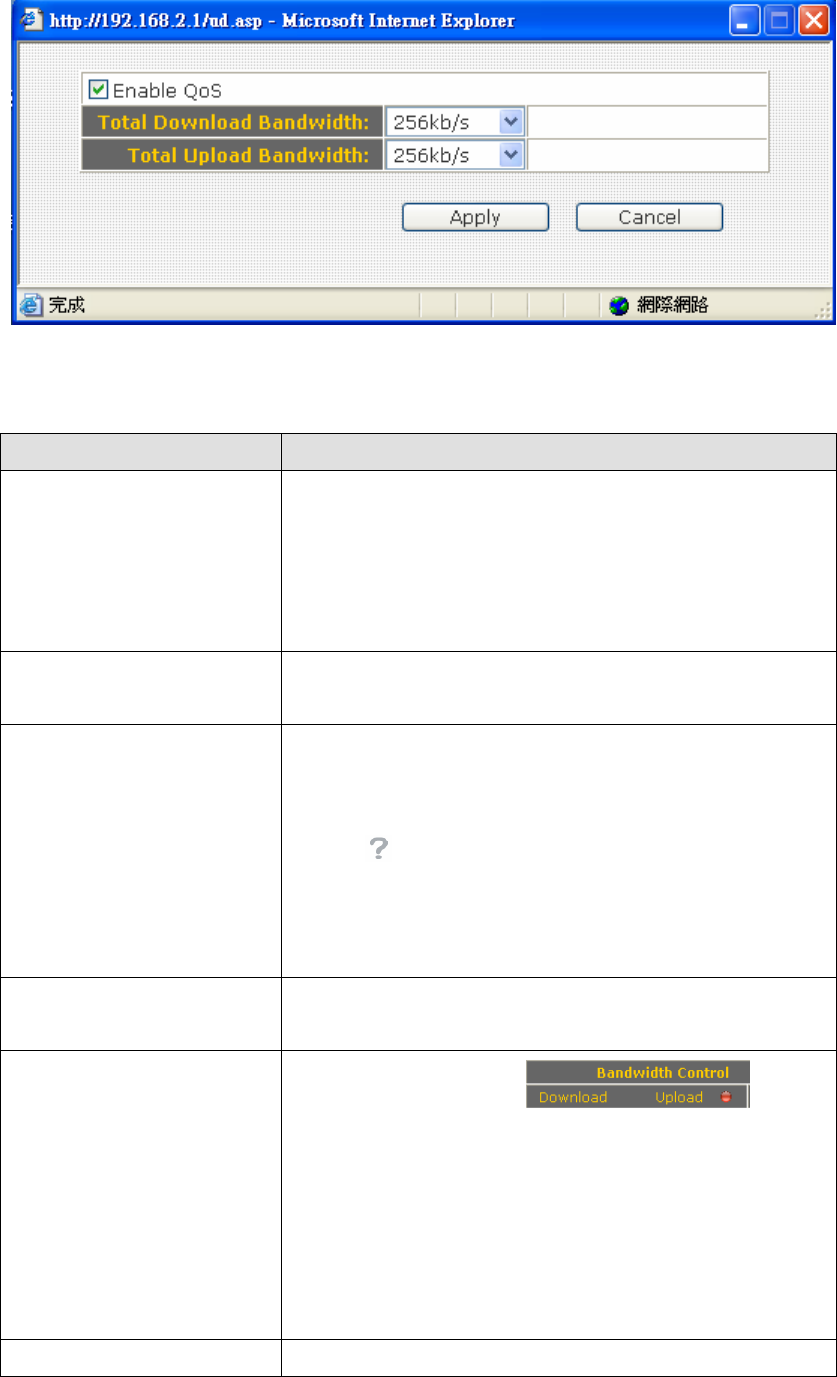
3-5-1 QoS...................................................................................................108
3-5-1-1 Basic QoS Settings................................................................108
3-5-1-2 Add a new QoS entry............................................................110
3-5-2 NAT..................................................................................................112
3-5-2-1 Virtual Server........................................................................112
3-5-2-2 Special Applications..............................................................115
3-5-2-3 Firewall .................................................................................118
3-5-2-3-1 Access Control...........................................................118
3-5-2-3-2 URL Blocking............................................................124
3-5-2-3-3 DoS............................................................................127
3-5-2-4 DDNS....................................................................................130
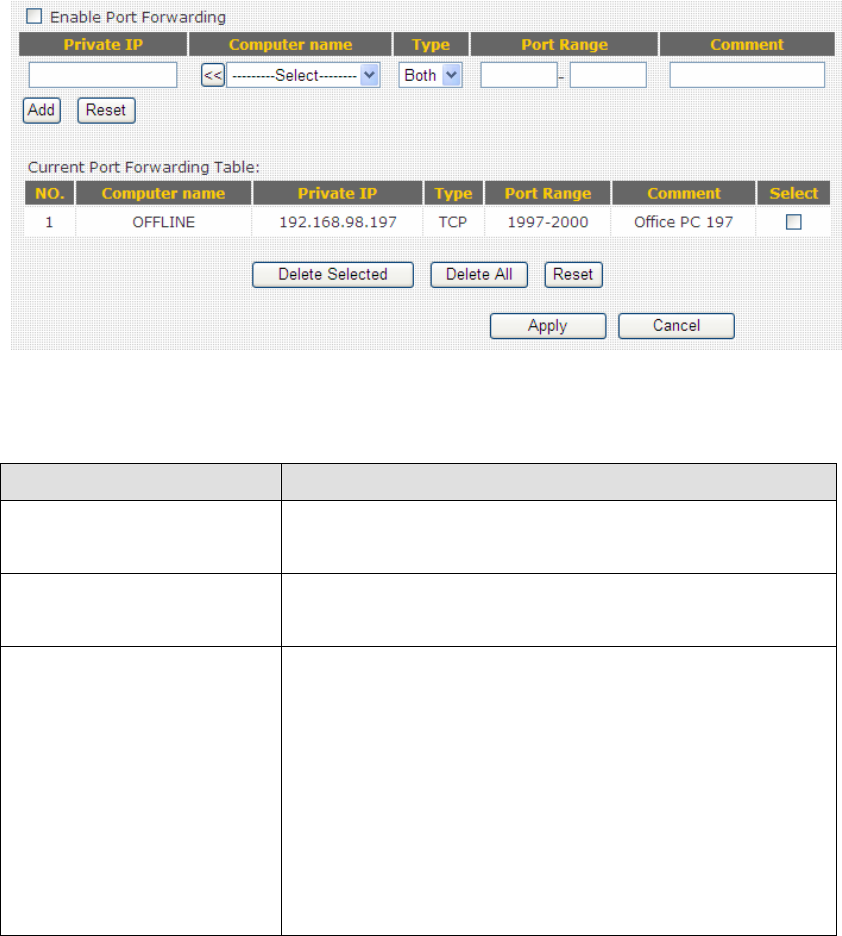
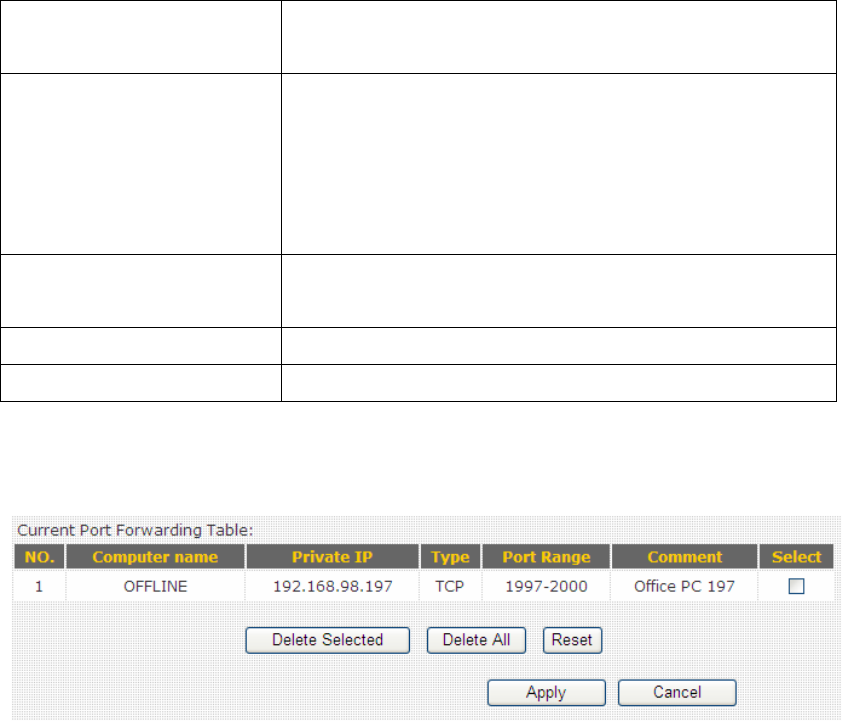
3-5-2-5 Port Forwarding ....................................................................133
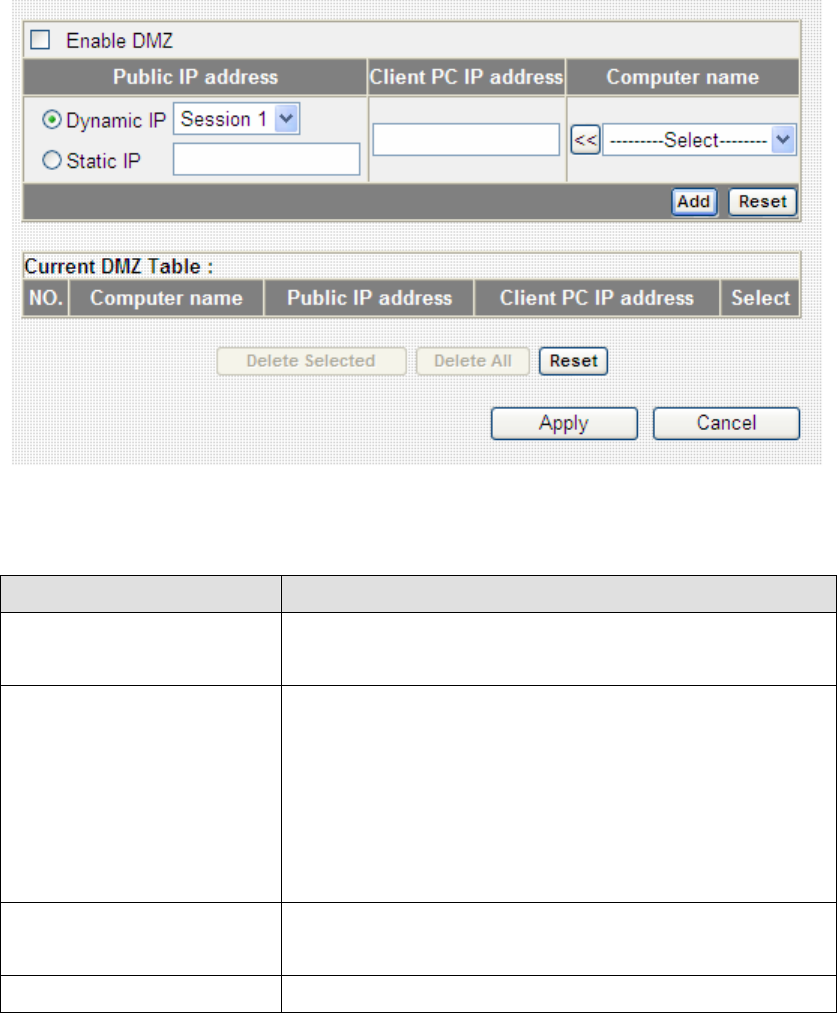
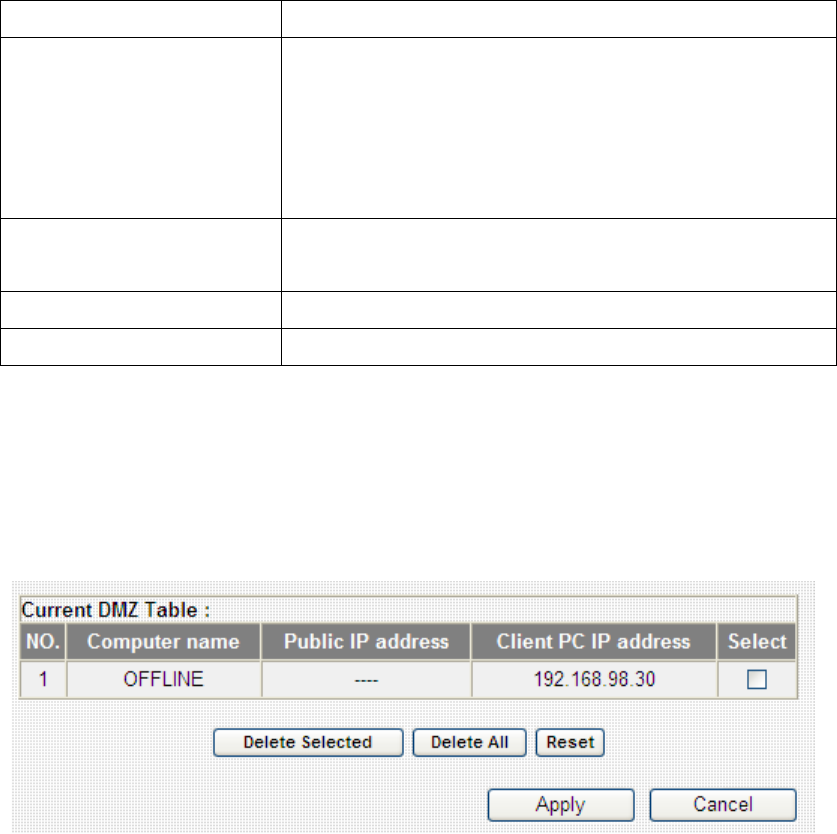
3-5-2-6 DMZ......................................................................................136
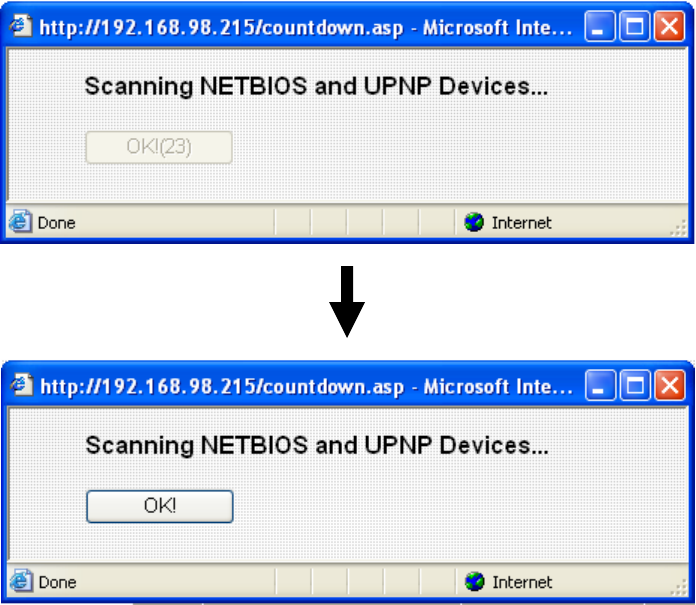
Chapter IV EZ View ................................................................................................139
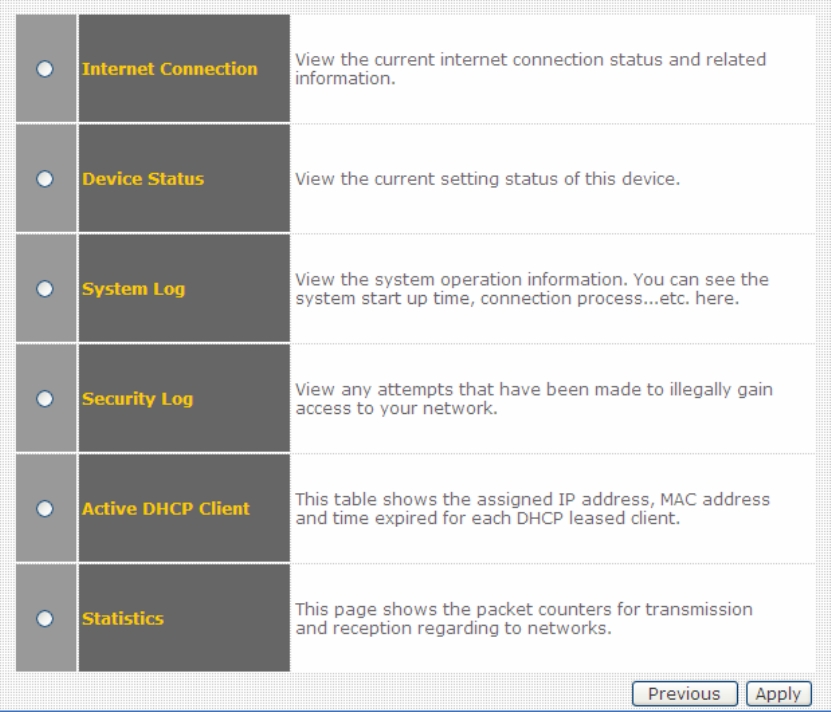
Chapter V: Status ...............................................................................................147
5-1 Internet Connection .............................................................................149
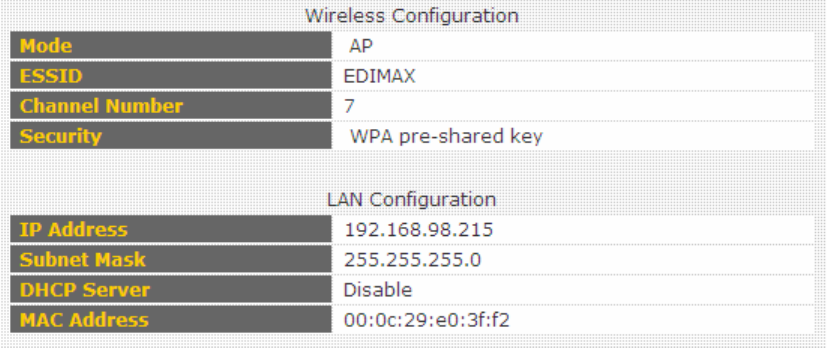
5-2 Device Status .......................................................................................150
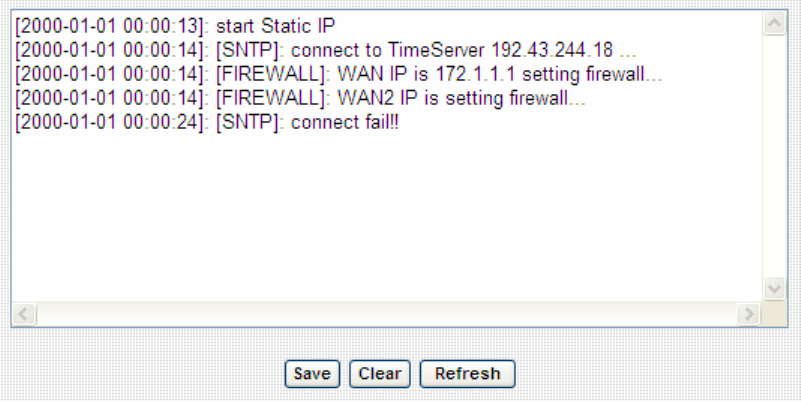
5-3 System Log..........................................................................................151
5-4 Security Log ........................................................................................152
5-5 Active DHCP Client ............................................................................153
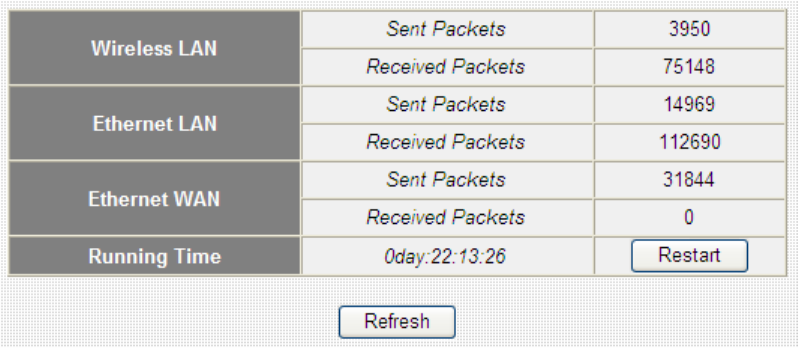
5-6 Statistics.......................................................................................................154
Chapter VI : Tools..............................................................................................155
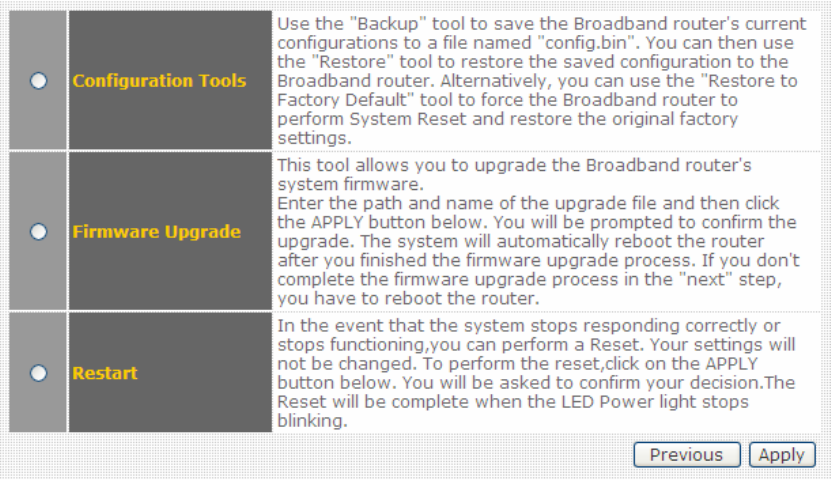
6-1 Configuration Tools.............................................................................157
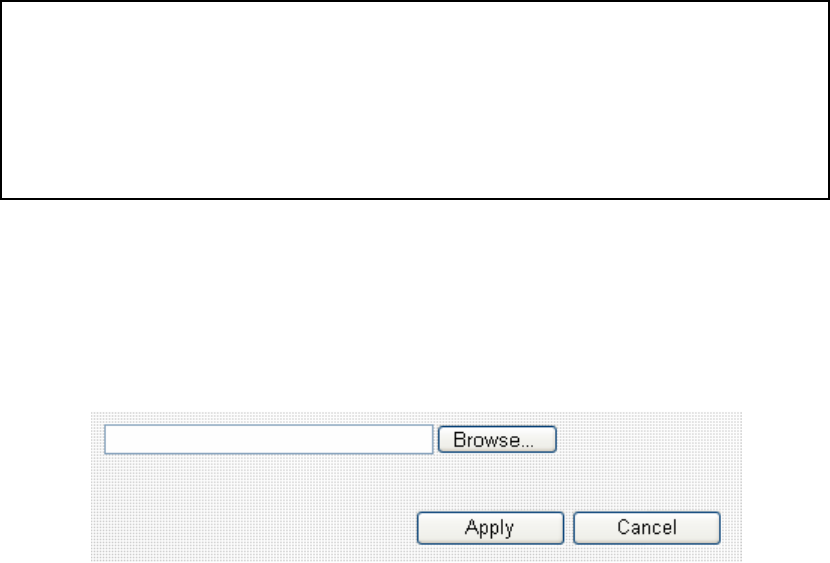
6-2 Firmware Upgrade...............................................................................158
6-3 Restart..................................................................................................159
Chapter VII : Language.....................................................................................160
Chapter I: Product Information
1-1 Introduction and safety information
Thank you for purchasing Edimax BR-6424n wireless 11n broadband
router! This high cost-efficiency router is the best choice for Small office
/ Home office users, all computers and network devices can share a single
xDSL / cable modem internet connection at high speed. Easy install
procedures allows any computer users to setup a network environment in
very short time - within minutes, even inexperienced. When the number
of your computers and network-enabled devices grow, you can also
expand the number of network slot by simple attach a hub or switch, to
extend the scope of your network!
With built-in IEEE 802.11b/g/Draft-N wireless network capability, all
computers and wireless-enabled network devices (including PDA,
cellular phone, game console, and more!) can connect to this broadband
router without additional cabling. New Draft-N wireless capability also
gives you the highest speed of wireless experience ever! With a
compatible wireless card installed in your PC, you can transfer file for
up to 300 Mbps! The radio coverage is also doubled, so don’t worry if
your office or house is really big!
Other features of this router including:
High Internet Access throughput
Allow multiple users to share a single Internet connection
Supports up to 253 LAN users sharing a single Cable or xDSL internet
connection
Four wired LAN ports (10/100Mbps) and one WAN port (10/100Mbps)
Provides IEEE 802.11b/g/n wireless LAN capability
Support DHCP (Server/Client) for easy client IP-address setup
Advanced network and security features like: Special Applications, DMZ,
Virtual Servers, Access Control, Firewall.
Allow you to monitor the router’s status like: DHCP Client Log, System
Log, Security Log and Device/Connection Status
Easy to use Web-based GUI for network configuration and
management purposes
Remote management function allows configuration and upgrades from
a remote computer (over the Internet)
Auto MDI / MDI-X function for all wired Ethernet ports.
1-2 Safety Information
In order to keep the safety of users and your properties, please follow the
following safety instructions:
1. This router is designed for indoor use only; DO NOT place this router
outdoor.
2. DO NOT put this router at or near hot or humid places, like kitchen or
bathroom. Also, do not left this router in the car in summer.
3. DO NOT pull any connected cable with force; disconnect it from the
router first.
4. If you want to place this router at high places or hang on the wall,
please make sure the router is firmly secured. Falling from high places
would damage the router and its accessories, and warranty will be void.
5. Accessories of this router, like antenna and power supply, are danger to
small children under 3 years old. They may put the small parts in their
nose or month and it could cause serious damage to them. KEEP THIS
ROUTER OUT THE REACH OF CHILDREN!
6. The router will become hot when being used for long time (This is
normal and is not a malfunction), DO NOT put this router on paper,
cloth, or other flammable materials.
7. There’s no user-serviceable part inside the router. If you found that the
router is not working properly, please contact your dealer of purchase and
ask for help. DO NOT disassemble the router, warranty will be void.
8. If the router falls into water when it’s powered, DO NOT use your
hand to pick it up. Switch the electrical power off before you do anything,
or contact an experienced technician for help.
9. If you smell something strange, or even see some smoke coming out
from the router or power supply, remove the power supply or switch the
electrical power off immediately, and call dealer of purchase for help.
1-3 System Requirements
z Internet connection, provided by xDSL or cable modem with a RJ-45
Ethernet port.
z Computer or network devices with wired or wireless network interface
card.
z Web browser (Microsoft Internet Explorer 4.0 or above, Netscape
Navigator 4.7 or above, Opera web browser, or Safari web browser).
z An available power socket
1-4 Package Contents
Before you starting to use this router, please check if there’s anything
missing in the package, and contact your dealer of purchase to claim for
missing items:
Router with Antennas (main body, 1 pcs)………………………… 1
Quick installation guide (1 pcs) ………………………………… 2
CDROM (with multi-languages setup wizard, multi-languages Quick
installation guide and User manual )(1 pcs) …………………….. 3
12V 1A power adapter (1 pcs)…………………………………..... 4
Ethernet Cable (1 pcs)………………………………………..... 5
Accessaries (1 pcs)……………………………………………..... 6
You can configure the router by running the Setup Wizard in the
CD-ROM provided in the package. The wizard provides quick setup
for the Internet connection, SSID, wireless security, firmware
upgrade and changing router’s password. When you start the
Setup Wizard, you will get the following Welcome screen. Please
choose the language to start with and follow the easy steps in the
Wizard. No instruction for the Setup Wizard is given here.
If you lost the CD-ROM or you prefer the traditional web setup,
please follow the procedures in this Manual ( or Quick Installation
Guide ) to configure the router
1-5 Familiar with your new wireless broadband router
Front Panel
LED Name Light Status Description
PWR ON Router is switched on and correctly powered
On Wireless network is switched on
Off Wireless network is switched off
WLAN
Flashing Wireless LAN activity (transferring data) or
WPS mode is on. (LED will on and off every
1 second)
On WAN port is connected
Off WAN port is not connected
WAN
LNK/ACT
Flashing WAN activity (transferring data)
On LAN port is connected
Off LAN port is not connected
LAN
LNK/ACT
Flashing LAN activity (transferring data)
Back Panel
BR-6424n
Item Name Description
Antennas Antenna A, B
ON/OFF
Enable / Disable wireless signal
You can not connect the router via wireless adapter,
when you disable the wireless signal,
12V (Power) Power connector, connects to power adapter
Reset / WPS Reset the router to factory default settings (clear all
settings) or start WPS function. Press this button and
hold for 20 seconds to clear all settings, and press this
button for less than 5 seconds to start WPS function.
1 - 4 Local Area Network (LAN) ports 1 to 4
WAN Wide Area Network (WAN / Internet) port
Antenna A Antenna B
Chapter II: System and Network Setup
2-1 Establish network connection
Please follow the following instruction to build the network connection
between your new Broadband router and your computers, network
devices:
1. Connect your xDSL / cable modem to the WAN port of router by
Ethernet cable.
2. Connect all your computers, network devices (network-enabled
consumer devices other than computers, like game console, or switch /
hub) to the LAN port of the router.
3. Connect the power adapter to the wall socket, and then connect it to
the ‘Power socket of the router.
4. Please check all LEDs on the front panel. ‘PWR’ LED should be
steadily on, WAN and LAN LEDs should be on if the computer /
network device connected to the respective port of the router is
powered on and correctly connected. If PWD LED is not on, or any
LED you expected is not on, please recheck the cabling.
5. To improve wireless signal reception, please arrange the antennas as
the picture shown below (horizontal or vertical installation), and place
the wireless access point in open space. Please keep the distance
between antennas, if the antennas are too close to each other, wireless
signal reception will be affected.
2-2 Setup client computers to obtain IP address automatically
After the network connection is established, the next step you should
do is setup the router with proper network parameters, so it can work
properly in your network environment.
Before you can connect to the router and start configuration
procedures, your computer must be able to get an IP address
automatically (use dynamic IP address). If it’s set to use static IP address,
or you’re unsure, please follow the following instructions to configure
your computer to use dynamic IP address:
If the operating system of your computer is….
Windows 95/98/Me - please go to section 2-2-1
Windows 2000 - please go to section 2-2-2
Windows XP - please go to section 2-2-3
Windows NT - please go to section 2-2-4
2-2-1 Windows 95/98/Me IP address setup:
1. Click ‘Start’ button (it should be located at lower-left corner of your
computer), then click control panel. Double-click Network icon, and
Network window will appear. Select ‘TCP/IP’, then click ‘Properties’.
2. Select ‘Obtain an IP address from a DHCP server’, then click ‘OK’.
2-2-2 Windows 2000 IP address setup:
1. Click ‘Start’ button (it should be located at lower-left corner of your
computer), then click control panel. Double-click Network and Dial-up
Connections icon, double click Local Area Connection, and Local Area
Connection Properties window will appear. Select ‘Internet Protocol
(TCP/IP)’, then click ‘Properties’
2. Select ‘Obtain an IP address automatically’ and ‘Obtain DNS server
address automatically’, then click ‘OK’.
2-2-3 Windows XP IP address setup:
1. Click ‘Start’ button (it should be located at lower-left corner of your
computer), then click control panel. Double-click Network and Internet
Connections icon, click Network Connections, then double-click Local
Area Connection, Local Area Connection Status window will appear,
and then click ‘Properties’
2. Select ‘Obtain an IP address automatically’ and ‘Obtain DNS server
address automatically’, then click ‘OK’.
2-2-4 Windows Vista IP address setup:
1. Click ‘Start’ button (it should be located at lower-left corner of your
computer), then click control panel. Click View Network Status and
Tasks, then click Manage Network Connections..Right-click Local Area
Netwrok, then select ‘Properties’. Local Area Connection Properties
window will appear, select ‘Internet Protocol Version 4 (TCP / IPv4), and
then click ‘Properties’
2. Select ‘Obtain an IP address automatically’ and ‘Obtain DNS server
address automatically’, then click ‘OK’.
2-3 Connect to broadband router by web browser
Default IP address of this broadband router is ‘192.168.2.1’, and you can
connect to broadband routers web-based configuration interface by any
connected computer with web browser (Internet Explorer 5.x or above,
Firefox, or Netscape).
Please input ‘192.168.2.1’ in web browsers address bar and press ‘Enter
key to establish connection:
You should see the following authentication window:
Please input ‘admin’ in ‘User name’ field, and ‘1234’ in ‘Password’ field,
and click ‘OK’ button to enter web configuration interface.
TIPS: If you can’t establish connection with broadband router with web
browser (got ‘The page cannot be displayed’ or similar error message),
the IP address you inputted may be wrong. If you’ve changed the IP
address of this broadband router previously, please input correct IP
address instead of the default IP address ’192.168.2.1’.
If the DHCP server function of this broadband router is enabled, please
follow the following instructions to find out the IP address of this
broadband router:
Please click ‘start’ -> ‘run’ at the bottom-lower corner of your desktop:
Input ‘cmd’, then click ‘OK’
Input ‘ipconfig’, then press ‘Enter key. Please check the IP address
followed by ‘Default Gateway’ (In this example, the IP address of router
is 192.168.2.1, please note that this value may be different.)
If you tried the instructions listed above and still can not find the IP
address of this broadband router / you forget the password, please jump to
chapter 3-6-1 to reset the broadband router.
NOTE: If the IP address of Gateway is not displayed, or the address followed
by ‘IP Address’ begins with ‘169’, please recheck network connection
between your computer and router, and / or go to the beginning of this
chapter, to recheck every step of network setup procedure.
2-4 Using ‘Quick Setup’
This broadband router provides a ‘Quick Setup’ menu, and you can setup
basic parameters of this broadband router.
Please follow the following instructions to use ‘Quick Setup’ menu:
1. Click ‘Quick Setup’ after logged in.
2. In the first step of quick setup, you can setup automatic time
synchronization settings.
The descriptions of every setting items are listed as follow:
Item Name Description
Time Zone Please select a time zone of the country or
region of your residence here. If you can’t find
the country / region of your residence here,
please select a city / region which time zone is
the same with the country / region of your
residence.
Time Server Address This load-balance router supports NTP
(Network Time Protocol). NTP server will
provide correct time for this router to setup the
date and time of the router automatically.
Please input the host name or IP address of
NTP server here. If you don’t know the host
name or IP address of time server, please ask
network administrator or use ‘pool.ntp.org’ as
time server.
Daylight Savings If the country / region of your residence use
daylight saving time, please check ‘Enable
Function’ box, and select the beginning and
ending date of daylight time saving.
After you finish with time zone settings, please click ‘Next’ to proceed to
next step of quick setup - broadband type:
Please choose the broadband (Internet connection) type you’re using in
this page. There are six types of Internet connection, they are:
Cable Modem - Please go to section 2-4-1
Fixed-IP xDSL - Please go to section 2-4-2
PPPoE xDSL - Please go to section 2-4-3
PPTP xDSL - Please go to section 2-4-4
L2TP xDSL - Please go to section 2-4-5
Telstra Big Pond - Please go to section 2-4-6
If you’re not sure, please contact your Internet service provider. A wrong
Internet connection type will cause connection problem, and you will not
be able to connect to internet.
If you want to go back to previous step, please press ‘Back’ button on the
bottom of this page.
3.
NOTE: Some service providers use ‘DHCP’ (Dynamic Host
Configuration Protocol) to assign IP address to you. In this case, you
can choose ‘Cable Modem’ as Internet connection type, even you’re
using another connection type, like xDSL. Also, some cable modem
uses PPPoE, so you can choose ‘PPPoE xDSL for such cable modem
connection, even you’re using a cable modem.
2-4-1 Using ‘Cable Modem’ as broadband connection type
If your Internet service provider uses cable modem to provide Internet
service to you, you can select this connection type. You can also select
this connection type if your ISP tells you that they will assign you the IP
address by ’DHCP’ (Dynamic Host Configuration Protocol).
Here are descriptions of every setup items:
Item Name Description
Host Name Please input the host name of your computer,
this is optional, and only required if your
service provider asks you to do so.
MAC address Please input MAC address of your computer
here, if your service provider only permits
computer with certain MAC address to access
internet. If you’re using the computer which
used to connect to Internet via cable modem,
you can simply press ‘Clone Mac address’
button to fill the MAC address field with the
MAC address of your computer.
TTL Time-to-live (TTL) is a value in an Internet
Protocol packet that tells a network router
whether or not the packet has been in the
network too long and should be discarded.
If you wish to select another connection type as broadband connection
type, click ‘Back’; or you can click ‘OK’ to finish with quick setup.
You’ll see the following messages:
Please click ‘Apply’ to save changes you made and restart the broadband
router, this requires about 30 seconds and the broadband router will stop
responding (this is normal and is not malfunction). You can reconnect to
this broadband router and continue on other settings later.
2-4-2 Using ‘Fixed-IP xDSL as broadband connection type
If your ISP requires you to set a fixed IP address to establish connection,
you can use this connection type to input the IP address information
assigned by your ISP.
Please note that not only xDSL connections (like ADSL, HDSL, VDSL)
can use this connection type, you can select this connection type for all
connections that requires you to input a fixed IP address. Also, if your ISP
is assigning a fixed IP address to you by DHCP or PPPoE, do not select
this connection type. Please contact your ISP’s service hotline to make
sure you really need to use static IP as connection type.
Here are descriptions of every setup items:
Item Name Description
IP address assigned by
your by your service
provider
Please input IP address assigned by your
service provider.
Subnet Mask Please input subnet mask assigned by your
service provider.
DNS address Please input the IP address of DNS server
provided by your service provider.
Service Provider
Gateway Address
Please input the IP address of DNS server
provided by your service provider.
TTL Time-to-live (TTL) is a value in an Internet
Protocol packet that tells a network router
whether or not the packet has been in the
network too long and should be discarded.
If you wish to select another connection type as broadband connection
type, click ‘Back’; or you can click ‘OK’ to finish with quick setup.
You’ll see the following messages:
Please click ‘Apply’ to save changes you made and restart the broadband
router, this requires about 30 seconds and the broadband router will stop
responding (this is normal and is not malfunction). You can reconnect to
this broadband router and continue on other settings later.
You must use the addresses provided by your Internet service
provider, wrong setting value will cause connection problem.
2-4-3 Using ‘PPPoE xDSL as broadband connection type
If your ISP requires you to establish Internet connection by PPPoE
(Point-to-Point Protocol over Ethernet), you can use this connection type
to establish Internet connection.
Here are descriptions of every setup items:
Item Name Description
User Name Please input user name assigned by your
Internet service provider here.
Password Please input the password assigned by your
Internet service provider here.
Service Name Please give a name to this Internet service, this
is optional.
MTU Please input the MTU value of your network
connection here. If you don’t know, you can use
default value.
Connection Type Please select the connection type of Internet
connection you wish to use. There are 3
options:
‘Continuous’ - keep internet connection alive,
do not disconnect.
’Connect on Demand’ - only connects to
Internet when there’s a connect attempt,
Manual - only connects to Internet when
‘Connect’ button on this page is pressed, and
disconnects when ‘Disconnect button is
pressed.
Idle Time Out Please specify the time to shutdown internet
connect after no internet activity is detected in
minute(s). This option is only available when
connection type is ‘Connect on Demand’.
TTL Time-to-live (TTL) is a value in an Internet
Protocol packet that tells a network router
whether or not the packet has been in the
network too long and should be discarded.
If you wish to select another connection type as broadband connection
type, click ‘Back’; or you can click ‘OK’ to finish with quick setup.
You’ll see the following messages:
Please click ‘Apply’ to save changes you made and restart the broadband
router, this requires about 30 seconds and the broadband router will stop
responding (this is normal and is not malfunction). You can reconnect to
this broadband router and continue on other settings later.
2-4-4 Using ‘PPTP xDSL as broadband connection type
If your ISP requires you to use PPTP (Point-to-Point Tunneling Protocol)
to establish connection, you can select this connection type to establish
Internet connection.
PPTP xDSL requires two kinds of setting: WAN interface setting (setup
IP address) and PPTP setting (PPTP user name and password). Here we
start from WAN interface setting first:
Select the type of how you obtain IP address from your service provider
here. You can choose ‘Obtain an IP address automatically’ (equal to
DHCP, please refer to ‘Cable Modem’ section above), or ‘Use the
following IP address’ (i.e. static IP address).
WAN interface settings must be correctly set, or the Internet connection
will fail even those settings of PPTP settings are correct. Please contact
your Internet service provider if you don’t know what you should fill in
these fields.
Now please go to PPTP settings section:
Here are descriptions of every setup items:
Item Name Description
User ID Please input user ID (user name) assigned by
your Internet service provider here.
Password Please input the password assigned by your
Internet service provider here.
PPTP Gateway Please input the IP address of PPTP gateway
assigned by your Internet service provider
here.
Connection ID Please input the connection ID here, this is
optional and you can leave it blank.
MTU Please input the MTU value of your network
connection here. If you don’t know, you can use
default value.
BEZEQ-ISRAEL Check ‘Enable’ box if you’re using BEZEQ
network service in Israel. Do not check this
box if you’re using other Internet service
provider.
Connection Type Please select the connection type of Internet
connection you wish to use. There are 3
options:
‘Continuous’ - keep internet connection alive,
do not disconnect.
’Connect on Demand’ - only connects to
Internet when there’s a connect attempt,
Manual - only connects to Internet when
‘Connect’ button on this page is pressed, and
disconnects when ‘Disconnect button is
pressed.
Idle Time Out Please specify the time to shutdown internet
connect after no internet activity is detected in
minute(s). This option is only available when
connection type is ‘Connect on Demand’.
If you wish to select another connection type as broadband connection
type, click ‘Back’; or you can click ‘OK’ to finish with quick setup.
You’ll see the following messages:
Please click ‘Apply’ to save changes you made and restart the broadband
router, this requires about 30 seconds and the broadband router will stop
responding (this is normal and is not malfunction). You can reconnect to
this broadband router and continue on other settings later.
2-4-5 Using 'L2TP xDSL' as broadband connection type
If your ISP requires you to use L2TP (Layer-2 Tunneling Protocol) to
establish connection, you can select this connection type to establish
Internet connection. L2TP is another popular connection method for
xDSL and other Internet connection types, and all required setting items
are the same with PPTP connection.
Like PPTP, there are two kinds of required setting, we’ll start from ‘WAN
Interface Settings’:
Please select the type of how you obtain IP address from your service
provider here. You can choose ‘Obtain an IP address automatically’ (equal
to DHCP, please refer to ‘Cable Modem’ section above), or ‘Use the
following IP address’ (equal to static IP address, please refer to ‘PPPoE
xDSL section above).
WAN interface settings must be correctly set, or the Internet connection
will fail even those settings of L2TP settings are correct. Please contact
your Internet service provider if you don’t know what you should fill in
these fields.
Now please go to L2TP settings section:
Here are descriptions of every setup items:
Item Name Description
User ID Please input user ID (user name) assigned by
your Internet service provider here.
Password Please input the password assigned by your
Internet service provider here.
L2TP Gateway Please input the IP address of L2TP gateway
assigned by your Internet service provider
here.
MTU Please input the MTU value of your network
connection here. If you don’t know, you can use
default value.
Connection Type Please select the connection type of Internet
connection you wish to use. There are 3
options:
‘Continuous’ - keep internet connection alive,
do not disconnect.
’Connect on Demand’ - only connects to
Internet when there’s a connect attempt,
Manual - only connects to Internet when
‘Connect’ button on this page is pressed, and
disconnects when ‘Disconnect button is
pressed.
Idle Time Out Please specify the time to shutdown internet
connect after no internet activity is detected in
minute(s). This option is only available when
connection type is ‘Connect on Demand’.
If you wish to select another connection type as broadband connection
type, click ‘Back’; or you can click ‘OK’ to finish with quick setup.
You’ll see the following messages:
Please click ‘Apply’ to save changes you made and restart the broadband
router, this requires about 30 seconds and the broadband router will stop
responding (this is normal and is not malfunction). You can reconnect to
this broadband router and continue on other settings later.
2-4-6 Using 'Telstra Big Pond' as broadband connection type
This connection type only works for Telstra big pond network service in
Australia. DO NOT select this connection type if you’re not using Telstra
big pond network service.
Here are descriptions of every setup items:
Item Name Description
User Name Please input the user name assigned by Telstra.
Password Please input the password assigned by Telstra.
User device login
server manually
Check this box to choose login server by
yourself.
Login Server Please input the IP address of login server
here.
If you wish to select another connection type as broadband connection
type, click ‘Back’; or you can click ‘OK’ to finish with quick setup.
You’ll see the following messages:
Please click ‘Apply’ to save changes you made and restart the broadband
router, this requires about 30 seconds and the broadband router will stop
responding (this is normal and is not malfunction). You can reconnect to
this broadband router and continue on other settings later.
Chapter III: General Setup
The ‘General Setup’ is for you to setup “System, WAN, LAN, Wireless,
and others ( Advance settings ) “.
Please follow the following instructions to use ‘General Setup’ menu:
1. Click ‘General Setup’ after logged in.
2. Five submenus will appear:
System - Basic system settings (please go to chapter 3-1)
WAN - Setup WAN port manually (please go to chapter 3-2)
LAN - Setup LAN port manually (please go to chapter 3-3)
Wireless - Setup wireless interface manually (please go to chapter 3-4)
Advance Settings - Setup advanced settings of this broadband router
(Please go to chapter 3-5)
3-1 System
You can setup basic system settings of this broadband router in ‘System
menu:
Please select the setting item you wish to set, then click ‘Apply’ button to
proceed. You can also click ‘Previous’ button to back to ‘System’ menu.
3-1-1 Time Zone
You can change the time zone settings of this broadband router. It’s
important to have correct date and time setting if you need to read system
log and use build-in firewall functions.
The descriptions of every setting item are listed as follow:
Item Name Description
Time Zone Please select a time zone of the country or
region of your residence here. If you can’t find
the country / region of your residence here,
please select a city / region which time zone is
the same with the country / region of your
residence.
Time Server Address This load-balance router supports NTP
(Network Time Protocol). NTP server will
provide correct time for this router to setup the
date and time of the router automatically.
Please input the host name or IP address of
NTP server here. If you don’t know the host
name or IP address of time server, please ask
network administrator or use ‘pool.ntp.org’ as
time server.
Daylight Savings If the country / region of your residence use
daylight saving time, please check ‘Enable
Function’ box, and select the beginning and
ending date of daylight time saving.
3-1-2 Password Settings
You can change the web login password of this broadband router. If you
keep using the default password ‘1234’, other people may access the
configuration interface without your permission. Please change the
password as soon as possible.
The descriptions of every setting item are listed as follow:
Item Name Description
Current Password Please input current password here.
New Password Please input new password here.
Confirmed Password Please input new password here again for
confirmation.
After you inputted current and new password, click ‘Apply’ to save
changes, or you can click ‘Cancel’ to keep current password untouched.
3-1-3 Remote Management
If you need to manage this broadband router outside of your LAN (i.e.
from Internet), you can use this function to assign a remote IP address
which is permitted to connect to this broadband routers web management
interface from Internet.
If it’s not required for you to manage this broadband router from Internet,
you can disable this function to improve security.
The descriptions of every setting item are listed as follow:
Item Name Description
Host address
Input the IP address of the remote host you
wish to initiate a management access.
Port
You can define the port number this router
should expect an incoming connection request.
If you’re providing a web service (default port
number is 80), you should try to use other port
number. You can use the default port setting
‘8080’, or something like ‘32245’ or ‘1429’.
(Any integer between 1 and 65534)
Enabled
Check this box to enable remote management
function. When this box is unchecked, no one
can access this broadband routers
management interface from Internet.
Please click ‘Apply’ to save changes in this page, or you can click
‘Cancel’ to discard all settings in this page. After you click ‘Apply’ button,
you’ll see the following message:
Please click ‘Apply’ to save changes you made and restart the broadband
router, this requires about 30 seconds and the broadband router will stop
responding (this is normal and is not malfunction). You can reconnect to
this broadband router and continue on other settings later.
3-2 WAN
You can setup WAN (Wide Area Network, i.e. Internet) connections of
this broadband router in ‘WAN’ menu:
Please select the WAN connection type you wish to use, then click
‘Apply’ to continue. You can also click ‘Previous’ to back to previous
page.
If you’re not sure which connection type you should use, please call your
ISP’s service hotline and ask for help. You’ll not be able to connect to
Internet with wrong connection type.
3-2-1 Dynamic IP
Dynamic IP means your ISP will assign an IP address to you
automatically by ‘DHCP’ (Dynamic Host Configuration Protocol).
Dynamic IP is often used by cable modem Internet connection.
Here are descriptions of every setup items:
Item Name Description
Host Name Please input the host name of your computer,
this is optional, and only required if your
service provider asks you to do so.
MAC address Please input MAC address of your computer
here, if your service provider only permits
computer with certain MAC address to access
internet. If you’re using the computer which
used to connect to Internet via cable modem,
you can simply press ‘Clone Mac address’
button to fill the MAC address field with the
MAC address of your computer.
TTL Time-to-live (TTL) is a value in an Internet
Protocol packet that tells a network router
whether or not the packet has been in the
network too long and should be discarded.
If you wish to select another connection type as broadband connection
type, click ‘Back’; or you can click ‘OK’ to finish with quick setup.
You’ll see the following messages:
Please click ‘Apply’ to save changes you made and restart the broadband
router, this requires about 30 seconds and the broadband router will stop
responding (this is normal and is not malfunction). You can reconnect to
this broadband router and continue on other settings later.
3-2-2 Static IP
Some ISP will give you a fixed IP address, and ask you to use this IP
address to establish Internet connection. In this case, you have to select
this connection type to establish connection with your ISP.
Please note that if your ISP is assigning a fixed IP address to you by
DHCP or PPPoE, do not select this connection type. Please contact your
ISP’s service hotline to make sure you really need to use static IP as
connection type.
Here are descriptions of every setup items:
Item Name Description
IP address assigned by
your by your service
provider
Please input IP address assigned by your
service provider.
Subnet Mask Please input subnet mask assigned by your
service provider.
DNS address Please input the IP address of DNS server
provided by your service provider.
Service Provider
Gateway Address
Please input the IP address of DNS server
provided by your service provider.
TTL Time-to-live (TTL) is a value in an Internet
Protocol packet that tells a network router
whether or not the packet has been in the
network too long and should be discarded.
If you wish to select another connection type as broadband connection
type, click ‘Back’; or you can click ‘OK’ to finish with quick setup.
You’ll see the following messages:
Please click ‘Apply’ to save changes you made and restart the broadband
router, this requires about 30 seconds and the broadband router will stop
responding (this is normal and is not malfunction). You can reconnect to
this broadband router and continue on other settings later.
You must use the addresses provided by your Internet service
provider, wrong setting value will cause connection problem.
3-2-3 PPPoE
If your ISP requires you to establish Internet connection by PPPoE
(Point-to-Point Protocol over Ethernet), you can use this connection type
to establish Internet connection.
Here are descriptions of every setup items:
Item Name Description
User Name Please input user name assigned by your
Internet service provider here.
Password Please input the password assigned by your
Internet service provider here.
Service Name Please give a name to this Internet service, this
is optional.
MTU Please input the MTU value of your network
connection here. If you don’t know, you can use
default value.
Connection Type Please select the connection type of Internet
connection you wish to use. There are 3
options:
‘Continuous’ - keep internet connection alive,
do not disconnect.
’Connect on Demand’ - only connects to
Internet when there’s a connect attempt,
Manual - only connects to Internet when
‘Connect’ button on this page is pressed, and
disconnects when ‘Disconnect button is
pressed.
Idle Time Out Please specify the time to shutdown internet
connect after no internet activity is detected in
minute(s). This option is only available when
connection type is ‘Connect on Demand’.
TTL Time-to-live (TTL) is a value in an Internet
Protocol packet that tells a network router
whether or not the packet has been in the
network too long and should be discarded.
If you wish to select another connection type as broadband connection
type, click ‘Back’; or you can click ‘OK’ to finish with quick setup.
You’ll see the following messages:
Please click ‘Apply’ to save changes you made and restart the broadband
router, this requires about 30 seconds and the broadband router will stop
responding (this is normal and is not malfunction). You can reconnect to
this broadband router and continue on other settings later.
3-2-4 PPTP
If your ISP requires you to use PPTP (Point-to-Point Tunneling Protocol)
to establish connection, you can select this connection type to establish
Internet connection.
PPTP requires two kinds of setting: WAN interface setting (setup IP
address) and PPTP setting (PPTP user name and password). Here we start
from WAN interface setting first:
Select the type of how you obtain IP address from your service provider
here. You can choose ‘Obtain an IP address automatically’ (equal to
DHCP, please refer to ‘Cable Modem’ section above), or ‘Use the
following IP address’ (i.e. static IP address).
WAN interface settings must be correctly set, or the Internet connection
will fail even those settings of PPTP settings are correct. Please contact
your Internet service provider if you don’t know what you should fill in
these fields.
Now please go to PPTP settings section:
Here are descriptions of every setup items:
Item Name Description
User ID Please input user ID (user name) assigned by
your Internet service provider here.
Password Please input the password assigned by your
Internet service provider here.
PPTP Gateway Please input the IP address of PPTP gateway
assigned by your Internet service provider
here.
Connection ID Please input the connection ID here, this is
optional and you can leave it blank.
MTU Please input the MTU value of your network
connection here. If you don’t know, you can use
default value.
BEZEQ-ISRAEL Check ‘Enable’ box if you’re using BEZEQ
network service in Israel. Do not check this
box if you’re using other Internet service
provider.
Connection Type Please select the connection type of Internet
connection you wish to use. There are 3
options:
‘Continuous’ - keep internet connection alive,
do not disconnect.
’Connect on Demand’ - only connects to
Internet when there’s a connect attempt,
Manual - only connects to Internet when
‘Connect’ button on this page is pressed, and
disconnects when ‘Disconnect button is
pressed.
Idle Time Out Please specify the time to shutdown internet
connect after no internet activity is detected in
minute(s). This option is only available when
connection type is ‘Connect on Demand’.
If you wish to select another connection type as broadband connection
type, click ‘Back’; or you can click ‘OK’ to finish with quick setup.
You’ll see the following messages:
Please click ‘Apply’ to save changes you made and restart the broadband
router, this requires about 30 seconds and the broadband router will stop
responding (this is normal and is not malfunction). You can reconnect to
this broadband router and continue on other settings later.
3-2-5 L2TP
If your ISP requires you to use L2TP (Layer-2 Tunneling Protocol) to
establish connection, you can select this connection type to establish
Internet connection. L2TP is another popular connection method for
xDSL and other Internet connection types, and all required setting items
are the same with PPTP connection.
Like PPTP, there are two kinds of required setting, we’ll start from ‘WAN
Interface Settings’:
Please select the type of how you obtain IP address from your service
provider here. You can choose ‘Obtain an IP address automatically’ (equal
to DHCP, please refer to ‘Cable Modem’ section above), or ‘Use the
following IP address’ (equal to static IP address, please refer to ‘PPPoE
xDSL section above).
WAN interface settings must be correctly set, or the Internet connection
will fail even those settings of L2TP settings are correct. Please contact
your Internet service provider if you don’t know what you should fill in
these fields.
Now please go to L2TP settings section:
Here are descriptions of every setup items:
Item Name Description
User ID Please input user ID (user name) assigned by
your Internet service provider here.
Password Please input the password assigned by your
Internet service provider here.
L2TP Gateway Please input the IP address of L2TP gateway
assigned by your Internet service provider
here.
MTU Please input the MTU value of your network
connection here. If you don’t know, you can use
default value.
Connection Type Please select the connection type of Internet
connection you wish to use. There are 3
options:
‘Continuous’ - keep internet connection alive,
do not disconnect.
’Connect on Demand’ - only connects to
Internet when there’s a connect attempt,
Manual - only connects to Internet when
‘Connect’ button on this page is pressed, and
disconnects when ‘Disconnect button is
pressed.
Idle Time Out Please specify the time to shutdown internet
connect after no internet activity is detected in
minute(s). This option is only available when
connection type is ‘Connect on Demand’.
If you wish to select another connection type as broadband connection
type, click ‘Back’; or you can click ‘OK’ to finish with quick setup.
You’ll see the following messages:
Please click ‘Apply’ to save changes you made and restart the broadband
router, this requires about 30 seconds and the broadband router will stop
responding (this is normal and is not malfunction). You can reconnect to
this broadband router and continue on other settings later.
3-2-6 Telstra Big Pond
This connection type only works for Telstra big pond network service in
Australia. DO NOT select this connection type if you’re not using Telstra
big pond network service.
Here are descriptions of every setup items:
Item Name Description
User Name Please input the user name assigned by Telstra.
Password Please input the password assigned by Telstra.
User device login
server manually
Check this box to choose login server by
yourself.
Login Server Please input the IP address of login server
here.
If you wish to select another connection type as broadband connection
type, click ‘Back’; or you can click ‘OK’ to finish with quick setup.
You’ll see the following messages:
Please click ‘Apply’ to save changes you made and restart the broadband
router, this requires about 30 seconds and the broadband router will stop
responding (this is normal and is not malfunction). You can reconnect to
this broadband router and continue on other settings later.
3-3 LAN (Wired)
You can setup Wired LAN (Local Area Network) connections of this
broadband router in ‘LAN’ menu. This broadband router has 4 LAN ports
and they’ll all use the same LAN IP address settings. Please also note that
both wired and wireless LAN uses the same LAN IP address settings, too.
LAN settings split into 3 sections: LAN IP, DHCP Server, and Static
DHCP leases. Please refer to corresponding sections below for detailed
setup instructions.
3-3-1 Before you start - Suggestions for deciding an IP address to be used
with this broadband router
Before all computers using wired Ethernet connection (i.e. those
computers connect to this routers LAN port 1 to 4 by Ethernet cable) or
wireless connection can communicate with each other and access internet,
they must have a valid IP address.
There are two ways to assign IP addresses to computers: static IP address
(set the IP address for every computer manually), and dynamic IP address
(IP address of computers will be assigned by router automatically. It’s
recommended for most of computers to use dynamic IP address, it will
save a lot of time on setting IP addresses for every computer, especially
when there are a lot of computers in your network; for servers and
network devices which will provide services to other computer and users
that come from Internet, static IP address should be used, so other
computes can locate the server.
This broadband router has a built-in DHCP (Dynamic Host Configuration
Protocol) server, and can help you to assign IP addresses to your client
computers. Almost all network computers / devices manufactured after
year 1995 are compatible with DHCP, and you can let this broadband
router to assign the IP address to client computers / devices for you.
Suggestions on IP address numbering plan:
If you have no idea on how to define an IP address plan for your
network, here are some suggestions.
1. A valid IP address has 4 fields: a.b.c.d, for most of home and
company users, it’s suggested to use 192.168.c.d, where c is
an integer between 0 and 254, and d is an integer between 1
and 254. This router is capable to work with up to 253 clients,
so you can set ‘d’ field of IP address of router as 1 or 254 (or
any number between 1 and 254), and pick a number between 0
and 254 for field ‘c’.
2. In most cases, you should use ‘255.255.255.0’ as subnet mask,
which allows up to 253 clients (this also meets router’s
capability of working with up to 253 clients).
3. For all servers and network devices which will provide
services to other people (like Internet service, print service,
and file service), they should use static IP address. Give each
of them a unique number between 1 and 253, and maintain a
list, so everyone can locate those servers easily.
4. For computers which are not dedicated to provide specific
service to others, they should use dynamic IP address.
If you don’t really understand the descriptions listed above, don’t
worry! We will provide recommended setup values below.
3-3-2 LAN IP
You can use this setting to assign an IP address to the LAN interface of
this broadband router.
Here are descriptions of every setup items:
Item Name Description
IP address Please input the IP address of this broadband
routers LAN interface.
Subnet Mask Please input subnet mask for this network.
802.1d Spanning Tree If you wish to activate 802.1d spanning tree
function, select ‘Enabled’ for setup item
‘802.1d Spanning Tree’, or set it to ‘Disabled’.
DHCP Server If you want to activate DHCP server function
of this router, select ‘Enabled’, or set it to
‘Disabled’.
Lease Time Please select the lease time for every DHCP
leases here. You can select the time period from
the dropdown list, and the DHCP client will be
forced to obtain a new IP address from this
broadband router after this period of time.
You can select ‘Forever if you’re using this
broadband router with only few computers
(less than 30 computers)
Recommended Value if you don’t know what to fill:
IP Address: 192.168.1.254
Subnet Mask: 255.255.255.0
802.1d Spanning Tree: Disabled
DHCP Server: Enabled
3-3-3 DHCP Server
You can use this setting to decide the range of IP address leases.
Here are descriptions of every setup items:
Item Name Description
Start IP Please input the start IP address of the IP
leases range.
End IP Please input the end IP address of the IP leases
range.
Domain Name If you wish, you can also input the domain
name for your network. This is optional.
Recommended Value if you don’t know what to fill:
Lease Time: Two Weeks (or ‘Forever’, if you have less than 20 computers)
Start IP: 192.168.1.1
End IP: 192.168.1.200
Domain Name: (leave it blank)
NOTE:
1. The number of the last field (mentioned ‘d’ field) of ‘End IP’ must be
greater than ‘Start IP’, and can not the same with router’s IP address.
2. The former three fields of IP address of ‘Start IP’, ‘End IP’, and ‘IP
Address of ‘LAN IP’ section (mentioned ‘a’, ‘b’, and ‘c’ field) should be
the same.
3. These settings will affect wireless clients, too.
3-3-4 Static DHCP Leases
If you wish to assign a fixed IP address to certain computers / devices by
DHCP, you can use this function to establish a MAC-to-IP address table
here, so you can assign a specific IP address to a specific computer /
network device by its MAC address.
Here are descriptions of every setup items:
Item Name Description
Enable Static
DHCP Leases
Check this box to enable this function,
otherwise uncheck it to disable this function.
MAC Address Input the MAC address of the computer or
network device (total 12 characters, with
character from 0 to 9, and from a to f, like
‘001122aabbcc’).
IP address Input the IP address you want to assign to
this computer or network device.
Add After you inputted MAC address and IP
address pair, click this button to add the pair
to static DHCP leases table.
Clear Click this button to remove texts in MAC
address and IP address field.
All MAC-to-IP address entries will be listed in this page, and this
broadband router supports up 16 static DHCP leases:
To delete one or more entries listed here, please check the box of the
mapping entry (under ‘Select’), and click ‘Delete Selected’ button.
If you wish to delete all mapping entries, click ‘Delete All’ button. To
deselect all checked boxes, click ‘Reset’ button.
When you finished with the settings in this page, you can click ‘Apply’
button to save changes you made in this page, or you can click ‘Cancel’
to discard changes. After you click ‘Apply’ button, you’ll see the
following messages:
Please click ‘Apply’ to save changes you made and restart the broadband
router, this requires about 30 seconds and the broadband router will stop
responding (this is normal and is not malfunction). You can reconnect to
this broadband router and continue on other settings later.
3-4 Wireless
You can setup Wireless LAN connection parameters of this broadband
router in ‘Wireless’ menu:
Please select one setting in this menu, then click ‘Apply’ to proceed. If
you wish to go back to previous page, click ‘Previous’.
3-4-1 Basic Settings
You can set basic settings of wireless LAN here.
Please select the working mode of this broadband router from ‘Mode’
dropdown list first:
a. AP: Standard wireless AP (access point).
b. Station-Infrastructure: This broadband router acts as both wireless
communication client and server - connects to another wireless access
point as client, and serves other wireless clients as server.
c. AP Bridge-Point to Point: Connect this router with another broadband
router, to expand the scope of network.
d. AP Bridge-Point to Multi-Point: Connect this router with up to four
other broadband routers, to expand the scope of network.
e. AP Bridge-WDS: Connect this router with up to four WDS-capable
broadband routers, to expand the scope of network.
f. Universal Repeater: This broadband router will repeat other wireless
access point’s signal to extend its wireless signal coverage, and also acts
as a wireless access point to serve other wireless clients.
3-4-1-1 AP mode
In AP mode, the following settings will appear:
Here are descriptions of every setup items:
Item Name Description
Band Please select the radio band from one of
following options:
2.4 GHz (B): 2.4GHz band, only allows
802.11b wireless network client to connect this
router (maximum transfer rate 11Mbps).
2.4 GHz (N): 2.4GHz band, only allows
802.11n wireless network client to connect this
router (maximum transfer rate 300Mbps).
2.4 GHz (B+G): 2.4GHz band, only allows
802.11b and 802.11g wireless network client to
connect this router (maximum transfer rate
11Mbps for 802.11b clients, and maximum
54Mbps for 802.11g clients).
2.4 GHz (G): 2.4GHz band, only allows
802.11g wireless network client to connect this
router (maximum transfer rate 54Mbps).
2.4 GHz (B+G+N): 2.4GHz Band, Allows
802.11b, 802.11g, and 802.11N wireless clients.
It’s recommends to select this band to maximize
compatibility.
ESSID This is the name of broadband router. You can
type any alphanumerical characters here,
maximum 32 characters. ESSID is used to
identify your own broadband router from
others when there are other broadband routers
in the same area. Default SSID is ‘default’, it’s
recommended to change default ESSID value
to the one which is meaningful to you, like
myhome, office_room1, etc.
Channel Number Please select a channel from the dropdown list
of ‘Channel Number’, available channel
numbers are 1 to 13. You can choose any
channel number you want to use, and almost
all wireless clients can locate the channel
you’re using automatically without any
problem. However, it’s still useful to remember
the channel number you use, some wireless
client supports manual channel number select,
and this would help in certain scenario when
there is some radio communication problem.
Associated Clients Click ‘Show Active Clients’ button to show
the list of all connected wireless clients. You
can click ‘Refresh’ in new window to get
latest list again, or click ‘Close’ to close the
window.
Please note that if you have pop-up blocker
installed, you may have to disable it or tell
your pop-up blocker to allow the popup
window, or you will not be able to see the
wireless client list window.
When you finished with the settings in this page, you can click ‘Apply’
button to save changes you made in this page, or you can click ‘Cancel’
to discard changes. After you click ‘Apply’ button, you’ll see the
following messages:
Please click ‘Apply’ to save changes you made and restart the broadband
router, this requires about 30 seconds and the broadband router will stop
responding (this is normal and is not malfunction). You can reconnect to
this broadband router and continue on other settings later.
You can click ‘Continue’ to continue on other settings without restart the
broadband router, however, the changes you made will not take effect
before you restart the broadband router.
TIPS: You can try to change channel number to another one if you
think the data transfer rate is too slow, or keep having problem while
transferring the file over wireless network. There could be some other
broadband routers using the same channel, which will disturb the
radio communication between wireless client and the broadband
3-4-1-2 Station-Infrastructure
In Station-Infrastructure mode, you can select a wireless access point to
become its wireless client, and also acts as wireless access point to serve
other wireless clients. If you have the access privilege of other wireless
access point nearby, and you wish to use that access point to access
Internet, you can use this connection type:
Here are descriptions of every setup items:
Item Name Description
Band Please select the radio band from one of
following options (must be the same with the
wireless access point you wish to connect):
2.4 GHz (B): 2.4GHz band, only allows
802.11b wireless network client to connect this
router (maximum transfer rate 11Mbps).
2.4 GHz (N): 2.4GHz band, only allows
802.11n wireless network client to connect this
router (maximum transfer rate 300Mbps).
2.4 GHz (B+G): 2.4GHz band, only allows
802.11b and 802.11g wireless network client to
connect this router (maximum transfer rate
11Mbps for 802.11b clients, and maximum
54Mbps for 802.11g clients).
2.4 GHz (G): 2.4GHz band, only allows
802.11g wireless network client to connect this
router (maximum transfer rate 54Mbps).
2.4 GHz (B+G+N): 2.4GHz Band, Allows
802.11b, 802.11g, and 802.11N wireless clients.
It’s recommends to select this band to maximize
compatibility.
ESSID This is the name of broadband router. You can
type any alphanumerical characters here,
maximum 32 characters. ESSID is used to
identify your own broadband router from
others when there are other broadband routers
in the same area. Default SSID is ‘default’, it’s
recommended to change default ESSID value
to the one which is meaningful to you, like
myhome, office_room1, etc.
Site Survey Click ‘Select Site Survey’ and a popup window
will appear. All reachable wireless access
points will be shown in the window. Select the
wireless access point you wish to connect from
the list, and click ‘Done’. If the wireless access
point you wish to connect is not listed, you can
click ‘Refresh’ to rescan.
If you still can’t find the wireless access point
you wish to connect, please move the
broadband router to the place nearer to the
access point you wish to connect.
WLAN MAC Some wireless access points will only allow
clients with certain MAC address to
establish connection. In this case, you can
input the MAC address that will be accepted
by the wireless access point you wish to
connect here. You can also click ‘Clone
MAC’ button to use the MAC address of your
computer (the one you used to connect to the
web management interface currently).
Auto MAC Clone If you wish to use the MAC address of wired
LAN interface of this broadband router,
select ‘Enable’, or select ‘Disable’ to not to
use the MAC address of the wired LAN
interface of this broadband router.
When you finished with the settings in this page, you can click ‘Apply’
button to save changes you made in this page, or you can click ‘Cancel’
to discard changes. After you click ‘Apply’ button, you’ll see the
following messages:
Please click ‘Apply’ to save changes you made and restart the broadband
router, this requires about 30 seconds and the broadband router will stop
responding (this is normal and is not malfunction). You can reconnect to
this broadband router and continue on other settings later.
You can click ‘Continue’ to continue on other settings without restart the
broadband router, however, the changes you made will not take effect
before you restart the broadband router.
3-4-1-3 AP Bridge-Point to Point
In this mode, you can use this broadband router as a wireless network
bridge and let all computers connected to the LAN ports of both wireless
access points to communicate with each other. This mode supports only
one wireless access point peer.
Please note that when you select this mode, this broadband router will act
as wireless bridge only, and will not accept other wireless clients.
Also, you can connect to the wireless access point with the same
functionality only. If you wish to connect to the wireless access points
made by other manufacturer, please select ‘AP Bridge-WDS’ mode if the
wireless access point you wish to connect supports WDS.
Here are descriptions of every setup items:
Item Name Description
Band Please select the radio band from one of
following options (must be the same with the
wireless access point you wish to connect):
2.4 GHz (B): 2.4GHz band, only allows
802.11b wireless network client to connect this
router (maximum transfer rate 11Mbps).
2.4 GHz (N): 2.4GHz band, only allows
802.11n wireless network client to connect this
router (maximum transfer rate 300Mbps).
2.4 GHz (B+G): 2.4GHz band, only allows
802.11b and 802.11g wireless network client to
connect this router (maximum transfer rate
11Mbps for 802.11b clients, and maximum
54Mbps for 802.11g clients).
2.4 GHz (G): 2.4GHz band, only allows
802.11g wireless network client to connect this
router (maximum transfer rate 54Mbps).
2.4 GHz (B+G+N): 2.4GHz Band, Allows
802.11b, 802.11g, and 802.11N wireless clients.
It’s recommends to select this band to maximize
compatibility.
Channel Number Select the channel number you wish to use;
both access points must use the same channel.
MAC address 1 Input the MAC address of another wireless
access point (the one you wish to connect).
Set Security Click ‘Set Security’ button to set security
functions of this wireless connection to
improve security. Please refer to chapter
3-2-1-7 for detailed instructions.
When you finished with the settings in this page, you can click ‘Apply’
button to save changes you made in this page, or you can click ‘Cancel’
to discard changes. After you click ‘Apply’ button, you’ll see the
following messages:
Please click ‘Apply’ to save changes you made and restart the broadband
router, this requires about 30 seconds and the broadband router will stop
responding (this is normal and is not malfunction). You can reconnect to
this broadband router and continue on other settings later.
You can click ‘Continue’ to continue on other settings without restart the
broadband router, however, the changes you made will not take effect
before you restart the broadband router.
3-4-1-4 AP Bridge-Point to Multi-Point
In this mode, you can use this broadband router as a wireless network
bridge and let all computers connected to the LAN ports of all wireless
access points to communicate with each other. This mode supports up to
four wireless access point peers.
Please note that when you select this mode, this broadband router will act
as wireless bridge only, and will not accept other wireless clients.
Also, you can connect to the wireless access point with the same
functionality only. If you wish to connect to the wireless access points
made by other manufacturer, please select ‘AP Bridge-WDS’ mode if the
wireless access point you wish to connect supports WDS.
Here are descriptions of every setup items:
Item Name Description
Band Please select the radio band from one of
following options (must be the same with the
wireless access point you wish to connect):
2.4 GHz (B): 2.4GHz band, only allows
802.11b wireless network client to connect this
router (maximum transfer rate 11Mbps).
2.4 GHz (N): 2.4GHz band, only allows
802.11n wireless network client to connect this
router (maximum transfer rate 300Mbps).
2.4 GHz (B+G): 2.4GHz band, only allows
802.11b and 802.11g wireless network client to
connect this router (maximum transfer rate
11Mbps for 802.11b clients, and maximum
54Mbps for 802.11g clients).
2.4 GHz (G): 2.4GHz band, only allows
802.11g wireless network client to connect this
router (maximum transfer rate 54Mbps).
2.4 GHz (B+G+N): 2.4GHz Band, Allows
802.11b, 802.11g, and 802.11N wireless clients.
It’s recommends to select this band to maximize
compatibility.
Channel Number Select the channel number you wish to use; all
access points must use the same channel.
MAC address 1 to 4 Input the MAC address of other wireless access
points (the access points you wish to connect).
Set Security Click ‘Set Security’ button to set security
functions of this wireless connection to
improve security. Please refer to chapter
3-2-1-7 for detailed instructions.
When you finished with the settings in this page, you can click ‘Apply’
button to save changes you made in this page, or you can click ‘Cancel’
to discard changes. After you click ‘Apply’ button, you’ll see the
following messages:
Please click ‘Apply’ to save changes you made and restart the broadband
router, this requires about 30 seconds and the broadband router will stop
responding (this is normal and is not malfunction). You can reconnect to
this broadband router and continue on other settings later.
You can click ‘Continue’ to continue on other settings without restart the
broadband router, however, the changes you made will not take effect
before you restart the broadband router.
3-4-1-5 AP Bridge-WDS
In this mode, this broadband router acts as both wireless communication
bridge and wireless access point. This broadband router can establish
communication with up to four WDS-compatible wireless access points,
and let all computers connected to the LAN ports of every wireless access
points communicate with each other. The broadband router is able to
serve other wireless clients and acts as a wireless access point at the same
time.
Here are descriptions of every setup items:
Item Name Description
Band Please select the radio band from one of
following options (must be the same with the
wireless access point you wish to connect):
2.4 GHz (B): 2.4GHz band, only allows
802.11b wireless network client to connect this
router (maximum transfer rate 11Mbps).
2.4 GHz (N): 2.4GHz band, only allows
802.11n wireless network client to connect this
router (maximum transfer rate 300Mbps).
2.4 GHz (B+G): 2.4GHz band, only allows
802.11b and 802.11g wireless network client to
connect this router (maximum transfer rate
11Mbps for 802.11b clients, and maximum
54Mbps for 802.11g clients).
2.4 GHz (G): 2.4GHz band, only allows
802.11g wireless network client to connect this
router (maximum transfer rate 54Mbps).
2.4 GHz (B+G+N): 2.4GHz Band, Allows
802.11b, 802.11g, and 802.11N wireless clients.
It’s recommends to select this band to maximize
compatibility.
ESSID This is the name of broadband router. You can
type any alphanumerical characters here,
maximum 32 characters. ESSID is used to
identify your own broadband router from
others when there are other broadband routers
in the same area. Default SSID is ‘default’, it’s
recommended to change default ESSID value
to the one which is meaningful to you, like
myhome, office_room1, etc.
Channel Number Select the channel number you wish to use; all
access points must use the same channel.
Associated Clients Click ‘Show Active Clients’ button to show
the list of all connected wireless clients. You
can click ‘Refresh’ in new window to get
latest list again, or click ‘Close’ to close the
window.
Please note that if you have pop-up blocker
installed, you may have to disable it or tell
your pop-up blocker to allow the popup
window, or you will not be able to see the
wireless client list window.
MAC address 1 to 4 Input the MAC address of other wireless access
points (the access points you wish to connect).
Set Security Click ‘Set Security’ button to set security
functions of this wireless connection to
improve security. Please refer to chapter
3-2-1-7 for detailed instructions.
When you finished with the settings in this page, you can click ‘Apply’
button to save changes you made in this page, or you can click ‘Cancel’
to discard changes. After you click ‘Apply’ button, you’ll see the
following messages:
Please click ‘Apply’ to save changes you made and restart the broadband
router, this requires about 30 seconds and the broadband router will stop
responding (this is normal and is not malfunction). You can reconnect to
this broadband router and continue on other settings later.
You can click ‘Continue’ to continue on other settings without restart the
broadband router, however, the changes you made will not take effect
before you restart the broadband router.
3-4-1-6 Universal Repeater
In this mode, this broadband router acts as a wireless repeater. It will
repeat the signal of the wireless access point you specified, to extend its
wireless coverage. The broadband router will still accept wireless clients
when in this mode.
Modem
BR-6574n BR-6574n
Universal Repeater
Here are descriptions of every setup items:
Item Name Description
Band Please select the radio band from one of
following options (must be the same with the
wireless access point you wish to connect):
2.4 GHz (B): 2.4GHz band, only allows
802.11b wireless network client to connect this
router (maximum transfer rate 11Mbps).
2.4 GHz (N): 2.4GHz band, only allows
802.11n wireless network client to connect this
router (maximum transfer rate 300Mbps).
2.4 GHz (B+G): 2.4GHz band, only allows
802.11b and 802.11g wireless network client to
connect this router (maximum transfer rate
11Mbps for 802.11b clients, and maximum
54Mbps for 802.11g clients).
2.4 GHz (G): 2.4GHz band, only allows
802.11g wireless network client to connect this
router (maximum transfer rate 54Mbps).
2.4 GHz (B+G+N): 2.4GHz Band, Allows
802.11b, 802.11g, and 802.11N wireless clients.
It’s recommends to select this band to maximize
compatibility.
ESSID This is the name of broadband router. You can
type any alphanumerical characters here,
maximum 32 characters. ESSID is used to
identify your own broadband router from
others when there are other broadband routers
in the same area. Default SSID is ‘default’, it’s
recommended to change default ESSID value
to the one which is meaningful to you, like
myhome, office_room1, etc.
Channel Number Select the channel number you wish to use; all
access points must use the same channel.
Associated Clients Click ‘Show Active Clients’ button to show
the list of all connected wireless clients. You
can click ‘Refresh’ in new window to get
latest list again, or click ‘Close’ to close the
window.
Please note that if you have pop-up blocker
installed, you may have to disable it or tell
your pop-up blocker to allow the popup
window, or you will not be able to see the
wireless client list window.
Root AP SSID Please input the SSID of the wireless access
point you wish to extend signal coverage.
Site Survey Click ‘Select Site Survey’ and a popup window
will appear. All reachable wireless access
points will be shown in the window. Select the
wireless access point you wish to connect from
the list, and click ‘Done’. If the wireless access
point you wish to connect is not listed, you can
click ‘Refresh’ to rescan.
If you still can’t find the wireless access point
you wish to connect, please move the
broadband router to the place nearer to the
access point you wish to connect.
When you finished with the settings in this page, you can click ‘Apply’
button to save changes you made in this page, or you can click ‘Cancel’
to discard changes. After you click ‘Apply’ button, you’ll see the
following messages:
Please click ‘Apply’ to save changes you made and restart the broadband
router, this requires about 30 seconds and the broadband router will stop
responding (this is normal and is not malfunction). You can reconnect to
this broadband router and continue on other settings later.
You can click ‘Continue’ to continue on other settings without restart the
broadband router, however, the changes you made will not take effect
before you restart the broadband router.
3-4-1-7 Set Security
In certain AP working modes, you can enable encryption to improve
security level.
When you click ‘Set Security’ button, the following window will appear:
Please select an encryption method from ‘Encryption’ dropdown menu,
and corresponding setting will appear:
Disabled
Encryption is disabled. It’s not recommended to disable encryption
because other people may use certain wireless scanner to copy the data
transferred over air.
WEP
Select WEP to enable WEP (Wired Equivalent Privacy) encryption:
Here are descriptions of every setup items:
Item Name Description
Key Length There are two types of WEP key length: 64-bit
and 128-bit. Using ‘128-bit’ is safer
than ’64-bit’, but will reduce some data
transfer performance.
Key Format There are two types of key format: ASCII and
Hex. When you select a key format, the number
of characters of key will be displayed. For
example, if you select ’64-bit’ as key length,
and ‘Hex’ as key format, you’ll see the message
at the right of ‘Key Format’ is ‘Hex (10
characters), which means the length of WEP
key is 10 characters.
Default Tx Key You can set up to four sets of WEP key, and you
can decide which key is being used by default
here. If you don’t know which one you should
use, select ‘Key 1’.
Encryption Key 1 to 4 Input WEP key characters here, the number of
characters must be the same as the number
displayed at ‘Key Format’ field. You can use
any alphanumerical characters (0-9, a-z, and
A-Z) if you select ‘ASCII’ key format, and if
you select ‘Hex’ as key format, you can use
characters 0-9, a-f, and A-F. You must enter at
least one encryption key here, and if you
entered multiple WEP keys, they should not be
same with each other.
Please click ‘Apply’ to save changes, or click ‘Reset’ to clear the texts in
all fields. If you click ‘Apply’, the following messages will appear:
You can click ‘Continue’ to back to previous page and continue setting, or
click ‘Apply’ to restart the broadband router so the changes will take
effect.
WPA pre-shared key
WPA (Wi-Fi Protected Access) is also an encryption method and is safer
than WEP. It’s recommended to use WPA instead of WEP when you need
to use encryption to protect your data security.
Here are descriptions of every setup items:
Item Name Description
WPA Unicast Cipher
Suite
Please select a type of WPA cipher suite.
Available options are: WPA (TKIP), WPA2
(AES), and WPA2 Mixed. You can select one of
them, but you have to make sure your wireless
client support the cipher you selected.
Pre-shared Key
Format
Select the type of pre-shared key, you
can select Passphrase (8 or more
alphanumerical characters, up to 63), or Hex
(64 characters of 0-9, and a-f).
Pre-shared Key Please input the WPA passphrase here.
It’s not recommended to use a word that can
be found in a dictionary due to security
reason.
Please click ‘Apply’ to save changes, or click ‘Reset’ to clear the texts in
all fields. If you click ‘Apply’, the following messages will appear:
You can click ‘Continue’ to back to previous page and continue setting, or
click ‘Apply’ to restart the broadband router so the changes will take
effect.
3-4-2 Security Settings
This wireless router supports two types of encryption: WEP (Wired
Equivalent Privacy) and WPA (Wi-Fi Protected Access):
Please select an encryption method from ‘Encryption’ dropdown menu,
and corresponding setting will appear:
Disabled
Encryption is disabled. It’s not recommended to disable encryption
because other people may use certain wireless scanner to copy the data
transferred over air.
WEP
Select WEP to enable WEP (Wired Equivalent Privacy) encryption:
Here are descriptions of every setup items:
Item Name Description
Key Length There are two types of WEP key length: 64-bit
and 128-bit. Using ‘128-bit’ is safer
than ’64-bit’, but will reduce some data
transfer performance.
Key Format There are two types of key format: ASCII and
Hex. When you select a key format, the number
of characters of key will be displayed. For
example, if you select ’64-bit’ as key length,
and ‘Hex’ as key format, you’ll see the message
at the right of ‘Key Format’ is ‘Hex (10
characters), which means the length of WEP
key is 10 characters.
Default Tx Key You can set up to four sets of WEP key, and you
can decide which key is being used by default
here. If you don’t know which one you should
use, select ‘Key 1’.
Encryption Key 1 to 4 Input WEP key characters here, the number of
characters must be the same as the number
displayed at ‘Key Format’ field. You can use
any alphanumerical characters (0-9, a-z, and
A-Z) if you select ‘ASCII’ key format, and if
you select ‘Hex’ as key format, you can use
characters 0-9, a-f, and A-F. You must enter at
least one encryption key here, and if you
entered multiple WEP keys, they should not be
same with each other.
Please click ‘Apply’ to save changes, or click ‘Reset’ to clear the texts in
all fields. If you click ‘Apply’, the following messages will appear:
You can click ‘Continue’ to back to previous page and continue setting, or
click ‘Apply’ to restart the broadband router so the changes will take
effect.
WPA pre-shared key
WPA (Wi-Fi Protected Access) is also an encryption method and is safer
than WEP. It’s recommended to use WPA instead of WEP when you need
to use encryption to protect your data security.
Here are descriptions of every setup items:
Item Name Description
WPA Unicast Cipher
Suite
Please select a type of WPA cipher suite.
Available options are: WPA (TKIP), WPA2
(AES), and WPA2 Mixed. You can select one of
them, but you have to make sure your wireless
client support the cipher you selected.
Pre-shared Key
Format
Select the type of pre-shared key, you
can select Passphrase (8 or more
alphanumerical characters, up to 63), or Hex
(64 characters of 0-9, and a-f).
Pre-shared Key Please input the WPA passphrase here.
It’s not recommended to use a word that can
be found in a dictionary due to security
reason.
Please click ‘Apply’ to save changes, or click ‘Reset’ to clear the texts in
all fields. If you click ‘Apply’, the following messages will appear:
You can click ‘Continue’ to back to previous page and continue setting, or
click ‘Apply’ to restart the broadband router so the changes will take
effect.
WPA RADIUS
If you have RADIUS authentication server on your local network, you
can authenticate the wireless clients by RADIUS servers user database.
Only authenticated clients can establish wireless connection with this
broadband router.
Here are descriptions of every setup items:
Item Name Description
WPA Unicast Cipher
Suite
Please select a type of WPA cipher suite.
Available options are: WPA (TKIP), WPA2
(AES), and WPA2 Mixed. You can select one of
them, but you have to make sure your wireless
client support the cipher you selected.
RADIUS Server IP
address
Input the IP address of RADIUS authentication
server here.
RADIUS Server Port Input the port number of RADIUS
authentication server here. Most of RADIUS
server will use port number 1812 and you can
keep using default value.
RADIUS Server
Password
Input the password of RADIUS authentication
server here.
Please click ‘Apply’ to save changes, or click ‘Reset’ to clear the texts in
all fields. If you click ‘Apply’, the following messages will appear:
You can click ‘Continue’ to back to previous page and continue setting, or
click ‘Apply’ to restart the broadband router so the changes will take
effect.
3-4-3 MAC Address Filtering
This function will help you to prevent unauthorized users from
connecting to your wireless router; only those wireless devices who have
the MAC address you assigned here can gain access to your wireless
router. You can use this function with other security measures described
in previous section, to create a safer wireless environment. Up to 20
MAC addresses can be assigned.
To enable MAC address filtering, please check ‘Enable Wireless Access
Control’ box in this page, the descriptions of other setting items are listed
as follow:
Item Name Description
MAC address Input the MAC address you wish to add to the
MAC address to the table.
Comment You can input any text here as the comment of
this MAC address, like ‘ROOM 2A Computer
or anything. You can input up to 16
alphanumerical characters here. This is
optional and you can leave it blank, however,
it’s recommended to use this field to write a
comment for every MAC addresses as a
memory aid.
Add Click ‘Add’ button to add the MAC address and
associated comment to the MAC address
filtering table.
Clear Click ‘Clear to remove the value you inputted
in MAC address and comment field.
All MAC address entries will be listed in this page:
To delete one or more entries listed here, please check the box of the
mapping entry (under ‘Select’), and click ‘Delete Selected’ button.
If you wish to delete all mapping entries, click ‘Delete All’ button. To
deselect all checked boxes, click ‘Reset’ button.
When you finished with the settings in this page, you can click ‘Apply’
button to save changes you made in this page, or you can click ‘Cancel’
to discard changes. After you click ‘Apply’ button, you’ll see the
following messages:
Please click ‘Apply’ to save changes you made and restart the broadband
router, this requires about 30 seconds and the broadband router will stop
responding (this is normal and is not malfunction). You can reconnect to
this broadband router and continue on other settings later.
3-4-4 WPS
WPS (Wi-Fi Protected Setup) provides a convenient way to establish the
connection between this broadband router and wireless clients. Any
WPS-compatible wireless clients can establish secure connection with
this broadband router with simple push-button type configuration or
PinCode type configuration.
Here are descriptions of every setup items:
Item Name Description
Enable WPS Check this box to enable WPS function,
uncheck it to disable WPS.
WPS Status If the wireless security (encryption) function of
this wireless router is properly set, you’ll see
‘Configured’ message here. If wireless security
function has not been set, you’ll see
‘unConfigured’.
Self PIN code This is the WPS PIN code of this wireless
router. This code is useful when you need to
build wireless connection by WPS with other
WPS-enabled wireless devices.
SSID The SSID of this wireless router will be
displayed here.
Authentication Mode The wireless security authentication mode of
this wireless router will be displayed here.
Passphrase Key The WPA passphrase will be displayed as
asterisk here.
Config Mode Select the WPS configuration role of this
broadband router.
Registrar: This broadband router will act as
WPS registrar and wait for wireless clients to
send WPS configuration request.
Enrollee: This broadband router will act as
WPS enrollee and send WPS configuration
request to other WPS registrar.
Configure via Push
Button
Click ‘Start PBC’ to start Push-Button type
WPS configuration (PBC). Please push the
WPS push-button on other WPS-compatible
network devices to begin WPS configuration.
You can also push the ‘WPS / Reset’ button
located at the back of this broadband router to
start PBC without using web configuration
interface.
Configure via Client
PinCode
Please input the PinCode displayed at the
configuration software of WPS-enabled
wireless client, and click ‘Start PIN’ to
establish connection with the wireless client.
3-5 Advance Settings*
This router provides various network functionalities like QoS and NAT,
and you can configure these functions in ‘Advanced Settings’ menu.
Please select the function you wish to set, then click ‘Apply’ button. If
you wish to go back to previous page, click ‘Previous’ button.
3-5-1 QoS
Quality of service provides an efficient way for computers on the network
to share the internet bandwidth with a promised quality of internet service.
Without QoS, all computers and devices on the network will compete
with each other to get internet bandwidth, and some applications which
require guaranteed bandwidth (like video streaming and network
telephone) will be affected, therefore an unpleasing result will occur, like
the interruption of video / audio transfer.
With this function, you can limit the maximum bandwidth or give a
guaranteed bandwidth for a specific computer, to avoid said unpleasing
result from happening.
3-5-1-1 Basic QoS Settings
Here are descriptions of every setup items:
Item Name Description
Enable QoS Check this box to enable QoS function,
uncheck it to disable QoS.
Total Download
Bandwidth
You can set the limit of total download
bandwidth in kbits. To disable download
bandwidth limitation, input ‘0’ here.
Total Upload
Bandwidth
You can set the limit of total upload bandwidth
in kbits. To disable upload bandwidth
limitation, input ‘0’ here.
Add Click ‘add’ button to add a new QoS rule
(detailed instructions will be given below).
Edit If you want to modify the content of a specific
rule, please check the ‘select’ box of the rule
you want to edit, then click ‘Edit’ button. Only
one rule should be selected a time! If you
didn’t select a rule before clicking ‘Edit’
button, you’ll be prompted to add a new rule.
Delete Selected You can delete selected rules by clicking this
button. You can select one or more rules to
delete by check the ‘select’ the box of the
rule(s) you want to delete a time. If the QoS
table is empty, this button will be grayed out
and can not be clicked.
Delete All By clicking this button, you can delete all rules
currently listed in the QoS table. If the QoS
table is empty, this button will be grayed out
and can not be clicked.
Move Up Move selected item up.
Move Down Move selected item down.
Reset If you want to erase all values you just entered.
Click ‘Reset’
When you finished with the settings in this page, you can click ‘Apply’
button to save changes you made in this page, or you can click ‘Cancel’
to discard changes. After you click ‘Apply’ button, you’ll see the
following messages:
Please click ‘Apply’ to save changes you made and restart the broadband
router, this requires about 30 seconds and the broadband router will stop
responding (this is normal and is not malfunction). You can reconnect to
this broadband router and continue on other settings later.
3-5-1-2 Add a new QoS entry
After you click ‘Add’ button in QoS menu, a new setting page will
appear:
Here are descriptions of every setup items:
Item Name Description
Rule Name Please give a name to this QoS rule (up to 15
alphanumerical characters).
Bandwidth Set the bandwidth limitation of this QoS rule.
You have to select the data direction of this rule
(Upload of Download), and the speed of
bandwidth limitation in Kbps, then select the
type of QoS: ‘guarantee’ (guaranteed usable
bandwidth for this rule) or ‘max’ (set the
maximum bandwidth for the application
allowed by this rule).
Local IP Address Specify the local (source) IP address that will
be affected by this rule. Please input the
starting IP address in the left field, and input
the end IP address in the right field to define a
range of IP addresses, or just input the IP
address in the left field to define a single IP
address.
Local Port Range Please input the range of local (source) port
number that will be affected by this rule. If you
want to apply this rule on port 80 to 90, please
input ’80-90’; if you want to apply this rule on
a single port, just input the port number, like
‘80’
Remote IP Address Specify the remote (destination) IP address that
will be affected by this rule. Please input the
starting IP address in the left field, and input
the end IP address in the right field to define a
range of IP addresses, or just input the IP
address in the left field to define a single IP
address.
Remote Port Range Please input the range of remote (destination)
port number that will be affected by this rule. If
you want to apply this rule on port 80 to 90,
please input ’80-90’; if you want to apply this
rule on a single port, just input the port
number, like ‘80’.
If the remote (destination) IP
address and /or port number is universal, just
leave it blank.
Traffic Type Please select the traffic type of this rule,
available options are None, SMTP, HTTP,
POP3, and FTP. You can select a specific
traffic type for this rule, if you want to make
this rule as a IP address based rule (apply the
limitation on all traffics from / to the specified
IP address / port number), select ‘None’.
Protocol Please select the protocol type of this rule,
available options are TCP and UDP. If you
don’t know what protocol your application
uses, please try ‘TCP’ first, and switch to
‘UDP’ if this rule doesn’t seems to work.
Please click ‘save’ button to save settings, and the rule you just set will
appear in current QoS table; if you did anything wrong, you’ll get an
error message when you click ‘Save’ button, please correct your input by
the instructions given by the error message. If you want to erase all values
you just entered, click ‘Reset’.
3-5-2 NAT
Network address translations solve the problem if sharing a single IP
address to multiple computers. Without NAT, all computers must be
assigned with a valid Internet IP address to get connected to Internet, but
Internet service providers only provide very few IP addresses to every
user. Therefore it’s necessary to use NAT technology to share a single
Internet IP address to multiple computers on local network, so everyone
can get connected to Internet.
This broadband router supports four types of NAT functions, and the
instructions of these functions will be given below.
3-5-2-1 Virtual Server
This function allows you to redirect a port on Internet IP address (on
WAN port) to a specified port of an IP address on local network, so you
can setup an Internet service on the computer on local network, without
exposing it on Internet directly. You can also build many sets of port
redirection, to provide many different Internet services on different local
computers via a single Internet IP address.
Here are descriptions of every setup items:
Item Name Description
Enable Virtual Server Check this box to enable virtual server, and
uncheck this box to disable virtual server.
Private IP Input the IP address of the computer which
provides Internet service.
Computer name All computer names found by this broadband
router on local network will be listed here. You
can select the computer name and click ‘<<’
button to add selected computers IP address to
‘Private IP’ field.
Please note that this list may not be able to list
all computers on your local network.
Private Port Input the port number of the IP address which
provides Internet service.
Type Select the type of connection, TCP or UDP. If
you’re not sure, please select ‘Both’
Public Port Please select the port number of Internet IP
address which will be redirected to the port
number of local IP address defined above.
Comment Please input any text to describe this mapping,
up to 16 alphanumerical characters.
Add Add the mapping to virtual server table.
Reset Remove all inputted values.
All existing virtual server mappings will be displayed in this page. To
delete one or more mappings, check the box of the mapping, then click
‘Delete Selected’ button to remove the mapping. To delete all existing
mappings, click ‘Delete All’ button. If you want to uncheck all boxes,
click ‘Reset’.
When you finished with the settings in this page, you can click ‘Apply’
button to save changes you made in this page, or you can click ‘Cancel’
to discard changes. After you click ‘Apply’ button, you’ll see the
following messages:
Please click ‘Apply’ to save changes you made and restart the broadband
router, this requires about 30 seconds and the broadband router will stop
responding (this is normal and is not malfunction). You can reconnect to
this broadband router and continue on other settings later.
3-5-2-2 Special Applications
Some applications require more than one connection a time; these
applications won’t work with simple NAT rules. In order to make these
applications work, you can use this function to let these applications
work.
Here are descriptions of every setup items:
Item Name Description
Enable Check this box to enable support for special
applications, and uncheck this box to disable
this support.
IP Address Input the IP address of the computer which is
going to use the special application.
Computer name All computer names found by this broadband
router on local network will be listed here. You
can select the computer name and click ‘<<’
button to add selected computers IP address to
‘IP Address’ field.
Please note that this list may not be able to list
all computers on your local network.
TCP Port to Open Input the TCP port number required by the
special application, the port number can be a
single value, or a range (like 20-50). If you
need to input more than one port number and
they’re not contiguous, list all port numbers
here and separate them by comma ( , ). If the
application does not use TCP port, leave it
blank.
UDP Port to Open) Input the UDP port number required by the
special application, the port number can be a
single value, or a range (like 20-50). If you
need to input more than one port number and
they’re not contiguous, list all port numbers
here and separate them by comma ( , ). If the
application does not use UDP port, leave it
blank.
Comment You can input any text here to help you
remember the purpose of this item. This is
optional.
Select Game This router comes with a numerous port
mapping settings of network games. If the
game you wish to set is listed here, you can
select it from dropdown menu.
After a game is selected, click ‘Add’ (the one
next to ‘Select Game’ dropdown list) to add the
connection parameters to all respective fields.
Add Click this button to add a new port mapping
rule to special applications table.
Reset Click this button to remove all values in every
field.
All existing special application mappings will be displayed in this page.
To delete one or more mappings, check the box of the mapping, then
click ‘Delete Selected’ button to remove the mapping. To delete all
existing mappings, click ‘Delete All’ button. If you want to uncheck all
boxes, click ‘Reset’.
When you finished with the settings in this page, you can click ‘Apply’
button to save changes you made in this page, or you can click ‘Cancel’
to discard changes. After you click ‘Apply’ button, you’ll see the
following messages:
Please click ‘Apply’ to save changes you made and restart the broadband
router, this requires about 30 seconds and the broadband router will stop
responding (this is normal and is not malfunction). You can reconnect to
this broadband router and continue on other settings later.
3-5-2-3 Firewall
This broadband router supports several firewall functions which will help
you to protect your network and computer. In this chapter, instructions for
using these functions will be given, so you can utilize these functions to
protect your network from hackers and malicious intruders.
3-5-2-3-1 Access Control
By using access control, you can restrict your computers from accessing
improper website, or using disallowed applications. You can even only
allow computers with certain MAC address to access the network, or
deny the computers in the list from accessing your network.
Here are descriptions of every setup items:
Item Name Description
Enable MAC Filtering Check this box to enable MAC address based
filtering, and please select ‘Deny’ or ‘Allow’ to
decide the behavior of MAC filtering table. If
you select deny, all MAC addresses listed in
filtering table will be denied from connecting
to the network; if you select allow, only MAC
addresses listed in filtering table will be able to
connect to the network, and rejecting all other
network devices.
Client PC MAC
address
Please input the MAC address of computer or
network device here, dash ( - ) or colon ( : ) are
not required. (i.e. If the MAC address label of
your wireless device indicates
‘aa-bb-cc-dd-ee-ff or ‘aa:bb:cc:dd:ee:ff’, just
input ‘aabbccddeeff
Computer Name All computer names found by this broadband
router on local network will be listed here. You
can select the computer name and click ‘<<’
button to add selected computers IP address to
‘Private IP’ field.
Please note that this list may not be able to list
all computers on your local network.
Comment You can input any text here as the comment of
this MAC address, like ‘ROOM 2A Computer
or anything. You can input up to 16
alphanumerical characters here. This is
optional and you can leave it blank, however,
it’s recommended to use this field to write a
comment for every MAC addresses as a
memory aid.
Add Click ‘Add’ button to add the MAC address and
associated comment to the MAC address
filtering table.
Reset Remove all inputted values.
All MAC address entries will be listed in this page:
To delete one or more entries listed here, please check the box of the
mapping entry (under ‘Select’), and click ‘Delete Selected’ button.
If you wish to delete all mapping entries, click ‘Delete All’ button. To
deselect all checked boxes, click ‘Reset’ button.
If you wish to use IP address-based filtering, please use ‘IP Filtering
Table’ in this page:
Please check ‘Enable IP Filtering Table’ box first, and select ‘Deny’ or
‘Allow’ to decide the behavior of IP filtering table (Deny the access of IP
addresses in the list, or allow the access of IP addressees in the list). You
have to click ‘Add PC’ button to add a new IP address to the list:
Here are descriptions of every setup items:
Item Name Description
Client PC Description Please input any text to describe this IP
address, up to 16 alphanumerical characters.
Client PC IP address Please input the starting IP address in the left
field, and input the end IP address in the right
field to define a range of IP addresses, or just
input the IP address in the left field to define a
single IP address.
You also have to select the type of Internet services that will be applied to
this access control rule from the list:
You can select multiple services here. If you wish to deny or allow all
services of certain IP address(es), please select both ‘TCP’ and ‘UDP’.
If the service you wish to deny or allow is not listed, you can use ‘User
Define Service’ table to add a new service of your own:
Here are descriptions of every setup items:
Item Name Description
Protocol Please select the protocol type of this service:
TCP or UDP, or ‘Both’.
Port Range Please input the port range if this service. For
a single port number, just input the number of
service port (like ‘110’).
If this service consists multiple continuous
ports, you can input ‘110-120’ for port number
110 to 120, or ’110,115,120’ for port number
110, 115, and 120.
Click ‘Add’ to add this IP address restriction rule to the list (and back to
previous page), or click ‘Reset’ to clear all texts in every field.
When you finished with the settings in this page, you can click ‘Apply’
button to save changes you made in this page, or you can click ‘Cancel’
to discard changes. After you click ‘Apply’ button, you’ll see the
following messages:
Please click ‘Apply’ to save changes you made and restart the broadband
router, this requires about 30 seconds and the broadband router will stop
responding (this is normal and is not malfunction). You can reconnect to
this broadband router and continue on other settings later.
3-5-2-3-2 URL Blocking
If you want to prevent computers in local network from accessing certain
website (like pornography, violence, or anything you want to block), you
can use this function to stop computers in local network from accessing
the site you defined here.
This function is useful for parents and company managers.
Please follow the following instructions to set URL blocking parameters:
Please click ‘Firewall’ menu on the left of web management interface,
then click ‘URL Blocking’, and the following message will be displayed
on your web browser:
Here are descriptions of every setup items:
Item Name Description
Enable URL Blocking Check this box to enforce URL Blocking,
uncheck it to disable URL Blocking.
URL/Keyword Input the URL (host name or IP address of
website, like http://www.blocked-site.com or
http://11.22.33.44
), or the keyword which is
contained in URL (like pornography, cartoon,
stock, or anything).
Add Click ‘Add’ button to add the URL / keyword to
the URL / Keyword filtering table.
Reset Click ‘Reset’ to remove the value you inputted
in URL/Keyword field.
All existing URLs will be displayed in ‘Current URL Blocking Table’:
If you want to delete a specific URL/Keyword entry, check the ‘select’
box of the MAC address you want to delete, then click ‘Delete Selected’
button. (You can select more than one MAC addresses). If you want to
delete all URL/Keyword listed here, please click ‘Delete All’ button, or
you can also click ‘Reset’ button to unselect all URL/Keywords.
When you finished with the settings in this page, you can click ‘Apply’
button to save changes you made in this page, or you can click ‘Cancel’
to discard changes. After you click ‘Apply’ button, you’ll see the
following messages:
Please click ‘Apply’ to save changes you made and restart the broadband
router, this requires about 30 seconds and the broadband router will stop
responding (this is normal and is not malfunction). You can reconnect to
this broadband router and continue on other settings later.
3-5-2-3-3 DoS
Denial of Service (DoS) is a common attack measure, by transmitting a
great amount of data or request to your Internet IP address and server, the
Internet connection will become very slow, and server may stop
responding because it is not capable to handle too much traffics.
This router has a built-in DoS attack prevention mechanism; when you
activate it, the router will stop the DoS attack for you:
Here lists four kinds of DoS attacks, please select the type of DoS attack
you wish this broadband router to protect, and you can select multiple
types of attacks.
The descriptions of every DoS attack is listed below:
Item Name Description
Ping of Death Ping of Death is a special packet, and it will
cause certain computer to stop responding.
Check this box and the router will filter this
kind of packet out.
Discard Ping From
WAN
Ping is a common and useful tool to know
the connection status of a specified remote
network device, but some malicious intruder
will try to fill your network bandwidth with a
lot of PING request data packet, to make your
internet connection become very slow, even
unusable. Check this box and the router will
ignore all inbound PING request, but when you
activate this function, you will not be able to
ping your own router from internet, too.
Port Scan Some malicious intruder will try to use a ‘port
scanner to know how many ports of your
Internet IP address are open, and they can
collect a lot of valuable information by doing
so. Check this box and the router will block all
traffics which are trying to scan your Internet
IP address.
Sync Flood This is another kind of attack, which uses a lot
of fake connection request to consume the
memory of your server, and try to make your
server become unusable. Check this box and
the router will filter this kind of traffic out.
If you need to specify the details of every DoS attack, please click
‘Advanced Settings’ button, and the following settings will appear:
The descriptions of every DoS attack is listed below:
Item Name Description
Ping of Death Set the threshold of when this DoS prevention
mechanism will be activated. Please check the
box of Ping of Death, and input the frequency
of threshold (how many packets per second,
minute, or hour), you can also input the ‘Burst’
value, which means when this number of ‘Ping
of Death’ packet is received in very short time,
this DoS prevention mechanism will be
activated.
Discard Ping From
WAN
Check the box to activate this DoS prevention
mechanism.
Port Scan Many kind of port scan methods are listed here,
please check one or more DoS attack methods
you want to prevent.
Sync Flood Like Ping of Death, you can set the threshold
of when this DoS prevention mechanism will be
activated.
When you finished with the settings in this page, you can click ‘Apply’
button to save changes you made in this page, or you can click ‘Cancel’
to discard changes. After you click ‘Apply’ button, you’ll see the
following messages:
Please click ‘Apply’ to save changes you made and restart the broadband
router, this requires about 30 seconds and the broadband router will stop
responding (this is normal and is not malfunction). You can reconnect to
this broadband router and continue on other settings later.
3-5-2-4 DDNS
DDNS (Dynamic DNS) is a IP-to-Hostname mapping service for those
Internet users who don’t have a static (fixed) IP address. It will be a
problem when such user wants to provide services to other users on
Internet, because their IP address will vary every time when connected to
Internet, and other user will not be able to know the IP address they’re
using at a certain time.
This router supports DDNS service of following service providers:
3322 (http://www.3322.org/
)
DHS (http://www.dhs.org
)
DynDNS (http://www.dyndns.org
/)
ODS (http://ods.org
)
TZO (http://www.tzo.com
/)
GnuDIP (http://gnudip2.sourceforge.net/
)
DyNS (http://www.dyns.cx/
)
ZoneEdit (http://www.zoneedit.com)
DHIS (http://www.dhis.org/)
CyberGate (http://cybergate.planex.co.jp/ddns/)
Please go to one of DDNS service providers webpage listed above, and
get a free DDNS account by the instructions given on their webpage.
After that, you can use the DDNS page to setup DDNS parameters to use
DDNS service:
Here are descriptions of every setup items:
Item Name Description
Dynamic DNS If you want to enable DDNS function, please
select ‘Enabled’; otherwise please select
‘Disabled’
Provider Select your DDNS service provider here.
Domain Name Input the domain name you’ve obtained from
DDNS service provider.
Account / E-Mail Input account or email of DDNS registration.
Password / Key Input DDNS service password or key.
If your DDNS provider is ‘DHIS’, the settings will be different:
Here are descriptions of every setup items:
Item Name Description
HostID Please input the HostID you applied during
DHIS registration.
ISAddr Please input the ISAddr you applied during
DHIS registration.
Authentication Type Please select the DHIS user authentication type
from dropdown menu: password or QRC.
HostPass Please input the HostID you applied during
DHIS registration.
(This field will appear only when
authentication type is password).
AuthP / AuthQ Please input the AuthP/AuthQ you applied
during DHIS registration.
(This field will appear only when
authentication type is QRC).
When you finished with the settings in this page, you can click ‘Apply’
button to save changes you made in this page, or you can click ‘Cancel’
to discard changes. After you click ‘Apply’ button, you’ll see the
following messages:
Please click ‘Apply’ to save changes you made and restart the broadband
router, this requires about 30 seconds and the broadband router will stop
responding (this is normal and is not malfunction). You can reconnect to
this broadband router and continue on other settings later.
3-5-2-5 Port Forwarding
This function allows you to redirect a single port or consecutive ports of
Internet IP address to the same port of the IP address on local network.
The port number(s) of Internet IP address and private IP address (the IP
address on local network) must be the same.
If the port number of Internet IP address and private IP address is
different, please use ‘Virtual Server function.
The port forwarding setting page looks like this:
Here are descriptions of every setup items:
Item Name Description
Enable Port
Forwarding
Check this box to enable port forwarding, and
uncheck this box to disable port forwarding.
Private IP Input the IP address of the computer on local
network which provides internet service.
Computer name All computer names found by this broadband
router on local network will be listed here. You
can select the computer name and click ‘<<’
button to add selected computers IP address to
‘Private IP’ field.
Please note that this list may not be able to list
all computers on your local network.
Type Select the type of connection, TCP or UDP. If
you’re not sure, please select ‘Both’.
Port Range Input the starting port number in the left field,
and input the ending port number in the right
field. If you only want to redirect a single port
number, just fill the port number in the left
field.
Comment Please input any text to describe this mapping,
up to 16 alphanumerical characters.
Add Add the mapping to port forwarding table.
Reset Remove all inputted values.
All existing URLs will be displayed in ‘Current URL Blocking Table’:
If you want to delete a specific port forwarding entry, check the ‘select’
box of the port forwarding entry you want to delete, then click ‘Delete
Selected’ button. (You can select more than one port forwarding entries).
If you want to delete all port forwarding entries listed here, please click
‘Delete All’ button or you can also click ‘Reset’ button to unselect all port
forwarding entries.
When you finished with the settings in this page, you can click ‘Apply’
button to save changes you made in this page, or you can click ‘Cancel’
to discard changes. After you click ‘Apply’ button, you’ll see the
following messages:
Please click ‘Apply’ to save changes you made and restart the broadband
router, this requires about 30 seconds and the broadband router will stop
responding (this is normal and is not malfunction). You can reconnect to
this broadband router and continue on other settings later.
3-5-2-6 DMZ
Demilitarized Zone (DMZ) is a special area in your local network. This
area resides in local network, and all computers in this area uses private
IP address, too. But these private IP addresses are mapped to a certain
Internet IP address, so other people on Internet can fully access those
computers in DMZ.
The DMZ setting page looks like this:
Here are descriptions of every setup items:
Item Name Description
Enable DMZ Check this box to enable DMZ function,
uncheck this box to disable DMZ function.
Public IP address You can select ‘Dynamic IP’ or ‘Static IP’ here.
If you select ‘Dynamic IP’, you have to select
an Internet connection session from dropdown
menu; if you select ‘Static IP’, please input the
IP address that you want to map to a specific
private IP address.
Client PC IP address Please input the private IP address that the
Internet IP address will be mapped to.
Type Select the type of connection, TCP or UDP. If
you’re not sure, please select ‘Both’.
Port Range Input the starting port number in the left field,
and input the ending port number in the right
field. If you only want to redirect a single port
number, just fill the port number in the left
field.
Comment Please input any text to describe this mapping,
up to 16 alphanumerical characters.
Add Add the mapping to port forwarding table.
Reset Remove all inputted values.
NOTE: Please note that every public IP address can be mapped to a single
Client PC IP address only.
All existing DMZ entries will be displayed in ‘Current DMZ Table’:
If you want to delete a specific DMZ entry, check the ‘select’ box of the
DMZ entry you want to delete, then click ‘Delete Selected’ button. (You
can select more than one DMZ entries). If you want to delete all DMZ
entries listed here, please click ‘Delete All’ button or you can also click
‘Reset’ button to unselect all DMZ entries.
When you finished with the settings in this page, you can click ‘Apply’
button to save changes you made in this page, or you can click ‘Cancel’
to discard changes. After you click ‘Apply’ button, you’ll see the
following messages:
Please click ‘Apply’ to save changes you made and restart the broadband
router, this requires about 30 seconds and the broadband router will stop
responding (this is normal and is not malfunction). You can reconnect to
this broadband router and continue on other settings later.
Chapter IV EZ View
Many network devices like printer, IP camera, and multi-media adapters
support UPnP (Universal PnP) function. Those UPnP-compatible devices
can communicate with each other, and make appropriate configurations.
This broadband router is capable to scan the local network and find all
UPnP-compatible devices out, you can get a list of all UPnP devices on
network, and you can connect to the administration interface of these
devices from web interface directly. EZView also helps you to set the
name and IP address of UPnP-compatible network devices, and control its
bandwidth usage. You can also set special network functions like DMZ
and port forwarding for a specific UPnP-compatible devices.
To use EZ View, please follow the following instructions:
1. click ‘EZ View’ button from main menu:
2. A pop-up window (or new web browser tab) will appear to show that
broadband router is scanning for UPnP devices on network, please wait
for 30 seconds until ‘OK’ button appears. Click ‘OK’ button to continue.
3. All UPnP-compatible devices found on the network will be listed here,
with the category it belongs to and its name. (For network devices not
manufactured by Edimax, or earlier non-PnP Edimax products, the
category and name will not be able to displayed).
You can click ‘ button to connect to the web administration
interface of the network device, as shown below. (The following picture
is an example of connecting to an IP camera, you can input its username
and password to login).
If you want to rescan UPnP devices, click ‘Refresh’ button.
If you need to set the detailed information of UPnP devices, please click
‘Advanced’ button, and the following settings will appear:
You can click ‘?’ icon and a drop-down list will shown, then you can
select an icon for the network device you selected. For example, if the
network device you selected is a computer, you can use the person icon to
represent it.
Here are descriptions of every setup items:
Item Name Description
Add Click this button to add a network device, and
you can set detailed network information like
name and IP address for it. Click ‘Apply’
button to save changes and new setting will
take effect until next login.
DEL Click this button to delete all settings assigned
to the network device.
Device Name You can give this device a name as memory
aid. Also, if the type of UPnP device is not
identified by this broadband router, a question
mark (
) will appear to the left of device’s
name. You can click the question mark, several
icons will appear and you can pick an icon that
is able to represents this device.
Config Click ‘Config’ button to connect to the web
configuration interface of UPnP device.
Upload / Download
Please click red dot
(located at the right of ‘Upload’), and a new
pop-up window will be shown. Please check
‘Enable QoS’ box to enable QoS bandwidth
control function for this device, and select the
upload / download bandwidth you wish to
assign to this device from dropdown list.
Block You can block this device so it will not be able
to access the network at certain time period.
Click ‘Set’ button and a new window will
appear with three time-selection options:
No Block: Do not block this UPnP device.
Time Interval: This UPnP device will be
blocked during the time period you specified.
Please input ‘from’ and ‘to’ hour in two
respective fields of this item by 24 hours
format.
Always: This UPnP device will be blocked
permanently.
Click ‘Apply’ to save changes you made, or
click ‘Cancel’ to close pop-up window and
discard changes.
DMZ Select ‘DMZ’ to set this device as a DMZ
server.
Please note that you can only set one DMZ
server at the same time.
Port Forwarding You can set the port-forwarding rules for this
device. Click ‘Set’ and a new pop-up window
will shown, you can set up to 5 sets of
port-forwarding rules for this device. You can
click ‘Apply’ in port-forwarding setting window
to save changes, or click ‘Cancel’ to close
window and discard changes.
You can also click ‘View’ to view current
port-forwarding rules for this device.
You can click ‘Refresh’ button to rescan all UPnP-compatible devices on
network,
When you finished with the settings in this page, you can click ‘Apply’
button to save changes you made in this page, or you can click ‘Cancel’
to discard changes. After you click ‘Apply’ button, you’ll see the
following messages:
Please click ‘Apply’ to save changes you made and restart the broadband
router, this requires about 30 seconds and the broadband router will stop
responding (this is normal and is not malfunction). You can reconnect to
this broadband router and continue on other settings later.
Chapter V: Status
In this menu, you can check the operation status of this broadband router.
To view the status, follow the following instructions:
1. Click ‘Status’ button from main menu:
2. The basic system information will be shown:
You can check the system uptime and firmware version of this broadband
router. If you need detailed information about Internet connection or
system usage log, please choose one of them and click ‘Apply’. If you
want to go back to previous page, please click ‘Previous’.
5-1 Internet Connection
This page shows the current status of Internet connection.
5-2 Device Status
This page shows current wireless LAN and wired LAN configuration.
5-3 System Log
This page shows all logged system information. You can use scroll bar to
view the logs, or click ‘Save’ to download the log file to your computer.
You can also click ‘Clear to remove all logs, or click ‘Refresh’ to reload
logs.
5-4 Security Log
This page shows all logged security-related information. You can use
scroll bar to view the logs, or click ‘Save’ to download the log file to your
computer. You can also click ‘Clear to remove all logs, or click ‘Refresh’
to reload logs.
5-5 Active DHCP Client
This page shows all current DHCP clients. You can click ‘Refresh’ to
reload the list.
5-6 Statistics
This page shows the statistical information of network interfaces of this
broadband router, and the total system uptime.
Chapter VI : Tools
This broadband router comes with several tools that will help you to
manage the configuration of broadband router, upgrade the firmware, and
restart the broadband router.
To use these tools, follow the following instructions:
1. Click ‘Tools’ button from main menu:
2. The list of tools will appear:
Please select the tool you wish to use, then click ‘Apply’ button. If you
wish to go back to previous page, click ‘Previous’ button.
6-1 Configuration Tools
In this page, you can backup and restore current system configuration,
and reset all settings to factory default value.
Here are descriptions of every setup items:
Item Name Description
Backup Settings Click ‘Save…’ button to download the current
configuration as ‘config.bin’ file. Save this file
on your computer to keep current
configuration. If you want to keep more than
one version of configuration file, please
rename the configuration file to another name.
Restore Settings Click ‘Browse...’ button to select a
previously-saved configuration file from your
computer, then click ‘Upload’ to upload the
configuration file to broadband router, and the
configuration of broadband router will be
replaced by the content of uploaded
configuration file.
Restore to Factory
Default
Click ‘Reset’ button to restore the settings of
the broadband router to factory default value.
A pop-up message window will appear and ask
you to confirm the reset.
6-2 Firmware Upgrade
New firmware releases will provide new functions to this broadband
router, and you can use firmware upgrade function to upgrade the
firmware to new version.
Please download the firmware file from our company’s website and save
it on your computer, and use firmware upgrade function to upgrade
firmware:
Please click ‘Browse…’ button to select the firmware file saved on your
computer, then click ‘Apply’ button to start firmware upload. The
broadband router will restart after file upload is successful, and all
settings will be lost. Please use default IP address (192.168.2.1) to
connect to the broadband router and set every settings again.
NOTE: It’s recommended to use wired Ethernet connection to upload the
firmware file, please refrain from using wireless connection to upload the
firmware file. Also, please do not switch the broadband router or computer
you used to upload the firmware file off during firmware upgrade. This will
cause broadband router become malfunction and unusable.
6-3 Restart
If you found that the broadband router is not functioning correctly, or
responding slowly then usual, you can use this function to restart the
broadband router, and this may correct the problem.
Click ‘Apply’ button to restart the broadband router. You’ll be prompted
to confirm the restart, click ‘OK’ to restart the broadband router.
Chapter VII : Language
This broadband routers web-based user interface supports several
languages in the future .We will release English version at first, and add
others step by step. You can view website http://www.edimax.com
to
check new firmware. You can change the display language by click
‘Language’ button in main menu.
To change the display language, follow the following instructions:
1. Click ‘Language’ button from main menu:
N20379
8


Need help? Post your question in this forum.

Forumrules


Report abuse

Libble takes abuse of its services very seriously. We're committed to dealing with such abuse according to the laws in your country of residence. When you submit a report, we'll investigate it and take the appropriate action. We'll get back to you only if we require additional details or have more information to share.

Product:

For example, Anti-Semitic content, racist content, or material that could result in a violent physical act.

For example, a credit card number, a personal identification number, or an unlisted home address. Note that email addresses and full names are not considered private information.

Forumrules

To achieve meaningful questions, we apply the following rules:

Register

Register getting emails for Edimax BR-6424n at:


You will receive an email to register for one or both of the options.


Get your user manual by e-mail

Enter your email address to receive the manual of Edimax BR-6424n in the language / languages: English as an attachment in your email.

The manual is 2,55 mb in size.


You will receive the manual in your email within minutes. If you have not received an email, then probably have entered the wrong email address or your mailbox is too full. In addition, it may be that your ISP may have a maximum size for emails to receive.

Others manual(s) of Edimax BR-6424n

Edimax BR-6424n Quick start guide - English - 25 pages


The manual is sent by email. Check your email

If you have not received an email with the manual within fifteen minutes, it may be that you have a entered a wrong email address or that your ISP has set a maximum size to receive email that is smaller than the size of the manual.

The email address you have provided is not correct.

Please check the email address and correct it.

Your question is posted on this page

Would you like to receive an email when new answers and questions are posted? Please enter your email address.


Info