The hot air produced by the fireplace is released into The hot air produced by the fireplace is released into
the rooms to be heated by the nozzles connected to the rooms to be heated by the nozzles connected to
the holes on the cover of the hood with aluminium the holes on the cover of the hood with aluminium
pipes Ø 14 cm.It is essential to guarantee the return of pipes Ø 14 cm.It is essential to guarantee the return of
the air into the room where the fireplace is installed by the air into the room where the fireplace is installed by
means of grills at the base of the walls or gaps under means of grills at the base of the walls or gaps under
the doors.The diameter of the pipes must not be less the doors.The diameter of the pipes must not be less
than Ø 14 cm.than Ø 14 cm.
The line of the pipes must be as straight as possible. The line of the pipes must be as straight as possible.
The aluminium pipes can be hidden with coffer work or The aluminium pipes can be hidden with coffer work or
false beams or they can be built into the walls; in any false beams or they can be built into the walls; in any
case, they must be well insulated.case, they must be well insulated.
The channels must have a maximum length of 4÷5 m The channels must have a maximum length of 4÷5 m
each.each.
The said length must be decreased by 1.2 m for The said length must be decreased by 1.2 m for
every curve and for every nozzle consequent to the
consequent load loss.
The following kits are available to channel hot air.
Kit one/bis solo locale caminetto
Kit four/bis
Kit five/bis
Further details are provided in the assembly instructions
supplied with the kit itself.
Circulation with Kit Air DiffuserCirculation with Kit Air Diffuser
The Air Diffuser Kit carries hot air into the room where
the product is installed or into other rooms (depending
on the model), assisted by one or more fans.
It is adjusted with a remote control.
Edilkamin proposes two Air Diffuser Kit models:
ADJACENT Air Diffuser Kit
REMOTE Air Diffuser Kit
The difference is in the presence or 1 or 2 fans and the
relative aluminium pipes.
The kit can be combined with each of the following
Edilkamin vents:
• Split, with lighting
• Bent, with lighting
• Origami
• Sharp
The vents are not included in the Air Kit Diffuser and
you can choose the one of the four models available
and described which best suits your needs at the
retailer.
The openings on the fireplace casing are initially The openings on the fireplace casing are initially
closed and must be opened by removing the pre-cut closed and must be opened by removing the pre-cut
membranes to enable the ambient air to pass through membranes to enable the ambient air to pass through
them.them.
Further details are provided in the assembly instructions
supplied with the kit itself.
11
22
33
44
Con Kit air Diffuser suggeriamo di collegare le due
aperture frontali (1 e 2) e lasciare chiuse le altre (3 e 4)
15
ENGLISH
INSTALLATION
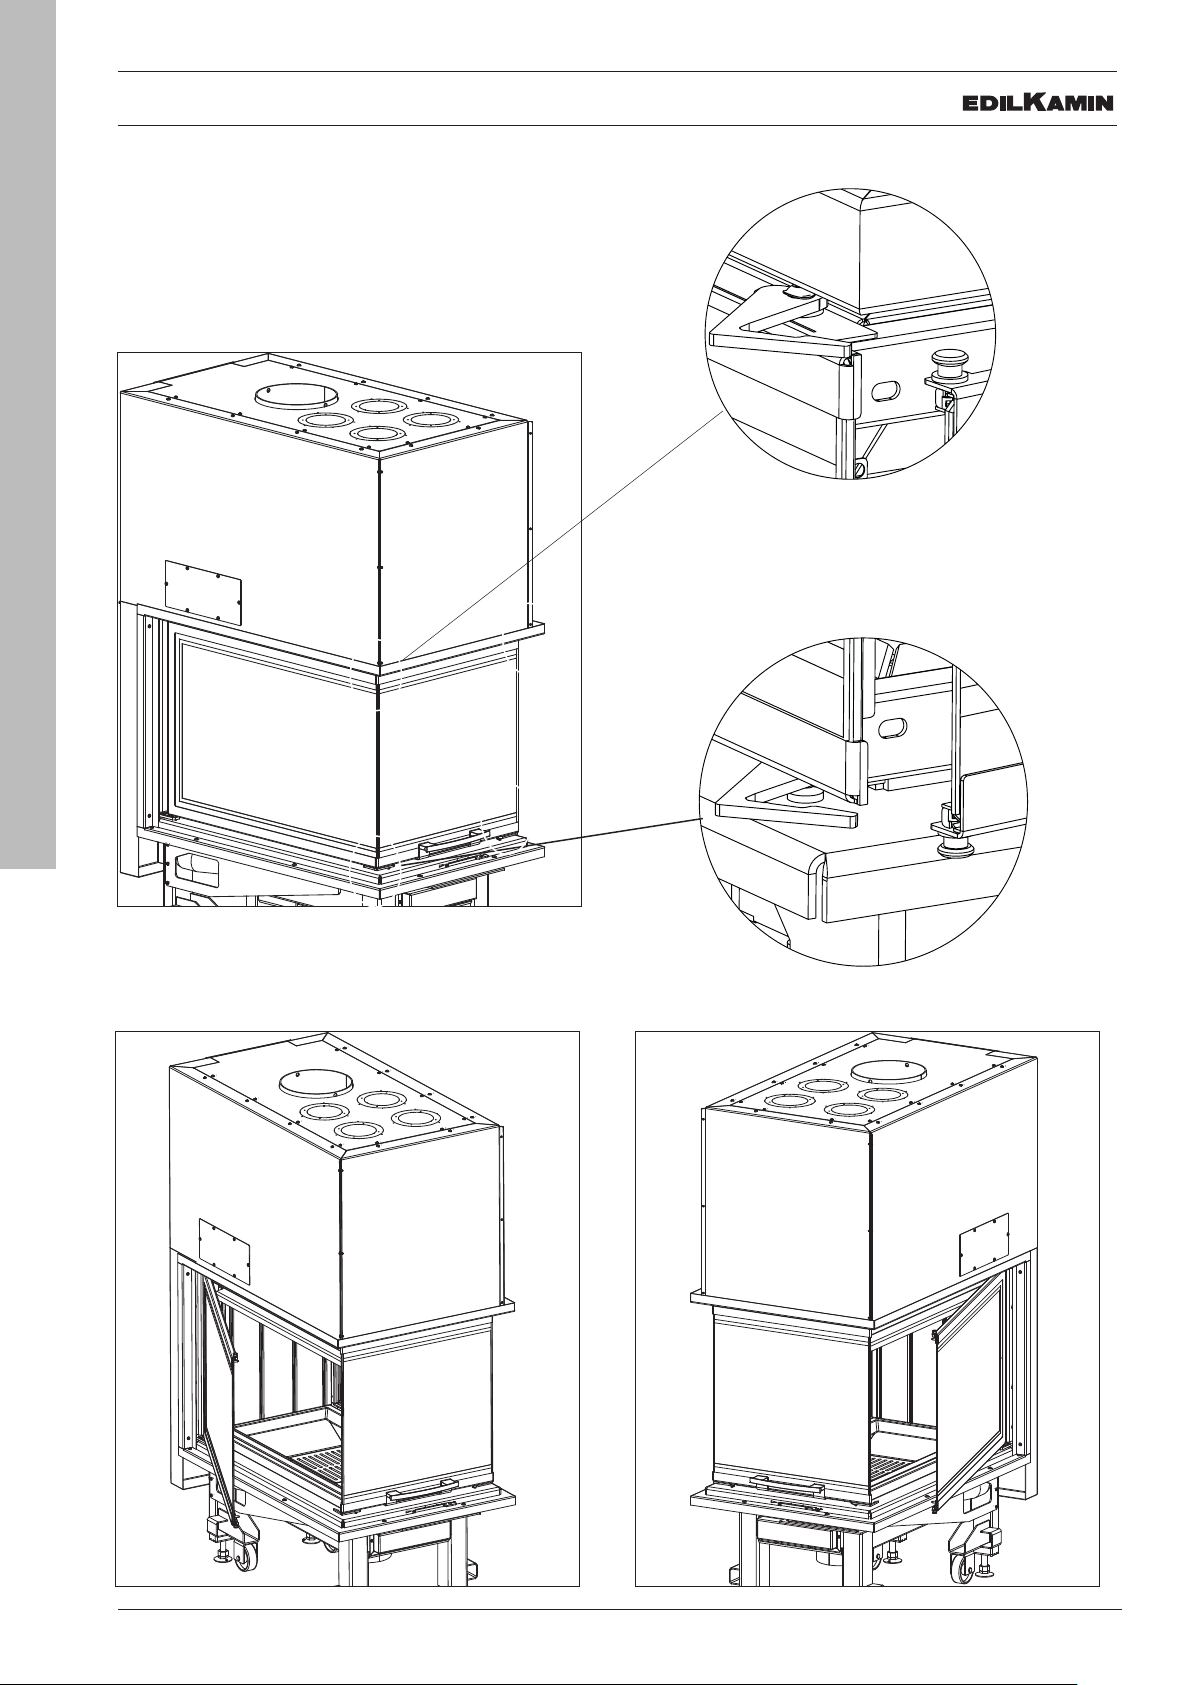
Facings, gather hood and ventsFacings, gather hood and vents
Face the product only after having completed the Face the product only after having completed the
following steps:following steps:
• • connection of the product to the smoke outlet and connection of the product to the smoke outlet and
air intake; air intake;
• • inspection of the product when hot; inspection of the product when hot;
• • check to verify whether the product is levelled.check to verify whether the product is levelled.
The installer must implement all the installation good The installer must implement all the installation good
practices and take all the necessary precautions practices and take all the necessary precautions
against overheating and fire.against overheating and fire.
In particular:In particular:
• • if a plinth is constructed beneath the hearth level, if a plinth is constructed beneath the hearth level,
it must include a suitable slot for the passage of it must include a suitable slot for the passage of
recirculation air from the room;recirculation air from the room;
• • if the Air Diffuser Kit is installed, it must be possible if the Air Diffuser Kit is installed, it must be possible
to inspect or replace the fans;to inspect or replace the fans;
• • wooden parts must be protected with fireproof wooden parts must be protected with fireproof
panels, which must not be placed against one panels, which must not be placed against one
another but spaced at least 1 cm apart to enable air another but spaced at least 1 cm apart to enable air
to flow and prevent heat build-up. The gather hood to flow and prevent heat build-up. The gather hood
can be made with fireproof panels, plasterboard can be made with fireproof panels, plasterboard
or gypsum slabs; during construction, the hot air or gypsum slabs; during construction, the hot air
ducting kit must be mounted as described above. ducting kit must be mounted as described above.
The interior of the gather hood should be aerated The interior of the gather hood should be aerated
by exploiting the flow of air coming from below (the by exploiting the flow of air coming from below (the
space between the door and mantel) which convective space between the door and mantel) which convective
currents will cause to exit from the grille on top, currents will cause to exit from the grille on top,
thus allowing heat recovery and preventing undue thus allowing heat recovery and preventing undue
overheating.overheating.
In addition to that mentioned above, take into account In addition to that mentioned above, take into account
thethe regulations in force in the relevant country
concerning “insulation, finishes, facings and safety “insulation, finishes, facings and safety
recommendations”.recommendations”.
VentsVents
These must be strictly installed on the front: one These must be strictly installed on the front: one
beneath and one above the fireplace’s opening. The beneath and one above the fireplace’s opening. The
product is not supplied with.product is not supplied with.
FRAME (OPTIONAL)FRAME (OPTIONAL)
The inlet surround is an optional accessory.
It fills in the gap remaining between the firebox’s
frame and the cladding itself.
16
ENGLISH
INSTRUCTIONS FOR USE
DOOR OPENING HINGED-TYPE OPENING DOOR OPENING HINGED-TYPE OPENING
Open the two side door wings turning the two spring Open the two side door wings turning the two spring
levers on both the wings outwards.levers on both the wings outwards.
17
ENGLISH
INSTRUCTIONS FOR USE
AIR CONTROLAIR CONTROL
Shifting the air limiter lever allows for regulating the amount of combustion air entering the combustion chamber. Shifting the air limiter lever allows for regulating the amount of combustion air entering the combustion chamber.
PositionDescriptionEffect
1Ignition / maximum
power
Primary air sent entirely to the hearth.Primary air sent entirely to the hearth.
2Intermediate positionfor normal combustion
3Intermediate positionfor normal combustion
4Ember maintenancePost-combustion air only All passages for the primary combustion air are Post-combustion air only All passages for the primary combustion air are
closed.closed.
1234
18
ENGLISH
Lighting a cold fireplaceLighting a cold fireplace
1. Check the existing ash bed is not too high. If the 1. Check the existing ash bed is not too high. If the
ash bed is too high, there is a danger of opening the ash bed is too high, there is a danger of opening the
door of the fireplace to add wood and possible brazier door of the fireplace to add wood and possible brazier
fragments fall out of the fireplace.fragments fall out of the fireplace.
2. Position the adjustment lever of the valve in the “total 2. Position the adjustment lever of the valve in the “total
opening” position . The air for combustion will flow opening” position . The air for combustion will flow
intensely to the wood in the fireplace, to quickly reach intensely to the wood in the fireplace, to quickly reach
good combustion.good combustion.
3. place the wood in the fireplace without excessively 3. place the wood in the fireplace without excessively
squashing it in. Position a firelighter between the wood squashing it in. Position a firelighter between the wood
logs and light. Never user materials such as petrol, logs and light. Never user materials such as petrol,
alcohol and similar to switch on.alcohol and similar to switch on.
4. At this point, close the door and monitor it for a few 4. At this point, close the door and monitor it for a few
minutes. If the fire should extinguish, slowly open the minutes. If the fire should extinguish, slowly open the
door, re-position another firelighter between the logs door, re-position another firelighter between the logs
and light again.and light again.
Lighting a hot fireplace Lighting a hot fireplace
When should wood be added? When the fuel is almost When should wood be added? When the fuel is almost
completely consumed to embers. With the glove, completely consumed to embers. With the glove,
slowly open (to avoid formation of vortexes that can slowly open (to avoid formation of vortexes that can
cause smoke to exit) the door. Add the desired wood to cause smoke to exit) the door. Add the desired wood to
the fireplace, locating it on the existing embers (within the fireplace, locating it on the existing embers (within
the quality limits indicated in the technical table). the quality limits indicated in the technical table).
Product functioning changes with the chimney flue Product functioning changes with the chimney flue
draft and adjustment of the air valve in combustion.draft and adjustment of the air valve in combustion.
Functioning with initial low draftFunctioning with initial low draft
To extract air for combustion and discharge the To extract air for combustion and discharge the
smoke, the fireplace needs a draft to be exerted on the smoke, the fireplace needs a draft to be exerted on the
chimney flue. chimney flue.
If the draft is weak, initially light a “starter” fire using If the draft is weak, initially light a “starter” fire using
small sized lighting material. small sized lighting material.
Once the correct draft is restored, you can add the fuel.Once the correct draft is restored, you can add the fuel.
As with all the products, the wood product heats and As with all the products, the wood product heats and
cools during the various phases. This would lead to cools during the various phases. This would lead to
normal dilation. Such dilation can cause slight settling normal dilation. Such dilation can cause slight settling
noise, which is not a reason for dispute.noise, which is not a reason for dispute.
INSTRUCTIONS FOR USE
FUEL
The product was designed to burn wooden logs or
sawdust briquettes.
Use dry wood logs (max. humidity 20%)Use logs The
use of damp wood would cause the product and the
flue to get dirty, the risk of smoke and a lower yield
than that declared.Each type of wood has different
characteristics that also influence combustion yield.
The data outlined on this manual are with wood used
during certification.
In general wood can have a heat of combustion up to
4.5 kWh/kg while cut fresh it has heat of combustion
around 2 kWh/kg
In general, beech or elm is recommended, or however
class A1 wood according to UNI EN ISO 17225-5
Attention to prolonged use of wood with aromatic oils
(e.g. eucalyptus). Cast iron parts can deteriorate
Use the recommended quantities of wood:
Overloading causes overheating, resulting in damage:
• possible deformation of the inner parts;
• possible irreversible changes to the colour of the
paint on the metal parts for which Edilkamin or the
retailer cannot be held liable.
To respect the environment and safety, do NOT burn,
among other things: plastic, varnished wood, coal and
bark waste. Do not use the product as an incinerator.
Use of these fuels also nullifies the guarantee.
First switch on phases
• Ensure you have read and understood the content
of this manual
• • Remove all the inflammable parts from the product Remove all the inflammable parts from the product
(manuals, labels, etc.). In particular remove any (manuals, labels, etc.). In particular remove any
labels from the glass. If they melt, they would labels from the glass. If they melt, they would
irreversibly damage the glass. irreversibly damage the glass.
For initial switch on of the fireplace, always use the For initial switch on of the fireplace, always use the
smallest logs. Use larger wooden logs to raise the fire. smallest logs. Use larger wooden logs to raise the fire.
Always locate the wood deep in the fireplace.Always locate the wood deep in the fireplace.
There may be a slight smell of paint the first few times it
is ignited, however, this will disappear quickly.
19
ENGLISH
MAINTENANCE
Cleaning the glassCleaning the glass
You can use specific products to clean the glass (see You can use specific products to clean the glass (see
Libble takes abuse of its services very seriously. We're committed to dealing with such abuse according to the laws in your country of residence. When you submit a report, we'll investigate it and take the appropriate action. We'll get back to you only if we require additional details or have more information to share.
Product:
Forumrules
To achieve meaningful questions, we apply the following rules:
First, read the manual;
Check if your question has been asked previously;
Try to ask your question as clearly as possible;
Did you already try to solve the problem? Please mention this;
Is your problem solved by a visitor then let him/her know in this forum;
To give a response to a question or answer, do not use this form but click on the button 'reply to this question';
Your question will be posted here and emailed to our subscribers. Therefore, avoid filling in personal details.
Register
Register getting emails for Edilkamin Windo 3 - 50 at:
new questions and answers
new manuals
You will receive an email to register for one or both of the options.
Get your user manual by e-mail
Enter your email address to receive the manual of Edilkamin Windo 3 - 50 in the language / languages: English as an attachment in your email.
The manual is 2.25 mb in size.
You will receive the manual in your email within minutes. If you have not received an email, then probably have entered the wrong email address or your mailbox is too full. In addition, it may be that your ISP may have a maximum size for emails to receive.
If you have not received an email with the manual within fifteen minutes, it may be that you have a entered a wrong email address or that your ISP has set a maximum size to receive email that is smaller than the size of the manual.
The email address you have provided is not correct.
Please check the email address and correct it.
Your question is posted on this page
Would you like to receive an email when new answers and questions are posted? Please enter your email address.