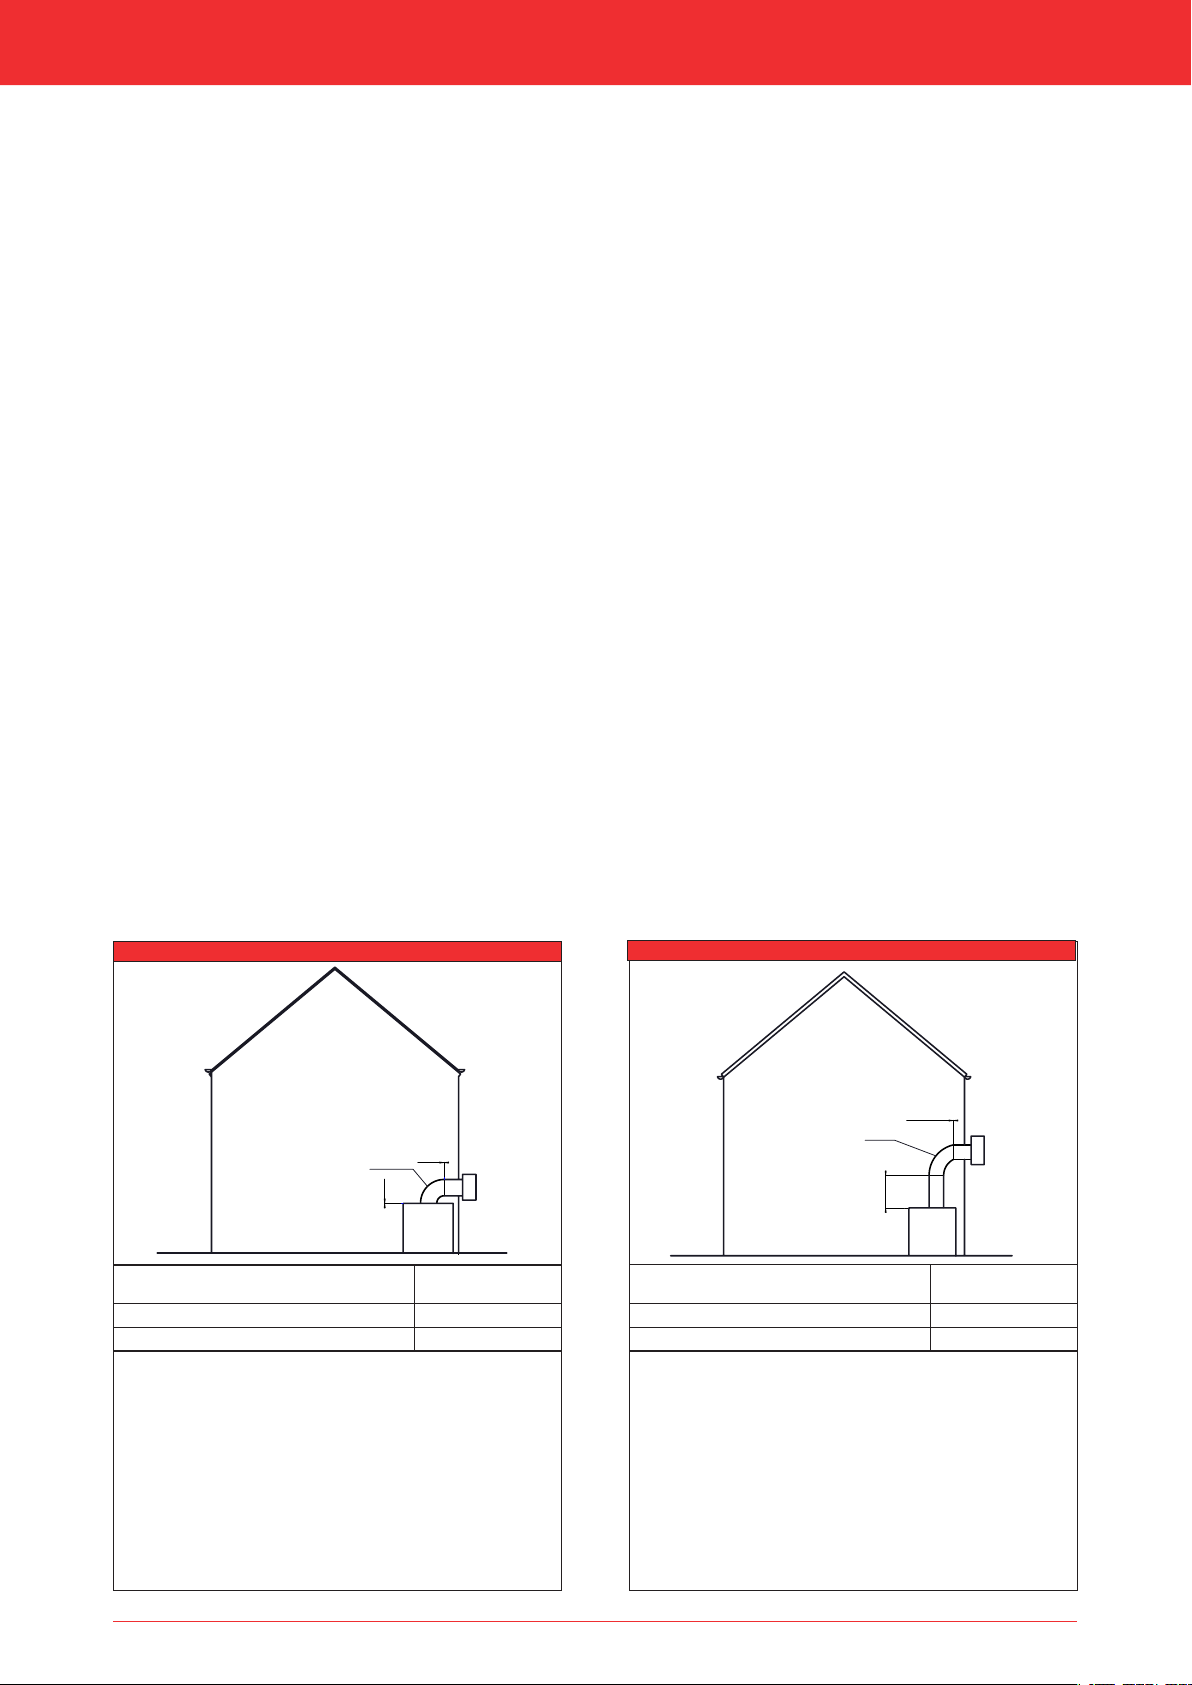
7.3.3 Windschutzeinrichtung an der Außenwand (C11)Bei Verwendung einer Windschutzeinrichtung an der Außenwand (C11) gilt:1Die Konstruktion des gewählten Systems muss zulässig sein.1Kontrollieren Sie, ob die vertikale Rohrlänge innerhalb der minimalen und maximalen Länge liegt (siehe Tabelle 7-5).1Kontrollieren Sie, ob die horizontale Rohrlänge (ohne Windschutzeinrichtung an der Außenwand) innerhalb der minimalen und maximalen Länge liegt (siehe Tabelle 7-5).3In den folgenden Tabellen ist standardmäßig 1 Bogen in das konzentrische System integriert. Es ist möglich, weitere Bögen hinzuzufügen. Pro zusätzlichem Bogen wird die maximal zulässige horizontale Länge des konzentrischen Systems verkürzt. Bei gilt Folgendes:-Ein zusätzlicher 90°-Bogen verkürzt die maximal zulässige Länge des konzentrischen Systems um 2 Meter.-Ein zusätzlicher 45°-Bogen verkürzt die maximal zulässige Länge des konzentrischen Systems um 1 Meter.3Es muss immer minimal 1 Meter vertikal an das Gerät angeschlossen werden, es sei denn, die Tabelle enthält andere Angaben.1Legen Sie die richtige Einstellung des Geräts fest (siehe Tabelle 7-5).1Stellen Sie das Gerät richtig ein, verwenden Sie dazu zum Beispiel einen Drosselschieber und eine Lufteinlassführung (siehe Absatz 8.2).Die Rosette der Windschutzeinrichtung an der Außenwand ist zu klein, um die Öffnung bei der Durchführung durch brennbares Material abzudichten. Daher muss zuerst eine hitzebeständige Zwischenplatte mit einer ausreichenden Größe auf der Wand befestigt werden. Danach wird die Rosette auf der Zwischenplatte befestigt.3Montieren Sie die Wanddurchführung bei Verwendung einer Windschutzeinrichtung an der Außenwand mit einem Gefälle von 1 cm/Meter nach außen, um zu verhindern, dass Regenwasser nach innen läuft.Installationsanleitung20
0,5 - 0,8m
0 m
38C-744ZZ
1x90°
0
0
38C-744W
1x90°
Tabelle 7-5aTabelle 7-5bEinstellungLufteinlassführungDrosselschieberVerwendenxx- Verwenden Sie ausschließlich ein konzentrisches Systemmit 200/130 mm, inklusive einer Windschutzeinrichtungan der Außenwand.- Bei dieser Konfiguration muss eine unlackierteWindschutzeinrichtung an der Außenwand aus Edelstahlverwendet werden.- Werkseinstellung: Lufteinlassführung 1 montiert, Lufteinlassführung 2 und Drosselschieber separat im Lieferumfang enthalten.-Verwenden Sie ausschließlich ein konzentrisches Systemmit 200/130 mm, inklusive einer Windschutzeinrichtungan der Außenwand.- Werkseinstellung: Lufteinlassführung 1 montiert, Lufteinlassführung 2 und Drosselschieber separat im Lieferumfang enthalten.EinstellungLufteinlassführungDrosselschieberVerwendenxx
Libble takes abuse of its services very seriously. We're committed to dealing with such abuse according to the laws in your country of residence. When you submit a report, we'll investigate it and take the appropriate action. We'll get back to you only if we require additional details or have more information to share.
Product:
Forumrules
To achieve meaningful questions, we apply the following rules:
First, read the manual;
Check if your question has been asked previously;
Try to ask your question as clearly as possible;
Did you already try to solve the problem? Please mention this;
Is your problem solved by a visitor then let him/her know in this forum;
To give a response to a question or answer, do not use this form but click on the button 'reply to this question';
Your question will be posted here and emailed to our subscribers. Therefore, avoid filling in personal details.
Register
Register getting emails for DRU Maestro 60 RCH at:
new questions and answers
new manuals
You will receive an email to register for one or both of the options.
Get your user manual by e-mail
Enter your email address to receive the manual of DRU Maestro 60 RCH in the language / languages: German as an attachment in your email.
The manual is 4.96 mb in size.
You will receive the manual in your email within minutes. If you have not received an email, then probably have entered the wrong email address or your mailbox is too full. In addition, it may be that your ISP may have a maximum size for emails to receive.
If you have not received an email with the manual within fifteen minutes, it may be that you have a entered a wrong email address or that your ISP has set a maximum size to receive email that is smaller than the size of the manual.
The email address you have provided is not correct.
Please check the email address and correct it.
Your question is posted on this page
Would you like to receive an email when new answers and questions are posted? Please enter your email address.