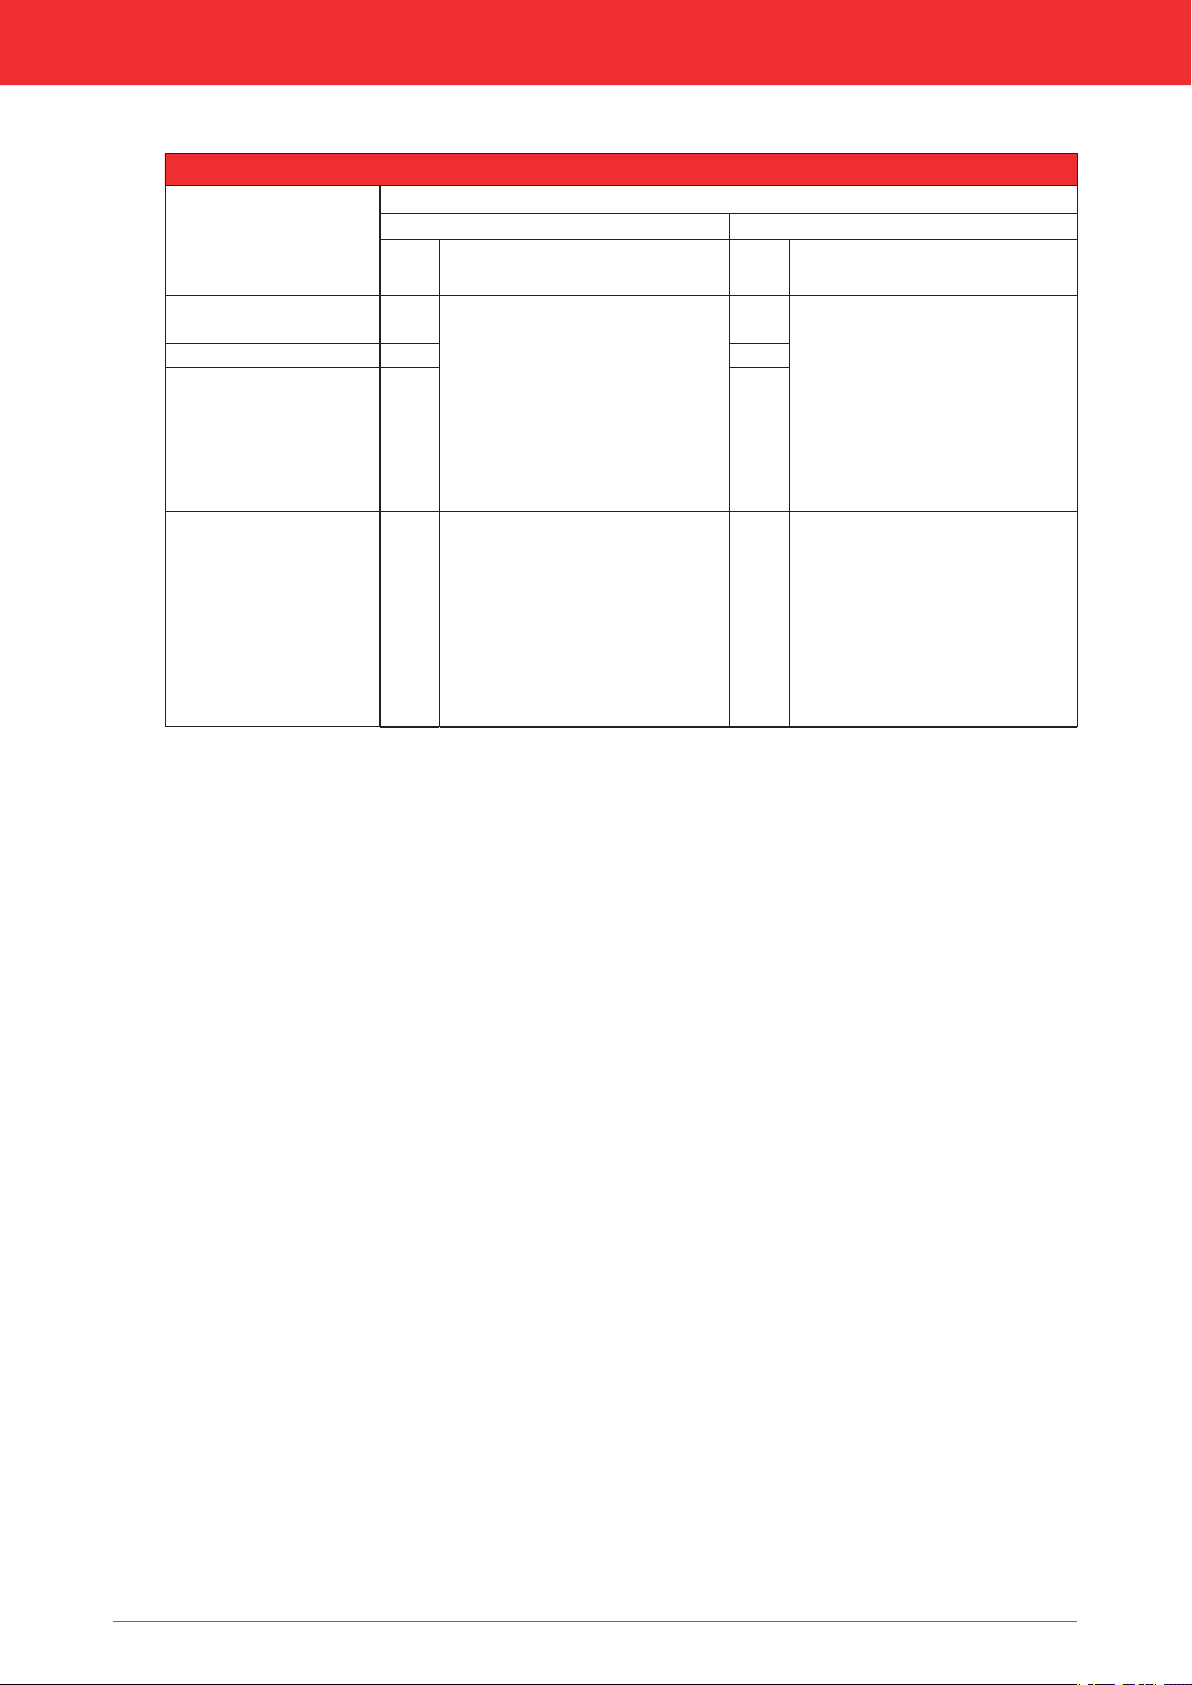
Installation manual16SystemDRU LAS AG-1 150/100DRU LAS ES-I 150/100DRU LAS ES-I 200/130DRU PV-I 100/60(also see:installation manuelPowerVent®)DRU LAS ES-E 200/150/100Ø(mm)≥250≥300≥200≥204Ø(mm)≥154≥204≥104≥204NotesThe terminal hole may be covered with a rosette made of non-combustible material. This terminal hole must be ventilated.A 2 mm wide ventilation opening around the tube is sufficient. The space between the tube and the combustible material may not be filled with insulation material.The distance from combustible material may be 0 mm.The terminal hole does not require ventilation.If a clip binding is placed in a terminal hole, a hole diameter of Ø230mm must be maintained.NoteMake terminal hole all around 2mm larger than the diameter of the concentric system to prevent "ticking"and such like.The terminal hole does not require ventilation.Make terminal hole all around 2mm larger than the diameter of the concentric system to prevent "ticking" and such like.The terminal hole does not require ventilation.If a clip binding is placed in a terminal hole, a hole diameter of Ø230 mm must be maintained.3-Maintain a distance of at least 50 mm between the outside of the concentric system and the walls and/or ceiling. If the system is built in (for instance) a cove, it should be made with non combustible, heat-resistant material all around it. This does not apply to the insulated concentric system (DRU LAS ES-E 200/150/100).-Some heat-resistant insulation materials contain volatile components that will spread an unpleasant smell for a prolonged time; these are not suitable.The concentric system is constructed from (the flue spigot of) the appliance.If, due to constructional circumstances, the concentric system is placed first, it is possible to connect the appliance by means of a telescopic pipe piece.Place the concentric system as follows:1Build the system up from (the flue spigot of) the appliance.1Connect the concentric pipe pieces and, if necessary, the bend(s).1Apply a clip binding with silicon sealing ring on each connection (does not apply to DRU LAS ES-E 200/150/100, here the sealing ring is inside the tube).1Use a sheet metal screw to fix the clip binding to the pipe on locations that cannot be reached after installation.1Attach the concentric system with sufficient fastening brackets, so that the weight is not resting on the appliance.Observe the following;-Place the first fastening bracket 0.5 metre from the appliance, at the most.-Place a fastening bracket maximum 0.1 metre from each bend, if the bends are more than 0.25 metre away from each other. If two bends are closer to one another than 0.25 metre, 1 fastening bracket between these bends will be sufficient.-At least every 1 metre, place a fastening bracket at slanted and horizontal sections.-At least every 2 metres, place a fastening bracket at vertical sections.1Fasten a roof terminal with anchor cables, if it protrudes more than 1,5 metres above the terminal.1Determine the remaining length for the wall or roof terminal and cut it to size, make sure the correct insertion length is maintained.1Place the wall terminal with the (groove/folded) seam at the top. Attach the wall terminal from the outside by means of four screws.Hole diameter and executionCombustible materialNon combustible materialTable 7-2: Terminals
Libble takes abuse of its services very seriously. We're committed to dealing with such abuse according to the laws in your country of residence. When you submit a report, we'll investigate it and take the appropriate action. We'll get back to you only if we require additional details or have more information to share.
Product:
Forumrules
To achieve meaningful questions, we apply the following rules:
First, read the manual;
Check if your question has been asked previously;
Try to ask your question as clearly as possible;
Did you already try to solve the problem? Please mention this;
Is your problem solved by a visitor then let him/her know in this forum;
To give a response to a question or answer, do not use this form but click on the button 'reply to this question';
Your question will be posted here and emailed to our subscribers. Therefore, avoid filling in personal details.
Register
Register getting emails for DRU Maestro 60 RCH at:
new questions and answers
new manuals
You will receive an email to register for one or both of the options.
Get your user manual by e-mail
Enter your email address to receive the manual of DRU Maestro 60 RCH in the language / languages: English as an attachment in your email.
The manual is 4.91 mb in size.
You will receive the manual in your email within minutes. If you have not received an email, then probably have entered the wrong email address or your mailbox is too full. In addition, it may be that your ISP may have a maximum size for emails to receive.
If you have not received an email with the manual within fifteen minutes, it may be that you have a entered a wrong email address or that your ISP has set a maximum size to receive email that is smaller than the size of the manual.
The email address you have provided is not correct.
Please check the email address and correct it.
Your question is posted on this page
Would you like to receive an email when new answers and questions are posted? Please enter your email address.