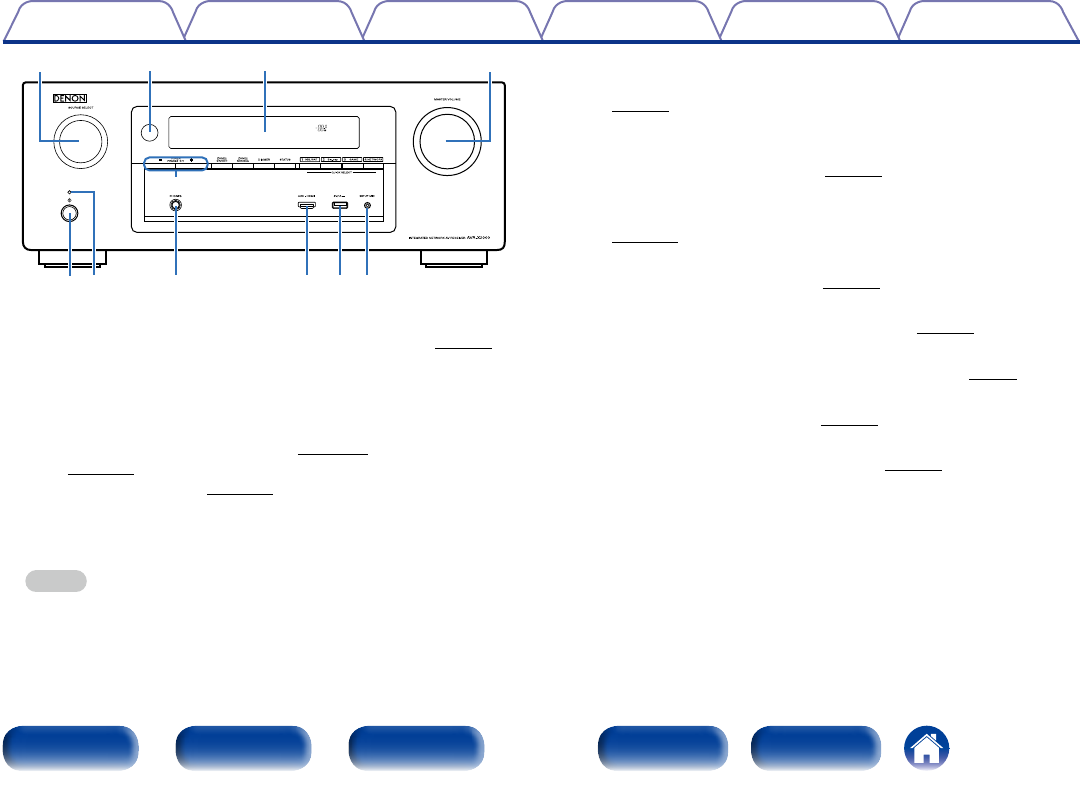
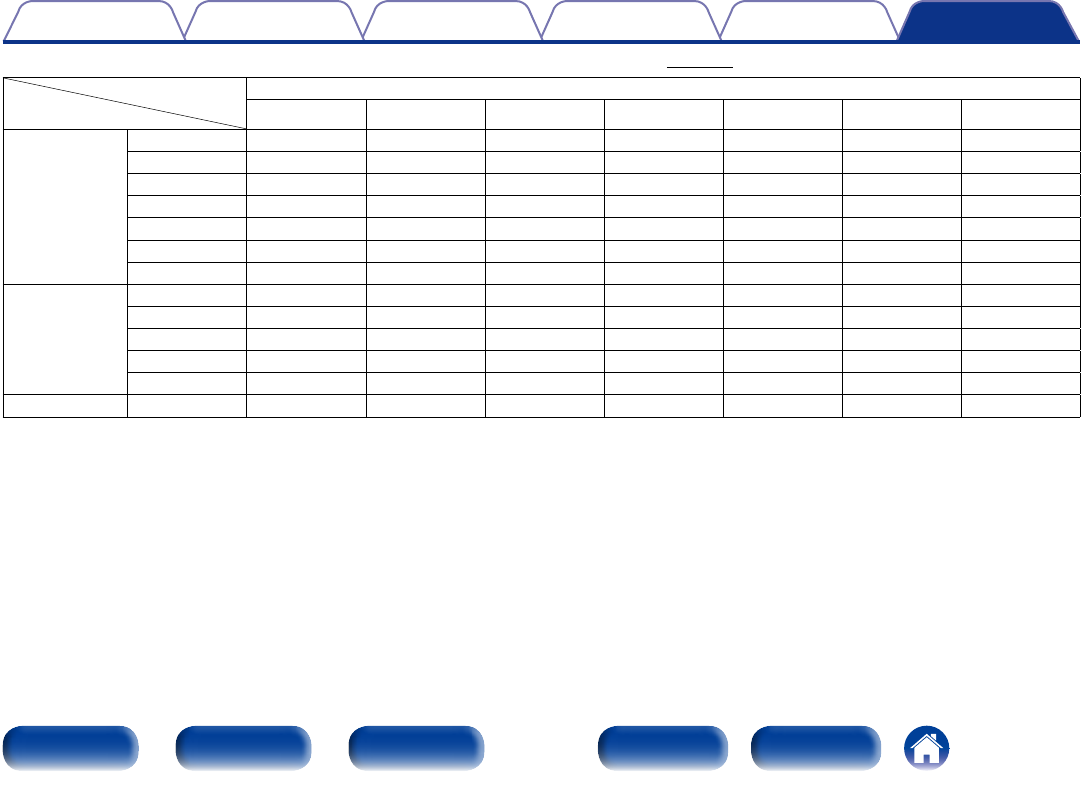
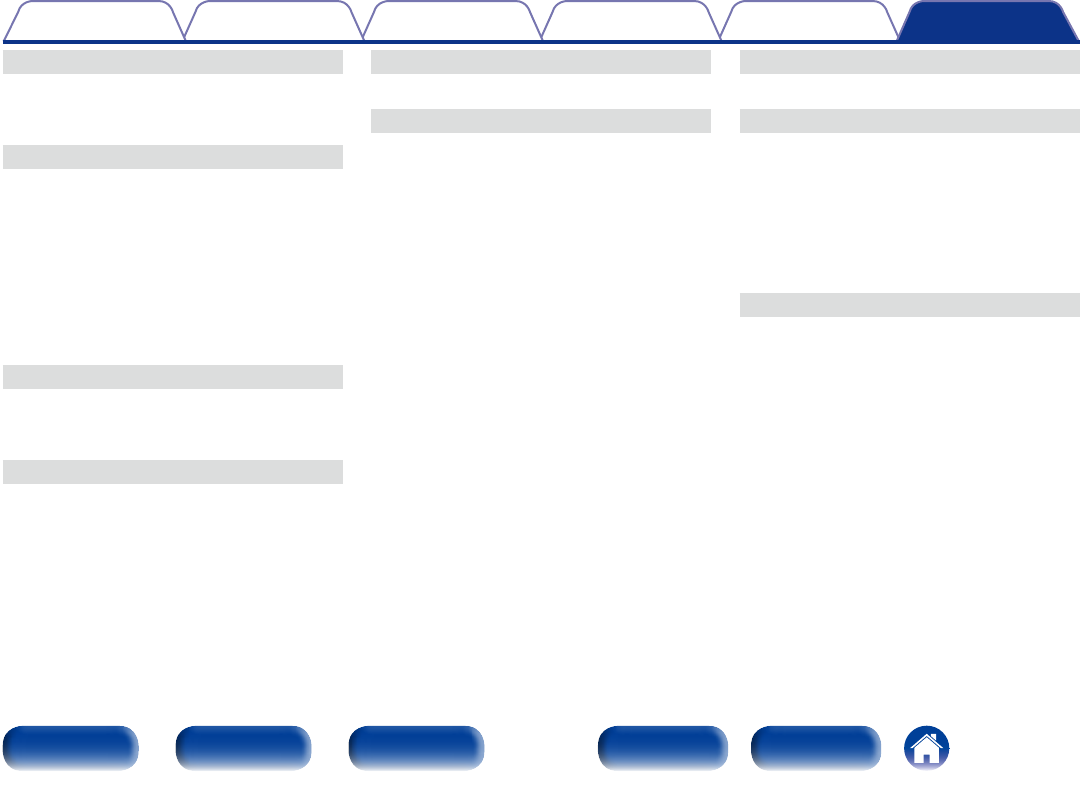
This selects the input source for ZONE2 (vpage112).
Q4 DIMMER button
Each press of this switches the brightness of the display (vpage162).
Q5 STATUS button
Each press of this switches the status information that is shown on the
display (vpage46).
Q6 QUICK SELECT buttons
With a single press of any of these buttons, you can call up various
settings you’ve registered to each button such as the input source,
volume level and sound mode settings (vpage107).
13
Appendix
TipsSettingsPlaybackConnections
Contents
Front panelDisplayRear panelIndexRemote
Display
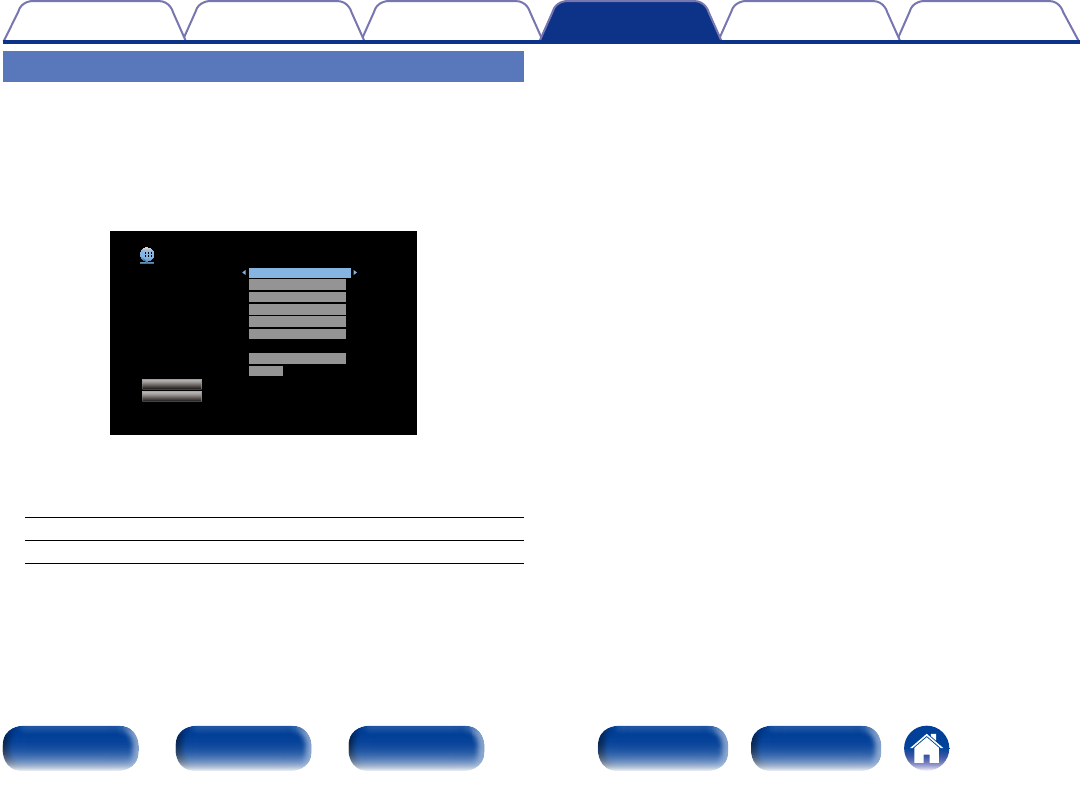
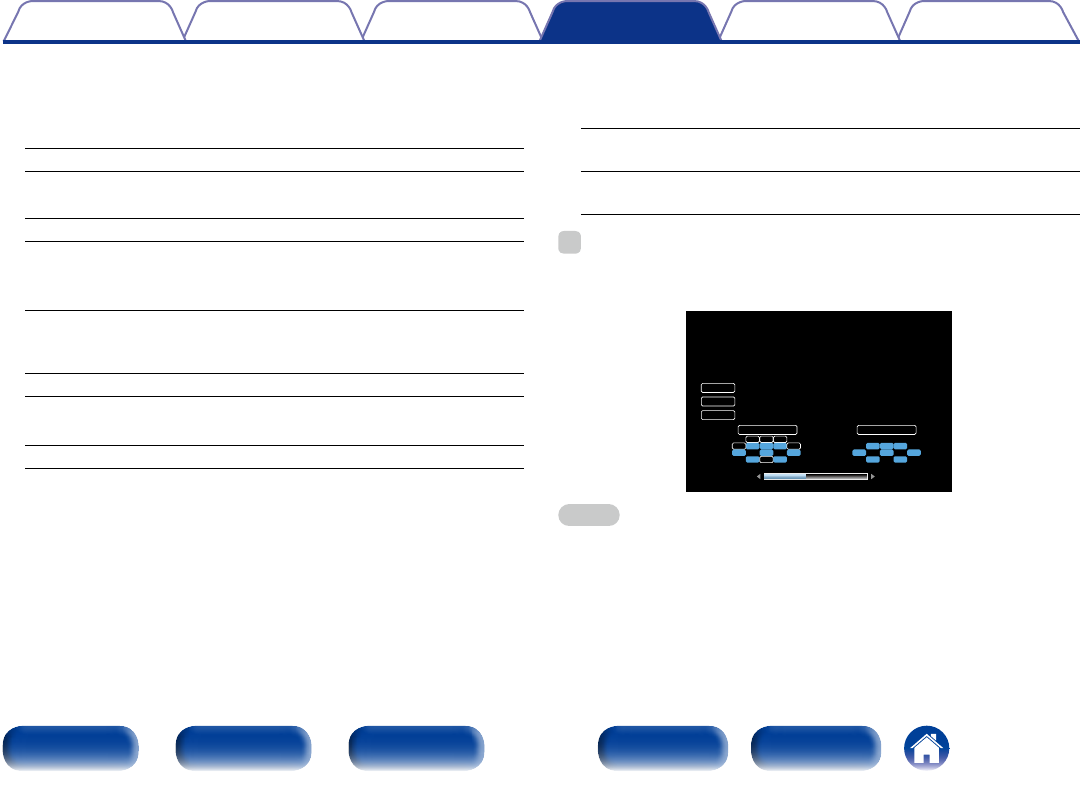
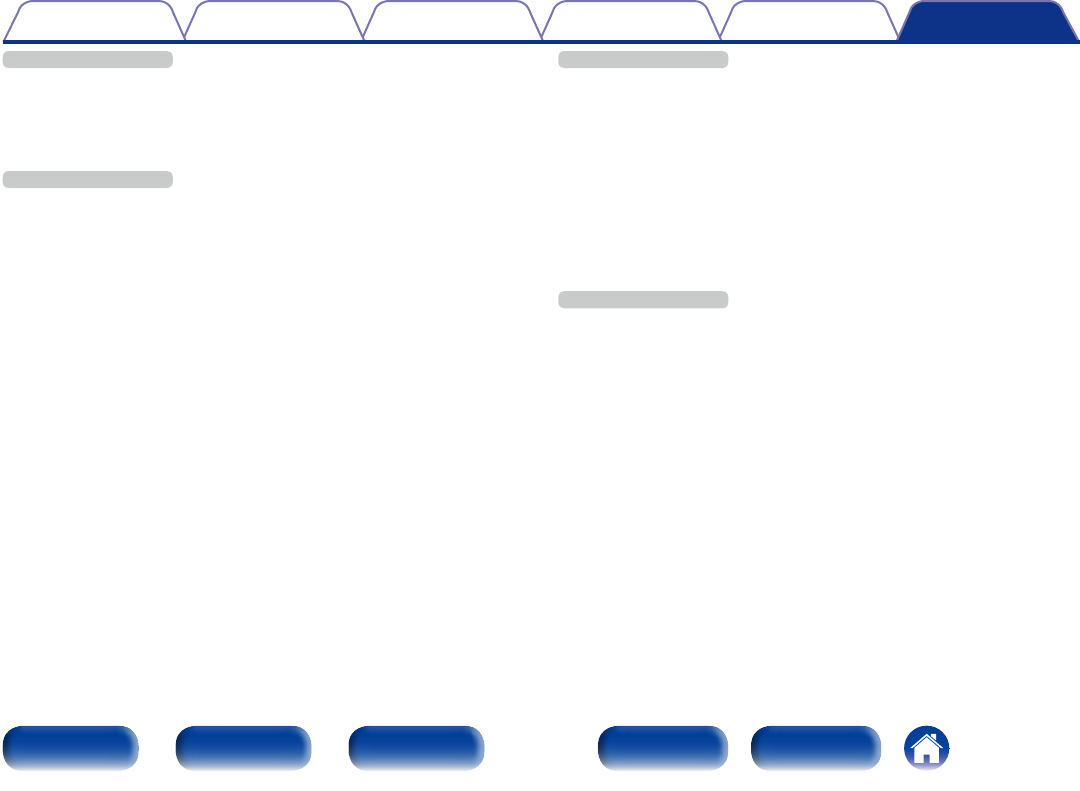
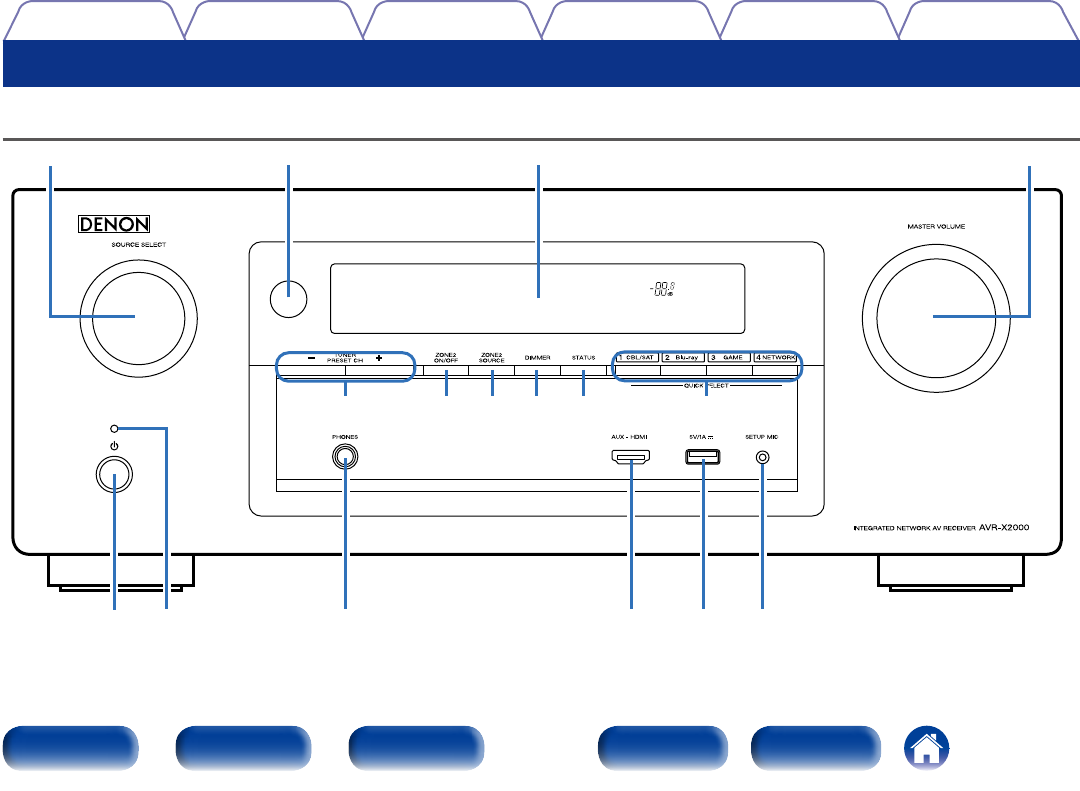
tryuioQ0Q1Q2
qwe
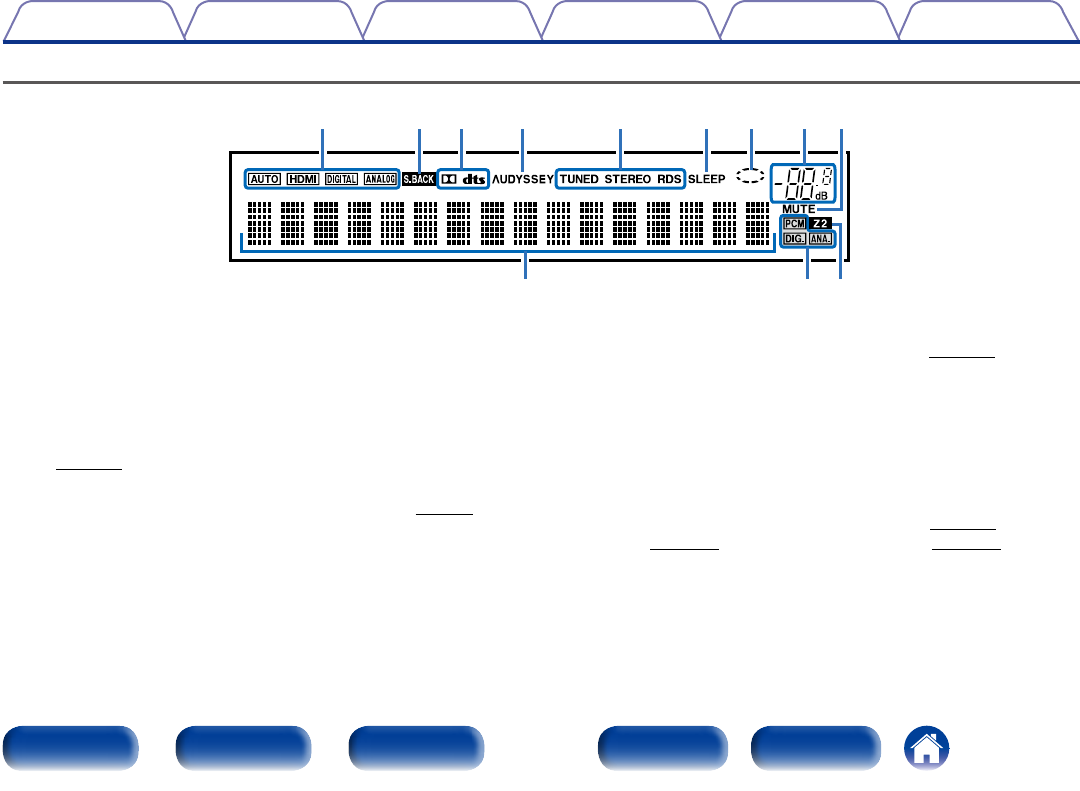
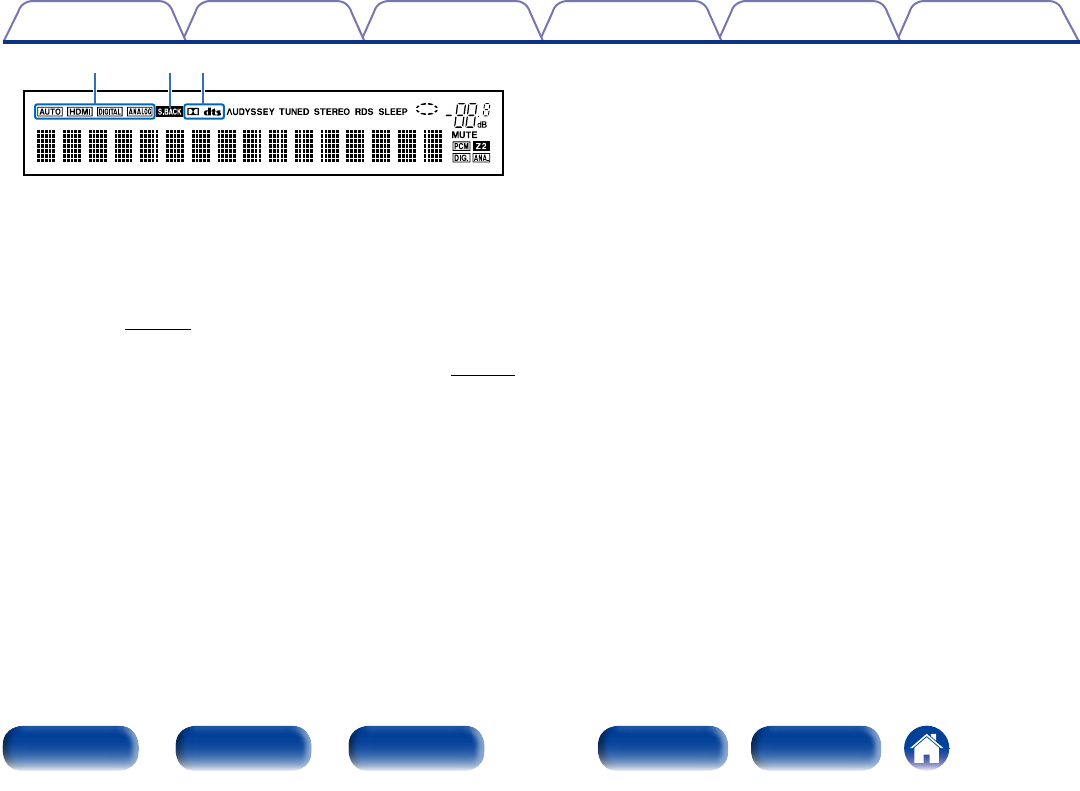
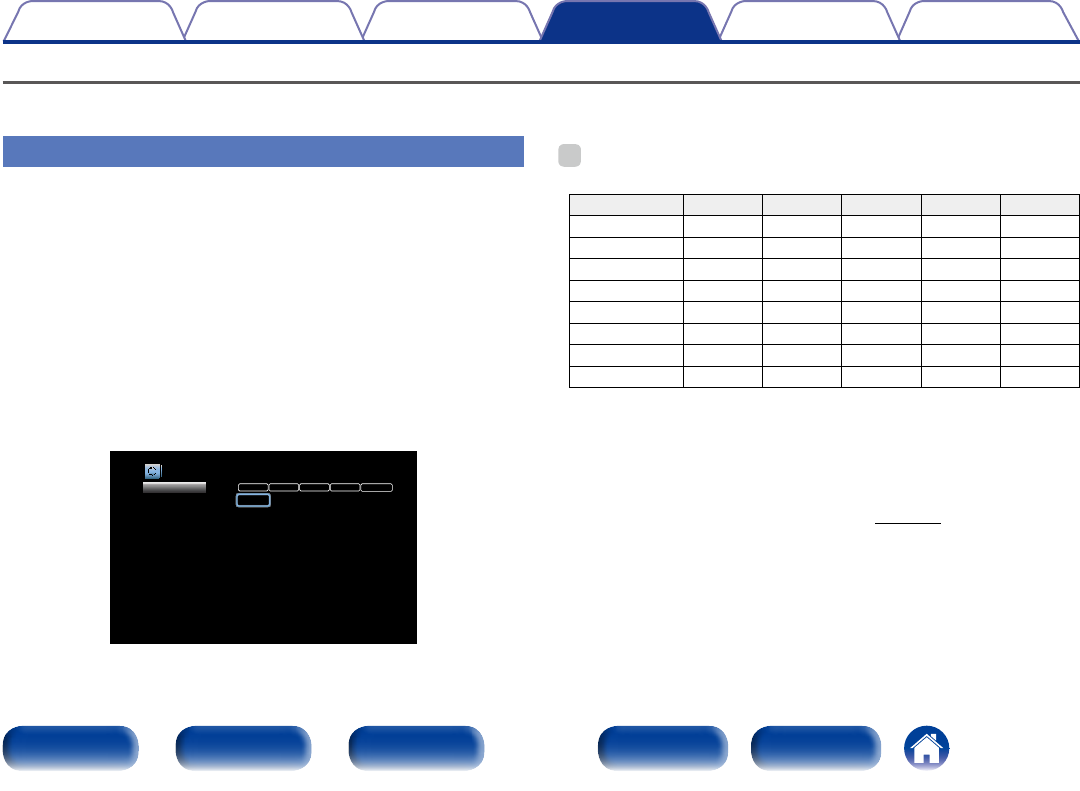
q Information display
The input source name, sound mode, setting values and other
information are displayed here.
w Input signal indicators
e MULTI ZONE indicators
This lights up when ZONE2 (separate room) power is turned on
(vpage112).
r MUTE indicator
This lights when the audio mute mode is selected (vpage43).
t Master volume indicator
y Circle indicator
Circle indicator is displayed when the input source is “NETWORK” or
“iPod/USB” when you are playing back music.
u Sleep timer indicator
This lights when the sleep mode is selected (vpage106).
i Tuner reception mode indicators
These light according to the reception conditions when the input
source is set to “TUNER”.
STEREO : In FM mode, this lights up when receiving stereo broadcasts.
TUNED : Lights up when the broadcast is properly tuned in.
RDS : Lights up when receiving RDS broadcasts.
o Audyssey
®
indicator
This indicator lights when the “MultEQ® XT” (vpage128), “Dynamic
EQ” (vpage128) or “Dynamic Volume” (vpage129) setting is
set to other than “O”.
14
Appendix
TipsSettingsPlaybackConnections
Contents
Front panelDisplayRear panelIndexRemote
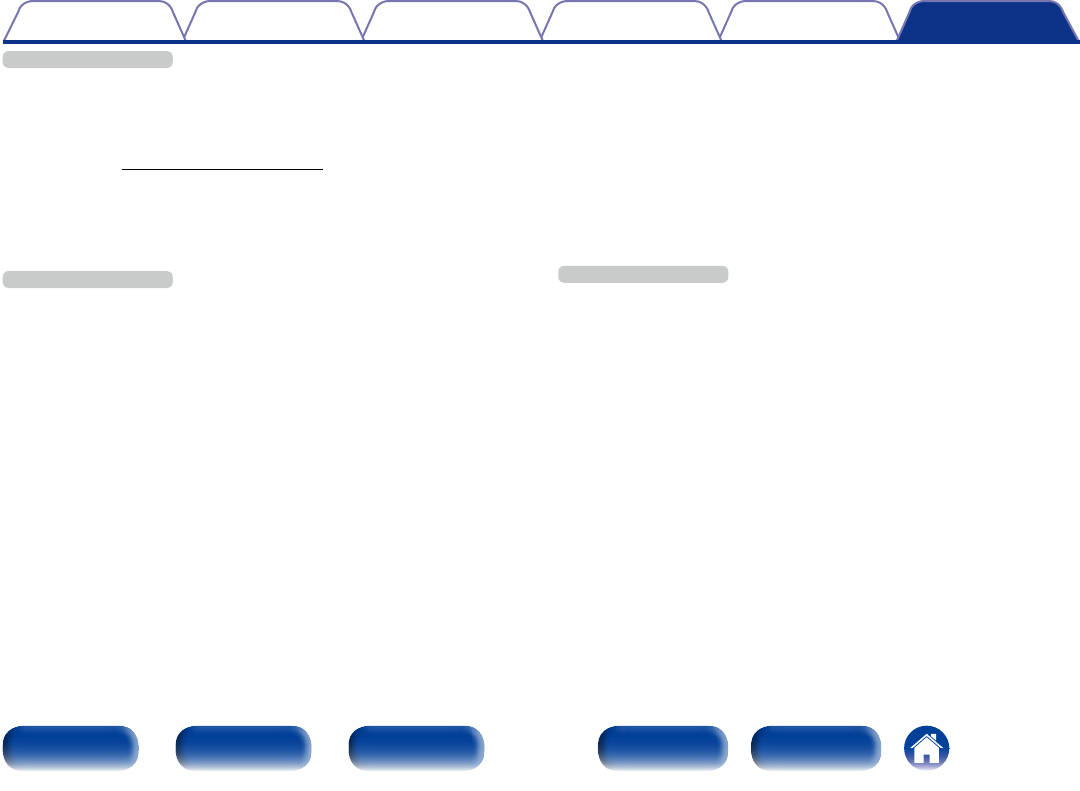
Q0Q1Q2
Q0 Decoder indicator
These light when Dolby or DTS signals are input or when the Dolby or
DTS decoder is running.
Q1 Surround back indicator
This lights when audio signals are being output from the surround back
speakers (vpage152).
Q2 Input mode indicators
Set the audio input modes for the dierent input sources (vpage140).
15
Appendix
TipsSettingsPlaybackConnections
Contents
Front panelDisplayRear panelIndexRemote
Rear panel
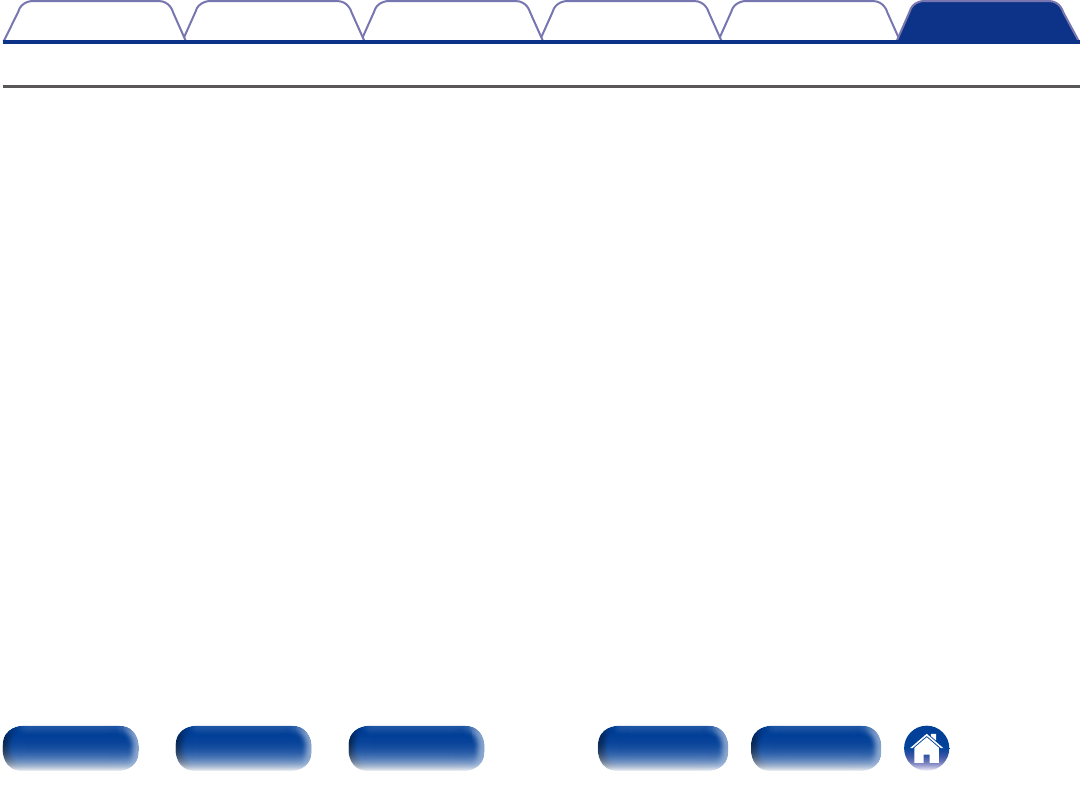
qwe
trQ0yiou
16
Appendix
TipsSettingsPlaybackConnections
Contents
Front panelDisplayRear panelIndexRemote
q FM antenna terminals (ANTENNA)
Used to connect FM antennas (vpage51).
w Speaker terminals (SPEAKERS)
Used to connect speakers (vpage23).
e Component video connectors (COMPONENT VIDEO)
Used to connect devices equipped with component video connectors
(vpage33, 34).
r AC inlet (AC IN)
Used to connect the power cord (vpage40).
t HDMI connectors
Used to connect devices equipped with HDMI connectors
(vpage30, 31, 35).
y Digital audio connectors (DIGITAL AUDIO)
Used to connect devices equipped with digital audio connectors
(vpage33, 34).
u Video connectors (VIDEO)
Used to connect devices equipped with video connectors
(vpage33, 34).
i Network connector (NETWORK)
Used to connect this unit to the network (vpage39).
o PRE OUT connectors
Used to connect a subwoofer with a built-in amplifier or an external
power amplifier (vpage24, 111).
Q0 Analog audio connectors (AUDIO)
Used to connect devices equipped with analog audio connectors
(vpage33, 34).
NOTE
•Do not touch the inner pins of the connectors on the rear panel. Electrostatic
discharge may cause permanent damage to the unit.
trQ0
y
iou
qwe
17
Appendix
TipsSettingsPlaybackConnections
Contents
Front panelDisplayRear panelIndexRemote
Remote control unit
q ZONE SELECT buttons (MAIN, ZONE2)
These switch the zone (MAIN ZONE, ZONE2) that is operated through
the remote control unit (vpage112, 120).
w Input source select buttons
These select the input source (vpage42).
e FAVORITE STATION buttons (1 – 3)
With a single press of these, you can call up registered radio stations
and contents (vpage81).
r Channel/page search buttons (CH/PAGE df)
These select preset radio stations or switch pages (vpage56).
t MUTE button (:)
This mutes the output audio (vpage43).
y Information button (INFO)
This displays the status information on the TV screen (vpage163).
u Cursor buttons (uiop)
These select items (vpage120).
i BACK button
This returns to the previous screen (vpage120).
o System buttons
These perform playback related operations (vpage44).
•Skip buttons (8, 9)
•Play/pause button (1/3)
Tuning up / Tuning down buttons (TUNE +, –)
These operate the tuner (vpage52).
q
w
e
r
y
t
i
o
u
18
Appendix
TipsSettingsPlaybackConnections
Contents
Front panelDisplayRear panelIndexRemote
Q0 SOUND MODE buttons
These select the sound mode (vpage94).
•MOVIE button
•MUSIC button
•GAME button
•PURE button
Q1 Remote control signal transmitter
This transmits signals from the remote control unit (vpage7).
Q2 SLEEP button
This sets the sleep timer (vpage106).
Q3 POWER button (X)
This turns the power on/o (vpage42).
Q4 VOLUME buttons (df)
These adjust the volume level (vpage43).
Q5 OPTION button
This displays the option menu on the TV screen (vpage86).
Q6 ENTER button
This determines the selection (vpage120).
Q7 SETUP button
This displays the menu on the TV screen (vpage120).
Q3
Q4
Q2
Q7
Q5
Q6
Q000
Q1
19
Appendix
TipsSettingsPlayback
Contents
Front panelDisplayRear panelIndexRemote
Connections
Connections
Speaker connection (vpage20)
Connecting a TV (vpage29)
Connecting a playback device (vpage32)
Connecting an iPod or USB memory device to the USB
port (vpage36)
Connecting an FM antenna (vpage38)
Connecting to a home network (LAN) (vpage39)
Connecting the power cord (vpage40)
NOTE
•Do not plug in the power cord until all connections have been completed.
However, when the “Setup Assistant” is running, follow the instructions in the
“Setup Assistant” (C page 7) screen for making connections. (During “Setup
Assistant” operation, the input/output connectors do not conduct current.)
•Do not bundle power cords together with connection cables. Doing so can result
in noise.
2Cables used for connections
Provide necessary cables according to the devices you want to connect.
Speaker cable
Subwoofer cable
HDMI cable
Component video cable
Video cable
Optical cable
Audio cable
R
L
R
L
LAN cable
20
Appendix
TipsSettingsPlayback
Contents
Front panelDisplayRear panelIndexRemote
Connections
Speaker connection
Install speakers and connect them to this unit (vpage20, 23).
Speaker installation
Determine the speaker system depending on the number of speakers you are using and install each speaker and subwoofer in the room. Here, we explain
how to install the speakers using a typical example.
FHLFHR
FLFR
SW
C
SLSR
SBLSBSBR
FL/FR : Place the FRONT left and right speakers an equal distance from
the main listening position. The distance between each speaker
and your TV should also be the same.
C : Place the CENTER speaker in between the front speakers and above
or below your TV.
SL/SR : Place the SURROUND left and right speakers an equal distance
to the left and right sides of the main listening position. If you
don’t have Surround Back speakers, move the surround speakers
slightly behind your listening position.
SBL/SBR (SB) : Place the SURROUND BACK left and right speakers
an equal distance from the main listening position and
directly behind the main listening position. If you only
have one Surround Back speaker, center it.
FHL/FHR : Place the FRONT HEIGHT left and right speakers just outside
of the front left and right speakers. Mount them as close to the
ceiling as possible and aim them towards the main listening
position.
SW : Place the SUBWOOFER at a convenient location near the front
speakers.
21
Appendix
TipsSettingsPlayback
Contents
Front panelDisplayRear panelIndexRemote
Connections
%
•This unit is compatible with Dolby Pro Logic gz (vpage200) which oers an
even wider and deeper surround sensation.
When using Dolby Pro Logic gz, install front height speakers.
•Use the illustration below as a guide for how high each speaker should be installed.
The height does not need to be exactly the same.
z
Surround
speaker
60 – 90 cm
GViewed from the sideH
Front height
speaker
•Point slightly
downwards
At least 1 m
Surround back
speaker
•Point slightly
downwards
Front
speaker
zRecommended for Dolby Pro Logic gz
NOTE
•You cannot have audio output from the surround back speakers and front height
speakers simultaneously.
2When 7.1/6.1-channel speakers are installed
using surround back speakers
FLFR
C
SBLSBR
SL
SR
SW
z1
z2
z3
Listening
position
z1 22˚ – 30˚
z2 90˚ – 110˚
z3 135˚ – 150˚
%
•When using a single surround back speaker, place it directly behind the listening
position.
GSpeaker abbreviationsH
FLFront speaker (L)SBLSurround back speaker (L)
FRFront speaker (R)SBRSurround back speaker (R)
CCenter speakerFHLFront height speaker (L)
SWSubwooferFHRFront height speaker (R)
SLSurround speaker (L)
SRSurround speaker (R)
22
Appendix
TipsSettingsPlayback
Contents
Front panelDisplayRear panelIndexRemote
Connections
2When 7.1-channel speakers are installed using
front height speakers
FL
FR
FHRFHL
C
SL
SR
SW
z1
z2
z3
z1 22˚ – 30˚
z2 22˚ – 45˚
z3 90˚ – 110˚
2When 5.1-channel speakers are installed
FLFR
SW
C
SL
SR
z1
z2
z1 22˚ – 30˚
z2 120˚
23
Appendix
TipsSettingsPlayback
Contents
Front panelDisplayRear panelIndexRemote
Connections
Speaker connection
Here we connect the speakers in the room to this unit.
This section explains how to connect them using typical examples.
NOTE
•Disconnect this unit’s power plug from the power outlet before connecting the
speakers. Also, turn o the subwoofer.
•Connect so that the speaker cable core wires do not protrude from the speaker
terminal. The protection circuit may be activated if the core wires touch the rear
panel or if the + and – sides touch each other (vpage203 “Protection circuit”).
•Never touch the speaker terminals while the power cord is connected. Doing so
could result in electric shock. When the “Setup Assistant” is running, follow the
instructions in the “Setup Assistant” screen for making connections. (Power is not
supplied to the speaker terminals while the “Setup Assistant” is running.)
•Use speakers with an impedance of 6 – 16 Ω/ohms.
2Connecting the speaker cables
Carefully check the left (L) and right (R) channels and + (red) and –
(black) polarities on the speakers being connected to this unit, and be
sure to connect the channels and polarities correctly.
1
Peel o about 10 mm of sheathing from
the tip of the speaker cable, then either
twist the core wire tightly or terminate it.
2
Turn the speaker terminal counterclockwise
to loosen it.
3
Insert the speaker cable’s core wire to the
hilt into the speaker terminal.
4
Turn the speaker terminal clockwise to
tighten it.
24
Appendix
TipsSettingsPlayback
Contents
Front panelDisplayRear panelIndexRemote
Connections
2Connecting the subwoofer
Use a subwoofer cable to connect the subwoofer.
SW
25
Appendix
TipsSettingsPlayback
Contents
Front panelDisplayRear panelIndexRemote
Connections
2About the speaker cable label (supplied) for
channel identification
The channel display section for speaker terminals on the rear panel is
color-coded for each channel to be identifiable.
Speaker terminalsColor
FRONT LWhite
FRONT RRed
CENTERGreen
SURROUND LLight blue
SURROUND RBlue
SURROUND BACK LBeige
SURROUND BACK RBrown
Attach the speaker cable label for each channel to its speaker cable as
shown in the diagram.
Then, make connection so that the color of the speaker terminal
matches that of the speaker cable label.
GHow to attach the speaker cable labelH
SpeakerThis unit
26
Appendix
TipsSettingsPlayback
Contents
Front panelDisplayRear panelIndexRemote
Connections
2Connecting 7.1-channel speakers using surround back speakers
The illustrations shows a connection example for performing 7.1-channel playback using surround back speakers.
FLFRCSRSLSBRSBL
SW
%
•When using this connection, also set “Assign Mode” in the menu to
“Surround Back” (vpage150).
•When using a single surround back speaker, connect it to the
SURROUND BACK L terminal.
27
Appendix
TipsSettingsPlayback
Contents
Front panelDisplayRear panelIndexRemote
Connections
2About the front height or front B speaker connections
The speaker connected to the SURROUND BACK terminal diers depending on the mode selected for “Assign Mode” (vpage150) in the menu.
•For how to connect the front, center, and surround speaker and the subwoofer to this unit, see “Connecting 7.1-channel speakers using surround
back speakers” (vpage26).
[Connecting the front height speaker][Connecting the front B speaker]
FHRFHL
FR (B)FL (B)
%
•When using this connection, also set “Assign Mode” in the menu to “Front
Height” (vpage150).
%
•When using this connection, also set “Assign Mode” in the menu to “Front B”
(vpage150).
28
Appendix
TipsSettingsPlayback
Contents
Front panelDisplayRear panelIndexRemote
Connections
2About the Bi-amp connection
Some audiophile loudspeakers can be connected to an amplifier with two separate amp-to-speaker connections per each speaker. One amplifier
channel’s output is hooked up to the speaker’s bass driver (woofer), while the other amplifier drives the upper range transducers (tweeter, or in
some cases midrange and tweeter). This connection method has one amplifier channel driving one half of the bi-amp speaker, and avoids electrical
interference between the speaker’s bass and treble drivers and the driving amplifier channels. You can assign 4 amp channels to connect to one pair
of bi-amp capable speakers. Bi-amp capable speakers always have two sets of speaker input connector pairs, one for the bass range and one for
the treble range. If you’re unsure about whether or not your speakers are bi-amp capable, consult the owner’s manual that came with the speakers.
•For how to connect the front, center, and surround speaker and the subwoofer to this unit, see “Connecting 7.1-channel speakers using surround
back speakers” (vpage26).
wqwq
(R) (L)
FLFR
SW
%
•When using this connection, also set “Assign Mode” in the menu to
“Bi-AMP” (vpage150).
NOTE
•When making bi-amp connections, be sure to remove the short-circuiting
plate or wire between the speaker’s woofer and tweeter terminals.
29
Appendix
TipsSettingsPlayback
Contents
Front panelDisplayRear panelIndexRemote
Connections
Connecting a TV
Connect a TV to this unit so that the input video is output to the TV. You can also enjoy audio from the TV on this unit.
How to connect a TV depends on the connectors and functions equipped on the TV.
ARC function plays TV audio on this unit by sending the TV audio signal to this unit via HDMI cable.
Yes
No
Yes
Connection 1
(vpage30)
Connection 2
(vpage31)
You cannot connect the TV to
this unit.
Is the TV equipped with an HDMI connector?
Is the TV compatible with the ARC (Audio
Return Channel) ?
No
30
Appendix
TipsSettingsPlayback
Contents
Front panelDisplayRear panelIndexRemote
Connections
Connection 1 : TV equipped with an HDMI connector and compatible with the ARC
(Audio Return Channel)
Use an HDMI cable to connect a TV that is compatible with the ARC function to this unit.
Set “HDMI Control” (vpage133) to “On” when using a TV that supports the ARC function.
(ARC)
IN
HDMI
TV
31
Appendix
TipsSettingsPlayback
Contents
Front panelDisplayRear panelIndexRemote
Connections
Connection 2 : TV equipped with an HDMI connector
Use an HDMI cable to connect the TV to this unit.
To listen to audio from TV on this unit, use an optical cable to connect the TV to this unit.
OUT
OPTICAL
OUTIN
IN
HDMI
TV
%
•To output audio signals that are input from the HDMI input
connector to a TV connected via HDMI, set “HDMI Audio Out”
(vpage132) to “TV”.
32
Appendix
TipsSettingsPlayback
Contents
Front panelDisplayRear panelIndexRemote
Connections
Connecting a playback device
This unit is equipped with three types of video input connectors (HDMI, component video and composite video) and one type of video output connector
(HDMI).
Select input connectors on this unit according to the connectors equipped on the device you want to connect.
If the device connected to this unit is equipped with an HDMI connector, it is recommended to use HDMI connections.
In the HDMI connection, audio and video signals can be transmitted through a single HDMI cable.
•Connecting a set-top box (Satellite tuner/cable TV) (vpage33)
•Connecting a DVD player (vpage34)
•Connecting a video camcorder or other device (vpage35)
%
•Connect devices to this unit as indicated by the input sources printed on the audio/video input connectors of this unit.
•This unit can change the source that is assigned to the HDMI IN, DIGITAL AUDIO IN, COMPONENT VIDEO IN, VIDEO IN and AUDIO IN connectors.
How to change the source assigned to connectors (vpage137 “Input Assign”).
33
Appendix
TipsSettingsPlayback
Contents
Front panelDisplayRear panelIndexRemote
Connections
Connecting a set-top box (Satellite tuner/cable TV)
This explanation uses the connection with a satellite tuner/cable TV STB as an example.
Select input connectors on this unit according to the connectors equipped on the device you want to connect.
R
L
R
L
AUDIO
AUDIO
RL
OUT
OUT
VIDEO
VIDEO
COMPONENT VIDEO
YP
BPR
OUT
OPTICAL
OUT
OUT
HDMI
(HDMI incompatible device)
Satellite tuner/Cable TV
or
Satellite tuner/
Cable TV
or
34
Appendix
TipsSettingsPlayback
Contents
Front panelDisplayRear panelIndexRemote
Connections
Connecting a DVD player
This explanation uses the connection with a DVD players as an example.
Select input connectors on this unit according to the connectors equipped on the device you want to connect.
R
L
R
L
AUDIO
AUDIO
RL
OUT
OUT
VIDEO
VIDEO
AUDIO/
VIDEO
OUT
HDMI
(HDMI incompatible
device)
DVD player
DVD player
35
Appendix
TipsSettingsPlayback
Contents
Front panelDisplayRear panelIndexRemote
Connections
Connecting a video camcorder or other device
Connect a playback device to this unit, such as a video camcorder or game console.
This explanation uses the connection with a video camcorders as an example.
OUT
HDMI
Video
camcorder
36
Appendix
TipsSettingsPlayback
Contents
Front panelDisplayRear panelIndexRemote
Connections
Connecting an iPod or USB memory device to the USB port
To connect an iPod to this unit, use the USB adapter cable that was supplied with the iPod.
For operating instructions see “Playing an iPod” (vpage44) or “Playing a USB memory device” (vpage48).
USB
memory
device
iPod
or
%
•Denon does not guarantee that all USB memory devices will operate or receive power. When using a portable USB hard disk drive (HDD) which came with an AC adapter,
use that device’s supplied AC adapter.
NOTE
•USB memory devices will not work via a USB hub.
•It is not possible to use this unit by connecting the unit’s USB port to a PC via a USB cable.
•Do not use an extension cable when connecting a USB memory device. This may cause radio interference with other devices.
37
Appendix
TipsSettingsPlayback
Contents
Front panelDisplayRear panelIndexRemote
Connections
2Supported iPod models
•iPod classic
•iPod nano
•iPod touch
•iPhone
38
Appendix
TipsSettingsPlayback
Contents
Front panelDisplayRear panelIndexRemote
Connections
Connecting an FM antenna
After connecting the antenna and receiving a broadcast signal
(vpage52 “Listening to FM broadcasts”), fix the antenna with tape in
a position where the noise level becomes minimal.
FM outdoor
antenna
Direction of broadcasting station
75 Ω/ohms
coaxial cable
FM indoor antenna
(supplied)
NOTE
•Do not connect two FM antennas simultaneously.
•If you are unable to receive a good broadcast signal, we recommend installing an
outdoor antenna. For details, inquire at the retail store where you purchased the
unit.
39
Appendix
TipsSettingsPlayback
Contents
Front panelDisplayRear panelIndexRemote
Connections
Connecting to a home network (LAN)
You can connect this unit to your home network (LAN) to perform various types of playbacks and operations as follows.
•Playback of network audio such as Internet
Radio and from your media server(s)
•Playback of music content from online
streaming services
•Using the Apple AirPlay function
•Operation on this unit via the network
•Firmware Update
%
•With this unit, it is possible to use the DHCP and
Auto IP functions to make the network settings
automatically.
•When using this unit with the broadband router’s
DHCP function enabled, this unit automatically
performs the IP address setting and other settings.
•When using this unit connected to a network with no
DHCP function, make the settings for the IP address,
etc., at “Network” (vpage156).
Internet
To WAN side
Router
To LAN port
To LAN port
LAN port/
Ethernet
connector
LAN port/
Ethernet
connector
PC
NAS
(Network Attached
Storage)
Modem
For connections to the Internet, contact an ISP (Internet Service Provider) or a computer
shop.
40
Appendix
TipsSettingsPlayback
Contents
Front panelDisplayRear panelIndexRemote
Connections
%
•When using this unit, we recommend you use a router equipped with the following
functions:
•Built-in DHCP server
This function automatically assigns IP addresses on the LAN.
•Built-in 100BASE-TX switch
When connecting multiple devices, we recommend a switching hub with a speed
of 100 Mbps or greater.
•Use only a shielded STP or ScTP LAN cable which is easily available at electronics
stores (CAT-5 or greater recommended).
•The normal shielded-type LAN cable is recommended. If a flat-type cable or
unshielded-type cable is used, other devices could be aected by noise.
NOTE
•The types of routers that can be used depend on the ISP. Contact your ISP or a
computer shop for details.
•This unit is not compatible with PPPoE. A PPPoE-compatible router is required if
you have a contract for a type of line set by PPPoE.
•Do not connect an NETWORK connector directly to the LAN port/ Ethernet
connector on your computer.
Connecting the power cord
After completing all the connections, insert the power plug into the power
outlet.
To household power outlet
(AC 230 V, 50/60 Hz)
Power cord (supplied)
41
Appendix
TipsSettingsConnections
Contents
Front panelDisplayRear panelIndexRemote
Playback
Playback
Turning the power on (vpage42)
Selecting the input source (vpage42)
Adjusting the master volume (vpage43)
Turning o the sound temporarily (vpage43)
Playing a DVD player/Blu-ray Disc player (vpage43)
Playing an iPod (vpage44)
Playing a USB memory device (vpage48)
Listening to FM broadcasts (vpage51)
Listening to Internet Radio (vpage60)
Playing back files stored on a PC and NAS (vpage64)
Listening to Last.fm (vpage68)
Viewing photographs on the Flickr site (vpage73)
Listening to Spotify (vpage77)
Adding to the FAVORITE STATION button (vpage81)
AirPlay function (vpage83)
Convenience functions (vpage86)
Selecting a sound mode (vpage94)
HDMI control function (vpage105)
Sleep timer function (vpage106)
Quick select function (vpage107)
Web control function (vpage108)
Playback in ZONE2 (Separate room) (vpage110)
42
Appendix
TipsSettingsConnections
Contents
Front panelDisplayRear panelIndexRemote
Playback
Basic operation
MUTE
POWER
VOLUME
X
df
:
Input source
select buttons
Turning the power on
1
Press POWER X to turn on power to the unit.
%
•You can also switch the power to standby by pressing X on the main unit.
Selecting the input source
1
Press the input source select button to be played back.
The desired input source can be selected directly.
%
•You can also select the input source by turning SOURCE SELECT knob on the
main unit.
43
Appendix
TipsSettingsConnections
Contents
Front panelDisplayRear panelIndexRemote
Playback
Adjusting the master volume
1
Use VOLUME df to adjust the volume.
•The variable range diers according to the input signal and channel
level setting.
%
•You can also adjust the master volume by turning MASTER VOLUME on the main
unit.
Turning o the sound temporarily
1
Press MUTE :.
•“MUTE” indicator on the display flashes.
•: appears on the TV screen.
%
•The sound is reduced to the level set at “Mute Level” (vpage127).
•To cancel, press MUTE
: again. Muting can also be cancelled by adjusting the
master volume.
Playing a DVD player/Blu-ray Disc player
The following describes the procedure for playing DVD player/Blu-ray Disc
player.
1
Prepare for playback.
q
Turn on the power of the TV, subwoofer and player.
w Change the TV input to the input of this unit.
2
Press POWER X to turn on power to the unit.
3
Press DVD or Blu-ray to switch an input source for a
player used for playback.
4
Play the DVD player or Blu-ray Disc player.
44
Appendix
TipsSettingsConnections
Contents
Front panelDisplayRear panelIndexRemote
Playback
Playing an iPod
uio
p
ENTER
1
/
3
8
9
OPTION
iPod/USB
BACK
CH/PAGE
df
•You can use the USB cable provided with the iPod to connect the iPod
with the unit’s USB port and enjoy music stored on the iPod.
•For information on the iPod models that can be played back with this
unit, see “Connecting an iPod or USB memory device to the USB port”
(vpage36).
45
Appendix
TipsSettingsConnections
Contents
Front panelDisplayRear panelIndexRemote
Playback
Listening to music on an iPod
1
Connect the iPod to the USB port (vpage36).
2
Press iPod/USB to switch the input source to “iPod/
USB”.
“Browse From iPod” is displayed on the display of this unit.
•Nothing is displayed on the TV screen.
3
Operate iPod itself directly while seeing the iPod screen
to play back music.
%
•The iPod display modes include “From iPod” and “On-Screen”.
By default, “From iPod”, where you directly operate the iPod itself while looking
at the iPod screen, is set.
•To change to “On-Screen”, where you perform operations while having the iPod
information displayed on the TV screen, see “Setting operation mode (iPod Browse
Mode)” (vpage46).
NOTE
•Depending on the type of iPod and the software version, some functions may not
operate.
•Note that Denon will accept no responsibility whatsoever for any problems arising
with the data on an iPod when using this unit in conjunction with the iPod.
Use ui to select a station, and press ENTER to start
playback.
Playback starts and the following screen appears.
MP3 128kbps
rock Radio
Title
Now Playing
Artist
Album
00:06100%
NextMenuSelect
71
Appendix
TipsSettingsConnections
Contents
Front panelDisplayRear panelIndexRemote
Playback
9
Press p while a track is playing.
The Last.fm menu screen is displayed.
Menu[1/3]
Love this track
Ban this track
Scrobbling (On)
Love this track :
•Loving tracks improves your Last.fm recommendations, and you
can optionally share them on popular social networks.
Ban this track :
•If you ban a track, we won’t play it again. You can undo this on the
Last.fm website.
Scrobbling :
•Scrobbling sends the tracks you played to your Last.fm account.
You can see charts of the music you’ve been listening to, get
recommendations for new music and events in your area and
share your listening tastes with your friends. You can turn this
service on or o using this option. The more you scrobble, the
better your recommendations will become.
Operation buttonsFunction
1/3
Playback
9
Next
ENTER(Press and hold)
Stop
i
Next
CH/PAGE df
Page previous / Page next
%
•The display switches between track title and radio station name each time the
STATUS button is pressed.
2Operations available through the OPTION
button
•Performing repeat playback (Repeat) (vpage87)
•Performing random playback (Random) (vpage87)
•Displaying your desired video on the monitor during audio playback
(Video Select) (vpage91)
•Adjusting the picture quality for your viewing environment (Picture
Mode) (vpage92)
•Playing music in All Zone Stereo (vpage93)
72
Appendix
TipsSettingsConnections
Contents
Front panelDisplayRear panelIndexRemote
Playback
Log Out
Disassociate this unit from your Last.fm account.
1
Use ui to select “Log Out”, then press ENTER.
BACK
Last.fm[10/10]
Option
Popular tag
Popular Artists
Your Recent Stations
Your Friends’ Radio
Your Recommended Radio
Your Library
Are you sure you want to log out
xxxxxxx?
Yes
No
2
When the popup menu appears, use op to select “Yes”,
then press ENTER.
73
Appendix
TipsSettingsConnections
Contents
Front panelDisplayRear panelIndexRemote
Playback
Viewing photographs on the Flickr site
uio
p
ENTER
OPTION
NETWORK
BACK
CH/PAGE
df
•Flickr is an online photograph sharing service that started in 2004. You
can use the this unit to view photographs that have been made public
by Flickr users. You do not need an account to use Flickr. To view
photographs that you recorded yourself, you need an account in order to
upload these photographs to the Flickr server. For details, see the Flickr
homepage.
http://www.flickr.com/
•You can view photographs shared by particular users, or all of the
photographs shared on Flickr.
74
Appendix
TipsSettingsConnections
Contents
Front panelDisplayRear panelIndexRemote
Playback
Viewing photographs shared by
particular users
1
Prepare for playback.
•Check the network environment, then turn on this unit’s power
(vpage39 “Connecting to a home network (LAN)”).
2
Press NETWORK.
3
Use uiop to select “Flickr”, then press ENTER.
FavoritesInternet Radio
Media Server
Spotify
Network
4
Use ui to select “Add Flickr Contact”, then press
ENTER.
OPTION
Flickr[1/2]
Add Flickr Contact
All Content
Option
5
In “Contact”, add the screen name (user name you want
to view) you want to add.
•For character input, see page121.
6
After inputting the “Contact”, press “OK”.
The screen name is added to “Contact”, and the screen name you
entered in Step 5 is displayed on the top screen of Flickr.
•If you enter a screen name that does not exist, “The Flickr Contact
you entered could not be found” is displayed. Check and enter the
correct screen name.
75
Appendix
TipsSettingsConnections
Contents
Front panelDisplayRear panelIndexRemote
Playback
7
Use ui to select the folder, and then press ENTER.
Favorites :
•Displays the favorite photographs of the specified user.
Photostream :
•Displays a list of shared photographs.
PhotoSets :
•Displays the folder (photograph album) list.
Contacts :
•Displays the screen name used by the specified user in Contacts.
Remove this Contact :
•Deletes a user from Flickr Contact.
Add this Contact :
•Adds a user from Flickr Contact.
8
Use ui to select the file, and then press ENTER.
The selected file is displayed.
Operation buttonsFunction
ENTER
Playback
(Press and hold)
Stop
ui
Previous / Next
CH/PAGE df
Page previous / Page next
Viewing all photographs on Flickr
1
Use ui to select “All Content”, then press ENTER.
OPTION
Flickr[1/2]
Add Flickr Contact
All Content
Option
2
Use ui to select the folder, and then press ENTER.
Interestingness :
•Displays photographs that are popular from the number of user
comments or number of times they are added as favorites.
Recent :
•Displays the most recently added photographs.
Search by text :
•Search for photographs by keyword.
3
Use ui to select the file, and then press ENTER.
The selected file is displayed.
76
Appendix
TipsSettingsConnections
Contents
Front panelDisplayRear panelIndexRemote
Playback
NOTE
•Depending on the file format, some photographs may not be viewable.
2Operations available through the OPTION
button
•Playing back still images in sequential order (Slideshow Interval)
(vpage91)
•Displaying your desired video on the monitor during audio playback
(Video Select) (vpage91)
•Adjusting the picture quality for your viewing environment (Picture
Mode) (vpage92)
•Playing music in All Zone Stereo (vpage93)
77
Appendix
TipsSettingsConnections
Contents
Front panelDisplayRear panelIndexRemote
Playback
Listening to Spotify
uio
p
ENTER
OPTION
1
/
3
8
9
NETWORK
BACK
CH/PAGE
df
Introduce your Denon to a whole new world of music. With Spotify, you
can enjoy instant access to millions of songs.
A Spotify Premium subscription is required.
For details, see the Spotify homepage.
http://www.spotify.com
Listening to Spotify
1
Prepare for playback.
q Check the network environment, then turn on this unit’s power
(vpage39 “Connecting to a home network (LAN)”).
wComplete step 5 and obtain a Spotify account.
•If you already have a Spotify account, you do not need to obtain
a new account. Use your existing Spotify account.
2
Press NETWORK.
3
Use uiop to select “Spotify”, then press ENTER.
FavoritesInternet Radio
Media Server
Spotify
Network
78
Appendix
TipsSettingsConnections
Contents
Front panelDisplayRear panelIndexRemote
Playback
4
If you have a Spotify account, then press ENTER.
BACK
Spotify
Get Started
Introduce your Denon to a whole new world
of music. With Spotify, you can enjoy instant
access to millions of songs.
A Spotify Premium subscription is required.
Just subscribe at spotify.com
Exit
5
Use uip to enter your username and password.
BACK
Enter
Username
Password
zzzzz
zzzzz
Log In
Exit
Spotify Log In
•For character input, see page121.
The types of characters that can be input are as shown below.
GUpper case characters/Numbers/SymbolsH
ABCDEFGHIJKLMNOPQRSTUVWXYZ
ÄÀÁÂÃÅÆÇÐÈÉÊËÌÍÎÏÑÖÒÓÔÕØÜÙÚÛÝÞ
0123456789
! “ # $ % & ’ ( ) z + , ; < = >
GLower case characters/Numbers/SymbolsH
abcdefghijklmnopqrstuvwxyz
äàáâãåæçðèéêëìíîïñöòóôõøüùúûýþÿß
0123456789
. @ - _ / : ˜ ? [ \ ] ^ ’ { | }
•The password should be no longer than 99 characters.
•Press BACK to cancel the input. When “Cancel Input?” is
displayed, select “Yes”, then press ENTER.
6
After inputting the username and password, select “Log
In”, then press ENTER.
If the username and password match, the top menu for Spotify is
displayed.
79
Appendix
TipsSettingsConnections
Contents
Front panelDisplayRear panelIndexRemote
Playback
7
Use ui to select menu and then press ENTER.
OPTION
[1/5]
Search
What’s New
Starred
Playlists
Accounts
Spotify
Option
Search :
•Searches for tracks, artists and albums by entering keywords.
What’s New :
•Displays the list of the latest albums.
Starred :
•Displays the list of the starred tracks.
Playlists :
•Displays the playlists for Spotify.
Accounts :
•Manages accounts (Log out, Add new user, Switch to user).
8
Use ui to select a station, and press ENTER to start
playback.
Playback starts and the following screen appears.
OPTION
Spotify
Title
Now Playing
Artist
Album
00:06
Pause
NextMenuBack
PreviousOption
Operation buttonsFunction
1/3
Playback / Pause
8 9
Previous / Next
(Press and hold)
Fast-reverse / Fast-forward
ENTER
Playback / Pause
(Press and hold)
Stop
ui
Previous / Next
(Press and hold)
Fast-reverse / Fast-forward
CH/PAGE df
Page previous / Page next
80
Appendix
TipsSettingsConnections
Contents
Front panelDisplayRear panelIndexRemote
Playback
9
Press p while a track is playing.
The Spotify menu screen is displayed.
[1/3]
Star this track
Browse “Artist name”
Browse “Album name”
Track-Artist
Back
Star this track :
•Adds a star to the selected track.
Browse “Artist name” :
•Displays the list of albums by the artist of the track that is being
played back.
Browse “Album name” :
•Displays the list of tracks on the album that is being played back.
%
•The display switches between track title, artist name, and album title each time the
STATUS button is pressed.
2Operations available through the OPTION
button
•Performing repeat playback (Repeat) (vpage87)
•Performing random playback (Random) (vpage87)
•Displaying your desired video on the monitor during audio playback
(Video Select) (vpage91)
•Adjusting the picture quality for your viewing environment (Picture
Mode) (vpage92)
•Playing music in All Zone Stereo (vpage93)
81
Appendix
TipsSettingsConnections
Contents
Front panelDisplayRear panelIndexRemote
Playback
Adding to the FAVORITE STATION button
With a single press of these, you can call up registered radio stations and
contents
You can add up to three types of content.
1
Press and hold one of the FAVORITE STATION 1 – 3
buttons for 3 seconds or longer while playing back a
content or listening to a radio station.
The content you are playing back or the radio station you are
listening to is registered to the pressed button.
•Contents that can be added to the FAVORITE STATION button
dier depending on the input source.
Input sourceContents that can be added
TUNERRadio station
Internet RadioTop list of content / Internet Radio station
Media ServerTop list of content / Track of Media Server
Last.fmTop list of content
FlickrTop list of content
SpotifyTop list of content
Favorites
Top list of content / Internet Radio station /
Track of Media Server
FAVORITE
1 – 3
STATION
82
Appendix
TipsSettingsConnections
Contents
Front panelDisplayRear panelIndexRemote
Playback
Playing back content added to the
FAVORITE STATION button
You can easily call up content by pressing the FAVORITE STATION button.
1
Press one of the FAVORITE STATION 1 – 3 buttons that
you added content to.
Playback starts.
%
•Internet Radio stations are already registered to the FAVORITE STATION 1 – 3
buttons. However, you may not be able to play the stations due to restrictions
imposed by the radio stations.
NOTE
•The following operations update the database on the Media Server, which may
make the added music files unplayable.
•When you quit the Media Server and then restart it.
•When music files are deleted or added on the Media Server.
83
Appendix
TipsSettingsConnections
Contents
Front panelDisplayRear panelIndexRemote
Playback
AirPlay function
Enjoy music from your iTunes library with high quality sound anywhere in
your home.
PC
Router
This unit
Streaming music stored in iPhone, iPod
touch, or iPad directly to the unit
If you update your “iPhone/iPod touch/iPad” to iOS 4.2.1 or later, you can
stream music stored in your “iPhone/iPod touch/iPad” directly to this unit.
1
Make the Wi-Fi settings for iPhone, iPod touch, or iPad.
•For details, see your device’s manual.
2
Startup iPhone, iPod touch, or iPad music or iPod app.
'
is displayed on the iPhone, iPod touch or iPad screen.
3
Tap the AirPlay icon '.
4
Select the speaker you want to use.
Cancel
Denon AVR-X2000
84
Appendix
TipsSettingsConnections
Contents
Front panelDisplayRear panelIndexRemote
Playback
Playing iTunes music with this unit
1
Install iTunes 10, or later, on a Mac or Windows PC that
is connected to the same network as this unit.
2
Turn this unit ON.
Set “IP Control” (vpage156) to “Always On” for this unit.
NOTE
•When “IP Control” is set to “Always On”, the unit consumes more standby
power.
3
Launch iTunes and click the AirPlay icon ' displayed
the window and select this unit from the list.
4
Choose a song and click play in iTunes.
The music will stream to this unit.
Selecting multiple speakers (devices)
It is possible to play iTunes songs on your home’s AirPlay compatible
speakers (devices) other than those of this unit.
1
Click the AirPlay icon ' and select “Multiple”.
2
Check the speakers you want to use.
My Computer
Denon AVR-X2000
Master Volume
AirPlaySingleMultiple
NOTE
•In playback using the AirPlay function, the sound is output at the iPhone, iPod
touch, iPad or iTunes volume setting level.
You should turn down the iPhone, iPod touch, iPad or iTunes volume prior to
playback and then adjust it to a suitable level.
85
Appendix
TipsSettingsConnections
Contents
Front panelDisplayRear panelIndexRemote
Playback
Perform iTunes playback operations
with the remote control unit of this unit
With this unit’s remote control unit, you can perform iTunes song play,
pause, and auto search (cue) operations.
1
Select “Edit” – “Preferences...” on the menu.
2
Select “Devices” in the iTunes setting window.
3
Check “Allow iTunes audio control from remote
speakers”, and then click “OK”.
%
•+ is displayed on the menu screen while AirPlay is being operated.
•Source input will be switched to “NETWORK” when AirPlay playback is started.
•You can stop AirPlay playback by pressing the
o or choosing other input source.
•To see song and artist names together, press STATUS on the main unit.
•For information about how to use iTunes, also see the Help for iTunes.
•The screen may dier depending on the OS and software versions.
OKCancel
?
Devices Preferences
GeneralPlaybackSharingStoreParentalAdvanced
more than 5%Warn when
Delete Backup ...
Device backups:
Forget All Remotes
Reset Sync History
of the data on this computer will be changed
Prevent iPods, iPhones, and iPads from syncing automatically
Allow iTunes audio control from remote speakers
Only allow paired or Home Sharing Remotes to control iTunes
iTunes is not paired with any Remotes
Devices
86
Appendix
TipsSettingsConnections
Contents
Front panelDisplayRear panelIndexRemote
Playback
Convenience functions
uio
p
ENTER
OPTION
NETWORK
Here, we explain how to use the convenience functions. The source
names under the titles of each function’s description are sources that
allow use of these functions.
87
Appendix
TipsSettingsConnections
Contents
Front panelDisplayRear panelIndexRemote
Playback
Performing repeat playback (Repeat)
nSupported input sources : USB / Media Server / Spotify
1
While content is playing, press OPTION.
The option menu screen is displayed.
2
Use ui to select “Repeat”, then press ENTER.
3
Use op to select repeat playback mode.
O (Default) : Repeat playback mode is canceled.
One : A file being played is played repeatedly.
All : All files in the folder currently being played are played
repeatedly.
4
Press ENTER.
The display returns to the playback screen.
Performing random playback (Random)
nSupported input sources : USB / Media Server / Spotify
1
While content is playing, press OPTION.
The option menu screen is displayed.
2
Use ui to select “Random”, then press ENTER.
3
Use op to select random playback mode.
O (Default) : Disable random playback.
On : Randomly play back all tracks in the current playback folder.
4
Press ENTER.
The display returns to the playback screen.
%
•During random playback, each time playback of a track is completed, another track
is randomly selected for playback from tracks in the folder. Therefore, it’s possible
that you may hear a track played back more than once during random playback.
88
Appendix
TipsSettingsConnections
Contents
Front panelDisplayRear panelIndexRemote
Playback
Add to favorites from the Option menu
(Save to Favorites)
You can add up to 100 items as favorites for Internet Radio and Media
Server.
nSupported input sources : Internet Radio / Media Server
1
While content is playing, press OPTION.
The option menu screen is displayed.
2
Use ui to select “Save to Favorites”, then press ENTER.
“Favorite added” is displayed, and the current content is added to
favorites.
•The display returns to the playback screen when the procedure
is completed.
Playing back content added in “Save to
Favorites”
1
Press NETWORK.
2
Use uiop to select “Favorites”, then press ENTER.
FavoritesInternet Radio
Media Server
Spotify
Network
3
Use ui to select the content you want to play, and
then press ENTER.
Playback starts.
89
Appendix
TipsSettingsConnections
Contents
Front panelDisplayRear panelIndexRemote
Playback
Deleting content added to favorites
(Remove from Favorites)
1
Press NETWORK.
2
Use uiop to select “Favorites”, then press ENTER.
3
Use ui to select the content you want to delete from
favorites, then press OPTION.
The option menu screen is displayed.
4
Use ui to select “Remove from Favorites”, then press
ENTER.
“Favorite removed” is displayed, and the selected content is
deleted from favorites.
•The display returns to the original screen when the procedure is
completed.
Searching content with keywords
(Text Search)
nSupported input sources : USB / Internet Radio / Media Server
1
While content is playing, press OPTION.
The option menu screen is displayed.
2
Use ui to select “Text Search”, then press ENTER.
The keyboard input screen is displayed.
3
Enter the first character of the Internet Radio station or
file you want to search for, and then press “OK”.
•For character input, see page121.
4
Use ui to select the content you want to play, and
then press ENTER.
Playback starts.
%
•“Text Search” searches for Internet Radio stations or files that start with the
entered first character from the displayed list.
NOTE
•“Text Search” may not work for some lists.
90
Appendix
TipsSettingsConnections
Contents
Front panelDisplayRear panelIndexRemote
Playback
Playing back music and a favorite picture at the same time (Slideshow)
nSupported input sources : USB
1
Play back a still picture.
•Playing back still pictures stored on USB memory devices
(vpage49).
2
Play back a music file (vpage49).
3
Press OPTION.
The option menu screen is displayed.
4
Use ui to select “Slideshow”, then press ENTER.
The option menu disappears, and the picture you were viewing is
shown on the screen.
nSupported input sources : Internet Radio / Media Server
1
Play back a still picture.
•Playing back still pictures stored on Flickr (vpage73).
•Playing back still pictures stored on Media Server (vpage64).
2
Play back a music file of Media Server or Internet Radio
station (vpage61, 66).
3
Press OPTION.
The option menu screen is displayed.
4
Use ui to select “Slideshow”, then press ENTER.
The option menu disappears, and the picture you were viewing is
shown on the screen.
91
Appendix
TipsSettingsConnections
Contents
Front panelDisplayRear panelIndexRemote
Playback
Playing back still pictures in sequential
order (Slideshow Interval)
You can play back still picture (JPEG) files stored on a USB memory device
or Media Server and pictures on Flickr website as a slide show. The display
time can also be set.
nSupported input sources : USB / Media Server / Flickr
1
While the list is displayed, press OPTION.
The option menu screen is displayed.
2
Use ui to select “Slideshow Interval”, then press
ENTER.
3
Use op to set the display time.
O : The slide show is not played back.
5s – 60s : Set the time for displaying a single picture when playing
back images in the slide show.
4
Press ENTER.
The slide show is displayed on the screen.
%
•This unit plays back picture (JPEG) files in the order in which they are stored in
the folder.
Displaying your desired video during
audio playback (Video Select)
This unit can display video from a dierent source on TV during audio
playback.
You can set this for each input source.
nSupported input sources : USB / CD
z
/ TUNER / NETWORK
zAvailable when none of HDMI, component video or video connector is
assigned.
1
Press OPTION during audio playback.
The option menu screen is displayed.
2
Use ui to select “Video Select”, then press ENTER.
3
Use op to select the Video Select mode.
O (Default) : Disable Video Select mode.
On : Enable Video Select mode.
4
If you selected “On” in step 3, press i and select
“Source”.
5
Press op to select the input source for video you want
to play back, and press ENTER.
92
Appendix
TipsSettingsConnections
Contents
Front panelDisplayRear panelIndexRemote
Playback
Adjusting the picture quality for your
viewing environment (Picture Mode)
nSupported input sources : CBL/SAT / DVD / Blu-ray / GAME/ AUX
/ MEDIA PLAYER / USB / NETWORK / CD
z
/ TV AUDIO
z
zYou can set the picture mode when an HDMI, component video or video
connector is assigned.
1
While content is playing, press OPTION.
The option menu screen is displayed.
2
Use ui to select “Picture Mode”, then press ENTER.
3
Use op to select picture mode.
O : No picture quality adjustment is done with this unit.
Standard : The standard mode suited for most living room viewing
environments.
Movie : A mode suited for watching movies in a dark room such as
a theater room.
Vivid : A mode that makes graphic images for games, etc. brighter
and more vivid.
Streaming : A mode suited for low bit rate video sources.
Custom : Adjusts the picture quality manually.
4
Press ENTER.
The display returns to the playback screen.
93
Appendix
TipsSettingsConnections
Contents
Front panelDisplayRear panelIndexRemote
Playback
Playing music in All Zone Stereo
You can play back music in another room (ZONE2) simultaneously that is
played back in MAIN ZONE.
It is useful when you want to enjoy the same music at the same time
in multiple rooms during home party or when you want to play back the
same BGM in the entire house.
The All Zone Stereo function can be set for any source.
%
•Before setting this function, you need to turn on the another room (ZONE2) for
which you want to use the All Zone Stereo function.
1
Press MAIN to switch the zone mode.
MAIN lights.
2
Press OPTION.
The option menu screen is displayed.
3
Use ui to select “All Zone Stereo”, then press ENTER.
4
Use op to select “On”, then press ENTER.
The input source for the multi-zones (ZONE2) is switched to the
same as the one for MAIN ZONE, and playback in the All Zone
Stereo mode starts.
2Stopping the All Zone Stereo function
1
During playback in All Zone Stereo, press OPTION.
The option menu screen is displayed.
2
Use ui to select “All Zone Stereo”, then press ENTER.
3
Use op to select “O”, then press ENTER.
%
•The All Zone Stereo function is also stopped when you:
•Turn MAIN ZONE o.
•Change the input source for MAIN ZONE.
•Change the sound mode.
•When “HDMI Audio Out” (vpage 132) is set to “TV”, the All Zone Stereo
function is not available.
94
Appendix
TipsSettingsConnections
Contents
Front panelDisplayRear panelIndexRemote
Playback
Selecting a sound mode
PUREMOVIE
MUSIC
GAME
This unit allows you to enjoy various kinds of surround and stereo playback
modes.
Multi-channel audio formats are provided on popular movie and music disc
formats such as Blu-ray and DVD, as well as being supported by digital
broadcasting, and even by streaming movies and music from internet-
based subscription services.
This unit supports playback of almost all of these multi-channel audio
formats. It also supports surround playback of audio formats other than
multi-channel audio such as 2-channel stereo audio.
%
•For audio formats recorded on a disc, see the disc jacket or label.
95
Appendix
TipsSettingsConnections
Contents
Front panelDisplayRear panelIndexRemote
Playback
Selecting a sound mode
1
Press MOVIE, MUSIC or GAME to select a sound mode.
MOVIE : Switches to the sound mode suitable for enjoying movies
and TV programs.
MUSIC : Switches to the sound mode suitable for enjoying music.
GAME : Switches to the sound mode suitable for enjoying games.
%
•The MOVIE, MUSIC, or GAME button memorizes the last sound mode selected for
its button. Pressing MOVIE, MUSIC, or GAME recalls the same sound mode as the
one selected at the previous playback.
•If the content played back does not support the previously selected sound mode,
the most appropriate sound mode for the content is automatically selected.
2Switching the sound mode
•Press and hold MOVIE, MUSIC or GAME displays a list of the sound
modes that can be selected. Each time you press MOVIE, MUSIC or
GAME, the sound mode changes.
•While the list is displayed, you can also use ui to select a sound
mode.
•Try out various surround playback modes and enjoy surround playback
in your favorite mode.
GExampleH When MOVIE is pressed and held
MOVIE SOUND
STEREO
DOLBY PLIIx CINEMA
DTS NEO:6 CINEMA
MULTI CH STEREO
MONO MOVIE
VIRTUAL
This unit provides not only sound modes that conform to the formats
recorded on discs such as Dolby and DTS but also extended types
of modes that match your speaker configuration including front height
speakers and surround back speakers and “original sound modes” that
create atmosphere of ROCK ARENA and JAZZ CLUB, etc.
96
Appendix
TipsSettingsConnections
Contents
Front panelDisplayRear panelIndexRemote
Playback
Direct playback
Sound recorded in source is played as is.
1
Press PURE to select “DIRECT”.
Direct playback begins.
Pure Direct playback
This mode is for playback with higher sound quality than in “DIRECT”
mode, by turning o the front panel display panel, which can eliminate
faint low level noise from creeping into sensitive analog circuitry.
1
Press PURE to select “PURE DIRECT”.
The display goes dark, and Pure Direct playback begins.
%
•In DIRECT and PURE DIRECT sound modes, the following items cannot be
adjusted.
•Tone (vpage126)
•Restorer (vpage126)
•MultEQ® XT (vpage128)
•Dynamic EQ (vpage128)
•Dynamic Volume (vpage129)
NOTE
•Video signals are only output when HDMI signals are played in the PURE DIRECT
mode.
•When the PURE DIRECT mode has been selected, the display turns o after about
5 seconds. The power indicator will remain lit (green). To restore the display press
PURE again, which will set the unit in DIRECT mode.
97
Appendix
TipsSettingsConnections
Contents
Front panelDisplayRear panelIndexRemote
Playback
2Description of sound mode types
Dolby sound mode
Sound mode typeDescription
DOLBY PLgx
z1
This mode can be selected when the Dolby Pro Logic gx decoder is used to play back 2-channel sources in 6.1/7.1-channel
surround sound including the surround back channel(s).
By adding the surround back channel(s), a more enveloping surround environment is produced, compared to Dolby Pro
Logic g.
There are three playback modes: “Cinema” mode that is optimized for movie playback, “Music” mode that is optimized
for music playback, and “Game” mode that is optimized for game play.
DOLBY PLgThis mode can be selected when the Dolby Pro Logic g decoder is used to play back 2-channel sources in 5.1-channel
surround sound with an enveloping surround sound experience.
DOLBY PLgz
z2
This mode can be selected when the Dolby Pro Logic gz decoder is used to play back 2-channel sources in 7.1-channel
surround sound with added front height channels.
By adding front height channels, the front soundstage becomes dramatically taller, simulating the eect of listening in
a large movie theater or concert hall.
DOLBY DIGITALThis mode can be selected when playing sources recorded with Dolby Digital.
DOLBY DIGITAL EX
z1
Using the Dolby Digital EX decoder, this mode plays Dolby Digital sources in 6.1/7.1-channel surround sound with added
surround back channel(s).
By adding surround back speaker(s), sounds can be heard coming at you from behind and not just from the sides.
DOLBY TrueHDThis mode can be selected when playing sources recorded in Dolby TrueHD.
DOLBY DIGITAL PlusThis mode can be selected when playing sources recorded with Dolby Digital Plus.
z1 This can be selected when “Speaker Config.” – “Surr.Back” (vpage152) is not set to “None”.
z2 This can be selected when “Speaker Config.” – “Front Height” (vpage152) is not set to “None”.
98
Appendix
TipsSettingsConnections
Contents
Front panelDisplayRear panelIndexRemote
Playback
DTS sound mode
Sound mode typeDescription
DTS NEO:6This mode can be selected when a DTS NEO:6 decoder is used to play back 2-channel source in 6.1/7.1-channel
surround sound including the surround back channel.
There is a “Cinema” mode optimized for movie playback, and a “Music” mode optimized for music playback.
DTS SURROUNDThis mode can be selected when playing sources recorded in DTS.
DTS ES DSCRT6.1
z1
This mode is suitable for playing discs recorded in DTS-ES. The surround back channel added using the discrete method
is played as an independent channel.
Since all channels are independent, the 360-degree spacial expressiveness and sound localization are enhanced.
DTS ES MTRX6.1
z2
This mode is suitable for playing discs recorded in DTS-ES.
The surround back channel added to the surround-left and surround-right channels by a matrix encoder at software
recording time is decoded by this unit’s matrix decoder and played from each channel (surround left, surround right,
surround back).
DTS 96/24This mode can be selected when playing sources recorded in DTS 96/24.
DTS-HDThis mode can be selected when playing sources recorded in DTS-HD.
DTS ExpressThis mode can be selected when playing sources recorded in DTS Express.
z1 This mode can be selected when only one surround back speaker is used and no front height speaker is used.
z2 This can be selected when “Speaker Config.” – “Surr.Back” (vpage152) is set to “1spkr”.
PCM multi-channel sound mode
Sound mode typeDescription
MULTI CH INThis mode can be selected when playing multi-channel PCM sources from a disc player or external decoder that
features analog multi-channel outputs.
99
Appendix
TipsSettingsConnections
Contents
Front panelDisplayRear panelIndexRemote
Playback
Original sound mode
Sound mode typeDescription
MULTI CH STEREOThis mode is for enjoying stereo sound from all speakers.
Stereo audio (2-channel) sources are played back via the front (L/R) speakers, the surround speakers and if connected
the surround back speakers.
ROCK ARENAThis mode simulates the expansive sound of a live concert in an arena.
JAZZ CLUBThis mode puts you right in the middle of an intimate jazz club.
MONO MOVIEThis mode works with monaural audio sources and delivers a surround sound eect. For optimum channel balance and
surround sound eects, connect the monaural source to both of the front (L/R) audio inputs.
VIDEO GAMEThis mode provides an exciting, dynamic surround sound eect with your favorite action video games.
MATRIXThis mode adds a spacious surround sound eect with stereo music sources.
VIRTUALThis mode lets you experience an expansive surround sound eect when playing back through just the front (L/R)
speakers only, and when listening with stereo headphones.
100
Appendix
TipsSettingsConnections
Contents
Front panelDisplayRear panelIndexRemote
Playback
Stereo sound mode
Sound mode typeDescription
STEREOThis mode plays 2-channel stereo audio with no additional surround sound processing.
•Sound is output from the front left and right speakers, and subwoofer if connected.
•When multi-ichannel signals are inputted, they are mixed down to 2-channel audio and are played back with no
additional surround sound processing.
Direct sound mode
Sound mode typeDescription
DIRECTThis mode provides a direct input-to-output path with minimal audio processing, bypassing any unnecessary stages for
purest sound.
PURE DIRECTThis mode provides the direct audio signal path benefit of the Direct mode along with disabling additional stages that
might possibly have an aect on sound quality.
In Pure Direct mode, the following elements are turned o:
•The front panel display and its driver circuitry are shut down. The display will temporarily come on when adjusting the
volume, etc., but will turn o again once the adjustment has been made.
•The analog video input/output switcher and processor is disabled.
101
Appendix
TipsSettingsConnections
Contents
Front panelDisplayRear panelIndexRemote
Playback
2Sound mode
•The following sound modes can be selected using the MOVIE, MUSIC, GAME, and PURE buttons.
•Adjust the sound field eect with the menu “Surround Parameter” (vpage123) to enjoy surround sound the way you like it.
Input signalSound modeNOTE
Sound mode
MOVIEMUSICGAME
2-channel z1
STEREO
SSS
DOLBY PLg/gx Cinema z2S
DOLBY PLg/gx Musicz2S
DOLBY PLg/gx Gamez2S
DOLBY PLgzz2SS
DTS NEO:6 Cinema
z2S
DTS NEO:6 Music
z2S
MULTI CH STEREO
SSS
MONO MOVIE
S
ROCK ARENA
S
JAZZ CLUB
S
MATRIX
S
VIDEO GAME
S
VIRTUAL
SSS
z1 2-channel also includes analog input.
z2 This mode plays back 2-channel sources in 5.1 or 7.1-channel playback. It cannot be selected when headphones are used, or when only front speakers are used.
102
Appendix
TipsSettingsConnections
Contents
Front panelDisplayRear panelIndexRemote
Playback
Input signalSound modeNOTE
Sound mode
MOVIEMUSICGAME
Multi-channel z3
STEREO
SSS
Dolby Digital
DOLBY DIGITAL
SSS
DOLBY DIGITAL EX
SSS
DOLBY DIGITAL + PLgx CinemaS
DOLBY DIGITAL + PLgx MusicS
DOLBY DIGITAL + PLgzSSS
Dolby TrueHD
DOLBY TrueHD
SSS
DOLBY TrueHD + EX
SSS
DOLBY TrueHD + PLgx CinemaS
DOLBY TrueHD + PLgx MusicS
DOLBY TrueHD + PLgzSSS
Dolby Digital Plus
DOLBY DIGITAL Plus
SSS
DOLBY DIGITAL Plus + EX
SSS
DOLBY DIGITAL Plus + PLgx CinemaS
DOLBY DIGITAL Plus + PLgx MusicS
DOLBY DIGITAL Plus + PLgzSSS
DTS
DTS SURROUND
SSS
DTS ES DSCRT 6.1
SSS
DTS ES MTRX 6.1
SSS
DTS 96/24
SSS
DTS + PLgx CinemaS
DTS + PLgx MusicS
DTS + PLgzSSS
DTS + NEO:6
SSS
z3 Some sound modes cannot be selected, depending on the audio format or number of channels of the input signal. For details, see “Types of input signals, and
corresponding sound modes” (vpage196).
103
Appendix
TipsSettingsConnections
Contents
Front panelDisplayRear panelIndexRemote
Playback
Input signalSound modeNOTE
Sound mode
MOVIEMUSICGAME
DTS-HD /
DTS Express
DTS-HD HI RES
SSS
DTS-HD MSTR
SSS
DTS Express
SSS
DTS-HD + PLgx CinemaS
DTS-HD + PLgx MusicS
DTS-HD + PLgzSSS
DTS-HD + NEO:6
SSS
PCM multi-channel
MULTI CH IN
SSS
MULTI CH IN 7.1
SSS
MULTI IN + PLgx CinemaS
MULTI IN + PLgx MusicS
MULTI IN + PLgzSSS
MULTI IN + NEO:6
SSS
Multi-channel
z3
MULTI CH STEREO
SSS
MONO MOVIE
S
ROCK ARENA
S
JAZZ CLUB
S
MATRIX
S
VIDEO GAME
S
VIRTUAL
SSS
z3 Some sound modes cannot be selected, depending on the audio format or number of channels of the input signal. For details, see “Types of input signals, and
corresponding sound modes” (vpage196).
104
Appendix
TipsSettingsConnections
Contents
Front panelDisplayRear panelIndexRemote
Playback
2Views on the display
+ PL z DVD
qw
q Shows a decoder to be used.
•A DOLBY DIGITAL Plus decoder is displayed as “”.
w Shows a decoder that creates sound output from the surround back
speakers.
•“+ PLgz” indicates the front height sound from front height speakers.
105
Appendix
TipsSettingsConnections
Contents
Front panelDisplayRear panelIndexRemote
Playback
HDMI control function
A recent addition to the HDMI standard is CEC (Consumer Electronics Control), which allows control signals from one device to communicate with
another device via the HDMI cable connection. Not all HDMI-equipped devices have this capability.
Setting procedure
1
Set the HDMI output connector corresponding with the
HDMI control function.
Set “HDMI Control” (vpage133) to “On”.
2
Turn the power on for all the devices connected by
HDMI cable.
3
Set the HDMI control function for all devices connected
by HDMI cable.
•Please consult the operating instructions for the connected
devices to check the settings.
•Carry out steps 2 and 3 should any of the devices be unplugged.
4
Switch the television input to the HDMI input connected
to this unit.
5
Switch this unit input to the HDMI input source and
check if the picture from the player is ok.
6
When you turn the TV’s power to standby, check that
the power of this unit also goes to standby.
NOTE
•Some functions may not operate depending on the connected TV or player. Check
the owner’s manual of each device for details beforehand.
106
Appendix
TipsSettingsConnections
Contents
Front panelDisplayRear panelIndexRemote
Playback
MAIN
ZONE2
SLEEP
Sleep timer function
You can have the power automatically switched to standby once a set
time has elapsed. This is convenient for viewing and listening while going
to sleep.
The sleep timer function can be set for each zone.
Using the sleep timer
1
Press MAIN or ZONE2 to switch the zone mode.
The button for the selected zone is lit.
2
Press SLEEP and display the time you want to set.
•The SLEEP indicator on the display lights.
•You can set the sleep timer in the range from 10 to 120 minutes
in steps of 10 minutes.
2To cancel the sleep timer
Press SLEEP to set “O”.
The SLEEP indicator on the display turns o.
%
•The sleep timer is also cancelled when this unit is set to the standby mode or the
MAIN ZONE or ZONE2 power is turned o.
NOTE
•The sleep timer function cannot turn o the power of devices connected to this
unit. To turn o the power of those connected devices, set up sleep timers on the
connected devices themselves.
107
Appendix
TipsSettingsConnections
Contents
Front panelDisplayRear panelIndexRemote
Playback
Quick select function
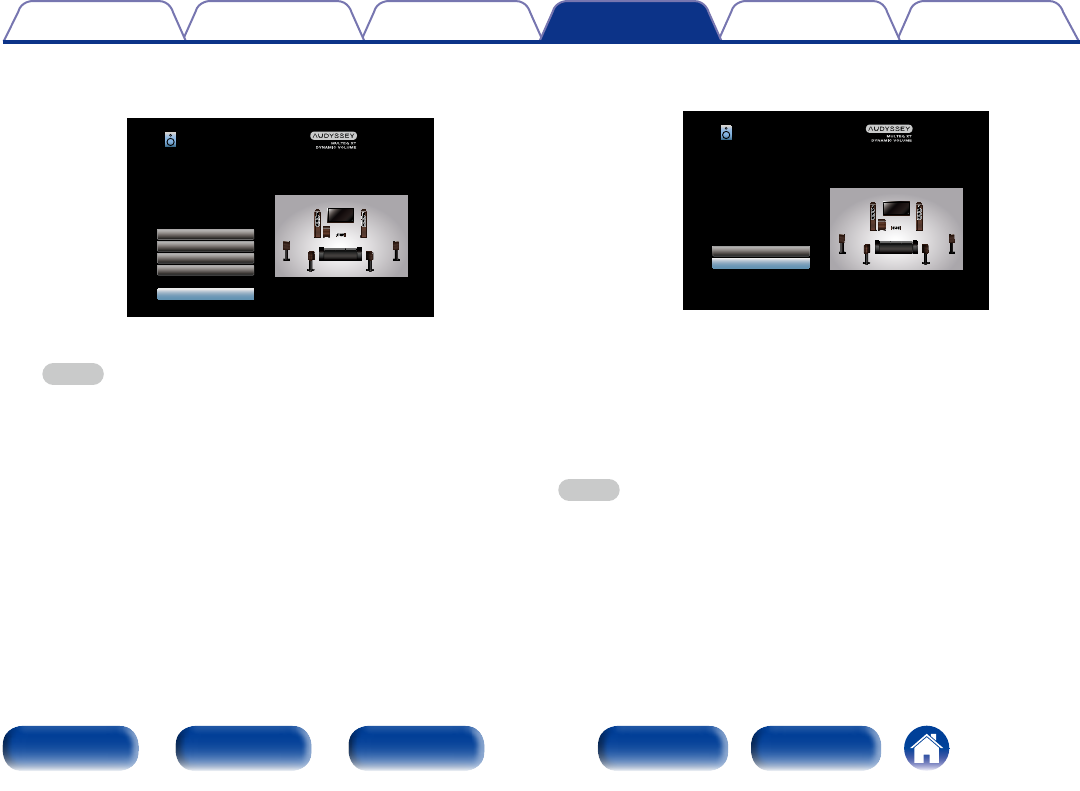
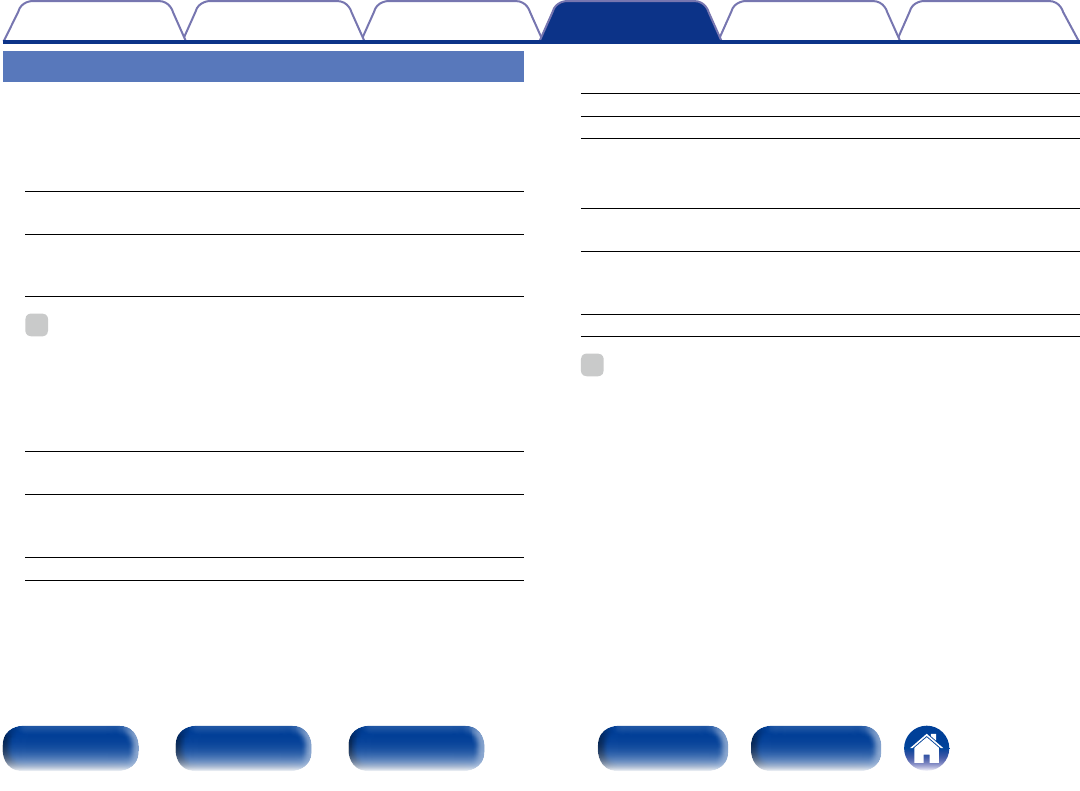
You can save settings such as the input source selection, volume level, and sound mode at the QUICK SELECT 1 – 4 buttons.
You can simply press one of the set QUICK SELECT buttons for subsequent playback to switch to various saved settings all at once.
By saving frequently used settings at the QUICK SELECT 1 – 4 buttons, you will always be able to easily call up the same playback environment.
Calling up the Quick Select
1
Press QUICK SELECT.
The Quick Select settings for the button you pressed are called up.
•The default settings of each Quick Select function are as shown below.
ButtonInput sourceVolumeSound mode
QUICK SELECT 1CBL/SAT40STEREO
QUICK SELECT 2Blu-ray40STEREO
QUICK SELECT 3GAME40STEREO
QUICK SELECT 4NETWORK40STEREO
Changing the settings
1
Set the items below to the settings you want to save.
qInput source
z
(vpage42)
wVolume (vpage43)
eSound mode (vpage94)
r Audyssey (Audyssey MultEQ® XT, Audyssey Dynamic EQ®,
Audyssey Dynamic Volume®) (vpage128)
2
Press and hold the desired QUICK SELECT until “Quickz
Memory” appears on the display.
The current settings will be memorized.
zThe number for the QUICK SELECT button you pressed is displayed.
2Changing the Quick Select Name
On this unit, you can change the Quick Select Name displayed on the
menu to the name that you prefer.
For the name change method, see “Quick Select Names”
(vpage161).
108
Appendix
TipsSettingsConnections
Contents
Front panelDisplayRear panelIndexRemote
Playback
Web control function
You can control this unit from a web control screen on a web browser.
PC
RouterThis unit
%
•This unit and the PC need to be connected to the network properly (vpage39
“Connecting to a home network (LAN)”) in order to use the web control function.
•Depending on the settings of your security-related software, you may not be able
to access this unit from your PC. If this is the case, then change the settings of the
security-related software.
Controlling the unit from a web control
1
Switch the “IP Control” (vpage156) setting to
“Always On”.
2
Check the IP address of this unit with “Information”
(vpage156).
Network/Information
Friendly name
DHCP
IP Address
MAC Address
Displays the current network settings of the AVR
Denon AVR-X2000
On
192.168.100.19
0005cd000000
Checking the IP address.
3
Start up the web browser.
109
Appendix
TipsSettingsConnections
Contents
Front panelDisplayRear panelIndexRemote
Playback
4
Enter the IP address of this unit in browser’s address
box.
For example, if the IP address of this unit is “192.168.100.19”,
enter “http://192.168.100.19/”.
http://192.168.100.19
INDEX
File
EditViewToolsHelpFavorites
Denon AVR-X2000
Web Controller
MAIN ZONE
0.0
CBL/SAT
ZONE2
Blu-ray
Setup Menu
5
When the top menu is displayed, click on the menu item
you want to operate.
http://192.168.100.19
INDEX
File
EditViewToolsHelpFavorites
Denon AVR-X2000
Web Controller
MAIN ZONE
0.0
CBL/SAT
ZONE2
Blu-ray
Setup Menu
%
•You can use the Web control function with Internet Explorer 8 or later to memorize
and call up various settings on this unit.
To memorize settings, click “SAVE” on the Setup Menu screen.
To call up settings, click “LOAD” on the Setup Menu screen.
110
Appendix
TipsSettingsConnections
Contents
Front panelDisplayRear panelIndexRemote
Playback
Playback in ZONE2 (Separate room)
You can operate this unit to enjoy audio in a room (ZONE2) that is dierent from the room where this unit is placed (MAIN ZONE).
You can simultaneously play back the same source in both the MAIN ZONE and ZONE2. You can also play back separate sources in the MAIN ZONE and
ZONE2.
Connecting ZONE2
You can use the following two methods to play back audio in ZONE2.
•Connection through the speaker output terminals (vpage110)
•Connection using an external amplifier (vpage111)
2Connection 1 : Connection through the speaker
output terminals
•Set the “Assign Mode” (vpage150) setting to “ZONE2”, and
outputs ZONE2 audio from SURROUND BACK speaker terminals
(The default setting is “Surround Back”).
•If you set the “Assign Mode” (vpage150) setting to “ZONE2”,
the main zone home theater system can play back up to 5.1-channels.
Even if you play back audio recorded in 6.1 or 7.1-channels, this unit
automatically downmixes the audio to 5.1-channels.
ZONE2
wqwq
(L)(R)
MAIN ZONE
This unit
111
Appendix
TipsSettingsConnections
Contents
Front panelDisplayRear panelIndexRemote
Playback
2Connection 2 : Connection using an external
amplifier
The audio signals of this unit’s ZONE2 audio output connectors are
output to the ZONE2 amplifiers and played on these amplifiers.
ZONE2MAIN ZONE
AUX IN
R
L
This unit
Power
amplifiers
%
•We recommend using high quality pin-plug (RCA type) cables for audio connections
in order to prevent noise.
•If you select a same input source for MAIN ZONE and ZONE2, audio playback may
be restricted.
112
Appendix
TipsSettingsConnections
Contents
Front panelDisplayRear panelIndexRemote
Playback
Playback in ZONE2
MUTE
ZONE2
POWER
VOLUME
X
df
:
Input source
select buttons
1
Press ZONE2 to switch the zone mode to the ZONE2.
2
Press POWER X to turn on the ZONE2 power.
The ( indicator on the display lights.
%
•Also press input source select button when in standby mode, the
power turns on.
•When POWER X is pressed, ZONE2 turns o.
•Power in ZONE2 can be turned on or o by pressing ZONE2 ON/
OFF on the main unit.
3
Press the input source select button to select the input
source to be played.
The audio signal of the selected source is output to ZONE2.
%
•In ZONE2, you can select iPod/USB, TUNER, NETWORK or an
input source with an analog audio input connector.
•To perform an operation with the main unit, press ZONE2
SOURCE.
Each time you press ZONE2 SOURCE, the input source changes.
2Adjusting the volume
Use VOLUME df to adjust the volume.
•At time of purchase, “Volume Limit” (vpage161) is set to “70
(–10dB)”.
%
•Turn MASTER VOLUME after pressing ZONE2 SOURCE on the main unit to
adjust the sound volume.
113
Appendix
TipsSettingsConnections
Contents
Front panelDisplayRear panelIndexRemote
Playback
2Turning o the sound temporarily
Press MUTE :.
The sound is reduced to the level set at “Mute Level” (vpage161)
in the menu.
•To cancel, either adjust the volume or press MUTE : again.
•You can also adjust the volume level to cancel the muting.
114
Appendix
TipsPlaybackConnections
Contents
Front panelDisplayRear panelIndexRemote
Settings
Settings
Menu map
For menu operation, connect a TV to this unit and display the menu on the TV screen. For menu operations, see the following page.
By default, this unit has recommended settings defined. You can customize this unit based on your existing system and your preferences.
2Audio
Setting itemsDescriptionPage
Dialog LevelSets the output level to clarify the dialogue output from the center channel.
122
Subwoofer LevelThis setting adjusts the volume level for the subwoofer.
122
SubwooferTurn subwoofer output on and o.
122
Subwoofer LevelThis setting adjusts the volume level for the subwoofer.
Set the front speakers to use for every sound mode.
%
•This can be set when “Assign Mode” (vpage150) is set to “Front B”.
22ch Playback
The front speakers used in direct play (2-channel), stereo play and pure
direct play (2-channel) are set in advance.
A (Default) : Front speaker A is used.
B : Front speaker B is used.
A+B : Both front speakers A and B are used.
2Multi ch Playback
The front speakers used in play modes other than direct play (2-channel),
stereo play and pure direct play (2-channel) are set in advance.
A (Default) : Front speaker A is used.
B : Front speaker B is used.
A+B : Both front speakers A and B are used.
156
Appendix
TipsPlaybackConnections
Contents
Front panelDisplayRear panelIndexRemote
Settings
Network
To use this unit by connecting it to a home network (LAN), you must configure network settings.
If you set up your home network (LAN) via DHCP, set “DHCP” to “On” (use the default setting). This allows this unit to use your home network (LAN).
If you assign an IP address for each device, you must use the “IP Address” setting to assign an IP address to this unit and enter the information about
your home network (LAN) such as the gateway address and subnet mask.
Information
Display network information.
Friendly Name / DHCP On or O / IP Address / MAC Address
%
•MAC Address is required to make a vTuner account.
IP Control
Enables network communication in standby power mode.
O In Standby (Default) : Suspend network function during standby.
Always On : Network is on during standby. Main unit operable with a
network compatible controller.
%
•Set to “Always On” when using the web control function.
NOTE
•When “IP Control” is set to “Always On”, it consumes more standby power.
Friendly Name
The Friendly Name is the name of this unit displayed on the network. You
can change the Friendly Name according to your preferences.
2Edit Name
Edits Friendly Name.
%
•The default Friendly Name on first use is “Denon AVR-X2000”.
•Up to 63 characters can be input.
•For character input, see page121.
2Set Defaults
Restores Friendly Name, which you had changed, to the default setting.
157
Appendix
TipsPlaybackConnections
Contents
Front panelDisplayRear panelIndexRemote
Settings
Settings
Make settings for wired LAN.
•If you are using a broadband router (DHCP function), there is no need
to make the settings at “IP Address” and “Proxy”, since the DHCP
function is set to “On” in this unit’s default settings.
•Only set “Settings” when connecting to a network without a DHCP
function.
DHCP
-IP Address
-Subnet Mask
Proxy
Save
Cancel
-Address
-Port
-Default Gateway
-Primary DNS
-Secondary DNS
Configure the network settings manually
Off
192.168.000.001
255.255.255.000
255.255.255.000
000.000.000.000
000.000.000.000
Off
000.000.000.000
00000
Network/Settings
2DHCP
Selects how to connect to the network.
On : Configure the network settings automatically from your router.
O : Configure the network settings manually.
2IP Address
Set the IP address within the ranges shown below.
•The Network Audio function cannot be used if other IP addresses
are set.
CLASS A: 10.0.0.1 – 10.255.255.254
CLASS B: 172.16.0.1 – 172.31.255.254
CLASS C: 192.168.0.1 – 192.168.255.254
2Subnet Mask
When connecting an xDSL modem or connector adapter directly to this
unit, input the subnet mask indicated in the documentation supplied by
your provider. Normally input 255.255.255.0.
2Default Gateway
When connected to a gateway (router), input its IP address.
2Primary DNS, Secondary DNS
If there is only one DNS address indicated in the documentation
supplied by your provider, input it at “Primary DNS”. If two or more
DNS are provided by your provider, enter both “Primary DNS” and
“Secondary DNS”.
158
Appendix
TipsPlaybackConnections
Contents
Front panelDisplayRear panelIndexRemote
Settings
2Proxy
Make this setting when connecting to the Internet via a proxy server.
Make the proxy settings only when you connect to the Internet via
a proxy server that is on your internal network or provided by your
provider, etc.
On(Address) : Select when inputting by address.
On(Name) : Select when inputting by domain name. Up to 38
characters can be input.
O : Disables the proxy server.
2Port
Enter port number.
%
•If you cannot connect to the Internet, recheck the connections and settings
(vpage39).
•If you do not understand about Internet connection, contact your ISP (Internet
Service Provider) or the store from which you purchased your computer.
Diagnostics
Used to check the network connection.
2Physical Connection
Checks the physical LAN port connection.
OK
Error : The LAN cable is not connected. Check the connection.
2Router Access
Checks the connection from this unit to the router.
OK
Error : Failed to communicate with the router. Check the router
settings.
2Internet Access
Checks whether this unit has access to the Internet (WAN).
OK
Error : Failed to connect to the Internet. Check the Internet connection
environment or router settings.
159
Appendix
TipsPlaybackConnections
Contents
Front panelDisplayRear panelIndexRemote
Settings
Maintenance Mode
Use when receiving maintenance from a Denon service engineer or custom
installer. Ordinarily, this mode isn’t suitable for use by the end user, only
by a trained service technician or custom installation professional.
NOTE
•Only use this function if so instructed by a Denon serviceperson or installer.
160
Appendix
TipsPlaybackConnections
Contents
Front panelDisplayRear panelIndexRemote
Settings
Language
Set the language for display on the menu screen.
English (Default) / Deutsch / Français / Italiano / Español / Nederlands
/ Svenska / / Polski
%
•“Language” can also be set by the following procedure. However, the menu
screen is not displayed.
Following the display content to make the setting.
1. Press and hold the main unit’s ZONE2 SOURCE and STATUS for at least 3
seconds.
“V.Format:<PAL>” appears on the display.
2. Press the main unit’s DIMMER.
“Lang.:<ENGLISH >” appears on the display.
3. Use the main unit’s TUNER PRESET CH +, – and set the language.
4. Press the main unit’s STATUS to complete the setting.
General
Make various other settings.
ZONE2 Setup
Set the audio to play back with multi-zone (ZONE2).
%
•The setting values (dB) for “Volume Limit” and “Power On Volume” are what is
displayed when “Scale” (vpage127) in the menu is set to “–79.5dB – 18.0dB”.
2Lch Level
Adjust the left channel output level.
–12dB – +12dB (Default : 0dB)
2Rch Level
Adjust the right channel output level.
–12dB – +12dB (Default : 0dB)
2Volume Level
Set the volume output level.
Variable (Default) : Volume adjustment is enabled by main unit and
remote control unit.
1 – 98 (–79dB – 18dB) : The volume is adjusted to the set level.
The Internet radio cannot be played back ......................................(180)
Music files on PC or NAS cannot be played back...........................(181)
The HDMI control function does not work ..................................... (182)
When using ZONE2, no sound comes out ..................................... (182)
169
Appendix
SettingsPlaybackConnections
Contents
Front panelDisplayRear panelIndexRemote
Tips
Tips
I want the volume not to become too loud by mistake.
•Set the volume upper limit for “Volume Limit” in the menu beforehand. This prevents children or others from increasing the volume too much by
mistake. You can set this for each zone (vpage127, 161).
I want to keep the volume at the same level when I turn the power on.
•By default, the volume setting when power was previously set to standby is applied at next power on. To use a fixed volume level, set the volume level
at power on for “Volume Limit” in the menu. You can set this for each zone (vpage127, 161).
I want to have the subwoofer always output audio.
•Depending on the input signals and sound mode, the subwoofer may not output audio.
When “Subwoofer Mode” in the menu is set to “LFE+Main”, you can have the subwoofer always output audio (vpage155).
I want to make human voices in the movies clearer.
•Use “Dialog Level” in the menu to adjust the level (vpage122).
I want to keep bass and clarity during playback at a lower volume level.
•Set “Dynamic EQ” in the menu to “On”. This setting corrects the frequency characteristics to allow you to enjoy clear sound without the bass being
lost even during playback at a lower volume level (vpage128).
I want to automatically adjust the volume level dierence in content such as TV and movies.
•Set “Dynamic Volume” in the menu. Volume level changes (between quiet scenes and loud scenes) in TV shows or movies are automatically adjusted
to your desired level (vpage129).
I want to set the optimized listening environment after changing the configuration/position of the speakers or
changing a speaker to a new one.
•Perform Audyssey® Setup. This automatically makes the optimized speaker settings for the new listening environment (vpage141).
170
Appendix
SettingsPlaybackConnections
Contents
Front panelDisplayRear panelIndexRemote
Tips
I want to combine a desired video with the current music.
•Set “Video Select” in the option menu to “On”. You can combine the current music with your desired video source from Set-top Box or DVD, etc. while
listening to music from Tuner, CD or the Internet radio (vpage91).
I want to play back photos from Flickr at the same time while listening to the Internet radio.
•After playing back photos from Flickr, start the slide show on the Internet radio playback screen (vpage90).
I want to delete unused input sources.
•Set unused input sources for “Hide Sources” in the menu. This allows you to skip unused input sources when rotating the SOURCE SELECT knob on
this unit (vpage139).
I want to enjoy the same music in all zones at the home party, etc.
•Set “All Zone Stereo” in the option menu to “On”. This allows you to simultaneously play back in ZONE2 the music that is played back in MAIN ZONE
(vpage93).
I want to minimize the delay in video signals when I’m playing a game on my game console.
•When the video is delayed against button operations with the controller on the game console, set “Video Mode” in the menu to “Game” (vpage134).
How to add Wi-Fi to the AV receiver?
•Connect a wireless LAN converter (sold separately) to the NETWORK connector on this unit.
171
Appendix
SettingsPlaybackConnections
Contents
Front panelDisplayRear panelIndexRemote
Tips
Troubleshooting
If a problem should arise, first check the following:
1. Are the connections correct?
2. Is the set being operated as described in the owner’s manual?
3. Are the other devices operating properly?
If this unit does not operate properly, check the items listed in the table below. Should the problem persist, there may be a malfunction.
In this case, disconnect the power immediately and contact your store of purchase.
2Power does not turn on / Power is turned o
SymptomCause / SolutionPage
Power does not turn on.•Check whether the power plug is correctly inserted into the power outlet.
40
Power automatically turns o.•The sleep timer is set. Turn on the power again.
•“Auto Standby” is set. “Auto Standby” is triggered when there is no operation for a set
amount of time. To disable “Auto Standby”, set “Auto Standby” on the menu to “O”.
106
162
Power turns o and the power
indicator flashes in red approx. every
2 seconds.
•Due to the temperature rise within this unit, the protection circuit is working. Turn o the
power and wait about an hour until this unit suciently cools down. Then, turn on the power
again.
•Please re-install this unit in a place having good ventilation.
203
–
Power turns o and the power
indicator flashes in red approx. every
0.5 seconds.
•Check the speaker connection. The protection circuit may have been activated because
speaker cable core wires came in contact with each other or a core wire was disconnected
from the connector and came in contact with the rear panel of this unit. After unplugging the
power cord, take corrective action such as firmly re-twisting the core wire or taking care of the
connector, and then reconnect the wire.
•Turn down the volume and turn on the power again.
•This unit’s amplifier circuit has failed. Turn o the power and please contact the Denon
service adviser.
23
42, 43
–
172
Appendix
SettingsPlaybackConnections
Contents
Front panelDisplayRear panelIndexRemote
Tips
2Operations cannot be performed through the remote control unit
SymptomCause/SolutionPage
Operations cannot be performed
through the remote control unit.
•Batteries are worn out. Replace with new batteries.
•Operate the remote control unit within a distance of about 7 m from this unit and at an angle
of within 30°.
•Remove any obstacle between this unit and the remote control unit.
•Insert the batteries in the proper direction, checking the q and w marks.
•The set’s remote control sensor is exposed to strong light (direct sunlight, inverter type
fluorescent bulb light, etc.). Move the set to a place in which the remote control sensor will
not be exposed to strong light.
•The operation target zone does not correspond to the zone setting specified on the remote
control unit. Press MAIN or ZONE2 to select the zone to operate.
•When using a 3D video device, the remote control unit of this unit may not function due to
eects of infrared communications between units (such as TV and glasses for 3D viewing). In
this case, adjust the direction of units with the 3D communications function and their distance
to ensure they do not aect operations from the remote control unit of this unit.
7
7
–
7
–
112, 120
–
2Display on this unit shows nothing
SymptomCause/SolutionPage
Display is o.•Set “Dimmer” on the menu to something other than “O”.
•When the sound mode is set to PURE DIRECT, the display is o.
162
96
173
Appendix
SettingsPlaybackConnections
Contents
Front panelDisplayRear panelIndexRemote
Tips
2No sound comes out
SymptomCause/SolutionPage
No sound comes out of speakers.•Check the connections for all devices.
•Insert connection cables all the way in.
•Check that input connectors and output connectors are not reversely connected.
•Check cables for damage.
•Check that speaker cables are properly connected. Check that cable core wires come in
contact with the metal part on speaker terminals. Also, securely tighten speaker terminals.
Check speaker terminals for looseness.
•Check that a proper input source is selected.
•Adjust the master volume.
•Cancel the mute mode.
•Check the digital input connector setting.
•Check the digital audio output setting on the connected device. On some devices, the digital
audio output is set to o by default.
•No sound is output from the speakers when headphones are connected.
23,30,31,33,
34,35,36,38,
39
–
–
–
23
42, 112
43, 112
43, 113
31,33,34
–
11
No sound comes out when using the
DVI-D connection.
•When this unit is connected to a device equipped with a DVI-D connector, no sound is output.
Make a separate audio connection.
–
174
Appendix
SettingsPlaybackConnections
Contents
Front panelDisplayRear panelIndexRemote
Tips
2Desired sound does not come out
SymptomCause/SolutionPage
The volume does not increase.•The maximum volume is set too low. Set the maximum volume using “Limit”on the menu.
•Appropriate volume correction processing is performed according to the input audio format
and settings, so the volume may not reach the upper limit.
127,161
–
No sound comes out with the HDMI
connection.
•Check the connection of the HDMI connectors.
•When outputting HDMI audio from the speakers, set “HDMI Audio Out” on the menu to
“AVR”. To output from the TV, set “TV”.
•When using the HDMI control function, check that the audio output is set to the AV amplifier
on the TV.
30,31
132
105
No sound comes out of a specific
speaker.
•Check that the speaker cable is properly connected.
•Check that a selection other than “None” is set for the “Speaker Config.” setting in menu.
•Check the “Assign Mode” setting in the menu.
•When the sound mode is “STEREO” and “VIRTUAL”, audio is only output from the front
speakers and subwoofer.
23
151,152
150
–
No sound is produced from
subwoofer.
•Check the subwoofer connections.
•Turn on the subwoofer’s power.
•Set “Speaker Config.” – “Subwoofer” on the menu to “Yes”.
•When “Speaker Config.” – “Front” in the menu is set to “Large”, depending on the input
signal and the sound mode, no sound may be output from the subwoofer.
•When no subwoofer audio signal (LFE) is included in the input signals, no sound may be
output from the subwoofer.
•You can make the subwoofer always output sound by setting the subwoofer mode to
“LFE+Main”.
24
–
151
151
155
155
175
Appendix
SettingsPlaybackConnections
Contents
Front panelDisplayRear panelIndexRemote
Tips
SymptomCause/SolutionPage
DTS sound is not output.•Check that the digital audio output setting on the connected device is set to “DTS”.
•Set “Decode Mode” on the menu to “Auto” or “DTS”.
–
140
Dolby TrueHD, DTS-HD, Dolby Digital
Plus audio is not output.
•Make HDMI connections.
•Check the digital audio output setting on the connected device. On some devices, “PCM” is
set by default.
33,34
–
Dolby PLg mode or DTS NEO:6 mode
cannot be selected.
•It cannot be selected when “None” is set for “Speaker Config.” – “Center” and “Surround”.
•These cannot be selected when using the headphones.
151
–
Audyssey MultEQ® XT, Audyssey
Dynamic EQ® and Audyssey Dynamic
Volume® cannot be selected.
•These cannot be selected when you have not performed Audyssey® Setup.
•Switch the sound mode to other than “DIRECT” or “PURE DIRECT”.
•These cannot be selected when using the headphones.
•These cannot be selected when an HD audio format with a sampling frequency of over 96 kHz
is input (such as may be found on select Dolby TrueHD and DTS-HD discs).
141
96
–
–
“Restorer” cannot be selected.•Check that an analog signal or PCM signal (Sample Rate=44.1/48 kHz) is input. For playback
of multichannel signals such as Dolby Digital or DTS surround, “Restorer” cannot be used.
•Switch the sound mode to other than “DIRECT” or “PURE DIRECT”.
126
96
No audio is output in ZONE2.•You cannot play back the audio for digital signals that are input from the HDMI connector or
digital connectors (OPTICAL/COAXIAL). Make an analog connection instead.
–
176
Appendix
SettingsPlaybackConnections
Contents
Front panelDisplayRear panelIndexRemote
Tips
2Sound is interrupted or noise occurs
SymptomCause/SolutionPage
During playback from the Internet
radio or USB memory device, sound
is occasionally interrupted.
•When the transfer speed of the USB memory device is slow, sound may occasionally be
interrupted.
•The network communication speed is slow or the radio station is busy.
–
–
When making a call on iPhone, noise
occurs in audio output on this unit.
•When making a call, keep a distance of 20 cm or longer between iPhone and this unit.–
Noise often occurs in FM
broadcasting.
•Change the antenna orientation or position.
•Use an FM outdoor antenna.
•Separate the antenna from other connection cables.
38
38
38
2No video is shown on the TV
SymptomCause/SolutionPage
No picture appears.•Check the connections for all devices.
•Insert connection cables all the way in.
•Check that input connectors and output connectors are not reversely connected.
•Check cables for damage.
•Match the input settings to the input connector of the TV connected to this unit.
•Check that the proper input source is selected.
•Check the video input connector setting.
•Check that the resolution of the player corresponds to that of the TV.
•Check whether the TV is compatible with copyright protection (HDCP). If connected to a
device not compatible with HDCP, video will not be output correctly.
30,31,33,34,
35,36,38,39
–
–
–
137
42, 112
137
163
186
177
Appendix
SettingsPlaybackConnections
Contents
Front panelDisplayRear panelIndexRemote
Tips
SymptomCause/SolutionPage
No video is shown on the TV with the
DVI-D connection.
•With the DVI-D connection, on some device combinations, devices may not function properly
due to the copy guard copyright protection (HDCP).
186
No video from an input source such
as a game console is shown on the
TV.
•When special video signals are input from a game console, etc., the video conversion function
may not function. Connect the input connector to the monitor output connector of the same
type.
–
While the menu is being displayed, no
video is shown on the TV.
•When the menu is operated during playback of some 3D video contents or of video at some
computer resolutions (such as VGA), no playback video is shown in the background of the
menu.
–
2The menu screen is not displayed on the TV
SymptomCause/SolutionPage
The menu screen is not displayed on
the TV.
•No operation detail is displayed for some 3D videos or videos with a computer resolution
such as VGA.
•When a 2D video is converted to a 3D video on the TV, the menu screen or status indication
screen is not properly displayed.
•In the pure direct playback mode, the menu screen or operation detail is not displayed. Switch
to a sound mode other than the pure direct mode.
•Set the “TV Format” setting in the menu to a selection that is appropriate for the TV.
163
–
95,96
136
178
Appendix
SettingsPlaybackConnections
Contents
Front panelDisplayRear panelIndexRemote
Tips
2iPod cannot be played back
SymptomCause/SolutionPage
iPod cannot be connected.•When using iPod by connecting it to the USB port, some iPod variations are not supported.
•When iPod is connected by using a USB cable other than the genuine cable, iPod may not be
recognized. Use a genuine USB cable.
37
–
The AirPlay icon
' is not displayed
on iTunes / iPhone / iPod touch / iPad.
•This unit and PC / iPhone / iPod touch / iPad are not connected to the same network (LAN).
Connect it to the same LAN as this unit.
•The firmware on iTunes / iPhone / iPod touch / iPad is not compatible with AirPlay. Update the
firmware to the latest version.
39
–
Audio is not output.•The volume on iTunes / iPhone / iPod touch / iPad is set to the minimum level. The volume on
iTunes / iPhone / iPod touch / iPad is linked with the volume on this unit. Set a proper volume
level.
•The AirPlay playback is not performed, or this unit is not selected. Click the AirPlay icon
' on
the iTunes / iPhone / iPod touch / iPad screen and select this unit.
–
83
Audio is interrupted during the AirPlay
playback on iPhone / iPod touch /
iPad.
•Quit the application running in the background of the iPhone/iPod touch/iPad, and then play
using AirPlay.
•Some external factors may be aecting the wireless connection. Modify the network
environment by taking measures such as shortening the distance from the wireless LAN
access point.
–
–
iTunes cannot be played back through
the remote control unit.
•Enable the “Allow iTunes control from remote speakers” setting on iTunes. Then, you can
perform playback, pause, and skip operations through the remote control unit.
–
179
Appendix
SettingsPlaybackConnections
Contents
Front panelDisplayRear panelIndexRemote
Tips
2USB memory devices cannot be played back
SymptomCause/SolutionPage
“No Connection” is displayed.•The set cannot recognize a USB memory device. Disconnect and reconnect the USB memory
device.
•USB memory devices of a mass storage class or those compatible with MTP are supported.
•This unit does not support a connection through a USB hub. Connect the USB memory device
directly to the USB port.
•The USB memory device must be formatted to FAT16 or FAT32.
•Not all USB memory devices are guaranteed to work. Some USB memory devices are not
recognized. When using a type of portable hard disc drive compatible with the USB connection
that requires power from an AC adapter, use the AC adapter that came with the drive.
36
–
–
–
–
Files on the USB memory device are
not displayed.
•Files of a type not supported by this unit are not displayed.
•This unit can display a file structure with up to 8 levels and up to 5000 subfolders and files in
total. Modify the folder structure of the USB memory device.
•When multiple partitions exist on the USB memory device, only files on the first partition are
displayed.
48
–
–
Files on a USB memory device cannot
be played.
•Files are created in a format that is not supported by this unit. Check the formats supported
by this unit.
•You are attempting to play a file that is copyright protected. Files that are copyright protected
cannot be played on this unit.
189
–
180
Appendix
SettingsPlaybackConnections
Contents
Front panelDisplayRear panelIndexRemote
Tips
2File names on the iPod/USB memory device are not displayed properly
SymptomCause/SolutionPage
The file names are not displayed
properly (“...”, etc.).
•Characters that cannot be displayed are used. This is not a malfunction. On this unit, characters
that cannot be displayed are replaced with a “.” (period).
–
2The Internet radio cannot be played back
SymptomCause/SolutionPage
A list of broadcasting stations is not
displayed.
•The LAN cable is not properly connected, or the network is disconnected. Check the
connection status.
•Perform the network diagnostic mode.
39
–
Internet Radio cannot be played.•The selected radio station is broadcasting in a format that is not supported by this unit.
Formats that can be played back in this unit are MP3, WMA and AAC.
•The firewall function is enabled on the router. Check the firewall setting.
•The IP address is not properly set.
•Check the power of the router is on.
•To obtain the IP address automatically, enable the DHCP server function on the router. Also,
set the DHCP setting to “On” on this unit.
•To obtain the IP address manually, set the IP address and proxy on this unit.
•Some radio stations broadcast silently during some time period. In this case, no audio is
output. Wait for a while and select the same radio station, or select another radio station.
191
–
157
–
157
157, 158
61
Cannot connect to favorite radio
stations.
•Radio station is not currently in service. Register radio stations in service.–
For some radio stations, “Connection
down” is displayed and station cannot
be connected to.
•The selected radio station is not in service. Select a radio station in service.–
181
Appendix
SettingsPlaybackConnections
Contents
Front panelDisplayRear panelIndexRemote
Tips
2Music files on PC or NAS cannot be played back
SymptomCause/SolutionPage
Files stored on a computer cannot be
played.
•Files are stored in a non-compatible format. Record in a compatible format.
•You are attempting to play a file that is copyright protected. Files that are copyright protected
cannot be played on this unit.
•Set and computer are connected by USB cable. The set’s USB port cannot be used for
connection to a computer.
•Media sharing settings are not correct. Change media sharing settings so that the unit can
access the folders on your computer.
190
–
–
65
Server is not found, or it is not
possible to connect to the server.
•The computer’s or router’s firewall is activated. Check the computer’s or router’s firewall
settings.
•Computer’s power is not turned on. Turn on the power.
•Server is not running. Launch the server.
•Set’s IP address is wrong. Check the set’s IP address.
–
–
–
156
Music files on PC cannot be played
back.
•Even if PC is connected to the USB connector on this unit, music files on it cannot be played
back. Connect PC or NAS to this unit through the network.
39
Files on PC or NAS are not displayed.•Files of a type not supported by this unit are not displayed.
190
Music stored on a NAS cannot be
played.
•If you use a NAS in conformity with the DLNA standard, enable the DLNA server function in
the NAS setting.
•If you use a NAS that does not conform with the DLNA standard, play the music via a PC.
Set Windows Media Player’s media sharing function and add NAS to the selected play folder.
•If connection is restricted, set audio equipment as the connection target.
–
65
–
182
Appendix
SettingsPlaybackConnections
Contents
Front panelDisplayRear panelIndexRemote
Tips
2The HDMI control function does not work
SymptomCause/SolutionPage
The HDMI control function does not
work.
•Check that “HDMI Control” in the menu is set to “On”.
•You cannot operate devices that are not compatible with the HDMI control function. In
addition, depending on the connected device or the settings, the HDMI control function may
not work. In this case, operate the external device directly.
•Check that the HDMI control function setting is enabled on all devices connected to this unit.
•When you make connection related changes such as connecting an additional HDMI device,
the link operation settings may be initialized. Turn o this unit and devices connected via
HDMI, and turn them on again.
133
105
105
105
2When using ZONE2, no sound comes out
SymptomCause/SolutionPage
When using ZONE2, no sound comes
out.
•In ZONE2, you can select iPod/USB, TUNER, NETWORK or an input source with an analog
audio input connector.
112
183
Appendix
SettingsPlaybackConnections
Contents
Front panelDisplayRear panelIndexRemote
Tips
Resetting factory settings
Perform this procedure if the display is abnormal or if operations cannot be performed.
Note that when the microprocessor is reset, all the settings are reset to their default values and setup will need to be performed again.
X
TUNER PRESET CH +
TUNER PRESET CH –
1
Turn o the power using X.
2
Press X while simultaneously pressing TUNER PRESET
CH – and TUNER PRESET CH +.
3
Once the display starts flashing at intervals of about 1
second, release the two buttons.
%
•If in step 3 the display does not flash at intervals of about 1 second, start over
from step 1.
184
TipsSettingsPlaybackConnections
Contents
Front panelDisplayRear panelIndexRemote
Appendix
Appendix
About HDMI
HDMI is an abbreviation of High-Definition Multimedia Interface, which is
an AV digital interface that can be connected to a TV or amplifier.
With the HDMI connection, high definition video and high quality audio
formats adopted by Blu-ray disc players (Dolby Digital Plus, Dolby TrueHD,
DTS-HD, DTS-HD Master Audio) can be transmitted, which is not possible
with the analog video transmission.
Furthermore, in the HDMI connection, audio and video signals can
be transmitted through a single HDMI cable, while in conventional
connections it is necessary to provide audio and video cables separately
for connection between devices.
This allows you to simplify the wiring configuration that tends to be quite
complex in a home theater system.
This unit supports the following HDMI functions.
•Deep Color
An imaging technology supported by HDMI. Unlike RGB or YCbCr, which
uses 8 bits (256 shades) per color, it can use 10 bits (1024 shades), 12
bits (4096 shades), or 16 bits (65536 shades) to produce colors in higher
definition. Both devices linked via HDMI must support Deep Color.
•“x.v.Color”
This function lets HDTVs display colors more accurately. It enables
display with natural, vivid colors.
“x.v.Color” is trademark of Sony Corporation.
•3D
This unit supports input and output of 3D (3 dimensional) video signals
of HDMI.
To play back 3D video, you need a TV and player that provide support for
the HDMI 3D function and a pair of 3D glasses.
•4K
This unit supports input and output of 4K Ultra HD (3840 x 2160 pixels)
video signals of HDMI.
•Content Type
It automatically makes settings suitable for the video output type
(content information).
•Adobe RGB color, Adobe YCC601 color
The color space defined by Adobe Systems Inc. Because it is a wider
color space than RGB, it can produce more vivid and natural images.
•sYCC601 color
Each of these color spaces defines a palette of available colors that is
larger than the traditional RGB color model.
•Auto Lip Sync
This function can automatically correct delay between the audio and
video.
Use a TV that is compatible with the Auto Lip Sync function.
•HDMI pass through
Even when the power to this unit is set to standby, signals input from
the HDMI input connector are output to a TV or other device that is
connected to the HDMI output connector.
185
TipsSettingsPlaybackConnections
Contents
Front panelDisplayRear panelIndexRemote
Appendix
•HDMI control
If you connect the unit and an HDMI control function compatible TV or
player with an HDMI cable and then enable the HDMI control function
setting on each device, the devices will be able to control each other.
•Power o link
This unit power o can be linked to the TV power o step.
•Audio output destination switching
From the TV, you can switch whether to output audio from the TV or
the AV amplifier.
•Volume adjustment
You can adjust this unit’s volume in the TV volume adjustment
operation.
•Input source switching
You can switch this unit input sources through linkage to TV input
switching.
When playing the player, this unit input source switches to the source
for that player.
•ARC (Audio Return Channel)
This function transmits audio signals from the TV to this unit through the
HDMI cable and plays back the audio from the TV on this unit based on
the HDMI control function.
If a TV without the ARC function is connected via HDMI connections,
video signals of the playback device connected to this unit are
transmitted to the TV, but this unit can not play back the audio from the
TV. If you want to enjoy surround audio for TV program, a separate audio
cable connection is required. In contrast, if a TV with the ARC function is
connected via HDMI connections, no audio cable connection is required.
Audio signals from the TV can be input to this unit through the HDMI
cable between this unit and the TV. This function allows you to enjoy
surround playback on this unit for the TV.
186
TipsSettingsPlaybackConnections
Contents
Front panelDisplayRear panelIndexRemote
Appendix
2Supported audio formats
2-channel Linear PCM
2-channel, 32 kHz – 192 kHz,
16/20/24 bit
Multi-channel Linear PCM
7.1-channel, 32 kHz – 192kHz,
16/20/24 bit
Bitstream
Dolby Digital / DTS / Dolby TrueHD /
Dolby Digital Plus /
DTS-HD Master Audio /
DTS-HD High Resolution Audio /
DTS Express
2Supported video signals
•480i•480p•576i
•576p•720p 60/50Hz•1080i 60/50Hz
•1080p 60/50/24Hz•4K 30/25/24Hz
Copyright protection system
In order to play back digital video and audio such as BD-Video (Blu-ray
Disc) or DVD-Video via HDMI connection, both this unit and TV and the
player need to support the copyright protection system known as HDCP
(High-bandwidth Digital Content Protection System). HDCP is copyright
protection technology comprised of data encryption and authentication
of the connected AV devices. This unit supports HDCP.
•If a device that does not support HDCP is connected, video and audio
are not output correctly. Read the owner’s manual of your television or
player for more information.
%
•When connecting this unit to a device that is compatible with the Deep Color, 4K,
ARC function, use a “High Speed HDMI cable” or “High Speed HDMI cable with
Ethernet”.
187
TipsSettingsPlaybackConnections
Contents
Front panelDisplayRear panelIndexRemote
Appendix
Video conversion function
This unit automatically converts the input video signals as shown in the diagram below before outputting them to the TV.
HDMI connector
HDMI signalHDMI signal
Component video
signal
Video signal
Video connector
HDMI-compatible TV
HDMI connector
Component video
connectors
Component video
connectors
Video connector
HDMI connectorHDMI connector
Video device
This unit
Output
Input
(IN)
Output
(MONITOR OUT)
Input
%
•The main zone video conversion function is
compatible with the following formats: NTSC,
PAL, SECAM, NTSC4.43, PAL-N, PAL-M and PAL-
60.
188
TipsSettingsPlaybackConnections
Contents
Front panelDisplayRear panelIndexRemote
Appendix
This unit can convert the input video signals to the resolution that is set for “Resolution” (vpage135) in the menu before outputting them to the TV.
Libble takes abuse of its services very seriously. We're committed to dealing with such abuse according to the laws in your country of residence. When you submit a report, we'll investigate it and take the appropriate action. We'll get back to you only if we require additional details or have more information to share.
Product:
Forumrules
To achieve meaningful questions, we apply the following rules:
First, read the manual;
Check if your question has been asked previously;
Try to ask your question as clearly as possible;
Did you already try to solve the problem? Please mention this;
Is your problem solved by a visitor then let him/her know in this forum;
To give a response to a question or answer, do not use this form but click on the button 'reply to this question';
Your question will be posted here and emailed to our subscribers. Therefore, avoid filling in personal details.
Register
Register getting emails for Denon AVR-X2000 at:
new questions and answers
new manuals
You will receive an email to register for one or both of the options.
Get your user manual by e-mail
Enter your email address to receive the manual of Denon AVR-X2000 in the language / languages: English as an attachment in your email.
The manual is 6,77 mb in size.
You will receive the manual in your email within minutes. If you have not received an email, then probably have entered the wrong email address or your mailbox is too full. In addition, it may be that your ISP may have a maximum size for emails to receive.
If you have not received an email with the manual within fifteen minutes, it may be that you have a entered a wrong email address or that your ISP has set a maximum size to receive email that is smaller than the size of the manual.
The email address you have provided is not correct.
Please check the email address and correct it.
Your question is posted on this page
Would you like to receive an email when new answers and questions are posted? Please enter your email address.