First select the language when prompted. Then simply follow the
instructions displayed on the TV screen to set up the speakers, network,
etc.
0
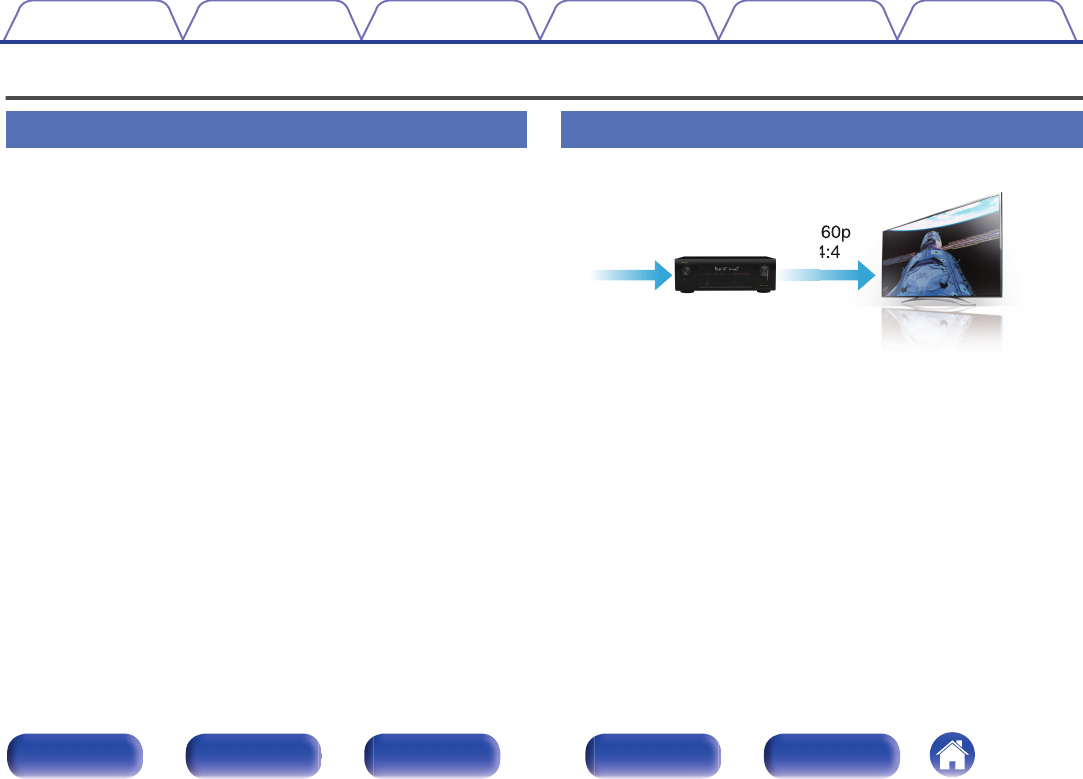
Easy to use Graphical User Interface
This unit is equipped with a Graphical User Interface for improved
operability.
ContentsConnectionsPlaybackSettingsTipsAppendix
12
Front panelDisplayRear panelRemoteIndex
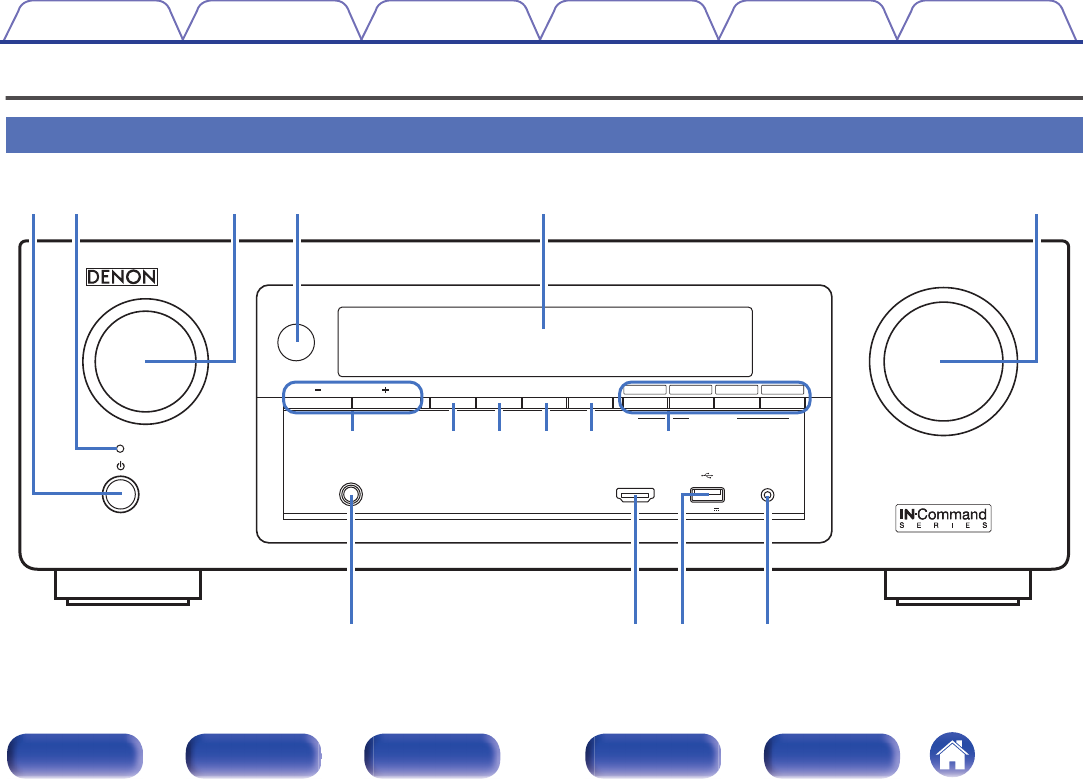
Part names and functions
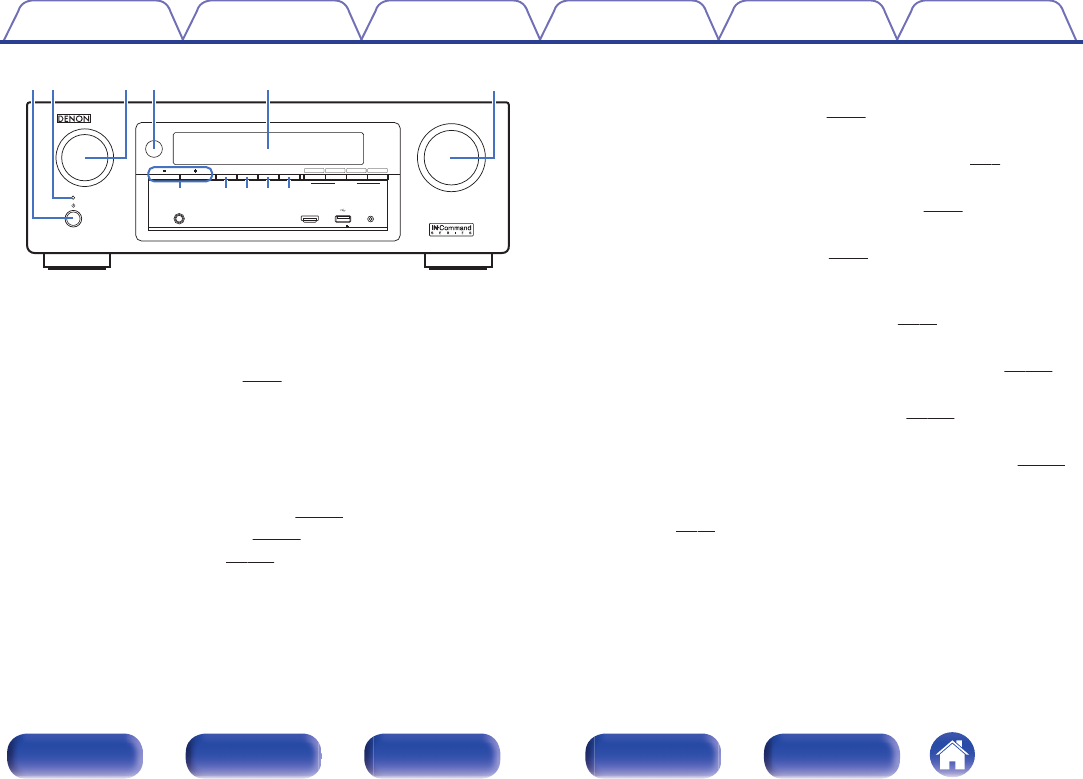
Front panel
.
QUICK SELECT
MASTER VOLUME
SOURCE SELECT
ZONE2
ON/OFF
ZONE2
SOURCE
DIMMERSTATUS
TUNER
PRESET CH
DVD/Blu-ray
ONLINE
MEDIA
PLAYER
CBL/SAT
3214
PHONES
SETUP MICAUX - HDMI
5V/1A
trqwey
Q
6
Q
4
Q
5
Q
3
Q2Q0oiQ1u
ABCDEF
GHIJKL
MNOP
ContentsConnectionsPlaybackSettingsTipsAppendix
13
Front panelDisplayRear panelRemoteIndex
.
QUICK SELECT
MASTER VOLUME
SOURCE SELECT
ZONE2
ON/OFF
ZONE2
SOURCE
DIMMERSTATUS
TUNER
PRESET CH
DVD/Blu-ray
ONLINE
MEDIA
PLAYER
CBL/SAT
3214
PHONES
SETUP MICAUX - HDMI
5V/1A
q
uioQ0Q1
werty
A
Power operation button (X)
Used to turn the power of the MAIN ZONE (room where this unit is
located) on/off (standby). (v
p. 55)
B
Power indicator
This is lit as follows according to the power status:
0
White: Power on
0
Off: Normal standby
0
Red:
0
When “HDMI PassThrough” (v
p. 155) is set to “On”
0
When “HDMI Control” (v p. 156) is set to “On”
0
When “IP Control” (v p. 186) is set to “Always On”
C
SOURCE SELECT knob
This selects the input source. (v
p. 55)
D
Remote control sensor
This receives signals from the remote control unit. (v p. 8)
E
Display
This displays various pieces of information. (v
p. 16)
F
MASTER VOLUME knob
This adjusts the volume level. (v
p. 56)
G
Tuner preset channel buttons
(TUNER PRESET CH +, –)
These select preset broadcast stations. (v
p. 74)
H
ZONE2 ON/OFF button
This turns the power of ZONE2 (separate room) on/off. (v p. 136)
I
ZONE2 SOURCE button
This selects the input source for ZONE2. (v p. 136)
J
DIMMER button
Each press of this switches the brightness of the display. (v p. 192)
K
STATUS button
Each press of this switches the status information that is shown on the
display. (v
p. 59)
Contents
ConnectionsPlaybackSettingsTipsAppendix
14
Front panelDisplayRear panelRemoteIndex
.
QUICK SELECT
MASTER VOLUME
SOURCE SELECT
ZONE2
ON/OFF
ZONE2
SOURCE
DIMMERSTATUS
TUNER
PRESET CH
DVD/Blu-ray
ONLINE
MEDIA
PLAYER
CBL/SAT
3214
PHONES
SETUP MICAUX - HDMI
5V/1A
Q
3
Q
4
Q
5
Q
6
Q2
L
QUICK SELECT buttons
With a single press of any of these buttons, you can call up various
settings you’ve registered to each button such as the input source,
volume level and sound mode settings. (v p. 129)
M
Headphones jack (PHONES)
This is used to connect headphones.
When the headphones are plugged into this jack, audio will no longer
be output from the connected speakers or from the SUBWOOFER
connectors.
NOTE
To prevent hearing loss, do not raise the volume level excessively when using
headphones.
N
AUX-HDMI connector
This is used to connect HDMI output compatible devices such as video
camcorders and game consoles. (v p. 45)
O
USB port
This is used to connect USB storages (such as USB memory devices)
and the USB cable supplied with iPod. (v p. 46)
P
SETUP MIC jack
This is used to connect the supplied Sound calibration microphone.
(v p. 167)
ContentsConnectionsPlaybackSettingsTipsAppendix
15
Front panelDisplayRear panelRemoteIndex
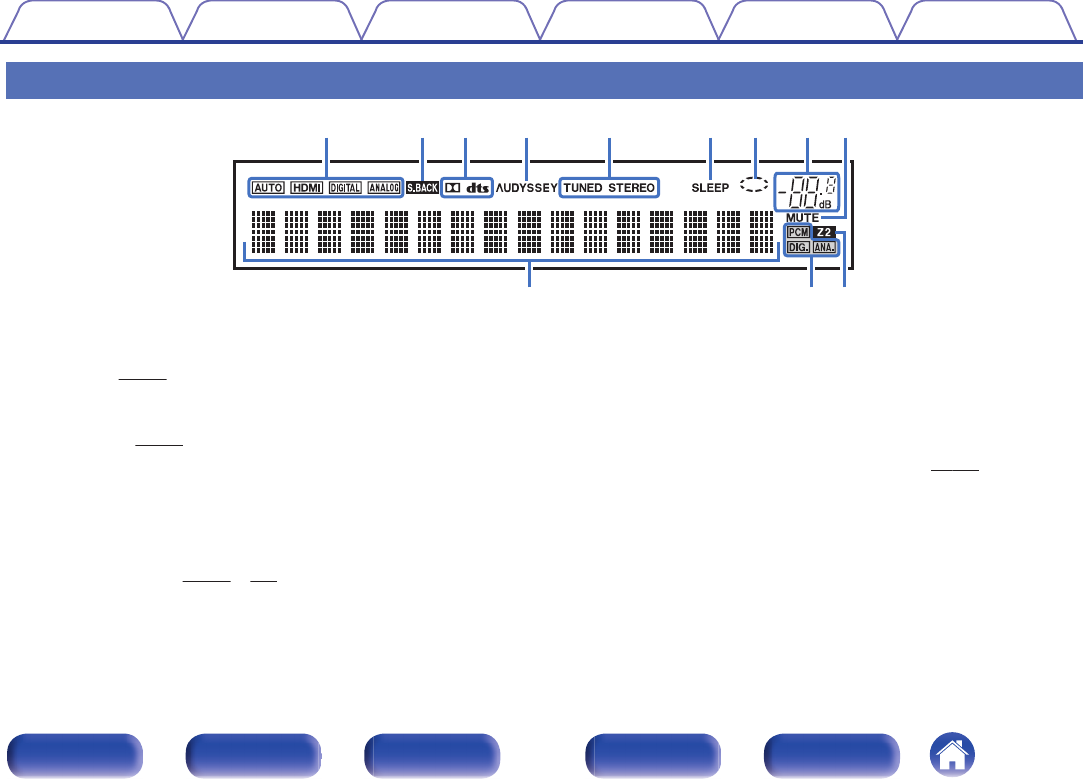
Display
.
iouytqwer
Q
0
Q
1
Q
2
I
JKL
A
Input mode indicators
These light according to the audio input mode settings of each input
source. (v p. 163)
B
Surround back indicator
This lights when audio signals are being output from the surround back
speakers. (v p. 176)
C
Decoder indicators
These light when Dolby or DTS signals are input or when the Dolby or
DTS decoder is running.
D
Audyssey
®
indicator
This lights when “MultEQ
®
XT”, “Dynamic EQ” or “Dynamic Volume”
has been set up. (v
p. 151 – 153)
E
Tuner reception mode indicators
These light up according to the reception conditions when the input
source is set to “Tuner”.
TUNED: Lights up when the broadcast is properly tuned in.
STEREO: Lights up when receiving FM stereo broadcasts.
F
Sleep timer indicator
This lights when the sleep mode is selected. (v p. 128)
G
Circle indicator
This is displayed when the input source is “Online Music” or “iPod/USB”
when you are playing back music.
H
Volume indicator
ContentsConnectionsPlaybackSettingsTipsAppendix
16
Front panelDisplayRear panelRemoteIndex
.
o
Q1Q0Q2
I
MUTE indicator
This blinks while the sound is muted. (v
p. 56)
J
Information display
The input source name, sound mode, setting values and other
information are displayed here.
K
Input signal indicators
The respective indicator will light corresponding to the input signal.
(v
p. 163)
L
ZONE2 indicator
This lights up when ZONE2 (separate room) power is turned on.
(v
p. 136)
ContentsConnectionsPlaybackSettingsTipsAppendix
17
Front panelDisplayRear panelRemoteIndex
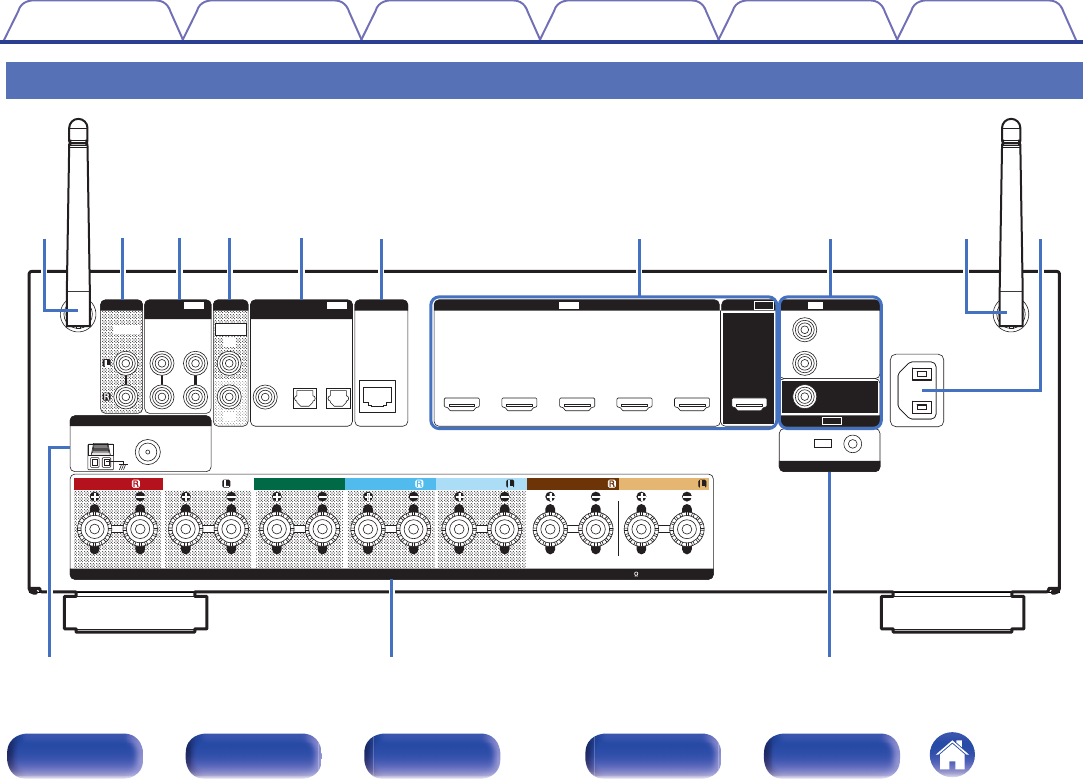
Rear panel
.
IMPEDANCE : 4㹼16Ȑ
SPEAKERS
ASSIGNABLE
ANTENNA
MEDIA
PLAYER
12
CBL/SAT
1 CBL/SAT4 Blu-ray5 GAME
MEDIA
PLAYER
3
DVD/
Blu-ray
2
MONITOR
ARC(4K)(4K)
HDMI
MEDIA
PLAYER
2
VIDEO
OUT
OUT
HDMI
(
ASSIGNABLE
)
IN
NETWORK
MONITOR
CLASS 2 WIRING
PRE OUT
ZONE2
AUDIO
(
ASSIGNABLE
)
IN
1
2
SUBWOOFER
CBL/SAT
MEDIA
PLAYER
TV AUDIO
IN
IR
REMOTE CONTROL
1 CBL/SAT
12
COAXIAL
OPTICAL
PRE OUT
IN
DIGITAL AUDIO
(
ASSIGNABLE
)
VIDEO
(
ASSIGNABLE
)
IN
75
Ȑ
FMAM
FRONTFRONT
CENTERSURROUND
SURROUND BACKSURROUND BACK
SURROUND
AC IN
tqrwewyu
oQ
0
Q
1
iq
A
BCBDEFGAH
IJK
ContentsConnectionsPlaybackSettingsTipsAppendix
18
Front panelDisplayRear panelRemoteIndex
.
IMPEDANCE : 4㹼16Ȑ
SPEAKERS
ASSIGNABLE
ANTENNA
MEDIA
PLAYER
12
CBL/SAT
1 CBL/SAT4 Blu-ray5 GAME
MEDIA
PLAYER
3
DVD/
Blu-ray
2
MONITOR
ARC(4K)(4K)
HDMI
MEDIA
PLAYER
2
VIDEO
OUT
OUT
HDMI
(
ASSIGNABLE
)
IN
NETWORK
MONITOR
CLASS 2 WIRING
PRE OUT
ZONE2
AUDIO
(
ASSIGNABLE
)
IN
1
2
SUBWOOFER
CBL/SAT
MEDIA
PLAYER
TV AUDIO
IN
IR
REMOTE CONTROL
1 CBL/SAT
12
COAXIAL
OPTICAL
PRE OUT
IN
DIGITAL AUDIO
(
ASSIGNABLE
)
VIDEO
(
ASSIGNABLE
)
IN
75
Ȑ
FMAM
FRONTFRONT
CENTERSURROUND
SURROUND BACKSURROUND BACK
SURROUND
AC IN
q
q
ytuirwew
A
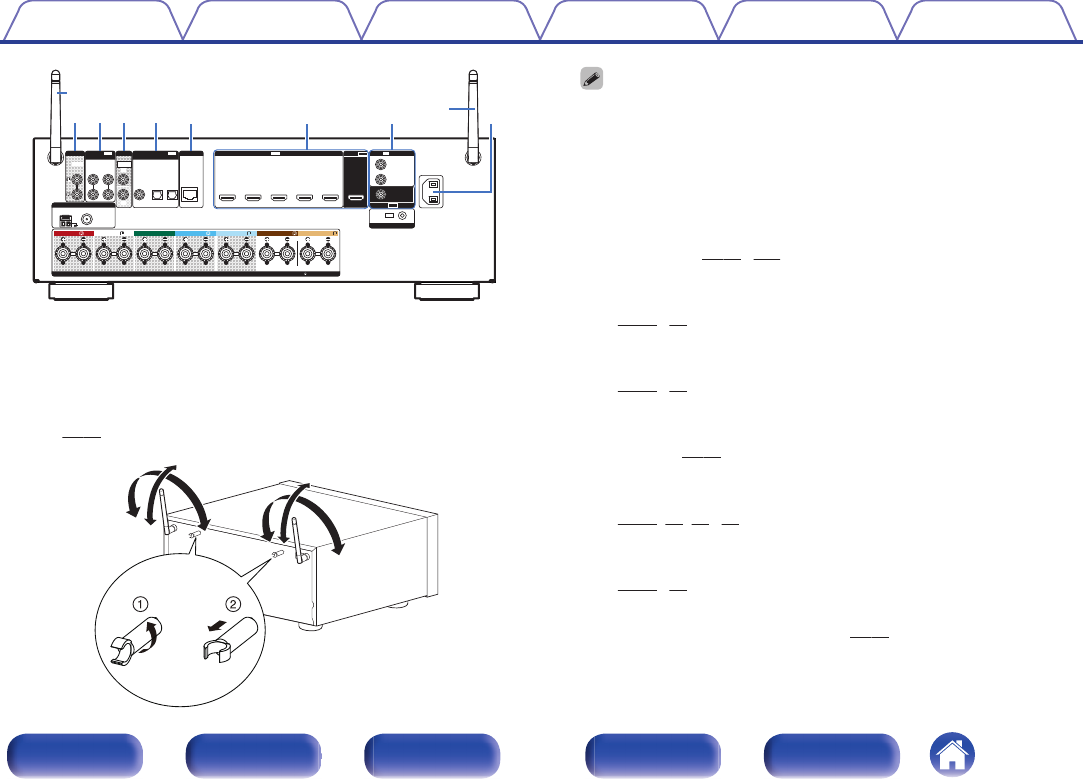
Rod antennas for Bluetooth/wireless LAN
Stand this antenna upright when connecting to a network via wireless
LAN, or when connecting to a handheld device via Bluetooth.
(v p. 51)
.
90°
320°
320°
90°
The antenna clip can be removed from the rear panel.
A
Rotate the antenna clip 90 degrees to the left.
B
Pull the antenna clip out towards yourself.
0
The antenna clip is needed when transporting this unit. Keep it in a safe place.
0
Attach the antenna clip by following the steps for removing it in reverse.
B
PRE OUT connectors
Used to connect a subwoofer with built-in amplifier or power amplifier
for ZONE2. (v
p. 29, 135)
C
Analog audio connectors (AUDIO)
Used to connect devices equipped with analog audio connectors.
(v
p. 43, 44)
D
Digital audio connectors (DIGITAL AUDIO)
Used to connect devices equipped with digital audio connectors.
(v
p. 40, 44)
E
NETWORK connector
Used to connect to a LAN cable when connecting to a wired LAN
network. (v
p. 50)
F
HDMI connectors
Used to connect devices equipped with HDMI connectors.
(v
p. 39, 40, 43, 44)
G
Video connectors (VIDEO)
Used to connect devices equipped with video connectors.
(v
p. 43, 44)
H
AC inlet (AC IN)
Used to connect the power cord. (v
p. 53)
Contents
ConnectionsPlaybackSettingsTipsAppendix
19
Front panelDisplayRear panelRemoteIndex
.
IMPEDANCE : 4㹼16Ȑ
SPEAKERS
ASSIGNABLE
ANTENNA
MEDIA
PLAYER
12
CBL/SAT
1 CBL/SAT4 Blu-ray5 GAME
MEDIA
PLAYER
3
DVD/
Blu-ray
2
MONITOR
ARC(4K)(4K)
HDMI
MEDIA
PLAYER
2
VIDEO
OUT
OUT
HDMI
(
ASSIGNABLE
)
IN
NETWORK
MONITOR
CLASS 2 WIRING
PRE OUT
ZONE2
AUDIO
(
ASSIGNABLE
)
IN
1
2
SUBWOOFER
CBL/SAT
MEDIA
PLAYER
TV AUDIO
IN
IR
REMOTE CONTROL
1 CBL/SAT
12
COAXIAL
OPTICAL
PRE OUT
IN
DIGITAL AUDIO
(
ASSIGNABLE
)
VIDEO
(
ASSIGNABLE
)
IN
75
Ȑ
FMAM
FRONTFRONT
CENTERSURROUND
SURROUND BACKSURROUND BACK
SURROUND
AC IN
oQ
0
Q
1
I
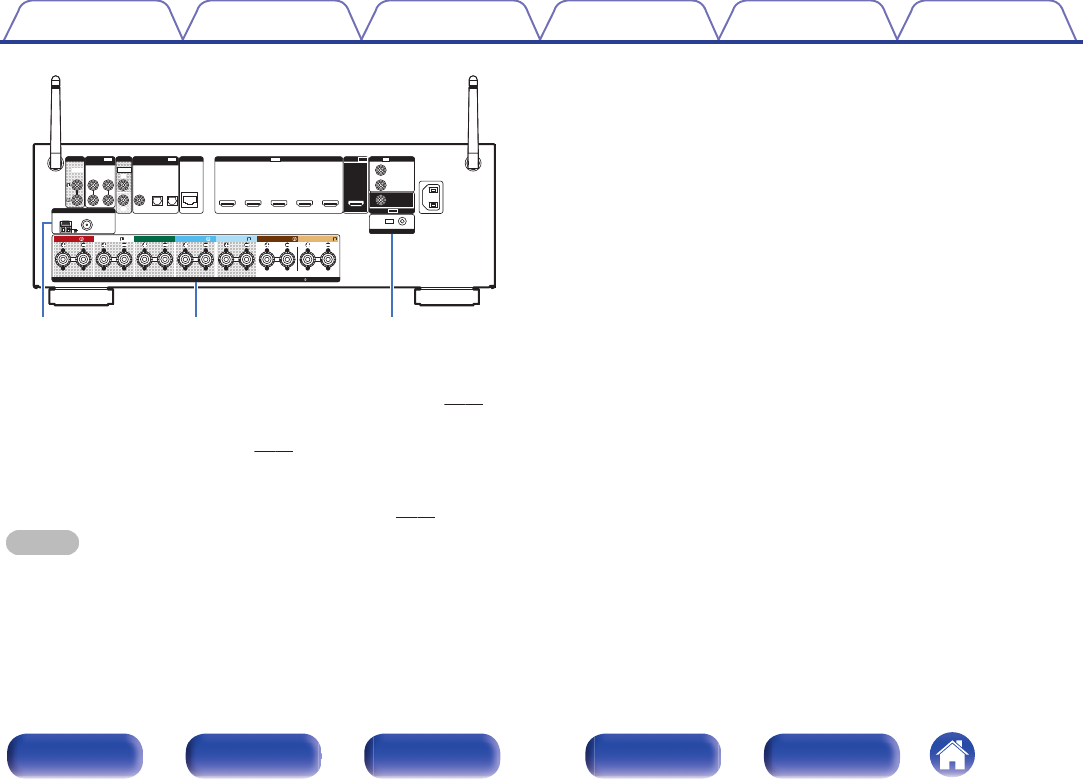
FM/AM antenna terminals (ANTENNA)
Used to connect FM antennas and AM loop antennas. (v p. 48)
J
Speaker terminals (SPEAKERS)
Used to connect speakers. (v p. 28)
K
REMOTE CONTROL jacks
Used to connect infrared receivers/transmitters in order to operate this
unit and external devices from a different room. (v
p. 52)
NOTE
Do not touch the inner pins of the connectors on the rear panel. Electrostatic
discharge may cause permanent damage to the unit.
ContentsConnectionsPlaybackSettingsTipsAppendix
20
Front panelDisplayRear panelRemoteIndex
Remote control unit
.
ENT
ENTER
S
OU
OU
ND
ND
MO
MODE
PO
POWER
VO
LU
LUME
C
HA
HA
NN
NNEL
MUTE
MUTE
QUIC
K
K
SE
SELECT
P
AG
AGE
VO
VO
LU
LUME
Bl
Blu
-r
-rayC
BL/SAT
BL/SAT
GA
GAME
D
VD/
VD/
Blu-ra
Blu-ray
AUX
M
ED
EDIA
PLAY
PLAYER
TV
A
AU
DI
DIO
B
lu
lu
etoo
etooth
INTE
INTE
RNET
RNET
R
ADI
ADIO
T
UN
UNER
iP
iP
od/
od/USB
PUREMOVIEGAMEMUSIC
T
UN
UNE
TU
TUNE
1234
ECO
ONLIN
ONLINE
MUSIC
ZO
ZONE 2
S
OU
OU
RC
RCE
S
LE
LEEP
I
NF
NFO
OP
OPT
IO
ION
BACK
SET
SETUP
q
r
t
y
u
i
o
w
e
A
ZONE2 ON/OFF button (ZONE2 X)
This turns the power of ZONE2 (separate room) on/off. (v p. 136)
B
ZONE2 VOLUME buttons (df)
This setting adjusts the volume level for ZONE2. (v
p. 137)
C
ZONE2 SOURCE button
This selects the input source for ZONE2. (v
p. 136)
D
Input source select buttons
These selects the input source. (v
p. 55, 136)
E
SOUND MODE buttons
These select the sound mode. (v p. 114)
0
MOVIE button
0
MUSIC button
0
GAME button
0
PURE button
F
Information button (INFO)
This displays the status information on the TV screen. (v p. 194)
G
Cursor buttons (uiop)
These select items. (v
p. 141)
H
ENTER button
This determines the selection. (v p. 141)
I
BACK button
This returns to the previous screen. (v p. 141)
Contents
ConnectionsPlaybackSettingsTipsAppendix
21
Front panelDisplayRear panelRemoteIndex
.
ENT
ENTER
S
OU
OU
ND
ND
MO
MODE
PO
POWER
VO
LU
LUME
C
HA
HA
NN
NNEL
MUTE
MUTE
QUIC
K
K
SE
SELECT
P
AG
AGE
VO
VO
LU
LUME
Bl
Blu
-r
-rayC
BL/SAT
BL/SAT
GA
GAME
D
VD/
VD/
Blu-ra
Blu-ray
AUX
M
ED
EDIA
PLAY
PLAYER
TV
A
AU
DI
DIO
B
lu
lu
etoo
etooth
INTE
INTE
RNET
RNET
R
ADI
ADIO
T
UN
UNER
iP
iP
od/
od/USB
PUREMOVIEGAMEMUSIC
T
UN
UNE
TU
TUNE
1234
ECO
ONLIN
ONLINE
MUSIC
ZO
ZONE 2
S
OU
OU
RC
RCE
S
LE
LEEP
I
NF
NFO
OP
OPT
IO
ION
BACK
SET
SETUP
Q3
Q2
Q7
Q6
Q4
Q5
Q1
Q0
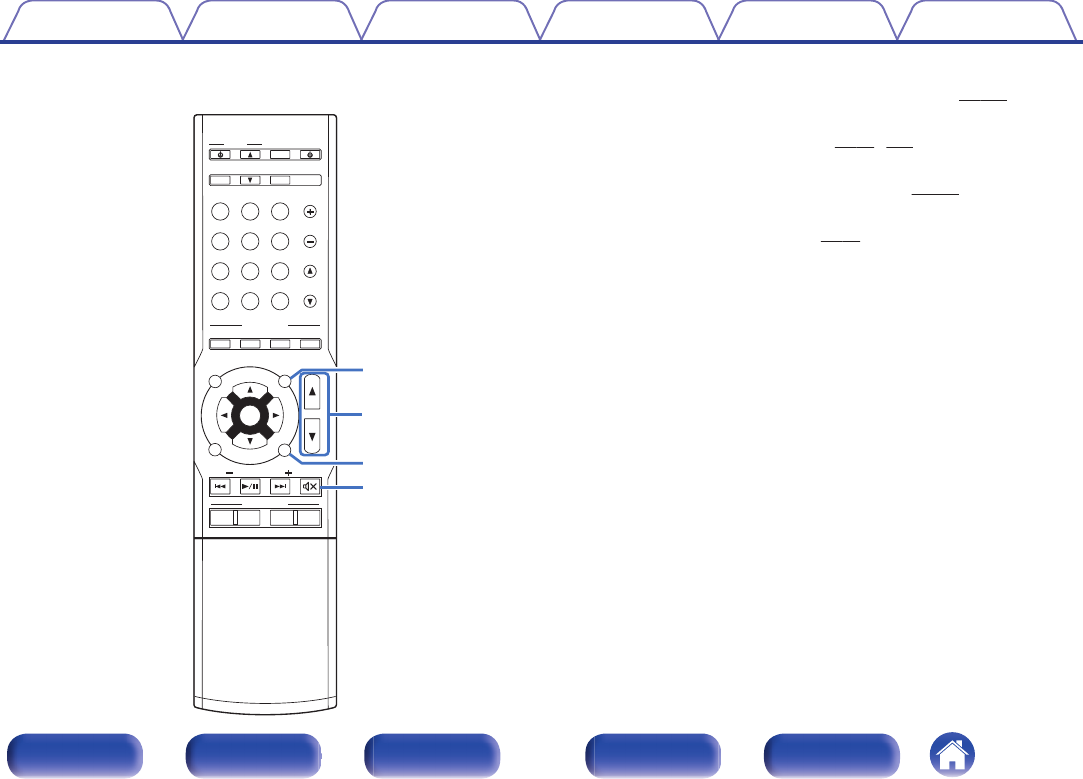
J
System buttons
These perform playback related operations. (v
p. 59)
0
Skip buttons (8, 9)
0
Play/pause button (1/3)
Tuning up / Tuning down buttons (TUNE +, –)
These select either FM broadcast or AM broadcast. (v p. 71)
K
QUICK SELECT buttons (1 – 4)
These call up settings registered to each button, such as input source,
volume level and sound mode settings. (v p. 129)
L
Remote control signal transmitter
This transmits signals from the remote control unit. (v
p. 8)
M
ECO Mode button (G)
This switches to ECO mode. (v
p. 189)
N
POWER button (X)
This turns the power on/off. (v p. 55, 136)
O
SLEEP button
This sets the sleep timer. (v p. 127)
P
Channel select buttons (CHANNEL +, –)
These select preset broadcast stations. (v p. 74)
Q
Page select buttons (PAGEdf)
These switch pages. (v
p. 59)
Contents
ConnectionsPlaybackSettingsTipsAppendix
22
Front panelDisplayRear panelRemoteIndex
.
ENT
ENTER
S
OU
OU
ND
ND
MO
MODE
PO
POWER
VO
LU
LUME
C
HA
HA
NN
NNEL
MUTE
MUTE
QUIC
K
K
SE
SELECT
P
AG
AGE
VO
VO
LU
LUME
Bl
Blu
-r
-rayC
BL/SAT
BL/SAT
GA
GAME
D
VD/
VD/
Blu-ra
Blu-ray
AUX
M
ED
EDIA
PLAY
PLAYER
TV
A
AU
DI
DIO
B
lu
lu
etoo
etooth
INTE
INTE
RNET
RNET
R
ADI
ADIO
T
UN
UNER
iP
iP
od/
od/USB
PUREMOVIEGAMEMUSIC
T
UN
UNE
TU
TUNE
1234
ECO
ONLIN
ONLINE
MUSIC
ZO
ZONE 2
S
OU
OU
RC
RCE
S
LE
LEEP
I
NF
NFO
OP
OPT
IO
ION
BACK
SET
SETUP
Q9
W1
Q8
W0
R
OPTION button
This displays the option menu on the TV screen. (v
p. 104)
S
VOLUME buttons (df)
These adjust the volume level. (v p. 56, 137)
T
SETUP button
This displays the menu on the TV screen. (v
p. 141)
U
MUTE button (:)
This mutes the output audio. (v
p. 56)
ContentsConnectionsPlaybackSettingsTipsAppendix
23
Front panelDisplayRear panelRemoteIndex
o
Contents
Connecting speakers25
Connecting a TV38
Connecting a playback device42
Connecting an iPod or USB memory device to the USB port46
Connecting an FM/AM antenna48
Connecting to a home network (LAN)50
Connecting an external control device52
Connecting the power cord53
NOTE
0
Do not plug in the power cord until all connections have been completed.
However, when the “Setup Assistant” is running, follow the instructions in the
“Setup Assistant” (page 8 in the separate “Quick Start Guide”) screen for making
connections. (During “Setup Assistant” operation, the input/output connectors do
not conduct current.)
0
Do not bundle power cords together with connection cables. Doing so can result in
noise.
o
Cables used for connections
Provide necessary cables according to the devices you want to
connect.
Speaker cable
.
Subwoofer cable
.
HDMI cable
.
Video cable
.
Coaxial digital cable
.
Optical cable
.
Audio cable
.
R
L
R
L
LAN cable
.
ContentsConnectionsPlaybackSettingsTipsAppendix
Connections
24
Front panelDisplayRear panelRemoteIndex
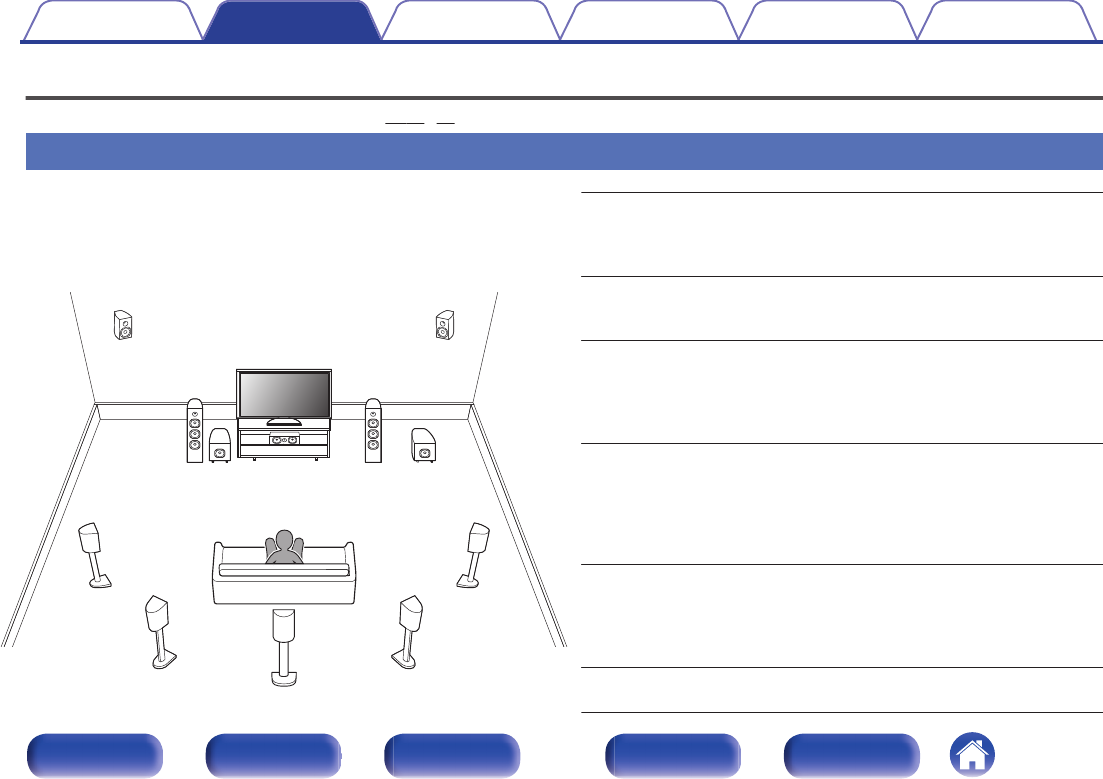
Connecting speakers
Install speakers and connect them to this unit. (v p. 25, 28)
Speaker installation
Determine the speaker system depending on the number of speakers you
are using and install each speaker and subwoofer in the room.
Speaker installation is explained using this example of a typical
installation.
.
FHL
FL
SW1
C
SL
SBL
FHR
FR
SR
SBR
SB
SW2
FL/FR (Front
speaker left/right):
Place the FRONT left and right speakers an
equal distance from the main listening position.
The distance between each speaker and your TV
should also be the same.
C (Center
speaker):
Place the CENTER speaker in front of and at the
center of the TV, between the front left and right
speakers.
SL/SR (Surround
speaker left/right):
Place the SURROUND left and right speakers an
equal distance to the left and right sides of the
main listening position. If you don’t have
surround back speakers, move the surround
speakers slightly behind your listening position.
SBL/SBR
(Surround back
speaker left/right):
Place the SURROUND BACK left and right
speakers an equal distance from the main
listening position and directly behind the main
listening position. When using a single surround
back speaker (SB), place it directly behind the
listening position.
FHL/FHR (Front
height speakers
left/right):
Place the FRONT HEIGHT left and right
speakers just outside of the front left and right
speakers. Mount them as close to the ceiling as
possible and aim them towards the listening
position.
SW 1/2 (Subwoofer) :
Place the SUBWOOFER at a convenient location
near the front speakers.
ContentsConnectionsPlaybackSettingsTipsAppendix
25
Front panelDisplayRear panelRemoteIndex
0
This unit is compatible with Dolby Pro Logicgz (v p. 234) which offers an even
wider and deeper surround sensation.
When using Dolby Pro Logicgz, install front height speakers.
0
Use the illustration below as a guide for how high each speaker should be
installed. The height does not need to be exactly the same.
.
z
Surround back
speaker
At least 3.3 ft / 1 m
Front height
speaker
Point slightly
downwards
Surround
speaker
Front speaker
GViewed from the sideH
z Recommended for Dolby Pro Logic gz
Contents
ConnectionsPlaybackSettingsTipsAppendix
26
Front panelDisplayRear panelRemoteIndex
o
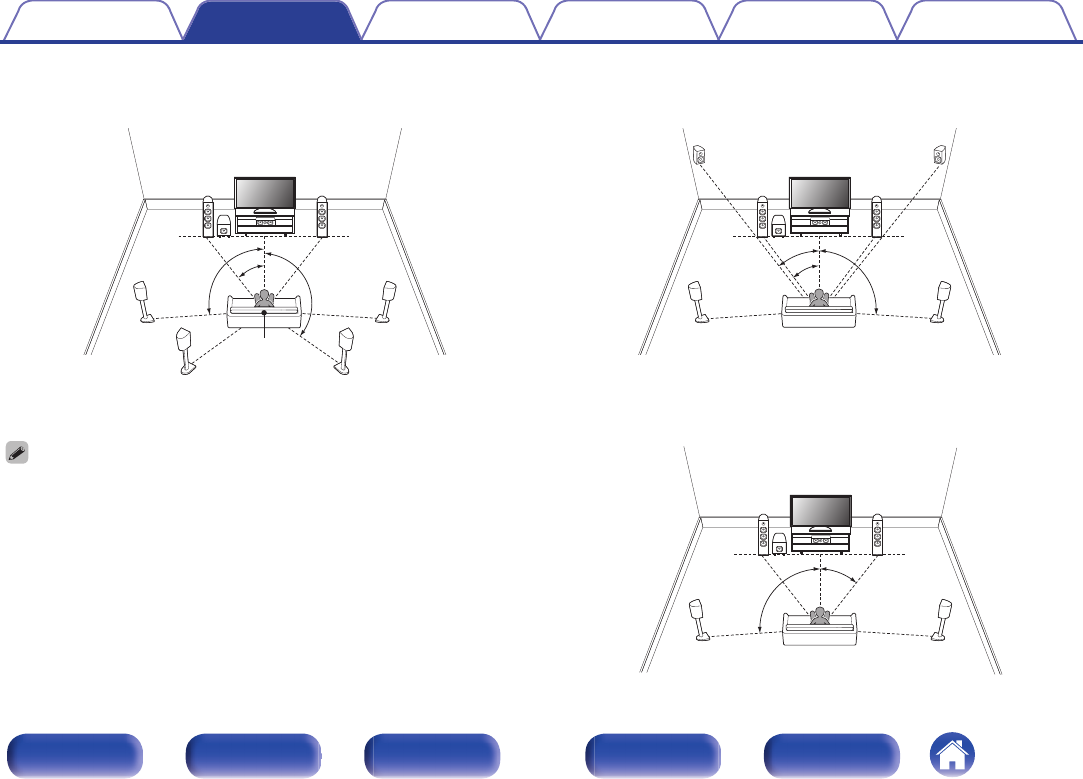
When 7.1-channel speakers are installed using
surround back speakers
.
z1
z2
z3
FL
SW
C
SL
SBL
FR
SR
SBR
Listening
position
z
1:22° - 30°
z
2:90° - 110°
z
3:135° - 150°
When using a single surround back speaker, place it directly behind the listening
position.
o
When 7.1-channel speakers are installed using
front height speakers
.
z1
z2
z3
FHLFHR
FL
SW
C
SL
FR
SR
z
1:22° - 30°
z
2:22° - 45°
z
3:90° - 110°
o
When 5.1-channel speakers are installed
.
z1
z2
FL
SW
C
SL
FR
SR
z
1:22° - 30°
z
2:120°
Contents
ConnectionsPlaybackSettingsTipsAppendix
27
Front panelDisplayRear panelRemoteIndex
Speaker connection
Here we connect the speakers in the room to this unit.
This section explains how to connect them using typical examples.
NOTE
0
Disconnect this unit’s power plug from the power outlet before connecting the
speakers. Also, turn off the subwoofer.
0
Connect so that the speaker cable core wires do not protrude from the speaker
terminal. The protection circuit may be activated if the core wires touch the rear
panel or if the + and - sides touch each other. (“Protection circuit” (v
p. 241))
0
Never touch the speaker terminals while the power cord is connected. Doing so
could result in electric shock. When the “Setup Assistant” (page 8 in the separate
“Quick Start Guide”) is running, follow the instructions in the “Setup Assistant”
screen for making connections. (Power is not supplied to the speaker terminals
while the “Setup Assistant” is running.)
0
Use speakers with an impedance of 4 – 16 Ω/ohms.
NOTE
0
Carry out the following settings when using a speaker with an impedance of 4 – 6
Ω/ohms.
1.
Press and hold the main unit’s ZONE2 SOURCE and STATUS for at least 3
seconds.
“V.Format:< NTSC>” appears on the display.
2.
Press DIMMER on the main unit twice.
“Sp.Imp.:<8ohms>” appears on the display.
3.
Press TUNER PRESET CH + or TUNER PRESET CH - on the main unit to
select the impedance.
6 Ω:
6 Ω/ohms to 8 Ω/ohms is selected even if it is for one speaker with a
connected impedance.
4 Ω:
4 Ω/ohms to 8 Ω/ohms is selected even if it is for one speaker with a
connected impedance.
4.
Press the main unit’s STATUS to complete the setting.
ContentsConnectionsPlaybackSettingsTipsAppendix
28
Front panelDisplayRear panelRemoteIndex
o
Connecting the speaker cables
Carefully check the left (L) and right (R) channels and + (red) and –
(black) polarities on the speakers being connected to this unit, and be
sure to connect the channels and polarities correctly.
1
Peel off about 3/8 inch (10 mm) of sheathing from the
tip of the speaker cable, then either twist the core wire
tightly or terminate it.
.
2
Turn the speaker terminal counterclockwise to loosen it.
.
3
Insert the speaker cable’s core wire to the hilt into the
speaker terminal.
.
4
Turn the speaker terminal clockwise to tighten it.
.
o
Connecting the subwoofer
Use a subwoofer cable to connect the subwoofer. Two subwoofers can
be connected to this unit.
The same signal is output from the respective subwoofer terminals.
.
IMPEDANCE : 4㹼16Ȑ
SPEAKERS
ASSIGNABLE
ANTENNA
MEDIA
PLAYER
12
CBL/SAT
NETWORK
CLASS 2 WIRING
ZONE2
AUDIO
(
ASSIGNABLE
)
IN
CBL/SAT
MEDIA
PLAYER
TV AUDIO
12
COAXIAL
OPTICAL
PRE OUT
IN
DIGITAL AUDIO
(
ASSIGNABLE
)
75Ȑ
FMAM
FRONTFRONT
CENTERSURROUND
SURROUND BACKSURROUND BACK
SURROUND
PRE OUT
1
2
SUBWOOFER
SW1SW2
Contents
ConnectionsPlaybackSettingsTipsAppendix
29
Front panelDisplayRear panelRemoteIndex
o
About the speaker cable label (supplied) for
channel identification
The channel display section for speaker terminals on the rear panel is
color-coded for each channel to be identifiable.
Speaker terminalsColor
FRONT LWhite
FRONT RRed
CENTERGreen
SURROUND LLight blue
SURROUND RBlue
SURROUND BACK LBeige
SURROUND BACK RBrown
SUBWOOFERBlack
Attach the speaker cable label for each channel to its speaker cable as
shown in the diagram.
Refer to the table above and attach the label to each speaker cable.
Then, make connection so that the color of the speaker terminal
matches that of the speaker cable label.
GHow to attach the speaker cable labelH
.
Speaker
This unit
ContentsConnectionsPlaybackSettingsTipsAppendix
30
Front panelDisplayRear panelRemoteIndex
Speaker configuration and Amp Assign settings
This unit has a built-in 7-channel power amplifier. In addition to the basic 5.1-channel system, a variety of speaker systems can be configured by changing
the “Amp Assign” (v p. 174) settings to suit the application, such as 7.1-channel systems, bi-amp connections and 2-channel systems for multi-zone
playback.
Perform “Amp Assign” (v p. 174) settings to suit the number of rooms and speaker configuration to be installed.
5.1-channel (bi-amp connection for front speaker)Not usedBi-Amp35
5.1-channel + front speaker of second unitNot usedFront B36
5.1-channel2-channelZONE2 (Default)37
The sound mode that can be selected varies according to the speaker configuration. See “Relationship between sound modes and channel output” (v p. 225) for the sound
modes that are supported.
ContentsConnectionsPlaybackSettingsTipsAppendix
31
Front panelDisplayRear panelRemoteIndex
o
Standard configuration and connection
n
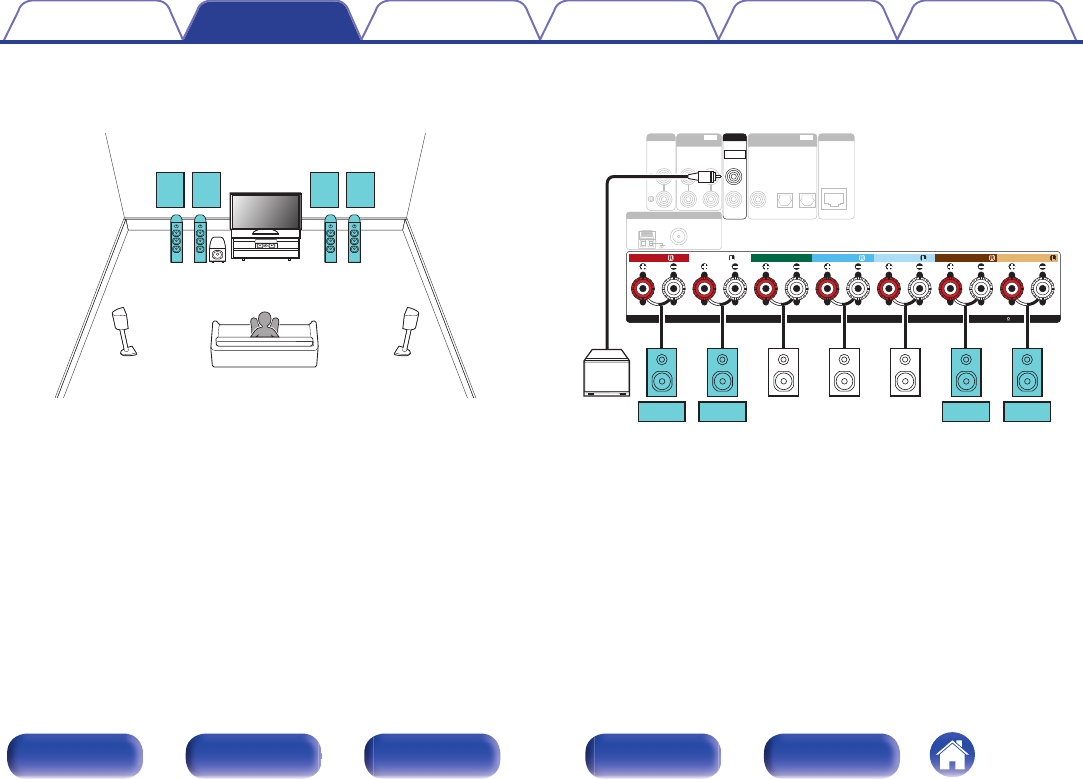
5.1-channel
This serves as a basic 5.1-channel surround system.
Sound modes such as Dolby Pro Logic g are supported.
.
FL
SWC
SL
FR
SR
.
ANTENNA
MEDIA
PLAYER
12
CBL/SAT
NETWORK
ZONE2
AUDIO
(
ASSIGNABLE
)
IN
CBL/SAT
MEDIA
PLAYER
TV AUDIO
12
COAXIAL
OPTICAL
PRE OUT
IN
DIGITAL AUDIO
(
ASSIGNABLE
)
75Ȑ
FMAM
IMPEDANCE : 4㹼16Ȑ
SPEAKERS
ASSIGNABLE
CLASS 2 WIRING
FRONTFRONT
CENTERSURROUNDSURROUND
PRE OUT
1
2
SUBWOOFER
SURROUND BACKSURROUND BACK
SW
SLFLFRCSR
Contents
ConnectionsPlaybackSettingsTipsAppendix
32
Front panelDisplayRear panelRemoteIndex
n
7.1-channel (surround back)
This 7.1-channel surround system is the same as a basic 5.1-channel system but with surround back speakers.
Sound modes such as Dolby Pro Logic gx are supported.
.
FL
SW
SL
FR
SR
SBRSBL
.
ANTENNA
MEDIA
PLAYER
12
CBL/SAT
NETWORK
ZONE2
AUDIO
(
ASSIGNABLE
)
IN
CBL/SAT
MEDIA
PLAYER
TV AUDIO
12
COAXIAL
OPTICAL
PRE OUT
IN
DIGITAL AUDIO
(
ASSIGNABLE
)
75Ȑ
FMAM
IMPEDANCE : 4㹼16Ȑ
SPEAKERS
ASSIGNABLE
CLASS 2 WIRING
FRONTFRONT
CENTERSURROUND
SURROUND BACKSURROUND BACK
SURROUND
PRE OUT
1
2
SUBWOOFER
FLFRCSRSL
SW
SBRSBL
When using a single surround back speaker, connect it to the SURROUND BACK L
terminal.
ContentsConnectionsPlaybackSettingsTipsAppendix
33
Front panelDisplayRear panelRemoteIndex
n
7.1-channel (front height)
This 7.1-channel surround system is the same as a basic 5.1-channel system but with front height speakers.
Sound modes such as Dolby Pro Logic gz are supported.
.
FL
SWC
SL
FHR
FR
SR
FHL
.
ANTENNA
MEDIA
PLAYER
12
CBL/SAT
NETWORK
ZONE2
AUDIO
(
ASSIGNABLE
)
IN
CBL/SAT
MEDIA
PLAYER
TV AUDIO
12
COAXIAL
OPTICAL
PRE OUT
IN
DIGITAL AUDIO
(
ASSIGNABLE
)
75Ȑ
FMAM
IMPEDANCE : 4㹼16Ȑ
SPEAKERS
ASSIGNABLE
CLASS 2 WIRING
FRONTFRONT
CENTERSURROUND
SURROUND BACKSURROUND BACK
SURROUND
PRE OUT
1
2
SUBWOOFER
FLFRCSRSLFHRFHL
SW
Contents
ConnectionsPlaybackSettingsTipsAppendix
34
Front panelDisplayRear panelRemoteIndex
o
Applied configuration and connection
n
5.1-channel (bi-amp connection of front speaker)
This is a method of connecting separate amplifiers to the tweeter terminals and woofer terminals of bi-amp compatible speakers. This connection
enables back EMF (power returned without being output) from the woofer to flow into the tweeter without affecting the sound quality, producing a
higher sound quality.
.
FL
(Bi-Amp)
FR
(Bi-Amp)
SWC
SL
SR
NOTE
When making bi-amp connections, be sure to remove the short-circuiting plate or
wire between the speaker’s woofer and tweeter terminals.
.
ANTENNA
MEDIA
PLAYER
12
CBL/SAT
NETWORK
ZONE2
AUDIO
(
ASSIGNABLE
)
IN
CBL/SAT
MEDIA
PLAYER
TV AUDIO
12
COAXIAL
OPTICAL
PRE OUT
IN
DIGITAL AUDIO
(
ASSIGNABLE
)
75Ȑ
FMAM
IMPEDANCE : 4㹼16Ȑ
SPEAKERS
ASSIGNABLE
CLASS 2 WIRING
FRONTFRONT
CENTERSURROUND
SURROUND BACKSURROUND BACK
SURROUND
PRE OUT
1
2
SUBWOOFER
wqwq
(R) (L)
SW
CSRSL
FLFR
Contents
ConnectionsPlaybackSettingsTipsAppendix
35
Front panelDisplayRear panelRemoteIndex
n
5.1-channel + front speaker of second unit
This system enables switching playback between front speakers A and B as desired.
.
SW
C
SL
SR
FLFL
(B)(A)
FRFR
(A)(B)
.
ANTENNA
MEDIA
PLAYER
12
CBL/SAT
NETWORK
ZONE2
AUDIO
(
ASSIGNABLE
)
IN
CBL/SAT
MEDIA
PLAYER
TV AUDIO
12
COAXIAL
OPTICAL
PRE OUT
IN
DIGITAL AUDIO
(
ASSIGNABLE
)
75Ȑ
FMAM
IMPEDANCE : 4㹼16Ȑ
SPEAKERS
ASSIGNABLE
CLASS 2 WIRING
FRONTFRONT
CENTERSURROUND
SURROUND BACKSURROUND BACK
SURROUND
PRE OUT
1
2
SUBWOOFER
CSRSL
SW
FL (A)FR (A)FR (B)FL (B)
Contents
ConnectionsPlaybackSettingsTipsAppendix
36
Front panelDisplayRear panelRemoteIndex
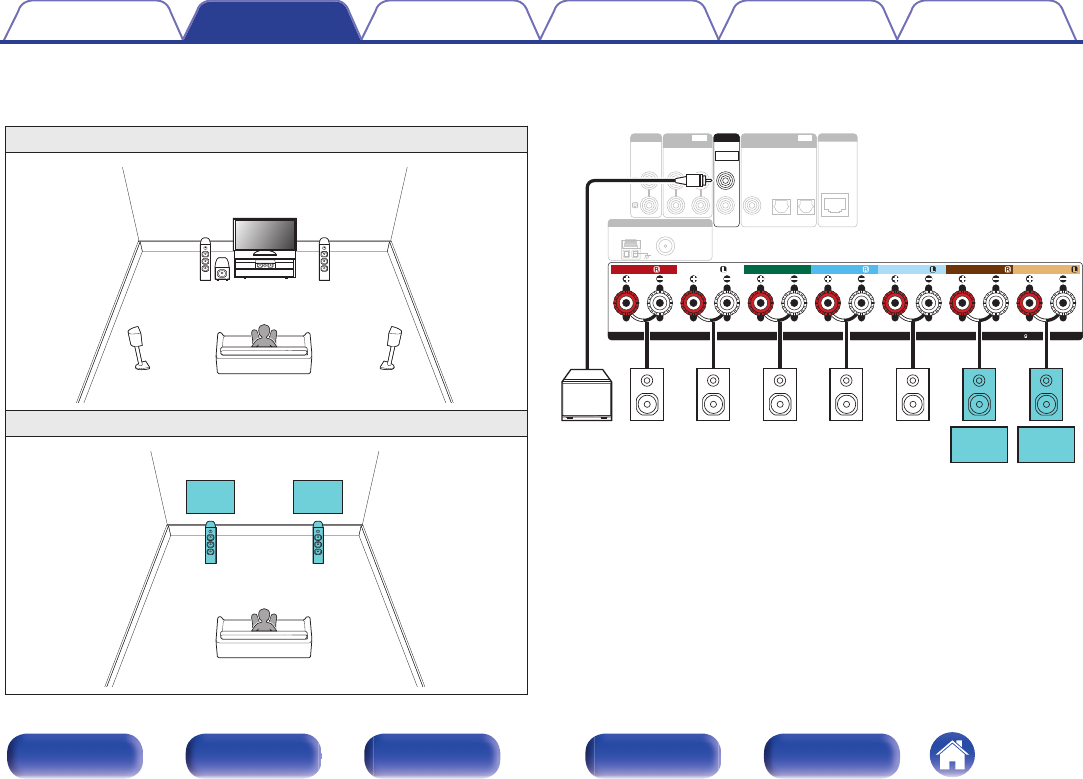
n
5.1-channel (MAIN ZONE) + 2-channel (ZONE2)
This connection method constructs a 5.1-channel speaker system in the MAIN ZONE and a 2-channel system in ZONE2.
MAIN ZONE
.
FL
SWC
SL
FR
SR
ZONE2
.
ZONE2
L
ZONE2
R
.
ANTENNA
MEDIA
PLAYER
12
CBL/SAT
NETWORK
ZONE2
AUDIO
(
ASSIGNABLE
)
IN
CBL/SAT
MEDIA
PLAYER
TV AUDIO
12
COAXIAL
OPTICAL
PRE OUT
IN
DIGITAL AUDIO
(
ASSIGNABLE
)
75Ȑ
FMAM
IMPEDANCE : 4㹼16Ȑ
SPEAKERS
ASSIGNABLE
CLASS 2 WIRING
FRONTFRONT
CENTERSURROUND
SURROUND BACKSURROUND BACK
SURROUND
PRE OUT
1
2
SUBWOOFER
FLFRCSRSL
SW
ZONE2
R
ZONE2
L
Contents
ConnectionsPlaybackSettingsTipsAppendix
37
Front panelDisplayRear panelRemoteIndex
Connecting a TV
Connect a TV to this unit so that the input video is output to the TV. You can also enjoy audio from the TV on this unit.
How to connect a TV depends on the connectors and functions equipped on the TV.
ARC (Audio Return Channel) function plays TV audio on this unit by sending the TV audio signal to this unit via HDMI cable.
.
Is the TV equipped with an HDMI connector?
Is the TV compatible with the ARC (Audio Return Channel) ?
Yes
YesNo
No
“Connection 1 : TV equipped with an HDMI
connector and compatible with the ARC (Audio
Return Channel)” (v
p. 39)
“Connection 2 : TV equipped with an HDMI
connector and incompatible with the ARC (Audio
Return Channel)” (v p. 40)
“Connection 3 : TV equipped without
an HDMI connector” (v
p. 41)
ContentsConnectionsPlaybackSettingsTipsAppendix
38
Front panelDisplayRear panelRemoteIndex
Connection 1 : TV equipped with an HDMI connector and compatible with the ARC
(Audio Return Channel)
Use an HDMI cable to connect a TV that is compatible with the ARC function to this unit.
Set “HDMI Control” (v
p. 156) to “On” when using a TV that supports the ARC function.
.
IMPEDANCE : 4㨪16ǡ
SPEAKERS
ASSIGNABLE
ANTENNA
MEDIA
PLAYER
12
CBL/SAT
1 CBL/SAT4 Blu-ray5 GAME
MEDIA
PLAYER
3
DVD/
Blu-ray
2
(4K)(4K)
MEDIA
PLAYER
2
VIDEO
OUT
HDMI
(
ASSIGNABLE
)
IN
NETWORK
MONITOR
CLASS 2 WIRING
PRE OUT
ZONE2
AUDIO
(
ASSIGNABLE
)
IN
1
2
SUBWOOFER
CBL/SAT
MEDIA
PLAYER
TV AUDIO
IN
IR
REMOTE CONTROL
1 CBL/SAT
12
COAXIAL
OPTICAL
PRE OUT
IN
DIGITAL AUDIO
(
ASSIGNABLE
)
VIDEO
(
ASSIGNABLE
)
IN
75ǡ
FMAM
FRONTFRONT
CENTERSURROUNDSURROUND
SURROUND BACKSURROUND BACK
SURROUNDSURROUND
AC IN
MONITOR
ARC
HDMI
OUT
(ARC)
IN
HDMI
TV
Contents
ConnectionsPlaybackSettingsTipsAppendix
39
Front panelDisplayRear panelRemoteIndex
Connection 2 : TV equipped with an HDMI connector and incompatible with the ARC
(Audio Return Channel)
Use an HDMI cable to connect the TV to this unit.
To listen to audio from TV on this unit, use an optical cable to connect the TV to this unit.
.
IMPEDANCE : 4㨪16ǡ
SPEAKERS
ASSIGNABLE
ANTENNA
MEDIA
PLAYER
12
CBL/SAT
1 CBL/SAT4 Blu-ray5 GAME
MEDIA
PLAYER
3
DVD/
Blu-ray
2
(4K)(4K)
MEDIA
PLAYER
2
VIDEO
OUT
HDMI
(
ASSIGNABLE
)
IN
NETWORK
MONITOR
CLASS 2 WIRING
PRE OUT
ZONE2
AUDIO
(
ASSIGNABLE
)
IN
1
2
SUBWOOFER
IN
IR
REMOTE CONTROL
1 CBL/SAT
PRE OUT
VIDEO
(
ASSIGNABLE
)
IN
75ǡ
FMAM
FRONTFRONT
CENTERSURROUNDSURROUND
SURROUND BACKSURROUND BACK
SURROUNDSURROUND
AC IN
MONITOR
ARC
HDMI
OUT
CBL/SAT
MEDIA
PLAYER
TV AUDIO
12
COAXIAL
OPTICAL
IN
DIGITAL AUDIO
(
ASSIGNABLE
)
OUT
OPTICAL
OUTIN
IN
HDMI
TV
Contents
ConnectionsPlaybackSettingsTipsAppendix
40
Front panelDisplayRear panelRemoteIndex
Connection 3 : TV equipped without an HDMI connector
Use a video cable to connect the TV to this unit.
To listen to audio from TV on this unit, use an optical cable to connect the TV to this unit.
.
IMPEDANCE : 4㨪16ǡ
SPEAKERS
ASSIGNABLE
ANTENNA
MEDIA
PLAYER
12
CBL/SAT
1 CBL/SAT4 Blu-ray5 GAME
MEDIA
PLAYER
3
DVD/
Blu-ray
2
(4K)(4K)
MEDIA
PLAYER
2
HDMI
(
ASSIGNABLE
)
IN
NETWORK
CLASS 2 WIRING
PRE OUT
ZONE2
AUDIO
(
ASSIGNABLE
)
IN
1
2
SUBWOOFER
IN
IR
REMOTE CONTROL
1 CBL/SAT
PRE OUT
VIDEO
(
ASSIGNABLE
)
IN
75ǡ
FMAM
FRONTFRONT
CENTERSURROUNDSURROUND
SURROUND BACKSURROUND BACK
SURROUNDSURROUND
AC IN
CBL/SAT
MEDIA
PLAYER
TV AUDIO
12
COAXIAL
OPTICAL
IN
DIGITAL AUDIO
(
ASSIGNABLE
)
MONITOR
ARC
HDMI
OUT
VIDEO
OUT
MONITOR
OUT
OPTICAL
OUTIN
IN
VIDEO
TV
Contents
ConnectionsPlaybackSettingsTipsAppendix
41
Front panelDisplayRear panelRemoteIndex
Connecting a playback device
This unit is equipped with two types of video input connectors (HDMI and composite video) and two types of audio input connectors (digital audio, audio).
Select input connectors on this unit according to the connectors equipped on the device you want to connect.
If the device connected to this unit is equipped with an HDMI connector, it is recommended to use HDMI connections.
In the HDMI connection, audio and video signals can be transmitted through a single HDMI cable.
0
“Connecting a DVD player or Blu-ray Disc player” (v p. 43)
0
“Connecting a set-top box (Satellite tuner/cable TV)” (v p. 44)
0
“Connecting a video camcorder or game console” (v p. 45)
0
Connect devices to this unit as indicated by the input sources printed on the audio/video input connectors of this unit.
0
The source that is assigned to the HDMI IN, DIGITAL AUDIO IN, VIDEO IN and AUDIO IN connectors can be changed. See “Input Assign” (v
p. 160) on how to change the
input source assigned to the input connectors.
0
To play back audio signals that are input to this unit on a TV connected via HDMI, set in the menu “HDMI Audio Out” (v p. 155) to “TV”.
Contents
ConnectionsPlaybackSettingsTipsAppendix
42
Front panelDisplayRear panelRemoteIndex
Connecting a DVD player or Blu-ray Disc player
This explanation uses the connection with a DVD player or Blu-ray disc player as an example.
When connecting a 4K compatible player, connect to either the HDMI 4 or HDMI 5 input connector.
.
IMPEDANCE : 4㨪16ǡ
SPEAKERS
ASSIGNABLE
ANTENNA
MEDIA
PLAYER
12
CBL/SAT
MONITOR
ARC
HDMI
MEDIA
PLAYER
2
VIDEO
OUT
OUT
NETWORK
MONITOR
CLASS 2 WIRING
PRE OUT
ZONE2
AUDIO
(
ASSIGNABLE
)
IN
1
2
SUBWOOFER
CBL/SAT
MEDIA
PLAYER
TV AUDIO
IN
IR
REMOTE CONTROL
1 CBL/SAT
12
COAXIAL
OPTICAL
PRE OUT
IN
DIGITAL AUDIO
(
ASSIGNABLE
)
VIDEO
(
ASSIGNABLE
)
IN
75ǡ
FMAM
FRONTFRONT
CENTERSURROUNDSURROUND
SURROUND BACKSURROUND BACK
SURROUNDSURROUND
AC IN
1 CBL/SAT4 Blu-ray5 GAME
MEDIA
PLAYER
3
DVD/
Blu-ray
2
(4K)(4K)
HDMI
(
ASSIGNABLE
)
IN
OUT
HDMI
DVD player/
Blu-ray Disc player
Contents
ConnectionsPlaybackSettingsTipsAppendix
43
Front panelDisplayRear panelRemoteIndex
Connecting a set-top box (Satellite tuner/cable TV)
This explanation uses the connection with a satellite tuner/cable TV STB as an example.
Select the input connectors on this unit to match the connectors on the device that you want to connect to.
.
IMPEDANCE : 4㨪16ǡ
SPEAKERS
ASSIGNABLE
ANTENNA
MONITOR
ARC
HDMI
VIDEO
OUT
OUT
NETWORK
MONITOR
CLASS 2 WIRING
PRE OUT
ZONE2
1
2
SUBWOOFER
IN
IR
REMOTE CONTROL
PRE OUT
75ǡ
FMAM
FRONTFRONT
CENTERSURROUNDSURROUND
SURROUND BACKSURROUND BACK
SURROUNDSURROUND
AC IN
1 CBL/SAT4 Blu-ray5 GAME
MEDIA
PLAYER
3
DVD/
Blu-ray
2
(4K)(4K)
HDMI
(
ASSIGNABLE
)
IN
CBL/SAT
MEDIA
PLAYER
TV AUDIO
12
COAXIAL
OPTICAL
IN
DIGITAL AUDIO
(
ASSIGNABLE
)
MEDIA
PLAYER
12
CBL/SAT
AUDIO
(
ASSIGNABLE
)
IN
MEDIA
PLAYER
2
1
CBL/SAT
VIDEO
(
ASSIGNABLE
)
IN
R
L
R
L
OUT
HDMI
OUT
COAXIAL
AUDIO
AUDIO
RL
OUT
OUT
VIDEO
VIDEO
(HDMI incompatible device)
Satellite tuner/
Cable TV
Satellite tuner/
Cable TV
or
Contents
ConnectionsPlaybackSettingsTipsAppendix
44
Front panelDisplayRear panelRemoteIndex
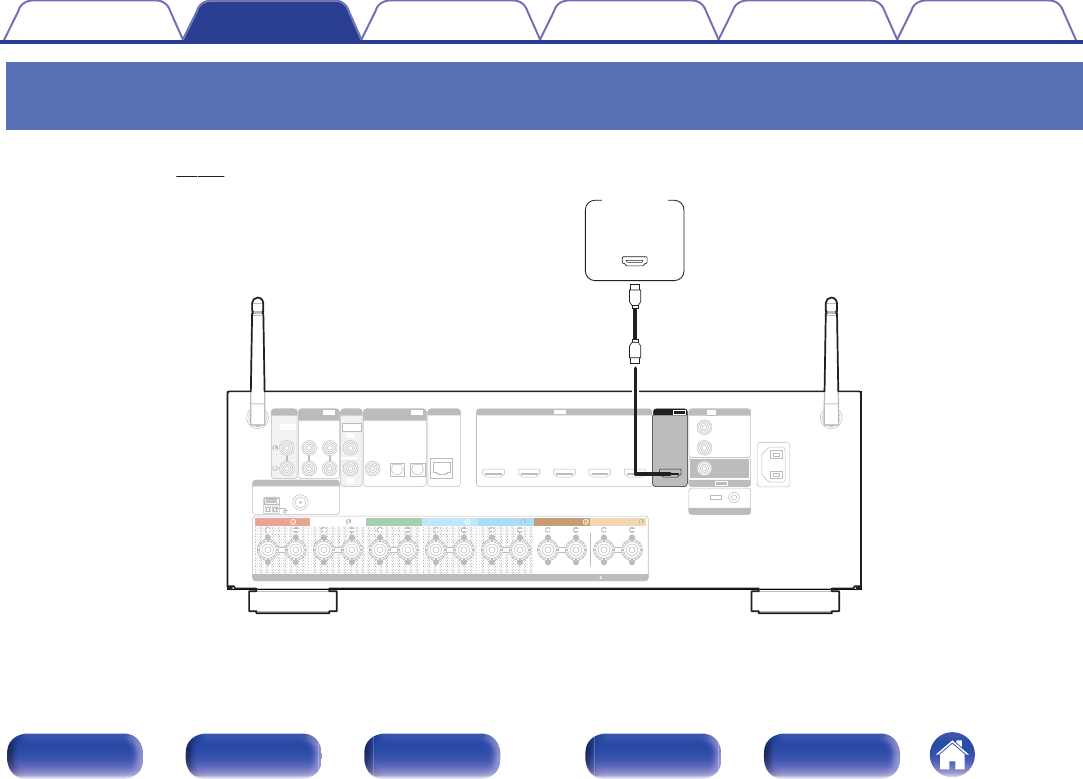
Connecting a video camcorder or game console
This explanation uses the connection with a video camcorders as an example.
Connect a playback device to this unit, such as a video camcorder or game console.
.
QUICK SELECT
MASTER VOLUME
M
MERSTATUS
DVD/Blu-ray
ONLINE
MEDIA
PLAYER
CBL/SAT
3214
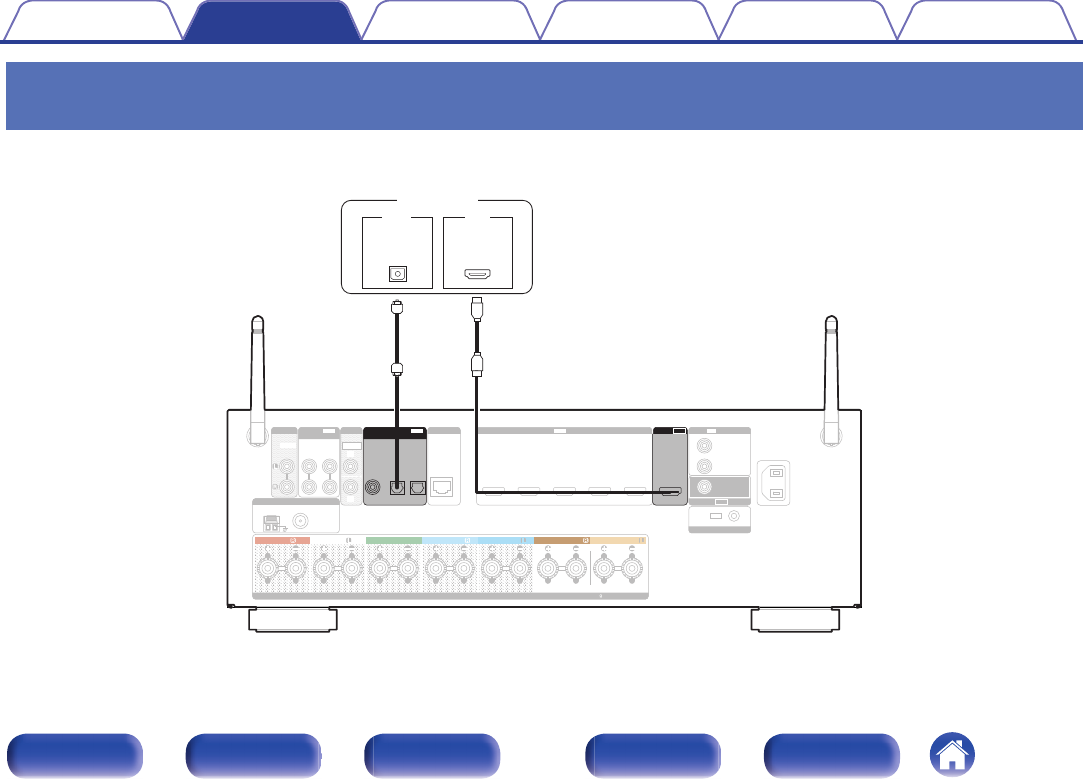
SETUP MICAUX - HDMI
5V / 1A
OUT
HDMI
Video
camcorder
Contents
ConnectionsPlaybackSettingsTipsAppendix
45
Front panelDisplayRear panelRemoteIndex
Connecting an iPod or USB memory device to the USB port
To connect an iPod to this unit, use the USB adapter cable that was supplied with the iPod.
For operating instructions see “Playing an iPod” (v
p. 57) or “Playing a USB memory device” (v p. 62).
.
QUICK SELECT
MASTER VOLUME
M
MERSTATUS
DVD/Blu-ray
ONLINE
MEDIA
PLAYER
CBL/SAT
3214
SETUP MICAUX - HDMI
5V / 1A
USB memory
device
iPod
or
Denon does not guarantee that all USB memory devices will operate or receive power. When using a portable USB hard disk drive (HDD) which came with an AC adapter, use
that device’s supplied AC adapter.
NOTE
0
USB memory devices will not work via a USB hub.
0
It is not possible to use this unit by connecting the unit’s USB port to a PC via a USB cable.
0
Do not use an extension cable when connecting a USB memory device. This may cause radio interference with other devices.
ContentsConnectionsPlaybackSettingsTipsAppendix
46
Front panelDisplayRear panelRemoteIndex
o
Supported iPod/iPhone models
.
• iPod classic
• iPod nano
• iPod touch
• iPhone
Contents
ConnectionsPlaybackSettingsTipsAppendix
47
Front panelDisplayRear panelRemoteIndex
Connecting an FM/AM antenna
Connect the antenna, tune in to a broadcast and then move the antenna to
the location where there is least noise. Then use tape, etc. to fix the
antenna in this location. (“Listening to FM/AM broadcasts” (v p. 71))
If you are unable to receive a good broadcast signal, we recommend installing an
outdoor antenna. For details, inquire at the retail store where you purchased the unit.
NOTE
0
Do not connect two FM antennas simultaneously.
0
Make sure the AM loop antenna lead terminals do not touch metal parts of the
panel.
.
SPEAKERS
MEDIA
PLAYER
12
CBL/SAT
1 CBL/SAT
DV
D
Blu-
r
2
NETWORK
PRE OUT
ZONE2
AUDIO
(
ASSIGNABLE
)
IN
1
2
SUBWOOFER
CBL/SAT
MEDIA
PLAYER
TV AUDIO
12
COAXIAL
OPTICAL
PRE OUT
IN
DIGITAL AUDIO
(
ASSIGNABLE
)
FRONTFRONT
CENTERSURROUNDSURROUNDSURROUNDSURROUND
ANTENNA
75ǡ
FMAM
wqe
AM loop antenna
(supplied)
FM indoor antenna
(supplied)
White
Black
Contents
ConnectionsPlaybackSettingsTipsAppendix
48
Front panelDisplayRear panelRemoteIndex
o
Using the AM loop antenna
Suspending on a wall
Suspend directly on a wall without assembling.
.
Nail, tack, etc.
Standing alone
Use the procedure shown above to assemble.
When assembling, refer to “AM loop antenna assembly”.
.
o
AM loop antenna assembly
1
Put the stand section through the bottom of the loop
antenna from the rear and bend it forward.
2
Insert the projecting part into the square hole in the
stand.
.
Stand
Square
hole
Loop
antenna
Projecting
part
Contents
ConnectionsPlaybackSettingsTipsAppendix
49
Front panelDisplayRear panelRemoteIndex
Connecting to a home network (LAN)
This unit can connect to a network using a wired LAN or wireless LAN.
You can connect this unit to your home network (LAN) to enable various
types of playback and operations as described below.
0
Playback of network audio such as Internet Radio and from your media
server(s)
0
Playback of music content from online streaming services
0
Using the Apple AirPlay function
0
Operation on this unit via the network
0
Firmware Update
For connections to the Internet, contact an ISP (Internet Service
Provider) or a computer shop.
Wired LAN
To make connections via wired LAN, use a LAN cable to connect the
router to this unit as shown in the figure below.
.
ANTENNA
MEDIA
PLAYER
12
CBL/SAT
1 CBL/SAT4 Blu-ray5 GAME
MEDIA
PLAYER
3
DVD/
Blu-ray
2
MONITOR
ARC(4K)(4K)
HDMI
MEDIA
PLAYER
2
VIDEO
OUT
OUT
HDMI
(
ASSIGNABLE
)
IN
MONITOR
PRE OUT
ZONE2
AUDIO
(
ASSIGNABLE
)
IN
1
2
SUBWOOFER
CBL/SAT
MEDIA
PLAYER
TV AUDIO
IN
IR
REMOTE CONTROL
1 CBL/SAT
12
COAXIAL
OPTICAL
PRE OUT
IN
DIGITAL AUDIO
(
ASSIGNABLE
)
VIDEO
(
ASSIGNABLE
)
IN
75ǡ
FMAM
FRONTFRONT
CENTERSURROUNDSURROUND
SURROUND BACKSURROUND BACK
SURROUNDSURROUND
NETWORK
To LAN port
To LAN port
To WAN side
Router
Modem
Internet
PC
LAN port/
Ethernet
connector
LAN port/
Ethernet
connector
NAS
(Network Attached
Storage)
Contents
ConnectionsPlaybackSettingsTipsAppendix
50
Front panelDisplayRear panelRemoteIndex
Wireless LAN
When connecting to a wireless LAN network, stand the rod antenna for
wireless LAN/Bluetooth connection upright on the rear panel.
See “Wi-Fi Setup” (v
p. 183) on how to connect to a wireless LAN
router.
.
Internet
Modem
To WAN side
Router with access
point
IMPEDANCE : 4㨪16ǡ
SPEAKERS
ASSIGNABLE
ANTENNA
MEDIA
PLAYER
12
CBL/SAT
1 CBL/SAT4 Blu-ray5 GAME
MEDIA
PLAYER
3
DVD/
Blu-ray
2
MONITOR
ARC(4K)(4K)
HDMI
MEDIA
PLAYER
2
VIDEO
OUT
OUT
HDMI
(
ASSIGNABLE
)
IN
MONITOR
CLASS 2 WIRING
PRE OUT
ZONE2
AUDIO
(
ASSIGNABLE
)
IN
1
2
SUBWOOFER
CBL/SAT
MEDIA
PLAYER
TV AUDIO
IN
IR
REMOTE CONTROL
1 CBL/SAT
12
COAXIAL
OPTICAL
PRE OUT
IN
DIGITAL AUDIO
(
ASSIGNABLE
)
VIDEO
(
ASSIGNABLE
)
IN
75ǡ
FMAM
FRONTFRONT
CENTERSURROUNDSURROUND
SURROUND BACKSURROUND BACK
SURROUNDSURROUND
AC IN
NETWORK
0
When using this unit, we recommend you use a router equipped with the following
functions:
0
Built-in DHCP server
This function automatically assigns IP addresses on the LAN.
0
Built-in 100BASE-TX switch
When connecting multiple devices, we recommend a switching hub with a
speed of 100 Mbps or greater.
0
Only use a shielded STP or ScTP LAN cable (readily available at electronics
stores). (CAT-5 or greater recommended)
0
The normal shielded-type LAN cable is recommended.
If a flat-type cable or unshielded-type cable is used, other devices could be
affected by noise.
0
When using a router that supports the WPS (Wi-Fi Protected Setup) function, Wi-
Fi connection can be carried out easily.
0
When using this unit connected to a network with no DHCP function, configure the
IP address, etc. in “Network” (v
p. 182).
NOTE
0
The types of routers that can be used depend on the ISP. Contact your ISP or a
computer shop for details.
0
This unit is not compatible with PPPoE. A PPPoE compatible router is required if
your contracted line is not set using PPPoE.
0
Do not connect an NETWORK connector directly to the LAN port / Ethernet
connector on your computer.
0
Various online services may be discontinued without prior notice.
ContentsConnectionsPlaybackSettingsTipsAppendix
51
Front panelDisplayRear panelRemoteIndex
Connecting an external control device
REMOTE CONTROL jacks
When this unit is installed in a location where the remote control signals cannot reach (installation in a cabinet etc.), it can still be controlled by the remote
control by connecting a remote control receiver unit (sold separately).
You can also use it to remotely control ZONE2 (separate room).
.
IMPEDANCE : 4㨪16ǡ
SPEAKERS
ASSIGNABLE
ANTENNA
MEDIA
PLAYER
12
CBL/SAT
1 CBL/SAT4 Blu-ray5 GAME
MEDIA
PLAYER
3
DVD/
Blu-ray
2
MONITOR
ARC(4K)(4K)
HDMI
MEDIA
PLAYER
2
VIDEO
OUT
OUT
HDMI
(
ASSIGNABLE
)
IN
NETWORK
MONITOR
CLASS 2 WIRING
PRE OUT
ZONE2
AUDIO
(
ASSIGNABLE
)
IN
1
2
SUBWOOFER
CBL/SAT
MEDIA
PLAYER
TV AUDIO
1 CBL/SAT
12
COAXIAL
OPTICAL
PRE OUT
IN
DIGITAL AUDIO
(
ASSIGNABLE
)
VIDEO
(
ASSIGNABLE
)
IN
75ǡ
FMAM
FRONTFRONT
CENTERSURROUNDSURROUND
SURROUND BACKSURROUND BACK
SURROUNDSURROUND
AC IN
IN
IR
REMOTE CONTROL
AUX
OUT
InputOutput
Infrared
retransmitter
Infrared
sensor
Contents
ConnectionsPlaybackSettingsTipsAppendix
52
Front panelDisplayRear panelRemoteIndex
Connecting the power cord
After completing all the connections, insert the power plug into the power outlet.
.
IMPEDANCE : 4㨪16ǡ
ASSIGNABLE
4 Blu-ray5 GAME
MEDIA
PLAYER
3
DVD/
Blu-ray
2
MONITOR
ARC(4K)(4K)
HDMI
MEDIA
PLAYER
2
VIDEO
OUT
OUT
HDMI
(
ASSIGNABLE
)
IN
MONITOR
CLASS 2 WIRING
IN
IR
REMOTE CONTROL
1 CBL/SAT
VIDEO
(
ASSIGNABLE
)
IN
SURROUND BACKSURROUND BACK
DD
AC IN
Power cord(supplied)
To household power outlet
(AC 120 V, 60 Hz)
Contents
ConnectionsPlaybackSettingsTipsAppendix
53
Front panelDisplayRear panelRemoteIndex
o
Contents
Basic operation
Turning the power on55
Selecting the input source55
Adjusting the volume56
Turning off the sound temporarily (Muting)56
Selecting a sound mode114
Playback a device
Playing a DVD player/Blu-ray Disc player56
Playing an iPod57
Playing a USB memory device62
Playing a Bluetooth device67
Listening to FM/AM broadcasts70
Playback network audio/service
Listening to Internet Radio78
Playing back files stored on a PC and NAS82
Viewing photographs on the Flickr site86
Listening to Pandora
®
90
Listening to SiriusXM Internet Radio97
AirPlay function100
Spotify Connect function103
Convenience functions
Convenience functions104
HDMI control function126
Sleep timer function127
Quick select plus function129
Other functions
Web control function132
Playback in ZONE2 (Separate room)134
ContentsConnectionsPlaybackSettingsTipsAppendix
Playback
54
Front panelDisplayRear panelRemoteIndex
Basic operation
.
ENT
ENTER
S
OU
OU
ND
ND
MO
MODE
VO
LU
LUME
C
HA
HA
NN
NNEL
QUIC
K
K
SE
SELECT
P
AG
AGE
PUREMOVIEGAMEMUSIC
T
UN
UNE
TU
TUNE
1234
ECO
ZO
ZONE 2
S
OU
OU
RC
RCE
S
LE
LEEP
I
NF
NFO
OP
OPT
IO
ION
BACK
SET
SETUP
Bl
Blu
-r
-rayC
BL/SAT
BL/SAT
GA
GAME
D
VD/
VD/
Blu-ra
Blu-ray
AUX
M
ED
EDIA
PLAY
PLAYER
TV
A
AU
DI
DIO
B
lu
lu
etoo
etooth
INTE
INTE
RNET
RNET
R
ADI
ADIO
T
UN
UNER
iP
iP
od/
od/USB
ONLIN
ONLINE
MUSIC
PO
POWER
VO
VO
LU
LUME
MUTE
MUTE
POWER
MUTE
VOLUME
X
df
:
Input source
select
buttons
Turning the power on
1
Press POWERX to turn on power to the unit.
0
You can press the input source select button when the unit is in standby mode to
turn on the power.
0
You can also switch the power to standby by pressing X on the main unit.
Selecting the input source
1
Press the input source select button to be played back.
The desired input source can be selected directly.
You can also select the input source by turning SOURCE SELECT on the main unit.
ContentsConnectionsPlaybackSettingsTipsAppendix
55
Front panelDisplayRear panelRemoteIndex
Adjusting the volume
1
Use VOLUMEdf to adjust the volume.
0
The variable range differs according to the input signal and channel level setting.
0
You can also adjust the master volume by turning MASTER VOLUME on the main
unit.
Turning off the sound temporarily
(Muting)
1
Press MUTE:.
0
MUTE indicator on the display flashes.
0
: appears on the TV screen.
0
The sound is reduced to the level set at “Mute Level” (v p. 150) in the menu.
0
To cancel mute, either adjust the sound volume or press MUTE: again.
Playback a DVD player/Blu-ray Disc
player
The following describes the procedure for playing DVD player/Blu-ray Disc
player.
1
Prepare for playback.
A
Turn on the power of the TV, subwoofer and player.
B
Change the TV input to the input of this unit.
2
Press POWERX to turn on power to the unit.
3
Press DVD/Blu-ray (4K not supported) or Blu-ray (4K
supported) to switch the input source of the player to
be played back.
4
Play the DVD player or Blu-ray Disc player.
o
Surround playback (v p. 114)
ContentsConnectionsPlaybackSettingsTipsAppendix
56
Front panelDisplayRear panelRemoteIndex
Playing an iPod
.
S
OU
OU
ND
ND
MO
MODE
PO
POWER
VO
LU
LUME
C
HA
HA
NN
NNEL
MUTE
MUTE
QUIC
K
K
SE
SELECT
VO
VO
LU
LUME
Bl
Blu
-r
-rayC
BL/SAT
BL/SAT
GA
GAME
D
VD/
VD/
Blu-ra
Blu-ray
AUX
M
ED
EDIA
PLAY
PLAYER
TV
A
AU
DI
DIO
B
lu
lu
etoo
etooth
INTE
INTE
RNET
RNET
R
ADI
ADIO
T
UN
UNER
PUREMOVIEGAMEMUSIC
T
UN
UNE
TU
TUNE
ECO
ONLIN
ONLINE
MUSIC
ZO
ZONE 2
S
OU
OU
RC
RCE
S
LE
LEEP
I
NF
NFO
BACK
SET
SETUP
P
AG
AGE
iP
iP
od/
od/USB
ENT
ENTER
OP
OPT
IO
ION
BACK
1234
uio
p
ENTER
OPTION
iPod/USB
BACK
PAGE
df
1
/
3
8
9
0
You can use the USB cable provided with the iPod to connect the iPod
with the unit’s USB port and enjoy music stored on the iPod.
0
For information on the iPod models that can be played back with this
unit, see “Supported iPod/iPhone models” (v p. 47).
0
See “AirPlay function” (v
p. 100) on how to play a music file saved on
an iPhone, iPod touch, iPad or iTunes on this unit via the network.
ContentsConnectionsPlaybackSettingsTipsAppendix
57
Front panelDisplayRear panelRemoteIndex
Listening to music on an iPod
1
Connect the iPod to the USB port. (v p. 46)
2
Press iPod/USB to switch the input source to “iPod/
USB”.
“Browse from iPod” is displayed on the display of this unit.
0
Nothing is displayed on the TV screen.
3
Operate iPod itself while seeing the iPod screen to play
back music.
0
“iPod Browse Mode” has two modes, “From iPod” and “On-Screen”. The default
setting is “From iPod” that operate the iPod itself while looking at the iPod screen.
0
To change to “On-Screen”, where you perform operations while having the iPod
information displayed on the TV screen, see “iPod Browse Mode settings”
(v p. 59).
NOTE
0
Depending on the type of iPod and the software version, some functions may not
operate.
0
Note that Denon will accept no responsibility whatsoever for any problems arising
with the data on an iPod when using this unit in conjunction with the iPod.
o
Operations accessible through the option
menu
This can be operated when the “iPod Browse Mode” (v p. 59) is
set to “From iPod”.
0
“iPod Browse Mode settings” (v p. 59)
0
“Adjusting the volume of each channel to match the input source (Ch
Level Adjust)” (v p. 110)
0
“Adjusting the tone (Tone Control)” (v p. 111)
0
“Displaying your desired video during audio playback (Video
Select)” (v
p. 112)
0
“Playing the same music in all zones (All Zone Stereo)” (v p. 113)
ContentsConnectionsPlaybackSettingsTipsAppendix
58
Front panelDisplayRear panelRemoteIndex
iPod Browse Mode settings
In this mode, various lists and screens during playback on the iPod are
displayed on the TV screen.
This section describes the steps up to playing back tracks on the iPod in
“On-Screen”.
1
Press OPTION when the input source is “iPod/USB”.
The option menu screen is displayed.
2
Select “iPod Browse Mode”, then press ENTER.
The iPod Browse Mode screen is displayed.
3
Use op to select “On-Screen”, then press ENTER.
0
Operations available for “On-Screen” and “From iPod” are listed
below.
iPod Browse ModeFrom iPodOn-Screen
Playable files
Music file
PP
Video file
z
Activebuttons
Remote control
unit (This unit)
PP
iPod
P
z
Only the sound is played.
4
Use uip to select the file to be played, then press
ENTER.
Playback starts.
Operation buttons
Function
1/3
Playback / Pause
89
Skip to previous track / Skip to next track
(Press and hold) Fast-reverse/Fast-forward
ENTER
Playback / Pause
(Press and hold) Stop
ui
Skip to previous track / Skip to next track
(Press and hold) Fast-reverse / Fast-forward
PAGEdf
Switch to the previous page/next page in the list
display
0
The actions of the operation buttons may differ.
0
The display switches between track title, artist name, and album title etc. each time
the main unit’s STATUS is pressed during playback with “iPod Browse Mode” set
to “On-Screen”.
0
English letters, numbers and certain symbols are displayed. Incompatible
characters are displayed as “.” (period).
ContentsConnectionsPlaybackSettingsTipsAppendix
59
Front panelDisplayRear panelRemoteIndex
o
Operations accessible through the option
menu
This can be operated when the “iPod Browse Mode” is set to “On-
Screen”. (v p. 59)
0
“iPod Browse Mode settings” (v p. 59)
0
“Performing repeat playback” (v p. 61)
0
“Performing random playback” (v p. 61)
0
“Adjusting the volume of each channel to match the input source (Ch
Level Adjust)” (v p. 110)
0
“Adjusting the tone (Tone Control)” (v p. 111)
0
“Displaying your desired video during audio playback (Video
Select)” (v p. 112)
0
“Playing the same music in all zones (All Zone Stereo)” (v p. 113)
Contents
ConnectionsPlaybackSettingsTipsAppendix
60
Front panelDisplayRear panelRemoteIndex
Performing repeat playback
1
Press OPTION with “iPod Browse Mode” set to “On-
Screen”.
The option menu screen is displayed.
2
Use ui to select “Repeat”, then press ENTER.
3
Use op to select repeat playback mode.
Off
(Default) :
Repeat playback mode is canceled.
One:
A file being played is played
repeatedly.
All:
All files in the folder currently being
played are played repeatedly.
4
Press ENTER.
The display returns to the playback screen.
“Repeat” settings are stored for each input source.
Performing random playback
1
Press OPTION with “iPod Browse Mode” set to “On-
Screen”.
The option menu screen is displayed.
2
Use ui to select “Random”, then press ENTER.
3
Use op to select random playback mode.
Off
(Default):
Disable random playback.
On:
Randomly play back all tracks in the
current playback folder.
4
Press ENTER.
The display returns to the playback screen.
0
During random playback, each time playback of a track is completed, another
track is randomly selected for playback from tracks in the folder. Therefore, it’s
possible that you may hear a track played back more than once during random
playback.
0
“Random” settings are stored for each input source.
ContentsConnectionsPlaybackSettingsTipsAppendix
61
Front panelDisplayRear panelRemoteIndex
Playing a USB memory device
.
S
OU
OU
ND
ND
MO
MODE
PO
POWER
VO
LU
LUME
C
HA
HA
NN
NNEL
MUTE
MUTE
QUIC
K
K
SE
SELECT
VO
VO
LU
LUME
Bl
Blu
-r
-rayC
BL/SAT
BL/SAT
GA
GAME
D
VD/
VD/
Blu-ra
Blu-ray
AUX
M
ED
EDIA
PLAY
PLAYER
TV
A
AU
DI
DIO
B
lu
lu
etoo
etooth
INTE
INTE
RNET
RNET
R
ADI
ADIO
T
UN
UNER
PUREMOVIEGAMEMUSIC
T
UN
UNE
TU
TUNE
ECO
ONLIN
ONLINE
MUSIC
ZO
ZONE 2
S
OU
OU
RC
RCE
S
LE
LEEP
I
NF
NFO
BACK
SET
SETUP
P
AG
AGE
iP
iP
od/
od/USB
ENT
ENTER
OP
OPT
IO
ION
BACK
1234
ui
p
ENTER
OPTION
iPod/USB
BACK
PAGE
df
1
/
3
8
9
0
Playing back music or viewing still picture (JPEG) files stored on a USB
memory device.
0
Only USB memory devices conforming to mass storage class standards
can be played on this unit.
0
This unit is compatible with USB memory devices in “FAT16” or
“FAT32” format.
0
The audio/video format types and specifications supported by this unit
for playback are as follows.
See “Playback a USB memory device” for details. (v
p. 221)
0
WMA (Windows Media Audio)
0
MP3 (MPEG-1 Audio Layer-3)
0
WAV
0
MPEG-4 AAC
0
FLAC (Free Lossless Audio Codec)
0
ALAC (Apple Lossless Audio Codec)
0
AIFF
0
DSD
0
JPEG
Contents
ConnectionsPlaybackSettingsTipsAppendix
62
Front panelDisplayRear panelRemoteIndex
Playing files stored on USB memory
devices
1
Connect the USB memory device to the USB port.
(v p. 46)
2
Press iPod/USB to switch the input source to “iPod/
USB”.
.
Folder1
Folder2
Folder3
Music1
Music2
Music3
Music4
OPTION
OPTION
USB[1/9]
Option
3
Use uip to select the file to be played, then press
ENTER.
Playback starts.
Operation buttons
Function
1/3
Playback / Pause
89
Skip to previous track / Skip to next track
(Press and hold) Fast-reverse / Fast-forward
ENTER
Playback / Pause
(Press and hold) Stop
ui
Skip to previous track / Skip to next track
(Press and hold) Fast-reverse / Fast-forward
PAGEdf
Switch to the previous page/next page in the list
display
0
When an MP3 music file includes album art data, the album art can be displayed while
playing the file.
0
This unit plays back picture (JPEG) files in the order in which they are stored in the
folder.
NOTE
Note that Denon will accept no responsibility whatsoever for any problems arising with the
data on a USB memory device when using this unit in conjunction with the USB memory
device.
ContentsConnectionsPlaybackSettingsTipsAppendix
63
Front panelDisplayRear panelRemoteIndex
o
Operations accessible through the option
menu
0
“Performing repeat playback” (v p. 105)
0
“Performing random playback” (v
p. 105)
0
“Searching content with keywords (Text Search)” (v p. 107)
0
“Playing back music and a favorite picture at the same time
(Slideshow)” (v p. 108)
0
“Setting the Slideshow Interval” (v p. 109)
0
“Adjusting the volume of each channel to match the input source (Ch
Level Adjust)” (v
p. 110)
0
“Adjusting the tone (Tone Control)” (v p. 111)
0
“Displaying your desired video during audio playback (Video
Select)” (v p. 112)
0
“Playing the same music in all zones (All Zone Stereo)” (v
p. 113)
Contents
ConnectionsPlaybackSettingsTipsAppendix
64
Front panelDisplayRear panelRemoteIndex
Listening to music on a Bluetooth device
.
S
OU
OU
ND
ND
MO
MODE
PO
POWER
VO
LU
LUME
C
HA
HA
NN
NNEL
MUTE
MUTE
QUIC
K
K
SE
SELECT
P
AG
AGE
VO
VO
LU
LUME
Bl
Blu
-r
-rayC
BL/SAT
BL/SAT
GA
GAME
D
VD/
VD/
Blu-ra
Blu-ray
AUX
M
ED
EDIA
PLAY
PLAYER
TV
A
AU
DI
DIO
INTE
INTE
RNET
RNET
R
ADI
ADIO
T
UN
UNER
iP
iP
od/
od/USB
PUREMOVIEGAMEMUSIC
T
UN
UNE
TU
TUNE
1234
ECO
ONLIN
ONLINE
MUSIC
ZO
ZONE 2
S
OU
OU
RC
RCE
S
LE
LEEP
B
lu
lu
etoo
etooth
ENT
ENTER
I
NF
NFO
OP
OPT
IO
ION
BACK
SET
SETUP
1
/
3
8
9
ui
ENTER
OPTION
Bluetooth
BACK
Music files stored on Bluetooth devices such as smartphones, digital
music players, etc. can be enjoyed on this unit by pairing and connecting
this unit with the Bluetooth device.
Communication is possible up to a range of about 32.8 ft/10 m.
NOTE
To play back music from a Bluetooth device, the Bluetooth device needs to support
the A2DP profile.
ContentsConnectionsPlaybackSettingsTipsAppendix
65
Front panelDisplayRear panelRemoteIndex
Pairing with a Bluetooth device
In order to enjoy music from a Bluetooth device on this unit, the Bluetooth
device must first be paired with this unit.
Once the Bluetooth device has been paired, it does not need to be paired
again.
1
Press Bluetooth to switch the input source to
“Bluetooth”.
.
OPTION
OPTION
Bluetooth
Music
Device
Now Playing
Artist
Album
Option
When using for the first time, the unit will go into the pairing mode
automatically and “Pairing...” will appear on the display of the unit.
2
Select this unit when its name appears in the list of
devices displayed on the screen of the Bluetooth
device.
At the end of the pairing, the device name appears on the display of
this unit.
0
Connect to the Bluetooth device while “Pairing” is being displayed
on the display of the unit.
Perform the connection with the Bluetooth device close to the unit
(about 3.3 ft/1 m).
0
When connecting a second Bluetooth device, press and hold Bluetooth for
approximately 3 seconds or select “Pairing Mode” from the options menu to pair
the device. (v p. 69)
0
This unit can be paired with a maximum of 8 Bluetooth devices. When a 9th
Bluetooth device is paired, it will be registered in place of the oldest registered
device.
0
When a number appears on the display of this unit, check that it is the same
number as that shown on the screen of the Bluetooth device and then select “Pair”
for both the Bluetooth device and the unit.
0
Enter “0000” when the password is requested on the screen of the Bluetooth
device.
ContentsConnectionsPlaybackSettingsTipsAppendix
66
Front panelDisplayRear panelRemoteIndex
Playing a Bluetooth device
Check the following before you play back music.
0
The Bluetooth function of the Bluetooth device must be turned on
0
Pairing must be completed
1
Press Bluetooth to switch the input source to
“Bluetooth”.
The unit will automatically connect to the most recently used
Bluetooth device.
2
Start playing the Bluetooth device.
0
The Bluetooth device can also be operated with the remote
control of this unit.
Operation buttonsFunction
1/3
Playback / Pause
89
Skip to previous track / Skip to next track
(Press and hold) Fast-reverse / Fast-forward
ENTER
Playback / Pause
(Press and hold) Stop
ui
Skip to previous track / Skip to next track
(Press and hold) Fast-reverse / Fast-forward
0
When the power of this unit is turned on, the input source will be automatically
switched to “Bluetooth” if a Bluetooth device is connected.
0
When the “IP Control” (v p. 182) setting of this unit is set to “Always On” and a
Bluetooth device is connected with the unit in the standby state, the power of the
unit will be turned on automatically.
0
Press STATUS on this unit during playback to switch the display between Title
name, Artist name, Album name, etc.
0
English letters, numbers and certain symbols are displayed. Incompatible
characters are displayed as “.” (period).
ContentsConnectionsPlaybackSettingsTipsAppendix
67
Front panelDisplayRear panelRemoteIndex
NOTE
0
To operate the Bluetooth device with the remote control of this unit, the Bluetooth
device needs to support the AVRCP profile.
0
The remote control of this unit is not guaranteed to work with all Bluetooth devices.
0
Depending on the type of Bluetooth device, this unit outputs audio that is coupled
to the volume setting on the Bluetooth device.
o
Operations accessible through the option
menu
0
“Performing repeat playback” (v p. 105)
0
“Performing random playback” (v p. 105)
0
“Pairing with the Pairing Mode” (v p. 69)
0
“Adjusting the volume of each channel to match the input source (Ch
Level Adjust)” (v
p. 110)
0
“Adjusting the tone (Tone Control)” (v p. 111)
0
“Displaying your desired video during audio playback (Video
Select)” (v p. 112)
0
“Playing the same music in all zones (All Zone Stereo)” (v
p. 113)
Contents
ConnectionsPlaybackSettingsTipsAppendix
68
Front panelDisplayRear panelRemoteIndex
Pairing with the Pairing Mode
Pair a Bluetooth device with this unit.
1
Press OPTION when the input source is “Bluetooth”.
The option menu screen is displayed.
2
Use ui to select “Pairing Mode”, then press ENTER.
The device will go into the pairing mode.
3
Select this unit when its name appears in the list of
devices displayed on the screen of the Bluetooth
device.
At the end of the pairing, the device name appears on the display of
this unit.
0
When a number appears on the display of this unit, check that it is the same
number as that shown on the screen of the Bluetooth device and then select “Pair”
for both the Bluetooth device and the unit.
0
Enter “0000” when the password is requested on the screen of the Bluetooth
device.
Contents
ConnectionsPlaybackSettingsTipsAppendix
69
Front panelDisplayRear panelRemoteIndex
Listening to FM/AM broadcasts
.
S
OU
OU
ND
ND
MO
MODE
PO
POWER
VO
LU
LUME
MUTE
MUTE
QUIC
K
K
SE
SELECT
P
AG
AGE
VO
VO
LU
LUME
Bl
Blu
-r
-rayC
BL/SAT
BL/SAT
GA
GAME
D
VD/
VD/
Blu-ra
Blu-ray
AUX
M
ED
EDIA
PLAY
PLAYER
TV
A
AU
DI
DIO
B
lu
lu
etoo
etooth
INTE
INTE
RNET
RNET
R
ADI
ADIO
iP
iP
od/
od/USB
PUREMOVIEGAMEMUSIC
1234
ECO
ONLIN
ONLINE
MUSIC
ZO
ZONE 2
S
OU
OU
RC
RCE
S
LE
LEEP
T
UN
UNER
ENT
ENTER
I
NF
NFO
OP
OPT
IO
ION
BACK
SET
SETUP
T
UN
UNE
TU
TUNE
C
HA
HA
NN
NNEL
uio
p
ENTER
OPTION
TUNER
BACK
TUNE +, –
CHANNEL +,
–
You can use the built-in tuner of this unit to listen to FM broadcasts and
AM broadcasts.
Make sure the FM antenna and AM loop antenna are connected to this
unit first.
ContentsConnectionsPlaybackSettingsTipsAppendix
70
Front panelDisplayRear panelRemoteIndex
Listening to FM/AM broadcasts
1
Connect the antenna. (“Connecting an FM/AM
antenna” (v p. 48))
2
Press TUNER to switch the input source to “Tuner”.
GTV screenH
.
TUNE+/-
TUNE+/-
OPTION
OPTION
AUTO
AUTO
CH
CH
+/-
+/-
Tuner
CH 1
FM 92.10MHz
TunePresetOption
.
01 FM 92.10MHz
GDisplay of this unitH
3
Press OPTION.
The option menu screen is displayed.
4
Use ui to select “FM/AM”, then press ENTER.
This displays the reception band input screen.
5
Use op to select “FM” or “AM”, then press ENTER.
FM:When listening to an FM broadcast.
AM:When listening to an AM broadcast.
6
Press TUNE + or TUNE - to select the station you want
listen to.
Scanning is performed until it finds an available radio station. When
it finds a radio station, it stops the scan automatically and tunes in.
The modes for receiving FM broadcasts consists of “Auto” mode that automatically
searches available broadcast stations and “Manual” mode that lets you tune in using
buttons to change the frequency. The default setting is “Auto”. You can also use
“Direct Tune” to tune in by entering the frequency directly.
In “Auto” mode, you cannot tune in to radio stations if the reception is not good.
If this is the case, then use the “Manual” mode or “Direct Tune” mode to tune in.
Operation buttonsFunction
TUNE +, –Selects the radio station (up/down)
CHANNEL +, -Selects preset radio stations
ContentsConnectionsPlaybackSettingsTipsAppendix
71
Front panelDisplayRear panelRemoteIndex
o
Operations accessible through the option
menu
0
“Tuning in by entering the frequency (Direct Tune)” (v p. 72)
0
“Changing the tune mode (Tune Mode)” (v p. 73)
0
“Tuning in to stations and presetting them automatically (Auto
Preset)” (v
p. 73)
0
“Presetting the current broadcast station (Preset
Memory)” (v
p. 74)
0
“Specify a name for the preset broadcast station (Preset
Name)” (v
p. 75)
0
“Skipping preset broadcast stations (Preset Skip)” (v p. 76)
0
“Adjusting the volume of each channel to match the input source (Ch
Level Adjust)” (v p. 110)
0
“Adjusting the tone (Tone Control)” (v
p. 111)
0
“Displaying your desired video during audio playback (Video
Select)” (v p. 112)
0
“Playing the same music in all zones (All Zone Stereo)” (v
p. 113)
Tuning in by entering the frequency
(Direct Tune)
You can enter the receiving frequency directly to tune in.
1
Press OPTION when the input source is “Tuner”.
The option menu screen is displayed.
2
Use ui to select “Direct Tune”, then press ENTER.
The screen that lets you enter the frequency is displayed.
3
Use ui to select the number, then press p.
0
If o is pressed, the immediately preceding input is cancelled.
4
Repeat step 3 and enter the frequency of the radio
station you want to hear.
5
When setting is completed, press ENTER.
The preset frequency is tuned in.
Contents
ConnectionsPlaybackSettingsTipsAppendix
72
Front panelDisplayRear panelRemoteIndex
Changing the tune mode (Tune Mode)
You can change the mode for tuning into FM and AM broadcasts. If you
cannot tune in automatically with “Auto” mode, change the mode to
“Manual” and tune in manually.
1
Press OPTION when the input source is “Tuner”.
The option menu screen is displayed.
2
Use ui to select “Tune Mode”, then press ENTER.
3
Use op to select the tune mode, then press ENTER.
Auto:
Automatically search for and tune to a receivable radio
station.
Manual:
Manually change the frequency one step at a time each
time the button is pressed.
Tuning in to stations and presetting
them automatically (Auto Preset)
A maximum of 56 radio stations can be automatically preset.
1
Press OPTION when the input source is “Tuner”.
The option menu screen is displayed.
2
Use ui to select “Auto Preset”, then press ENTER.
3
Press ENTER.
The unit starts to tune in to radio stations automatically and preset
them.
0
When presetting is completed, “Completed” is displayed for about
5 seconds and the option menu screen turns off.
The preset memory is overwritten.
ContentsConnectionsPlaybackSettingsTipsAppendix
73
Front panelDisplayRear panelRemoteIndex
Presetting the current broadcast
station (Preset Memory)
Your favorite broadcast stations can be preset so that you can tune them
in easily.
Up to 56 stations can be preset.
1
Tune in the broadcast station you want to preset.
(“Listening to FM/AM broadcasts” (v p. 71))
2
Press OPTION.
The option menu screen is displayed.
3
Use ui to select “Preset Memory”, then press ENTER.
The list of already preset channels is displayed.
4
Use ui to select the channel you want to preset, then
This mode plays back 2-channel sources in 5.1 or 7.1-channel playback. It cannot be selected when headphones are used or when the speaker configuration is front
The sound mode that can be selected differs depending on the audio format of the input signal and the number of channels. For details, see “Types of input signals, and
The sound mode that can be selected differs depending on the audio format of the input signal and the number of channels. For details, see “Types of input signals, and
corresponding sound modes” (v
p. 229).
Contents
ConnectionsPlaybackSettingsTipsAppendix
124
Front panelDisplayRear panelRemoteIndex
o
Views on the display
.
+ PL z DVD
qw
A
Shows a decoder to be used.
0
A Dolby Digital Plus decoder is displayed as “H”.
B
Shows a decoder that creates sound output.
0
“+ PLgz” indicates that the PLgz decoder is being used, and that
front height channel sound is being created.
ContentsConnectionsPlaybackSettingsTipsAppendix
125
Front panelDisplayRear panelRemoteIndex
HDMI control function
A recent addition to the HDMI standard is CEC (Consumer Electronics Control), which allows control signals from one device to communicate with
another device via the HDMI cable connection.
Setting procedure
1
Enable the HDMI control function of this unit.
Set “HDMI Control” (v p. 156) to “On”.
2
Turn the power on for all the devices connected by
HDMI cable.
3
Set the HDMI control function for all devices connected
by HDMI cable.
0
Please consult the operating instructions for the connected
devices to check the settings.
0
Carry out steps 2 and 3 should any of the devices be unplugged.
4
Switch the television input to the HDMI input connected
to this unit.
5
Switch the input source of this unit to check that video
from the player connected by HDMI is played back
correctly.
6
When you turn the TV’s power to standby, check that
the power of this unit also goes to standby.
NOTE
Some functions may not operate depending on the connected TV or player. Check
the owner’s manual of each device for details beforehand.
ContentsConnectionsPlaybackSettingsTipsAppendix
126
Front panelDisplayRear panelRemoteIndex
Sleep timer function
.
ENT
ENTER
S
OU
OU
ND
ND
MO
MODE
PO
POWER
VO
LU
LUME
C
HA
HA
NN
NNEL
MUTE
MUTE
QUIC
K
K
SE
SELECT
P
AG
AGE
VO
VO
LU
LUME
Bl
Blu
-r
-rayC
BL/SAT
BL/SAT
GA
GAME
D
VD/
VD/
Blu-ra
Blu-ray
AUX
M
ED
EDIA
PLAY
PLAYER
TV
A
AU
DI
DIO
B
lu
lu
etoo
etooth
INTE
INTE
RNET
RNET
R
ADI
ADIO
T
UN
UNER
iP
iP
od/
od/USB
PUREMOVIEGAMEMUSIC
T
UN
UNE
TU
TUNE
1234
ECO
ONLIN
ONLINE
MUSIC
S
OU
OU
RC
RCE
I
NF
NFO
OP
OPT
IO
ION
BACK
SET
SETUP
ZO
ZONE 2
S
LE
LEEP
SLEEP
You can have the power automatically switched to standby once a set time
has elapsed. This is convenient for viewing and listening while going to
sleep.
ContentsConnectionsPlaybackSettingsTipsAppendix
127
Front panelDisplayRear panelRemoteIndex
Using the sleep timer
1
Press SLEEP and display the time you want to set.
0
The SLEEP indicator lights up on the display and the sleep timer
starts.
0
You can set the sleep timer in the range from 10 to 120 minutes in
steps of 10 minutes.
o
Checking the remaining time
Press SLEEP when the sleep timer is in operation.
The remaining time appears on the display.
o
To cancel the sleep timer
Press SLEEP to select “Off”.
The SLEEP indicator on the display turns off.
The sleep timer setting is canceled when the unit switches to standby mode.
NOTE
The sleep timer function cannot turn off the power of devices connected to this unit.
To turn off the power of those connected devices, set up sleep timers on the
connected devices themselves.
ContentsConnectionsPlaybackSettingsTipsAppendix
128
Front panelDisplayRear panelRemoteIndex
Quick select plus function
.
B
lu
lu
etoo
etooth
S
OU
OU
ND
ND
MO
MODE
PO
POWER
VO
LU
LUME
C
HA
HA
NN
NNEL
MUTE
MUTE
P
AG
AGE
VO
VO
LU
LUME
Bl
Blu
-r
-rayC
BL/SAT
BL/SAT
GA
GAME
D
VD/
VD/
Blu-ra
Blu-ray
AUX
M
ED
EDIA
PLAY
PLAYER
TV
A
AU
DI
DIO
INTE
INTE
RNET
RNET
R
ADI
ADIO
T
UN
UNER
iP
iP
od/
od/USB
PUREMOVIEGAMEMUSIC
T
UN
UNE
TU
TUNE
ECO
ONLIN
ONLINE
MUSIC
ZO
ZONE 2
S
OU
OU
RC
RCE
S
LE
LEEP
B
lu
lu
etoo
etooth
QUIC
K
K
SE
SELECT
QUICK SELECT
1 – 4
1234
ENT
ENTER
I
NF
NFO
OP
OPT
IO
ION
BACK
SET
SETUP
Settings such as the input source, volume level and sound mode can be
registered to the QUICK SELECT 1 - 4 buttons.
You can simply press one of the registered QUICK SELECT buttons in
subsequent playbacks to switch to the group of saved settings in a batch.
By saving frequently used settings at the QUICK SELECT 1 – 4 buttons,
you will always be able to easily call up the same playback environment.
The Quick Select Plus function can be memorized for each zone.
The QUICK SELECT button on this unit can only be used to operate the MAIN
ZONE.
ContentsConnectionsPlaybackSettingsTipsAppendix
129
Front panelDisplayRear panelRemoteIndex
Calling up the settings
1
Press QUICK SELECT.
The Quick Select settings registered to the button you pressed are
called up.
0
The default settings for the input source and volume are as shown
below.
GMAIN ZONEH
ButtonInput sourceVolume
QUICK SELECT 1CBL/SAT40
QUICK SELECT 2DVD/Blu-ray40
QUICK SELECT 3Media Player40
QUICK SELECT 4Online Music40
ContentsConnectionsPlaybackSettingsTipsAppendix
130
Front panelDisplayRear panelRemoteIndex
Changing the settings
1
Set the items below to the settings you want to
register.
The following settings from A to H can be memorized for MAIN
ZONE, and settings A and B can be memorized for ZONE2.
A
Input source (v p. 55)
B
Volume (v p. 56)
C
Sound mode (v
p. 114)
D
Audyssey (Audyssey MultEQ
®
XT, Audyssey Dynamic EQ
®
,
Audyssey Dynamic Volume
®
) (v
p. 151 - 153)
E
“Restorer” (v p. 149)
F
“Adjusting the volume of each channel to match the input source
(Ch Level Adjust)” (v p. 110)
G
“Displaying your desired video during audio playback (Video
Select)” (v p. 112)
Press and hold QUICK SELECT while a radio station is being received or a
track is being played back with any of the following sources, the current radio
station or track is memorized.
0
Tuner / Internet Radio / Media Server / Pandora / SiriusXM / Favorites /
iPod/USB
2
Press and hold the desired QUICK SELECT until
“Quickz Memory” appears on the display.
The current settings will be memorized.
z is displayed the number for the QUICK SELECT button you
pressed.
o
Changing the Quick Select Name
The MAIN ZONE Quick Select name displayed on the TV screen or
display of this unit can be changed to a different name.
For the name change method, see “Quick Sel.Names” (v
p. 192).
ContentsConnectionsPlaybackSettingsTipsAppendix
131
Front panelDisplayRear panelRemoteIndex
Web control function
You can control this unit from a web control screen on a web browser.
.
PC
Router
Tablet
This unit
0
This unit and the PC or tablet need to be connected correctly to the network in
order to use the web control function. (“Connecting to a home network
(LAN)” (v p. 50))
0
Depending on the settings of your security-related software, you may not be able
to access this unit from your PC. If this is the case, then change the settings of the
security-related software.
Controlling the unit from a web control
1
Switch the “IP Control” setting to “Always On”.
(v p. 186)
2
Check the IP address of this unit with “Information”.
(v p. 182)
.
Network/Information
Friendly name
Connection
IP Address
MAC Address
Denon AVR-X1100W
Wired(Ethernet)
DHCPOn
192.168.100.19
0005cd-000000
Checking the IP address.
3
Start up the web browser.
ContentsConnectionsPlaybackSettingsTipsAppendix
132
Front panelDisplayRear panelRemoteIndex
4
Enter the IP address of this unit in browser’s address
box.
For example, if the IP address of this unit is “192.168.100.19”, enter
“http://192.168.100.19”.
.
http://192.168.100.19
File
EditViewToolsHelpFavorites
5
When the top menu is displayed, click on the menu
item you want to operate.
.
MAIN ZONE
CBL/SAT
ZONE2
CBL/SAT
Load
AVR-X1100W
AVR-X1100W
Audio
Setup Menu
Video
Inputs
Speakers
Network
General
Save
0
You can use the “Save” and “Load” functions to store or recall various function
settings using web control from a PC.
0
To memorize settings, click “Save” on the Setup Menu screen.
0
To call up settings, click “Load” on the Setup Menu screen.
0
We recommend using one of the following web browsers.
Internet Explorer 10 and above
Mozilla Firefox 24 and above
Google Chrome 29 and above
Safari 5.x and above
ContentsConnectionsPlaybackSettingsTipsAppendix
133
Front panelDisplayRear panelRemoteIndex
Playback in ZONE2 (Separate room)
You can operate this unit to enjoy audio in a room (ZONE2) that is different from the room where this unit is placed (MAIN ZONE).
You can simultaneously play back the same source in both the MAIN ZONE and ZONE2. You can also play back separate sources in the MAIN ZONE
and ZONE2.
Connecting ZONE2
You can use the following two methods to play back audio in ZONE2.
0
“Connecting using a speaker output connector” (v p. 134)
0
“Connecting using an external amplifier” (v p. 135)
o
Connection 1: Connection through the speaker
output terminals
When “Assign Mode” (v p. 174) is set to “ZONE2” in the menu,
ZONE2 audio is output from the SURROUND BACK speaker terminal.
.
IMPEDANCE : 4㨪16ǡ
ASSIGNABLE
CLASS 2 WIRING
SURROUND BACKSURROUND BACK
This unit
MAIN ZONE
(L)
(R)
ZONE2
Contents
ConnectionsPlaybackSettingsTipsAppendix
134
Front panelDisplayRear panelRemoteIndex
o
Connection 2 : Connection using an external
amplifier
The audio signals of this unit’s ZONE2 audio output connectors are
output to the ZONE2 amplifiers and played on these amplifiers.
.
ZONE2
PRE OUT
AUX IN
R
L
This unit
Power Amplifier
MAIN ZONEZONE2
ContentsConnectionsPlaybackSettingsTipsAppendix
135
Front panelDisplayRear panelRemoteIndex
Playback in ZONE2
.
ENT
ENTER
S
OU
OU
ND
ND
MO
MODE
VO
LU
LUME
C
HA
HA
NN
NNEL
QUIC
K
K
SE
SELECT
P
AG
AGE
PUREMOVIEGAMEMUSIC
T
UN
UNE
TU
TUNE
1234
ECO
ZO
ZONE 2
S
OU
OU
RC
RCE
S
LE
LEEP
I
NF
NFO
OP
OPT
IO
ION
BACK
SET
SETUP
Bl
Blu
-r
-rayC
BL/SAT
BL/SAT
GA
GAME
D
VD/
VD/
Blu-ra
Blu-ray
AUX
M
ED
EDIA
PLAY
PLAYER
TV
A
AU
DI
DIO
B
lu
lu
etoo
etooth
INTE
INTE
RNET
RNET
R
ADI
ADIO
T
UN
UNER
iP
iP
od/
od/USB
ONLIN
ONLINE
MUSIC
PO
POWER
VO
VO
LU
LUME
MUTE
MUTE
ZONE2
ZONE2
VOLUME
ZONE2
SOURCE
df
X
Input source
select
buttons
1
Press ZONE2X to turn on the ZONE2 power.
The ( indicator on the display lights.
0
Power in ZONE2 can be turned on or off by pressing ZONE2
ON/OFF on the main unit.
2
Press ZONE2 SOURCE to select the input source to be
played.
The audio signal of the selected source is output to ZONE2.
0
To perform an operation with the main unit, press ZONE2
SOURCE. Each time you press ZONE2 SOURCE, the input
source changes.
ContentsConnectionsPlaybackSettingsTipsAppendix
136
Front panelDisplayRear panelRemoteIndex
o
Adjusting the volume
Use ZONE2VOLUMEdf to adjust the volume.
0
At time of purchase, “Volume Limit” is set to “70 (–10 dB)”.
(v
p. 191)
Turn MASTER VOLUME after pressing ZONE2 SOURCE on the main unit to
adjust the sound volume.
ContentsConnectionsPlaybackSettingsTipsAppendix
137
Front panelDisplayRear panelRemoteIndex
Menu map
When using menu operations, connect this unit to a TV and operate this unit while viewing the TV.
The recommended settings are configured for this unit by default. You can customize this unit based on your existing system and your preferences.
Setting itemsDetailed itemsDescriptionPage
.
Audio
Dialog LevelThis setting adjusts the output level to clarify the dialogue output from the center
channel.
144
Subwoofer LevelThis setting adjusts the volume level for the subwoofer.144
This is displayed when inputting signals including a
surround back channel. “MATRIX” is displayed with
Dolby Digital EX and DTS-ES Matrix signals,
“DISCRETE” with DTS-ES Discrete signals.
o
Video
Show the HDMI input/output signals and HDMI monitor information for
MAIN ZONE.
HDMI Signal
Resolution/Color Space/Pixel Depth
HDMI Monitor
Interface/Resolutions
o
ZONE
Show information about current settings.
MAIN ZONE:
This item shows information about
settings for MAIN ZONE. The information
displayed differs according to the input
source.
ZONE2:
This item shows information about
settings for ZONE2.
o
Firmware
Version:Displays information for the current firmware.
ContentsConnectionsPlaybackSettingsTipsAppendix
193
Front panelDisplayRear panelRemoteIndex
o
Notifications
Displays and sets notifications.
Also, sets whether or not to display the notification when the power is
turned on.
n
Notif.Alerts
On
(Default):
Notification messages are displayed.
Off:Notification messages are not displayed.
Press INFO on the remote control unit to display current source name, volume,
sound mode name, and other information at the bottom of the screen.
.
EXTFHRFHL
SBSBRSBL
CFRFWRFLFWL
LFESRSL
SBRSBL
CFRFL
SWSRSL
INPUT SIGNALACTIVE SPEAKERS
AUDYSSEY
SIGNAL
SOURCE
SOURCE
Dynamic EQ : On
MultEQ XT : Reference
Dolby TrueHD
Dolby TrueHD
CBL/SAT
Dynamic Volume : Off
−40.0dB
NOTE
The status display screen cannot be displayed when playing the following video
signals.
0
Computer resolution video
0
Video with an aspect ratio other than 16:9 or 4:3
0
4K video
Usage Data
To help us improve our products and customer service, Denon collects
anonymous information about how you use your AV receiver (such as
frequently used input sources and sound modes and speaker settings).
Denon will never provide any information we collect to third parties.
Yes:Provide information on the operating status of this unit.
No:Do not provide information on the operating status of this unit.
ContentsConnectionsPlaybackSettingsTipsAppendix
194
Front panelDisplayRear panelRemoteIndex
Firmware
Checks for the latest firmware information about updates and upgrades,
updates the firmware, and sets up the notification message display for
updates and upgrades.
o
Update
Updates the firmware of this unit.
Check for
Update:
Checks to see if the firmware is the latest version. You
can also check approximately how long it will take to
complete an update.
Update
Start:
Execute the update process. When the update starts,
the menu screen is shut down. During the update, the
progress is shown on the display.
This unit automatically retries updating if updating fails. If the update still fails,
either one of the following messages will appear on the screen. If the display
reads as shown below, check the settings and network environment, then update
again.
DisplayDescription
Updating failUpdating failed.
Login failedFailure to log into server.
Server is busyServer is busy. Wait a while then try again.
Connection failFailure in connecting to server.
Download failDownloading of the firmware has failed.
o
Notifications
When the latest firmware is available, a notification message is
displayed on the TV screen at power on.
The notification message is displayed for about 40 seconds when the
power is turned on.
Update
On
(Default):
Display update message.
Off:Do not display update message.
Upgrade
On
(Default):
Display upgrade message.
Off:Do not display upgrade message.
ContentsConnectionsPlaybackSettingsTipsAppendix
195
Front panelDisplayRear panelRemoteIndex
o
Add New Feature
Display new features that can be downloaded to this unit and perform
an upgrade.
Upgrade
Package:
Display the items to be upgraded.
Upgrade
Status:
Display a list of the additional functions provided by
the upgrade.
Upgrade Start:
Execute the upgrade process.
When the upgrade starts, the menu screen is shut
down. During the upgrade, the amount of upgrade
time which has elapsed is displayed.
0
See the Denon website for details about upgrades.
0
When the procedure is complete, “Registered” is displayed in this menu and
upgrades can be carried out. If the procedure has not been carried out, “-------”
is displayed.
The ID number shown on this screen is needed when carrying out the
procedure.
The ID number can also be displayed by pressing and holding the main unit’s
TUNER PRESET CH + and STATUS for at least 3 seconds.
0
If the upgrade is not successful, an error message identical to those in
“Firmware”-“Update” will appear on the display. Check the settings and
network environment and then perform the upgrade again.
Notes concerning use of “Update” and “Add New Feature”
0
In order to use these functions, you must have the correct system
requirements and settings for an Internet connection. (v
p. 50)
0
Do not turn off the power until updating or upgrading is completed.
0
Approximately 1 hour is required for the updating/upgrading procedure
to be completed.
0
Once updating/upgrade starts, normal operations on this unit cannot
be performed until updating/upgrading is completed. Furthermore,
there may be cases where backup data is reset for the parameters,
etc., set on this unit.
0
If the update or upgrade fails, press and hold the X on the main unit for
more than 5 seconds, or remove and re-insert the power cord. “Update
Retry” appears on the display and update restarts from the point at
which update failed. If the error continues despite this, check the
network environment.
Information regarding the “Update” function and “Add New Feature” will be
announced on the Denon web site each time related plans are defined.
ContentsConnectionsPlaybackSettingsTipsAppendix
196
Front panelDisplayRear panelRemoteIndex
Setup Lock
Protect settings from inadvertent changes.
o
Lock
On:Turn protection on.
Off
(Default):
Turn protection off.
When cancelling the setting, set “Lock” to “Off”.
NOTE
When “Lock” is set to “On”, no setting items are displayed except for “Setup
Lock”.
ContentsConnectionsPlaybackSettingsTipsAppendix
197
Front panelDisplayRear panelRemoteIndex
o
Contents
Tips
I want the volume not to become too loud by mistake199
I want to keep the volume at the same level when I turn the power on199
I want to have the subwoofer always output audio199
I want to make human voices in the movies clearer199
I want to keep bass and clarity during playback at a lower volume
level199
I want to automatically adjust the volume level difference in content
such as TV and movies199
I want to set the optimized listening environment after changing the
configuration/position of the speakers or changing a speaker to a new
one200
I want to combine a desired video with the current music200
I want to play back photos from Flickr at the same time while listening
to the Internet radio200
I want to delete unused input sources200
I want to enjoy the same music in all zones at the home party, etc.200
Troubleshooting
Power does not turn on / Power is turned off202
Operations cannot be performed through the remote control unit203
Display on this unit shows nothing203
No sound comes out204
Desired sound does not come out205
Sound is interrupted or noise occurs207
No video is shown on the TV208
The menu screen is not displayed on the TV209
iPod cannot be played back210
USB memory devices cannot be played back211
File names on the iPod/USB memory device are not displayed
properly212
Bluetooth cannot be played back212
The Internet radio cannot be played back213
Music files on PC or NAS cannot be played back214
Various online services cannot be played214
The HDMI control function does not work215
When it is not possible to connect to a wireless LAN network216
ContentsConnectionsPlaybackSettingsTipsAppendix
Tips
198
Front panelDisplayRear panelRemoteIndex
Tips
I want the volume not to become too loud by mistake
0
Set the volume upper limit for “Volume Limit” in the menu beforehand. This prevents children or others from increasing the volume too much by mistake.
You can set this for each zone. (v p. 150, 191)
I want to keep the volume at the same level when I turn the power on
0
By default, the volume setting when power was previously set to standby on this unit is applied at next power on with no change. To use a fixed volume
level, set the volume level at power on for “Pow.On Volume” in the menu. You can set this for each zone. (v p. 150, 191)
I want to have the subwoofer always output audio
0
Depending on the input signals and sound mode, the subwoofer may not output audio. When “Subwoofer Mode” in the menu is set to “LFE+Main”, you
can have the subwoofer always output audio. (v p. 180)
I want to make human voices in the movies clearer
0
Use “Dialog Level” in the menu to adjust the level. (v
p. 144)
I want to keep bass and clarity during playback at a lower volume level
0
Set “Dynamic EQ” in the menu to “On”. This setting corrects the frequency characteristics to allow you to enjoy clear sound without the bass being lost
even during playback at a lower volume level. (v p. 152)
I want to automatically adjust the volume level difference in content such as TV and movies
0
Set “Dynamic Volume” in the menu. Volume level changes (between quiet scenes and loud scenes) in TV shows or movies are automatically adjusted
to your desired level. (v p. 153)
Contents
ConnectionsPlaybackSettingsTipsAppendix
199
Front panelDisplayRear panelRemoteIndex
I want to set the optimized listening environment after changing the configuration/position of the speakers or changing a speaker to a new
one.
0
Perform Audyssey
®
Setup. This automatically makes the optimized speaker settings for the new listening environment. (v p. 164)
I want to combine a desired video with the current music
0
Set “Video Select” in the option menu to “On”. You can combine the current music with your desired video source from Set-top Box or DVD, etc. while
listening to music from Tuner or the Internet radio. (v p. 112)
I want to play back photos from Flickr at the same time while listening to the Internet radio
0
After playing back photos from Flickr, start the slide show on the Internet radio playback screen. (v p. 108)
I want to delete unused input sources
0
Set unused input sources for “Hide Sources” in the menu. This allows you to skip unused input sources when turning the SOURCE SELECT knob on
this unit. (v p. 162)
I want to enjoy the same music in all zones at the home party, etc.
0
Set “All Zone Stereo” in the option menu to “Start”. This allows you to simultaneously play back the music that is being played back in MAIN ZONE in
ZONE2. (v p. 113)
Contents
ConnectionsPlaybackSettingsTipsAppendix
200
Front panelDisplayRear panelRemoteIndex
Troubleshooting
If a problem should arise, first check the following:
1.Are the connections correct?
2.Is the set being operated as described in the owner’s manual?
3.Are the other devices operating properly?
If this unit does not operate properly, check the corresponding symptoms in this section.
If the symptoms do not match any of those described here, consult your dealer as it could be due to a fault in this unit. In this case, disconnect the power
immediately and contact the store where you purchased this unit.
ContentsConnectionsPlaybackSettingsTipsAppendix
201
Front panelDisplayRear panelRemoteIndex
o
Power does not turn on / Power is turned off
SymptomCause / SolutionPage
Power does not turn on.
0
Check whether the power plug is correctly inserted into the power outlet.53
Power automatically turns
off.
0
The sleep timer is set. Turn on the power again.127
0
“Auto Standby” is set. “Auto Standby” is triggered when there is no operation for a set amount of time. To
disable “Auto Standby”, set “Auto Standby” on the menu to “Off”.
190
Power turns off and the
power indicator flashes in
red approx. every 2
seconds.
0
The protection circuit has been activated due to a rise in temperature within this unit. Turn the power off,
wait about an hour until this unit cools down sufficiently, and then turn the power on again.
241
0
Please re-install this unit in a place having good ventilation.-
Power turns off and the
power indicator flashes in
red approx. every 0.5
seconds.
0
Check the speaker connections. The protection circuit may have been activated because speaker cable
core wires came in contact with each other or a core wire was disconnected from the connector and
came in contact with the rear panel of this unit. After unplugging the power cord, take corrective action
such as firmly re-twisting the core wire or taking care of the connector, and then reconnect the wire.
28
0
Turn down the volume and turn on the power again.55
0
This unit’s amplifier circuit has failed. Unplug the power cord and contact our customer service center.-
Power does not turn off
even when the power
button is pressed, and the
display shows “ZONE2
On”.
0
The power supply of ZONE2 is turned to ON. To turn off the power supply of this unit (standby), press the
ZONE2 ON/OFF on the main unit, or press the X button on the remote control unit to turn off the power
supply of ZONE2.
-
ContentsConnectionsPlaybackSettingsTipsAppendix
202
Front panelDisplayRear panelRemoteIndex
o
Operations cannot be performed through the remote control unit
SymptomCause / SolutionPage
Operations cannot be
performed through the
remote control unit.
0
Batteries are worn out. Replace with new batteries.8
0
Operate the remote control unit within a distance of about 23 ft/7 m from this unit and at an angle of within
30°.
8
0
Remove any obstacle between this unit and the remote control unit.-
0
Insert the batteries in the proper direction, checking the q and w marks.
8
0
The set’s remote control sensor is exposed to strong light (direct sunlight, inverter type fluorescent bulb
light, etc.). Move the set to a place in which the remote control sensor will not be exposed to strong light.
-
0
When using a 3D video device, the remote control unit of this unit may not function due to effects of
infrared communications between units (such as TV and glasses for 3D viewing). In this case, adjust the
direction of units with the 3D communications function and their distance to ensure they do not affect
operations from the remote control unit of this unit.
-
o
Display on this unit shows nothing
SymptomCause / SolutionPage
Display is off.
0
Set “Dimmer” on the menu to something other than “Off”.192
0
When the sound mode is set to “Pure Direct”, the display is off.116
ContentsConnectionsPlaybackSettingsTipsAppendix
203
Front panelDisplayRear panelRemoteIndex
o
No sound comes out
SymptomCause / SolutionPage
No sound comes out of
speakers.
0
Check the connections for all devices.28
0
Insert connection cables all the way in.-
0
Check that input connectors and output connectors are not reversely connected.-
0
Check cables for damage.-
0
Check that speaker cables are properly connected.Check that cable core wires come in contact with the
metal part on speaker terminals.
28
0
Securely tighten the speaker terminals. Check speaker terminals for looseness.28
0
Check that a proper input source is selected.55
0
Adjust the volume.56
0
Cancel the mute mode.56
0
Check the digital audio input connector setting.160
0
Check the digital audio output setting on the connected device. On some devices, the digital audio output
is set to off by default.
-
0
When a headphone is plugged into the PHONES jack on the main unit, sound is not output from the
speaker terminal and SUBWOOFER connector.
15
No sound comes out when
using the DVI-D
connection.
0
When this unit is connected to a device equipped with a DVI-D connector, no sound is output. Make a
separate audio connection.
-
ContentsConnectionsPlaybackSettingsTipsAppendix
204
Front panelDisplayRear panelRemoteIndex
o
Desired sound does not come out
SymptomCause / SolutionPage
The volume does not
increase.
0
The maximum volume is set too low. Set the maximum volume using “Limit” on the menu.150
0
Appropriate volume correction processing is performed according to the input audio format and settings,
so the volume may not reach the upper limit.
-
No sound comes out with
the HDMI connection.
0
Check the connection of the HDMI connectors.39
0
When outputting HDMI audio from the speakers, set “HDMI Audio Out” on the menu to “AVR”. To output
from the TV, set “TV”.
155
0
When using the HDMI control function, check that the audio output is set to the AV amplifier on the TV.126
No sound comes out of a
specific speaker.
0
Check that speaker cables are properly connected.28
0
Check that a selection other than “None” is set for the “Speaker Config.” setting in menu.175
0
Check the “Assign Mode” setting in the menu.174
0
When the sound mode is “Stereo” and “Virtual”, audio is only output from the front speakers and
subwoofer.
-
No sound is produced from
subwoofer.
0
Check the subwoofer connections.29
0
Turn on the subwoofer’s power.-
0
Set “Speaker Config.” – “Subwoofer” on the menu to “Yes”.175
0
When “Speaker Config.”-“Front” in the menu is set to “Large”, depending on the input signal and the
sound mode, no sound may be output from the subwoofer.
175
0
When no subwoofer audio signal (LFE) is included in the input signals, no sound may be output from the
subwoofer.
180
0
You can make the subwoofer always output sound by setting the “Subwoofer Mode” to “LFE+Main”.180
DTS sound is not output.
0
Check that the digital audio output setting on the connected device is set to “DTS”.-
0
Set “Decode Mode” on the menu to “Auto” or “DTS”.163
Dolby TrueHD, DTS-HD,
Dolby Digital Plus audio is
not output.
0
Make HDMI connections.44
0
Check the digital audio output setting on the connected device. On some devices, “PCM” is set by
default.
-
ContentsConnectionsPlaybackSettingsTipsAppendix
205
Front panelDisplayRear panelRemoteIndex
SymptomCause / SolutionPage
Dolby PLg mode or DTS
Neo:6 mode cannot be
selected.
0
It cannot be selected when “Speaker Config.” - “Center” or “Surround” is set for “None”.175
0
Dolby PLg or DTS Neo:6 cannot be selected when using headphones.
-
Audyssey MultEQ
®
XT,
Audyssey Dynamic EQ
®
and Audyssey Dynamic
Volume
®
cannot be
selected.
0
These cannot be selected when you have not performed Audyssey
®
Setup.
164
0
Switch to a sound mode other than “Direct” or “Pure Direct”.116
0
These cannot be selected when using the headphones.-
“Restorer” cannot be
selected.
0
Check that an analog signal or PCM signal (Sample Rate = 44.1/48 kHz) is input. For playback of
multichannel signals such as Dolby Digital or DTS surround, “Restorer” cannot be used.
149
0
Switch to a sound mode other than “Direct” or “Pure Direct”.116
No sound is output when
using ZONE2.
0
Digital signal audio input from the HDMI connector or digital audio connectors (OPTICAL/COAXIAL)
cannot be played back. Use analog connections.
-
0
When listening to the audio of a Bluetooth device in ZONE2, remove any obstructions between the
Bluetooth device and this unit and use it within a range of about 32.8 ft/10 m.
-
ContentsConnectionsPlaybackSettingsTipsAppendix
206
Front panelDisplayRear panelRemoteIndex
o
Sound is interrupted or noise occurs
SymptomCause / SolutionPage
During playback from the
Internet radio or USB
memory device, sound is
occasionally interrupted.
0
When the transfer speed of the USB memory device is slow, sound may occasionally be interrupted.-
0
The network communication speed is slow or the radio station is busy.-
When making a call on
iPhone, noise occurs in
audio output on this unit.
0
When making a call, keep a distance of 0.7 ft/20 cm or longer between iPhone and this unit.-
Noise often occurs in
FM/AM broadcasting.
0
Change the antenna orientation or position.48
0
Please use an outdoor antenna.48
0
Separate the antenna from other connection cables.48
The sounds appear to be
distorted.
0
Lower the volume.56
0
Set “Off” to the ECO Mode. When “On” or “Auto” is in the ECO Mode, the audio may by distorted when
the playback volume is high.
189
Sound cuts out when using
Wi-Fi connection.
0
If nearby devices cause playback to cut out due to electronic interference, switch to a wired LAN
connection.
50
0
Particularly when you play back large music files, depending on your wireless LAN environment, the
playback sound may be interrupted. In this case, make the wired LAN connection.
183
ContentsConnectionsPlaybackSettingsTipsAppendix
207
Front panelDisplayRear panelRemoteIndex
o
No video is shown on the TV
SymptomCause / SolutionPage
No picture appears.
0
Check the connections for all devices.39
0
Insert connection cables all the way in.-
0
Check that input connectors and output connectors are not reversely connected.-
0
Check cables for damage.-
0
Match the input settings to the input connector of the TV connected to this unit.160
0
Check that the proper input source is selected.55
0
Check the video input connector setting.160
0
Check that the resolution of the player corresponds to that of the TV.193
0
Check whether the TV is compatible with copyright protection (HDCP). If connected to a device not
compatible with HDCP, video will not be output correctly.
220
0
The HDMI signal cannot be converted to an analog signal. Use analog connections.-
0
Use an “High Speed HDMI cable with Ethernet” or “High speed cable” that comes with the HDMI logo if
you wish to playback 4K (60/50 Hz) video.
-
No video is shown on the
TV with the DVI-D
connection.
0
With the DVI-D connection, on some device combinations, devices may not function properly due to the
copy guard copyright protection (HDCP).
220
While the menu is being
displayed, no video is
shown on the TV.
0
The video being played will not appear in the background of the menu when the menu is operated during
playback of the following video signals.
- Some images of 3D video content
- Computer resolution images (example: VGA)
- Video with an aspect ratio other than 16:9 or 4:3
- Dedicated 4K connector (Blu-ray, Game)
-
ContentsConnectionsPlaybackSettingsTipsAppendix
208
Front panelDisplayRear panelRemoteIndex
o
The menu screen is not displayed on the TV
SymptomCause / SolutionPage
The menu screen or status
information screen is not
displayed on the TV.
0
The menu screen is only displayed on this unit and a TV connected with an HDMI cable. If this unit is
connected to a TV using a different video output connector, operate while watching the display on this
unit.
-
0
The status information will not appear on the TV when the following video signals are being played.
- Some images of 3D video contents
- Computer resolution images (example: VGA)
- Video with an aspect ratio other than 16:9 or 4:3
- 4K (60/50 Hz) video
115
0
When a 2D video is converted to a 3D video on the TV, the menu screen or status information screen is
not displayed properly.
115
0
In the pure direct playback mode, the menu screen or status information is not displayed. Switch to a
sound mode other than the pure direct mode.
-
0
Set the “TV Format” setting in the menu to a selection that is appropriate for the TV.159
ContentsConnectionsPlaybackSettingsTipsAppendix
209
Front panelDisplayRear panelRemoteIndex
o
iPod cannot be played back
SymptomCause / SolutionPage
iPod cannot be connected.
0
When using iPod by connecting it to the USB port, some iPod variations are not supported.46
0
When iPod is connected by using a USB cable other than the genuine cable, iPod may not be
recognized. Use a genuine USB cable.
-
The AirPlay icon ' is not
displayed on iTunes /
iPhone / iPod touch / iPad.
0
This unit and PC / iPhone / iPod touch / iPad are not connected to the same network (LAN). Connect it to
the same LAN as this unit.
50
0
The firmware on iTunes / iPhone / iPod touch / iPad is not compatible with AirPlay. Update the firmware to
the latest version.
-
Audio is not output.
0
The volume on iTunes / iPhone / iPod touch / iPad is set to the minimum level. The volume on iTunes /
iPhone / iPod touch / iPad is linked with the volume on this unit. Set a proper volume level.
-
0
The AirPlay playback is not performed, or this unit is not selected. Click the AirPlay icon ' on the
iTunes / iPhone / iPod touch / iPad screen and select this unit.
101
Audio is interrupted during
the AirPlay playback on
iPhone / iPod touch / iPad.
0
Quit the application running in the background of the iPhone/iPod touch/iPad, and then play using
AirPlay.
-
0
Some external factors may be affecting the wireless connection. Modify the network environment by
taking measures such as shortening the distance from the wireless LAN access point.
-
iTunes cannot be played
back through the remote
control unit.
0
Enable the “Allow iTunes audio control from remote speakers” setting on iTunes. Then, you can perform
playback, pause, and skip operations through the remote control unit.
-
ContentsConnectionsPlaybackSettingsTipsAppendix
210
Front panelDisplayRear panelRemoteIndex
o
USB memory devices cannot be played back
SymptomCause / SolutionPage
“No connection” is
displayed.
0
This unit cannot recognize the USB memory device. Disconnect and reconnect the USB memory device.46
0
Mass storage class compatible USB memory devices are supported.-
0
This unit does not support a connection through a USB hub. Connect the USB memory device directly to
the USB port.
-
0
The USB memory device must be formatted to FAT16 or FAT32.-
0
Not all USB memory devices are guaranteed to work. Some USB memory devices are not recognized.
When using a type of portable hard disc drive compatible with the USB connection that requires power
from an AC adapter, use the AC adapter that came with the drive.
-
Files on the USB memory
device are not displayed.
0
Files of a type not supported by this unit are not displayed.62
0
This unit is able to display files in a maximum of eight folder layers. A maximum of 5000 files (folders) can
also be displayed for each layer. Modify the folder structure of the USB memory device.
-
0
When multiple partitions exist on the USB memory device, only files on the first partition are displayed.-
Files on a USB memory
device cannot be played.
0
Files are created in a format that is not supported by this unit. Check the formats supported by this unit.221
0
You are attempting to play a file that is copyright protected. Files that are copyright protected cannot be
played on this unit.
-
0
Playback may not be possible if the album art file size exceeds 2 MB.-
ContentsConnectionsPlaybackSettingsTipsAppendix
211
Front panelDisplayRear panelRemoteIndex
o
File names on the iPod/USB memory device are not displayed properly
SymptomCause / SolutionPage
The file names are not
displayed properly (“...”,
etc.).
0
Characters that cannot be displayed have been used. On this unit, characters that cannot be displayed
are replaced with a “. (period)”.
-
o
Bluetooth cannot be played back
SymptomCause / SolutionPage
Bluetooth devices cannot
be connected to this unit.
0
The Bluetooth function in the Bluetooth device has not been enabled. See the Owner’s Manual of the
Bluetooth device to enable the Bluetooth function.
-
0
Bring the Bluetooth device near to this unit.-
0
The Bluetooth device cannot connect with this unit if it is not compatible with the A2DP profile.-
0
Turn the power of the Bluetooth device off and on again, and then try again.-
The sound is cut off.
0
Bring the Bluetooth device near to this unit.-
0
Remove obstructions between the Bluetooth device and this unit.-
0
To prevent electromagnetic interference, locate this unit away from microwave ovens, wireless LAN
devices and other Bluetooth devices.
-
0
Reconnect the Bluetooth device.-
ContentsConnectionsPlaybackSettingsTipsAppendix
212
Front panelDisplayRear panelRemoteIndex
o
The Internet radio cannot be played back
SymptomCause / SolutionPage
A list of broadcasting
stations is not displayed.
0
The LAN cable is not properly connected, or the network is disconnected. Check the connection status.50
0
Perform the network diagnostic mode.-
Internet Radio cannot be
played.
0
The selected radio station is broadcasting in a format that is not supported by this unit. Formats that can
be played back in this unit are MP3, WMA and AAC.
224
0
The firewall function is enabled on the router. Check the firewall setting.-
0
The IP address is not properly set.185
0
Check the power of the router is on.-
0
To obtain the IP address automatically, enable the DHCP server function on the router. Also, set the
DHCP setting to “On” on this unit.
185
0
To obtain the IP address manually, set the IP address and proxy on this unit.-
0
Some radio stations broadcast silently during some time period. In this case, no audio is output. Wait for a
while and select the same radio station, or select another radio station.
79
Cannot connect to favorite
radio stations.
0
Radio station is not currently in service. Register radio stations in service.-
For some radio stations,
“Connection down” is
displayed and station
cannot be connected to.
0
The selected radio station is not in service. Select a radio station in service.-
ContentsConnectionsPlaybackSettingsTipsAppendix
213
Front panelDisplayRear panelRemoteIndex
o
Music files on PC or NAS cannot be played back
SymptomCause / SolutionPage
Files stored on a computer
cannot be played.
0
Files are stored in a non-compatible format. Record in a compatible format.223
0
Files that are copyright protected cannot be played on this unit.-
0
The set’s USB port cannot be used for connection to a computer.-
0
Media sharing settings are not correct. Change media sharing settings so that the unit can access the
folders on your computer.
83
Server is not found, or it is
not possible to connect to
the server.
0
The computer’s or router’s firewall is activated. Check the computer’s or router’s firewall settings.-
0
Computer’s power is not turned on. Turn on the power.-
0
Server is not running. Launch the server.-
0
Set’s IP address is wrong. Check the set’s IP address.182
Music files on PC cannot
be played back.
0
Even if PC is connected to the USB port on this unit, music files on it cannot be played back. Connect PC
to this unit through the network.
50
Files on PC or NAS are not
displayed.
0
Files of a type not supported by this unit are not displayed.223
Music stored on a NAS
cannot be played.
0
If you use a NAS in conformity with the DLNA standard, enable the DLNA server function in the NAS
setting.
-
0
If you use a NAS that does not conform with the DLNA standard, play the music via a PC. Set Windows
Media Player’s media sharing function and add NAS to the selected play folder.
83
0
If connection is restricted, set audio equipment as the connection target.-
o
Various online services cannot be played
SymptomCause / SolutionPage
Various online services
cannot be played.
0
The online service may have been discontinued.-
ContentsConnectionsPlaybackSettingsTipsAppendix
214
Front panelDisplayRear panelRemoteIndex
o
The HDMI control function does not work
SymptomCause / SolutionPage
The HDMI control function
does not work.
0
Check that “HDMI Control” in the menu is set to “On”.156
0
You cannot operate devices that are not compatible with the HDMI control function. In addition,
depending on the connected device or the settings, the HDMI control function may not work. In this case,
operate the external device directly.
126
0
Check that the HDMI control function setting is enabled on all devices connected to this unit.126
0
When you make connection related changes such as connecting an additional HDMI device, the link
operation settings may be initialized. Turn off this unit and devices connected via HDMI, and turn them on
again.
126
ContentsConnectionsPlaybackSettingsTipsAppendix
215
Front panelDisplayRear panelRemoteIndex
o
Cannot connect to a wireless LAN network
SymptomCause / SolutionPage
Cannot connect to the
network.
0
The network name (SSID), password and encryption setting have not been set up correctly. Configure the
network settings according to the setting details of this unit.
184
0
Shorten the distance from the wireless LAN access point and remove any obstructions to improve access
first before re-connecting again. Place the unit away from microwave ovens and other network access
points.
-
0
Configure the access point channel settings away from channels that are being used by other networks.-
0
This unit is not compatible with WEP (TSN).-
Cannot connect to WPS.
0
Check that the WPS mode of the router is operating.-
0
Click the “Connect” button displayed on the TV within 2 minutes.-
0
A router/settings that are compatible with WPS 2.0 standards are required. Set the encryption time to
“None”, “WPA-PSK (AES)” or WPA2-PSK (AES).
184
0
If the router encryption method is WEP/WPA-TKIP/WPA2-TKIP, you cannot connect by using the WPS
button. In this case, use the “Scan Networks” or “Manual” method to connect.
-
Cannot connect to the
network using iPhone/iPod
touch/iPad.
0
Update the iPhone/iPod touch/iPad firmware to the latest version.-
0
When using a USB cable to configure the settings, the iOS device firmware version needs to support
iOS5 or later. When configuring the settings via a wireless connection, iOS7 or later needs to be
supported.
-
ContentsConnectionsPlaybackSettingsTipsAppendix
216
Front panelDisplayRear panelRemoteIndex
Resetting factory settings
Perform this procedure if the display is abnormal or if operations cannot be performed.
Various settings are reset to the factory default values. Make settings again.
.
X
TUNER PRESET CH +
TUNER PRESET CH –
1
Turn off the power using X.
2
Press X while simultaneously pressing TUNER
PRESET CH + and TUNER PRESET CH -.
3
Remove your fingers from the two buttons when
“Initialized” appears on the display.
0
Before restoring the default setting, the “Save” function of the web control function
can be used to store the various settings of the unit. (v
p. 133)
However, account information for network content and information on registered
favorites cannot be stored.
0
When deleting a Pandora account, carry out steps 1 to 3 after signing out in the
Pandora service. (v p. 96)
ContentsConnectionsPlaybackSettingsTipsAppendix
217
Front panelDisplayRear panelRemoteIndex
About HDMI
HDMI is an abbreviation of High-Definition Multimedia Interface, which is
an AV digital interface that can be connected to a TV or amplifier.
With the HDMI connection, high definition video and high quality audio
formats adopted by Blu-ray Disc players (Dolby Digital Plus, Dolby
TrueHD, DTS-HD, DTS-HD Master Audio) can be transmitted, which is not
possible with the analog video transmission.
Furthermore, in the HDMI connection, audio and video signals can be
transmitted through a single HDMI cable, while in conventional
connections it is necessary to provide audio and video cables separately
for connection between devices. This allows you to simplify the wiring
configuration that tends to be quite complex in a home theater system.
This unit supports the following HDMI functions.
0
Deep Color
An imaging technology supported by HDMI. Unlike RGB or YCbCr,
which uses 8 bits (256 shades) per color, it can use 10 bits (1024
shades), 12 bits (4096 shades), or 16 bits (65536 shades) to produce
colors in higher definition.
Both devices linked via HDMI must support Deep Color.
0
“x.v.Color”
This function lets HDTVs display colors more accurately. It enables
display with natural, vivid colors.
“x.v.Color” is trademark of Sony Corporation.
0
3D
This unit supports input and output of 3D (3 dimensional) video signals
of HDMI. To play back 3D video, you need a TV and player that
provide support for the HDMI 3D function and a pair of 3D glasses.
0
4K
This unit supports input and output of 4K (3840 x 2160 pixels) video
signals of HDMI.
0
Content Type
It automatically makes settings suitable for the video output type
(content information).
0
Adobe RGB color, Adobe YCC601 color
The color space defined by Adobe Systems Inc. Because it is a wider
color space than RGB, it can produce more vivid and natural images.
0
sYCC601 color
Each of these color spaces defines a palette of available colors that is
larger than the traditional RGB color model.
Contents
ConnectionsPlaybackSettingsTipsAppendix
Appendix
218
Front panelDisplayRear panelRemoteIndex
0
Auto Lip Sync
This function can automatically correct delay between the audio and
video.
Use a TV that is compatible with the Auto Lip Sync function.
0
HDMI Pass Through
Even when the power to this unit is set to standby, signals input from
the HDMI input connector are output to a TV or other device that is
connected to the HDMI output connector.
0
HDMI Control
If you connect the unit and an HDMI control function compatible TV or
player with an HDMI cable and then enable the HDMI control function
setting on each device, the devices will be able to control each other.
0
Power off link
This unit power off can be linked to the TV power off step.
0
Audio output destination switching
From the TV, you can switch whether to output audio from the TV or
the AV amplifier.
0
Volume adjustment
You can adjust this unit’s volume in the TV volume adjustment
operation.
0
Input source switching
You can switch this unit input sources through linkage to TV input
switching.
When playing the player, this unit input source switches to the
source for that player.
0
ARC (Audio Return Channel)
This function transmits audio signals from the TV to this unit through
the HDMI cable and plays back the audio from the TV on this unit
based on the HDMI control function.
If a TV without the ARC function is connected via HDMI connections,
video signals of the playback device connected to this unit are
transmitted to the TV, but this unit can not play back the audio from the
TV. If you want to enjoy surround audio for TV program, a separate
audio cable connection is required.
In contrast, if a TV with the ARC function is connected via HDMI
connections, no audio cable connection is required. Audio signals from
the TV can be input to this unit through the HDMI cable between this
unit and the TV. This function allows you to enjoy surround playback
on this unit for the TV.
Contents
ConnectionsPlaybackSettingsTipsAppendix
219
Front panelDisplayRear panelRemoteIndex
o
Supported audio formats
2-channel Linear PCM2-channel, 32 kHz – 192 kHz, 16/20/24 bit
Multi-channel Linear
PCM
7.1-channel, 32 kHz – 192 kHz, 16/20/24 bit
Bitstream
Dolby Digital/DTS/Dolby TrueHD/
Dolby Digital Plus/DTS-HD Master Audio/
DTS-HD High Resolution Audio/DTS Express
o
Supported video signals
0
480i
0
480p
0
576i
0
576p
0
720p 60/50Hz
0
1080i 60/50Hz
0
1080p 60/50/24Hz
0
4K 60/50/30/25/24 Hz
Copyright protection system
In order to play back digital video and audio such as BD video or DVD
video via HDMI connection, both this unit and the TV or player must to
support the copyright protection system known as HDCP (High-
bandwidth Digital Content Protection System). HDCP is copyright
protection technology comprised of data encryption and authentication of
the connected AV devices. This unit supports HDCP.
0
If a device that does not support HDCP is connected, video and audio
are not output correctly. Read the owner’s manual of your television or
player for more information.
When connecting this unit to a device that is compatible with the Deep Color, 4K and
ARC functions, use a “High Speed HDMI cable with Ethernet” that bears the HDMI
logo.
ContentsConnectionsPlaybackSettingsTipsAppendix
220
Front panelDisplayRear panelRemoteIndex
Playing back a USB memory devices
0
This unit is compatible with MP3 ID3-Tag (Ver. 2) standard.
0
This unit can show the artwork that was embedded by using MP3 ID3-Tag Ver. 2.3 or 2.4.
0
This unit is compatible with WMA META tags.
0
If the image size (pixels) of an album artwork exceeds 500 × 500 (WMA/MP3/WAV/FLAC) or 349 × 349 (MPEG-4 AAC), then music may not be played
back properly.
o
Compatible formats
Sampling frequencyBit rate
Extension
WMA
(Windows Media Audio)
z
1
32/44.1/48 kHz
48 – 192
kbps
.wma
MP3
(MPEG-1 Audio Layer-3)
32/44.1/ 48 kHz
32 – 320
kbps
.mp3
WAV
32/44.1/48/88.2/
96/176.4/192 kHz
]
.wav
MPEG-4 AAC
z
1
32/44.1/48 kHz
16 – 320
kbps
.aac/
.m4a/
.mp4
FLAC
(Free Lossless Audio Codec)
32/44.1/48/88.2/
96/176.4/192 kHz
]
.flac
ALAC
(Apple Lossless Audio
Codec)
z
2
32/44.1/48/88.2/
96 kHz
]
.m4a
DSD2.8 MHz
]
.dsf/
.dff
AIFF
32/44.1/48/88.2/
96/176.4/192 kHz
]
.aif/
.aiff
z1
Only files that are not protected by copyright can be played on this unit.
Content downloaded from pay sites on the Internet are copyright protected.
Also, files encoded in WMA format when ripped from a CD, etc. on a computer
may be copyright protected, depending on the computer’s settings.
z2
Copyright [2012] [D&M Holdings. Inc.]
Licensed under the Apache License, Version 2.0 (the “License”); you may not
use this file except in compliance with the License. You may obtain a copy of
the License at
http://www.apache.org/licenses/LICENSE-2.0
In ZONE2, it is not possible to play the DSD signal.
ContentsConnectionsPlaybackSettingsTipsAppendix
221
Front panelDisplayRear panelRemoteIndex
o
Maximum number of playable files and folder
The limits on the number of folders and files that can be displayed by
this unit are as follows.
Media
Item
USB memory device
Memory capacityFAT16 : 2 GB, FAT32 : 2 TB
Number of folder directory levels
z
1
8 levels
Number of folders500
Number of files
z
2
5000
z1
The limited number includes the root folder.
z2
The allowable number of files may differ according to the USB memory device
capacity and the file size.
Playing back a Bluetooth device
This unit supports the following Bluetooth profile.
0
A2DP (Advanced Audio Distribution Profile):
When a Bluetooth device that supports this standard is connected,
monaural and stereo sound data can be streamed at a high quality.
0
AVRCP (Audio/Video Remote Control Profile):
When a Bluetooth device that supports this standard is connected, the
Bluetooth device can be operated from this unit.
o
About Bluetooth communications
Radio waves broadcast from this unit may interfere with the operation
of medical devices. Make sure you turn off the power of this unit and
Bluetooth device in the following locations as radio wave interference
may cause malfunctions.
0
Hospitals, trains, aircraft, petrol kiosks and places where flammable
gases are generated
0
Near automatic doors and fire alarms
Contents
ConnectionsPlaybackSettingsTipsAppendix
222
Front panelDisplayRear panelRemoteIndex
Playing back a file saved on a PC or NAS
0
This unit is compatible with MP3 ID3-Tag (Ver. 2) standard.
0
This unit can show the artwork that was embedded by using MP3 ID3-Tag Ver. 2.3 or 2.4.
0
This unit is compatible with WMA META tags.
0
If the image size (pixels) of an album artwork exceeds 500 × 500 (WMA/MP3/WAV/FLAC) or 349 × 349 (MPEG-4 AAC), then music may not be played
back properly.
0
A server or server software compatible with distribution in the corresponding formats is required to play music files via a network.
o
Specifications of supported files
Sampling frequencyBit rate
Extension
WMA
(Windows Media Audio)
z
1
32/44.1/48 kHz
48 – 192
kbps
.wma
MP3
(MPEG-1 Audio Layer-3)
32/44.1/ 48 kHz
32 – 320
kbps
.mp3
WAV
32/44.1/48/88.2/
96/176.4/192 kHz
]
.wav
MPEG-4 AAC
z
1
32/44.1/48 kHz
16 – 320
kbps
.aac/
.m4a/
.mp4
FLAC
(Free Lossless Audio Codec)
32/44.1/48/88.2/
96/176.4/192 kHz
]
.flac
ALAC
(Apple Lossless Audio
Codec)
z
2
32/44.1/48/88.2/
96 kHz
]
.m4a
DSD2.8 MHz
]
.dsf/
.dff
AIFF
32/44.1/48/88.2/
96/176.4/192 kHz
]
.aif/
.aiff
z1
Only files that are not protected by copyright can be played on this unit.
Content downloaded from pay sites on the Internet are copyright protected.
Also, files encoded in WMA format when ripped from a CD, etc. on a computer
may be copyright protected, depending on the computer’s settings.
z2
Copyright [2012] [D&M Holdings. Inc.]
Licensed under the Apache License, Version 2.0 (the “License”); you may not
use this file except in compliance with the License. You may obtain a copy of
the License at
http://www.apache.org/licenses/LICENSE-2.0
In ZONE2, it is not possible to play the DSD signal.
ContentsConnectionsPlaybackSettingsTipsAppendix
223
Front panelDisplayRear panelRemoteIndex
Playing back Internet Radio
o
Playable broadcast station specifications
Sampling frequencyBit rate
Extension
WMA
(Windows Media Audio)
32/44.1/48 kHz
48 – 192
kbps
.wma
MP3
(MPEG-1 Audio Layer-3)
32/44.1/ 48 kHz
32 – 320
kbps
.mp3
MPEG-4 AAC32/44.1/48 kHz
16 – 320
kbps
.aac/
.m4a/
.mp4
Personal memory plus function
The most recently used settings (input mode, HDMI output mode, sound
mode, tone control, channel level, MultEQ
®
XT, Dynamic EQ, Dynamic
Volume, Restorer and audio delay, etc.) are saved for each input source.
“Surr.Parameter” settings are stored for each sound mode.
Last function memory
This function stores the settings which were made before going into the
standby mode.
ContentsConnectionsPlaybackSettingsTipsAppendix
224
Front panelDisplayRear panelRemoteIndex
Sound modes and channel output
S This indicates the audio output channels or surround parameters that can be set.
D This indicates the audio output channels. The output channels depend on the settings of “Speaker Config.”. (v
p. 175)
Sound mode (v p. 114)
Channel output
Front L/RCenterSurround L/RSurround back L/RFront height L/RSubwoofer
Direct/Pure Direct (2-channel)
S
D
z
3
Direct/Pure Direct (Multi-channel)
SDD
D
z
1D
z
1
D
Stereo
SD
Multi Ch In
SDD
D
z
1
D
Dolby Pro Logic gzSDDDD
Dolby Pro Logic gxSDDDD
Dolby Pro Logic gSDDD
DTS Neo:6
SDDDD
Dolby Digital
SDDD
D
z
2
D
Dolby Digital Plus
SDD
D
z
1D
z
1
D
Dolby TrueHD
SDD
D
z
1D
z
1
D
DTS Surround
SDDD
D
z
2
D
DTS 96/24
SDDD
D
z
2
D
DTS-HD
SDD
D
z
1D
z
1
D
DTS Express
SDDD
D
z
2
D
Multi Ch Stereo
SDDDDD
Rock Arena
SDDDDD
Jazz Club
SDDDDD
Mono Movie
SDDDDD
Video Game
SDDDDD
Matrix
SDDDDD
Virtual
SD
z1
A signal for each channel contained in an input signal is output as audio.
z2Audio is output when the set sound mode name contains “+PLgz”.
z3Audio is output when “Subwoofer Mode” in the menu is set to “LFE+Main”. (v p. 180)
Contents
ConnectionsPlaybackSettingsTipsAppendix
225
Front panelDisplayRear panelRemoteIndex
Sound modes and surround parameters
Sound mode (v p. 114)
Surr.Parameter (v p. 145)
Dialog Level
(v p. 144)
Subwoofer Level
(v p. 144)
Cinema EQ
(v p. 145)
Loudness
Mngmt
z
1
(v p. 145)
Dynamic
Comp.
z
2
(v p. 146)
Low Frequency
z
3
(v
p. 146)
Delay
Time
(v
p.
147)
Effect
Level
(v
p.
147)
Room Size
(v p.
148)
Height
Gain
z
4
(v p.
148)
Direct/Pure Direct (2-channel)
z
5
S
z
6
SS
Direct/Pure Direct (Multi-channel)
z
5
SSSS
Stereo
SSSS
Multi Ch In
SSSSS
Dolby Pro Logic gzSSSSSS
Dolby Pro Logic gxSSSSS
Dolby Pro Logic gSSSSS
DTS Neo:6
SSSSS
Dolby Digital
SSSSSS
Dolby Digital Plus
SSSSSS
Dolby TrueHD
SSSSSSS
DTS Surround
SSSSSS
DTS 96/24
SSSSS
DTS-HD
SSSSS
DTS Express
SSSSS
Multi Ch Stereo
SSSSSS
Rock Arena
SSSSSSS
Jazz Club
SSSSSSS
Mono Movie
SSSSSSS
Video Game
SSSSSSS
Matrix
SSSSSS
Virtual
SSSS
z
1 -
z
6 : “Sound modes and surround parameters” (v
p. 228)
Contents
ConnectionsPlaybackSettingsTipsAppendix
226
Front panelDisplayRear panelRemoteIndex
Sound mode (v p. 114)
Surr.Parameter (v p. 145)
Tone Control
z
7
(v p. 111)
Audyssey (v p. 151)
Restorer
z
10 (v p. 149)
Pro Logicg/gx Music mode only
Neo: 6 Music
mode only
Panorama
(v p. 146)
Dimension
(v p. 147)
Center Width
(v p. 147)
Center
Image
(v p. 146)
MultEQ
®
XT
z
8 (v p. 151)
Dynamic EQ
z
9
(v p. 152)
Dynamic Volume
z
9 (v p. 153)
Direct/Pure Direct (2-channel)
z
5
Direct/Pure Direct (Multi-channel)
z
5
Stereo
SSSS
Multi Ch In
SSSS
Dolby Pro Logic gzSSSSS
Dolby Pro Logic gxSSSSSSSS
Dolby Pro Logic gSSSSSSSS
DTS Neo:6
SSSSSS
Dolby Digital
SSSS
Dolby Digital Plus
SSSS
Dolby TrueHD
SSSS
DTS Surround
SSSS
DTS 96/24
SSSS
DTS-HD
SSSS
DTS Express
SSSS
Multi Ch Stereo
SSSSS
Rock Arena
S
z
11
SSSS
Jazz Club
SSSSS
Mono Movie
SSSSS
Video Game
SSSSS
Matrix
SSSSS
Virtual
SSSSS
z
5,
z
7 -
z
11: “Sound modes and surround parameters” (v p. 228)
Contents
ConnectionsPlaybackSettingsTipsAppendix
227
Front panelDisplayRear panelRemoteIndex
z1
This item can be selected when a Dolby TrueHD signal is played.
z2
This item can be selected when Dolby TrueHD, Dolby Digital or DTS signal is played.
z3
This item can be selected when a Dolby Digital or DTS signal or DVD-Audio is played.
z4This setting is available when the set sound mode name contains “+PLgz”.
z5
During playback in Pure Direct mode, the surround parameters are the same as in Direct mode.
z6This setting is available when “Subwoofer Mode” in the menu is set to “LFE+Main”. (v
p. 180)
z7This item cannot be set when “Dynamic EQ” is set to “On”. (v p. 152)
z8
This item cannot be set when Audyssey
®
Setup (Speaker Calibration) has not been performed.
z9
This item cannot be set when “MultEQ
®
XT” is set to “Off”. (v p. 151)
z10
This item can be set when the input signal is analog, PCM 48 kHz or 44.1 kHz.
z11
In this sound mode, bass is +6 dB, and treble is +4 dB. (Default)
ContentsConnectionsPlaybackSettingsTipsAppendix
228
Front panelDisplayRear panelRemoteIndex
Types of input signals, and corresponding sound modes
F This indicates the default sound mode.
S This indicates the selectable sound mode.
Sound mode (v p. 114)
NOTE
2-channel signalMulti-channel signal
Analog /PCMDolby Digital
(+/HD)/DTS (-HD)
PCM
Multi
DTS-HDDTS ExpressDTS
ES
DSCRT
6.1
DTS
ES
MTRIX
6.1
DTSDolby TrueHDDolby Digital PlusDolby Digital EXDolby Digital
DTS Surround
DTS-HD Mstr
F
z
6
DTS-HD Hi Res
F
z
7
DTS ES Dscrt6.1
z
1
F
DTS ES Mtrx6.1
z
1
F
DTS Surround
F
DTS 96/24
F
z
8
DTS (–HD) + PLgx
z
1
z
2
SSS
DTS (–HD) + PLgz
z
3
SSSSS
DTS Express
F
DTS Neo:6
z
4
SS
Dolby Surround
Dolby TrueHD
F
Dolby Digital+
F
Dolby Digital EX
z
1
SS
Dolby (D+) (HD) + EX
z
1
SS
Dolby Digital
FF
Dolby (D) (D+) (HD) + PLgx
z
1
z
2
SSSS
Dolby (D) (D+) (HD) + PLgz
z
3
SSSS
Dolby Pro Logic g/gx
z
5
SS
Dolby Pro Logic gz
z
3
SS
z
1 –
z
8 : “Types of input signals, and corresponding sound modes” (v p. 231)
Contents
ConnectionsPlaybackSettingsTipsAppendix
229
Front panelDisplayRear panelRemoteIndex
Sound mode (v p. 114)
NOTE
2-channel signalMulti-channel signal
Analog /PCMDolby Digital
(+/HD)/DTS (-HD)
PCM
Multi
DTS-HDDTS ExpressDTS
ES
DSCRT
6.1
DTS
ES
MTRIX
6.1
DTSDolby TrueHDDolby Digital PlusDolby Digital EXDolby Digital
Multi Ch In
Multi Ch In
F
Multi Ch In + Dolby EX
z
1
S
Multi Ch In + PLgx
z
1
z
2
S
Multi Ch In + PLgz
z
3
S
Multi Ch In 7.1
z
1F
z
10
Direct
Direct
S
z
9
SSSSSSSSSSS
Pure Direct
Pure Direct
SSSSSSSSSSSS
Original sound mode
Multi Ch Stereo
SSSSSSSSSSSS
Rock Arena
SSSSSSSSSSSS
Jazz Club
SSSSSSSSSSSS
Mono Movie
SSSSSSSSSSSS
Video Game
SSSSSSSSSSSS
Matrix
SSSSSSSSSSSS
Virtual
SSSSSSSSSSSS
Stereo
Stereo
FSSSSSSSSSSS
z
1 –
z
3,
z
9,
z
10 : “Types of input signals, and corresponding sound modes” (v p. 231)
Contents
ConnectionsPlaybackSettingsTipsAppendix
230
Front panelDisplayRear panelRemoteIndex
z1
This item can be selected when surround back speakers are used.
z2
The “Cinema” mode or “Music” mode can be selected. When using a single surround back speaker, the “Music” mode is used.
z3
This item can be selected when front height speakers are used.
z4
The “Cinema” mode or “Music” mode can be selected.
z5
The “Cinema” mode, “Music” mode or “Game” mode can be selected.
z6
This item can be selected when the input signal is DTS-HD Master Audio.
z7
This item can be selected when the input signal is DTS-HD Hi Resolution.
z8
This item can be selected when the input signal is DTS 96/24.
z9
The default sound mode for the AirPlay playback is Direct.
z10
This item can be selected when the input signals contain surround back signals.
ContentsConnectionsPlaybackSettingsTipsAppendix
231
Front panelDisplayRear panelRemoteIndex
Explanation of terms
o
Audyssey
Audyssey Dynamic EQ
®
Dynamic EQ solves the problem of deteriorating sound quality as volume
is decreased by taking into account human perception and room
acoustics.
Audyssey Dynamic EQ
®
works in tandem with Audyssey MultEQ
®
XT to
provide well-balanced sound for every listener at any volume level.
Audyssey Dynamic Volume
®
Dynamic Volume solves the problem of large variations in volume level
between television programs, commercials, and between the soft and loud
passages of movies. Audyssey Dynamic EQ
®
is integrated into Dynamic
Volume so that as the playback volume is adjusted automatically, the
perceived bass response, tonal balance, surround impression, and dialog
clarity remain the same.
Audyssey MultEQ
®
XT
Audyssey MultEQ
®
XT is a room equalization solution that calibrates any
audio system so that it can achieve optimum performance for every
listener in a large listening area. Based on several room measurements,
MultEQ
®
XT calculates an equalization solution that corrects for both time
and frequency response problems in the listening area and also performs
a fully automated surround system setup.
o
Dolby
Dolby Digital
Dolby Digital is a multi-channel digital signal format developed by Dolby
Laboratories.
A total of 5.1-channels are played: 3 front channels (“FL”, “FR” and “C”), 2
surround channels (“SL” and “SR”) and the “LFE” channel for low
frequency effects.
Because of this, there is no crosstalk between channels and a realistic
sound field with a “three-dimensional” feeling (sense of distance,
movement and positioning) is achieved. This delivers a thrilling surround
sound experience in the home.
Contents
ConnectionsPlaybackSettingsTipsAppendix
232
Front panelDisplayRear panelRemoteIndex
Dolby Digital Plus
Dolby Digital Plus is an improved Dolby Digital signal format that is
compatible with up to 7.1-channels of discrete digital sound and also
improves sound quality thanks to extra data bit rate performance. It is
upwardly compatible with conventional Dolby Digital, so it offers greater
flexibility in response to the source signal and the conditions of the
playback device.
Dolby Digital EX
Dolby Digital EX is a 6.1-channel surround format from Dolby Laboratories
that allows users to enjoy in their homes the “Dolby Digital Surround EX”
audio format jointly developed by Dolby Laboratories and Lucasfilm.
The 6.1-channels of sound, including surround back channel, provide
improved sound positioning and expansion of the surround sound field.
Dolby Pro Logicg
Dolby Pro Logicg is a matrix decoding technology developed by Dolby
Laboratories.
Regular music such as that on CDs is encoded into 5-channels to achieve
an excellent surround effect.
The surround channel signals are converted into stereo and full band
signals (with a frequency response of 20 Hz to 20 kHz or greater) to create
a “three-dimensional” sound image offering a rich sense of presence for all
stereo sources.
Dolby Pro Logicgx
Dolby Pro Logicgx is a further improved version of the Dolby Pro Logicg
matrix decoding technology. Audio signals recorded in 2-channels are
decoded to achieve a natural sound with up to 7.1-channels. There are
three modes: “Music” suited for playing music, “Cinema” suited for playing
movies, and “Game” which is optimized for playing games.
Contents
ConnectionsPlaybackSettingsTipsAppendix
233
Front panelDisplayRear panelRemoteIndex
Dolby Pro Logicgz
Dolby Pro Logicgz introduces a new dimension to Home Entertainment
through the addition of a pair of front height channels. This supports
various sources such as 2-channel sources and 7.1/5.1 multi-channel
sources.
By adding height speakers to the upper left and right locations in the front
of the listening environment, you can enjoy more spatial spread feel and
depth feel when you play back movies/music/games.
Dolby Pro Logic gz, with front height channels is also an ideal alternative
for households that cannot support the placement of back surround
speakers of a typical 7.1-channel system but may have bookshelf space
available to support the addition of height speakers.
Dolby TrueHD
Dolby TrueHD is a high definition audio technology developed by Dolby
Laboratories, using lossless coding technology to faithfully reproduce the
sound of the studio master.
This format provides the facility to support up to 8 audio channels with a
sampling frequency of 96 kHz/24 bit resolution and up to 6 audio channels
with a sampling frequency of 192 kHz/24 bit resolution.
o
DTS
DTS
This is an abbreviation of Digital Theater System, which is a digital audio
system developed by DTS. DTS delivers a powerful and dynamic
surround sound experience, and is found in the world’s finest movie
theaters and screening rooms.
DTS 96/24
DTS 96/24 is a digital audio format enabling high sound quality playback in
5.1-channels with a sampling frequency of 96 kHz and 24 bit quantization
on DVD-Video.
DTS Digital Surround
DTS™ Digital Surround is the standard digital surround format of DTS,
Inc., compatible with a sampling frequency of 44.1 or 48 kHz and up to
5.1-channels of digital discrete surround sound.
Contents
ConnectionsPlaybackSettingsTipsAppendix
234
Front panelDisplayRear panelRemoteIndex
DTS-ES™ Discrete 6.1
DTS-ES™ Discrete 6.1 is a 6.1-channel discrete digital audio format
adding a surround back (SB) channel to the DTS digital surround sound.
Decoding of conventional 5.1-channel audio signals is also possible
according to the decoder.
DTS-ES™ Matrix 6.1
DTS-ES™ Matrix 6.1 is a 6.1-channel audio format that inserts a surround
back (SB) channel to the DTS digital surround sound through matrix
encoding. Decoding of conventional 5.1-channel audio signals is also
possible according to the decoder.
DTS Express
DTS Express is an audio format supporting low bit rates (max. 5.1-
channels, 24 to 256 kbps).
DTS-HD
This audio technology provides higher sound quality and enhanced
functionality than the conventional DTS and is adopted as an optional
audio for Blu-ray Disc.
This technology supports multi-channel, high data transfer speed, high
sampling frequency, and lossless audio playback. Maximum 7.1-channels
are supported in Blu-ray Disc.
DTS-HD High Resolution Audio
DTS-HD High Resolution Audio is an improved version of the conventional
DTS, DTS-ES and DTS 96/24 signals formats, compatible with sampling
frequencies of 96 or 48 kHz and up to 7.1-channels of discrete digital
sound. High data bit rate performance provides high quality sound. This
format is fully compatible with conventional products, including
conventional DTS digital surround 5.1-channel data.
DTS-HD Master Audio
DTS-HD Master Audio is a lossless audio format created by Digital
Theater System (DTS). This format provides the facility to support up to 8
audio channels with a sampling frequency of 96 kHz/24 bit resolution and
up to 6 audio channels with a sampling frequency of 192 kHz/24 bit
resolution. It is fully compatible with conventional products, including
conventional DTS digital surround 5.1-channel data.
DTS Neo:6™ Surround
DTS Neo:6™ is a matrix decoding technology for achieving 6.1-channel
surround playback with 2-channel sources. It includes “DTS Neo:6
Cinema” suite for playing movies and “DTS Neo:6 Music” suited for
playing music.
Contents
ConnectionsPlaybackSettingsTipsAppendix
235
Front panelDisplayRear panelRemoteIndex
o
Audio
ALAC (Apple Lossless Audio Codec)
This is a codec for lossless audio compression method developed by
Apple Inc. This codec can be played back on iTunes, iPod or iPhone. Data
compressed to approximately 60 – 70 % can be decompressed to exactly
the same original data.
FLAC (Free Lossless Audio Codec)
FLAC stands for Free lossless Audio Codec, and is a lossless free audio
file format. Lossless means that the audio is compressed without any loss
Libble takes abuse of its services very seriously. We're committed to dealing with such abuse according to the laws in your country of residence. When you submit a report, we'll investigate it and take the appropriate action. We'll get back to you only if we require additional details or have more information to share.
Product:
Forumrules
To achieve meaningful questions, we apply the following rules:
First, read the manual;
Check if your question has been asked previously;
Try to ask your question as clearly as possible;
Did you already try to solve the problem? Please mention this;
Is your problem solved by a visitor then let him/her know in this forum;
To give a response to a question or answer, do not use this form but click on the button 'reply to this question';
Your question will be posted here and emailed to our subscribers. Therefore, avoid filling in personal details.
Register
Register getting emails for Denon AVR-X1100W at:
new questions and answers
new manuals
You will receive an email to register for one or both of the options.
Get your user manual by e-mail
Enter your email address to receive the manual of Denon AVR-X1100W in the language / languages: English as an attachment in your email.
The manual is 8,62 mb in size.
You will receive the manual in your email within minutes. If you have not received an email, then probably have entered the wrong email address or your mailbox is too full. In addition, it may be that your ISP may have a maximum size for emails to receive.
If you have not received an email with the manual within fifteen minutes, it may be that you have a entered a wrong email address or that your ISP has set a maximum size to receive email that is smaller than the size of the manual.
The email address you have provided is not correct.
Please check the email address and correct it.
Your question is posted on this page
Would you like to receive an email when new answers and questions are posted? Please enter your email address.