This unit is equipped with a sophisticated digital signal processing circuit that lets you play your favorite movie and music sources and listen to them with a wide range of surround sound mode choices.
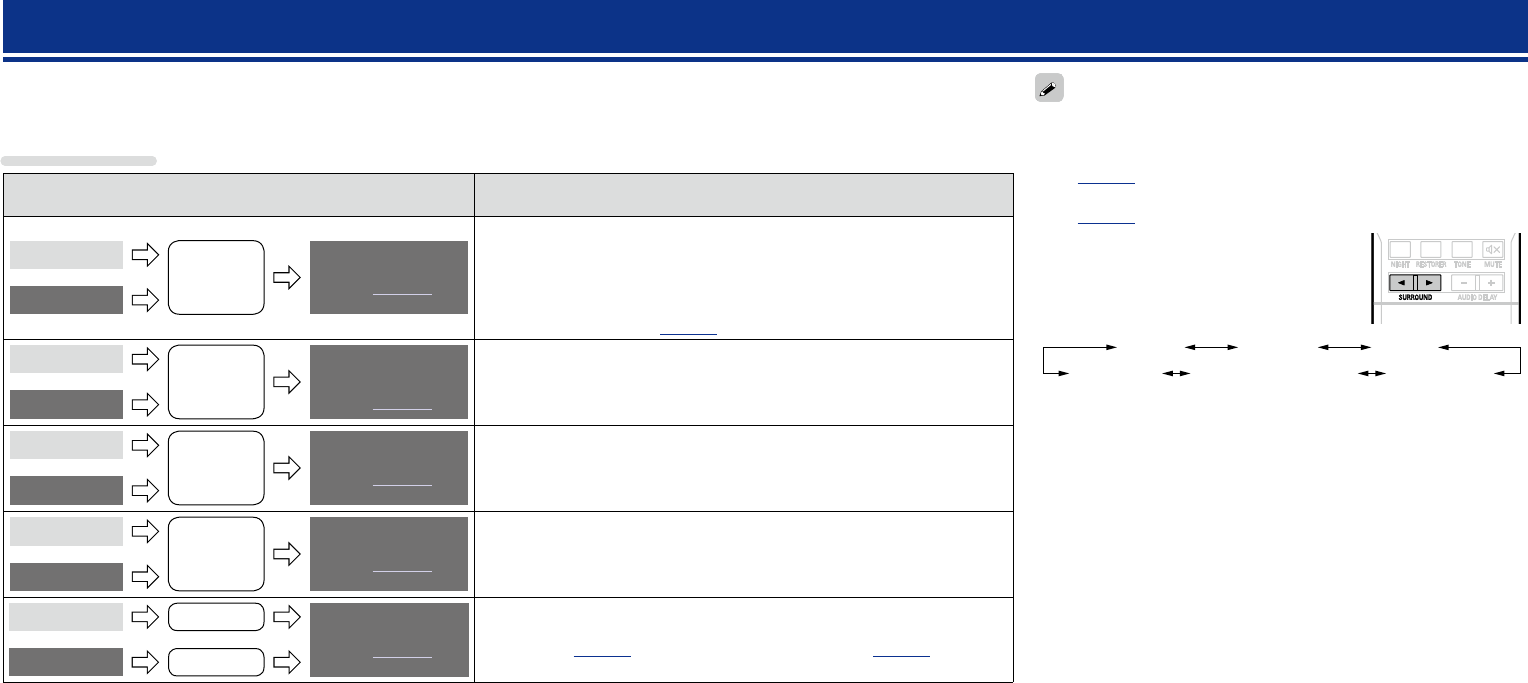
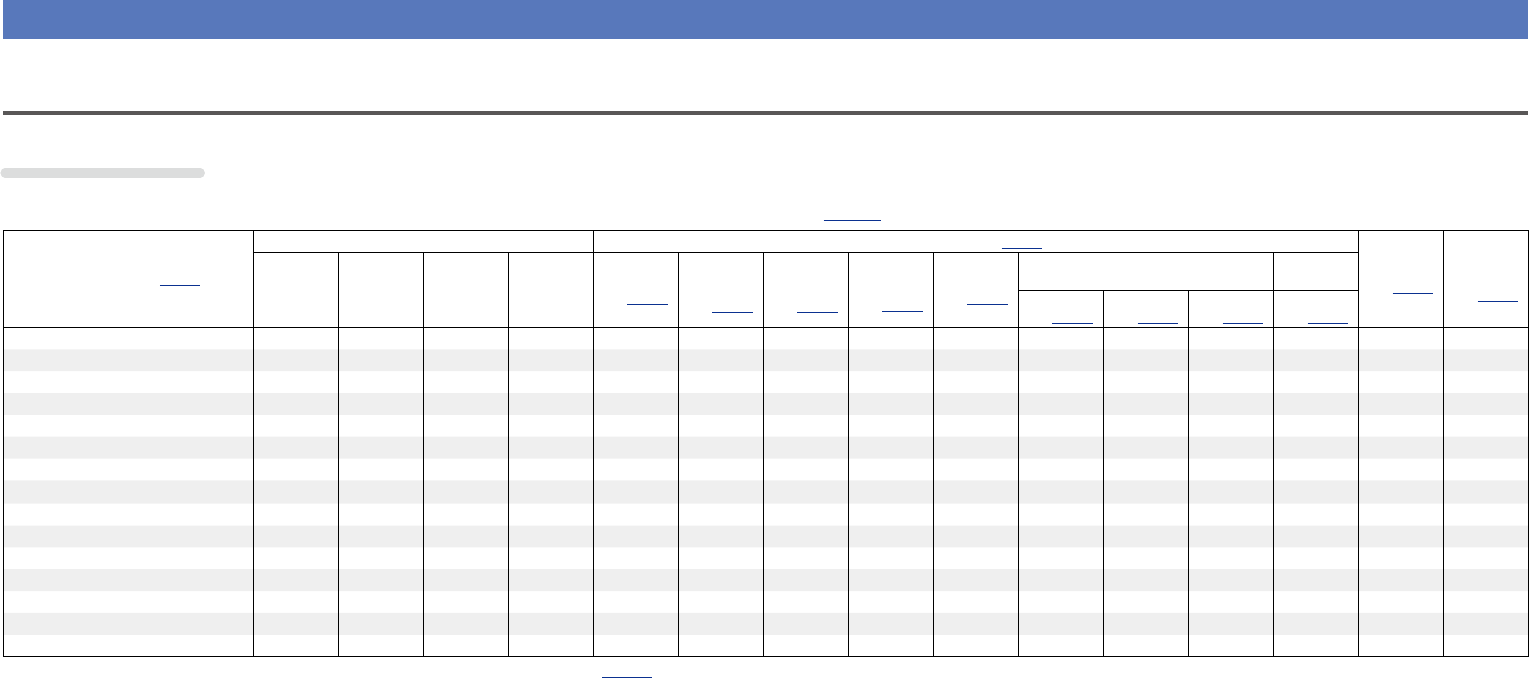
Surround modes and surround parameters
This table shows the speakers that can be used in each surround mode and the surround parameters adjustable in each surround mode.
Symbols in the table
SThis indicates the audio output channels or surround parameters that can be set.
DThis indicates the audio output channels. The output channels depend on the settings of “Speaker Config.” (vpage35).
Surround mode (vpage19)
Channel output
Audio Adjust (vpage39)
Tone
(vpage41)
RESTORER
z5
(vpage42)
Front L/RCenterSurround L/RSubwoofer
Mode
(vpage39)
LFE
z2
(vpage40)
D. Comp
z3
(vpage39)
DRC
z4
(vpage39)
Subwoofer
(vpage40)
PRO LOGIC g Music mode only
NEO:6 Music
mode only
Panorama
(vpage40)
Dimension
(vpage40)
Center Width
(vpage40)
Center Image
(vpage40)
DIRECT (2-channel)
SD
z1
SSS
z1
DIRECT (Multi-channel)
SDDDSSS
STEREO
SDSSSSS
MULTI CH IN
SDDDSS
DOLBY PRO LOGIC gSDDDSSSSSSSS
DTS NEO:6
SDDDSSSSSS
DOLBY DIGITAL
SDDDSSS
DOLBY DIGITAL Plus
SDDDSSS
DOLBY TrueHD
SDDDS
DTS SURROUND
SDDDSSS
DTS 96/24
SDDDSSS
DTS-HD
SDDDSS
DTS Express
SDDDSSS
MULTI CH STEREO
SDDDSSSS
VIRTUAL
SD
z1
SSSS
z1 Only when “SW Mode” is set to “LFE+Main” (vpage36), sound is output from the subwoofer.
z2 This item can be selected when a Dolby Digital or DTS signal or DVD-Audio is played.
z3 This item can be selected when a Dolby Digital or DTS signal is played.
z4 This item can be selected when a Dolby TrueHD signal is played.
z5 This item can be set when the input signal is analog, PCM 48 kHz or 44.1 kHz.
Basic instructions
Advanced instructions
InformationInformation
DVD
52
Surround
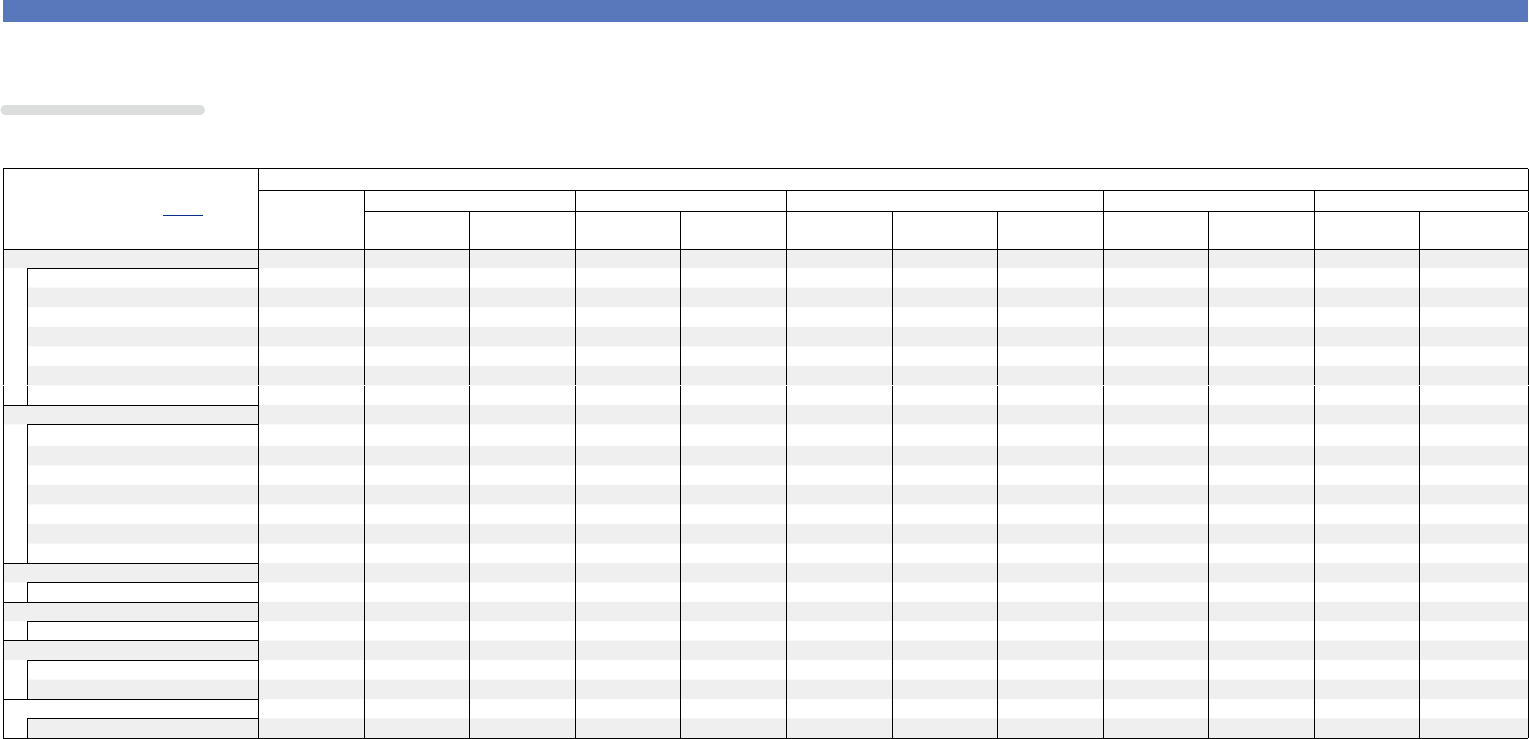
nTypes of input signals, and corresponding surround modes
This table shows the input signal that can be played in each surround mode. Check the audio signal of the input source then select the surround mode.
Symbols in the table
FThis indicates the default surround mode.
SThis indicates the selectable surround mode.
Surround mode (vpage19)
Input signal types and formats
ANALOG
PCMDTS-HDDTSDOLBYDOLBY DIGITAL
PCM
(Multi-channel)
PCM
(2-channel)
DTS-HD Master
Audio
DTS-HD High
Resolution Audio
DTS EXPRESS
DTS
(5.1-channel)
DTS 96/24DOLBY TrueHD
DOLBY DIGITAL
Plus
DOLBY DIGITAL
(5.1-channel)
DOLBY DIGITAL
(2-channel)
DTS SURROUND
DTS-HD MSTR
F
DTS-HD HI RES
F
DTS SURROUND
F
DTS 96/24
F
DTS EXPRESS
F
DTS NEO:6 CINEMA
SSS
DTS NEO:6 MUSIC
SSS
DOLBY SURROUND
DOLBY TrueHD
F
DOLBY DIGITAL+
F
DOLBY DIGITAL
F
DOLBY PRO LOGIC g CINEMASSS
DOLBY PRO LOGIC g MUSICSSS
DOLBY PRO LOGIC g GAMESSS
DOLBY PRO LOGIC
SSS
MULTI CH IN
MULTI CH IN
F
DIRECT
DIRECT
SSSSSSSSSSSS
DSP SIMULATION
MULTI CH STEREO
SSSSSSS
VIRTUAL
SSSSSSS
STEREO
STEREO
FSFSSSSSSSSS
Basic instructions
Advanced instructions
InformationInformation
DVD
53
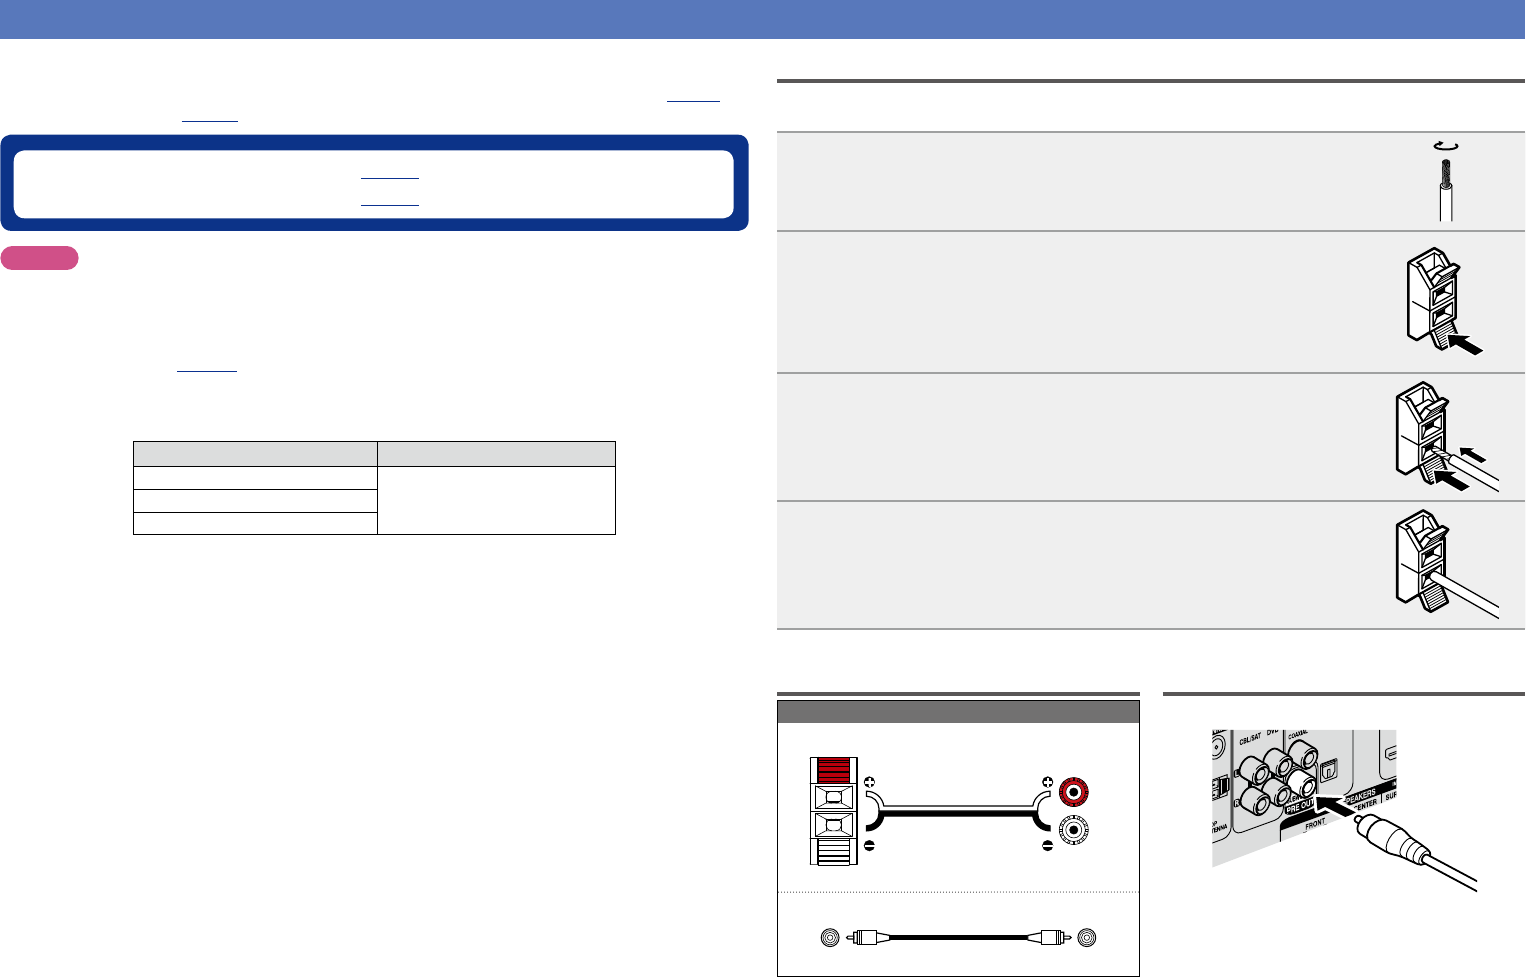
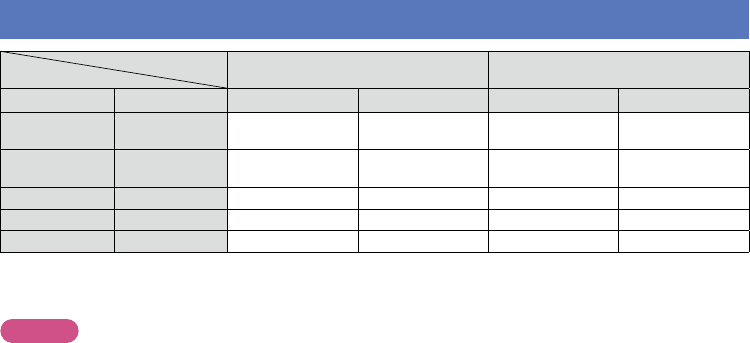
Relationship between video signals and monitor output
Output connector
Input connector
HDMIVIDEO
HDMIVIDEOVideoMenuVideoMenu
AAA
Only the menu is
displayed
AA
ASA
Only the menu is
displayed
S (VIDEO)A (VIDEO)
SAS <HDMI>S <HDMI>AA
SSS <HDMI>S <HDMI>S (VIDEO)A (VIDEO)
SAS <HDMI>S <HDMI>AA
SVideo signal input present
ANo video signal input
S < > The input signal between the
< > marks is output.
ANo video signal output
S ( ) Superimposed on the picture
indicated in ( ).
A ( ) Only the picture in ( ) is output.
NOTE
•If you operate the menu while playing back 3D video content or computer’s resolution (e.g. VGA), the
playback video is replaced by the menu screen. The playback video is not displayed behind the menu
screen.
•This unit does not show the status display while playing back 3D video content or computer’s resolution
(e.g. VGA).
Basic instructions
Advanced instructions
InformationInformation
DVD
54
Explanation of terms
A
Adobe RGB color, Adobe YCC601 color
The color space defined by Adobe Systems Inc.
Because it is a wider color space than RGB, it can
produce more vivid and natural images.
D
Deep Color
An imaging technology supported by HDMI. Unlike
RGB, which uses 8 bits (256 shades) per color, it can
use 10 bits (1024 shades), 12 bits (4096 shades), or
16 bits (65536 shades) to produce colors in higher
definition.
Both devices linked via HDMI must support Deep
Color.
Dolby Digital
Dolby Digital is a multi-channel digital signal format
developed by Dolby Laboratories.
A total of 5.1 channels are played: 3 front channels
(“FL”, “FR” and “C”), 2 surround channels
(“SL” and “SR”) and the “LFE” channel for low
frequencies.
Because of this, there is no crosstalk between
channels and a realistic sound field with a
“threedimensional” feeling (sense of distance,
movement and positioning) is achieved. This
delivers a thrilling surround sound experience in the
home.
Dolby Digital Plus
Dolby Digital Plus is an improved Dolby Digital signal
format that is compatible with up to 7.1 channels
of discrete digital sound and also improves sound
quality thanks to extra data bit rate performance.
It is upwardly compatible with conventional Dolby
Digital, so it offers greater flexibility in response to
the source signal and the conditions of the playback
device.
Dolby Pro Logic g
Dolby Pro Logic g is a matrix decoding technology
developed by Dolby Laboratories.
Regular music such as that on CDs is encoded into
5 channels to achieve an excellent surround effect.
The surround channel signals are converted into
stereo and full band signals (with a frequency
response of 20 Hz to 20 kHz or greater) to create
a “three-dimensional” sound image offering a rich
sense of presence for all stereo sources.
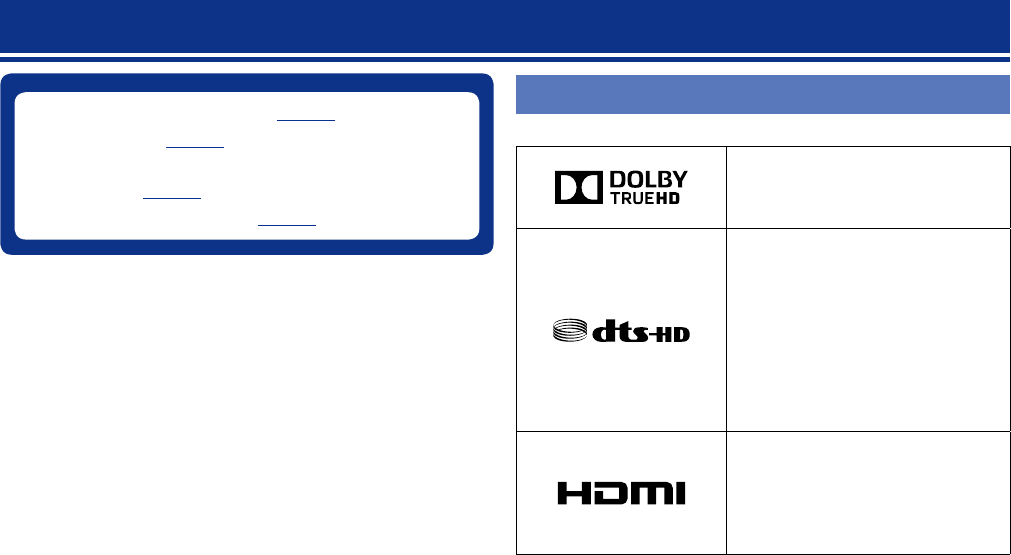
Dolby TrueHD
Dolby TrueHD is a high definition audio technology
developed by Dolby Laboratories, using lossless
coding technology to faithfully reproduce the sound
of the studio master.
This format provides the facility to support up to
8 audio channels with a sampling frequency of
96kHz/24bit resolution and up to 6 audio channels
with a sampling frequency of 192kHz/24bit
resolution. Dolby TrueHD is adopted for applications
that put very high importance on sound quality.
Downmix
This function converts the number of channels of
surround audio to a lower number of channels and
plays back according to the system’s configuration.
DTS
This is an abbreviation of Digital Theater System,
which is a digital audio system developed by DTS.
DTS delivers a powerful and dynamic surround
sound experience, and is found in the world’s finest
movie theaters and screening rooms.
DTS 96/24
DTS 96/24 is a digital audio format enabling high
sound quality playback in 5.1 channels with a
sampling frequency of 96 kHz and 24 bit quantization
on DVD-Video.
DTS Digital Surround
DTS Digital Surround is the standard digital surround
format of DTS, Inc., compatible with a sampling
frequency of 44.1 or 48 kHz and up to 5.1 channels
of digital discrete surround sound.
DTS Express
DTS Express is an audio format supporting low bit
rates (max. 5.1 channels, 24 to 256 kbps).
DTS-HD
This audio technology provides higher sound quality
and enhanced functionality than the conventional
DTS and is adopted as an optional audio for Blu-ray
Disc. This technology supports multi-channel, high
data transfer speed, high sampling frequency, and
lossless audio playback. Maximum 7.1-channels are
supported in Blu-ray Disc.
DTS-HD High Resolution Audio
DTS-HD High Resolution Audio is an improved
version of the conventional DTS, DTS-ES and
DTS 96/24 signals formats, compatible with
sampling frequencies of 96 or 48 kHz and up to
7.1 channels of discrete digital sound. High data
bit rate performance provides high quality sound.
This format is fully compatible with conventional
products, including conventional DTS digital
surround 5.1-channel data.
DTS-HD Master Audio
DTS-HD Master Audio is a lossless audio format
created by Digital Theater System (DTS). This
format provides the facility to support up to 8 audio
channels with a sampling frequency of 96kHz/24bit
resolution and up to 6 audio channels with a
sampling frequency of 192kHz/24bit resolution.
It is fully compatible with conventional products,
including conventional DTS digital surround
5.1-channel data.
DTS NEO:6™ Surround
DTS NEO:6™ is a matrix decoding technology
for achieving 6.1-channel surround playback
with 2-channel sources. It includes “DTS NEO:6
Cinema” suited for playing movies and “DTS
NEO:6 Music” suited for playing music.
Dynamic range
The difference between the maximum undistorted
sound level and the minimum discernible level
above the noise emitted by the device.
H
HDCP
When transmitting digital signals between devices,
this copyright protection technology encrypts
the signals to prevent content from being copied
without authorization.
HDMI
This is an abbreviation of High-Definition Multimedia
Interface, which is an AV digital interface that can
be connected to a TV or amplifier. Video signals and
audio signals can be connected using a single cable.
L
LFE
This is an abbreviation of Low Frequency Effect,
which is an output channel that emphasizes
low frequency effect sound. Surround audio is
intensified by outputting 20 Hz to 120 Hz deep bass
to the system subwoofer.
M
MP3 (MPEG Audio Layer-3)
This is an internationally standardized audio data
compression scheme, using the “MPEG-1” video
compression standard. It compresses the data
volume to about one eleventh its original size while
maintaining sound quality equivalent to a music CD.
MPEG (Moving Picture Experts Group), MPEG-2,
MPEG-4
These are the names for digital compression format
standards used for the encoding of video and audio.
Video standards include “MPEG-1 Video”, “MPEG-
2 Video”, “MPEG-4 Visual”, “MPEG-4 AVC”. Audio
standards include “MPEG-1 Audio”, “MPEG-2
Audio”, “MPEG-4 AAC”.
P
Protection circuit
This is a function to prevent damage to devices
within the power supply when an abnormality
such as an overload, excess voltage occurs or over
temperature for any reason.
In this unit, the power indicator blinks and the unit
enters standby mode when an abnormality occurs.
S
Sampling frequency
Sampling involves taking a reading of a sound wave
(analog signal) at regular intervals and expressing
the height of the wave at each reading in digitized
format (producing a digital signal).
The number of readings taken in one second is
called the “sampling frequency”. The larger the
value, the closer the reproduced sound is to the
original.
Speaker impedance
This is an AC resistance value, indicated in Ω
(ohms). Greater power can be obtained when this
value is smaller.
Basic instructions
Advanced instructions
InformationInformation
DVD
55
sYCC601 color
Like “x.v.Color”, each of these color spaces defines
a palette of available colors that is larger than the
traditional RGB color model.
W
WMA (Windows Media Audio)
This is audio compression technology developed by
Microsoft Corporation.
WMA data can be encoded using Windows
Media
®
Player Ver.7, 7.1, Windows Media
®
Player
for Windows
®
XP and Windows Media
®
Player 9
Series.
To encode WMA files, only use applications
authorized by Microsoft Corporation. If you use
an unauthorized application, the file may not work
properly.
X
x.v.Color
This function lets HDTVs display colors more
accurately. It enables display with natural, vivid
colors. “x.v.Color” is a Sony registered trademark.
Explanation of terms
Basic instructions
Advanced instructions
InformationInformation
DVD
56
Troubleshooting
If a problem should arise, first check the following:
1. Are the connections correct?
2. Is the set being operated as described in the owner’s manual?
3. Are the other devices operating properly?
If this unit does not operate properly, check the items listed in the table below. Should the problem persist,
there may be a malfunction.
In this case, disconnect the power immediately and contact your store of purchase.
GGeneralH
SymptomCause/SolutionPage
Power does not turn
on.
•Check whether the power plug is correctly inserted into the power
outlet.
•The protection circuit is active. Disconnect the power plug from
the electric outlet, wait 5 to 10 seconds and then insert it back
into the outlet.
14
54
Power automatically
switches to standby
mode.
•The sleep timer is set. Turn on the power again, or change the
sleep timer settings.
•“Auto Standby” is triggered when there is no operation for a set
amount of time. To disable “Auto Standby”, set “Auto Standby”
on the menu to “Off”.
28
38
Display is off.
•Press
DIMMER and apply any setting except “Off”.
16
The power indicator
is blinking red.
•The temperature inside the unit has risen. Please turn off power
once, and re-apply the power after the temperature has fallen
sufficiently.
•Please re-install this unit in a place having good ventilation.
•Please use speakers which have the specified impedance.
•The speaker cable has shorted (is touching). Firmly twist the core
wire in the speaker cable, and then re-connect it to the speaker
terminal.
–
–
24
25
After turning on the
power, the power
indicator is blinking
red.
•This unit’s amplifier circuit has failed. Turn off the power and
please contact the Denon service adviser.
–
Set does not operate
properly.
•Reset the microprocessor. Note that re-setting the microprocessor
restores all pre-configured settings to the factory defaults.
58
GHDMIH
SymptomCause/SolutionPage
No audio is
output with HDMI
connection.
•Check the connection of the HDMI connectors.
•When outputting HDMI audio from the speakers, set “HDMI
Audio Out” on the menu to “Amp”.
•When outputting HDMI audio from a TV, set “HDMI Audio Out”
on the menu to “TV”.
6
38
38
No video is
output with HDMI
connection.
•Check the connection of the HDMI connectors.
•Set the input source to match the connected HDMI connector.
•Check whether the TV is compatible with copyright protection
(HDCP). If connected to a device not compatible with HDCP, video
will not be output correctly.
6
6, 15
8
No audio is output
when “Pass
Through” is set.
•Check the TV settings. Refer to the owner’s manual for your TV
for more details.
•Set the speaker to the TV speakers.
•Set HDMI control to “Off”.
–
GVideoH
SymptomCause/SolutionPage
No picture appears.•Check the TV connection.
•Set the TV input correctly.
6, 10
6, 10
Basic instructions
Advanced instructions
InformationInformation
DVD
57
GAudioH
SymptomCause/SolutionPage
Audio is not output.•Check the connections for all devices.
•Check the speaker connections and configurations.
•Check whether the audio device power is turned on.
•Adjust the master volume.
•Cancel the mute mode.
•Select a suitable input source.
•Select a suitable input mode.
•Disconnect the headphones. No sound is output from the
speakers when headphones are connected.
6,7,10,11,
12,13
26
–
16
16
15
33
45
The volume does not
increase.
•The maximum volume is set too low. Set the maximum volume
using “Limit” on the menu.
•Power for external devices connected to the output connectors
of the unit may not be turned on. Check the power of connected
external devices.
37
–
No sound is
produced from
surround speakers.
•Check if the surround speakers are connected to the SURROUND
terminals.
–
No sound is
produced from
subwoofer.
•Check the subwoofer connections.
•Turn on the subwoofer’s power.
•Set “Speaker Config.” – “Subwoofer” on the menu to “Yes”.
•If “Front” and “Center” for “Speaker Config.” are set to “Large”,
and “SW Mode” is set to “LFE”, no sound may be output from
the subwoofers, depending on the input signal or selected
surround mode.
24
–
35
35
DTS sound is not
output.
•Set “Decode Mode” on the menu to “Auto” or “DTS”.
33
Dolby TrueHD, DTS-
HD, Dolby Digital
Plus audio is not
output.
•Make HDMI connections.
6
Dolby PLg mode or
DTS NEO:6 mode
cannot be selected.
•Check that “Speaker Config.” – “Center” or “Surround” is set
to other than “None”. If the speaker system is 2.0/2.1ch, this
surround mode cannot be selected.
•When headphones are used, Dolby PLg or DTS NEO:6 cannot be
selected.
36
–
RESTORER cannot
be selected.
•Check that an analog signal or PCM signal (fs=44.1/48 kHz) is
input. For playback of multi-channel signals such as Dolby Digital
or DTS surround, RESTORER cannot be used.
42
GRadioH
SymptomCause/SolutionPage
Reception fails, or
there is a lot of noise
or distortion.
•Change the antenna orientation or position.
•Separate the AM loop antenna from the unit.
•Use an FM outdoor antenna.
•Separate the antenna from other connection cables.
13
13
13
13
GRemote Control UnitH
SymptomCause/SolutionPage
The set cannot be
operated with the
remote control unit.
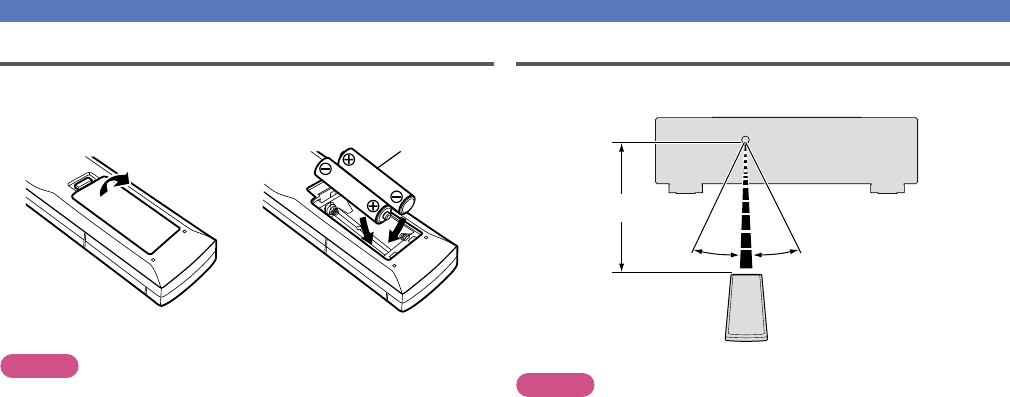
•Batteries are worn out. Replace with new batteries.
•Operate the remote control unit within a distance of about 23 ft/7
m from this unit and at an angle of within 30°.
•Remove any obstacle between this unit and the remote control
unit.
•Insert the batteries in the proper direction, checking the q and
w marks.
•The set’s remote control sensor is exposed to strong light (direct
sunlight, inverter type fluorescent bulb light, etc.). Move the set
to a place in which the remote control sensor will not be exposed
to strong light.
49
49
49
49
49
Basic instructions
Advanced instructions
InformationInformation
DVD
58
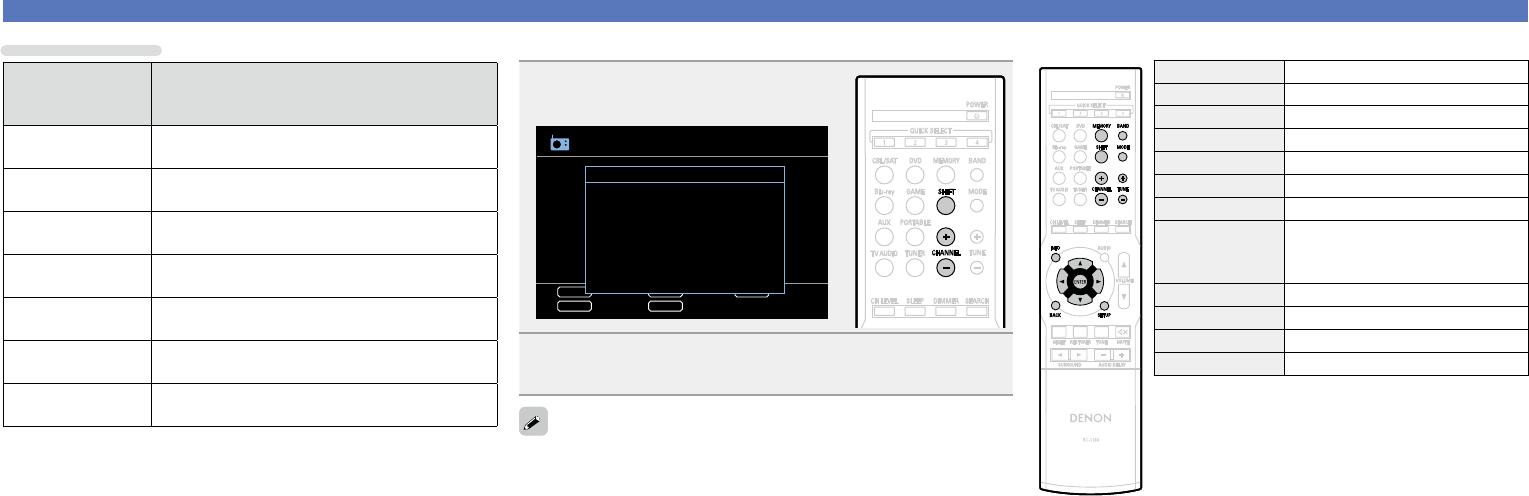
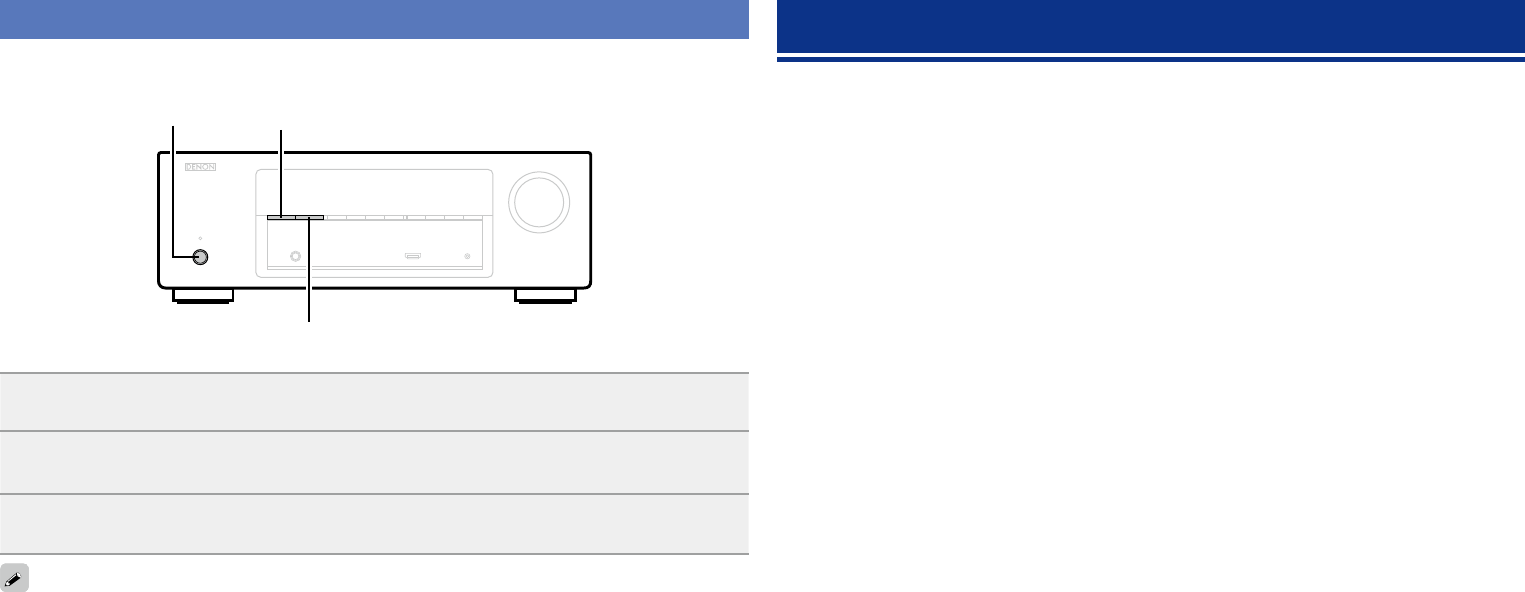
Resetting the microprocessor
Perform this procedure if the display is abnormal or if operations cannot be performed.
Note that when the microprocessor is reset, all the settings are reset to their default values.
X
SOURCE SELECT 1
SOURCE SELECT 0
1
Turn off the power using X.
2
Press X while simultaneously pressing SOURCE SELECT 0 and SOURCE SELECT
1
.
3
Once the display starts ashing at intervals of about 1 second, release the two
buttons.
If in step 3 the display does not flash at intervals of about 1 second, start over from step 1.
Specifications
nAudio section
•Power amplifier
Rated output:Front:
75 W + 75 W (8 Ω/ohms, 20 Hz – 20 kHz with 0.08 % T.H.D.)
110 W + 110 W (6 Ω/ohms, 1 kHz with 0.7 % T.H.D.)
Center:
75 W (8 Ω/ohms, 20 Hz – 20 kHz with 0.08 % T.H.D.)
110 W (6 Ω/ohms, 1 kHz with 0.7 % T.H.D.)
Surround:
75 W + 75 W (8 Ω/ohms, 20 Hz – 20 kHz with 0.08 % T.H.D.)
Libble takes abuse of its services very seriously. We're committed to dealing with such abuse according to the laws in your country of residence. When you submit a report, we'll investigate it and take the appropriate action. We'll get back to you only if we require additional details or have more information to share.
Product:
Forumrules
To achieve meaningful questions, we apply the following rules:
First, read the manual;
Check if your question has been asked previously;
Try to ask your question as clearly as possible;
Did you already try to solve the problem? Please mention this;
Is your problem solved by a visitor then let him/her know in this forum;
To give a response to a question or answer, do not use this form but click on the button 'reply to this question';
Your question will be posted here and emailed to our subscribers. Therefore, avoid filling in personal details.
Register
Register getting emails for Denon AVR-E200 at:
new questions and answers
new manuals
You will receive an email to register for one or both of the options.
Get your user manual by e-mail
Enter your email address to receive the manual of Denon AVR-E200 in the language / languages: English as an attachment in your email.
The manual is 12,76 mb in size.
You will receive the manual in your email within minutes. If you have not received an email, then probably have entered the wrong email address or your mailbox is too full. In addition, it may be that your ISP may have a maximum size for emails to receive.
If you have not received an email with the manual within fifteen minutes, it may be that you have a entered a wrong email address or that your ISP has set a maximum size to receive email that is smaller than the size of the manual.
The email address you have provided is not correct.
Please check the email address and correct it.
Your question is posted on this page
Would you like to receive an email when new answers and questions are posted? Please enter your email address.