74
BESCHRIJVING VAN DE AFSTANDSBE-
DIENING
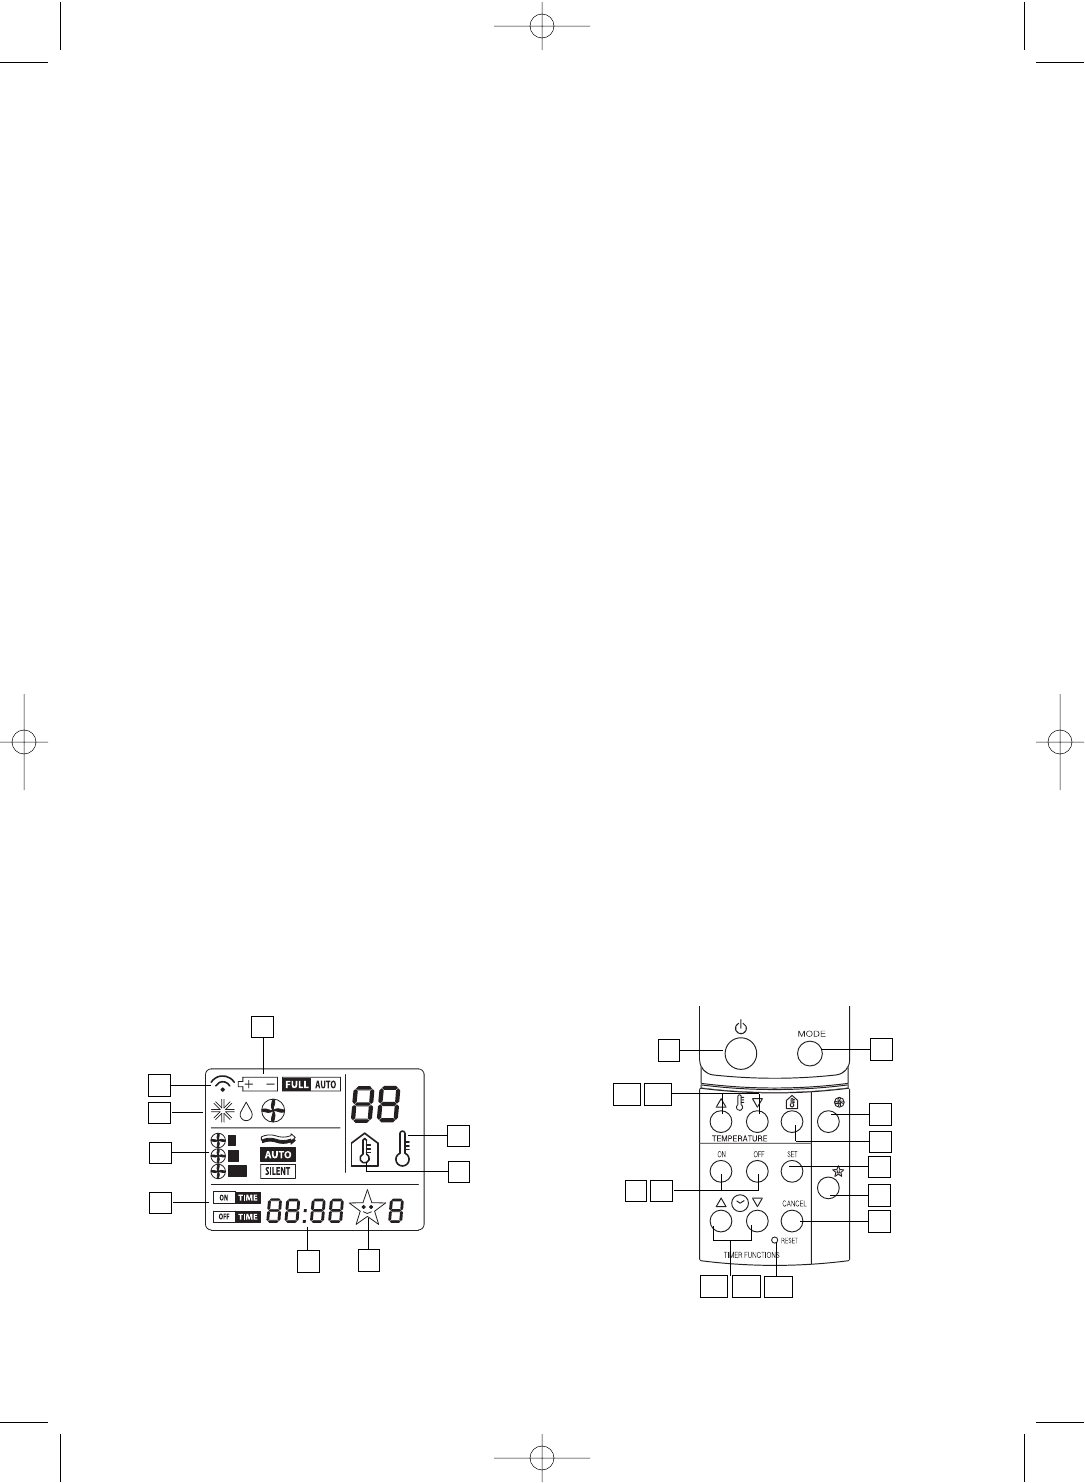
Het paneel
Bij het aanzetten van de airconditioner worden
alle symbolen zichtbaar. Bij het uitzetten, blijft
alleen de klok zichtbaar.
A. Beep
Hiermee wordt de pieptoon zichtbaar gemaakt
bij het aanzetten van de airconditioner, boven-
dien gaat dit symbool branden bij elke hande-
ling die verricht wordt.
B. Symbolen van de verschillende functies
Airconditioning, ontvochtiging, ventilatie, vol
automatisch.
C. Omgevingstemperatuur
Geeft de temperatuur in de ruimte aan.
D. Ventilatorsnelheid
Geeft de verschillende snelheden aan: mini-
mum, gemiddeld, maximum, automatisch en
geruisloos.
E. Timer aan en uit
Geeft de geprogrommeerde tijden aan voor
het aan-en uitgaan van de airconditioner.
F. Timer sleep/geruisloos
Geeft de gewenste uren aan tijdens bij de
sleep functie.
G. De klok
Geeft de tijd aan.
H. Geprogrammeerde temperatuur
Geeft de geprogrammeerde temperatuur aan.
I. Aanduiding dat de batterijen aan vervan-
ging toezijn.
DE TIPTOETSEN
1. Aan/Uit
Door op deze toets te drukken gaat het
DISPLAY aan. Door nogmaals op de toets
te drukken gaat het DISPLAY uit.
2. MODE: keuze van de functies
Door op deze toets te drukken worden de
verschillende functiemogelijkheden geko-
zen: airconditioning, ontvochtiging, venti-
latie en VOL AUTOMATISCH
3. Keuze ventilatorsnelheid
Deze toets kiest de ventilatorsnelheid:
minimum, gemiddeld, maximum en auto-
matisch.
4. Aanduiding omgevingstemperatuur
Deze toets geeft de huidige temperatuur
in de ruimte aan. Na ongeveer 4 seconden
zal de voorheen geprogrammeerde tem-
peratuur weer verschijnen.
5. Sleep
Deze toets stelt de nachtfunctie in.
6. CANCEL: Annuleren van de timer.
Deze toets annuleert de programmering
van de Timer AAN/UIT
7/8. AAN/UIT Programmering Timer
Deze toetsen programmeren het aan- en
uitgaan van de airconditioner.
9. SET: bevestiging klok of timer
Deze toets bevestigd de programmering
van de klok of van de Timer AAN/UIT.
10/11. Ruimte thermostaat.
Deze twee toetsen kiezen de gewenste
temperatuur in de ruimte, met 11 gaat de
temperatuur omhoog en met toets 10
gaat de temperatuur omlaag.
12/13. Programmering klok of timer
Deze toetsen programmeren de uren en
de minuten van de klok en van de timer.
14. Reset