111504
5
Zoom out
Zoom in
Previous page
1/41
Next page
IMPORTANT INSTRUCTIONS
SAVE THESE INSTRUCTIONS
MODE D’EMPLOI IMPORTANT
CONSERVEZ LES PRESENTES INSTRUCTIONS
INSTRUCIONES IMPORTANTES
REPASE Y GUARDE ESTAS INSTRUCCIONES
LEA CUIDADOSAMENTE ESTE INSTRUCTIVO ANTES
DE USAR SU APARATO
ISTRUZIONI IMPORTANTI
CONSERVARE LE ISTRUZIONI
Register this product on-line and receive a free trial issue of Cook's Illustrated. Visit
http://registration.delonghi-csservice.com. Visit www.delonghi.com for a list of
service centers near you. (U.S. and Canada)
Enregistrez ce produit en ligne et recevez un numéro gratuit de Cook's Illustrated.
Visitez http://registration.delonghi-csservice.com.
Visitez www.delonghi.com pour y voir une liste des centres de réparation proches
de chez vous. (É.-U. et Canada).
Registre este producto en línea y reciba un ejemplar gratis de Cook's Illustrated.
Visite http://registration.delonghi-csservice.com. Visite www.delonghi.com para
ver la lista de centros de servicios cercanos a usted. (Estados Unidos y Canada)
Registra questo prodotto "on-line" per ricevere una copia omaggio della rivista
“Cook's Illustrated”. Visita http://registration.delonghi-csservice.com.
Visita
www.delonghi.com per una lista dei centri di servizio a te piu vicini.
(Stati Uniti e Canada)
ELECTRONIC CHARACTERISTICS: CARACTÉRISTIQUES ÉLECTRIQUES: CARACTERISTICAS
ELECTRICAS: CARATTERISTICHE ELETTRICHE: 120V
˜
60HZ 1350W
COFFEE MAKER TYPE
ESAM2000/
CAFETERIE MODÈLE
ESAM2000/
CAFETERA ELECTRICA MODELO
ESAM2000/
MACCHINA DA CAFFÈ
ESAM2000
2
K
L
A
C
D
E
N
F
G
I
J
Q
U
V
TS
R
P
O
H
Z
M
B
3
4
OPERATING INSTRUCTIONS
Important safeguards … … … … … … … … … … … … … … … … … … … … …6
1 Description of the appliance … … … … … … … … … … … … … … … … … …6
2 Safety warning … … … … … … … … … … … … … … … … … … … … … …7
3 Installation … … … … … … … … … … … … … … … … … … … … … … … …7
4 Preparing the coffee maker … … … … … … … … … … … … … … … … … …8
4.1 Filling the water tank … … … … … … … … … … … … … … … … … … …8
4.2 Filling the container with coffee beans … … … … … … … … … … … … …8
4.3 Using the coffee maker for the first time … … … … … … … … … … … … …8
5 Preparing the coffee (using coffee beans) … … … … … … … … … … … … …9
6 Adjusting the coffee grinder … … … … … … … … … … … … … … … … …11
7 Preparing espresso coffee with ground coffee (instead of beans) … … … … … …12
8 Hot water delivery … … … … … … … … … … … … … … … … … … … …12
9 Preparing cappuccinos (using steam) … … … … … … … … … … … … … …13
10 Cleaning and maintenance … … … … … … … … … … … … … … … … … …14
10.1 Cleaning the coffee maker … … … … … … … … … … … … … … … …14
10.2 Cleaning the infuser … … … … … … … … … … … … … … … … … …15
10.3 Descaling … … … … … … … … … … … … … … … … … … … … … …16
10.4 Setting the water hardness … … … … … … … … … … … … … … … …17
11 Meaning of the normal operation indicator lights … … … … … … … … … …18
12 Meaning of the alarm indicator lights and what to do when they are on … … …19
13 Problems that can be resolved before calling the service centre … … … … … …20
Limited Warranty … … … … … … … … … … … … … … … … … … … … … …22
Coffee has been used to factory test the appliance and it is therefore completely normal for there to
be traces of coffee in the mill. This appliance is however guaranteed to be new.
The grinding coarseness regulator should only be turned when the coffee mill is on.
5
OPERATING INSTRUCTIONS
GB
SHORT CORD INSTRUCTIONS
- A short power cord is provided to reduce risks resulting from becoming entangled in or tripping over
a longer cord.
- Longer, detachable power supply cords or extension cords are available and may be used if care is
exercised in their use.
- If an extension cord is used, the marked electrical rating should be at least as great as the electrical
rating of the appliance. If the appliance is provided with 3- wire, grounding type cord, the extension
should be a GROUNDING TYPE 3 - WIRE CORD. The longer cord should be arranged so that it will
not drape over the counter-top or table top where it can be pulled on by children or tripped over.
- Your product is equipped with a polarized alternating current line plug (a plug having one blade
wider than the other). This plug will fit into the power outlet only one way. This is a safety feature. If
you are unable to insert the plug fully into the outlet, try reversing the plug. If the plug should still fail
to fit, contact your electrician to replace your obsolete outlet. Do not defeat the safety purpose of the
polarized plug.
IMPORTANT SAFEGUARDS
When using electrical appliances, basic safety precautions should always be followed, including the fol-
lowing:
Read all instructions.
Do not touch hot surfaces. Use handles and knobs.
To protect against fire, electrical shock and personal injury, do not immerse cord, plug or appliance
in water or other liquid.
Never allow the appliance to be used by children.
Unplug from the outlet when not in use and before cleaning. Allow to cool before fitting or taking
off parts, and before cleaning the appliance.
Do not operate with a damaged cord or plug, or after the appliance malfunctions, or has been
damaged in any manner. Return the appliance to the nearest authorized service facility for exami-
nation, repair or adjustment.
The use of accessory attachments or spare parts not recommended by the appliance manufacturer
may result in fire, electrical shock or personal injury.
Do not use outdoors.
Do not let the cord hang over the edge of the table or counter, or touch hot surfaces.
Do not place on or near a hot gas or electrical burner, or in a heated oven.
Plug cord into the wall outlet. To disconnect, turn any control to “off”, then remove plug from wall
outlet.
Do not use the appliance for other than the intended use. This appliance is to be utilized for domes-
tic use only. Any other use is to be considered improper and therefore, dangerous.
WARNING: To reduce the risk of fire or electric shock, do not remove the cover.
No user serviceable parts inside. Repair should be done by authorized service personnel only!
SAVE THESE INSTRUCTIONS
THIS PRODUCT IS FOR HOUSEHOLD USE ONLY
6
OPERATING INSTRUCTIONS
1. DESCRIPTION OF THE APPLIANCE (SEE PAGE 3)
A. Cup warmer tray
B. Steam knob
C. Steam spout
D. Milk frother
E. Water tank (removable)
F. Cup support tray
G. Drip tray (removable)
H. Service door
I. Coffee spout, adjustable in height
J. Control panel
K. Bean container lid
L. Centre lid for the ground coffee
M. Infuser
N. Power cable
O. Milk frother (removable)
P. Milk frother nozzle (removable)
Q. Measure for pre-ground coffee
R. Removable container for the coffee grounds
S. Grinding coarseness adjustment knob
T. Container for the coffee beans
U. Compartment for the measure
V. Funnel for pre-ground coffee
Z. Mobile drawer
Control panel
1) On/off button
2) 1 cup and coffee temperature OK light
3) One cup button
4) 2 cup and coffee temperature OK light
5) Two cup button
6) Steam and steam temperature OK light
7) Steam function selector button
8) Coffee quantity selector knob (short, normal or
long)
1
16 15 14 13
12
2
34567
8
9
10
11
9) Grinding quantity selector knob (for weak, nor-
mal or strong coffee)
10)Rinse and descaling button
11)Ground coffee button (disables the coffee grin-
der)
12)Ground coffee light (coffee grinder disabled)
13)Scale alarm light
14)Generic alarm indicator light
15)Grounds container full or absent indicator
light
16)No water or water tank absent indicator light
7
OPERATING INSTRUCTIONS
GB
2 SAFETY WARNINGS
CAREFULLY READ AND KEEP THESE INSTRUC-
TIONS!
This machine is designed to “make espresso
coffee” and to “heat drinks”: be careful to
avoid scalding from the water and steam jets
or by using the machine incorrectly.
This appliance is for household use only. All
other use is considered improper and conse-
quently dangerous.
The manufacturer is not liable for damage
caused by improper, incorrect or unreasona-
ble use of the appliance.
During operation, do not touch the hot surfa-
ces of the appliance. Use the knobs or hand-
les.
Do not touch the appliance with damp hands
or feet.
Do not allow children or unfit persons to use
the appliance unsupervised.
Do not allow children to play with the applian-
ce.
In the event of breakdown or faulty operation,
turn the appliance off and do not tamper with
it. For repairs, contact a technical service cen-
tre authorised by the manufacturer only.
Request that only original spare parts be used.
Failure to respect the above may compromise
the safety of the appliance.
3 INSTALLATION
After unpacking, make sure the appliance is
complete and undamaged. If in doubt, do not
use it. Contact professionally qualified person-
nel.
Packing elements (plastic bags, polystyrene
etc) must not be left within reach of children as
they may represent a hazard.
Place the appliance on a work surface far
away from water taps, basins and sources of
heat.
After having positioned the appliance on the
work bench, make sure that there is a free
space of around 2 in (5 cm) between the sur-
faces of the appliance and the side and rear
walls and a free space of at least 8 in (20
cm) above the coffee maker.
Never install the machine in environments
where the temperature may reach 0°C or
lower (the appliance may be damaged if the
water freezes).
Check that the voltage of the mains power
supply corresponds to the value indicated on
the appliance’s rating plate. Only connect the
appliance to a power outlet with a minimum
rating of 10A that is properly earthed. The
manufacturer declines all liability for any acci-
dents caused if the system is not correctly
earthed.
If the power outlet does not match the plug on
the appliance, have the outlet replaced with a
suitable type by qualified personnel.
The power cable for this appliance must not
be replaced by the user, in that this operation
requires the use of special tools. In the event of
damage, only contact a service centre authori-
sed by the manufacturer so as to avoid any
risks.
The water hardness should be set as soon as
possible, following the procedure described in
chapter 10.4.
8
OPERATING INSTRUCTIONS
To correctly learn how to use the machine, when starting it for the first
time, carefully follow the step-by-step instructions described in the fol-
lowing paragraphs.
4 PREPARING THE COFFEE MAKER
4.1 FILLING THE WATER TANK
Remove the water tank (Fig.1), rinse it and fill it with fresh water,
without exceeding the MAX line. When removing the tank, the milk
frother must always be positioned towards the centre of the machine,
otherwise the tank cannot be removed.
Replace the tank, pushing it all the way in.
4.2 FILLING THE CONTAINER WITH COFFEE BEANS
Open the lid on the coffee bean container (Fig.2).
Fill the container with coffee beans.
Close the lid.
WARNING: To avoid malfunctions, never introduce ground coffee,
freeze-dried coffee or caramelised beans, or other objects that may
damage the machine.
4.3 USING THE COFFEE MAKER FOR THE FIRST TIME
1. Check that the water tank is full and that power cable is plugged into the
power outlet.
2. Move the milk frother towards the outside and place a cup underneath
(Fig.3). Then turn the machine on by pressing the button (Fig.4).
3. IMMEDIATELY AFTER, WITHIN A MAXIMUM OF 30 SECONDS, turn the
steam knob anticlockwise until it stops (Fig.5) (it is normal for the machine to
make some noise).
4. After few seconds, a little water will come out of the milk frother. When
there is around 30cc in the cup, turn the steam knob half a turn clockwise
(Fig.6) until it stops, so as to stop the water coming out.
5. Wait for the and lights to stop flashing and turn on steady.
(When the lights are flashing it means that the machine is pre-heating,
while when they are on steady it means that the machine has reached the
ideal temperature for making coffee - par. 11 - points 1 and 2).
A few moments before the lights stop flashing the machine automatically
performs a rinse cycle: a little hot water will come out of the delivery
spouts and will be collected in the drip tray underneath.
Tip: for a hotter, short coffee (less than 60 cc), , first fill the cup with the hot rin-
sing water. Then leave it inside for a few seconds (before emptying it) so as to
pre-heat the cup.
6. At this point, the machine is ready for use.
Fig.1
Fig.2
Fig.3
Fig.4
9
OPERATING INSTRUCTIONS
GB
5 PREPARING THE COFFEE (USING COFFEE BEANS)
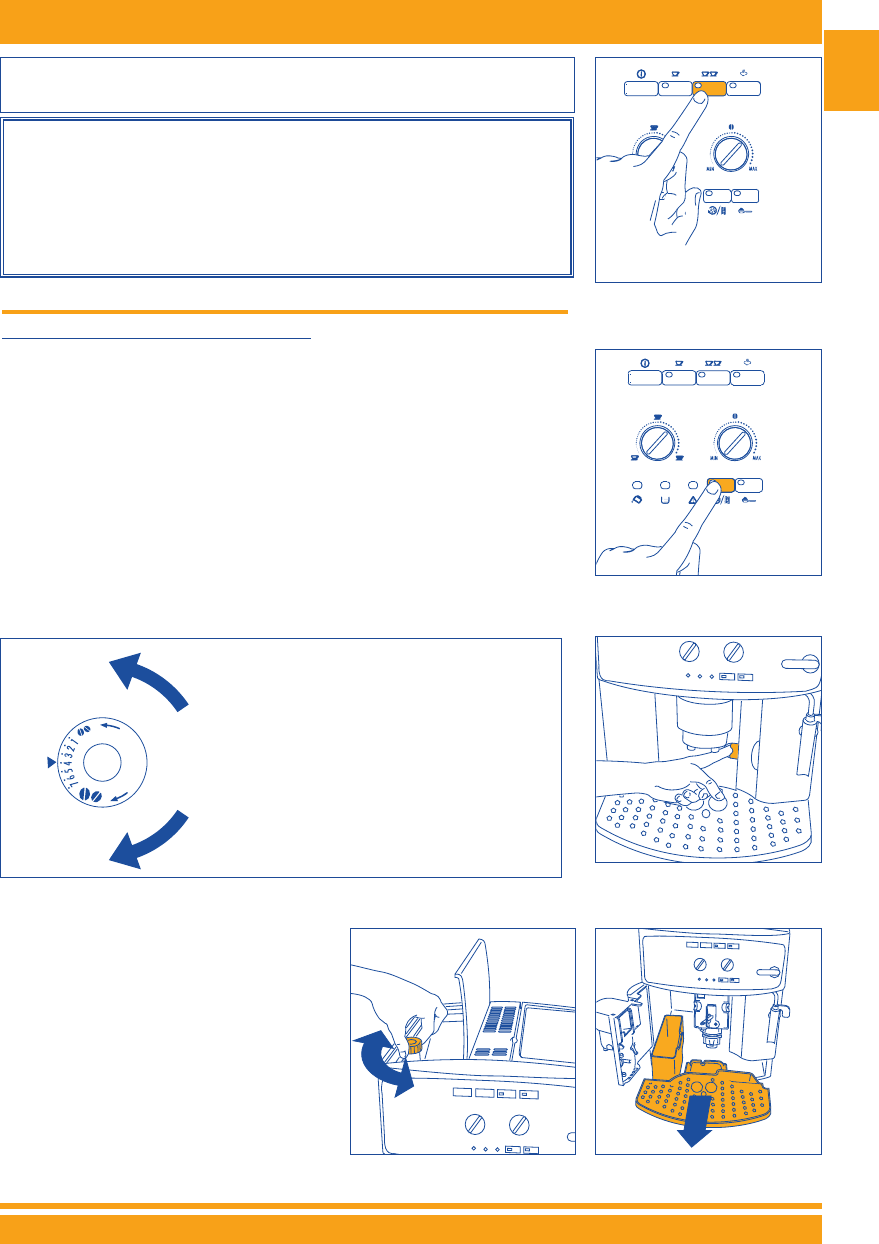
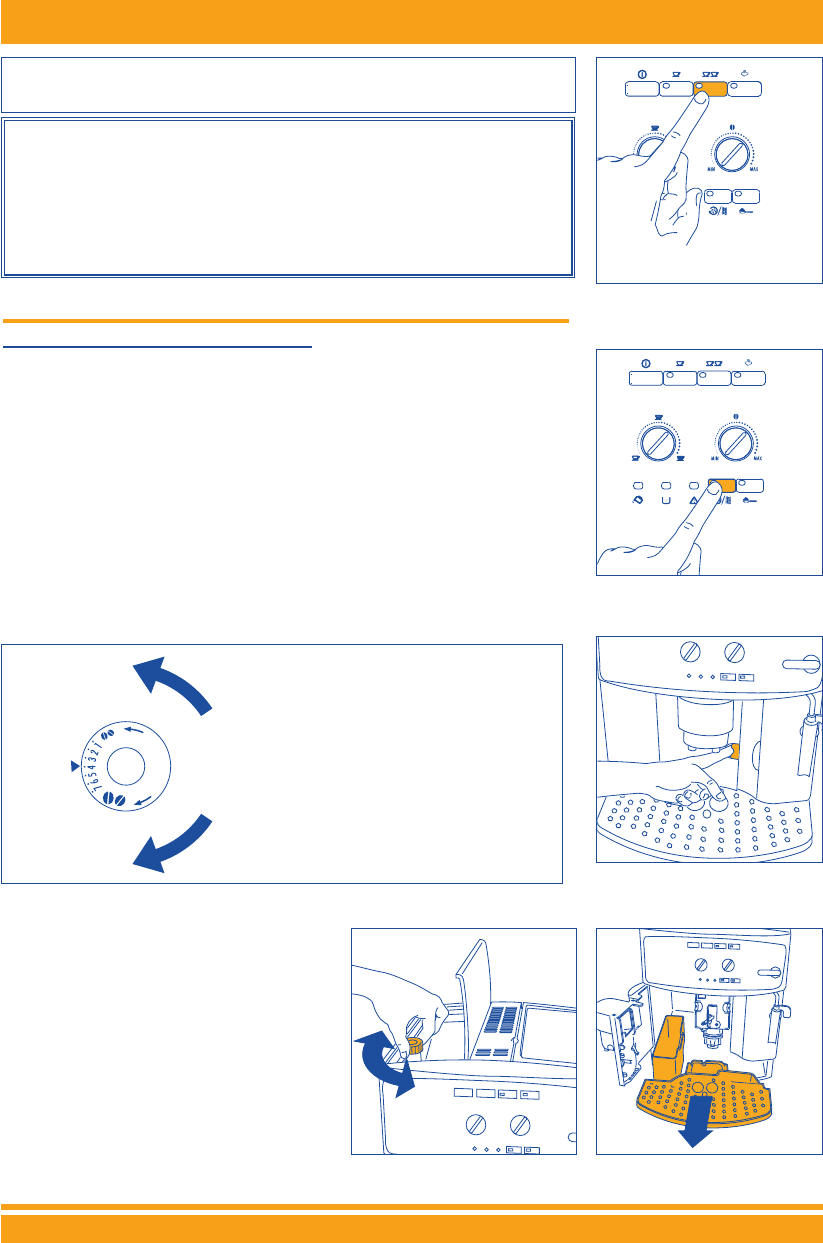
1) Before delivering the coffee, always make sure that the green and
lights are on steady, that the water tank and the coffee bean
container are full.
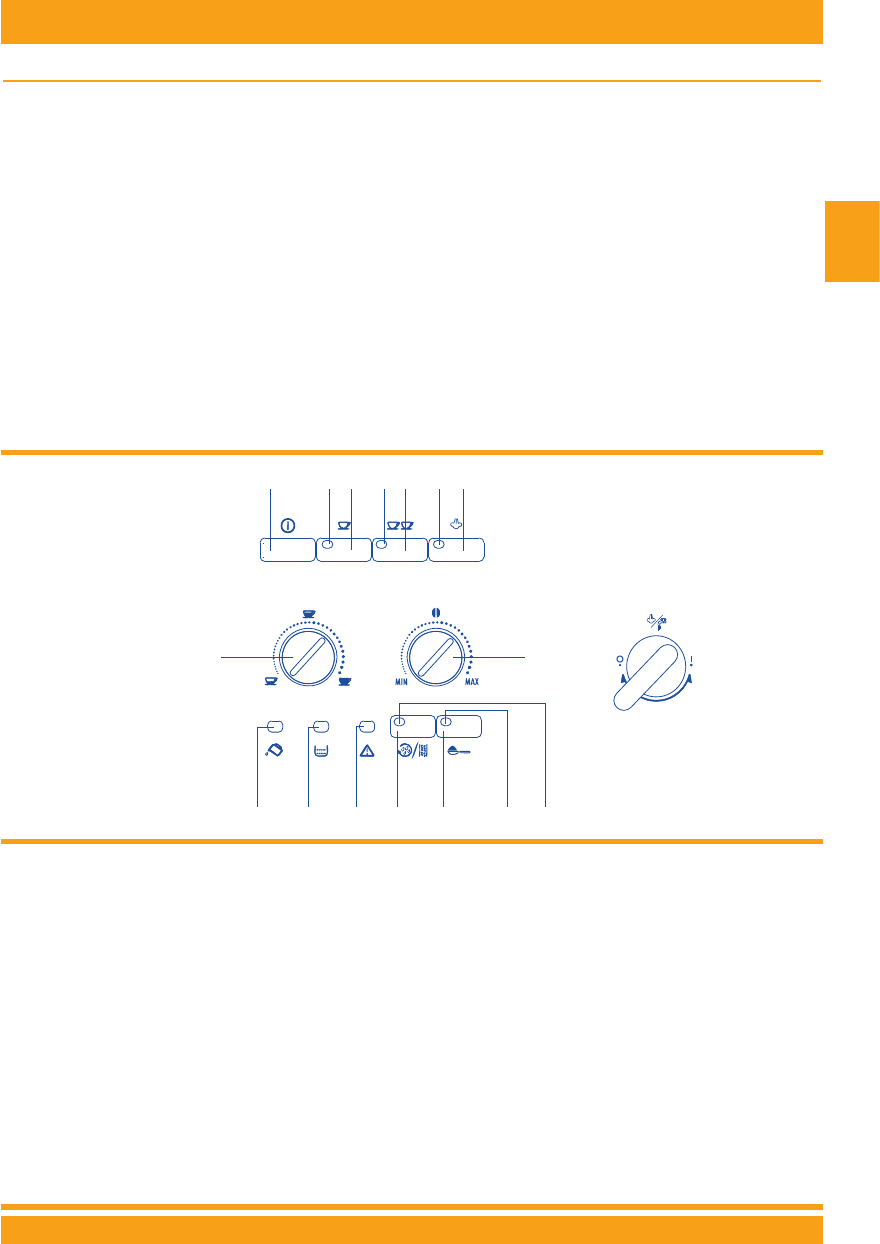
2) Adjust the right-hand knob (Fig. 7) to set the desired taste of the coffee.
Turning the knob clockwise increases the quantity of coffee beans that
the machine will grind, and thus makes the taste of the coffee stronger.
When using the machine for the first time, the correct position of the
knob can be found by trial and error. Make sure not to turn it too far
clockwise, otherwise the coffee will be delivered too slowly (in drops),
above all when preparing two cups of coffee.
3) Adjust the left-hand knob (Fig. 8) to set the quantity of coffee requi-
red. Turning the knob clockwise makes a longer coffee. When using
the machine for the first time, the correct position of the knob can be
found by trial and error.
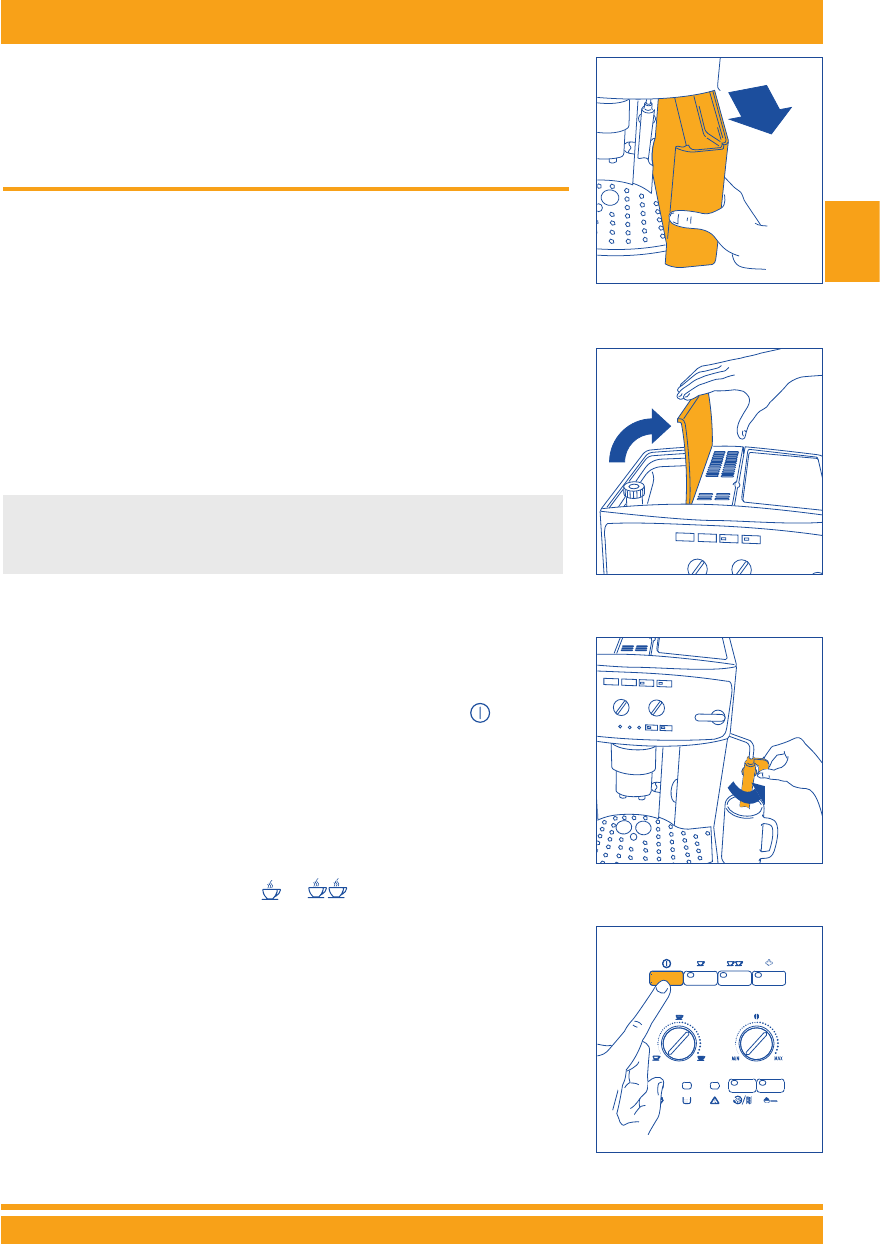
4) Place one cup under the spouts to make 1 coffee (Fig. 9) or 2 cups
for 2 coffees (Fig. 10). For a creamy coffee, lower the spouts to bring
them as close to the cups as possible (Fig. 11).
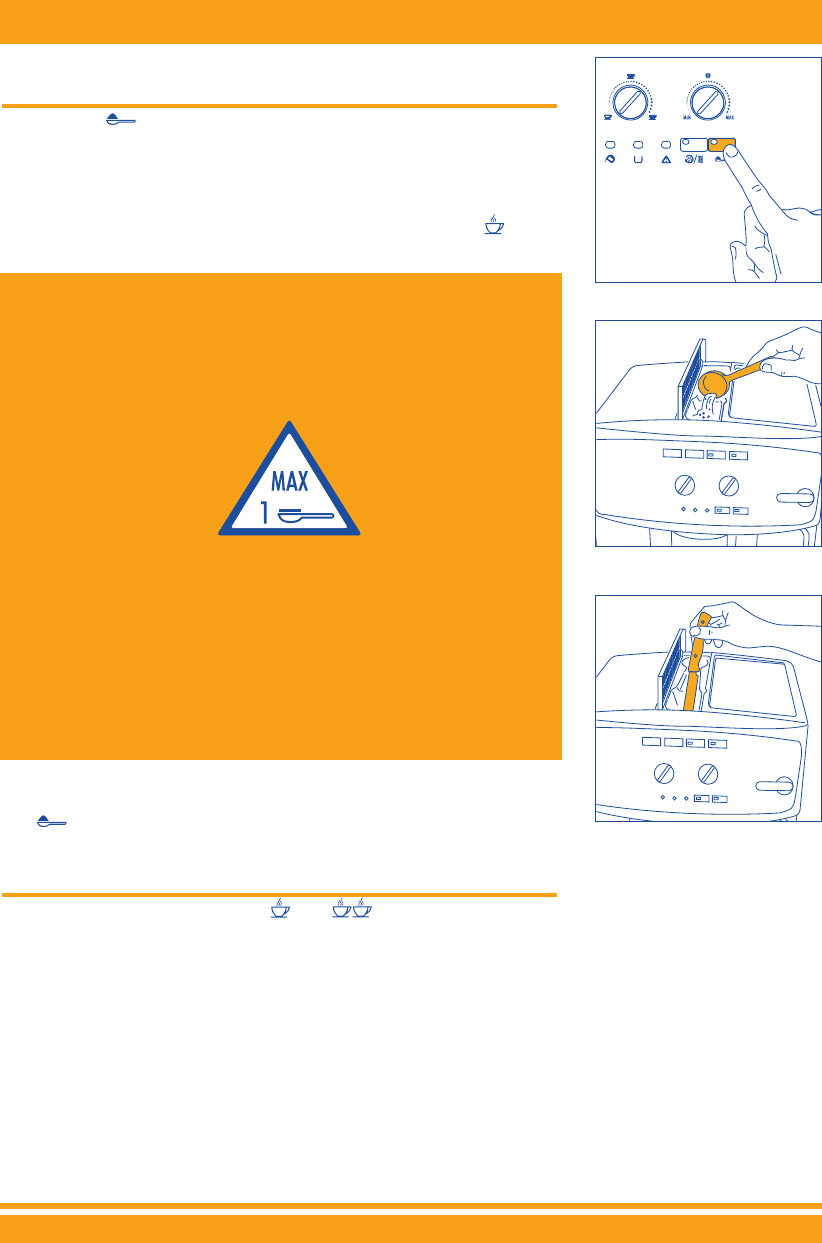
5) Press the button (Fig. 12) to make one cup of coffee or the
button (Fig. 13) to make 2 coffees.
At this point the machine grinds
the beans, runs a short pre-infusion cycle, a pause and then comple-
tes the delivery.
Once the desired quantity has been reached, the machine automati-
cally stops delivering the coffee and discharges the grounds into the
special container.
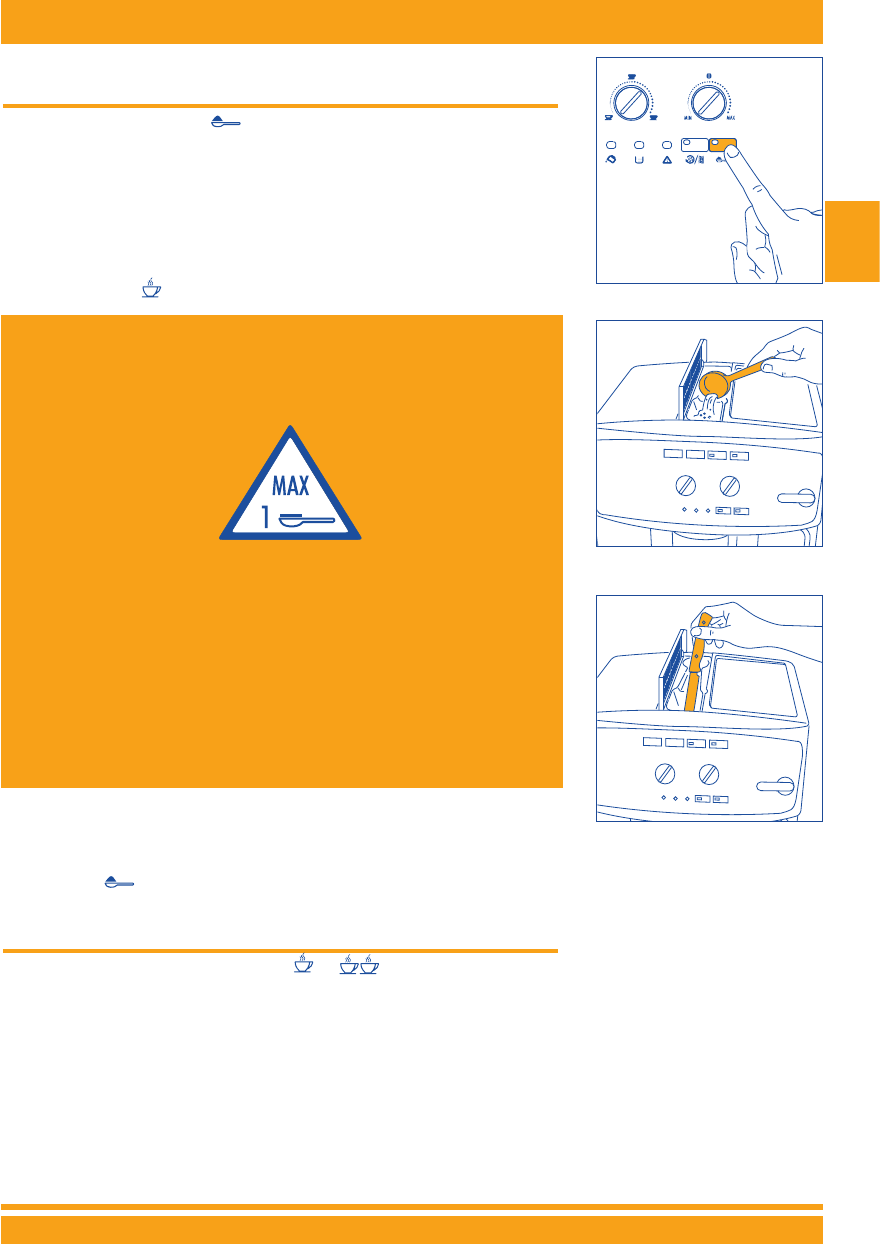
6) After a few seconds, when both the green and indicator lights
are on again, another coffee can be made.
7) To switch the machine off, press the button.
(Before switching off, the
machine automatically runs a rinse cycle: a little hot water will come out of
the spouts and will be collected in the drip tray underneath - be careful, to
avoid being scalded ). If the machine is not switched off using the but-
ton, it will switch itself off and run a brief rinse cycle 3 hours after the last
operation
Fig.5
Fig.6
Fig.7
Fig.8
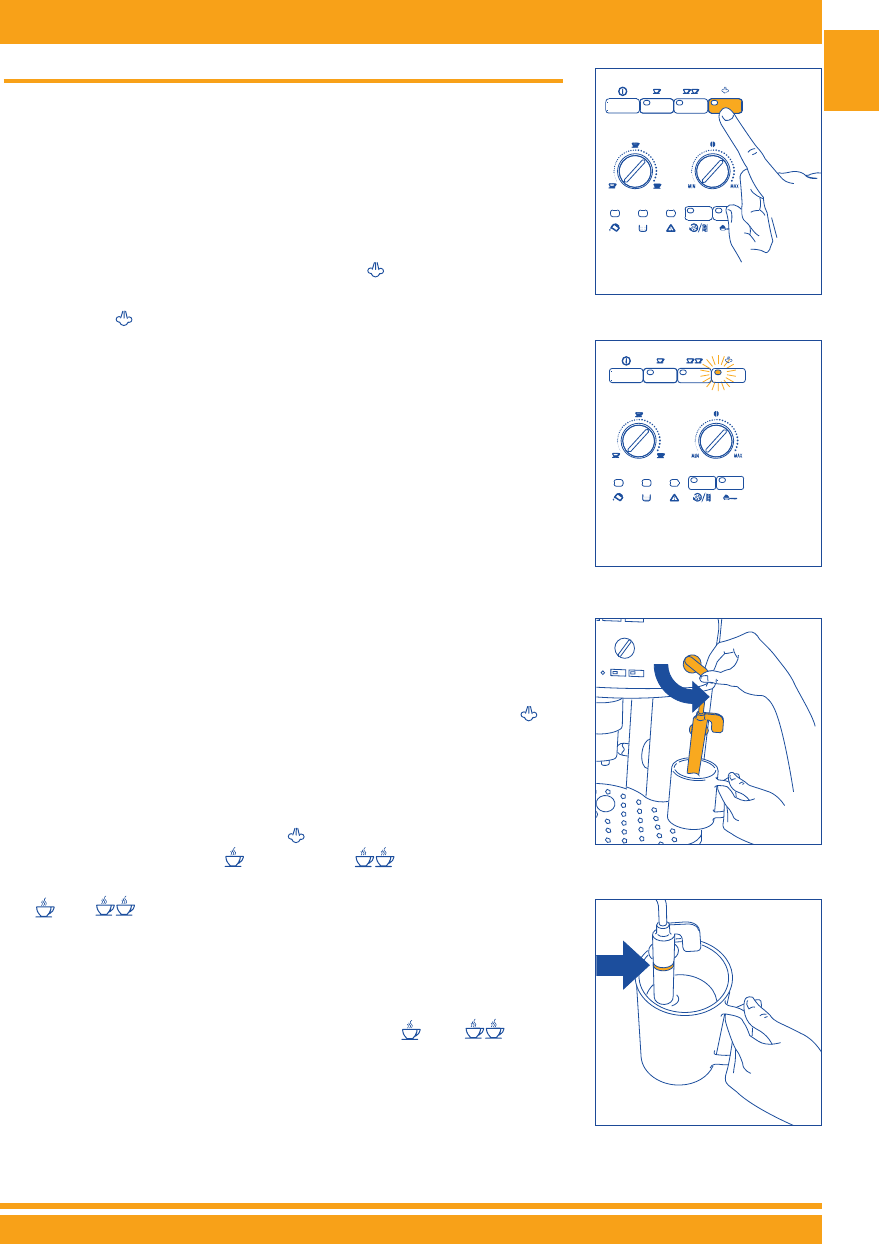
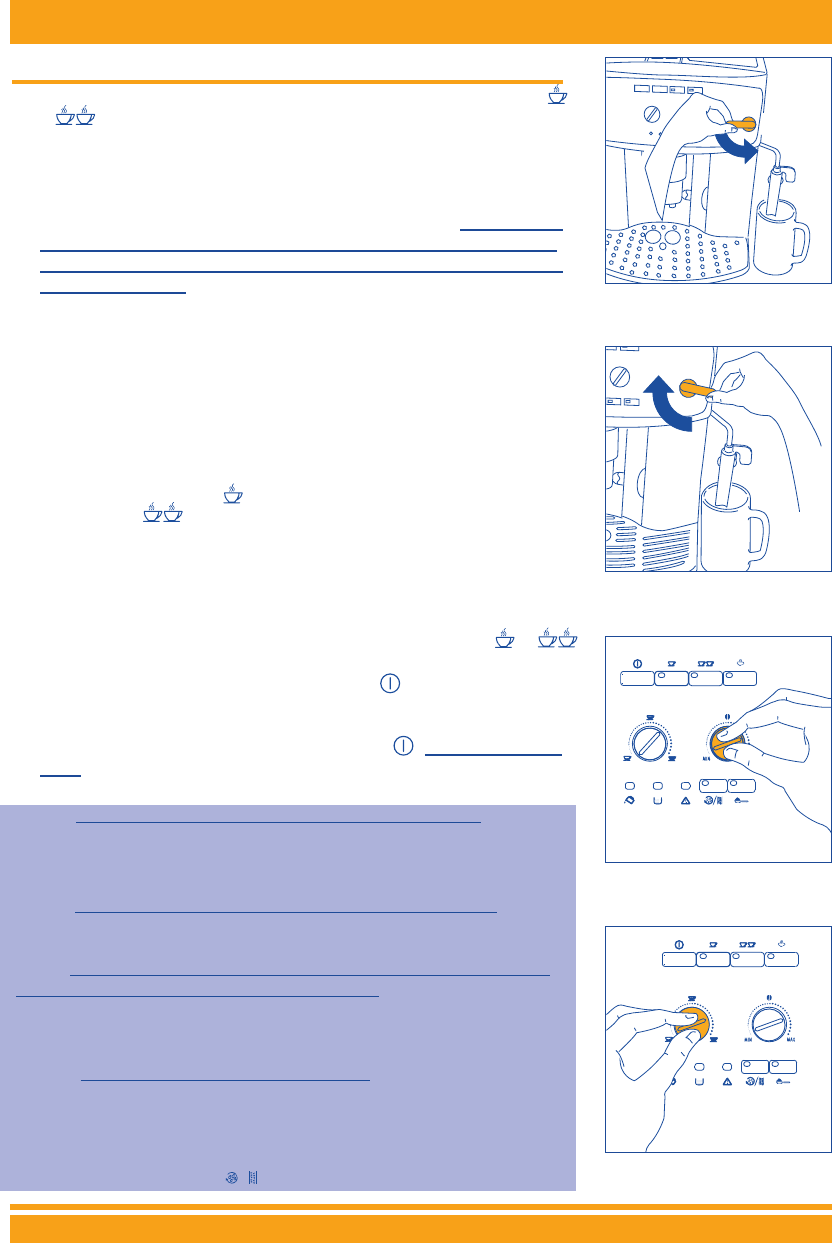
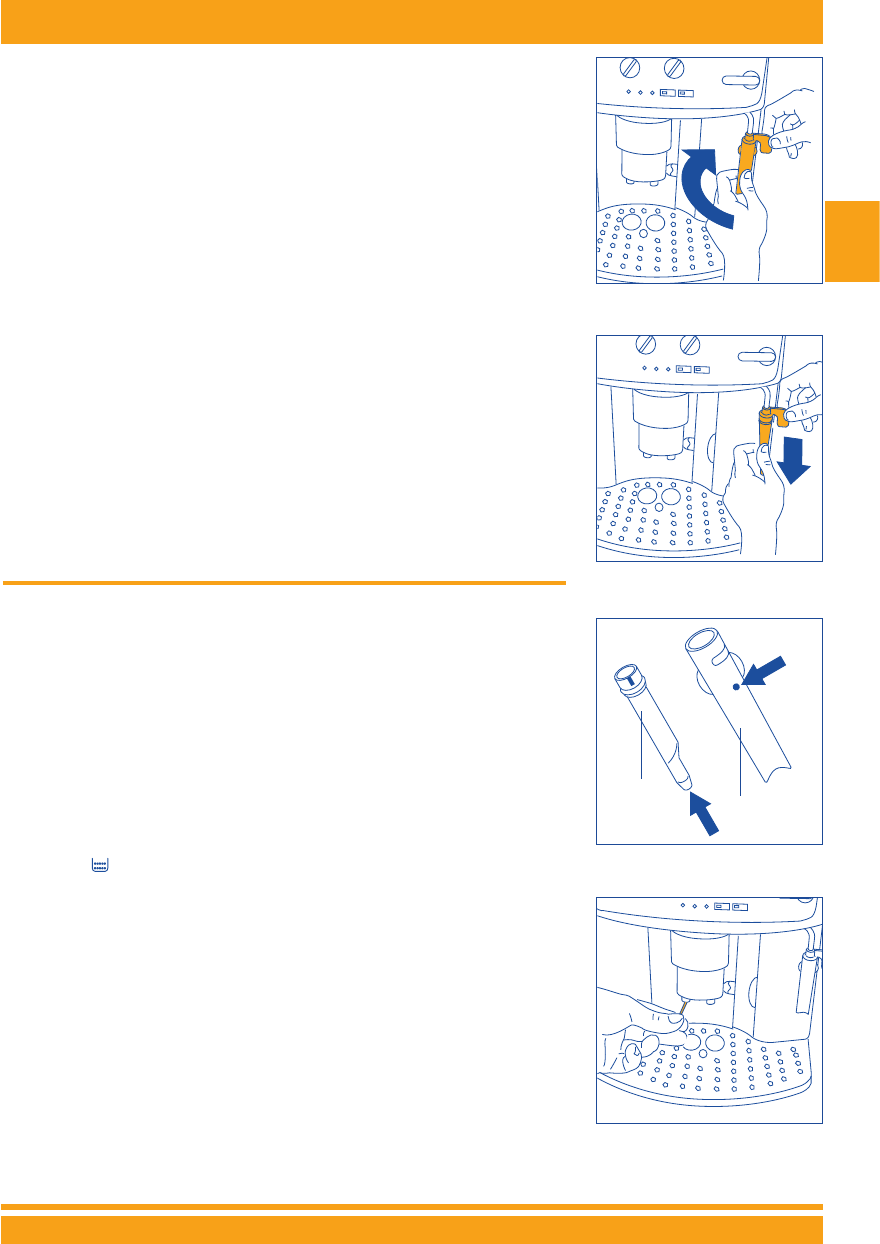
NOTE 1: : If the coffee is delivered a drop at a time or not at all, turn the
grinding coarseness regulator (fig. 17) one click clockwise (see para. 6). Turn a
click at a time until the coffee is delivered satisfactorily.
NOTE 2:
If the coffee is delivered too fast and is not creamy enough, turn the
right-hand knob (fig. 7) clockwise. Proceed by trial and error to find the correct
position of the knob. Make sure not to turn the knob too far clockwise, otherwise
the delivery may become too slow (in drops), above all when making two cups of
coffee. If, after several coffees, the cream is still not satisfactory, also turn the grin-
ding adjustment knob (Fig. 17) one click clockwise (see par. 6).
NOTE 3: Tips on making hotter coffee:
1) ) If, when the machine has just been turned on, a short cup of coffee is required
(less than 60cc), use the hot rinsing water to pre-heat the cups (see the suggestion
in par. 4.3, point 5). 1) If, when the machine has just been turned on, a short cup
of coffee is required (less than 60cc), use the hot rinsing water to pre-heat the cups
(see the suggestion in par. 4.3, point 5). If, on the other hand, more than 2/3
minutes have elapsed since the last coffee was made, before preparing another
coffee the infuser must be pre-heated, pressing the button (Fig. 14).
10
OPERATING INSTRUCTIONS
Fig.9
Fig.10
Then let the water flow out into the drip tray underneath, or alternatively use this
water to fill (and then empty) the cup to be used for the coffee, so as to pre-heat it.
2) Unless preheated, do not use cups that are too thick, as they will absorb too much
heat.
3) Use cups that have been previously heated by rinsing them with hot water or
alternatively by leaving them for at least 20 minutes on the cup warmer tray on top
of the machine with the appliance on.
NOTE 4: while the machine is making the coffee, the delivery can be stopped
at any time by pressing the button (Fig. 12) or button (Fig. 13), as pre-
viously selected.
NOTE 5: as soon as delivery is complete, to increase the quantity of coffee,
simply press and hold the button (Fig. 12) or button (Fig. 13), as pre-
viously selected, until reaching the desired quantity (this operation must be
performed within 3 seconds from the end of the delivery of the coffee from the
spouts).
NOTE 6:
when the alarm comes on (chap. 12, point 1), the water tank must
be filled, otherwise the coffee cannot be made. The water tank can only be
removed if the milk frother is first positioned towards the centre of the machine.
(It is normal for there to be a little water left in the tank when the alarm
comes on).
NOTE 7: : the machine counts the number of cups of coffee made. Each 14 single
cups (or 7 double cups), the light switches on steady
(chap. 12 point 3), war-
ning the user that the grounds container is full and must be emptied and cleaned.
Until the grounds container has been cleaned, the light will remain on and the machi-
ne cannot deliver coffee. To clean the container, open the service door on the front
(pulling the handle, Fig. 15), the light flashes (see para 12 point 9); remove the
drip tray (Fig. 16), empty and clean. Empty and carefully clean the grounds contai-
ner, making sure to remove all the residues that may be deposited on the bottom.
Also dry the any drops of condensate that may have formed inside the machine
under the drip tray. IMPORTANT: when removing the drip tray, the grounds contai-
ner MUST be emptied, even if it is not completely full. If this is not done, when next
making coffee the grounds container may fill over the maximum level and block
the machine with lumps of coffee grounds.
NOTE 8: the grinder in the coffee maker may become worn over time and con-
sequently the coffee will change taste as it is ground more coarsely.
To resolve this problem, re-set the grinding coarseness on the coffee grinder by
adjusting the knob (Fig. 17) one click anticlockwise (as described in chap. 6).
NOTE 9: if the machine is not used for a long period, the infuser must be clea-
ned, as described in par. 10.2.
NOTE 10: while the machine is delivering coffee, never remove the water tank. If it
is removed, the machine will not be able to make the coffee and the "no water"
light will flash. If you try and make another coffee, the machine becomes noisy
and does not make the coffee. To reset the machine, turn the steam knob anti-
clockwise as far as it will go and run off water from the cappuccino maker for a
few seconds.
Fig.11
Fig.12
11
OPERATING INSTRUCTIONS
GB
Fig.13
Fig.14
Fig.15
Fig.16
When an alarm light comes on to signal an anomaly, do not contact the
service centre straight away. The problems can almost always be resolved
by following the instructions indicated in paragraphs 12 and 13. If neces-
sary, contact the customer service by calling the number listed on the sheet
enclosed on page 2.
If your country is not listed on the sheet, call the number indicated on
the warranty.
When using the machine for the first time, 4-5 cups of coffee need to
be made before the machine starts to give satisfying results.
Fig.17
6 ADJUSTING THE COFFEE GRINDER
The coffee grinder must not be adjusted,
at least initially, as it has already
been pre-set in the factory for the correct delivery of the coffee.
Nonetheless, after having made the first coffees, if delivery is too fast or
too slow (in drops), the grinding coarseness must be adjusted using the
knob (Fig.17) located inside the bean container. Turning one click (one
number) clockwise achieves faster delivery of the coffee (without drops).
Turning one click anticlockwise achieves slower delivery and makes the
coffee creamier in appearance.
These adjustments will only be evident after the delivery of at least 2 cups
of coffee.
The grinding coarseness adjustment knob must only be turned when the
coffee grinder is on.
Turn anticlockwise for finer ground coffee
and consequently slower delivery and a
creamier appearance.
Turn clockwise for coarser ground coffee
and consequently faster delivery (not a
drop at a time).
NOTE 1: The machine has been tested in
the factory using coffee and therefore it is
completely normal to find some traces of
coffee in the grinder.
The machine is in any case guaranteed to be
new.
12
OPERATING INSTRUCTIONS
Fig.18
Fig.19
Fig.20
7 PREPARING ESPRESSO COFFEE WITH GROUND COFFEE (INSTEAD OF
BEANS)
1. Press the button to select the ground coffee function (Fig. 18).
The light inside the button switches on to indicate that the function
has been selected and the coffee grinder has been disabled.
2. Lift the lid in the centre, insert the pre-ground coffee measure in the
funnel (see fig. 19) and proceed as described in paragraph 5.
NB: You can make just one coffee at a time by pressing the but-
ton.
NOTE 1: Never add the ground coffee when the machine is off,
to prevent it from spilling inside the machine.
NOTE 2: Never add more than 1 measure, otherwise either the
machine will not make the coffee and the pre-ground coffee will
be lost inside the machine, dirtying it, or the coffee will be run off
in drips.
NOTE 3: When dosing the quantity of coffee to be added, only
use the measure supplied.
NOTE 4: Only use ground coffee for espresso coffee makers: do
not use coffee beans, freeze-dried coffee or other materials that
may damage the machine.
NOTE 5: If you add more than one measure of pre-ground coffee
and the funnel blocks, use a knife to push the coffee down (Fig.
20) and then remove and clean the infuser and the machine, as
described in paragraph 10.2 "Cleaning the infuser".
3. Once the coffee has been delivered, to make coffee using the
beans again, deactivate the ground coffee function by pressing the
button again (the light goes off and the coffee grinder is ena-
bled for operation again).
8 HOT WATER DELIVERY
Always make sure that the green and lights are on steady.
Turn the milk frother towards the outside of the machine (Fig. 3).
Position a container underneath the milk frother (Fig. 3).
Turn the steam knob half a turn in anticlockwise until it stops (Fig. 5):
hot water will come out of the milk frother and start to fill the contai-
ner underneath.
To stop the flow of hot water, turn the knob all the way clockwise (Fig. 6)
and return the milk frother to the original position towards the centre of the
machine. (It is recommended to deliver hot water for no more than 2 minu-
tes).
13
OPERATING INSTRUCTIONS
GB
9 PREPARING CAPPUCCINOS (USING STEAM)
Fill a container with around 100 grams of milk for each cappuccino
being prepared. When choosing the size of the container, remem-
ber that the volume will increase by 2 or 3 times. It is recommen-
ded to use partially skimmed milk at fridge temperature.
Move the milk frother towards the outside (Fig. 3).
Prepare the espresso coffee as described in the previous para-
graph, using sufficiently large cups.
Then press the steam button (Fig. 21). The light (Fig. 22) starts
flashing to indicate that the machine is heating up.
When the light remains on steady and stops flashing, the tempe-
rature of the machine has reached the ideal value for making the
steam (par. 11 - point 6).
Immediately after, within a maximum of two minutes (otherwise
the machine automatically returns to the coffee function), dip the
milk frother into the container of milk (Fig. 23), making sure not to
immerse the line in relief on the milk frother (indicated by the arrow
in Fig. 24) and turn the steam knob half a turn anticlockwise until it
stops (Fig. 5).
(Be careful, to avoid being scalded).
The steam relea-
sed will make the milk froth and increase in volume. To make crea-
mier foam, dip the milk frother into the milk and rotate the container
with slow movements from the bottom to the top (you are recom-
mended to limit steam delivery to no more than two minutes at a
time).
Once having reached the desired temperature, stop the steam by
turning the steam knob clockwise until it stops (Fig. 6) and then
press the steam button (Fig. 21) to deactivate the steam function .
Pour the frothed milk into the cups containing the espresso coffee
prepared previously. The cappuccino is now ready (add sugar to
taste and if desired, sprinkle the foam with a little cocoa powder).
NOTE 1: : immediately after having prepared the cappuccino, once
having pressed the steam button Fig. 21) to deactivate the func-
tion, when pressing the (Fig. 12) or button (Fig. 13) to
make coffee again, the machine is too hot to make coffee (the green
and lights flash to indicate that the temperature is not sui-
table); simply wait around ten minutes for the machine to cool down
a little.
HINT: To cool it down more quickly, after having deactivated the
steam function, open the steam knob and release some water from
the milk frother into a container, until the green and lights
stop flashing.
NOTE 2: The milk frother must always be cleaned after use.
Proceed as follows:
Release a little steam for a few seconds by turning the steam knob
anticlockwise until it stops (Fig. 5).
Fig.21
Fig.22
Fig.23
Fig.24
With this operation, the steam spout discharges any milk that may
be left inside. IMPORTANT: For reasons of hygiene, this operation
should always be performed, so as to prevent the milk from remai-
ning in the circuits inside the milk frother.
Turn the knob clockwise as far as it will go. With one hand, hold the
cappuccino tube firm and with the other unscrew the cappuccino
maker itself by rotating clockwise and extracting downwards (fig.
25).
Remove the steam nozzle from the delivery spout by pulling it
downwards (Fig. 26).
Carefully wash the milk frother and the steam nozzle in warm water.
Check that the two holes indicated by the arrows in Fig. 27 are not
clogged. If necessary, clean them using a needle or pin.
Replace the steam nozzle by inserting it and vigorously turning it
upwards into the steam spout.
Replace the milk frother by pushing it upwards and turning it anti-
clockwise.
10 CLEANING AND MAINTENANCE
Before performing any cleaning operations, the machine must have
cooled down and must be disconnected from the mains power sup-
ply.
Never immerse the machine in the water: it is an electrical applian-
ce.
Do not use solvents or abrasive detergents to clean the coffee maker.
A soft damp cloth will suffice.
All the components of the machine must not be washed in the
dishwasher.
10.1 CLEANING THE COFFEE MAKER
Clean the grounds container (as described in chapter 5, note 7)
whenever the light comes on steady (chap. 12 - point3).
The water tank should be cleaned regularly.
The drip tray is fitted with a level indicator (red) showing the level of
water inside. When the indicator starts to become visible (a few mil-
limetres under the drip tray), the drip tray must be emptied and
cleaned.
Check that the holes in the coffee delivery spout are not blocked. To
clean them, scrape the dry coffee residues with a needle (Fig. 28).
14
OPERATING INSTRUCTIONS
Fig.25
Fig.26
Fig.27
Fig.28
Steam
nozzle
Milk frother
15
OPERATING INSTRUCTIONS
GB
10.2 CLEANING THE INFUSER
The infuser must be cleaned regularly to prevent it from filling with coffee
deposits (that may lead to malfunctions). To clean it, proceed as follows:
turn the machine off by pressing the button (Fig. 4) (do not
unplug it) and wait for all the indicator lights to go off;
open the service door (Fig. 15);
remove the drip tray and the grounds container (Fig. 16) and clean
them;
press the two red release buttons on the infuser sideways and
towards the centre (Fig. 29) and pull it out;
WARNING: THE INFUSER CAN ONLY BE REMOVED WHEN THE MACHINE
IS OFF. ATTEMPTING TO REMOVE THE INFUSER WITH THE MACHINE ON
WILL RISK CAUSING DAMAGE.E.
wash the infuser under running water, without using detergents.
Never wash the infuser in the dishwasher;
carefully clean the inside of the machine. To remove the coffee stuck
to the parts inside the machine, scrape it with a plastic or wooden
fork (Fig. 30) and then pick up all the residues using a vacuum clea-
ner (Fig. 31);
Replace the infuser by sliding it onto the supports and the pin at the
bottom; then push the PUSH symbol fully in until hearing the click.
Fig.29
Fig.30
Fig.31
Support
Pin
Infuser
Push the PUSH
symbol fully in until
hearing the click.
After having heard
the click, check that
the red buttons have
opened back out.
Bottom pipe on the infuser.
The pin must be inserted
into the bottom pipe on the
infuser.
16
OPERATING INSTRUCTIONS
Check that the two red buttons have opened back out, otherwise the door
cannot close.
NOTE 1: If the infuser is not inserted correctly until hearing the
click and the two red buttons have not opened out properly, the
service door will not close and the machine will not operate (when
switching on the machine the light starts flashing (chap. 12 -
point 9)).
NOTE 2: if it is hard to insert the infuser, (before inserting it)
squeeze it into size by pressing it vigorously from above and
below at the same time, as shown in Figure 32
NOTE 3: if it is still hard to insert the infuser, leave it out of the machine,
close the service door, unplug from the mains then plug in again. Wait
for all the lights to go off, then open the door and replace the infuser.
replace the drip tray, complete with the grounds container;
close the service door.
10.3 DESCALING
Due to the continuous heating of the water used to make the coffee, over
time it is normal for the tubing inside the machine to fill with lime scale.
When the light starts flashing( chap. 12-point 5), it is time to descale
the machine.
NOTE: when the light switches on, the coffee maker can still be used to
prepare coffee.
Proceed as follows:
Pour the descaler diluted with water (respecting the proportions indica-
ted on the descaler bottle) into the water tank. Always use descaler
recommended by De’Longhi (contact an authorised service centre).
place a container with a minimum capacity of 1.5 litres under
the milk frother (Fig. 3);
turn the machine on by pressing the button (Fig. 4).
wait for the green and indicator lights to come on steady.
press and hold the button for at least 5 seconds (Fig.14). The
light inside the button switches on (chap. 11 - point 8) to indicate
the start of the descaling program (the and lights remain
off to indicate that it is not possible to make coffee).
turn the steam knob half a turn anticlockwise (Fig.5). The
descaling solution will come out of the milk frother and start to
fill the container underneath.
the descaling program automatically performs a series of deli-
veries and pauses, so as to remove the lime scale deposits from
inside the coffee maker.
after around 30 minutes, when the light comes on (chap.
12 - point 1), turn the steam knob half a turn clockwise (Fig.6)
until it stops.
Fig.32
The two red but-
tons have opened
out CORRECTLY
The two red but-
tons have not
opened out
CORRECT
INCORRECT
17
OPERATING INSTRUCTIONS
GB
The machine must be rinsed so as to eliminate the residues of descaling
solution from inside the machine. Proceed as follows:
remove the water tank, rinse it and fill it with clean water.
reposition the tank.
empty the collection container (located under the milk frother) that is
full of liquid, and then replace it under the milk frother.
turn the steam knob half a turn anticlockwise (Fig. 5). Hot water will
come out of the milk frother and fill the container underneath.
when the tank is empty, the light goes off and the light
comes on (chap. 12 - point 1).
turn the steam knob all the way clockwise (Fig. 6) and fill the water
tank with clean water again.
the program of descaling is hour terminated and the machine is
ready per do again the coffee.
NOTE: if the descaling procedure is stopped before completion, the
alarm (chap. 12 - point 5) is not deactivated and the procedure
must be started again form the beginning.
IMPORTANT: THE GUARANTEE IS NOT VALID IF THE ABOVE DESCALING OPE-
RATION IS NOT PERFORMED REGULARLY.
10.4 SETTING THE WATER HARDNESS
The light (chap. 12 - point 5) switches on after a preset period of opera-
tion, set in the factory, considering the maximum quantity of lime scale that
may be contained in the mains water. If necessary, this period of operation can
be extended, thus making the descaling operation less frequent, by program-
ming the machine based on the actual lime content in the water used. Proceed
as follows:
after having removed the "Total hardness test" strip (enclosed on page 2)
from its packaging, dip it fully in the water for a few seconds, then pull it
out and wait around 30 seconds (until it changes colour and a number of
red dots are formed);
check that the machine is off (all the indicator lights are off);
press the button (Fig. 14) and hold it for at least 5 seconds. The four
lights , , and come on.
press the button (Fig.18) repeatedly until the number of lights that are
on coincides with the number of red squares on the test strip (for exam-
ple, if there are 3 red squares on the test strip, press the button until
3 indicator lights come on together, , and ).
press the button (Fig. 14) to save the data. The coffee maker is now
programmed to provide the descaling warning when effectively neces-
sary, based on the actual hardness of the water..
18
OPERATING INSTRUCTIONS
LIGHT DESCRIPTION MEANING
The , indicator
lights flash
The machine is not ready to make coffee (the ideal
water temperature has not yet been reached).
Wait for the indicator lights to come on steady
before making the coffee.
The , indicator
lights are on steady.
The machine is at the right temperature and
ready to make coffee
The light is on
steady
The machine is delivering one cup of coffee.
The light is on
steady
The machine is delivering two cups of coffee.
The steam light
flashes
The machine is heating to the ideal temperature to
produce steam. Wait for the light to come on
steady before turning the steam knob.
The light is on steady
The machine is ready to deliver steam and the
steam knob can be turned.
The light is on
steady
The machine is ready for delivery using ground
coffee (see chap. 7).
The light is on
steady
The automatic descaling program is in progress
(see par. 10.3)
11 MEANING OF THE NORMAL OPERATION INDICATOR LIGHTS
1
2
3
4
5
6
7
8
19
OPERATING INSTRUCTIONS
GB
12 MEANING OF THE ALARM INDICATOR LIGHTS AND WHAT TO DO WHEN THEY ARE ON
The light
flashes
This indicates the presence of lime
scale in the machine.
The descaling procedure, described in
par. 10.3, needs to be performed as
soon as possible.
The machine makes a
strange noise and the
four lights , ,
and flash
alternately.
After cleaning, the infuser has pro-
bably been left out of the coffee
maker.
Leave the service door closed and the
infuser out of the coffee maker. Press
the 1CUP and 2CUPS buttons together
until the four lights go off. Only when
all four lights are off can the door be
opened and the infuser inserted (to
insert the infuser see par. 10.2)
The machine has just been swit-
ched on and the infuser is not
inserted correctly, consequently the
door is not closed properly.
Press the infuser where marked PUSH
until hearing the click. Check that the two
red buttons open out correctly (par.
10.2).
Close the service door and press the
button.
The and lights
flash alternately
The machine has been switched on
with the steam knob in the open
position.
Turn the steam knob clockwise all the
way round (Fig. 6).
The , and
lights are on and
flashing
The light is on
steady
The water tank is empty or is
positioned incorrectly.
The tank is dirty or lined with lime
scale.
Fill the water tank as described in par.
5, note 6 and insert it fully.
Rinse or descale the tank.
The light flashes
The machine cannot make the
coffee and is noisy.
Turn the steam knob anticlockwise (Fig. 5) as
described in par. 5 note 10.
The light is on
steady
The coffee grounds container is full
or not in place.
The grounds container has not
been replaced after cleaning.
Empty the grounds container and clean it as
described in par. 5 - note 7, then insert it fully.
Open the access door and replace the
grounds container.
The light flashes
The ground coffee has not been
poured into the funnel with the
function selected.
Add the ground coffee as described in
par. 7.
No more coffee beans
Fill the container with beans, as descri-
bed in par. 4.2
LIGHTS
DESCRIPTION
MEANING
ACTION
The service door is open.
If the service door cannot be closed,
check that the infuser is inserted correc-
tly (par. 10.2 - note 1)
The light is flashing
1
2
3
4
5
6
7
8
9
The coffee comes out too slowly.
Turn the grinding adjustment knob
(Fig. 17) one click clockwise (par.
6).
If the coffee grinder is very noisy, it
means that a small stone in the coffee
beans has blocked the coffee grinder.
Contact an authorised Dè Longhi servi-
ce centre.
20
OPERATING INSTRUCTIONS
SOLUTION
Heat the cups by rinsing them in hot water
or leaving them to rest for at least 15 minu-
tes on the cup warmer tray on the lid (see
par. 5 note 3).
Heat the infuser by pressing the button
before making the coffee (Fig. 14, see note 3,
chapter 5).
Turn the right-hand knob (Fig. 7) a little
clockwise (see chap. 5 note 2)
Turn the grinding adjustment knob (Fig. 17)
one click anticlockwise (see chap. 6).
Use another brand of coffee blend.
Turn the grinding adjustment knob (Fig. 17) one
click clockwise (see chap. 6).
Turn the right-hand knob (Fig. 7) a little anti-
clockwise.
Turn the grinding adjustment knob (Fig. 17) one
click anticlockwise (see chap. 6).
Turn the right-hand knob (Fig. 7) a little clockwi-
se.
PROBLEM
The coffee does not come out
of one of the spouts.
The coffee is not creamy enou-
gh
The coffee comes out too
slowly
The coffee comes out too
quickly.
CAUSE
The cups have not been
preheated.
The infuser is too cold
The machine uses too little cof-
fee during the infusion process.
The coffee is ground too coarse
The ground coffee is not correct
The coffee is ground too fine.
The machine uses too much cof-
fee during the infusion process
The coffee is ground too
coarse
The machine uses too little cof-
fee during infusion.
If the machine is not working and an alarm light is on, the causes of the malfunction can be identified and resolved by
referring to chap. 12. If, on the other hand, no alarm light is on, run the following checks before calling the service
centre.
LIGHTS
DESCRIPTION
MEANING
ACTION
The light is on
steady and the green
lights are flashing.
Insert the infuser, see par. 10.2
The inside of the machine is very
dirty.
Thoroughly clean the inside of the
machine, as described in par. 10.2
After cleaning, the infuser has pro-
bably been left out of the coffee
maker
13 PROBLEMS THAT CAN BE RESOLVED BEFORE CALLING THE SERVICE CENTRE
10
The light is
flashing
The ground coffee funnel is clog-
ged.
Empty the funnel with the help of a
knife, as described in par. 7 note 5
(Fig.20).
11
21
OPERATING INSTRUCTIONS
GB
SOLUTION
Scrape the remains of dry coffee
accumulated with a needle (Fig.
28).
Clean the holes in the milk frother and the
steam nozzle (see chap. 9 - Fig.27).
Remove the ground coffee inside
the funnel, using a knife (see chap.
7 – note 5). Then clean the infuser
and the inside of the machine (see
the description in par. 10.2)
Check that the power cable is plug-
ged into the power outlet
Turn the machine off (see par. 10.2).
WARNING: the infuser can only be
removed when the machine is off.
Attempting to remove the infuser with
the machine on will risk causing
damage.
Remove the infuser and thoroughly
clean the inside of the machine, as
described in par. 10.2. Repeat the
operation using a maximum of 1 level
measure of ground coffee
Thoroughly clean the inside of the
machine, as described in par. 10.2.
Repeat the operation by first pres-
sing the button, as indicated in
chapter 7.
Remove the infuser and thoroughly
clean the inside of the machine, as
described in par. 10.2. Repeat the
operation, however switching on
the machine first.
Scrape the holes with a needle (see
par. 10.1, Fig. 28).
Thoroughly clean the mobile
drawer, above all near the hinges,
so that they swing smoothly.
PROBLEM
The coffee does not come
out of one of the spouts.
Turning the steam knob, no
steam comes out of the
milk frother.
Pressing the and
buttons, the machine does
not deliver coffee, but only
water.
Pressing the button, the
machine does not switch
on.
The infuser cannot be
removed for cleaning.
Ground coffee is used
(rather than beans) and the
machine does not deliver
the coffee.
The coffee does not come
out of the spouts, but
rather around the service
door.
CAUSE
The outlet is blocked
The holes in the spouts are clog-
ged.
Ground coffee may be blocked
in the funnel.
The machine is not plugged in.
The machine is on. The infuser
can only be removed if the
machine is off
Too much ground coffee has
been added.
The button has not been
pressed and the machine has
used both the ground coffee
added and the coffee ground
by the grinder.
Ground coffee has been added
when the machine is off.
The holes in the spouts are clog-
ged with dry coffee.
The mobile drawer inside the
service door is blocked and
cannot swing.
22
OPERATING INSTRUCTIONS
This warranty applies to all products with De’Longhi or Kenwood brand names.
Limited Warranty
What does the warranty cover?
We warrant each appliance to be free from defects in material and workmanship. Our obligation under
this warranty is limited to repair at our factory or authorized service center of any defective parts or part
thereof, other than parts damaged in transit. In the event of a products replacement or return, the unit
must be returned transportation prepaid. The repaired or new model will be returned at the company
expense.
This warranty shall apply only if the appliance is used in accordance with the factory directions, which
accompany it, and on an Alternating current ( AC ) circuit.
How long does the coverage last?
This warranty runs for one year ( 1 ) from the purchase date found on your receipt and applies only to
the original purchaser for use.
What is not covered by the warranty?
The warranty does not cover defects or damage of the appliance, which result from repairs or alterations
to the appliance outside our factory or authorized service centers, nor shall it apply to any appliance,
which has been subject to abuse, misuse, negligence or accidents. Also, consequential and incidental
damage resulting from the use of this product or arising out of any breach of contract or breach of this
warranty are not recoverable under this warranty. Some states do not allow the exclusion or limitation
of incidental or consequential damage, so the above limitation may not apply to you.
How do you get service?
If repairs become necessary, see contact information below:
U.S. Residents:
Please contact our toll free hotline at 1-800-322-3848 or log onto our website at www.delonghi.com.
For all accessories, spare parts or replacement parts, please contact our parts division at 1-800-865-
6330.
Residents of Canada: Please contact our toll free hotline at 1-888-335-6644 or log onto our website at
www.delonghi.com.
Residents of Mexico: Please refer to the Limited Warranty statement for Mexico.
Please refer to the back page of the manual for De’Longhi addresses.
The above warranty is in lieu of all other express warranties and representations. All implied warranties
are limited to the applicable warranty period set forth above. This limitation does not apply if you enter
into an extended warranty with De’Longhi. Some states do not allow limitations on how long an implied
warranty lasts, so the above exclusions may not apply to you. De’Longhi does not authorize any other
person or company to assume for it any liability in connection with the sale or use of its appliance.
How does state law apply?
This warranty gives you specific legal rights, and you may also have other rights, which vary from state
to state.
55
MODE D’EMPLOI
F
Mesures de securitè importantes … … … … … … … … … … … … … … … … …56
1 Description de l’appareil … … … … … … … … … … … … … … … … … … …57
2 Consignes de sécurité … … … … … … … … … … … … … … … … … … … …58
3 Installation … … … … … … … … … … … … … … … … … … … … … … …58
4 Préparation de la machine … … … … … … … … … … … … … … … … … …59
4.1 Remplissage du réservoir d’eau … … … … … … … … … … … … … … …59
4.2 Remplissage du réservoir de grains de café … … … … … … … … … … …59
4.3 Première mise en service … … … … … … … … … … … … … … … … …59
5 Préparation du café (avec du café en grains) … … … … … … … … … … … …60
6 Réglage du moulin à café … … … … … … … … … … … … … … … … … …62
7 Préparation du café expresso avec du café prémoulu (à la place des grains) … …63
8 Sortie d’eau chaude … … … … … … … … … … … … … … … … … … … …63
9 Préparation du cappuccino (avec la vapeur) … … … … … … … … … … … …64
10 Nettoyage et entretien … … … … … … … … … … … … … … … … … … …65
10.1 Nettoyage de la machine … … … … … … … … … … … … … … … … …65
10.2 Nettoyage de l'infuseur … … … … … … … … … … … … … … … … …66
10.3 Détartrage … … … … … … … … … … … … … … … … … … … … …67
10.4 Programmation de la dureté de l’eau … … … … … … … … … … … … …68
11 Explication des voyants de fonctionnement normal … … … … … … … … … …69
12 Explication des voyants d’alarme et que faire quand ils sont allumés ? … … … …70
13 Problèmes solubles avant d’appeler l’assistance technique … … … … … … … …71
Garantie Limitée … … … … … … … … … … … … … … … … … … … … … … …73
56
MODE D’EMPLOI
CORDON SPECIAL
(soulement pour etats unis)
L’appareil est muni d’un cordon d’alimentation court (ou bien un cordon d’alimentation détachable)
pour réduire les risques d’enchevêtrement et la possibilité de trébucher sur un cordon plus long.
Des cordons d’alimentation détachables plus longs ou des fils de rallonge sont également disponibles; il
faut cependant les utiliser avec précaution.
Si l’on utilise un cordon long détachable ou une rallonge, les spécifications électriques du cordon ou de
la rallonge doivent être au moins de la même valeur que celles de l’appareil. Si l’appareil est équipé
d’une mise à terre, la rallonge doit être de même un cordon a trois fils avec terre, et le cordon long doit
être rangé de telle façon qu’il ne soit pas étalé sur le comptoir ou sur la table, où il pourrait être tiré par
les enfants, ou sur lequel on pourrait trébucher.
Votre produit est muni d’une fiche polarisée de courant alternatif (à savoir une fiche ayant une dent plus
large que l’autre). Cette fiche ne peut être enfoncée dans la prise que dans une seule position. Il s’agit
d’une mesure de sécurité. Si vous ne pouvez pas enfoncer complètement la fiche dans la prise essayez
de la tourner. Si malgré tout vous ne pouvez pas encore la brancher, demandez à un électricien de rem-
placer la prise obsolète. Ne pas annuler la sécurité de la fiche polarisée.
MESURES DE SECURITE IMPORTANTES
Lors de l’utilisation d’un appareil électroménager, il faut toujours prendre certaines précautions de base:
Lire toutes les instructions.
Ne pas toucher les surfaces chaudes; se servir des poignées ou des boutons.
Afin d’éviter les incendies, les chocs électriques et les blessures aux personnes, ne pas immer-
ger le cordon, la fiche ou l’appareil dans l’eau ou tout autre liquide.
Ne pas laisser utiliser l’appareil par des enfants ou par des personnes en état d’incapacité sans
surveillance.
Débrancher l’appareil lorsqu’il n’est pas utilisé et avant de le nettoyer. Le laisser refroidir avant
d’installer ou d’enlever des pièces ou avant de le nettoyer.
Il est déconseillé d’utiliser l’appareil si le cordon ou la fiche sont endommagés, défectueux ou
s’ils ont subi des dommages. Il est en effet préférable de renvoyer l’appareil à un centre de
service après-vente autorisé.
L’utilisation d’accessoires non recommandés par le fabricant peut causer des incendies, des
chocs électriques et des blessures.
Ne pas utiliser l’appareil à l’extérieur.
Ne pas laisser le cordon pendre d’une table ou d’un comptoir ou entrer en contact avec une
surface chaude.
Ne pas placer l’appareil sur ou près d’une cuisinière à gaz ou électrique ou dans un four chaud.
Brancher la fiche du cordon à la prise. Pour débrancher l’appareil, eteindre l’appareil, puis enlever
la fiche de la prise.
Il ne faut utiliser l’appareil que pour les fonctions qui lui sont attribuées. Cet appareil ne doit être
utilisé que pour un usage domestique. Toute autre utilisation est réputée impropre et, par consé-
quent, dangereuse.
AVERTISSEMENT : POUR RÉDUIRE LES RISQUES D’INCENDIE OU D’ÉLECTROCUTION, NE RETIREZ PAS
LE COUVERCLE INFÉRIEUR. IL NE CONTIENT AUCUNE PIÈCE RÉPARABLE PAR L’UTILISATEUR. LES
RÉPARATIONS DEVRAIENT ÊTRE EFFECTUÉES UNIQUEMENT PAR UN PERSONNEL AGRÉÉ.
CONSERVEZ CES INSTRUCTIONS
USAGE DOMESTIQUE SEULEMENT
57
MODE D’EMPLOI
F
1. DESCRIPTION DE L’APPAREIL (VOIR PAGE 3)
A. Appui chauffe-tasses
B. Manette vapeur
C. Tube vapeur
D. Buse à cappuccino
E. Réservoir d’eau (amovible)
F. Plateau appui tasses
G. Égouttoir (amovible)
H. Volet de service
I. Sortie café (réglable en hauteur)
J. Commandes
K. Couvercle du réservoir de grains
L. Couvercle central du café moulu
M. Infuseur
N. Cordon d’alimentation électrique
O. Buse à cappuccino (amovible)
P. Gicleur buse (amovible)
Q. Doseur pour café prémoulu
R. Tiroir à marc (amovible)
S. Bouton de réglage du degré de mouture
T. Réservoir de grains de café
U. Range-doseur
V. Entonnoir pour verser le café prémoulu
Z. Tiroir mobile
Commandes
1) Touche marche/ arrêt
2) Voyant 1 tasse et OK température café
3) Touche une tasse
4) Voyant 2 tasses et OK température café
5) Voyant deux tasses
6) Voyant vapeur et OK température vapeur
7) Voyant sélection fonction vapeur
8) Bouton sélecteur quantité café (serré, normal
ou allongé)
1
16 15 14 13
12
2
34567
8
9
10
11
9) Bouton sélecteur quantité mouture (pour un
café léger, normal ou fort)
10)Touche rinçage et détartrage
11)Touche sélection café prémoulu (moulin à café
coupé)
12)Voyant café prémoulu (moulin à café coupé)
13)Voyant alarme calcaire
14)Voyant alarme générique
15)Voyant tiroir à marc plein ou tiroir à marc
manquant
16)Voyant manque d’eau ou réservoir d’eau
manquant
58
MODE D’EMPLOI
2 CONSIGNES DE SÉCURITÉ
LISEZ ATTENTIVEMENT CE MODE D’EMPLOI ET
CONSERVEZ-LE !
Cette machine est fabriquée pour 'faire du
café expresso' et pour 'réchauffer des bois-
sons'. Attention aux brûlures provoquées par
les jets d’eau chaude ou de vapeur ou par un
usage impropre de l’appareil.
Cet appareil est destiné à un usage exclusive-
ment domestique. Tout autre usage est jugé
impropre et, par conséquent, dangereux.
Le fabricant ne peut être tenu pour responsa-
ble d’éventuels dégâts découlant d’usages
impropres, erronés et irraisonnés.
Évitez de toucher les surfaces chaudes de l’ap-
pareil. Utilisez les boutons ou les poignées.
Ne touchez jamais l’appareil les mains ou les
pieds mouillés ou humides.
Ne laissez pas les enfants ni les personnes
incapables utiliser l’appareil sans surveillance.
Ne laissez pas les enfants jouer avec l'appa-
reil.
Si l’appareil tombe en panne ou s’il fonction-
ne mal, débranchez-le et n’y touchez plus.
Pour toute réparation, adressez-vous exclusi-
vement à un Centre de service agréé par le
Fabricant et exigez des pièces détachées d’o-
rigine. L’inobservation de ces règles risque de
compromettre la sécurité de l’appareil.
3 INSTALLATION
Après avoir déballé l’appareil, assurez-vous
qu’il est intact. Si vous avez des doutes, ne l’u-
tilisez pas et adressez-vous à un spécialiste.
Les emballages de cet appareil (sacs en plasti-
que, polystyrène expansé, etc.) sont des sour-
ces potentielles de danger. Ne les laissez pas
à la portée des enfants !
Placez l'appareil sur un plan de travail éloi-
gné des robinets d'eau et des éviers et loin
des sources de chaleur.
Après avoir positionné l'appareil sur le plan
de travail, laissez un espace d’environ 5 cm
de chaque côté et derrière et au moins 20 cm
au-dessus de la machine.
N’installez jamais la machine dans une pièce
où la température peut être égale ou inférieu-
re à 0°C (si l’eau gèle, l’appareil peut se dété-
riorer).
Vérifiez si la tension du secteur correspond à
celle indiquée sur la plaque signalétique de
l’appareil. Branchez l’appareil exclusivement
sur une prise de courant présentant une inten-
sité minimale de 10 A et munie d’une terre
efficace. Le fabricant ne pourra être tenu pour
responsable d’éventuels accidents provoqués
par le manque de mise à la terre.
S’il y a incompatibilité entre la prise de cou-
rant et la fiche de l'appareil, appelez un élec-
tricien pour qu’il remplace la prise.
Le cordon d'alimentation de cet appareil ne
doit jamais être remplacé par l'utilisateur car
cette opération exige des outils spéciaux. Si le
cordon est abîmé ou doit être remplacé,
adressez-vous exclusivement à un Centre de
Service agréé par le fabricant afin d'éviter
tout risque.
Nous conseillons de mesurer au plus vite la
dureté de l’eau, en suivant la procédure illu-
strée au paragraphe 10.4
59
MODE D’EMPLOI
F
Pour apprendre à utiliser correctement la machine, il est nécessaire, la
première fois, de suivre pas à pas les instructions fournies aux para-
graphes suivants.
4 PRÉPARATION DE LA MACHINE
4.1 REMPLISSAGE DU RÉSERVOIR D’EAU
Sortez le réservoir d’eau (fig. 1), rincez-le et remplissez-le d’eau fraî-
che sans dépasser la ligne MAX. Quand vous sortez le réservoir, la
buse à cappuccino doit toujours être positionnée vers le centre de la
machine, autrement elle empêcherait l’extraction.
Remettez le réservoir à sa place en le poussant jusqu’au bout.
4.2 REMPLISSAGE DU RÉSERVOIR DE GRAINS DE CAFÉ
Ouvrez le couvercle du réservoir de café en grains (fig.2)
Remplissez-le de grains de café.
Refermez le couvercle
ATTENTION : pour prévenir les mauvais fonctionnements, évitez
d’introduire du café prémoulu ou lyophilisé, des grains caramélisés
et tout objet pouvant détériorer la machine.
4.3 PREMIÈRE MISE EN SERVICE
1. Vérifiez si le réservoir d’eau est rempli et si la fiche du cordon est bran-
chée sur la prise de courant.
2. Tournez la buse à cappuccino vers l’extérieur, posez une tasse dessous (fig.
3) et mettez la machine en marche en appuyant sur la touche (fig.4).
3. TOUT DE SUITE APRÈS, DANS LES 30 SECONDES, tournez complètement la
manette vapeur en sens inverse des aiguilles d’une montre (fig.5) (il est nor-
mal que la machine fasse du bruit).
4. Au bout de quelques secondes, de l’eau sortira de la buse à cappuccino.
Dès que la tasse contient environ 30 cc, tournez la commande vapeur
d’un demi-tour dans le sens des aiguilles d’une montre (fig.6) pour arrêter
la sortie d’eau.
5. Attendez que les voyants verts et cessent de clignoter et restent
allumés fixes. (Quand les voyants verts clignotent, ils indiquent que la
machine est en préchauffage ; quand ils sont allumés fixes, ils indiquent
que la machine a atteint la température idéale pour faire le café - § 11 -
points 1 et 2).
Quelques instants avant que les voyants cessent de clignoter, la machine
exécute automatiquement un rinçage : un peu d’eau chaude sortira des
buses de sortie et coulera dans l’égouttoir
Conseil si vous demandez un café serré (moins de 60 cc) : pour qu’il soit plus
chaud, versez d‘abord l’eau chaude de rinçage, laissez-la quelques secondes
dans la tasse afin de préchauffer celle-ci, et videz-la.
6. La machine est prête.
Fig.1
Fig.2
Fig.3
Fig.4
60
MODE D’EMPLOI
5 PRÉPARATION DU CAFÉ (AVEC DU CAFÉ EN GRAINS)
1) Avant de faire couler le café, contrôlez toujours si les voyants verts
et sont allumés fixes et si le réservoir de grains de café est plein.
2) Réglez le bouton de droite (fig. 7) pour programmer le goût désiré du
café. Plus vous tournez dans le sens des aiguilles d’une montre et plus la
quantité de grains à moudre augmentera et donnera un café plus fort.
Lors de la première utilisation, il faut procéder par tentatives et faire
plusieurs cafés pour trouver la bonne position du bouton. Attention à ne
pas trop tourner dans le sens des aiguilles d’une montre, le café risque-
rait de couler trop lentement (goutte à goutte) surtout si vous devez faire
deux tasses de café.
3) Réglez le bouton de gauche (fig. 8) pour programmer la quantité de
café désirée. Plus vous tournez dans le sens des aiguilles d’une mon-
tre et plus le café obtenu sera allongé. Lors de la première utilisation,
il faut procéder par tentatives et faire plusieurs cafés pour trouver la
bonne position du bouton.
4) Mettez sous les buses de sortie une tasse si vous désirez 1 café (fig.
9) ou 2 tasses pour 2 cafés (fig. 10). Pour obtenir une meilleure
crème, approchez la buse sortie café le plus possible des tasses en la
baissant (fig. 11).
5) Appuyez sur la touche (fig. 12) si vous désirez faire un café ou
sur la touche (fig. 13) si vous désirez faire 2 cafés.
La machine
va maintenant moudre les grains et exécuter une brève pré-infusion
avant de compléter la sortie de café dans la tasse.
Dès que la quantité de café programmée est obtenue, la machine
arrête automatiquement la sortie de café et éjecte la pastille usée
dans le tiroir à marc).
6) Au bout de quelques secondes, dès que les deux voyants verts et
sont de nouveau allumés fixes, vous pouvez faire un autre café.
7) Pour arrêter la machine, appuyez sur la touche .
Avant de s’arrêter, la
machine exécute automatiquement un rinçage : un peu d’eau chaude sor-
tira des buses et coulera dans l’égouttoir. • Attention à ne pas vous brûler!
Si vous n’arrêtez pas la machine avec la touche , elle s’éteindra toute
seule 3 heures après le dernier usage et après avoir exécuté un bref rinça-
ge.
Fig.5
Fig.6
Fig.7
Fig.8
NOTA 1: Si le café coule goutte à goutte ou s’il ne sort pas du tout, , tournez
le bouton de réglage de la mouture (fig. 17) d’un cran dans le sens des aiguil-
les d’une montre (voir § 6). Tournez d’un cran à la fois jusqu’à obtention d’un
débit satisfaisant
NOTA 2: si le café coule trop vite et que la crème n’est pas satisfaisante,
tournez
légèrement le bouton de droite (fig.7) dans le sens des aiguilles d’une montre.
Procédez par tentatives et faites plusieurs cafés pour trouver la bonne position du
bouton. Attention à ne pas trop tourner dans le sens des aiguilles d’une montre, le
café risquerait de couler trop lentement (goutte à goutte) surtout si vous devez faire
deux tasses de café. Si, au bout de quelques cafés la crème obtenue n’est pas sati-
sfaisante, tournez également le bouton de réglage de la mouture (fig.17) d’un
cran en sens inverse des aiguilles d’une montre (voir § 6).
NOTA 3: Conseils pour obtenir un café plus chaud :
1) Si, la machine à peine en marche, vous devez faire une tasse de café serré
(moins de 60 cc) utilisez l’eau chaude du rinçage pour préchauffer les tasses (voir
conseil § 4.3 point 5). Si, en revanche, il s’est écoulé plus de 2/3 minutes depuis
le dernier café fait, vous devrez préchauffer l’infuseur avant de faire un autre
café, en appuyant sur la touche (fig. 14). Laissez couler l’eau dans l’égouttoir
61
MODE D’EMPLOI
F
Fig.9
Fig.10
ou utilisez cette eau pour remplir (puis vider) la tasse que vous utiliserez ensuite
pour le café, de manière à la préchauffer.
2) Évitez les tasses épaisses car elles absorbent trop de chaleur, à moins qu’elles ne
soient préchauffées.
3) Utilisez des tasses que vous aurez préchauffées en les rinçant à l’eau chaude ou
en les laissant pendant au moins 20 minutes posées sur le chauffe-tasses du cou-
vercle de la machine en marche.
NOTA 4: pendant que la machine fait le café, vous pouvez interrompre la sor-
tie à tout moment en appuyant sur la touche (fig. 12) ou (fig. 13)
précédemment sélectionnée.
NOTA 5 : dès que le café a fini de couler, si vous souhaitez augmenter la
quantité, il suffit de maintenir la pression sur la touche (fig. 12) ou (fig.
13) précédemment sélectionnée jusqu’à obtenir la quantité désirée (cette opé-
ration doit être exécutée dans les 3 secondes après que le café a fini de sortir).
NOTA 6: si l'alarme s’allume
(chap. 12 - point 1)et reste fixe, il faudra
remplir le réservoir d’eau, autrement la machine ne pourra pas faire de café.
Pour extraire le réservoir d’eau, il faut d’abord que la buse à cappuccino soit
positionnée vers le centre de la machine. (Quand l’alarme s’allume, il reste
toujours un peu d’eau dans le réservoir).
NOTA 7: : la machine compte le nombre de cafés qu’elle fait. Tous les 14 cafés sim-
ples (ou 7 doubles), le voyant s’allume fixe (chap. 12 point 3) pour avertir que le
tiroir est plein de pastilles usées et qu’il faut le vider et le nettoyer. Tant que le tiroir
n’est pas nettoyé, le voyant reste allumé et la machine ne peut pas faire de café. Pour
effectuer le nettoyage, ouvrez le volet de service sur le devant en tirant la poignée
(fig. 15) ; le voyant commencera à clignoter (voir § 12 point 9) ; sortez l’égout-
toir (fig. 16) videz-le et nettoyez-le. Videz et nettoyez soigneusement le tiroir à marc
en éliminant tous les résidus déposés sur le fond. Essuyez également les éventuelles
gouttes de condensation déposées à l’intérieur de la machine sous l’égouttoir.
IMPORTANT: quand vous sortez l’égouttoir, VIDEZ TOUJOURS le tiroir à marc,
même s’il n’est pas plein. Sans cela, il se peut qu’après, en faisant les cafés, le
tiroir se remplisse plus que prévu et que la machine s’engorge de pastilles usées.
NOTA 8: à force d’utiliser la machine, il se peut que les meules s’usent et que le
café sorte trop vite et sans crème parce qu’il est moulu trop gros.
Pour résoudre ce problème, il faut régler le degré de mouture du moulin à café en
tournant le bouton de réglage (fig.17) d’un cran en sens inverse des aiguilles
d’une montre (voir chap. 6)
NOTA 9: si la machine est restée longtemps inutilisée, il faudra nettoyer l’infu-
seur avant usage (voir § 10.2.)
NOTA 10: Vous ne devez jamais extraire le réservoir d’eau pendant que le café
coule. Le cas échéant, la machine ne parviendrait plus à faire de café et le voyant
(manque d’eau) se mettrait à clignoter. À la demande d’un autre café, la machine
deviendrait bruyante et ne le ferait pas. Pour remettre la machine en marche, vous
devez tourner la manette vapeur jusqu’au bout en sens inverse des aiguilles d’une
montre et laisser couler l’eau de la buse à cappuccino pendant quelques secondes.
Fig.11
Fig.12
62
MODE D’EMPLOI
Fig.13
Fig.14
Fig.15
Fig.16
Quand un voyant d’alarme s’allume pour signaler une anomalie, ne
courez pas appeler le service assistance. Le problème est presque
toujours soluble en suivant les instructions fournies aux paragraphes
12 et 13. Si ces instructions ne suffisent pas, nous vous conseillons
d’appeler le numéro indiqué sur l’annexe page 2. Si votre pays ne
figure pas sur la liste, appelez le numéro indiqué dans la garantie.
Lors de la première utilisation, il faudra faire 4 ou 5 cafés avant
d’obtenir de la machine un résultat satisfaisant.
Fig.17
6 RÉGLAGE DU MOULIN À CAFÉ
Le moulin à café ne doit pas être réglé,
du moins au début, puisqu’il est
préréglé en usine pour que le café coule correctement. Cependant, si
après les premiers cafés le café coule trop vite ou trop lentement (goutte à
goutte) vous devez régler le problème en agissant sur le bouton de réglage
du degré de mouture (fig. 17). Pour obtenir une sortie plus rapide du café
(sans gouttes) tournez le bouton d’un cran (égal à un chiffre) dans le sens
des aiguilles d’une montre.
Pour une sortie plus lente qui produira une crème plus belle, tournez d’un
cran en sens inverse.
Pour sentir l’effet de cette correction, il faudra attendre au moins 2 cafés.
Le bouton de réglage doit être tourné seulement pendant que le moulin
à café est en marche.
Pour que le café coule plus lentement et
que la crème soit plus belle, tournez en
sens inverse des aiguilles d’une montre
(café moulu plus fin)
Pour que le café coule plus vite (et non
goutte à goutte), tournez dans le sens des
aiguilles d’une montre (= café moulu plus
gros)
NOTA1: La machine ayant été testée en
usine avec du café, il est normal d’en trouver
des traces dans le moulin.
Nous garantissons en tout cas que cette
machine est neuve.
63
MODE D’EMPLOI
F
Fig.18
Fig.19
Fig.20
7 PRÉPARATION DU CAFÉ EXPRESSO AVEC DU CAFÉ PRÉMOULU (À LA
PLACE DES GRAINS)
1. Appuyez sur la touche pour sélectionner la fonction café pré-
moulu (fig. 18). Le voyant dans le bouton s’allume pour indiquer
que la fonction a été sélectionnée et que le fonctionnement du mou-
lin à café est coupé.
2. Soulevez le couvercle central, versez dans l’entonnoir un doseur de
café prémoulu (fig. 19) et procédez en suivant les indications du
paragraphe 5.
N. B. : Vous ne pouvez faire qu’un seul café à la fois , en appuyant
sur la touche .
NOTA 1: Ne versez jamais de café prémoulu quand la machine
est arrêtée, il se disperserait à l’intérieur.
NOTA 2 : Ne versez jamais plus de 1 doseur autrement la machi-
ne ne fera pas de café, et le café prémoulu se dispersera à l’inté-
rieur de la machine et la salira, ou alors le café coulera goutte à
goutte.
NOTA 3: pour doser la quantité de café, utilisez exclusivement le
doseur fourni avec l’appareil.
NOTA 4: Versez dans l’entonnoir exclusivement du café prémou-
lu pour machines à café expresso : ne versez jamais de café en
grains ni lyophilisé ni rien qui pourrait détériorer la machine.
NOTA 5 : Si vous avez versé plus d’un doseur de café prémoulu
et qu’il bouche l’entonnoir, faites-le descendre à l’aide d’un cou-
teau (fig. 20) puis retirez et nettoyez l’infuseur et la machine en
suivant les indications du paragraphe 10.2 "Nettoyage de l'infu-
seur".
3. Si après avoir fait fonctionner la machine avec du café prémoulu
vous désirez faire du café en utilisant des grains, vous devrez
désactiver la fonction café prémoulu en appuyant de nouveau sur
la touche (le voyant s’éteindra et le moulin à café pourra fonc-
tionner).
8 SORTIE D’EAU CHAUDE
Contrôlez toujours si les voyants verts et sont allumés fixes.
Tournez la buse à cappuccino vers l'extérieur de la machine (fig. 3).
Posez une tasse sous la buse à cappuccino (fig. 3)
Tournez le robinet vapeur d’un demi-tour en sens inverse des aiguilles
d’une montre (fig. 5) : l’eau chaude sortira de la buse à cappuccino
et commencera à remplir la tasse.
Pour arrêter la sortie d’eau chaude, tournez le robinet dans le sens des
aiguilles d’une montre (fig. 6) et ramenez la buse à cappuccino dans sa
position initiale vers le centre de la machine. (Il est conseillé de ne pas faire
couler l’eau chaude pendant plus de 2 minutes.)
64
MODE D’EMPLOI
9 PRÉPARATION DU CAPPUCCINO (AVEC LA VAPEUR)
Versez dans un pichet environ 100 grammes de lait par cappuccino
à préparer. Choisissez le récipient en tenant compte que le lait va
doubler ou tripler de volume. Il est conseillé d’utiliser du lait demi-
écrémé à température réfrigérateur.
Poussez vers l’extérieur la buse à cappuccino (fig. 3)
Préparez le café en suivant les indications des paragraphes précé-
dents et en utilisant des tasses suffisamment grandes.
Appuyez sur la touche vapeur (fig. 21). Le voyant (fig. 22) com-
mence à clignoter pour indiquer que la machine est en préchauffa-
ge.
Quand le voyant reste allumé fixe, la température de la machine
a atteint la température idéale pour produire de la vapeur (§ 11 –
point 6)
Tout de suite après, dans les deux minutes qui suivent (autrement
la machine revient automatiquement à la fonction café) plongez la
buse à cappuccino dans le lait (fig. 23) en veillant à ne pas immer-
ger la ligne en relief sur la buse (indiquée par la flèche fig. 24).
Tournez le robinet vapeur d’un demi-tour en sens inverse des aiguil-
les d’une montre(fig. 5). Attention à ne pas vous brûler ! La vapeur
qui sort de la buse à cappuccino donne au lait un aspect crémeux
et va augmenter son volume. Pour obtenir une mousse plus crémeu-
se, immergez la buse à cappuccino dans le lait et, dans un mouve-
ment rotatoire, montez et descendez lentement le récipient. (Il est
conseillé de ne pas faire sortir de vapeur pendant plus de 2 minutes
à la fois.)
Une fois la température désirée atteinte, arrêtez la sortie de vapeur
en tournant complètement la manette dans le sens des aiguilles
d'une montre (fig. 6) et appuyez sur la touche vapeur (fig. 21)
pour désactiver la fonction vapeur.
Versez la mousse de lait ainsi obtenue dans les tasses contenant le
café préparé auparavant. Le cappuccino est prêt. Sucrez à volonté
et, éventuellement, saupoudrez de cacao.
NOTA 1: si, juste après avoir préparé le cappuccino et désactivé la
fonction vapeur en appuyant sur la touche vapeur (fig. 21), vous
appuyez sur la touche (fig. 12) ou (fig. 13) pour demander
encore du café, la machine aura une température trop élevée pour
faire du café (les voyants verts et clignotent pour indiquer
que la température n’est pas bonne). Il faudra attendre une dizaine
de minutes que la machine refroidisse un peu.
CONSEIL : pour refroidir plus vite, après avoir désactivé la fonction
vapeur, ouvrez la manette vapeur et laissez sortir l’eau de la buse à
cappuccino dans un récipient jusqu’à ce que les voyants verts et
cessent de clignoter.
NOTA 2: Il est important de toujours nettoyer la buse à cappuccino
après usage. Procédez de la façon suivante :
Fig.21
Fig.22
Fig.23
Fig.24
Tournez complètement le robinet vapeur en sens inverse des aiguil-
les d’une montre (fig. 5) et laissez sortir un peu d’eau ou de vapeur
pendant quelques secondes. Cette opération permet de vider le lait
qui serait resté à l’intérieur du tuyau vapeur. IMPORTANT : Par
mesure d’hygiène, il est recommandé de toujours exécuter cette opé-
ration, afin d’éviter que le lait ne stagne dans les circuits intérieurs
de la buse à cappuccino.
Tournez le bouton jusqu’au bout dans le sens des aiguilles d'une
montre, puis tenez d'une main la poignée du tube de la buse à cap-
puccino et, de l'autre, dévissez la buse en la tournant dans le sens
des aiguilles d'une montre, puis retirez-la par le bas (fig. 25).
Retirez le gicleur du tuyau de sortie en le tirant vers le bas (fig. 26)
Lavez soigneusement à l'eau tiède la buse à cappuccino et le
gicleur.
Vérifiez si les deux trous indiqués par les flèches fig. 27 sont bien
dégagés. Si nécessaire, débouchez-les avec une épingle.
Remontez le gicleur vapeur en l’introduisant et en le tournant fran-
chement vers le haut dans le tuyau vapeur.
Remontez la buse à cappuccino en l’introduisant vers le haut et en
la tournant en sens inverse des aiguilles d'une montre.
10 NETTOYAGE ET ENTRETIEN
Avant toute opération de nettoyage, débranchez la machine et lais-
sez-la refroidir.
Ne plongez jamais la machine dans l'eau : c'est un appareil électri-
que!
Pour nettoyer la machine, évitez les solvants et les détergents abra-
sifs. Un chiffon doux et humide suffit.
Ne passez JAMAIS aucun composant de la machine au lave-vaissel-
le.
10.1 NETTOYAGE DE LA MACHINE
Nettoyez le tiroir à marc (voir chapitre 5, note 7) chaque fois que le
voyant s’allume fixe (chap. 12 – point 3).
Il est recommandé de nettoyer fréquemment aussi le réservoir d’eau.
L'égouttoir est doté d'un indicateur (rouge) de niveau d’eau. Quand
l'indicateur commence à se voir (quelques millimètres sous de l’é-
gouttoir) il faut vider le bac et le nettoyer.
Vérifiez de temps en temps si les trous de la buse d’où sort le café
ne sont pas bouchés. Pour les déboucher, raclez avec une épingle le
dépôt de café séché qui s’est accumulé (fig. 28)
65
MODE D’EMPLOI
F
Fig.25
Fig.26
Fig.27
Fig.28
Gicleur
vapeur
Buse à
cappuccino
66
MODE D’EMPLOI
10.2 NETTOYAGE DE L'INFUSEUR
L'infuseur doit être nettoyé périodiquement pour éviter qu’il ne se remplis-
se de dépôts de café (pouvant provoquer des dysfonctionnements). Pour le
nettoyage, procédez de la façon suivante :
arrêtez la machine en appuyant sur la touche (fig. 4) (sans la
débrancher) et attendez que tous les voyants s’éteignent ;
ouvrez le volet de service (fig. 15) ;
retirez l’égouttoir et le tiroir à marc (fig. 16) et lavez-les ;
appuyez de chaque coté et vers le centre sur les deux touches rou-
ges de déblocage de l’infuseur (fig. 29) et tirez vers l’extérieur pour
l’extraire ;
ATTENTION : vous ne pouvez extraire l’infuseur que si la machine est
arrêtée. Si vous essayez de le retirer quand la machine est en marche,
vous risquez de détériorer gravement la machine.
lavez l’infuseur sous le robinet, sans détergent.
Ne le passez jamais
au lave-vaisselle ;
nettoyez soigneusement l’intérieur de la machine. Pour éliminer le
café déposé à l’intérieur, grattez avec une fourchette en bois ou en
plastique (fig. 30) et aspirez tous les résidus (fig. 31) ;
Remontez l'infuseur en l’introduisant sur les parois latérales du support
interne sur l’axe en bas puis appuyez à bloc et fort sur le symbole
PUSH jusqu’au déclic de blocage.
Fig.29
Fig.30
Fig.31
Support
Axe
Infuseur
Appuyez à bloc sur
le ‘PUSH’ jusqu’au
déclic de blocage.
Après avoir entendu
le clic de blocage,
assurez-vous que les
touches rouges sont
ressorties.
Tube inférieur de l’infuseur.
L’axe doit être introduit dans le
tube inférieur de l’infuseur.
67
MODE D’EMPLOI
F
Assurez-vous que les deux touches rouges sont ressorties, autrement, le
volet ne pourra pas se fermer.
NOTA 1: : Si l'infuseur n’est pas inséré correctement jusqu’au
déclic de blocage et si les touches rouges ne sont pas ressorties
correctement, le volet ne se fermera pas et vous ne pourrez pas
faire marcher la machine (si vous la mettez en marche, le voyant
restera allumé et clignotera).(chap. 12 - point 9)
NOTA 2: si l'infuseur est difficile à insérer, il faut (avant de l’insérer)
l’amener à la bonne dimension en appuyez fort sur le bas et sur le
haut en même temps (voir figure 32).
NOTA 3: si l'infuseur est encore difficile à insérer, laissez-le hors de la
machine, refermez le volet de service, débranchez et rebranchez le
cordon d’alimentation sur la prise de courant. Attendez que tous les
voyants s’éteignent, ouvrez le volet et réinsérez l’infuseur.
remettez en place l’égouttoir et le tiroir à marc ;
refermez le volet de service
10.3 DÉTARTRAGE
L’eau utilisée pour faire le café étant continuellement chauffée, il est nor-
mal qu’avec le temps les conduits intérieurs de la machine s’entartrent.
Quand le voyant commence à clignoter (chap. 12- point 5) il signa-
le qu’il est temps d'effectuer un détartrage.
Nota: Quand le voyant est allumé, la machine peut toujours préparer le
café.
Procédez de la façon suivante :
Versez dans le réservoir (que vous aurez vidé) le contenu d’un
flacon de détartrant DURGOL (125ml) et un litre d’eau
posez sous la buse à cappuccino un récipient d’une capacité
minimale de 1,5 l (fig.3) ;
mettez la machine en marche en appuyant sur la touche (fig.
4).
attendez que les voyants verts et restent allumés fixes.
appuyez sur la touche et maintenez la pression pendant au
moins 5 secondes (fig. 14). Le voyant dans la touche s’allume (chap.
11 – point 8) pour indiquer que le programme de détartrage a
démarré. (Les voyants et restent éteints pour indiquer que
vous ne pouvez pas faire de café).
tournez la manette vapeur d’un demi-tour en sens inverse des
aiguilles d’une montre (fig. 5). La solution détartrante va couler
de la buse à cappuccino et remplir le récipient.
pendant que de la solution coule, le programme de détartrage
exécute automatiquement une série de pauses pour éliminer les
dépôts de tartre à l’intérieur de la machine.
Fig.32
Les deux touches
rouges sont res-
sorties CORREC-
TEMENT
Les deux touches
rouges ne sont
pas ressorties
OUI
NON
68
MODE D’EMPLOI
au bout de 30 minutes environ, quand le voyant s’allume (chap.
12 – point 1), tournez la manette d’un demi-tour dans le sens des
aiguilles d’une montre (fig. 6).
Le rinçage est maintenant nécessaire pour chasser de la machine les rési-
dus de solution détartrante. Procédez de la façon suivante :
retirez le réservoir d’eau, rincez-le et remplissez-le d’eau claire.
remettez le réservoir à sa place.
videz le récipient (sous la buse à cappuccino) plein de liquide et
remettez-le sous la buse à cappuccino.
tournez la manette vapeur d’un demi-tour en sens inverse des aiguil-
les d’une montre (fig. 5). De l’eau chaude sort de la buse et va rem-
plir le récipient.
quand le réservoir est vide, le voyant s’éteint et le voyant s’al-
lume (chap. 12 – point 1).
tournez complètement la manette vapeur dans le sens des aiguilles
d’une montre (fig.6) et remplissez d’eau claire le réservoir d’eau.
le programme de détartrage est terminé et la machine peut faire du
café.
Nota : si la procédure de détartrage est interrompue avant la fin, l’a-
larme (chap. 12 – point 5) ne se désactivera pas et il faudra tout
recommencer.
IMPORTANT : SI LE DÉTARTRAGE N'EST PAS EFFECTUÉ RÉGULIÈREMENT, LA
GARANTIE SERA NULLE.
10.4 PROGRAMMATION DE LA DURETÉ DE L’EAU
Le voyant (chap. 12 – point 5) s’allume au bout d’un certain temps de
fonctionnement qui a été programmé en usine en tenant compte de la quantité
maximale de calcaire que peut contenir l’eau du robinet. Il est possible d’allon-
ger cette période de fonctionnement, donc de réduire la fréquence de détar-
trage, en programmant la machine selon le contenu réel de calcaire dans l’eau
utilisée. Procédez de la façon suivante :
après avoir retiré de son emballage la bande réactive "Total hardness
test" (ci-jointe page 2) immergez-la dans l’eau pendant quelques secon-
des. Ensuite, ressortez-la et attendez 30 secondes environ (jusqu’à ce
qu’elle change de couleur et qu’il se forme de petits carrés rouges) ;
assurez-vous que la machine est arrêtée (tous les voyants éteints) ;
appuyez sur la touche (fig. 14) et maintenez la pression pendant
au moins 5 secondes. Les quatre voyants , , et s’allument.
appuyez sur la touche (fig. 18) à plusieurs reprises jusqu’à faire
s’allumer autant de voyants que de carrés rouges qui se sont formés sur
la bande réactive (exemple : si 3 carrés rouges se sont formés sur la
bande réactive, il faudra appuyer trois fois sur la touche pour faire
s’allumer ensemble les 3 voyants , et ).
appuyez sur la touche (fig. 14) pour mémoriser la donnée. La
machine est programmée pour avertir quand il est nécessaire d’effectuer
un détartrage, selon le contenu réel de calcaire dans l’eau.
69
MODE D’EMPLOI
F
VOYANTS DESCRIPTION EXPLICATION
Les voyants ,
clignotent
La machine n’est pas prête (l’eau n’a pas encore
atteint la température idéale pour faire le café)
Attendez que les voyants s’allument fixes avant de
faire du café.
Les voyants ,
sont allumés fixes
La machine a atteint la bonne température et
elle est prête pour faire le café.
Le voyant est allumé
fixe
La machine fait couler une tasse de café.
Le voyant est
allumé fixe
La machine fait couler deux tasses de café.
Le voyant vapeur
clignote
La machine est en train de chauffer pour atteindre
la température idéale et produire de la vapeur.
Attendez que le voyant reste allumé fixe avant de
tourner la manette vapeur.
Le voyant est allumé
fixe
La machine est prête pour produire de la
vapeur. Vous pouvez tourner la manette vapeur.
Le voyant est
allumé fixe
La machine est programmée pour travailler
avec du café prémoulu (voir chap. 7).
Le voyant est
allumé fixe
Le programme automatique de détartrage est
en cours (voir § 10.3)
11 EXPLICATION DES VOYANTS DE FONCTIONNEMENT NORMAL
1
2
3
4
5
6
7
8
70
MODE D’EMPLOI
12 EXPLICATION DES VOYANTS D’ALARME ET QUE FAIRE QUAND ILS SONT ALLUMÉS?
Le voyant
clignote
Il indique que la machine est entar-
trée.
Il faut exécuter au plus vite le program-
me de détartrage décrit au chapitre
10.3.
La machine a fait un
bruit anormal et les
quatre voyants , ,
et clignotent
en s’alternant.
L'infuseur, une fois nettoyé, a été
probablement oublié hors de la
machine.
Laissez le volet de service fermé et l'in-
fuseur hors de la machine. Appuyez
simultanément sur la touche 1 TASSE
et 2 TASSES jusqu’à ce que les quatre
voyants s’éteignent. Une fois que les
quatre voyants seront éteints, vous
pourrez ouvrir le volet et insérer l’infu-
seur (voir § 10.2)
La machine vient d’être mise en
marche et l’infuseur n’a pas été
inséré correctement, par consé-
quent le volet est mal fermé.
Appuyez sur le symbole PUSH de l’infu-
seur jusqu’au déclic de blocage.
Assurez-vous que les deux touches rou-
ges sont ressorties (§ 10. 2).
Refermez le volet de service et appuyez
sur la touche
Le voyant et
est allumé fixe
La machine a été mise en marche le
robinet de vapeur ouvert.
Tournez complètement le robinet
vapeur dans le sens des aiguilles d’une
montre (fig. 6).
Les voyants ,
et clignotent en
s’alternant
Le voyant est
allumé fixe
Le réservoir d’eau est vide ou mal
inséré
Le réservoir est sale ou entartré.
Remplissez le réservoir d’eau (voir §
5, nota 6) et insérez-le jusqu’au bout.
Rincez ou détartrez le réservoir.
Le voyant
clignote
La machine ne parvient pas à
faire le café et elle est bruyante.
Tournez la manette vapeur en sens inverse des aiguilles
d’une montre (fig. 5) comme l’indique le § 5 note 10
Le voyant est
allumé fixe
Le tiroir à marc est plein ou il n’a
pas été inséré.
Après le nettoyage, le tiroir à
marc n’a pas été inséré.
Videz le tiroir à marc, exécutez le nettoyage décrit
au § 5, nota 7 et réinsérez-le.
Ouvrez le volet d’accès et insérez le
tiroir à marc.
Le voyant
clignote
La fonction a été sélectionnée
mais la mouture n’a pas été ver-
sée dans l’entonnoir.
Versez la mouture comme l’indique le
§ 7.
Il n’y a plus de café en grains
Remplissez le réservoir de grains (voir
§ 4.2)
VOYANTS
DESCRIPTION
EXPLICATION
QUE FAIRE ?
Le volet de service est ouvert
Si vous ne parvenez pas à refermer le
volet, assurez-vous que l’infuseur est
inséré correctement (§ 10.2 – nota 1)
Le voyant clignote
1
2
3
4
5
6
7
8
9
Le café sort trop lentement
Tournez le bouton de réglage de
la mouture (fig. 17) d’un cran
dans le sens des aiguilles d’une
montre (§ 6)
Le volet de service est ouvert Si vous ne parvenez
pas à refermer le volet, assurez-vous que l’infu-
seur est inséré correctement (§ 10.2 – nota 1)
Adressez-vous à un Centre de service
De’Longhi
71
MODE D’EMPLOI
F
SOLUTION
Chauffez les tasses en les rinçant à l'eau
chaude ou en les laissant au moins 20 minu-
tes posées sur le chauffe-tasses, sur le cou-
vercle (voir § 5, nota 3).
Avant de faire le café, chauffez l'infuseur en
appuyant sur la touche (fig. 14) (voir nota
1 du chap. 5).
Tournez légèrement le bouton de droite
(fig. 7) dans le sens des aiguilles d’une
montre (voir chap. 5, nota 2).
Tournez le bouton de réglage de la mouture
(fig. 17) d’un cran en sens inverse des
aiguilles d’une montre (voir chap. 6)
Utilisez du café en grains d’une autre marque.
Tournez le bouton de réglage de la mouture (fig. 17) d’un
cran dans le sens des aiguilles d’une montre (voir chap. 6)
Tournez légèrement le bouton de droite (fig. 7)
en sens inverse des aiguilles d’une montre
Tournez le bouton de réglage de la mouture
(fig. 17) d’un cran en sens inverse des
aiguilles d’une montre (voir chap. 6)
Tournez légèrement le bouton de droite (fig. 7)
dans le sens des aiguilles d’une montre.
PROBLÈME
Le café n’est pas chaud
Le café est peu crémeux
Le café sort trop lentement
Le café sort trop vite
CAUSE
Les tasses n’ont pas été pré-
chauffées
L'infuseur est trop froid
La machine utilise peu de café
pendant l’infusion
Le café est moulu trop gros
Le café en grains ne va pas
Le café est moulu trop fin
La machine utilise trop de café
pour faire l’infusion
Le café est moulu trop gros.
La machine utilise peu de café
pendant l’infusion
Si la machine ne fonctionne pas et qu’il y a un voyant d’alarme allumé, vous pouvez facilement identifier la cause et
résoudre le problème en consultant le chap. 12. Si, en revanche, aucune alarme n’est allumée, vérifiez les points sui-
vants avant d’appeler l’assistance technique.
VOYANTS
DESCRIPTION
EXPLICATION
QUE FAIRE ?
Le voyant est
allumé fixe et les
voyants verts
clignotent
Insérez l’infuseur (voir § 10. 2)
L’intérieur de la machine est très
sale.
Nettoyez soigneusement la machine
(voir § 10. 2)
L'infuseur, une fois nettoyé, a été
probablement oublié hors de la
machine
13 PROBLÈMES SOLUBLES AVANT D’APPELER L’ASSISTANCE TECHNIQUE
10
Le voyant
clignote
L’entonnoir pour le café prémoulu
est bouché.
Videz l’entonnoir à l’aide d’un cou-
teau comme l‘indique le § 7 nota 5
(fig.20).
11
SOLUTION
Raclez avec une épingle le dépôt
de café séché qui s’est accumulé
(fig. 28)
Nettoyez les trous de la buse à cappuccino et
du gicleur vapeur (voir chap. 9 - fig. 27).
Retirez, à l’aide d’un couteau, le
café moulu qui bouche l’entonnoir
(voir chap. 7, nota 5) Nettoyez l'in-
fuseur et l’intérieur de la machine
(voir indications au §. 10.2).
Vérifiez si la fiche du cordon est
bien enfoncée dans la prise de cou-
rant.
Arrêtez la machine (voir § 10. 2)
ATTENTION : vous ne pouvez extraire
l’infuseur que si la machine est arrêtée.
Si vous essayez de le retirer quand la
machine est en marche, vous risquez
de détériorer gravement la machine.
Retirez l’infuseur et nettoyez soigneuse-
ment l’intérieur de la machine (voir § 10.
2) Répétez l’opération en utilisant au
maximum 1 doseur de café moulu. net-
toyez soigneusement l’intérieur de la
machine (voir § 10.2)
Nettoyez soigneusement l’intérieur
de la machine (voir § 10. 2)
Répétez l’opération en appuyant
d’abord sur la touche , comme
l’indique le chap. 7.
Retirez l’infuseur et nettoyez soi-
gneusement l’intérieur de la machi-
ne (voir § 10. 2). Répétez l’opéra-
tion mais en mettant d’abord la
machine en marche.
Raclez les trous avec une épingle
(voir § 10.1, fig. 28).
Nettoyez bien le tiroir mobile sur-
tout à proximité des charnières
PROBLÈME
Le café ne coule pas d’une
des buses de sortie café.
Vous tournez la manette
vapeur, mais la vapeur ne sort
pas de la buse à cappuccino.
Vous appuyez sur la touche
ou , mais au lieu
du café la machine donne
de l’eau.
Vous appuyez sur la touche
, mais la machine ne
s’allume pas.
Vous ne parvenez pas à
extraire l’infuseur pour
effectuer le nettoyage.
Vous avez utilisé du café
prémoulu (à la place des
grains) et la machine ne
fait pas de café.
Le café ne sort pas par les
buses mais il coule le long
du volet de service.
CAUSE
Le trou est bouché.
Les trous de la buse à cappucci-
no et du gicleur vapeur sont bou-
chés.
La mouture est peut être blo-
quée dans l’entonnoir.
La machine n'est pas sous ten-
sion.
La machine est allumée. Vous
ne pouvez extraire l’infuseur
que si la machine est arrêtée.
Vous avez versé trop de café
prémoulu.
Vous n’avez pas appuyé sur la
touche et la machine a utili-
sé du café prémoulu et du café
en grains moulu par le moulin.
Vous avez versé du café pré-
moulu quand la machine était
arrêtée.
Les trous de la buse sont bou-
chés par du café séché.
Le tiroir mobile dans le volet de
service est coincé et ne peut pas
osciller.
MODE D’EMPLOI
73
MODE D’EMPLOI
F
Cette garantie s’applique à tous les appareils ménagers de marques De’Longhi ou Kenwood.
Garantie limitée
Qu’est-ce qui est couvert par la garantie?
Nous garantissons que chaque appareil est exempt de vices de matériaux et de fabrication. Notre obli-
gation, dans le cadre de cette garantie, est limitée à la réparation, à notre usine ou dans un centre de
réparation agréé, de toutes les pièces défectueuses ou leurs composants. En cas de remplacement ou
retour d’un produit, il doit être retourné tout port payé. Le modèle neuf ou réparé sera retourné aux frais
de la société. Cette garantie ne s’applique que dans les cas où l’appareil est utilisé conformément aux
instructions de l’usine qui l’accompagnent et sur un circuit électrique à courant alternatif (c.a.).
Combien de temps dure la garantie?
Cette garantie dure une (1) année à partir de la date d’achat indiquée sur votre reçu et s’applique uni-
quement à l’acheteur initial pour l’utilisation.
Qu’est ce qui n’est pas couvert par cette garantie?
Cette garantie ne couvre ni les défauts ou dégâts résultant de réparations ou altérations apportées à
l’appareil en dehors de notre usine ou des centres de réparation agréés ni les appareils qui ont été sou-
mis à un mauvais traitement, une mauvaise utilisation, une négligence ou des accidents. En outre, les
dommages-intérêts directs ou indirects résultant de l’utilisation de ce produit ou de la rupture d’un con-
trat ou du non-respect de cette garantie ne sont pas recouvrables dans le cadre de cette garantie.
Certains états ou provinces n’autorisent pas l’exclusion ou la limitation des dommages-intérêts directs ou
indirects. Par conséquent, la limitation ci-dessus peut ne pas s’appliquer à vous.
Comment faire réparer l’appareil?
Si des réparations s’avèrent nécessaires, consultez les informations ci-dessous :
Résidents des États-Unis : Veuillez appeler notre ligne d’assistance sans frais au 1-800-322-3848 ou
connectez-vous à notre site Web à www.delonghi.com. Pour tous les accessoires, les pièces détachées
et les pièces de rechange, veuillez contacter notre service des pièces détachées au 1-800-865-6330.
Résidents du Canada : Veuillez appeler notre ligne d’assistance sans frais au 1-888-335-6644 ou con-
nectez-vous à notre site Web à www.delonghi.com.
Résidents du Mexique : Veuillez consulter la déclaration de garantie limitée pour le Mexique.
Autres pays : Veuillez visitez www.delonghi.com.
Veuillez consulter le dos du manuel pour connaître les adresses de De’Longhi.
La garantie ci-dessus remplace toutes les autres garanties et représentations explicites. Toutes les garan-
ties implicites sont limitées à la période de garantie applicable établie ci-dessus. Cette limitation ne s’ap-
plique pas si vous concluez un contrat d’extension de garantie avec De’Longhi. Certains états ou provin-
ces n’autorisent pas les limitations sur la durée des garanties implicites. Par conséquent, les exclusions
ci-dessus peuvent ne pas s’appliquer à vous. De’Longhi n’autorise aucune personne ni société à assumer
des responsabilités en association avec la vente ou l’utilisation de ses appareils.
Comment s’appliquent les lois de l’état ou de la province?
Cette garantie vous donne des droits juridiques précis et vous pouvez également avoir d’autres droits
qui peuvent varier d’un état à un autre ou d’une province à une autre.
5


Need help? Post your question in this forum.

Forumrules


Report abuse

Libble takes abuse of its services very seriously. We're committed to dealing with such abuse according to the laws in your country of residence. When you submit a report, we'll investigate it and take the appropriate action. We'll get back to you only if we require additional details or have more information to share.

Product:

For example, Anti-Semitic content, racist content, or material that could result in a violent physical act.

For example, a credit card number, a personal identification number, or an unlisted home address. Note that email addresses and full names are not considered private information.

Forumrules

To achieve meaningful questions, we apply the following rules:

Register

Register getting emails for DeLonghi ESAM 2000 at:


You will receive an email to register for one or both of the options.


Get your user manual by e-mail

Enter your email address to receive the manual of DeLonghi ESAM 2000 in the language / languages: English as an attachment in your email.

The manual is 1,54 mb in size.


You will receive the manual in your email within minutes. If you have not received an email, then probably have entered the wrong email address or your mailbox is too full. In addition, it may be that your ISP may have a maximum size for emails to receive.

Others manual(s) of DeLonghi ESAM 2000

DeLonghi ESAM 2000 User Manual - Dutch - 17 pages


The manual is sent by email. Check your email

If you have not received an email with the manual within fifteen minutes, it may be that you have a entered a wrong email address or that your ISP has set a maximum size to receive email that is smaller than the size of the manual.

The email address you have provided is not correct.

Please check the email address and correct it.

Your question is posted on this page

Would you like to receive an email when new answers and questions are posted? Please enter your email address.


Info